

Page 1
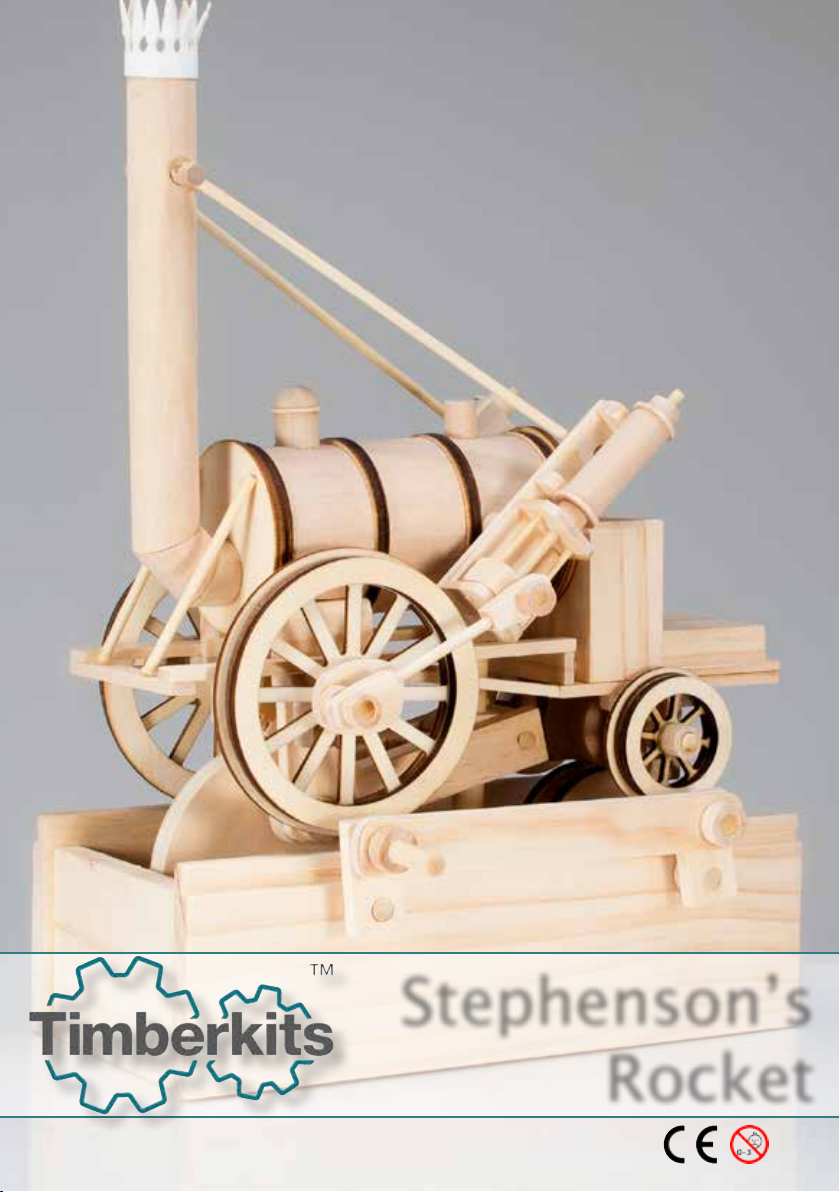
Stephenson’s
Rocket
Page 2
(UK) Symbols in these instructions. (FR) Symboles des instructions. (ESP) Simbolos en estas instrucciones. (IT) Simboli
in queste istruzioni. (Ger) Symbole in dieser anleitung
Helpful hints/conseils utiles/consejos utiles/suggerimentutili/nützliche tipps
(UK) Check all parts present in trays
(FR) Vérier que toutes les pièces soient présentes dans les bacs
(ESP) Controlar que hay todas la partes en la caja
(IT) Controllare tutte le parti presenti nel kit
(DE) Bitte prüfen sie, ob alle benötigten teile vorhanden sind
(UK) Read all instructions and look at all diagrams
(FR) Lire toutes les instructions et regarder toutes les gures
(ESP) Leer las intrucciones y guardar a los diagrames
(IT) Leggere tutte le istruzioni e guardare i diagrammi
(DE) Lesen sie alle anweisungen und betrachten sie die schaubilder
(UK) Check assembly before gluing
(FR) Vérier le montage avant collage
(ESP) Controlar el montaje antes de empezar a pegar
(IT) Controllare l’assemblaggio prima di incollare
(DE) Montage prüfen vor dem einklebern
(UK) Some parts may need sanding
(FR) Certaines pièces nécessiteront d’être poncées.
(ESP) Algunas parte necesitan de ser suavizadas
(IT) Alcune parti potrebbero aver bisogno di levigatura
(DE) Möglicherweise müssen manche teile geschlien werden
Colouring tips/conseils concernant l’application de peinture/ consejos para Pintar/ suggerimenti per colorare/
lackiertipps
(UK) Do not apply paint to parts which move against one another. It is easier to paint some parts before
assembling
(FR) Ne pas appliquer de peinture sur les parties qui se déplacent l’une contre l’autre. Il est conseillé de pein
dre avant assemblage
(ESP) No aplique la pintura sobre las partes que se tocaran. Resulta mas facil pintar las partes antes de montar.
(IT) Non applicare la pittura su quelle parti dove ce attrito con un’altra parte. è piu semplice pitturare alcune
parti prima della fase di assemblaggio.
(DE) Teile, die aneinander reiben, sollten nicht lackiert werden. Fertig lackierte teile sind o leichter zu
montieren
(UK) Waiting time.
(FR) Temps d’attente.
(ESP) Tiempo de espera.
(IT) Tempo d’attesa.
(DE) Wartezeit.
(UK) Wax surface to lubricate.
(FR) Appliquer la cire sur cette
surface.
(ESP) Aplica la cera sobre esta supercie.
(IT) Applicare la cera su questa
supercie
(DE) Wax Oberäche zu schmieren.
(UK) Glue guard. Prevents glue getting between moving parts during build. Remove after 2
minutes.
(FR) Piece de protection contre la colle. pendant l’assemblage, eviter tout depôt de colle sur les
pieces en mouvement. Enlever apres 2 minutes.
(ESP) Parte de protection de el pegamento. durante la fase de esambalje, evitar que el pegamento
se ponga sobre partes que se mueven. Quitar despues de dos minutos .
(IT) Pezzo di protezione della colla. Durante l’assemblaggio evitare che la colla vada su parti non
statiche . Imuovere dopo due minuti.
(DE) Karton. Verhindert das eindringen von leim zwischen die bewegliche teile während der
montage. Zwischen die beweglichen Teile.
(UK) Glue.
(FR) Coller.
(ESP) Pegar.
(IT) Incollare.
(DE) Leimen
(UK) Don’t glue.
(FR) Ne pas coller.
(ESP) No pegar.
(IT) Non incollare.
(DE) Nicht leimen.
New Symbols in our
Instructions
Visit our website to view
instructional videos where you
see this symbol.
www.timberkits.com
!
Pay special attention to this
section.
1
Page 3

Or visit our website for tips, advice and instructional videos.
All these can be found in Resources/Advice Videos on our website.
2
Page 4
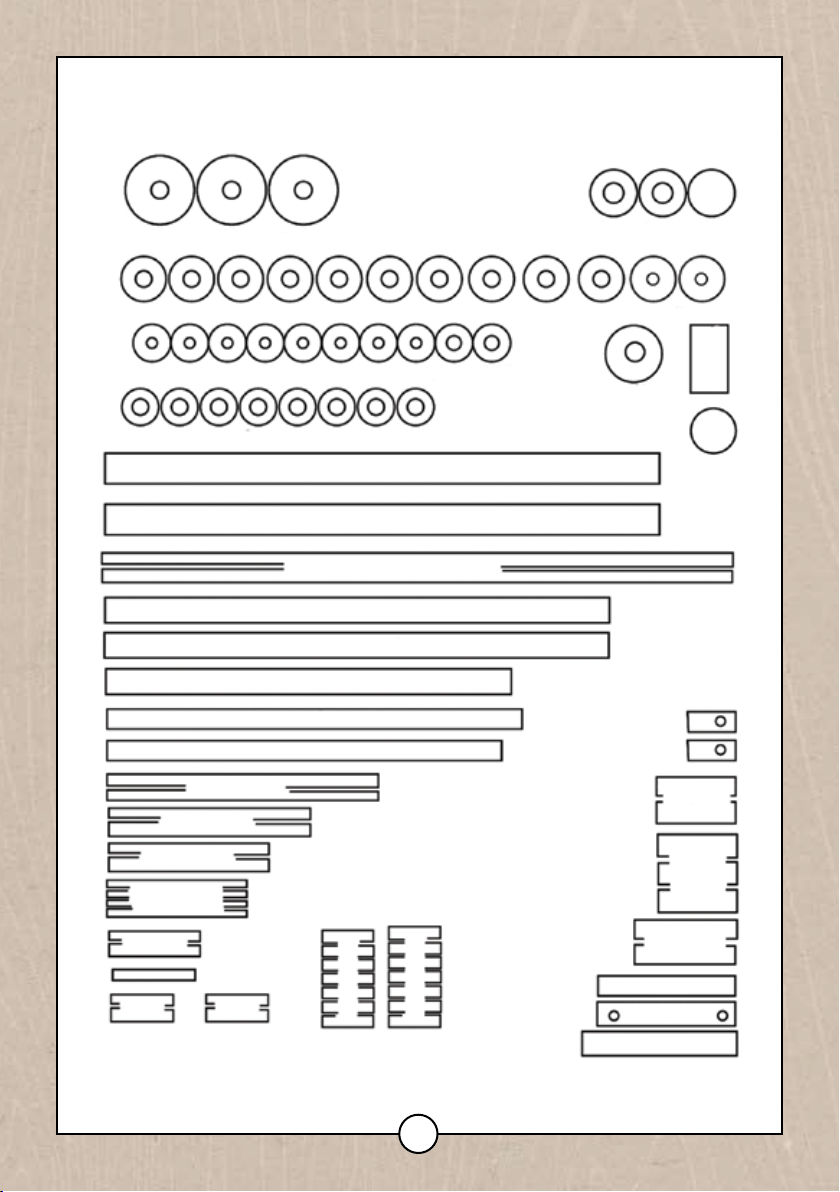
2848 28
30 30 30 30 30 30 30 30 30 30 24 24
55 55 39 39 39 39 39 39 39 39
49 49 10
2
32 32 32 32 32 32 32 32
15
15
3mmx145mm
6mmx110mm
6mmx110mm
6mmx90mm
5mmx92mm
5mmx88mm
3mmx58mm x2
3mmx46mm x2
3mmx38 x2
2mmx34mm
x4
3mmx10mm
x2
3mmx-
12mm
3mmx
18mm
3x16mm
x2
3mmx-
12mm
3mmx10mm
9 x5
64
64
5mmx20mm
5mmx32mm
62
6mmx35mm
5mmx-
16mm
6mmx-
16mm
8
3
Page 5
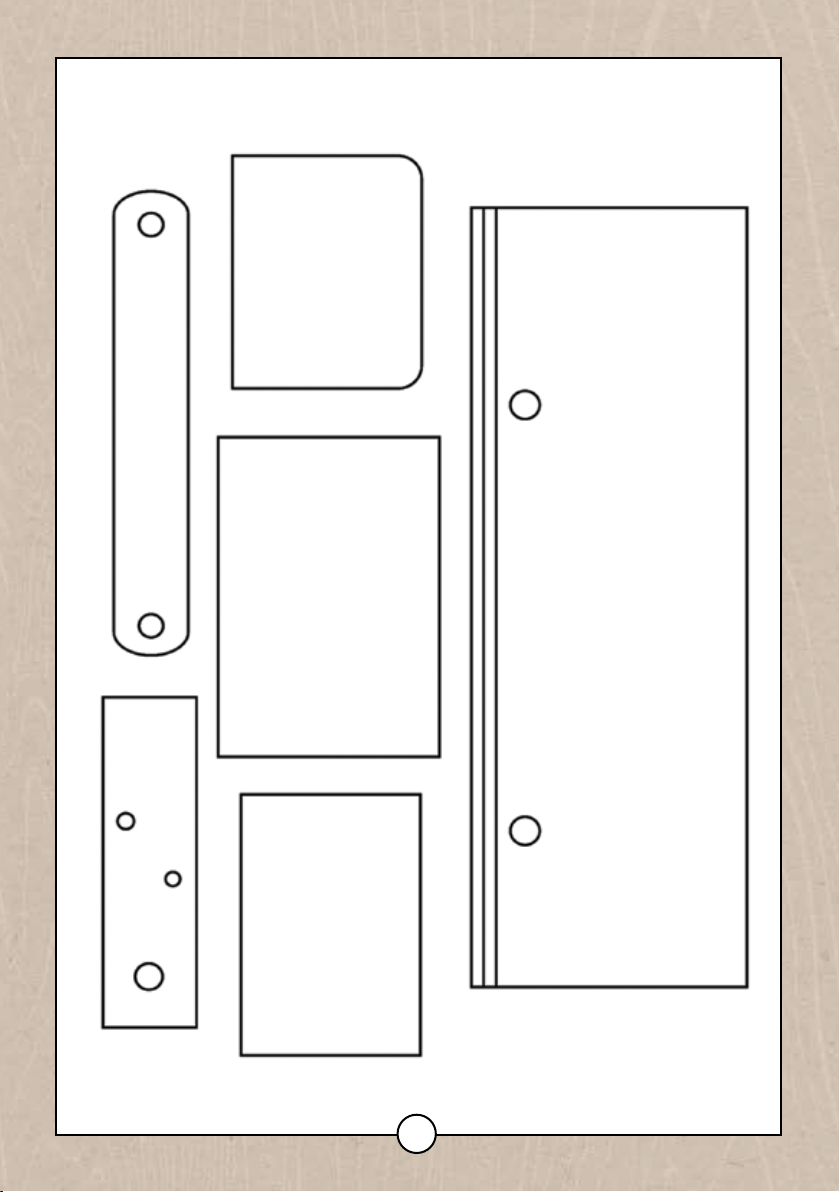
38 x2
13
45 x2
51 x2
43 x2
19
4
Page 6
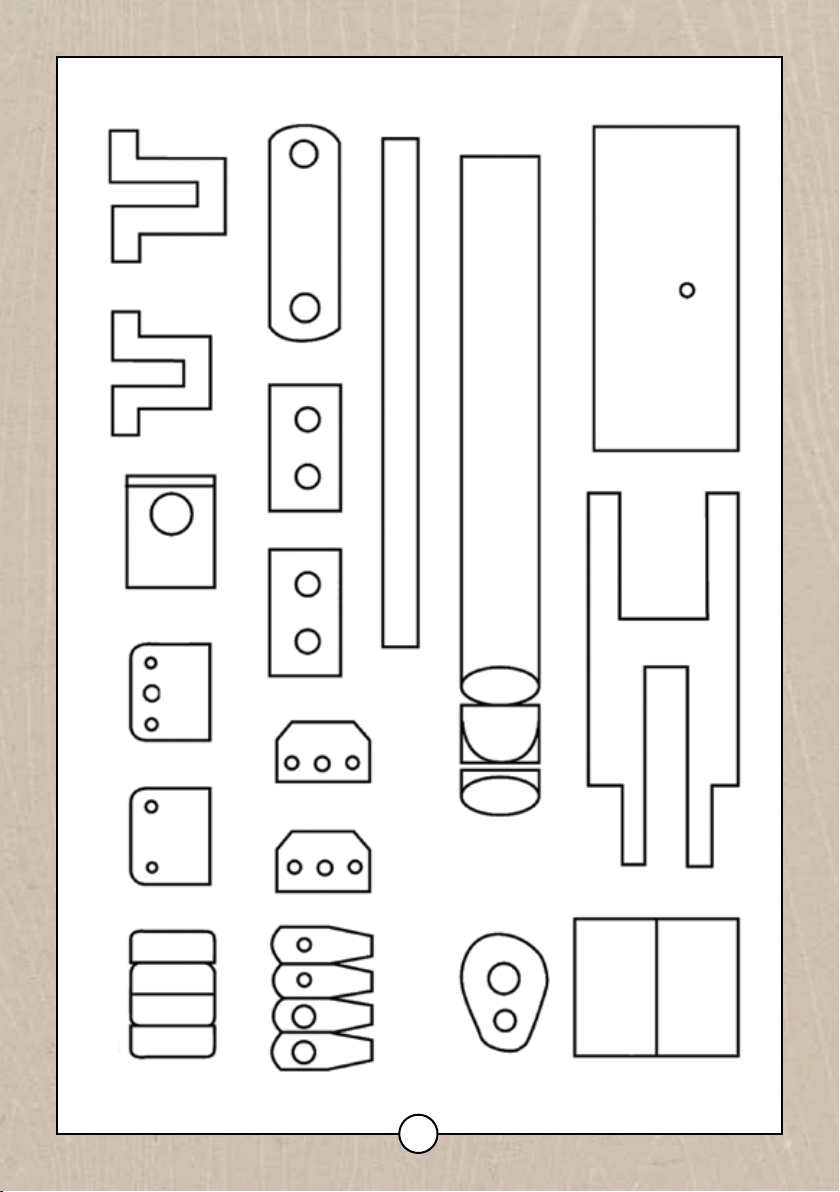
56 x2
18 x2
22
35 x2
23 x2
46 x2
46 x2
41
60
44
21
34 x4
36 x2
31
61
63
31
29 x2
59
58
17 17
5
Page 7
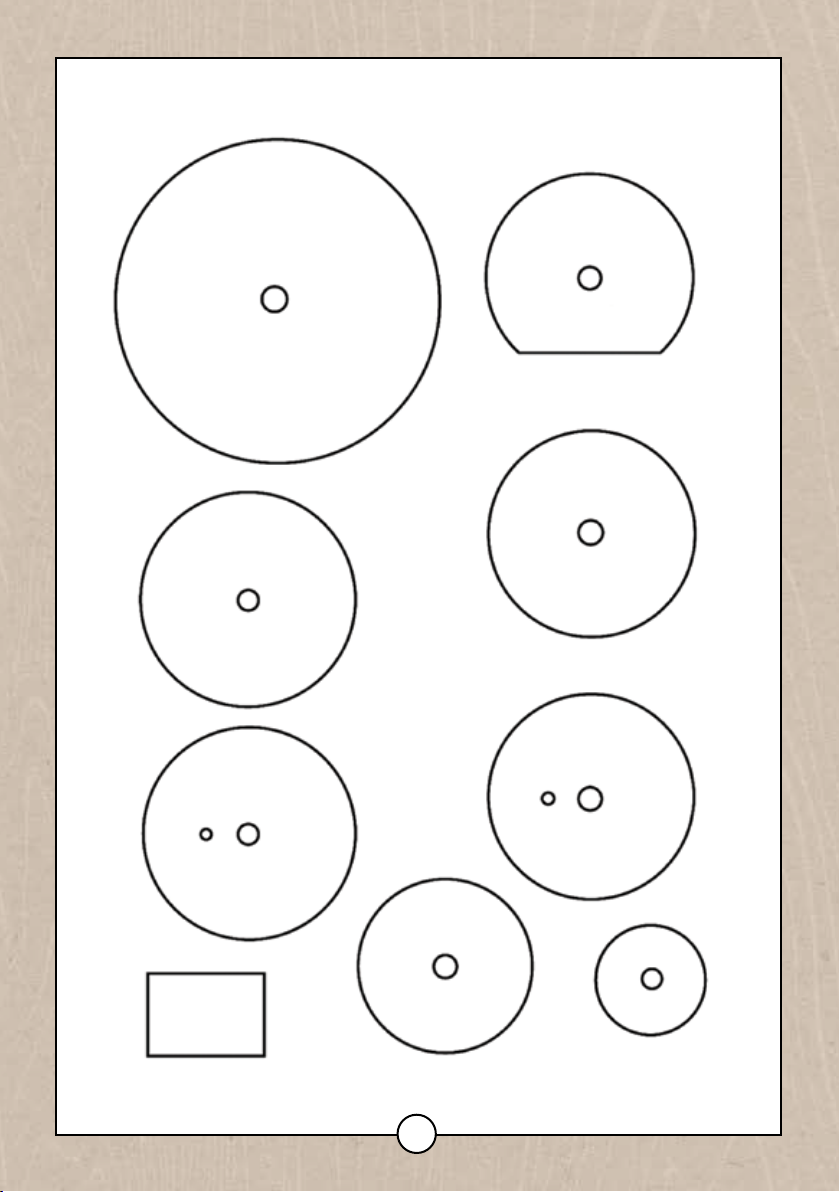
50
4 x2
6
5
1
3
37 x2
47 x2
57
6
Page 8
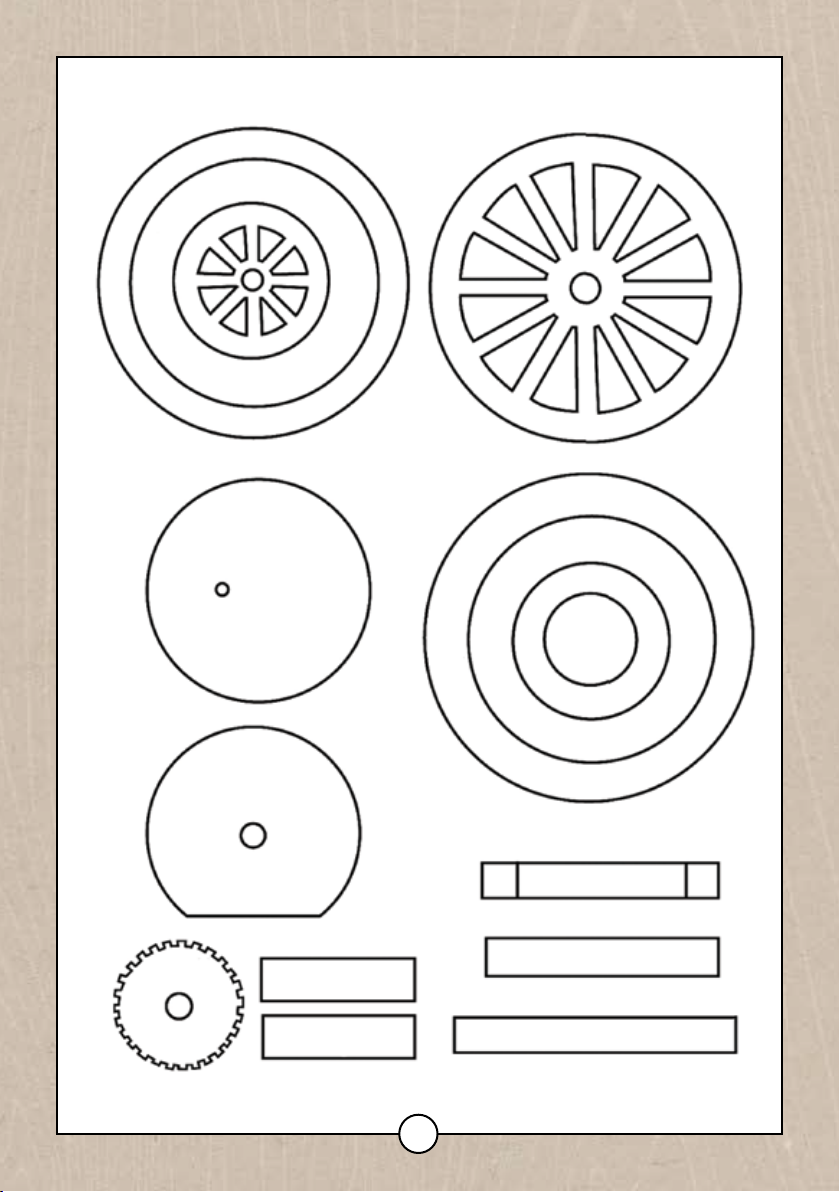
25 x2
53 x2
52 x2
26 x2
11
12
7
42
33
33
14
20 x2
27 x2
54 x2
16
40 x2
7
Page 9
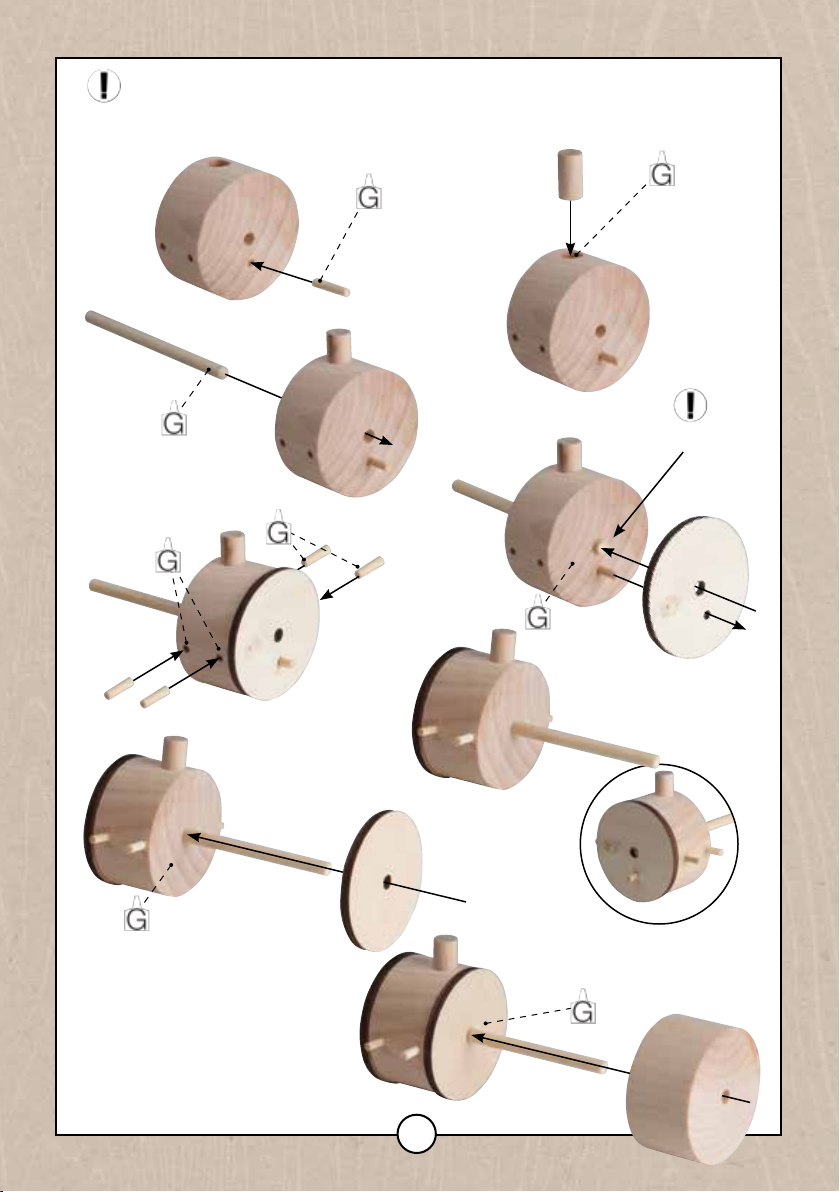
1
If you are mounting this model on a Battery or Electric Drive Kit please refer to the Battery or Electric Drive
Kit instructions before building the model as drive pulleys need to be tted part way through the building
process
1a
1
2
1b
1c
1e
3mmx12mm
3mmx12mm
5mmx88mm
1f
3mmx16mm
3mmx12mm
3mmx12mm
4
1d
3mm
protruding
3
1g
5
8
Page 10
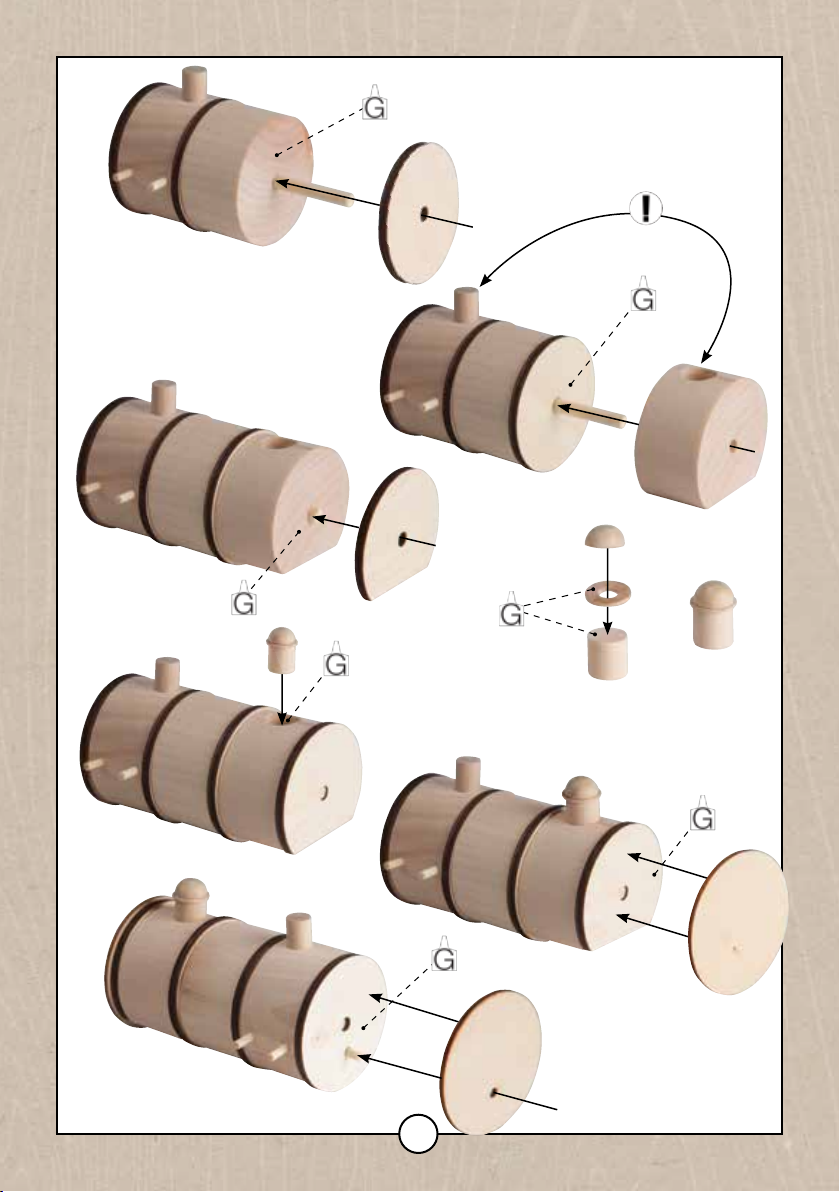
1h
1j
4
Line up hole with
part #2
1i
6
1m
1k
Boiler is rotated to
x #12
7
8
1g
9
10
1l
11
12
9
Page 11
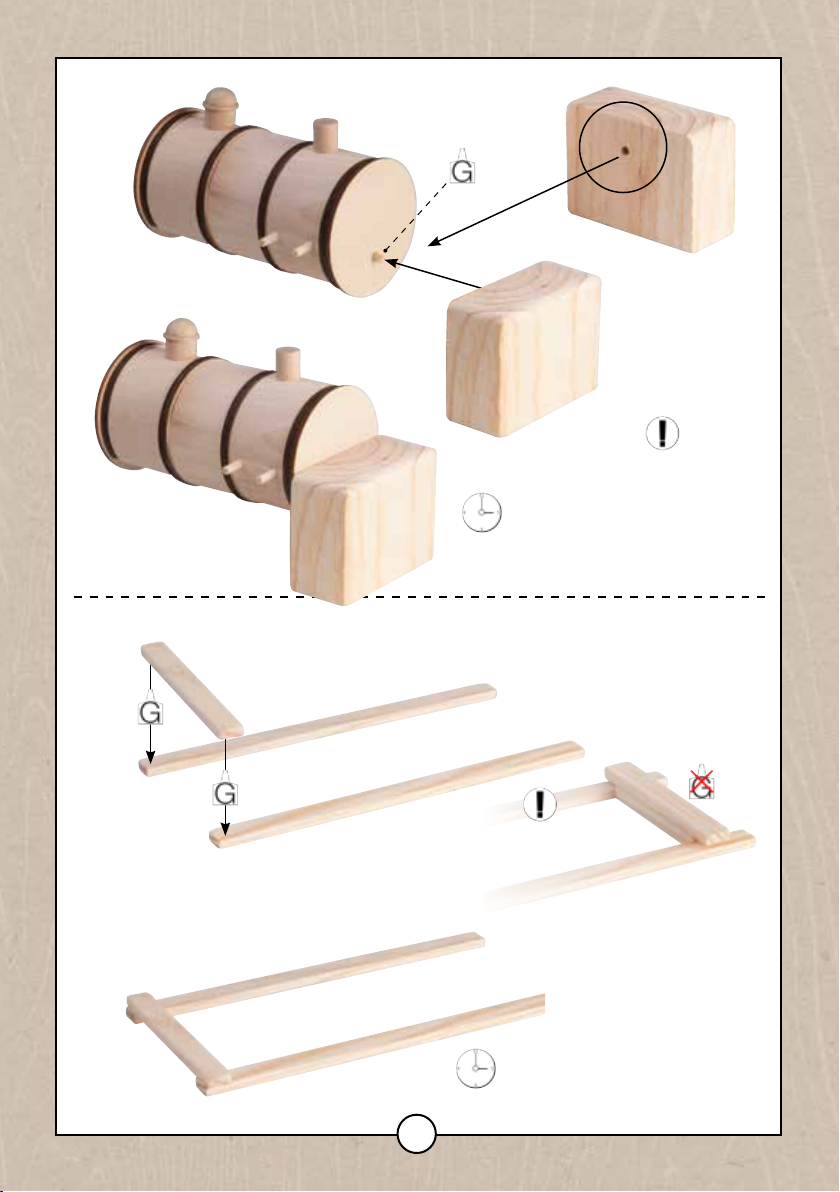
2
3
13
13
Ensure the Firebox (#13) is
parallel with the 3 x 15mm
pegs on either side of rear
30mins
14
boiler section (# 1).
15
15
Use part no 16 to help
ensure side rails (#15) are
kept parallel
30mins
10
Page 12
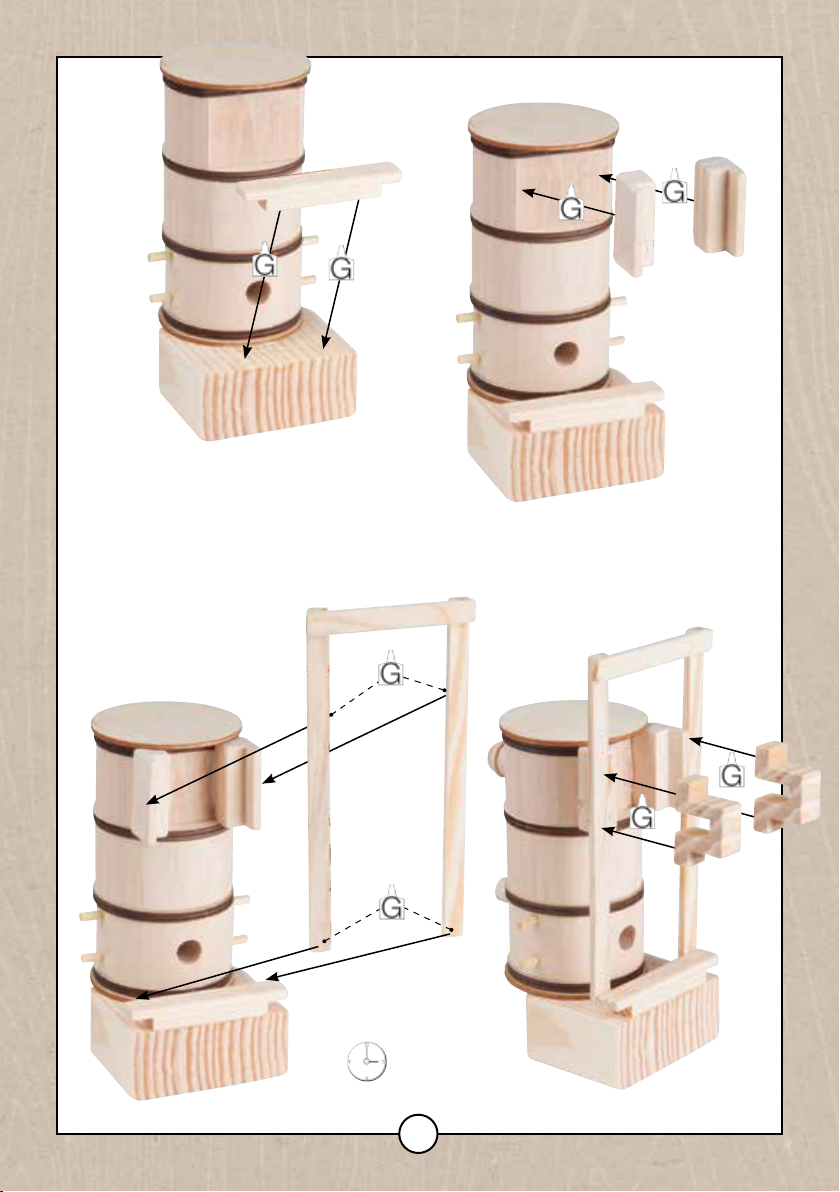
4
4a
Whilst the glue holding the two parts #17 is
still drying, position and glue the frame built
in section 3. Adjust the two parts #17 to t
against the inner rims of the frame. The
bottom of the two parts #17 must be level with
the underside surface of the frame as the two
front axle blocks (#18) need to be glued in
place at that point.
4c
4b
16
17
17
4d
30mins
11
18
18
Page 13
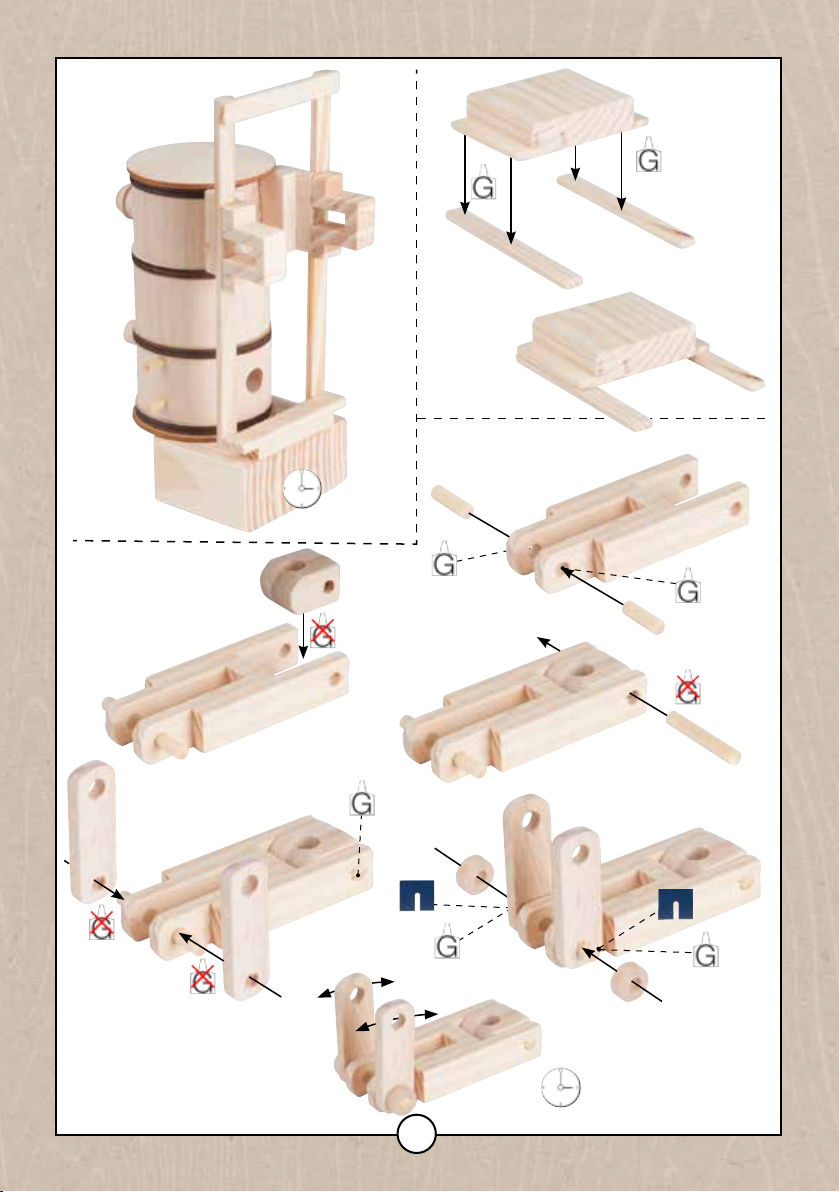
5
19
20
20
6b
30mins
22
6
5mmx16mm
6a
21
6c
5mmx16mm
23
6d
23
6e
24
24
5mmx32mm
12
15mins
Page 14
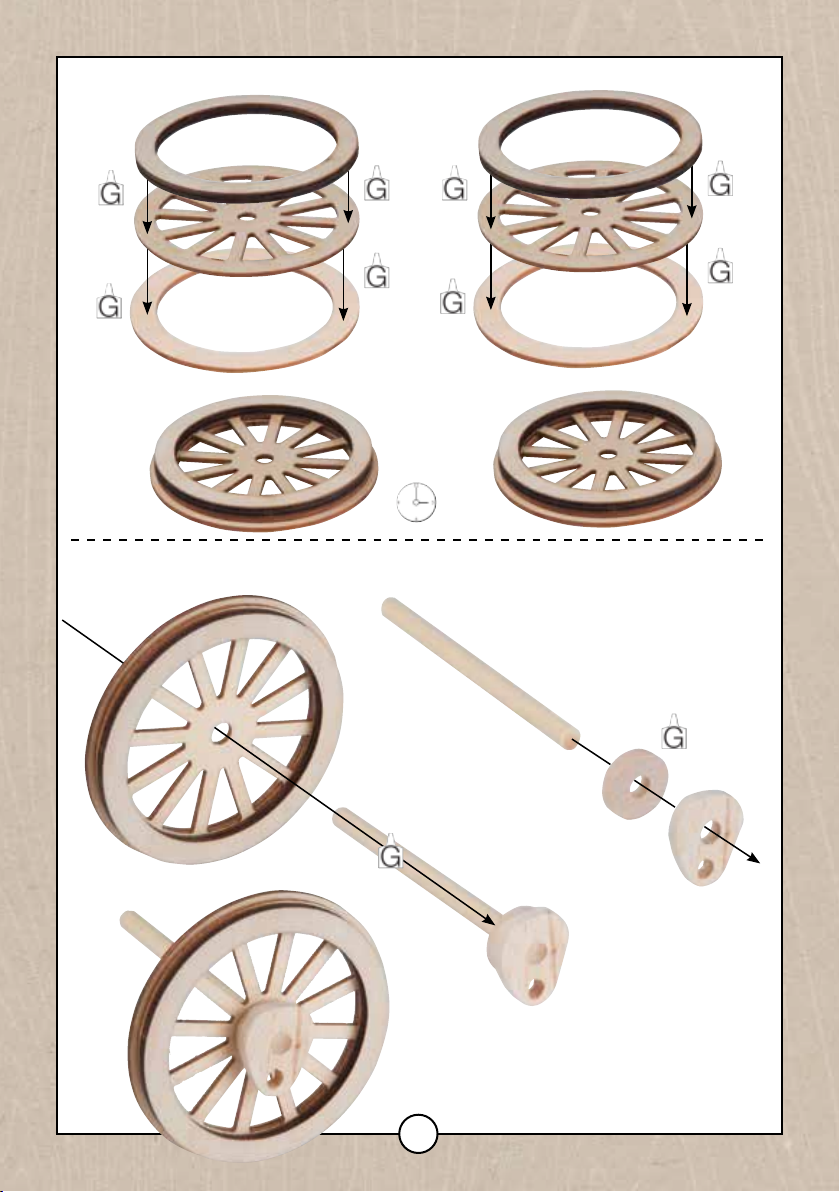
7
7a
25
7b
25
8
26
27
10mins
26
27
8a
6mmx90mm
8b
28
29
13
Page 15
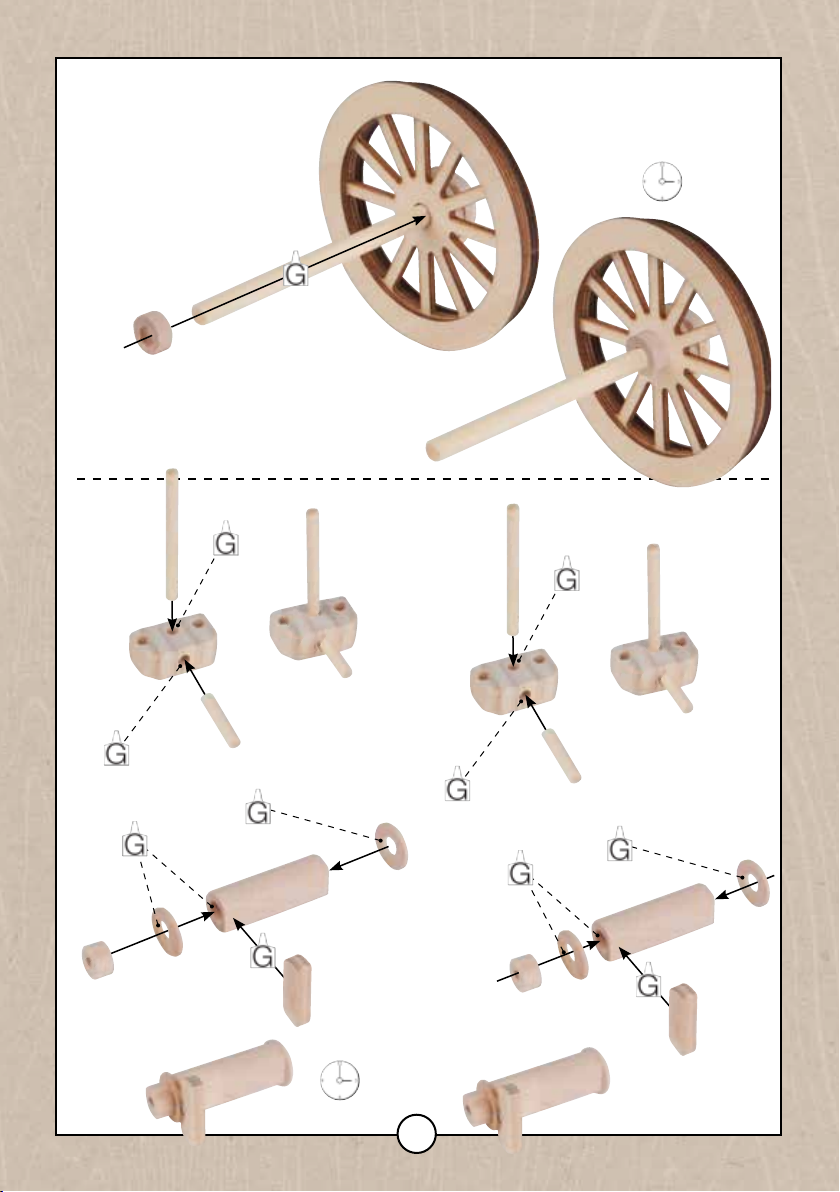
9
3mmx38mm
9a
31
30
8c
3mmx18mm
10mins
3mmx38mm
9b
31
9c
3mmx18mm
9d
33
Ensure the holes in 32, 9 and
32
9
33 all line up with each other.
The curved side of part #34 is
34
9
glued to part #33.
10mins
33
32
9
34
9
14
Page 16
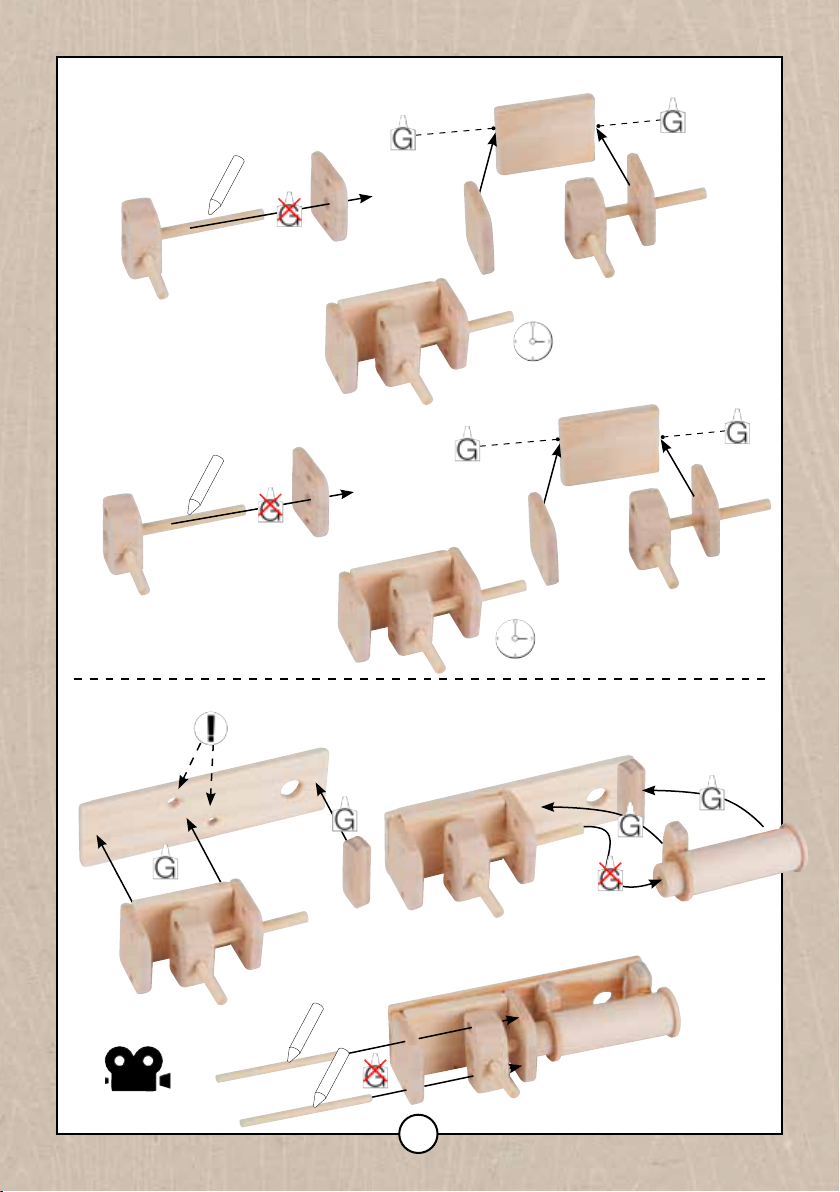
10
10b
37
11
10a
10c
11a
35
35
Part #34 is glued with the at
surface against part #28.
36
10mins
10d
36
37
10mins
11b
38
2mmx34mm
2mmx34mm
34
11c
15
Page 17
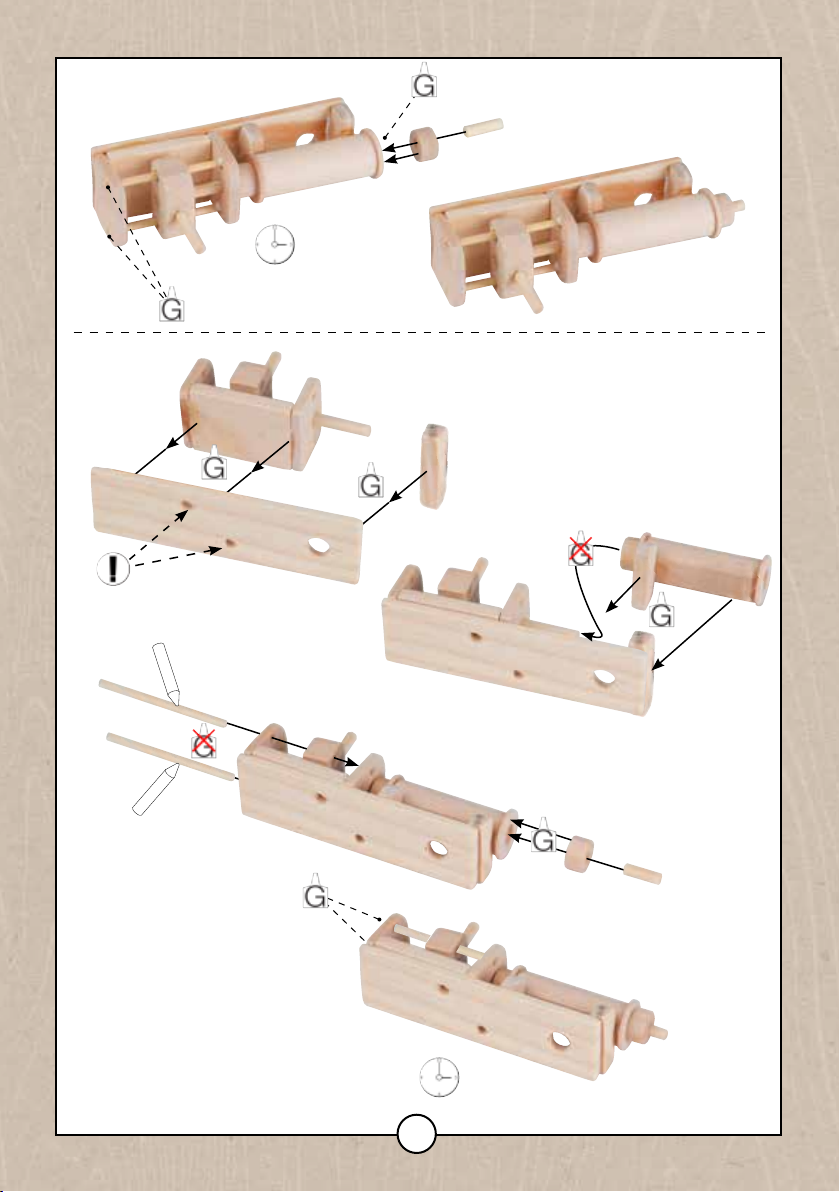
12
11b
12a
It is very important that part #31 slides up
and down the two 2 x 34mm rods very easily
and does not stick at any point, otherwise the
3mmx10mm
39
15mins
34
pistons will not work.
12b
38
2mmx34mm
2mmx34mm
12c
12d
16
15mins
39
3mmx10mm
Page 18
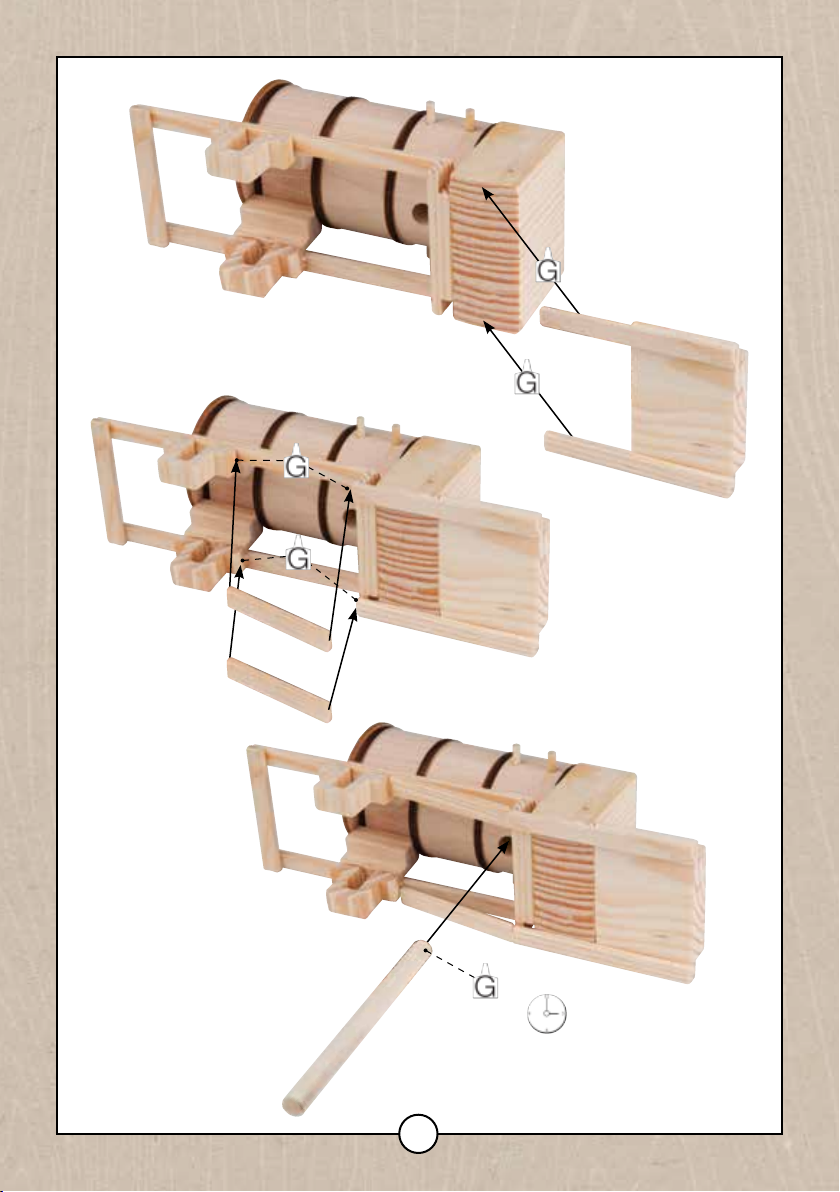
13
13a
13b
You may want to sand the
parts #40 to ensure good t.
40
40
13c
20mins
41
17
Page 19
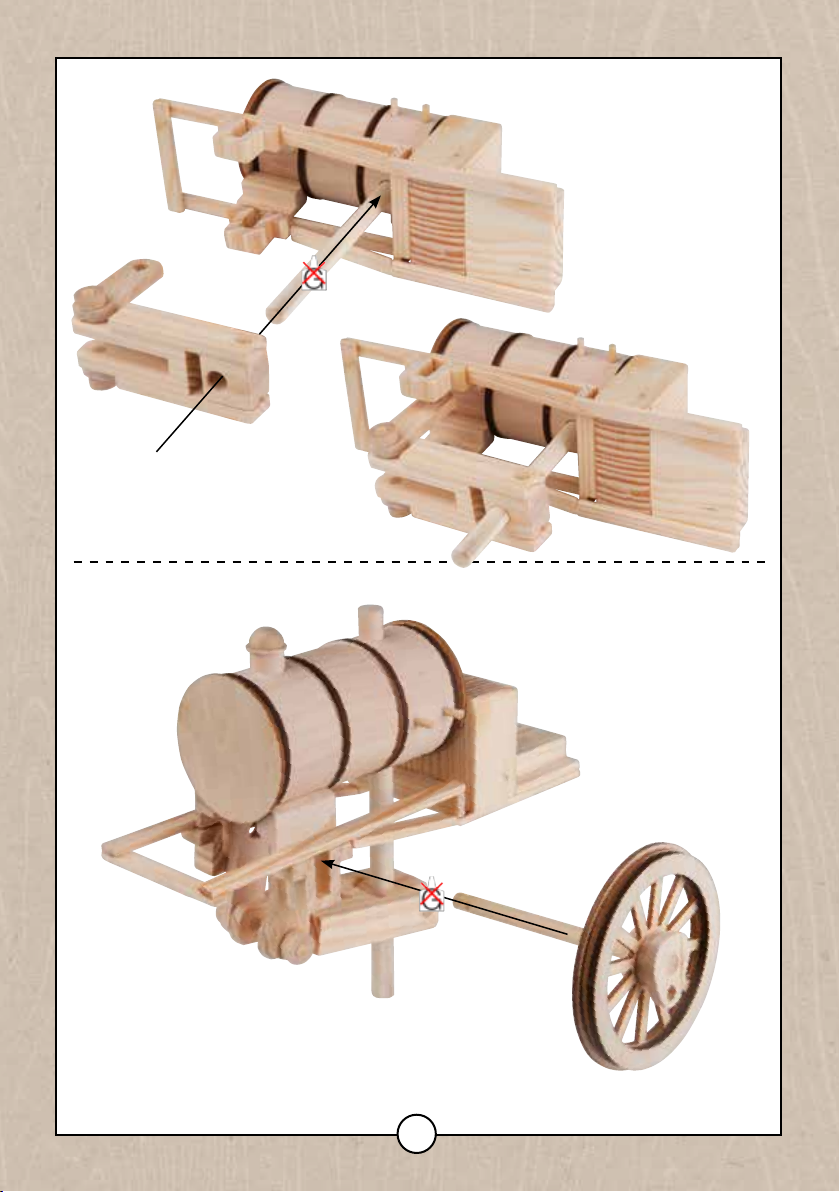
13d
Drop Arm Assembly from stage 6
14
14a
Thread the axle through the rst front
axle block (#18) and then through the
hole in the drop arm (#23) with no glue.
18
Page 20
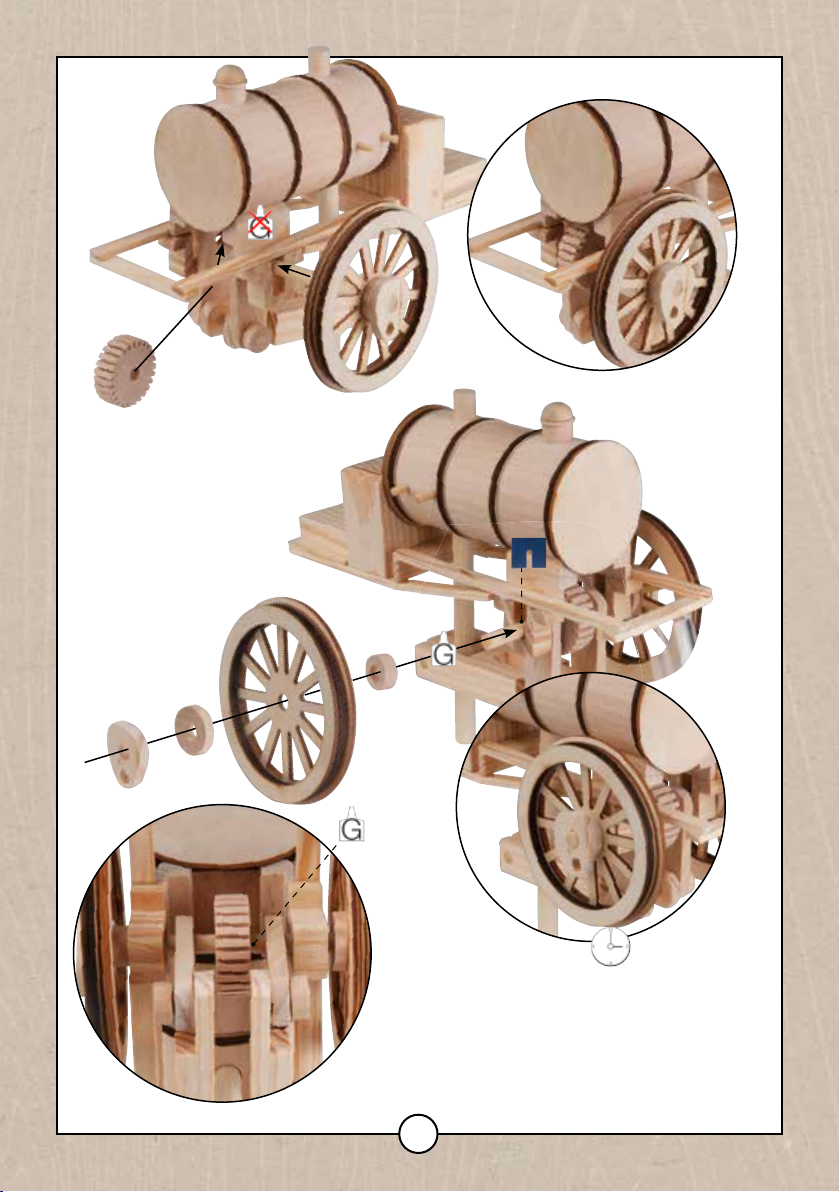
14b
42
Then thread the axle through the
friction disc (42), through the hole
in the other drop arm and then
through the other front axle block
all with no glue.
14c
Glue part #29 so that it is
in alignment with the other
part #29 on the other front
wheel.
30
28
29
20mins
Make sure the shaft end is ush/level with the
outer surface of part #29 and does not protrude.
Turn the wheels carefully, whilst the glue is still
drying, to check that they run evenly and do not
Glue the friction disk in place by moving it to one
side, dabbing glue on shaft and then moving back.
oscillate.
Ensure it is central.
19
Page 21
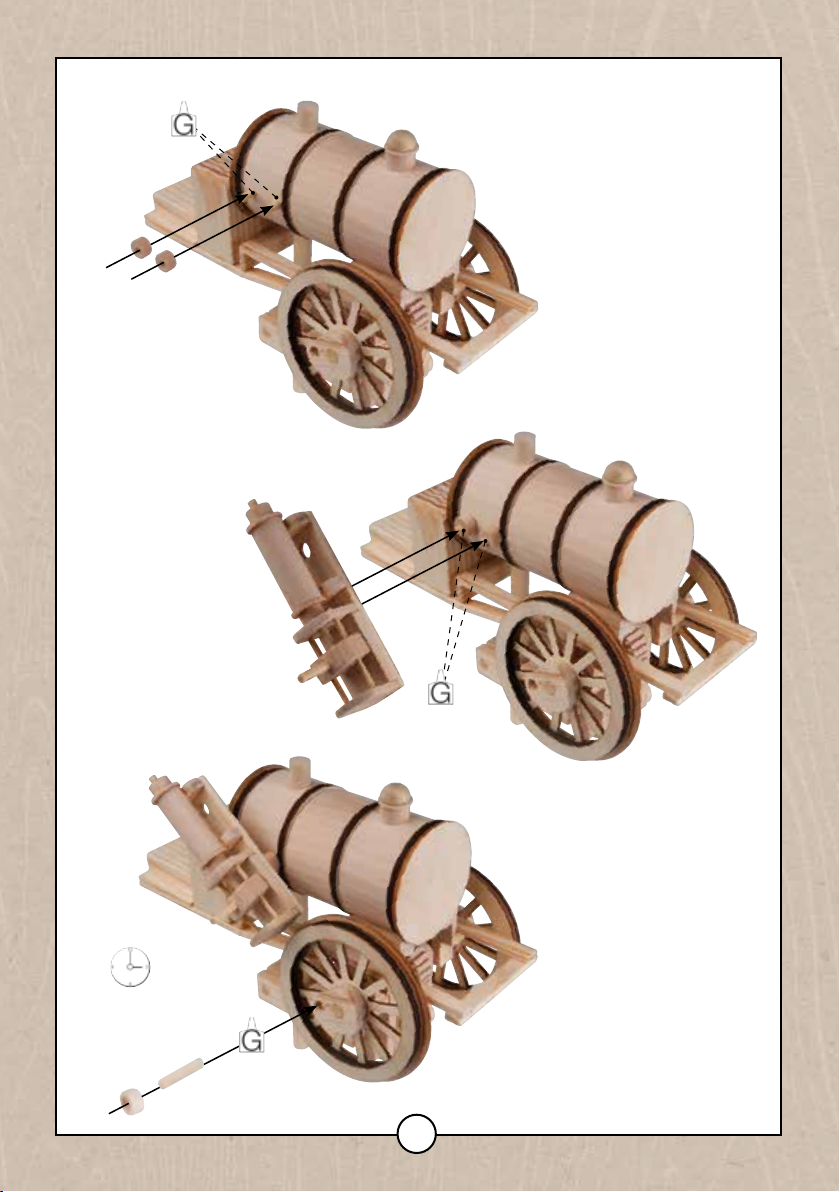
15
15a
39
39
15b
15c
15mins
32
5mmx20mm
20
Page 22
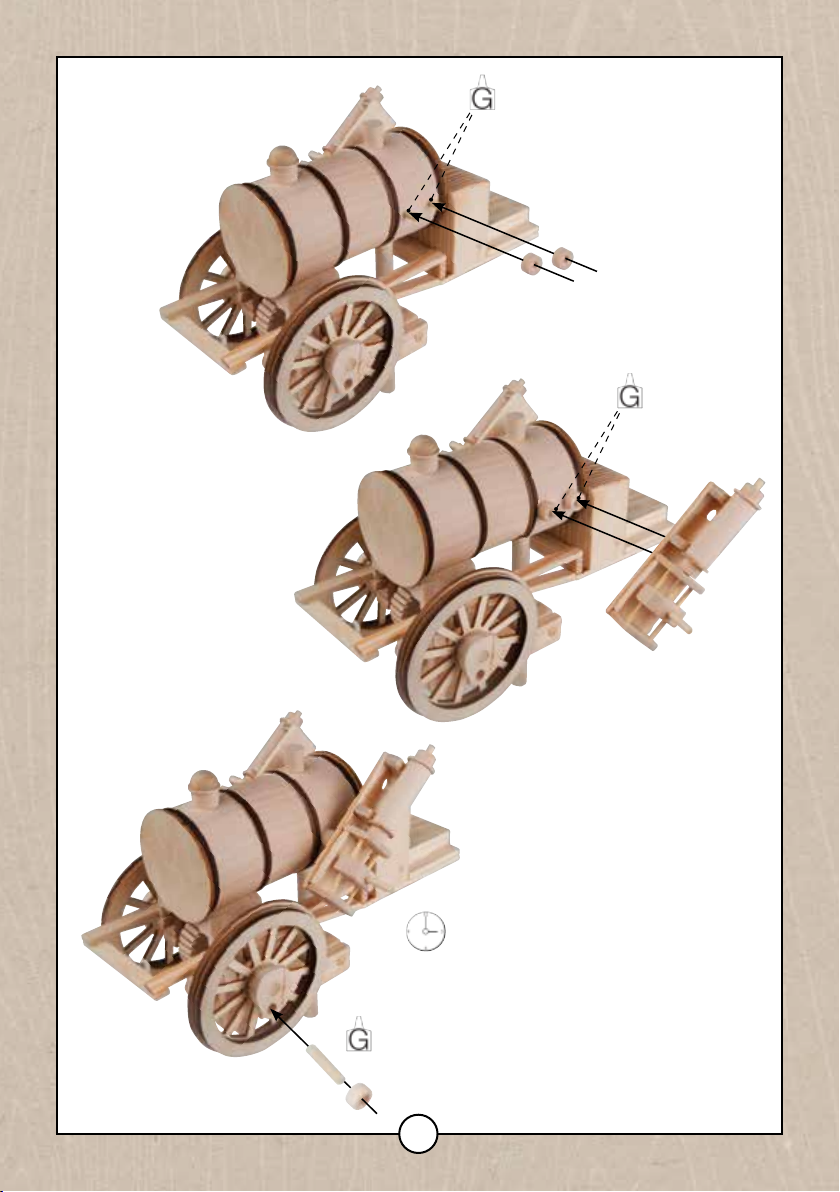
16
16a
39
39
16b
16c
5mmx20mm
15mins
32
21
Page 23
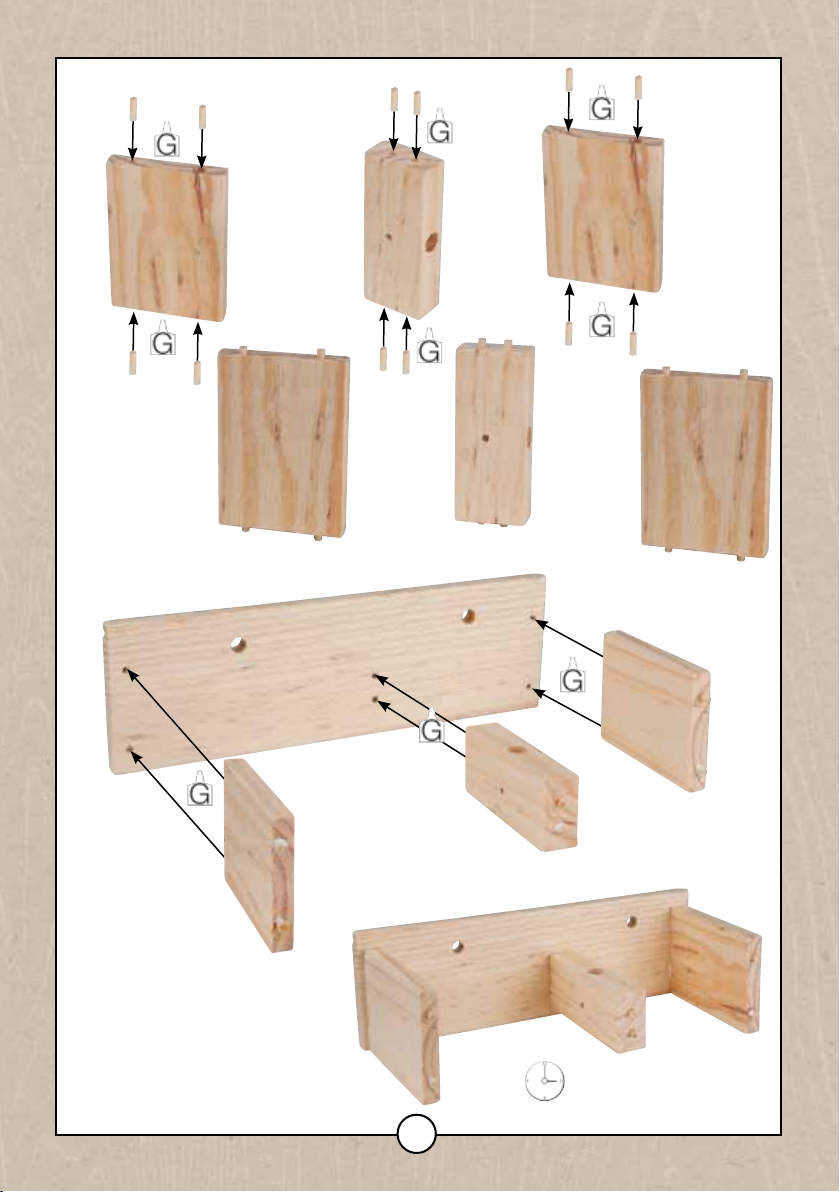
17
17a
3mmx10mm
17b
3mmx10mm
3mmx10mm
17c
17d
3mmx10mm
44
43
3mmx10mm
3mmx10mm
45
43
When tting the parts #43 and #44 into the
sides (#45) it helps to locate the pegs in
the holes if you sand the end of the pegs
to a point.
10mins
22
Page 24
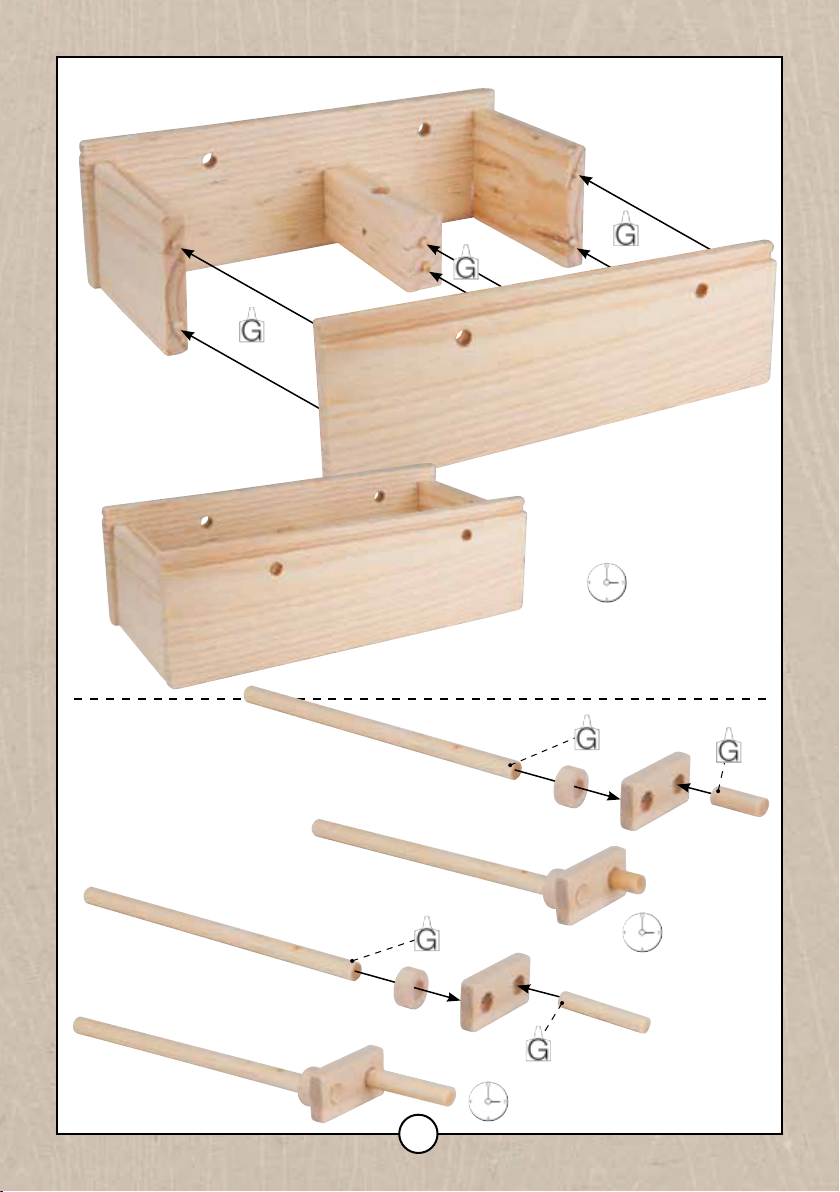
17d
45
20mins
18
6mmx110mm
18b
18a
6mmx110mm
30
23
46
20mins
30
46
6mmx35mm
6mmx16mm
20mins
Page 25
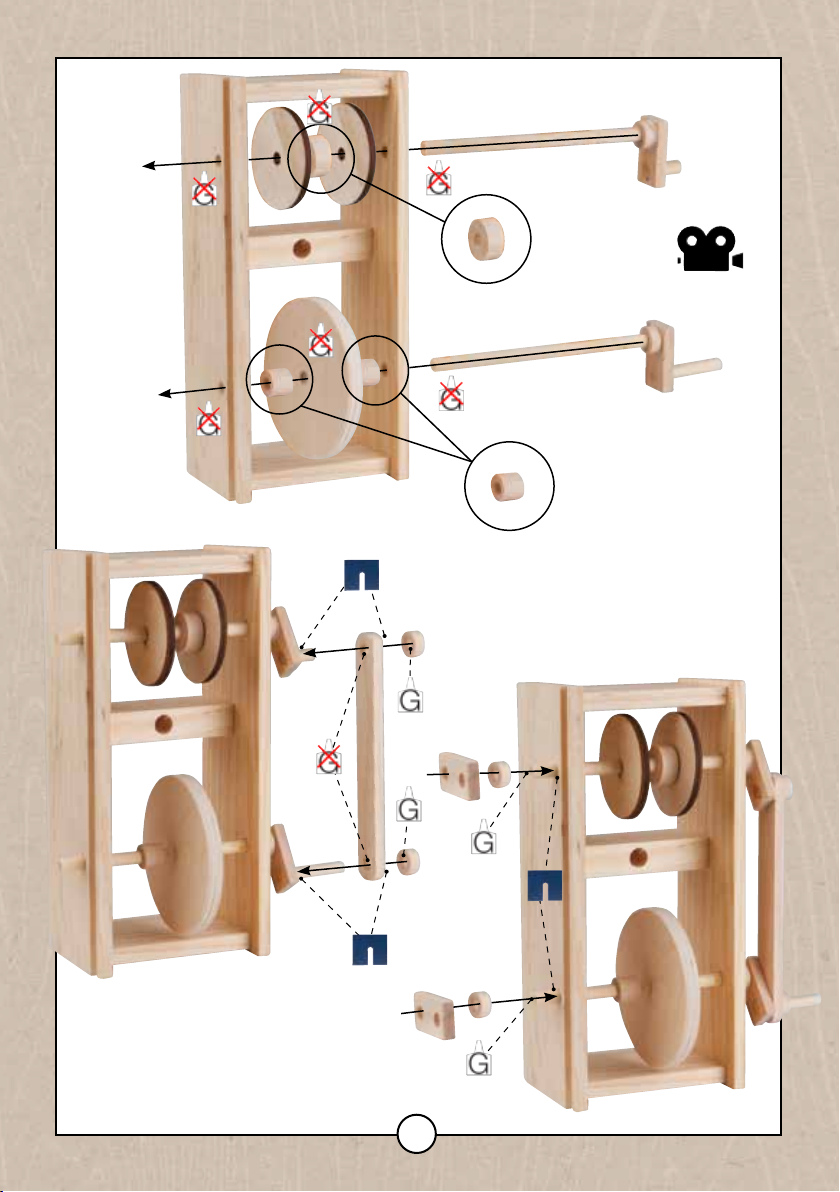
19
19a
19c
47
47
48
50
19b
49
19d
30
51
When gluing on the cranks (#46) to the shafts
make sure the end of the shaft is ush/level
with the surface of the cranks (#46) and that
none of the shaft is protruding.
46
30
30
24
30
46
Page 26
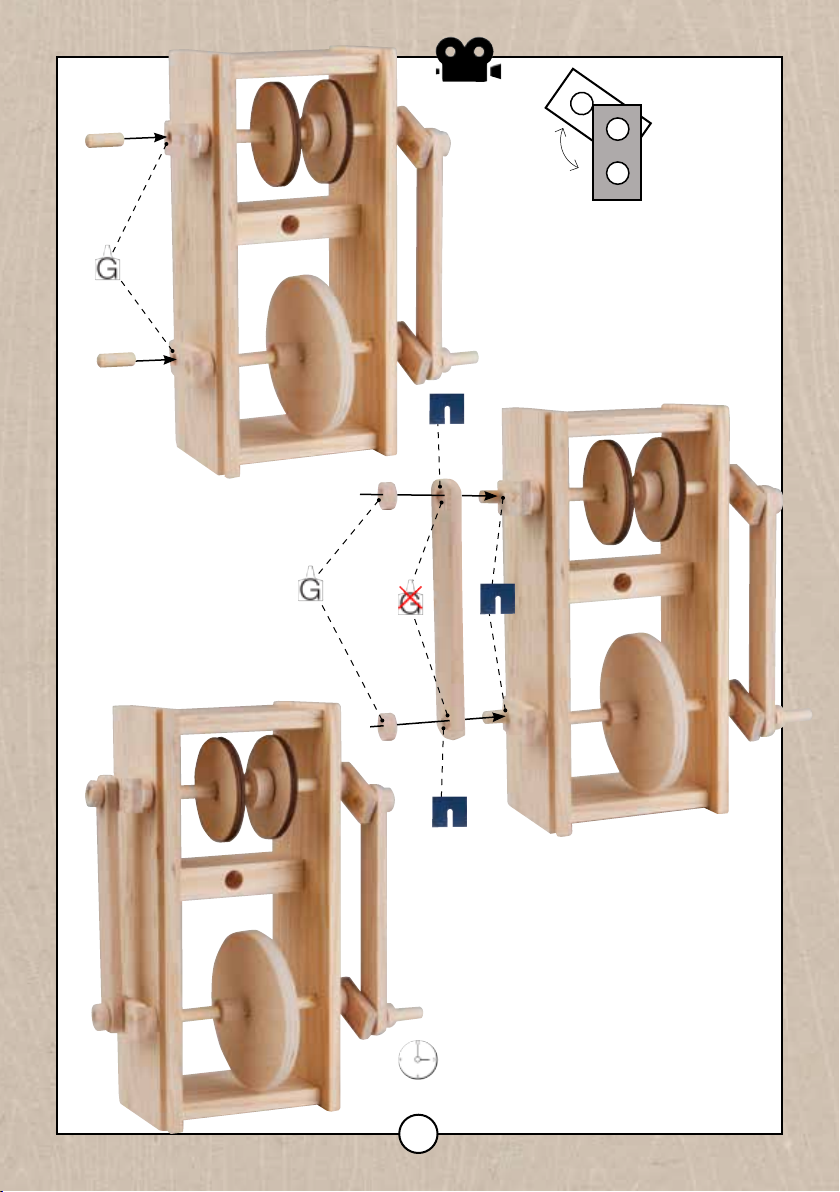
19e
6mmx16mm
o
125
When gluing the cranks (#46) onto the shafts,
make sure that they are positioned at the angle
illustrated above on opposite ends of the main
drive shafts on either side of the main base unit.
6mmx16mm
19g
19f
30
30
51
Slowly turn the 6mm x 35mm
handle just to check that the crank
assembly runs smoothly before the
glue is completely dry. If it doesn’t,
adjust the angles slightly on the
cranks (#46).
25
30mins
Page 27
20
20a 20b
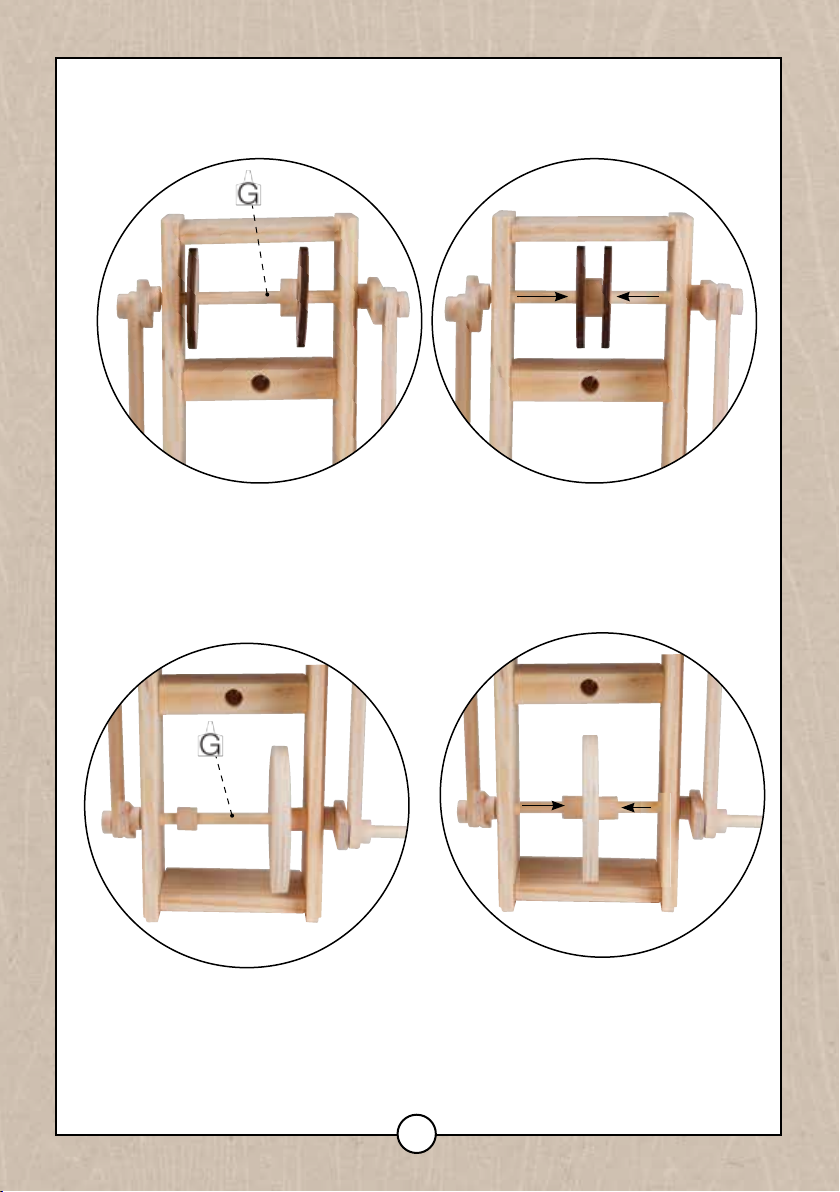
Put a dab of glue on the shaft, on either side of the part #48, and then push up the two parts #47. Make sure they are
20c
Repeat the above process with the front drive disc (# 50), making sure it is central and does not oscillate.
central (as shown) and that they do not oscillate when the handle is turned.
20d
26
Page 28
21
21a
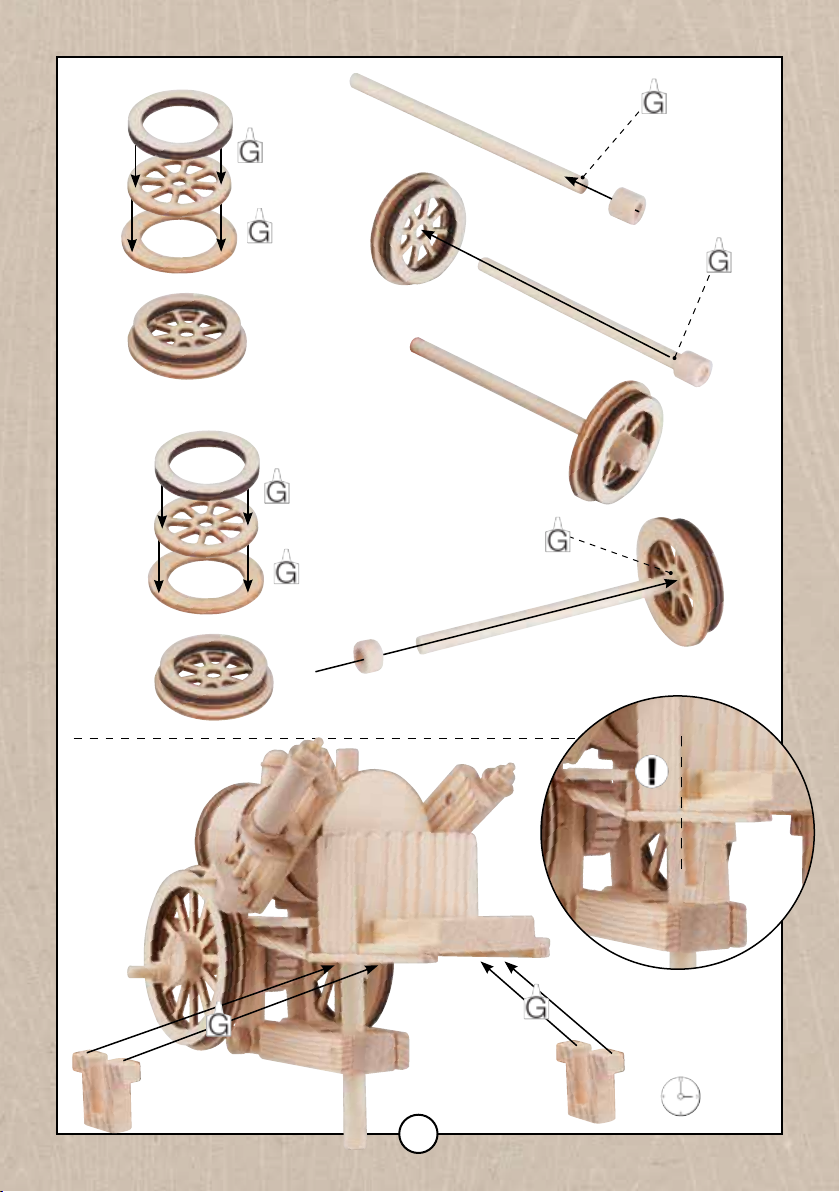
52
53
21c
5mmx92mm
22
54
21b
21d
52
53
54
32
21e
55
Line up the front inside edge
of the Rear Drop Axle (56) with
the back of the Firebox (13) as
56
56
shown.
25mins
27
Page 29
23
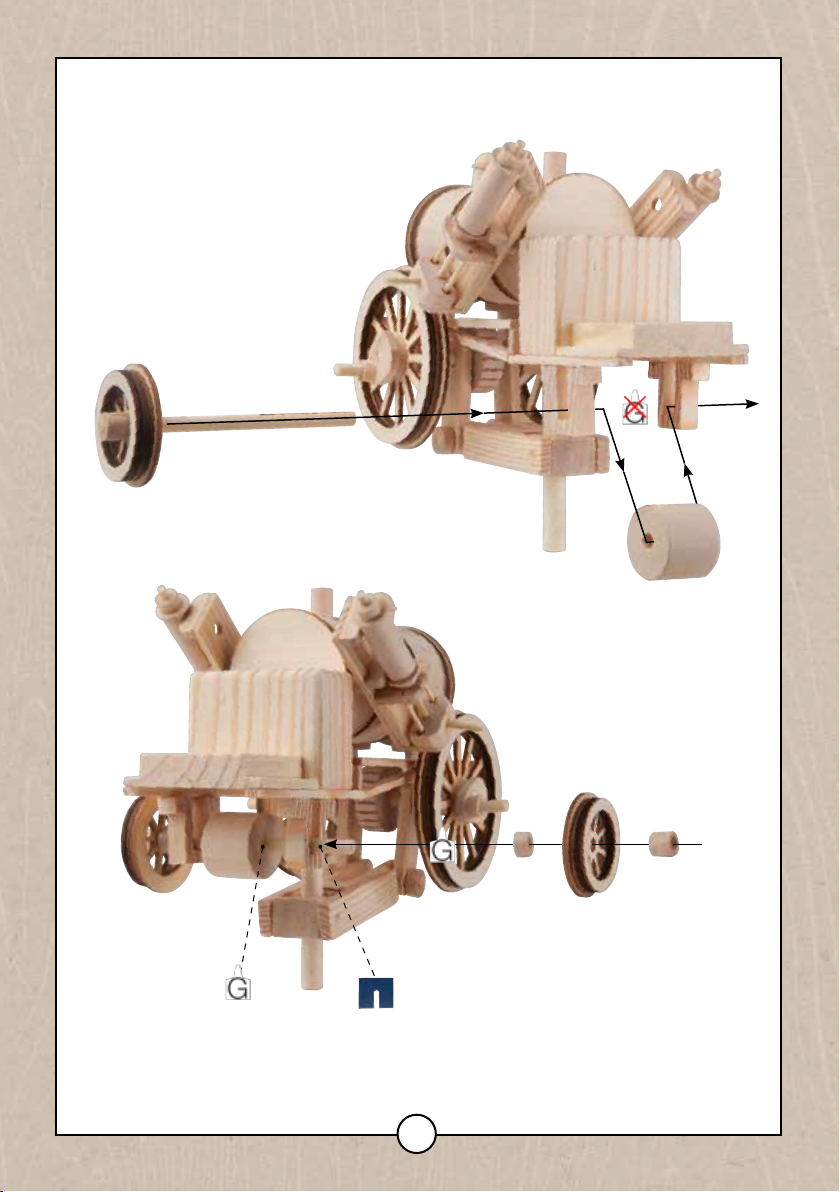
23a
57
23c
When the wheel is in
place, glue part 57
centrally on the rear
axle.
28
23b
32 55
Push the spacer #55 so that
it is level with the end of
the shaft (5x92).
Carefully turn the wheels to
check they do not oscillate.
Page 30
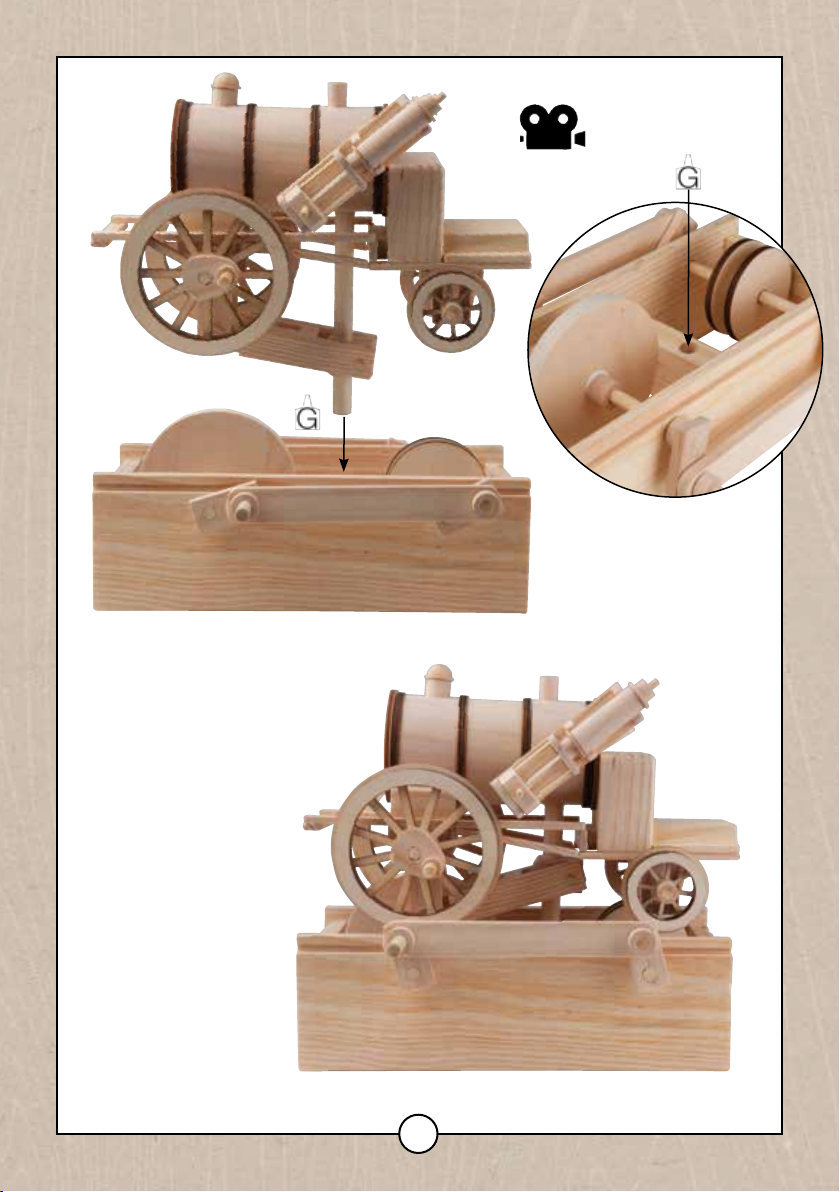
24
Put a generous amount of glue
in the 12mm hole in the base (as
shown) and carefully push down
the main shaft (#41).
Push down a little at a time and
keep turnng the handle until all 4
wheels start to turn freely.
You will need to put glue halfway
up the shaft and raise up the pivot
block (#22) until it is at an angle
of about 30º to the base sides (as
This helps turn the wheels freely
While the glue is drying it is a good
idea to lay the model on one end
so the parts dry in the correct
position and don’t slide down.
shown).
and is important.
29
Page 31
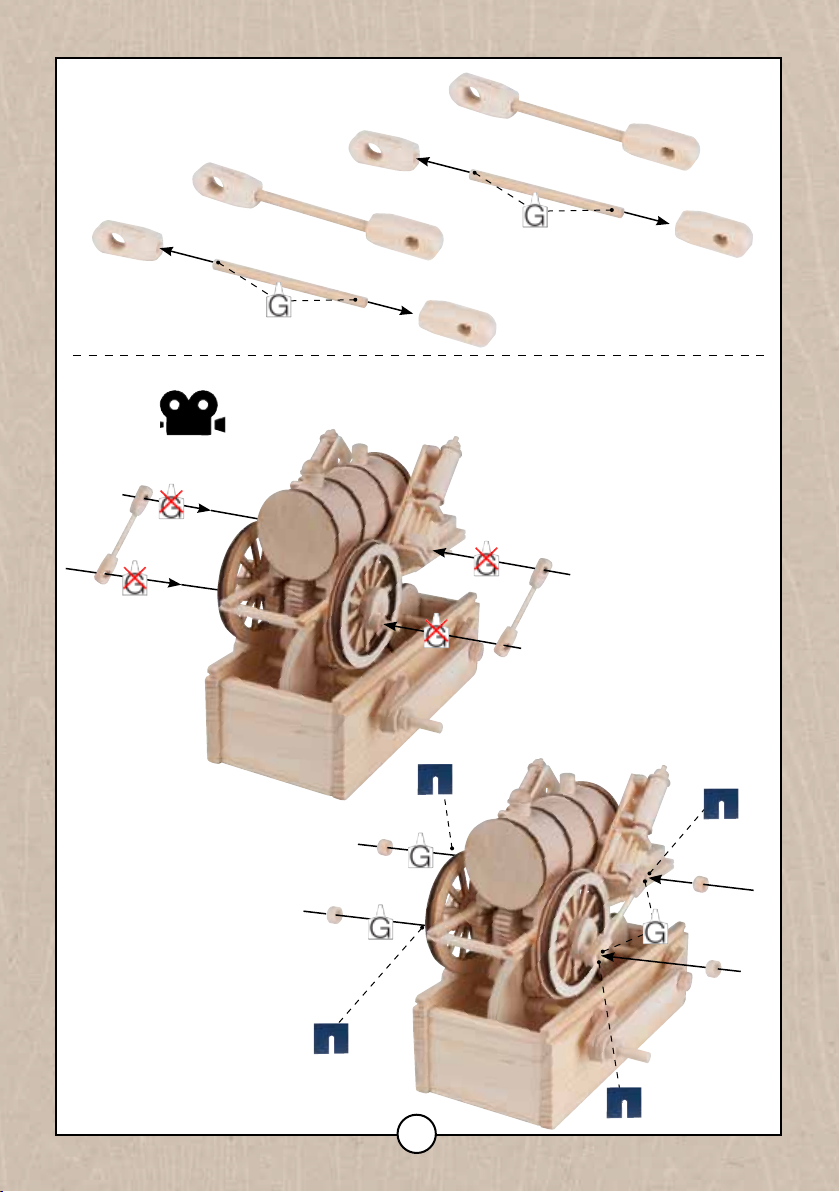
25
58
26
25a
3mmx46mm
26a
58
25b
3mmx46mm
59
Whilst the glue is still drying on #58 and #59,
follow steps 26 and 26b.
Fit one side at a time.
If a piston sticks at the top or bottom of its
travel, either extend the length of the 3 x 46mm
rod by pulling the parts #58 and #59 out by
2-3mm (if it is hitting the bottom Piston Plate)
or cut o 2-3mm from the 3 x 46mm rod (if it
is hitting the top Piston Plate).
59
26b
39
39
32
32
30
Page 32
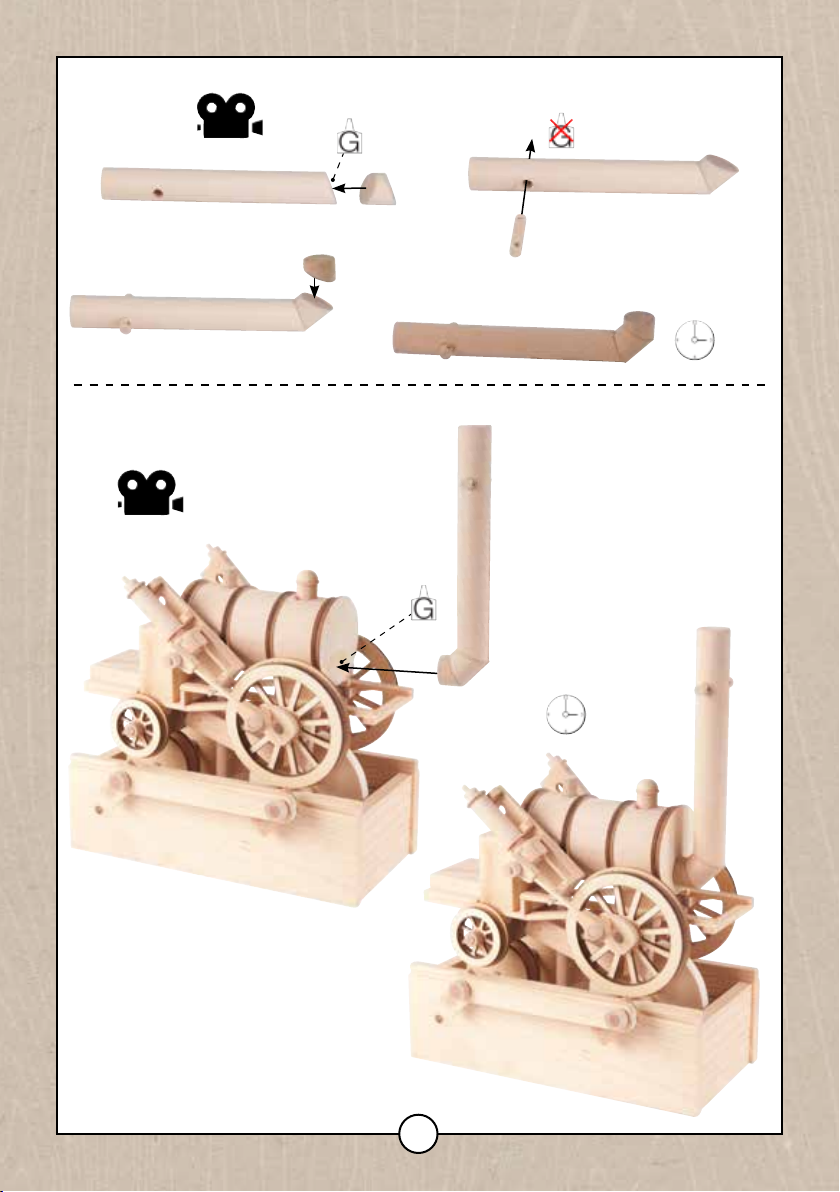
27
27a
27c
28
27b
60
63
61
62
overwise you may be holding
Use part #62 in position
to check face of part ¢61
is parallel to line of #62
when seen from above
looking down the funnel.
If you have any super glue
use a drop at this stage
the funnel for a long time!
15mins
31
30mins
Page 33
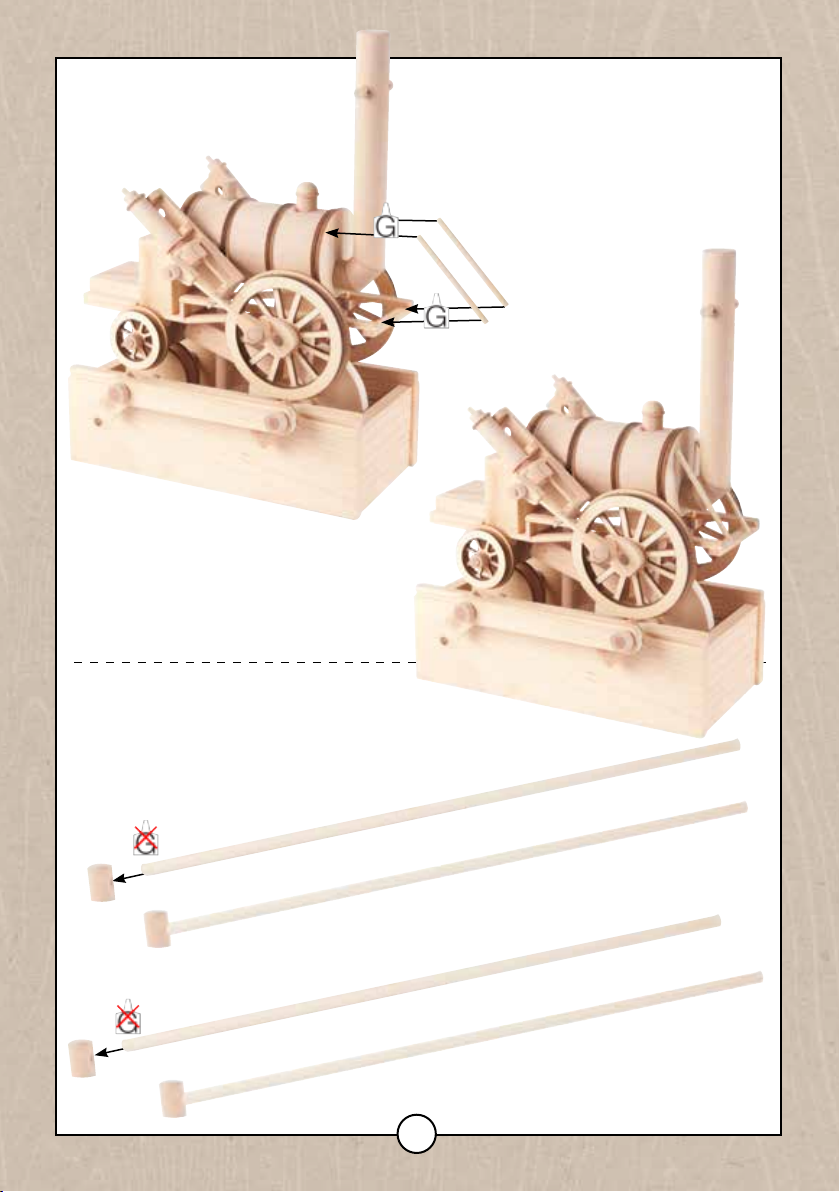
29
3mmx58mm
3mmx58mm
30
64
30a
64
3mmx145mm
3mmx145mm
30b
32
Page 34
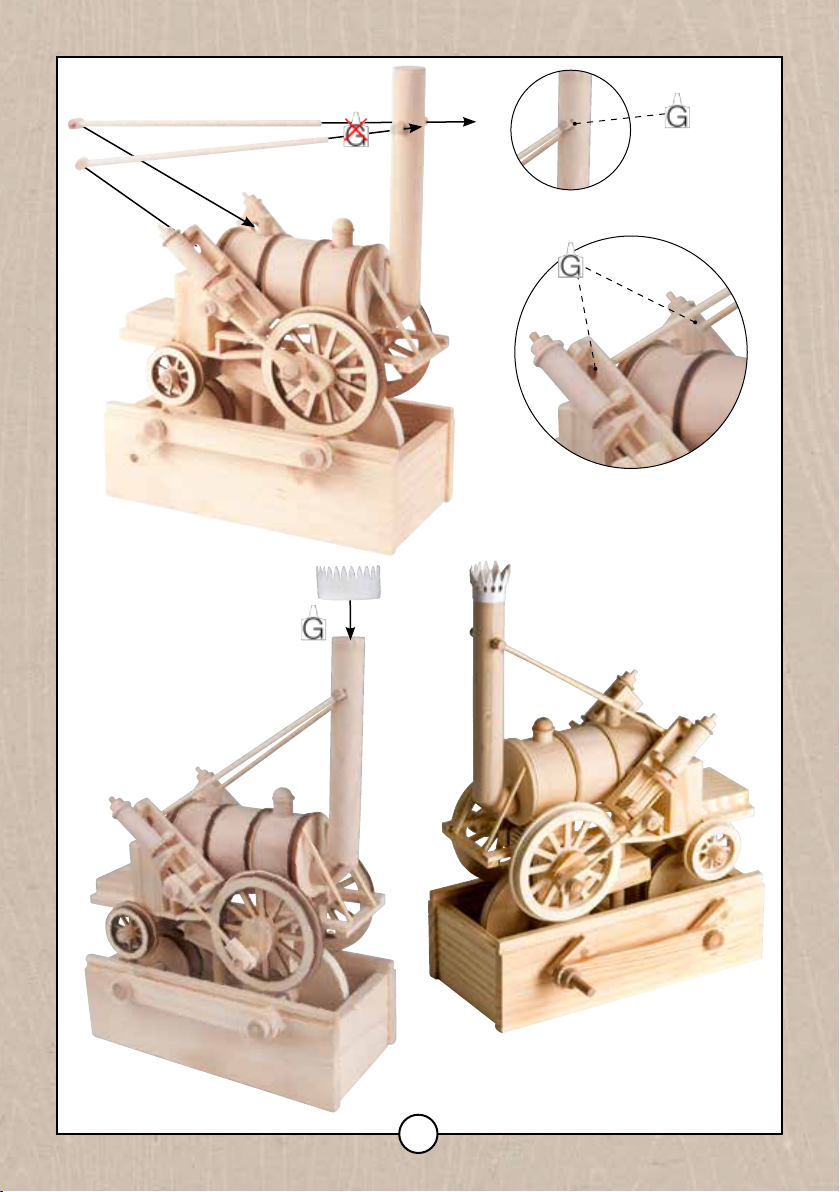
The holes in #62 are angled. Spin the part around so
that the 3mmx145mm will splay outwards towards
the pistons at the back.
31
32
33
Page 35
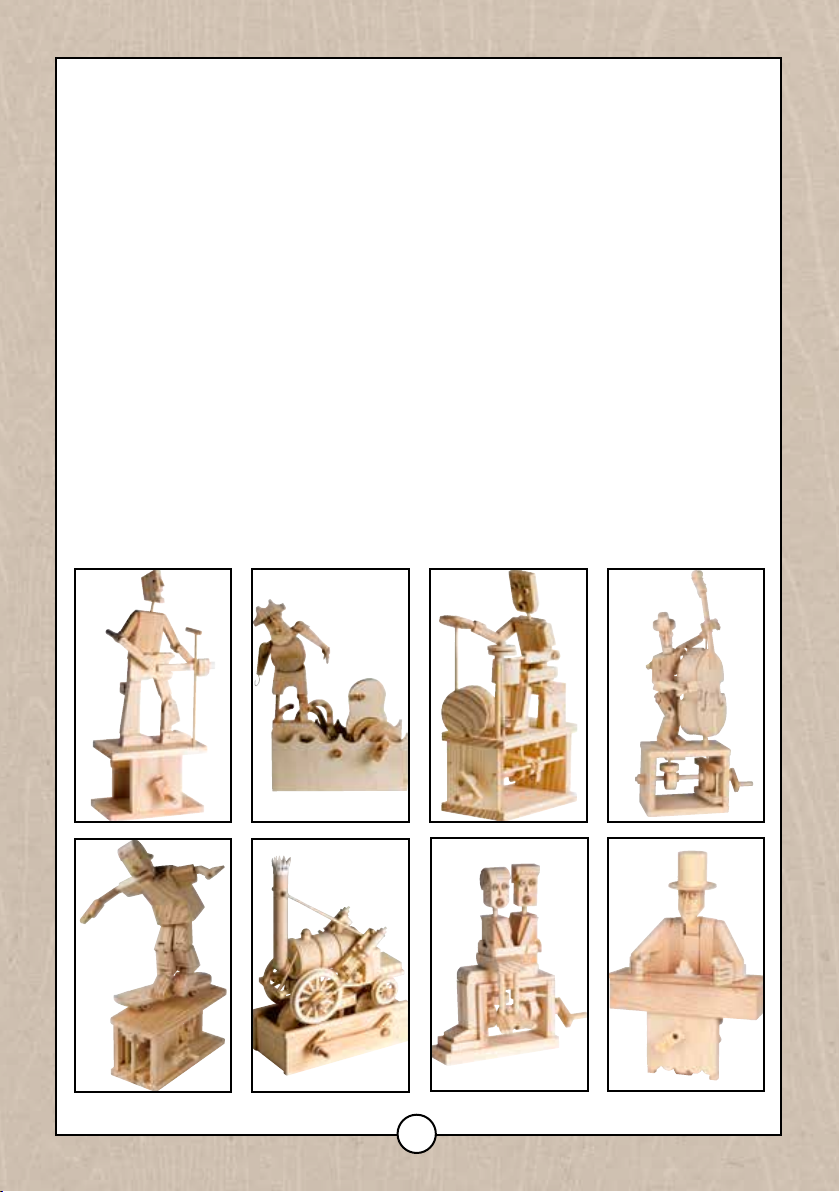
(UK) If you enjoyed building this model why not try our others. Available
directly from Timberkits Ltd or from our UK, European or worldwide retail
partners.Checkourwebsitetondyourneareststockist.
(FR) Si vous avez apprecie construire ce modele, pourquoi ne pas en essayer
d’autres.IlssontdisponibleschezTimberkitsLtdoucheznospartenaires
detaillants au Royaume Uni, en Europe et plus largement dans le monde.
(SP) Si te has divertido con este modelo, porque no pruebas los ademas. Estan
todos disponibles directamente desde Timberkit Ltd o desde las nuestra
tiendas en Reino Unido, Europa o en otros continentes. Visita el nuestro
sitio web para conocer el punto vendida mas cercano.
(IT) Se ti sei entusiasmato a costruire questo modello, perche non provare gli
altri. Sono disponibili direttamente dalla Timberkits Ltd oppure dai nostri
rivenditori in Gran Bretagna, Europa e altri continenti. Visita il nostro sito
web per trovare il più vicino punto vendita.
(DE) Wenn sie freude daran hatten, dieses modell zu bauen, wieso nicht die
anderen ausprobieren. Sie können direkt bei Timberkits Ltd bestellen oder
bei unseren handelspartnern in Großbritannien, Europa und weltweit.
Besuchen sie unsere webseite für ihren nächstgelegenen händ-ler.
www.timberkits.com
34
Page 36
Timberkits Limited
Old Village Hall
Llanbrynmair
Powys, SY19 7AA
00 (44) (0) 1650 521635
www.timberkits.com
Timberkits logo and all Timberkits designs are Copyright (©) 2012 all rights
reserved.
 Loading...