

Page 1

Instruction manual
Руководство по эксплуатации
TOR 21...BTX I
TOR 21...HBX I
TOR 21...SLX I
TOR 21...SLX Z
TOR 31...EHX ITOR 31...QB
Электрический
маслонаполненный
радиатор
Electric
oil filled
radiator
Модели/Models:
TOR 21.1206 BTX I
TOR 21.1507 BTX I
TOR 21.2009 BTX I
TOR 21.2512 BTX I
TOR 21.1206 HBX I
TOR 21.1507 HBX I
TOR 21.2009 HBX I
TOR 21.2512 HBX I
TOR 31.1706 EHX I
TOR 31.2007 EHX I
TOR 31.2509 EHX I
TOR 31.3012 EHX I
Outlook of devices, aslo colour scores can be revised without any special advance
notices.
Производитель вправе менять внешний вид прибора и цветовую гамму прибора без специального уведомления.
TOR 31.1606 QB
TOR 31.1907 QB
TOR 31.2409 QB
TOR 31.2912 QB
TOR 21.1005 SLX Z
TOR 21.1507 SLX Z
TOR 21.1809 SLX Z
TOR 21.2211 SLX Z
TOR 21.1006 SLX I
TOR 21.1507 SLX I
TOR 21.1809 SLX I
TOR 21.2212 SLX I
Page 2

Dear customer!
Thank you for your good choice! You purchased a Timberk oil
filled radiator. We did everything for the unit to operate reliably
for a long time.
Timberk electric oil filled radiator is designed to heat the air
and create a comfortable environment indoors during cold
season (early spring, fall, winter). The radiator is very easy-touse, easy to install, and also has an increased heat transfer and
an efficient air flow distribution. Besides, Timberk Professional
oil filled radiators are additionally equipped with an air ionizing
function. The built-in air ionizer can operate independently of
the air heating mode.
You must install the oil filled radiator only vertically and only on
a rigid surface (for example, on the floor) in a place, where it is
possible to connect to ~220 V single-phase power supply wiring
with an earth circuit.
IMPORTANT!
Important safeguards and instructions contained in
this manual do not include all possible modes and
situations. It is necessary to understand that common
sense, caution and accuracy are factors, which cannot
be ‘built-in’ any product.
These factors should be considered by a person, who
is interested in the proper operation of the appliance.
The manufacturer is nor responsible for damage of the
appliance or its parts during transportation, as a result
of incorrect installation or voltage fluctuations, as well
as when any part of the appliance has been changed
or modified.
2. SAFEGUARDS
1. IMPORTANT INFORMATION
Please, read this manual carefully before use of the electric oil-filled radiator.
This manual contains important information regarding your safety, as well
as recommendations concerning the correct use and maintenance of this
appliance.
Keep this manual together with a guarantee slip, cash register receipt and,
if possible, carton and packaging material.
The radiator you have bought may slightly differ from that described in the
manual, but it does not affect its use and operation procedures.
2
www.timberk.com • electric oil filled radiator
When using the oil-filled radiator several safety precautions should be
followed in order to reduce the risk of fire, electric shock and injury to
persons. Incorrect operation due to disregard to precautions may cause
harm to health of the user and other persons, as well as damage to their
property.
1. Read this manual carefully before using the radiator.
2. The radiator is very hot when in use. To avoid burns, do not let bare skin
touch hot surfaces. Keep the radiator at least 0.9 m from furniture, pillows,
bedding, paper, clothes, curtains and other combustible materials. Let the
radiator cool down before moving. When moving radiator, use a built-in
handle.
3. Extreme caution is necessary when the radiator is used near children
and whenever the radiator is left operating and unattended.
4. Always unplug the radiator when not in use.
5. Do not operate radiator with a damaged cord or plug. To avoid the
damage of electric shock, damaged cord should be replaced only in
authorized service centers of the manufacturer by qualified specialists.
6. Do not use radiator outdoors.
7. This radiator is not intended for use in bathrooms, laundry areas or other
similar wet indoor locations. Never locate radiator where it may fall into a
Page 3
bathtub or other water container.
8. Do not run cord of the radiator under carpeting and do not press it with
furniture. Arrange cord where it will not be tripped over.
9. To shut-off the radiator, use a power switch. Do not switch on and switch
off the appliance by connection and disconnection of electric supply.
10. Do not insert your fingers and do not allow foreign objects to enter any
ventilation or exhaust opening as it may cause an electric shock or damage
the radiator.
11. To prevent a possible fire, do not block air intakes or exhaust in any
manner. Do not dry your clothes on the radiator! Do not use it on soft
surfaces, like bed, where openings may become blocked. Use the radiator
only on flat dry surface.
12. The radiator has hot sparking parts inside. Do not use it in areas where
gasoline, paint or other flammable liquids are used or stored.
13. Use this radiator only as described in this manual. Any other use not
recommended by the manufacturer may cause fire, electric shock or injury
to persons.
14. Always unplug the radiator before cleaning. Do not submerge the
radiator. Never pull the cord.
15. Avoid the change of a cord and the use of an extension cord because
it may cause overheat and a risk of fire, as well as damage of internal
electrical network. However, if you have to use an extension cord, the cord
shall be polarized, with conductor cross-section of at least 1.0 mm2 and
rated not less than 1875 W.
16. Connect the radiator only to the ~220V/50Hz electric network. If
needed, find out the characteristics of your network from power supplier.
17. Install and operate the appliance only when upright. Do not operate the
appliance in the horizontal or on the slant.
18. The appliance is not intended for use by handicapped persons
(including children) with insufficient experience and knowledge, if they are
not under observation or have not been instructed in the use of appliance
from a person responsible for their safety. Make sure that children do not
play with the radiator.
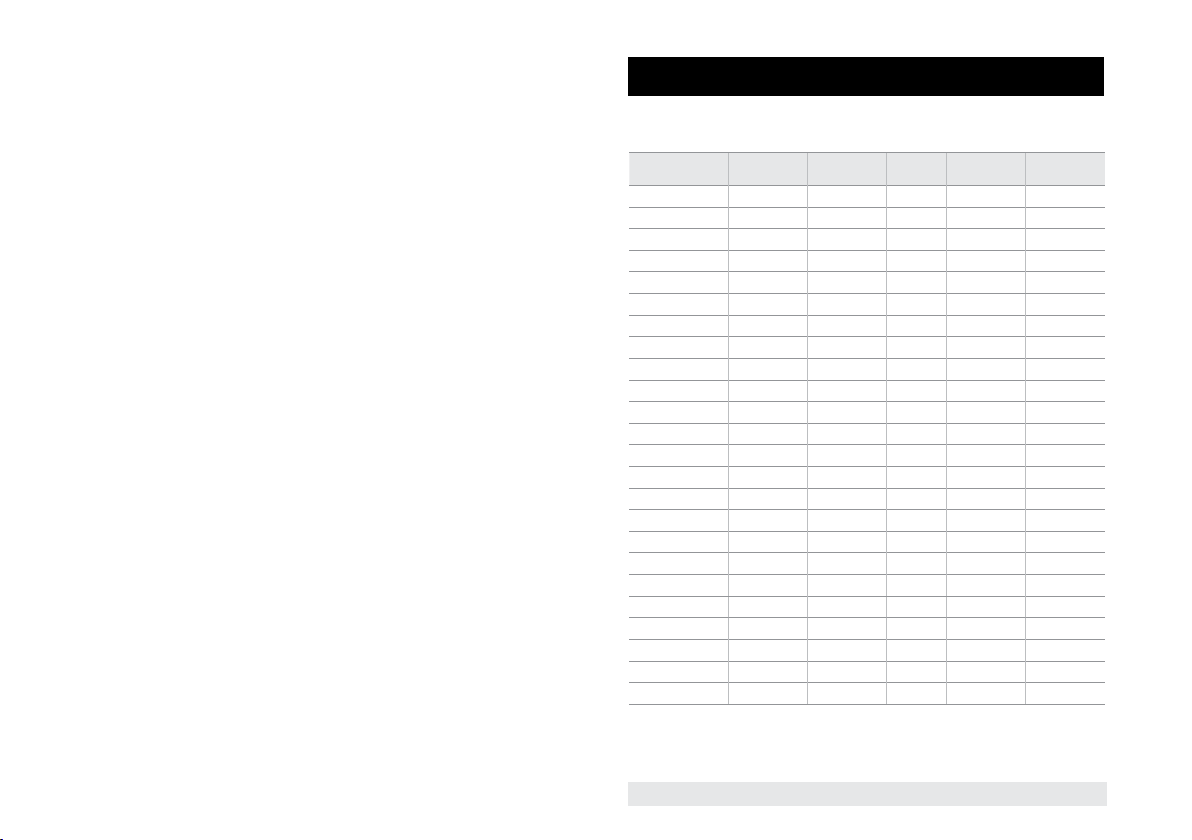
3. SPECIFICATIONS
Specifications of the oil-filled radiator are shown in Table 1.
Table 1
Model Power (W) Rated current, A Fins
TOR 21.1206 BTX I 1200 5,45 6 315x275x625 6,0
TOR 21.1507 BTX I 1500 6,8 7 353x275x625 6,7
TOR 21.2009 BTX I 2000 9,1 9 429x275x625 8,1
TOR 21.2512 BTX I 2500 11,4 12 543x275x625 10,2
TOR 21.1206 HBX I 1200 5,45 6 315x275x625 6,0
TOR 21.1507 HBX I 1500 6,8 7 353x275x625 6,7
TOR 21.2009 HBX I 2000 9,1 9 429x275x625 8,1
TOR 21.2512 HBX I 2500 11,4 12 543x275x625 10,2
TOR 31.1706 EHX I 1700 7,7 6 323x275x625 7,4
TOR 31.2007 EHX I 2000 9,1 7 361x275x625 8,2
TOR 31.2509 EHX I 2500 11,4 9 437x275x625 9,8
TOR 31.3012 EHX I 3000 13,6 12 551x275x625 12,2
TOR 21.1006 SLX I 1000 4,5 6 277x280x625 5,6
TOR 21.1507 SLX I 1500 6,8 7 315x275x625 6,3
TOR 21.1809 SLX I 1800 8,2 9 391x275x625 7,6
TOR 21.2212 SLX I 2200 10,0 12 505x275x625 9,5
TOR 21.1005 SLX Z 800 3,6 5 239x280x625 4,9
TOR 21.1507 SLX Z 1500 6,8 7 315x275x625 6,3
TOR 21.1809 SLX Z 1800 8,2 9 391x275x625 7,6
TOR 21.2211 SLX Z 2000 9,1 11 467x275x625 8,9
Dimensions
(mm)
~Net weight (kg)*
www.timberk.com • electric oil filled radiator
3
Page 4

Model Power (W) Rated current, A Fins
TOR 31.1606 QB 1600 7,3 6 315x275x625 6,6
TOR 31.1907 QB 1900 8,6 7 353x275x625 7,3
TOR 31.2409 QB 2400 10,9 9 429x275x625 8,7
TOR 31.2912 QB 2900 13,2 12 543x275x625 10,8
Dimensions
(mm)
Noise level, dB (for models TOR 31... EHX I, TOP 31 ... QB): 58
Rated voltage, V/Hz: ~220/50
IMPORTANT!
The manufacturer reserves the right to change the set-list of the
device (including liquid and powder components) for different
supplies without prior notice. The changes either in no way
influence the basic technical parameters of the device or may
improve them, and also not violate the legislation or quality
standards of the countries of manufacture, transit and selling.
The changes in the set-list may result in changing of the weight
and dimensions of the device, but not more than by +\- 5-20%
(depending on the product category)
4. RADIATOR DESCRIPTION
1. Handle for moving
2. Heading indicator
3. Thermostat hardle
4. Power mode switcher
5. Wheel
6. Ionizer switch
7. Ionizer
8. Front cover
9. Radiator sections
10. Fan heater
11. Fan heater button
12 Cord holder
~Net weight (kg)*
1 1
2
3
4
TOR 21...SLX I
TOR 21...SLX Z
TOR 31...QB I
11
9
7
6
9
8
5
1
2
3
4
10
8
12
5
Fig. 1
5. DELIVERY SET
1. Oil-filled radiator - 1 pc
2. Roller wheels, assembled - 2 pcs
4. Finger nut - 1 set
5. User manual - 1 pcs
6. Guarantee slip - 1 pcs
7. Packing - 1 pcs
TOR 21...BTX I
TOR 21...HBX I
TOR 31...EHX I
2
3
4
6
7
8
9
12
5
1
3
2
6
4
7
10
9
10
8
12
5
4
www.timberk.com • electric oil filled radiator
Page 5
NOTE:
Design and technical characteristics of the convector
heater, as well as its complete set may be changed by
the manufacturer without prior notification, when it is
needed to improve its quality.
6. ASSEMBLY AND INSTALLATION
IMPORTANT!
1. Switch on and operate the radiator only when upright (with
wheels below and control elements above). Any other position
may cause a dangerous situation and result in failure of the oilfilled radiator or damage of property and the manufacturer will
consider this as a non-warranty case.
2. Do not switch the radiator on, if roller wheels are not installed.
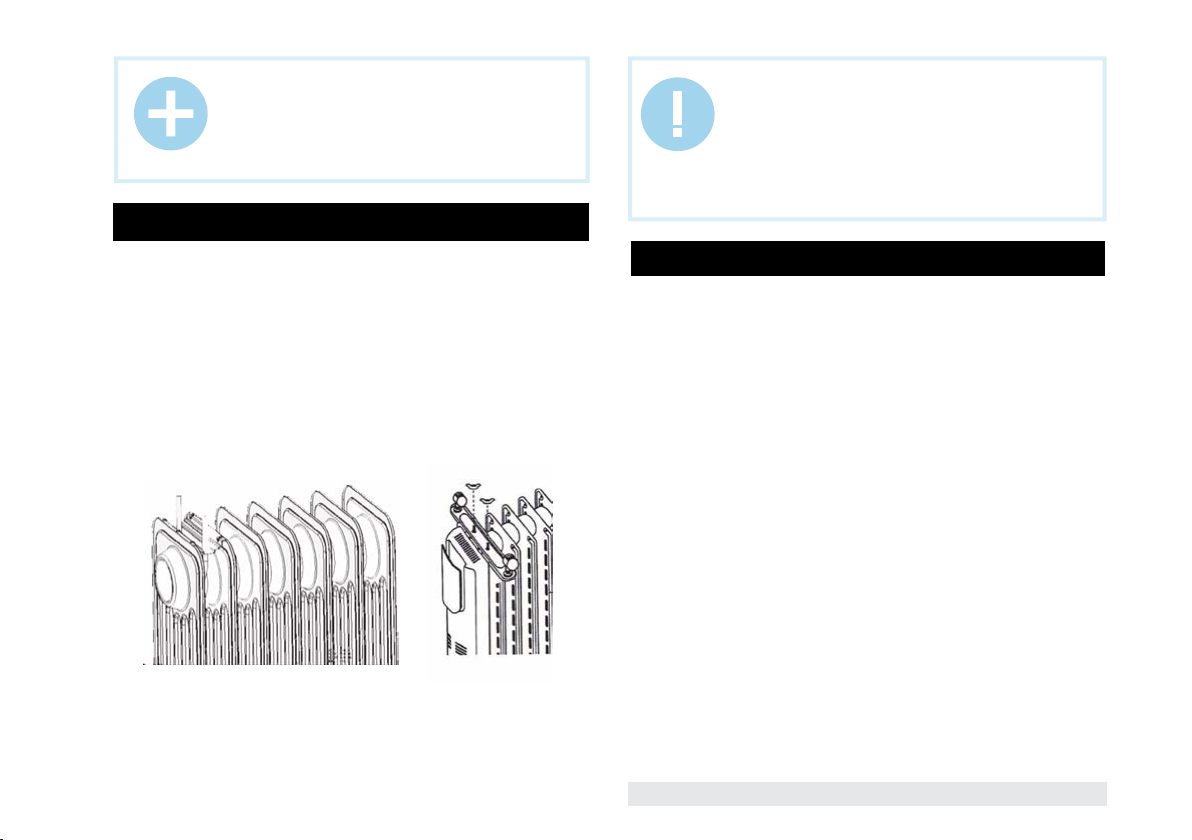
1. Unpack the radiator and roller wheels and remove all the packaging
material.
2. Overturn the radiator on a mat or no soft surface, to avoid damage to
lacquer coating.
3. Install wheel plates on the lower part of radiator sections, into two fixed
supports.
4. Draw up two finger nuts on one side and two finger nuts on the other - in
clamp extensions passed through the wheel plate supports, after making
sure that 2 openings in the wheel plate match together with the clamp
extensions (see Figure 3).
5. Turn the radiator back and tip it up.
Fig. 2 Fig. 3
7. UNIT OPERATION RULES AND PROCEDURE
1. Read section «Important precautions» carefully unless you already did it.
2. Connect the unit’s power cord to an electric outlet, observing all of the
abovementioned precautions. Remember that you can connect the unit
to electric mains only if the rotating power regulator is in OFF position
(switched off), i.e. the knob is rotated against the stop counterclockwise.
3. It is also preferable to turn the temperature regulating knob against the
stop counterclockwise. Then you can connect the unit to electric mains.
4. Set the unit’s power regulator (knob) to position I, II or III (corresponds to
low, normal and maximum power of unit’s operation). Remember that the
higher the power you choose, the faster the unit heats the air. But at a low
power you save electric power and reduce the load on your electric mains.
5. After you chose the desired operating power in accordance with
your individual preferences, you have to choose the desired heating
temperature. Turning the thermostat knob clockwise (from MIN position
towards MAX position), you thus adjust the temperature mode you need.
Since the moment you choose the temperature mode (provided one or
another power mode is activated see item 4) the oil filled radiator will start
to operate.
6. During the first minutes of radiator’s operation you may fell a slight smell
of burning. It may be caused by dust on the unit; it will soon disappear.
If necessary, you can perform a preliminary preventive cleaning of the
unit, following rules, set forth in this manual and observing «Important
precautions».
7. When the room temperature will reach the desired level, you should
slowly turn the temperature regulator’s knob counterclockwise (towards
MIN). You will hear a click of the thermostat turning off, and the light on the
www.timberk.com • electric oil filled radiator
5
Page 6

control panel will go out. Now the room temperature will be maintained at
the chosen level.
8. If you need to reduce the room temperature, turn the thermostat knob
counterclockwise. Also you can lower the unit’s operating power (I or II).
9. If you need to raise the room temperature, turn the thermostat knob
clockwise (maximum possible position MAX indicator). Also you can raise
the unit’s operating power (II or III).
10. The lines of Timberk oil filled radiators TOR 31...QB, TOR 31...EHX
I are additionally equipped with a built-in fan heater, located on the front
panel of the unit. To speed up the room heating, activate the fan heater by
pressing the special button switch (the button can be located both on the
front panel of the unit and on the side (to the left) of the front panel of the
unit depending on the unit line).
Pressing the fan heater button, you must select the ON position (switched
on), upon that power supply will be automatically fed both to the fan motor
and to the built-in heating element. If you need to turn on the fan heater,
please, press the button again, selecting the OFF position (switched off).
IMPORTANT!
For the unit to operate normally, the level of voltage in
electric mains must be sufficient in strict compliance
with the technical parameters indicated on the unit.
Carefully study the technical label, as well as all labels
with special warnings, attached to the unit’s surface.
8. AIR IONIZATION FUNCTION
The radiator is equipped with the air ionizer.
The ionizer is turned on and off with the use of a key switch on the front
panel. To turn the ionizer on, set the switch to „I”, and the green indicator
will be lit. To turn the ionizer off, set the switch to „O”, and the indicator
will go out.
The air ionizer is a completely independent appliance and may work even
when the heating mode is off.
Operating principle of the ionizer is mainly the following: the high voltage
applied to metal needles with a point diameter of 5…10 micrometers leads
to discharging of electrons - electric effluvium. Molecules of atmospheric
oxygen grasp these electrons, take a minus charge and become negative
air ions.
This provides for high concentration of light negative air ions of oxygen in
the air.
THE IONIZER is intended for: health promotion and prevention of various
diseases, reduction of fatigability, improvement of working efficiency and
immunity, air cleaning from aerosol contaminants, allergic agents and
microorganisms, neutralization of harmful effect of working computers, TV
sets, office equipment, restoration of biological activity of the air entering
the room from air conditioners, filters, air ducts, for making of comfort and
good humour.
Moreover, air ionizers also serve for air cleaning from: tobacco smoke,
odours, tars, dust, pollen, spores, animal hair, viruses and bacteria. The air
ionizer will help to save your health, to avoid infectious diseases, allergy and
create comfort in your house/office.
The ionizer in Timberk radiators performs the following basic functions:
it saturates the air with negative air ions making it similar to that in the forest
it eliminates the consequences of electromagnetic radiation (computers,
TV sets, etc.)
low concentration of ozone kills viruses, bacteria, fungi
It decomposes smoke, carbon monoxide and odours into non-hazardous
chemical components.
The used air ionizer conforms to the effective SanPiN 2003
The values of specified indices for concentration of air ions and unipolarity
factor are shown in Table 2 (according to SanPiN 2.2.4.1294-03):
Table 3
Rated indices
Minimum
permissible
Maximum
permissible
Concentration
n+ (ion/cm3)
N+>=400 n->=400 0,4=<Y=<1,0
n+<=50000 n-<=50000
Concentration
n- (ion/cm3)
Unipolarity
coefficient Y
6
www.timberk.com • electric oil filled radiator
Page 7

8. CLEANING AND MAINTENANCE OF THE UNIT
1. Remember that you must clean the unit regularly to remove dust from
the surface of heating sections. Dust and dirt on the unit’s surface have
a negative effect on the unit’s operational efficiency, in some cases a
smell of burning dust can cause a headache and nausea, as well as other
negative health effects. Also a dirty unit cannot operate 100% effectively,
temperature parameters of the room heating can be disrupted.
2. Prior to preventive cleaning of the unit, you must switch off the unit,
unplug it from electric mains (see «Important precautions») and let the unit
cool down.
3. Clean the unit’s sections and other surfaces with a soft, slightly damp
duster/cloth. The cloth must not leave fluff on the unit’s surface.
4. It is not recommended to use detergents, including materials containing
abrasive elements.
5. During cleaning, please, do not damage the unit’s surface by sharp
objects (hard sponge, polishing paper, etc). Scratches on the painted
surface can result in rusting.
Switch on and use the unit again only having carried out all «Important
precautions»; also make sure that the unit’s surface is absolutely dry.
9. TROUBLESHOOTING
Possible malfunctions and remedies for them:
Malfunction Cause Remedy
1. The heater heats poorly
2. The heater does not work
1. The heating element is faulty
2. Low voltage in the electric mains 2. Check voltage in the electric mains
1. No voltage in the electric mains
2. Breakdown of the electric cable
3. The automatic circuit breaker of the
electric mains is faulty
4. Breakdown in the heating element circuit
1. Contact the authorized service center
of Timberk
1. Check presence of voltage in the
electric mains
2. Check integrity of the electric cable and
replace it if necessary
3. Check operability of the automatic circuit
breaker of the electric mains and replace
the faulty circuit breaker if necessary
4. Contact the authorized service center
of Timberk
If you are not able to remedy a malfunction according to the
recommendations or other malfunctions occur, contact the authorized
service center of Timberk.
10. TRANSPORTATIOM AND STORAGE
Temperature
requirements*
Humidity
requirements*
Transportation and
storage
We are exploring new technologies and we constantly improving the quality
of our products. That’s why specifications, design and accessories are
subject to change without any specific notice.
* This product must have storage in dry, well-ventilated space of warehouse at the temperature
not lower than -30°
From -30° to +50°
From 15% to 85%
(without a condensate)
11. UTILIZATION
After end of life the fan heater should be utilized in accordance with the
norms, regulations and procedures effective in the place of utilization. For
more detailed information please contact representatives of local authorities.
www.timberk.com • electric oil filled radiator
7
Page 8

Уважаемый покупатель!
Благодарим вас за удачный выбор! Вы приобрели маслонаполненный радиатор Timberk. Со своей стороны мы сделали
все, чтобы прибор работал надежно и прослужил вам долго.
Электрический маслонаполненный радиатор Timberk предназначен для обогрева воздуха и создания комфортной
атмосферы в помещении в холодное время года (ранняя
весна, осень, зима). Радиатор очень удобен в использовании, прост в установке, а также обладает повышенной теплоотдачей и эффективным распределением воздушного
потока. Кроме того, маслонаполненные радиаторы Timberk
Professional дополнительно оснащены функцией ионизации
воздуха. Встроенный ионизатор воздуха может работать
автономно от режима обогрева воздуха.
Вы должны установить маслонаполненный радиатор только
в вертикальном положении и только на жесткой основе (например, на полу) там, где есть возможность подключения к
электропроводке с однофазным электропитанием ~220V и с
заземляющим контуром.
1. ВАЖНАЯ ИНФОРМАЦИЯ
Просим внимательно ознакомиться с руководством по эксплуатации
перед использованием маслонаполненного радиатора.
В данном руководстве по эксплуатации содержится важная информация, касающаяся Вашей безопасности, а также рекомендации по
правильному использованию прибора и уходу за ним.
Сохраните руководство по эксплуатации, вместе с гарантийным талоном, кассовым чеком, по возможности, картонной коробкой и упаковочным материалом.
Приобретенный Вами радиатор может несколько отличаться от описанного в руководстве, что не влияет на способы использования и
эксплуатации.
ВНИМАНИЕ!
Важные меры предосторожности и инструкции, содержащиеся в данном руководстве, не включают
всех возможных режимов и ситуаций, которые мо
гут встречаться. Необходимо понимать, что здравый смысл, осторожность и тщательность являются
факторами, которые невозможно «встроить» ни в
один продукт.
Эти факторы должен учитывать человек, который
заинтересован в надлежащей эксплуатации устрой
ства. Изготовитель не несет ответственности в случае повреждения прибора или его отдельных частей
во время транспортировки, в результате неправиль
ной установки, в результате колебаний напряжения,
а также в случае, если какая-либо часть прибора
была изменена или модифицирована.
-
-
-
2. МЕРЫ ПРЕДОСТОРОЖНОСТИ
При использовании маслонаполненного радиатора, необходимо соблюдать ряд мер предосторожности, для снижения риска пожара,
поражения электрическим током и травмирования людей. Неправильная эксплуатация в силу игнорирования мер предосторожности
может привести к причинению вреда здоровью пользователя и других людей, а также нанесения ущерба их имуществу.
1. Прочитайте все инструкции перед использованием радиатора.
2. Радиатор при работе нагревается до очень высокой температуры.
Чтобы избежать ожогов, не прикасайтесь руками и другими частями
тела к горячим поверхностям. Располагайте радиатор на расстоянии
не менее 0,9 м от мебели, подушек, постельных принадлежностей, бумаги, одежды, штор и других горючих предметов и материалов. Дайте радиатору остыть, прежде чем перемещать его. Для перемещения
радиатора используйте встроенную ручку.
3. Необходимо соблюдать крайнюю осторожность, когда рядом с работающим радиатором играют дети, и всегда, когда радиатор работает без присмотра.
4. Всегда выключайте радиатор из розетки, когда он не используется.
8
www.timberk.com • электрический маслонаполненный радиатор
Page 9

5. Не включайте радиатор, если его сетевой шнур или вилка имеют
повреждения. Во избежание опасности поражения электрическим
током, поврежденный сетевой шнур должен меняться только в авторизованных сервисных центрах изготовителя, квалифицированными
специалистами.
6. Не используйте радиатор на улице.
7. Данный радиатор не предназначен для использования в ванных
комнатах, прачечных или других аналогичных влажных помещениях.
Ни в коем случае не размещайте радиатор в таких местах, где он может упасть в ванну или другую емкость с водой.
8. Не прокладывайте сетевой шнур радиатора под ковровыми покрытиями и не прижимайте его предметами мебели. Прокладывайте сетевой шнур так, чтобы об него невозможно было споткнуться.
9. Для отключения радиатора используйте выключатель питания. Не
включайте и не отключайте устройство посредством подключения
или отключения электрического питания.
10. Не просовывайте пальцы и исключите попадание посторонних
предметов в какое-либо вентиляционные или вытяжные отверстия,
так как это может привести к поражению электрическим током или
повреждению радиатора.
11. Для предотвращения возможного пожара не загораживайте ничем воздухозаборные и вытяжные отверстия. Не вешайте и не сушите
вещи на радиаторе! Не используйте радиатор на мягких поверхностях, например, на кровати, где отверстия могут быть заблокированы. Используйте радиатор только на ровной сухой поверхности.
12. Радиатор содержит внутри горячие компоненты. Не используйте
радиатор в местах использования или хранения бензина, краски или
других легковоспламеняющихся жидкостей.
13. Используйте данный радиатор только так, как описано в данном
руководстве. Любое другое использование, не рекомендуемое изготовителем, может привести к пожару, поражению электрическим током или травмированию людей.
14. Ни в коем случае не выполняйте очистку радиатора, когда он
включен в розетку. Не погружайте радиатор в воду. Никогда не тяните за сетевой шнур.
15. Во избежание перегрева и риска возникновения пожара, а также
повреждения внутренней электрической сети, не изменяйте длину
сетевого шнура и не подключайте устройство через электрические
удлинители. Однако при необходимости можно использовать удлинитель, который должен быть рассчитан на минимальную мощность
прибора.
16. Подключайте радиатор только к сети ~220В/50Гц. При необходимости выясните характеристики своей сети у поставщика электроэнергии.
17. Устанавливайте и эксплуатируйте прибор в строго вертикальном
положении. Запрещено эксплуатировать прибор в горизонтальном
или наклонном положениях.
18. Прибор не предназначен для использования лицами (включая
детей) с ограниченными физическими, сенсорными или умственными
возможностями, обладающими недостаточным опытом и знаниями,
если они не находятся под наблюдением и не получили инструкций
по использованию устройства от лица, ответственного за их безопасность. Необходимо следить, чтобы дети не играли с радиатором.
3. ТЕХНИЧЕСКИЕ ХАРАКТЕРИСТИКИ
Технические характеристики маслонаполненного радиатора приведены в таблице 1.
Табл. 1
Модель
TOR 21.1206 BTX I 1200 5,45 6 315x275x625 6,0
TOR 21.1507 BTX I 1500 6,8 7 353x275x625 6,7
TOR 21.2009 BTX I 2000 9,1 9 429x275x625 8,1
TOR 21.2512 BTX I 2500 11,4 12 543x275x625 10,2
TOR 21.1206 HBX I 1200 5,45 6 315x275x625 6,0
TOR 21.1507 HBX I 1500 6,8 7 353x275x625 6,7
TOR 21.2009 HBX I 2000 9,1 9 429x275x625 8,1
TOR 21.2512 HBX I 2500 11,4 12 543x275x625 10,2
TOR 31.1706 EHX I 1700 7,7 6 323x275x625 7,4
TOR 31.2007 EHX I 2000 9,1 7 361x275x625 8,2
TOR 31.2509 EHX I 2500 11,4 9 437x275x625 9,8
TOR 31.3012 EHX I 3000 13,6 12 551x275x625 12,2
TOR 21.1006 SLX I 1000 4,5 6 277x280x625 5,6
Номинальная
потребляемая
мощность (Вт)
Номинальная
сила тока (А)
секций (шт)
Кол-во
Габаритные
размеры
прибора (мм)
~Вес нетто (кг)*
www.timberk.com • электрический маслонаполненный радиатор
9
Page 10

Модель
TOR 21.1507 SLX I 1500 6,8 7 315x275x625 6,3
TOR 21.1809 SLX I 1800 8,2 9 391x275x625 7,6
TOR 21.2212 SLX I 2200 10,0 12 505x275x625 9,5
TOR 21.1005 SLX Z 800 3,6 5 239x280x625 4,9
TOR 21.1507 SLX Z 1500 6,8 7 315x275x625 6,3
TOR 21.1809 SLX Z 1800 8,2 9 391x275x625 7,6
TOR 21.2211 SLX Z 2000 9,1 11 467х275х625 8,9
TOR 31.1606 QB 1600 7,3 6 315x275x625 6,6
TOR 31.1907 QB 1900 8,6 7 353x275x625 7,3
TOR 31.2409 QB 2400 10,9 9 429x275x625 8,7
TOR 31.2912 QB 2900 13,2 12 543x275x625 10,8
Номинальная
потребляемая
мощность (Вт)
Номинальная
сила тока (А)
Кол-во
секций (шт)
Габаритные
размеры
прибора (мм)
~Вес нетто (кг)*
Корректированный уровень звуковой мощности, Дб (для моделей
TOR 31... EHX I, TOP 31 ... QB): 58. Номинальное напряжение питания В/Гц: ~220/50
ВНИМАНИЕ!
Производитель оставляет за собой право для разных партий
поставок без предварительного уведомления изменять комплектующие части изделия (включая заливаемые \ засыпаемые
составляющие), не влияя при этом на основные технические параметры изделия или улучшая их, а также не нарушая изменениями принятые на территории страны производства \ транзита
\ реализации стандарты качества и нормы законодательства.
Это может повлечь за собой изменение веса и габаритов изделия, но не более чем на +\- 5-20% (могут отличаться для разного
вида изделий).
4. ОПИСАНИЕ ПРИБОРА
1. Ручка для переноски
2. Индикатор нагрева
3. Ручка термостата
4. Ручка переключателя мощности
5. Роликовые колесики для перемещения радиатора (входят в комплект поставки)
6. Выключатель ионизатора*
7. Ионизатор**
8. Лицевая панель прибора
9. Маслосодержащие секции радиатора
10. Встроенный тепловентилятор**
11. Выклычатель тепловентилятора**
12. Держатель сетевого шнура
1 1
2
3
4
TOR 21...SLX I
TOR 21...SLX Z
6
9
Рис. 1
* - кроме модели TOP 21 ... SLX Z, TOP 31 ... QB
** - только для серии TOP 21 ... EHX I, TOP 31 ... QB
7
6
9
8
5
1
2
3
4
10
8
12
5
TOR 21...BTX I
TOR 21...HBX I
TOR 31...EHX ITOR 31...QB I
2
3
4
6
7
8
9
12
5
1
3
2
6
4
7
11
9
10
8
12
5
10
www.timberk.com • электрический маслонаполненный радиатор
Page 11

5. КОМПЛЕКТ ПОСТАВКИ
1. Маслонаполненный радиатор - 1 шт
2. Роликовые колеса, в сборе - 2 шт
3. U-образная скоба - 2 шт
4. Барашковая гайка - 1 комплект
5. Руководство по эксплуатации - 1 шт
6. Гарантийный талон - 1 шт
7. Упаковка - 1 шт
ПРИМЕЧАНИЕ:
Для улучшения качества продукции, конструкция
и технические характеристики конвектора, а так
же его комплектация могут быть изменены производителем без предварительного уведомления.
-
6. СБОРКА И УСТАНОВКА
1. Выньте радиатор и роликовые колёса из упаковки и удалите весь
упаковочный материал.
2. Переверните радиатор вверх дном на коврике или мягкой поверхности, чтобы не повредить лакокрасочное покрытие.
3. Закрепите пластины колёс на нижнюю часть секций радиатора
при помощи прилагаемых U-образных скоб и барашковых гаек, пропустив U-образную скобу под соединительный межсекционный элемент и соединив скобу с пластиной колес.
4. Затяните барашковую гайку с одной стороны и барашковую гайку
с другой стороны в выступах струбцины.
5. Переверните радиатор обратно и поставьте вертикально.
Рис. 2 Рис. 3
ВНИМАНИЕ!
1. Включайте и эксплуатируйте прибор только в
вертикальном положении (с колесиками внизу, орга
нами управления вверху). Любое другое полежение
создает опасную ситуацию и приведет к выходу из
строя маслонаполненного радиатора или прочее
имущество и будет рассматриваться как негаран
тийный случай.
2. Не включайте радиатор, если роликовые колеса
не установлены.
-
-
7. ЭКСПЛУАТАЦИЯ ПРИБОРА
1. Внимательно прочитайте раздел «Важные меры предосторожности», если вы этого еще не сделали.
2. Подсоедините сетевой шнур прибора к электрической розетке, соблюдая все вышеперечисленные меры предосторожности. Помните,
что подсоединять прибор к электрической сети можно только при условии, что ручка переключателя мощности стоит в положении «OFF»
(выключено), т.е. ручка повернута до упора против часовой стрелки.
3. Желательно также повернуть ручку термостата до упора против
часовой стрелки. После этого вы можете подключить прибор к электросети.
www.timberk.com • электрический маслонаполненный радиатор
11
Page 12

4. Установите ручку перелючателя мощности в положение «I», «II» или
«III» (соответствует низкой, средней и максимальной мощности нагрева прибора). Помните, что чем выше мощность нагрева вы выбираете,
тем быстрее прибор будет нагревать воздух. Но при низкой мощности нагрева вы снижаете нагрузку на вашу электрическую сеть
5. После того, как вы выбрали желаемую мощность нагрева в соответствии с вашими индивидуальными предпочтениями, вы должны
выбрать желаемую температуру нагрева. помещения. Поворачивая
ручку термостата по часовой стрелке (из положения «MIN» в cторону
положения «MAX»), вы, таким образом, регулируете нужный вам температурный режим. С момента выбора температурного режима (при
условии активации того или иного режима мощности см. п. 4) маслонаполненный радиатор начнет нагрев.
6. В первые минуты нагрева радиатора вы можете почувствовать
легкий запах гари. Причиной может быть пыль на приборе; это скоро закончится. При желании вы можете провести предварительную
профилактическую чистку прибора, соблюдая правила, изложенные
в данном руководстве и соблюдая «Важные меры предосторожности»
7. Когда температура в помещении достигнет желаемого уровня,
медленно поверните ручку термостата против часовой стрелке (в направлении MIN). Вы услышите щелчок выключения термостата, лампочка на панели управления погаснет. Теперь температура в помещении будет поддерживаться на уровне, который вы выбрали.
8. Если вы захотите понизить температуру в помещении, то поверните ручку термостата против часовой стрелки. Также вы можете переключить мощность прибора на более низкую («I» или «II»)
9. Если вы захотите повысить температуру в помещении, то поверните ручку термостата по часовой стрелке (максимально возможное
положение «MAX»). Также вы можете переключить мощность прибора
на более высокую («II» или «III»)
10. Серия маслонаполненных радиаторов Timberk TOR 31...EHX I/ TOR
31...QB дополнительно оснащена встроенным тепловентилятором, который расположен на лицевой панели прибора. Чтобы ускорить обогрев
помещения, активируйте работу тепловентилятора, нажав выключатель
(может быть расположен как на лицевой панели прибора, так и сбоку
(слева) лицевой панели прибора в зависимости от серии прибора).
Включая кнопку тепловентилятора, вы должны выбрать позицию «ON
«(включено), при этом электропитание автоматически будет подаваться
как на мотор вентилятора, так и на встроенный нагревательный элемент. Если вы хотите выключить тепловентилятор, пожалуйста, нажмите на выключатель повторно, выбирая позицию «OFF» (выключено).
ВНИМАНИЕ!
Для нормальной работы прибора уровень напряжения в электросети должен быть достаточен в
строгом соответствии с указанными на приборе тех
ническими параметрами. Внимательно изучите техническую наклейку, а также все наклейки со специальными предупреждениями, которые расположены
на поверхности прибора.
-
8. ФУНКЦИЯ ИОНИЗАЦИИ ВОЗДУХА
Радиатор оснащён ионизатором воздуха.
Включение и выключение ионизатора производится клавишным вы-
ключателем, находящимся сбоку лицевой панели радиатора. Для
включения ионизатора переведите выключатель в положение „I”, при
этом загориться зеленый индикатор. Для выключения ионизатора
переведите выключатель в положение „O”, индикатор погаснет.
Ионизатор воздуха является полностью автономным устройством и
может работать, даже тогда, когда выключен режим нагрева прибора.
Принцип действия ионизатора в основном сводится к тому, что под
воздействием высокого напряжения, приложенного к металлическим
иглам с диаметром острия 5…10 микрометров происходит стекание
электронов-электрический эффлювий. Молекулы кислорода воздуха
захватывают эти электроны, приобретая отрицательный заряд и становятся отрицательными аэроионами (АИ):
Таким образом, обеспечивая образование в воздухе высокой концентрации легких отрицательных аэроионов (АИ) кислорода.
ИОНИЗАТОР предназначен для: оздоровления и профилактики
различных болезней, снижения утомляемости, повышения работоспособности и иммунитета, очистки воздуха от аэрозольных загрязнений, аллергенов и микроорганизмов , нейтрализации вредного влияния на человека работающих компьютеров, телевизоров , офисной
техники, восстановления биологической активности воздуха, поступающего в помещение через кондиционеры, фильтры, воздуховоды,
создания комфортной обстановки и хорошего настроения.
Кроме того, ионизаторы воздуха служат еще для очистки воздуха от:
табачного дыма, запахов , смол, пыли, цветочной пыльцы, спор расте-
12
www.timberk.com • электрический маслонаполненный радиатор
Page 13

ний, шерсти животных, вирусов и бактерий. Ионизатор воздуха поможет сохранить ваше здоровье, избежать инфекционных заболеваний,
аллергии и создаст комфортную атмосферу в доме и/или офисе.
Ионизатор в радиаторах Timberk выполняет следующие основные
функции:
•насыщает воздух отрицательными (АИ), делая его подобно лесному
•устраняет последствия электромагнитного излучения (компьюте-
ров, телевизоров и т.д.)
•низкая концентрация озона убивает вирусы, бактерии, грибки
•разлагает дым, угарный газ и запахи на безопасные химические со-
ставляющие
Используемый ионизатор воздуха соответствует действующим
СанПиН от 2003 года. Значения нормируемых показателей
концентраций аэроионов и коэффициента униполярности приведены
в таблице 2 (согласно СанПиН 2.2.4.1294-03):
Табл. 2
Нормируемые
показатели
Минимально
допустимые
Максимально
допустимые
Концентрация
n+(ион/см3)
N+>=400 n->=400 0,4=<Y=<1,0
n+<=50000 n-<=50000
Концентрация
n-(ион/см3)
Коэффициент
униполярности Y
9. ОБСЛУЖИВАНИЕ
1. Помните, что вы должны регулярно проводить чистку прибора для
удаления пыли с поверхности обогревательных секций. Пыль и загрязнения на поверхности прибора отрицательно влияет на эффективность работы прибора, запах горящей пыли может вызывать в некоторых случаях головную боль и тошноту, а также другие негативные
последствия для вашего здоровья. Также грязный прибор не может
работать 100% эффективно, температурные параметры обогрева помещения могут быть нарушены
2. Перед проведением профилактических работ по чистке прибора,
выключите прибор, отсоедините его от электрической сети (см. «Важные меры предосторожности») и дайте прибору остыть.
3. Протрите секции прибора и прочие поверхности мягкой, слегка
влажной тряпкой/куском ткани. Ткань не должна оставлять ворса на
поверхности прибора
4. Не рекомендуется использовать моющие средства, в том числе
средства с абразивными составами.
5. В процессе чистки, пожалуйста, не допускайте повреждения поверхности прибора острыми предметами (жесткая губка, наждачная
бумага и т.п.). Царапины на окрашенной поверхности могут привести
к образованию ржавчины.
6. Включайте и используйте прибор снова, только выполнив все
«Важные меры предосторожности»; также обязательно убедитесь,
что поверхность прибора абсолютно сухая.
ПРИМЕЧАНИЕ:
В приборах, укомплектованных ионизатором
воздуха, возможно накопление незначительного
статического электрического заряда на металли
ческих поверхностях корпуса.
Если ваша электрическая сеть не имеет заземля
ющего контура или если он повреждён, то в этом
случае существует небольшая вероятность элек
трического удара от статического напряжения.
-
-
-
ВНИМАНИЕ!
Изменение цвета секций не является дефектом, а служит следствием эксплуатации прибора в помещении с сильно загрязненным воздухом
10. УТИЛИЗАЦИЯ
По окончании срока службы тепловентилятор следует утилизировать
в соответствии с нормами, правилами и способами, действующими в
месте утилизации. Подробную информацию по утилизации тепловентилятора Вы можете получить у представителя местного органа власти.
www.timberk.com • электрический маслонаполненный радиатор
13
Page 14

11. УСТРАНЕНИЕ НЕИСПРАВНОСТЕЙ
Возможные неисправности и методы их устранения:
Неисправность Причина Способ устранения
1. Обогреватель плохо греет
2. Обогреватель не работает
1. Неисправен нагревательный элемент
2. Низкое напряжение в электросети 2. Проверить напряжение в электросети
1. Отсутствует напряжение в электросети
2. Обрыв электрического кабеля
3. Неисправен автоматический выключа
тель электрической сети
4. Обрыв в цепи нагревательного
элемента
1. Обратиться в авторизованный сервис
ный центр «Timberk»
1. Проверить наличие напряжения в
электросети
2. Проверить целостность электриче
ского кабеля и при необходимости
заменить его
3. Проверить работоспособность автома-
-
тического выключателя электрической
сети и при необходимости неисправный выключатель заменить
4. Обратиться в авторизованный сервис
ный центр «Timberk»
-
-
-
Если неисправность не удается устранить в соответствии с рекомендациями или при возникновении других неисправностей обратитесь в
авторизованный сервисный центр Timberk.
12. ТРАНСПОРТИРОВКА И ХРАНЕНИЕ
1. Прибор в упаковке изготовителя можно транспортировать на любое расстояние всеми видами закрытого транспорта при температуре от -50
температуре воздуха +25
грузов, действующих на данном виде транспорта.
2. При транспортировании должны быть исключены любые возможные удары и перемещения упаковки внутри транспортного средства.
3. Упакованный прибор должен храниться в крытых вентилируемых помещениях при температуре воздуха -10
ной влажности до 80% (при температуре воздуха +25
не должно быть агрессивных примесей, вызывающих коррозию.
4. При транпортировки и хранении должны строго соблюдаться требования манипуляционных знаков на упаковке прибора.
0
С до +50 0С и относительной влажности до 80% (при
0
С) в соответствии с правилами перевозки
0
С до +50 0С при относитель-
0
С). В помещении
Температурные
требования*
Требования к
влажности*
Транспортировка
и хранение
От -30° до +50°
От 15% до 85%
(нет конденсата)
Мы изучаем новые технологии и постоянно улучшаем качество нашей
продукции. Технические характеристики, конструкция и комплектация могут быть изменены без предварительного уведомления.
* Продукция должна храниться в сухих, проветриваемых складских помещениях при
температуре не ниже -30°
14
www.timberk.com • электрический маслонаполненный радиатор
Page 15

13. ИНФОРМАЦИЯ О СЕРТИФИКАЦИИ
Изделие соответствует директиве EEC 89/336, касающейся
электромагнитного оборудования
Гарантируется безотказная работа изделия в соответствии со сроками, указанными в гарантийном талоне. Обязательно ознакомьтесь с
условиями гарантии и требуйте от продавца правильного и четкого
заполнения гарантийного талона.
Гарантийный талон вложен в упаковку изделия
Timberk снимает с себя любую ответственность за возможный вред,
прямо или косвенно нанесенный продукцией Timberk людям, домашним животным, имуществу в случае, если это произошло в результате
несоблюдения правил и условий эксплуатации, установки изделия,
умышленных или неосторожных действий потребителя или третьих
лиц.
Изготовитель:
«Тимберк Хоум Хиатинг Эпплаенсис Компани» Хамасгер стрит, 10, Эйлат, Израиль 88000
Телефон/факс +972-8-637-88-311
Импортёр*:
ООО «КлиматКомфорт»
Адрес: РФ, 111024, г. Москва, ул. 5-я Кабельная, д.2Б, стр. 1
телефон: +7 499 653 7356
По вопросам сервисной поддержки приобретённого товара
просьба обращаться:
ООО «Авангард Холго»
Адрес: РФ, 125195, г. Москва, Ленинградское шоссе, д. 57, стр.12
Телефон: +7 495 627 52 85
Товар сертифицирован на территории России органом по сертификации: рег. № РОСС RU.0001.11AB71
ПРОДУКЦИИ ООО «ОПТИМАТЕСТ».
Фактический адрес: 123308, г. Москва, ул. Мневники, д. 3, корп. 1, оф.
323; Юридический адрес: 115162, г. Москва, Павла Андреева ул., дом
№28, корпус 4, тел. +7 495 6044266, факс +7 495 6044266
Орган по сертификации может обновляться ежегодно. При отсутствии
копии нового сертификата в коробке, спрашивайте копию у продавца
Товар соответствует требованиям нормативных документов:
ГОСТ Р 52161.2.30-2007
ГОСТ Р 51318.14.1-2006 р.4
ГОСТ Р 51318.14.2-2006 р.5,7
ГОСТ Р 51317.3.3-2008
ГОСТ Р 51317.3.2-2006 р.6,7
№ сертификата: TCRU C-IL.AB71.B.00074
Сертификат обновляется ежегодно. При отсутствии копии нового сер-
тификата в коробке, спрашивайте копию у продавца
Срок действия: с 25.06.2012 до 24.06.2015
Серийный номер изделия, месяц и год изготовления указаны в составе ID LINE кода изделия, наклеенного на изделие и\или упаковку
изделия. Месяц и последние цифры года внутри кода расположены
после знака тире в указанном порядке.
* Данные могут быть изменены в связи со сменой производителя, продавца, производственного филиала и\или импортера в РФ и\или страны ЕТС. Актуальную информация
Вы можете получить из содержания действующего на момент продажи сертификата
соответствия, а также из данных этикетки, которой маркируется упаковка изделия до
даты последующей продажи дистрибьютором на территории РФ или стран ЕТС.
www.timberk.com • электрический маслонаполненный радиатор
15
Page 16

www.btpart.ru
Уважаемый покупатель!
Timberk предоставляет Вам специальный сервис в рамках программы
клиентской поддержки. Теперь Вы всегда сможете заказать и оформить доставку на запасные части и расходные материалы, необходимые для оптимальной, качественной работы техники Timberk в течение всего срока службы на едином портале www.btpart.ru.
Всю информацию о работе портала Вы также всегда сможете увидеть
на сайте www.timberk.com. Мы искренне надеемся, что этот уникальный дополнительный сервис поможет вам сделать жизнь с Timberk
еще удобнее!
16
www.timberk.com • электрический маслонаполненный радиатор
Page 17

В целях информирования покупателей техники Timberk, мы дополнительно сообщаем, что русский
является государственным языком
в следующих государствах:
•вРоссийскойФедерации
•вРеспубликеБеларусь
наряду с белорусским языком
•вчастичнопризнанной
Южной Осетии наряду
с осетинским языком
Русский язык является официальным языком (во всех случаях
другой язык или другие языки
выступают как государственный
или второй официальный) в следующих государствах и на территориях:
•вРеспубликеКазахстан
•вКиргизскойРеспублике
•вадминистративных
единицах Украины, где доля
носителей русского языка
cоставляет более 10%, при
соответствующем решении
местных советов
•вАвтономнойРеспублике
Крым
В Республике Таджикистан русский язык признан по Конституции
языком межнационального общения.
Официальным языком
международной организации
Содружество Независимых
Государств (СНГ) является
русский язык.
www.timberk.com • электрический маслонаполненный радиатор
17
Page 18

Если вы заметили ошибку в инструкции, пожалуйста, сообщите нам
об этом, связавшись с нами по электронной почте, указанной на
сайте www.timberk.com
If you found any mistake in this manual please let us know by email listed
on www.timberk.com
18
www.timberk.com • электрический маслонаполненный радиатор
Page 19

www.timberk.com • электрический маслонаполненный радиатор
19
Page 20

www.timberk.com
 Loading...