

Page 1
Instruction manual
Руководство по эксплуатации
Электрический
осушитель для изме-
нения
влажности воздуха
Модели/Models:
Electric dehumidifier
DH TIM 30 E9
DH TIM 40 E9
DH TIM 50 E9
Руководство по эксплуатации включает в себя гарантийный талон
Outlook of devices, aslo colour scores can be revised without any
special advance notices.
Производитель вправе менять внешний вид прибора и цветовую гамму прибора без специального уведомления.
Page 2

CONTENTS
1. Important information .......................................................................2
2. Safeguards .......................................................................................3
3. Specifications ................................................................................... 3
4. Appliance description .......................................................................4
5. Delivery set ....................................................................................... 5
6. Appliance control ..............................................................................5
7. Maintenance ..................................................................................... 7
8. Troubleshooting ................................................................................ 9
9. Transportatiom and storage .............................................................. 10
10. Service life ...................................................................................... 10
11. Utilization rules................................................................................10
Dear customer!
We thank you for your happy choice and buying of a electric
dehumidifier TIMBERK. It will serve you for a long time.
Is intended for dehydration of air in domestic premises
1. IMPORTANT INFORMATION
Is intended for dehydration of air in domestic premises
the appliance is designed for air cooling in domestic
premises. The manufacturer reserves the right to
introduce changes in design, configuration and
processing of the article with a view to improve its
properties without any prior notification of customers.
There may be some misprints in text and digital
notations of the present manual. If after reading of
this manual you have any questions concerning work
and operation of the appliance, please, refer to a shop
assistant or to a specialized service center for further
explanations.
The article has a label with all the needed technical
data and other useful information about the appliance.
Use the appliance only for its intended purpose
indicated in this manual.
2
www.timberk.com • Electric drier for changing of air humidity
Page 3
2. SAFEGUARDS
3. SPECIFICATIONS
1. DON’T CLOSE VENTS! Make sure that vent inlet and outlet are free.
2. Don’t insert foreign objects in air-outlet grille of the drier. It is very
dangerous, since the fan revolves at high speed.
3. Install the appliance only on a horizontal surface to avoid water leakage.
4. Don’t install the appliance in the following locations:
- where it is exposed to direct sunlight;
- near sources of open flame;
- near other working heating appliances;
- where the appliance may be exposed to water splashes or steam.
5. Don’t use the appliance in explosive or corrosive environment. Don’t
keep petrol and other volatile flammable liquids near the drier – it’s very
dangerous!
6. Don’t use the appliance only for drying (reducing of humidity level) of air
in domestic premises.
7. Clean the filter occasionally to ensure efficient work of the appliance.
8. To ensure reliable work of the compressor, don’t incline the appliance.
9. To avoid electric shock, a damaged power cord should be replaced only
in authorized service centers by qualified specialists.
10. Connect the appliance only to 220-230V~50Hz network. If needed,
find out characteristics of your network from power suppliers
Specifications are shown in table below.
Model DH TIM 30 E9 DH TIM 40 E9 DH TIM 50 E9
Capacity of draining (L/d) 30 40 50
Water tank volume (L) 3 6 6
Rated power consumption (W) 465 560 775
Power supply, V/Hz 220~/50 220~/50 220~/50
Rated power current (A) 2,5 2,7 3,6
3
Air circulation m
Noise level dB(A) 54/52 52/51 52/51
Refrigerant R410A R410A R410A
Electrical protection class I class I class I class
Degree of protection against
moisture
Filling of Freon, g 220 190 290
Operating temperature range:
Net weight (kg) 15,3 18,1 19,8
Gross weight (kg) 16,4 19,5 21,2
Net dimensions (mm) 386x260x500 392x282x616 392x282x616
Packing dimensions (mm) 420x297x537 427x327x657 427x327x657
/h 210/180 345/320 345/320
IPX0 IPX0 IPX0
° C
5-35 5-35 5-35
www.timberk.com • Electric drier for changing of air humidity
3
Page 4

4. APPLIANCE DESCRIPTION
Identification of parts
Front Rear
Fig. 3.
Accessories:(placed in the water bucket of the unit)
Fig. 1.
1. Control panel
2. Panel
3. Water bucket
4. Water level window
5. Handle (both sides)
Fig. 2.
1. Continuous drain hose outlet
2. Caster
3. Power Cord and plug
4. Power cord buckle (placed in
the water bucket, used only when
storing the unit. Installed as shown
Fig.3a))
5. Pump drain hose outlet(some
models without)
6. Air outlet grille
7. Air filter
NOTE:
All the pictures in the manual are for explanation
purposes only.Your unit may be slightly different.The
actual shape shall prevail.The operations and functions
are the same.
4
www.timberk.com • Electric drier for changing of air humidity
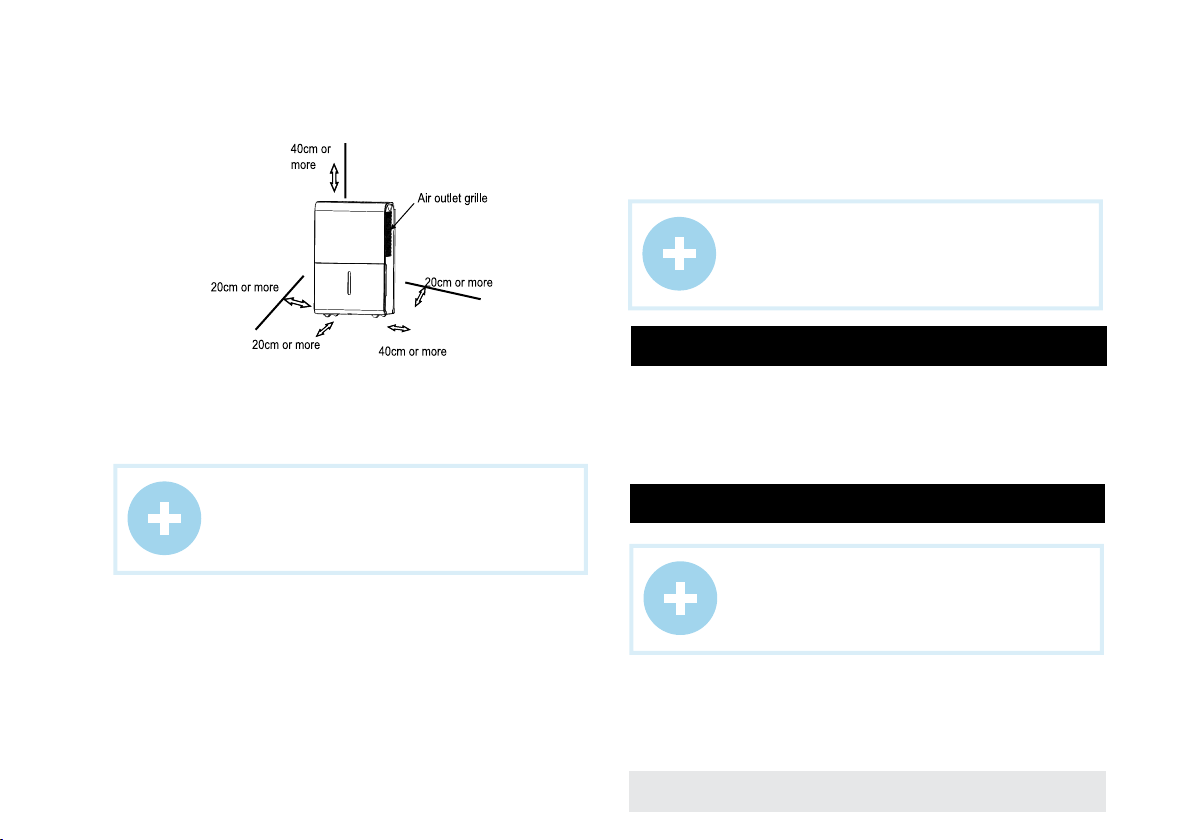
Fig. 4.
Positioning the unit
A dehumidifier operating in a basement will have little or no effect in
drying an adjacent enclosed storage area, such as a closet, unless here is
adequate circulation of air in and out of the area.
• Do not use outdoors.
• This dehumidifer is intended for indoor residential applications only. This
dehumidifier should not be used for commercial or industrial applications.
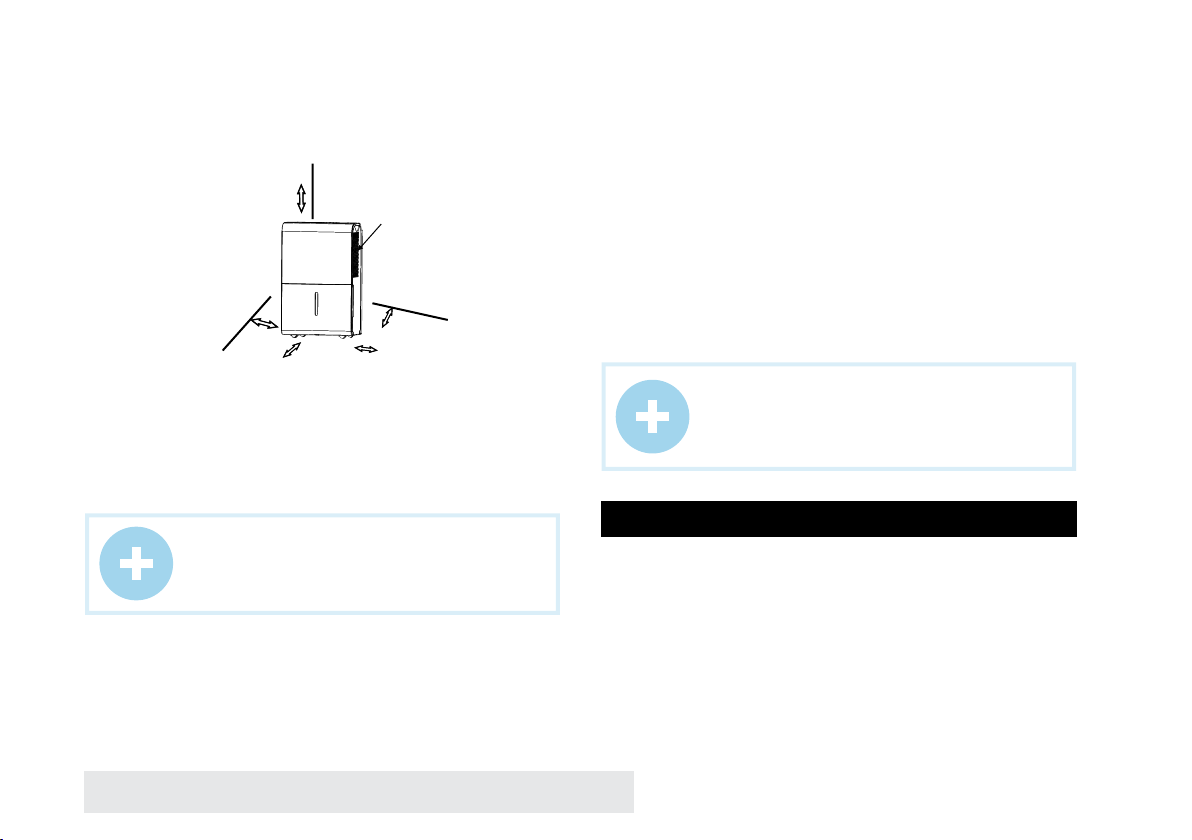
• Place the dehumidifier on a smooth, level floor strong enough to support
the unit with a full bucket of water.
• Allow at least 20cm of air space on all sides of the unit for good air
circulation.
• Place the unit in an area where the temperature will not fall below
O
C(41OF). The coils can become covered with frost at temperatures below
5
O
C(41OF), which may reduce performance.
5
• Place the unit away from the clothes dryer, heater or radiator.
• Use the unit to prevent moisture damage anywhere books or valuables
are stored.
Page 5
• Use the dehumidifier in a basement to help prevent moisture damage.
• The dehumidifier must be operated in an enclosed area to be most
effective.
• Close all doors, windows and other outside openings to the room.
• Do not connect the dehumidifier to a multiple socket outlet, which is
also being used for other electrical appliances.
• Select a suitable location, making sure you have easy access to an
electrical outlet.
• Plug the unit into a electrical socket-outlet with earth connection.
• Make sure the Water bucket is correctly fitted otherwise the unit will
not operate properly.
NOTE:
When the water in the bucket reaches to a certain
level,please be careful to move the machine to avoid it
falling down.
Fig. 5.
Casters(Install at four points on the bottom of unit)
• Casters can only move laterally.
• Do not force casters to move over carpet, nor move the unit with water
in the bucket. (The unit may tip over and spill water.)
NOTE:
Casters is optional,some models without.
When using the unit
• When first using the dehumidifier, operate the unit continuously 24
hours. Make sure the plastic cover on the continuous drain hose outlet
install stightly properly so there are no leaks.
• This unit is designed to operate with a working environment between
O
C/41OF and 35OC/95OF.
5
• If the unit has been switched off and needs to beswitched on again
quickly, allow approximately three minutes for the correct operation to
resume.
5. DELIVERY SET
Completed set of the appliance:
Appliance (air drier) - 1 piece
Appliance packing - 1 piece
User manual and Guarantee slip -1 piece
6. APPLIANCE CONTROL
NOTE:
The control panel of the unit you purchased may be
slightly different according to the models.
www.timberk.com • Electric drier for changing of air humidity
5
Page 6

Fig. 5.
Indicator lights
When you push the button to change operation modes, the unit will make
a beep sound to indicate that it is changing modes.
1. COMFORT Pad (optional)
Press to activate the comfort dehumidifying operation.
NOTE:
On this operation,the unit can not be set humidity level.
2. FILTER Pad
The check filter feature is a reminder to clean the Air Filter for more
efficient operation. The Filter light(Clean filter l ight) will illuminate after
250 hours of operation. To reset after cleaning the filter, press the Filter
pad and the light will go off.
3. CONTINUE Pad
Press to activate the continuous dehumidifying operation.
4. TURBO Pad
Control the fan speed. Press to select either High or Normal fan speed.
Set the fan control to High for maximum moisture removal. When the
humidity has been reduced and quiet operation is preferred, set the fan
control to Normal.
5. Timer Pad
Press to initiate the Auto start and Auto stop feature, in conjuction with
the and key pads.
6. « » / « »: Up/Down Pads
• Humidity Set Control Pads
The humidity level can be set within a range of 35%RH(Relative Humidity)
to 85%RH(Relative Humidity) in 5% increments.
For drier air, press the «
For damper air, press the «
• TIMER Set Control Pads
Use the Up/Down pads to set the Auto start and Auto stop time from
0.0 to 24.
7. Power Pad
Press to turn the dehumidifier on and off.
8. Display
Shows the set % humidity level from 35% to 85% or auto start/stop
time (0~24) while setting, then shows the actual ( ± 5% accuracy) room
% humidity level in a range of RH(Relative Humidity) to 90%RH(Relative
Humidity).
Error Codes and Protection Code:
AS- Humidity sensor error – Unplug the unit and plug it back in. If error
repeats, call for service.
ES- Tube Temperature sensor of the evaporator error-- Unplug the unit
and plug it back in. If error repeats, call for service.
P2- Bucket is full or bucket is not in right position-- Empty the bucket
and replace it in the right position.(only available for the uint with no
pump feature.)
P2- Bucket is full – Empty the bucket.(only available for the unit with
pump feature.) 30%
EC- Refrigerant leakage detection – With this new technology, the
display area will appear EC when the unit detects refrigerant leakage
,call for service.
E3- Unit malfunction – Unplug the unit and plug it back in. If error
repeats, call for service.
Eb- Bucket is removed or not in right position-- Replace the bucket in
the right position.(only available for the unit with pump feature.)
» pad and set to a lower percent value(%).
» pad and set a higher percent value(%).
6
www.timberk.com • Electric drier for changing of air humidity
Page 7
Other features
Bucket Full Light
Glows when the bucket is ready to be emptied, or when the bucket is
removed or not replaced in the proper position.
Auto Shut OFF
The dehumidifier huts off when the bucket is full, or when the bucket is
removed or not replaced in the proper position.When the setting humidity
is reached, the unit will be shut off automatically. For some models,the fan
motor will continue operating.
Auto Defrost
When frost builds up on the evaporator coils, the compressor will cycle off
and the fan will continue to run until the frost disappears.
Wait 3 minutes before resuming operation
After the unit has stopped, it can not be restart opertation in the first 3
minutes. This is to protect the unit. Operation will automatically start after
3 minutes.
Check filter feature
The system starts to count the time once the fan motor operates. The
check filter feature can be only activated when the accumulated operation
time achieves 250 hours or more. The Reset light(Clean filter indicator light)
flashes at one time per second, after finishing clean the air filter, press the
Filter pad and the Reset light(Clean filter indicator light) goes off.
Auto-Restart(on some models)
If the unit breaks off unexpectedly due to the power cut, it will restart with
the previous function setting automatically when the power resumes.
Setting the Timer
• When the unit is on, first press the Timer button, the Timer Off indicator
light illuminates. It indicates the Auto Stop program is initiated. Press it
again the Time On indecator light illuminates.It indicates the Auto Start is
initiated.
• When the unit is off, first press the Timer button, the TIMER ON indicator
light illuminates. It indicates the Auto Start program is initiated. Press it
again the Time Off indecator light illuminates.It indicates the Auto Stop is
initiated.
• Press or hold the UP or DOWN pad to change the Auto time by 0.5 hour
increments, up to 10 hours, then at 1 hour increments up to 24 hours. The
control will count down the time remaining until start.
• The selected time will register in 5 seconds and the system will
automatically revert back to display the previous humidity setting.
• When the Auto start & Auto stop times are set, within the same program
sequence, TIMER ON OFF indicator lights illuminate identifying both ON
and OFF times are now programmed.
• Turning the unit ON or OFF at any time or adjusting the timer setting to
0.0 will cancel the Auto Start/Stop function.
• When LED display window displays the code of P2, the Auto Start/Stop
function will also be cancelled.
7. MAINTENANCE
There are two ways to remove collected water.
1. Use the bucket
• When the unit is off,if the bucket is full, the Full indicator light will light.
• When the unit is on,if the bucket is full, the compressor and the fan turn
off, and the Full indicator light will light, the digital display shows P2.
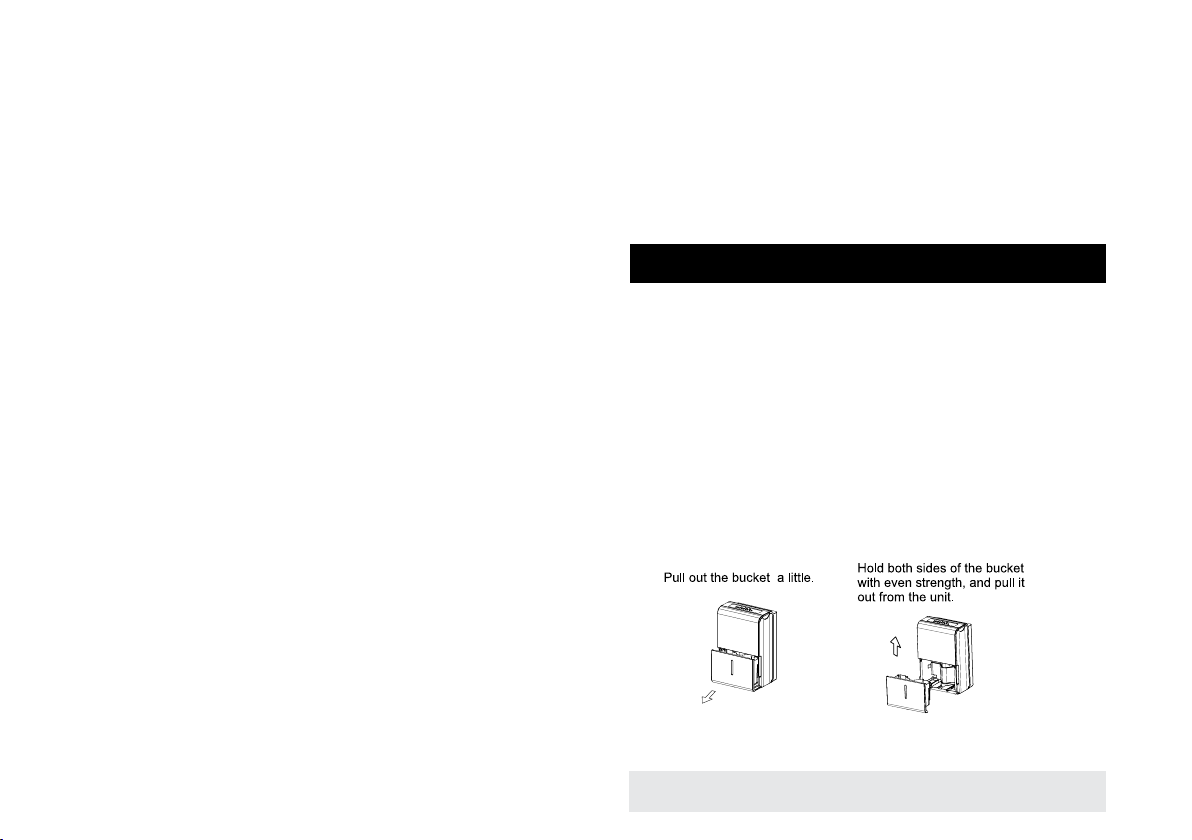
• Slowly pull out the bucket. Grip the left and right handles securely, and
carefully pull out straight so water does not spill. Do not put the bucket
on the floor because the bottom of the bucket is uneven. Otherwise the
bucket will fall and cause the water to spill.
• Throw away the water and replace the bucket. The bucket must be in
right place and securely seated for the dehumidifier to operate.
• The machine will re-start when the bucket is restored in its correct position.
Fig. 6
www.timberk.com • Electric drier for changing of air humidity
7
Page 8

NOTE:
• When you remove the bucket, do not touch any parts
inside of the unit. Doing so may damage the product. Be
sure to push the bucket gently all the way into the unit.
Banging the bucket against anything or failing to push it
in securely may cause the unit not to operate.
• If the pump hose drops when you remove the bucket
(see Fig.7),you must reinstall the pump hose properly
to the unit before replace the bucket into the unit (see
Fig.8).
• When you remove the bucket,if there is some water in
the unit you must dry it.
• When the unit is on, if the bucket is removed, the
compressor and the fan turn off, then the unit will beep
8 times and the digital display shows Eb.
• When the unit is off, if the bucket is removed, the unit
will beep 8 times and the digital display shows Eb.
2. Continuous draining
• Water can be automatically emptied into a floor drain by attaching the
unit with a water hose (Id≥ 5/16 , not included) with a female threaded end
(ID:M=1 , not included) 8
• Remove the plastic cover from the back drain outlet of the unit and set
aside, then insert the drain hose through the drain outlet of the unit and
lead the drain hose to the floor drain or a suitable drainage facility. (See.
Fig.9 and Fig.10)
• When you remove the plastic cover, if there is some water in the back
drain outlet of the unit you must dry it. Make sure the hose is secure so
there are no leaks and the end of the hose is level or down to let the water
flow smoothly.
• Direct the hose toward the drain,making sure that there are no kinks that
will stop the warter flowing.
• Select the desired humidity setting and fan speed on the unit for
continuous draining to start.
NOTE:
When the continuous drain feature is not being used,
remove the drain hose from the outlet and attach the
rubber plug back to the drain outlet.
Fig. 7
Fig. 8
8
www.timberk.com • Electric drier for changing of air humidity
Care and cleaning of the dehumidifier
Turn the dehumidifier off and remove the plug from the wall outlet before
cleaning.
1. Clean the Grille and Case
• Use water and a mild detergent. Do not use bleach or abrasives.
• Do not splash water directly onto the main unit. Doing so may cause an
electrical shock, cause the insulation to deteriorate, or cause the unit to rust.
• The air intake and outlet grilles get soiled easily, so use a vacuum
attachment or brush to clean.
2. Clean the bucket
Every few weeks, clean the bucket to prevent growth of mold, mildew
and bacteria. Partially fill the bucket with clean water and add a little mild
detergent. Swish it around in the bucket, empty and rinse.
Page 9
NOTE:
Do not use a dishwasher to clean the bucket. After
clean, the bucket must be in place and securely seated
for the dehumidifier to operate.
3. Clean the air filter
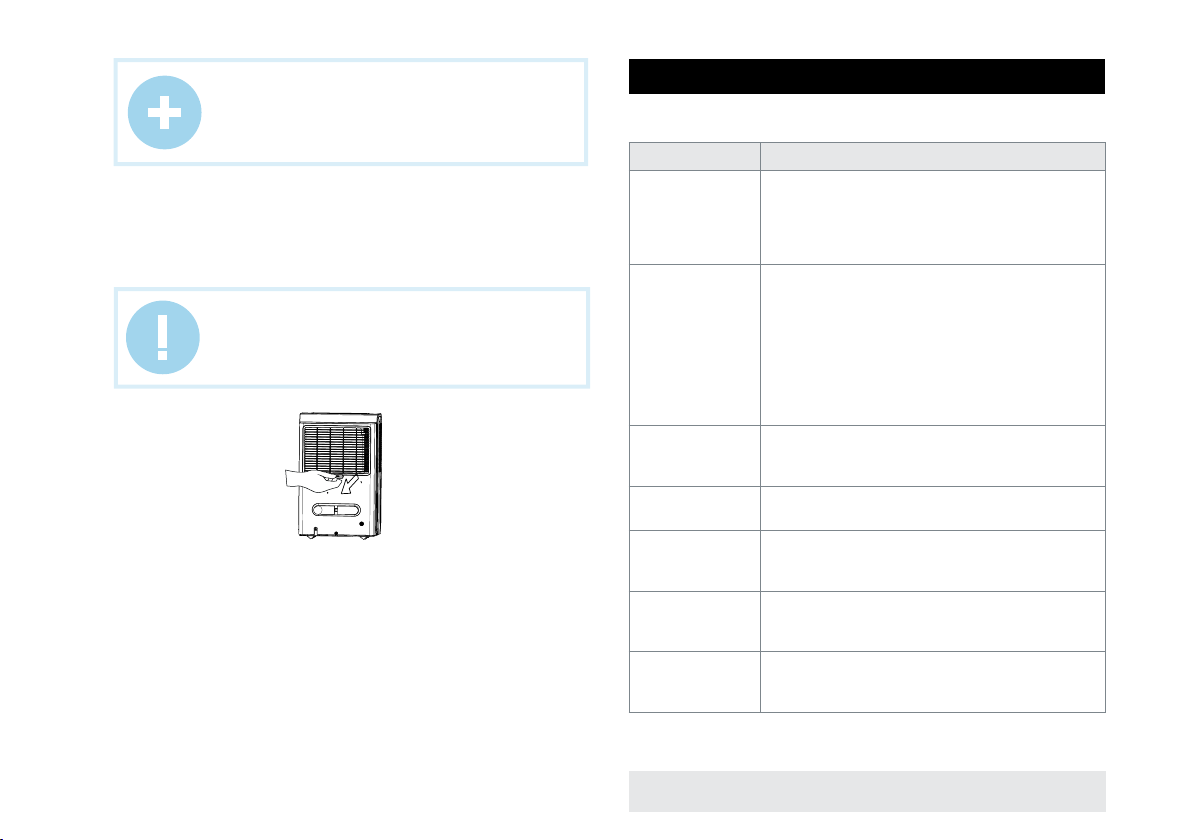
• Remove the filter every two weeks based on normal operating conditions.
• To remove the filter, pull filter outwards (See Fig.14).
• Wash the filter with clean water then dry.
• Re-install the filter,replace Bucket.
CAUTION!
DO NOT operate the dehumidifier without a filter
because dirt and lint will clog it and reduce performance.
Fig. 11
4. When not using the unit for long time periods
• After turning off the unit, wait one day before emptying the tank.
• Clean the main unit, bucket and air filter.
• Wrap the cord and bundle it with the band (see Fig.8).
• Cover the unit with a plastic bag.
• Store the unit upright in a dry, well-ventilated place.
8. TROUBLESHOOTING
Before calling for service, review the chart below first yourself.
Problem What to check
• Make sure the dehumidifier s plug is pushed completely into
Unit does not start
Dehumidifier does
not dry the air as it
should
The unit makes a
loud noise when
operating
Frost appears on the
coils
Water on floor
ES, AS,P2,EC ,Eb
and E3 appear in the
display
The pump operation
on light blinks at 1Hz
the outlet.
• Check the house fuse/circuit breaker box.
• Dehumidifier has reached its preset level or bucket is full.
• Water bucket is not in the proper position.
• Did not allow enough time to remove the moisture.
• Make sure there are no curtains, blinds or furniture blocking
the front or back of the dehumidifier.
• The humidity selector may not be set low enough.
• Check that all doors, windows and other openings are
securely closed.
• Room temperature is too low, below 5 C(41 F).
• There is a kerosene heater or something giving off water
vapor in the room.
• The air filter is clogged.
• The unit is tilted instead of upright as it should be.
• The floor surface is not level.
This is normal. The dehumidifier has Auto defrost feature.
• Hose to connector or hose connection may be loose.
• Intend to use the bucket to collect water, but the back drain
plug is removed.
These are error codes and protection code. See the CONTROL
PADS ON THE DEHUMIDIFIER section.
Clean the filter of the pump.
Check the pump hose does not link or block.
Empty the water of the bucket.
www.timberk.com • Electric drier for changing of air humidity
9
Page 10

9. TRANSPORTATIOM AND STORAGE
Temperature
requirements*
Humidity
requirements*
We are exploring new technologies and we constantly improving the
quality of our products. That’s why specifications, design and accessories
are subject to change without any specific notice.
* This product must have storage in dry, well-ventilated space of warehouse at the
temperature not lower than -30°
Transportation and
storage
From -30° to +50°
From 15% to 85%
(without a condensate)
10.SERVICE LIFE
Service life of the appliance is 10 years provided that the respective
installation and operation rules are observed.
Date of the conditioner manufacture is shown in a serial number of the
device. For more details, please, ask a shop assistant.
11. UTILIZATION RULES
Upon expiration of the service life, the appliance should be utilized in
accordance with norms, regulations and procedures effective in the
place of utilization.
10
www.timberk.com • Electric drier for changing of air humidity
Page 11

СОДЕРЖАНИЕ*
1. Важная информация ...................................................................... 11
2. Меры предосторожности ...............................................................12
3. Технические характеристики .........................................................12
4. Описание прибора .......................................................................... 13
5. Комплект поставки .........................................................................14
6. Управление прибором ....................................................................15
7. Обслуживание ................................................................................15
8. Устранение неисправностей ..........................................................19
9. Гарантийный талон .........................................................................20
Уважаемый покупатель!
Благодарим Вас за удачный выбор и приобретение осушителя воздуха TIMBERK.
Он прослужит Вам долго.
Электрический осушитель воздуха предназначен для осу-
шения воздуха в бытовых помещениях.
Просим вас внимательно ознакомиться с руководством по
эксплуатации перед тем, как вы начнете эксплуатацию изделия.
1. ВАЖНАЯ ИНФОРМАЦИЯ
Прибор предназначен для осушения воздуха в бытовых помещениях.
Производитель оставляет за собой право без предварительного уве-
домления покупателя вносить изменения в конструкцию, комплектацию или технологию изготовления изделия с целью улучшения его
свойств. В тексте и цифровых обозначениях данного руководства
могут быть допущены опечатки.
Если после прочтения руководства у Вас останутся вопросы по работе и эксплуатации прибора, обратитесь к продавцу или в специализированный сервисный центр для получения разъяснений.
ВНИМАНИЕ!
На изделии присутствует этикетка, на которой указаны все необходимые технические данные и другая полезная информация о приборе. Используйте
прибор только по назначению, указанному в данном руководстве.
* Руководство по эксплуатации дополнено приложением №1, которое является
неотъемлемой частью Руководства по эксплуатации.
www.timberk.сom • электрический осушитель для изменения влажности воздуха
11
Page 12

2. МЕРЫ ПРЕДОСТОРОЖНОСТИ
3. ТЕХНИЧЕСКИЕ ХАРАКТЕРИСТИКИ
1.НЕ ЗАКРЫВАЙТЕ ВЕНТИЛЯЦИОННЫЕ ОТВЕРСТИЯ! Убедитесь, что
входное и выходное вентиляционное отверстие свободно.
2. Не засовывайте посторонние предметы в воздуховыпускную решетку осушителя. Это очень опасно, т.к. вентилятор вращается с высокой скоростью.
3. Устанавливайте устройство только на горизонтальную поверхность
во избежание утечки воды.
4. Не устанавливайте прибор в следующих местах:
- в местах воздействия прямых солнечных лучей;
- вблизи источников открытого пламени;
- вблизи других работающих нагревательных приборов;
- в местах, где возможно попадание брызг воды или пара на прибор.
5. Не используйте устройство во взрывоопасной или коррозионной
среде. Не храните рядом с осушителем бензин и другие летучие легковоспламеняющиеся жидкости это очень опасно!
6. Используйте устройство только для осушения (снижения уровня
влажности) воздуха в бытовом помещении.
7. Периодически очищайте фильтр для обеспечения эффективной
работы устройства.
8. Для обеспечения надежной работы компрессора не наклоняйте
прибор.
9. Во избежание опасности поражения электрическим током, поврежденный силовой шнур должен заменяться авторизованным сервисным центром, квалифицированными специалистами.
10. Подключайте прибор только к сети 220-230~ В / 50 Гц. При необходимости выясните характеристики своей сети у поставщиков
электроэнергии.
Технические характеристики приведены в таблице ниже.
Модель DH TIM 30 E9 DH TIM 40 E9 DH TIM 50 E9
Производительность по
осушению (л/сут)
Объем бака (л) 3 6 6
Номинальная потребляемая
мощность (Вт)
Параметры электропитания
Номинальная сила тока (А) 2,5 2,7 3,6
Заправочный вес фреона, г 220 190 290
Размеры в упаковке (мм) 420x297x537 427x327x657 427x327x657
В/Гц
3
Расход воздуха м
Уровень шума Дб (А) 54/52 52/51 52/51
Тип фреона R410A R410A R410A
Класс электрозащиты I class I class I class
Степень защиты от влаги IPX0 IPX0 IPX0
Диапазон рабочих
температур: °С
Вес нетто (кг) 15,3 18,1 19,8
Вес брутто (кг) 16,4 19,5 21,2
Размеры прибора (мм) 386x260x500 392x282x616 392x282x616
/ч 210/180 345/320 345/320
30 40 50
465 560 775
220~/50 220~/50 220~/50
5-35 5-35 5-35
12
www.timberk.сom • электрический осушитель для изменения влажности воздуха
Page 13

4. ОПИСАНИЕ ПРИБОРА
Вид спереди Вид сзади
Рис. 1
1. Панель управления
2. Панель
3. Емкость для воды
4. Окно уровня воды
5. Ручка (с обеих сторон)
ПРИМЕЧАНИЕ:
Все рисунки в руководстве приведены исключительно в пояснительных целях. Действительный вид
приобретенного Вами устройства может слегка от
личаться, однако принципы работы и функции остаются теми же.
Рис. 2
1. Отверстие для шланга для
непрерывного слива
2. Колесо
3. Шнур питания и вилка
4. Стяжка для шнура питания
(устанавливается в емкость для
воды, используется только при
хранении устройства. Устанавливается, как показано на Рис. 3).
5. Отверстие для сливного
шланга насоса (отсутствует на
некоторых моделях)
6. Воздуховыпускная решетка
7. Воздушный фильтр
Вставьте стяжку для шнура
Рис. 3
питания в устройство.
Принадлежности: (размещаются в емкости устройства для воды)
сливной шланг насоса (1 шт.)
(только для устройства с насосом)
стяжка для шнура питания (1 шт.)
Рис. 4
Размещение устройства
Осушитель воздуха, работающий в подвале, будет малоэффективен
или не эффективен вообще для осушения смежной огороженной
зоны хранения, как например, кладовая, если только в зону и из нее
не осуществляется соответствующая циркуляция воздуха.
• Не использовать вне помещения.
• Этот осушитель воздуха предназначен только для использования
в жилых помещениях. Его не следует использовать в коммерческих
или промышленных помещениях.
• Поместите осушитель воздуха на гладкую, ровную поверхность,
достаточно прочную для обеспечения опоры устройства с полной
емкостью для воды.
• Для обеспечения хорошей циркуляции воздуха со всех сторон
устройства должно иметься, по крайней мере, по 20 см свободного
-
пространства (по крайней мере, 40 см свободного пространства со
стороны воздуховыпускной решетки).
• Поместите устройство в месте, где температура не падает ниже
www.timberk.сom • электрический осушитель для изменения влажности воздуха
13
Page 14
5°С (41°F). ). Теплообменники могут покрыться наледью при температурах ниже 5°С (41°F), что может привести к снижению производительности.
• Разместите устройство вдали от сушилки для одежды, нагревателя
или батареи.
40 см и более
воздуховыпускная
решетка
20 см или более
20 см или более
При эксплуатации устройства
• Это устройство предназначено для эксплуатации в рабочих условиях
с температурой от 5°С (41°F) до 35°С (95°F).
• Если устройство было выключено и требуется его снова включить,
подождите приблизительно три минуты до возобновления работы для
корректного функционирования устройства.
• Выберите подходящее место, убедившись, что имеется легкий доступ
к электрической розетке.
• Не подключайте осушитель воздуха к розетке с несколькими гнездами, которая также используется для других электрических приборов.
• Подключите устройство в электрическую розетку с заземлением
220-240~В 50Гц (См. заводскую табличку, расположенную сбоку или
сзади устройства).
• Убедитесь в том, что правильно установлена емкость для воды, в
противном случае устройство не будет работать надлежащим образом.
20 см или более
20 см или более
Рис. 2.
Колеса (в четырех точках снизу устройства)
Не прикладывайте силу для того, чтобы колесики катились по ковру,
и не перемещайте устройство с водой в емкости (Устройство может
перевернуться и расплескать воду).
ПРИМЕЧАНИЕ:
Колеса опциональны, некоторые модели поставляются без них.
14
www.timberk.сom • электрический осушитель для изменения влажности воздуха
20 см или более
ПРИМЕЧАНИЕ:
Когда вода в емкости достигает определенного уровня, пожалуйста, осторожно передвигайте
устройство во избежание его падения.
5. КОМПЛЕКТ ПОСТАВКИ
Прибор (осушитель воздуха) – 1 шт.
Упаковка прибора – 1 шт.
Инструкция по эксплуатации и гарантийный талон – 1 шт.
Page 15

6. УПРАВЛЕНИЕ ПРИБОРОМ
Кнопки управления
ПРИМЕЧАНИЕ:
Панель управления купленного Вами устройства может слегка отличаться.
Индикатор полного
Индикатор работы
в непрерывном
Индикатор
необходимости
чистки фильтра
Индикатор
работы
комфортного
осушения
режиме
заполнения емкости
Индикатор работы
автоматического
размораживания
Индикатор работы
при высоких
оборотах
вентилятора
Индикатор
Таймера
ВКЛ/ВЫКЛ
Рис. 3.
При нажатии на кнопку для изменения режима работы, устройство
подаст звуковой сигнал для указания смены режима.
1. Кнопка КОМФОРТ (опционально)
Нажмите для активации режима комфортного осушения.
NOTE:
Для этого режима нельзя установить уровень влажности.
2. Кнопка ФИЛЬТР
Функция проверки фильтра напоминает о необходимости чистки
Воздушного фильтра для обеспечения более эффективной работы
устройства. Индикатор фильтра (индикатор «Прочистить фильтр») загорается спустя 250 часов эксплуатации. Для сброса индикатора после чистки фильтра, нажмите на кнопку Фильтр и индикатор погаснет.
3. Кнопка ПРОДОЛЖИТЬ
Нажмите для активации режима непрерывного осушения.
4. Кнопка ТУРБО
Управление скоростью вращения вентилятора. Нажмите для выбора
Высокой или Нормальной скорости вращения вентилятора. Установите Высокую скорость для максимального удаления влаги. Когда влажность будет снижена и будет предпочтительна тихая работа устройства, установите Нормальную скорость.
5. Кнопка ТАЙМЕР
Нажмите для активации Автоматического включения и Автоматического выключения, совместно с кнопками управления «
» / « »: Кнопки Вверх/Вниз
6. «
» и « ».
• Кнопки установки уровня влажности
Уровень влажности можно установить в диапазоне от 35% до 85% относительной влажности с шагом 5%.
- Для получения более сухого воздуха нажмите кнопку «
те более низкое процентное значение (%).
- Для получения более влажного воздуха нажмите кнопку «
новите более высокое процентное значение (%).
» и установи-
» и уста-
• Кнопки установки ТАЙМЕРА
Используйте кнопки Вверх/Вниз для установки Автоматического запуска и Автоматического выключения в диапазоне от 0.0 до 24.
7. Кнопка питания
Нажмите для включения и выключения осушителя воздуха.
8. Дисплей
Показывает установленный уровень (%) влажности в диапазоне от
35% до 85% или время автоматического включения/выключения
(0~24) в ходе установки, затем показывает действительный уровень
влажности помещения (точность ± 5%) в диапазоне от 30% до 90%
относительной влажности.
Коды ошибок и защиты:
AS – Ошибка датчика влажности – Отключите устройство от сети пи-
www.timberk.сom • электрический осушитель для изменения влажности воздуха
15
Page 16

тания и снова подключите. Если ошибка появляется снова, обратитесь
в службу поддержки.
ES – Ошибка датчика температуры трубки испарителя – Отключите
устройство от сети питания и снова подключите. Если ошибка появляется снова, обратитесь в службу поддержки.
P2 – Емкость заполнена или находится в неправильном положении
– Опустошите емкость и установите ее в правильное положение. (доступно только для устройства без насоса)
P2 – Емкость заполнена – Опустошите емкость. (доступно только для
устройства с насосом)
EC – Обнаружена утечка хладагента – С этой новой технологией при
обнаружении устройством утечки хладагента на дисплее будет отображаться код «EC», обратитесь в службу поддержки.
E3 – Некорректная работа устройства – Отключите устройство от сети
питания и снова подключите. Если ошибка появляется снова, обратитесь в службу поддержки.
Eb – Емкость удалена или находится в неправильном положении –
Установите емкость в правильное положение. (доступно только для
устройства с насосом)
Прочие особенности
Индикатор полного заполнения емкости
Загорается, когда емкость готова к опустошению.
Автоматическое выключение
Осушитель воздуха отключается, когда емкость полностью заполнена
или при удалении емкости или установке в неправильном положении.
При достижении заданной влажности, устройство автоматически отключится. В некоторых моделях, двигатель вентилятора продолжит работу.
Автоматическое размораживание
Когда на змеевиках испарителя образуется наледь, компрессор отключается, а вентилятор продолжает работать до исчезновения наледи.
Подождите 3 минуты до возобновления работы устройства
После выключения устройства его невозможно повторно запустить в течение первых 3 минут. Это сделано для защиты устройства. Работа автоматически возобновится спустя 3 минуты.
Функция проверки фильтра
Система начинает отсчет времени, как только начинает работать вентилятор. Функцию проверки фильтра можно активировать только когда
совокупное время эксплуатации достигнет уровня 250 часов или более.
Индикатор загрязнения фильтра (индикатор «Прочистить фильтр») мигает один раз в секунду, после окончания чистки воздушного фильтра
нажмите кнопку Фильтр и индикатор загрязнения фильтра (индикатор
«Прочистить фильтр») погаснет.
Автоматический повторный запуск
Если случается внезапная остановка устройства в виду прекращения
подачи электропитания, то при возобновлении питания произойдет автоматический повторный запуск с предыдущей установленной функцией.
Установка Таймера
• При включенном устройстве нажмите кнопку «Таймер», после чего загорится индикатор «Таймер Выкл». Он показывает, что запущена программа Автоматического выключения. Снова нажмите эту кнопку, загорится
индикатор «Таймер Вкл.». Он показывает, что запущена программа Автоматического включения.
• При выключенном устройстве сначала нажмите кнопку «Таймер», после
чего загорится индикатор «ТАЙМЕР ВКЛ». Он показывает, что запущена
программа Автоматического включения. Снова нажмите эту кнопку, загорится индикатор «Таймер Выкл.». Он показывает, что запущена программа Автоматического выключения.
• Нажмите и удерживайте кнопку ВВЕРХ или ВНИЗ для того, чтобы изменить время таймера с шагом 0.5 часа, до 10 часов, затем с шагом 1 час
до 24 часов. На дисплее будет показываться обратный отсчет времени,
оставшегося до запуска.
• Выбранное время будет зафиксировано через 5 секунд, и система автоматически вернется к отображению предыдущей настройки уровня
влажности.
• При установке времени Автоматического включения и Автоматического
выключения в рамках одной управляющей программы, индикаторы ТАЙМЕР ВКЛ ВЫКЛ загорятся, показывая, что теперь запрограммированы
оба времени – ВКЛЮЧЕНИЕ и ВЫКЛЮЧЕНИЕ.
• Выключение или включение устройства в какой-либо момент времени
или установка значения таймера равным 0.0 отменит функцию Автоматического включения/ выключения.
• Когда на экране светодиодного дисплея показывается код P2, функция
Автоматического включения/выключения также будет отменена.
16
www.timberk.сom • электрический осушитель для изменения влажности воздуха
Page 17

7. ОБСЛУЖИВАНИЕ
Удаление собранной воды
Существует два способа удаления собранной воды.
1. При помощи емкости
• В выключенном состоянии, если емкость для воды заполнена,
загорится индикатор заполненности емкости для воды.
• Во включенном состоянии, если емкость для воды заполнена, то
компрессор и вентилятор отключатся, загорится индикатор заполненности емкости для воды, на цифровом дисплее будет отображаться код P2.
• Медленно выдвиньте емкость для воды. Надежно возьмитесь за
левую и правую ручки, и осторожно выдвигайте емкость по прямой
таким образом, чтобы не пролить воду. Не ставьте емкость на пол,
так как дно емкости неровное. В противном случае емкость упадет,
что приведет к разливу воды.
• Слейте воду и поставьте емкость обратно. Для функционирования
осушителя воздуха емкость должна располагаться в правильном
положении и быть надежно закреплена.
• Устройство повторно включиться, когда емкость будет возвращена
в правильное положение.
Удерживайте обе стороны
емкости с одинаковой силой и
выдвигайте ее из устройства.
Рис. 4.
Слегка выдвиньте
емкость для воды
ПРМЕЧАНИЕ:
• При удалении емкости не прикасайтесь к каким-либо деталям внутри устройства. Это может привести
к повреждению устройства.
• Бережно устанавливайте емкость обратно в
устройство. В случае столкновения емкости с
чем-либо или ненадежной установки устройство
может не заработать.
• Если при удалении емкости падает шланг насоса,
то перед обратной установкой емкости для воды в
устройство необходимо переустановить шланг насо
са надлежащим образом (см. Рис. 5).
• При удалении емкости для воды обратить внима
ние: если внутри устройства осталась вода, то ее
необходимо высушить.
• Во включенном состоянии, если емкость для воды
заполнена, компрессор и вентилятор отключатся,
затем устройство 8 раз подаст звуковой сигнал, а
на цифровом дисплее будет отображаться код Eb.
• В выключенном состоянии, если емкость для воды
заполнена, то устройство 8 раз подаст звуковой сиг
нал, а на цифровом дисплее будет отображаться код
Eb.
2. Непрерывный слив
Воду можно автоматически слить в дренаж посредством подсоединения к устройству шланга для воды (внутренний диаметр ≥ 5/16”,
не включен в комплект поставки) с концом с внутренней резьбой
(внутренний диаметр : М=1”, не включен в комплект поставки).
• Снимите крышку с заднего сливного отверстия устройства и
отложите в сторону, затем вставьте в отверстие сливной шланги
подведите его к дренажу или к подходящему сливному устройству
(см. Рис. 6).
• Убедитесь в том, что шланг надежно закреплен во избежание утечек, конец шланга находится на одном уровне или ниже, чтобы дать
воде беспрепятственно вытекать в слив.
• Направьте шланг по направлению к сливу, убедившись, что нет
никаких перегибов, которые остановят поток воды.
-
-
-
www.timberk.сom • электрический осушитель для изменения влажности воздуха
17
Page 18

• Выберите на устройстве требуемую влажность и скорость вентилятора для начала непрерывного слива воды.
ПРИМЕЧАНИЕ:
Когда функция непрерывного слива не используется, отсоедините сливной шланг от выпускного отверстия и просушите воду в отверстии для шланга для
непрерывного слива.
• Воздухозаборная и воздуховыпускная решетки легко загрязняются,
поэтому для очистки используйте щетку.
2. Прочистите емкость для воды
Каждые несколько недель очищайте емкость для воды для предотвращения роста плесени, грибка и бактерий. Частично заполните емкость чистой водой и добавьте немного мягкого моющего средства.
Перемешайте воду, слейте ее и прополоскайте емкость.
ПРИМЕЧАНИЕ:
Не используйте посудомоечную машину для чистки
емкости для воды. После чистки, емкость необхо
димо поместить обратно на свое место и надежно
закрепить для обеспечения нормального функцио
нирования осушителя воздуха.
-
-
Повторно установите
Шланг насоса падает
Рис. 5.
Открутите крышку против
часовой стрелки
Слейте воду из
шланг насоса надлежащим
образом
шланга
Рис. 6.
Уход за осушителем воздуха и его чистка
Перед чисткой выключите осушитель воздуха и выньте вилку из розетки.
1. Прочистите решетку и корпус
• Используйте воду и мягкое моющее средство. Не используйте отбеливатель или абразивные материалы.
• Не разбрызгивайте воду прямо на корпус устройства. Это может
привести к удару электрическим током, разрушению изоляции или
появлению ржавчины.
18
www.timberk.сom • электрический осушитель для изменения влажности воздуха
3. Прочистите воздушный фильтр
Воздушный фильтр за вентиляционной решеткой необходимо проверять и чистить, по крайней мере, каждые 30 дней или чаще, при
необходимости.
ПРИМЕЧАНИЕ:
Не полоскайте и не кладите фильтр в посудомоечную машину.
Для того, чтобы снять фильтр:
• Достаньте емкость для воды, как показано на Рис. 4.
• Возьмитесь за нижнюю часть фильтра и потяните его вниз (см. Рис. 7).
Очистите фильтр при помощи теплой, мыльной воды. Прополоскайте
фильтр и дайте ему просохнуть перед обратной установкой. Не чистите фильтр в посудомоечной машине.
Для того, чтобы установить фильтр:
Вставьте воздушный фильтр в устройство.
Page 19

Рис. 7.
ВНИМАНИЕ!
НЕ используйте осушитель воздуха без фильтра,
так как грязь и волокнистая пыль засорят его и снизят производительность.
4. Когда устройство не используется продолжительное время
• Прочистите устройство, емкость для воды и воздушный фильтр.
• Смотайте шнур питания.
• Поместите устройство в пластиковый мешок.
• Храните устройство в вертикальном положении.
8. УСТРАНЕНИЕ НЕИСПРАВНОСТЕЙ
Перед обращением в техническую службу просмотрите таблицу
ниже.
Проблема Что необходимо проверить
• Убедитесь в том, что вилка осушителя воздуха полностью вставлена в розетку.
Устройство не
включается
• Проверьте домовую коробку предохранителей/автоматического контактного выключателя.
• Влажность воздуха достигла предустановленного уровня
или емкость для воды заполнена.
• Емкость для воды установлена неправильно.
Проблема Что необходимо проверить
• Не было предоставлено достаточно времени для удаления влаги.
• Убедитесь, что нет штор, жалюзи или мебели, блокирую-
Осушитель воздуха
не осушает воздух
надлежащим
образом
Устройство издает
громкий шум при
работе
На змеевиках появляется наледь
Вода на полу
На дисплее появляются коды ES,
AS,P2,EC ,Eb и E3
щих переднюю или заднюю часть осушителя воздуха.
• Регулятор влажности может быть установлен в недостаточно низкое положение.
• Проверьте, что все двери, окна и другие выходы надежно
закрыты.
• Слишком низкая температура помещения, ниже
5°С(41°F).
• В комнате имеется водный нагреватель или что-то,
выделяющее водяные пары.
• Засорился воздушный фильтр.
• Устройство резмещено не вертикально.
• Неровная поверхность пола.
Это нормально. У осушителя воздуха имеется функция
Автоматического размораживания.
• Шланг присединен не плотно.
• Для сбора воды предполагается использовать емкость,
однако снята задняя сливная заглушка.
• Это коды ошибок и защиты. См. раздел КНОПКИ УПРАВЛЕНИЯ НА ОСУШИТЕЛЕ ВОЗДУХА.
www.timberk.сom • электрический осушитель для изменения влажности воздуха
19
Page 20

ГАРАНТИЙНЫЙ ТАЛОН
20
www.timberk.сom • гарантийный талон
www.timberk.com
Уважаемый покупатель!
Обратите внимание на необходимость вашей подписи
на стр. 24
Page 21

Гарантийные обязательства
Гарантийное обслуживание и ремонт электрического осушителя воздуха TIMBERK с соблюдением требований и
норм Изготовителя (TIMBERK) производится на территории
РФ только в авторизованных сервисных центрах Изготовителя или мастерских, уполномоченных производителем и
работающих с ним на основании договора.
Срок проведения экспертизы и гарантийного ремонта - не
более 45 дней с момента приемки дефектного изделия авторизованным сервисным центром TIMBERK.
Если при эксплуатации изделия Вы столкнулись с неполадками в его
работе, которые Вы не можете устранить самостоятельно в строгом соответствии с Руководством по эксплуатации изделия, обратитесь к региональному представителю Изготовителя в России или в региональный
авторизованный сервисный центр TIMBERK, уточнив адрес у продавца.
Полный перечень сервисных центров указан на сайте: www.timberk.com
или приложен отдельным списком в комплекте с изделием.
Также Вы можете обратиться в уполномоченную сервисную службу Изготовителя по телефону: +7 (495) 627-5285, либо по телефонам, указанным
на сайте: www.timberk.com, или отправить сообщение по электронному
адресу: ru.service@timberk.com
Если отсутствие надлежащим образом заполненного гарантийного талона на изделие или отсутствие чека с указанием изделия не позволяет
идентифицировать изделие и факт его продажи на территории РФ, то
Изготовитель вправе отказать в гарантийном обслуживании изделия.
При невозможности определить дату продажи изделия, гарантийный
срок исчисляется с даты его производства.
Дата производства изделия определяется по реестру Изготовителя в соответствии с серийным номером изделия.
Официальный срок службы осушителя воздуха TIMBERK, установленный
изготовителем, составляет 10 лет, со дня передачи изделия потребителю.
Указанный срок службы действителен только при условии соблюдения
правил эксплуатации и правильного ухода за изделием.
Во избежание недоразумений убедительно просим Вас внимательно изучить Руководство по эксплуатации изделия и условия гарантийных
обязательств, проверить правильность заполнения бланка гарантийного талона. Согласно требованиям Изготовителя, гарантийный талон
действителен только при наличии четко и правильно указанных данных: модели, серийного номера изделия, даты покупки, данных фирмы-продавца, подписи покупателя. Соответствующие данные также
должны быть указаны продавцом на отрывных талонах. В гарантийном талоне обязательным является указание даты запуска изделия
в эксплуатацию и штамп уполномоченной организации, произведшей
запуск в эксплуатацию.
При проведении планового профилактического обслуживания изделия специалист сервисного центра должен заполнить соответствующую часть гарантийного талона, поставить подпись и печать сервисного центра.
Модель и серийный номер изделия (на маркировочной (идентификационной) наклейке Изготовителя на изделии (TIMBERK ID) должны
соответствовать указанным в гарантийном талоне продавцом. При
нарушении этих условий, а также в случае, когда данные, указанные в
гарантийном талоне, изменены или стерты, талон может быть признан
недействительным.
ВНИМАНИЕ!
Производитель рекомендует приобретать приборы
Timberk только у авторизованных продавцов.
Данным гарантийным талоном Изготовитель подтверждает принятие на
себя обязательств по удовлетворению законных требований потребителей в случае обнаружения недостатков изделия, возникших по вине Изготовителя в течение установленного гарантийного срока.
Гарантийный срок для осушителя воздуха TIMBERK, установленный изготовителем, составляет 2 года, со дня передачи изделия потребителю.
Изготовитель оставляет за собой право:
• отказать в гарантийном сервисном обслуживании изделия в случае несоблюдения изложенных ниже условий (cм. «Досрочное прекращение
гарантийного обслуживания»);
• самостоятельно инициировать независимую экспертизу для выяснения обстоятельств, приведших к выходу прибора из строя;
• сравнивать предоставленную маркировочную (идентификационную)
наклейку изделия (TIMBERK ID) с данными реестров производства для
проверки соответствия серийного номера изделия уникальным производственным номерам реестров.
• предоставлять дополнительную гарантию; информация об условиях
дополнительной гарантии содержится на сайте: www.timberk.com.
Просим Вас хранить Гарантийный талон в течение всего гарантийного
срока, установленного Изготовителем на приобретенное Вами изделие.
При покупке изделия требуйте от продавца проверку его комплектности
и отсутствия механических повреждений в Вашем присутствии, а также
правильного и четкого заполнения данного гарантийного талона. Претензии по некомплектности и выявленным механическим повреждениям
после продажи не принимаются. Для гарантийного ремонта предъявляй
www.timberk.сom • гарантийный талон
21
Page 22

те данный Гарантийный талон вместе с товарным (кассовым) чеком или
другим документом, подтверждающим дату и факт продажи изделия на
территории РФ.
Установка, подключение и запуск в эксплуатацию данного изделия допускается исключительно специалистами и организациями, имеющими
лицензии или соответствующие разрешения (допуски) на данный вид деятельности, либо специалистами и организациями, авторизованными для
монтажа и/или обслуживания данного вида техники.
О необходимости проведения тех или иных монтажных и/или сервисных
работ специализированными организациями Вы можете узнать, внимательно ознакомившись с Руководством по эксплуатации на приобретенное Вами изделие.
Для монтажа приобретенного оборудования Вы можете воспользоваться платной услугой специалистов авторизованных сервисных центров
TIMBERK, которые проведут все необходимые работы для длительного и
безопасного использования приобретенного Вами изделия.
Вы можете также воспользоваться услугами любых других квалифицированных специалистов, однако, в этом случае, если изделие вышло из
строя вследствие неправильной установки и подключения, Вы теряете
право на бесплатное гарантийное обслуживание.
Досрочное прекращение гарантийного обслуживания.
Все условия гарантийного обслуживания регулируются Законодательством РФ и Законом РФ «О защите прав потребителей». В частности, отказ в бесплатном гарантийном обслуживании изделия может быть вызван:
• нарушением при оформлении гарантийного талона при продаже
изделия;
• отсутствием товарного или кассового чека о продаже изделия или невозможностью определить продавца изделия;
• наличием следов механических повреждений, возникших после передачи изделия потребителю и явившихся возможной причиной возникновения дефекта;
• наличием повреждений, вызванных несоответствием стандартам параметров питающих сетей и других подобных внешних факторов, а
также вызванных использованием нестандартных, неоригинальных
(или некачественных) аксессуаров, принадлежностей, запасных частей, элементов и т.д.;
• нарушением правил Руководства по эксплуатации данного изделия;
• наличием следов несанкционированного вскрытия и/или ремонта изделия (за исключением случаев, предусмотренных Руководством по
эксплуатации), повлекших за собой отказ в работе изделия;
• дефектом или отказом системы или ее части, где изделие использовалось как часть системы и это могло привести к дефекту или
отказу изделия.
Гарантийные обязательства не распространяются на перечисленные ниже части и принадлежности изделия, если их замена не
связана с разборкой самого изделия или их замена требуется при
профилактическом обслуживании:
• монтажные приспособления, инструмент и документацию, прилагаемую к изделию;
• расходные части изделия, подразумевающие периодическую замену
за счет потребителя (элементы питания, фильтрующие элементы и др.);
• части и узлы изделия, неисправность которых связана с естественным
износом в процессе эксплуатации (фильтрующие элементы, втулки,
подшипники и т.д.);
• материалы, наклеенные на изделие, имеющие рекламное или информационное назначение, за исключением маркировочной (идентификационной) наклейки Изготовителя (TIMBERK ID).
ВНИМАНИЕ!
Если в результате экспертизы/диагностики изделия
установлено, что его недостатки возникли вследствие обстоятельств, за которые не отвечает продавец (изготовитель), либо недостатки в товаре отсутствуют, Потребитель обязан возместить продавцу
(изготовителю или уполномоченной изготовителем
организации) расходы на проведение экспертизы
(диагностики, а также связанные с ее проведением
расходы на хранение и транспортировку товара) в
соответствии с Законом РФ «О защите прав потребителей» № 171-ФЗ в ред. от 21.12.2004 ст. 18 п.5.
Изготовитель не несет гарантийных обязательств за изделие в
следующих случаях:
• если изделие использовалось в иных целях, не соответствующих
его прямому назначению в соответствии с Руководством по эксплуатации;
• если на изделии отсутствует маркировочная (идентификационная) табличка Изготовителя (TIMBERK ID);
• если изделие имеет следы несанкционированного вскрытия, не предусмотренного Руководством по эксплуатации, и попыток неквалифицированного ремонта;
• если дефект вызван изменением/нарушением конструкции или схемы
изделия, не предусмотренным Изготовителем;
• если обнаружены повреждения, вызванные попаданием внутрь изделия посторонних предметов, веществ, жидкостей, насекомых, скоплением большого количества пыли;
22
www.timberk.сom • гарантийный талон
Page 23

• если обнаружены повреждения, вызванные подключением к сетям с
недопустимыми параметрами;
• если дефект вызван действием непреодолимых сил, несчастными
случаями, умышленными или неосторожными действиями потребителя или третьих лиц;
• если нарушены требования Изготовителя по проведению обязательных для сохранения гарантии и продления срока службы профилактических работ, описанных в Руководстве по эксплуатации;
• неправильного хранения (консервации / разборки-сборки на период
хранения) изделия;
Изготовитель снимает с себя любую ответственность за возможный
вред, прямо и или косвенно нанесенный продукцией TIMBERK людям,
домашним животным, и имуществу, в случаях, если это произошло в
результате несоблюдения правил и условий эксплуатации или вследствие неквалифицированной установки (профилактики, обслуживания,
ремонта) изделия, умышленных или неосторожных действий потребителя или третьих лиц.
ВНИМАНИЕ!
Если маркировочная (идентификационная) наклейка на
изделие TIMBERK (TIMBERK ID) закреплена на изделии
не плотно и существует риск ее утери, то вклейте ее в
гарантийный талон на последней странице.
Помните! Изготовитель/импортер/продавец не несут ответственности
в случае возникновения недостатков изделия из-за неправильных/некачественных монтажных, пусконаладочных, сервисных, профилактических работ неавторизованными организациями и специалистами.
Гарантийные обязательства Изготовителя не распространяются на
случаи:
• если покупатель самостоятельно без учета рекомендаций Изготовителя и продавца купил осушитель надлежащего качества и установил в помещении, для которого изделие не подходит по своим
техническим характеристикам;
• эксплуатации изделия в недопустимых условиях и с нарушением
режимов работы, прописанных в Руководстве по эксплуатации;
• если неисправность была вызвана нарушением сроков периодического обслуживания изделия;
• если неисправность была вызвана сильными загрязнениями фильтров и/или испарителя/конденсатора пылью, листвой, насекомыми
и другими предметами.
ПРИМЕЧАНИЕ:
Пожалуйста, потребуйте от продавца полностью,
четко и правильно заполнить бланк Гарантийного
талона.
Для ряда территорий могут действовать исключительные правила гарантии, увеличивающие срок на изделие или компоненты. Такие правила устанавливаются только по распоряжению Производителя официальным письмом Производителя.
ПРИМЕЧАНИЕ!
Техническое (профилактическое) обслуживание изделия не входит в гарантийные обязательства изготовителя и продавца и является дополнительной
платной услугой.
ВНИМАНИЕ!
Большинство приборов торговой марки TIMBERK
требуют профессиональных консультаций со специ
алистами соответствующей квалификации в процессе подбора, а также при вводе их в эксплуатацию.
Производитель рекомендует приобретать приборы
TIMBERK только у авторизированных им продавцов.
В предоставлении дополнительной гарантии может
быть отказано, если прибор TIMBERK был приоб
ретен у продавцов, указанных в соответствующем
разделе на сайте www.timberk.com, не исполняющих
полностью или частично требований производителя
к правилам обслуживания покупателей, а также тре
бований производителя к предоставлению стандартных условий приобретения приборов TIMBERK.
Покупатель информирован о том, что он не вправе требовать возврата или обмена купленного изделия в порядке статьи 25 Закона
«О защите прав потребителей» и статьи 502 Гражданского Кодекса РФ в соответствии с п.11 «Перечня непродовольственных товаров надлежащего качества, не подлежащих возврату или обмену
на аналогичный товар другого размера, формы, габарита, фасона,
расцветки или комплектации» Постановления Правительства РФ
от 19.01.1998 г. №55.
-
-
-
www.timberk.сom • гарантийный талон
23
Page 24

Бланк гарантийного талона.
Заполняется фирмой-продавцом
Изделие
Модель
Серийный номер
Дата продажи
Фирма-продавец
Адрес фирмы продавца
Телефон фирмы продавца
Без подписи покупателя Гарантийный талон является недействительным.
Печать
фирмы-продавца
Заполняется сервисным центром
«А»
Дата приема
Дата выдачи
Особые отметки
Печать
сервисного центра
«Б»
Дата приема
Дата выдачи
Особые отметки
Печать
сервисного центра
«В»
Дата приема
Дата выдачи
Особые отметки
Печать
сервисного центра
«Г»
Дата приема
Дата выдачи
Особые отметки
Печать
сервисного центра
Подписывая данный гарантийный талон, Покупатель признает, что он:
1. Проверил заполнение информации.
2. Получил Руководство по эксплуатации на изделие на русском языке.
3. Владеет всей необходимой информацией о приобретенном изделии и
его потребительских свойствах, характеристиках в соответствии со статьей 10 Закона РФ «О защите прав потребителей».
4. Ознакомлен и полностью согласен с условиями и ограничениями гарантийного обслуживания, а также с условиями установки / подключения
/ сервисного обслуживания / эксплуатации приобретенного изделия.
5. Не имеет претензий к внешнему виду / комплектности / работоспособности (если прибор проверялся в его присутствии при продаже) приобретенного изделия.
Подпись покупателя (с расшифровкой)
__________________________________ / _____________________/
Дата______________________________
24
www.timberk.сom • гарантийный талон
Page 25

Отрывной талон«А»
Изделие
Модель
Серийный номер
Дата продажи
Фирма-продавец
Отрывной талон«Б»
Изделие
Модель
Серийный номер
Дата продажи
Фирма-продавец
Отрывной талон«В»
Изделие
Модель
Серийный номер
Дата продажи
Фирма-продавец
Отрывной талон«Г»
Изделие
Модель
Серийный номер
Дата продажи
Фирма-продавец
Заполняется фирмой-продавцом
Заполняется фирмой-продавцом
Заполняется фирмой-продавцом
Заполняется фирмой-продавцом
Печать
фирмы-продавца
Печать
фирмы-продавца
Печать
фирмы-продавца
Печать
фирмы-продавца
www.timberk.сom • гарантийный талон
25
Page 26

Дата приема
Дата выдачи
Номер заказа-наряда
Проявление дефекта
Мастер
Код неисправности
Дата приема
Дата выдачи
Номер заказа-наряда
Проявление дефекта
Мастер
Код неисправности
Дата приема
Дата выдачи
Номер заказа-наряда
Проявление дефекта
Мастер
Код неисправности
Дата приема
Дата выдачи
Номер заказа-наряда
Проявление дефекта
Мастер
Код неисправности
Заполняется сервисным центром
Заполняется сервисным центром
Заполняется сервисным центром
Заполняется сервисным центром
Печать
сервисного центра
Печать
сервисного центра
Печать
сервисного центра
Печать
сервисного центра
26
www.timberk.сom • гарантийный талон
Page 27

Профилактическое обслуживание изделия. (Заполняется специалистом авторизованного сервисного центра)
Дата выполнения
№№
работ
Перечень выполненных работ Наименование СЦ
Ф.И.О. Исполнителя
подпись печать
www.timberk.сom • гарантийный талон
27
Page 28

Профилактическое обслуживание изделия. (Заполняется специалистом авторизованного сервисного центра)
Дата выполнения
№№
работ
Перечень выполненных работ Наименование СЦ
Ф.И.О. Исполнителя
подпись печать
28
www.timberk.сom • гарантийный талон
Page 29

www.btpart.ru
Все расходные материалы для
продукции Timberk вы можете
приобрести на сайте www.btpart.ru
Уважаемый покупатель!
Timberk предоставляет вам специальный сервис в рамках
программы клиентской поддержки. Теперь вы всегда сможете
заказать и оформить доставку на запасные части и расходные
материалы, необходимые для оптимальной, качественной
работы техники Timberk в течение всего срока службы на
едином портале www.btpart.ru.
Всю информацию о работе портала вы также всегда сможете
увидеть на сайте www.timberk.com. Мы искренне надеемся,
что этот уникальный дополнительный сервис поможет вам
сделать жизнь с Timberk еще удобнее!
www.timberk.сom • электрический осушитель для изменения влажности воздуха
29
Page 30

В целях информирования покупателей техники Timberk, мы дополнительно сообщаем, что русский
является государственным языком
в следующих государствах:
• в Российской Федерации
• в Республике Беларусь
наряду с белорусским языком
• в частично признанной
Южной Осетии наряду
с осетинским языком
Русский язык является официальным языком (во всех случаях
другой язык или другие языки
выступают как государственный
или второй официальный) в следующих государствах и на территориях:
30
www.timberk.сom • электрический осушитель для изменения влажности воздуха
• в Республике Казахстан
• в Киргизской Республике
• в административных
единицах Украины, где доля
носителей русского языка
cоставляет более 10%, при
соответствующем решении
местных советов
• в Автономной Республике
Крым
В Республике Таджикистан русский язык признан по Конституции
языком межнационального общения.
Официальным языком
международной организации
Содружество Независимых
Государств (СНГ) является
русский язык.
Page 31

Если вы заметили ошибку в инструкции, пожалуйста, сообщите нам
об этом, связавшись с нами по электронной почте, указанной на
сайте www.timberk.com
If you found any mistake in this manual please let us know by email listed
on www.timberk.com
www.timberk.сom • электрический осушитель для изменения влажности воздуха
31
Page 32

www.timberk.com
 Loading...