


Excelsior Inverter
SERIES
Instruction manual Руководство по эксплуатации
Сплит-система on-off / |
Split system on-off / |
Инверторная |
DC Inverter |
сплит-система |
split system |
|
|
Модели/Models:
Сплит-система on-off / Инверторная сплит-система (внутренний блок) Split system on-off / DC Inverter split system (indoor unit)
• AC TIM 07H S20 |
• AC TIM 09HDN S20 |
• AC TIM 09H S20 |
• AC TIM 12HDN S20 |
• AC TIM 12H S20 |
• AC TIM 18HDN S20 |
• AC TIM 18H S20 |
• AC TIM 24HDN S20 |
• AC TIM 24H S20 |
|
Сплит-система on-off / Инверторная сплит-система (наружный блок) Split system on-off / DC Inverter split system (outdoor unit)
• AC TIM 07H S20-01 |
• AC TIM 09HDN S20-01 |
|
• AC TIM 12HDN S20-01 |
||
• AC TIM 09H S20-01 |
||
• AC TIM 18HDN S20-01 |
||
• AC TIM 12H S20-01 |
||
• AC TIM 24HDN S20-01 |
||
• AC TIM 18H S20-01 |
||
|
||
• AC TIM 24H S20-01 |
|
Руководство по эксплуатации включает в себя гарантийный талон
Outlook of devices, aslo colour scores can be revised without any special advance notices.
Производитель вправе менять внешний вид прибора и цветовую гамму прибора без специального предварительного уведомления.

|
|
CONTENTS |
|
|
|
|
|
1. |
Important information........................................................................ |
2 |
|
2. |
Safeguards........................................................................................ |
3 |
|
3. |
Specifications.................................................................................... |
4 |
|
4. |
Appliance description........................................................................ |
8 |
|
5. |
Delivery set....................................................................................... |
8 |
|
6. |
Display indoor unit............................................................................. |
8 |
|
7. |
Operating modes.............................................................................. |
9 |
|
8. |
Maintenance..................................................................................... |
14 |
|
9. |
Troubleshooting................................................................................. |
15 |
|
10. |
Transportatiom and storage............................................................ |
15 |
|
11. |
Service life....................................................................................... |
15 |
|
12. |
Utilization rules................................................................................ |
15 |
|
Dear customer!
We thank you for your happy choice and buying of a domestic air conditioner Timberk. It will serve you for a long time.
Is intended for cooling, heating, dehydration of air in domestic premises.
1. IMPORTANT INFORMATION
Is intended for dehydration of air in domestic premises the appliance is designed for air cooling in domestic premises. The manufacturer reserves the right to introduce changes in design, configuration and processing of the article with a view to improve its properties without any prior notification of customers. There may be some misprints in text and digital notations of the present manual. If after reading of this manual you have any questions concerning work and operation of the appliance, please, refer to a shop assistant or to a specialized service center for further explanations.
The article has a label with all the needed technical data and other useful information about the appliance. Use the appliance only for its intended purpose indicated in this manual.
2.SAFEGUARDS
1.Don’t try to install the conditioner by yourself. Call for a qualified installation specialist.
2.While using the air conditioner, it is necessary to observe several precautions. Incorrect operation due to ignoring of precautions may result in personal injury of a user and other people, as well as in damaging of their property.
3.The electric appliance should be under observation while operated, especially if there are any children near it.
4.Don’t pass your fingers or foreign objects through an air outlet grille of indoor and outdoor units, since it may result in a trauma caused by a revolving fan.
5.Don’t let children turn the conditioner on by themselves. Children may turn the conditioner on only under the care of adults.
6.Don’t try to repair the conditioner by yourself. Internal units of the conditioner carry a voltage and it is life-threatening! For repair of the appliance refer to an authorized service center.
7.Don’t use the appliance if it is faulty, or if it was dropped or damaged.
8.Don’t open a front panel of the appliance during its work.
9.Don’t dismantle and modify the appliance.
10.Unplug the conditioner immediately, if it emits strange odours or smoke. 11.Don’t splash and pour water and other liquids on the conditioner.
12.Always unplug the conditioner during a lighting storm.
13.Always unplug the conditioner, when it is not used.
14. Before cleaning and maintenance of the conditioner unplug it. Cleaning and maintenance should be performed in accordance with instructions of this manual.
15.To ensure the effective work of the conditioner, operate it in environment described in the present manual.
16.Don’t use dangerous chemicals for cleaning of the appliance and don’t let them on the appliance.
17.When removing an air filter, don’t touch metal parts of the appliance.
18.To avoid overheating and risk of flash fire, as well as damage of internal electric network, don’t change the length of a power cord and don’t connect the appliance via extension cords.
19.To avoid electrical hazards, damaged power cord must be changed only at authorized service centers qualified professionals.
20.To avoid risk of electric shock, do not place the power cord near a heater and flammable or combustible substances.
21.Do not start or stop the unit by connecting or disconnecting electrical power.
22.To avoid electric shock, a damaged power cord should be replaced only in authorized service centers by qualified specialists.
23.To avoid electric shock, don’t place the power cord near heating appliances and flammable or combustible substances.
24.Don’t start and stop the appliance by power-up and down.
25.Don’t press the buttons of the remote control board by anything but your fingers.
26.Don’t use the appliance for purposes not intended by this user manual.
2 |
www.timberk.com • Electric air conditioner |
|
www.timberk.com • Electric air conditioner |
3 |
|
|
|
|
|

3. SPECIFICATIONS
Модель |
AC TIM 07H S20 |
AC TIM 09H S20 |
AC TIM 12H S20 |
AC TIM 18H S20 |
AC TIM 24H S20 |
|
|
|
|
|
|
Внутренний блок |
AC TIM 07H S20 |
AC TIM 09H S20 |
AC TIM 12H S20 |
AC TIM 18H S20 |
AC TIM 24H S20 |
|
|
|
|
|
|
Наружный блок |
AC TIM 07H S20-01 |
AC TIM 09H S20-01 |
AC TIM 12H S20-01 |
AC TIM 18H S20-01 |
AC TIM 24H S20-01 |
|
|
|
|
|
|
Capacity (cooling) BTU |
7000 (2,05) |
9000 (2,6) |
12000 (3.51) |
18000 (5.27) |
22000 (6,45) |
|
|
|
|
|
|
Capacity (heating) BTU |
7000 (2,05) |
9000 (2,6) |
12000 (3.51) |
18000 (5.27) |
22000 (6,45) |
|
|
|
|
|
|
Rated power consumption (cooling) (W) |
635 |
810 |
1090 |
1640 |
2000 |
|
|
|
|
|
|
Rated power consumption (heating) (W) |
565 |
720 |
960 |
1460 |
1785 |
|
|
|
|
|
|
Power supply, V/Hz |
220-240~/50 |
220-240~/50 |
220-240~/50 |
220-240~/50 |
220-240~/50 |
|
|
|
|
|
|
Rated power current (cooling/heating) (W) |
2,82/2,51 |
3.9/3.3 |
4.85/4.2 |
9.5/7.9 |
10,5/9,85 |
|
|
|
|
|
|
Air circulation (indoor unit) m3/h |
480/420/390/320 |
500/440/380/330 |
630/550/470/350 |
900/840/800/770 |
900/840/800/770 |
Air circulation (outdoor unit) m3/h |
1200 |
1200 |
1800 |
1800 |
3000 |
Noise level (indoor unit) dB(A) |
37/34/28/23 |
39/36/31/26 |
42/38/34/29 |
48/44/40/36 |
48/44/40/36 |
|
|
|
|
|
|
Noise level (outdoor unit) dB(A) |
48 |
48 |
52 |
54 |
56 |
|
|
|
|
|
|
Refrigerant |
R410A |
R410A |
R410A |
R410A |
R410A |
|
|
|
|
|
|
Electrical protection class |
I class |
I class |
I class |
I class |
I class |
|
|
|
|
|
|
Energy class (cooling/heating) |
A/A |
A/A |
A/A |
A/A |
A/A |
|
|
|
|
|
|
Degree of protection against moisture (indoor unit) |
IPX0 |
IPX0 |
IPX0 |
IPX0 |
IPX0 |
|
|
|
|
|
|
Degree of protection against moisture (outdoor unit) |
IP24 |
IP24 |
IP24 |
IP24 |
IP24 |
|
|
|
|
|
|
Refrigerant piping, Liquid side / Gas side, (inch) |
1/4+3/8 |
1/4+3/8 |
1/4+1/2 |
1/4+1/2 |
1/4+5/8 |
|
|
|
|
|
|
Max. refrigerant pipe length, m |
20 |
20 |
20 |
25 |
25 |
|
|
|
|
|
|
Maximum difference in level, m |
8 |
8 |
8 |
10 |
10 |
|
|
|
|
|
|
Модель |
AC TIM 07H S20 |
AC TIM 09H S20 |
AC TIM 12H S20 |
AC TIM 18H S20 |
AC TIM 24H S20 |
|
|
|
|
|
|
Внутренний блок |
AC TIM 07H S20 |
AC TIM 09H S20 |
AC TIM 12H S20 |
AC TIM 18H S20 |
AC TIM 24H S20 |
|
|
|
|
|
|
Наружный блок |
AC TIM 07H S20-01 |
AC TIM 09H S20-01 |
AC TIM 12H S20-01 |
AC TIM 18H S20-01 |
AC TIM 24H S20-01 |
|
|
|
|
|
|
Filling of Freon, kg |
0,5 |
0,59 |
0,68 |
1,1 |
1,3 |
|
|
|
|
|
|
Operating temperature range: cooling, ° C |
+18 ~ +43 |
+18 ~ +43 |
+18 ~ +43 |
+18 ~ +43 |
+18 ~ +43 |
|
|
|
|
|
|
Operating temperature range: heating, ° C |
-7 ~ + 24 |
-7 ~ + 24 |
-7 ~ + 24 |
-7 ~ + 24 |
-7 ~ + 24 |
|
|
|
|
|
|
Net weight, indoor unit (kg) |
9,0 |
9,5 |
10,5 |
14,0 |
14,0 |
|
|
|
|
|
|
Net weight, outdoor unit (kg) |
23,0 |
24,5 |
33,0 |
40,0 |
50,0 |
|
|
|
|
|
|
Gross weight, indoor unit (kg) |
11,0 |
12,5 |
13,0 |
17,0 |
17,0 |
|
|
|
|
|
|
Gross weight, outdoor unit (kg) |
25,5 |
27,0 |
36,0 |
43,0 |
54,5 |
|
|
|
|
|
|
Net dimensions, indoor unit (mm) |
278х743х194 |
283x821x200 |
298x884x205 |
310х1003x222 |
310х1003x222 |
|
|
|
|
|
|
Net dimensions, outdoor unit (mm) |
431х729х318 |
431х729х318 |
540х830х325 |
540х830х325 |
700х960х396 |
|
|
|
|
|
|
Packing dimensions, indoor unit (mm) |
291x822x353 |
291x898x353 |
298x951x369 |
314х1080х383 |
314х1080х383 |
|
|
|
|
|
|
Packing dimensions, outdoor unit (mm) |
492х774х351 |
492х774х351 |
605х879х366 |
605х879х366 |
763х1011х455 |
|
|
|
|
|
|
4 |
www.timberk.com • Electric air conditioner |
|
www.timberk.com • Electric air conditioner |
5 |
|
|
|
|
|

Модель |
AC TIM 09HDN S20 |
AC TIM 12HDN S20 |
AC TIM 18HDN S20 |
AC TIM 24HDN S20 |
|
|
|
|
|
Внутренний блок |
AC TIM 09HDN S20 |
AC TIM 12HDN S20 |
AC TIM 18H S20 |
AC TIM 24HDN S20 |
|
|
|
|
|
Наружный блок |
AC TIM 09HDN S20-01 |
AC TIM 12HDN S20-01 |
AC TIM 18HDN S20-01 |
AC TIM 24HDN S20-01 |
|
|
|
|
|
Capacity (cooling) BTU |
9000 (2.64) |
12000 (3.51) |
18000 (5.27) |
22000 (6.45) |
|
|
|
|
|
Capacity (heating) BTU |
10000 (2.92) |
13000 (3.7) |
18000 (5.27) |
24000 (6.6) |
|
|
|
|
|
Rated power consumption (cooling) (W) |
805 |
1085 |
1580 |
2000 |
|
|
|
|
|
Rated power consumption (heating) (W) |
755 |
985 |
1420 |
1780 |
|
|
|
|
|
Power supply, V/Hz |
220-240~/50 |
220-240~/50 |
220-240~/50 |
220-240~/50 |
|
|
|
|
|
Rated power current (cooling/heating) (W) |
3.6/3.4 |
4.8/4.4 |
7.0/6.3 |
8.9/8.4 |
|
|
|
|
|
Air circulation (indoor unit) m3/h |
530/490/430/330 |
660/540/460/330 |
850/720/610/520 |
1150/1050/950/850 |
Air circulation (outdoor unit) m3/h |
1800 |
1800 |
3300 |
3300 |
Noise level (indoor unit) dB(A) |
39/36/32/26 |
42/38/33/26 |
46/42/39/36 |
48/45/42/39 |
|
|
|
|
|
Noise level (outdoor unit) dB(A) |
52 |
53 |
56 |
60 |
|
|
|
|
|
Refrigerant |
R410A |
R410A |
R410A |
R410A |
|
|
|
|
|
Electrical protection class |
I class |
I class |
I class |
I class |
|
|
|
|
|
Energy class (cooling/heating) |
A/A |
A/A |
A/A |
A/A |
|
|
|
|
|
Degree of protection against moisture (indoor unit) |
IPX0 |
IPX0 |
IPX0 |
IPX0 |
|
|
|
|
|
Degree of protection against moisture (outdoor unit) |
IP24 |
IP24 |
IP24 |
IP24 |
|
|
|
|
|
Refrigerant piping, Liquid side / Gas side, (inch) |
1/4+3/8 |
1/4+3/8 |
1/4+1/2 |
1/4+5/8 |
|
|
|
|
|
Max. refrigerant pipe length, m |
20 |
20 |
25 |
25 |
|
|
|
|
|
Maximum difference in level, m |
8 |
8 |
10 |
10 |
|
|
|
|
|
Filling of Freon, kg |
0,7 |
0,9 |
1,25 |
1,45 |
|
|
|
|
|
Operating temperature range: cooling, ° C |
+18 ~ +43 |
+18 ~ +43 |
+18 ~ +43 |
+18 ~ +43 |
|
|
|
|
|
Модель |
AC TIM 09HDN S20 |
AC TIM 12HDN S20 |
AC TIM 18HDN S20 |
AC TIM 24HDN S20 |
|
|
|
|
|
Внутренний блок |
AC TIM 09HDN S20 |
AC TIM 12HDN S20 |
AC TIM 18H S20 |
AC TIM 24HDN S20 |
|
|
|
|
|
Наружный блок |
AC TIM 09HDN S20-01 |
AC TIM 12HDN S20-01 |
AC TIM 18HDN S20-01 |
AC TIM 24HDN S20-01 |
|
|
|
|
|
Operating temperature range: heating, ° C |
-7 ~ + 24 |
-7 ~ + 24 |
-7 ~ + 24 |
-7 ~ + 24 |
|
|
|
|
|
Net weight, indoor unit (kg) |
9,5 |
10,5 |
14,0 |
16,5 |
|
|
|
|
|
Net weight, outdoor unit (kg) |
29,0 |
30,0 |
43,0 |
43,5 |
|
|
|
|
|
Gross weight, indoor unit (kg) |
12,0 |
13,0 |
17,0 |
20,0 |
|
|
|
|
|
Gross weight, outdoor unit (kg) |
32,0 |
33,0 |
47,5 |
48,0 |
|
|
|
|
|
Net dimensions, indoor unit (mm) |
283x821x200 |
298x884x205 |
310x1003x222 |
328x1100x258 |
|
|
|
|
|
Net dimensions, outdoor unit (mm) |
540х830х325 |
540х830х325 |
700х960х396 |
700х960х396 |
|
|
|
|
|
Packing dimensions, indoor unit (mm) |
291x898x353 |
298x951x369 |
314х1080х383 |
354х1181х417 |
|
|
|
|
|
Packing dimensions, outdoor unit (mm) |
605х879х366 |
605х879х366 |
763х1011х455 |
763х1011х455 |
|
|
|
|
|
6 |
www.timberk.com • Electric air conditioner |
|
www.timberk.com • Electric air conditioner |
7 |
|
|
|
|
|

4. APPLIANCE DESCRIPTION
The conditioner consists of indoor and outdoor units connected by pipelines. The conditioner may be controlled from a remote control board or from an indoor unit control panel.
●
●
●
●
●
●
Fig. 1
1.Front panel
2.Display
3.Air Filter
4.The air intake
5.The horizontal grille
6.On / Off button
5. DELIVERY SET
Complete set of air conditioner (split system) includes:
Conditioner unit for indoor installation -1 piece
Conditioner unit for outdoor installation -1 piece
Remote control board -1 piece
Batteries for remote control board - 2 pcs.
User manual -1 piece
Guarantee slip -1 piece
Packing of indoor-installation unit -1 piece
Packing of outdoor-installation unit -1 piece
6. DISPLAY INDOOR UNIT
Mode indicator
Power indicator
Fig. 2
In standby mode, the power indicator lights redmode lamp is off.
In the cooling mode and the cooling mode in automatic indicators power is off, mode indicator lights green color.
In the heating mode and heating in automatic mode indicator Power is not lit mode indicator lights up in orange.
In the dry mode and the fan both indicators are off.
The conditioner may be controlled from a remote control board
Set fan speed
I feel
Turbo mode
Auto mode
Cool mode
Dry mode
Fan mode
Heat mode
Left&right swing
Temp. display type
Indoor ambient temp.
Outdoor ambient temp.
Mode button
Up&down swing button
- button
ON/OFF button
Health button
Turbo button
Temp button
I feel button
Clock button
Quiet button
Fig. 3
|
● |
● |
● |
●
●


●
●
●

●
●
●
●
● |
● |
|
|
|
● |
|
● |
|
|
|
● |
|
|
● |
|
|
● |
|
|
● |
|
● |
|
● |
|
|
|
● |
● |
|
|
|
|
|
● |
|
|
● |
|
● |
|
|
● |
|
●
●
●T
● HEALT
●
●
●
●
●
 ●
●
●
Send signal Quiet mode Clean mode
Dual-8 nixietube
Health function ECO mode Sleep mode
Child lock Clock display Light Up&down swing
Fan button
+ button
Left&right swing button
Sleep button
Clean button
Timer off button
Timer on button
Light button
ECO button
7. OPERATING MODES
ON/OFF button
Press this button can turn on or turn off the air conditioner.
MODE button
Press this button to select your required operation mode.
Fig. 4
When selecting auto mode, air conditioner will operate automatically according to exfactory setting. Set temperature can’t be adjusted and will not be displayed as well. Press «FAN» button can adjust fan speed. Press «  » or «
 » button can adjust fan blowing angle.
After selecting cool mode, air conditioner will operate under cool mode. Press « » or «
 » button to adjust set temperature. Press «FAN» button to adjust fan speed. Press «
 » or «
 » button to adjust fan blowing angle.
When selecting dry mode, the air conditioner operates at fan1 under dry mode. Under dry mode, fan speed can’t be adjusted. Press « » or «
 » button to adjust fan blowing angle.
When selecting fan mode, the air conditioner will only blow fan, no cooling
and no heating. Press «FAN» button to adjust fan speed. Press « |
» or |
|
« |
» button to adjust fan blowing angle. |
|
When selecting heating mode, the air conditioner operates under heat mode. Press «  » or «
  » button to adjust set temperature. Press «FAN» button to adjust fan speed. Press «
  » or «
  » button to adjust fan blowing angle. (Cooling only unit won’t receive
  heating mode signal. If setting heat mode with remote controller, press ON/OFF button can’t start up the unit).
NOTE:
For preventing cold air, after starting up heating mode, indoor unit will delay 1~5 minutes to blow air (actual delay time is depend on indoor ambient temperature).
Set temperature range from remote controller: 16~310C; Fan speed: auto, fan1, fan2 , fan3, fan4, fan5, infinte speed
8 |
www.timberk.com • Electric air conditioner |
|
www.timberk.com • Electric air conditioner |
9 |
|
|
|
|
|
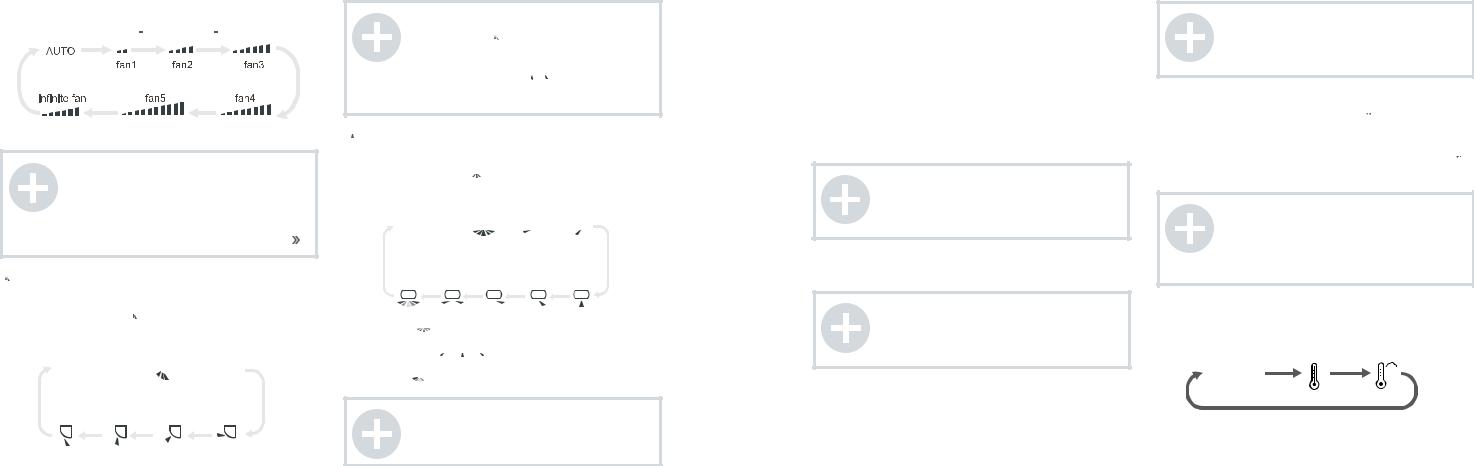
FAN button
Pressing this button can set fan speed circularly as: auto (AUTO), fan1( ), fan2 (
 ), fan3 (

 ), fan4(


 ), fan5 (


 ), infinite fan.
Fig. 5
NOTE:
In AUTO speed, air conditioner will select proper fan speed automatically according to ambient temperature.
Fan speed under dry mode is fan1.
After entering the infinite fan speed mode, users can adjust the fan speed according to the button « » or « ».
 button
Press this button the up&down swing function can be started and canceled. The remote controller defaults to static swing condition.
Press «MODE» button and « » button at the same time when remote controller OFF to switch between simple swing and static swing.
In static swing condition, pressing button, the swing angle of up & down louver changes as below:
No display 


Fig. 6
NOTE:
When selecting « » with remote controller, it’s auto swing. Horizontal louver of air conditioner will swing up&down automatically at the maximum angle.
When selecting «


 » with remote controller swing. Horizontal louver of air conditioner will stop at that position as shown by the icon to swing.

 button
Rotate button blinds left / right in this series do not used «Health» button -to activate the mode in this series do not used
Press «MODE» button and « 
 » button at the same time at remote controller OFF to switch between simple swing and static swing.
In static swing condition, pressing button, the swing angle of left & right louver changes as below:
No display


Fig. 7
When selecting « » with remote controller, it’s auto swing. Vertical louver of air conditioner will swing up&down automatically at the maximum angle.
When selecting « 


 » position swing. Vertical louver of air conditioner will stop at that position as shown by the icon to swing.
When selecting « », it’s the circulating swing. Vertical louver of air conditioner will swing circularly according to the angle as shown by the icon.
NOTE:
There is no this function for the units. If press this button, the main unit will sound, but it also runs under original status.
« » and «
  » button
Press «  » or «
  » button once to increase or decrease 1 0C of set temperature.
Holding «  » or «
  » button, set temperature on remote controller will change quickly. On reseasing button after setting is finished, temperature indicator on indoor unit will change accordingly. (Temperature can’t be adjusted under auto mode)
When setting TIMER ON, TIMER OFF or CLOCK, press «+» or «-» button to adjust time (Refer to CLOCK, TIMER ON, TIMER OFF buttons).
TURBO button
Press this button to turn on or turn off the TURBO function in cool heat fan mode.
NOTE:
Press «QUIET» or «FAN» button the unit will quit this function.
This function is no use in auto mode or dry mode.
HEALTH button
Press this button to turn on or turn off the health function.
NOTE:
If there is no this function for units, If press this button, the main unit will sound, but it also runs under original status.
SLEEP button
Press this button to turn on or turn off the SLEEP function under cool heat dry mode.
NOTE:
This function is off as defaulted after power on.
It will be cleared after changing mode.
It is no use under «FAN» mode and «AUTO» mode.
I FEEL button
Press this button to start I FEEL function and « 
 » will be displayed on the remote controller. After this function is set, the remote controller will send the detected ambient temperature to the indoor unit and the unit will automatically adjust the indoor temperature according to the detected temperature. Press this button again to close I FEEL function and «
 » will disappear.
NOTE:
Please put the removte controller near and confirm the unit can receive the remote code when this function is set. Do not put the remote controller near the object of high temperature or low temperature in order to avoid detecting inaccurate ambient temperature.
TEMP button
By pressing this button, you can see indoor set temperature, indoor ambient temperature or outdoor ambient temperature on indoor unit’s display. The setting on remote controller is selected circularly as below:
Fig. 8
10 |
www.timberk.com • Electric air conditioner |
|
www.timberk.com • Electric air conditioner |
11 |
|
|
|
|
|
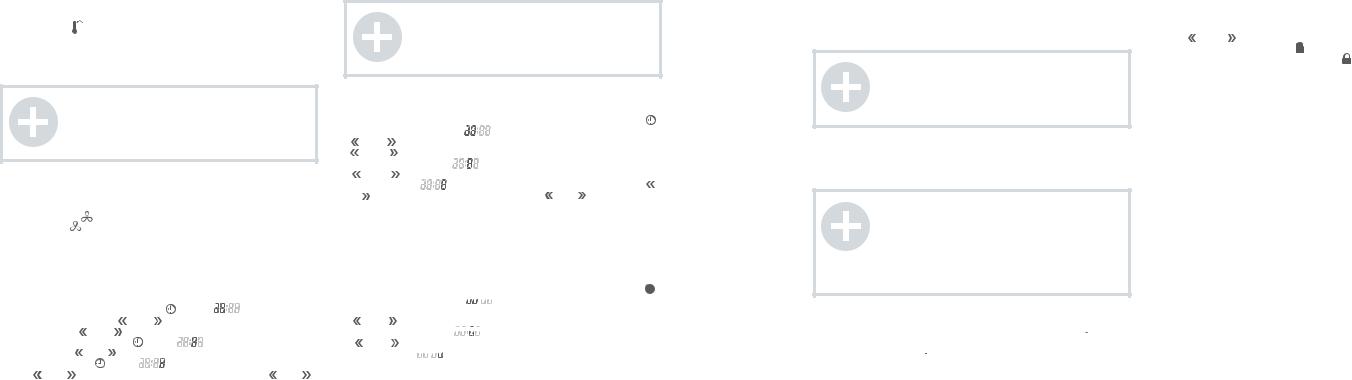
When selecting «no display» on the remote controller, the temperature indicator which on the indoor units will display the set temperature.
When selecting « » with remote controller, temperature indicator on indoor unit displays indoor ambient temperature.
When selecting « » with remote controller, temperature indicator on indoor unit displays outdoor ambient temperature.
NOTE:
Outdoor temperature display is not available for some models. At that time, indoor unit receives « « signal, it displays indoor set temperature.
CLEAN button
The Clean mode can not be set in the state of power-on; if the air conditioner ran Cooling and Dry mode before turning off. Press «CLEAN»
button and show |
then the Clean mode is turned on; Press «CLEAN» |
button again, « |
disappeared, then the Clean mode is turned off, or |
running 10 mins in Clean mode then turn off automatically.
In hte first power on, the Clean mode is turned off acquiescent.
The Clean mode can not be set and displayed when the air conditioner was in auto, Fan and Heat mode before turned off.
CLOCK button |
|
|
|
|
|
Press this button to set clock time. « |
» and « |
» icon on remote |
|||
controller will blink. Press « |
» or « » button within 5s to set clock time. |
||||
Each pressing of « » or « |
» button, clock time will increase or decrease 1 |
||||
hour. Press this button again, « |
» and « |
» icon on remote controller |
|||
will blink. Press « |
» or « |
» button within 5s to set clock time. Press this |
|||
button another time, « » and « |
» icon on remote controller will blink. |
||||
Press « » or « |
» button within 5s to set clock time. If hold « » or « » |
||||
button, clock time will change quickly. |
|
|
|||
Release when reaching your required time. Press «CLOCK» button to confirm the time, « » icon stops blinking.
NOTE:
Clock time adopts 24-hour mode.
The interval between two operation can’t exceeds 5s. Otherwise, remote controller will quit setting status. Operation for TIMER ON/TIMER OFF is the same.
TIMER ON button |
|
|
|
|
This button can set the time for timer on. After pressing this button, « |
» |
|||
icon disappears, «ON» and « |
» icon on remote controller blinks. Press |
|||
« |
» or « » button within 5s to set «TIMER ON» time. Each pressing of |
|||
« |
» or « » button, the time will increase or decrease 1 hour. Press this |
|||
button again, «ON» and « |
» icon on remote controller will blink. Press |
|||
« |
» or « » button within 5s to set the time. Press this button another |
|||
time, «ON» and « |
» icon on remote controller will blink. Press « |
» |
||
or « |
» button within 5s to set the time. Hold « » or « » button, the time |
|||
will change quickly until reaching your required time. Press «Timer ON» to confirm it. The word «ON» will stop blinking. « » icon resumes displaying.
Cancel TIMER ON
Under the condition that TIMER ON is started up, press «TIMER ON» button to cancel it.
TIMER OFF button
This button can set the time for timer on. After pressing this button, «  » icon disappears, «ON» and «


 » icon on remote controller blinks. Press
« » or «
 » button within 5s to set «TIMER ON» time. Each pressing of
«» or « » button, the time will increase or decrease 1 hour. Press this
button again, «ON» and « 


 » icon on remote controller will blink. Press
«» or « » button within 5s to set the time. Press this button another time, «ON» and «


 » icon on remote controller will blink. Press «
 » or
» or
« » button within 5s to set the time. Hold «
  » or «
 » button, the time will change quickly until reaching your required time. Press «Timer ON» to confirm it. The word «ON» will stop blinking. «
  » icon resumes displaying.
Cancel TIMER OFF
Under the condition that TIMER OFF is started up, press “TIMER OFF” button to cancel it.
QUIET button
Press this button to turn on or turn off the QUIET function in cool heat auto mode.
NOTE:
Press «TURBO» or «FAN» button the unit will quit this function.
This function is no use in fan mode or dry mode.
ECO button
In cool mode, press «ECO» button and the unit will operate under ECO mode.
NOTE:
Remote controller displays «ECO».
Air conditioner will operate at auto fan speed. Set temperature can’t be adjusted.
Under cool mode, sleep function can not work with ECO mode together at the same time.
Change mode will exit the ECO mode.
ECO button
Press this button can turn off the light for indoor unit’s display. «

 » icon on remote controller will disappear.Press this button again to turn on the light for indoor unit’s display. «

 » icon on remote controller will be displayed.
Function introduction for combination buttons
Child lock function
Press « » and « » simultaneously to turn on or turn off child lock function. When child lock function is on, «  » icon is displayed on remote controller.
If you operate the remote controller, the « |
» icon will blink three times |
without sending signal to the unit. |
|
Temperature display switchover function
In the off mode, press «  » and «MODE» buttons simultaneously to switch temperature display between 0C and °F.
The minimum cooling temperature setting
IIn the off mode,pressing «TEMP» and «  » button at the same time,the LCD will display the minimum cooling temperature.The default temperature is 160C and you can adjust the temperature with «
 » or «
  » from 160C to 310C . After pressing the «TEMP» and «
 » button with 3 seconds it will return to the standby mode.
The maximum heating temperature setting
In the off mode,pressing «TEMP» and « » button at the same time,the LCD will display the maximum heating temperature.The default temperature is 31 0C and you can modulate the temperature with «
 » or «
 » from 16 0C to 31 0C . After pressing the «TEMP» and «
 » button with 3 seconds it will return to the standby mode.
Timing defrost
In the heating mode, press «SLEEP» and «TURBO» buttons together for 3s would start or cancel the Timing defrost.
Low temperature heating function setting
In heating mode, pressing «Mode» and « » button at the same time will enter/exit the low temperature heating function.
«LA» would be showed on the remote controller after entered into the low temperature heating funtion.
When switching from one mode to another mode, low temperature heating function was canceled. Turn off and then turn on air conditioner that will remain the low temperature heating function. After powered on, the low temperature heating mode was default to off status.
In the low temperature heating mode, «SLEEP» and «Low temperature heating» function cannot start at same time. When low temperature heating mode has already started,meanwhile you press the «sleep» button, the air conditioner will exit low temperature heating mode and enter the sleep mode. Vice versa.
12 |
www.timberk.com • Electric air conditioner |
|
www.timberk.com • Electric air conditioner |
13 |
|
|
|
|
|
 Loading...