

TimberBlindsMetroShade ROLLER EXPRESS Getting Started
ROLLER EXPRESS
WAND MOTORIZATION INSTALLATION INSTRUCTIONS
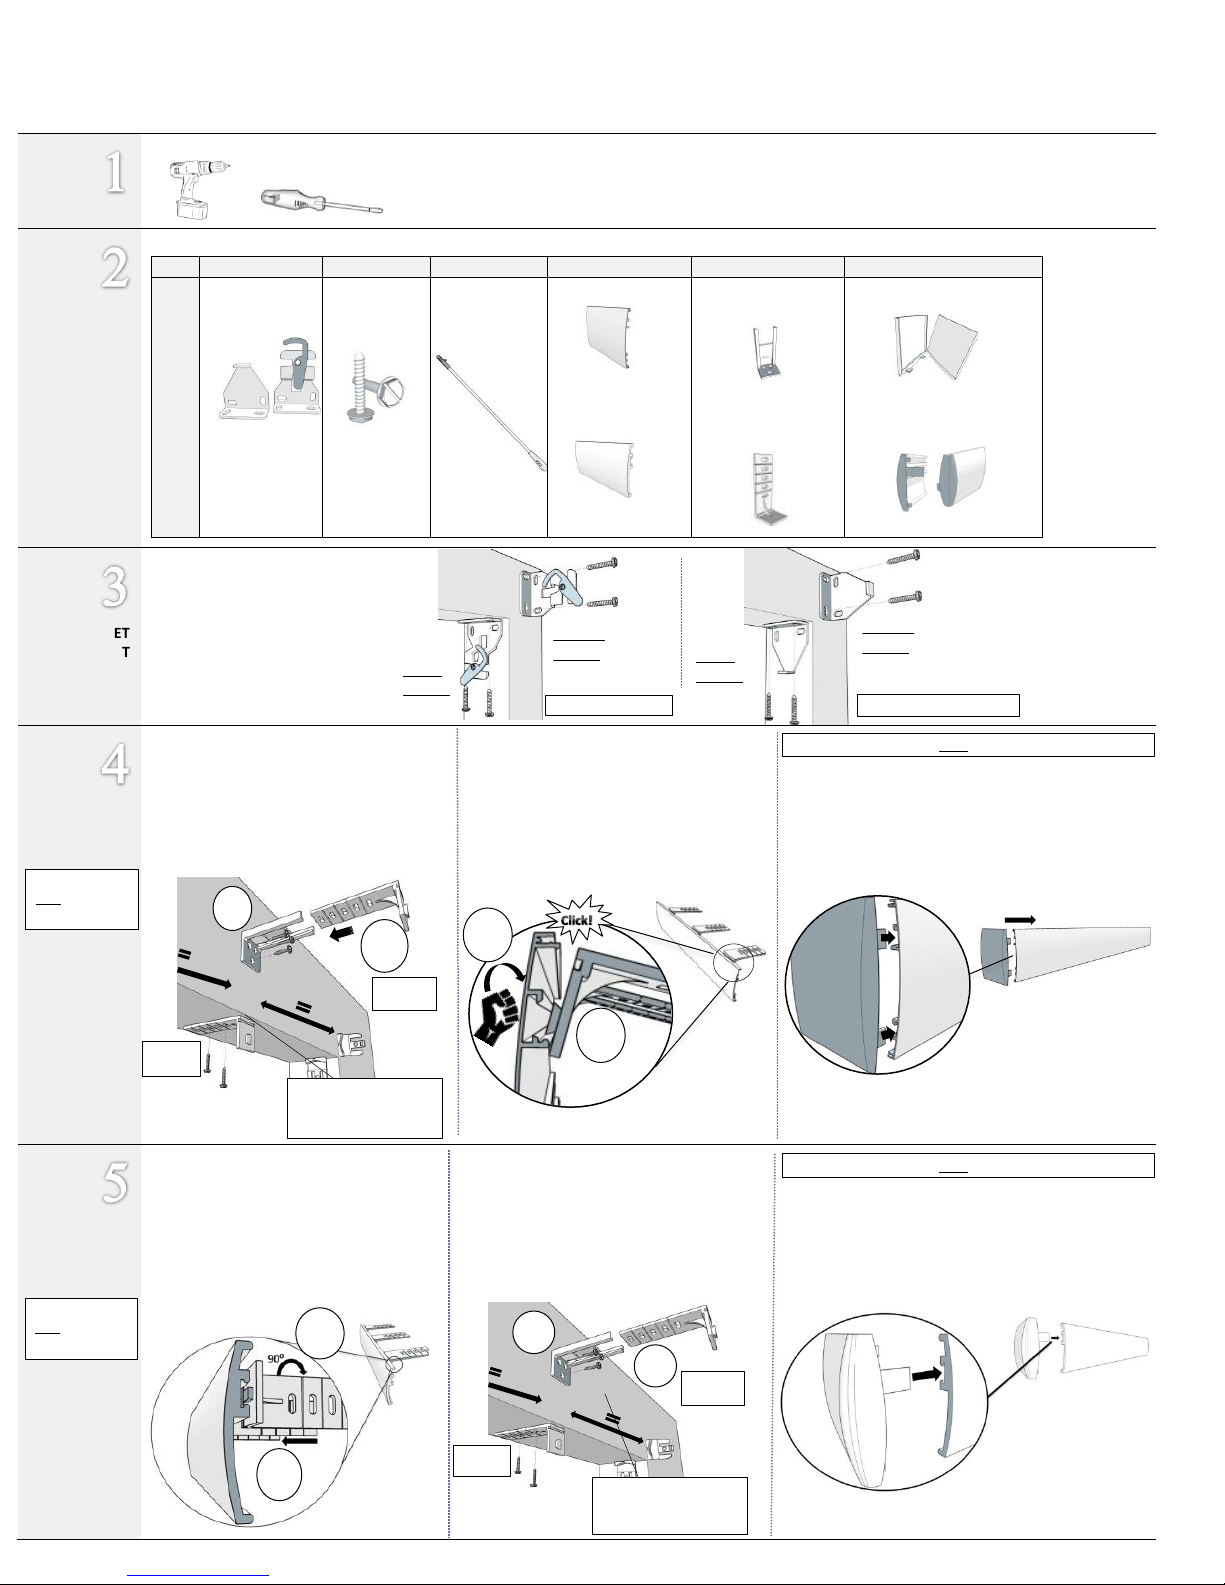
TOOLS
GETTING STARTED – TOOLS NEEDED FOR INSTALLATION
UNPACKING
THE PARTS
Locate labeled hardware bag (items may vary depending on requested shade).
ITEM 1 2
3
4 (If Applicable)
5 (If Applicable)
6 (If Applicable)
ITEM
NAME
Installation
Bracket
Installation
Screws
Wand
(A) Fascia
OR
(B) Contoured
Valance
(A) Outside Mount
Extension
OR/AND
(B) Inside Mount
Fascia Bracket
(A) Fascia Standard Returns
(B) Valance Returns
BRACKET
PLACEMENT
METAL FASCIA
PLACEMENT
VALANCE
PLACEMENT
INSIDE
MOUNT
OUTSIDE
MOUNT
OR
Locate Items 1 & 2 for this section
Determine bracket placement
(Inside Mount OR Outside Mount).
Using the Drill, secure your
brackets with installation screws.
Locate Item 4(A) for this section
To insert item 4(A) into Inside Mount Fascia
Bracket make sure to first position/rest the
Fascia according to the image (step 1) and
then give a slight tap to the fascia with
enough force until you hear an audible
Locate Item 4(B) for this section
To insert item 8(B) into Inside Mount Fascia
Bracket, make sure to position the valance
where the channel is at the top of the
valance (as shown in the image). Then push
in the Inside Mount Fascia Bracket and turn it
SKIP THIS STEP IF
NOT INSTALLING
A VALANCE
Step
2
Step
1
Locate Item(s) 5 for this section
Item 5(A) will only be included if installing as
an outside mount.
Place and secure item(s) 5A and/or 5(B) at an
equal in-between distance between the
Installation Brackets.
Locate Item(s) 5 for this section
Item 5(A) will only be included if installing as
an outside mount.
Place and secure item(s) 5A and/or 5(B) at an
equal in-between distance between the
Installation Brackets (item 1).
INSIDE
MOUNT
Step
1
Step
2
OUTSIDE
MOUNT
For flush mount, be sure
to leave a front gap the
thickness of the valance.
INSIDE
MOUNT
Step
1
Step
2
OUTSIDE
MOUNT
For flush mount, be sure
to leave a front gap the
thickness of the fascia.
Step
1
Step
2
SKIP THIS STEP IF
NOT INSTALLING
A FASCIA
Locate Item 6 (A) for this section
To insert item 6 (A) into Fascia, position the standard
return as shown in the image, and insert the return until
fully secured.
Locate Item 6 (B) for this section
To insert item 6 (B) into Valance, positon the valance as
shown in the image, and insert the return until fully
secured.
SKIP THIS STEP IF NOT INSTALLING RETURNS.
SKIP THIS STEP IF NOT INSTALLING RETURNS.
INSIDE
MOUNT
OUTSIDE
MOUNT
OR
Bracket for one side
Bracket for opposing side
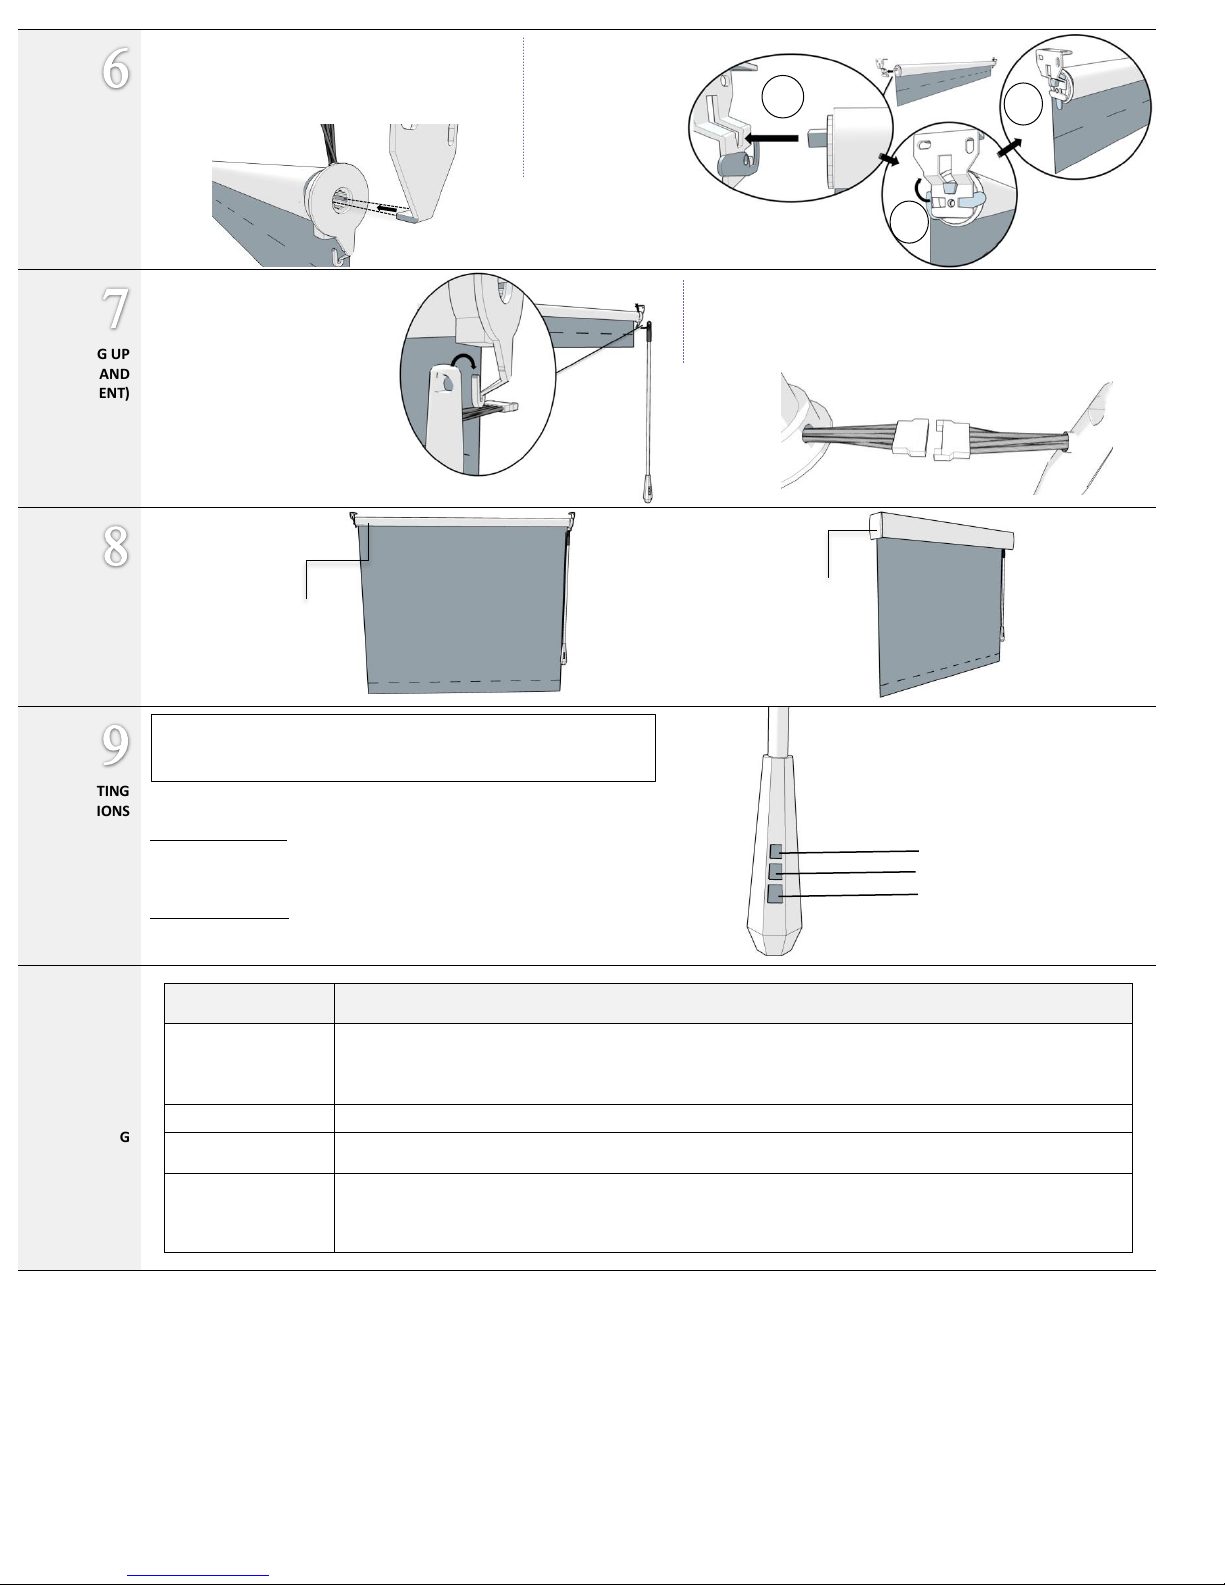
SHADE
PLACEMENT
FINISHING UP
(WAND
PLACEMENT)
FINAL LOOKS
OPERATING
INSTRUCTIONS
.
TIPS
&TROUBLE
SHOOTING
Tips &
Troubleshooting
Solutions
Shade is rolling up on
tube unevenly or
tracks:
If you notice the material winds unevenly and begins to track or telescope to one side check to insure that the shade is
level. If the shade is not level, remove it from the mounting brackets and shim or reinstall the brackets, as necessary.
IMPORTANT NOTE: Operating a shade that is not level will result in damage to the material. Damage caused by operating an unleveled
shade is not covered under our normal warranty.
Clearing the Limits
Press and hold the setting button for 4 beeps.
Reverse Motor
Direccion
Press and hold Stop + Setting Button for 4 beeps.
Wand will not operate
the shade
Re-charge the battery. The lithium ion bettery is charged via a USB power cable that plugs into the end of the wand.
Plug the recharger into the micro USB charging port on the bottom of the wand. The other end will plug into any USB
power adapter.
When the battery is fully charged, the Recharging Indicator Light will glow green.
Locate Item 3 for this section
Follow image instructions to
insert item 3 into the hook from
the installation bracket.
Follow image
instructions to insert
your shade into the
opposing Installation
Bracket from prior
section.
Open Roll
Motorized Shade
Motorized Shade with Top
Treatment & Returns
(Image: Fascia + Standard
Returns)
Follow image instructions to insert your shade into
installation bracket.
*Make sure the gap where intallation bracket will be inserted are
parallet to each other.
You will need your shade for this section
Step
1
Step 2 Step
3
Roller Wand Programming
1.Setting upper limit: Move shade to desired upper limit and press stop. Shade will
automatically go into step mode for final adjustments. When desired limit is reached,
press the setting button for one beep. THE UPPER LIMIT IS NOW SET.
2.Setting Lower limit: Move shade to desired lower limit and press stop. Shade will
automatically go into step mode for final adjustments. When desired limit is reached,
press the setting button for one beep. THE LOWER LIMIT IS NOW SET.
Up Button
Stop Button
Down Button
To finalize your wand placement,
make sure to conenct the wand to
the motor from the shade.
IMPORTANT: Your motorized shade has came to you with the limit sets.
However, if you need or would like to change/adjust the limits please follow
the instruccions located below.
 Loading...