

Page 1
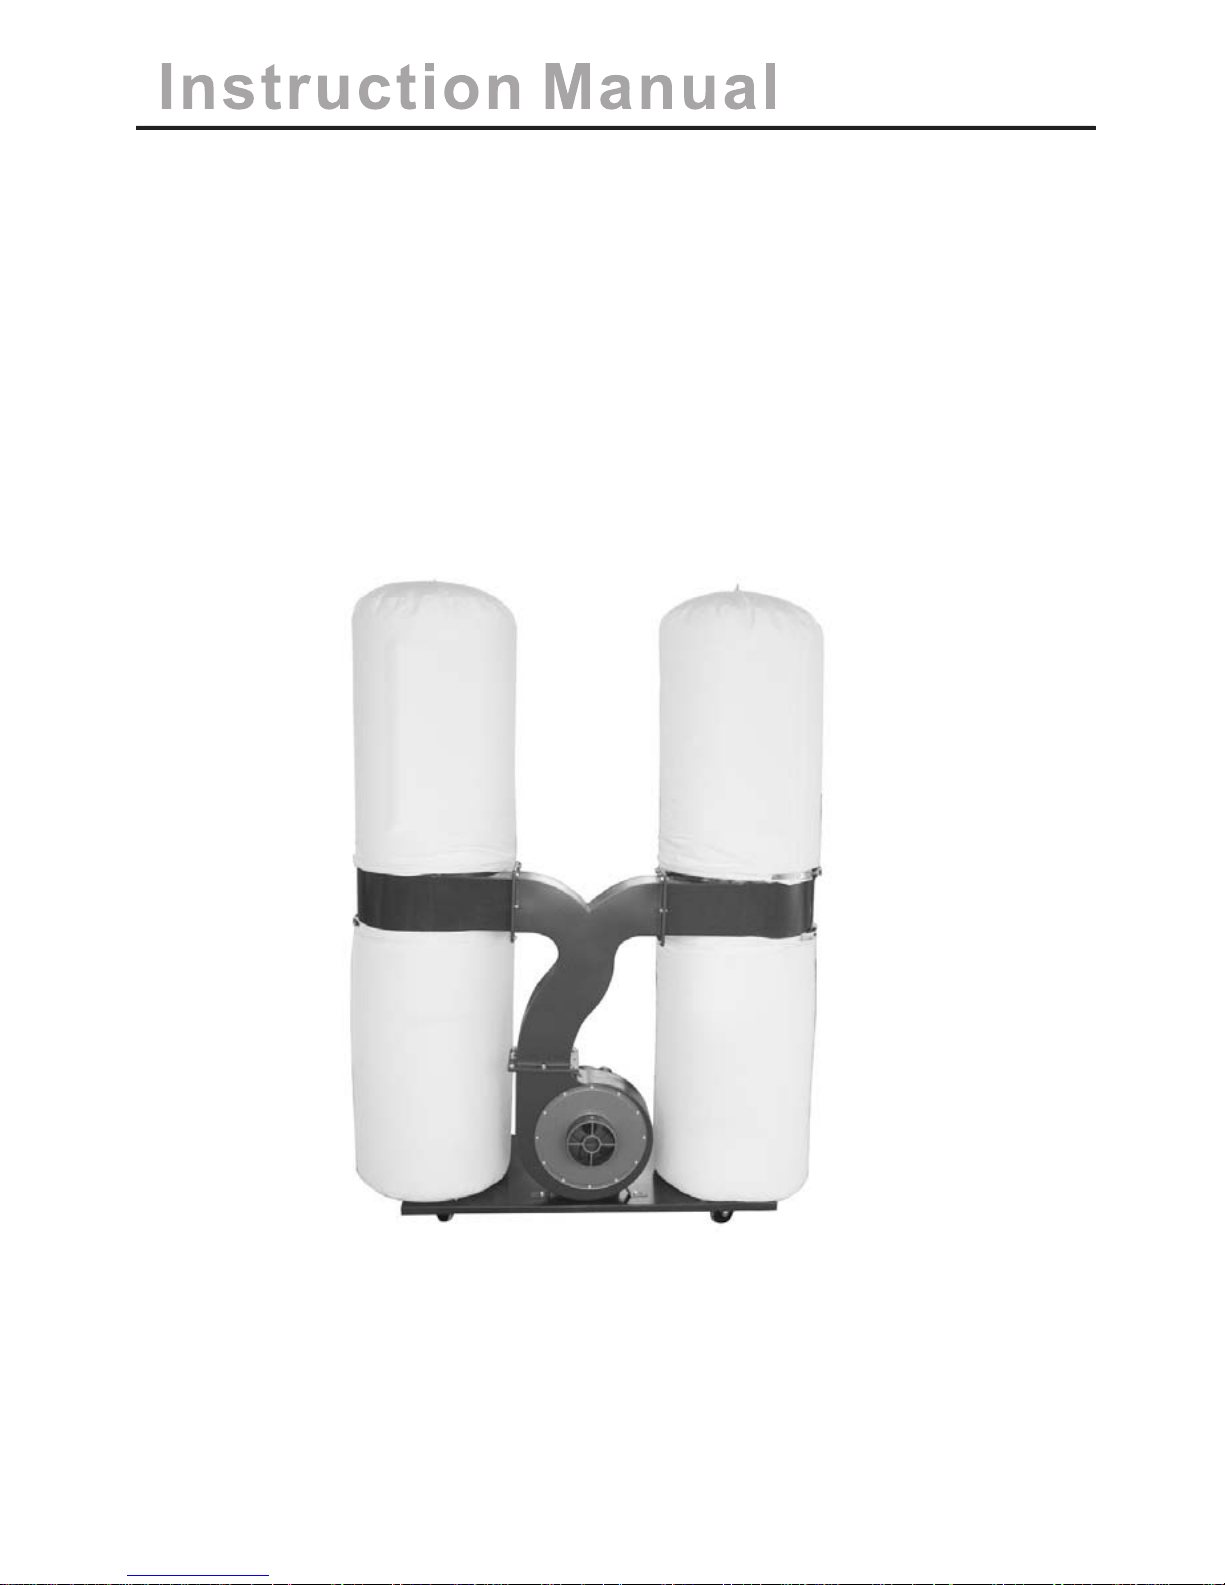
Dust Collector
Model No: DC2200
(FM300S)
Page 2

GENERAL SAFETY INSTRUCTIONS
Personal sa fe ty Clothing
Do not wear loo se c lothing, je we llery or anyt hi ng that
could get cau gh t in moving mac hi nery.
Before atte mp ting to opera te t his machine , it is
important t ha t you read, und er stand and fol low these
instructi on s very carefu ll y. The y are designe d fo r the
Hair
safety of you rs elf and other s en suring a long a nd
Long hair sho ul d be tied back or c on tained in a
trouble fre e se rvice life fr om y our machine .
protectiv e co vering.
SAFE OPERATION
Eye Protect io n
The use of safe ty g oggles is a man da tory requir ement
Know You r Power Tool
(normal gla ss es are not sufficient fo r ey e protectio n) .
It is importa nt t hat you read an d un derstand yo ur
Prescript io n spectacle s do n ot have safet y lenses.
instructi on m anual and any l ab el attached t o the
power tool. L ea rn its applic at ions as well as i ts
Ear Protect io n
limitatio ns a nd the potent ia l hazards ass ociated with
Ear protect io n is advised du ri ng periods of e xtended
this power to ol .
operation .
Work Area
Footwear
Cluttered b en ches and work a re as invite acc idents.
Where there i s a ri sk of heavy obj ec ts damaging f eet or
Workben ches should b e ke pt tidy. Flo ors should be
if there is a ris k of s lipping on we t or s lippery flo ors
kept clean an d fr ee from rubbi sh . Special car e should
suitable no n- slip safety f oo twear shoul d be worn.
be taken wher e th e floor is slip pe ry due to sawdu st or
wax.
Head Protec ti on
Where there i s a ri sk of falling o bj ects or hitti ng your
Work Envi ronment
head on protr ud ing or low leve l ob struction s a ha rd hat
Do not expose y ou r power tools t o ra in, or use in
should be wor n.
damp or wet loc at ions. Keep th e wo rk area well li t. Do
not use power t oo ls in areas whe re t here is a risk of
Respirato ry P rotection
explosion o r fi re from combu st ible materi als,
When the mach in ing operati on c reates dust , we ar a
flammable l iq uids, paint , va rnish, petr ol etc.
dust mask. Wh en m achining co nc rete, man mad e fi bre
flammable g as es and dust of an e xp losive natu re. As
boards, esp ec ially MDF (Me di um Density Fi br e Board)
a precautio n it i s recommend ed t hat you consu lt an
the resin use d in t hese materi al s can be hazard ou s to
expert on a sui ta ble fire exti ng uisher and it s use.
your health . Us e an approved f ac e mask with
replaceab le f ilter.
Guard Against Elec tric Shock
Avoid bod y contact wit h ea rthed or grou nd ed
Dust Extrac ti on Equipmen t
surfaces (e .g . pipes, radi at ors, ranges , and
If the machin e is f itted with du st e xtraction a nd
refrigera to rs).
collectio n fa cilities en su re that these a re p roperly
connected a nd u sed.
Beware Chil dr en and Pets
Children an d pe ts should be ke pt o ut of the work
Do Not Abuse th e Po wer Cord
area. Child re n should not be a ll owed to touch o r
Never yank or p ul l on the power co rd t o disconnec t it
operate mac hi nery or touch e xt ension cord s. All
from the main s su pply socket . Ne ver carry you r po wer
power tools s ho uld be kept out o f th e reach of
tool by its pow er c ord. Keep the p ow er cord away fr om
children, p re ferably sto re d or locked in a se cure
heat, oil, so lv ents and shar p ed ges. If the pow er c ord
cabinet or ro om w hen not in use.
becomes dam ag ed have it repl ac ed by an author is ed
service fac il ity.
Do Not Force th e Po wer Tool
The power too l wi ll do a better an d sa fer job and giv e
Secure the Work Piece
you much bett er s ervice if it is u se d at the rate for
Wherever po ss ible secure t he w ork piece usi ng c lamps
which it was de si gned.
or a vice. It is sa fe r than using yo ur h and and leave s
both hands fr ee t o control the p ow er tool.
Use the right t oo l
Select the ri gh t tool for the jo b. D o not use a tool fo r a
Do Not Over-r ea ch
job for which i t wa s not designe d. D o not force a sma ll
tool to do the jo b of a h eavy-duty t oo l. Do not use
Do not over-r ea ch, keep prop er f ooting and ma in tain
tools for pur po ses not inten de d; for exampl e do not
your balanc e at a ll times.
use a circula r sa w to cut tree lim bs o r logs.
1
Page 3

Maintain Tools with Car e Have your pow er t ool repaire d by a q ualified pe rs on.
Keep cuttin g to ols sharp and c le an for better a nd
This electr ic p ower tool com pl ies with nati onal and
safer perfo rm ance. Follo w th e instructi on s for
internati on al standard s an d safety requ irements.
lubricati ng a nd changing a cc essories.
Check the too l po wer cord peri od ically and if
Repairs sho ul d only be carri ed o ut by qualifi ed
damaged hav e it r eplaced by an a ut horised ser vi ce
persons usi ng o riginal spa re p arts. Failu re to do so
facility.
may result in c on siderable d an ger to the user.
Inspect ext en sion cords pe ri odically an d if d amaged
replace it.
Protect Fur ni shings
Keep handle s dr y, clean and fr ee f rom oil and gre as e.
If using the po we r tool inside y ou r house prote ct
Ensure that v en tilation sl ot s are kept clea n an d free
furnishin gs a nd floors wit h a su itable dust s heet.
from dust at al l ti mes. Blocke d ve ntilation s lo ts can
cause overh ea ting and dama ge t o the motor.
Fire Precau ti ons
When using ce rt ain power too ls i nside your ho use or
Disconnec t Po wer Tool s
workshop ge ne ral fire prec au tions shoul d be
Ensure that p ow er tools are di sc onnected fr om t he
observed. As a p re caution it is r ec ommended th at an
mains suppl y wh en not in use, be fo re servicin g,
expert is con su lted on obtai ni ng and using a su itable
lubricati ng o r making adju st ments and whe n ch anging
fire exting ui sher.
accessori es s uch as blades , bi ts and cutter s.
Remove Adju st ing Keys and Wrenches
SPECIFIC SAFETY I NSTRUCTIONS
Form the habi t of a lways check in g to see that key s
and adjusti ng w renches are r em oved from the p ow er
tool before t ur ning it on.
Avo id U nintentio nal Startin g
Some wood and w oo d type produc ts e specially M DF
Ensure that t he s witch is in the O FF p osition bef or e
(Mediu m De nsity Fibre bo ard) can prod uc e dust
plugging th e po wer tool into t he m ains supply .
that can be haz ar dous to your he al th. We
recommend t he u se of an approv ed f acemask wit h
Stay Al ert
replaceab le f ilters when r ep lacing the co ll ector and
Wat ch w hat you are doi ng, use common se nse, and
filter bags a nd w hen cleanin g th is machine.
do not operat e th e power tool wh en y ou are tired, i f
taking medi ca tion that cau se s drowsines s, when
Ensure that p ow er tools are di sc onnected fr om the
having cons um ed alcohol or t ak en drugs.
mains suppl y wh en not in use, be fo re servicin g,
lubricati ng o r making adju st ments and whe n
Check Damag ed P arts
changing ac ce ssories suc h as c ollection b ag s, and
Before usin g th e power tool it s ho uld be carefu lly
hoses.
checked to de te rmine that it w il l operate pro perly and
perform its i nt ended funct io n.
Do not use the ch ip c ollector wi th out all the gua rds,
Check for the c or rect alignm en t of moving par ts
hoses and bag s fi tted.
ensuring th ey d o not bind. Che ck f or broken or
missing par ts a nd have them re pl aced or repai red at
Do not attemp t to c lear any bloc kage until the
an authoris ed s ervice cent re . If the power to ol
machine is di sc onnected fr om t he mains supp ly.
requires mo un ting make sur e it i s securely at tached
to a suitable w or k bench.
Never place y ou r hands or fore ig n objects int o the
Check any oth er c ondition th at m ay affe ct t he
inlet or outl et o penings.
operation o f th e power tool.
A guard or any oth er p art of the powe r to ol that is
This machin e is n ot intended t o be u sed for the
damaged sho ul d be properly r ep aired or repl ac ed by
collectio n of l iquid, an ele ct ric shock wil l occur.
an authoris ed s ervice cent re u nless other wise
indicated i n th is instruct io n manual.
Any switch th at d oes not opera te c orrectly mu st be
replaced by a n au thorised se rv ice centre.
Do not use the po we r tool if the ON/ OFF switch does
not turn the po we r tool ON and OFF.
Do not attemp t to m odify the pow er tool in any way.
The use of any at ta chment or acc es sory other th an
those recom me nded in this in st ruction man ual could
result in dam ag e to the power to ol a nd injury to th e
operator.
2
Page 4
SPECIFICATION
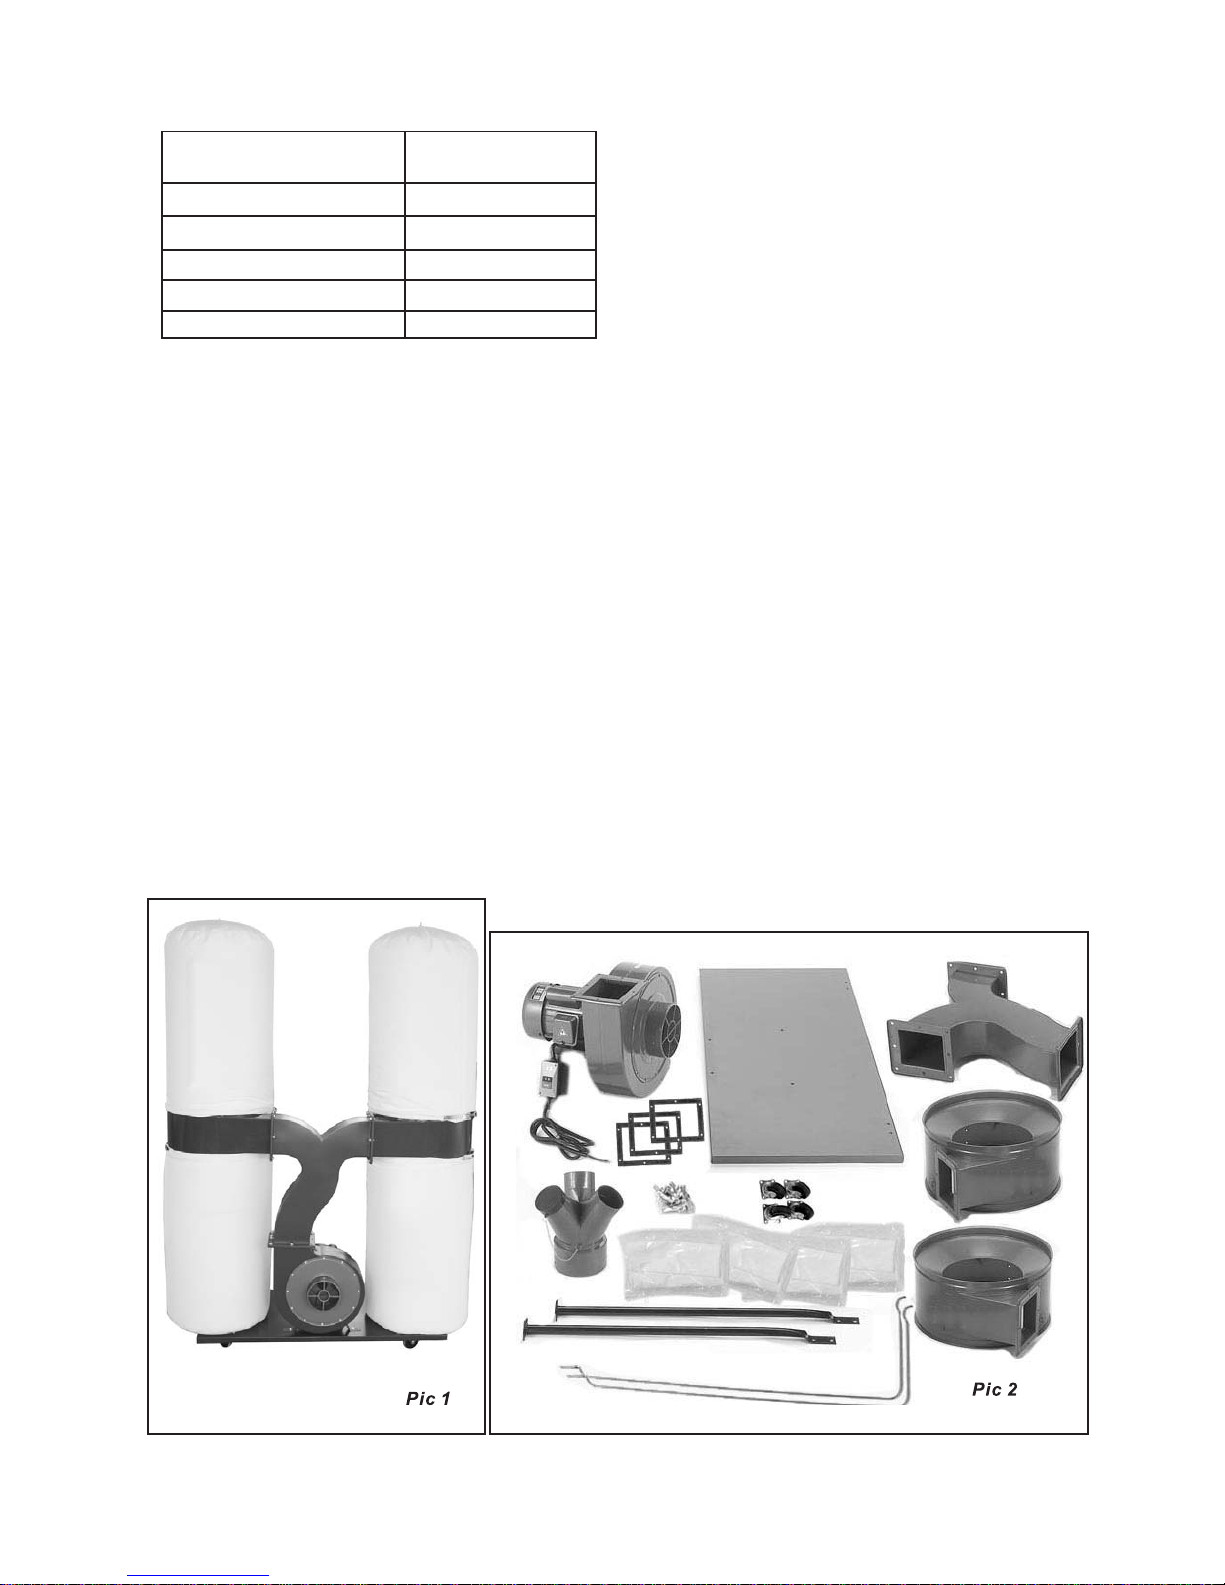
UNPACKING AND CHECK CONTENTS
ASSEMBLY
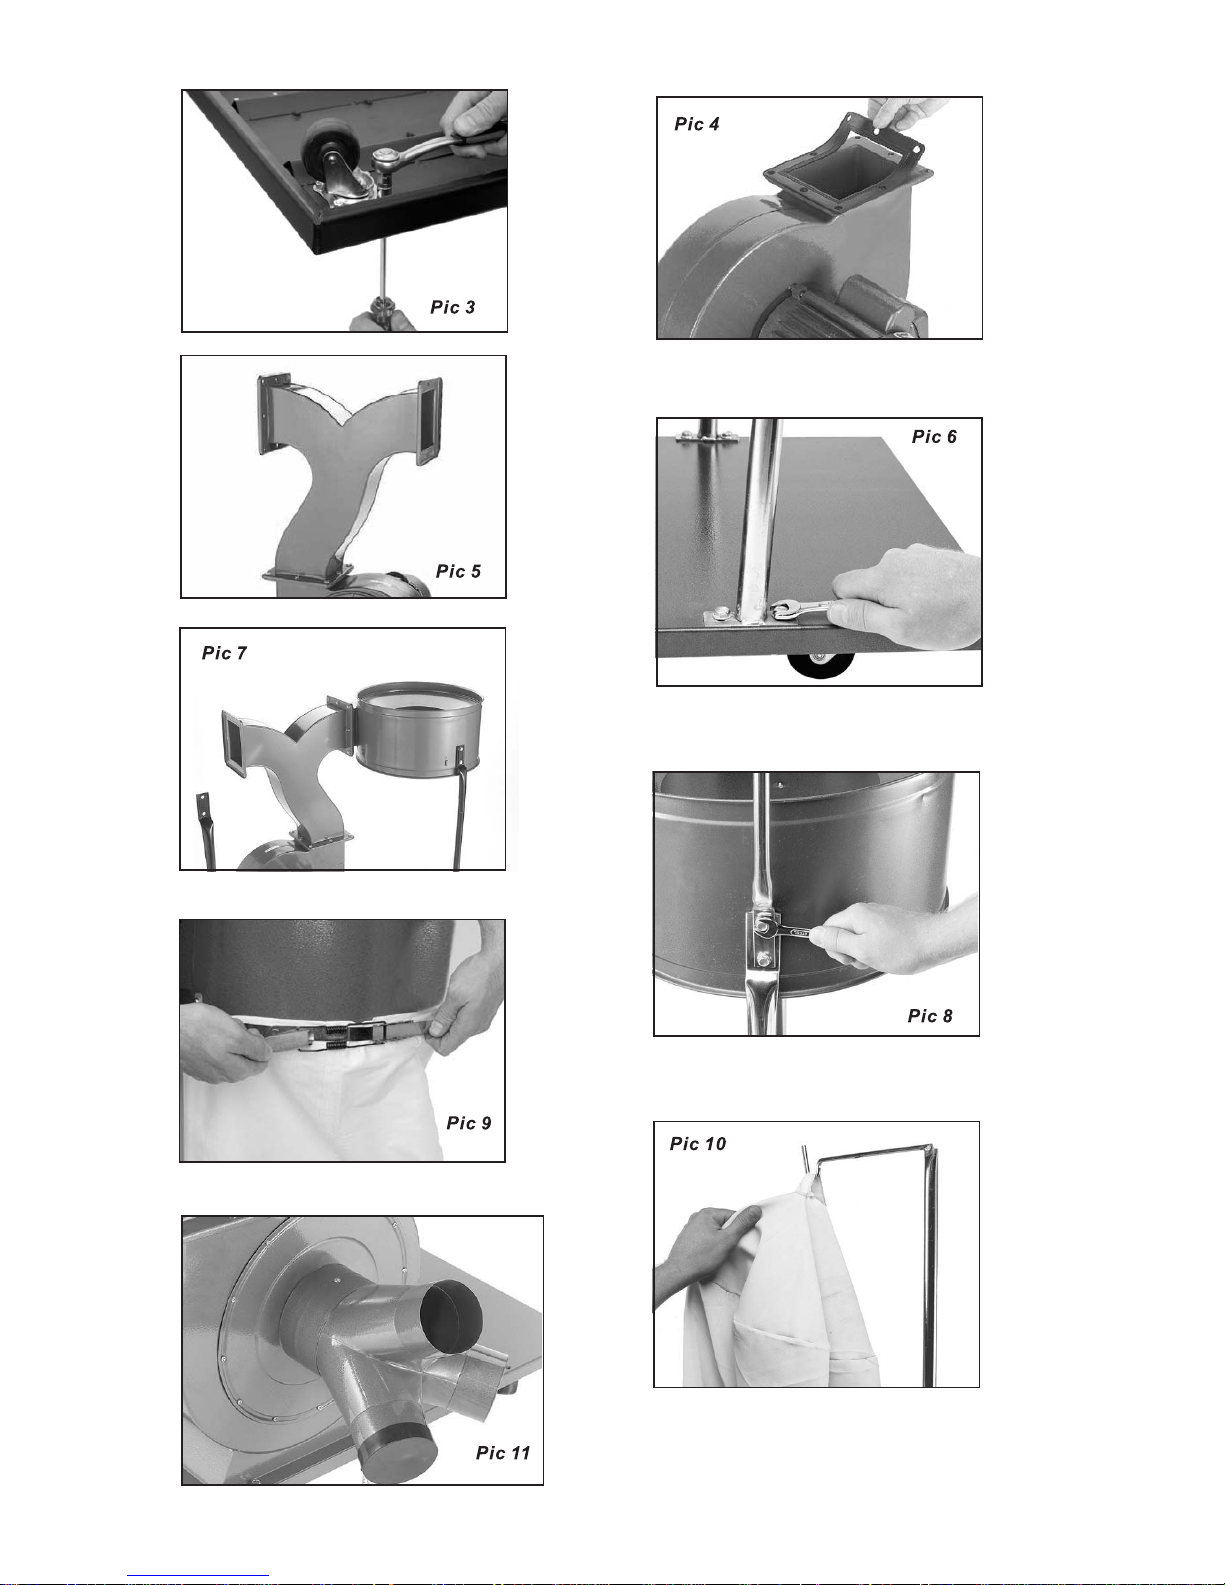
To assemb le , first place t he base plate ups ide down on
a work bench an d at tach the four c as tor's to the ho les
provided an d ti ghten with a sc re wdriver as sh own in
(Pic.3).
With the coll ec tor body & fan/ mo tor assembl y in p lace,
secure it to th e ba se plate usin g th e fixings pro vi ded.
Next, mount t he o utlet and gas ke t to the collec to r body
as shown in (Pi cs .4 & 5).
Now attach th e co llector bod y to t he outlet hos e an d
tighten wit h si x hex head scre ws p rovided.( Pic. 7)
Fit the suppo rt r ods, the dust c ol lector shou ld n ow look
like the one in ( Pi cs. 6 ,7 &8).
Place the col le ctor and filt er b ags onto the co ll ector and
secure with t he b elts as shown i n (P ic.9).
After the bag s ar e secured, th e up per bag shoul d be
hung from the u pp er bag suppor t. ( Pic. 10)
The shutter c an n ow be placed on t he i ntake hole of t he
fan/motor a ss embly. (Pic .11).
The dust coll ec tor is now read y to b e placed into s er vice.
Before conn ec ting to a power s ou rce, be sure th e po wer
source is pro pe rly earthed a nd i s of proper vol ta ge and
amperage.
1 Base 1
2 Motor/fan a ss embly 1
3 Collectio n bo dy 2
4 Bags 4
5 Packing 3
6 Caster 4
7 Support rod 3
8 3-way outle t ho se 1
9 3-way inlet 1
10 Hard ware 1bag
Motor power
Inlet diame te r (mm)
Fan diamete r (mm)
Bag capacit y (l)
3
Collectio n ca pacity ( M /hr)
Weight (kg)
150
300
307
3900
59/64
3
3HP/5HP
Page 5
4
Page 6
10 Turbo fan 20 Screw 30 Key
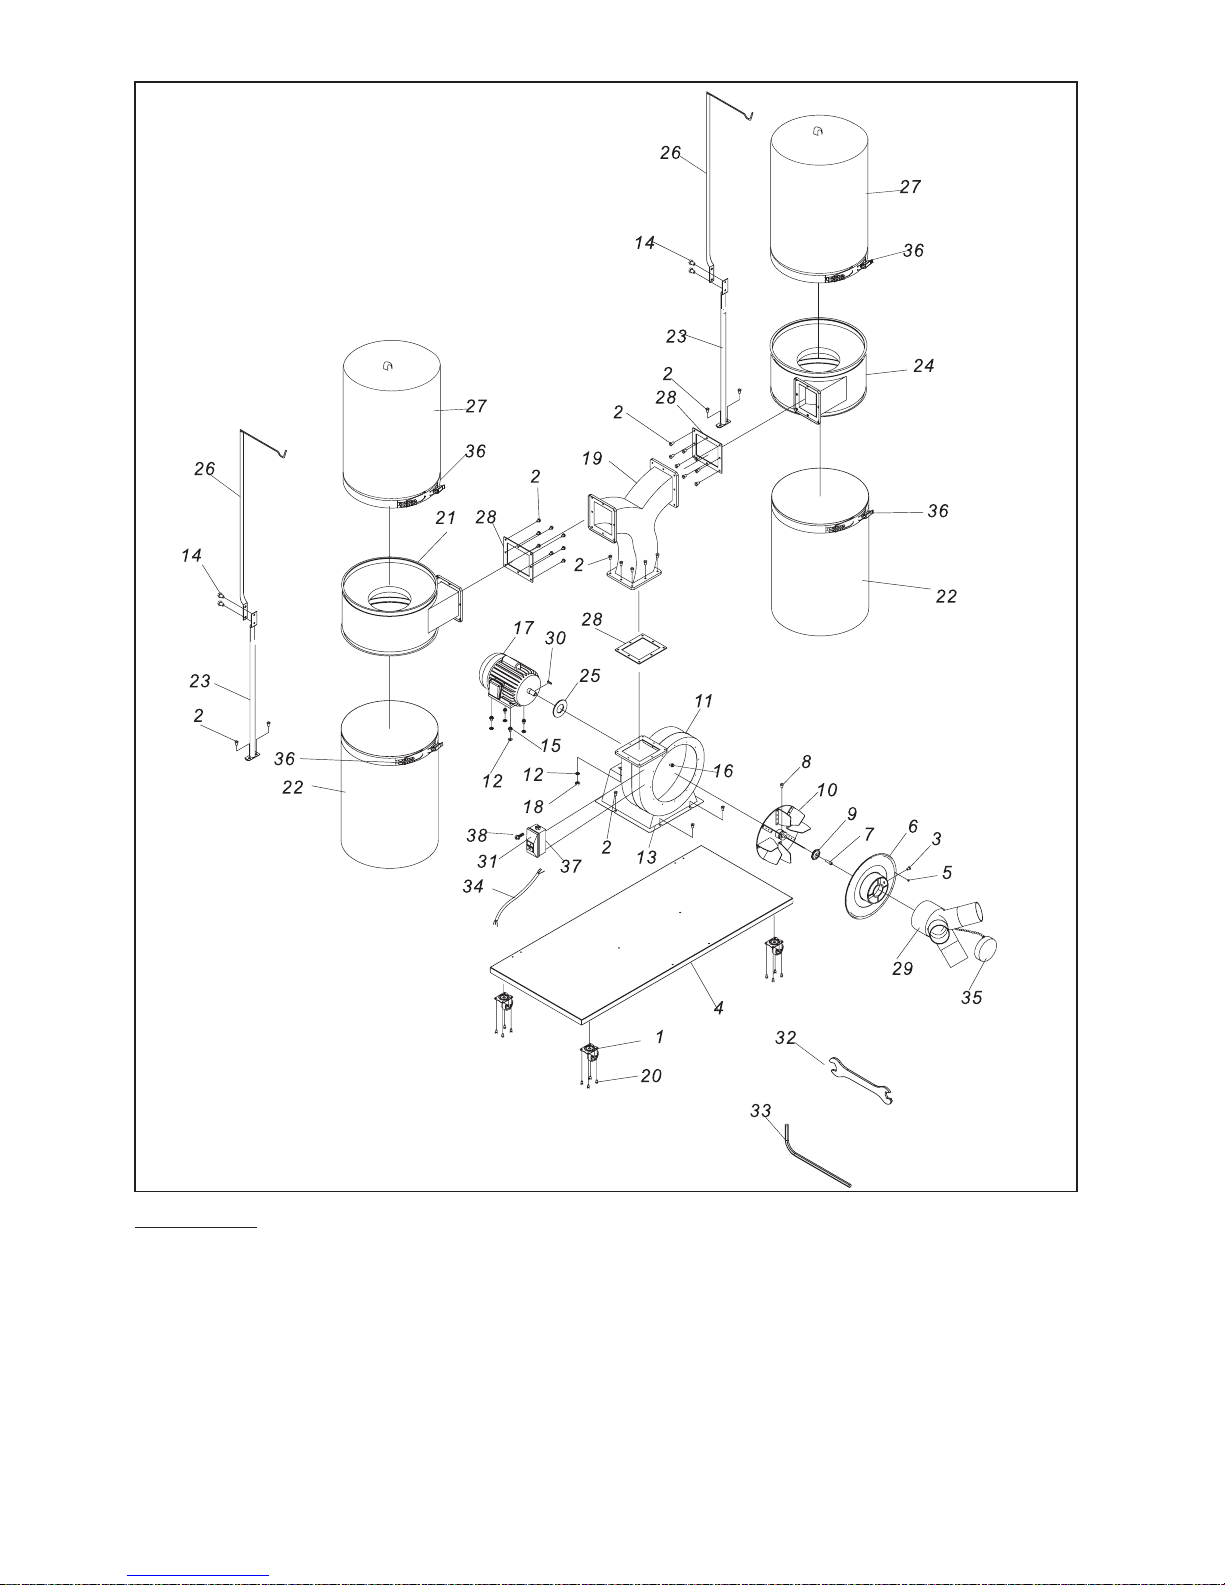
PART LIST
11 Collect or b ody 21 Left coll ec tor 31 Switch
1 Caster
12 Washer 22 Collect or b ag 32 Open end wr en ch
2 Hex head scre w
13 Motor sup po rt 23 Collect or s upport 33 Hex wrenc h
3 Screw
14 Hex head sc re w 24 Right col le ctor 34 Cable
4 Base plate
15 Hex head sc re w 25 Packing 35 Cap
5 Pan head screw
16 Bolt 26 Upper bag s up port 36 Bag clamp
6 Inlet cover
17 Motor 27 Filter ba g 37 Switc h bo x
7 Socket hex hea d screw
18 Nut 28 Packing 38 Pan head sc re w
8 Hex head screw
19 Outlet 29 Inlet
9 Wa sh er
5
Ref: 060800
 Loading...