

Tilia FoodSaver Professional II User guide
©2001 by Tilia, Inc. All Rights Reser ved.
This material may not be copied or reproduced in any
fashion without written permission from the publisher.
FoodSaver
®
is a registered trademark of Tilia, Inc.
First printing, May 2001
Printed in the United States of America
FoodSaver Patent 4,941,310
FoodSaver Bag Patent # Re. 34,929
Item# 18-0009 (5/01)
User Manual
The Original Home Vacuum Packaging System
™
PROFESSIONAL II
Hane Chow Proof
Version 6
Date 5.1.01

Welcome
THE FOODSAVER USER MANUAL
You have just purchased an appliance that will soon
have you wondering how you ever got by without
it. The FoodSaver Professional II is so convenient
and versatile, you’ll find yourself using it every day.
We guarantee that if you make room for it on your
countertop, you will quickly see how indispensable
it becomes in your kitchen.
You’ll Save Money, Time, and Effort.
◗ Meats, poultry, fish, and produce stay fresh and
flavorful in your freezer.
◗ No more freezer burn.
◗ Foods stay fresh longer in your refrigerator.
◗ Dry ingredients stay fresh in the pantry, too.
◗ Buy in bulk to reduce your grocery bills.
◗ Repackage your purchases in portions sized for
your family’s needs.
◗ Prepare meals in advance so when you don’t have
time to cook, you and your family will still have
great-tasting homemade meals.
◗ Take bags right from the freezer or refrigerator
and boil or microwave.
◗ Reduce waste and spoilage.
◗ Great for storing non-food items to keep them dry
and free of dust and mold.
◗ Stop silver from tarnishing because the metal is
not exposed to air.
Table of Contents
THE FOODSAVER USER MANUAL
1
Welcome
2 The FoodSaver Professional II
4 FoodSaver Accessories
Operating Instructions: How to...
6 Make a Custom-Made Bag with FoodSaver Rolls
8 Vacuum Package Using Ready-Made and
Custom-Made FoodSaver Bags
10 Use the Vacuum Override Button
11 Use the Manual Seal Button
14 Vacuum Package Using FoodSaver Designer Canisters
16 Vacuum Package Using FoodSaver Bulk Storage and
Square Canisters
18 Vacuum Package Using the FoodSaver Jar Sealer with Mason Jars
20 Vacuum Package Using FoodSaver Universal Lids
22 Vacuum Package Using FoodSaver Bottle Stoppers
24 Care and Cleaning Instructions
25 Food Preparation and Storage Guide
34 Important Safeguards
35 Troubleshooting
39 Vacuum Packaging Non-Food Items
40 Warranty and Service Information
THE FOODSAVER USER MANUAL
3
About Vacuum Packaging
Air is left in most food storage
containers and plastic bags even
when they are sealed tightly.
Oxygen is one of the main reasons
that food goes bad. It starts a
chemical change – robbing food of
its nutritional value, texture, color,
flavor, and overall quality. The
FoodSaver Professional II removes
the air from our FoodSaver Bags
and then seals the bags so that air
cannot reenter. The Professional II
is also designed to be used with a
wide range of FoodSaver accessories
that will keep a variety of foods
fresh longer. Finally, you can maintain the same freshness at home that
you get with professionally vacuumpackaged items you purchase at the
grocery store.
FoodSaver Bags and Rolls
◗ FoodSaver Bags and Rolls are made
from a patented, 3-ply plastic
material with special channels that
remove the air. The outer layer of
nylon seals freshness in, while locking air and moisture out.
◗ FoodSaver Bags and Rolls can go
straight from the freezer and
refrigerator to the microwave or
boiling water.
◗ FoodSaver Bags and Rolls are
reusable, washable (including in
the dishwasher), and recyclable.
◗ FoodSaver Bags are ready-made
in quart and gallon sizes to offer
convenient, one-step storage.
◗ FoodSaver Rolls come in two
widths, 8 inches and 11 inches,
which allow you to make customsized bags for the items that you
are vacuum packaging.
◗ Most FoodSaver users like to keep
both bags and rolls handy for the
greatest packaging convenience.
Our Patented 3-Layer Design
Patented FoodSaver Bags are designed to
remove air and seal in freshness.
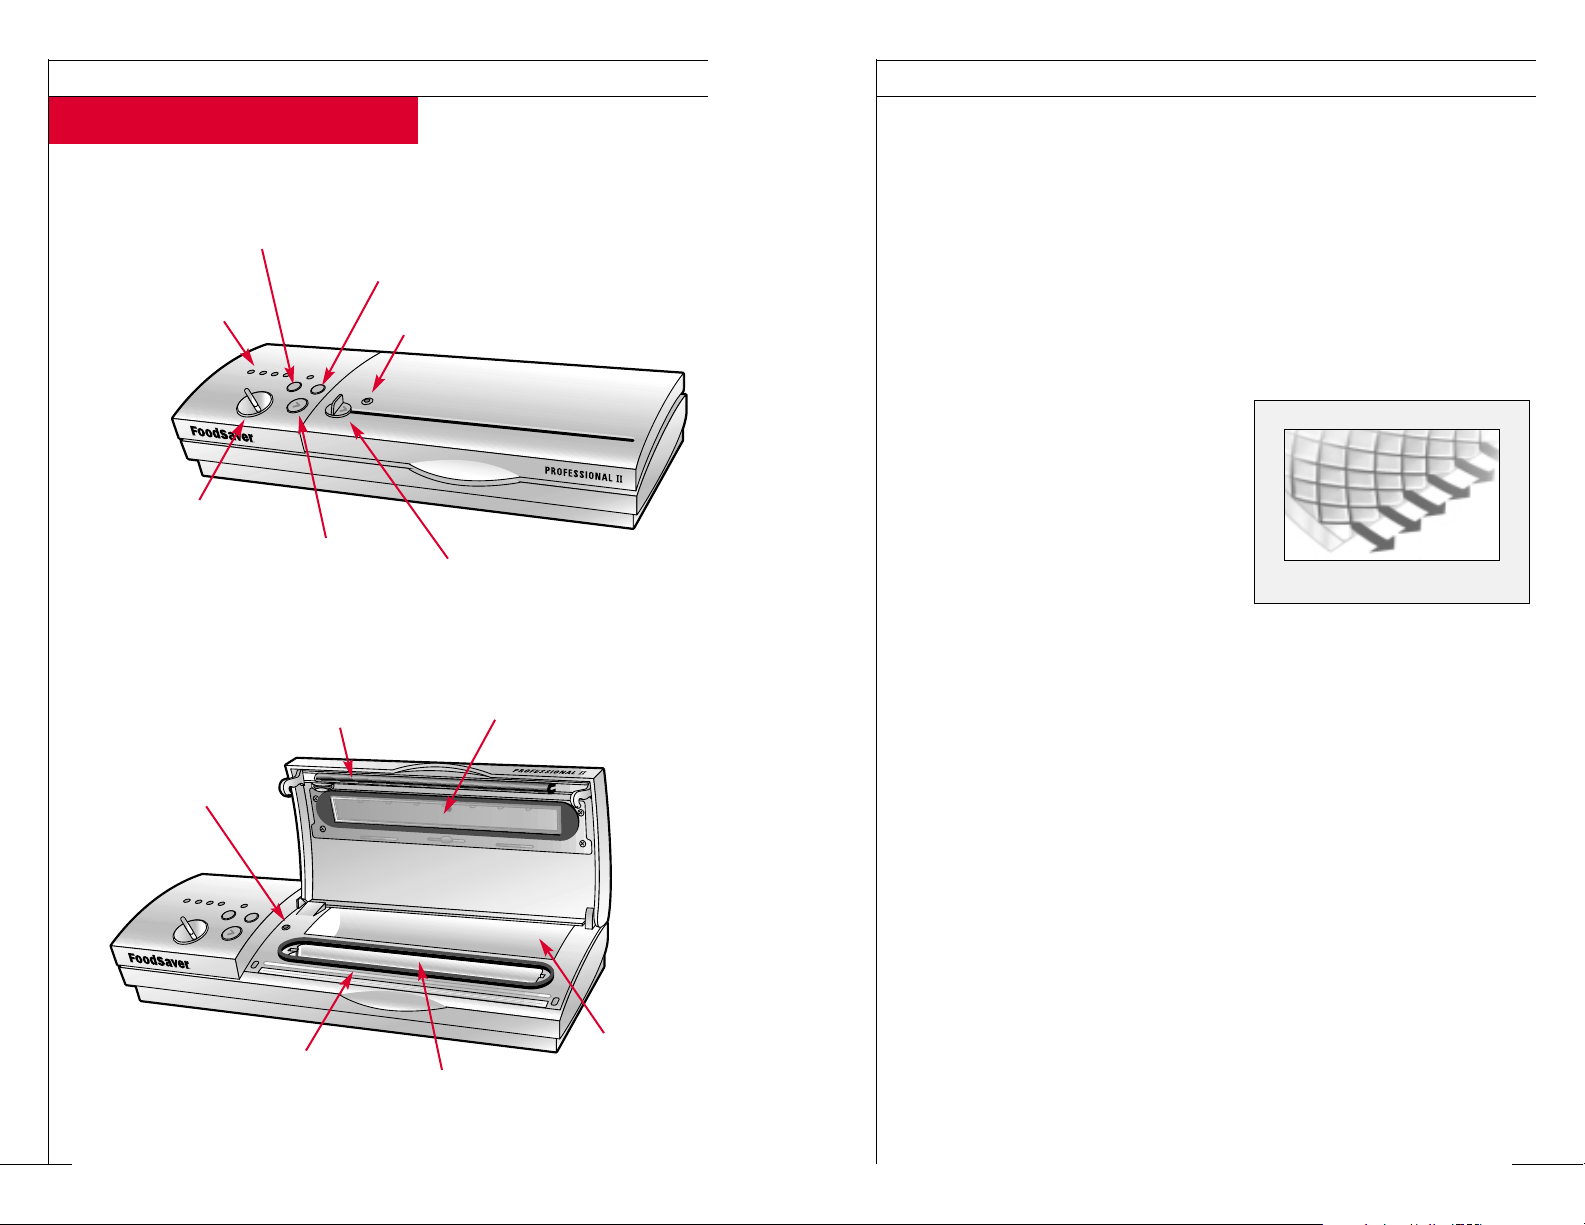
The FoodSaver Professional II
THE FOODSAVER USER MANUAL
2
Indicator Lights
Safety Precision
Bag Cutter
Bag Sensor
Switch
Accessory Port
Sealing Time
Adjustment Knob
Automatic
On/Off Button
Manual Seal
Button
Vacuum Override
Button
Vacuum Channel
Sealing Strip
Bag Strorage
Compartment
Safety Knife Blade
Sealer
Pressure Bar
FoodSaver Accessories
THE FOODSAVER USER MANUAL
4
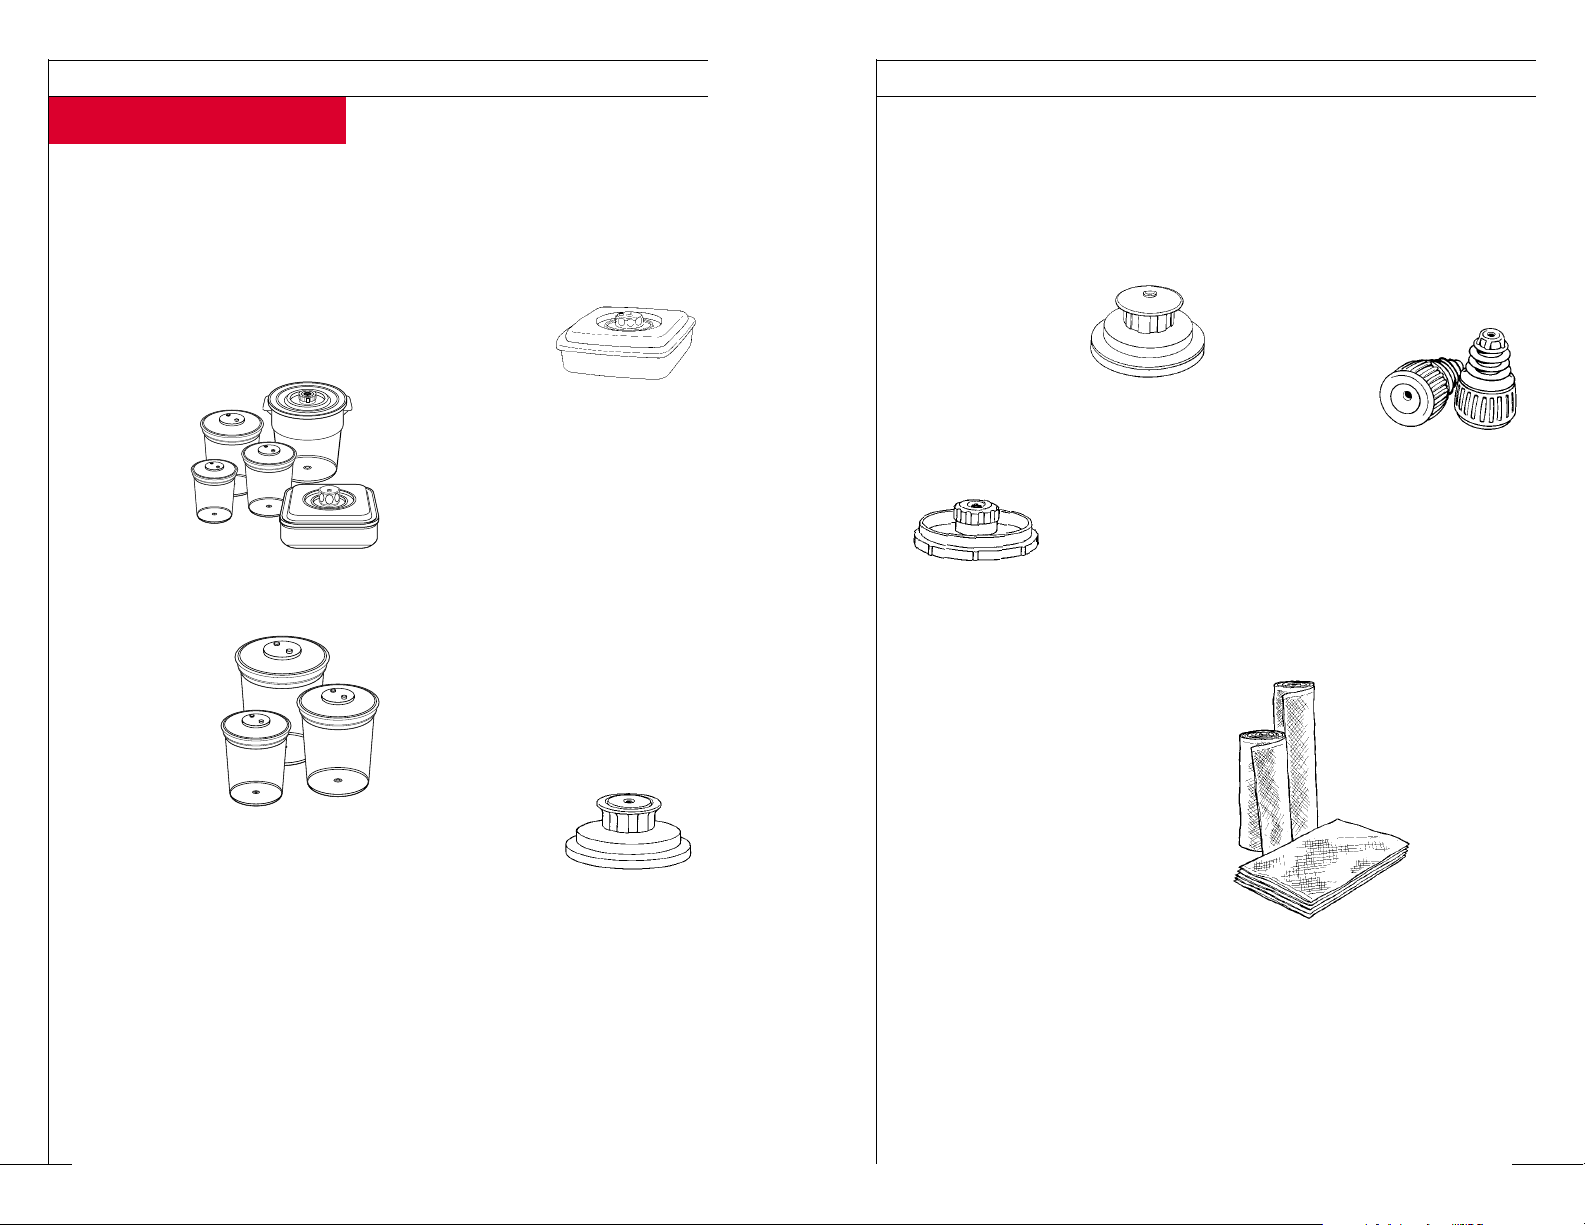
FoodSaver Canisters
◗ There are three styles of FoodSaver
Canisters – Designer, Square, and
Bulk Storage. They are ideal for
storing delicate items and liquids,
as well as dry goods and cooking
staples. The
canisters
come in a
variety of
sizes and
all can be
used in the refrigerator
and pantry. Canisters are not to
be used in the freezer.
◗ FoodSaver
Designer
Canisters are
especially
attractive for
use on your
countertop.
◗ Vacuum packaging in the
FoodSaver Square Canister is an
excellent way to marinate foods
because the process opens the
pores of the
food and seals
in the flavor. The Professional II
can marinate food in 20 minutes
so you don’t have to wait all day
or overnight for that special taste.
All FoodSaver Canisters work for
marinating, but we recommend
the Square Canister because less
marinade will be needed.
◗ The Bulk Storage Canisters are
designed to store pantry items
such as cereal, chips, rice, and
baking goods.
FoodSaver Regular Jar Sealer
◗ The FoodSaver
Regular Jar
Sealer allows
you to vacuum
package in regular or standardmouth mason jars.
Note: FoodSaver Jar Sealers are
designed to fit mason jars manufactured in the U.S., such as Ball
®
and Kerr®brands.
THE FOODSAVER USER MANUAL
5
FoodSaver Wide-Mouth Jar Sealer
◗ The FoodSaver Wide-Mouth Jar
Sealer allows you to
vacuum package
in wide-mouth
mason jars.
FoodSaver Universal Lids
◗ With this great kitchen accessory,
you don’t have to transfer many
foods out of their
original containers.
Vacuum package
and extend the life of foods in their
original glass jars and metal cans.
◗ Available in two sizes – 4 inches
and 5
1
⁄2 inches in diameter.
FoodSaver Bottle Stoppers
◗ FoodSaver Bottle Stoppers allow
you to vacuum package bottles
to protect the taste and
extend the life of liquids
such as wine,
liquor, and
cooking oils.
Purchasing FoodSaver Bags,
Rolls, and Accessories
◗ Your Professional II kit includes
FoodSaver Bags and Rolls and
may include some accessories.
Additional supplies and accessories are available at your local
retailer. To find the nearest one,
visit our website at
www.foodsaver.com
or call our Consumer
Services Department
at the number listed
at the back of
this manual.
THE FOODSAVER USER MANUAL
7
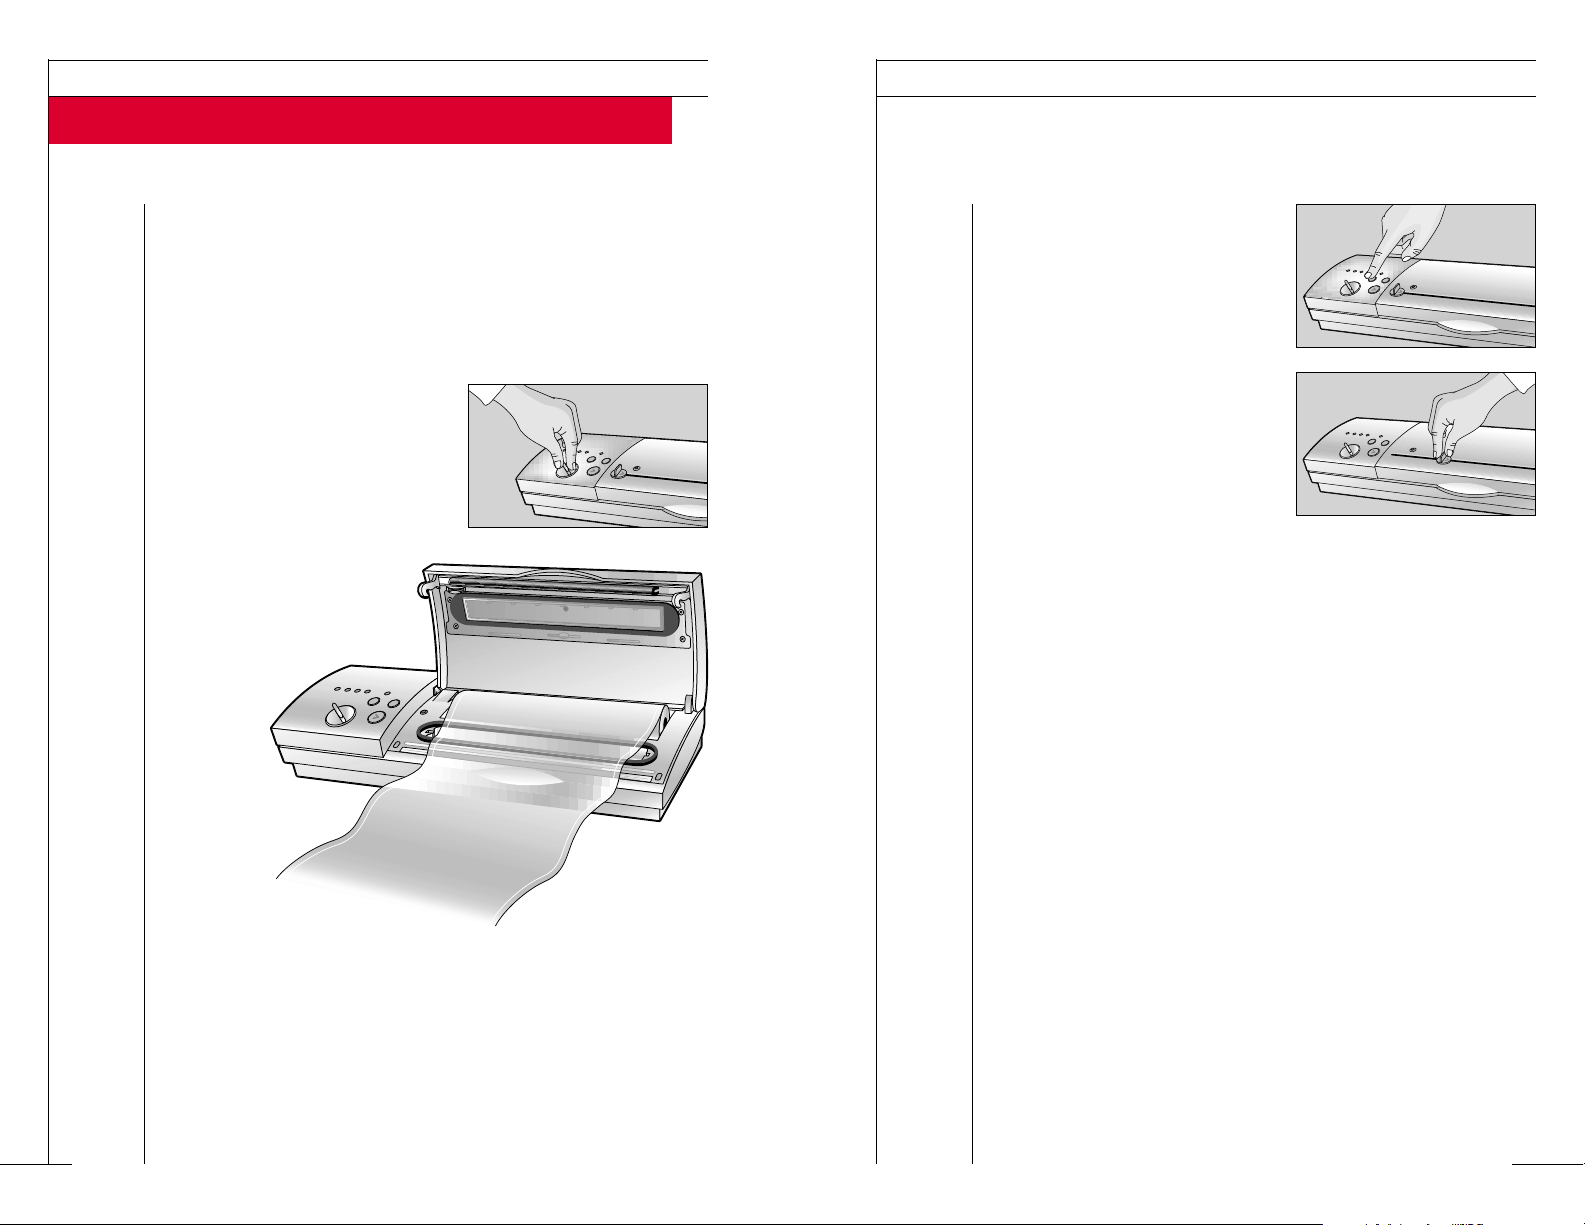
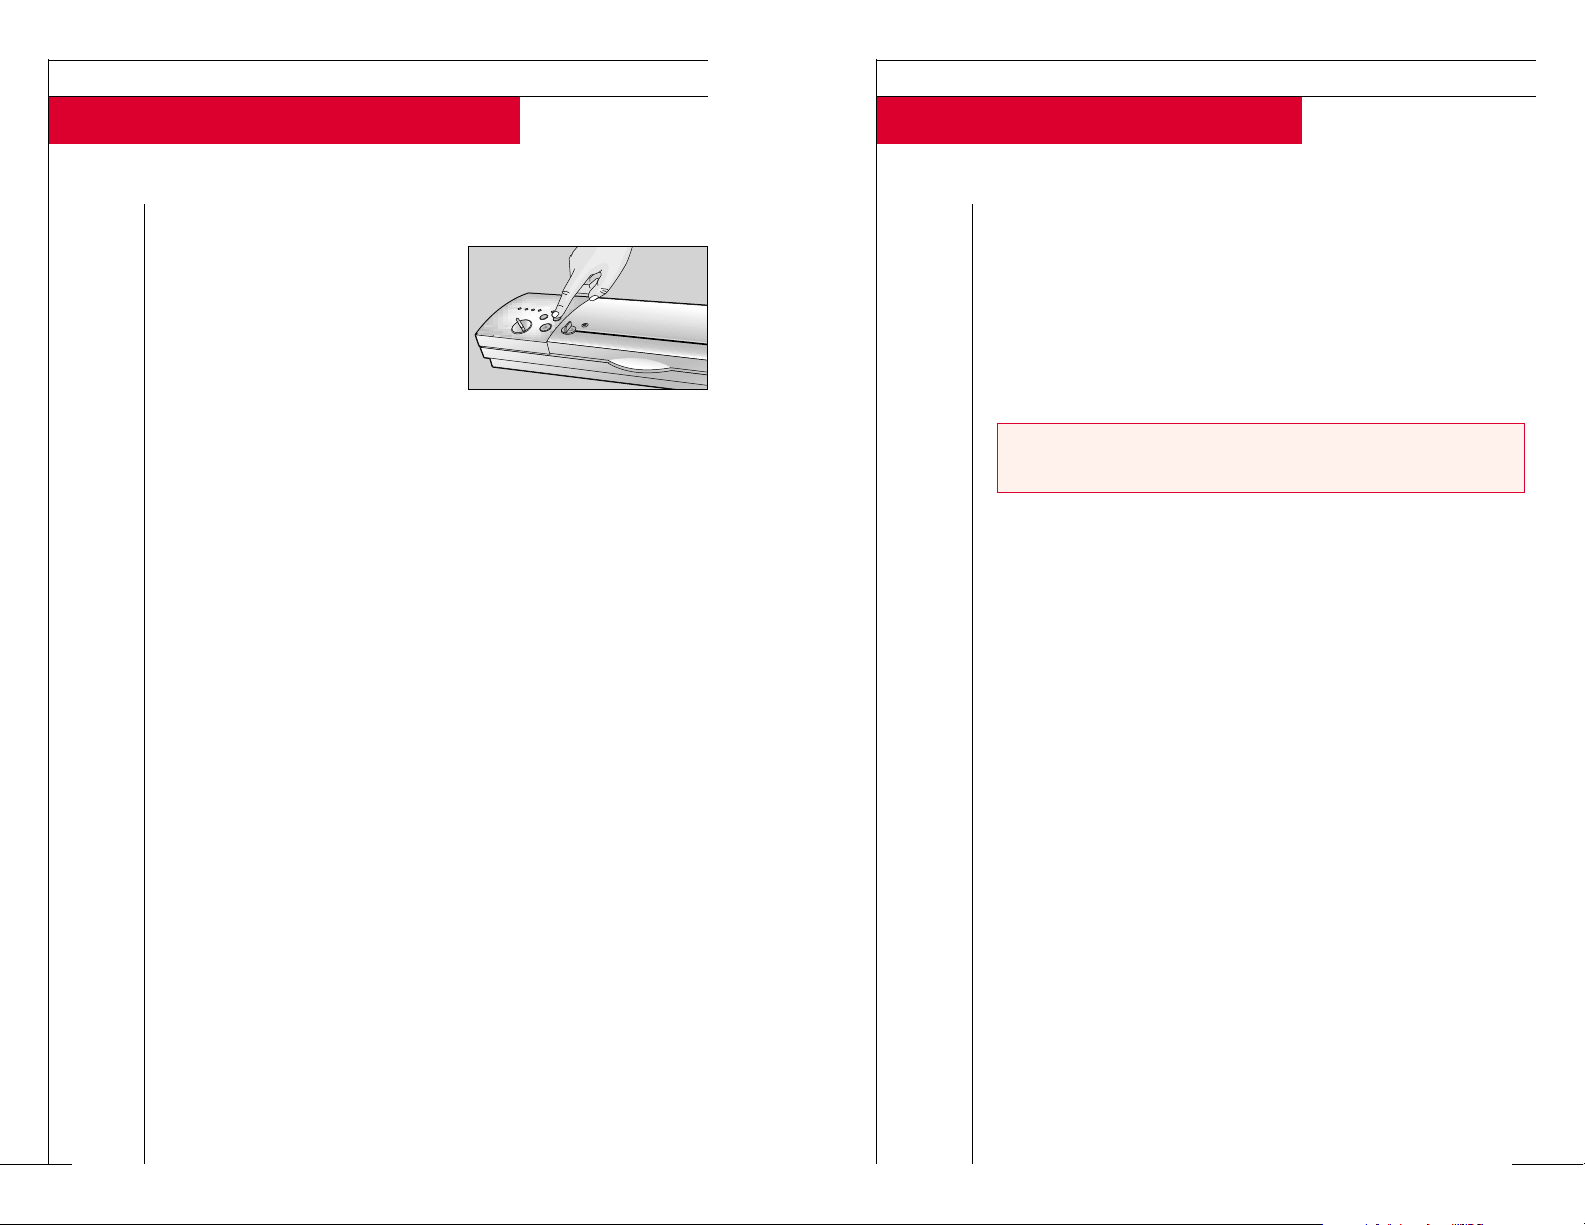
6 Press and release the Manual Seal
Button. The lid will be automatically pulled down into the sealing
position. The red sealing light will
come on indicating the bag is
being sealed.
7 While the bag is sealing, slide the
bag cutter completely across the
sliding channel to cut the bag.
Make sure you return the bag
cutter to the extreme left or right
side of the sliding channel. Note:
You may have to push down and apply extra pressure to make
sure the bag has been cut.
8 At the end of the sealing process, the red sealing light will blink,
indicating the machine is re-programming itself for the next
function. The lid will open slightly returning to the ready position.
Do not lift the lid until after the red sealing light stops blinking and the lid has reset to the ready position.
9
Lift up the lid and remove the bag.
10 You now have a custom-sized FoodSaver Bag.
You are now ready to vaccum package. Just follow the instructions on page 8.
How to Make a Custom-Made Bag with FoodSaver Rolls
THE FOODSAVER USER MANUAL
6
When using FoodSaver Rolls you first need to make a bag, then
vacuum package your food in the bag. (If you are using ready-made
FoodSaver bags, go to page 8.)
1 Place the Professional II on a flat, dry surface and plug the power
cord into a standard electrical outlet.
2 Set the sealing time adjustment
to “3.”
3 Open the lid and place the
FoodSaver Roll into the bag
storage compartment so that
the end of the roll comes up
from the back and can be
pulled across the top of the
roll toward the front of
the machine. Make
sure the roll is
centered so
that an
even seal
will be
achieved.
4 Lay the item(s) you want to vacuum package near the Professional II
and pull the roll out to the desired length. Leave at least 3 extra
inches at one end of the bag and more if you want to reseal or
reuse the bag. (One inch per reseal.)
5 Close the lid.

THE FOODSAVER USER MANUAL
9
6 Press and release the On button.
The Professional II will automatically vacuum and seal, then turn
itself off.
7 When the vacuum and sealing pro-
cess is complete, the red sealing
light will blink indicating the
machine is re-programming itself
for the next function. The lid will
open slightly returning to the
ready position.
Do not lift the lid
until after the red sealing light
stops blinking and the lid has reset to the ready position.
8
Lift up the lid and remove the bag.
9 Vacuum packaging is complete.
IMPORTANT: You will need to pre-freeze foods that have excess
liquid or moisture before vacuum packaging in FoodSaver Bags
because the liquid can be drawn up into the vacuum pump.
How to Vacuum Package Using Ready-Made
and Custom-Made FoodSaver Bags
THE FOODSAVER USER MANUAL
8
1 If you have not already done so, place the Professional II on a flat,
dry surface and plug the power cord into a standard electrical outlet.
2 Open the lid.
3 Place the items to be vacuum packaged into the bag.
4 Place the open end of
the bag
down into the
vacuum channel.
5 Close the lid.
How to Use the Manual Seal Button
THE FOODSAVER USER MANUAL
11
When to Use the Manual Seal Button
Use the Manual Seal Button when you want to seal a FoodSaver
Bag before a complete vacuum has been created. This feature is
useful when vacuum packaging fragile items such as bread, baked
goods, and berries so they don’t get crushed.
How to Use the Manual Seal Button
1
If you have not already done so, place the Professional II on a
flat, dry surface and plug the power cord into a standard electrical outlet.
2 Open the lid.
3 Place the items to be vacuum packaged into the bag.
NOTE: If using a FoodSaver Roll, you will need to create a bag first.
Refer to instructions on page 6.
How to Use the Vacuum Override Button
THE FOODSAVER USER MANUAL
10
How to Use the Vacuum Override Button
If you want to remove even more
air from a FoodSaver Bag, Designer
Canister, Square Canister, Bulk
Storage Canister, mason jar, or
other storage container, simply
press and hold the Vacuum
Override Button. It will delay the
sealing process. When you release the button, the Professional II
will return to the normal sealing cycle, then turn itself off and
reset to the ready position.
 Loading...