


17
&
23DVB-T
the bathroom television
HIGH-DEFINITION MULTIMEDIA INTERFACE
TM

1
Safety Instructions and Warnings
Do not use a damaged socket and do not let the power cord
touch a heat source.
– This may cause an electric shock or fire.
Do not attempt to service the unit.
Contact an authorised dealer or repair service.
– Servicing the unit yourself may cause an electric shock or fire.
If there are any unusual sounds or smells coming from the
unit, unplug it immediately and contact an authorised
dealer or repair service.
– This may cause an electric shock or fire.
If an outside antenna is connected to the unit, ensure the
external to internal cable entry is fully sealed
– This may cause an electric shock or fire.
Do not connect too many extension cords or plugs to
an outlet.
– This may cause a fire.
Keep the power adaptor away from any heat source.
– This may cause a fire.
Ensure the antenna is located away from overhead cables.
– This may cause an electric shock.
Do not add an additional screen or cover the TileVision’s glass.
– The heated screen prevents condensation forming in steamy
rooms and covering the screen may cause the unit to overheat.
CAUTION
RISK OF ELECTRIC SHOCK
DO NOT OPEN
WARNING: TO PREVENT INJURY, THIS APPARATUS MUST BE
SECURELY ATTACHED TO THE WALL IN ACCORDANCE
WITH THE INSTALLATION INSTRUCTIONS.
CAUTION: DO NOT REMOVE COVER.
NO USER-SERVICEABLE PARTS INSIDE.
REFER SERVICING TO QUALIFIED SERVICE PERSONNEL.
BEWARE OF STATIC SENSITIVE PARTS.
17&23DVB-T
This symbol is intended to alert the user to the presence of
important operating and maintenance (servicing) instructions in the
literature accompanying the appliance.
RoHS
COMPLIANT
This product contain Electrical/Electronic Parts which are produced
using components in compliance with the requirements of: European
Union Directive 2002/195/EC for the Restriction of the use of certain
Hazardous Substances in Electrical and Electronics Equipment (RoHS).
the bathroom television
Waste Electrical and Electronic Equipment (WEEE) Directive
In the European Union, this symbol indicates that this product should
not be disposed of with household waste. It should be deposited at an
appropriate facility to enable recovery and recycling.
To prevent injury, the TileVision® must be securely attached to the wall in accordance with the
installation instructions.
The power supply must be connected to a mains socket outlet with a protective earth connection.
The mains plug or the pull switch is the disconnect device and must remain readily operable.
Failure to observe the above safety warnings may invalidate the warranty.
HIGH-DEFINITION MULTIMEDIA INTERFACE
TM
The HD ready logo is a trademark of EICTA

2
3
☛
Silicone Sealant produces acetic acid during cure.
Use only in well ventilated areas. Irritating to eyes.
Wash hands after use and before meals. Wash
splashes from skin, clothing and other surfaces. Use
a clean cloth. In case of contact with eyes wash
immediately with plenty of water.
Please observe safety precautions on the container.
Keep out of reach of children and animals.
☛
Isopropyl alcohol is available from most pharmacies
and larger electronics wholesalers. It is an effective
degreasing agent.
Please observe safety precautions on the container.
Keep out of reach of children and animals.
Do not drink.
Table of ContentsTools Required
Suction Lifter
Clear Silicone Sealant
Isopropyl Alcohol
I
s
o
p
r
o
p
y
l
A
l
c
o
h
o
l
Soft Cloth
HIGHLY
FLAMMABLE
IRRITANT
IRRITANT
Safety Instructions and Warnings ............................................................................................................................1
Tools Required .................................................................................................................................................................2
Unpacking your TileVision
®
.......................................................................................................................................4
Your TileVision
®
..............................................................................................................................................................4
TileVision® Connector Inputs .....................................................................................................................................5
Connecting to your TileVision
®
.................................................................................................................................6
Connecting an Antenna or Cable ..............................................................................................................................7
Sky™ Remote Control Link Setup ............................................................................................................................7
Connecting to the HDMI and S-VIDEO Inputs ......................................................................................................8
Connecting to the SCART Input .................................................................................................................................9
Installing the Front Plate ..........................................................................................................................................10
The Waterproof Remote Control ............................................................................................................................ 12
The Full Function Remote Control ........................................................................................................................13
Switching the TileVision® On/Off .......................................................................................................................... 14
Selecting your On-screen Language ................................................................................................................... 14
Selecting a Picture from External Sources ....................................................................................................... 15
Displaying Information (TV Mode) ....................................................................................................................... 15
On-screen Menus and Displays (TV Mode) ......................................................................................................16
Tuning, Setup and Editing Analogue TV Programmes – Auto Programme ..........................................17
Tuning, Setup and Editing Analogue TV Programmes – Manual Programme ..................................... 18
Tuning, Setup and Editing Analogue TV Programmes – Edit, Delete, Select Programmes ............19
Tuning, Setup and Editing Analogue TV Programmes – Moving and Skipping Programmes .......20
Auto Tuning Digital TV ............................................................................................................................................... 21
Digital TV Programme Information – General and Detailed Programme Information .......................22
Digital TV Setup – Banner Display Time .............................................................................................................23
Digital TV Setup – Subtitle Language ..................................................................................................................24
Digital TV Setup – Audio Language ...................................................................................................................... 25
Digital TV Setup – Common Interface .................................................................................................................25
Digital TV – Basic Operation – Signal Strength ............................................................................................... 26
Digital TV – Basic Operation – Software Update ............................................................................................ 27
Digital TV – Basic Operation – Selecting a Menu Language ....................................................................... 28
Digital TV – Basic Operation – New Service Message, Active Antenna ..................................................29
Digital TV – Electronic Programme Guide (EPG) – Viewing the EPG ..................................................... 30
Digital TV – Electronic Programme Guide (EPG) – Edit Favourite Channel Groups .......................... 31
Picture Control – Manual Picture Control ...........................................................................................................33
Picture Control – Auto Picture Control, Picture Effect ................................................................................... 34
Sound Control – Manual Sound Control .............................................................................................................. 35
Sound Control – Auto Sound Control ...................................................................................................................36
Sound Output Selection – Mono Output Selection .......................................................................................... 36
Clock Functions ............................................................................................................................................................ 37
Other Functions – Noise Reduction, Blue Back, Auto Sleep and Sleep Timer ....................................... 38
Child Lock .......................................................................................................................................................................39
Aspect Ratio Control (ARC) ..................................................................................................................................... 39
The Programme List ...................................................................................................................................................40
DTV Text ..........................................................................................................................................................................41
Analogue TV Teletext – Functions of Teletext ...................................................................................................42
Displaying the Teletext Information ..................................................................................................................... 42
Teletext Button Functions ......................................................................................................................................... 43
Troubleshooting ............................................................................................................................................................ 44
Specifications ................................................................................................................................................................ 45

4
5
TileVision® Connector Inputs
Please make sure the following items are
included with your TileVision®.
1
TileVision® glass front plate assembly – complete with Velcro
fixing strips
1
waterproof remote control
1
remote control holder
1
standard full function remote control
1
installation and instruction manual
1
mirror acrylic surround.
Your TileVision
®
Unpacking your TileVision
®
Remote control sensor and indicator
Power Indicator Status
Status
Stand-by
Power on
Remote control
Indicator
Red
Green
Red blinking
☛
If any items are missing,
contact your dealer.
POWER
ABC DEF
GHI JKL MNO
WXYZTUVPQRS
SubTitle
Info.
0
987
456
321
MENU TV/AV
OK
SLEEP ARC
PR
EPG DTV I/II
V
O
L
V
O
L
PP
FAVLIST
TEXT MIX SIZE INDEX
HOLDREVEALTIMEUPDATE
PIP INPUT SWAP
PIP PR
MODEPOSITION
PICTURESOUND DTV
AUDIO PROFILE
510-301K
?
i
TV/AV
PR VOL
MENU
TEXT
OKEPG
PP
Full function
remote control
illustrated without
sliding cover
TV 17 Main Connector Array
DC12V Power In
HDMI (High Definition Multimedia Interface) In
S-VIDEO In
S-VIDEO Audio In (Left–White · Right–Red)
EURO-SCART – (RGB, FB, AV In, AV Out)
SVC Port – connect for service only
Internal Antenna
Antenna Input 75 Ω
1 2 3 4 65 7 8
1
2
3
4
5
6
7
8
12VDC
S-Video
HDMI
Audio
L R
EURO-SCART
Internal AntennaSVC Port
Antenna Input
TV 23 Main Connector Array
DC24V Power In
HDMI (High Definition Multimedia Interface) In
S-VIDEO In
S-VIDEO Audio In (Left–White · Right–Red)
EURO-SCART – (RGB, FB, AV In, AV Out)
SVC Port – connect for service only
Internal Antenna
Antenna Input 75 Ω
1 2 3 4 65 7 8
1
2
3
4
5
6
7
8
24VDC
S-Video
HDMI
Audio
L R
EURO-SCART
Internal AntennaSVC Port
Antenna Input
The antenna should be connected to the TileVision® using the
Antenna Input (8) and not to the Internal Antenna connection
(7). This allows a Sky™ or Sky+™ remote control to be used to
change channel on the Sky™ digital receiver via the infrared
sensor in the TileVision®. See page 7 for more information.

6
7
Connecting an Antenna or Cable
or
Cable Television
Network
Antenna
Input on the
TileVision
®
RF 1
RF 2
Sky™ digital receiver
TV 1
1
Connect the antenna or input cable to the 75Ω coaxial input
on the rear of the TileVision®.
2
If you are using an indoor antenna in the loft space, you may
need to turn it when tuning your television until you receive a
clear picture.
The connection to the Antenna/RF sockets on the TileVision® and
the Sky™ receiver must be made with both the TileVision® and the
Sky™ receiver disconnected from the mains supply.
Once the connections have been made, the Sky™ receiver must be
setup to supply power to the RF 2 socket as detailed below.
1
On the Sky™ remote control press
SERVICES
to show the
SERVICES menu.
2
Press the 4 button for the SYSTEM SETUP menu.
3
Press the 0 button, then the 1 button, then the
select
button, in
sequence, to display the INSTALLER SETUP menu.
4
Press the 4 button to select RF OUTLETS.
5
Press the
down
arrow to select RF Outlet Power Supply and
press the
left
or
right
arrows to change the setting to ON.
6
Press the
down
arrow to select Save New Settings and press
select
to save the settings.
7
Press the
sky
button to return to the previously viewed channel.
To view television channels correctly, a signal must be received by the set from one of
the following sources: an outdoor antenna, a cable television system or a satellite dish.
If a TileVision® is used with a Sky™ digital receiver which has two RF outputs, the channel can be
changed on the Sky™ receiver using the Sky™ remote control via the remote sensor on the TileVision®.
Connecting to your TileVision
®
Earthing Points
The Earthing connection points are found on the rear of the front plate and are clearly marked
with green labels. Connect the earthing cables from the back box to these points.
Power Socket
The Power socket (1) is located at the extreme left of the connection array.
Speaker Connections
The speakers should be connected after the
Earth straps to the rear of the front plate as
detailed on page 10 of these operating
instructions.
The speaker connection block is found on
the right of the rear of the front plate. Lift one
of the lugs, push one conductor of the
speaker lead into the connector, release the
lug and give the lead a slight pull to make
sure that it is gripped correctly. The other wires are connected in the same way.
Note: To ensure that the speakers are in correct phase, the conductor with the stripe should be
connected to the negative terminal (L– or R–) and the plain conductor should be connected to
the corresponding positive terminal (L+ or R+).
Connections to the speakers terminals should be made in the same way – striped conductor to
the negative terminal and plain conductor to the positive terminal.
Antenna Feed
The Antenna input jack is found at the extreme right of the connection array (refer to page 7).
A minimum signal level of 60dBu/1mV is required to avoid a noisy picture.
Additional connections
Connectors for; HDMI, SCART, S-VIDEO and Audio are found in the central portion of the
connection array. If these inputs are to be utilised the necessary cables must be installed at the
same time as the back box. COMPONENT video can also be connected via a suitable
COMPONENT to SCART adaptor (refer to pages 8 and 9 of these instructions).
Note: Careful consideration should be given to use of these inputs prior to the installation
of the unit.
Speaker Connection Block
L–L+ R+ R–
☛
The signal level fed to the set must be at least
60dBu/1mV or the picture may be noisy.
If in doubt, consult a qualified aerial technician.
See page 29 for Active Antenna set-up.
Sky™ Remote Control Link Setup
☛
To set-up the Sky™ receiver to work with the
TileVision® you must use the Sky™ remote
control via the main TV (TV 1).
8
9
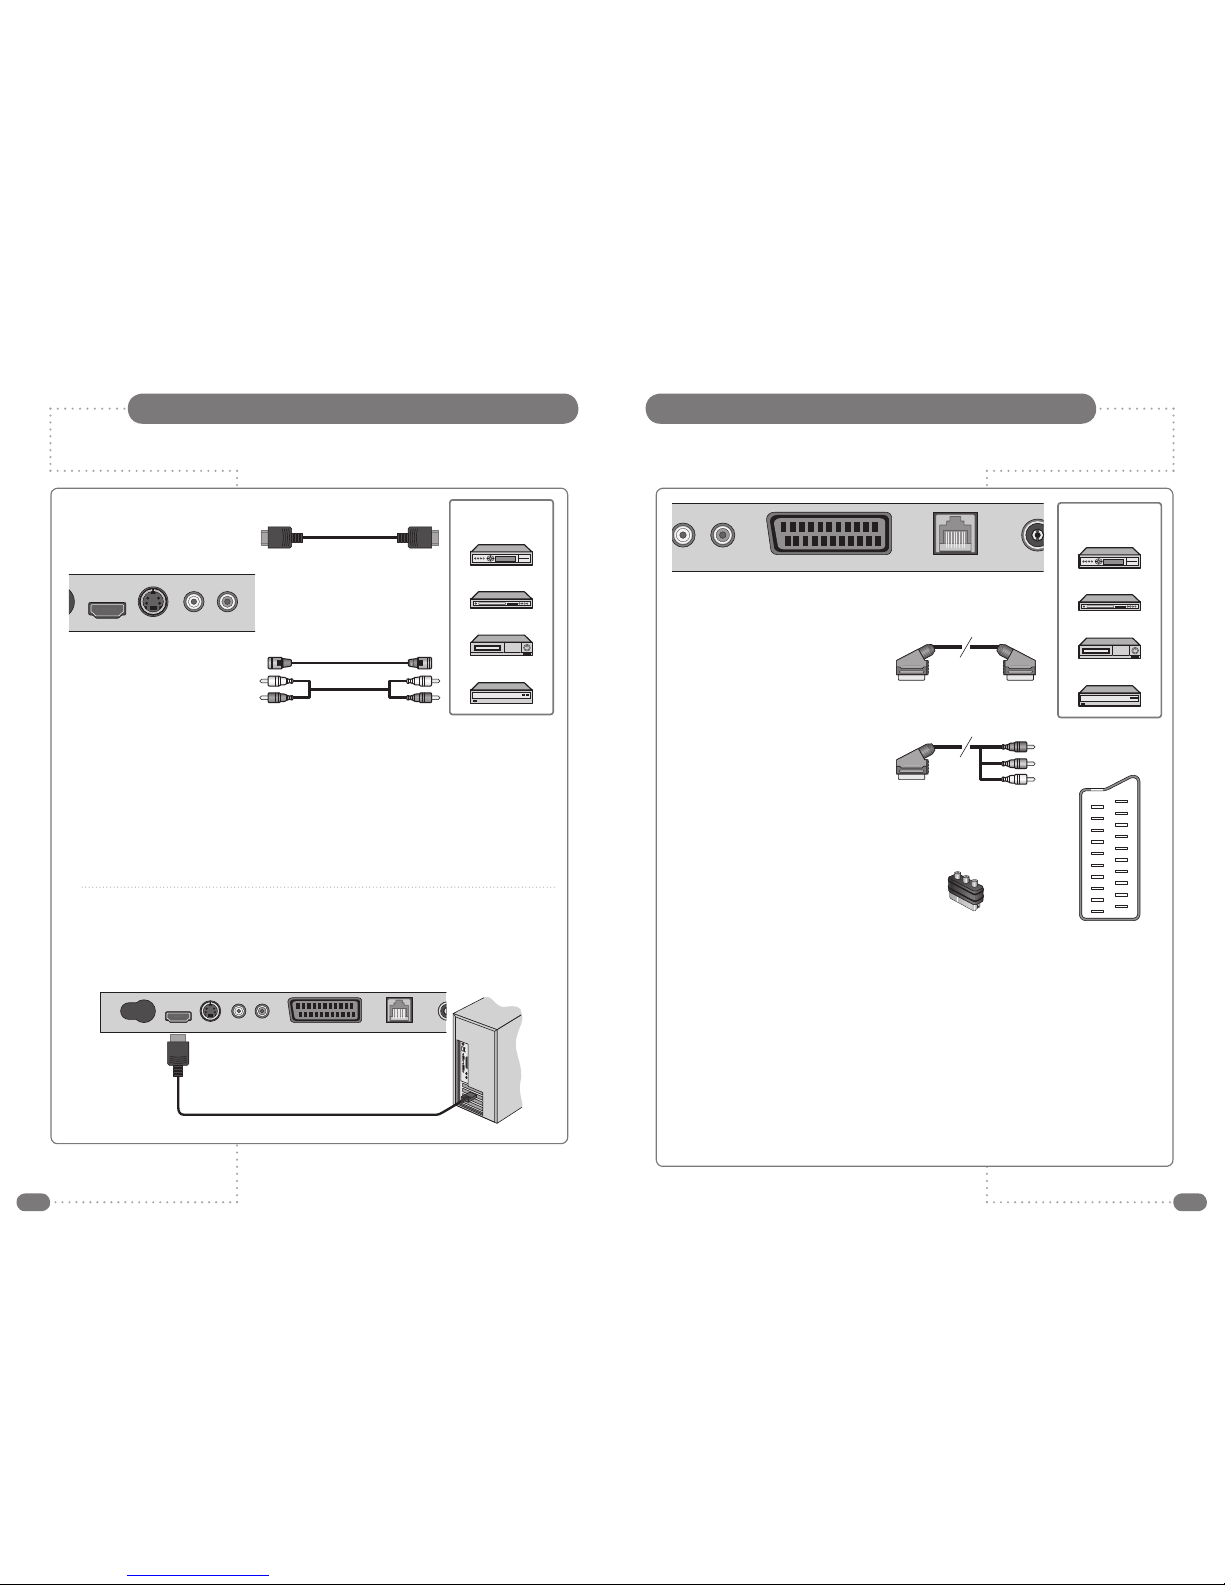
Connecting to HDMI and S-VIDEO Inputs
All connections must be made before sealing the front plate into the back box.All connections must be made before sealing the front plate into the back box.
All connections must be made prior to sealing the front plate into the back box.
(A) For HDMI Input
1
Connect the HDMI cable to the HDMI input on the TileVision® and output on the external
equipment such as satellite receiver or HD DVD player.
(B) For S-VIDEO Input
1
Connect the S-VIDEO/RCA and audio L/R cable to the inputs on the TileVision® and outputs
on the external equipment such as a VCR, camcorder and some video game devices.
2
If the external equipment has mono audio output, connect it only to the left socket of the Audio
Input/Output.
HDMI Input from PC
1
Connect the HDMI out of the PC to the HDMI input on the TileVision® using a HDMI cable.
S-Video
HDMI
Audio
L R
Video Game Console
DVD Player
VCR
Satellite Receiver,
Cable Box or Hard
Disk Recorder
Internal
S-Video
HDMI
Audio
L R
EURO-SCART
SVC Port
DC Input
(A) For HDMI Input
(B) For S-VIDEO Input
The EURO-SCART socket can be connected to equipment with RGB or composite video inputs and
outputs. A VCR, satellite or cable receiver, DVD player, or video game console should be connected
using the EURO-SCART connection.
◆
The EURO-SCART socket is fully connected as shown above.
◆
The audio output from the EURO-SCART can be connected to a separate amplifier to allow
integration with a multi-room audio video system. This should be carried out by a qualified engineer.
◆
Adaptors are commercially available to allow video and audio equipment to be connected to the
TileVision® via the EURO-SCART socket.
See the examples in diagrams B (SCART to RCA), C (SCART to RCA) and D (SCART to
COMPONENT).
◆
When connecting COMPONENT video via the SCART socket, connections must be made to the
chosen COMPONENT to SCART adaptor and Audio L and R. Select the COMPONENT input from
the Input Selection Menu (see page 15).
19
17
15
13
11
9
7
5
3
1
20
18
16
14
12
10
8
6
4
2
21
Internal
A
Audio
L R
EURO-SCART
SVC Port
Video Game Console
DVD Player/Recorder
VCR
Satellite Receiver,
Cable Box or Hard
Disk Recorder
(A) SCART to SCART connector
(RGB Video + Audio L/R or
Composite Video + Audio L/R)
(B) SCART to RCA connectors
(Composite Video + Audio L/R)
(C) SCART to RCA adaptor
(Composite Video + Audio L/R)
(D) SCART to COMPONENT
adaptor (Y, Pb, Pr)
SCART Pinouts
(solder side view)
SCART Connection Reference
Pin Name Description
1 AOR Audio Out Right
2 AIR Audio In Right
3 AOL Audio Out Left + Mono
4 AGND Audio Ground
5 BGND RGB Blue Ground
6 AIL Audio In Left + Mono
7 B RGB Blue
8 SWTCH Audio, RGB switch,16:9
9 GGND RGB Green Ground
10 CLKOUT Clock Out
11 G RGB Green
12 DATA Data Out
13 RGND RGB Red Ground
14 DATAGND Data Ground
15 R RGB Red
16 BLNK Blanking Signal
17 VGND Composite Video Ground
18 BLNKGND Blanking Signal Ground
19 VOUT Composite Video Out
20 VIN Composite Video In
21 SHIELD Chassis Ground, Cable Shield
Connecting to the SCART Input

10
11
Installing the Front PlateInstalling the Front Plate
Note: A glass carrier/suction lifter is required.
Checking back box prior to installation of front plate
Before commencing the installation of the front plate the
polystyrene blanking panel must be removed from the back box.
The next step is to ensure that the appropriate cables and their
connectors are present within the back box.
It is important to ensure that the flange inside the back box is
cleaned using a grease removal agent and allowed to dry. The
space between the back box and front plate must be even on all
four sides. If the flange needs to be straightened, this must be
done before proceeding any further. This is very important, as
any damage will affect the unit’s waterproofing capabilities.
Installation of the front plate
Remove the front plate from its packaging and place the remote control
to one side.
Introduce the lower front edge of the unit into the box and fit the earth
straps to the two Earthing screws as indicated by the green labels on
the rear of the front plate. Connect all cables to their respective sockets
(refer to pages 5 to 9 of these instructions).
The next step is to remove the soft adhesive protector
from the top length of special Velcro‚ and press the
front plate into the back plate (it may be necessary to
adjust the position of the cables to achieve a good fit).
The unit installation must comply with all relevant electrical safety regulations before turning the mains
supply to the 12VDC power adaptor on using the remote pull switch. The unit should now show a red
indicator light showing that it is in standby mode.
The next step is to tune the unit as detailed on pages 17 to 20
and 22.
Once you are satisfied that the unit is tuned and working correctly,
press the Power 0/I button on the remote control to put the unit in
standby mode and isolate the unit using the remote pull switch.
Gently remove the front plate using a suction lifter. Do not use a
lever to remove the front plate as this will invalidate your
guarantee. Next, remove the self-adhesive protectors from the side
and bottom Velcro strips and press the front panel into the back
box with reasonable force. Take care to apply force to all four sides
of the box. Restore mains power using the remote pull switch and
press the Power 0/I button on the remote control to turn the unit on
again and check that it is still working correctly.
Sealing the unit
When you are sure that the unit is installed correctly put it in standby mode and apply a clear silicone
sealant to the joint between the sides of the back box and the sides of the front plate. Ensure that the
silicone is worked into the space evenly and is applied
without any gaps, bubbles or voids. Wipe any excess
silicone sealant away and check for any imperfections.
Rectify any errors as necessary. This seal is essential for
the reliable and safe operation of the TileVision® and
must be completely waterproof.
Sealing Tip
: To achieve a neat seal easily it may be found useful
to use masking tape around
the TileVision® glass screen
and the surrounding tiles, just
leaving sufficient gap to apply
the silicone sealant around the
joint between the sides of the back
box and front plate. The acrylic surround can be fitted using silicone
sealant once the tape is removed.
Fitting the acrylic surround
The mirrored acrylic surround is a cosmetic addition and has no bearing on
the integrity of the waterproof seal of the TileVision®.
If the surround is being fitted to the TileVision®, the same silicone
sealant used to seal the screen into the back box can be used to fasten
the surround to the wall.
Lay the surround on a flat surface and apply the silicone to the matt
grey surface as shown.
Once the adhesive has
been applied, align the
surround with the
TileVision® using a spirit
level as a guide and
press the acrylic
surround firmly to
the wall.
After the silicone
sealant has hardened the
protective film can be remove from the front of the surround.
Cleaning Instructions
To clean the screen and surround, use only a soft damp cloth. Under no circumstances are
abrasive cleaners to be used, failure to observe this warning will invalidate your guarantee.
all of the
flange must
be cleaned
only the top
strip is removed
before tuning
fill all the space between
the edge of the screen
and the back box
Tile
Back box
Grout
Velcro
Masking tape
Silicone
Screen
apply the adhesive
on the grey side of
the mirrored surround
Note: It is the installer’s responsibility to ensure that the TileVision® unit is installed
and sealed correctly, failure to do so will invalidate your guarantee. The unit will
require cleaning and re-sealing after any servicing/repair operation.

12
13
Buttons marked (D) are only available in Digital TV mode. Buttons marked (D) are only available in Digital TV mode.
The Full Function Remote ControlThe Waterproof Remote Control
1 Power On/Off button – Turns the TileVision® on from,
or off to, standby
2 Menu button – Displays the main menu
3 TV/AV button – Selects between DTV, TV, SCART,
COMPONENT, S-VIDEO or HDMI mode.
Clears the menu from the screen
4 Previous Programme button – Returns to the previously
viewed programme
5 Number buttons – Selects programme numbers
6 Teletext On/Off button – See page 42 for Teletext function
table (buttons 16 to 19)
7 Info button (D) – Displays the information about the channel
and programme when in the Digital TV mode
8 PR (Programme up/down) buttons – Selects next or
previous programme
9 VOL (Volume up/down) buttons – Adjust the volume
10
Menu left button – Menu and EPG navigation
11 Menu up button – Menu and EPG navigation
12
Menu right button – Menu and EPG navigation
13 EPG button (D) – Displays the Electronic Programme Guide
14
Menu down button – Menu and EPG navigation
15
OK button – Accepts your selection or displays current mode
16 Colour buttons – Teletext FastText & Digital TV menu options
1 Power On/Off button – Turns the TileVision® on from,
or off to, standby
2 Mute button – Turns the sound on or off
3 Number buttons – Selects programme numbers
4 Subtitle button (D) – Changes language
5 Info. button (D) – Displays the information about the channel
and programme
6 EPG button (D) – Displays the Electronic Programme Guide
7 DTV button – Switches between analogue and digital TV
8 I/II button – Selects language for dual language broadcasts
9 Menu button – Displays the Main Menu
10 TV/AV button – Selects between DTV, TV, SCART,
COMPONENT, S-VIDEO or HDMI mode.
Clears the menu from the screen
11 Menu left/right buttons – Menu and EPG navigation
12
Menu up/down buttons – Menu and EPG navigation
13 OK button – Accepts your selection or displays current mode
14
VOL (Volume up/down) buttons – Adjust the volume
15
Sleep button – Sets the sleep timer
16
ARC (Aspect Ratio Control) button – Change picture format:
Auto, 16:9,14:9, 4:3, 16:9 zoom, 14:9 zoom, 4:3 zoom
17
PR (Programme up/down) buttons – Selects next or previous
programme
18
Previous Programme button – Returns to the previously
viewed programme
19
Colour buttons – Teletext FastText & Digital TV menu options
20
LIST button – Display the programme list
21
FAV +/- – Press to switch to your favourite channels
22
Teletext buttons – See page 43 for Teletext function table
23
PIP buttons – Picture in Picture is not available on TileVision
24
Picture button – Press to recall your preferred picture settings
25
Sound button – Press to recall your preferred sound settings
26
AUDIO button (D) – Select audio language directly
27
PROFILE button (D) – Select User Profile directly
☛
Make sure there are no
objects between the
remote control and
its sensor.
Do not place the remote
control near a heater.
A strong blow to the
remote control may cause
it not to operate.
TV/AV
PR VOL
MENU
TEXT
OKEPG
PP
4
5
7
9
8
6
1 2 3
10 11 12
13 14 15
16
POWER
ABC DEF
GHI JKL MNO
WXYZTUVPQRS
SubTitle
Info.
0
987
456
321
MENU TV/AV
OK
SLEEP ARC
PR
EPG DTV I/II
V
O
L
V
O
L
PP
FAVLIST
TEXT MIX SIZE INDEX
HOLDREVEALTIMEUPDATE
PIP INPUT SWAP
PIP PR
MODEPOSITION
PICTURE SOUND DTV
AUDIO PROFILE
510-301K
?
i
4 5
7
9
20
86
1 2
10
11
12
13
14
15 16
17 18
3
11
12
14
21
19
22
24 25
26 27
23

14
15
1
Make sure all the necessary connections have been made.
2
Press the POWER ( ) button to switch the device on.
3
Press the TV/AV (
TV/AV
) button to select the required external
input: SCART, COMPONENT, S-VIDEO or HDMI.
4
After a short delay the desired input will be selected and the
menu will be cleared from the screen.
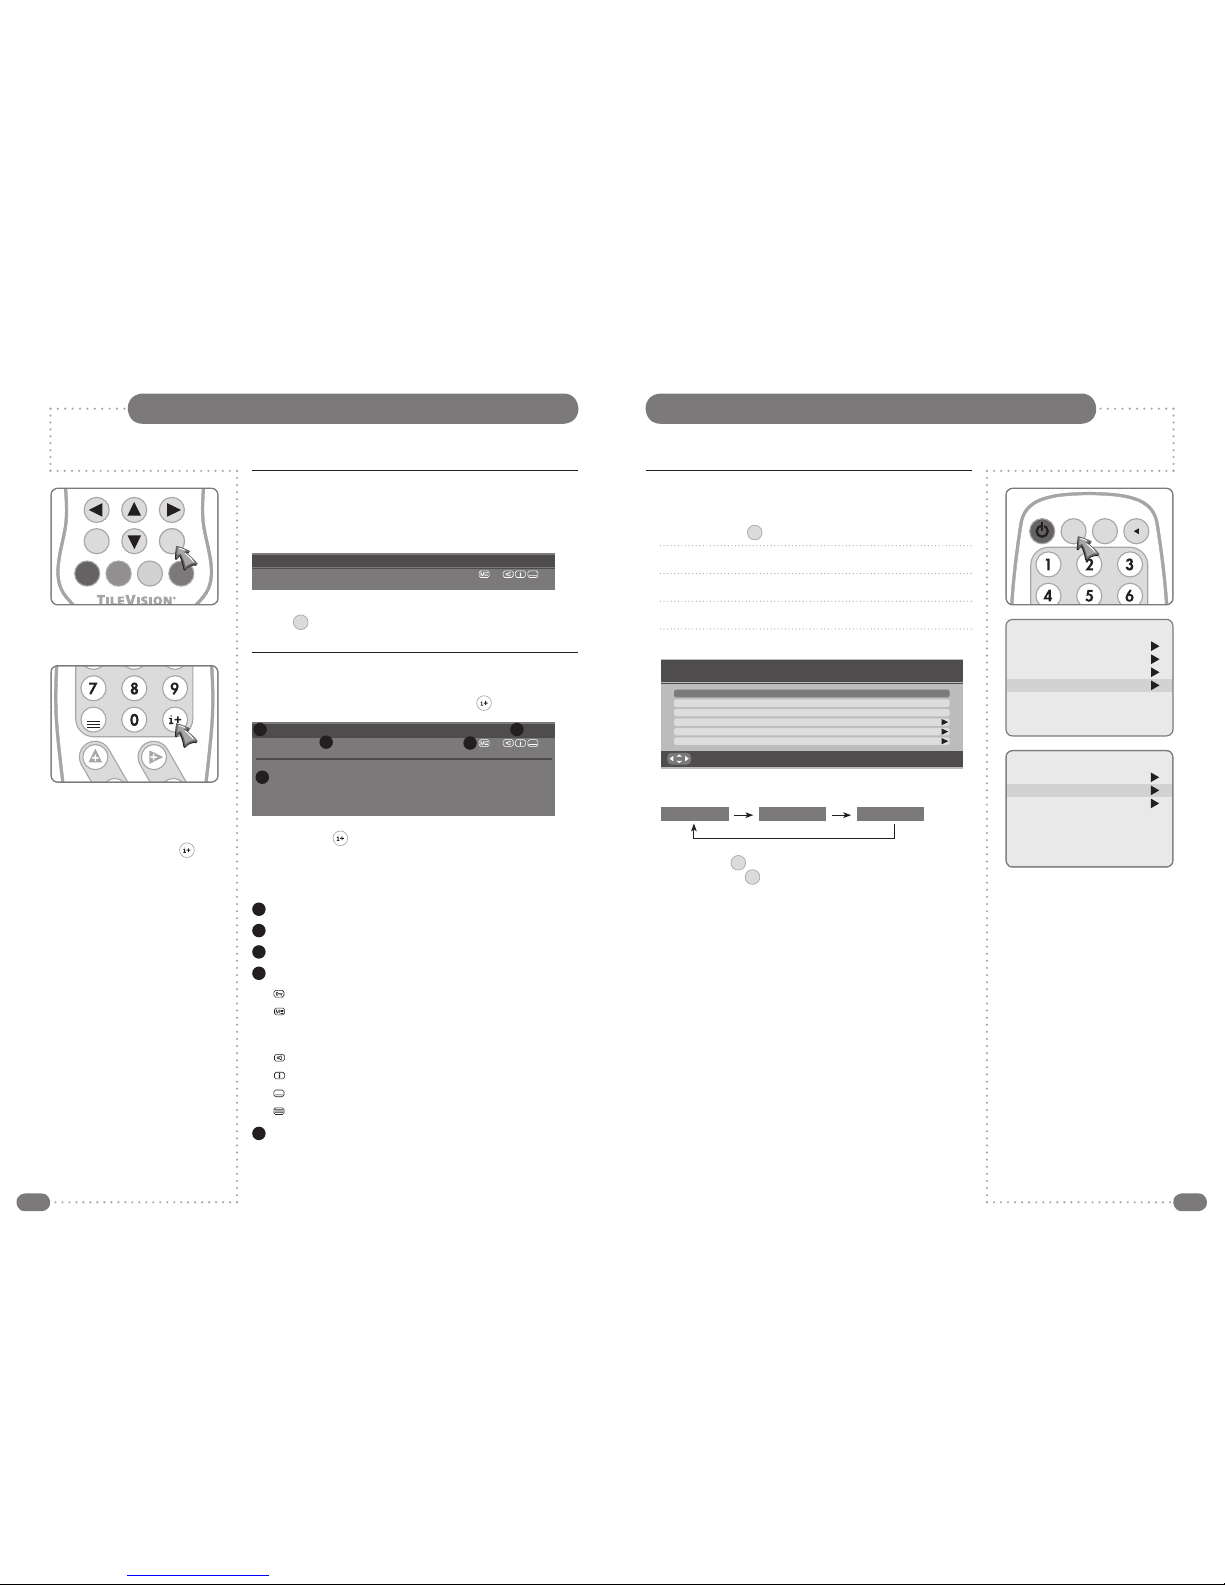
You can display the programme information and settings status
currently in use.
1
Press the OK (OK) button.
If external sources have been connected to your TileVision®, you can view any of the sources by
selecting the appropriate external input.
Selecting a Picture from External Sources
Displaying Information (TV Mode)
Please allow a minimum of five seconds after switching the TileVision® off before
switching it on again.
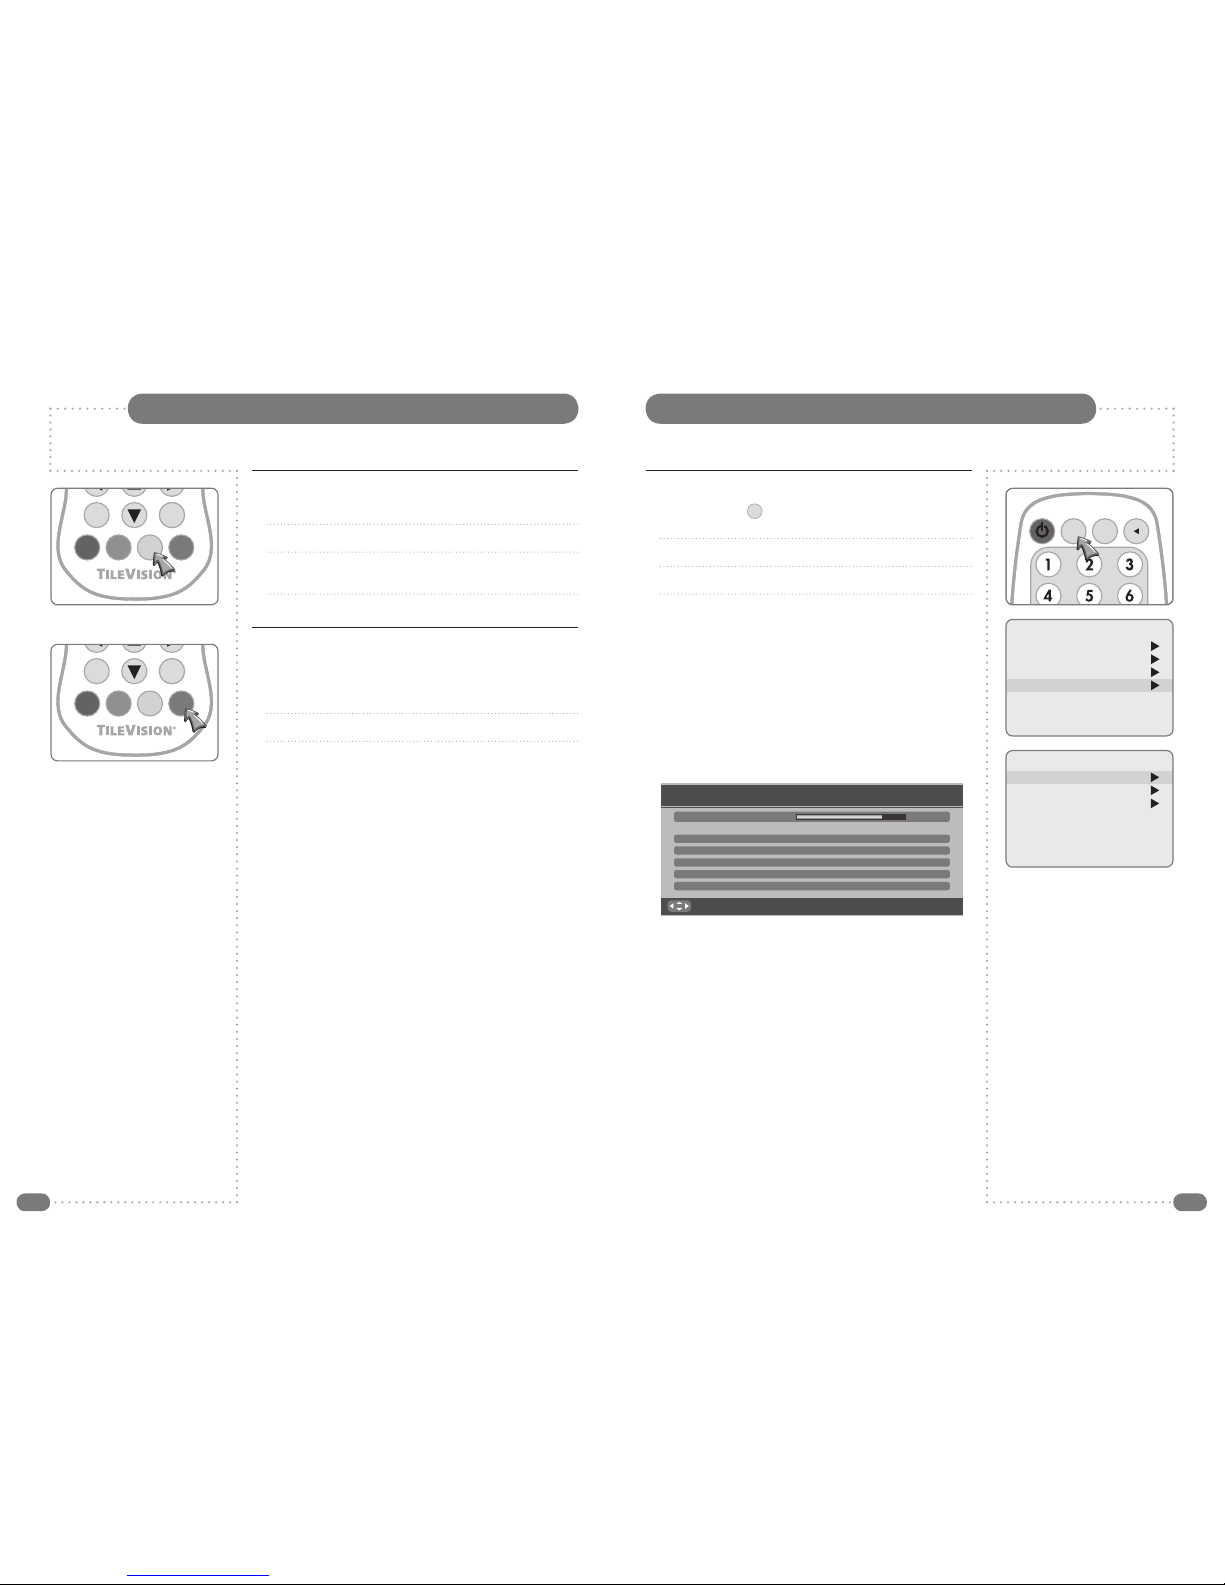
When you start using your TV for the first time, select the language in which to
display all on-screen menus.
TV/AV
MENU
PP
TV/AV
MENU
PP
TV/AV
MENU
PP
Main Menu
Picture
Sound
Special
Setup
Input Selection
DTV
TV
SCART
COMPONENT
S-VIDEO
HDMI
P 1 --------- --:-Sound Mode : Mono
Dynamic Flat
Auto
A
Language
English Norsk
Deutsch Svenska
Français Romaneste
Español Polski
Italiano
Nederlands
Dansk Hrvatski
Switching the TileVision® On/Off
Selecting your On-screen Language
1
To switch your TileVision® on, press the POWER ( ) button.
2
To switch your TileVision® to standby, press the POWER ( )
button again.
1
Press the TV/AV (
TV/AV
) button to display the Input Selection
menu. Press TV/AV (
TV/AV
) repeatedly until TV mode is selected.
After a short delay the desired input will be selected and the
menu will be cleared from the screen.
2
Press the MENU (
MENU
) button to display the Main Menu.
3
Press the UD buttons to select the Setup menu and then press
the R button.
4
Press the UD buttons to select the Language menu and then
press the R button.
5
Press the UD, LR buttons to select your desired language.
6
Press TV/AV (
TV/AV
) to exit the menus and confirm settings.
All the on-screen displays will now appear in the selected
language.
☛
The language selected applies to both TV and
DTV modes
☛
A COMPONENT to SCART adaptor must be used
to enable COMPONENT video connection (see
page 9).

16
17
Auto Programme
1
Press the MENU (
MENU
) button.
2
Press the UD buttons to select the Setup menu and then press
the R button.
3
Press the UD buttons to select the Auto Programme menu
and then press the R button.
4
Select the Country with the LR buttons. Choose from:
Austria, Belgium, Switzerland, Czech Rep, Germany, Denmark,
Spain, France, Finland, Great Britain, Greece, Hungary, Italy,
Norway, Netherlands, Portugal, Poland, Sweden, Slovenia,
Slovakia, Turkey, others.
5
Press the UD buttons to select the System.
6
Select a TV system with the LR buttons:
BG: Western Europe/Asia/Middle East/Africa/Australia
I: UK/Hong Kong/South Africa
DK: Russia/China/Eastern Europe
L: France.
7
Press UD buttons to select Storage From.
8
Select the beginning programme number with the LR buttons
or NUMBER buttons.
9
Press the UD buttons to select Start and press the R button to
confirm. The Auto Programme will now start, this will take a few
minutes to complete.
To delete, skip, move or name the stored programmes see
Programme Edit, on page 19.
Note: It is recommended that Auto Programme is used when installing TileVision® as all
available programmes will be stored.
Tuning, Setup and Editing Analogue TV Programmes
On-screen Menus and Displays (TV Mode)
Manual Programme
Programme 1
System I
Channel V/UHF 55
Name BBC 1
Finetune 0
Memorize
Setup
Auto programme
Manual programme
Programme edit
Clock
Language
Picture
Colour Temperature
Contrast 75
Brightness 65
Colour 75
Sharpness 80
Sound
Equalizer
Balance 0
AVL Off
SRS WOW On
Special
N.R. Mode2
Blue Back On
Auto Sleep Off
Child Lock Off
ARC Auto
Colour Temperature
Standard
Reddish
Greenish
Bluish
User
RGB
Auto Programme
Country Great Britain
System BG
Storage From 1
Start
Programme Edit
P001--------- P006--------P002--------- P007--------P003--------- P008--------P004--------- P009--------P005--------- P010---------
� Delete � Favourite
� Move � Skip
Main Menu
Picture
Sound
Special
Setup
Language
English Norsk
Deutsch Svenska
Français Romaneste
Español Polski
Italiano P
Nederlands
Dansk Hrvatski
TV/AV
PR VOL
MENU
TEXT
OKEPG
PP
1
Press the MENU (
MENU
) button to display the Main menu.
2
Press the UD buttons to select menus.
3
Press LR buttons to adjust menu items.
4
Press MENU (
MENU
) to go back to the previous menu.
5
Press TV/AV (
TV/AV
) to exit the menus and confirm settings.
TV/AV
MENU
PP
Main Menu
Picture
Sound
Special
Setup
Setup
Auto programme
Manual programme
Programme edit
Clock
Language
Auto Programme
Country Great Britain
System BG
Storage From 1
Start

18
19
Programme Edit
This function enables you to delete, make favourite, move or skip
the stored programmes.
You can also move channels to different programme numbers, or
insert blank programme data into the selected programme number.
1
Press the MENU (
MENU
) button.
2
Press the UD buttons to select the Setup menu and then press
the R button.
3
Press the UD buttons to select Programme Edit and then
press the R button.
4
Select the programme name to edit with the UD buttons and
LR
buttons.
Deleting a programme
1
Select a programme to be deleted with the UD or LR buttons.
2
Press the RED button once. The selected programme is deleted,
all the following programmes shift up one position.
Selecting a favourite programme
1
Select a favourite programme with the UD buttons or LR.
2
Press the GREEN button.
This function lets you select your favourite programme directly.
Tuning, Setup and Editing Analogue TV Programmes
TV/AV
MENUPPTV/AV
MENU
PP
TV/AV
PR VOL
MENU
TEXT
OKEPG
PP
Manual Programme
1
Press the MENU (
MENU
) button.
2
Press the UD buttons to select the Setup menu and then
press the R button.
3
Press the UD buttons to select the Manual Programme menu
and then press the R button.
4
Select the programme with the LR buttons or number buttons.
5
Press the UD buttons to select the System.
6
Select a TV system with the LR buttons:
BG: Western Europe/Asia/Middle East/Africa/Australia
I: UK/Hong Kong/South Africa
DK: Russia/China/Eastern Europe
L: France
7
Press UD buttons to select Channel. Then, press the
R
button to select V/UHF or Cable.
8
Press the UD buttons to select V/UHF or Cable as required
and press the R button to confirm. Select the channel number
either directly with the number buttons or the UD buttons.
Press the R button to confirm.
9
You can assign a programme name with up to eight characters
using the numbers 0–9, the alphabet from A–Z, and a space.
Press UD buttons to select Name. Then press the R button.
Press the LR buttons to move the red cursors to select the
character to edit. Press the UD buttons to select the desired
letter or number. Press the R button to select the next
character to edit or confirm the name when on the last letter.
10
Press UD buttons to select Finetune.
Press the LR buttons to adjust the fine tuning.
11
Press UD buttons to select memorize.
12
Press the R button or OK (OK) button to store it.
13
Press the Menu button to return to the previous menu.
14
Press the TV/AV (
TV/AV
) button to return to normal TV viewing.
Manual Programme lets you tune and arrange the programmes in any order you want.
You can assign an eight character programme name to each programme number.
Tuning, Setup and Editing Analogue TV Programmes
Main Menu
Picture
Sound
Special
Setup
Main Menu
Picture
Sound
Special
Setup
Setup
Auto programme
Manual programme
Programme edit
Clock
Language
Setup
Auto programme
Manual programme
Programme edit
Clock
Language
Manual Programme
Programme 1
System I
Channel V/UHF 55
Name BBC 1
Finetune 0
Memorize
Programme Edit
P001--------- P006--------P002--------- P007--------P003--------- P008--------P004--------- P009--------P005--------- P010---------
� Delete � Favourite
� Move � Skip
20
21
The TileVision® must be in DTV mode to perform Digital TV tuning. Press the
TV/AV
button and select
DTV from the Input Selection menu.
Auto Tuning Digital TV
Moving a programme in Programme Edit menu
1
Select a programme to be moved with the UD or LR buttons.
2
Press the YELLOW button.
3
Move the programme to the desired programme number with
the UD or LR buttons.
4
Press the YELLOW button again to release this function.
Skipping a programme number in Programme
Edit menu
1
Select a programme to be skipped with the UD or
LR
buttons.
2
Press the BLUE button. The skipped programme tur ns blue.
3
Press the BLUE button again to release the skipped programme.
☛
When a programme number is skipped it means
that you will be unable to select it using the PR UD
buttons during normal TV viewing.
If you want to select the skipped programme, enter
the programme number with the NUMBER buttons,
or select it in the programme edit menu.
Tuning, Setup and Editing Analogue TV Programmes
TV/AV
PR VOL
MENU
TEXT
OKEPG
PP
TV/AV
PR VOL
MENU
TEXT
OKEPG
PP
Auto Tune all Receivable Digital Channels
1
Press the MENU (
MENU
) button to display Main Menu in the
DTV mode.
2
On the Main Menu, use the UD buttons to select DTV System.
3
Press R button to enter DTV System menu.
4
On the DTV System menu, press the UD buttons to select
DTV Scanning.
5
Press the R button to start DTV scanning.
The DTV Scanning menu is displayed and the DTV Scanning
starts immediately.
Scanning, tuning and sorting can take several minutes – please
wait for the TileVision® to finish the process.
Once the channel search has finished and all available channels
have been stored, the channels will be sorted and channel 1 will
be selected.
☛
If you exit DTV Scanning without fully completing
the channel searching procedure, the TileVision®
may not have stored any digital TV channels.
With the New Service Message set to On, a
banner will be displayed when any new channels
are added.
DTV Scanning
Please wait!
0 100%
Pos. Channel ServiceName Quality
31 56 BBC NEWS 24 Excellent
32 56 BBCi Excellent
33 56 CBBC Channel Excellent
34 56 BBC TWO Excellent
35 56 BBC ONE Excellent
B ack:MENU E xit:TV/AV
DTV System
DTV Scanning
DTV Setup
Language
New Service Message On
Active Antenna On
Main Menu
Picture
Sound
Special
DTV System
TV/AV
MENU
PP
22
23
Banner Display Time
You can choose a banner display time of 3, 5 or 10 seconds.
1
Press the MENU (
MENU
) button to display the Main Menu.
2
On the Main Menu, use the UD buttons to select DTV System.
3
Press the R button to enter DTV System menu.
4
Use the UD buttons to select DTV Setup.
5
Use the R button to enter DTV Setup.
6
Use the LR buttons to select the required banner display time.
7
Press the OK (OK) button to store the chosen display time and
press the TV/AV (
TV/AV
) button to return to normal TV viewing.
Digital TV Setup
Main Menu
Picture
Sound
Special
DTV System
DTV System
DTV Scanning
DTV Setup
Language
New Service Message On
Active Antenna On
TV/AV
MENU
PP
Digital TV Programme Information
3 seconds 5 seconds 10 seconds
DTV Setup
B ack:MENU
S tore:OK
E xit:TV/AV
Banner Display Time 3 seconds
Subtitle Language English
Audio Language English
Common Interface
Signal Strength
Software Update
General Programme Information
The programme information banner is always displayed at the
bottom of the screen for a preset period of time whenever you
switch channels.
You can view the programme information at any time by pressing
the OK (OK) button while watching a programme. The banner will
be cleared from the screen after the preset time.
Detailed Programme Information
You can see more detailed information about the current
programme at any time by pressing the INFO ( ) button.
Press the INFO ( ) button again to remove the banner from the
screen.
The layout of information contained in the banner is as shown
below:
1
Channel number and channel name.
2
Current time.
3
Programme name.
4
Icons:
Displayed only when the channel is a locked channel.
Displayed when the MHEG application is triggered to
make DTV Text available. This icon will only be displayed
in the United Kingdom, Ireland and New Zealand.
Displayed only when the audio language is operated.
Displayed only when programme information is available.
Displayed only when subtitle text is available.
Displayed only when teletext is available.
5
Detailed programme information.
1 BBC ONE 13:21
National News
Now
>>
13:00 – 13:30 SUBTITLE OFF
1 BBC ONE 13:21
National News
Now
>>
13:00 – 13:30 SUBTITLE OFF
National and international news from the BBC, followed by Weather [S]
1
3
2
4
5
☛
If no programme
information is available
no banner is displayed
when the INFO ( )
button is pressed.
TV/AV
PR VOL
MENU
TEXT
OKEPG
PP
TV/AV
PR VOL
MENU
TEXT
PP

24
25
Audio Language
If the current programme is available in multiple audio languages,
you can select the language that you wish to listen to.
1
Press the MENU (
MENU
) button to display the Main Menu.
2
On the Main Menu, Use the UD buttons to select DTV System.
3
Press the R button to enter the DTV System menu.
4
On the DTV System menu, press the UD buttons to select DTV
Setup and press the R button to enter the DTV Setup menu.
5
Press the UD buttons to select Audio Language and use the
LR buttons to select your desired subtitle language.
6
Press the OK (OK) button to save your selection as the language
for the broadcast. Press the TV/AV (
TV/AV
) button to return to
normal TV viewing.
Common Interface
Common Interface is not applicable to TileVision®.
Subtitle Language
If the current programme provides subtitle information, you can
select the language for the Subtitle.
1
Press the MENU (
MENU
) button to display the Main Menu.
2
On the Main Menu, Use the UD buttons to select DTV System.
3
Press the R button to enter the DTV System menu.
4
On the DTV System menu, press the UD buttons to select DTV
Setup and press the R button to enter the DTV Setup menu.
5
Press the UD buttons to select Subtitle Language and use the
LR buttons to select your desired subtitle language.
6
Press the OK (OK) button to save your selection as the language
that subtitles will be displayed in at the bottom of the screen
when Subtitles are switched on. Press the TV/AV (
TV/AV
) button to
return to normal TV viewing.
Subtitles can only be switched on or off with the full function
remote control.
Press the
Subtitle
button to display the Subtitle Option – press the
OK
button to confirm the option shown or press the
Subtitle
button to hide the Subtitle Option again.
Digital TV SetupDigital TV Setup
Main Menu
Picture
Sound
Special
DTV System
Main Menu
Picture
Sound
Special
DTV System
DTV System
DTV Scanning
DTV Setup
Language
New Service Message On
Active Antenna On
DTV System
DTV Scanning
DTV Setup
Language
New Service Message On
Active Antenna On
TV/AV
MENUPPTV/AV
MENU
PP
POWER
ABC DEF
GHI JKL MNO
WXYZTUVPQRS
SubTitle
Info.
0
987
456
321
MENU TV/AV
OK
SLEEP ARC
PR
EPG DTV I/II
V
O
L
V
O
L
DTV Setup
B ack:MENU
S tore:OK
E xit:TV/AV
Banner Display Time 3 seconds
Subtitle Language English
Audio Language English
Common Interface
Signal Strength
Software Update
DTV Setup
B ack:MENU
S tore:OK
E xit:TV/AV
Banner Display Time 3 seconds
Subtitle LanguageEnglish
Audio Language English
Common Interface
Signal Strength
Software Update
☛
Subtitles are not available from all broadcasters.
All languages listed are not necessarily available
from all broadcasters.

26
27
Digital TV – Basic Operation
Software Update
To keep your TileVision® up-to-date with new digital television
features, software updates are periodically broadcast as part of the
normal television signal. Your TileVision® will automatically detect
these signals and display the software update banner.
1
Press the MENU (
MENU
) button to display the Main Menu.
2
On the Main Menu, Use the UD buttons to select DTV System.
3
Press the R button to enter the DTV System menu.
4
On the DTV System menu, press the UD buttons to select DTV
Setup and press the R button to enter the DTV Setup menu.
5
Press the UD buttons to select Software Update menu and
press the R button to enter Software Update menu.
6
Press the OK (OK) button to download the Software Upgrade.
7
After downloading is completed, wait for a moment. Then restart
the TileVision® to install the software upgrade.
Signal Strength
You can check and see how strong the signal is for any stored
channel.
1
Press the MENU (
MENU
) button to display the Main Menu.
2
On the Main Menu, Use the UD buttons to select DTV System.
3
Press the R button to enter the DTV System menu.
4
On the DTV System menu, press the UD buttons to select DTV
Setup and press the R button to enter the DTV Setup menu.
5
Press the UD buttons to select Signal Strength and use the R
button to view the Signal Strength banner.
6
You can view the signal strength reception for the channel that is
currently being viewed.
7
Press the TV/AV (
TV/AV
) button to return to normal TV viewing.
Digital TV – Basic Operation
DTV Setup
B ack:MENU
S tore:OK
E xit:TV/AV
Banner Display Time 3 seconds
Subtitle Language English
Audio Language English
Common Interface
Signal Strength
Software Update
Signal Strength
2 BBC TWO CH56
B ack:MENU E xit:TV/AV
weak strong
Main Menu
Picture
Sound
Special
DTV System
Main Menu
Picture
Sound
Special
DTV System
DTV System
DTV Scanning
DTV Setup
Language
New Service Message On
Active Antenna On
DTV System
DTV Scanning
DTV Setup
Language
New Service Message On
Active Antenna On
TV/AV
MENUPPTV/AV
MENU
PP
Software Update
New version is found!
Please go to DTV Setup menu to update the software!
E xit:TV/AV
Current Software Version: 0.0.2.46.7 UK
New version is found!
Do you want to start downloading now?
E xit:TV/AV
B ack:MENU
S tore:OK
Software Update
Software Update
WARNING!
Writing To Flash, Don’t Power Off TV
It takes about 2 minutes.
DTV Setup
B ack:MENU
S tore:OK
E xit:TV/AV
Banner Display Time 3 seconds
Subtitle Language English
Audio Language English
Common Interface
Signal Strength
Software Update

28
29
Digital TV – Basic Operation
New Service Message
If New Service Message is set to On, a banner will be displayed
when any new channels are added.
1
Press the MENU (
MENU
) button to display the Main Menu.
2
On the Main Menu, Use the UD buttons to select DTV System.
3
Press the R button to enter the DTV System menu.
4
On the DTV System menu, press the UD buttons to select
New Service Message, and press the LR buttons to select On
or Off.
5
Press the TV/AV (
TV/AV
) button to return to normal TV viewing.
Active Antenna
If Active Antenna is set to On, the antenna receives 5V from the
TileVision®.
If your antenna is exter nal or a self-powered indoor antenna, set
Active Antenna to Off, if not, set Active Antenna to On.
1
Press the MENU (
MENU
) button to display the Main Menu.
2
On the Main Menu, Use the UD buttons to select DTV System.
3
Press the R button to enter the DTV System menu.
4
On the DTV System menu, press the UD buttons to select
Active Antenna, and press the LR buttons to select On or Off.
5
Press the TV/AV (
TV/AV
) button to return to normal TV viewing.
Digital TV – Basic Operation
Selecting a Menu Language
The menu can be displayed on the screen in a desired language.
1
Press the MENU (
MENU
) button to display the Main Menu.
2
On the Main Menu, Use the UD buttons to select DTV System.
3
Press the R button to enter the DTV System menu.
4
On the DTV System menu, press the UD buttons to select
Language, and press the R button to display the
Language menu.
5
Press the UD or LR buttons to select the desired language.
6
Press the TV/AV (
TV/AV
) button to return to normal TV viewing.
Main Menu
Picture
Sound
Special
DTV System
Main Menu
Picture
Sound
Special
DTV System
DTV System
DTV Scanning
DTV Setup
Language
New Service Message On
Active Antenna On
DTV System
DTV Scanning
DTV Setup
Language
New Service Message On
Active Antenna On
DTV System
DTV Scanning
DTV Setup
Language
New Service Message On
Active Antenna On
DTV System
Language
English Norsk
Deutsch Svenska
Français Romaneste
Español Polski
Italiano
Nederlands
Dansk Hrvatski
TV/AV
MENUPPTV/AV
MENU
PP
☛
The language selected applys to both DTV and
TV modes

30
31
Edit Favourite Channel Groups
You can add, rename and edit user profiles which contain groups of
favourite channels.
1
Press EPG (
EPG
) button two times and the DTV EPG Profile
Menu appears.
2
Press the Red button to add a user profile and the Profile
renaming menu is displayed.
Use the numerical buttons to select the letters for the profile
name. Press the number button as often as necessary to select
the required letter.
Press the L/R buttons to move the cursor from letter to letter.
Press the Blue button cancel Profile renaming.
Press the OK (OK) button to save Profile Name.
Continued on page 32
Viewing the EPG
The EPG information is provided by the broadcasters.
Programme entries may appear blank or out of date as a result of
the information broadcast on a given channel. The display will
dynamically update as soon as new information becomes available.
You can display EPG information at any time while watching digital
programmes.
1
Press EPG (
EPG
) button to display the DTV EPG menu.
2
Use the numerical buttons to select the date for which you want
to see the listing.
3
Press the Blue button to switch between Service Category
and Theme.
4
Use the LR buttons to select Service Categories or Themes
of various kinds.
Service Category: All Service, Free to Air Services, Pay TV
Services, Audio Services.
Themes: Movies, News, Entertainment, Sports, Children/Youth,
Education, Lifestyle, Drama, Undefined/Unsupported.
If you select All Services, all channels are displayed in the left
hand column.
5
Press the UD buttons to select the desired programme.
6
Press the Red button to move the highlight between the left and
right-hand columns.
7
Pressing the Green button will display the detailed programme
information for the currently highlighted programme. Press the
Green button again to hide the detailed programme information
and display the programme listing.
Digital TV – Electronic Programme Guide (EPG)Digital TV – Electronic Programme Guide (EPG)
DTV EPG
Tue2Wed3Thu4Fri5Sat6Sun
7
Today
Aug01 2007
00:51
Mon
1
Service Category All Services
Services
2 BBC TWO
3ITV1
4 Channel 4
5Five
6ITV2
7 BBC THREE
9 BBC FOUR
10 ITV3
01:05 Programme A
02:35 Programme B
03:55 Programme C
06:00 Programme D
06:20 Programme E
06:35 Programme F
07:00 Programme G
07:15 Programme H
Go To :OK
Exit :TV/AV
User Profile :EPG Schedule
Theme
ScheduleAug 01 2007
DTV EPG
Tue2Wed3Thu4Fri5Sat6Sun
7
Today
Aug01 2007
12:50
Mon
1
User Profile Please add a profile before continuing
Profiles
1 USER
1 BBC ONE
2 BBC TWO
3 ITV1
4 Channel 4
5 Five
6 ITV2
7 BBC THREE
8 BBC TWO
Save :OK
Exit :TV/AV
Exit Profile :EPG Add
Rename
All Services
fav skip
Edit <All Services>
Delete
TV/AV
PR VOL
MENU
TEXT
OKEPG
PP
POWER
ABC DEF
GHI JKL MNO
WXYZTUVPQRS
SubTitle
Info.
0
987
456
321
MENU TV/AV
EPG DTV I/II
POWER
ABC DEF
GHI JKL MNO
WXYZTUVPQRS
SubTitle
Info.
0
987
456
321
POWER
ABC DEF
GHI JKL MNO
WXYZTUVPQRS
SubTitle
Info.
0
987
456
321
MENU TV/AV
EPG DTV I/II
POWER
ABC DEF
GHI JKL MNO
WXYZTUVPQRS
Sub-
Title
Info.
0
987
456
321
MENU TV/AV
OK
EPG DTV I/II
V
O
L
V
O
L
Profile renaming
U S E R _ _ _ _ _
Please use the number keys for
input.
Cancel Renaming
Save Profile Name
OK
32
33
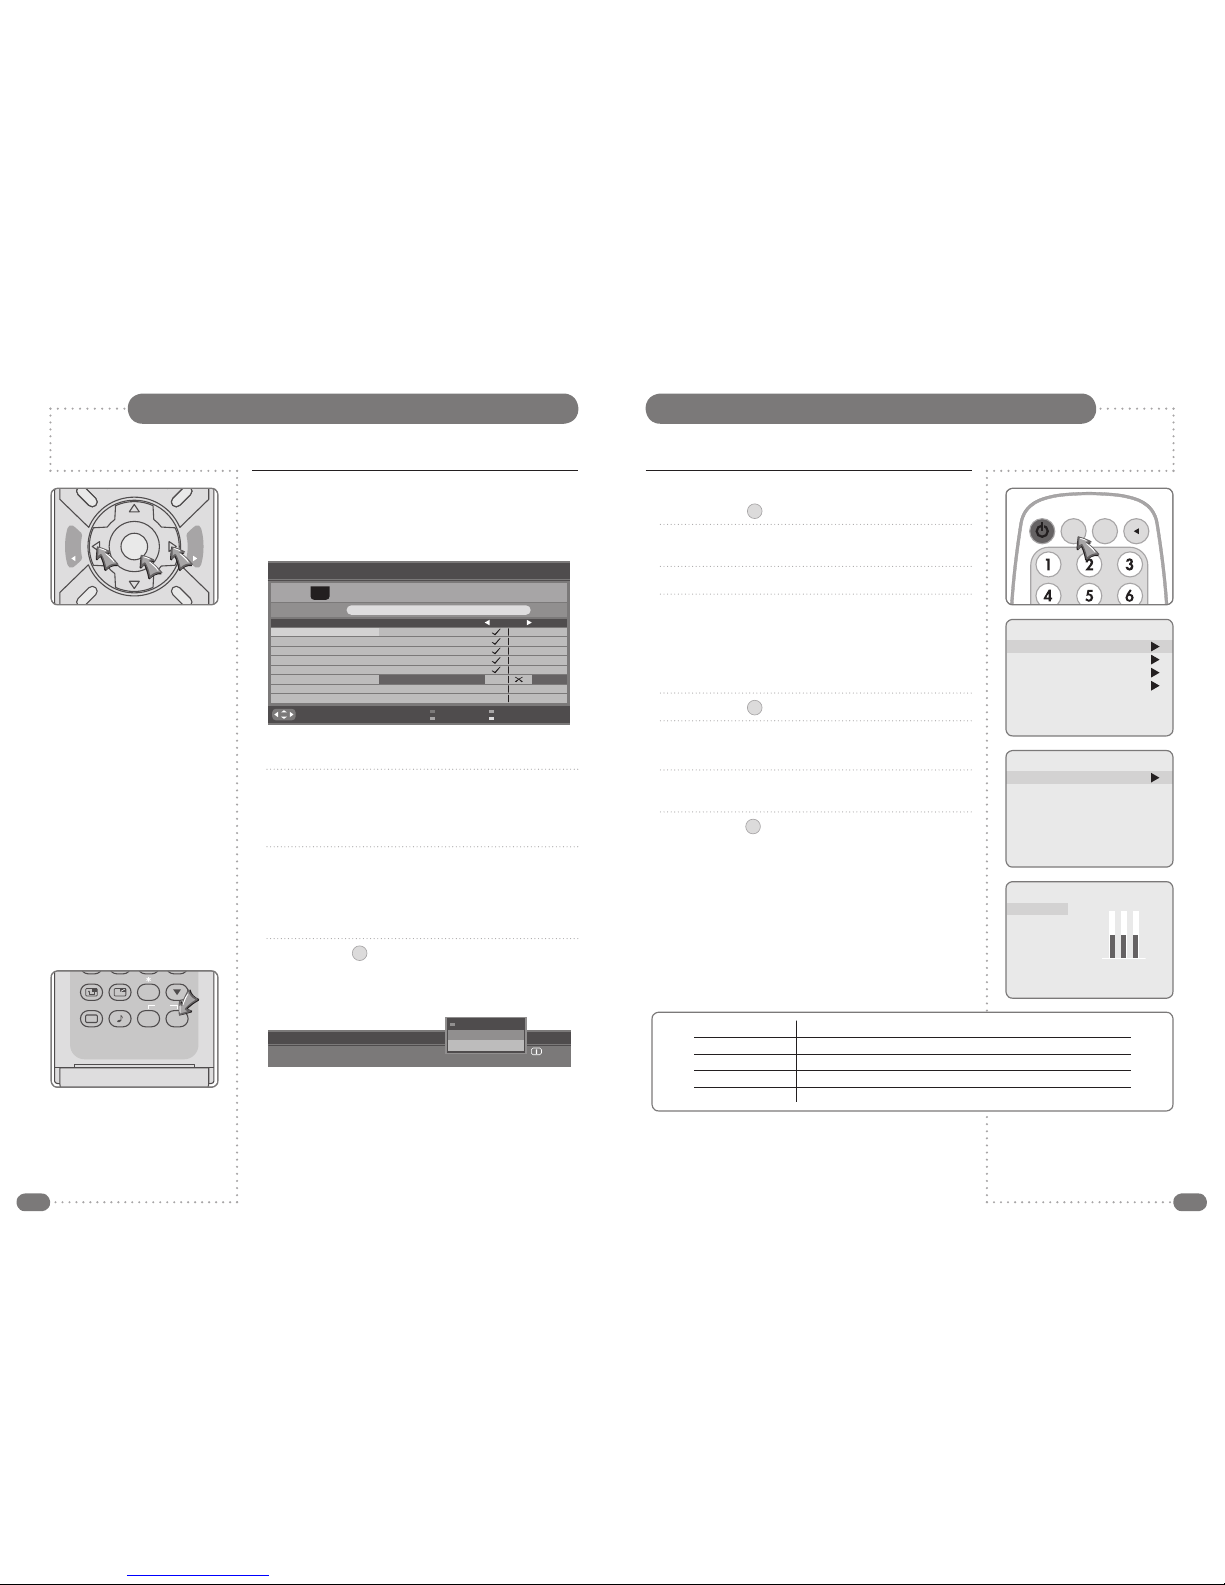
Manual Picture Control
1
Press the MENU (
MENU
) button.
2
Press the UD buttons to select the Picture menu and then
press the R button.
3
Select Colour Temperature using the R button.
4
Press the UD buttons to select a particular colour tone.
If you select User you can control the value manually. Press
the LR buttons to select the colour (R, G or B) to adjust and
press the UD buttons to adjust the value.
Press the LR buttons until no colour is selected.
5
Press the MENU (
MENU
) button to return to the previous menu.
6
Press the UD buttons to select a picture item;
Contrast, Brightness, Colour
or
Sharpness
.
7
Press the LR buttons to adjust the picture setting to your
requirement as shown in the table below.
8
Press the TV/AV (
TV/AV
) button to store your personal preferences
in User.
Picture Control
You can adjust Colour Temperature, Contrast, Brightness, Colour and Sharpness to the
levels you prefer.
Edit Favourite Channel Groups – continued
3
Press the Green button to edit <All Services>.
Use the LR buttons to include the channel as a favourite or
exclude it from the list.
4
Press the Blue button to display the favourite channel list so that
the channels can be arranged in their preferred order.
5
To change the order of favourite channels.
Highlight the channel that you want to move with the UD
buttons and press the L button to select the channel. The
channel name will go grey to show it has been selected.
6
Use the UD buttons to choose a new position for the selected
channel and press the L button to insert the channel in it's new
position in the list.
Press the R button to cancel moving a channel that has been
selected.
7
Press the TV/AV (
TV/AV
) button to return to normal TV viewing.
When user profiles have been defined they can be accessed by
pressing the
PROFILE
button when the General Programme
Information banner is displayed.
Digital TV – Electronic Programme Guide (EPG)
DTV EPG
Tue2Wed3Thu4Fri5Sat6Sun
7
Today
Aug01 2007
14:21
Mon
1
User Profile Profile Configuration
Profiles
1 USER
1 BBC ONE
2 BBC TWO
3 ITV1
4 Channel 4
5 Five
6 ITV2
7 BBC THREE
8 BBC TWO
Save :OK
Exit :TV/AV
Exit Profile :EPG Add
Move Service
All Services
fav skip
Back to <Profiles>
Delete
POWER
ABC DEF
GHI JKL MNO
WXYZTUVPQRS
Sub-
Title
Info.
0
987
456
321
MENU TV/AV
OK
EPG DTV I/II
V
O
L
V
O
L
3 ITV1 15:22
Rosemary and Thyme
Next
>>
16:00 – 17:00 SUBTITLE OFF
Select Profile
USER
OFF
TV/AV
MENU
PP
Main Menu
Picture
Sound
Special
Setup
Picture
Colour Temperature
Contrast 75
Brightness 65
Colour 75
Sharpness 80
Colour Temperature
Standard
Reddish
Greenish
Bluish
User
RGB
Selected Item Setting Change
Contrast Less Contrast L 0–100 R More Contrast
Brightness Darker L 0–100 R Brighter
Colour Lower Colour Intensity L 0–100 R Higher Colour Intensity
Sharpness Soft picture L 0–100 R Sharp Picture
POWER
ABC DEF
GHI JKL MNO
WXYZTUVPQRS
Sub-
Title
Info.
0
987
456
321
MENU TV/AV
OK
SLEEP ARC
PR
EPG DTV I/II
V
O
L
V
O
L
PP
FAVLIST
TEXT MIX SIZE INDEX
HOLDREVEALTIMEUPDATE
PIP INPUT SWAP
PIP PR
MODEPOSITION
PICTURE SOUND DTV
AUDIO PROFILE
510-301K
?
i

34
35
Sound Control
Manual Sound Control
The Equalizer can be manually adjusted by cutting and boosting
the five selected frequency bands and storing the settings as User.
The left to right Balance can be adjusted and if AVL is switched on
there will be a more equal volume level between programmes.
1
Press the MENU (
MENU
) button.
2
Press the UD buttons to select the Sound menu, and then
press the R button.
3
Press UD buttons to select the desired sound item;
Equalizer, Balance, AVL or SRS WOW.
4
Press the LR buttons to make desired adjustment.
5
Press the LR buttons in Equalizer to set the Equalizer.
6
Press the UD buttons to select the preferred setting;
Flat, Music, Movie, Speech or User. To set the Equalizer:
a) Select User by pressing the UD buttons.
b) Select a sound band by pressing the LR buttons.
c) Make the desired sound level adjustment with the
UD buttons.
d) Press the MENU (
MENU
) button to return to the last menu, or
the TV/AV (
TV/AV
) button to return to normal TV viewing.
7
Press the UD buttons to select Balance and adjust the left to
right balance with the LR buttons.
8
Select AV L with the UD buttons and use the LR buttons to
select ON or OFF.
9
Select SRS WOW with the UD buttons and use the
LR
buttons to select ON or OFF
10
Press the MENU (
MENU
) button to return to the preceding menu
or the TV/AV (
TV/AV
) button to return to normal TV viewing.
Picture Control
Auto Picture Control
The Picture options – Dynamic, Standard, Mild, and Game are
programmed for optimum picture reproduction at the factory and
cannot be changed.
Picture Effect
1
Press the PICTURE ( ) button on the full function remote
control.
2
Press the button repeatedly. Each press of the button changes
the screen display as below:
●
Dynamic: Vivid Picture.
●
Standard: Standard Picture.
●
Mild: Softer Picture.
●
Game: External Video Game Picture Setup.
●
User: Manual Picture Setup.
After a short time the display will clear leaving the setting as chosen.
POWER
ABC DEF
GHI JKL MNO
WXYZTUVPQRS
Sub-
Title
Info.
0
987
456
321
MENU TV/AV
OK
SLEEP ARC
PR
EPG DTV I/II
V
O
L
V
O
L
PP
FAVLIST
TEXT MIX SIZE INDEX
HOLDREVEALTIMEUPDATE
PIP INPUT SWAP
PIP PR
MODEPOSITION
PICTURE SOUND DTV
AUDIO PROFILE
510-301K
?
i
Dynamic Standard Mild Game User
☛
The benefits of SRS WOW sound are enormous –
you can be completely enveloped in sound.
The Equaliser menu is not available when
SRS WOW is set to On.
TV/AV
MENU
PP
TV/AV
MENU
PP
Main Menu
Picture
Sound
Special
Setup
Sound
Equalizer
Balance 0
AVLOff
SRS WOW On
Equalizer
Flat
Music
Movie
Speech
User
0.1 0.5 1.5 5.0 10Khz

36
37
The clock can only be set in TV mode.
Clock Functions
Setting the clock is necessary in order to use the various timer
features of the TileVision®. You can set automatic On or Off time.
1
Press the MENU (
MENU
) button.
2
Press the UD buttons to select the Setup menu and press the
R
button to enter the Setup menu.
3
Press the UD buttons to select Clock menu and press the R
button to enter the Clock menu.
Press the UD buttons to select the item you want to adjust and
press the LR buttons until the figures you want to adjust are
highlighted in red. Highlighted figures can be adjusted using the
UD
or number buttons.
4
The present time must be set for any time function to work
correctly. Store a time value between 00:00 and 23:59
(hours:minutes).
5
Press TV/AV (
TV/AV
) button to return to normal TV viewing.
Auto Sound Control
The sound settings for Flat, Music, Movie, Speech, and
SRS WOW are programmed at the factory for optimum sound
reproduction, and cannot be changed.
Sound Effect
1
Press the SOUND ( ) button on the full function remote
control.
2
Press the SOUND ( ) button repeatedly to select a setting.
Each press of the button changes the setting as below.
After a short time the display will clear leaving the setting as chosen.
In DTV and AV modes you can select output sound for the left and
right speakers.
Repeatedly press the I/II (
I/II
) button to select the sound output.
L+R: Audio signal from audio L input is sent to the left speaker and
audio signal from audio R input is sent to the right speaker.
L+L: Audio signal from audio L input is sent to the left and right
speakers.
R+R: Audio signal from audio R input is sent to the left and right
speakers.
Mono Sound Selection
If the signal is weak in TV mode, switch to mono by pressing the
I/II (
I/II
) button twice on the standard full function remote control.
Listening in mono will reduce noise in comparison with poor stereo
reception.
Press the I/II (
I/II
) button twice again to switch back to stereo.
Sound Control
Sound Output Selection
POWER
ABC DEF
GHI JKL MNO
WXYZTUVPQRS
Sub-
Title
Info.
0
987
456
321
MENU TV/AV
OK
SLEEP ARC
PR
EPG DTV I/II
V
O
L
V
O
L
PP
FAVLIST
TEXT MIX SIZE INDEX
HOLDREVEALTIMEUPDATE
PIP INPUT SWAP
PIP PR
MODEPOSITION
PICTURE SOUND DTV
AUDIO PROFILE
510-301K
?
i
POWER
ABC DEF
GHI JKL MNO
WXYZTUVPQRS
SubTitle
Info.
0
987
456
321
MENU TV/AV
EPG DTV I/II
Flat Music Movie Speech User SRS WOW
☛
The I/II button is only
on the full function
remote control.
TV/AV
MENU
PP
Setup
Auto programme
Manual programme
Programme edit
Clock
Language
Main Menu
Picture
Sound
Special
Setup
Setup Clock
Clock --:-Off Time --:-- Off
On Time --:-- Off
On Programme --:-- 1
On Volume --:-- 30

38
39
TileVision can be viewed in six picture formats by repeatedly
pressing the ARC button on the full function remote control until
the desired image is selected.
Alternatively, the waterproof remote control can be used to alter the
ARC setting via the Special menu.
1
Press the MENU (
MENU
) button and press the UD buttons to
select the Special menu. Press the R button to enter the
Special menu.
2
Press the UD buttons to select ARC.
3
Press the LR buttons to select the required ARC setting.
4
Press TV/AV (
TV/AV
) button to return to normal TV viewing.
This function is not applicable to TileVision.
If ARC is set to Auto, the TileVision® will alter the picture to best suit the programme being received
and there will be little need to change the setting manually.
Child Lock
Aspect Ratio Control (ARC)
Other Functions
Noise Reduction (N.R.)
The N.R. feature may improve the picture quality on poor
broadcasts. If you experience noise on a certain programme,
setting the N.R. to Mode1 or Mode2 for this programme may
greatly improve the picture.
1
Press the MENU (
MENU
) button and press the UD buttons to
select the Special menu. Press the R button to enter the
Special menu.
2
Press the LR buttons to select the N.R. options: Mode1,
Mode2, or Off.
3
Press TV/AV (
TV/AV
) button to return to normal TV viewing.
Blue Back (TV mode only)
If no signal is being received or the signal is very weak, a blue
screen automatically replaces the noisy picture background.
If you wish to continue viewing the poor picture, you must select to
turn Blue Back Off.
Pressing the LR buttons will alternate between On and Off.
Auto Sleep (TV mode only) and Sleep Timer
If you select Auto Sleep, the TileVision® will automatically switch to
standby approximately ten minutes after current channel stops
broadcasting.
1
Press the MENU (
MENU
) button and press the UD buttons to
select the Special menu. Press the R button to enter the
Special menu.
2
Press the UD buttons to select Auto Sleep.
3
Press the LR buttons to select On or Off.
4
Press TV/AV (
TV/AV
) button to return to normal TV viewing.
The sleep timer function is only available by pressing the SLEEP
button on the full function standard remote control.
Press the SLEEP button repeatedly to select the number of
minutes. The display will appear on the screen – select 0, 15, 30,
60, 120 minutes.
The sleep timer automatically switches the TileVision® off after the
preset time elapses.
To view remaining sleep time press the SLEEP button once. To
cancel the sleep time, Select 0 with the SLEEP button.
TV/AV
MENU
PP
Special
N.R. Mode2
Blue Back On
Auto Sleep Off
Child Lock Off
ARC Auto
Special
N.R. Mode2
Blue Back On
Auto Sleep Off
Child Lock Off
ARC Auto
Main Menu
Picture
Sound
Special
Setup
☛
If the TileVision® connects
with an external input
source during the ten
minutes after a TV
programme stops, the Auto
Sleep function is
automatically cancelled.
☛
In Zoom mode, you can adjust the vertical position
of the picture with the PRUPRD buttons whilst the
ARC information is displayed on screen.
In HDMI mode the zoom settings are not available.
POWER
ABC DEF
GHI JKL MNO
WXYZTUVPQRS
Sub-
Title
Info.
0
987
456
321
MENU TV/AV
OK
SLEEP ARC
PR
EPG DTV I/II
V
O
L
V
O
L
PP
FAVLIST
Auto 16:9 14:9 4:3 16:9 Zoom 14:9 Zoom 4:3 Zoom
How ARC settings alter the picture
14:9
14:9 zoom
4:3
4:3 zoom16:9 zoom
16:9

40
41
DTV Text (MHEG-5 standard) is only available in Great Britain, Ireland and New Zealand.
To access DTV Text press the TEXT (
TEXT
) or Red button depending
on the programme’s broadcaster. A small banner 'loading…' will be
displayed on screen. After a few seconds the broadcaster’s menu
will appear, either overlaying part of the current programme:
or with the current programme in a smaller window next to the text
menus and instructions:
Use the UD buttons (or in some cases the LR buttons) to
navigate the menus and the OK (OK) button to select items. Use
the Red, Green, Yellow and Blue buttons to access shortcuts, help
and additional menus etc., as shown on screen.
To exit DTV Text press the TEXT (
TEXT
), the TV/AV (
TV/AV
) button or
change channel.
As all DTV Text navigation uses the
UDLR,
OK, Colour and 0–9
number buttons, all functions are available with the TileVision®
waterproof remote control.
If you press the TEXT (
TEXT
) button immediately after changing
channel you may see the screen display as below:
This is because the TileVision® had not had time to load any text
information. Press the TEXT (
TEXT
) button again, wait a couple of
seconds and try again.
DTV Text
Programme List
P001--------- P011--------P002--------- P012--------P003--------- P013--------P004--------- P014--------P005--------- P015--------P006--------- P016--------P007--------- P017--------P008--------- P018--------P009--------- P019--------P010--------- P020---------
Displaying the Programme List
Press the RED button to display the programme list menu.
The programme list appears on the screen. Each programme list
contains 20 programmes.
Selecting a programme in the Programme List
Select a programme with the UD or LR buttons. Then press the
OK button. The set switches to the chosen programme.
Paging through the Programme List
There are 5 programme table pages giving a total of
100 programmes. Pressing the UD or LR buttons repeatedly
turns the pages.
Analogue TV Programmes stored in the memory can be checked by displaying the
programme LIST.
The Programme List
☛
Some broadcasters show
a red on-screen prompt
when DTV Text is
available.
To remove the prompt
from the screen press
the Green button.
TV/AV
PR VOL
MENU
TEXT
PP
TV/AV
PR VOL
MENU
TEXT
OKEPG
PP
TV/AV
PR VOL
MENU
TEXT
OKEPG
PP
Channel Logo
Item one
Item two
Item three
Item four
Item five
Item six
Item seven
INDEX
Latest news item:
To exit, press TEXT
Channel Logo
Item one 300
Item two 150
Item three 200
Item four 170
Item five 110
Item six 800
Item seven 160
Item eight 850
Item nine 121
Latest news item:
Home
MENUSHORTCUTSHELPHOME
adveretising banner
100
– + 110 200
Typical
overlay
example
Typical
inset
example
POWER
ABC DEF
GHI JKL MNO
WXYZTUVPQRS
Sub-
Title
Info.
0
987
456
321
MENU TV/AV
OK
SLEEP ARC
PR
EPG DTV I/II
V
O
L
V
O
L
PP
FAVLIST
TEXT MIX SIZE INDEX
HOLDREVEALTIMEUPDATE
i

42
43
Teletext Button Functions
The table below gives a complete explanation of each of the
Teletext buttons on the full function remote control.
A
B
C D
F
E
Functions of Teletext
Part Display Contents
A Selected page number.
B Broadcast Station identity.
C Current page number or searching status.
D Date and time.
E Text information.
F FasText information.
Red, Green, Yellow, Blue
1
Press the TEXT (
TEXT
) button once to display the Teletext pages.
2
Use the 0–9 number buttons and the Red, Green, Yellow and
Blue FastText buttons to navigate the text pages.
3
Press the TEXT (
TEXT
) button again to switch Teletext off and
return to normal viewing.
The waterproof remote control does not include any ‘extended’
Teletext functions. To use all of the Teletext options, the buttons
beneath the sliding cover on the full function remote control must
be used.
Analogue TV Teletext
Displaying the Teletext Information
TV/AV
PR VOL
MENU
TEXT
PP
POWER
ABC DEF
GHI JKL MNO
WXYZTUVPQRS
Sub-
Title
Info.
0
987
456
321
MENU TV/AV
OK
SLEEP ARC
PR
EPG DTV I/II
V
O
L
V
O
L
PP
FAVLIST
TEXT MIX SIZE INDEX
HOLDREVEALTIMEUPDATE
PIP INPUT SWAP
PIP PR
MODEPOSITION
?
i
Button Menu Functions
TEXT Press the button to turn Teletext on or off.
MIX
In Teletext mode – press the button to superimpose the text page over the
TV picture, press again for normal Teletext mode.
Selects double height text.
SIZE
Press button to enlarge top half of the page.
Press again to enlarge the bottom half of the page.
Press again to return to normal size text.
INDEX Press to return to the index page.
Displays the TV picture on the screen while waiting for the new Teletext
page. The display will appear at the top left hand corner of the screen.
UPDATE When the updated page is available then the display will change to the
page number.
Press the UPDATE button to view the updated Teletext page.
When viewing a TV programme, press this button to display the time at
the top right hand corner of the screen. Press the button again to remove
TIME
the display.
In Teletext mode press this button to select and hold or change a four
digit sub page number. This is displayed along the bottom of the screen.
Press the button again to exit this function.
Press this button to display concealed text, such as answers to quiz
REVEAL games.
Press the button again to remove the information from the display.
Stops the automatic page change, which occurs if a Teletext page
HOLD
consists of two or more sub pages. Stop symbol is displayed in the top
left hand corner of the screen.
Press the button again to resume.
i
?

44
45
SpecificationsTroubleshooting
No picture or sound.
Screen is black.
Picture is OK but
there is no sound.
Poor sound quality.
No image on a
specific channel.
Image is not stable
and may appear to
vibrate, horizontal
bars appear.
No colour on a
specific channel
(a black & white image).
Black or white dots
appear on all
channels or a
specific channel.
☛ Make sure the AC power cord is connected to the power adaptor.
☛ Make sure the DC power cord is connected to the TileVision®.
☛ Check for power failure.
☛ If the red indicator is not showing press the POWER ( ) button on
the remote control
☛ Make sure the external signal source mode is selected.
☛ Press the signal input button TV/AV (
TV/AV
) to change to TV.
☛ Press the Mute ( ) button on the full function remote control.
☛ Check another channel.
☛ Press the button to increase the volume.
☛ Check the speaker connections from the TileVision® to the speakers.
☛ Make sure the channel is broadcasting in stereo.
Press the I/II button to Select Mono. The sound quality of a stereo
broadcast may be poor in a weak signal area.
(See Sound Output Selection on page 36)
☛ Make sure the channel selection is correct.
☛ Change the antenna direction to the right or left.
☛ Adjust the fine tuning of the channel.
☛ Adjust the fine tuning of the channel.
☛ Make sure there is no powerful electromagnetic wave interference
from the transmitting station.
☛ Stop using a hair drier, electric drill or electric blender.
☛ Check other channels to see if the specific channel is broadcasting
a black & white program.
☛ Adjust the colour. (See page 33)
☛ Make sure the antenna is connected correctly. (See page 7)
☛ Make sure the status of the antenna or wire is good.
☛ Adjust the fine tuning of the channel.
Model TV/17/FR5/PS TV/23/FR3/PS
External Dimensions (W x H x D) 483 mm x 353 mm x 75 mm 630 mm x 450 mm x 90 mm
Total Weight complete with back box 12 Kg 16 Kg
Requirements 12 VDC/6.67 A 24 VDC/5.42 A
Power
Consumption 72 W max, standby below 3 W 116 W max, standby below 3 W
AC/DC Power Adaptor
Input 100–240 VAC 50/60 Hz Input 100–240 VAC 50/60 Hz
Output 12 VDC/6.67 A Output 24 VDC/5.42 A
Analog PAL-BG, I, DK/SECAM-BG, DK, L PAL-BG, I, DK/SECAM-BG, DK, L
System
Digital DVB-T (MHEG) MPEG-2 decoding DVB-T (MHEG) MPEG-2 decoding
TV
Programme
VHF:2–13 UHF 21–69 Cable S1–S41 VHF:2–13 UHF 21–69 Cable S1–S41
FVS 100 programme (Analog) FVS 100 programme (Analog)
Size Diagonal 17" (434.34 mm) Widescreen (16:9) 23" (584.2 mm) Widescreen (16:9)
Resolution/Pixel no. WXGA (1280 x 768) WXGA (1366 x 768)
Type a-si TFT active matrix a-si TFT active matrix
LCD Brightness 550 cd/m2 450 cd/m2
Contrast Ratio 600:1 1,200:1
Viewing Angle L/R/U/D 89°/89°/89°/89° L/R/U/D 89°/89°/89°/89°
Colour Depth 16.7 M colours 16.7 M colours
Response Time 12 ms (Typ) 16 ms (Typ)
External Antenna Impedence VHF/UHF at 75 Ohm VHF/UHF at 75 Ohm
5 W + 5 W rms (both channels driven) 5 W + 5 W rms (both channels driven)
Audio Output Nicam, A2 Stereo Nicam, A2 Stereo
Graphic Equaliser Graphic Equaliser
OSD
Programme list/edit Programme list/edit
Menu – multi-language – halftone Menu – multi-language – halftone
12 VDC/6.67 A 24 VDC/5.42 A
HDMI HDMI
AUDIO (L & R) AUDIO (L & R)
Connection Ports
EURO-SCART (Full) EURO-SCART (Full)
S-VIDEO S-VIDEO
ANTENNA/TUNER (Co-axial) ANTENNA/TUNER (Co-axial)
Speakers (clip terminals) Speakers (clip terminals)
SuppliedLoudspeakers External, Waterproof,8Ω External,Waterproof,8Ω
Auto Programme Auto Programme
Manual Programme Manual Programme
ACMS (Auto Channel Memory System) ACMS (Auto Channel Memory System)
PSM (Picture Status Memory) PSM (Picture Status Memory)
Functions SSM (Sound Status Memory) SSM (Sound Status Memory)
SRS WOW SRS WOW
AVL (Auto Volume Leveller) AVL (Auto Volume Leveller)
ARC (Aspect Ratio Control) ARC (Aspect Ratio Control)
Teletext – TOP/FLOF/MHEG-5 Teletext – TOP/FLOF/MHEG-5
☛
Design and specifications are subject to change
without notice.
Produced by digiSET 01772 828083

PORTER LANCASTRIAN LIMITED
www.tilevision.tv
TV/17/FR5/PS – 17" and TV/23/FR3/PS – 23" Tilevision® Operating Instructions – October 2007 – Part No. TVS/00318/04
 Loading...