

Page 1
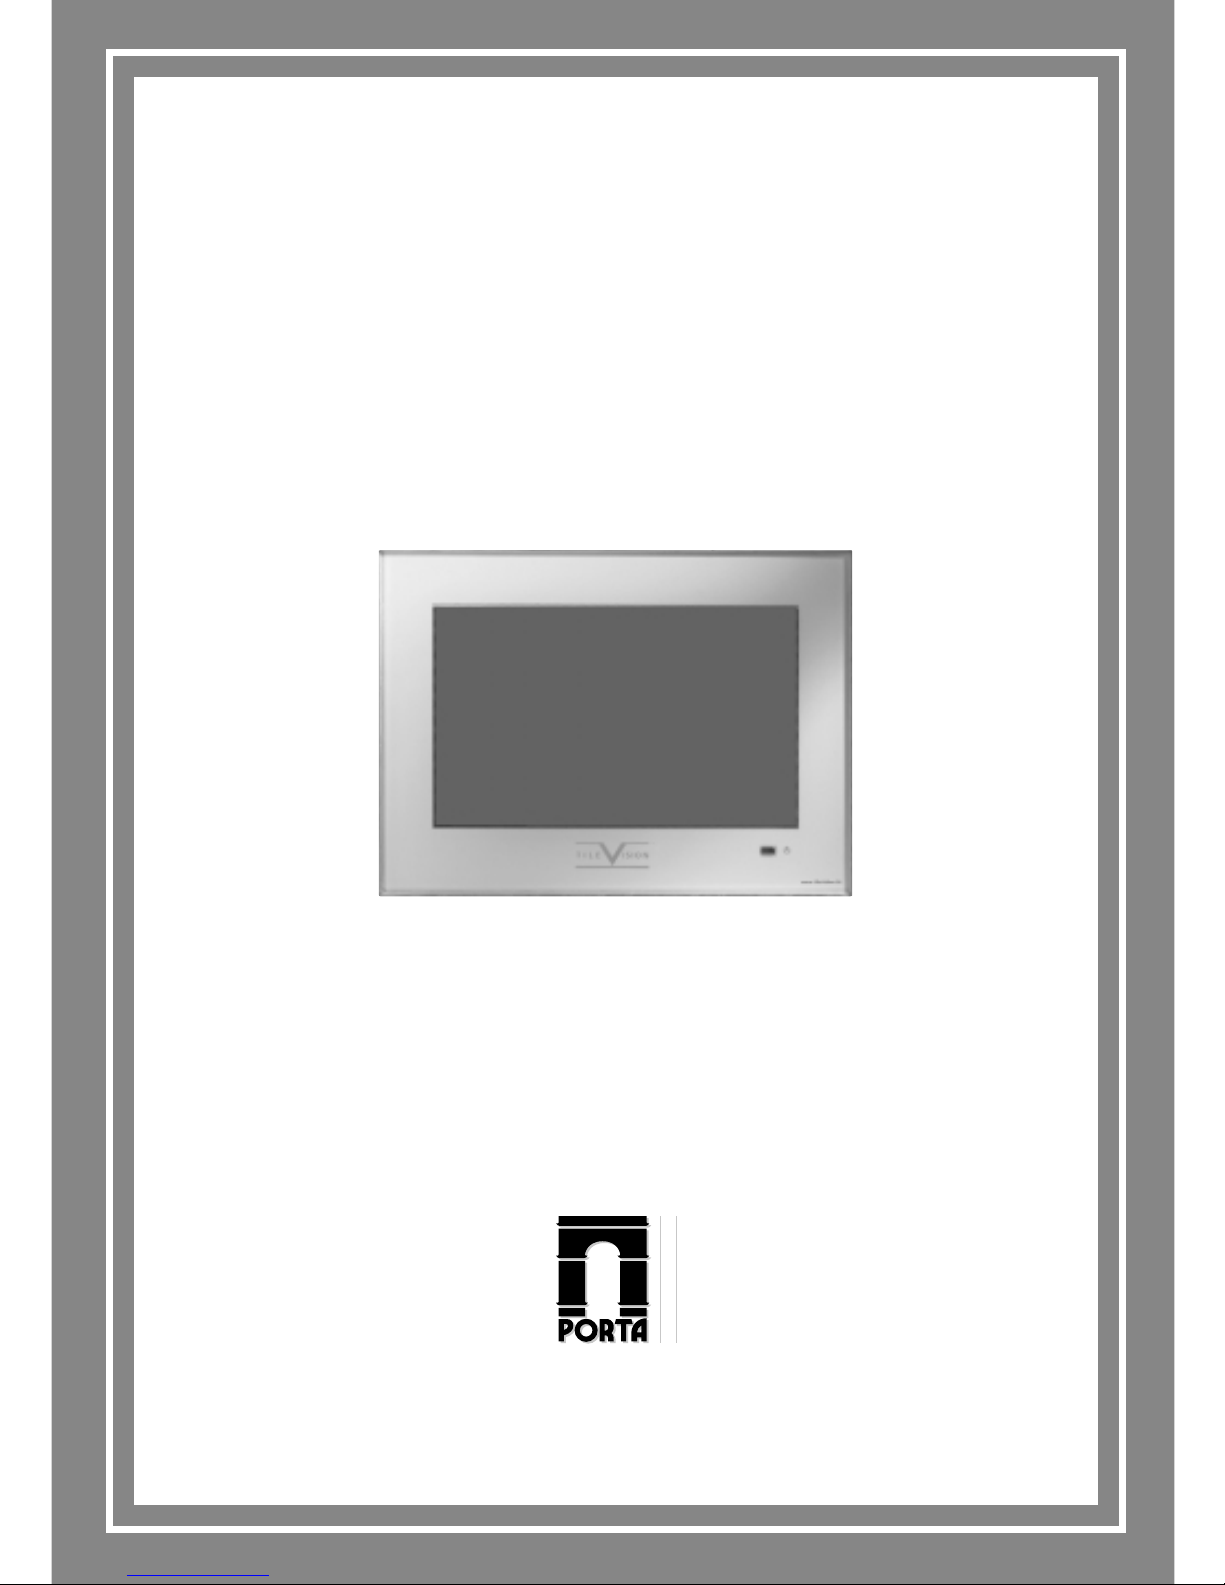
17" TileVision
®
Operating Instructions (NTSC)
PORTER LANCASTRIAN
PORTER LANCASTRIAN LIMITED
www.tilevision.tv
Page 2
17" Widescreen TileVision
®
A Wide Array of Screen Settings
You can choose different screen settings depending on the type of programme you are
watching or the surrounding conditions (the lighting or the outside weather conditions).
You can switch between Dynamic, Standard, Mild and Game Options, or you can
configure the screen settings yourself. You can select 4:3 (normal format), 16:9
(widescreen format), or Zoom (widescreen view of normal format) to match what you are
watching to your preference.
A Wide Array of Sound Settings
You can choose an optimal sound setting for the type of program you are watching.
You can switch between Flat, Music, Movie, and Speech, or you can configure
the settings yourself.
Quick View
Press the QV button to view the last programme you were watching.
This symbol is intended to alert the user to the presence of important
operating and maintenance (servicing) instructions in the literature
accompanying the appliance.
CAUTION
RISK OF ELECTRIC SHOCK
DO NOT OPEN
WARNING: TO PREVENT INJURY, THIS APPARATUS MUST BE
SECURELYATTACHED TO THE WALL IN ACCORDANCE THE
INSTALLATION INSTRUCTIONS.
CAUTION: DO NOT REMOVE COVER.
NO USER-SERVICEABLE PARTS INSIDE.
REFER SERVICING TO QUALIFIED SERVICE PERSONNEL.
BEWARE OF STATIC SENSITIVE PARTS.
Page 3
Safety Instructions
1
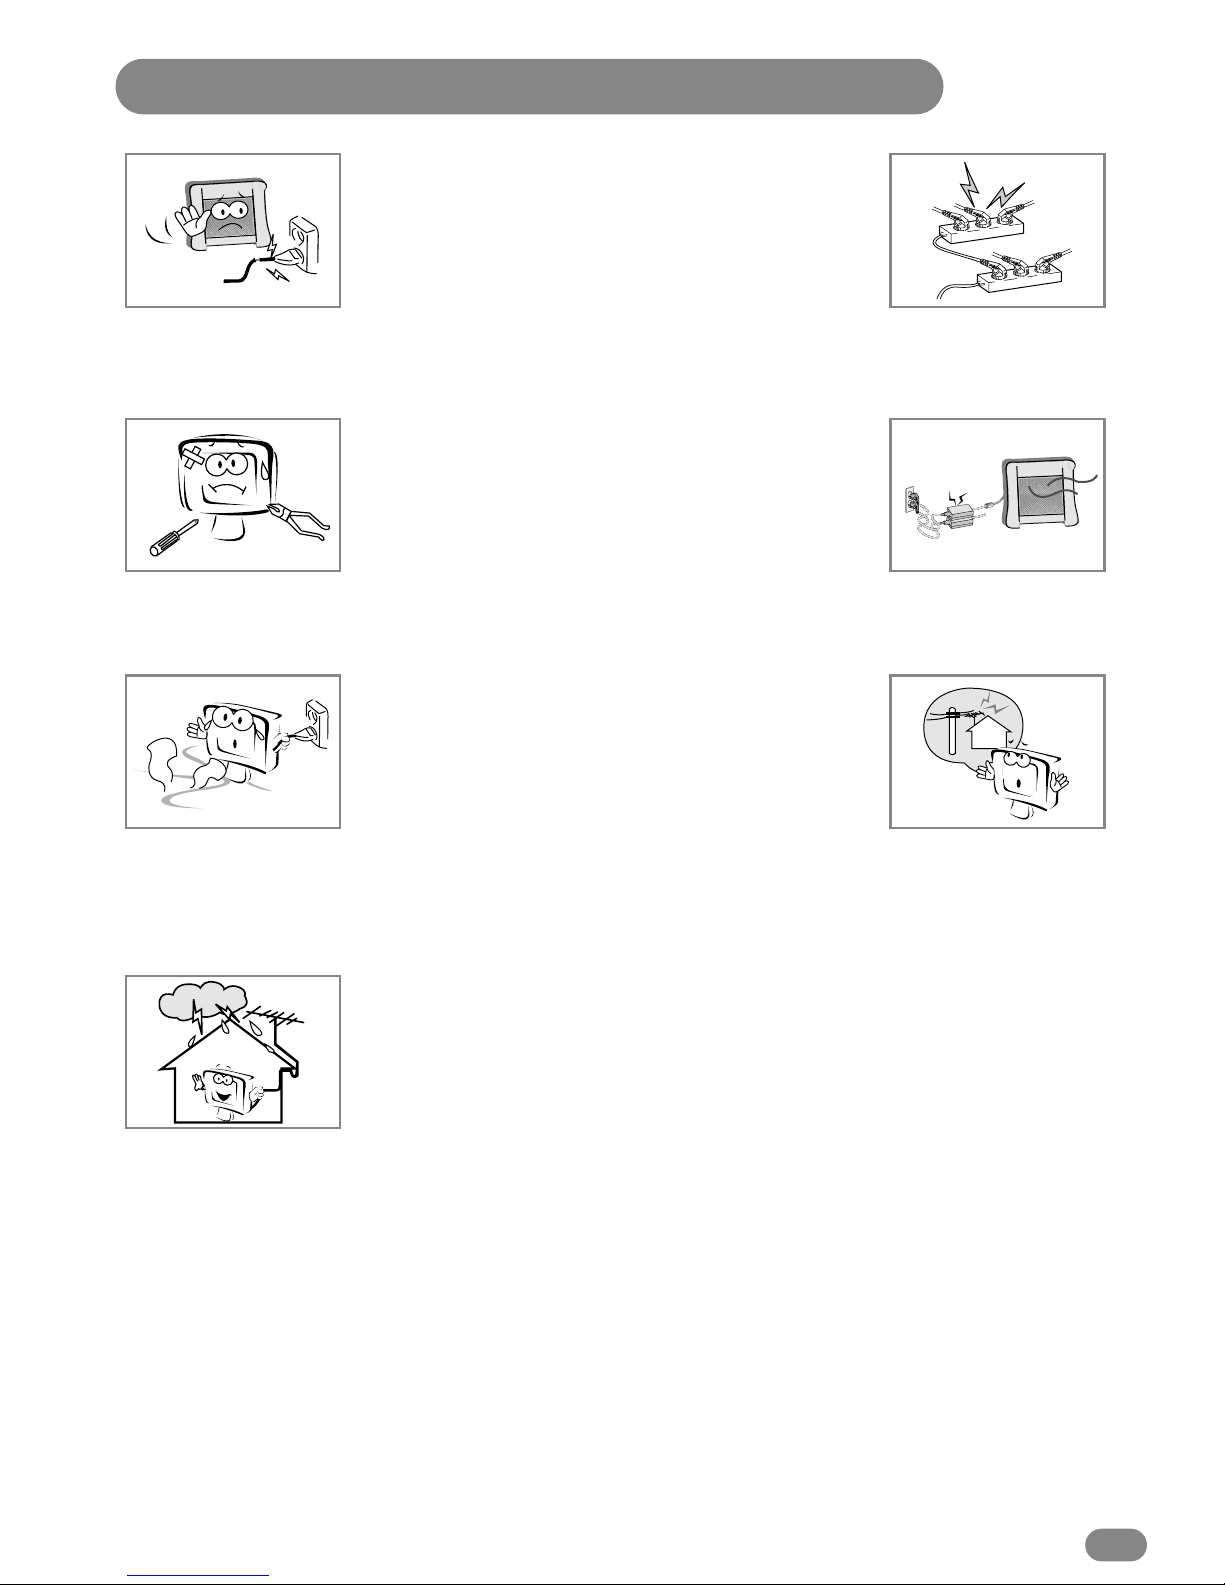
Do not use a damaged socket and do not let the power cord
touch a heat source.
– This may cause an electric shock or fire.
Do not attempt to service the unit.
Contact an authorised dealer or repair service.
– Servicing the unit yourself may cause an electric shock or fire.
If there are any unusual sounds or smells coming from the
unit, unplug it immediately and contact an authorised
dealer or repair service.
– This may cause an electric shock or fire.
If an outside antenna is connected to the unit, ensure the
external to internal cable entry is fully sealed
– This may cause an electric shock or fire.
Note to the Cable/TV Installer
This reminder is provided to call the cable TV system Installer’s
attention to Article 820-40 of the National Electric Code (U.S.A.).
The code provides guidelines for proper grounding and, in
particular, specifies that the cable ground shall be connected to
the grounding system of the building, as close to the point of
cable entry as practical.
Do not connect too many extension cords or plugs to
an outlet.
– This may cause a fire.
Keep the power adaptor away from any heat source.
– This may cause a fire.
Ensure the antenna is located away from overhead cables.
– This may cause an electric shock.
Page 4
2
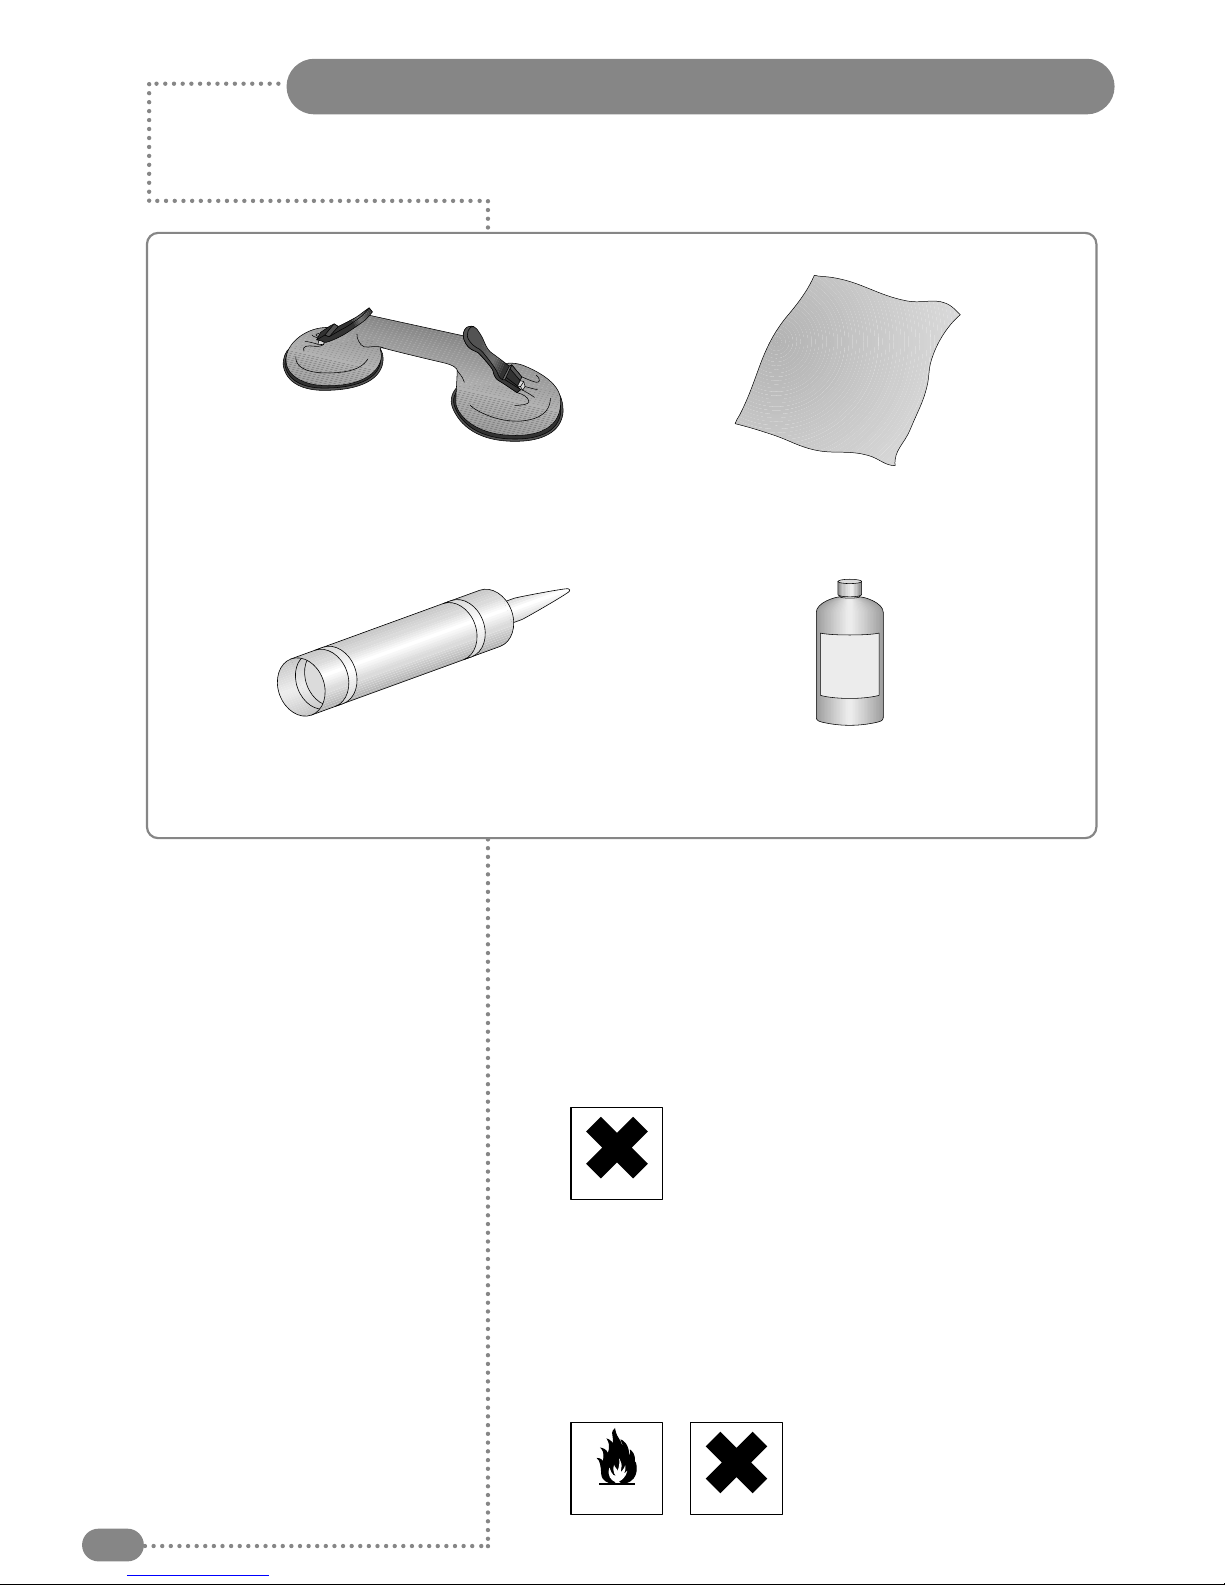
Tools Required
Suction Lifter
Silicone Sealant
Isopropyl Alcohol
I
s
o
p
r
o
p
y
l
A
l
c
o
h
o
l
Soft Cloth
☛
Silicone Sealant evolves acetic acid during cure. Use only
in well ventilated areas. Irritating to eyes. Wash hands
after use and before meals. Wash splashes from skin,
clothing and other surfaces. Use a clean cloth. In case of
contact with eyes wash immediately with plenty of water.
Please observe safety precautions on the container. Keep
out of reach of children and animals.
☛
Isopropyl alcohol is available from most pharmacies and
larger electronics wholesalers. It is an effective
degreasing agent.
Please observe safety precautions on the container. Keep
out of reach of children and animals. Do not drink.
HIGHLY
FLAMMABLE
IRRITANT
IRRITANT
Page 5
Table of Contents
3
Safety Instructions ........................................................................................................................1
Tools Required ..............................................................................................................................2
Unpacking your TileVision®............................................................................................................4
Your TileVision®..............................................................................................................................5
Connector Inputs ..........................................................................................................................5
Connections ..................................................................................................................................6
Connecting an Antenna or Cable ..................................................................................................7
Connecting to the RCA or S-Video Input ......................................................................................8
Connecting to a DVD or DTV Set-Top Box Input ..........................................................................9
Connecting to the Component Input ............................................................................................9
Installing the Front Plate ............................................................................................................10
The Remote Control ....................................................................................................................11
Switching the TileVision®On/Off ..................................................................................................12
Selecting a Picture from External Sources ................................................................................12
Selecting your On-screen Language ..........................................................................................12
On-screen Menus and Displays ..................................................................................................13
Tuning, Setup and Editing TV Programs ....................................................................................14
Parental Control ..........................................................................................................................16
Picture Control ............................................................................................................................19
PC Picture Adjustment ......................................................................................................... .......20
Sound Control ............................................................................................................................21
TV, Component, S-Video and PC Modes ....................................................................................22
Auto Sleep ..................................................................................................................................22
Blue Back ....................................................................................................................................23
ARC (Aspect Ratio Control) ........................................................................................................23
Sleep Timer ................................................................................................................................24
ST/SAP ........................................................................................................................................24
Troubleshooting ..........................................................................................................................25
Specifications ..............................................................................................................................26
Notes ..........................................................................................................................................27
Page 6
Unpacking your TileVision
®
4
Accessories
Please make sure the following items are included with your TileVision
®
if any items are missing, contact your dealer.
Two boxes supplied –
1. Back Box Assembly – (first fix)
2 speakers.
2 lengths speaker cable.
1 12V DC Adaptor with 4 metre cord.
1 AC Power cord – 100–240V.
1 stainless steel back box.
1 back box installation instructions.
2. Front Assembly – (second fix)
1 front plate assembly complete with Velcro sealing strips.
1 remote control.
1 installation and instruction manual.
1 mirror acrylic surround.
Page 7
Your TileVision
®
5
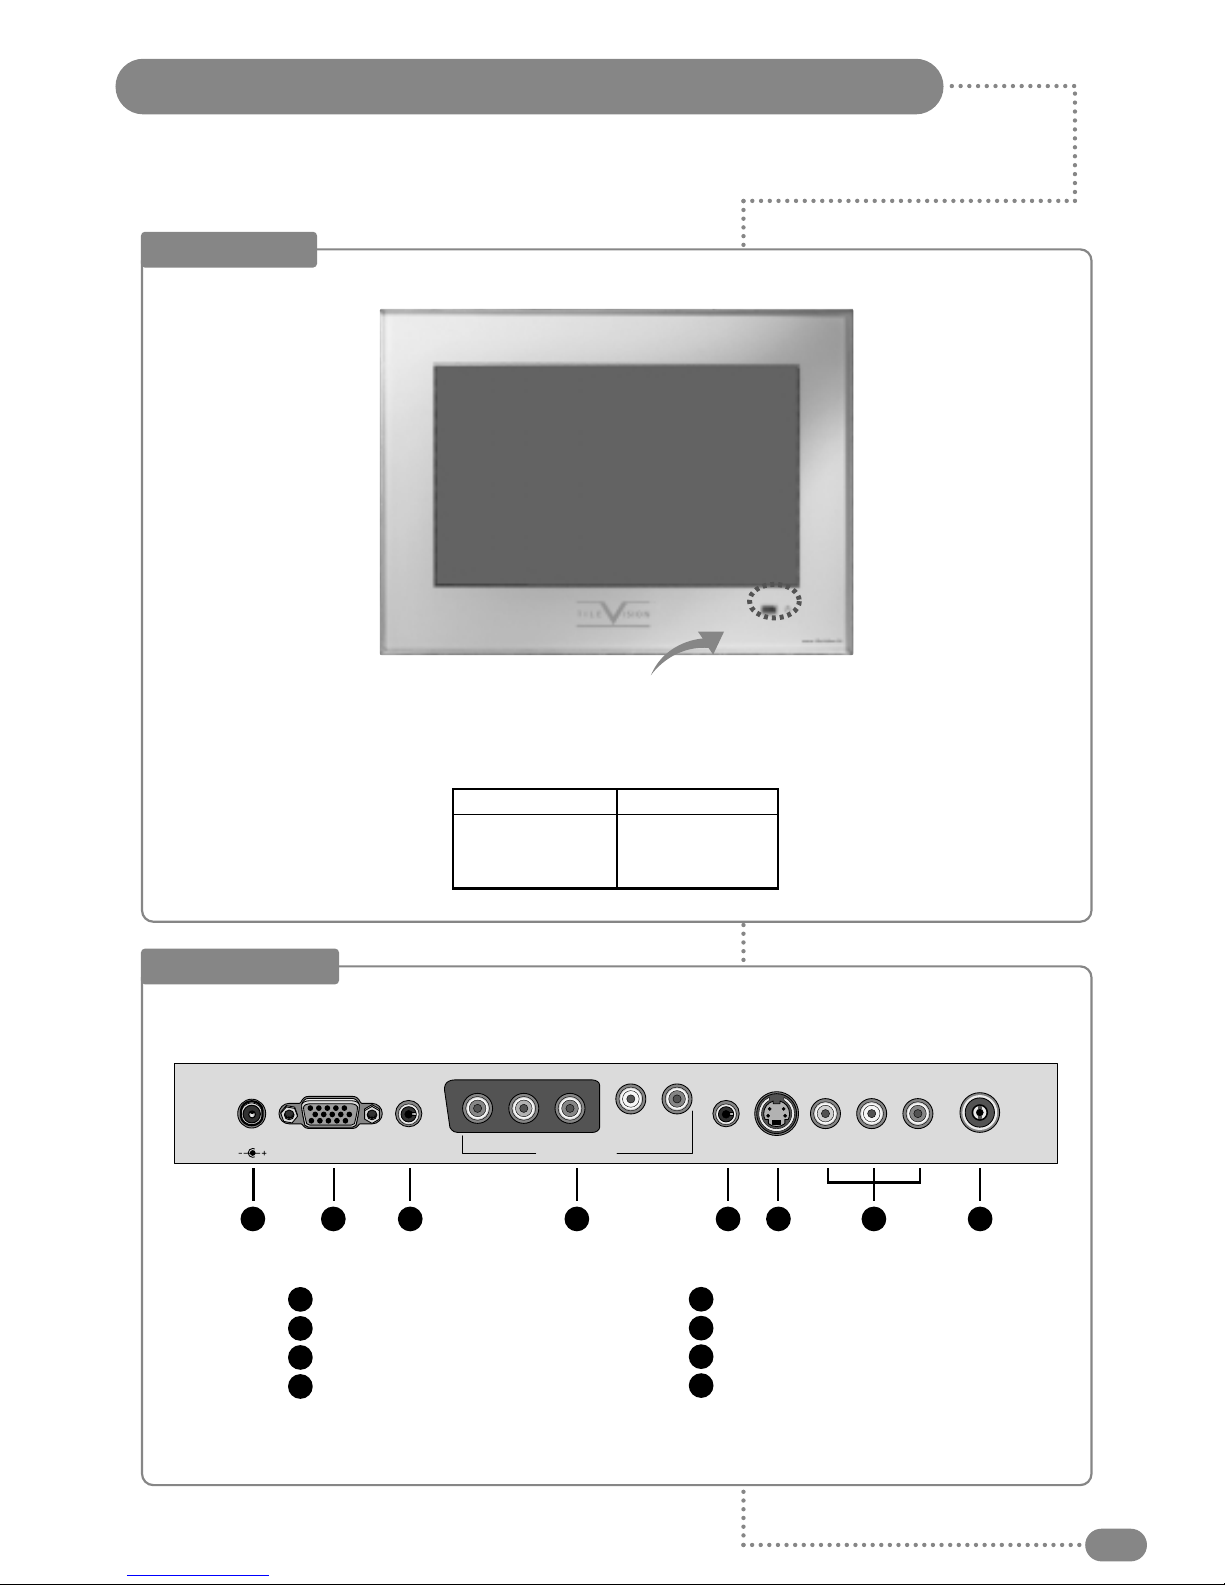
Front View
Indicator
Red
Green
Green blinking
Remote control sensor and indicator
Status
Stand-by
Power on
Remote control
Power Indicator Status
Connector Inputs
DC12V Power Input
RGB Video Input (PC/DTV)
Audio Input (PC/DTV)
Component Input (Y, CB, CR)/
L (mono) R
1
2
3
4
Headphone Output
S-VIDEO Input
AV Video & Audio Inputs
Antenna Input Jack
5
6
7
8
1 2 3 4
5
6
7
8
12VDC
RGB Audio In
COMPONENT
S-VIDEO VIDEO
L
Audio
R ANTPhones
YCBCR
L (mono) R
Page 8
Connections
6
Earthing Points
The Earthing connection points are found on the rear of the front plate and are clearly marked with
green labels.
Power Socket
The Power socket (1) is located at the extreme left of the connection array.
Speaker Connections
The speakers should be connected after the
Earth straps to the rear of the front plate as
detailed on page 10 of these operating
instructions.
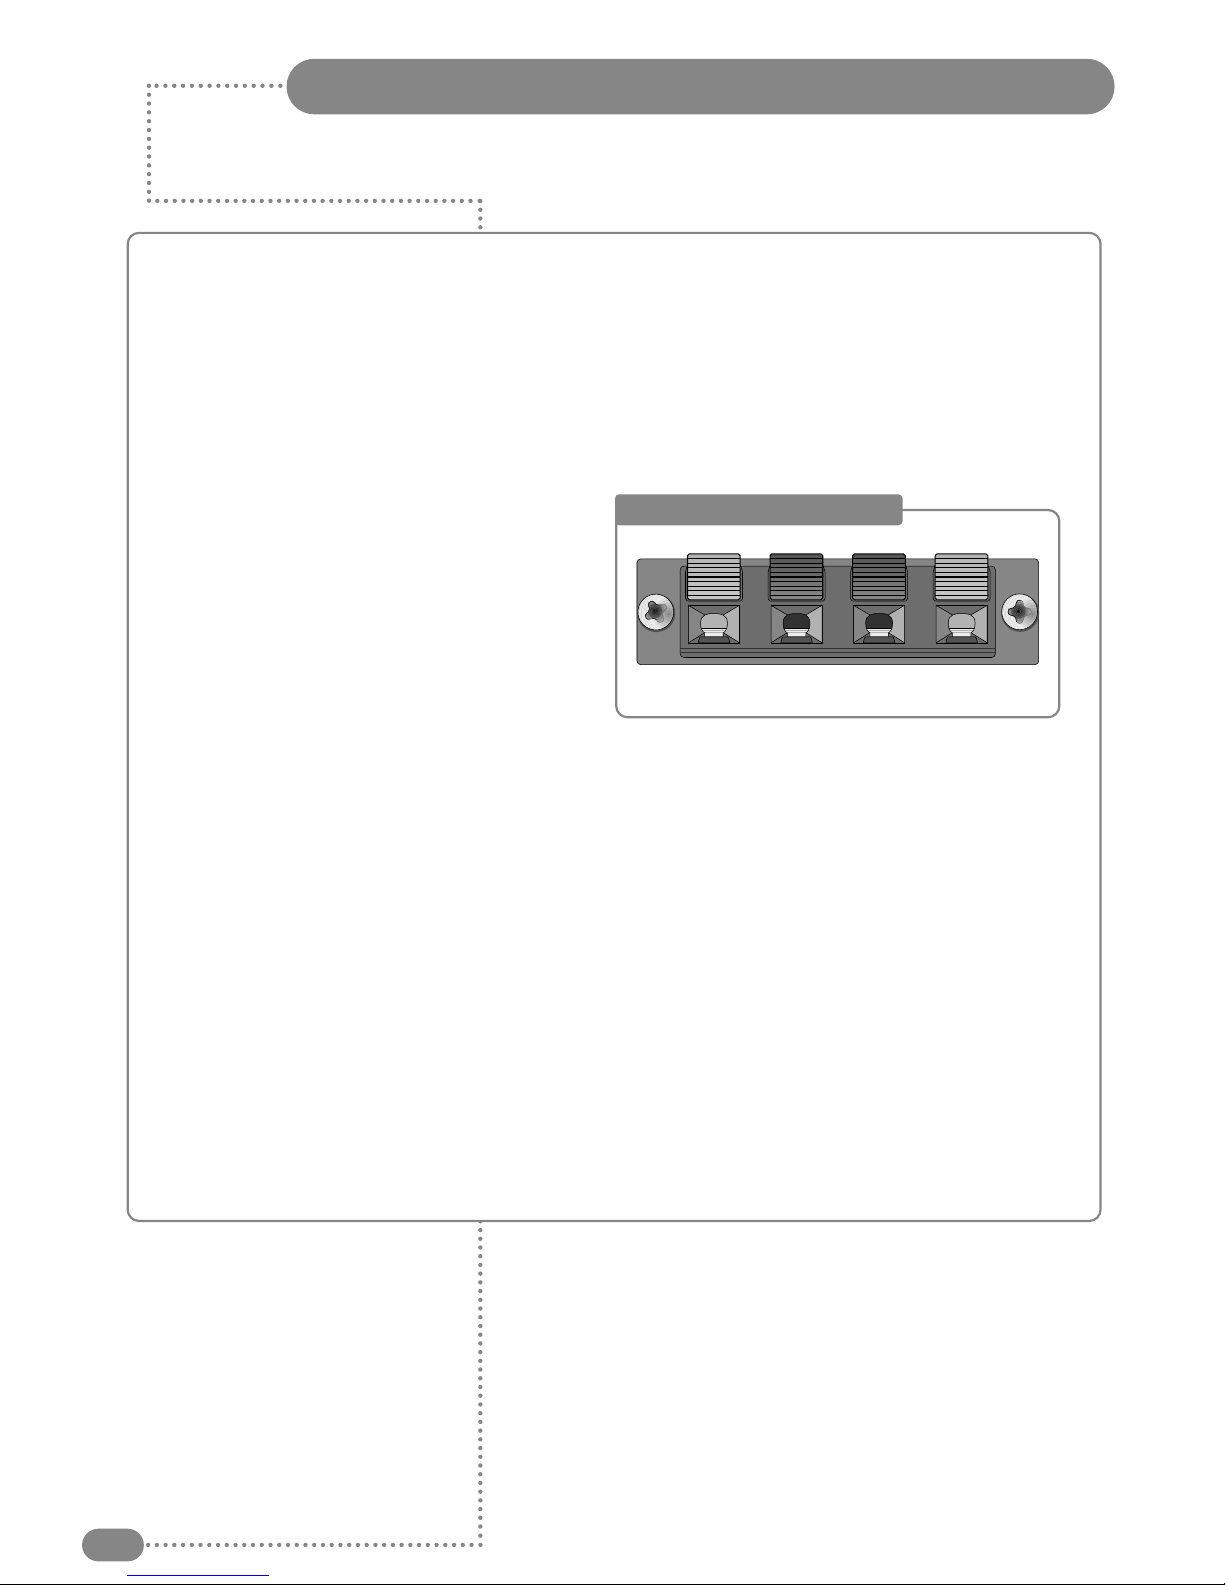
The speaker connection block is found on the
right of the rear of the front plate. Lift one of
the lugs and push one conductor of the
speaker lead into the connector and release
the lug and give the lead a slight pull to make
sure that it is gripped correctly. The other wires are connected in the same way.
Note: To ensure that the speakers are in correct phase, the conductor with the stripe should be
connected to the negative terminal (L– or R–) and the plain conductor should be connected to the
corresponding positive terminal (L+ or R+).
Connections to the speakers terminals should be made in the same way – striped conductor to the
negative terminal and positive conductor to the positive terminal.
Antenna Feed
The Antenna input jack is found at the extreme right of the connection array (refer to page 7). A
minimum signal level of 60dBu/1mV is required to avoid a noisy picture.
Component/Composite Video/S-Video/PC/DTV (RGB) Inputs
These are found in the central portion of the connection array. If these inputs are to be utilised the
necessary cables must be installed at the same time as the back box (refer to pages 8 and 9 of
these instructions).
Note: Careful consideration should be given to use of these inputs prior to the installation
of the unit.
Speaker Connection Block
L–L+ R– R+
Page 9
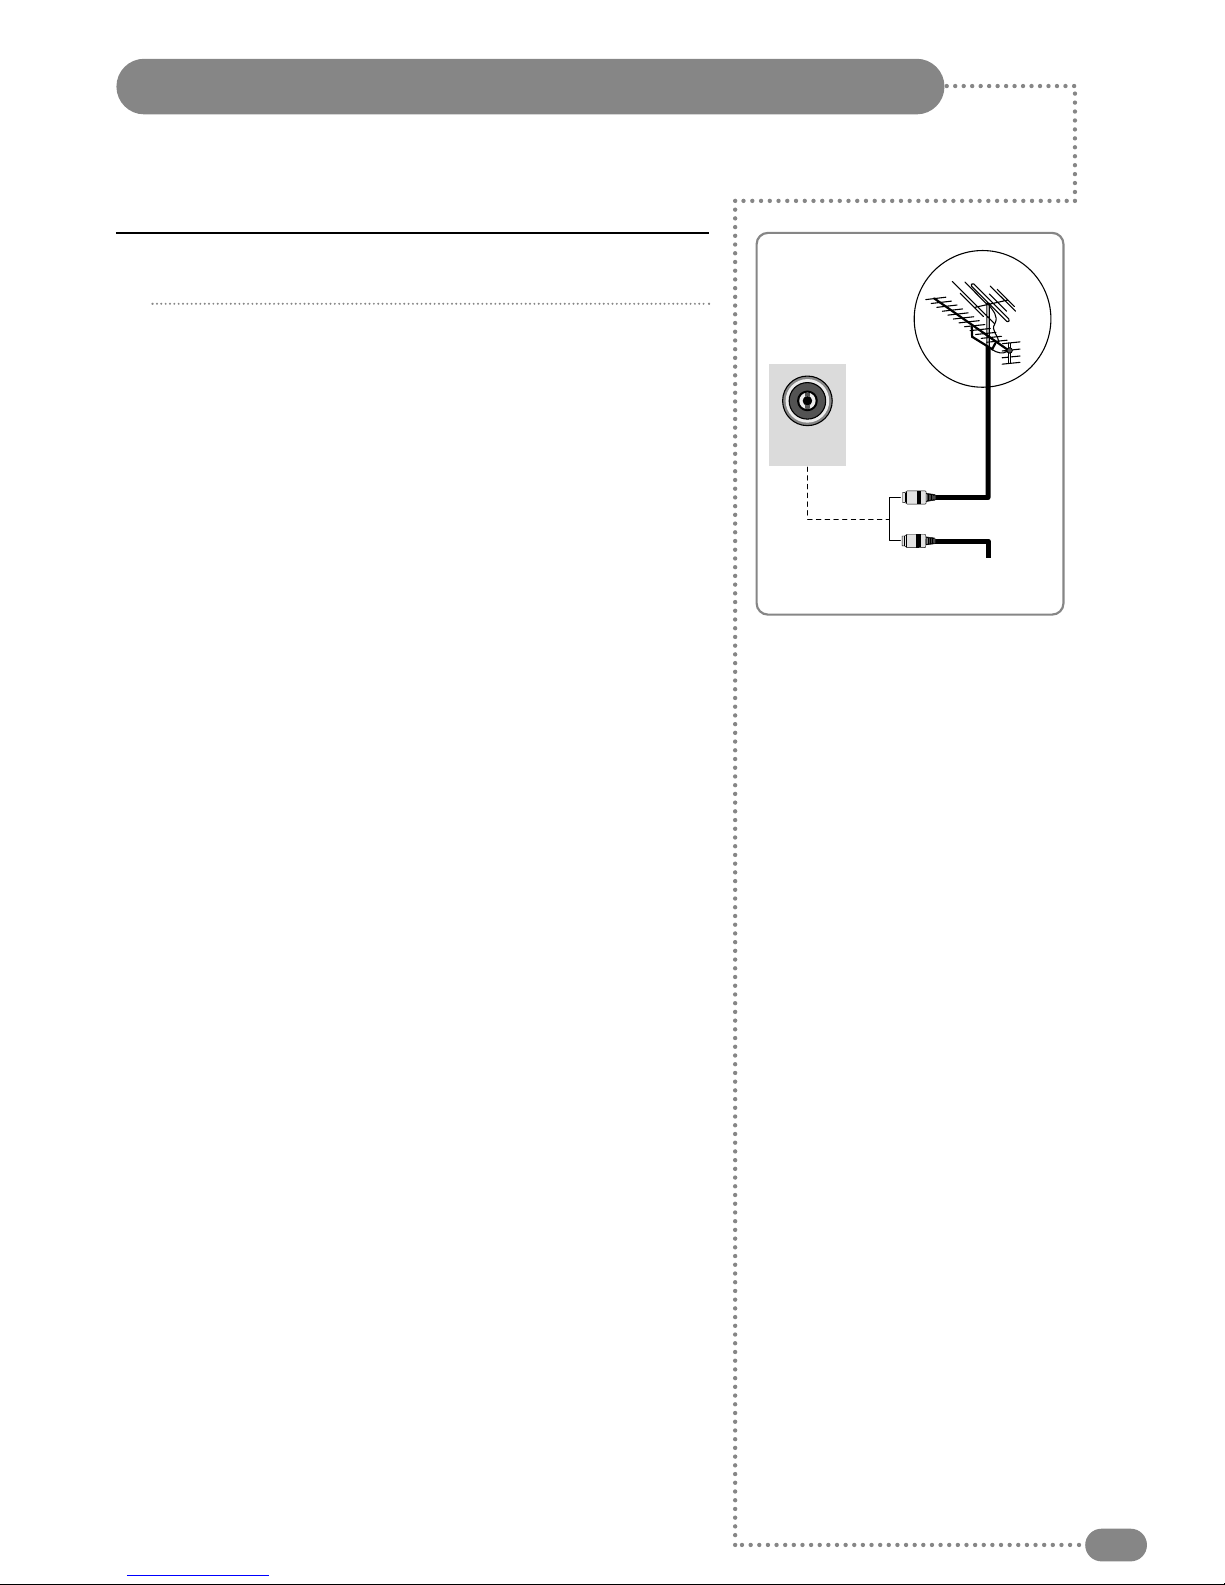
7
or
Cable Television
Network
Rear of the
TileVision
®
ANT
Connecting an Antenna or Cable
1
2
To view television channels correctly, a signal must be received by the set from one of
the following sources: an outdoor antenna, a cable television system or a satellite dish.
Connect the antenna or input cable to the 75Ω coaxial input
on the rear of the TileVision®.
If you are using an indoor antenna, you may need to turn it
when tuning your television until you receive a clear picture.
☛
The signal level fed to the set must be at least
60dBu/1mV or the picture may be noisy.
If in doubt, consult a qualified aerial technician.
Page 10
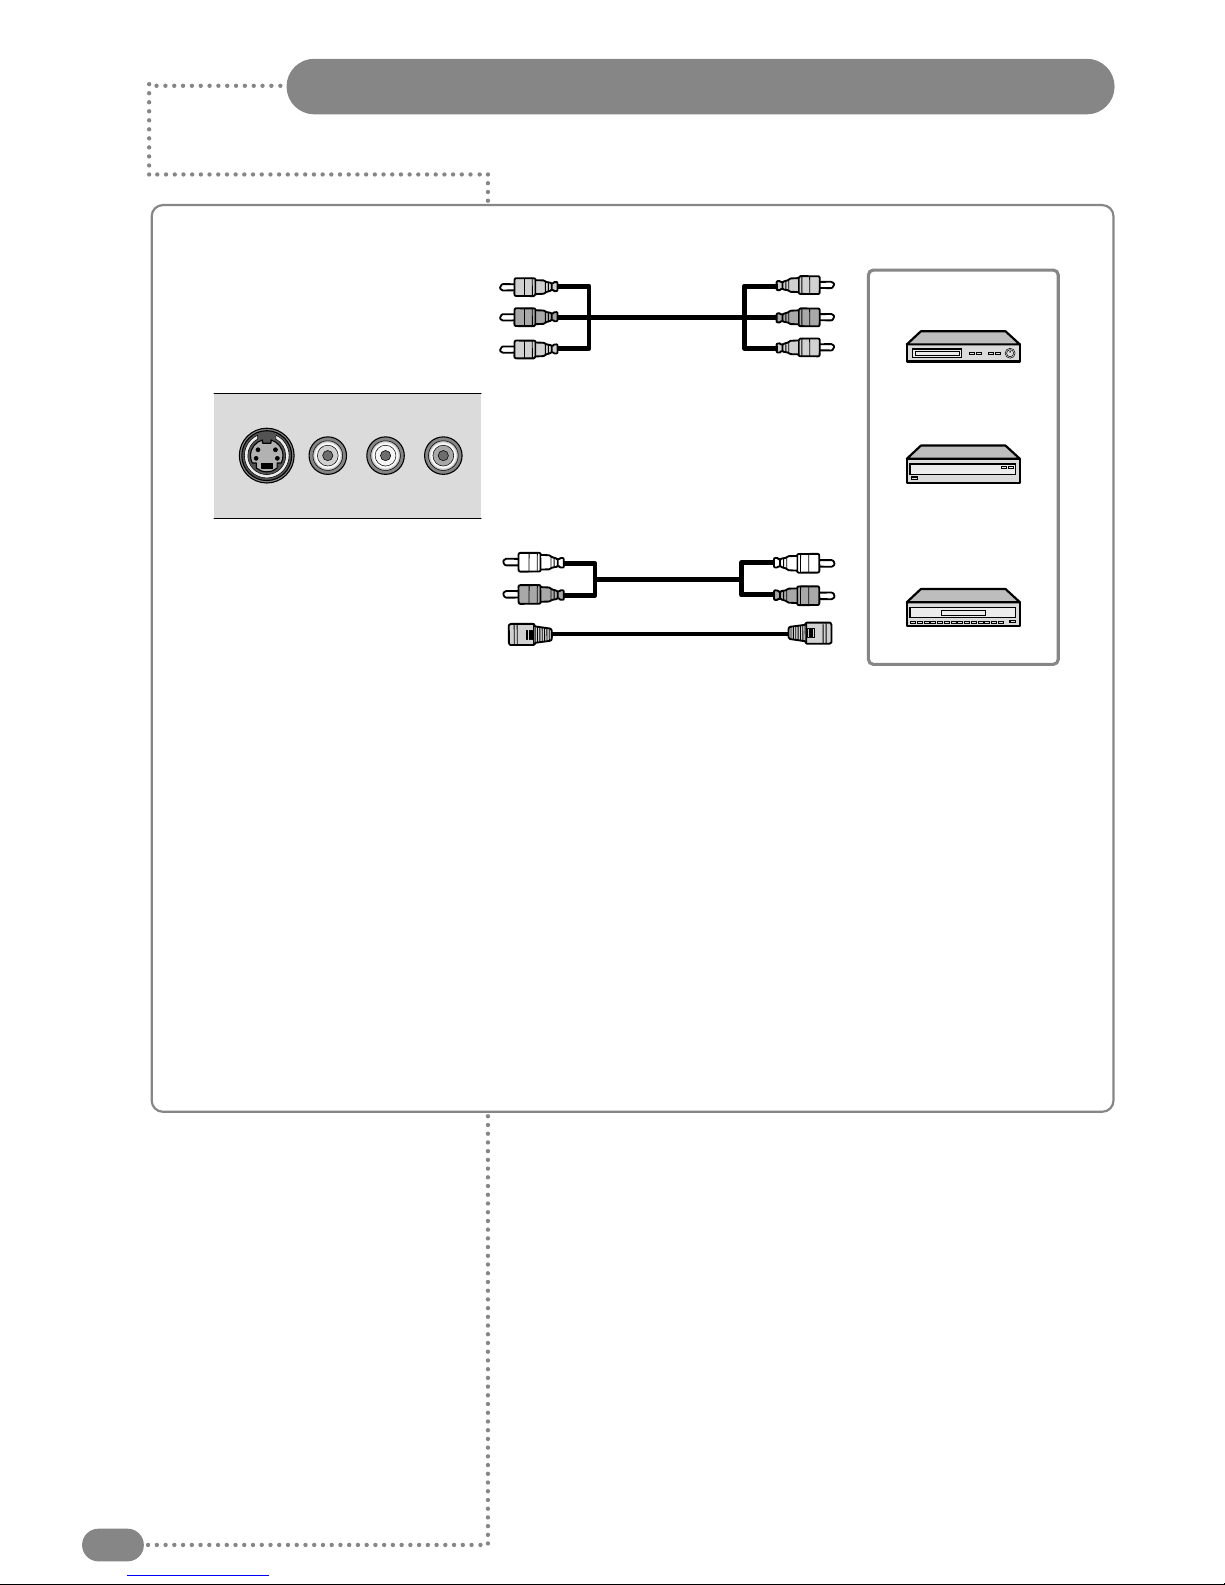
Connecting to the RCA and S-Video Inputs
8
All connections must be made prior to sealing the front plate into the back box.
(A) For RCA Input
1. Connect the RCA cable to the input jacks (video+ audio L/R) on the TileVision®and
output jacks on the external equipment such as a video recorder (VCR, DVD or HD) or DVD player, a
video game device, or a home automation system.
(B) For S-Video Input
1. Connect the S-Video/RCA (audio L/R) cable to the input jacks on the TileVision®and output jacks
on the external equipment such as a video recorder (VCR, DVD or HD) or DVD player, a video game
device, or a home automation system.
2. If the external equipment has mono audio output, connect it only to left jack of the Audio
Input/Output.
S-VIDEO VIDEO
L
Audio
R
Video game device
Home automation
system
Video Recorder
(A) For RCA Input
(B) For S-Video Input
Page 11
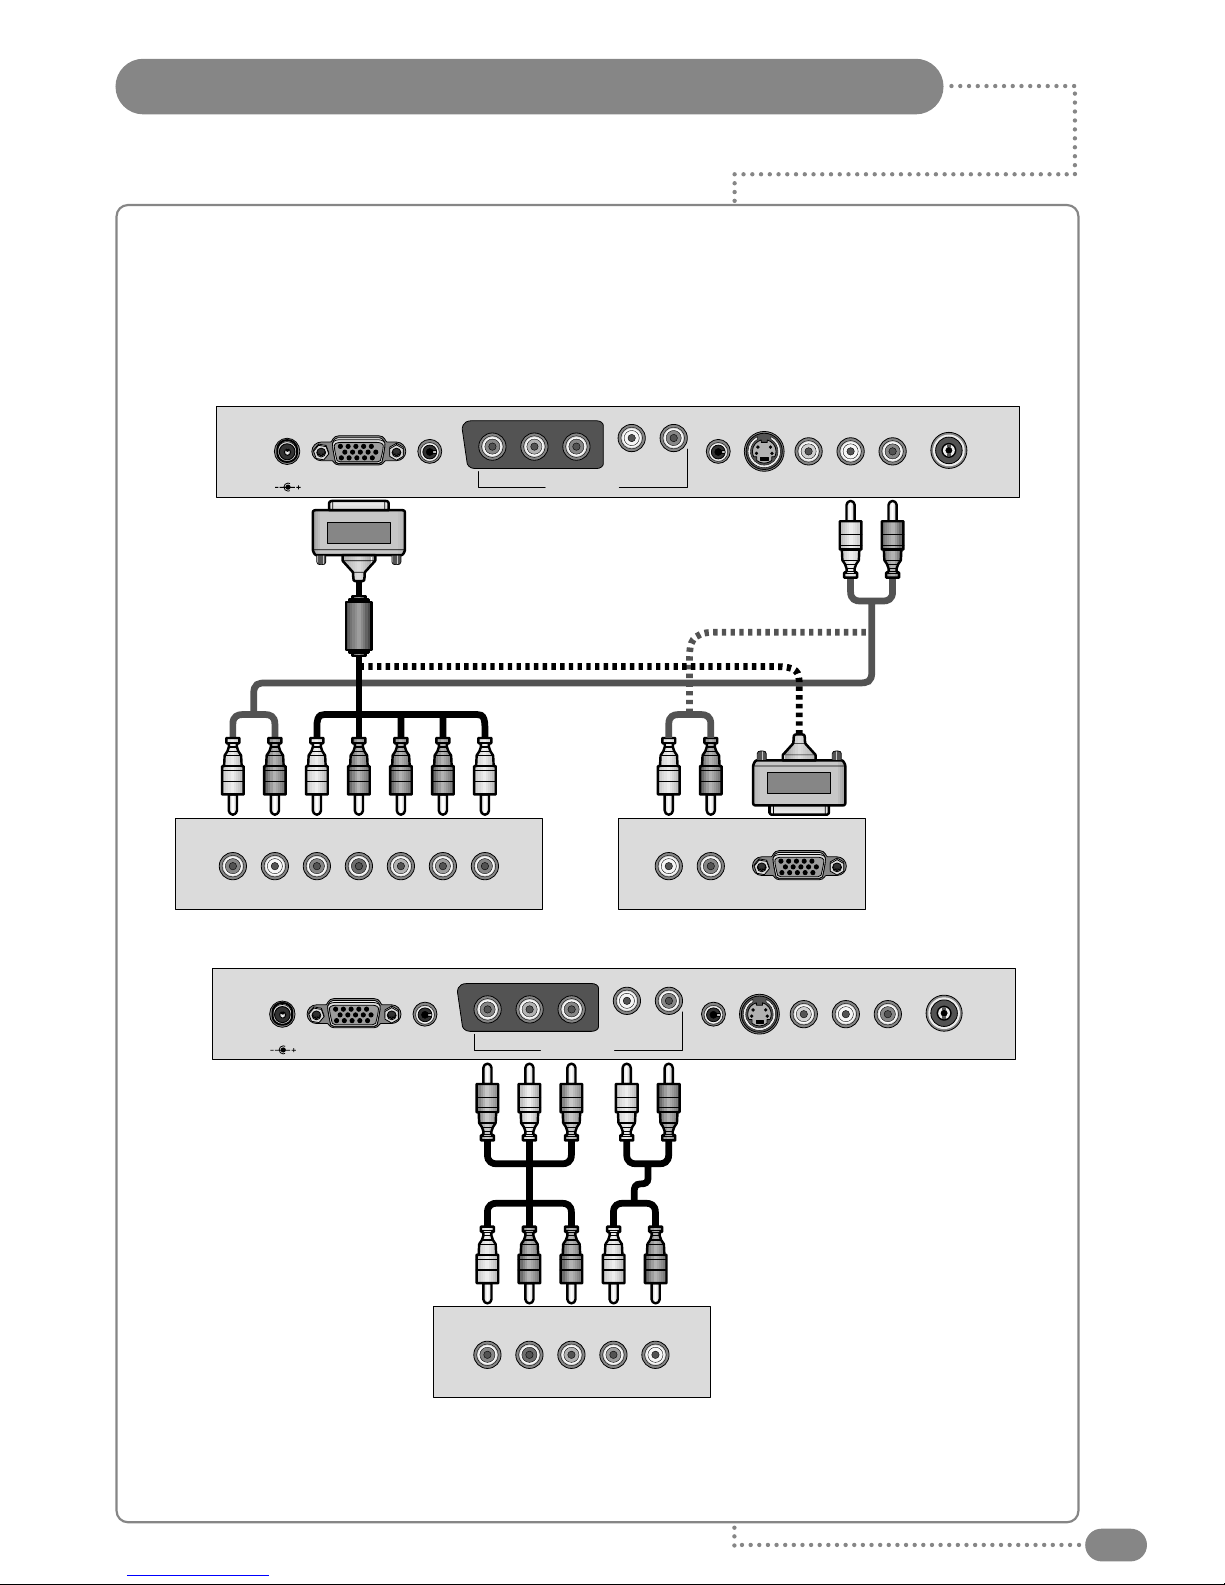
Connecting to the PC/DTV Input
9
PC/DTV Input
1. Connect the PC IN cable (D sub jack) from the DTV output of the DTV receiver to PC/DTV IN of
the TileVision®.
2. Connect the Audio cable from the Audio output of DTV receiver of L (mono) and R of the set.
3. Press the
TV/AV button to select PC mode.
4. Try this after turning on DTV set.
12VDC
RGB Audio In
COMPONENT
S-VIDEO VIDEO
L
Audio
R ANTPhones
YCBCR
L (mono) R
L
Audio
RL
Audio
R HVRGB
or
12VDC
RGB Audio In
COMPONENT
S-VIDEO VIDEO
L
Audio
R ANTPhones
YCBCR
L (mono) R
Y CB CR L(mono) R
COMPONENT
RGB connection
example
Component connection example
Note: To receive the DTV program, it is necessary to purchase DTV receiver (Set-top Box) and
connect it to the TileVision®.
Page 12
Installing the Front Plate
10
Checking back box prior to installation of front plate
Before commencing the installation of the front plate the polystyrene-blanking panel must be removed
from the back box. The next step is to ensure that the appropriate cables and their connectors are
present within the back box.
It is important to ensure that the flange inside the back box is cleaned using a grease removal
agent and allowing it to dry. The space between the back box and front plate must be even on all
4 sides. If the flange needs to be straightened, this must be done before proceeding any further. This is
very important, as any damage will affect the unit’s waterproofing capabilities.
Installation of the front plate
Remove the front plate from its packaging and place the remote control to one side, next remove the
protective plastic film from the glass.
Introduce the lower front edge of the unit into the box and fit the earth straps to the two Earthing screws
as indicated by the green labels on the rear of the front plate. Connect all cables to their respective
sockets (refer to pages 6 to 9 of these instructions).
The next step is to remove the soft adhesive protector from the top length of special Velcro‚ and press
the front plate into the back plate (it may be necessary to adjust the position of the cables to achieve a
good fit).
The unit installation must comply with all relevant electrical safety regulations before turning the mains
supply to the 12V-power adaptor on using the remote pull switch. The unit should now show a red
indicator light showing that it is standby mode.
The next step is to tune the unit as detailed on pages 14 and 15.
Once you are satisfied that the unit is tuned and working correctly, press the Power 0/I button to put the
unit in standby mode and isolate the unit using the remote pull switch.
Gently remove the front plate using a suction lifter; please do not use a lever to remove the front plate as
this will invalidate your guarantee. Next, remove the self-adhesive protectors from the side and bottom
Velcro strips and press the front panel into the back box with reasonable force. Take care to apply force
to all 4 sides of the box. Restore mains power to the unit using the remote pull switch and press the
Power 0/I button to turn the unit on again and check that it is still working correctly.
Sealing the unit
When you are sure that the unit is installed correctly put it in standby mode and apply a clear silicone
sealant to the joint between the sides of the back box and the sides of the front plate. Ensure that the
silicone is worked into the gap evenly and is applied without any gaps, bubbles, etc. Wipe any excess
silicone away; check visually for any gaps or bubbles rectify if necessary. This Seal is of the greatest
importance to the reliable and safe operation of this unit and must be waterproof.
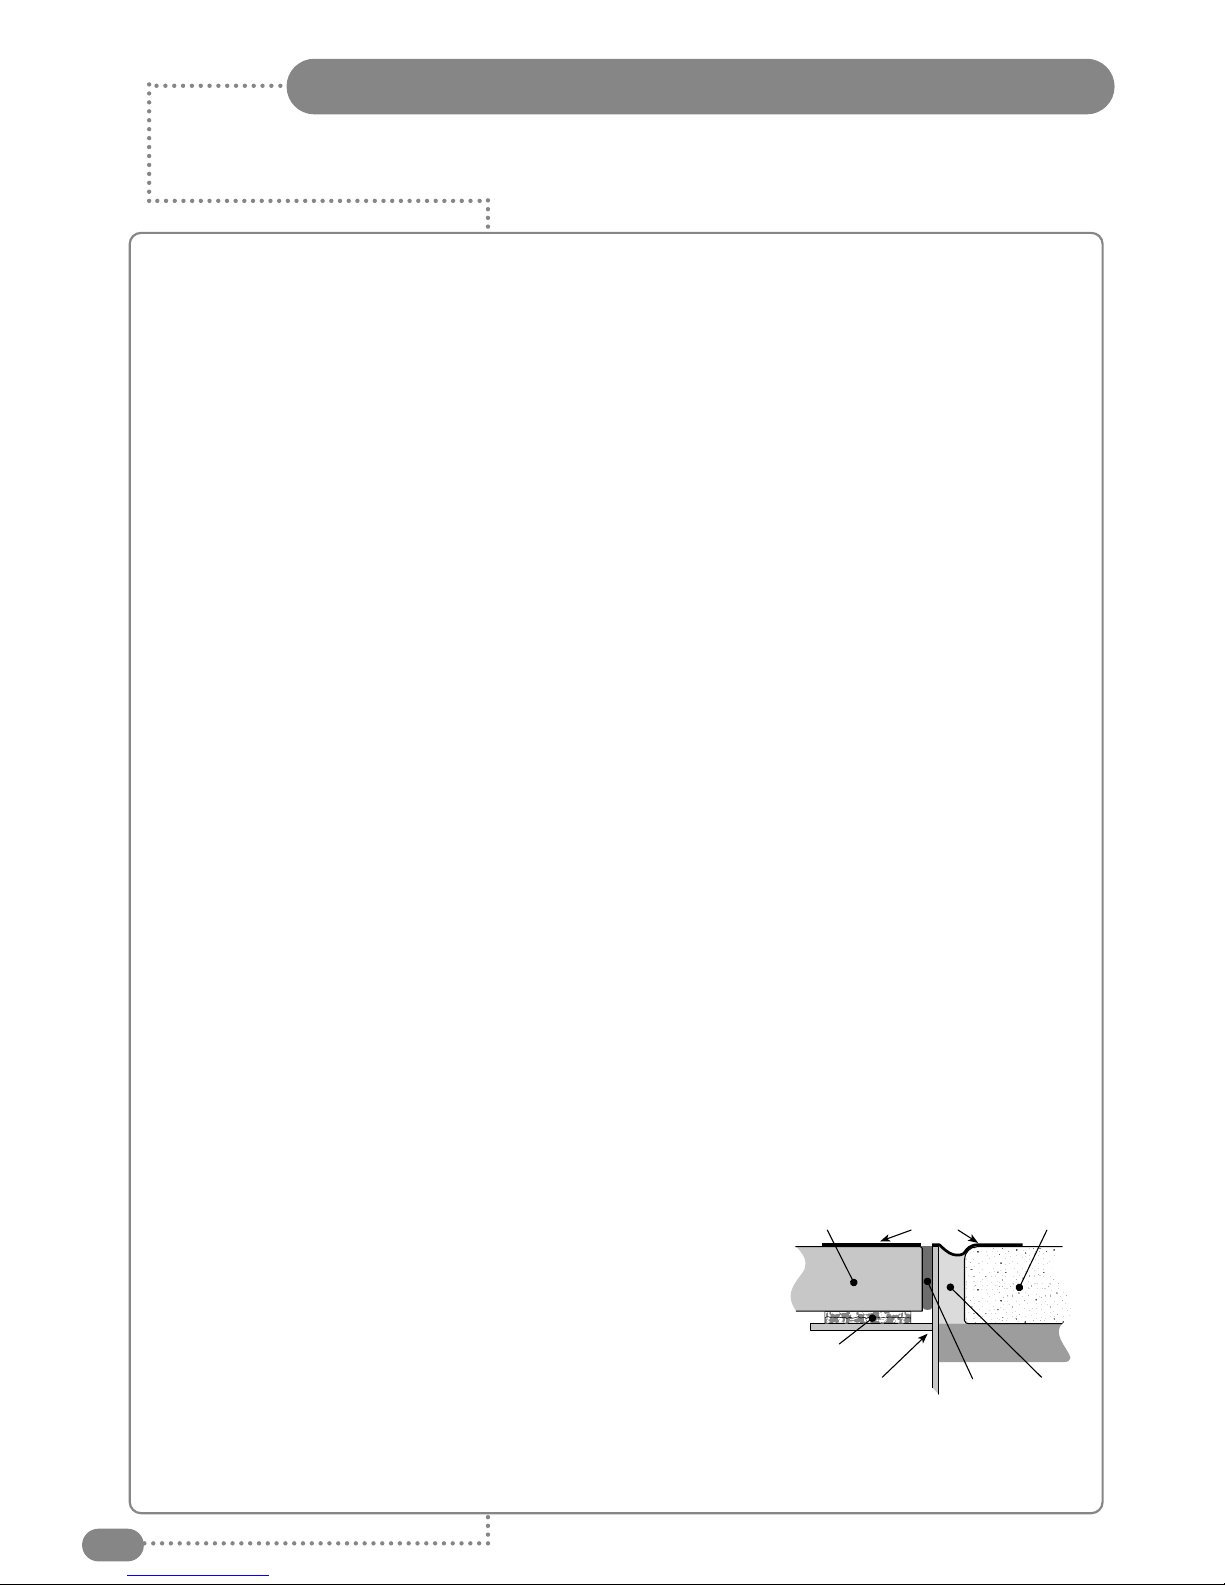
Sealing Tip: To achieve a neat seal easily it is good practice to use
masking tape around the TileVision®glass screen and the surrounding
tiles, just leaving sufficient gap to apply the silicone sealant around
the joint between the sides of the back box and front plate.
Note: It is the installer’s responsibility to ensure that the TileVision
®
unit is installed and sealed correctly, failure to do so will invalidate
your guarantee. The unit will require cleaning and re-sealing after any
servicing/repair operation
Cleaning Instructions
To clean the front screen, use only a soft damp cloth. Under no circumstances are abrasive
cleaners to be used, failure to observe this warning will Invalidate your guarantee.
Note: A glass carrier/suction lifter is required.
Tile
Back box
Grout
Velcro
Masking tape
Silicone
Screen
Page 13
☛
– Make sure there are no
objects between the remote
control and its sensor.
– Don't place the remote
control near a heater.
– A strong blow to the
remote control may cause it
not to operate.
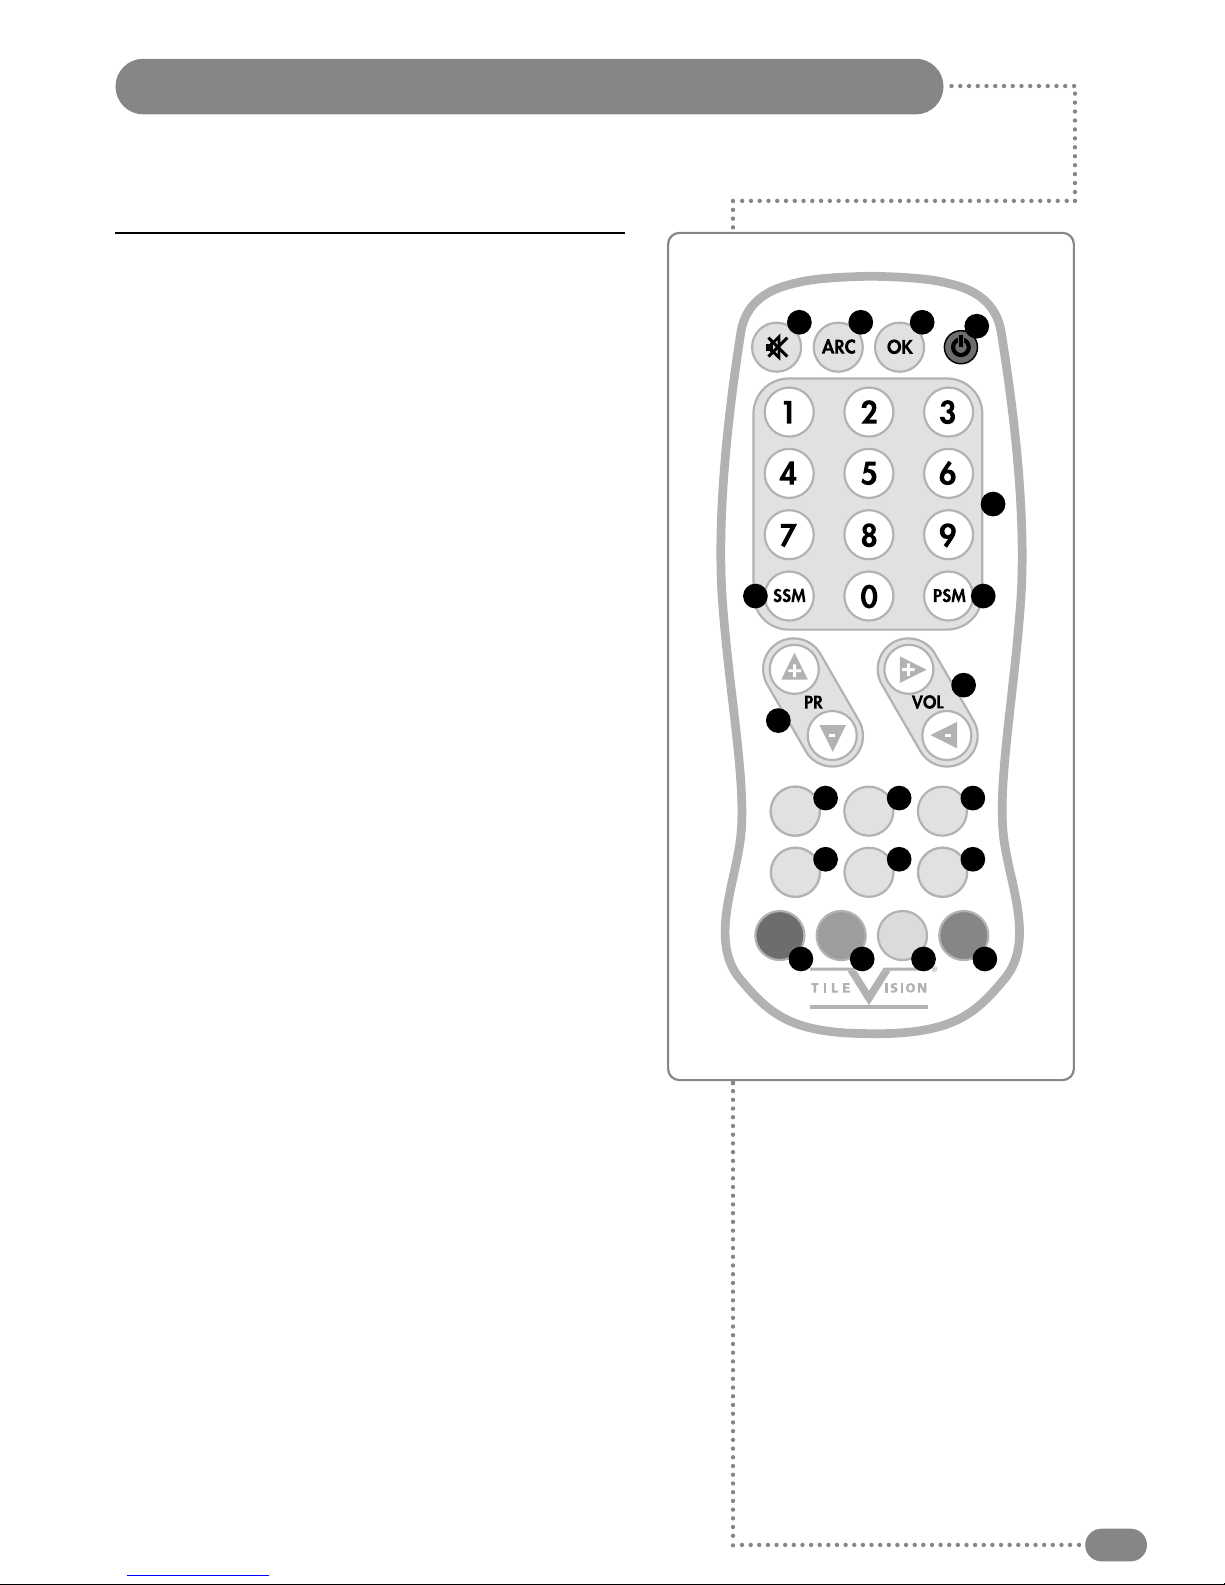
Remote Control
11
1
Power On/Off button
Turns the TileVision®on or off from standby
2
Number buttons
Selects programme numbers
3
PSM (Picture Status Memory) button
Recalls the preferred picture setting
4
VOL (Volume) buttons
Adjust the volume and selects/adjusts Menu Items
5
PR (Programme up/down) button
Selects next or previous programme or Menu Item
6
SSM (Sound Status Memory) button
Recalls the preferred sound setting
7
Mute button
Turns the sound on or off
8
ARC (Aspect Ratio Control) button
Selects the screen mode – 4:3, 16:9, or Zoom
9
OK button
Accepts your selection or displays the current mode
10
CC button
Sets the caption function
11
MEM. button
Stores or removes the current channel
12
Sleep button
Sets the sleep timer
13
COMP button
Selects the COMPONENT mode
14
VIDEO button
Selects the VIDEO mode
15
S-VIDEO button
Selects the S-VIDEO mode
16
Menu button
Displays the Main Menu
17
ST/SAP button
Selects the MTS-Stereo
18
Quick View button
Returns to the previously viewed programme
19
TV/AV button
Selects between television broadcast, COMPONENT,
VIDEO, S-VIDEO, and PC inputs
Clears the Menu from the screen
COMP VIDEO S-VIDEOCOMP
CC
CC MEM. SLEEP
SLEEP
MENU ST/SAP QV TV/AV
1
2
3
4
19
5
6
7 8 9
10 11 12
13 14 15
16 17 18
Page 14
Setup
Auto programme
Manual programme
Language
Parental Control
Captions OFF
Language
English
Français
Español
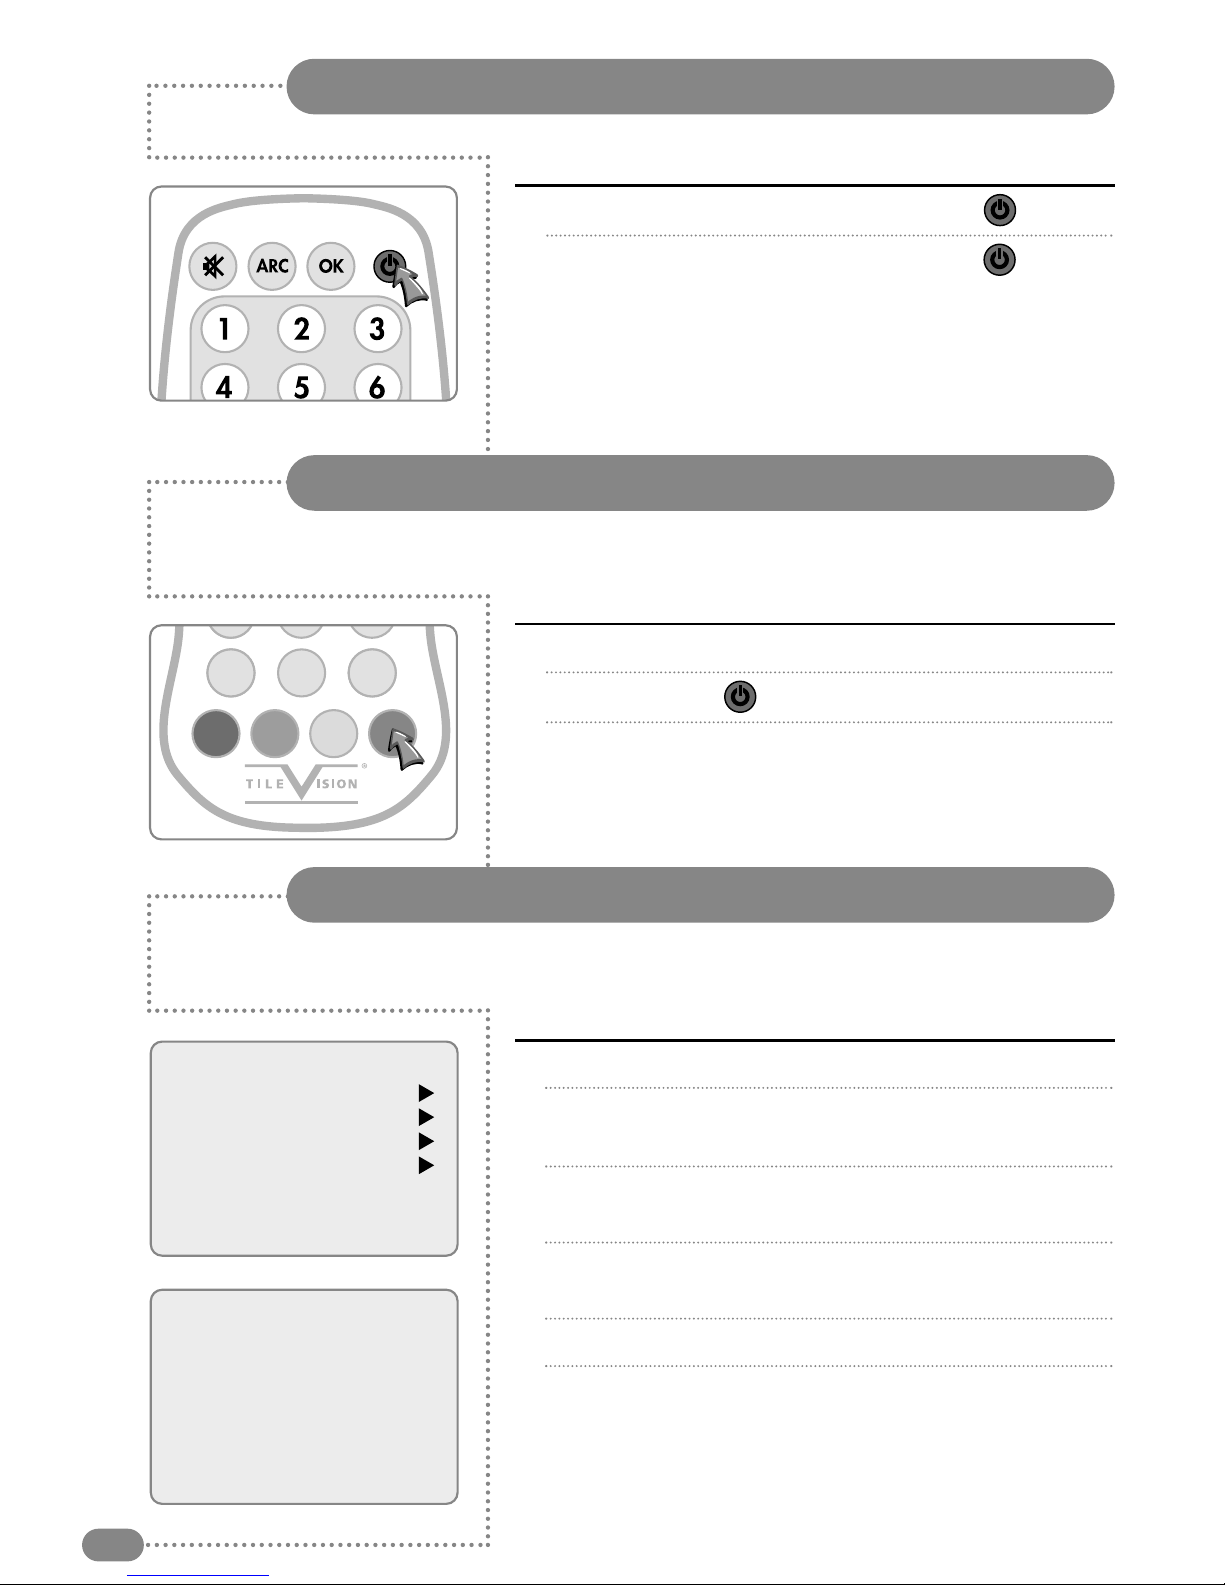
Switching the TileVision®On/Off
12
1
To switch your TileVision®on, press the POWER ( ) button.
2
To switch your TileVision®off, press the POWER ( ) button
again.
1
Make sure all the necessary connections have been made.
2
Press the POWER ( ) button to switch the device on.
3
Press the blue TV/AV button to select required external input
mode – Antenna (TV), COMPONENT, VIDEO, S-VIDEO,
and PC.
Selecting a Picture from External Sources
After your various systems (audio and video) have been connected, you can view any of
the sources by selecting the appropriate external input.
1
Press the red MENU button.
2
Press the PR
UD
to select the Setup menu and then press the
VOLRbutton.
3
Press the PR
UD
button to select the Language menu and then
press the VOLRbutton.
4
Press the PR
UD
button to select your desired language and
then press the VOLRbutton.
5
Press the TV/AV button.
All the on-screen displays will now appear in the selected
language.
Selecting your On-screen Language
When you start using your TV for the first time, you must select the language in which to
display all on-screen menus.
COMP VIDEO S-VIDEOCOMP
CC
CC MEM. SLEEP
MENU ST/SAP QV TV/AV
Page 15
Picture
Contrast 90
Brightness 75
Colour 70
Sharpness 50
Tint 0
Sound
Equaliser
Balance 0
AVL Off
MTS MONO
Special
Input TV
Auto Sleep Off
Blue back Off
ARC 16:9
Setup
Auto programme
Manual programme
Language
Parental Control
Captions OFF
Equalizer
Flat
Music
Movie
Speech
User
0.1 0.5 1.5 5.0 10Khz
Auto programme
Tuner mode TV
Start
Manual programme
Fine
Storage On
Language
English
Français
Español
Parental Control
Movie Rating
MPAA Unblock
Ext. Sources Unblock
No Rating Unblock
Block Hour 00 Hours
Password To Set
Parental Lock Off
Main menu
Picture
Sound
Special
Setup
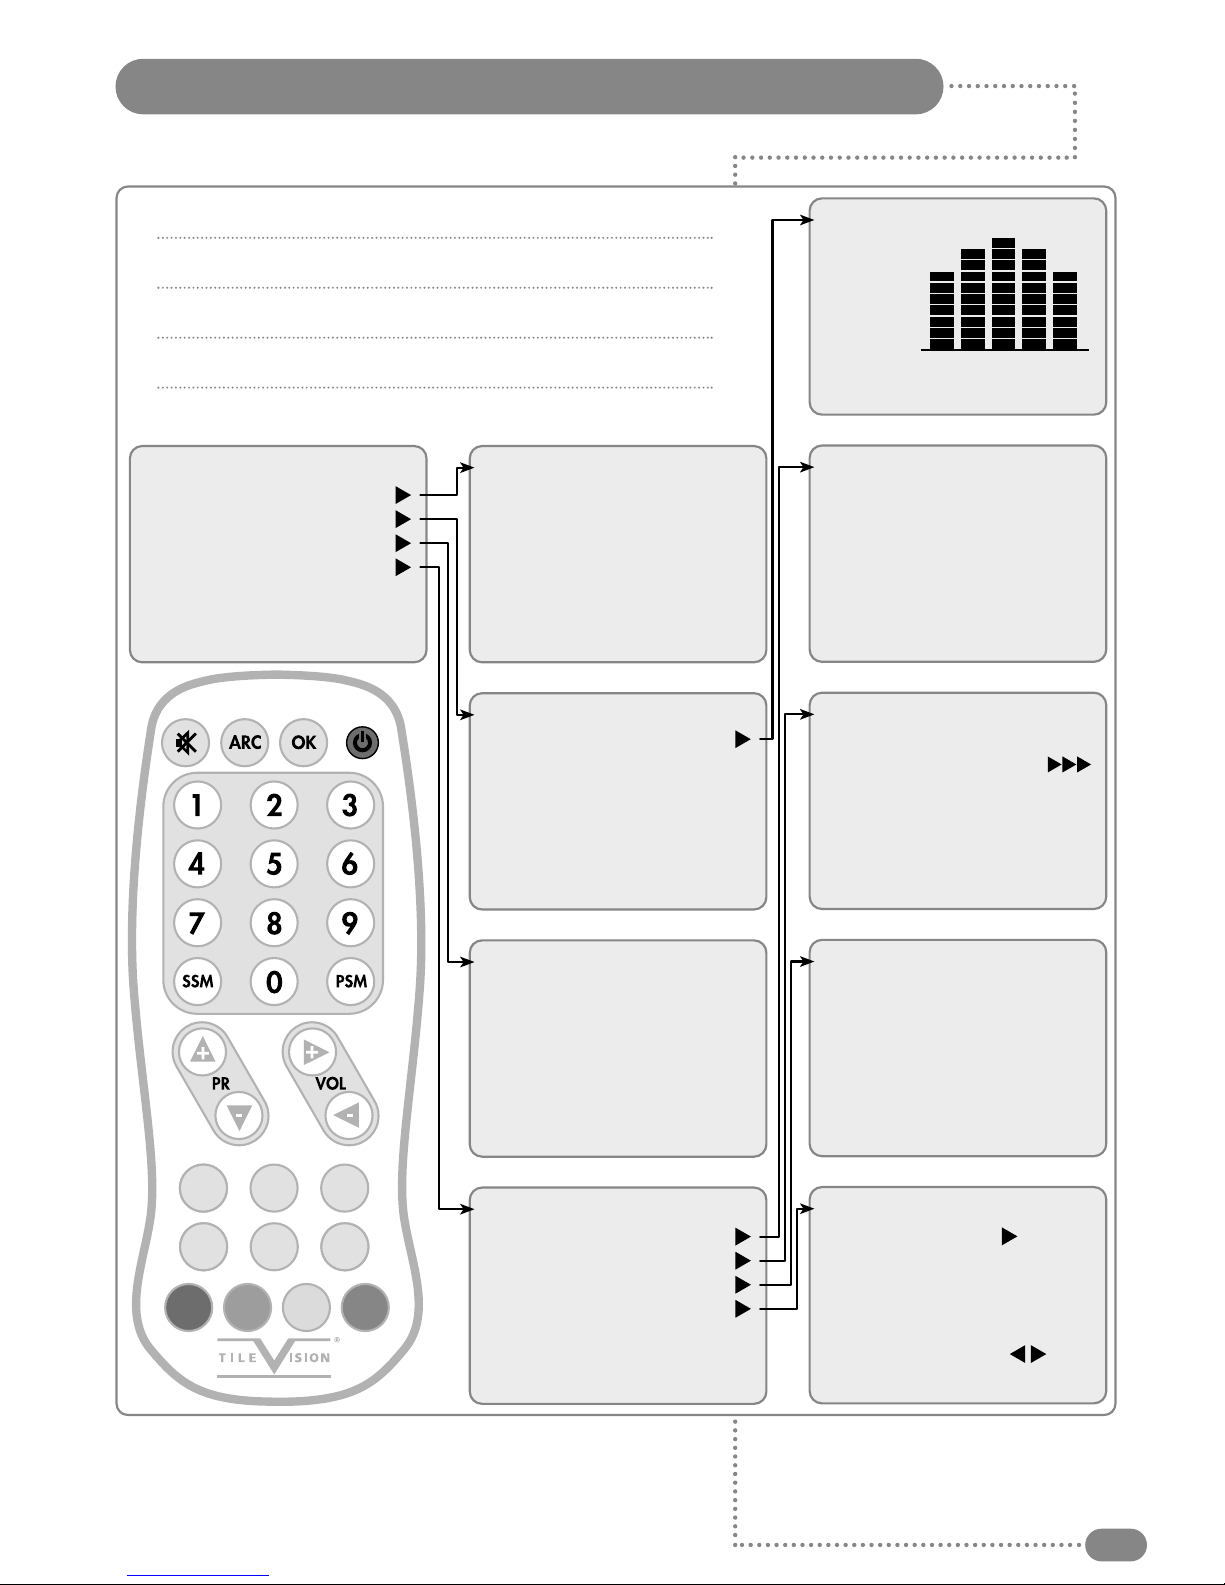
On-screen Menus and Displays
13
COMP VIDEO S-VIDEOCOMP
CC
CC MEM. SLEEP
MENU ST/SAP QV TV/AV
1
Press the red MENU button to display the main menu.
2
Press the PR
UD
to select menus.
3
Press VOL
LR
to adjust menu items.
4
Press MENU to go back to the previous menu.
5
Press TV/AV to exit the menus and confirm settings.
Page 16
Main menu
Picture
Sound
Special
Setup
Setup
Auto programme
Manual programme
Language
Parental Control
Captions OFF
Auto programme
Tuner mode TV
Start
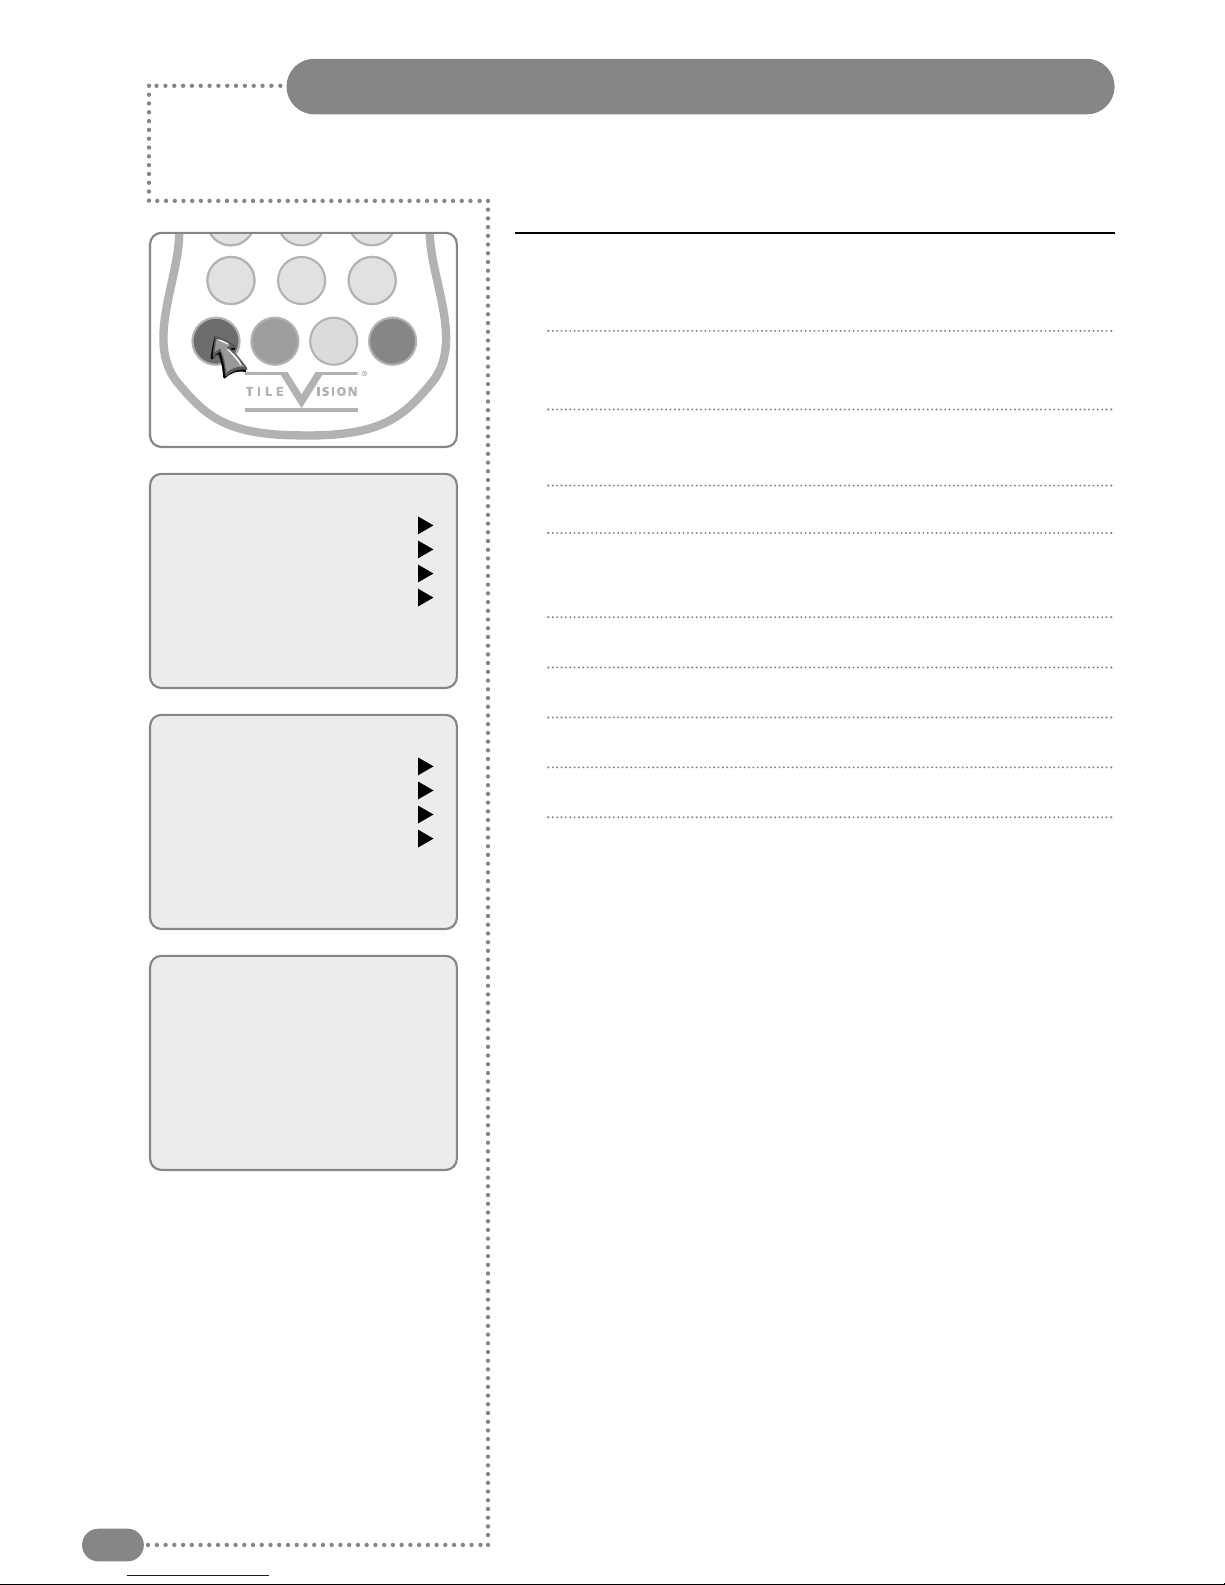
Tuning, Setup and Editing TV Programmes
14
Auto Programme
1
Press the red MENU button.
2
Press the PR
UD
button to select the SETUP menu and then
press the VOLRbutton.
3
Press the PR
UD
button to select the Auto Programme menu
and then press the VOLRbutton.
4
Press the PR
UD
button to select Tuner Mode.
5
Select a TV system with the VOL
LR
button:
TV ↔ CATV
6
Press the PR
UD
button to select the menu.
7
Start Auto Programme by pressing the VOL
LR
button.
8
Press the MENU button to finish Auto Programme.
9
Press the TV/AV button toreturn to normal TV viewing.
● Press the CH
UD
buttons to check the memorised channels
after Auto Programme is finished.
● If you press the MENU button during auto programming, the
function will stop and only channels programmed up to that time
will remain.
● Auto Programming function can memorise only the channels
which are being received at that time.
Note: It is recommended that Auto Programme is used when installing TileVision®as all
available programmes will be stored.
COMP VIDEO S-VIDEOCOMP
CC
CC MEM. SLEEP
MENU ST/SAP QV TV/AV
Page 17
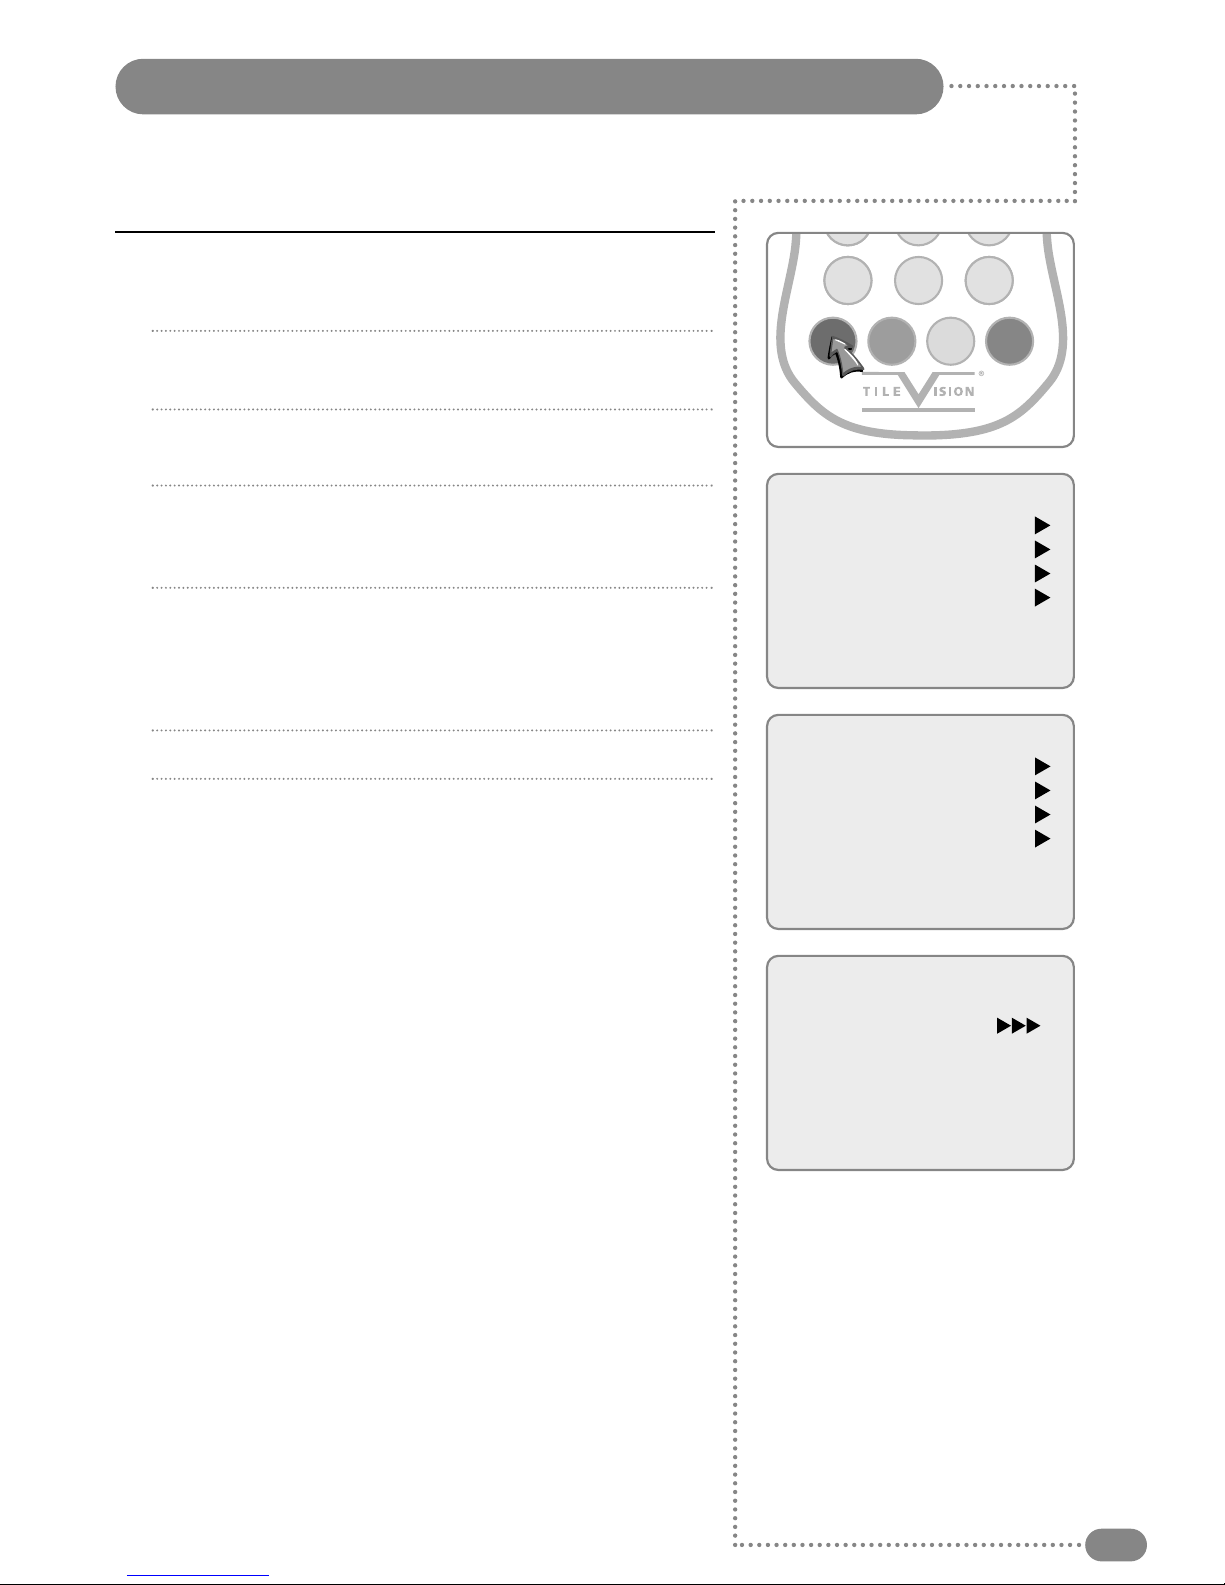
Tuning, Setup and Editing TV Programmes
15
Manual Programme
1
Press the red MENU button.
2
Press the PR
UD
button to select the SETUP menu and then
press the VOLRbutton.
3
Press the PR
UD
button to select the Manual Programme
menu and then press the VOLRbutton.
4
Select the Fine menu and adjust the received signal with
VOL
LR
button.
(
VOL
L)LLL
↔
RRR
(
VOL
R
)
5
Select Storage on or off with the VOL
LR
button. Each time
you press the VOL
LR
button you can select as below:
On: stores the channel.
Off: deletes the channel.
6
Press the TV/AV button to return to normal TV viewing.
Main menu
Picture
Sound
Special
Setup
Setup
Auto programme
Manual programme
Language
Parental Control
Captions OFF
Manual programme
Fine
Storage On
Manual Programme lets you tune and arrange the programmes in whatever order you desire.
COMP VIDEO S-VIDEOCOMP
CC
CC MEM. SLEEP
MENU ST/SAP QV TV/AV
Page 18
Parental Control
16
If used, this optional feature can ‘block’ undesirable programs from appearing on the TV.
Parental Control offers the user a wide variety of options and settings that restrict or ‘block’ the programming that can appear on the TV. Parental control allows the user the capability of defining which program
rating is acceptable, to the younger or more sensitive viewer. It can be preset and turned either on or off
by the user who specifies the secret 4-digit code, the password. The number of hours blocked are specified. General audience and children viewer blocks should be programmed into the TV’s memory respectively. Viewer ratings are specified for both TV and the motion picture industry; both rating systems
should be used, for complete coverage. The ratings are based on the ages of children.
Overview
To insure complete coverage for all TV programs, (movies and regular TV shows) choose a rating for
MPAA, from the selections below. And choose ratings from the TV Parental Guidelines Rating System on
the next page, using the Age Block option for General Audiences, and for Children. In addition to those,
you may wish to add additional restrictions from the Content Block menu. See the Parental Control
menu, and submenus example on the next page.
Things to Consider before Setting Up Parental Control
Determine which rating you consider acceptable to the viewer. (For example, if you choose TV-PG, all
more restrictive ratings will be automatically blocked; the viewer will not be able to see: TV-PG, TV-14, or
TV-MArated programming.)
Do you want to block the auxiliary video source entirely? (Blocks the signal sent by the equipment, such
as a VCR, connected to the TV Audio/Video input jacks; in the Aux. Block option.) Or leave unblocked,
then choose allowable ratings.
Block program ‘Content’ based on individual parameters such as: Strong Dialog, Bad Language, Sex
Scenes, Violence Scenes, or Fantasy Violence Scenes: in the Content Block option.
How many hours do you want Parental Control to be active? You can set the Hours option for up to 99
hours.
Select a secret password; in the Set Password option. Use the number keys on the remote. Don’t forget
the password, it is the only way you can access the Parental Control menu and change rating selections,
or turn Parental Control off.
Do you want Parental Control to be active all the time? If not, you can turn it on or off with the Lock
On/Off option.
● You can set different Parental Control viewing restrictions for general audiences and for children –
both can be active at the same time.
● Simply specifying one content block such as Sex Scenes, will not automatically block another content
in the programs from appearing.
● Even if you choose to leave the Aux inputs unblocked, the ratings you specify will automatically
restrict the program that appears from the video sources.
● You cannot disable Parental Control by disconnecting the TV from power. Block hours will
automatically reset to the original block time setting specified if power is disconnected.
Page 19
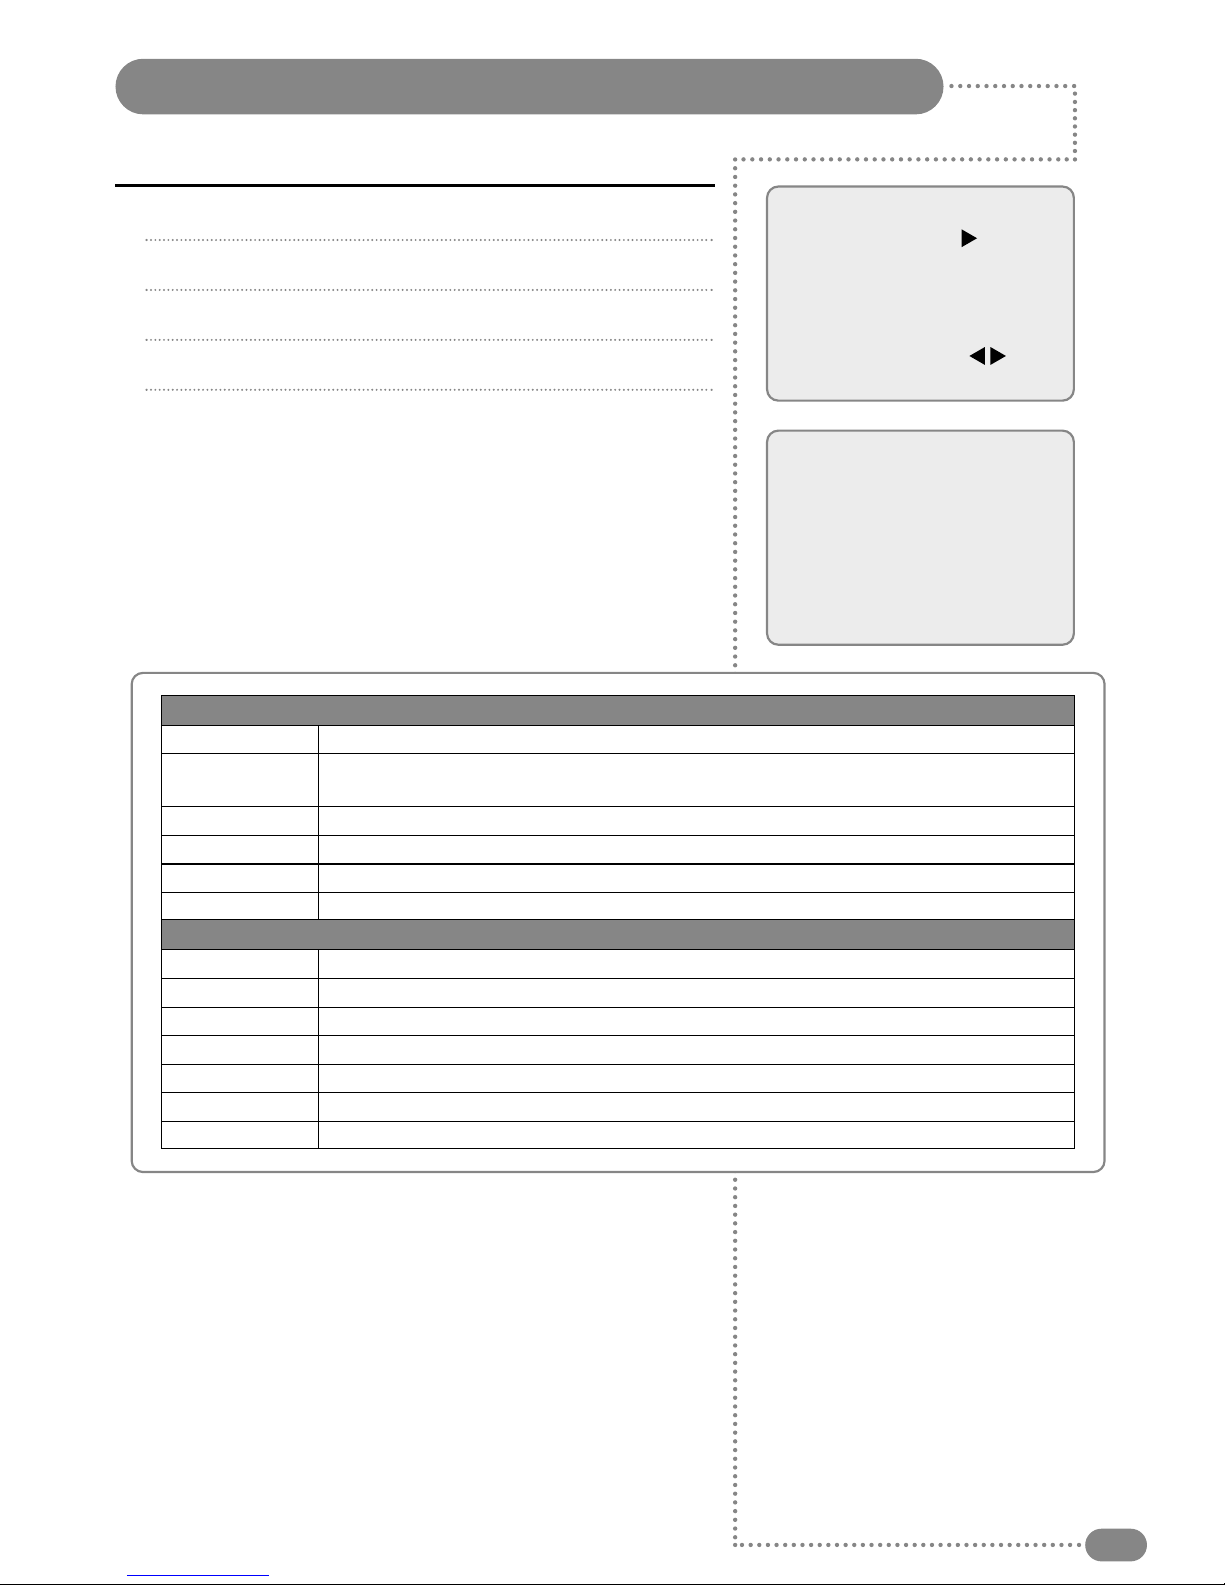
Parental Control
Movie Rating
MPAA Unblock
Ext. Sources Unblock
No Rating Unblock
Block Hour 00 Hours
Password To Set
Parental Lock Off
Parental Control
General Unblock
Children Unblock
Dialog Unblock
Language Unblock
Sex scenes Unblock
General Unblock
Violence Unblock
F-Violence Unblock
Parental Control
17
1
Press the MENU button,
2
Select the Setup menu.
3
Select the Parental Control menu.
4
Press the PR
UD
button to select.
5
Adjust each item with VOLLRbutton.
Selected item Setting Change
MPAAA Unblock ↔ G and above ↔ PG and above ↔ PG13 and above ↔ R and
above ↔ NC 17 and above ↔ X
Ext Sources Unblock ↔ Block
No Rating Unblock ↔ Block
Block Hours 00–99 hours
Parental Lock On ↔ Off
General Unblocked ↔ TV-G and above ↔ TV-PG and above ↔ TV-14 and above ↔ TV-MA
Children Unblock ↔ TV-Y and above ↔ TV-7
Dialog Unblock ↔ TV-PG and above ↔ TV-14
Language Unblock ↔ TV-PG and above ↔ TV-14 and above ↔ TV-MA
Sex Scenes Unblock ↔ TV-PG and above ↔ TV-14 and above ↔ TV-MA
Violence Unblock ↔ TV-PG and above ↔ TV-14 and above ↔ TV-MA
F-Violence Unblock ↔ TV-Y7
Parental Control
Movie Rating
As shown above, with the Parental Control menu on-screen,
Use the VOL
LR
and PR
UD
button to select and adjust or
set the rating for the Age Block or Content Block.
For Sex Scenes for example, use the ‘From TV-PG’ setting.
(See the Mini Glossary, Ratings Charts on this and the
previous page for rating definitions.)
After you have selected and adjusted the Parental Control
menu options to your preferences:
● Set the hours you want Parental Control active.
● Set a 4-number password.
● Set the Lock On/Off option to either on or off.
Page 20
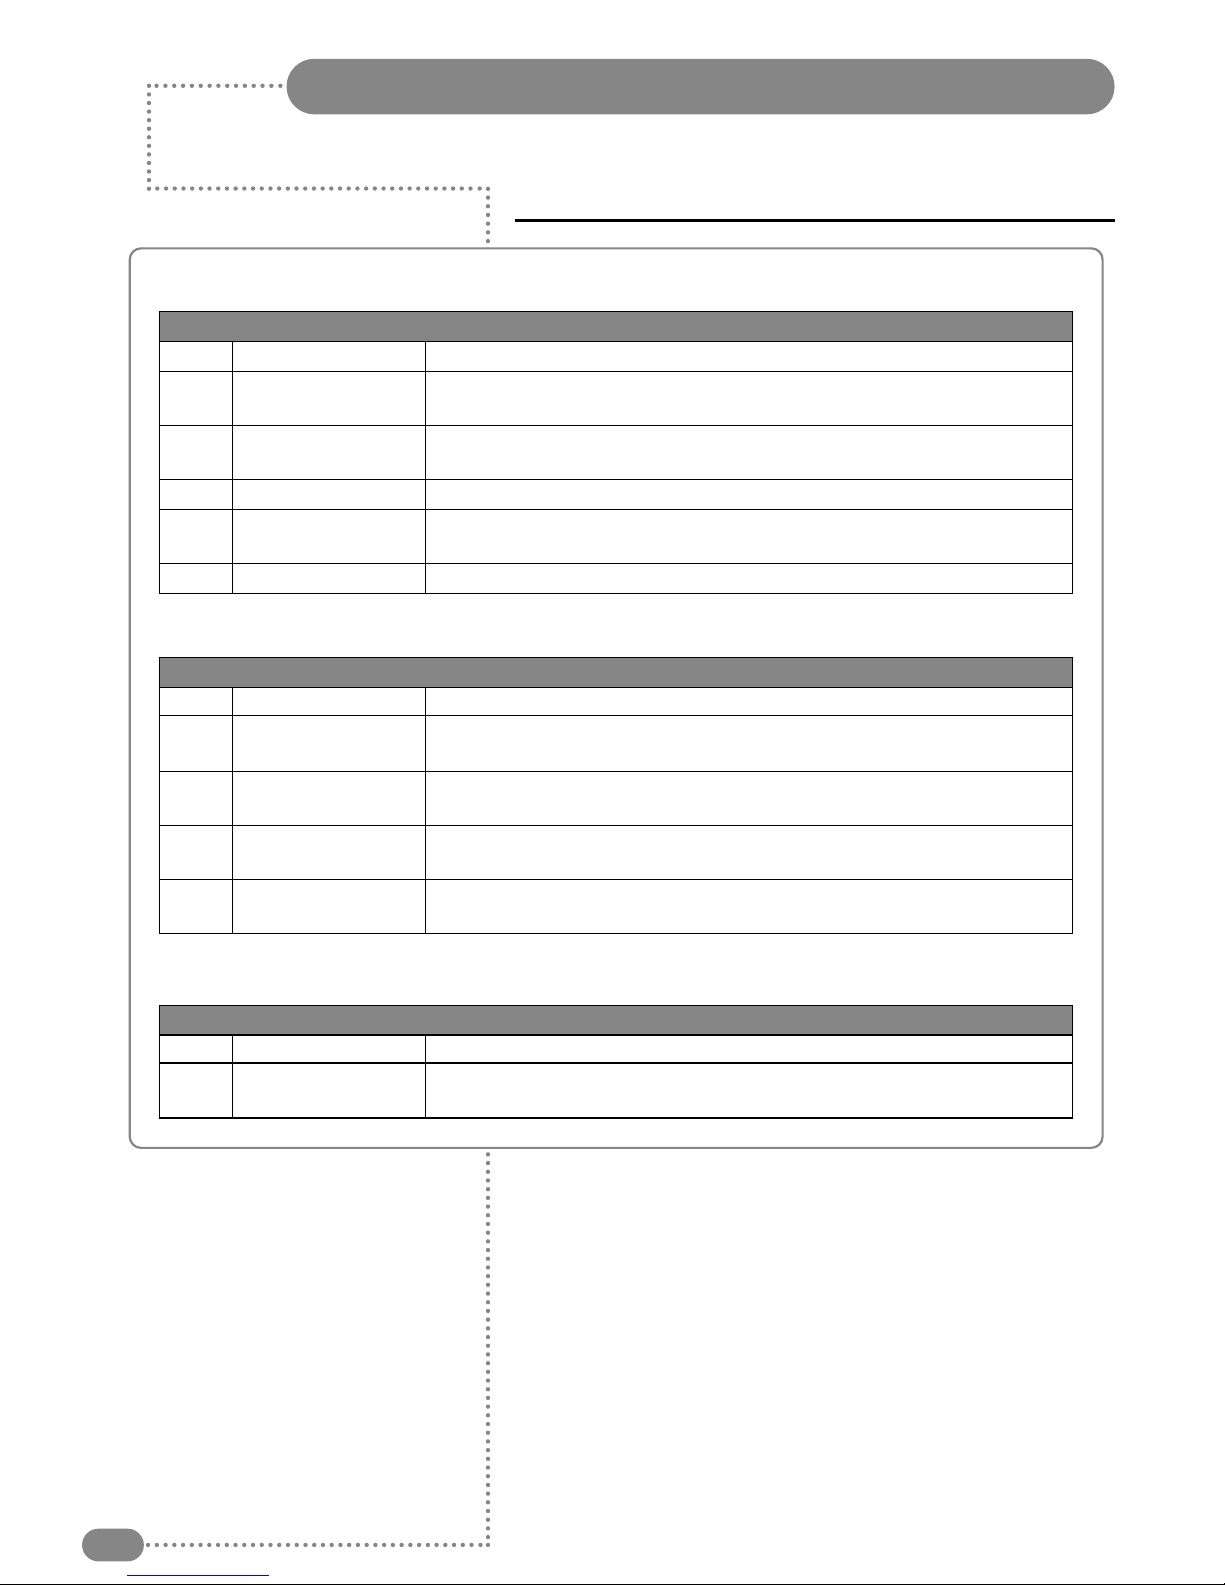
Parental Control
18
G General Audiences Content not offensive to most viewers
PG Parental Guidance Contents such that parents may not want their children to view
Suggested the program
PG-13 Parental Guidance Program is inappropriate for ore-teens, with a greater degree of
Suggested offensive material suggested than a PG rated program
R Restricted viewing Not for children under age 17. Strong elements of sex and/or violence
NC-17 Restricted Viewing
Not for children under age 17 under any circumstances.
Strong sexual content
X Hard Core Films Same as NC-17 rating
Rating System Information
MOTION PICTURE ASSOCIATION OF USA (MPAA) RATING SYSTEM
Grade Meaning
TV-G General Audience Considered suitable for all audiences: children may watch unattended
TV-PG Parental Guidance
Suggested Unsuitable for younger children, may contain suggestive
Dialog, Bad Language, Sex, and Violence Scenes
TV-14 Parents Strongly Unsuitable for children under 14, may contain Strong Dialog,
Cautioned Bad Language, Sex, and Violence Scenes
TV-14 Parents Strongly Unsuitable for children under 14, may contain Strong Dialog,
Cautioned Bad Language, Sex, and Violence Scenes
TV-MA Mature Audience Adults only, may contain Strong Dialog, Bad Language, Sex,
Only and Violence Scenes
TV PARENTAL GUIDELINE RATING SYSTEM
Grade Meaning
TV-Y Children Considered suitable for all children under 7 years old
TV-Y7 Children 7 and over
Considered suitable for children over 7, may contain Fantasy Violence
Scenes
MOTION PICTURE ASSOCIATION OF USA (MPAA) RATING SYSTEM
Grade Meaning
Page 21
Main menu
Picture
Sound
Special
Setup
Picture
Contrast 90
Brightness 75
Colour 70
Sharpness 50
Tint 0
Picture Control
19
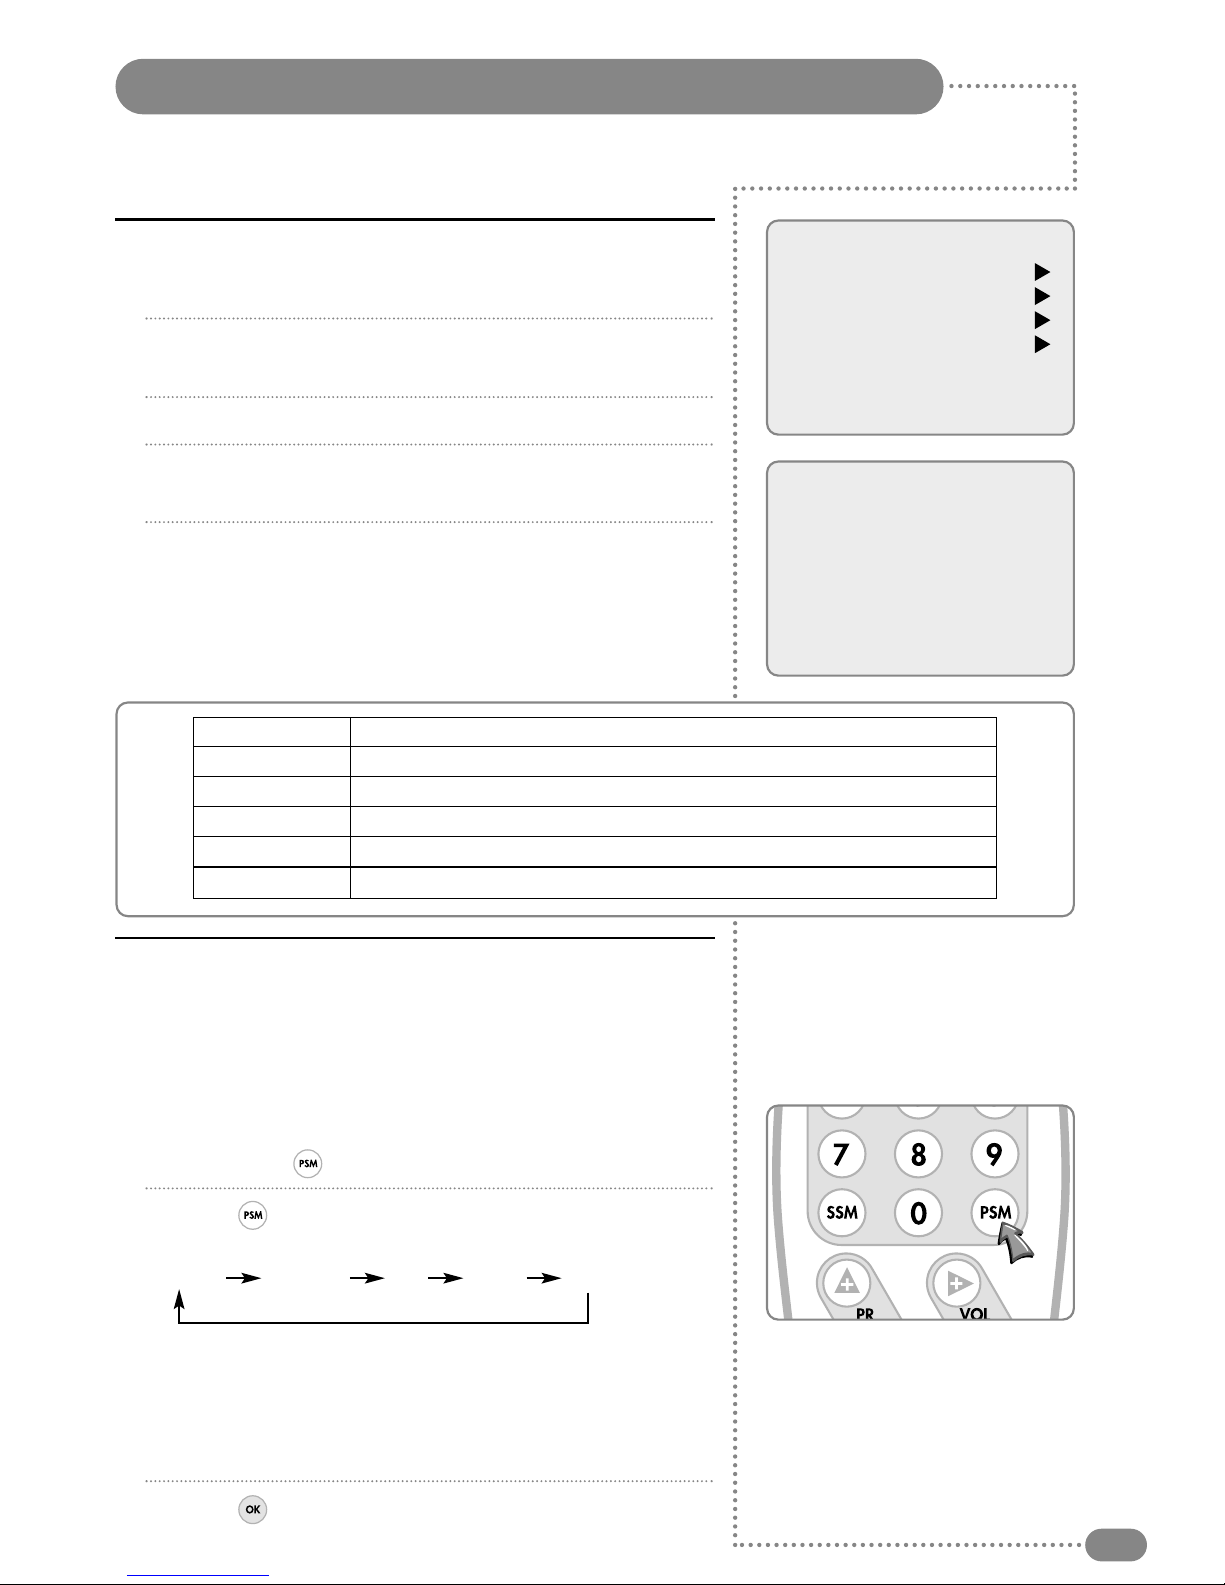
You can adjust picture Contrast, Brightness, Colour and Sharpness to the levels you prefer.
Manual Picture Control
1
Press the red MENU button.
2
Press the PR
UD
button to select the Picture menu and then
press the VOLRbutton.
3
Press the PR
UD
button to select a picture item.
4
Press the VOL
LR
button to adjust the picture setting to your
requirement.
5
Press the TV/AV button to store your personal preferences
in
User.
Auto Picture Control
The Picture options – Dynamic, Standard, Mild, and Game are
programmed for optimum picture reproduction at the factory and
cannot be changed.
PSM (Picture Status Memory)
1
Press the PSM ( ) button.
2
Press the button repeatedly. Each press of the button
changes the screen display as below:
Dynamic Standard Mild Game User
● Dynamic: Vivid Picture.
● Standard: Standard Picture.
● Mild: Softer Picture.
● Game: External Video Game Picture Setup.
● User: Manual Picture Setup.
3
Press the button.
Selected Item Setting Change
Contrast Less contrast VOLL0–100 RVOL More contrast
Brightness Darker VOLL0–100 RVOL Brighter
Colour Lower colour intensity VOLL0–100 RVOL Higher colour intensity
Sharpness Soft picture VOLL0–100 RVOL Sharp picture
Tint More purple
VOLL50–50 RVOL More green
Page 22
PC Picture Adjustment
20
0 90 100
Contrast
1024 x 768
AUTO
1
Press the TV/AV button to select the PC mode.
2
Press the red MENU button.
3
Press the PR
UD
button to select the desired picture item.
4
Press the VOL
LR
button to make appropriate adjustments.
5
Press the TV/AV button to store the adjustment.
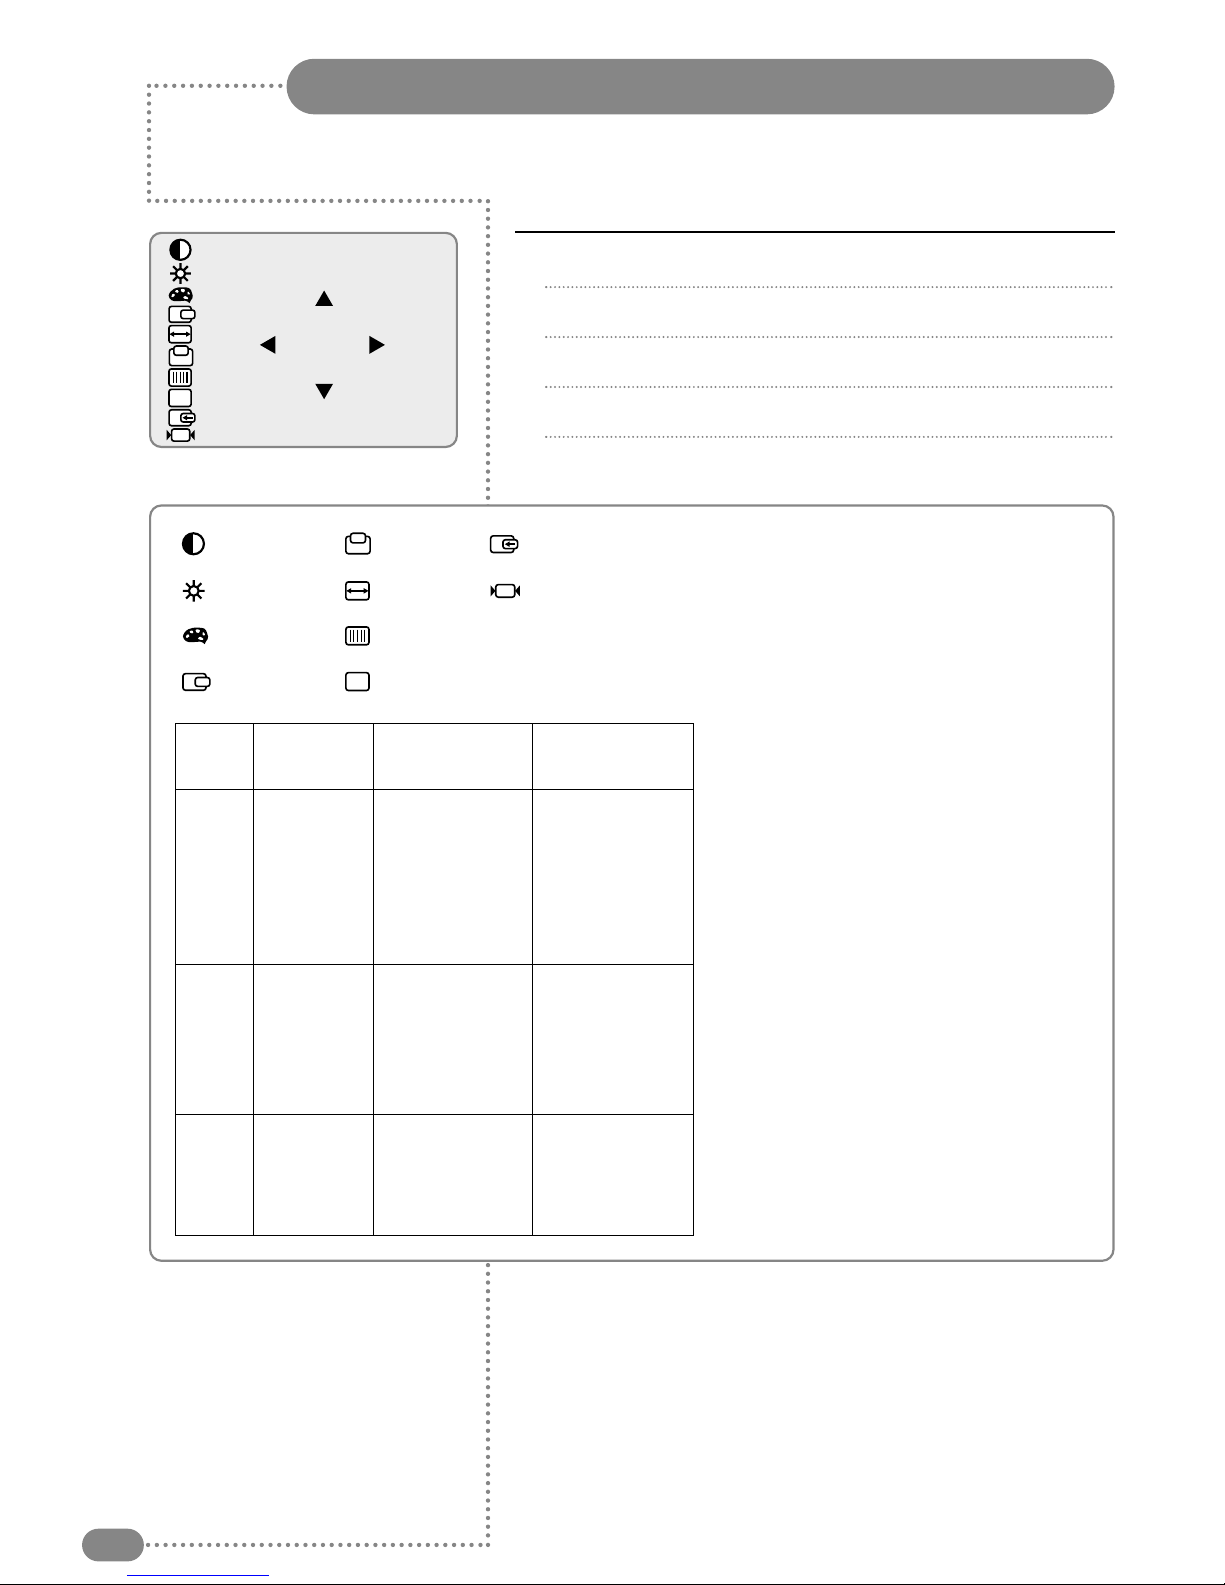
You can adjust picture Contrast, Brightness, Temperature, Horizontal/Vertical position,
Clock, Phase, Auto and Reset as you prefer.
Contrast – adjusts the balance between
light and dark areas of the picture.
Brightness – makes the picture darker
or brighter as preferred.
Temperature – adjusts the ‘warmth’ of
the image colour (colour temperature).
Horizontal/Vertical Position – adjusts
the picture left/right and up/down as
required.
Clock – allows adjustment to minimise
any vertical bars or stripes visible on the
screen background. The horizontal
screen size will also change.
Phase – allows the removal of any
horizontal noise. The images of
characters can also be sharpened.
Auto – is for the automatic adjustment of
the screen position, clock and clock
phase. The displayed image will blank for
a few seconds whilst auto-configuration
is in progress.
Aspect Ratio Control – switches
between 4:3 and 16:9.
Reset – restores the factory
programmed settings.
Mode Resolution
Horizontal Vertical
frequency (KHz) frequency (KHz)
640 x 480 31.5 KHz 60 Hz
640 x 480 35.0 KHz 67 Hz
VGA
640 x 480 37.9 KHz 72 Hz
640 x 480 37.5 KHz 75 Hz
640 x 480 43.5 KHz 85 Hz
720 x 400 31.5 KHz 70 Hz
800 x 600 35.2 KHz 56Hz
800 x 600 37.9 KHz 60 Hz
SVGA 800 x 600 48.1 KHz 72 Hz
800 x 600 46.9 KHz 75 Hz
800 x 600 53.7 KHz 85 Hz
1024 x 768 48.4 KHz 60 Hz
XGA
1024 x 768 56.5 KHz 70 Hz
1024 x 768 60.2 KHz 75 Hz
1024 x 768 68.7 KHz 85 Hz
☛
Signals from some graphics cards may not lock properly.
If the results are unsatisfactory, adjust the clock and
clock phase manually.
If the set is cold, there may be a small ‘flicker’ when first
switched on. This is normal, there is nothing wrong with
the equipment.
Some red, green and blue dot effects may appear. This is
caused by aliasing and has no impact on the equipment.
Reset
Aspect Ratio Control
Clock
V-position
AUTO
Auto
Phase
Contrast
Brightness
Temperature
H-position
Page 23
Main menu
Picture
Sound
Special
Setup
Sound
Equaliser
Balance 0
AVL Off
MTS MONO
Equalizer
Flat
Music
Movie
Speech
User
0.1 0.5 1.5 5.0 10Khz
Sound Control
21
Manual Sound Control
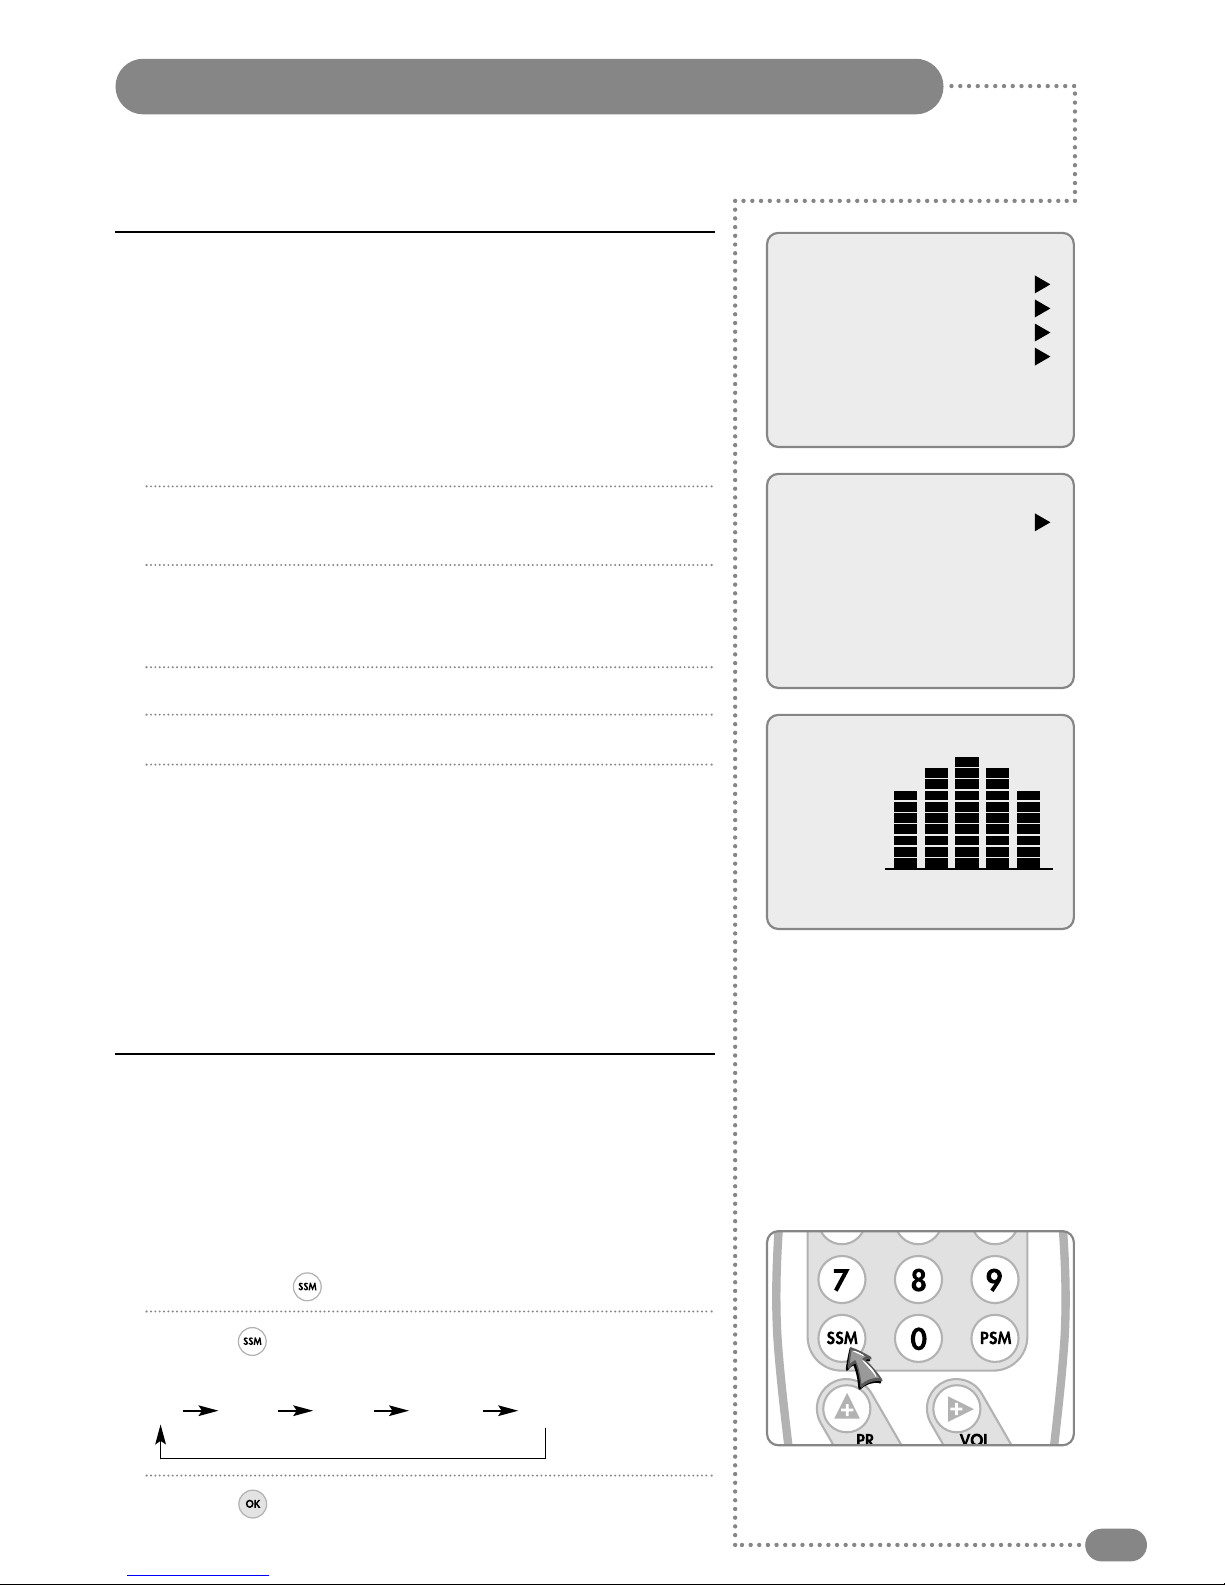
Equaliser mode can be manually adjusted by cutting and boosting
the five selected frequency bands, then storing the settings as User.
Balance can be adjusted.
AVL, when switched on, will automatically keep an equal volume
level, even when changing programmes.
1
Press the red MENU button.
2
Press the PR
UD
button to select the Sound menu, and then
press the VOLRbutton.
3
Press the PR
UD
button to select the desired sound item:
Equalizer, Balance, AVL, or MTS, then press the
VOLRbutton.
4
Press the VOL
LR
button to make desired adjustment.
5
Press the VOLRbutton in Equalizer to set the Equalizer.
6
Press the PR
UD
button to select the preferred setting; Flat,
Music, Movie, Speech, or User. To set the Equalizer User:
a) Select User by pressing the
PR
UD
button.
b) Select a sound band by pressing the VOL
LR
button.
c) Make the desired sound level adjustment with the
PR
UD
button.
d) Press the
MENU button to return to the preceding menu, and
the TV/AV button to return to normal TV viewing.
Auto Sound Control
The sound settings for Flat, Music, Movie, and Speech are
programmed at the factory for optimum sound reproduction, and
cannot be changed.
SSM (Sound Status Memory)
1
Press the SSM ( ) button.
2
Press the button repeatedly to select.
Each press of the button changes the screen display as below.
Flat Music Movie Speech User
3
Press the button.
Preferred sound setting can be selected; Flat, Music, Movie or Speech.
Page 24
Main menu
Picture
Sound
Special
Setup
Special
Input TV
Auto Sleep Off
Blue back Off
ARC 16:9
TV, Component, Video, and S-Video Modes
22
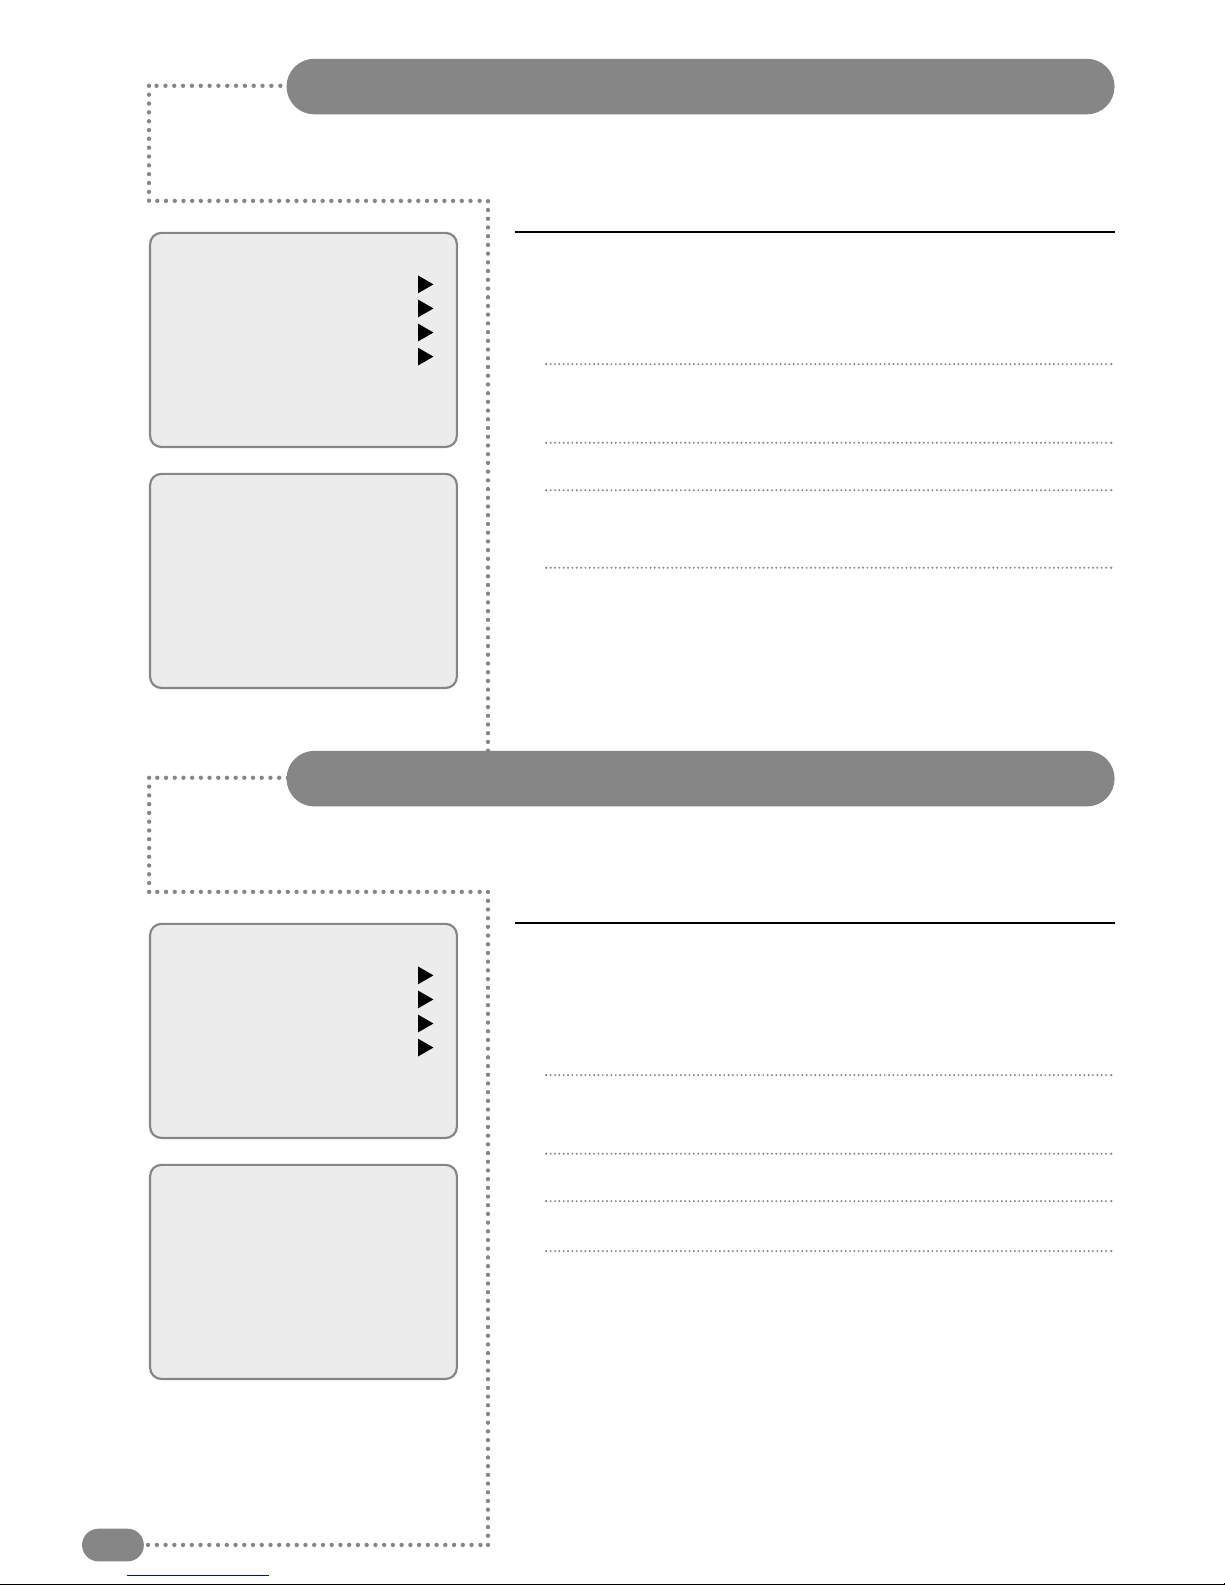
Alternatively the external equipment inputs can be selected via the
Special menu.
1
Press the red MENU button.
2
Press the PR
UD
button to select the Special menu, and then
press the VOLRbutton.
3
Press the PR
UD
button to select Input.
4
Press the VOL
LR
button to select TV, COMPONENT, Video
and S-Video.
5
To return to TV mode, press the TV/AV button repeatedly.
If you select
Auto Sleep On the TileVision®will automatically switch
itself to standby mode approximately ten minutes after a TV
channel stops broadcasting.
1
Press the red MENU button.
2
Press the PR
UD
button to select the Special menu, and then
press the VOLRbutton.
3
Press the PR
UD
button to select Auto Sleep.
4
Press the VOL
LR
button to select On.
5
Press the TV/AV button to return to the normal TV viewing.
Main menu
Picture
Sound
Special
Setup
Special
Input TV
Auto Sleep Off
Blue back Off
ARC 16:9
Auto Sleep
TV, Component, Video, S-Video or PC inputs can be selected by pressing the TV/AV
button repeatedly.
Page 25
Main menu
Picture
Sound
Special
Setup
Special
Input TV
Auto Sleep Off
Blue back Off
ARC 16:9
Blue Back
23
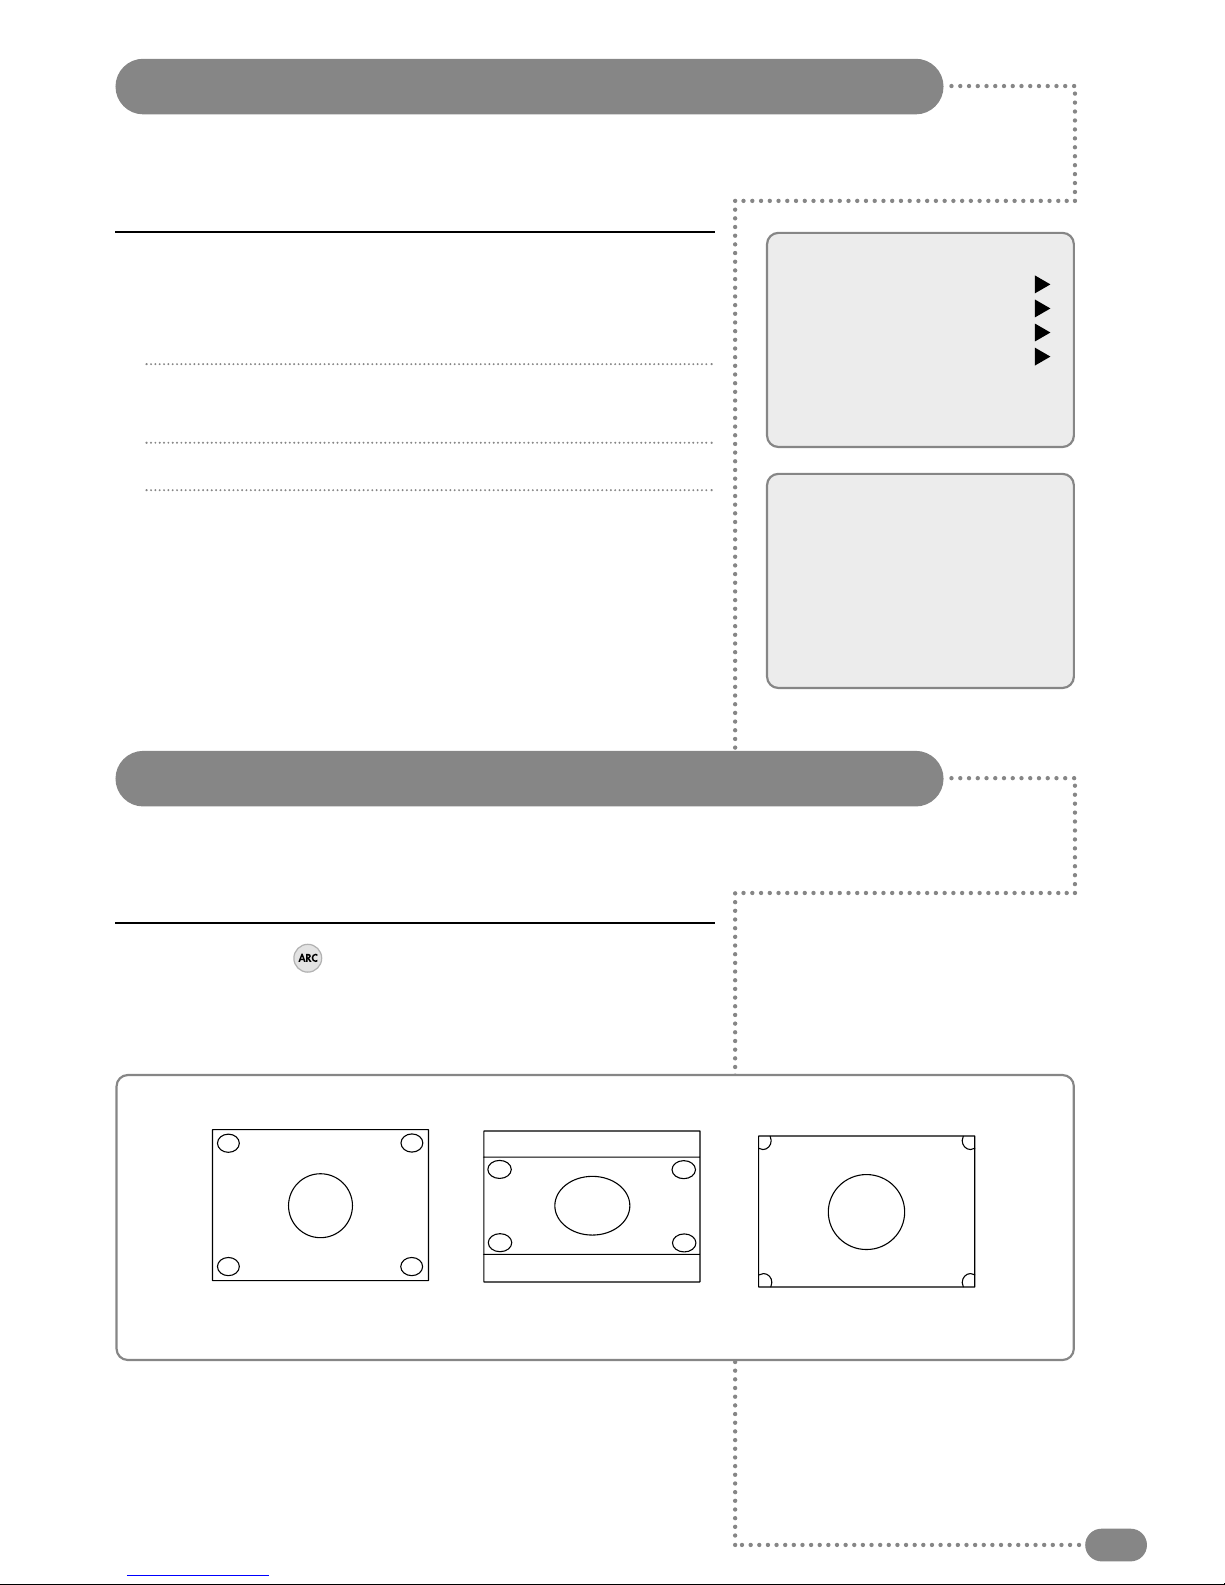
ARC (Aspect Ratio Control)
If you select Blue Back On any programme without a signal will
appear in blue on the screen.
1
Press the red MENU button.
2
Press the PR
UD
button to select the Special menu, and then
press the VOLRbutton.
3
Press the PR
UD
button to select Blue Back.
4
Press the VOL
LR
button to select On.
1
Press the ARC ( ) button.
The image will change as shown below whenever you press the
ARC button.
16 : 9
Zoom
4 : 3
Page 26
Sleep Timer
24
The sleep timer automatically switches the TileVision®to standby
after the preset time elapses.
1
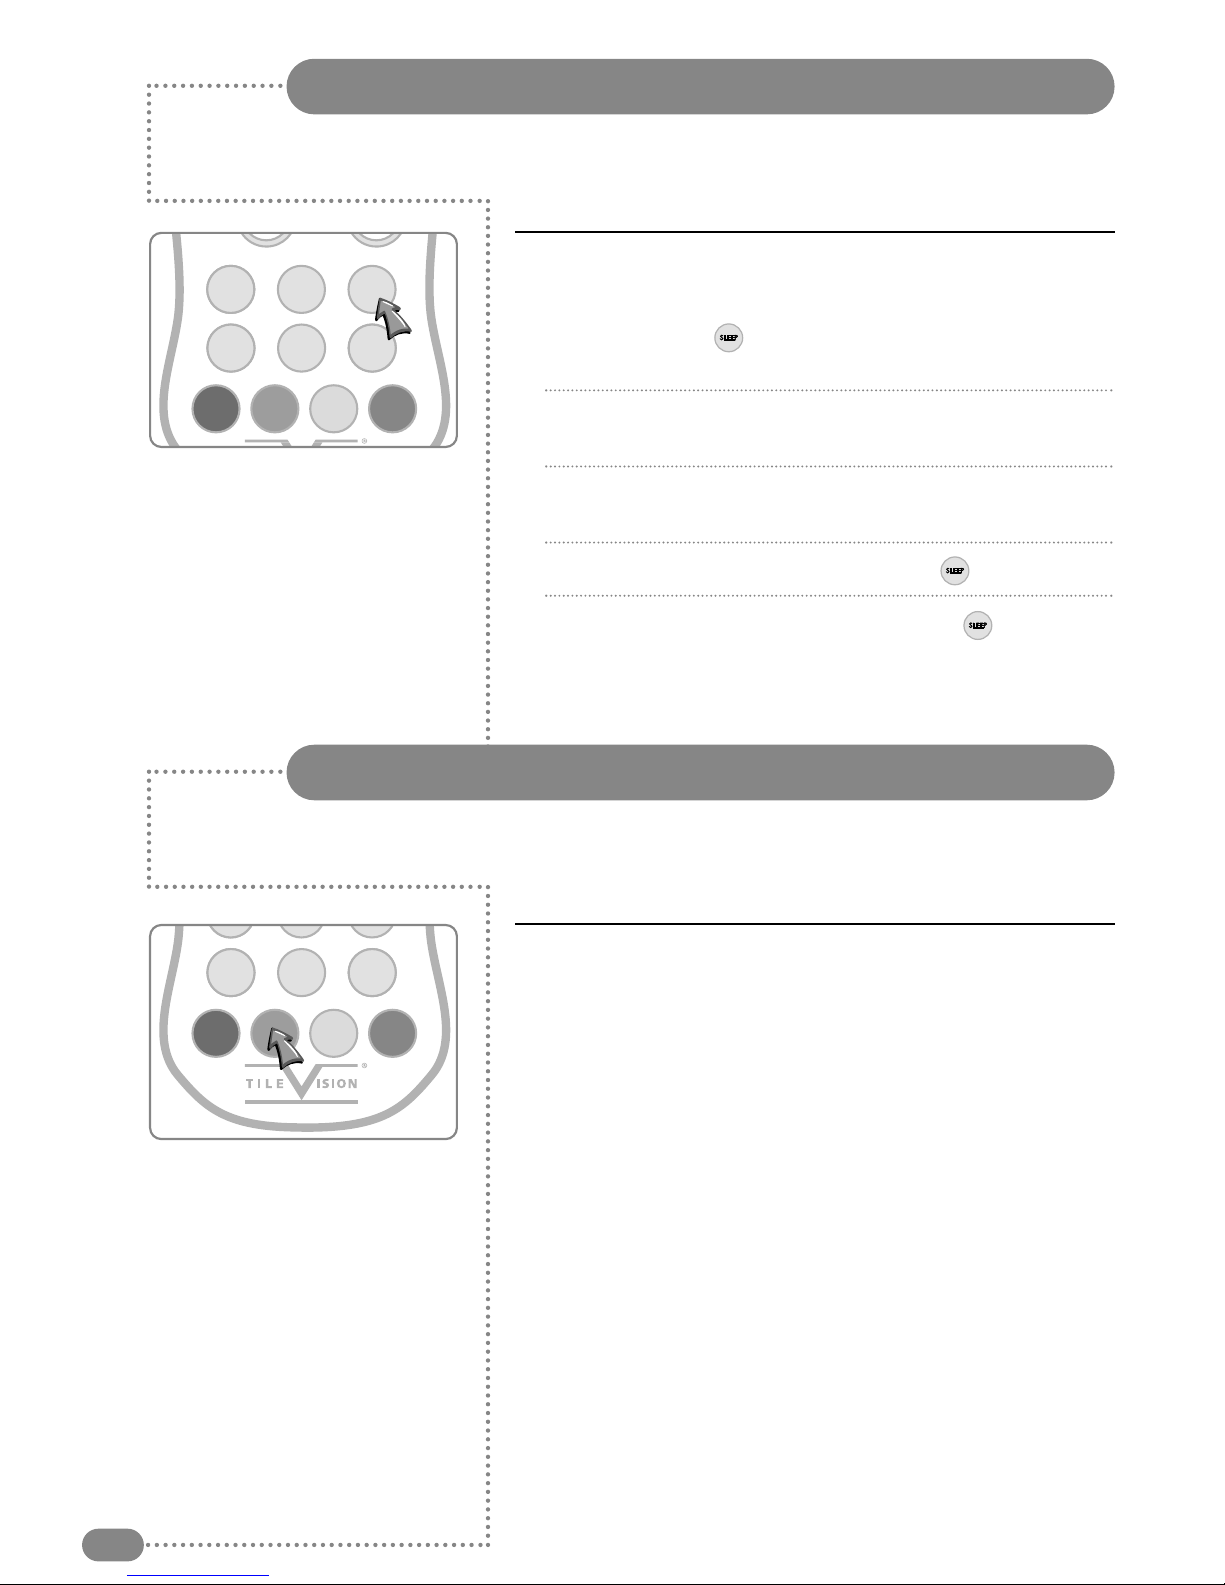
Press the SLEEP ( ) button repeatedly to select the number
of minutes.
2
The display will appear on the screen followed by 0, 10, 20, 30,
60, 90, 120, 180 and 240.
3
The timer begins to countdown from the number of minutes
selected.
4
To view the remaining sleep time, press the ( ) button once.
5
To cancel the sleep time, repeatedly press the ( ) button until
the time is set to zero.
COMP VIDEO S-VIDEOCOMP
CC
CC MEM. SLEEP
MENU ST/SAP QV TV/AV
ST/SAP
Press the ST/SAP button.
You can select the sound output system – Stereo, Mono or SAP
and the language during dual language broadcast.
COMP VIDEO S-VIDEOCOMP
CC
CC MEM. SLEEP
MENU ST/SAP QV TV/AV
Page 27
Troubleshooting
25
No picture or sound.
Screen is black.
Picture is OK but
there is no sound.
Poor sound quality.
No image on a
specific channel.
Image is not stable
and may appear to
vibrate, horizontal
bars appear.
No colour on a
specific channel
(a black & white image).
Black or white dots
appear on all
channels or a
specific channel.
☛ Make sure the AC power cord is connected to the 12V power adapter.
☛ Make sure the 12V DC power cord is connected to the TileVision®.
☛ Check for power failure.
☛ Make sure the external signal source mode is selected.
☛ Press the signal input button (TV/AV) to change to TV.
☛ Press the Mute button.
☛ Check another channel.
☛ Press the button to increase the volume.
☛ Check the speaker connections from the Tilevision®to the speakers.
☛ Make sure the channel is broadcasting in stereo.
Press the
ST/SAP button to Select Mono. The sound quality of a stereo
broadcast may be poor in a weak signal area.
(See page 21)
☛ Make sure the channel selection is correct.
☛ Change the antenna direction to the right or left.
☛ Adjust the fine tuning of the channel.
☛ Adjust the fine tuning of the channel.
☛ Make sure there is no powerful electromagnetic wave interference
from the transmitting station.
☛ Stop using a hair drier, electric drill or electric blender.
☛ Check other channels to see if the specific channel is broadcasting
a black & white program.
☛ Adjust the colour. (See page 19)
☛ Make sure the antenna is connected correctly. (See page 7)
☛ Make sure the status of the antenna or wire is good.
☛ Adjust the fine tuning of the channel.
Page 28
Specifications – TV/17/FR2N
26
Model name
17.1" Diagonal
400mm (H) x 258mm (V)
0.291mm (H)/0.291mm (V)
1,280 x 768 pixels RGB stripe arrangement
8 bits (16.7 million colours)
a-si TFT active matrix
550cd/m
2
600:1
178° typ (L/R & U/D)
PAL/SECAM or NTSC only
B/G, D/K, I, M, L
CVBS, S-VHS, RGB
1.0Vp-p @ 75ohm
500mv rms
0.7Vp-p @ 75 ohm
2.5W x 2
12VDC/60W
Max. 50W
483mm x 353mm x 75mm
11.7 Kg
Remote Control (2), Operating Instructions, Power Cord, DC Adaptor,
Speaker (2), Speaker Cable (2), Back Box, Front Plate
Size
Display Size
Pixel Pitch
Pixel Number
Colour Depth
Type
Brightness
Contrast Ratio
Viewing Angle
Colour System
Sound System
Video System
Video Input
Audio Input
RGB Input
LCD
TV/VIDEO
COMPONENT
Audio Output
Power Supply
Power Consumption
Dimension (WxHxD)
Weight of Fitted Assembly
Accessories
TV/17/FR2
☛
Design and specifications
are subject to change
without notice.
Page 29
Notes
27
Page 30
Notes
28
Page 31

Page 32

PORTER LANCASTRIAN LIMITED
www.tilevision.tv
PORTER LANCASTRIAN
TV/17/FR2N – 17" Tilevision®Operating Instructions – January 2005 – Part No. TVS/00188/04
 Loading...