

Page 1
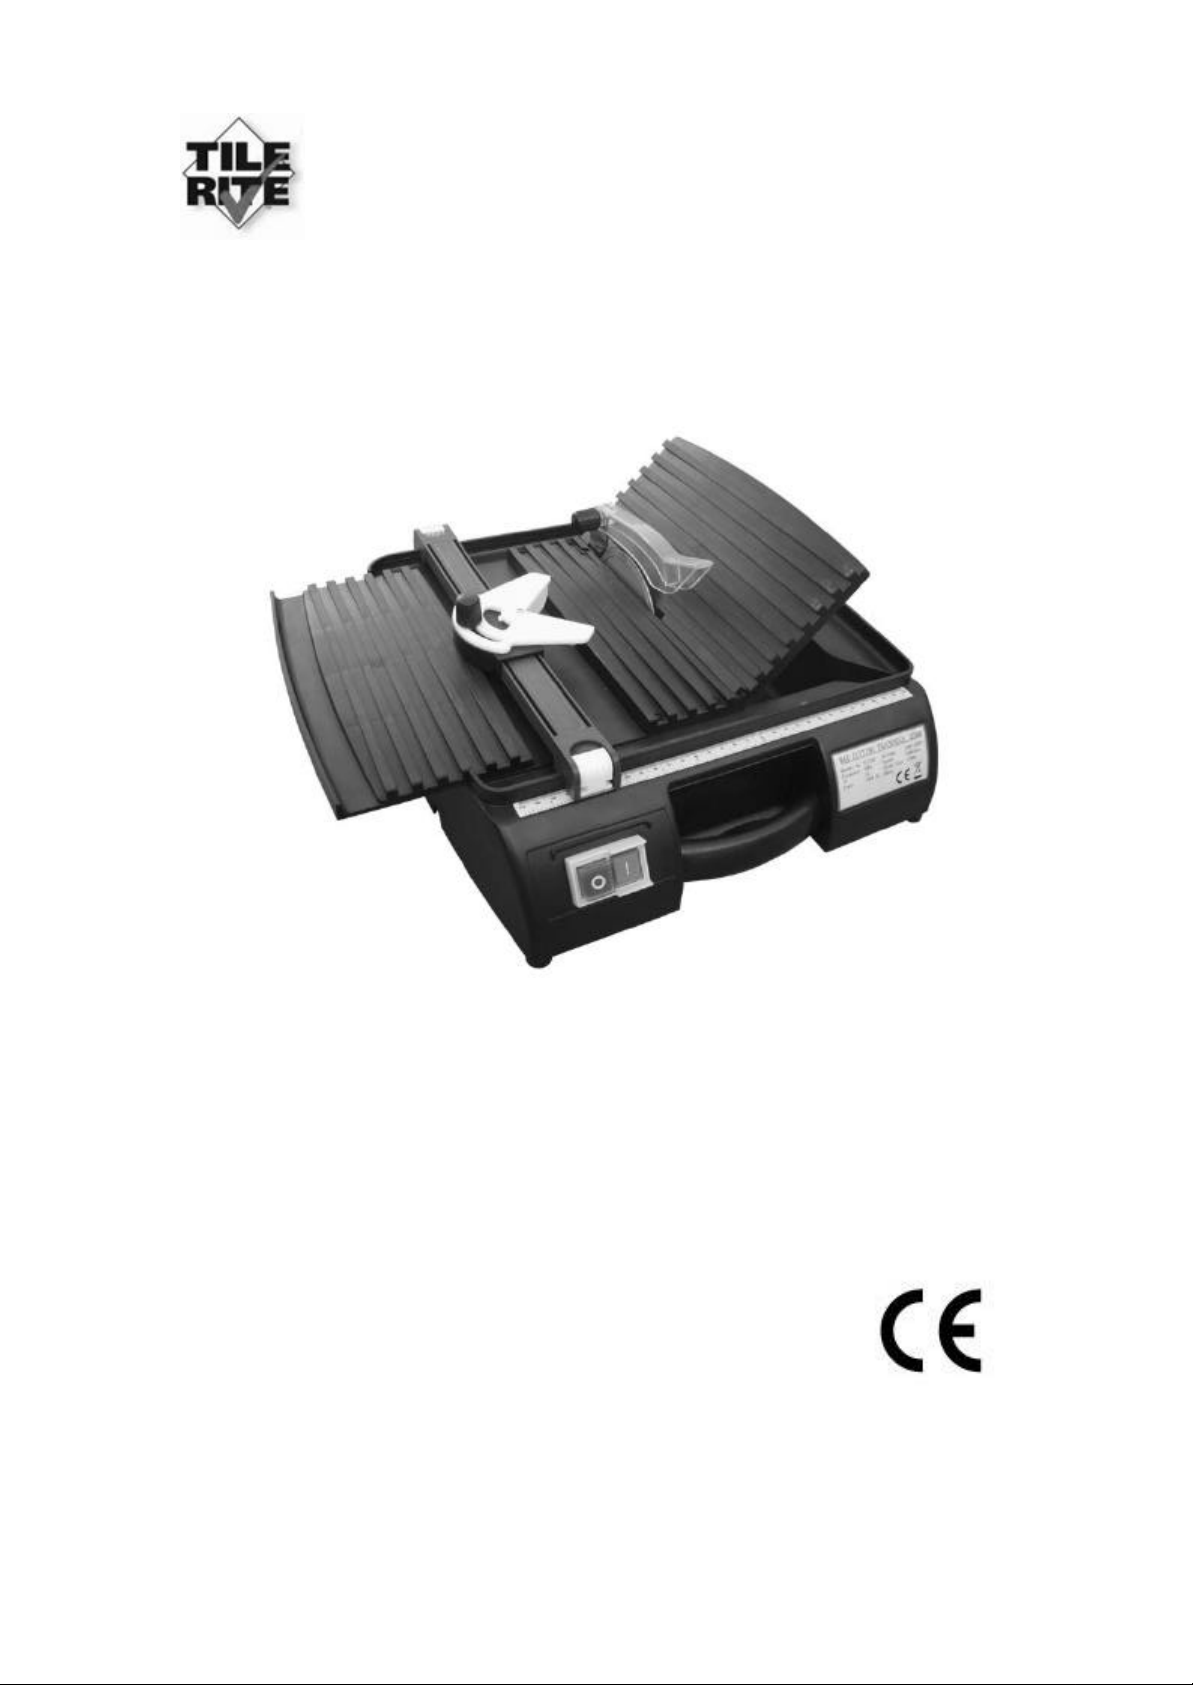
450 WATT DIAMOND TILE CUTTER
MODEL NO. TRP 438
Please read these instructions BEFORE using your tile cutter
Page 2

450 Watt Diamond Tile Cutter
WARNING! PLEASE READ THESE INSTRUCTIONS CAREFULLY
BEFORE USING THIS TILE CUTTER
General Safety Rules
Failure to follow all instructions listed below may result in electric shock, fire and/or serious
personal injury, please read and save these instructions.
Work area
Keep work area clean and well lit. Cluttered and dark areas invite accidents. Do not operate
power tools in explosive atmosphere, such as in the presence of flammable liquids, gases or
dust. Tools create sparks that may ignite such substance. Keep bystanders, children and
visitors away while operating a power tool. Distractions can cause loss of control.
Electrical safety
Avoid body contact with grounded surfaces such as pipes, radiators and refrigerators. There is
an increased risk of electric shock if your body contacts with such grounded surfaces.
Do not expose tools to rain or wet conditions. Water entering a tool will increase the risk of
electric shock.
Do not abuse the cord. Never use the cord to carry the tools or pull the plug from an outlet.
Keep cord away from heat, oil, sharp edges or moving parts. Replace damaged cords
immediately to avoid the risk of electric shock.
When operating a power tool outdoors, use an extension cord suitable for outdoor use. Use of
a cord suitable for outdoor use reduces the risk of electric shock.
If operating a power tool in a damp location is unavoidable, use a residual current device (RCD)
protected supply. Use of an RCD reduces the risk of electric shock.
Personal safety
Stay alert, watch what you ar e doing and use common sense when operating a tool. Do not
use tool while tired or under the influence of drugs, alcohol or medication. A moment of
inattention while operating tools may result in serious personal injury.
Dress properly, Do not wear loose clothing or jewellery. Tie back long hair. Keep your hair,
clothing and gloves away from moving parts. Loose clothes, jewellery or long hair can be
2
Page 3

caught in moving parts.
Avoid accidental starting. Be sure switch is off before plugging in. Carrying tools with your
finger on the switch or plugging-in tools that have the switch on invites accidents.
Remove adjusting wrenches or switches before turning the tool on. A wrench or a key that is
left attached to a rotating part of the tool may result in personal injury.
Do not overreach. Keep proper footing and balance at all times. Proper footing and balance
enables better control of the tool in unexpected situations.
Use safety equipment. Always wear eye protection. Dust mask, non-skid safety shoes, hard
hat, or hearing protection must be used for appropriate conditions.
Tool use and care
Do not force the tool. Use the correct tool for your application. The correct tool will do the job
better and safer at the rate for which it is designed.
Do not use the tool if the switch does not turn it on and off. Any tool that cannot be controlled
with the switch is dangerous and must be repaired.
Disconnect the plug from the power source before making any adjustments, changing
accessories, or storing the tools. Such preventive safety measures reduce the risk of staring
the tool accidentally.
Store idle tools out of reach of children and other untrained person. Tools are dangerous in the
hands of untrained users.
Maintain tools with care. Keep cutting tools sharp an d clean. Properly maintained tools with
sharp cutting edges are less likely to bind and are easier to control.
Check for misalignment or binding of moving parts, breakage of parts and any other condition
that may affect the tools operation. If damaged, ha ve the tools serviced before using. Poorly
maintained tools cause many accidents.
Use only accessories that are recommended by the manufacturer for your model. Accessories
that may be suitable for one tool may become hazardous when used on another tool.
3
Page 4

Service
Have your power tool serviced by a qualified repair person using only identical replacement
parts. This will ensure that the safety of the power tool is maintained.
Specific Safety Rules
Always connect to an electrical power point using an approved RCD circuit breaker. This is an
essential safety precaution.
For safety and to prolong the motor life only switch the tile cutter on before cutting a tile and
switch off immediately after use.
Only ever cut one tile one time.
Keep water clear off the electrical parts of the tool and away from persons in the working area.
Always use blades correct in size and arbor shapes. Blades that do not match the mounting
hardware of the saw will run eccentrically causing loss of control.
Never use damaged or incor rect blade washers or bolts. The blade washers and bolts are
specially designed for your saw to ensure optimal performance and safety of operation.
Tool Precaution
Make sure the tool is connected to the voltage marked on its name plate.
Always wear hearing protection, safety glasses and dust mask.
Never touch the moving parts or the blades during use.
Never start the tool when its rotating components are in contact with the work piece.
Check the blade carefully to see if cracked or damaged before use. If cracked or damaged,
replace it immediately.
Keep the cord away from the cutting area and position it so that it will not be caught on the
work piece.
Unpacking
The tile cutter comes partially assembled for packaging purposes. Lay the parts on the bench
and check against the parts list.
- 1Pc x Cutting guide
- 1Pc x Angle cutting guide
- 1Set x Splash guard assembly
(1Pc x Splash guard, 1Pc x Metal plate, 1Pc x Locking bolt, 1Pc x Nut)
- 1Pc x Diamond wheel
- 2Pcs x Spanners (holding spanner and tightening spanner )
- 2Pcs x Bench stops
Once it has been established that all parts are correct proceed assembling as below.
4
Page 5
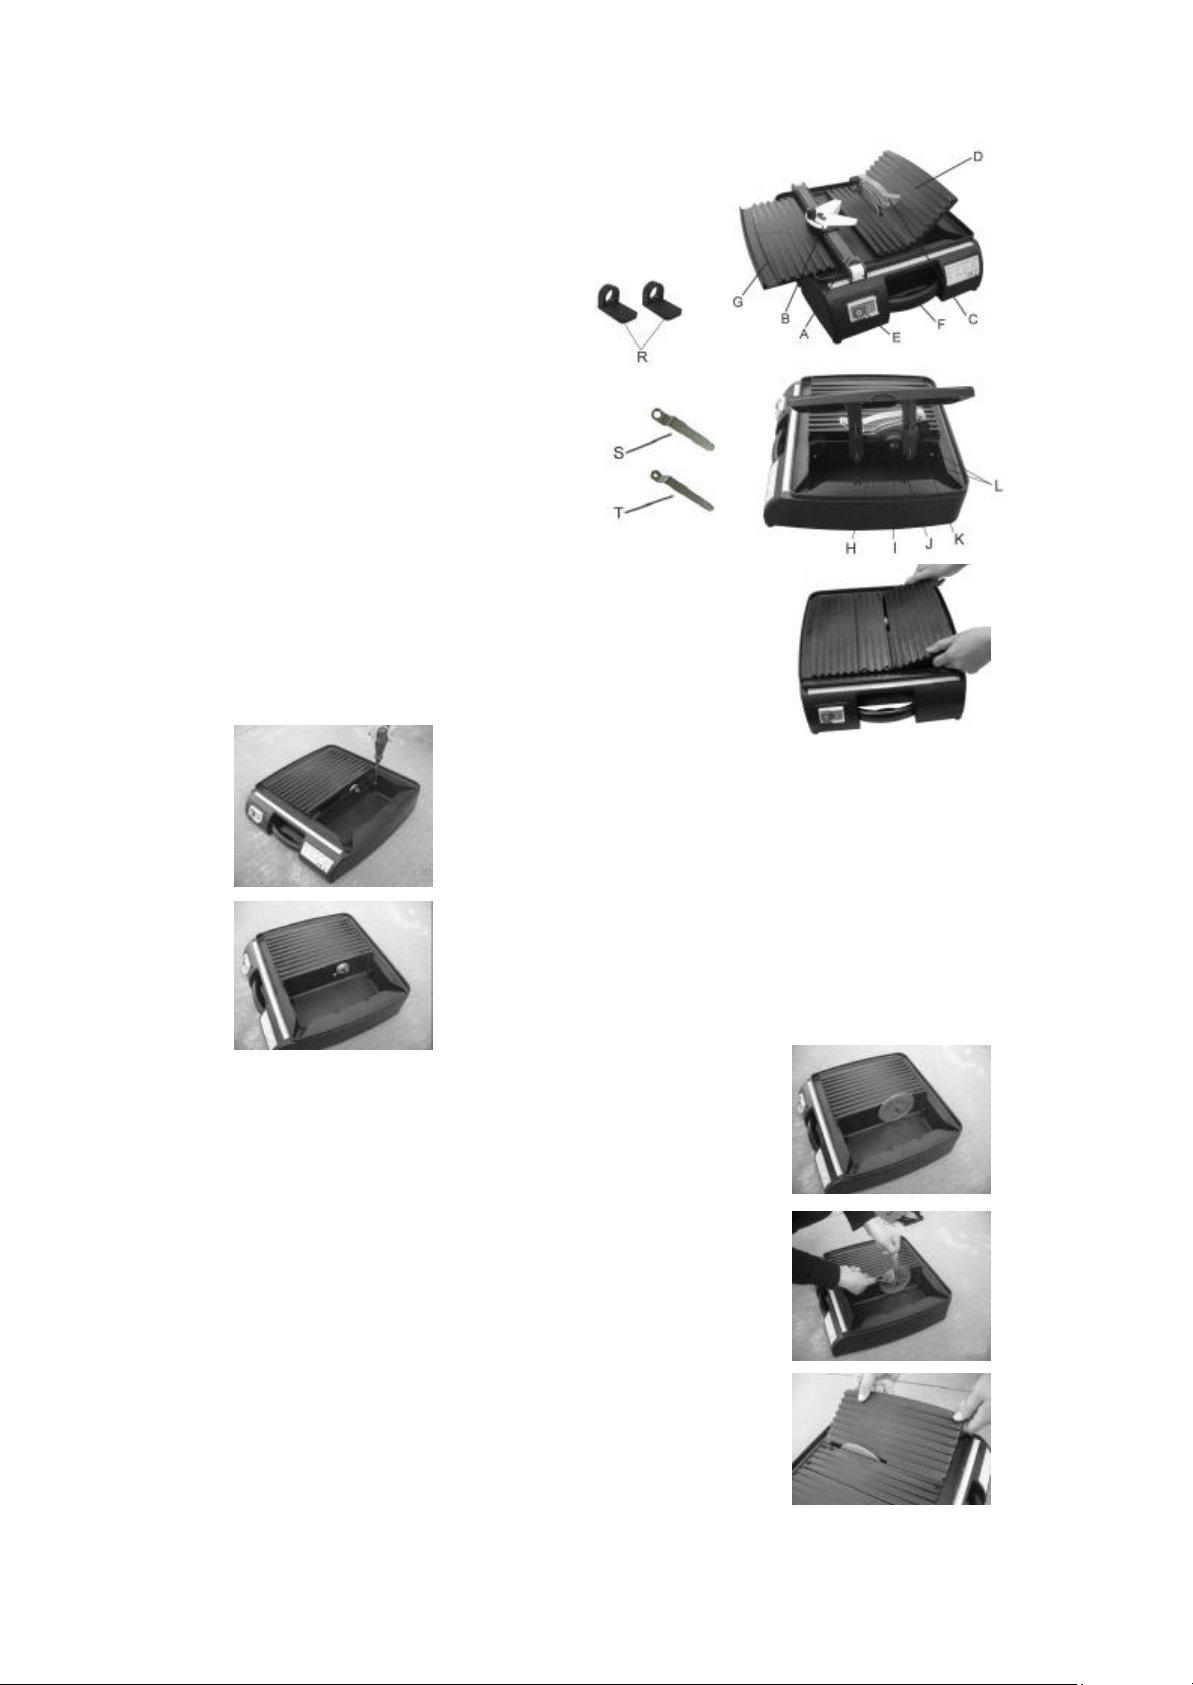
Assembly Instructions
Remove the water tank splash guard (K) by unscrewing
Fitting the Diamond Wheel
A. Cutting guide
B. Angle guide
C. Splash guard
D. Water reservoir lid
E. On/Off switch
F. Carry handle
G. Extension table
R. Bench stops
H. Diamond wheel
I. Outer flange
J. Tightening nut
K. Water tank splash guard
L. Lid supports
S. Tightening spanner
T. Holding spanner
l Disconnect the machine.
l Lift the water reservoir lid (D) up to remove by pulling the two
pivot tabs upward at the front and back.
l
the screw and the washer.
l Loose the tightening nut (J) using the tightening spanner
(S) while holding the spindle in place with the holding
spanner (T).
l Remove the tight ening nut (J) and the outer flange (I).
l Fit the diamond wheel (H) onto the inner flange noting the
rotation direction on the diamond wheel. The direction arrows
on the diamond wheel (H) must be in the same direction as
that marked on the splash gua rd (C), or as that indicated
around the spindle.
l Ensure that the diamond wheel (H) is fully located and centred.
l Replace the outer flange (I) and lock the tightening nut (J) firmly
using spanners (S&T).
l Re-fit the water tank splash guard (K) and the wat er reservoir
lid (D).
5
Page 6
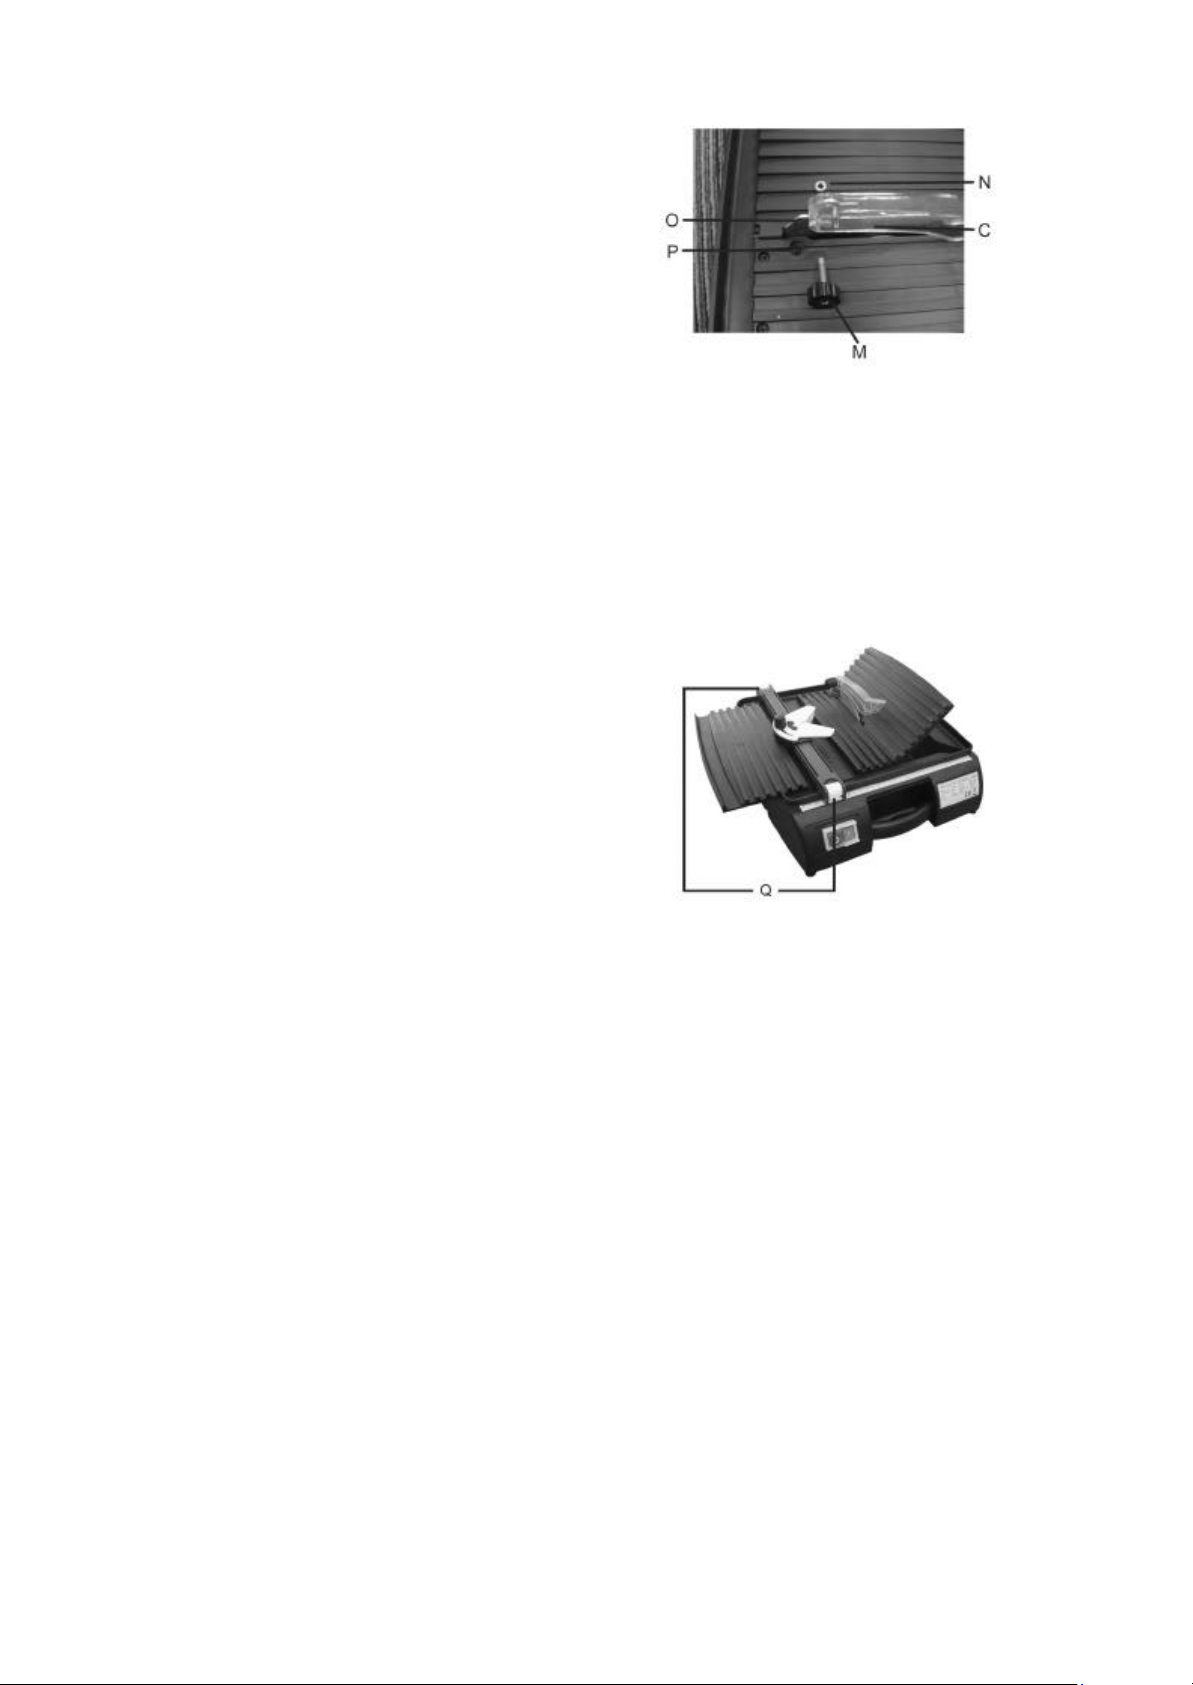
Fitting the Wheel Guard
M. Locking bolt
N. Nut
O. Metal plate
P. Screw
C. Splash guard
l Locate the metal plate of the splash guard (C)
into the recess behind the diamond wheel (H) on the cutting blade.
l Ensure the vertical part of metal plate is fitted so it is in line with the diamond wheel (H).
l Secure the metal plate to the cutting table using the screw supplied by screwing down from
the top of the cutting table.
l Fit the splash guard (C) by using locking bolt (M) and nut (N) through metal plate (O).
Note: The splash guard has been designed to be loose so that it always rests on the tile or tile
cutting table. This has been necessary to conform to the latest CE safety requirements.
Fitting the Cutting Guide
Q. Cutting guide clasps
l Locate the cutting guide (A) to seat over the
table.
l Firmly clasps the cutting guide at both ends.
Operating Instructions
Starting up
l Lift the water reservoir lid (D) up to remove by pulling the two pivot tabs upward at the front
and back.
l Fill the water reservoir with water to the recommend level. Do not overfill.
l Connect the machine to the mains by using a RCD circuit breaker.
l Start by means of the On/Off switch (E). To start the machine, press the green On (1)
button. To stop the machine, press the red Off (0) but ton.
NOTE. In the event of a power failure while the machine is operating the motor will not
restart when the power is restored until the green button is pressed.
6
Page 7
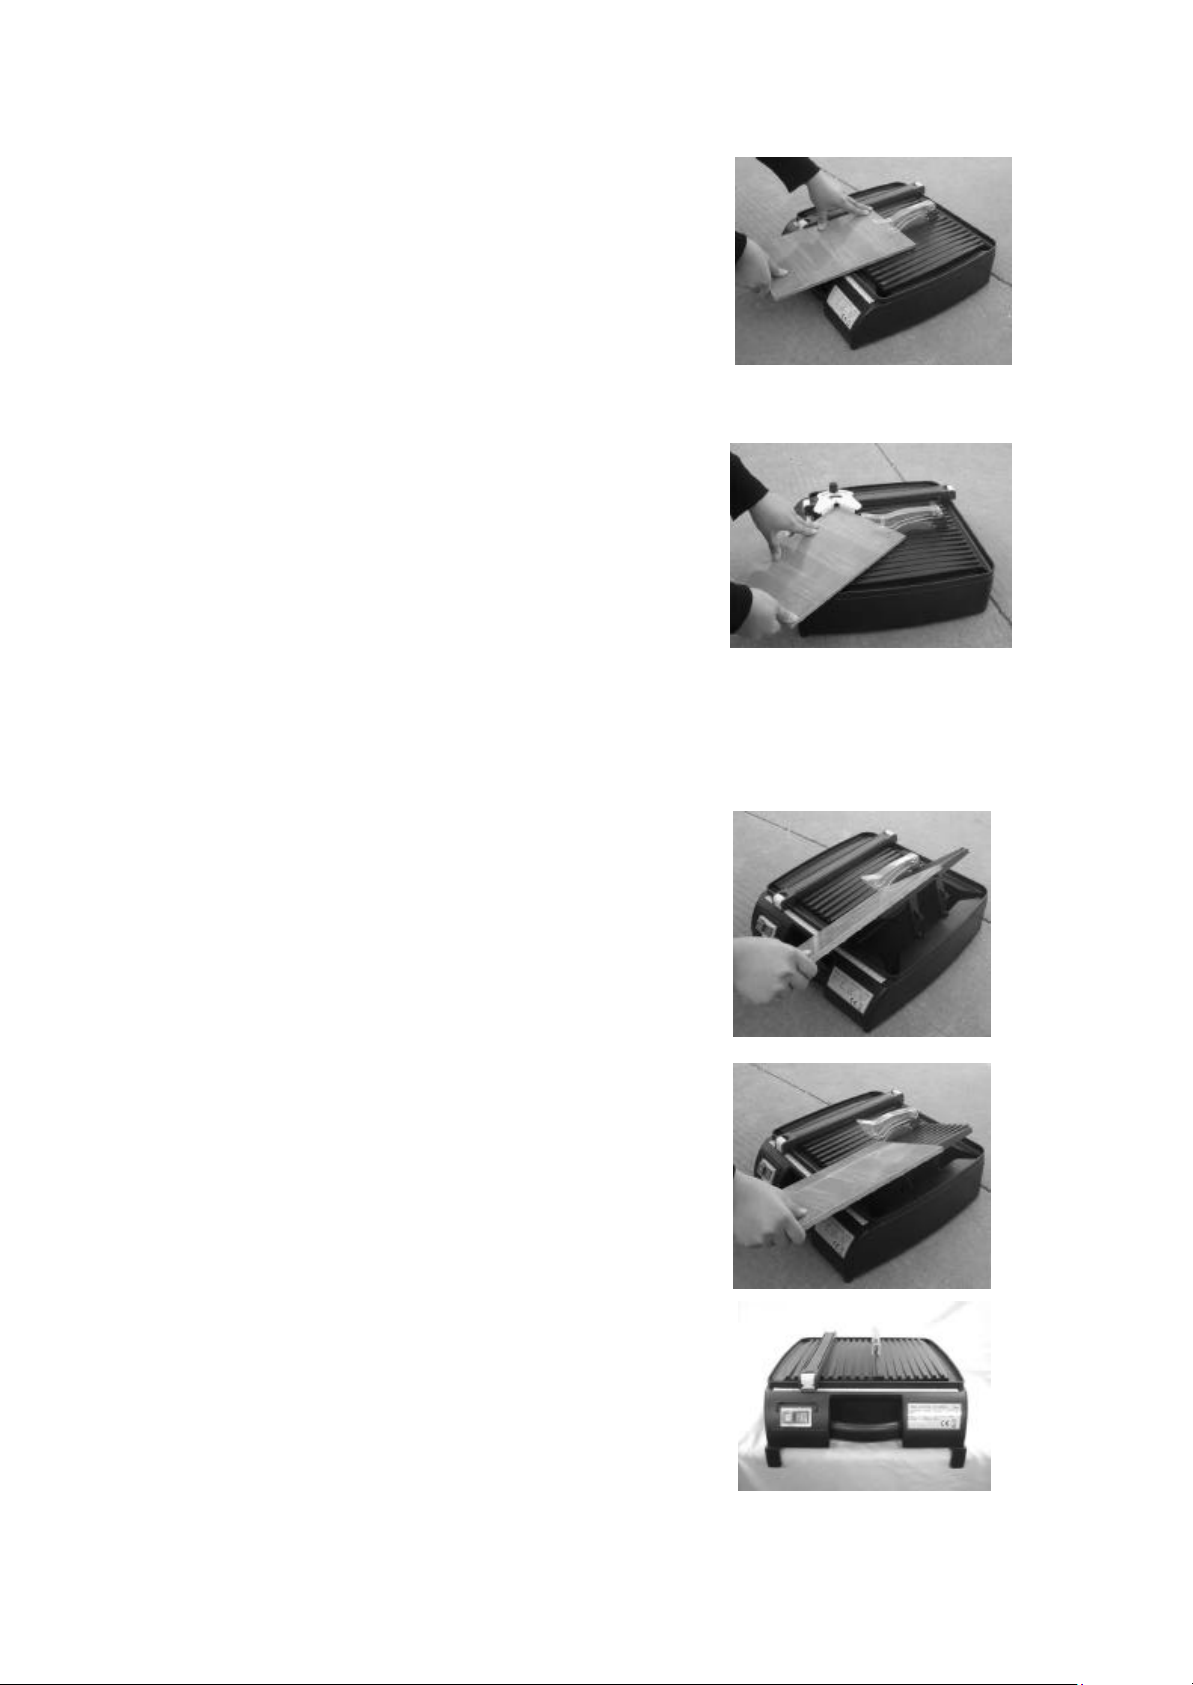
Straight cuts
l Loosen the cutting guide clasps (Q) at both ends of the
cutting guide (A).
l Set the cutting guide (A).
l Relock cutting guide clasps (Q).
l Place the piece of tile against the cutting guide (A) then
push the work piece towards the diamond wheel (H).
Diagonal cuts
l Loosen the cutting guide clasps (Q) at both ends
of the cutting guide (A).
l Set the cutting guide (A) to the distance required.
l Relock the cutting guide clasps (Q).
l Hook the angle guide (B) onto the cutting guide (A).
l Choose the angle desired and tighten the bolt to secure
the angle guide (B) in conjunction with the cutting
guide (A).
l Push the angle guide (B) together with the tile to be cut towards the diamond wheel (H).
Mitre Cuts (22.5° and 45°)
l Lift up the water reservoir lid (D).
l Pull out the two lid supports (L) located on the back
of the water reservoir lid (D).
l To cut 22.5° angles, place the two upper 22.5° mitre
stays on the lid supports (L) into the two slots located
inside the water reservoir.
l To cut 45° angles, place the two lower 45° mitre stays
on the lid supports (L) into the two slots located inside
the water reservoir.
l Place the piece of tile facing down onto the water
reservoir lid (D) then push the work piece towards the
diamond wheel (H).
Using the Bench stops
l Locate and place both of the bench stops (R)
underneath the front bottom legs on both left and right
ends.
7
Page 8

Using the Extension Table
l Slide outwards the extension table (G) to get the
maximum working table length this tile cutter can
provide.
Maintenance
WARNING!
When servicing, use only identical replacement parts. Use of any other parts may create
a hazard or cause product damage.
Always ensure that the machine is disconnected from the power supply before any
maintenance or adjustments are carried out.
Cleaning:
l Keep the ventilation slot of the machine clean to prevent overheating of the motor.
Regularly clean the machine housing with a soft cloth, preferable after each use. Keep the
ventilation slot free from dust and dirt. If the dirt does not come off use a soft cloth
moistened with soapy water.
l Never use solvents such as petrol, alcohol, ammonia water, etc. these solvents my
damage the plastic parts.
8
Page 9
Technical Specifications
Voltage/Frequency 230-240V~ 50Hz
Motor Power 450W
Duty Cycle S2:30min
No-Load Speed 5400/min
Blade size ø110mm (D) - Bore ø22.23mm
Max. Cutting Thickness To 90°:23mm – to 45°:16mm
Ingress Protection (IP) IP23
Sound pressure level 92.6 dB(A)
Sound power level 105.6 dB(A)
Symbols
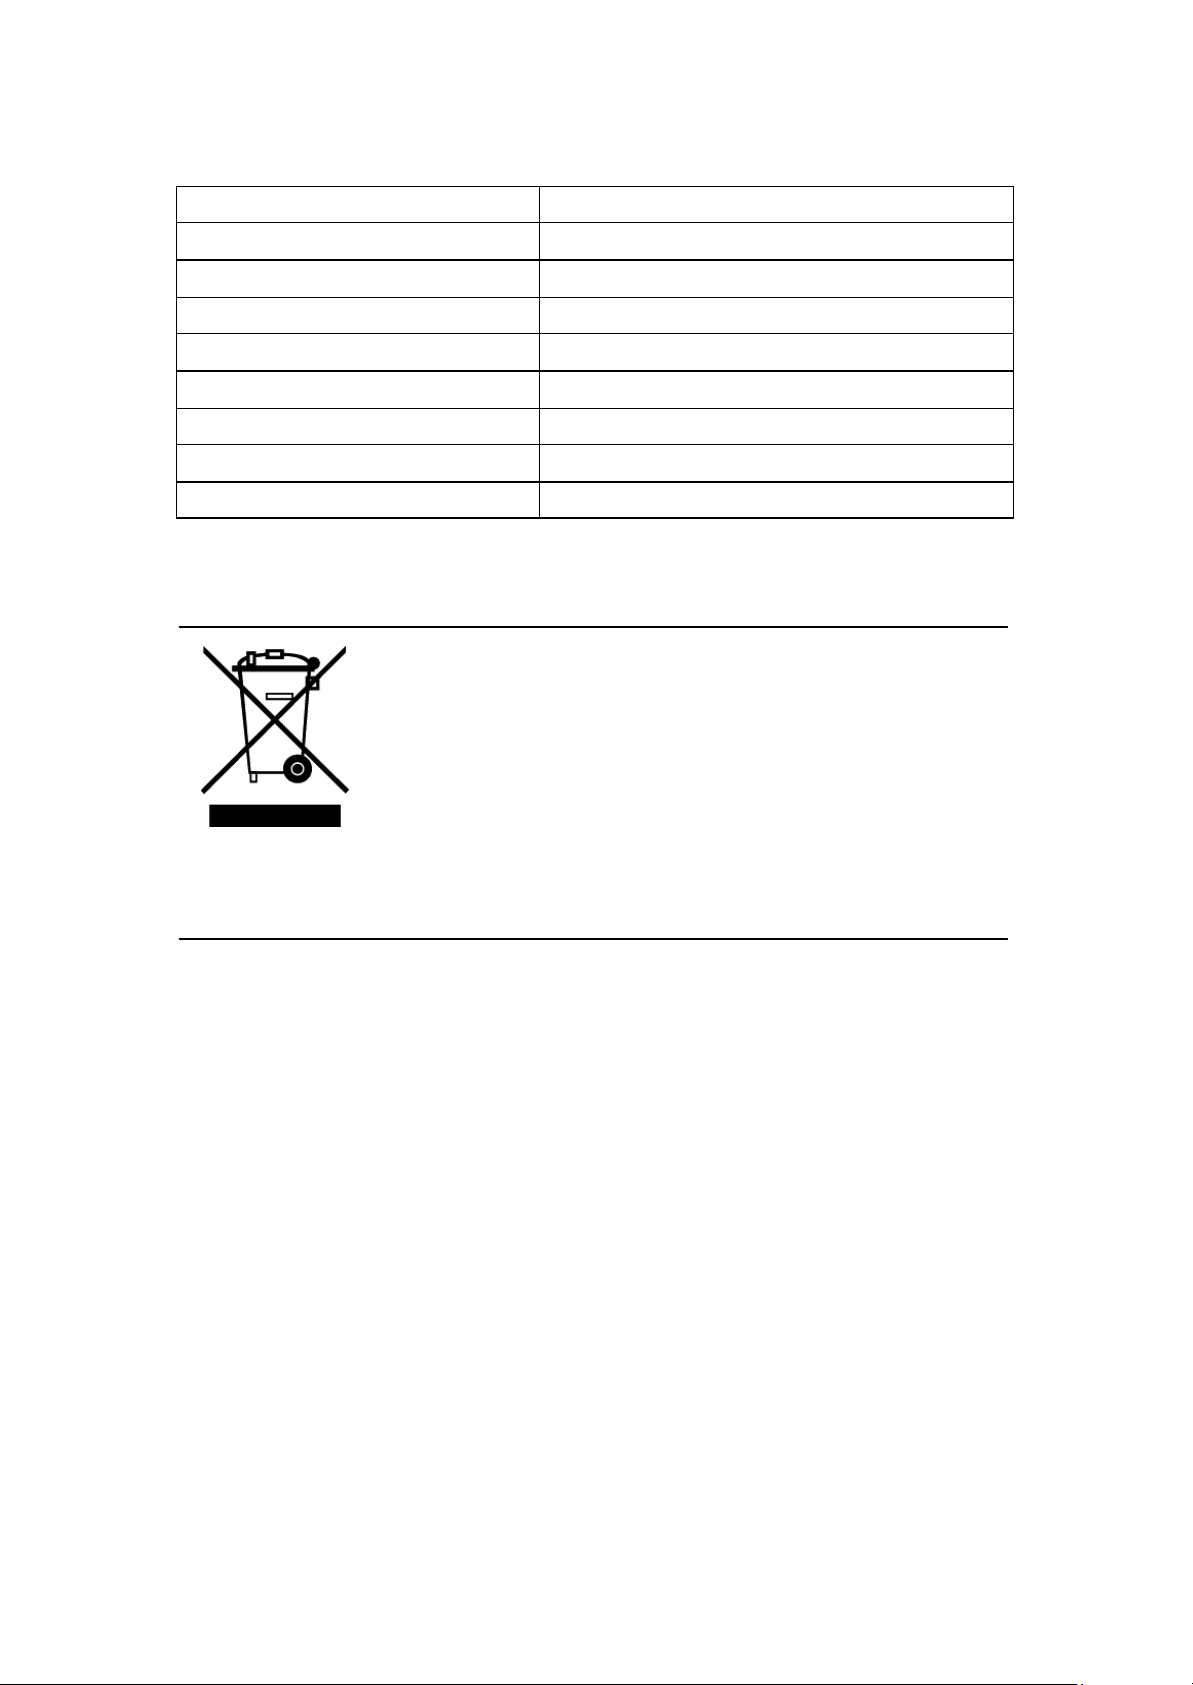
This symbol is known as the 'Crossed-out Wheelie Bin Symbol'. When
this symbol is marked on a product or battery, it means that it should not
be disposed of with your general household waste. Some chemicals
contained within electrical/electronic products or batteries can be
harmful to health and the environment.
Only dispose of electrical/electronic/battery items in separate collection
schemes, which cater for the recovery and recycling of materials
contained within. Your co-operation is vital to ensure the success of
these schemes and for the protection of the environment.
9
Page 10
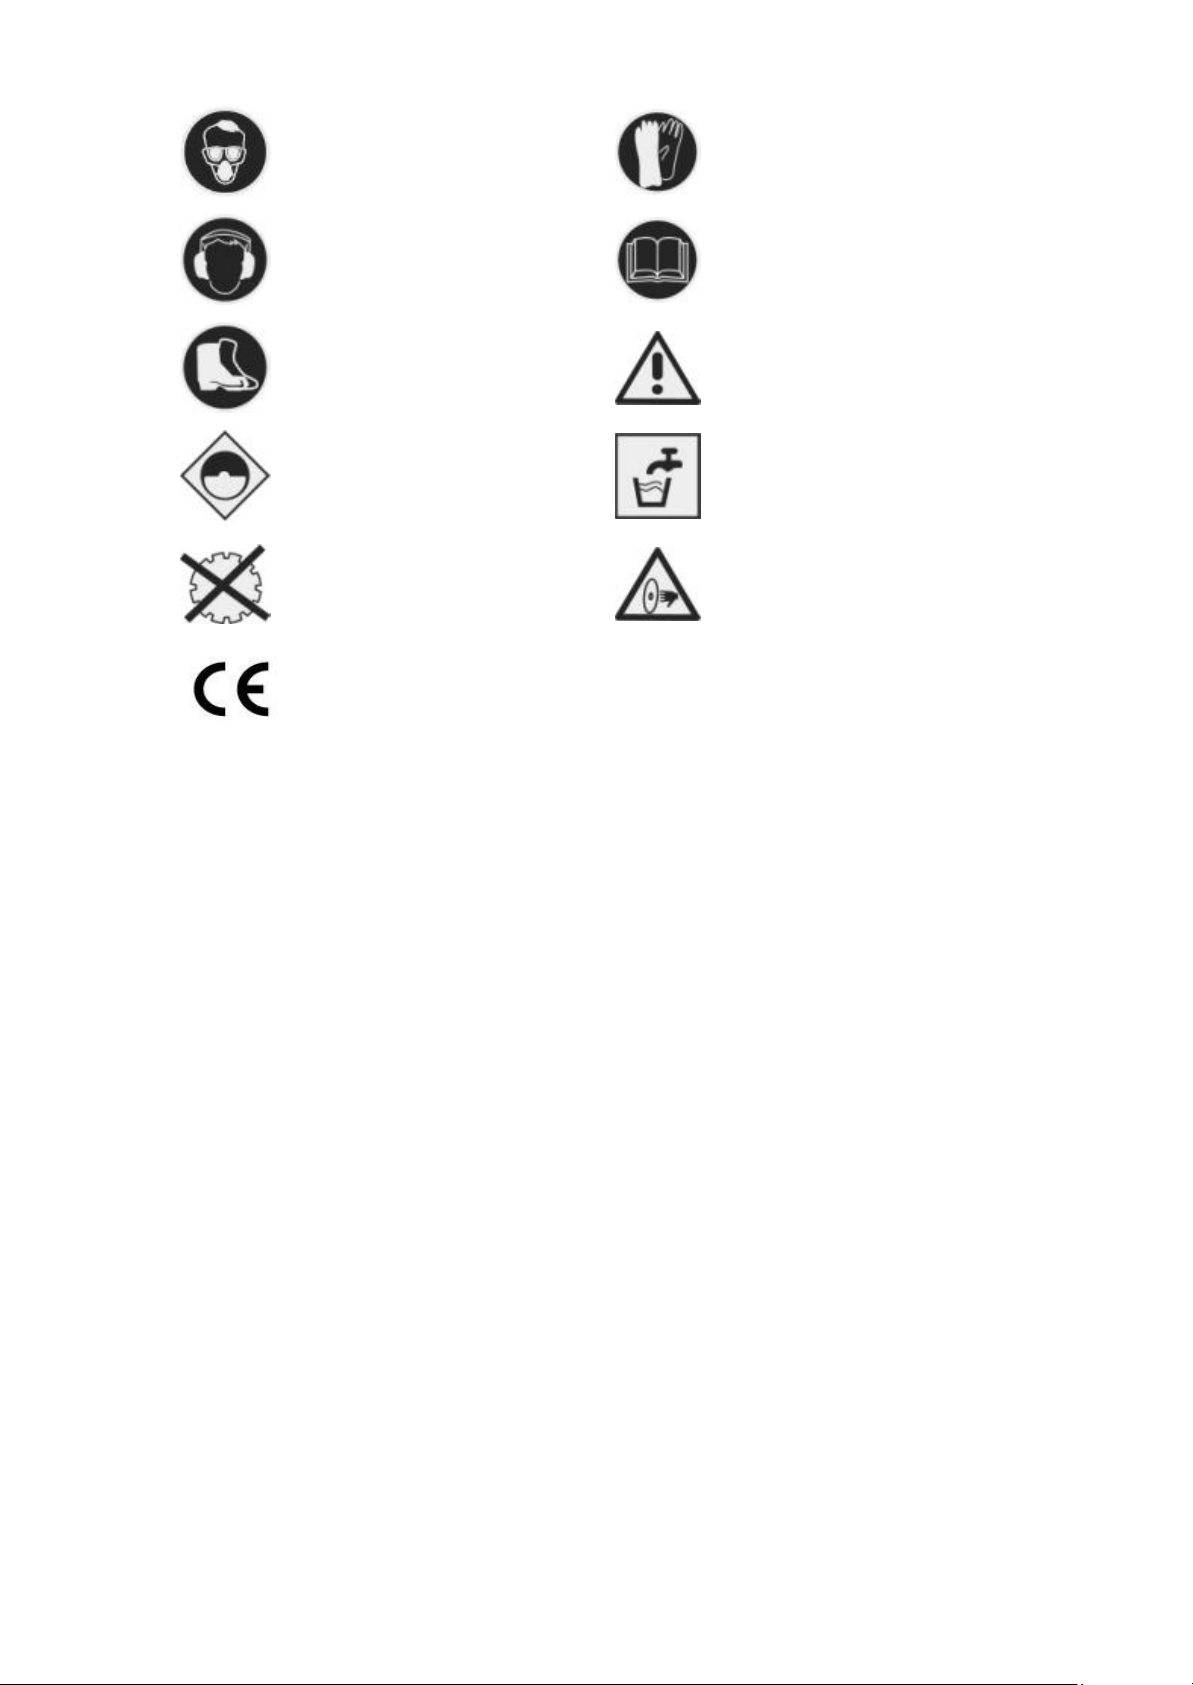
Wear eye protection.
Wear respiratory protection.
Wear protection gloves
Wear hearing protection.
Wear foot protection.
Read the instruction manual
Warning.
Use correct size of blades.
Do not use segmented blade.
Conforms to relevant safety
standard.
Wet cut only.
Attention! Risk of injury! Do
not hold hands into the
rotating disc!
10
 Loading...