

Page 1

Steam and Wet Room Seating Kits
Assembly Instructions
for Curved Edge with
Backrest Kits
1200mm long, suitable for mosaic tiles only.
Assembly and installation instructions
Page 2

Take the four Support Proles (Parts A)
and place them upright on your bench.
Lay generous beads of Board Fix Adhesive
into the top notch of each Prole.
Take the Back Support piece (Part E) and
rmly press it into these recesses.
Lay a generous bead of Board Fix
Adhesive into the lower notches of
the proles.
1.
2.
3.
4.
Support Prole 50mm 4
Back Support Piece 1200 x 600 x 30mm 1
Back Support Piece 1200 x 210 x 30mm 1
Seat Support Piece 1200 x 230 x 40mm 1
Back Support Piece 1200 x 100 x 40mm 1
Front Board 1200 x XX x 30mm 1
Flexo Plus Board 1200 x 600 x 30mm 2
4506342 Board Fix Adhesive 3
100mm Screws & Washers 20
• Hand or Jig saw
• Phillips screwdriver
• Tape measure or ruler
• Straight Edge
• Spirit Level
• Set Square
Assembly Instructions for Curved Edge with
Backrest Kits.
Kit Contents
Parts
Tools you will need
Jackoboard Steam and Wet Room Seating
Kits are the simple, waterproof, cost
eective and exible way to create stylish
tiled seating in steam rooms and wet rooms.
The kits can be easily trimmed to suit the
dimensions of your job by making simple
straight cuts using hand tools to the
individual components before assembly.
You can assemble the unit either on a work
bench or in situ.
First of all, make sure you have all the items
in the kit and familiarise yourself with them:
840mm
840mm
420mm
100
mm
x 40
mm
230
mm
50mm
100mm
R90
x40
mm
460mm
490mm
560mm
590mm
2
o
Installation
A
A
D
D
G
G
B
B
B
E
E
C
C
C
F
F
F
1
2
3
4
F
G
Page 3
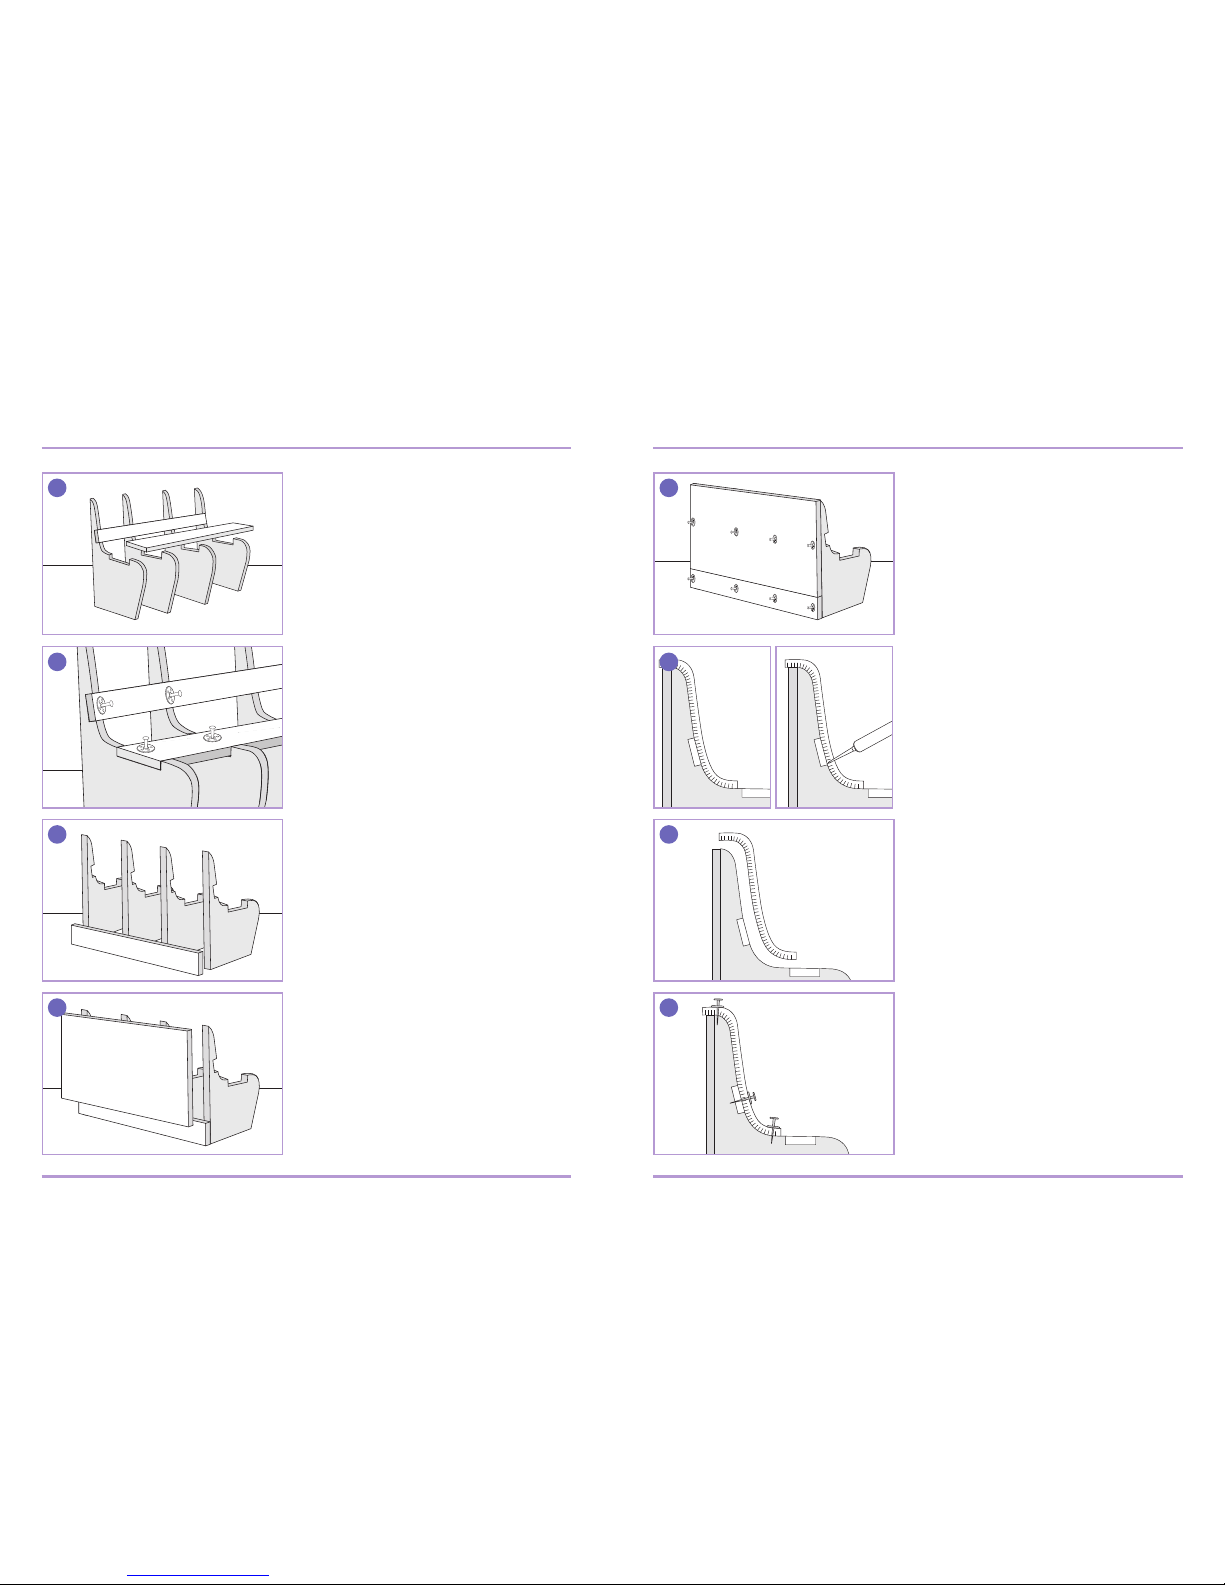
Now screw and washer x through the
Seat Backs into the proles at the rate of
one xing per back section. Allow the
whole structure to cure for at least
four hours.
Remove the screw and washer xings
for re-use.
Take the Seat Support piece (Part D) and
rmly press it into these recesses.
Take one of the Flexo Plus Boards
(Part G) and trim it along its length to nish
at approximately point (i) as indicated on the
Parts drawing. Allow it to slightly overlap the
top of the seat to be trimmed later.
Apply a generous bead of adhesive to the
Support Proles and back Support E from
the top of the seat to point (i).
Now screw and washer x through each
Support piece into the Support Proles.
Use one xing per recess. Allow the unit to
cure for a few minutes.
Press the trimmed Flexo Plus Board rmly
onto the adhesive beads making sure the
cuts are facing inwards.
Now take the Lower Back Section
(Part C) and bond it with Board Fix
Adhesive to the lower back sections of
the four proles. Check the structure for
square and vertical and allow the unit to
cure for a few minutes.
Now Screw and washer x the Flexo
Board at three points as indicated against
each Seat Support section.
Take the Top Back Section (Part B) and
bond it to the top sections of the Support
Proles with Board Fix Adhesive. Check
for square and allow the unit to cure for
a few minutes.
9.
10.
5.
11.
12.
6.
13.7.
14.8.
InstallationInstallation
95
116
137
148
Page 4
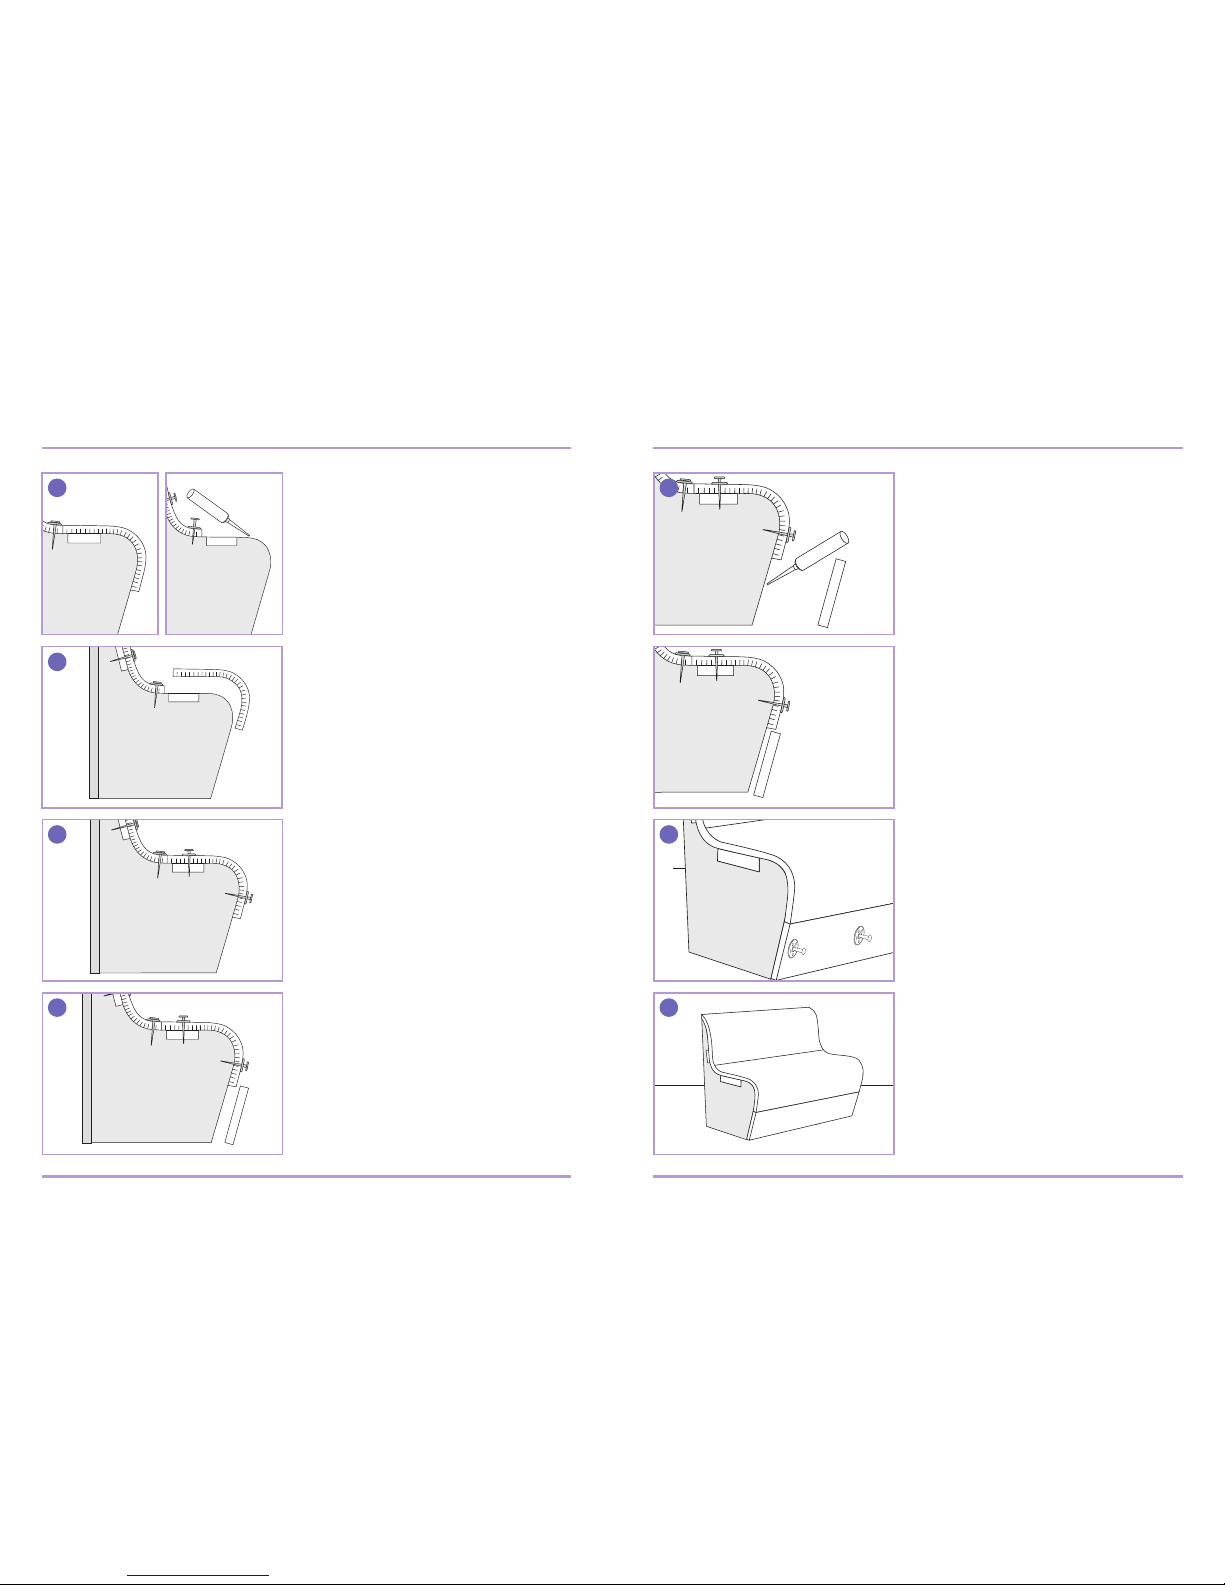
Apply adhesive to the remaining areas of
the Support Proles and press the Front
Board into place.
Similarly, take the other Flexo Plus Board,
butt it tightly up to the rst piece, and trim
it to nish at approximately point (ii) as
indicated on the Parts drawing.
Apply a generous bead of adhesive to the
appropriate parts of the Support Proles
and Seat Support D.
Press the Flexo Plus piece onto the
Supports, making sure the cuts are
facing inwards.
Now screw and washer x through the
Front Board into the Support Proles.
Position the xings as shown.
When the construction is fully cured
(overnight) trim o any excess Flexo
Board. You can install it into your steam
room or wet room using the Board Fix
Adhesive. Obviously, trial a dry t before
applying any adhesive. We then advise
that you seal all the joints between
the seat unit and the room with the
Jackoboard Sealing Kit.
The screw and washer xings may be
removed before tiling if desired.
Screw and washer x the Flexo Board
to the Seat Supports at three xings per
support as indicated.
Take the Front Board (Part F) and trim it
approximately to the depth required to
ll the space between the bottom of the
support piece (allow an overlap to be
trimmed later) and the Flexo Plus Board.
20.15.
16.
17.
21.
22.
23.
18
19.
InstallationInstallation
2015
17
2118
2219
Page 5

Jackobord Seating Kits are also available in Straight Edge and Curved Edge (without
backrest) styles.
t. 01204 221089 [email protected]
www.tile-backer.co.uk
 Loading...