

Tiiwee Starter Kit, XLPIR, XL User Manual
1
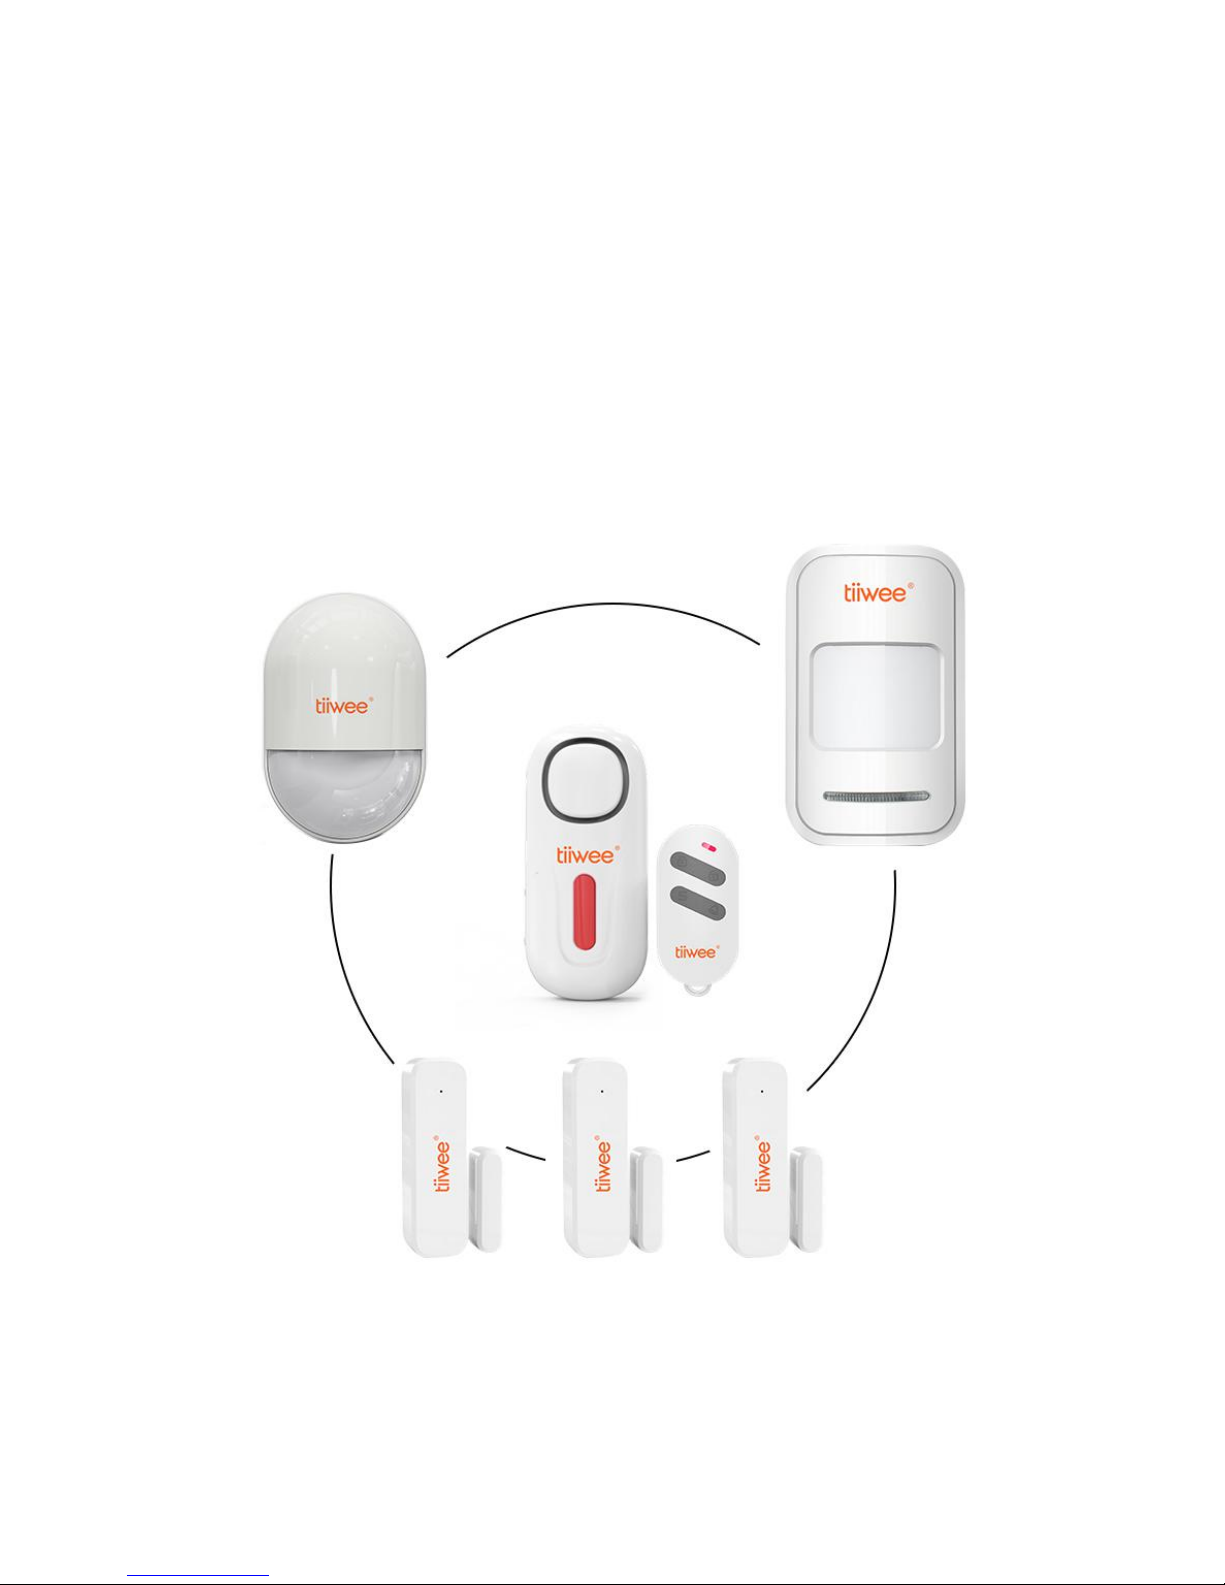
Tiiwee Home Alarm Starter Kit
Tiiwee Home Alarm Kit XL
Tiiwee Home Alarm Kit XLPIR
User Manual

2
ENGLISH
TiiweeHomeAlarmSystemManual
IMPORTANT: Please also refer to www.tiiwee.com for further information and technical
assistance. Contact us at info@tiiwee.com.
Important: Extending your Tiiwee Home Alarm Kit: Only select devices from the Tiiwee
Home Alarm System. Other devices will not be compatible.
Introduction
Congratulations with your new Tiiwee Home Alarm Kit. The Tiiwee Home Alarm Kit is a
versatile alarm system that helps to detect if people or animals are entering your home or
shop. It allows you to use several sensors with one or more alarms in up to 4 different
zones. These sensors (PIR Motion Sensors, Window/Door sensors) are wirelessly
connected to an alarm unit ("A1"). This alarm unit produces a chime sound or a loud siren.
The alarm unit can be placed on a fixed position or taken with you as you move around the
house or if you go to sleep.
A maximum of 10 sensors can be assigned to each of the 4 zones with a maximum of 40
sensors per alarm unit. Each sensor can be paired to several Alarm units if required. Also,
up to 20 remote controls can be paired with each Alarm unit to enable you to equip each
of your family members with a remote control.
Intended use
The Tiiwee Home Alarm System is designed primarily to create a loud siren alarm sound
when a burglar is trying to enter you home. The basis of the system is the A1 Siren. Place
the siren in your home where burglars are most likely to enter. If you have a larger home,
please consider placing additional sirens from the Tiiwee Home Alarm System on other
vulnerable positions. We advise to position the siren at a place where it cannot be easily
reached.
Your system is preconfigured, and the sensors and remote controls are connected to the
A1 Siren. The system therefore is ready for use. We advise to read this user manual
carefully and to familiarize yourself with its basic operating principle and ways to fine-tune
it to your exact security needs.
Box contents
There are 3 versions of Tiiwee Home Alarm Kits with the following content.

3
Tiiwee Home Alarm Starter Kit
User manual
1 x A1 Siren including 2 AAA Batteries
2 x window sensors, each with 1 12V, 23A battery, adhesive tape and screws
1 x remote control including one CR2032 battery
Tiiwee Home Alarm Kit XL
User manual
1 x A1 Siren including 2 AAA Batteries
4 x window sensors, each with 1 12V, 23A battery, adhesive tape and screws
2 x remote control including 1 CR2032 battery
Tiiwee Home Alarm Kit XLPIR
User manual
1 x A1 Siren including 2 AAA Batteries
2 x window sensors, each with 1 12V, 23A battery, adhesive tape and screws
2 x remote control including 1 CR2032 battery each
1 x PIR Motion Detector including 3 AAA batteries
Pre-Configuration of Tiiwee Home Alarm Kits
Your system is ready for use. The window sensors in the kit are paired to zone 1. If your kit
contains a PIR Motion Detector, it is paired to zone 2.
Operating principle
The Tiiwee Home Alarm system is based on 433MHz technology. Sensors emit a wireless
signal at 433MHz when they are triggered. The A1 Siren unit is a receiver for these 433MHz
signals and will emit a sound when a signal is received.
Siren: The A1 Siren produces either a chime or an alarm sound depending on its setting.
Sensors can be paired to any of the 4 zones. This allows you to perfectly adapt the system
to your home situation.
Sensors in general: Each sensor transmits a signal at 433MHz that is composed of a specific
combination of digital 0- and 1 bits. This is the signal signature of that unique sensor. The
siren recognizes sensors by their signal signature.
Door & window sensors: These sensors have 2 parts. A small magnet and a sensor. When
the magnet is moved away from the sensor, a 433MHz signal is transmitted. The siren will
now sound the alarm or chime sound.
4
PIR Movement Detectors: The movement detector detects infrared light that is emitted by
people and animals. Infrared light cannot be seen by human beings. However, the PIR
motion detector is equipped with an electronic infrared sensor that detects infared light.
When the infrared light changes, the PIR motion detector will apply specific algorithmic
calculations to help determine if the change in infrared light is indicative of a human being.
If so, it will emit a 433 MHz signal that is received by the Siren.
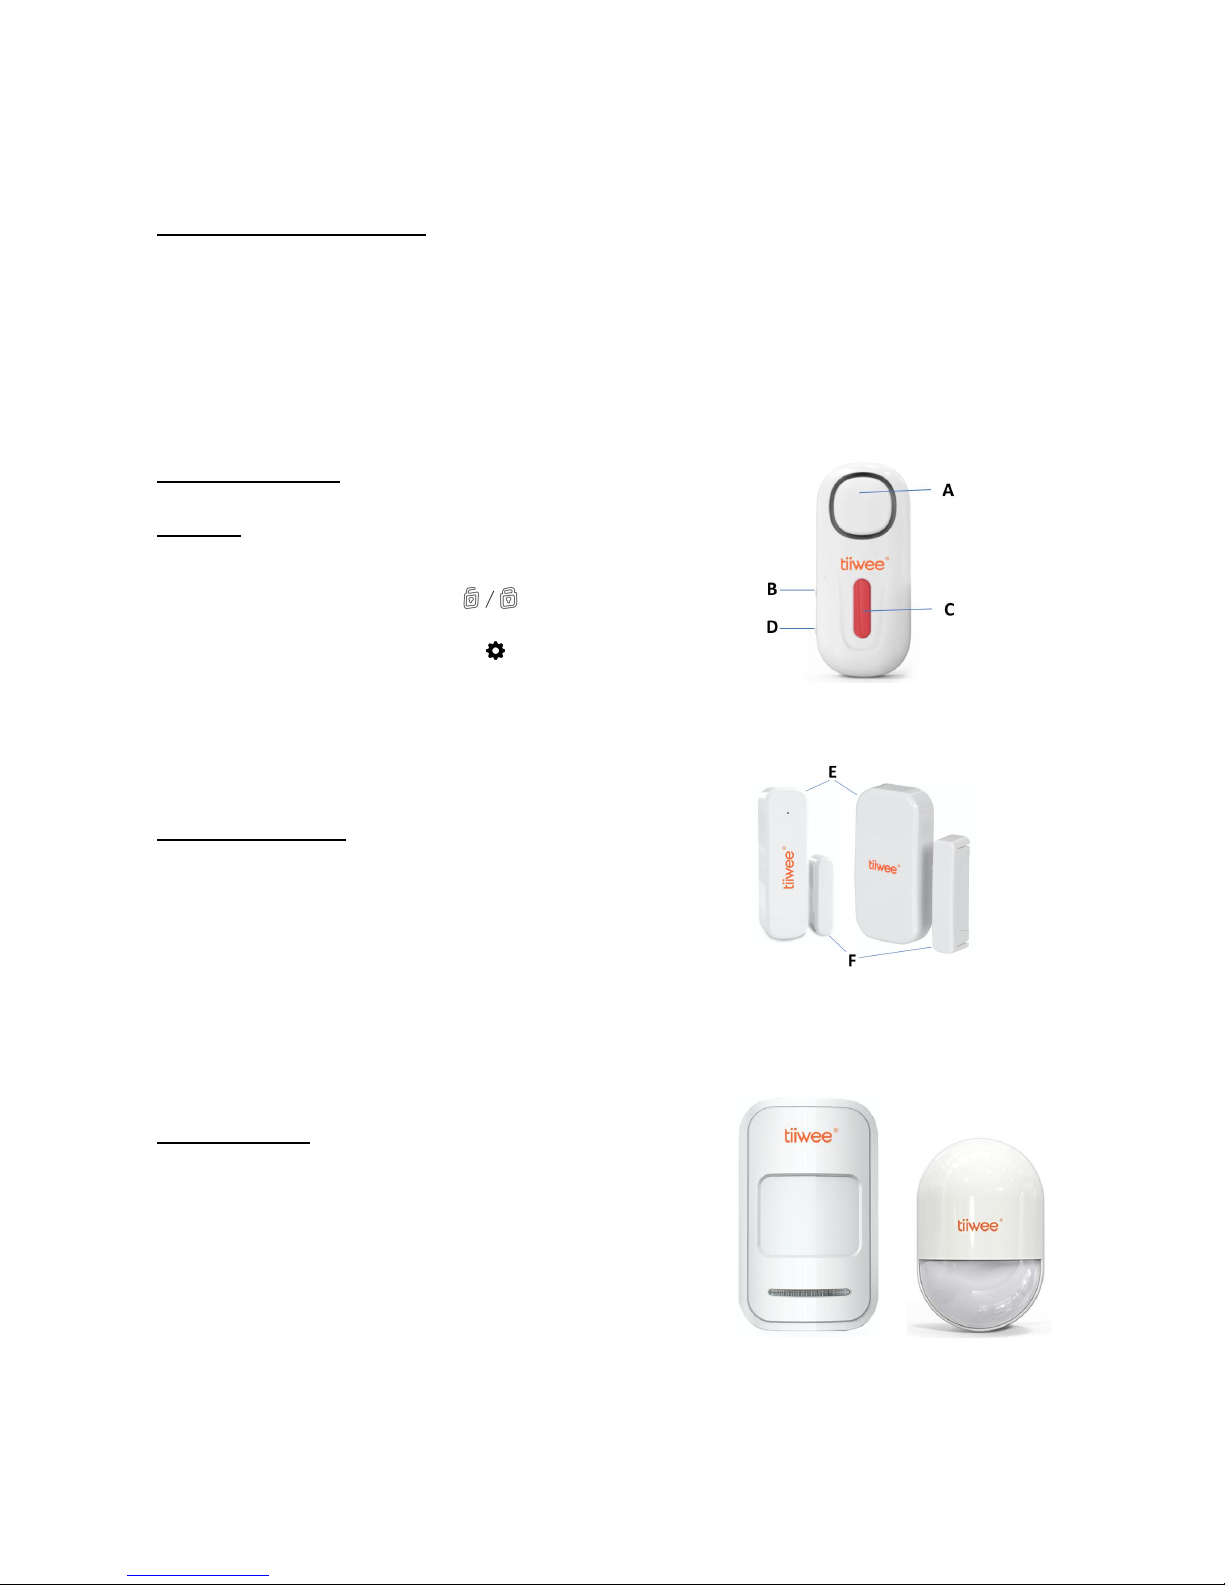
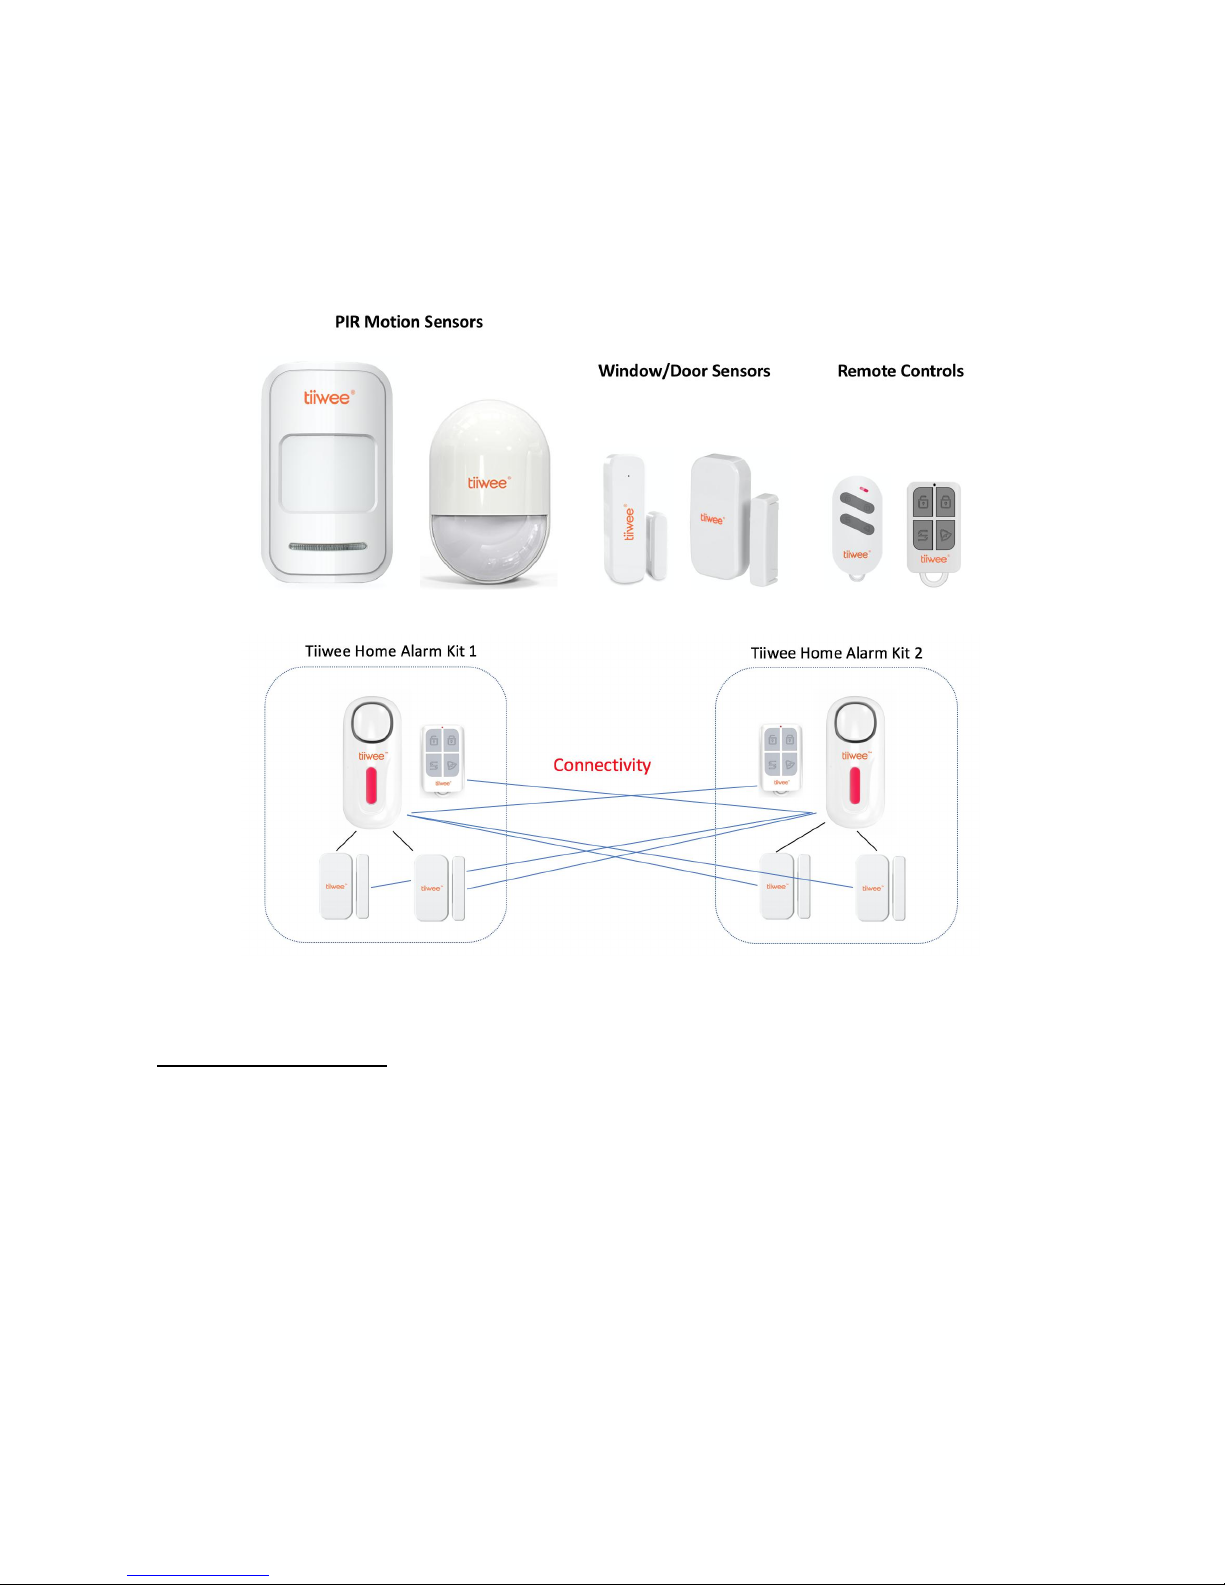
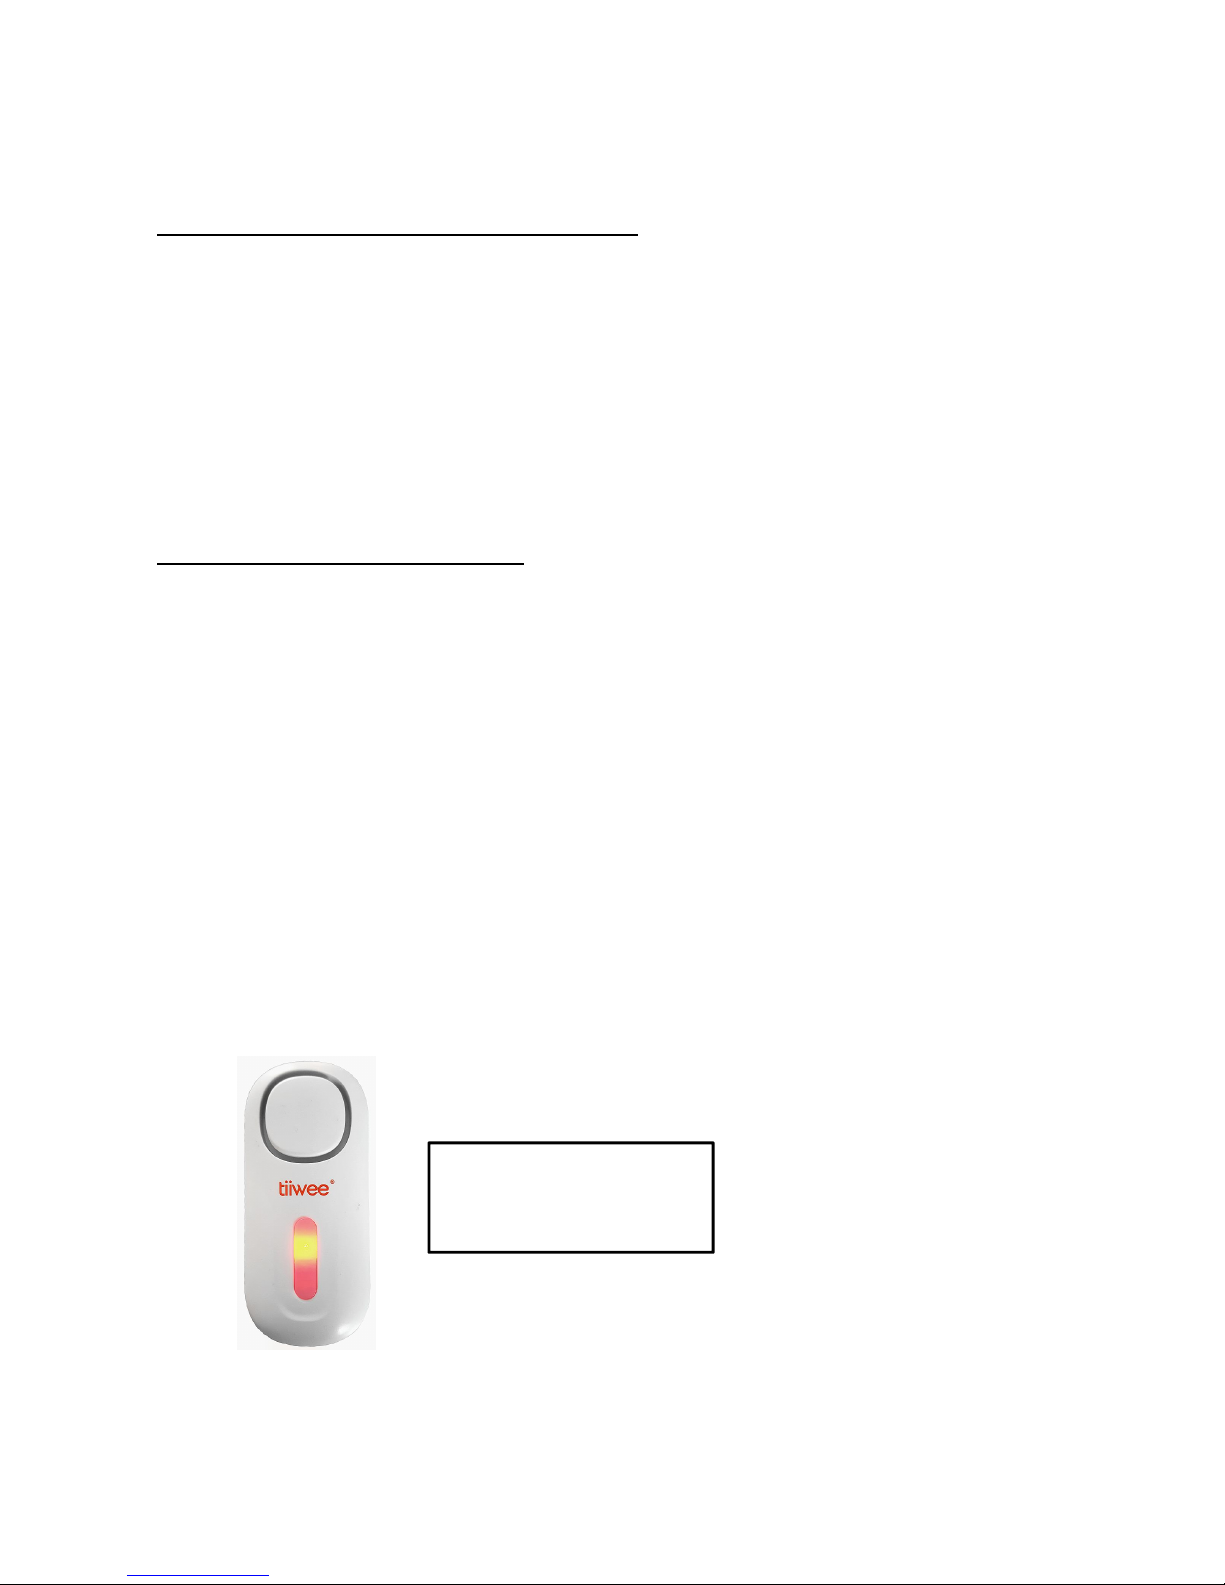
Product Overview
Alarm unit
A. Siren
B. SET button [ ]
C. Visual Indicator for 4 different zones
D. On/Off Button [ ]
Door & window Sensors
E. Sensor
F. Magnet
PIR Motion Sensors
5
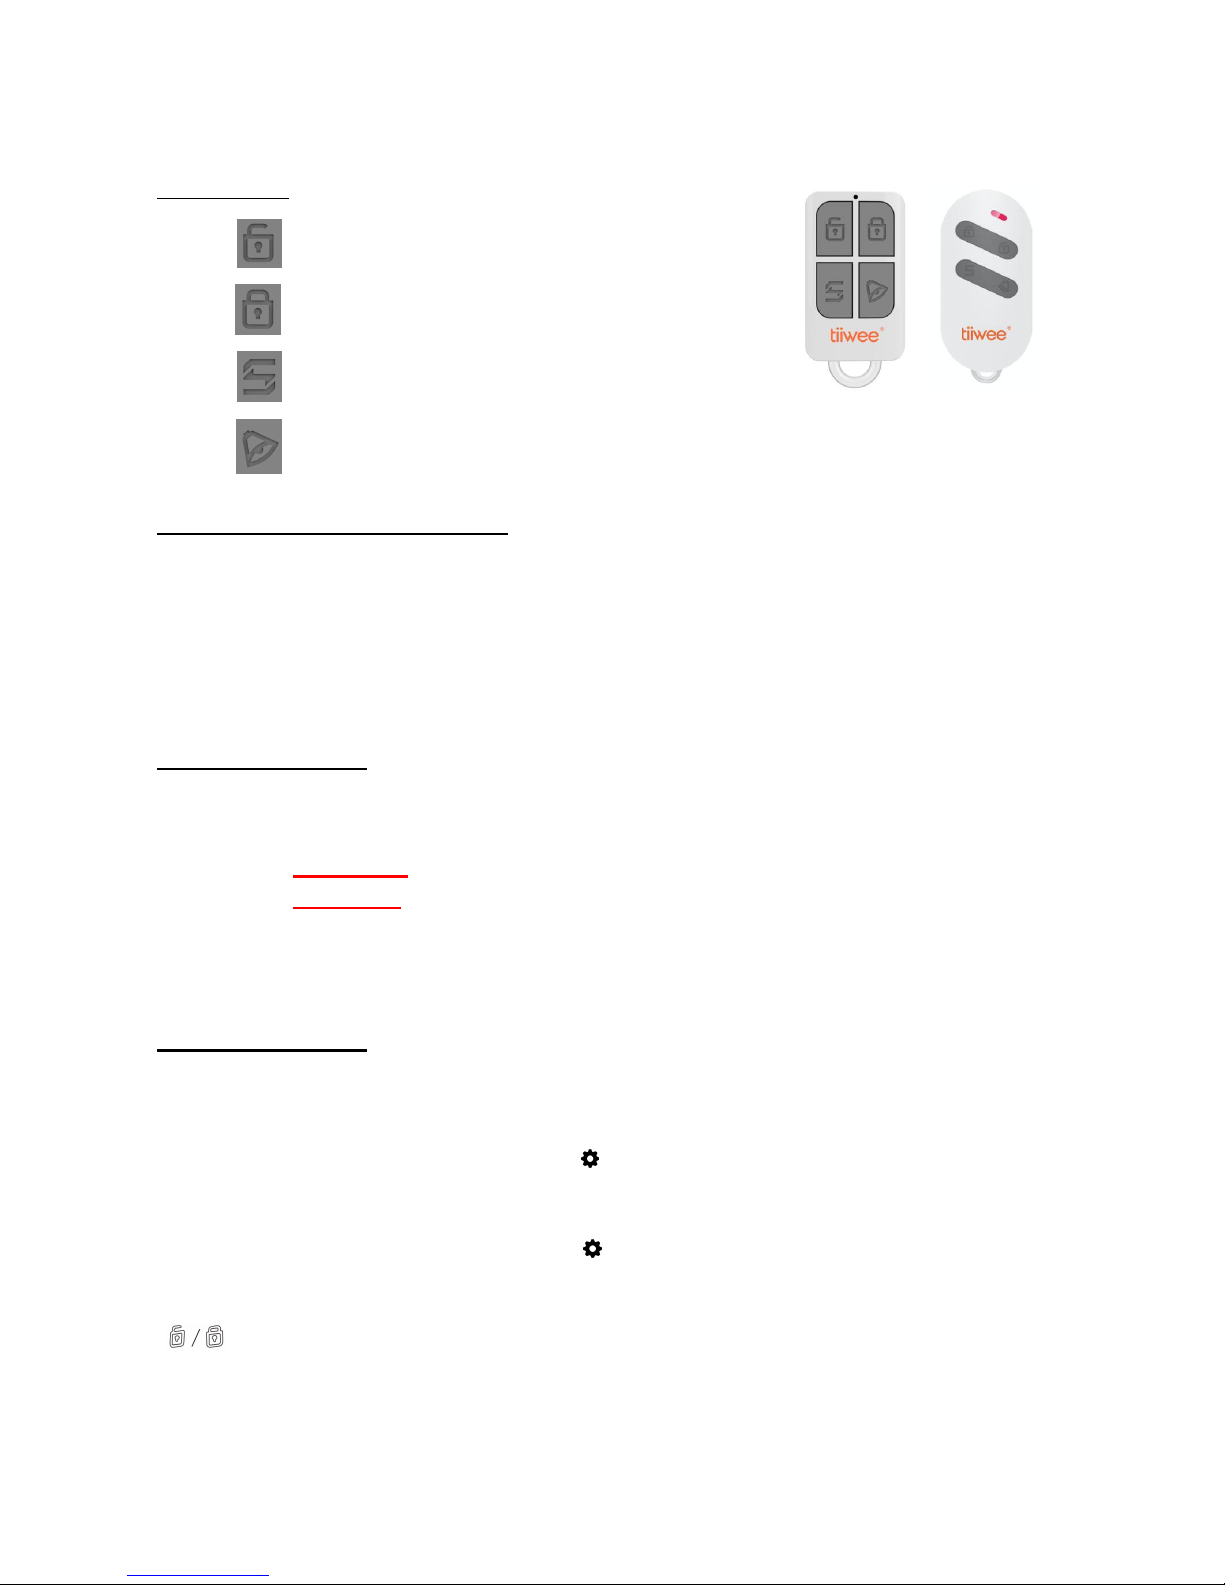
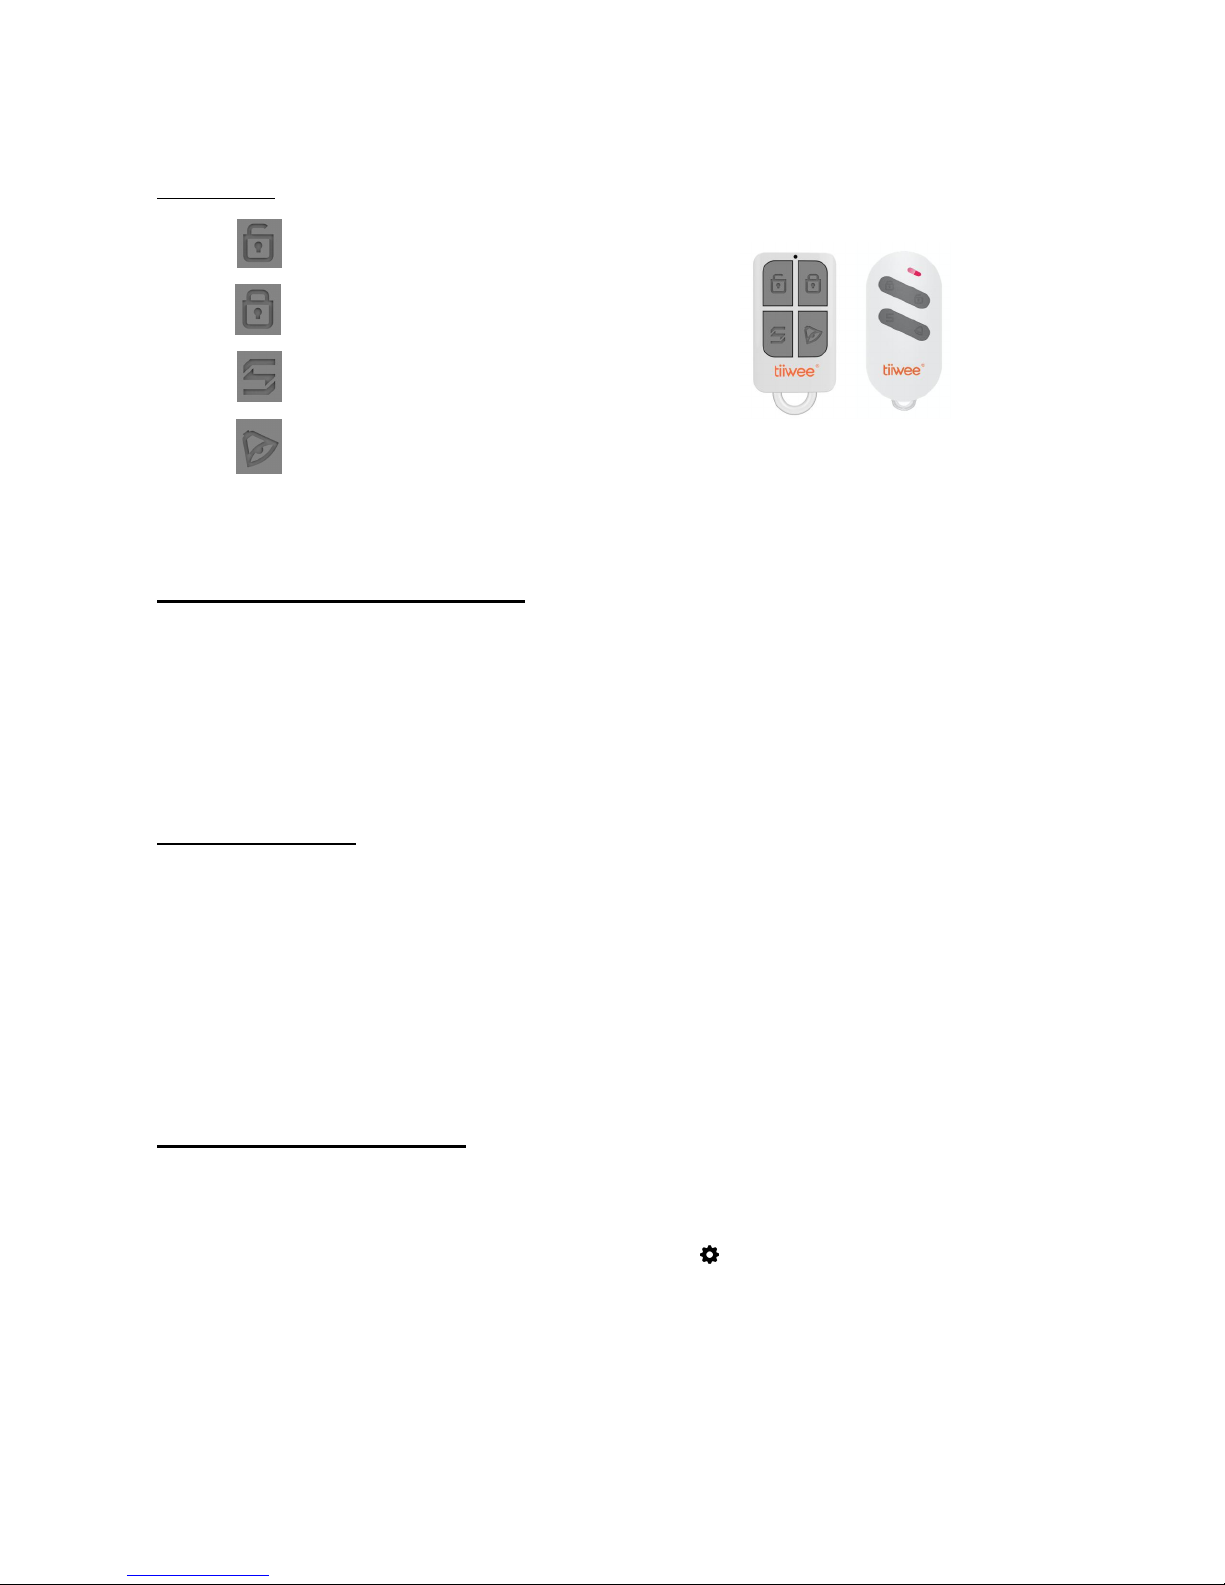
Remote Controls
Disarm: deactivate the Alarm unit
Arm button: activate the Alarm unit
Switch Voice: Switch from Chime to Siren and vice versa
Bell button: triggers a loud emergency alarm
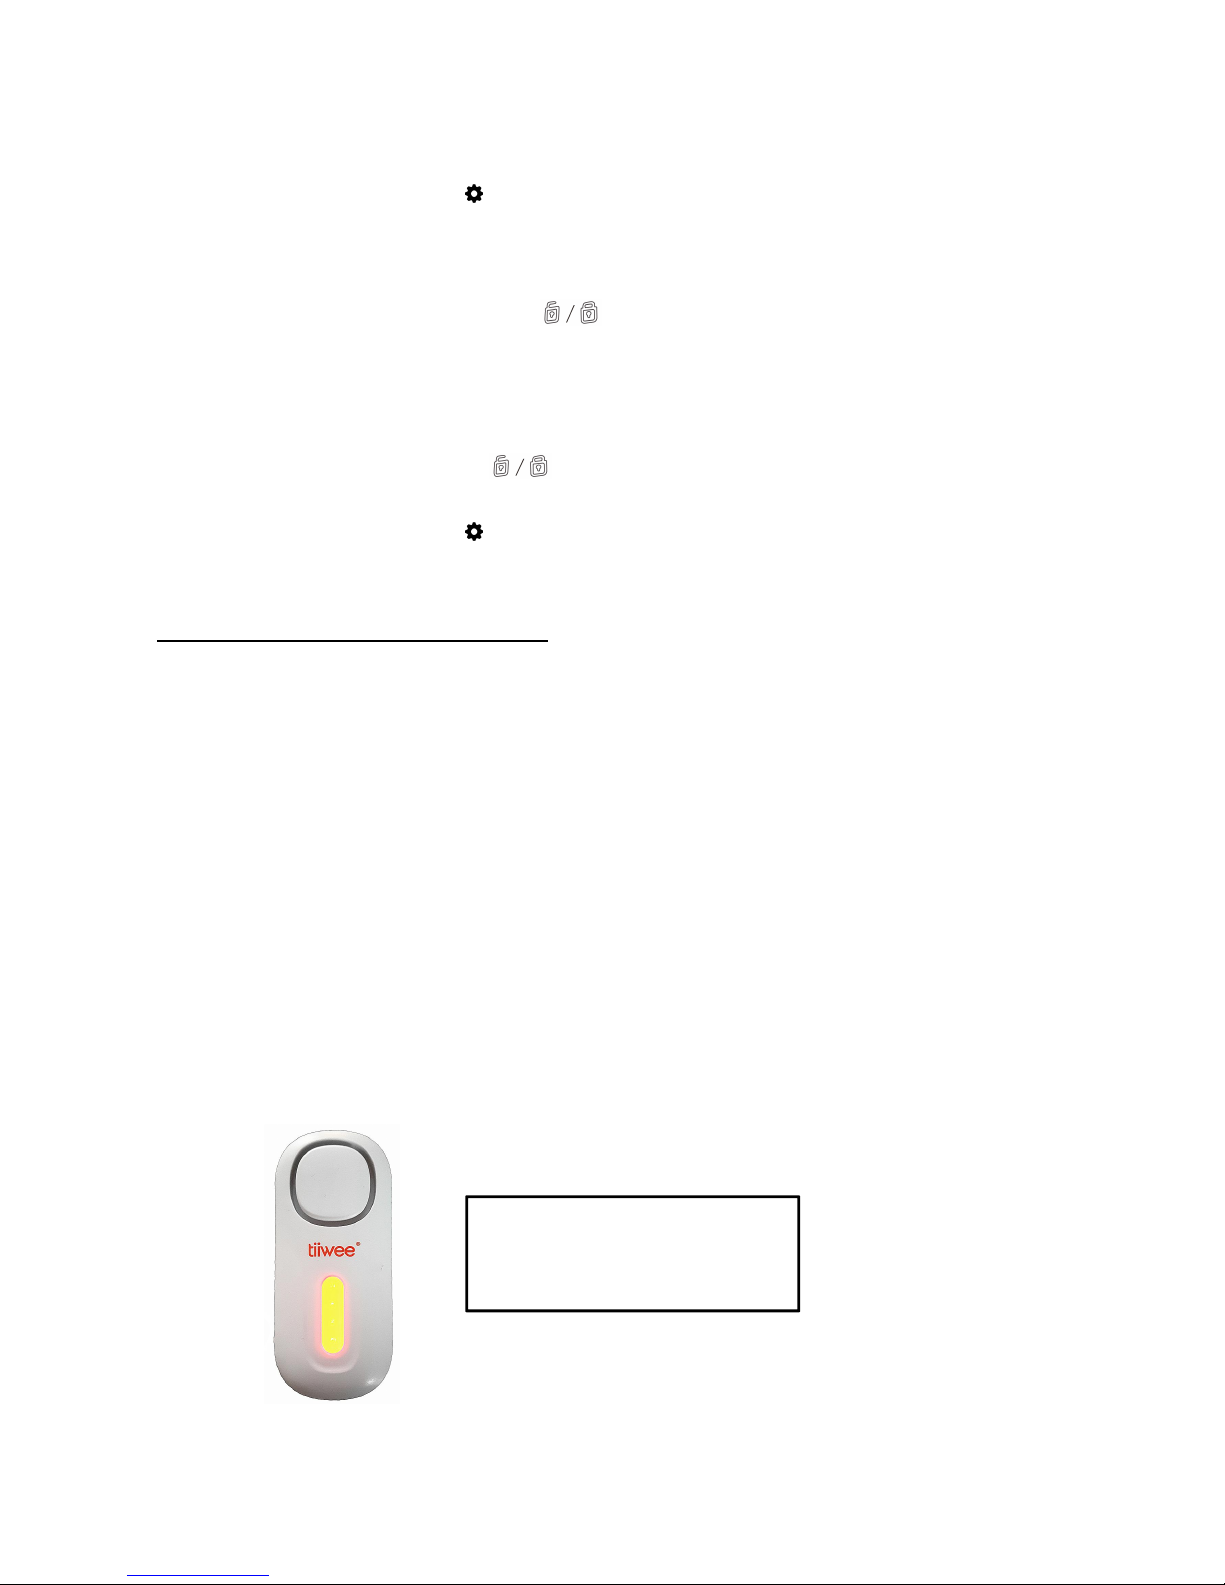
First preparation of the Alarm unit
Open the battery compartment of the A1 Siren and remove the protective slip. You
will hear a beep and the indicator light on the Alarm unit will light up from top to
bottom. Your Alarm unit is now active.
Insert one 12V, 23A battery in each Door sensor.
Please note the correct orientation of the batteries (+ /-).
Pressing the buttons
IMPORTANT: There are 2 ways to press the buttons on your Alarm unit:
Short press: press the button for 1 second or less.
Long press: keep the button pressed for 5 seconds.
Usually, the long press of 5 seconds is used to enter a programming or pairing mode. This
procedure prevents that important settings are changed accidentally.
Using the Alarm unit
The alarm unit can be operated both through the remote control as well as by pressing the
buttons on the side.
Switch On: Long press the On/Off Button [ ] to switch the unit on. The lights on the front
will light up one by one from top to bottom when the unit is switched on and a beep will
be heard.
Switch Off: Long press the On/Off Button [ ] to switch the unit off. The lights on the front
will dim one by one from bottom to top when switching off. A beep will be heard.
Arm/Disarm: Make sure the Alarm unit is switched On. Now, short press the SET button
[ ] once. A beep will be heard and the visual indicator will light up once when the
unit is armed, and 2 beeps will be heard and the visual indicator will light up twice if the
unit is disarmed.
6
IMPORTANT: Your Alarm unit is equipped with a memory function. This means that the
Alarm unit will always resume with its last settings when switched On. If it was armed
when it was switched off, it will be armed when it is switched On again. However, if it was
disarmed when it was switched Off, it will be disarmed when switched On again. In this
case, to arm the Alarm unit just short press the SET button [ ] .
Change the sound: Make sure the Alarm unit is switched On. Change the sound by short
pressing the On/Off Button [ ] . A short confirmation sound will be heard if the sound is
changed.
Pairing sensors to the Alarm Unit: Please refer to the respective chapter on pairing
sensors.
Using the remote control
The supplied remote control will work with multiple Alarm units if required.
There are four buttons on the remote control:
Button Action What happens if pressed
Disarm button
Switch Off Alarm unit is deactivated
Arm button
Switch On Alarm unit is activated
Switch Voice
Change siren type Siren changes from chime to
alarm sound or vice versa
Bell Button Alarm will sound Siren sounds loud. Press
Disarm button to stop.
Pairing with sensors and remote control
The Alarm unit is already paired with the remote control and the sensors. Use this
procedure to connect more door & window sensors or PIR motion sensors from the Tiiwee
Home Alarm System.
IMPORTANT: The A1 Alarm Unit has a separate mode for pairing of remote controls and
another mode for pairing of sensors. The mode for pairing of remote controls is active
when all 4 LEDs are lit. The mode for pairing of sensors is active when just one LED is lit.

7
Pairing with additional sensors
IMPORTANT: In the procedure below, you will need to activate sensors to pair them with
the Alarm unit. A door sensor can be activated by keeping the sensor and magnet against
each other and then move them away from each other. A PIR sensor can be activated by
waving your hand in front of it.
IMPORTANT: Do not pair sensors when all 4 LEDs are lit. When you want to pair a sensor
and you have entered pairing mode by long pressing the SET button and all 4 LEDs are lit,
you should short press the SET button again to select one of the 4 zones. For instance, if
you want to pair a sensor to zone 3, short press the SET button another three times after
you entered pairing mode.
The image below shows an example for zone 2.
Entering pairing mode
Make sure the Alarm unit is On. If this is not the case, long press the On/Off Button
[ ].
Long press the SET button [ ] on the Alarm unit to enter pairing mode. The four
lights on the front will light up.
Setup Zone 1
Now short press the SET button [ ] once to select Zone 1. The first upper light
is now lit.
Activate the respective unit (door sensor or PIR) which corresponds to Zone 1. Two
beeps will be heard. The sensor for Zone 1 is now properly connected. Other sensors
can be connected for this zone by activating it at this stage.
This A1 Alarm is ready
for pairing sensors in
zone 2
8
Press the On/Off Button [ ] to exit the pairing mode OR pair another sensor for the
next zone:
Setup Zones 2-4
Now short press the SET button [ ] again to select the next zone. The second
upper light is now lit.
Activate the respective units (door sensor or PIR) which correspond to Zone 2. Two
beeps will be heard. The sensor for Zone 2 is now properly connected. Other sensors
can be connected for this zone by activating it at this stage.
Short press the SET button [ ] to select Zone 3 or Zone 4 and do as described to
add further sensors
Press the On/Off Button [ ] to exit the pairing mode.
Pairing with additional remote control
Your remote control is ready for use and already paired with your Alarm unit but you can
add more remote controls if desired.
IMPORTANT: Connection mode for remote controls is activated by once long pressing the
SET button. All 4 LEDs will now be lit.
IMPORTANT: If just one LED is lit at this stage, you probably have pressed the SET button
again after Long pressing the SET button. This means that the A1 is in the pairing mode for
sensors and the remote control will be paired incorrectly. If this is the case, exit the
pairing-mode by pressing the On/Off button shortly. Now, long press the SET button once
to enter pairing-mode for remote controls.
The image below shows the correct stage when remote controls can be paired:
All 4 LEDs are lit and the A1
alarm unit is now ready for
pairing remote controls.
9
1. Enter the pairing mode by long pressing the SET button [ ]. All 4 LEDs are now
lit.
2. Press the arm or disarm button on your remote once. Two beeps will be heard as a
confirmation.
3. Press the On/Off Button [ ] on the Alarm unit to exit the pairing mode
Your remote control is now paired. Multiple remotes can be connected to any Alarm unit.
Also, the remote control can be linked to multiple Alarm units using the method described.
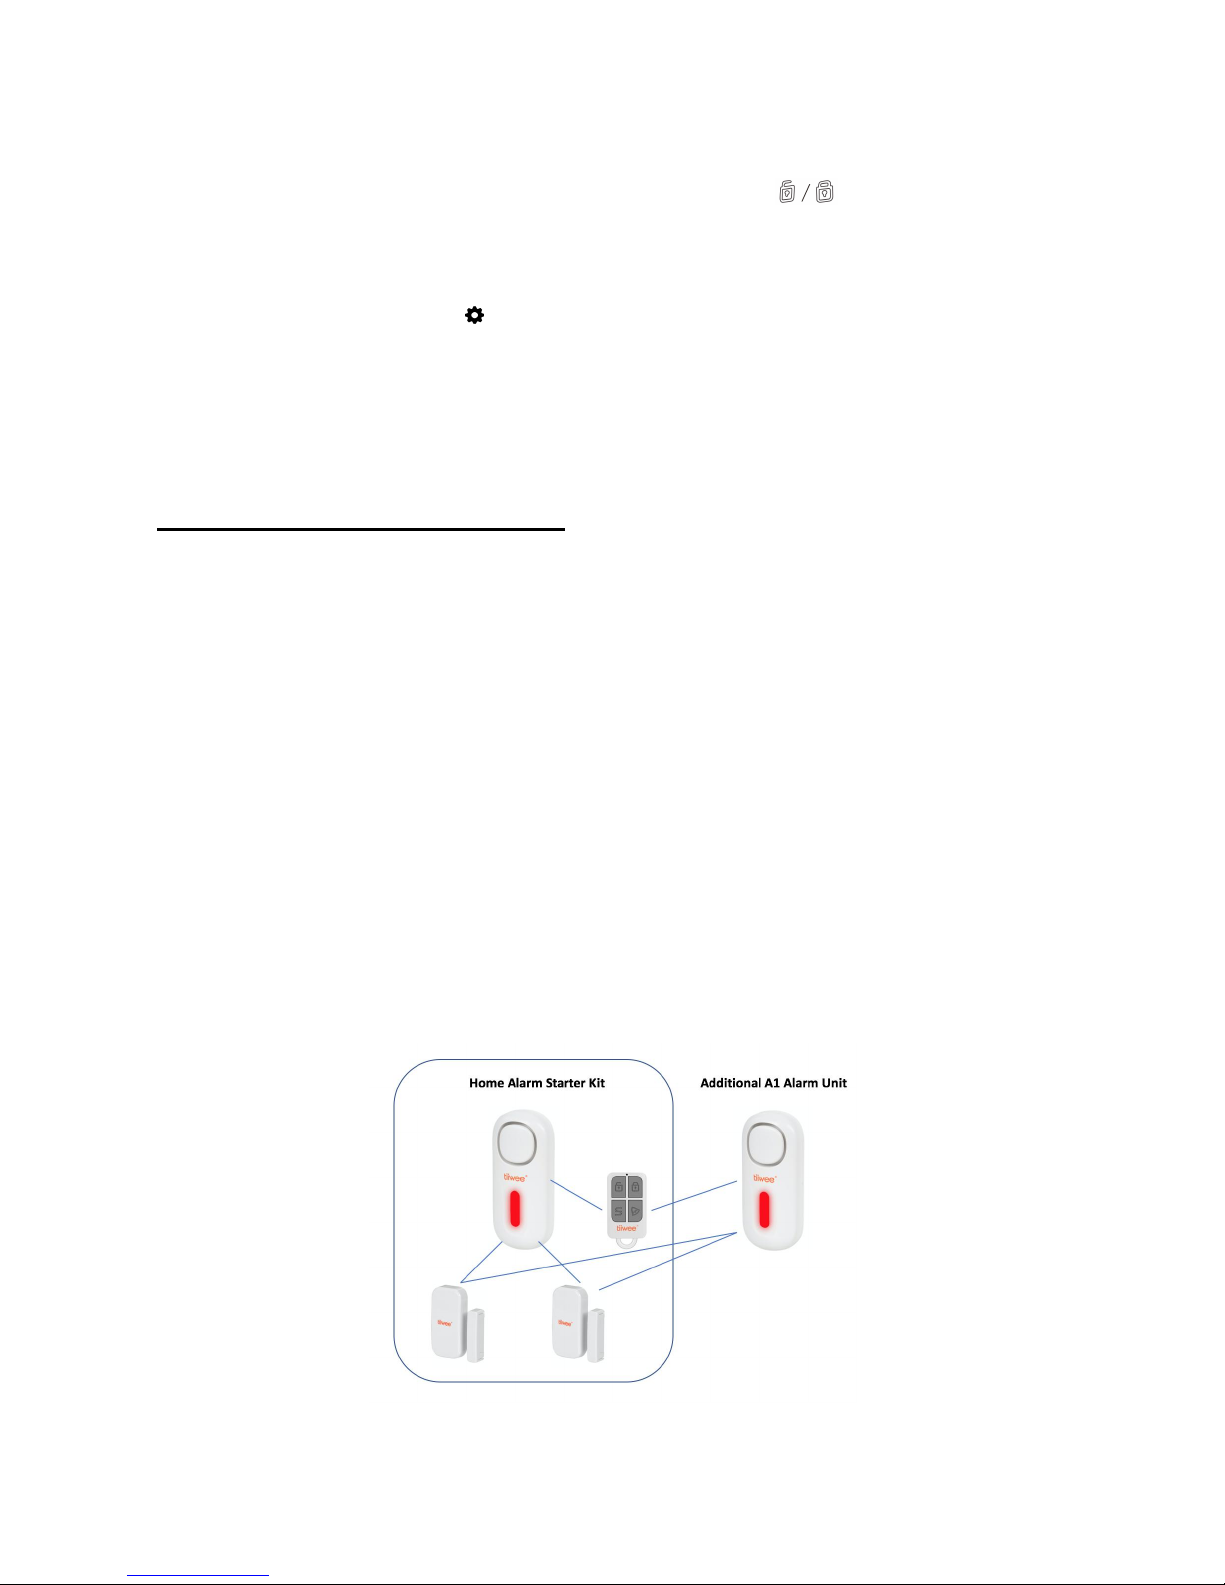
How to add an additional A1 Alarm Unit
Sometimes a second or third siren might be needed in your home. In those cases, an
additional A1 Alarm siren can easily be added to your existing A1 Alarm system.
IMPORTANT: A1 Alarm Units cannot be directly paired to each other. A1 Alarm units are
receivers and do not transmit any signals. They receive their signals from the sensors of
the tiiwee Home Alarm system but not from other A1 Alarm units.
IMPORTANT: Adding an A1 Alarm Unit means that all your existing window & door
sensors, PIR motion sensors and remote controls need to be directly paired to the new
A1 Alarm unit. Luckily, this is a very simple procedure.
Please visit the sections "Pairing with additional sensors" and "Pairing with additional
remote controls" and proceed as described there.
After all sensors have been paired successfully to the new A1 Alarm Unit, both your A1
Alarm Units will sound when a sensor triggers a signal.

10
Unpairing remote controls and sensors with the Alarm unit
Zones can be reset individually. Doing so allows you to disconnect the sensors for just that
zone. The Alarm unit can also be disconnected from all remote controls (if you are using
more than one).
IMPORTANT: If more than one remote control is used with the Alarm unit: Please be
aware that there is no option to disconnect just one remote control. With this procedure,
all remote controls are unpaired. Please make sure to again pair the remote controls you
wish to continue to use after you unpaired them.
Deleting the remote control
1. Enter pairing mode by long pressing the SET button [ ] when the Alarm unit is
on. All four lights are now on.
2. Now, again long press the SET button [ ]. 5 Beeps will be heard, and the light
will flash. All remote controls have now been disconnected from your Alarm unit.
Deleting the sensors for one zone
1. Enter pairing mode by long pressing the SET button [ ] when the Alarm unit is
on. All four lights are now on.
2. Now, again short press the SET button [ ] one- or multiple times to select the
zone you’d like to reset. The respective light on the visual indicator will light up.
3. Now, again long press the SET button [ ]. 5 Beeps will be heard, and the light
will flash. The settings for this zone have now been cleared.
Changing the batteries
Please refer to the user manual or leaflet included with the siren or sensors for specific
information regarding the battery power indication.
Adding Alarm units, remote controls and sensors
This Tiiwee alarm system is extremely versatile and flexible. Your Tiiwee Home Alarm Kit
can be extended with more sensors, A1 alarm units and remote controls. You can add
many more Tiiwee sensors to adapt it to your exact requirements. You can extend your
system with more Tiiwee Door and Window or PIR Motion sensors. Up to 10 sensors per
zone - in total 40 sensors.
Extending your Tiiwee Home Alarm System
If you want to add remote controls and sensors, please only select devices from the Tiiwee
Home Alarm System. Our range of supported products is updated regularly.
11
Only use components from the Tiiwee Home Alarm System. For advice, contact us at
info@tiiwee.com. We normally respond within 24 hours.
Low battery indication
A1 Siren: The batteries of the A1 Siren need immediate replacement when 3 beeps sound
every 20-30 seconds.
Window sensors: The LED of the window sensors shows a red blinking or continuous light
when the batteries run low. Replace the batteries immediately when this happens.
PIR Motion detectors: When the window light is lit continuously, the batteries need
immediate replacement.

12
Replacing the batteries
Remote control: The battery can be changed by removing the screw on the back of the
remote control. Remove the back panel and replace the battery. The battery type is
CR2032 (3V, Lithium battery).
A1 Alarm unit: Slide off the back panel and replace the batteries with 2x AAA size 1.5V
Alkaline batteries.
Door sensor: Remove the back panel by sliding it off and replace the battery with a new
one. The battery type is an alkaline 23A, 12V.
PIR Motion detectors: Slide off the backpanels and replace the batteries with 2 x AAA or 3
x AAA batteries depending on the model you use.
Setting the A1 alarm unit back to factory settings
Sometimes, it might be necessary to reset the A1 alarm unit to factory settings when:
a remote control was accidentally paired when a zone was selected during the pairing
process and now the A1 treats the remote control as a sensor (pressing of a button
on the remote control triggers an alarm).
other abnormal behaviour of the system (in this case often a number of buttons was
pressed in a random fashion resulting in unpredictable behaviour).
This reset is fast and simple. The procedure includes deleting sensors and remote controls
from the A1 Alarm.
IMPORTANT: Please note that the below process disconnects all sensors and remote
controls. Pair them again by following the procedures described earlier in this document
or in the user manual.

13
How to reset the A1 Alarm unit:
Deleting the remote controls:
Put the A1 alarm unit into pairing mode by long pressing the Set button (all 4 LEDs
are lit) - do NOT select a zone yet!
Long press the Set button again for about 5 seconds - 5 beeps are heard
Now, all remote controls have been removed from the unit
Deleting the sensors from all zones:
Please put the A1 alarm unit into pairing mode by long pressing the Set button (all 4
LEDs are lit)
Now you MUST select zone 1 by short pressing the Set button again
The first LED on the top is now lit
Long press the Set button again for about 5 seconds - 5 beeps are heard
Now all sensors have been removed from zone 1
IMPORTANT: Please proceed in the same way for all remaining zones (zone 2 - 4)
Now, all sensors have been removed from the system
You can now pair all sensors and remote controls again.

14
DEUTSCH
Tiiwee Home Alarm System Handbuch
WICHTIG: Weitere Informationen und technische Unterstützung finden Sie auch unter
www.tiiwee.com. Kontaktieren Sie uns unter info@tiiwee.com.
Wichtig: Erweitern Sie Ihr Tiiwee Home Alarm Kit: Wählen Sie nur Geräte aus dem Tiiwee
Home Alarm System aus. Andere Geräte sind nicht kompatibel.
Einleitung
Herzlichen Glückwunsch zu Ihrem neuen Tiiwee Home Alarm Kit. Das Tiiwee Home Alarm
Kit ist ein vielseitiges Alarmsystem, mit dessen Hilfe Sie erkennen können, ob Menschen
oder Tiere in Ihr Haus oder Ihren Laden eindringen. Es erlaubt Ihnen, mehrere Sensoren
mit einer oder mehreren Alarmeinheiten in bis zu 4 verschiedenen Zonen zu verwenden.
Diese Sensoren (PIR-Bewegungsmelder, Fenster/Tür-Sensoren) sind drahtlos mit einer
oder mehreren Alarmeinheiten ("A1") verbunden. Diese Alarmanlage hat wahlweise einen
Ankündigungston oder eine laute Sirene. Die Alarmeinheit kann an einer Position fixiert
oder mitgenommen werden, wenn Sie sich im Haus bewegen oder schlafen gehen.
Jeder der 4 Zonen können maximal 10 Sensoren zugeordnet werden, wobei maximal 40
Sensoren pro Alarmeinheit verbunden werden können. Jeder Sensor kann bei Bedarf mit
mehreren Alarmeinheiten gekoppelt werden. Außerdem können bis zu 20 Fernbedienungen mit jeder Alarmeinheit gekoppelt werden, damit Sie jedes Ihrer Familienmitglieder
mit einer Fernbedienung ausstatten können.
Bestimmungsgemäßer Gebrauch
Das Tiiwee Home Alarm System wurde in erster Linie entwickelt, um einen lauten
Sirenenalarm zu erzeugen, wenn ein Einbrecher versucht, in Ihr Haus einzudringen. Die
Basis des Systems ist die A1 Sirene. Platzieren Sie die Sirene in Ihrem Haus an der Stelle,
wo Einbrecher am ehesten eindringen können. Wenn Sie ein größeres Haus haben, ziehen
Sie bitte in Betracht, zusätzliche Sirenen aus dem Tiiwee Home Alarm System an anderen
gefährdeten Stellen anzubringen. Wir empfehlen, die Sirene an einem Ort zu platzieren, an
dem sie nicht leicht erreichbar ist.
Ihr System ist vorkonfiguriert und die Sensoren und Fernbedienungen sind mit der A1
Sirene verbunden. Das System ist damit einsatzbereit. Wir empfehlen Ihnen, diese
Bedienungsanleitung sorgfältig zu lesen und sich mit dem grundlegenden Funktionsprinzip
vertraut zu machen und die Feinabstimmung auf Ihre genauen Sicherheitsbedürfnisse
vorzunehmen.

15
Was ist enthalten?
Es gibt 3 Versionen von Tiiwee Home Alarm Kits mit folgendem Inhalt.
Tiiwee Home Alarm Starter Kit
Benutzerhandbuch
1 x A1 Sirene inklusive 2 AAA Batterien
2 x Fenstersensoren, jeweils mit 12V, 23A Batterie, Klebepads und Schrauben
1 x Fernbedienung inkl. einer CR2032-Batterie
Tiiwee Home Alarm Kit XL
Benutzerhandbuch
1 x A1 Sirene inklusive 2 AAA Batterien
4 x Fenstersensoren, jeweils mit 12V, 23A Batterie, Klebepads und Schrauben
2 x Fernbedienung inkl. 1 CR2032 Batterie
Tiiwee Home Alarm Kit XLPIR
Benutzerhandbuch
1 x A1 Sirene inklusive 2 AAA Batterien
2 x Fenstersensoren, jeweils mit 12V, 23A Batterie, Klebepads und Schrauben
2 x Fernbedienung inkl. je 1 CR2032-Batterie
1 x PIR Bewegungsmelder inkl. 3 AAA-Batterien
Vorkonfiguration von Tiiwee Home Alarm Kits
Ihr System ist einsatzbereit. Die Fenstersensoren sind mit der Zone 1 gekoppelt. Wenn Ihr
Kit einen PIR-Bewegungsmelder enthält, ist dieser in Zone 2 gekoppelt.
Funktionsprinzip
Das Tiiwee Home Alarm System basiert auf der 433MHz Technologie. Sensoren senden ein
drahtloses 433MHz Signal, wenn sie ausgelöst werden. Die A1 Sireneneinheit ist ein
Empfänger für diese 433MHz Signale und gibt einen Ton ab, wenn ein Signal empfangen
wird.
Sirene: Die A1 Sirene erzeugt je nach Einstellung entweder einen Signalton oder einen
Alarmton. Sensoren können mit jeder der 4 Zonen gekoppelt werden. So können Sie das
System perfekt an Ihre Wohnsituation anpassen.
Sensoren allgemein: Jeder Sensor überträgt ein 433MHz Signal, das aus einer bestimmten
Kombination von digitalen 0- und 1 Bits besteht. Das ist die Signatur dieses einzigartigen
Sensors. Die Sirene erkennt Sensoren an ihrer Signatur.

16
Tür- und Fenstersensoren: Diese Sensoren bestehen aus 2 Teilen. Ein kleiner Magnet und
ein Sensor. Wenn der Magnet vom Sensor wegbewegt wird, wird ein 433MHz Signal
übertragen. Die Sirene erzeugt nun den Alarm bzw. den Signalton.
PIR-Bewegungsmelder: Der Bewegungsmelder erfasst infrarotes Licht, das von Menschen
und Tieren emittiert wird. Infrarotlicht ist für den Menschen nicht sichtbar. Der PIRBewegungsmelder ist jedoch mit einem elektronischen Infrarotsensor ausgestattet, der
das Infrarotlicht detektiert. Wenn sich das Infrarotlicht ändert, wendet der PIRBewegungsmelder spezielle algorithmische Berechnungen an, um festzustellen, ob die
Änderung des Infrarotlichts ein Hinweis auf einen Menschen ist. Wenn ja, wird ein 433MHz
Signal aussendet, das von der Sirene empfangen wird.
Produkt Übersicht
Alarmeinheit
A. Sirene
B. Einstellknopf [ ]
C. Kontrolllicht der 4 Zonen
D. Ein/Aus Knopf [ ]
Door & window Sensors
E. Sensor
F. Magnet
PIR Motion Sensors
17
Fernbedienung
Unscharfschalten
Scharfschalten
Umschalten zw. Signalton und Sirene
Notfallknopf - es wird sofort ein Alarm ausgelöst
Erste Vorbereitung der Alarmanlage
Öffnen Sie das Batteriefach der A1 Sirene und entfernen Sie die den Plastikstreifen,
der die Batterien vor Entladung schützt. Sie hören einen Piepton und das Kontrolllicht
der Alarmeinheit leuchtet von oben nach unten auf. Ihr Alarmgerät ist nun aktiv.
Legen Sie eine 12V, 23A Batterie in jeden Türsensor ein.
Bitte beachten Sie die korrekte Ausrichtung der Batterien (+ /-).
Drücken der Tasten
WICHTIG: Es gibt 2 Möglichkeiten, die Tasten an der Alarmeinheit zu drücken:
Kurzer Druck: Drücken Sie die Taste für 1 Sekunde oder weniger.
Langer Druck: Halten Sie die Taste 5 Sekunden lang gedrückt.
Normalerweise wird der lange Druck von 5 Sekunden verwendet, um in einen
Programmier- oder Pairing-Modus zu gelangen. Diese Vorgehensweise verhindert, dass
wichtige Einstellungen versehentlich geändert werden.
Verwendung der Alarmeinheit
Die Alarmeinheit kann sowohl über die Fernbedienung als auch über die seitlichen Tasten
bedient werden.
Einschalten: Durch langes Drücken der Ein/Aus-Taste [ ] wird das Gerät eingeschaltet. Die
Lichter auf der Vorderseite leuchten nacheinander von oben nach unten, wenn das Gerät
eingeschaltet wird und ein Piepton ertönt.

18
Ausschalten: Durch langes Drücken der Ein/Aus-Taste [ ] wird das Gerät ausgeschaltet.
Die Leuchten auf der Vorderseite dimmen beim Ausschalten nacheinander von unten nach
oben. Es ertönt ein Piepton.
Scharfschalten/Unscharfschalten: Vergewissern Sie sich, dass die Alarmeinheit
eingeschaltet ist. Drücken Sie nun kurz einmal den Einstellknopf [ ], um die Anlage
Scharfzuschalten. Ein Piepton ertönt und die optische Anzeige leuchtet einmal. Zum
Unscharfschalten drücken Sie erneut kurz den Einstellknopf. 2 Pieptöne ertönen und die
optische Anzeige leuchtet zweimal auf, wenn das Gerät unscharf geschaltet wird.
WICHTIG: Ihr Alarmgerät ist mit einer Memory-Funktion ausgestattet. Das bedeutet, dass
die Alarmeinheit nach dem Einschalten immer mit den zuletzt eingestellten Modus
weiterläuft. Wenn sie beim Ausschalten scharf geschaltet war, wird sie beim
Wiedereinschalten scharf geschaltet. Wurde sie jedoch vor dem Ausschalten deaktiviert, so
wird sie beim Wiedereinschalten unscharf sein. In diesem Fall drücken Sie kurz auf den
Einstellknopf, um die Alarmanlage zu aktivieren.
Ändern Sie den Ton: Vergewissern Sie sich, dass die Alarmeinheit eingeschaltet ist. Ändern
Sie den Ton durch kurzes Drücken der Ein/Aus-Taste [ ]. Ein kurzer Bestätigungston
ertönt und zeigt an, was gewählt wurde.
Verbinden von weiteren Sensoren mit der Alarmeinheit: Bitte beachten Sie das
entsprechende Kapitel über die Kopplung von Sensoren.
Verwenden der Fernbedienung
Die mitgelieferte Fernbedienung kann bei Bedarf mit mehreren Alarmgeräten verwendet
werden.
Die Fernbedienung hat 4 verschiedene Tasten:
Taste Aktion Was passiert?
Unscharfschalten
Alarm ausschalten Alarmeinheit inaktiv
Scharfschalten
Alarm aktivieren Alarmeinheit aktiv
Tonumschaltung
Tonausgabewechsel Signalton oder
Sirene
Notfallknopf Alarm wird ausgelöst Sirene startet
19
Verbinden von Sensoren und Fernbedienungen
Die Alarmeinheit ist bereits mit der Fernbedienung und den Sensoren gekoppelt.
Verwenden Sie dieses Verfahren, um weitere Tür- und Fenstersensoren, PIRBewegungsmelder oder Fernbedienungen aus dem Tiiwee Home Alarm System
anzuschließen.
WICHTIG: Die Alarmeinheit A1 verfügt über einen separaten Modus für die Paarung von
Fernbedienungen und einen weiteren Modus für die Paarung von Sensoren. Der Modus
für die Paarung von Fernbedienungen ist aktiv, wenn alle 4 LEDs leuchten. Der Modus für
die Paarung von Sensoren ist aktiv, wenn nur eine LED leuchtet.
Kopplung mit zusätzlichen Sensoren
WICHTIG: In der folgenden Prozedur müssen Sie die Sensoren aktivieren, um sie mit der
Alarmeinheit zu koppeln. Ein Türsensor kann aktiviert werden, indem man Sensor und
Magnet gegeneinander hält und sie dann voneinander wegbewegt. Ein PIR-Sensor kann
aktiviert werden, indem man die Hand davor bewegt.
WICHTIG: Sensoren nicht koppeln, wenn alle 4 LEDs leuchten. Wenn Sie einen Sensor
koppeln möchten und Sie durch langes Drücken der SET-Taste in den Verbindungsmodus
eingetreten sind und alle 4 LEDs leuchten, sollten Sie den Einstellknopf erneut kurz
drücken, um eine der 4 Zonen auszuwählen. Wenn Sie z.B. einen Sensor mit Zone 3
koppeln möchten, drücken Sie kurz den Einstellknopf dreimal, nachdem Sie in den
Verbindungsmodus gewechselt sind. Die 3. LED leuchtet nun.
Das Bild unten zeigt ein Beispiel für Zone 2.
Die A1 Alarmeinheit ist
bereit für das Verbinden
von Sensoren in Zone 2.
 Loading...