

Page 1
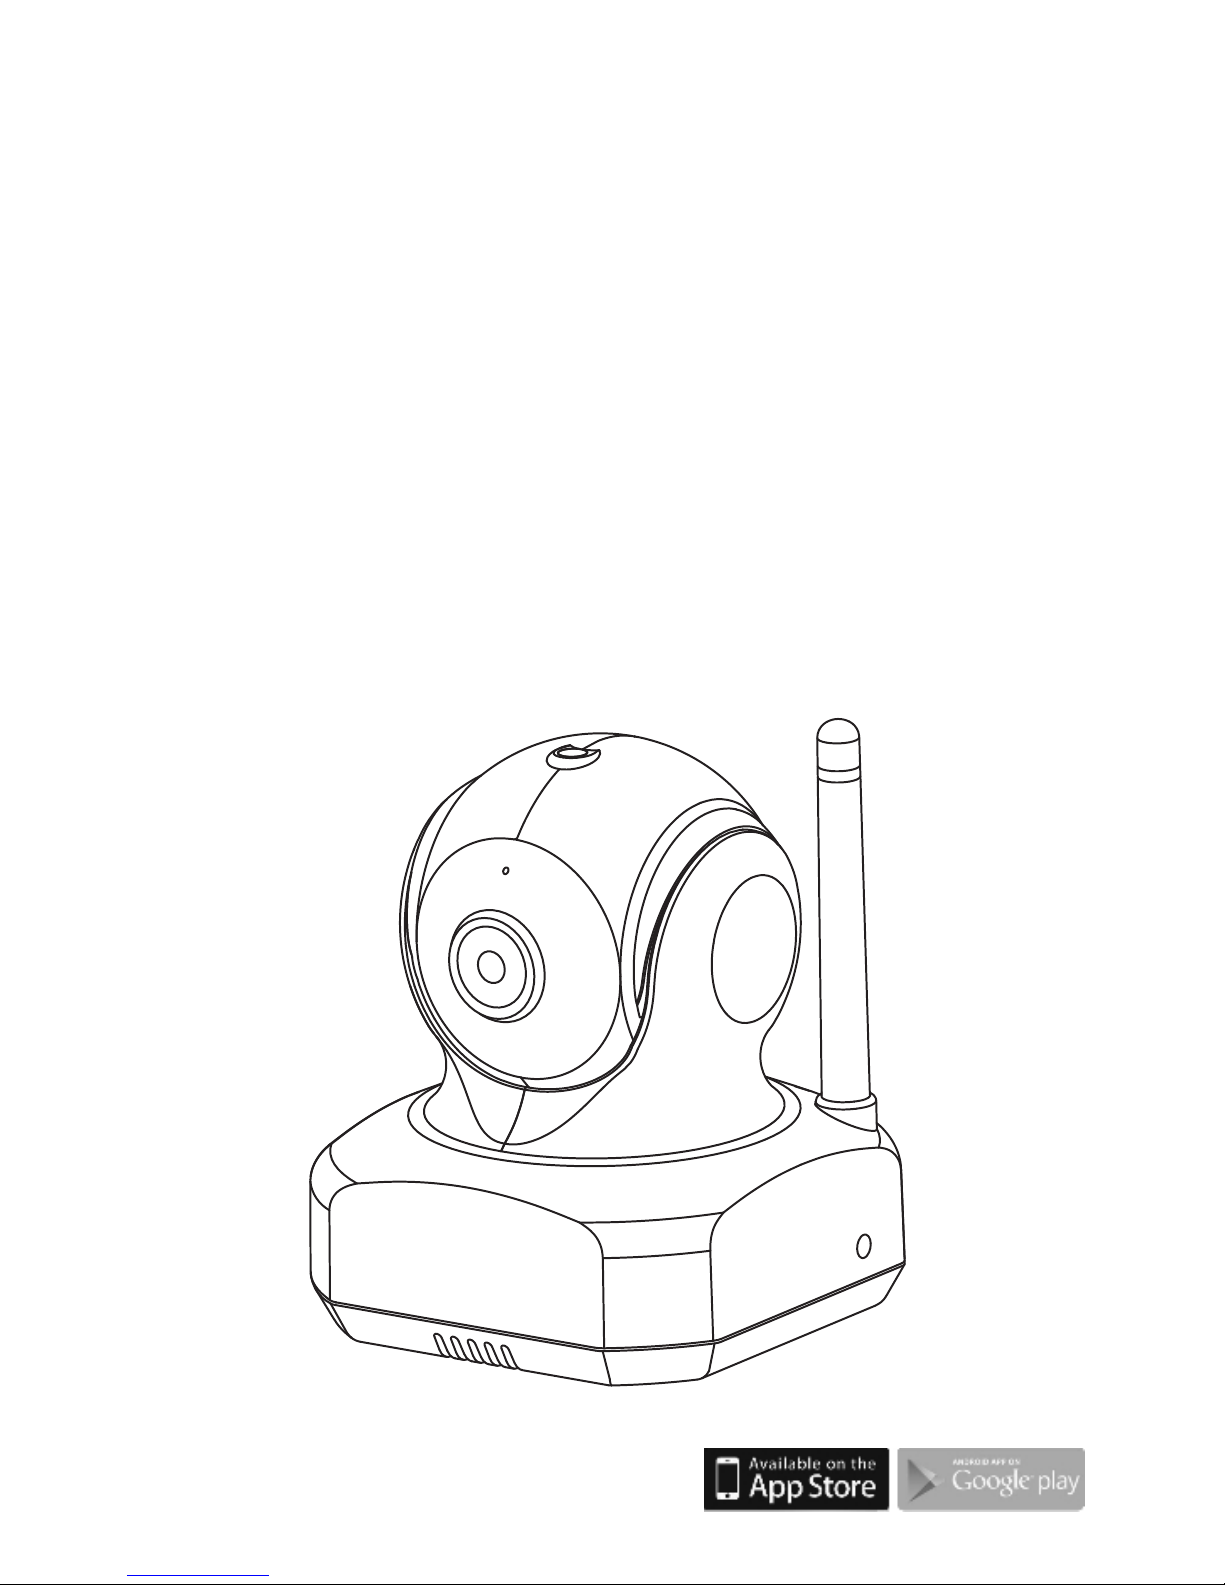
Easy iCAM
Video Surveillance Camera
Remote Wireless
User's Manual
Manuel de l'utilisateur
Manual del Usuario
Bedienungsanleitung
Manuale d'uso
Page 2
Watch your concern anytime
and anywhere
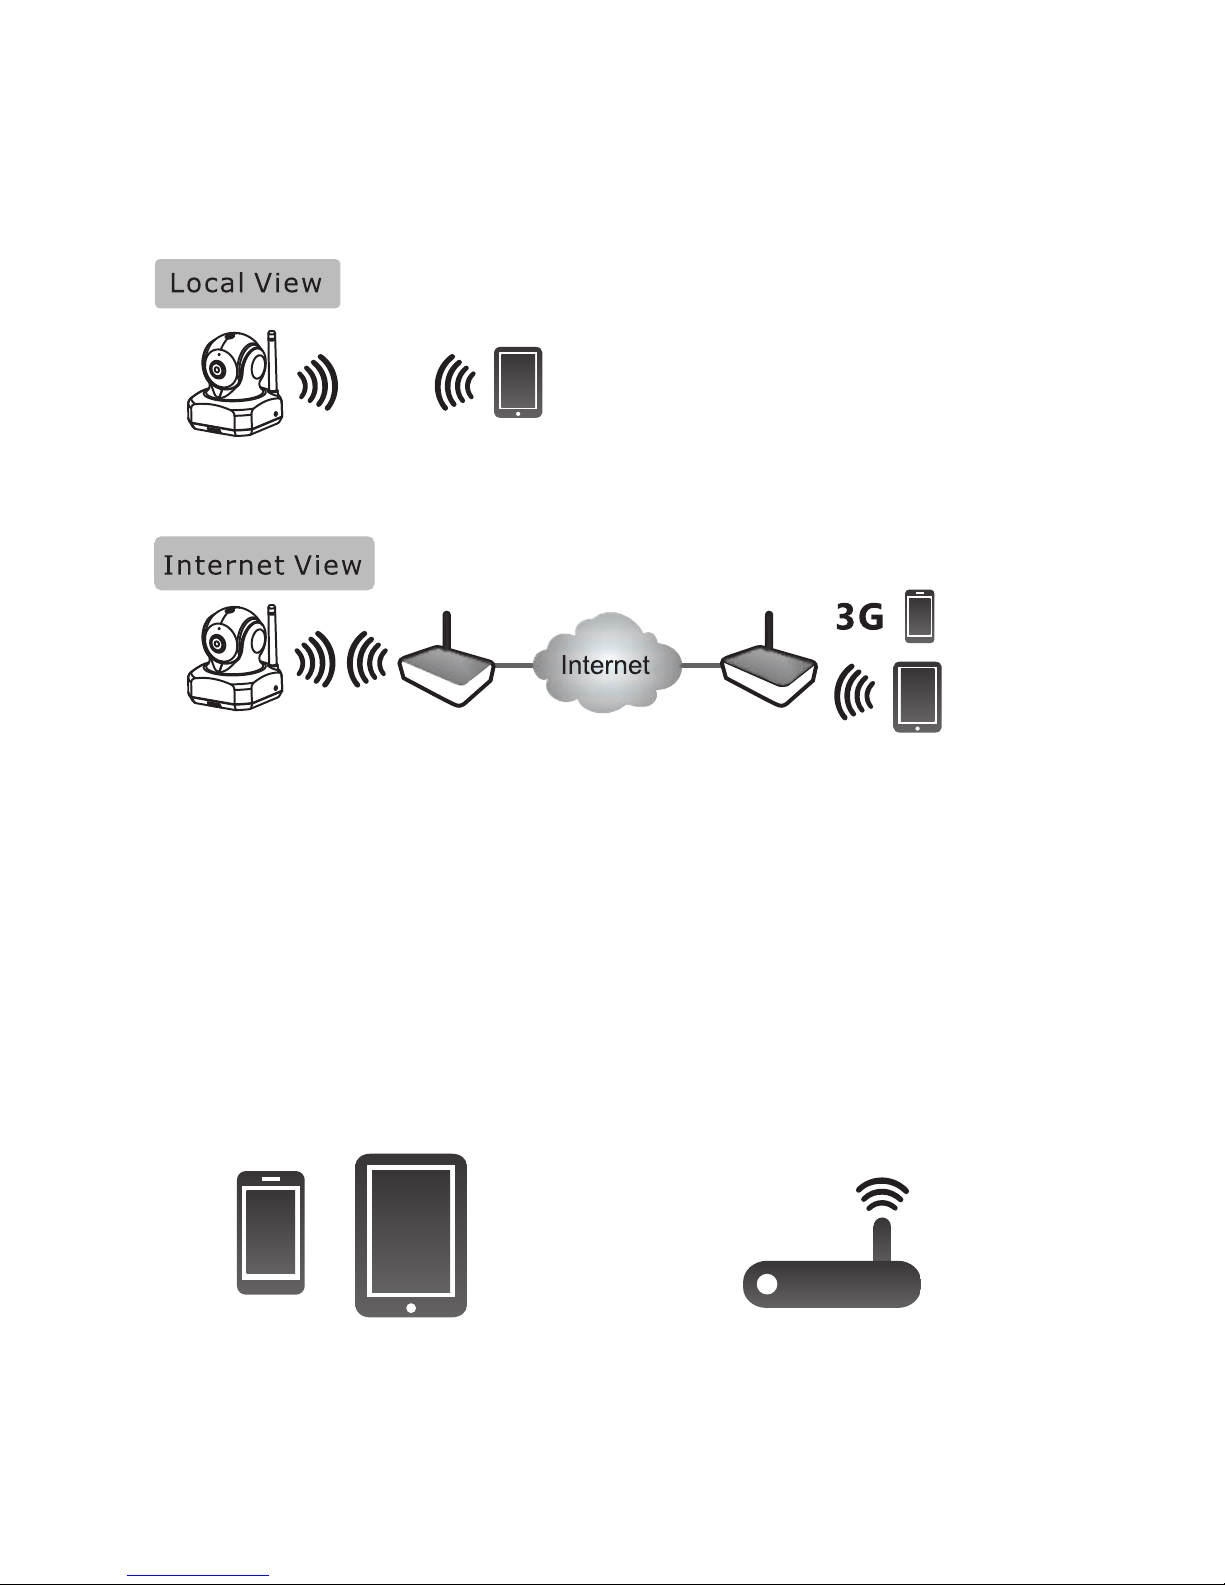
Easy iCAM is a wireless network camera. It can connect with your
smartphone or tablet by wireless technology, and monitor everything
you concern on your smartphone or tablet from anywhere and anytime.
Before you start, you need:
iPhone, iPad,
Android smartphone
or Android tablet
Wi-Fi router
Wi-Fi routerWi-Fi routerEasy iCAM
Smartphone
Tablet
Smartphone,TabletEasy iCAM
1
Page 3
2
1
2
3
4
5
6
OFF ON
800m A
6VDC
7
9
8
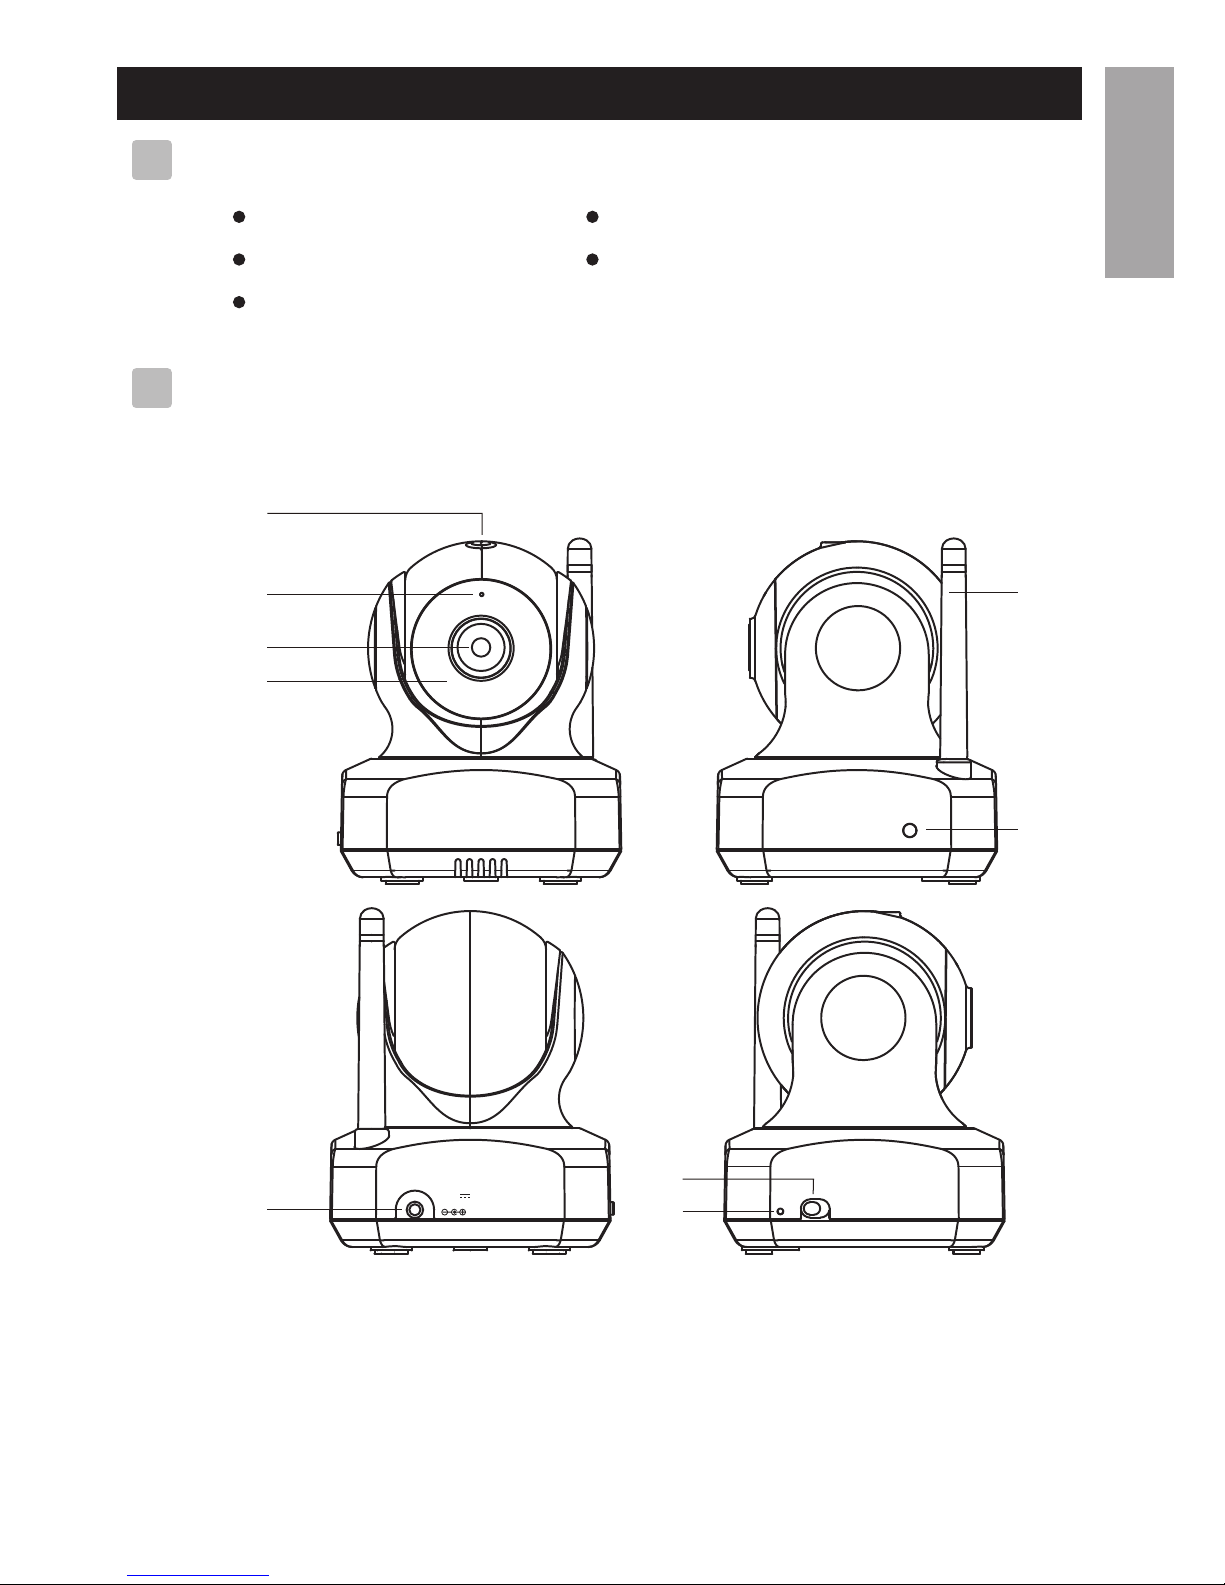
Product Layout
1.Light sensor
2.Microphone
3.Camera lens
4.Infrared LEDs
5.Antenna
Camera
6.Power/Status LED
7.Power adapter plug
8.
9.Power ON/OFF switch
Reset to factory default button
Package Content
One Camera
One Adapter
One Screw and One Wall Anchor
EN
ENGLISH
1
2
This User's Manual
Two Cable Clips
Page 4
3
First-time Setup
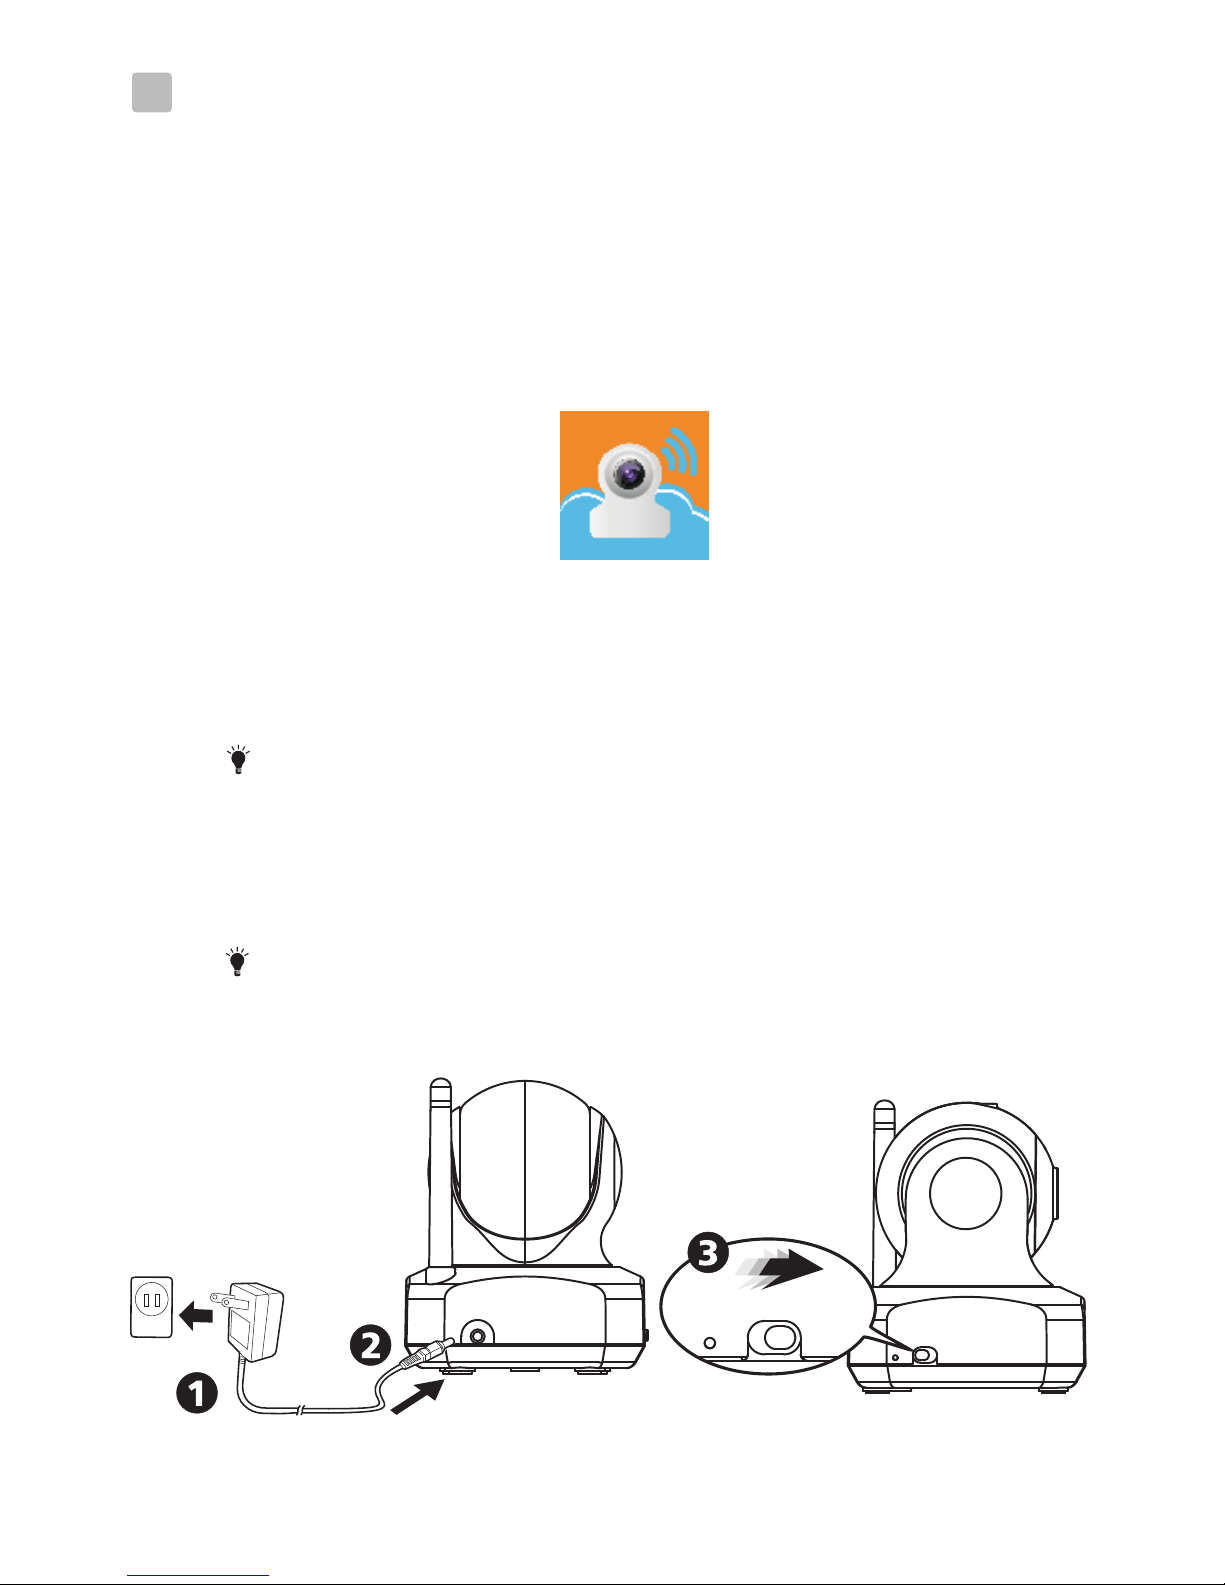
Power on the camera
1. Plug one end of the provided power adapter into a wall
outlet and the other end into the back of the camera.
Note : Use the adapter labeled OUTPUT: 6V DC with
the camera.
2. Slide the Power ON/OFF switch to the ON position.
The LED on the camera will glow orange and then
changes to red.
Note : When you power the camera on, it takes around
40 to 60 seconds for initial setup.
OFF ON
OF F ON
Before the setting up
3.2
3.1
1. Make sure your Wi-Fi router is turned on and it can connect
to the internet.
2. Download the App of Easy iCAM:
Key in the keyword “Easy iCAM” and download the
App from Apple App Store or Android Market
(Google Play).
3
Page 5
4
3.3
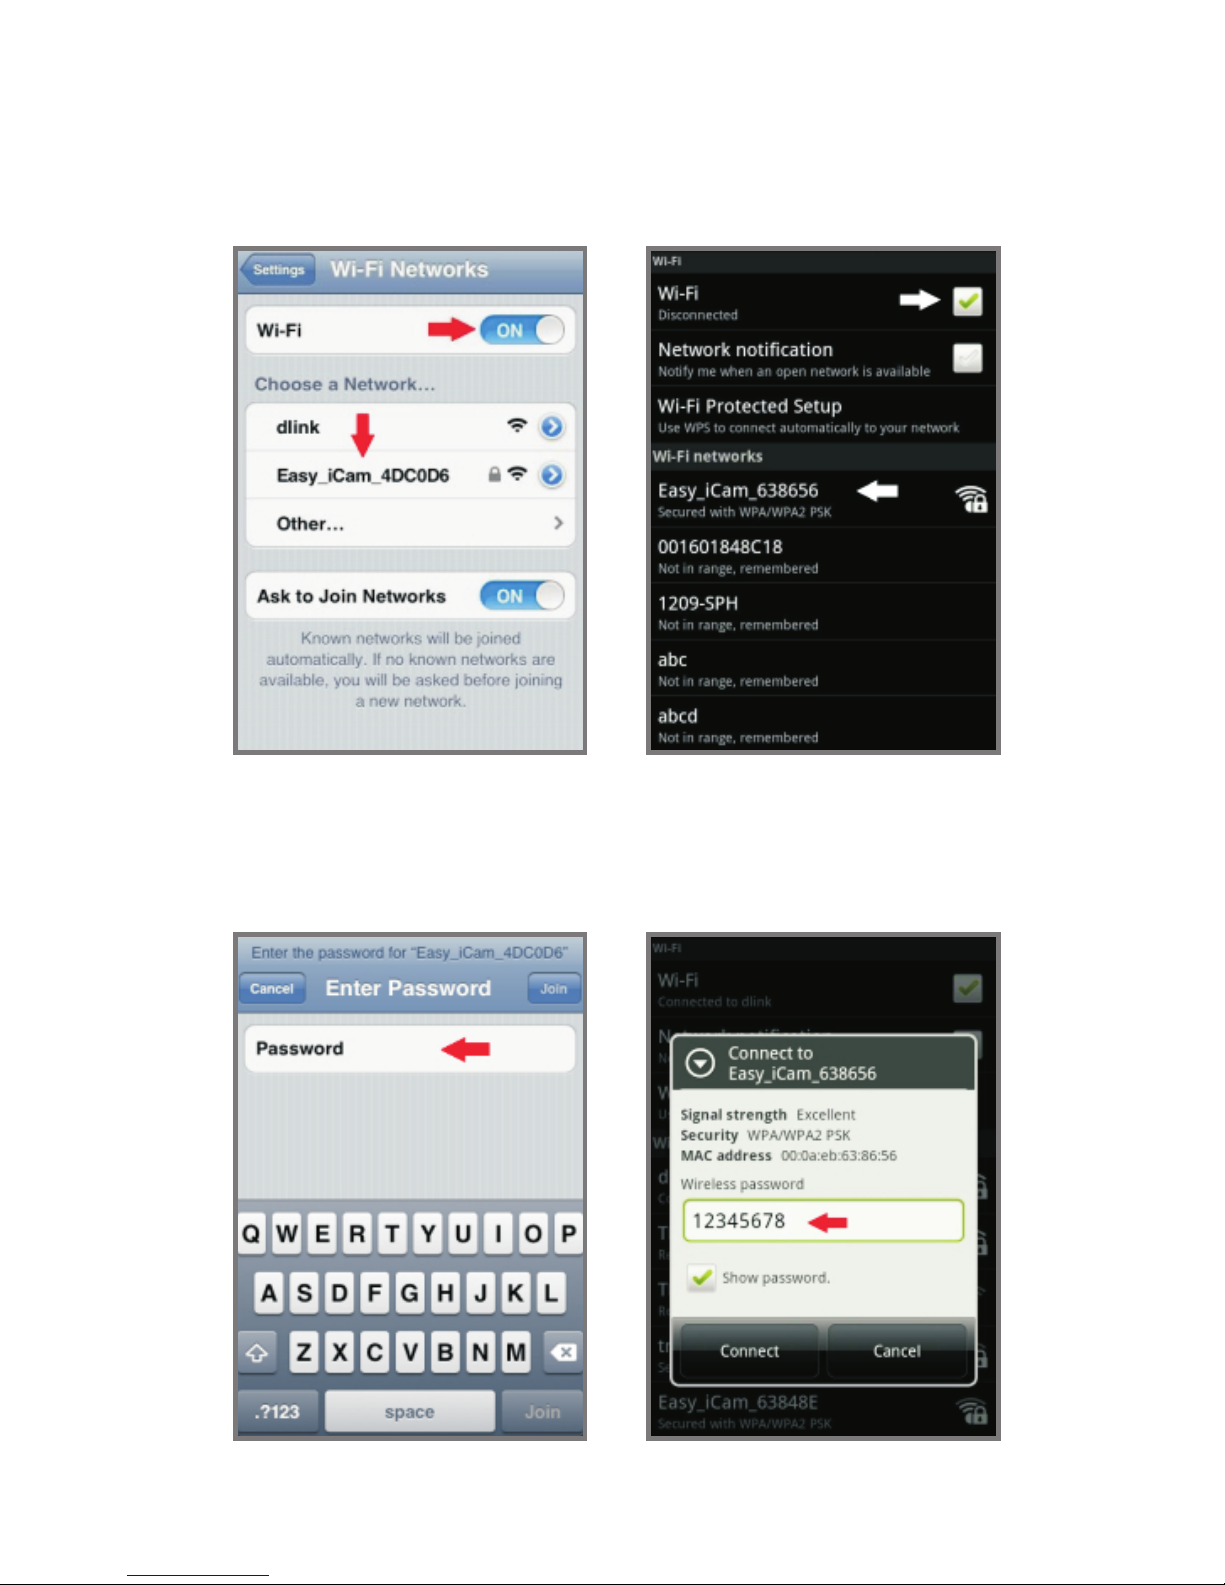
Connect your smartphone or tablet to the camera
1. Turn on the Wi-Fi of your smartphone or tablet.
2. Tap the screen to select “Easy_iCAM_XXXXXX”
under Wi-Fi Networks.
3. Enter the password for
“Easy_iCAM_XXXXXX” and the default password is
“12345678”.
iPhone / iPad Android system
iPhone / iPad Android system
Page 6

5
Setting up the camera and internet connection
3.4
1. Launch the Easy iCAM App on your smartphone or tablet.
2. Follow the on-screen App instructions.
3. Setting up the camera name (SSID) or password:
The screen will show a message that reminds you to
change the Wi-Fi camera name (SSID) or password.
a. If you select “Yes”, you can change the Wi-Fi camera
name or password. When you complete the setup of
camera name or password and tap the ok icon, the app
will ask you if you want to set up internet connection.
If you select “Yes”, the internet setup will be started.
If you select “No”, the camera will restart to do the
change of camera name and password automatically.
At this stage please make sure your smartphone or tablet
is connected to the camera because the camera name or
password is changed.
Note : The password must contain at least eight characters.
b. If you select “No”, the app will ask you if you want to
set up internet connection.
4. Setting up internet connection
The screen will show a message asking if you want to set up
the internet connection.
a. If you select “Yes”, the camera will scan for available
Wi-Fi networks in range. Tap the name of your Wi-Fi
network, and enter the password of your Wi-Fi router if
necessary. Then the first-time setup is done.
Note 1 : If the camera can not find the Wi-Fi network
you want to connect, please tap the scan icon to
scan for available Wi-Fi networks in range again.
2 you complete the internet setup successfully,
the power/status LED will glow green light after
1 to 2 minutes.
b. If you select “No”, the first-time setup is done.
Note : If you don’t set up internet connection, you can
only get live video feeds by connecting the camera
with your smartphone or tablet directly.
:
: If
Page 7
6
Easy-iCAM is a wireless network camera. It can connect with
your smartphone or tablet by wireless technology directly, and
you can watch live video feeds on your smartphone or tablet in
local view mode. In internet view mode, Easy-iCAM can link
to internet via Wi-Fi router or 3G/4G mobile network, then you
can access a live stream of video and audio on your
smartphone or tablet from anywhere in the world.
Note: Local view – Your smartphone or tablet connects to
the camera directly.
Internet view – Your smartphone or tablet connects
to the camera through Wi-Fi router or 3G/4G mobile
network.
Operation Mode – Local View / Internet View:
4
Local view
When your smartphone or tablet connects with the camera
directly through Wi-Fi, you can launch the app of Easy iCAM
to operate it in local view mode.
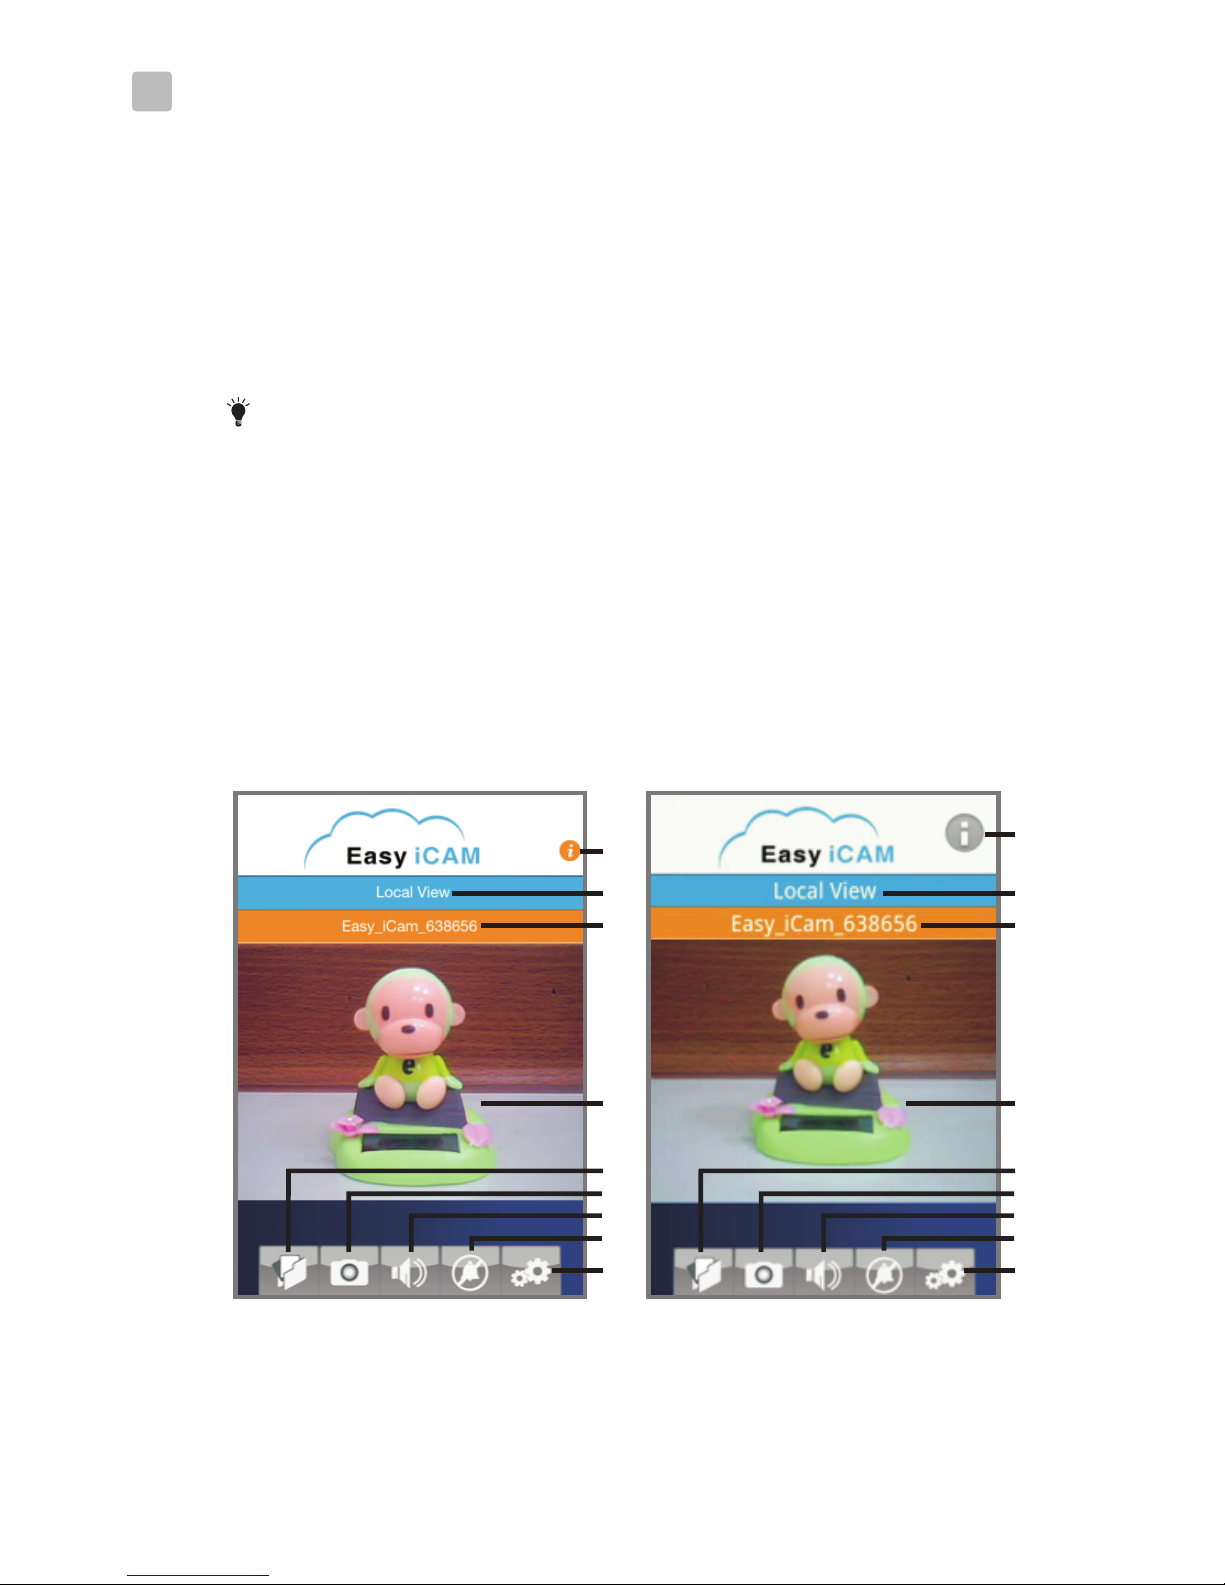
4.1
iPhone / iPad Android system
1
2
3
4
5
6
9
8
7
1
2
3
4
5
6
9
8
7
1. Information
Tap the icon to get more information of the camera.
2. Operation mode
This row shows the current operation mode of the app.
Page 8

7
3. Camera name (SSID)
This row shows the camera name which is the same as the Wi-Fi
Network (SSID).
4. Image display area
To touch screen of image display area with two fingers and move
them apart for zoom function. You also can slide on the screen
for digital pan-tilt function.
5. Photo
Tap the icon to see all of the photos you have taken.
6. Snapshot
Tap the icon to save a snapshot of the camera on your smartphone
or tablet.
7. Audio ON/OFF
Tap the icon can turn on or off the sound.
8. Voice activation function (VOX)
Tap the icon to turn on the voice activation function, tap it again to
turn the function off. If you turn on the function and then press the
home button on your smartphone or tablet to exit the app, the screen
will show a reminding message when the volume level from camera
unit is higher than the volume setting level. Tap or slide the reminding
message icon can launch the app directly.
Note 1: If you turn on the voice activation function and press the
home button on your smartphone or tablet to exit the
app, the VOX function can work and remind you the
audio event from camera.
2 If you want to exit the app completely, please double-
click home button on your iPhone/iPad when it is at
home screen status
When you exit the
app completely, the voice activation function can’t work.
3: If you want to exit the app completely, please press the
back button on your Android system. When you exit
the app completely, the voice activation function can’t
4: The voice activation function can only work in local view
mode.
:
, and then tap the Easy iCAM icon
until the cancel symbol appearance.
work.
Page 9
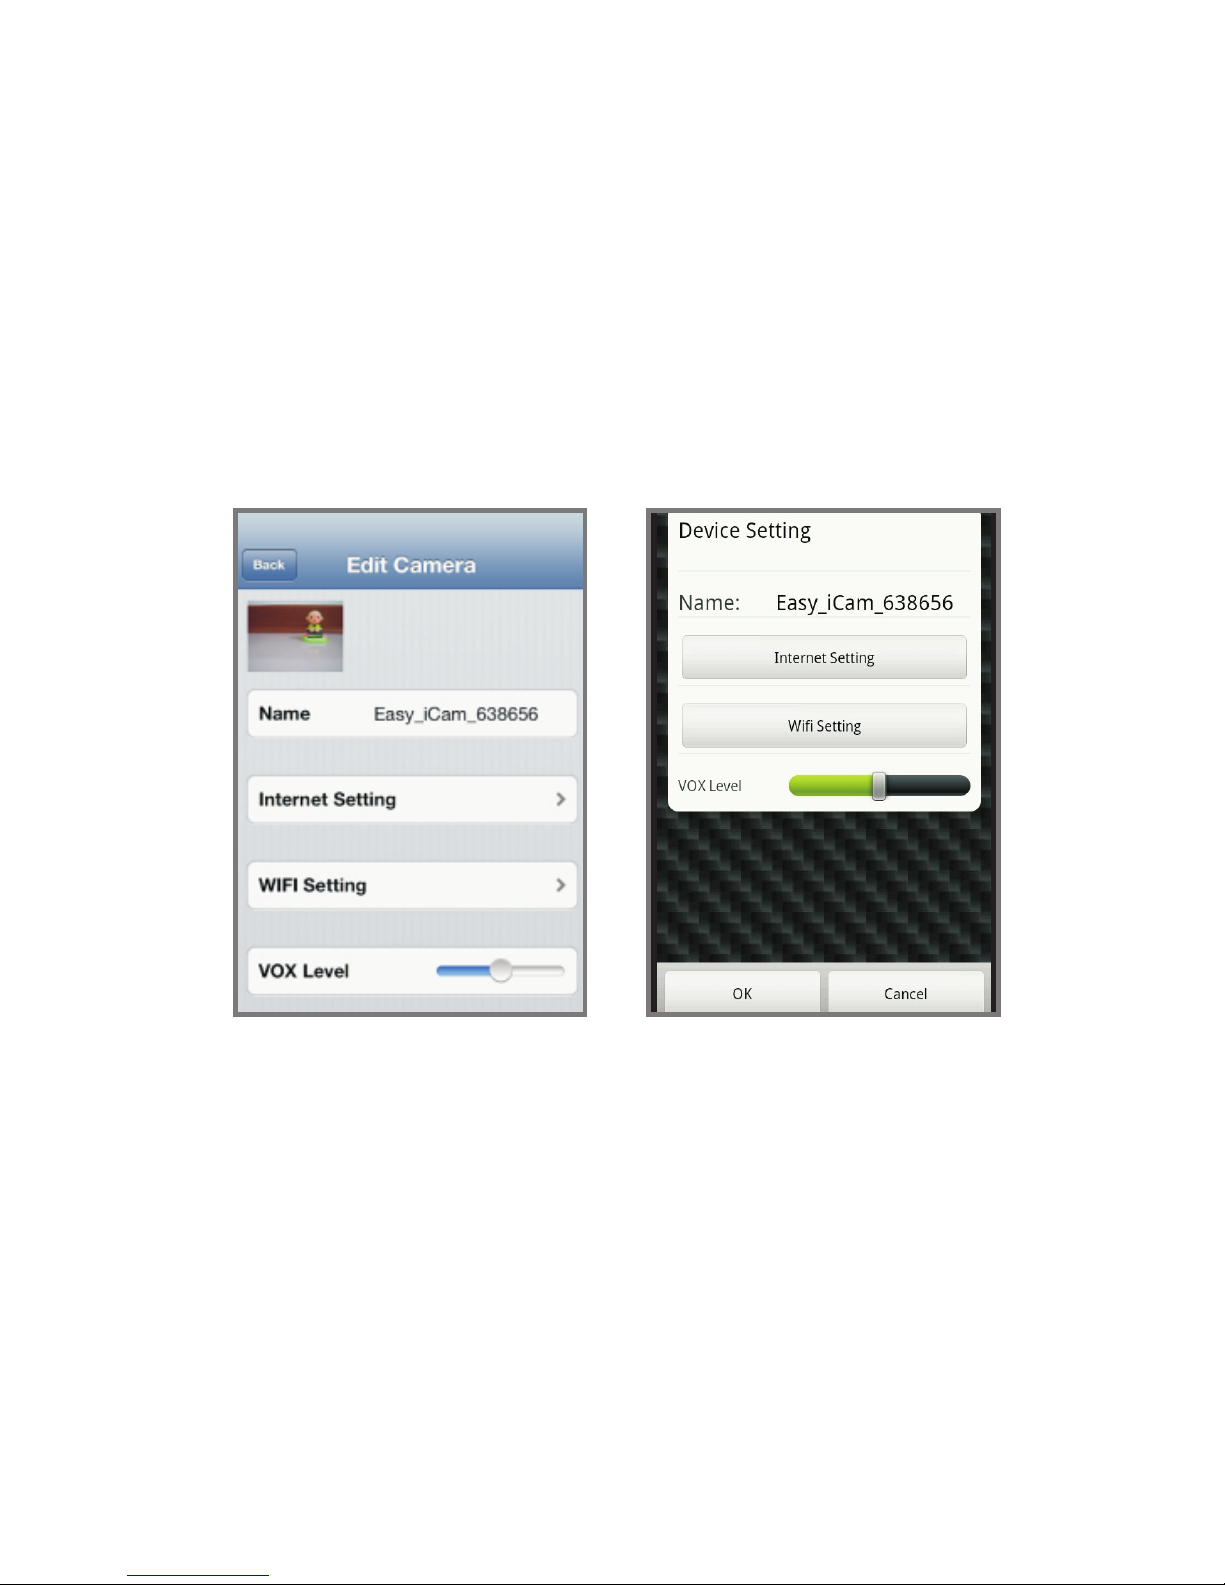
9. Setting
Tap the icon to set up camera functions.
a. Internet Setting
You can setup internet connection, or change camera connection
to other Wi-Fi router.
b. WI-FI Setting
If you want to change the camera name (Wi-Fi SSID) or
password, please tap this row to do the change.
c. VOX Level (volume trigger level)
Tap and slide VOX Level bar to adjust volume trigger level.
iPhone / iPad Android system
Internet view
If the internet connection of your camera has been setup and
the Power/Status LED glows green light, the camera can link to
internet and you can access a live stream of video and audio on
your smartphone or tablet in internet view from anywhere in
the world. Please make sure your smart phone or tablet can link
to internet by Wi-Fi router or 3G/4G mobile network, and then
launch the app of Easy iCAM.
4.2
8
Page 10
4.2.1
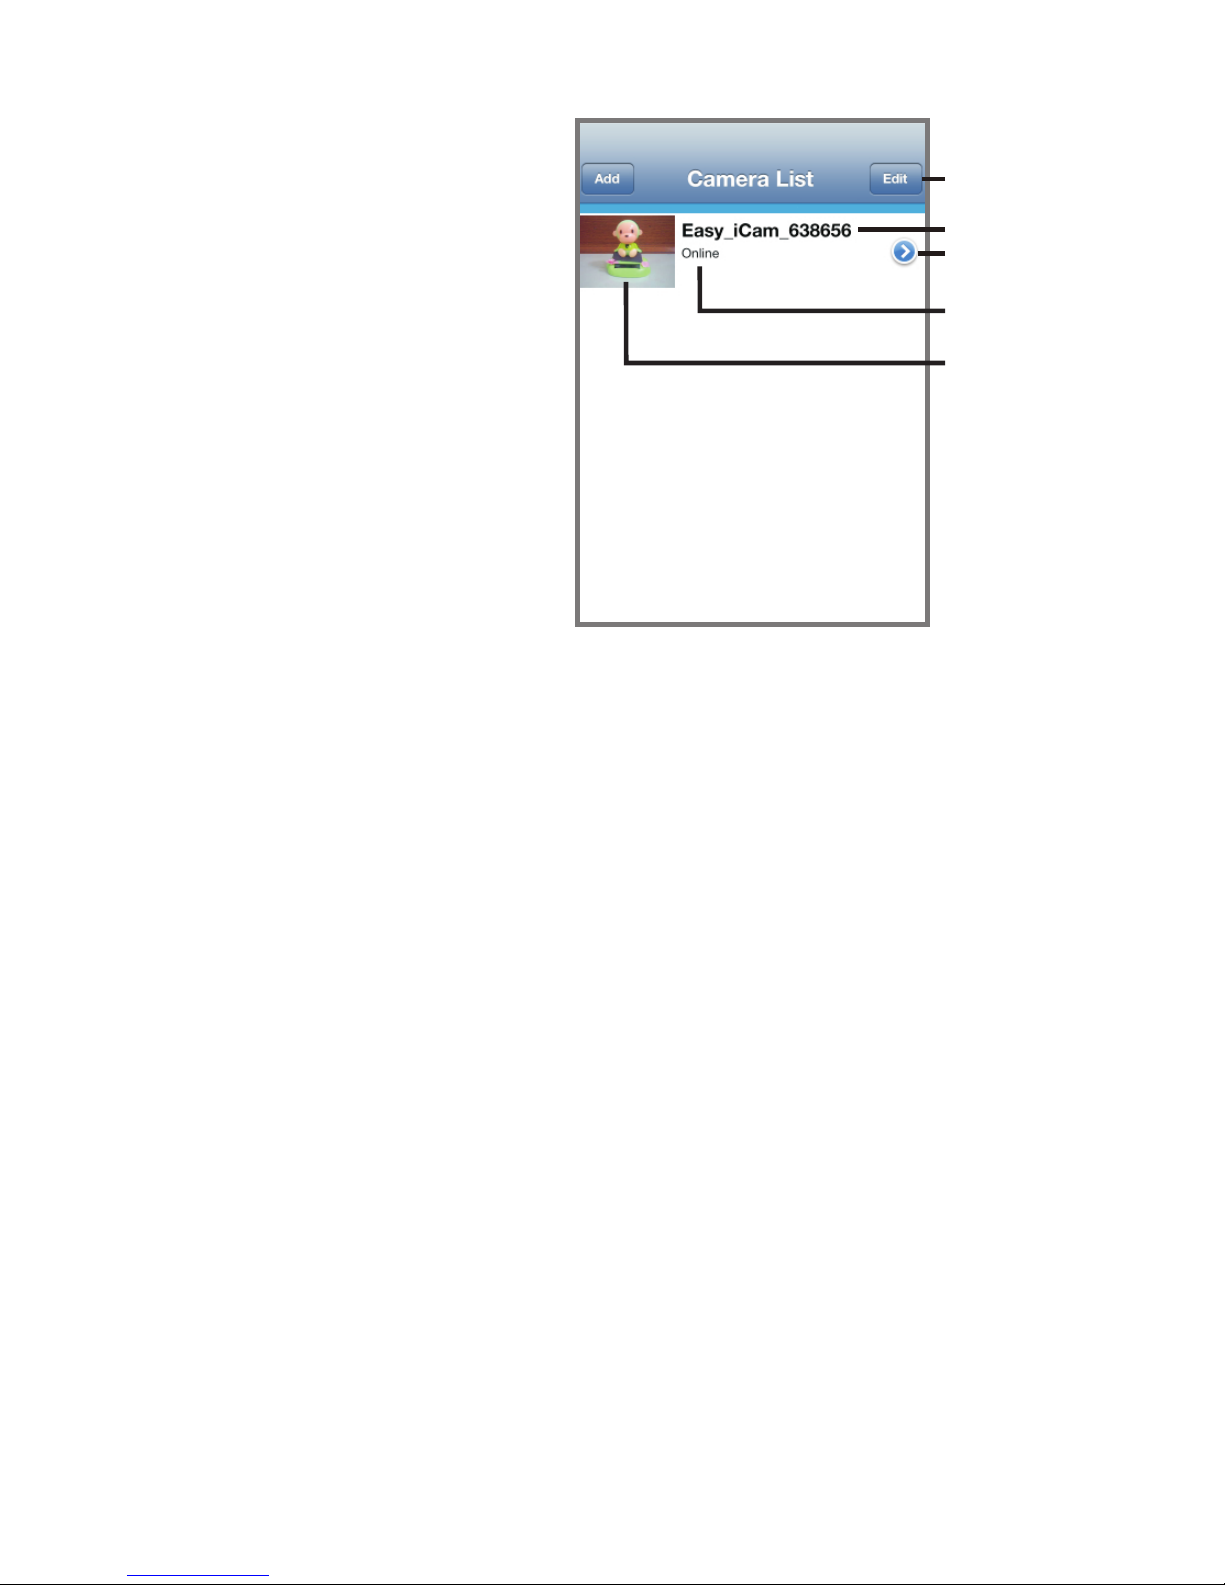
Internet view for
iPhone / iPad
1. Camera name (SSID)
When you launch the app, all the Easy-iCAM cameras you
have added will be shown on the screen.
2. Camera status:
a. Online
If the camera status shows “online”; you can tap the
camera photo to see the video of the camera.
b. Connecting
If the camera status shows “connecting”; you need to wait
until the status change to online, and then tap the camera
photo to see the video of the camera.
c. Off line
If the camera status shows “off-line”; you need to tap the
arrow icon beside the camera name, and then tap
“Reconnect” to re-confirm the internet connection.
3. Tap the arrow icon and you can see the screen shows as below.
a. Password
If you have changed the camera password by your other
smartphone or tablet, you need to tap the row to correct the
password for internet connection.
iPhone / iPad
5
1
3
4
2
9
Page 11
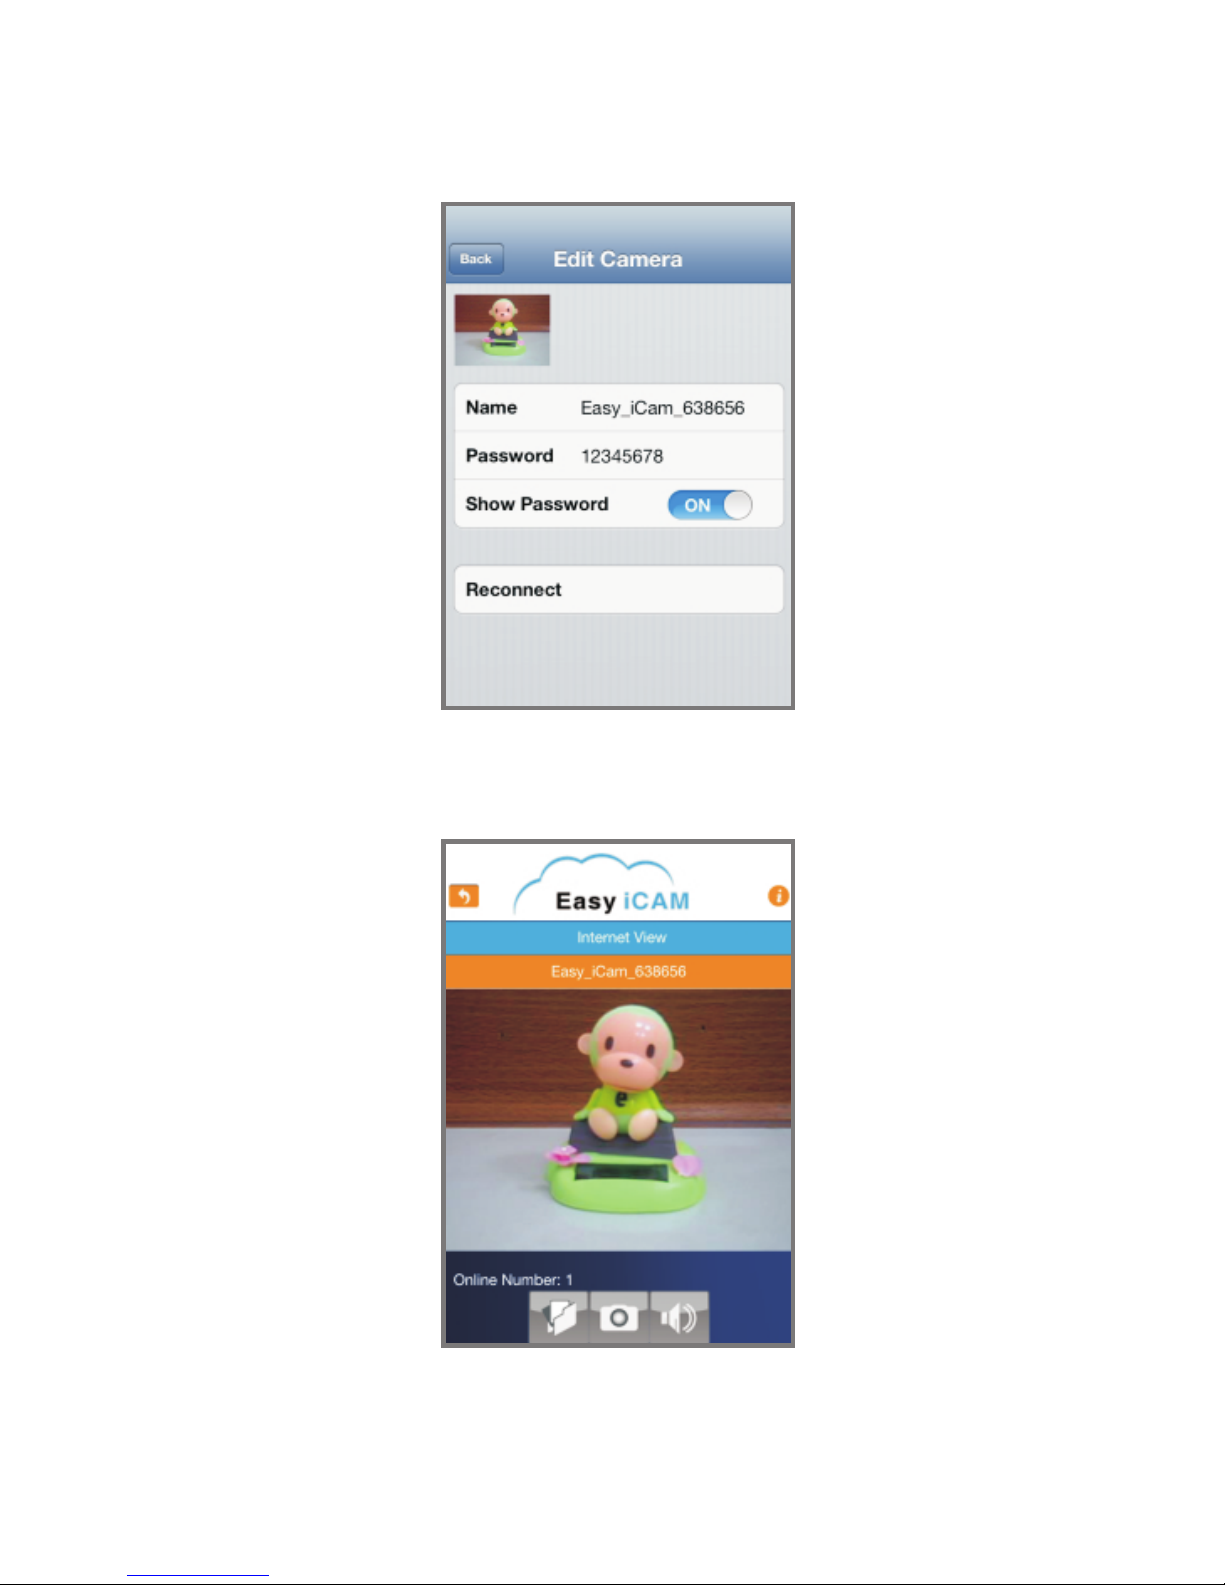
b. Reconnect
You need to tap “Reconnect” to re-confirm the internet
connection if the camera status shows off line.
4. Camera photo
Tap the camera photo and you can see the video of the camera.
5. Edit
Tap the Edit icon and you can select which camera you want
to delete.
10
Page 12
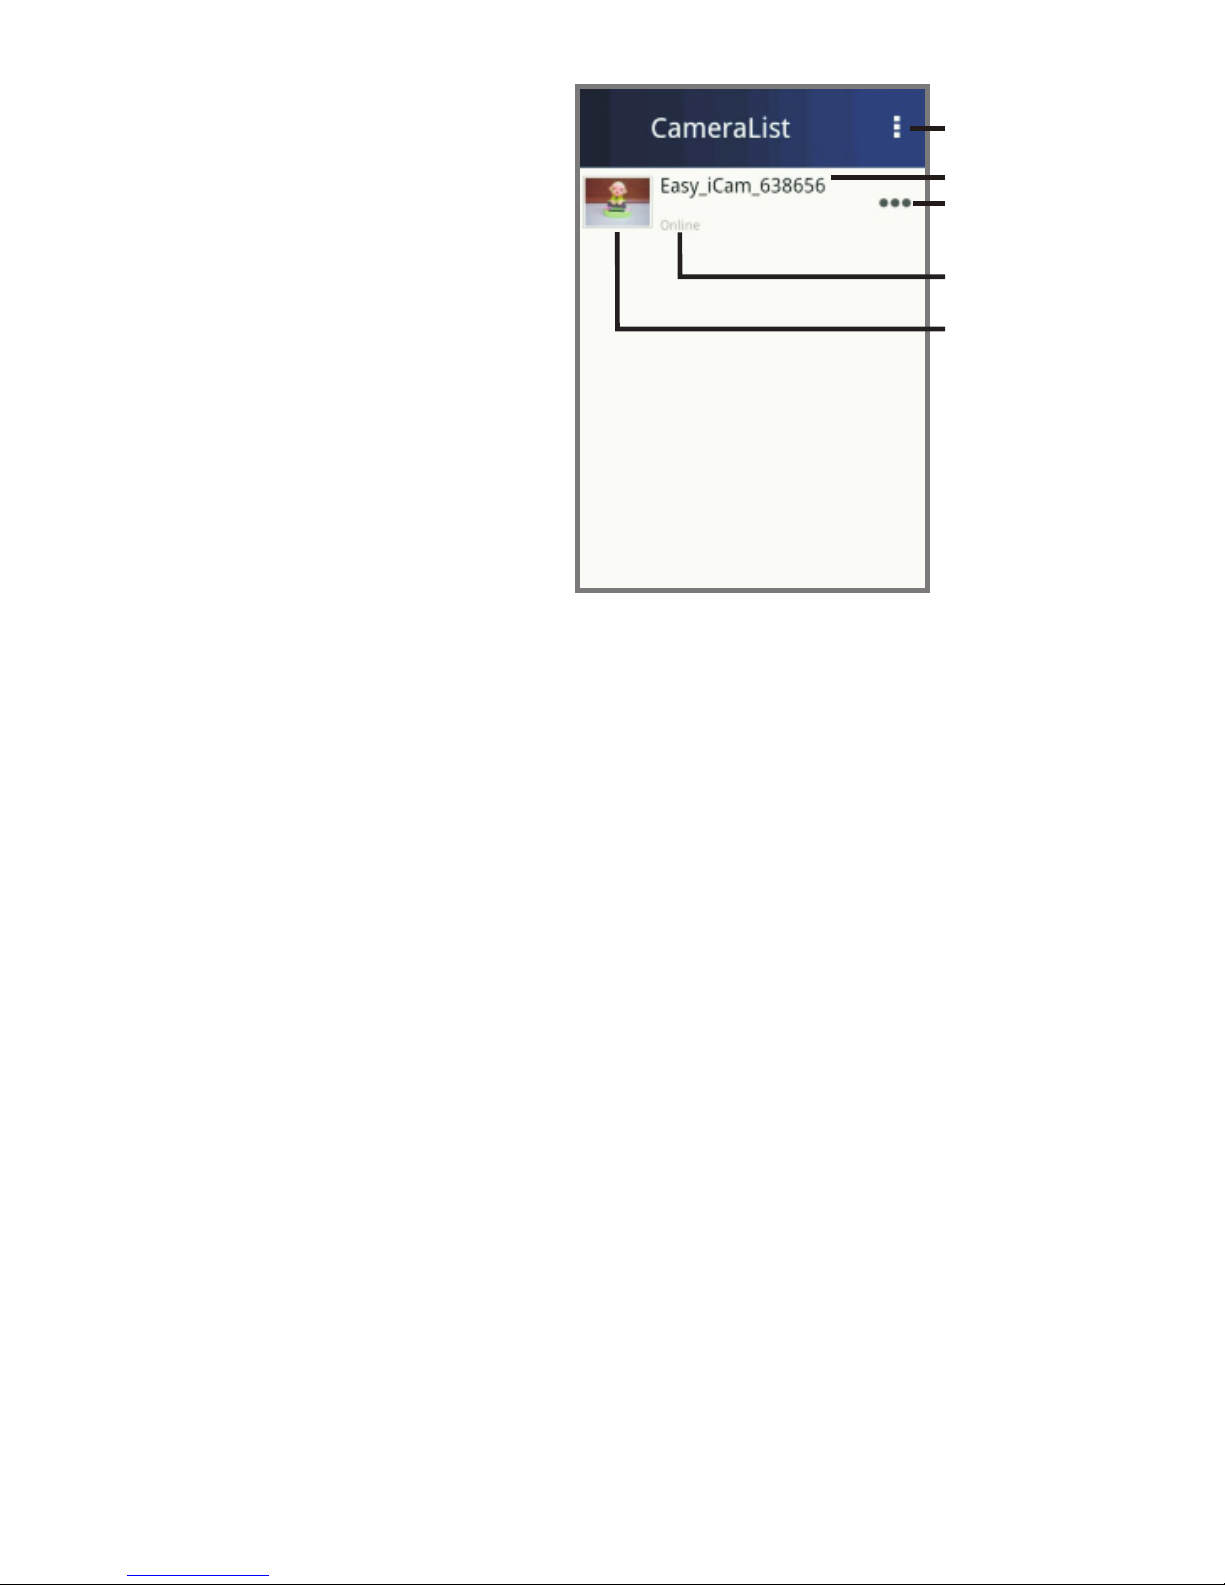
4.2.2
Internet view for
Android system
1. Camera name (SSID)
When you launch the app, all the Easy-iCAM cameras you have
added will be shown on the screen.
2. Camera status:
a. Online
If the camera status shows “online”; you can tap the
camera photo to see the video of the camera.
b. Connecting
If the camera status shows “connecting”; you need to wait
until the status change to online, and then tap the camera
photo to see the video of the camera.
c. Off line
If the camera status shows “off-line”; you need to tap the
dots icon (…) beside the camera name, and then tap
“Reconnect” to re-confirm the internet connection.
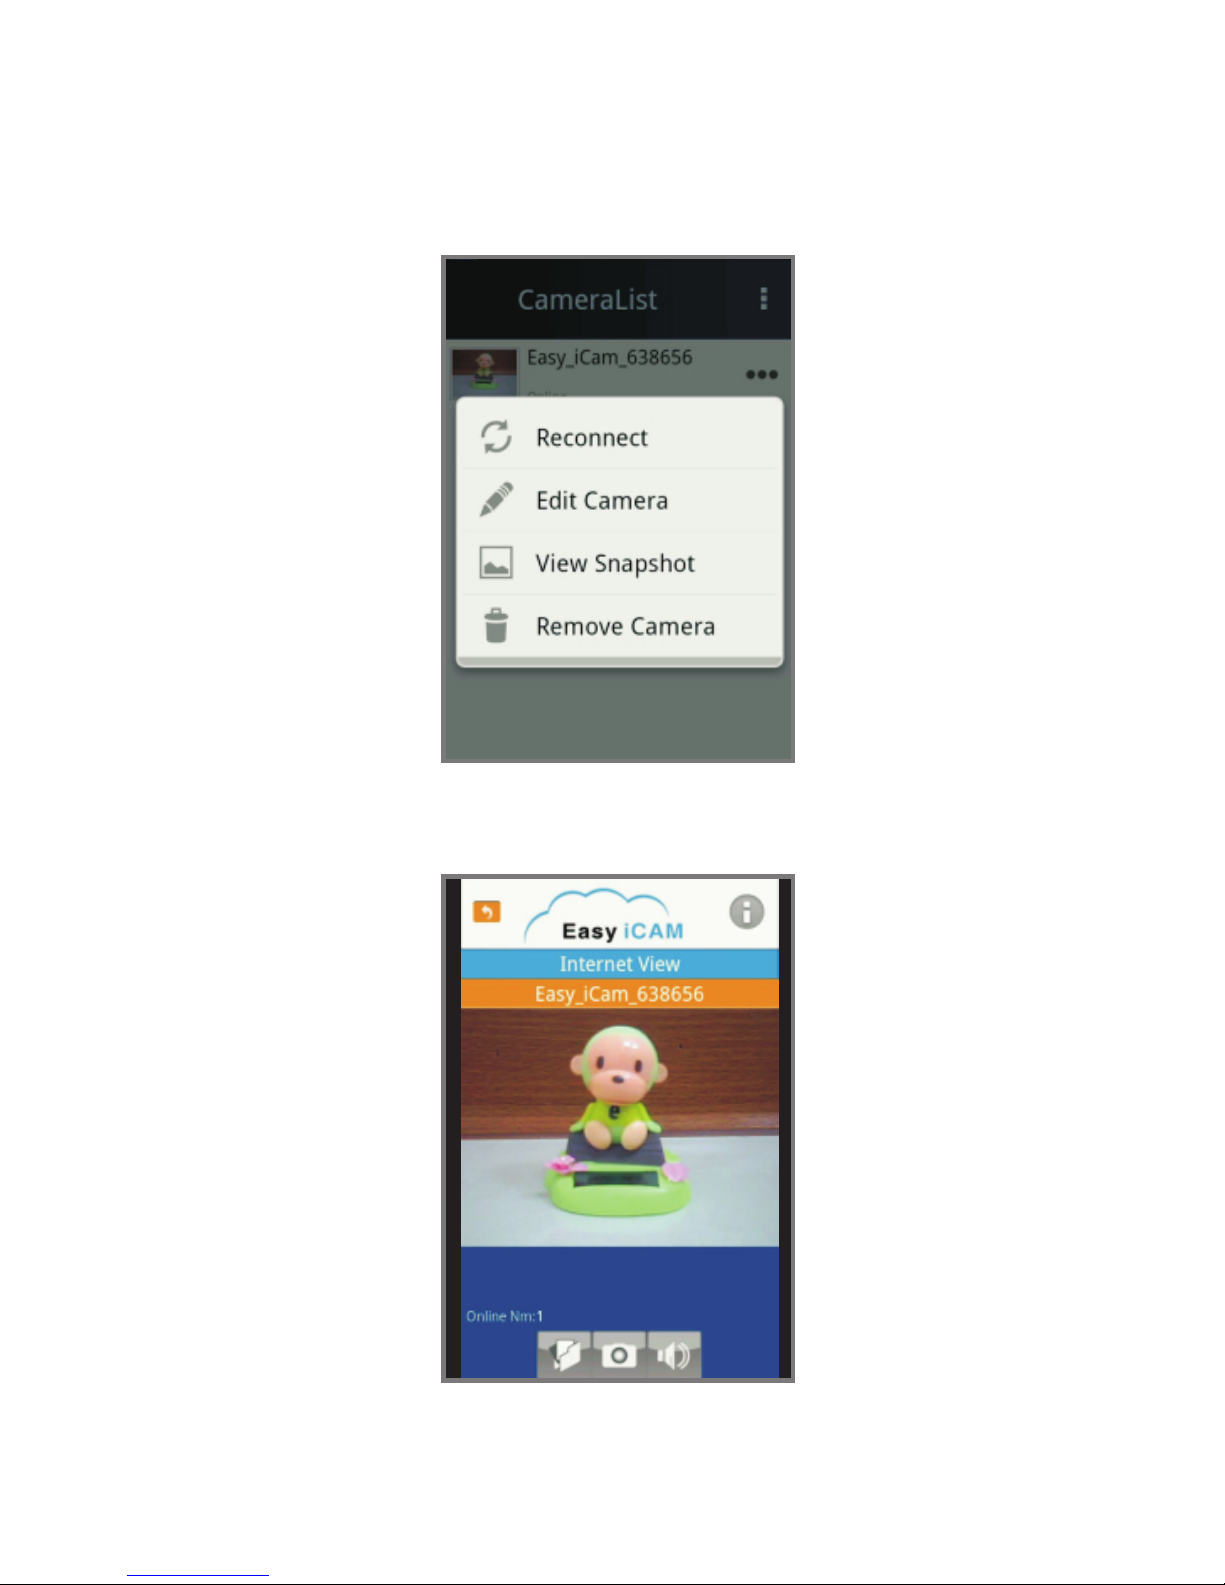
3. Tap the icon and you can see the screen shows as below.
a. Reconnect
You need to tap “Reconnect” to re-confirm the internet
connection if the camera status shows off line.
b. Edit Camera
If you have changed the camera password by your other
smartphone or tablet, you need to tap the row to correct the
password for internet connection.
11
Android system
1
3
4
2
5
Page 13
12
c. View Snapshot
Tap the row and you can see all of the photos you have taken.
d. Remove Camera
Tap the row if you want to remove the camera.
4. Camera photo
Tap the camera photo and you can see the video of the camera.
5. Tap the icon and select “Exit” if you want to exit the app.
Page 14
If the camera has been done the internet setup and you want to
add the camera to second or more other smartphones or tablets,
you just need to follow the step “3.3 Connect your smartphone
or tablet to the camera”, and then the smartphone or tablet can
connect with the camera through Wi-Fi router or 3G/4G mobile
network.
Add camera to second or more other
smartphones or tablets
5
If the camera has been done the internet setup and you want to
add the camera to second or more other smartphones or tablets
through remote setup, you need to do the procedure as below.
Add camera through remote setup
6
Add camera through remote setup for iPhone / iPad
6.1
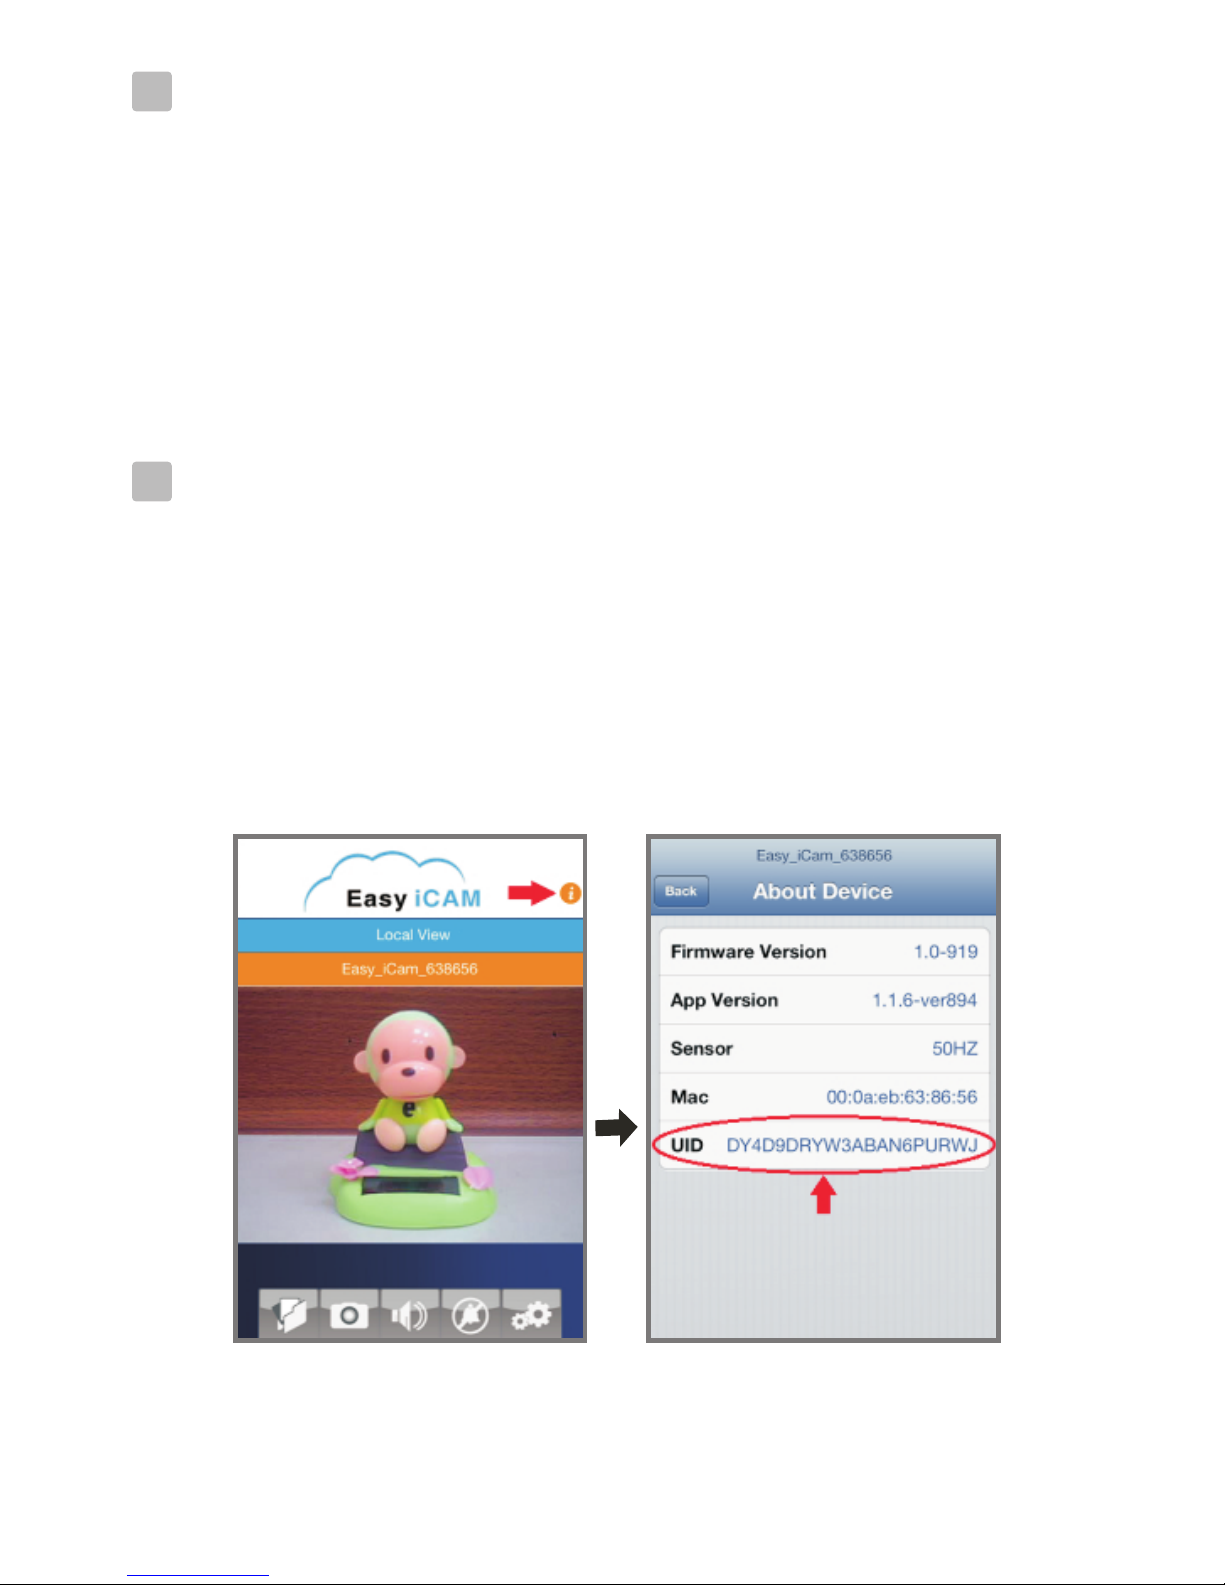
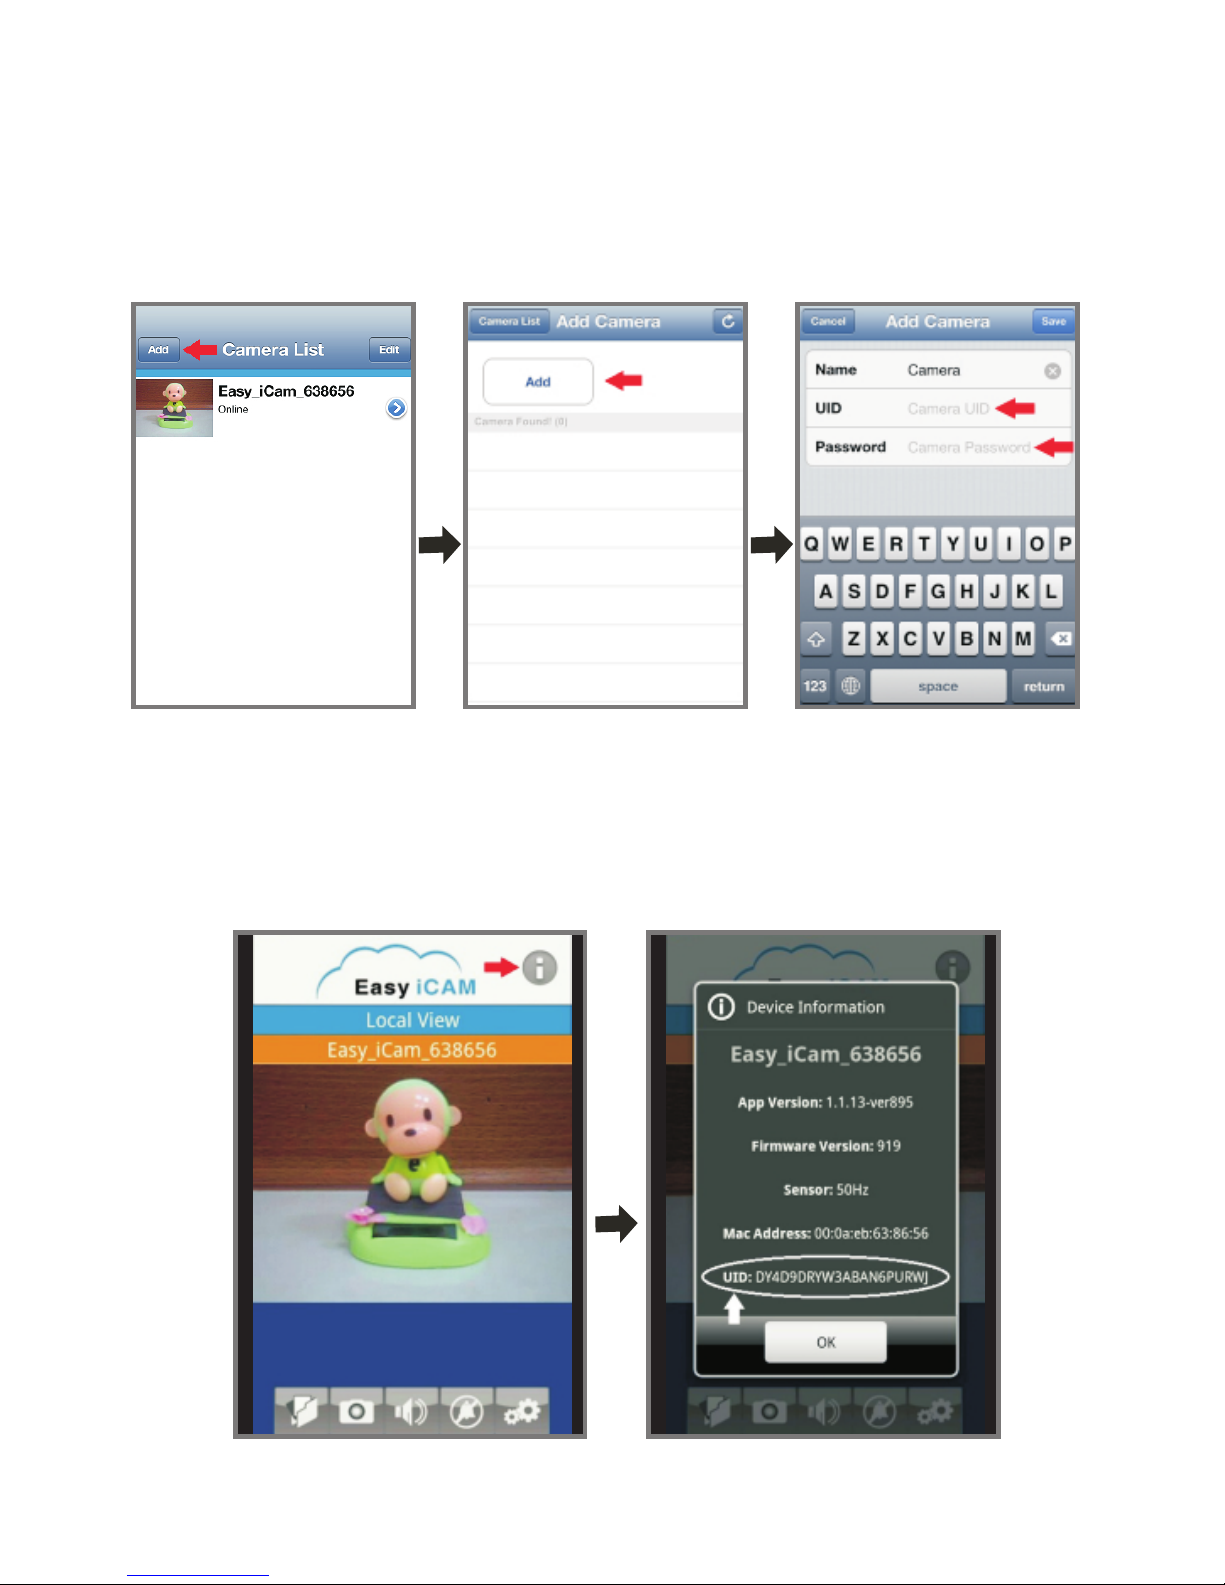
6.1.1
Get UID information
Tap the i (information) icon in the local view and then you can
get UID information.
13
Page 15
14
6.1.2
Add camera
Tap the dots icon in the camera list of internet view and
then tap the Add icon in next page. Type in UID and
password information of the camera and then tape OK icon
to finish the setup.
Add camera through remote setup for Android system
6.2
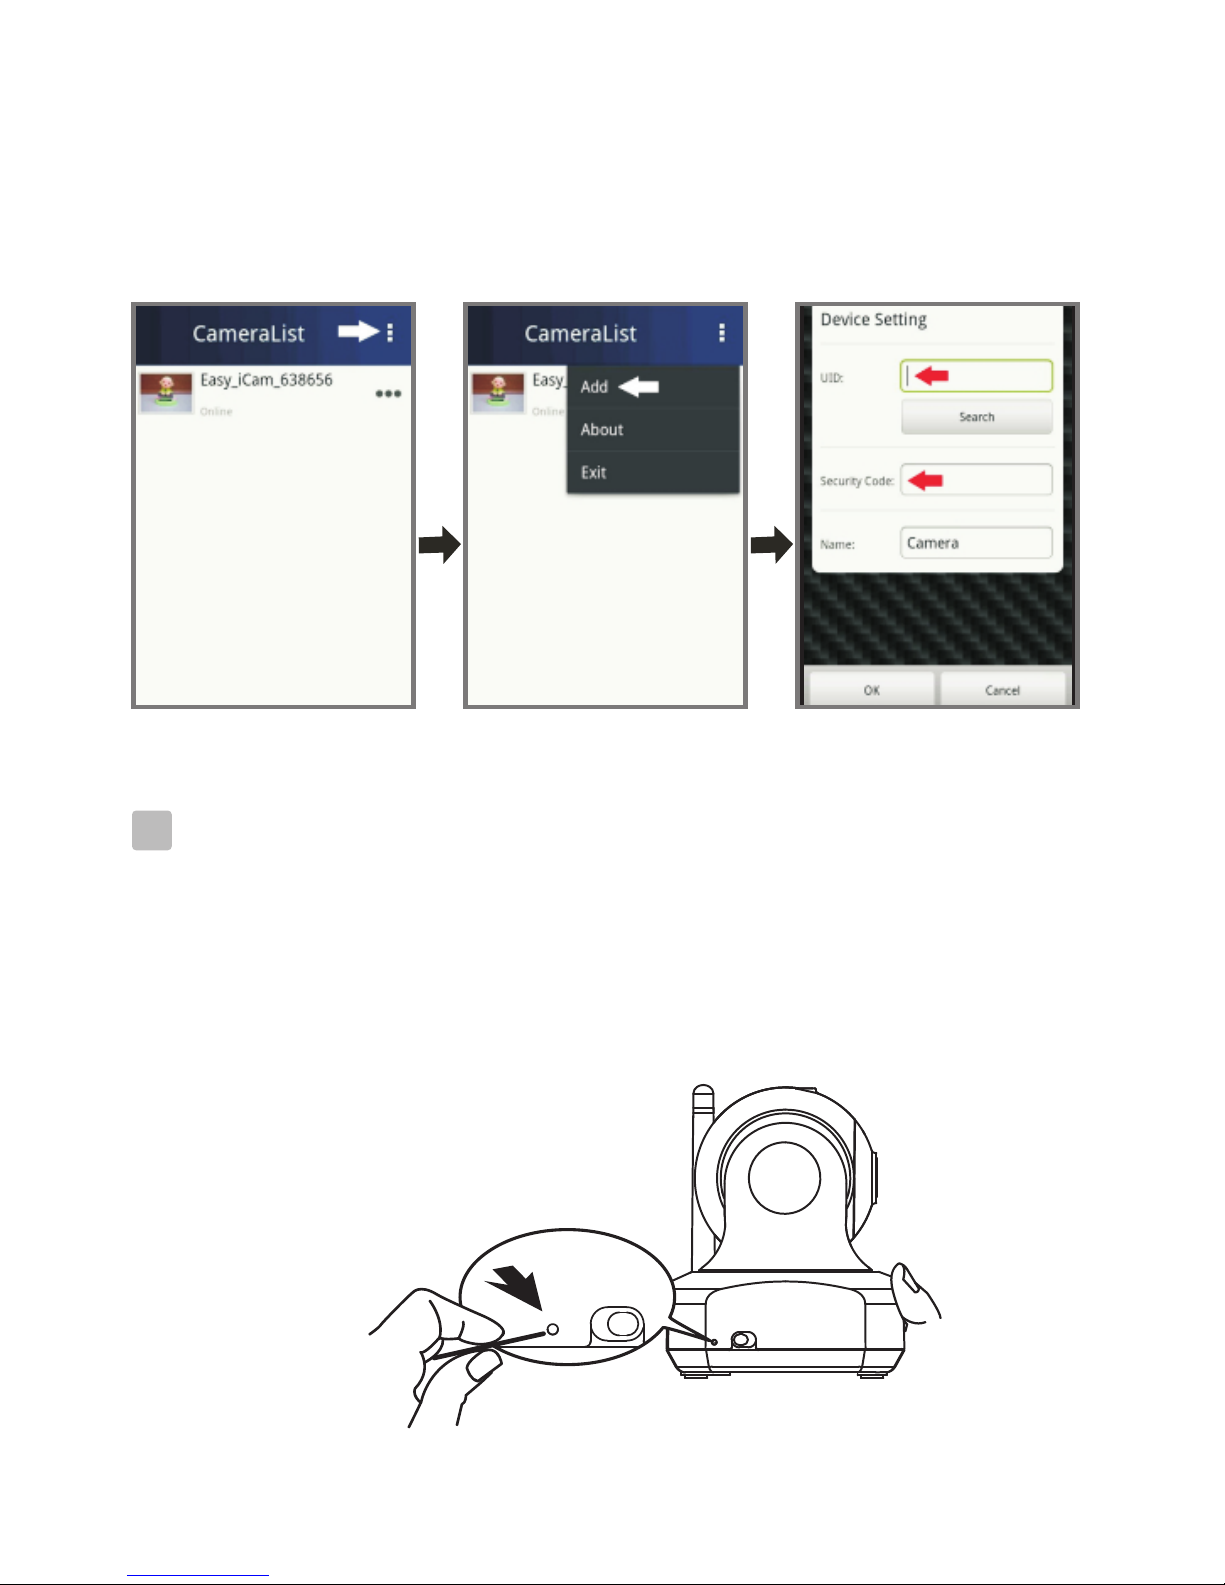
6.2.1
Get UID information
Tap the i (information) icon in the local view and then you can
get UID information.
Page 16
15
6.2.2
Add camera
Tap the Add icon in the camera list of internet view and
then tap the Add icon in next page. Type in UID and
password information of the camera and then tape Save
icon to finish the setup.
While the camera is powered on and wait around 1 minute, press the
reset button (using a small object or a pin) for at least 3 seconds, and then
the power/status LED starts blinking. The camera will be reset to factory
default, and it is useful if you forget the password of the camera.
Reset the camera to factory defaults
7
OFF ON
OF F ON
Page 17

16
Troubleshooting
Make sure the power plugs is pushed all the way in.
Make sure the camera is turned on and power/status LED glows red or green.
Make sure the camera and your smartphone/tablet are within range of
each other.
Make sure you enter the right password of the camera on your
smartphone/tablet.
You may need to reset the camera by pressing the reset button with a
thin object (i.e. paper clip). Please refer to 7 - Reset the camera to
factory defaults of this user manual.
Make sure the power plugs is pushed all the way in.
Make sure the camera is turned on and power/status LED glows green.
Make sure you type in the right password of the Wi-Fi router in internet
setting. Please refer to 3.4 - Setting up the camera and internet connection
of this user manual.
Make sure the camera and the Wi-Fi router are within range of each other.
Make sure your smartphone/tablet has connected to internet through
Wi-Fi or 3G/4G mobile network.You may need to reset the camera by
pressing the reset button with a thin object (i.e. paper clip).
Please refer to 7 - Reset the camera to factory defaults of this user
manual and then refer to 3.4 - Setting up the camera and internet
connection of this user manual.
Cannot connect the camera to your smartphone/tablet through
Wi-Fi router or 3G/4G mobile network in internet view
If there is a microwave oven in use near the camera or Wi-Fi router,
remove the microwave oven or turn it off.
Make sure the camera and the Wi-Fi router are within range of each other.
The speed of getting the video feed from the camera highly depends on
the speed of the connection you are using.
The internet speed either from your Wi-Fi network or 3G/4G mobile
network highly influences the performance of the product. The faster
and more stable connection speed, the faster you can see the video from
the camera.
Video streaming is slow or has a delay
Cannot connect the camera to your smartphone or tablet in local view
Page 18

Keep all parts and accessories out of children's reach.
Fingerprints or dirt on the lens surface can adversely affect camera
performances. Avoid touching the lens surface with your fingers.
Should the lens become dirty, use a blower to blow off dirt
or a soft, dry cloth to wipe off the lens.
Keep the camera dry. Precipitation, humidity, and other liquids
minerals will corrode electronic circuits.
Do not use or store in dusty, dirty areas.
Do not store in hot areas. High temperatures can shorten the life
electronic devices and warp or melt certain plastics.
Do not store in very cold areas. When the system warms up
(to its normal temperature), moisture can form inside the case,
which may damage electronic circuit boards.
Do not attempt to open the case. Non-expert handling of the
may damage the system.
Avoid dropping or strong shocks.
Operate this product using only with the power supply included
provided as an accessory.
Do not overload electrical outlets or extension cords this can
fire or electric shocks.
and dust,
contain
of
device
or
result in
Care and Maintenance
17
Page 19

Caution
FCC Statement
This equipment has been tested and found to comply with the limits for a Class B
digital device, pursuant to Part 15 of the FCC Rules. These limits are designed to
provide reasonable protection against harmful interference in a residential
installation. This equipment generates, uses and can radiate radio frequency
energy and, if not installed and used in accordance with the instructions, may
cause harmful interference to radio communications. However, there is no
guarantee that interference will not occur in a particular installation. If this
equipment does cause harmful interference to radio or television reception, which
can be determined by turning the equipment off and on, the user is encouraged to
try to correct the interference by one or more of the following measures:
Reorient or relocate the receiving antenna
Increase the separation between the equipment and receiver
Connect the equipment into an outlet on a circuit different from that to
which the receiver is connected
Consult the dealer or an experienced radio/TV technician for help
This device complies with Part 15 of the FCC Rules. Operation is subject to the
following two conditions: (1) this device may not cause harmful interference,
and (2) this device must accept any interference received, including interference
that may cause undesired operation.
To comply with FCC RF exposure compliance requirements, a separation
distance of at least 20 cm must be maintained between the antenna of this
device and all persons.
This Transmitter must not be co-located or operating in conjunction with
any other antenna or transmitter.
Changes or modifications to this unit not expressly approved by
the party responsible for compliance could void the user authority to operate
the equipment.
18
Page 20
Specifications subject to change without notice
Camera
Frequency
Antenna
Modulation
Image Sensor
Lens
IR LED
Video compression
Audio
Dimensions
Weight
Power
Operating temperature
2.4 GHz
Dipole antenna
DBPSK, DQPSK, CCK and OFDM
Color CMOS
f 3.0mm, F 2.4
8 pcs
MJPEG (Motion JPEG )
One-way audio
8.5(W) x 10.6(H) x 8.5(D) cm
137g
DC 6V, 800mA
0℃ ~ 40℃ (32℉ ~ 104℉)
This item is in compliance with the essential requirements and other relevant
provisions of Directive 1999/5/EC.
Specifications
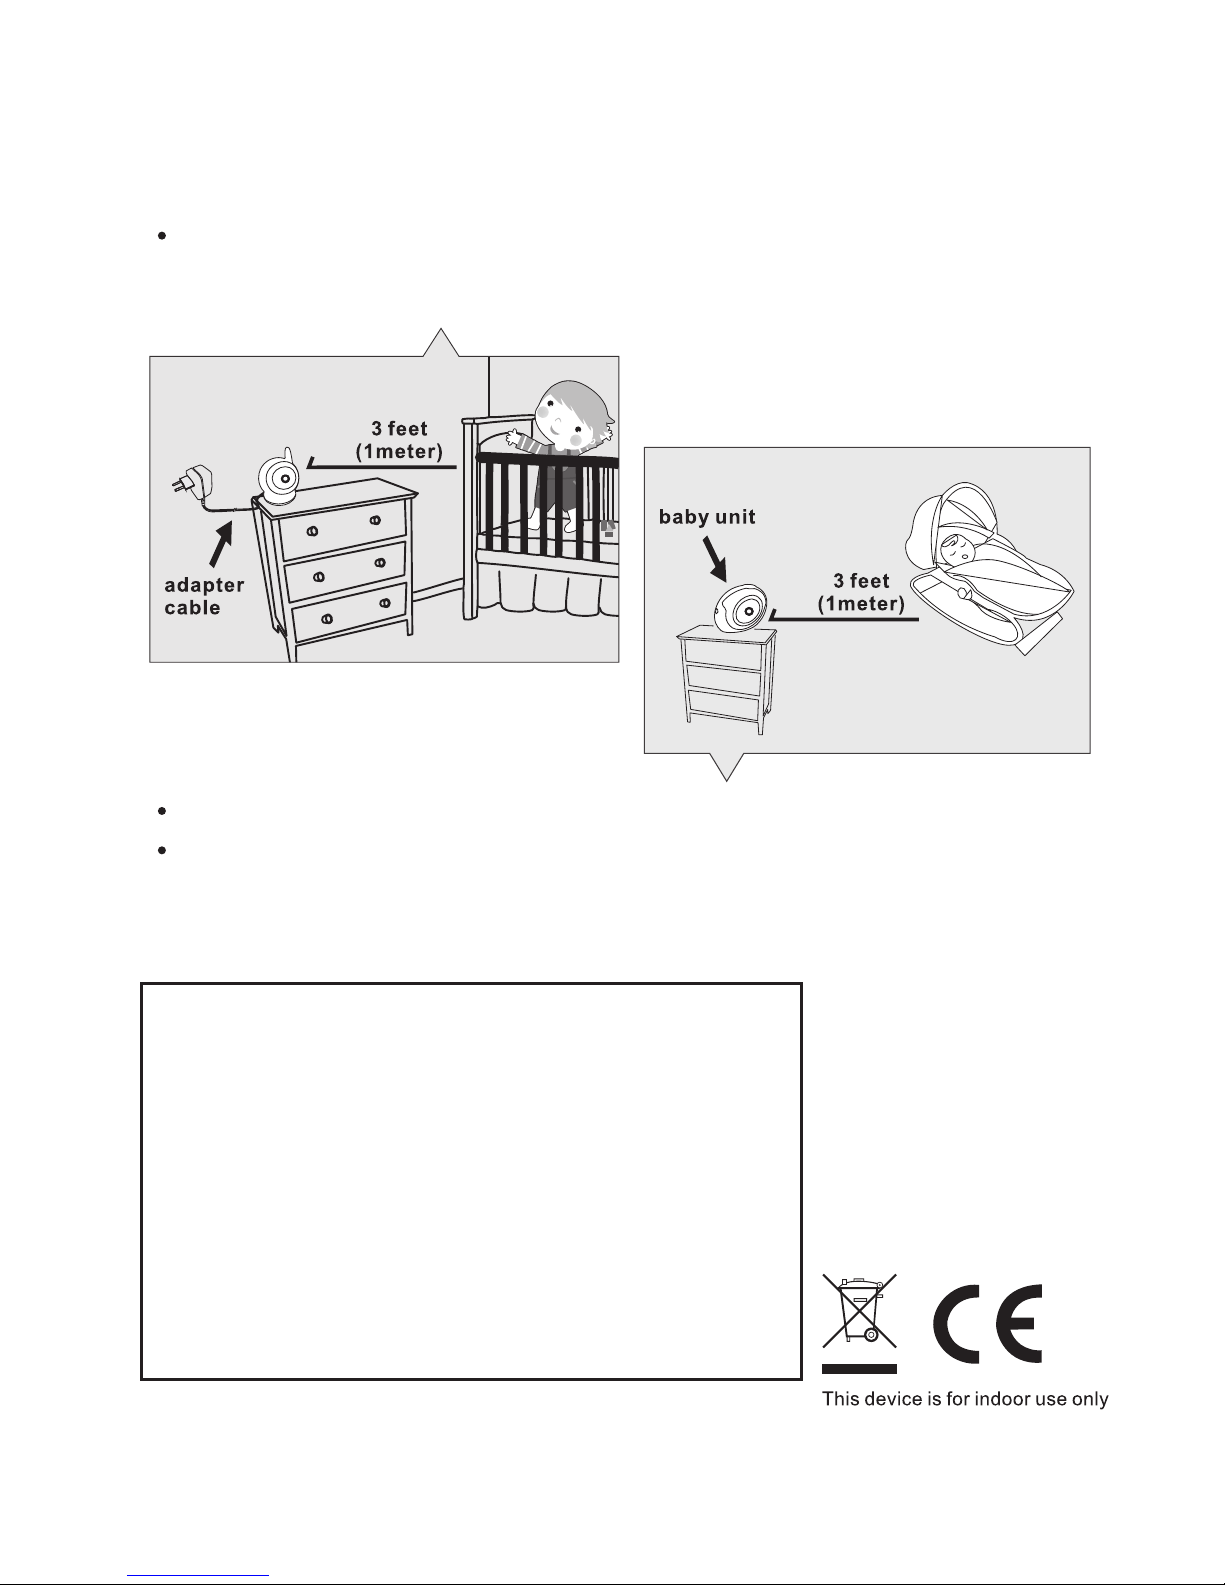
Following the safety tips
To prevent deaths and injuries associated with
baby monitor cords :
Make sure the baby unit and AC adapter cords are always out of
reach of the baby at least 3 feet (1 meter) away.
Note : It's important even if your baby is not yet standing or mobile.
Use a wireless baby monitor to avoid risk of strangulation.
Never use extension cords with AC adapters. Only use the
AC adapters provided.
 Loading...