

Tiger-Vac B-8 HEPA, 2D-15 HEPA, B-8 (A) HEPA (SCVP), 2D-15 (2+2) HEPA (SCVP) Instruction Manual
Page 1

INSTRUCTION MANUAL
INDUSTRIAL VACUUM CLEANERS
WITH INTERNAL HEPA FILTER
FOR DRY RECOVERY AND SANDING
(SELF CLOSING VACUUM PORT)
MODELS:
B-8 (A) HEPA (SCVP)
2D-15 (2+2) HEPA (SCVP)
TO ENSURE A SAFE WORKING ENVIRONMENT,
CAREFULLY READ AND FOLLOW ALL INSTRUCTIONS
SAVE THESE INSTRUCTIONS
Page 2

TABLE OF CONTENTS
1 INSPECTION ................................................................................................................................... 3
2 PRE-USAGE NOTES AND TESTING PROCEDURES .................................................................. 3
2.1 GROUNDING INSTRUCTIONS ............................................................................................... 3
2.2 IMPORTANT SAFETY PRECAUTIONS .................................................................................. 4
3 FILTRATION SYSTEM .................................................................................................................... 6
4 OPERATING INSTRUCTIONS ....................................................................................................... 7
4.1 OPERATING INSTRUCTIONS FOR DRY RECOVERY .......................................................... 7
4.2 OPERATING INSTRUCTIONS FOR VACUUM SANDING KITS ............................................ 8
5 MAINTENANCE .............................................................................................................................. 9
5.1 CLEANUP PROCEDURE AFTER USE ...................................................................................... 9
5.2 STORAGE ................................................................................................................................... 9
5.3 INSTALLING AND REPLACING THE INTERNAL HEPA FILTER AND SAFETY FILTER ..... 10
August 23, 2013
Page 2 of 13
Page 3

1 INSPECTION
Carefully unpack and inspect your Tiger-Vac vacuum cleaner. Each vacuum cleaner is tested and
thoroughly inspected before being shipped; therefore, any damage is the responsibility of the
delivering carrier, who should be notified.
2 PRE-USAGE NOTES AND TESTING PROCEDURES
POWER SUPPLY CORD
Should the power supply cord be replaced, carefully study the wiring diagram supplied with the
instruction manual.
NOTE: As the colors of the wires in the mains load of this appliance may not correspond
with the colored markings identifying the terminals in your plug, proceed as
follows:
- The wire which is colored green must be connected to the terminal in the plug which is marked with
the letter E or by the earth symbol, or colored green.
WARNING: THIS APPLIANCE MUST BE EARTHED.
- Dispose of a plug that has been cut from the power supply cord.
2.1 GROUNDING INSTRUCTIONS
This vacuum cleaner must be grounded. If it should malfunction or breakdown, grounding provides a
path of least resistance for electric current to reduce the risk of electric shock.
WARNING: This vacuum cleaner is equipped with a cord having an equipment-grounding
conductor and grounding plug. The plug must be plugged into an appropriate
outlet that is properly installed and grounded in accordance with all local codes
and ordinances. Ensure that the fuse/breaker on the electrical panel is of the
correct rating and exceeds the maximum current rating shown on the technical
data sticker of the vacuum unit.
WARNING: DO NOT OPERATE UNIT WITHOUT A PROPER GROUND SOURCE.
DANGER: Improper connection of the equipment-grounding conductor can result in a risk
of electric shock. Check with a qualified electrician or service person if you are in
doubt as to whether an outlet is properly grounded. Do not modify the plug
provided with the vacuum cleaner. If it will not fit the outlet, have a proper outlet
installed by a qualified electrician. No adaptor should be used with this vacuum
cleaner.
Page 3 of 13
Page 4

2.2 IMPORTANT SAFETY PRECAUTIONS
WARNING: If vacuum cleaner is used to recover toxic or hazardous substances such as:
asbestos, silica, lead, pesticides, etc., the following safety precautions must be
taken:
1. Vacuum cleaner must be equipped with a HEPA filter.
2. Service and operation should only be carried out by trained personnel wearing appropriate
clothing and breathing apparatus.
3. Dispose of collected materials responsibly. Follow government regulations for the disposal of
hazardous materials.
NOTE: Any health hazard associated with the use of this vacuum cleaner in conjunction
with the recovery of asbestos and other hazardous substances has not been
investigated.
WARNING: To reduce the risk of fire, electrical shock or injury:
4. Do not leave vacuum cleaner when plugged in. Unplug from outlet when not in use and before
servicing.
5. Do not allow vacuum cleaner to be used as a toy. Close attention is necessary when used near
children.
6. Use only as described in this manual. Use only with recommended attachments.
7. Do not use with damaged cord or plug. If vacuum cleaner is not working as it should, has been
dropped, damaged, left outdoors or dropped into water, return it to a service centre.
8. Do not: pull or carry by cord, use cord as a handle, close a door on cord, or pull cord around
sharp edges or corners. Do not run vacuum cleaner over cord. Keep cord away from heated
surfaces.
9. Do not unplug by pulling on cord. To unplug, grasp the plug, not the cord.
Page 4 of 13
Page 5

10. Do not handle plug or appliance with wet hands.
11. Do not put any object into openings. Do not use with any openings blocked; keep free of dust, lint,
hair and anything that may reduce air flow. Poor ventilation will result in overheating of motor.
12. Keep hair, loose clothing, fingers and all parts of body away from openings and moving parts.
13. Do not pick-up anything that is burning or smoking such as: cigarettes, matches or hot ashes, etc.
14. Do not use without appropriate filters in place.
15. Turn of all controls before unplugging.
16. Use extra care when cleaning on stairs.
17. Do not pick-up flammable or combustible liquids such as gasoline, or use in areas where they
may be present.
18. Never operate unit unless the power-head is securely fastened to the recovery tank with latches.
19. Connect to a properly grounded outlet only. See grounding instructions.
Page 5 of 13
Page 6

3 FILTRATION SYSTEM
1 Paper filter bag
2 Main cloth filter
3 Safety filter
4 HEPA filter
Page 6 of 13
Page 7

4 OPERATING INSTRUCTIONS
(Refer to section 3.0 Filtration System for illustrations)
WARNING: The vacuum cleaner is designed dry recovery. The appropriate filters must be
installed in the vacuum cleaner.
4.1 OPERATING INSTRUCTIONS FOR DRY RECOVERY
1. Disengage the latches and remove the power head from recovery tank.
WARNING: Make sure that the HEPA FILTER is properly installed prior to use.
2. Ensure that no liquids are present in the recovery tank.
3. Connect the PAPER FILTER BAG (item 1) to the inlet inside of the recovery tank. Make sure that
the rubber collar of the paper filter bag fits snugly around it.
4. Install the main cloth filter in the recovery tank. Make certain that the filter’s gasket covers the
entire circumference of the recovery tank lip.
5. Place the power head on the recovery tank and fasten the lid to the tank with the latches.
6. Plug in the power cord into a grounded electrical outlet.
7. Fasten hose to suction intake on side of recovery tank
8. Attach desired tools to the hose. Use only the recommended cleaning tools supplied with each
unit.
9. To operate unit, depress switch in the ON position.
10. To shut off unit, depress switch in the OFF position. Disconnect power cord when not in use.
Page 7 of 13
Page 8

4.2 OPERATING INSTRUCTIONS FOR VACUUM SANDING KITS
WARNING: Always wear eye protection when sanding or grinding even if using vacuum
assisted tools.
WARNING: It is the users responsibility to determine the type of protective clothing and
respiratory equipment required.
IMPORTANT: Carefully read and follow the instructions provided with the vacuum assisted
sander or grinder to ensure proper operation.
1. Disengage the latches and remove the powerhead from the recovery tank.
WARNING: Make sure that the HEPA FILTER is properly installed prior to use.
2. Ensure that no liquids are present in the recovery tank.
3. Connect the PAPER FILTER BAG (item 1) to the inlet inside of the recovery tank. Make sure that
the rubber collar of the paper filter bag fits snugly around it.
4. Install the main cloth filter in the recovery tank. Make certain that the filter’s gasket covers the
entire circumference of the recovery tank lip.
5. Place the power head on the recovery tank and fasten the lid to the tank with the latches.
6. Plug in the power cord into a grounded electrical outlet.
7. Fasten hose to suction intake on side of recovery tank
8. Connect sander or grinder to the suction supply hose. Follow the instructions provided with the
sander or grinder to ensure proper operation.
9. To operate unit, depress switch in the ON position.
10. To shut off unit, depress switch in the OFF position. Disconnect power cord when not in use.
Page 8 of 13
Page 9

5 MAINTENANCE
5.1 CLEANUP PROCEDURE AFTER USE
1. Disconnect power cord from electrical outlet.
2. Disengage latches and remove power head from recovery tank.
3. Remove the main cloth filter and paper filter bag from recovery tank.
4. Empty collected materials into suitable container.
5. Clean the main cloth filter periodically. A clogged filter restricts the air flow and reduces the
vacuum’s performance. The main cloth filter may be washed in lukewarm water.
NOTE:
cleaner.
6. Paper filter bags may not be reused once full, they must be discarded.
Ensure that main cloth filter assembly is completely dry before reinstallation in vacuum
NOTE: Ensure that main cloth filter assembly is completely dry before reinstallation in vacuum
cleaner.
5.2 STORAGE
It is recommended that the inside of the recovery tank be cleaned and dried before storing the vacuum
cleaner.
Page 9 of 13
Page 10
5.3 INSTALLING AND REPLACING THE INTERNAL HEPA FILTER AND SAFETY FILTER
HEPA filters are designed for filtration of ultra-fine particles. A clogged HEPA filter will restrict the air
flow thereby reducing the vacuum's performance.
Depending upon operating conditions, it is recommended that the HEPA filter and the safety filter be
replaced at least once a year.
WARNING: If vacuum is used for the recovery of toxic materials proper clothing and the use
of an appropriate breathing apparatus is necessary when replacing the HEPA
filter, the safety filter or any other contaminated part of the vacuum cleaner.
HOW TO PROPERLY DISPOSE OF THE INTERNAL HEPA FILTER AND SAFETY FILTER
NOTE: A second vacuum cleaner sprays or other power sources are not required for this type of
operation in our industry. Proper clothing is, however, required by OSHA for the health and
safety of the operator.
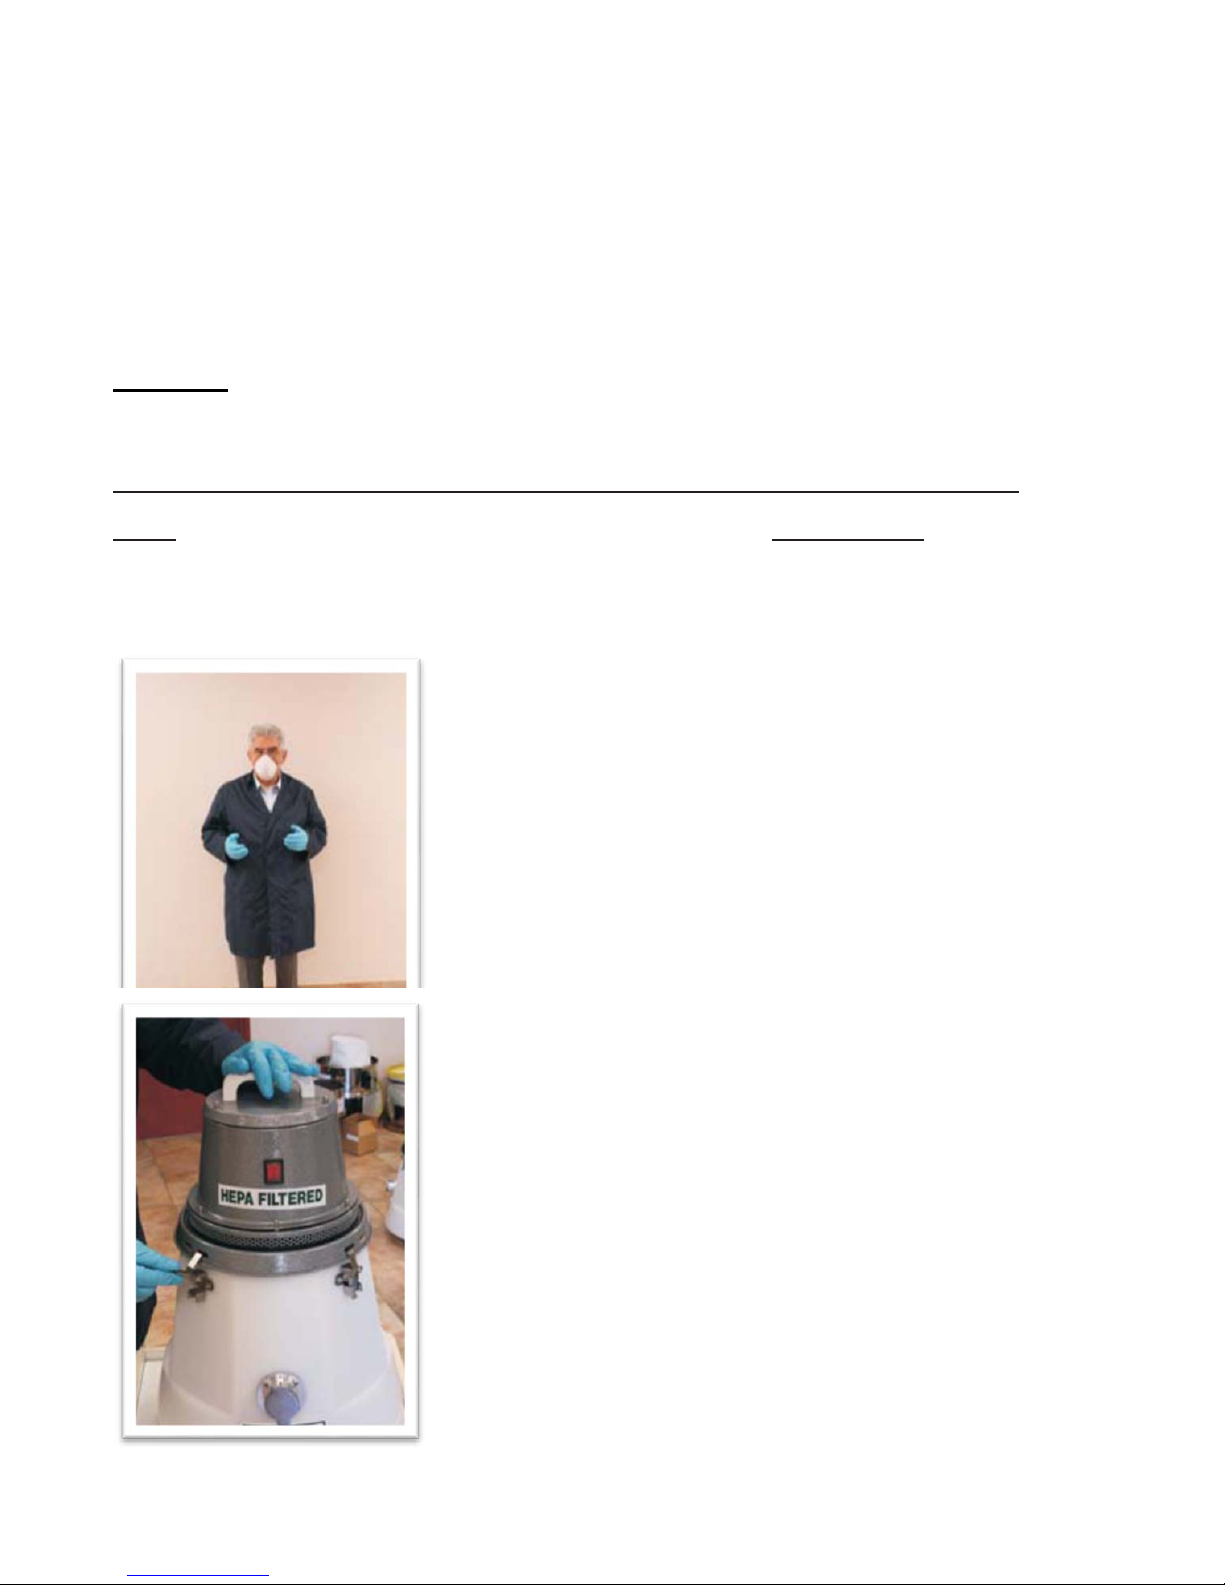
In the Controlled Environment Industry for the recovery of
designated substances, changing a filter is considered a low to
moderate risk. However, a protective mask and gloves should be
worn. The following procedure is valid for both electrically and
pneumatically (air) operated vacuum cleaners.
In order to change the HEPA filter, leave the vacuum
cleaner running and remove the powerhead from the
recovery tank by detaching the latches.
Page 10 of 13
Page 11
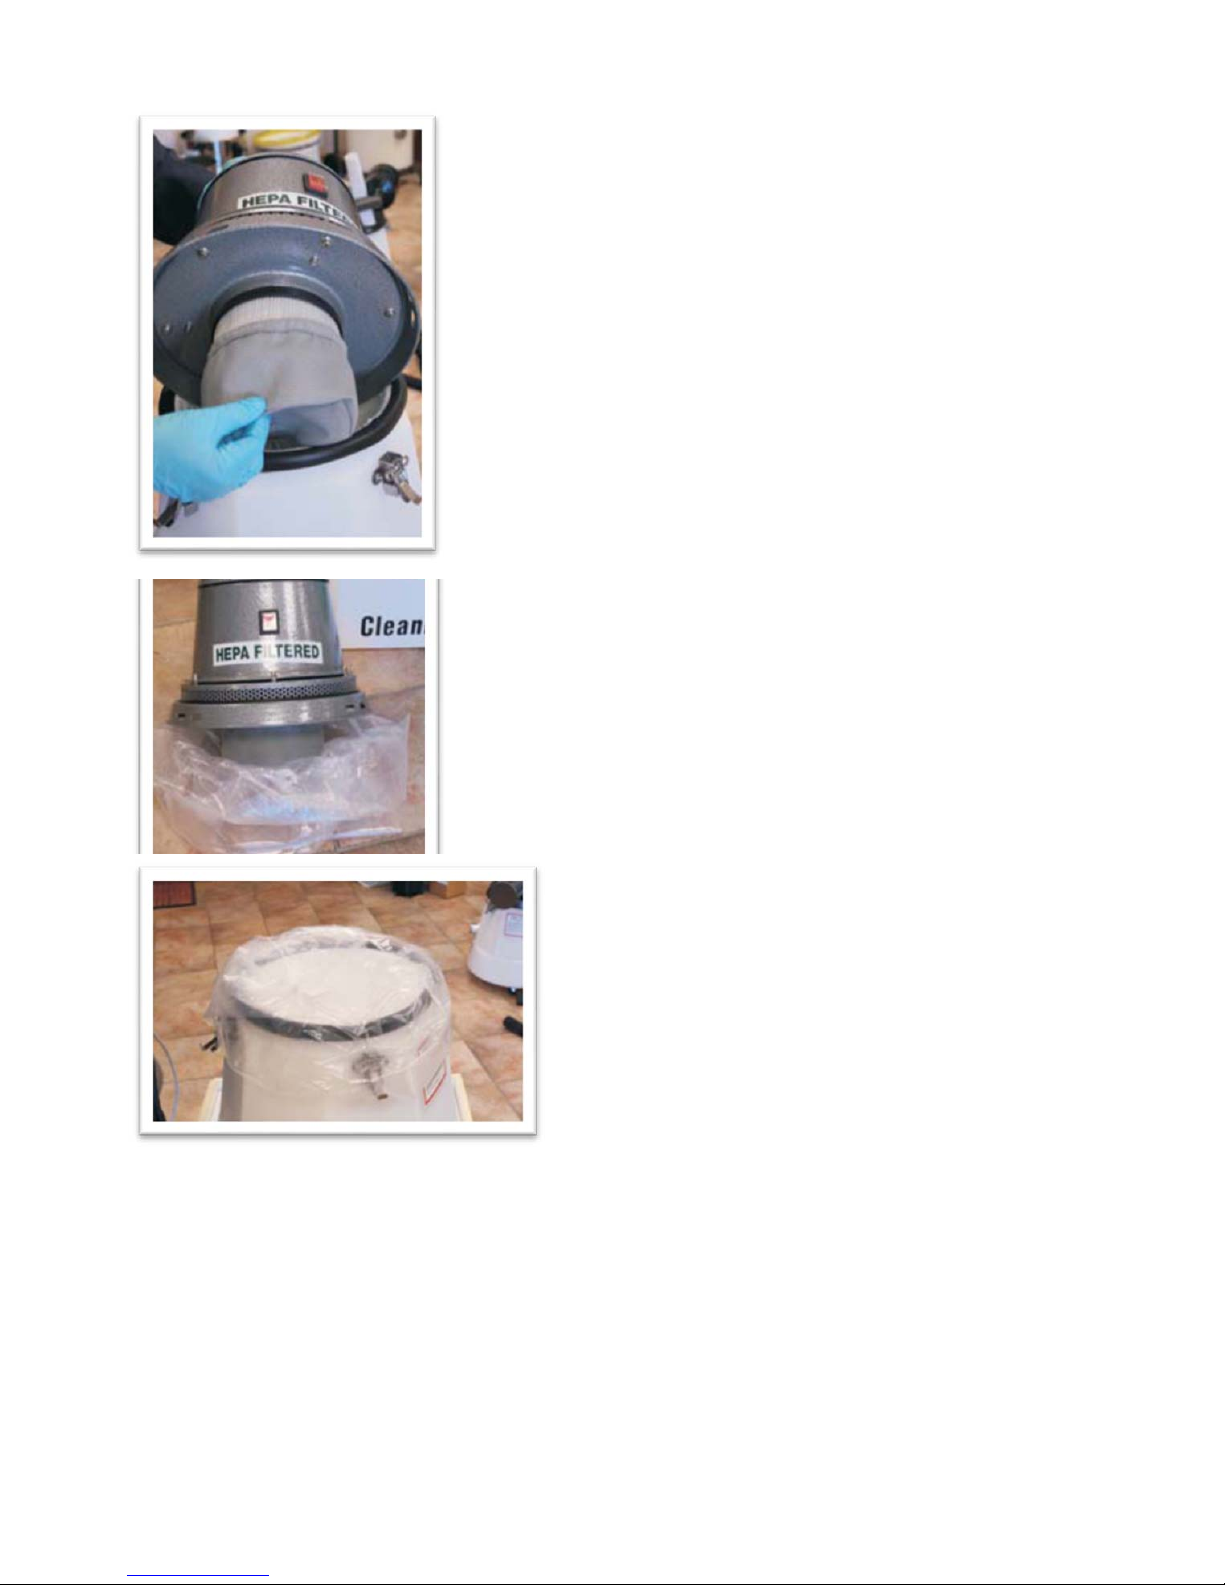
The HEPA filter and safety filter are attached to the
lid of the powerhead.
Stop the vacuum cleaner and carefully place the
powerhead of the vacuum cleaner on a poly liner on the
ground.
Place a poly liner in the recovery tank inside of the
main cloth filter.
Page 11 of 13
Page 12

Place the powerhead on the edge of the recovery
tank on top of the poly liner.
Carefully remove the safety filter and place it gently
into the poly liner.
Unscrew the hex nut located under the HEPA filter using a
5mm (5/6” #8) tool and carefully lower the HEPA filter into
the poly liner.
Page 12 of 13
Page 13

The HEPA filter and safety filter are now sealed inside of the
poly liner and can be disposed of according to local
governmental laws. (Conductive poly liners are available.)
Gently lift up the poly liner and seal it with a tie wrap.
Following the above operations:
1. Place a new HEPA filter under the lid and fix it with the hex nut using a 5mm (5/6” #8) tool
2. Place and fasten a new safety filter around the HEPA filter.
NOTE: It is recommended that an aerosol leak test, or particle count test be performed
before use to ensure that HEPA filter has been properly installed.
Page 13 of 13
Page 14

Page 15

Two Year Warranty
Tiger-Vac warrants that its equipment will be free of defects in workmanship or material for a
period of Two year from the date of delivery. Should any failure to conform to this warranty
appear Tiger-Vac shall upon notification within such time period, correct such non-conformity, at
its option, either by repairing any defective part or parts, or by replacing a part or parts provided
that the equipment is returned to an authorized Tiger-Vac service facility. In all cases freight
both ways will be at the expense of the customer. Equipment shall not be returned without
advance notice to, and consent of Tiger-Vac.
Except as specifically set forth herein, Tiger-Vac makes no warranties, either expressed or
implied as to any matter whatsoever, including without limitation any and all warranties of
merchantability, fitness for purpose, or other warranties, all of which are expressly disclaimed
and excluded. Neither party shall be liable to the other for special, indirect, incidental or
consequential damages, including but not limited to loss of production, loss of time, loss of
profits or any other similar indirect losses which might occur as a result of defects partial or total
failure of the product to perform as specified.
Correction of non-conformities or defects in the manner and for the period of time provided
above, shall constitute fulfillment of all liabilities of Tiger-Vac to the customer whether based on
contract, negligence or otherwise with respect to, or arising out of such equipment. The remedies
set forth herein are exclusive, and the liability of Tiger-Vac with respect to this sale or anything
done in connection therewith, whether in contract, in tort, under any warranty, or otherwise, shall
not, except as expressly provided herein, exceed the price of the equipment or part on which such
liability is based.
This warranty does not cover repairs due to normal wear and tear, accident, neglect, misuse or
abuse, incorrect installation or use other than as described in the instruction booklet. Breaks in
hoses and cables are not covered. This warranty is rendered void if the motor plate is removed or
defaced or if repairs are made or attempted by persons not authorized by Tiger-Vac.
Some states do not allow exclusions of implied warranties or limitation on how long an implied
warranty lasts so the above exclusions or limitation of implied warranties may not apply. Some
states do not allow exclusion or limitation of incidental or consequential damages so the above
exclusion or limitation of incidental or consequential damages may not apply. Limited warranties
set forth above give specific legal rights. Customer may have other rights which vary from state
to state.
Tiger-Vac Inc. (USA)
73 S.W. 12 Ave. Bldg. 1, Unit 7
Dania, FL 33004 USA
Tel: (954) 925-3625
Fax: (954) 925-3626
Tiger-Vac International Inc.
2020 Da gena is West
Laval, Qc H7L 5W2 Canada
Tel: (450) 622-0100
Fax: (450) 625-3388
e-mail: support@tiger-vac.com
web-site: www.tiger-vac.com
 Loading...