

Page 1
Printer
2016 TigerStop,LLC
September 2016 Mk1
1
Page 2
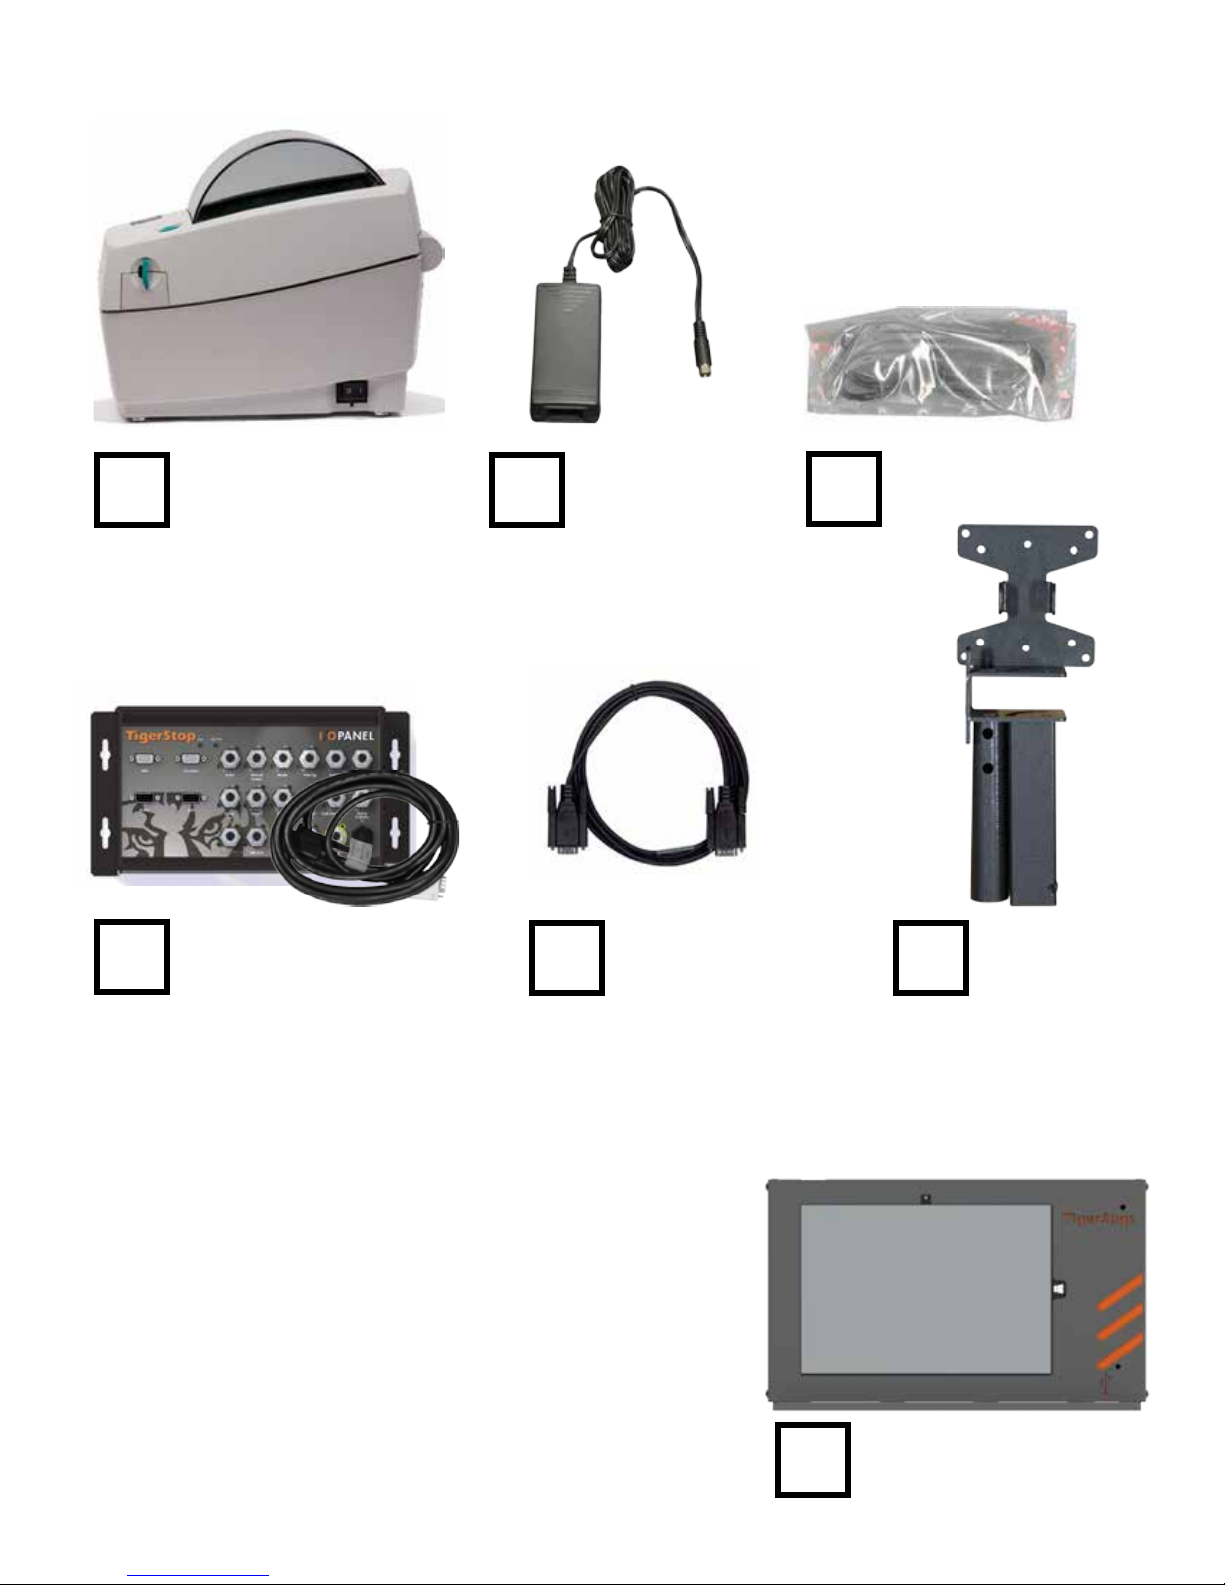
Printer
Power Supply
Power Cable
I/O Panel
RS232 Cable
Printer Stand
w/ Cable
Optional
Tablet Package
(Loaded with TigerPrint Display)
2
Page 3
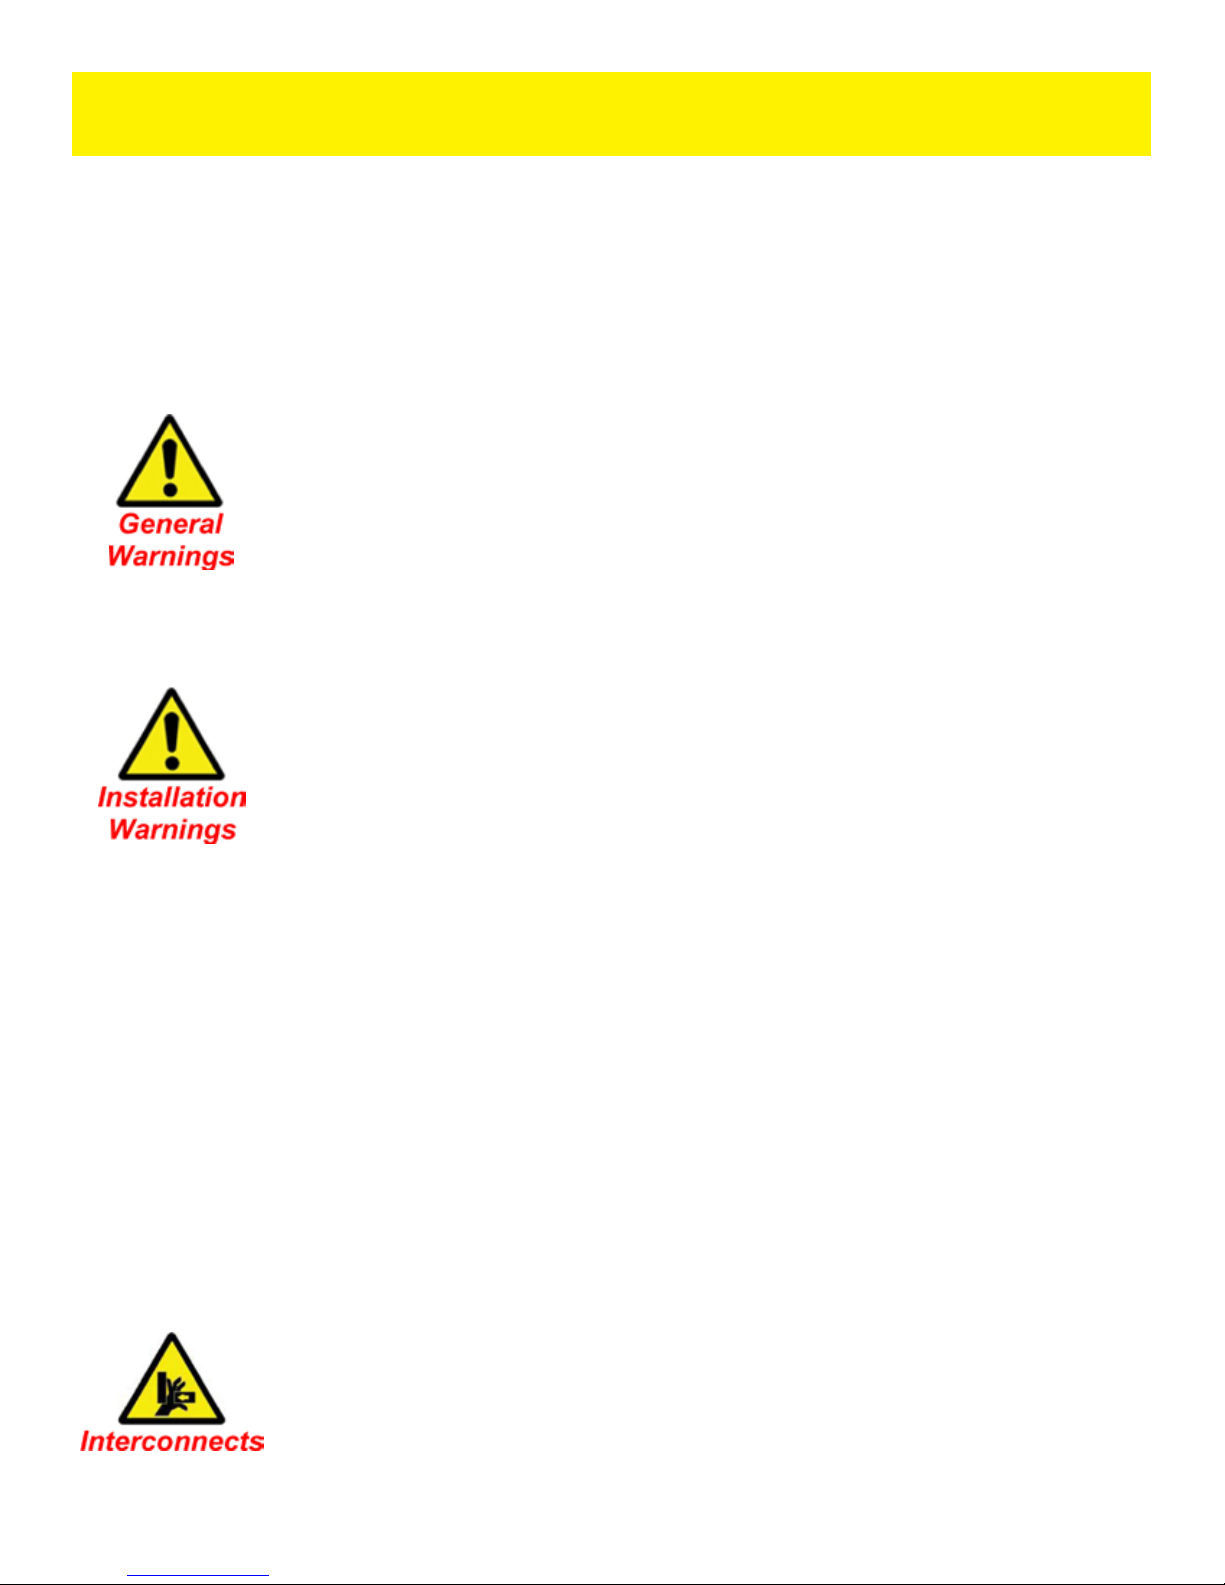
Safety First!
• Any Automatic equipment can be dangerous if used improperly, and this includes TigerStop and its line of automation
equipment: TigerStop, TigerPro, TigerFence (standard and SLR), TigerCrossCut, TigerTurbo, TigerRack, Heavy Duty2
and TigerSaw.
• But before you put your tape measure away and start making a TigerStop machine your newest best friend, please
read and consider the following safety reminders, some of which may relate to the operation of your other power tools
as well.
• If a warning is also found elsewhere in this manual or on a label axed to the machine, the reference is shown in
parentheses.
Warning: TigerStop, TigerFence, TigerCrossCut, TigerRip Fence, Heavy Duty2, TigerTurbo and
TigerRack are machine components intended for use in conjunction with other potentially dangerous
machinery. The use of these components does not make that machinery safe. TigerStop, LLC’s
products are not intended to substitute, in any manner, for safety requirements in general, or in
conjunction with other safety features to make the machine as safe as possible and to ensure that
it meets federal, state and local law with respect to safety and all other regulatory requirements. In
addition, TigerStop, TigerStop Heavy Duty 2, and TigerTurbo are machine components that should
qualied persons trained in safe operating procedures. Illustrations of TigerStop, TigerStop Heavy Duty2 and TigerTurbo
components in use do not show, and are not intended to show, safety features necessary to make the machinery safe to
operate.
(Label covering end cap of fence extrusions)
Warning: TigerStop (TigerFence SLR, TigerFence, TigerCrossCut, TigerTurbo, TigerRack, Heavy
Duty2 and TigerSaw) must be installed in accordance with all local, state, and federal regulations,
as well as common sense safety requirements, Use only trained professionals when installing
TigerStop machines with existing equipment to ensure a safe and proper work station that will in no
way endanger the operator or any other personnel. Do not operate without proper training, both in
TigerStop operation, and in the operation of adjoining equipment.
(Installation Guides of: TigerStop, TigerFence, TigerFence SLR, TigerCrossCut, TigerTurbo, TigerRack
and Heavy Duty2)
FOUR IMPORTANT CAUTIONS:
1. Do not randomly drill and tap holes in the TigerStop fence beam for mounting or for any other purpose. This might
damage the drive system. All fastening or attachment to the fence beam MUST be made by inserting T-bolts or T-nuts
WITH washers!
2. It is CRITICAL - especially if NOT using TigerStop attachment brackets (UBR), that if T-nuts are used, the bolts are
prevented from tightening through them and into the aluminum fence beam. Again, it is imperative that washers be
used.
3. Uneven tightening of the bolts used to fasten down TigerStop to its mounting support can introduce a slight twist or
other deformation in the beam. This will result in inaccurate measurement and premature failure of the drive belt or
other components.
4. The motor box (compartment) contains DC voltage with potentially FATAL amperage. NEVER attempt any
unauthorized actions inside the motor box.
(linked from TigerStop Installation, Feed Table Installation, Ledge Stand)
CAUTION: NEVER drill holes into the HD2 fence beam for any reason!
(HD2 Installation)
CAUTION: NEVER drill holes into the TigerTurbo fence beam for any reason!
(TigerTurbo Installation)
CAUTION: Washers MUST be used to prevent damage to the fence beam by over tightening!
(Mounting TigerStop to a Feed Table)
WARNING: Using a TigerStop interconnect does not relieve you of the responsibility for making
sure that your saw or other tool has all the necessary safety equipment in place.
(Standard Interconnect Kit, Advanced Interconnect Kit)
3
Page 4
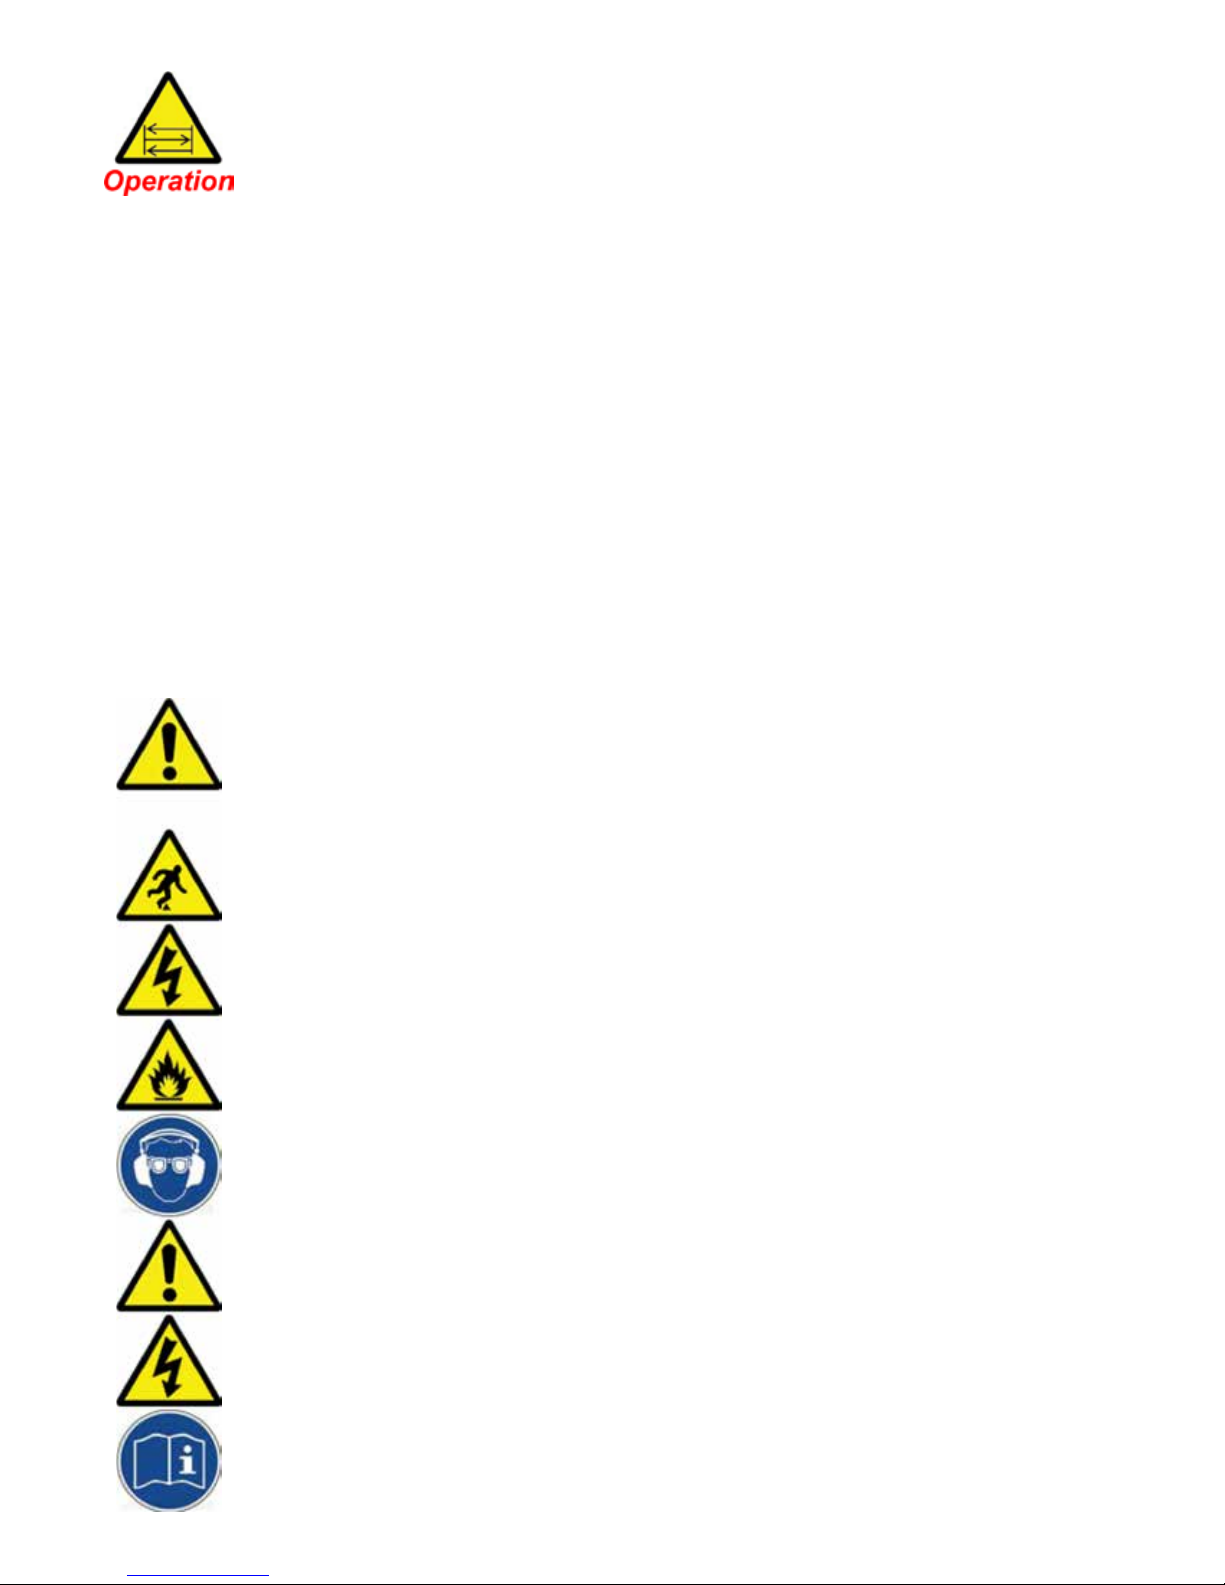
DANGER: This machine can start, move and stop automatically. Keep hands and loose clothing
clear of moving parts while operating. Moving parts can crush and cut. When used with a saw or
other cutting equipment, bodily injury and death may result if operated without safety guards on
all machines. Do not operate with guards removed. Operators must wear adequate eye and ear
protection. High voltage DANGER - Do not open motor compartment or controller keypad. No user
serviceable parts inside.
(TigerStop Quick Reference Card, ALSO label of motor end plate or amplier cover)
DANGER! CAUTION! Keep hands and loose clothing clear of moving parts while operating. Moving parts can crush
and cut. To comply with ANSI Safety Standard B11-19 paragraph 4.2.1, “The user shall be responsible for ensuring that
safeguarding is provided, integrated, installed, maintained and used in accordance with the requirements of this standard.”
When used with saws or other cutting equipment, bodily injury and death may result if operated without safety guards on
all machines. Do not operate with guards removed. Keep the work area clean and well-lit to avoid accidental injury. Do not
use TigerStop in a dangerous environment. Using power tools in wet locations or in rain can cause shock or electrocution!
Do not operate near ammable liquids or in gaseous or explosive atmospheres! Wear proper apparel, no loose clothes or
jewelry which could get pulled into moving machinery or materials. Wear non slip footwear, safety glasses, ear protection
and a dust mask. Do NOT operate this machinery under the inuence of drugs or alcohol! POWER: Use only 3-wire
extension cords, 3-prong grounded plugs and 3-pole receptacles. No one should operate this machine except fully
qualied personnel. Read the TigerStop Manual for complete instructions. HIGH VOLTAGE DANGER: Do not open motor
compartment or controller keypad. DC voltage with potentially FATAL amperage! Disconnect power before servicing.
(Label covering motor box or amplier end cap)
CAUTION: The springs are loaded! Do not loosen the clamp at the back end of the buer tubes without taking
precautions. Sudden release of spring tension could result in bodily injury.
(Spring Buer Heavy Duty)
IMPORTANT CAUTIONS - READ AND UNDERSTAND BEFORE OPERATING TIGERSTOP MACHINES!
DANGER! Don’t get pinched by the push feeder. Keep your hands away when in motion!
Keep the work area clean and well lit to avoid accidental injury.
Do not use TigerStop machines in a dangerous environment. Using power tools in damp or wet
locations or in rain can cause shock or electrocution.
Do not operate near ammable liquids or in gaseous or explosive atmospheres!
Wear proper apparel, no loose clothes or jewelry which could get pulled into moving machinery or
materials.
Wear non slip footwear, safety glasses, ear protection and a dust mask.
Use only 3- wire extension cords that have 3-prong grounding type plugs and 3-pole receptacles that
accept the tools plug for 110VAC. Use only 5-wire cords and plugs when using 3 phase.
DO NOT operate this or any machine under the inuence of drugs or alcohol!
Do not open motor compartment or controller keypad. DC Voltage with potentially FATAL amperage!
Disconnect power before servicing.
No one should operate this machine except for fully qualied personnel.
Read the manual!
4
Page 5

Table of Contents
Table of Contents
Installation....................................................................................................................6
Connections..................................................................................................................7
Setup...........................................................................................................................8
Installing TigerPrint Display.........................................................................................12
Using TigerPrint Display..............................................................................................15
5
Page 6
Installation
Installation
The TigerStop printer will print part information for each part processed. When used with TigerLink 6,
you can print labels with custom part information. TigerStop offers a 2 inch wide printer (PR2) and a 4
inch wide printer (PR4). Each printer is tted with thermal labels, so you will not need to replace ink or
toner cartridges.
The printer must be installed after TigerStop is installed to the tool. If TigerStop has not been installed,
please do so now.
If you are installing TigerPrint Display software, skip to page 12.
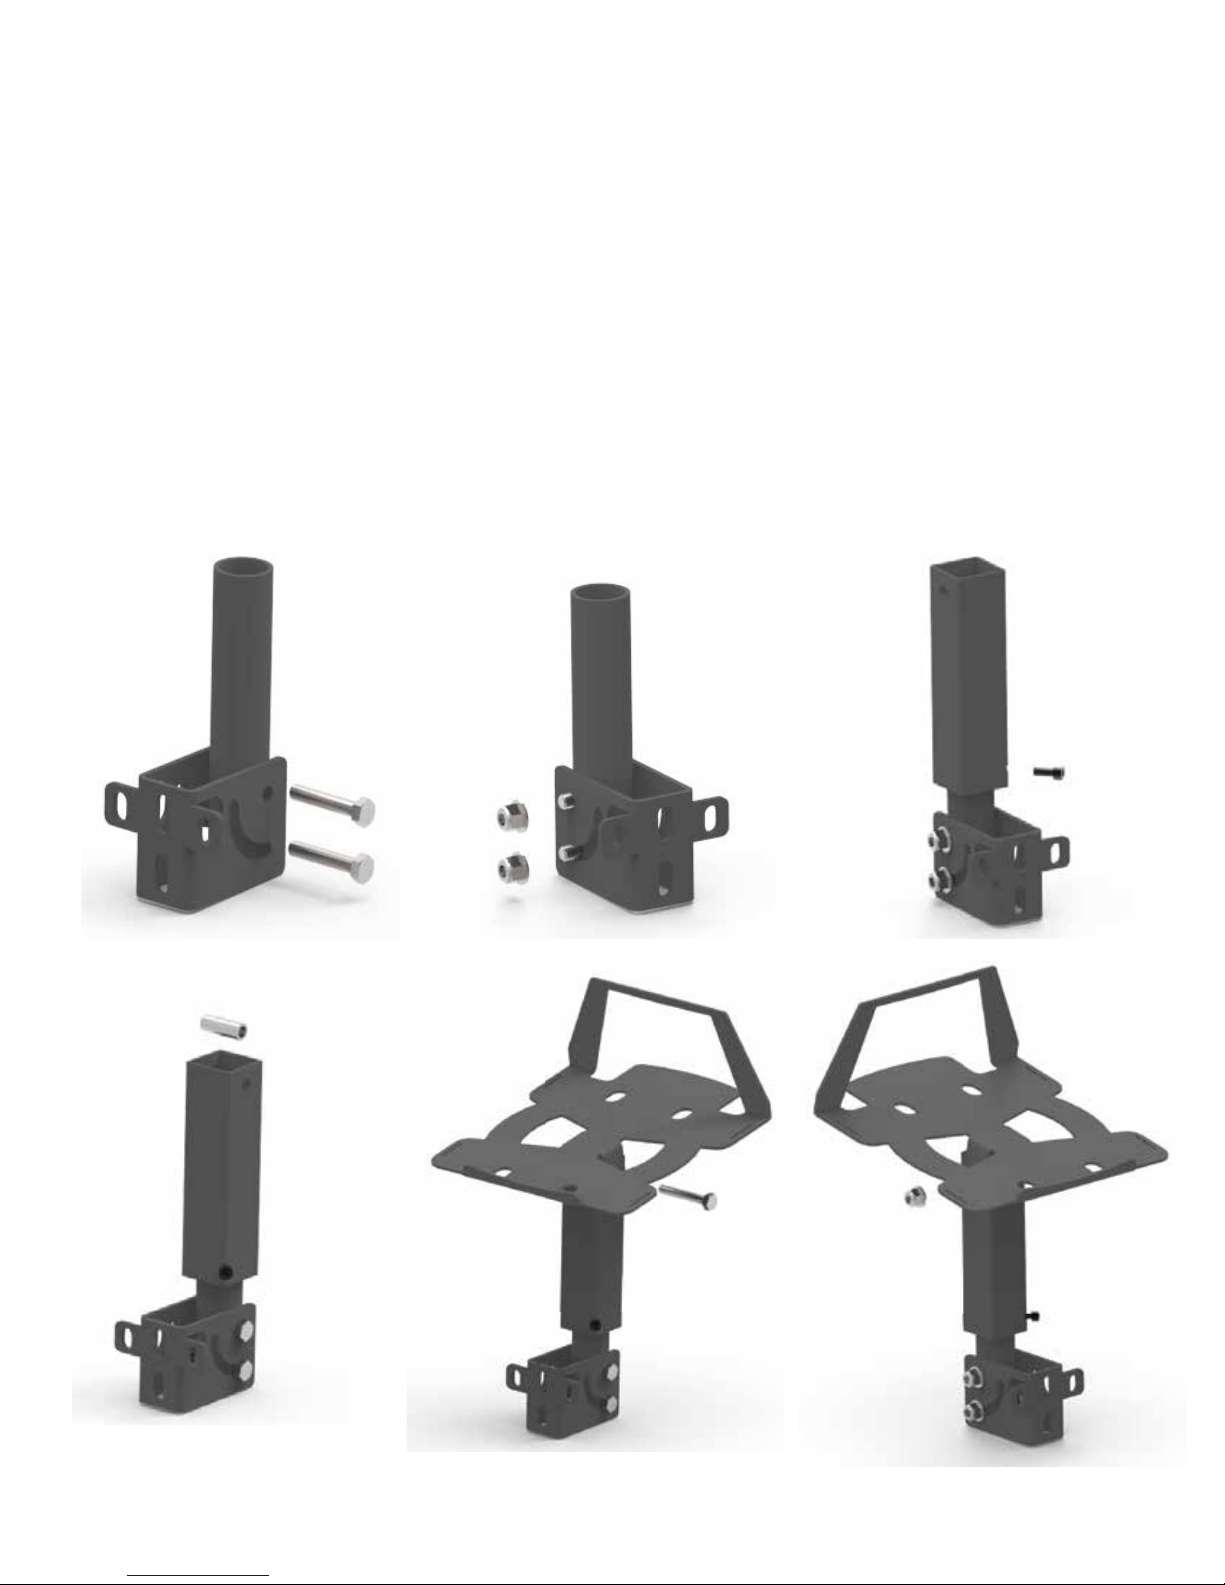
Assemble Printer Stand
1. 2. 3.
4. 5. 6.
6
Page 7
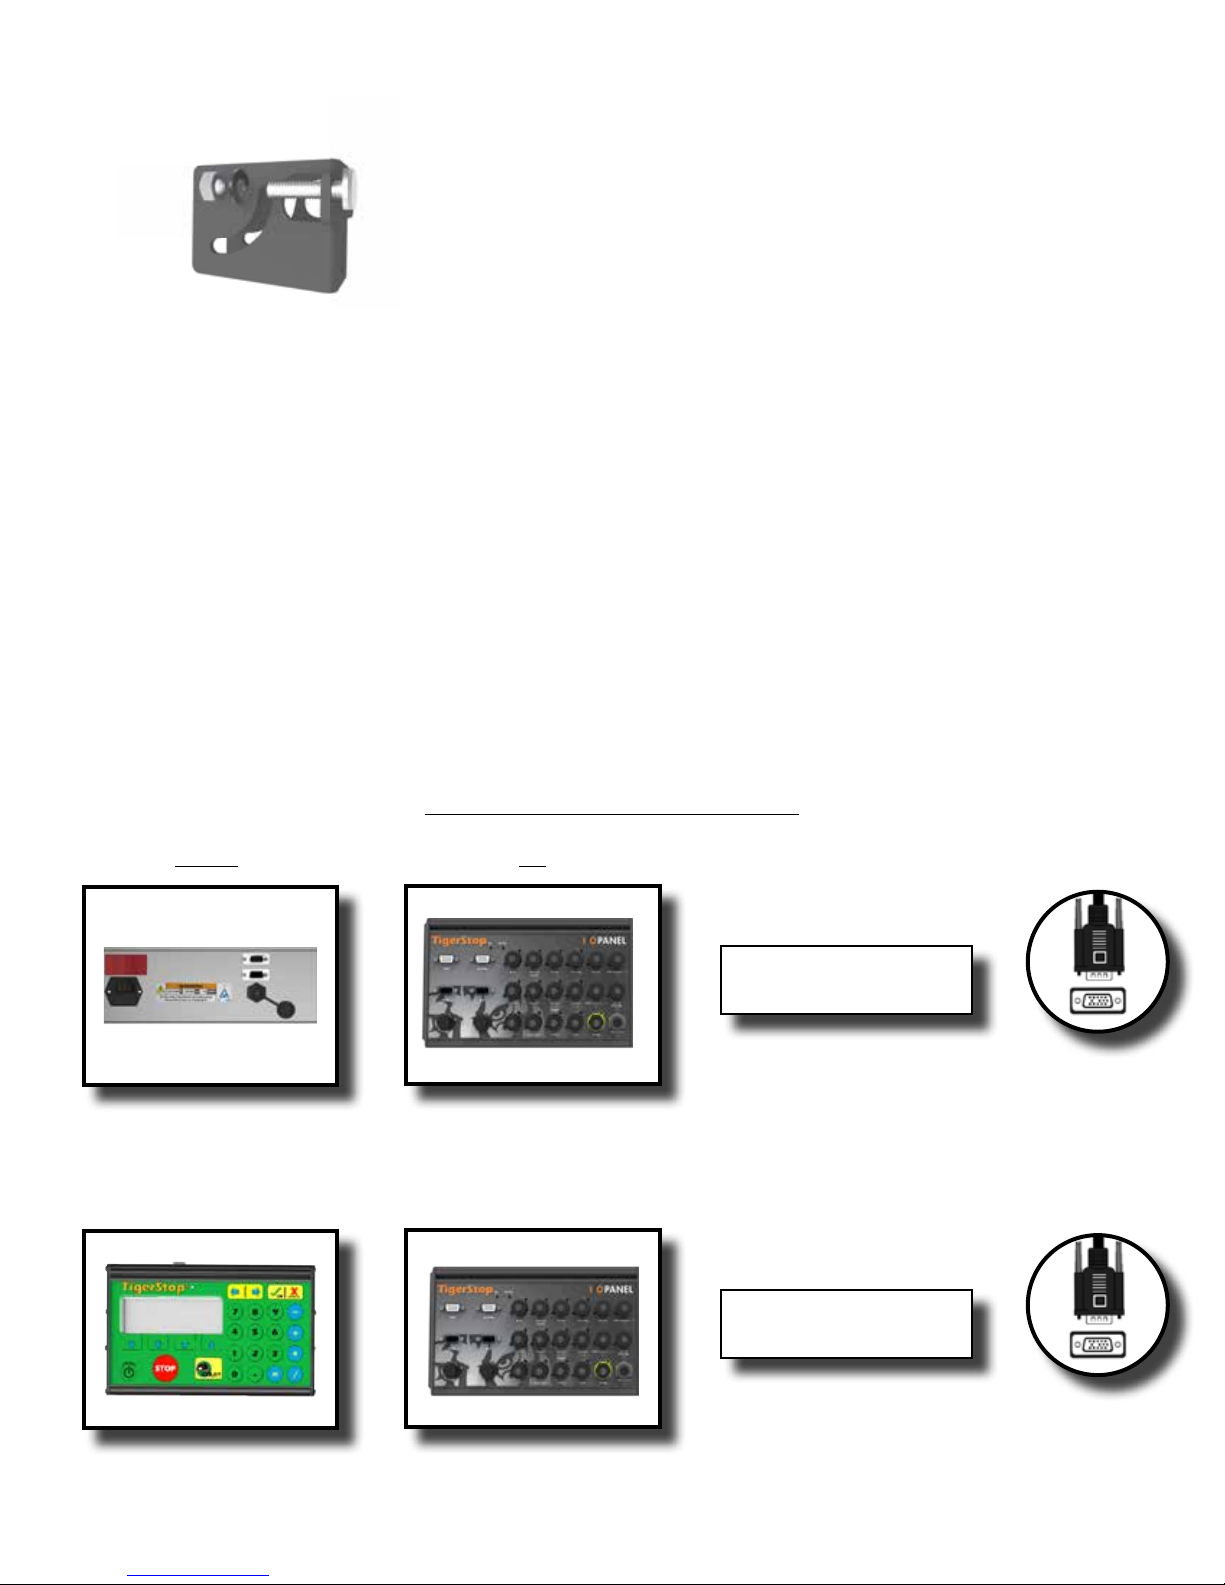
7.
Connections
Connections
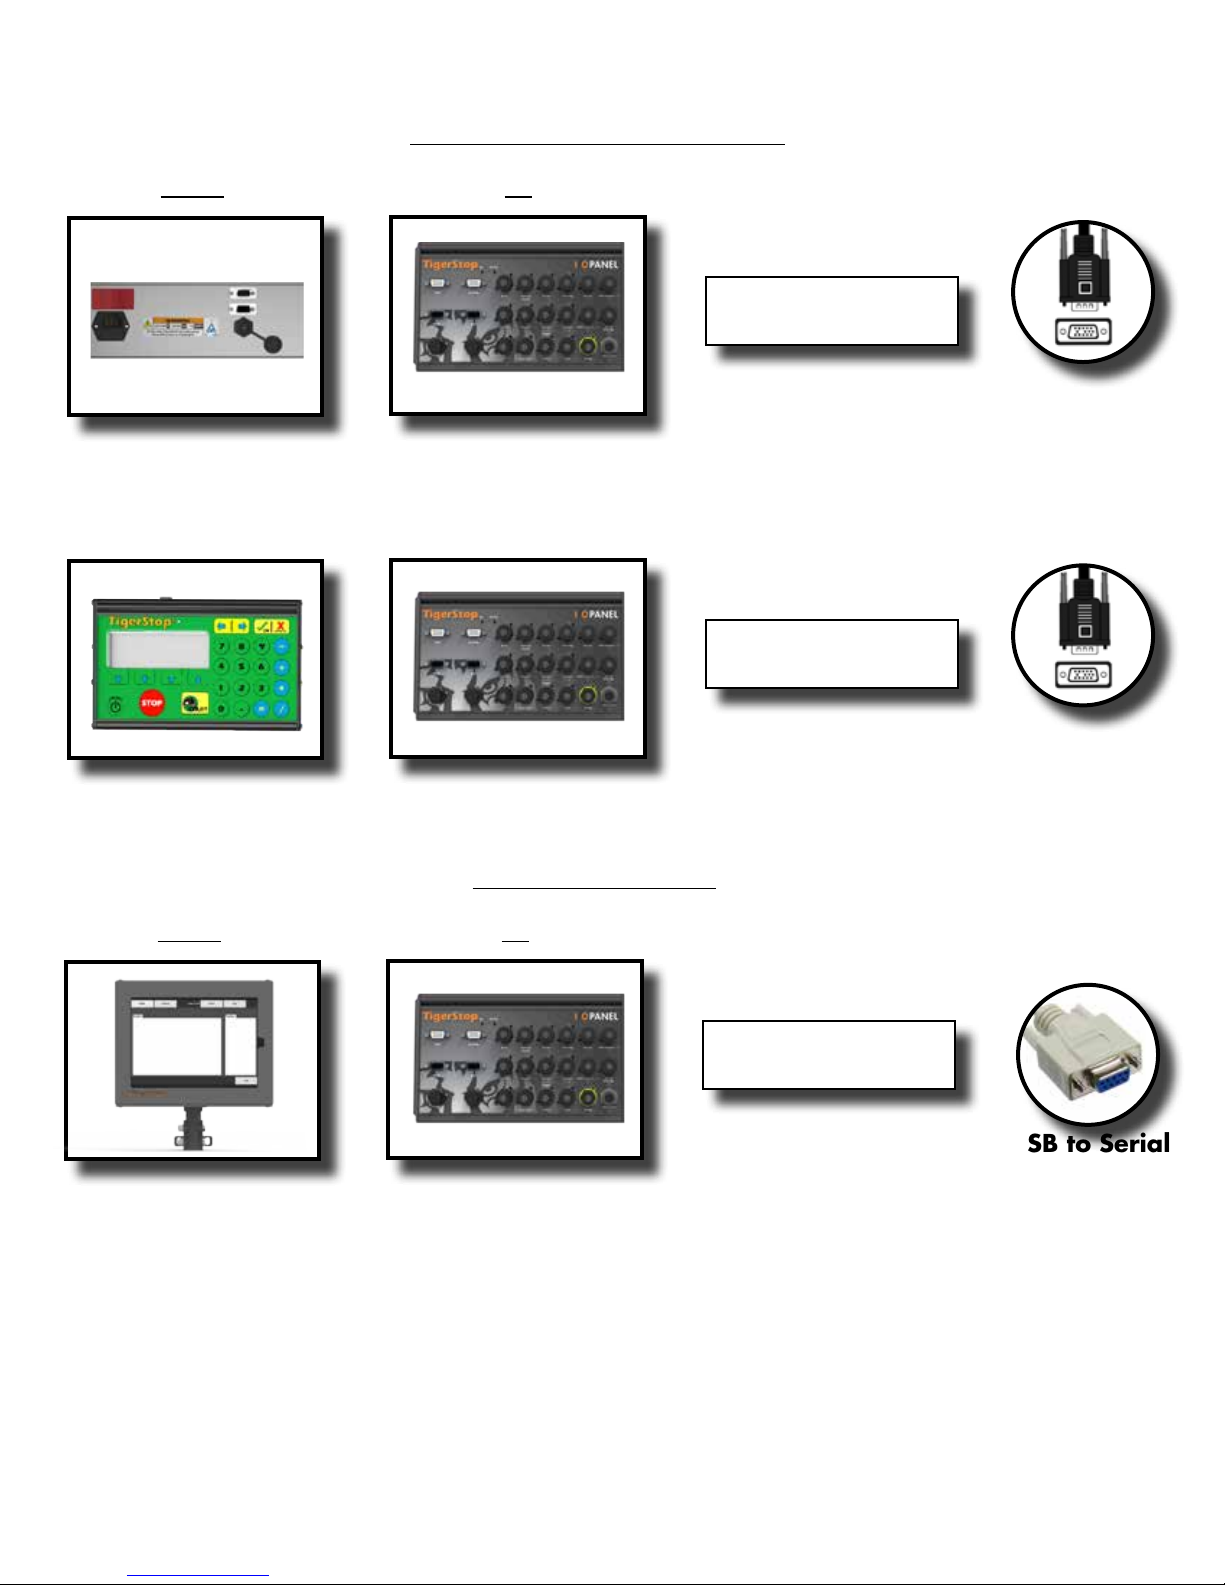
Amplifier and Controller Connections
From To
Amplifier
I/O Panel
(Amplifier)
White End (Amplier)
Black End (I/O Panel)
15 Pin
White End (I/O Panel)
Black End (Controller)
Controller
I/O Panel
(Controller)
15 Pin
7
Page 8
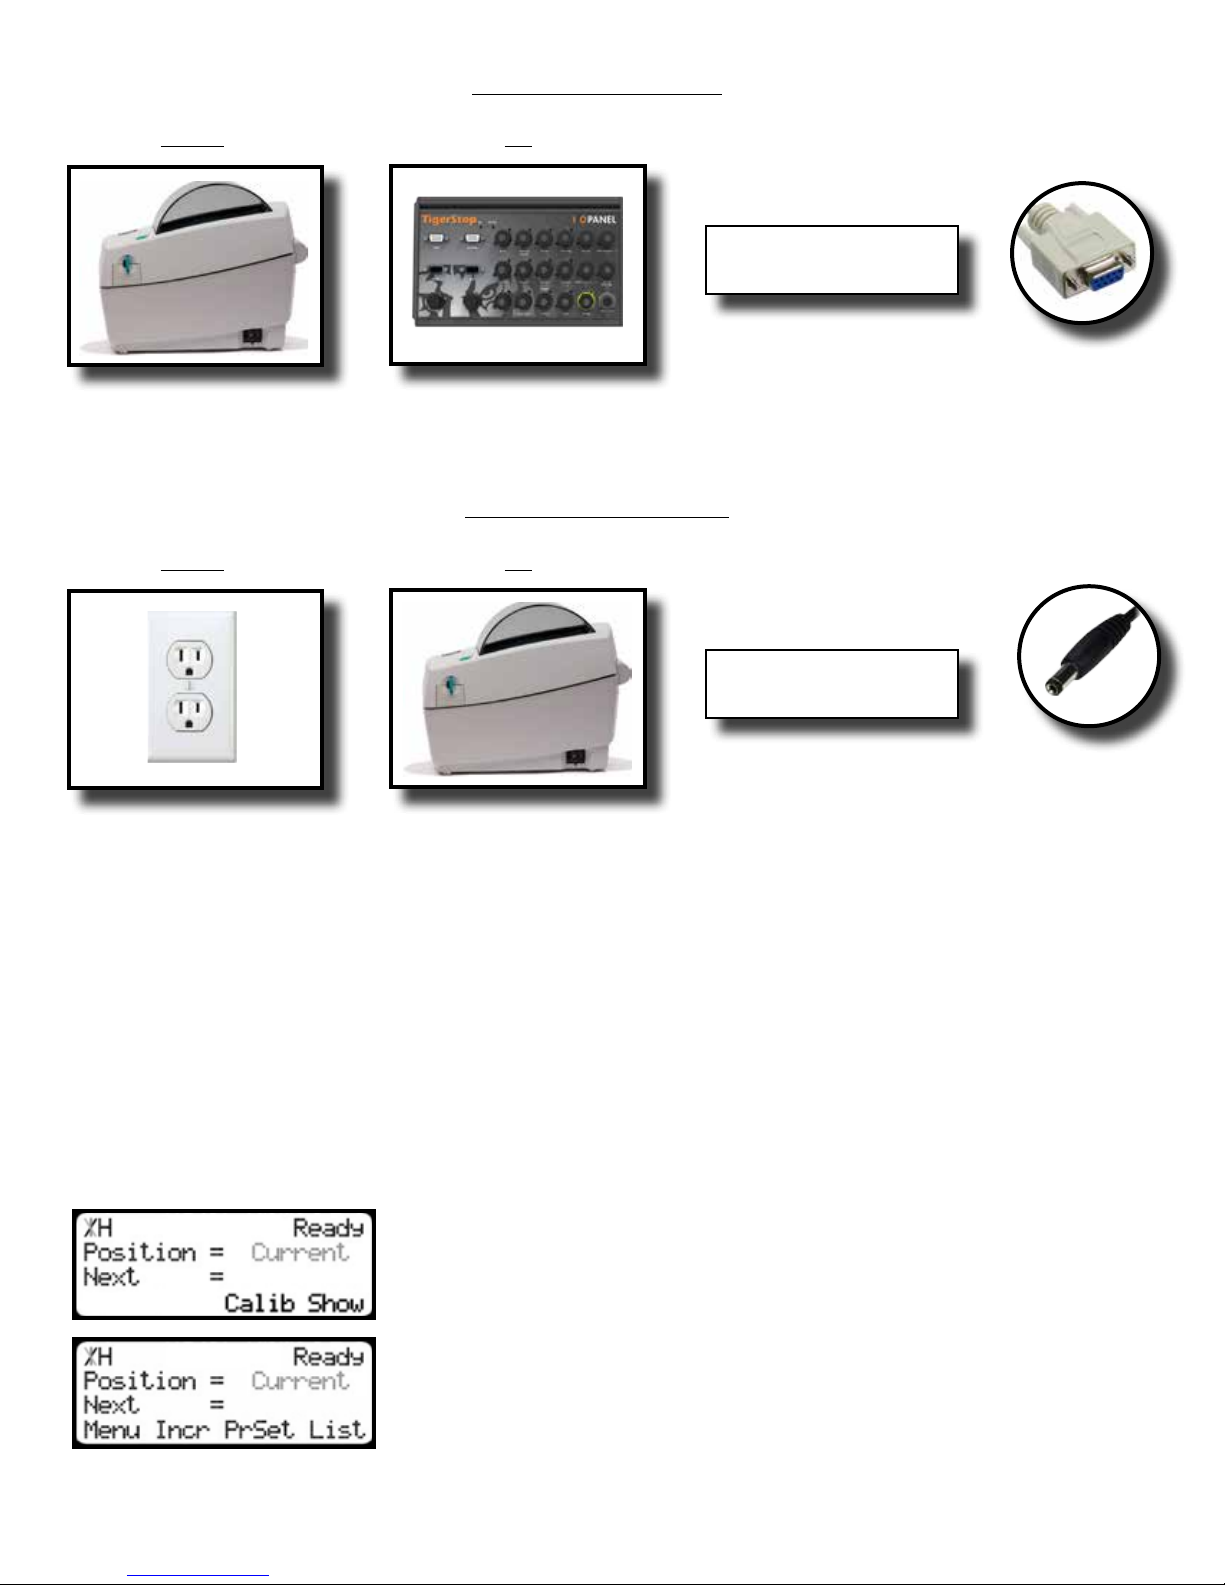
Printer Data Connections
From To
15 Pin RS232 Serial
Cable
Serial
Printer
(RS232 Port)
From To
Wall
(120 VAC)
Setup
Setup
I/O Panel
(Printer)
Printer Power Connections
Attached to AC power
adapter
Power
Connector
Printer
(Power Port)
Enter Enable Code
If you purchased printing as an add on to an existing TigerStop, you must enter a new enable code
(provided by TigerStop at time of purchase) that will unlock the printing upgrade. If you purchased
printing as part of a new TigerStop product, the complete functionality will be unlocked during the
warranty registration process.
1. Start at the Ready Screen. Press the [Show] soft key to display more
2. Press the [Menu] soft key to access the menu select screen.
8
options.
Page 9
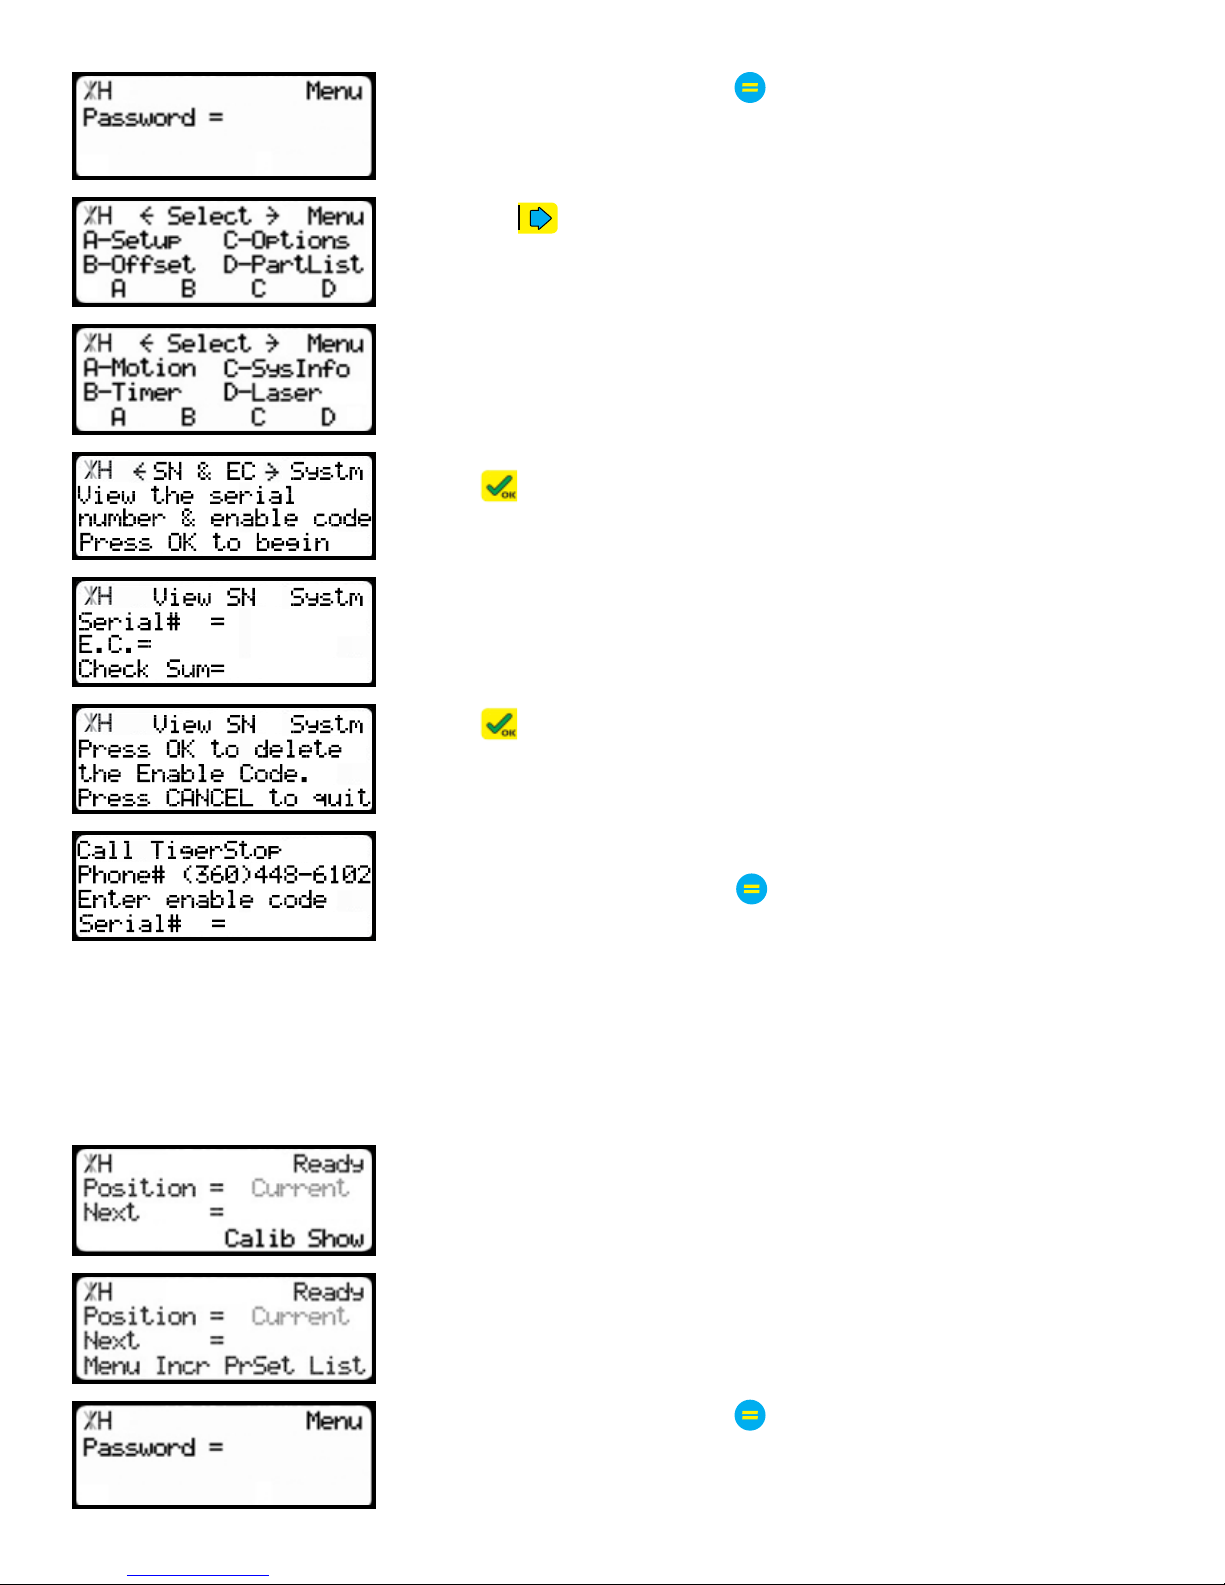
3. Enter the password and press
Note: The default password is set to the serial number of the TigerStop.
.
4. Press the button.
5. Press the [Sys Info] soft key to access the System Information menu.
6. Press
to view the TigerStop serial number and enable code.
7. Press the [A], [B], [C] and [D] soft keys, one after the other.
8. Press .
9. Press [Stop] to return to the Ready Screen.
10. Cycle power.
11. After power up, TigerStop will ask you for a new enable code.
12. Enter your code and press
.
TigerStop is now properly enabled.
Set Printer Settings
Once the printer is enabled, there are few settings to congure. These settings are inside the Options
menu.
To access the Options menu...
1. Start at the Ready Screen. Press the [Show] soft key to display more
2. Press the [Menu] soft key to access the menu select screen.
3. Enter the password and press
Note: The default password is set to the serial number of the TigerStop.
options.
.
9
Page 10
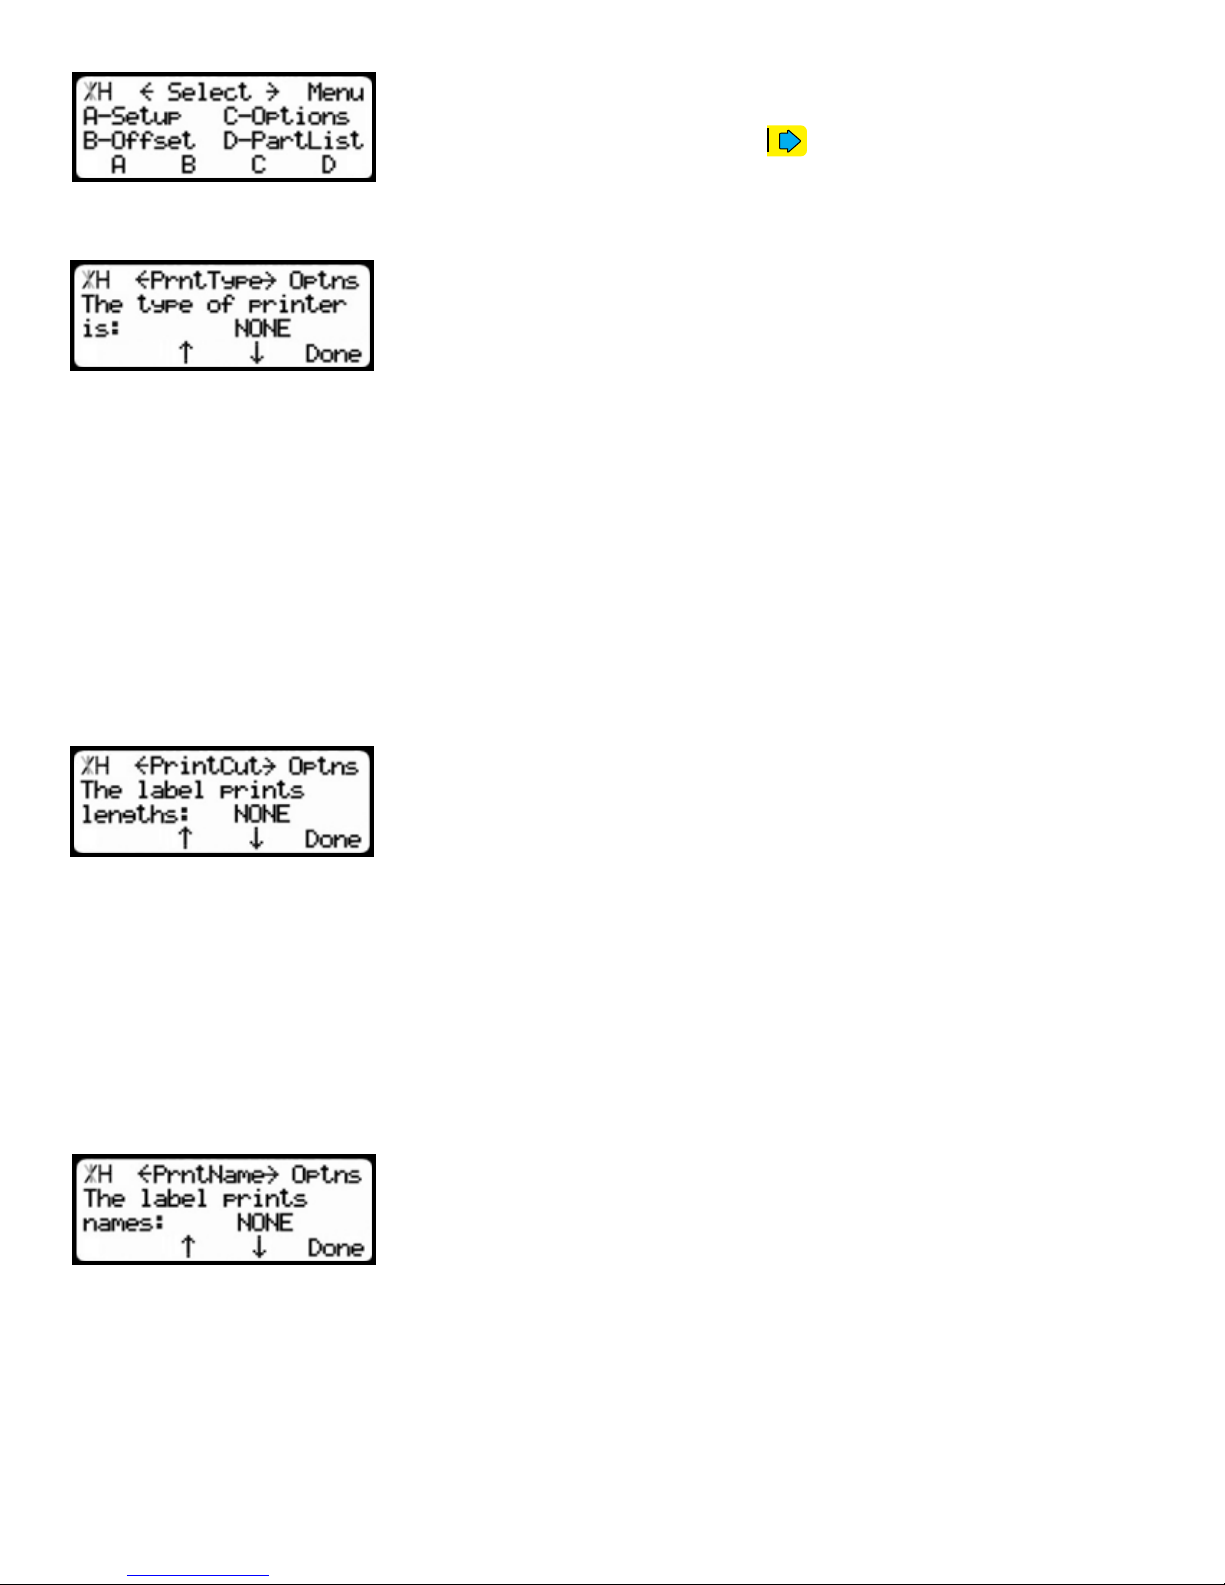
4. Press the [Options] soft key to access the Options menu.
5. Inside the Options menu, use the
button to scroll through the
settings.
Printer Type Setting
The Printer Type setting is used to tell TigerStop what kind of a printer it is
connected to.
Printer Type can be set to different settings, depending on the type of printer you are using.
• 1in Wide - This option is used if you are using a 1 inch wide labels.
• 2in Wide - Used if you are using 2 inch wide labels (LP2824plus printer).
• 3in Wide - Use this option if you are printing on 3 inch wide labels.
• 4in Wide - Select this option if you are using 4 inch wide labels (GC420d printer).
Note: TigerStop is also compatable with Zebra TLP2824 and CG420T.
To change Printer Type...
1. Press [B] or [C] to toggle the Printer Type setting.
2. When you nd the proper printer type, press the [Done] soft key to save the parameter.
Print Cut Setting
The Print Cut setting tells TigerStop to print length and quantity
information.
Print Cut can be set to two different settings
Standard - This will print the data in a standard small font.
Large - This will print the data in a large font.
Note: aside from standard and large, font cannot be change when using print cut.
To change Print Cut...
1. Press [B] or [C] to toggle the Print Cut setting.
2. Press the [Done] soft key to save the parameter.
Print Name Setting
The Print Name setting is used to print the part list name from
downloaded parts lists, if you have the TigerStop downloading upgrade.
To change Print Cut...
1. Press [B] or [C] to toggle the Print Cut setting.
2. Press the [Done] soft key to save the parameter.
10
Page 11
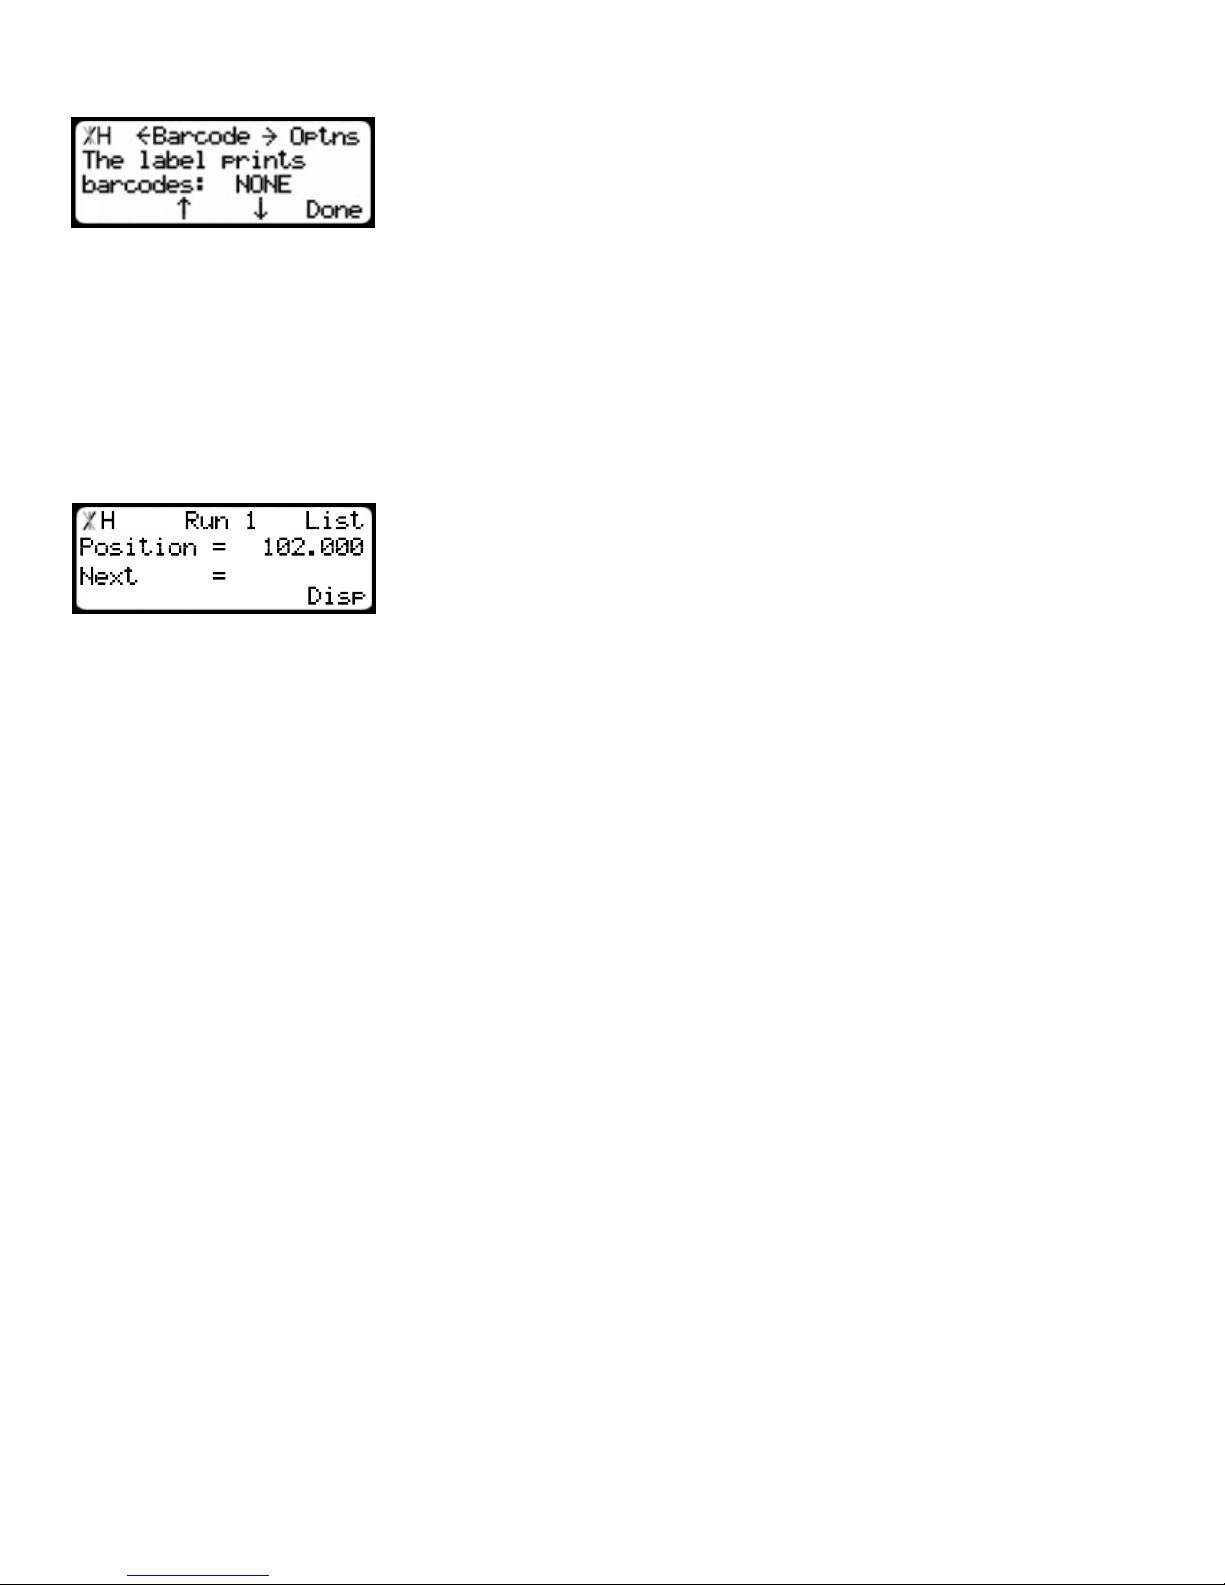
Print Barcode Setting
Barcode tells TigerStop to print bar coded data on your label. This setting
will be available if you have the TigerStop printing upgrade.
To change Barcode...
1. Press [B] or [C] to toggle the Barcode setting.
2. Press the [Done] soft key to save the parameter.
Displaying Print Data on the TigerStop Controller
If you are using the TigerStop printing upgrade with TigerLink 6 downloading software, you can display
the rst two print elds on the TigerStop controller (up to 10 characters per print eld).
1. When running a part list, press the [Disp] soft key 3 times.
2. This will activate TigerStops print eld display mode.
11
Page 12
Installing TigerPrint Display
Installing TigerPrint Display
TigerPrint Display software can be installed in place of the TigerStop printer and will display a visual
representation of the label on a TigerStop Tablet PC. The Tablet PC and TigerPrint Display software are
sold separately and are not included with the TigerStop printing upgrade.
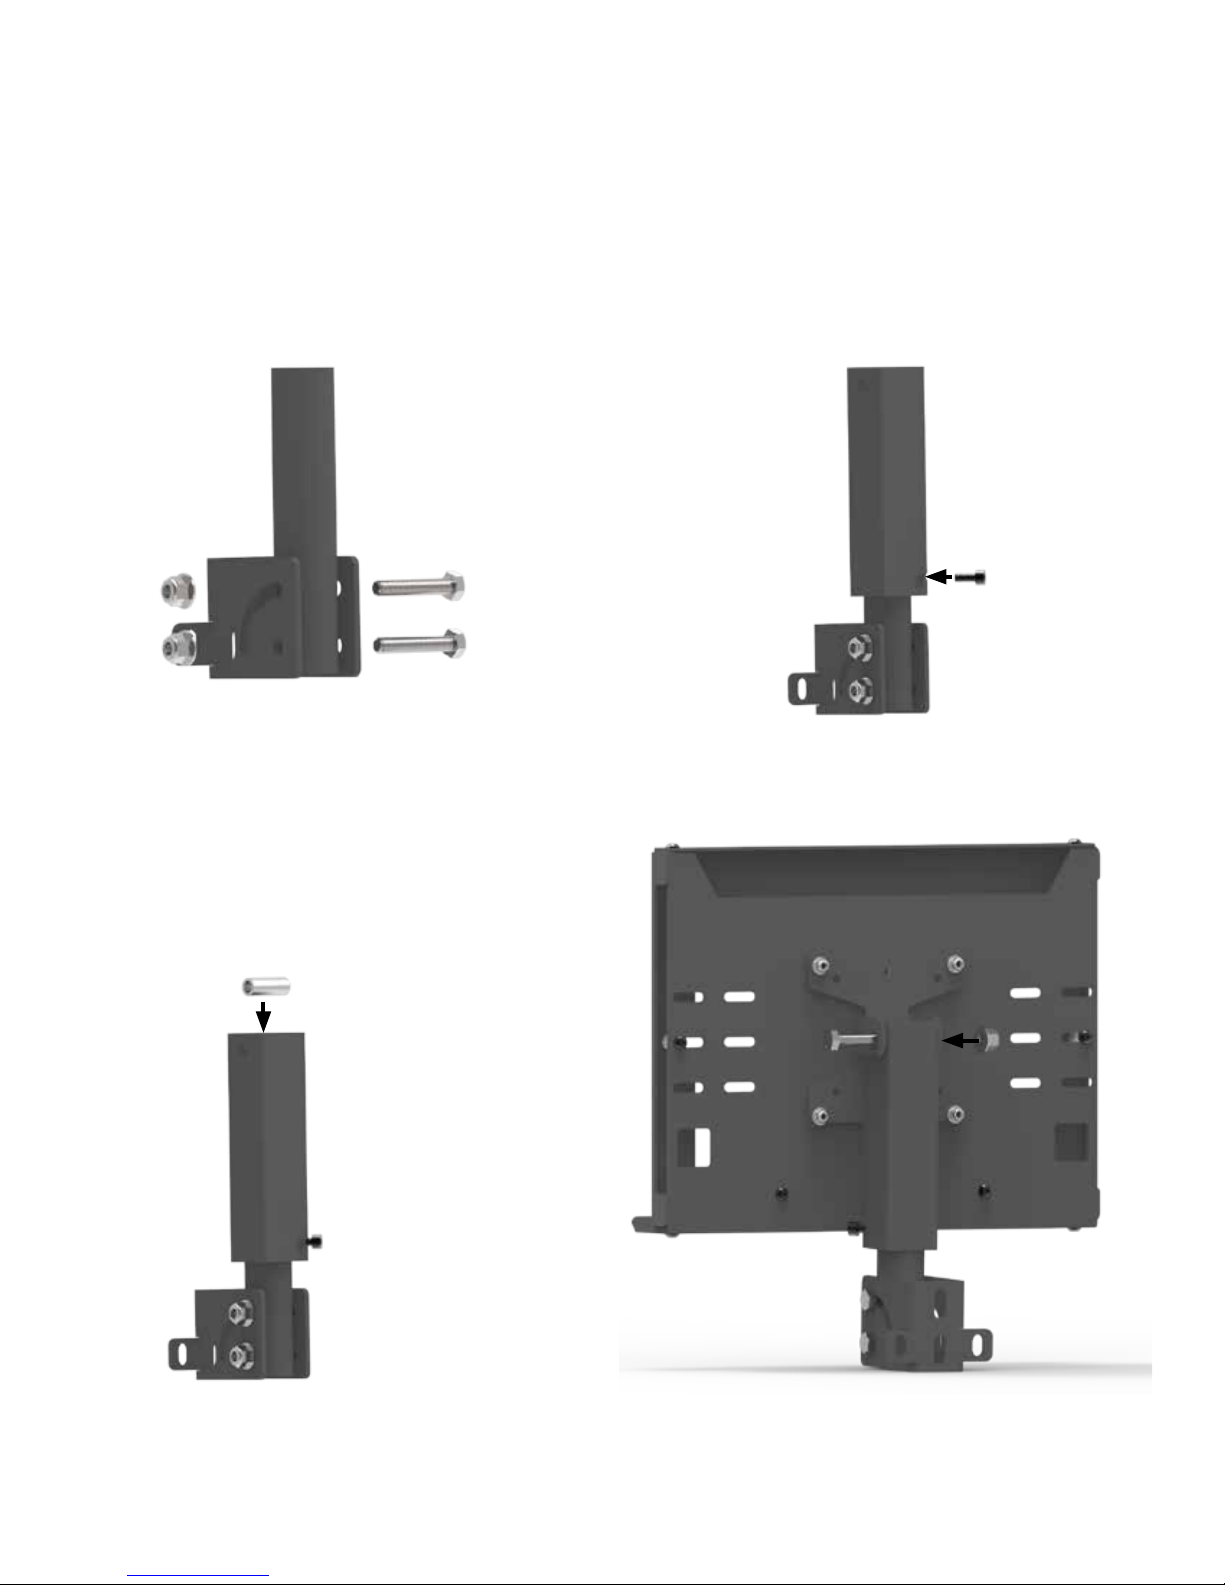
Assemble Tablet Stand
1.
2.
3.
4.
12
Page 13
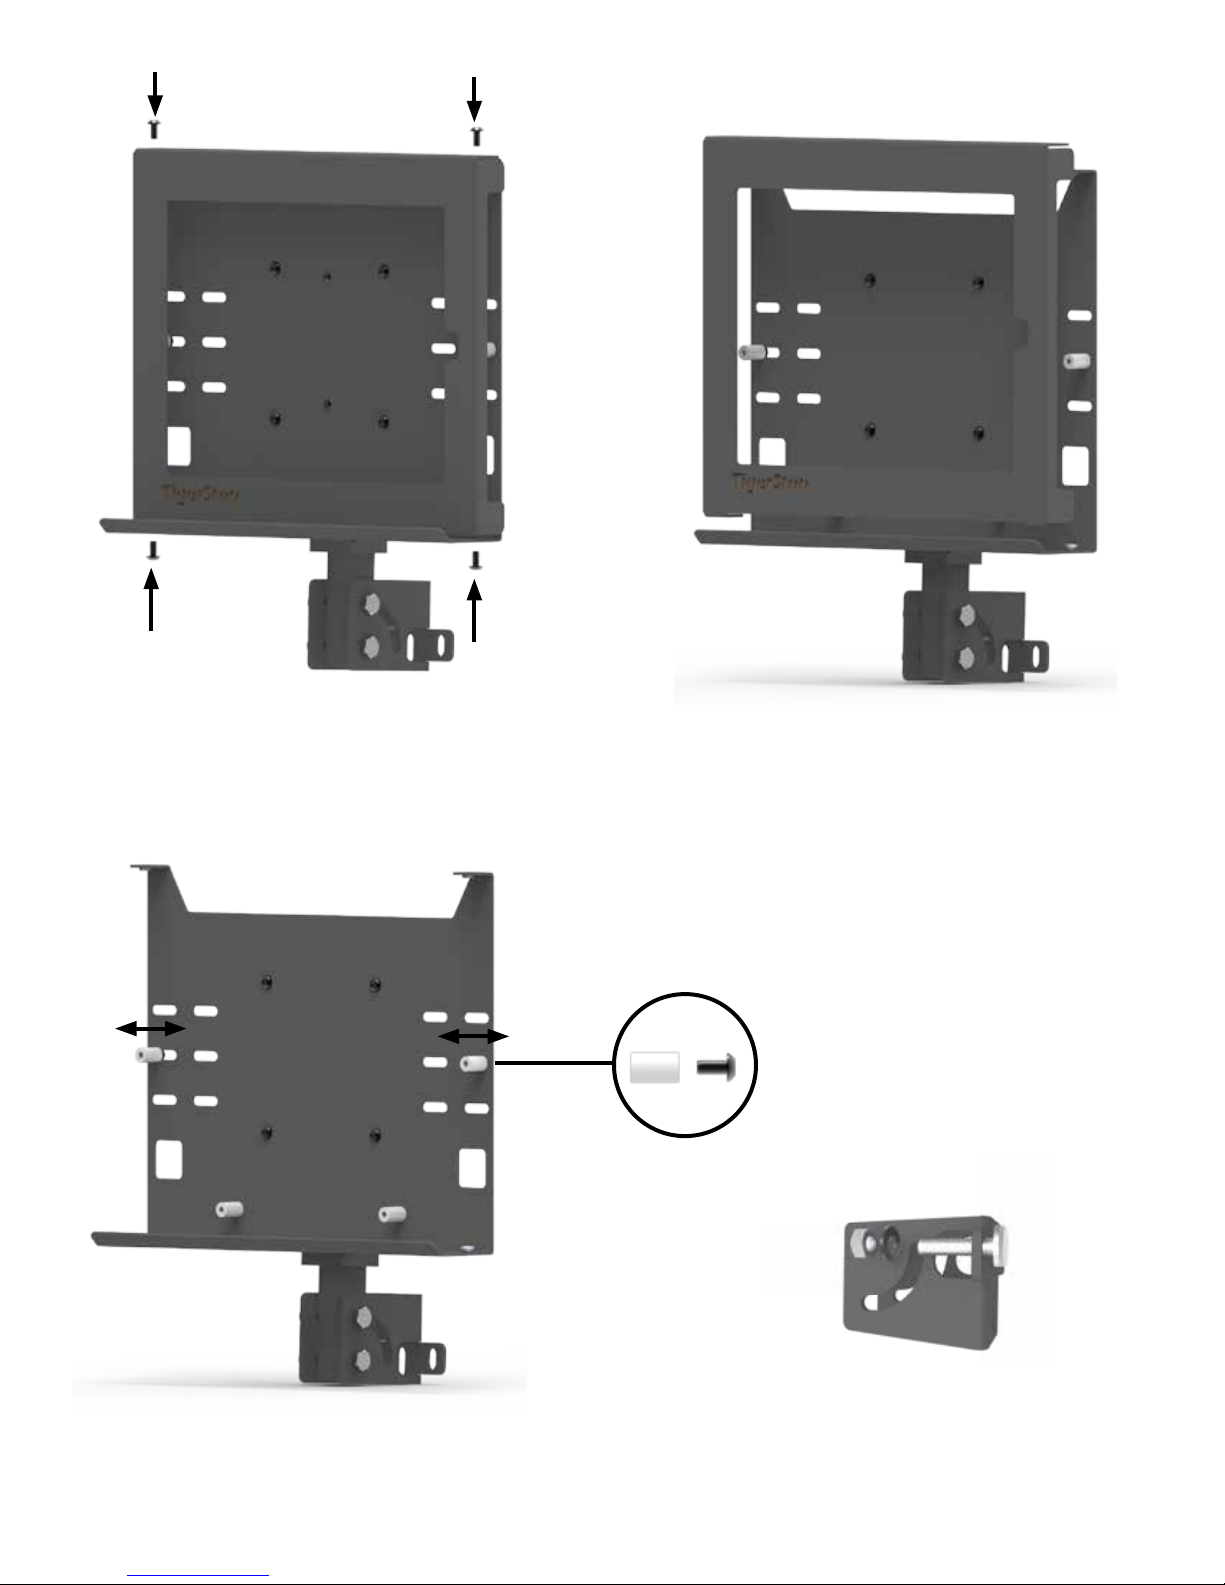
5. 6.
Note: Install the tablet PC between the spacers, then move the left and right spacer to t the tablet size. Once the tablet is
installed, put the front cover on and secure it.
7.
8.
The assembled tablet stand can be mounted to any surface that is convenient for the operator.
13
Page 14
Tablet Connections
From To
Amplifier and Controller Connections
White End (Amplier)
Black End (I/O Panel)
15 Pin
Amplifier
Controller
I/O Panel
(Amplifier)
I/O Panel
(Controller)
Tablet Data Connections
From To
White End (I/O Panel)
Black End (Controller)
15 Pin
Tablet
(USB Port)
14
Supplied USB to Serial
Adapter
USB to Serial
I/O Panel
(Printer)
Page 15
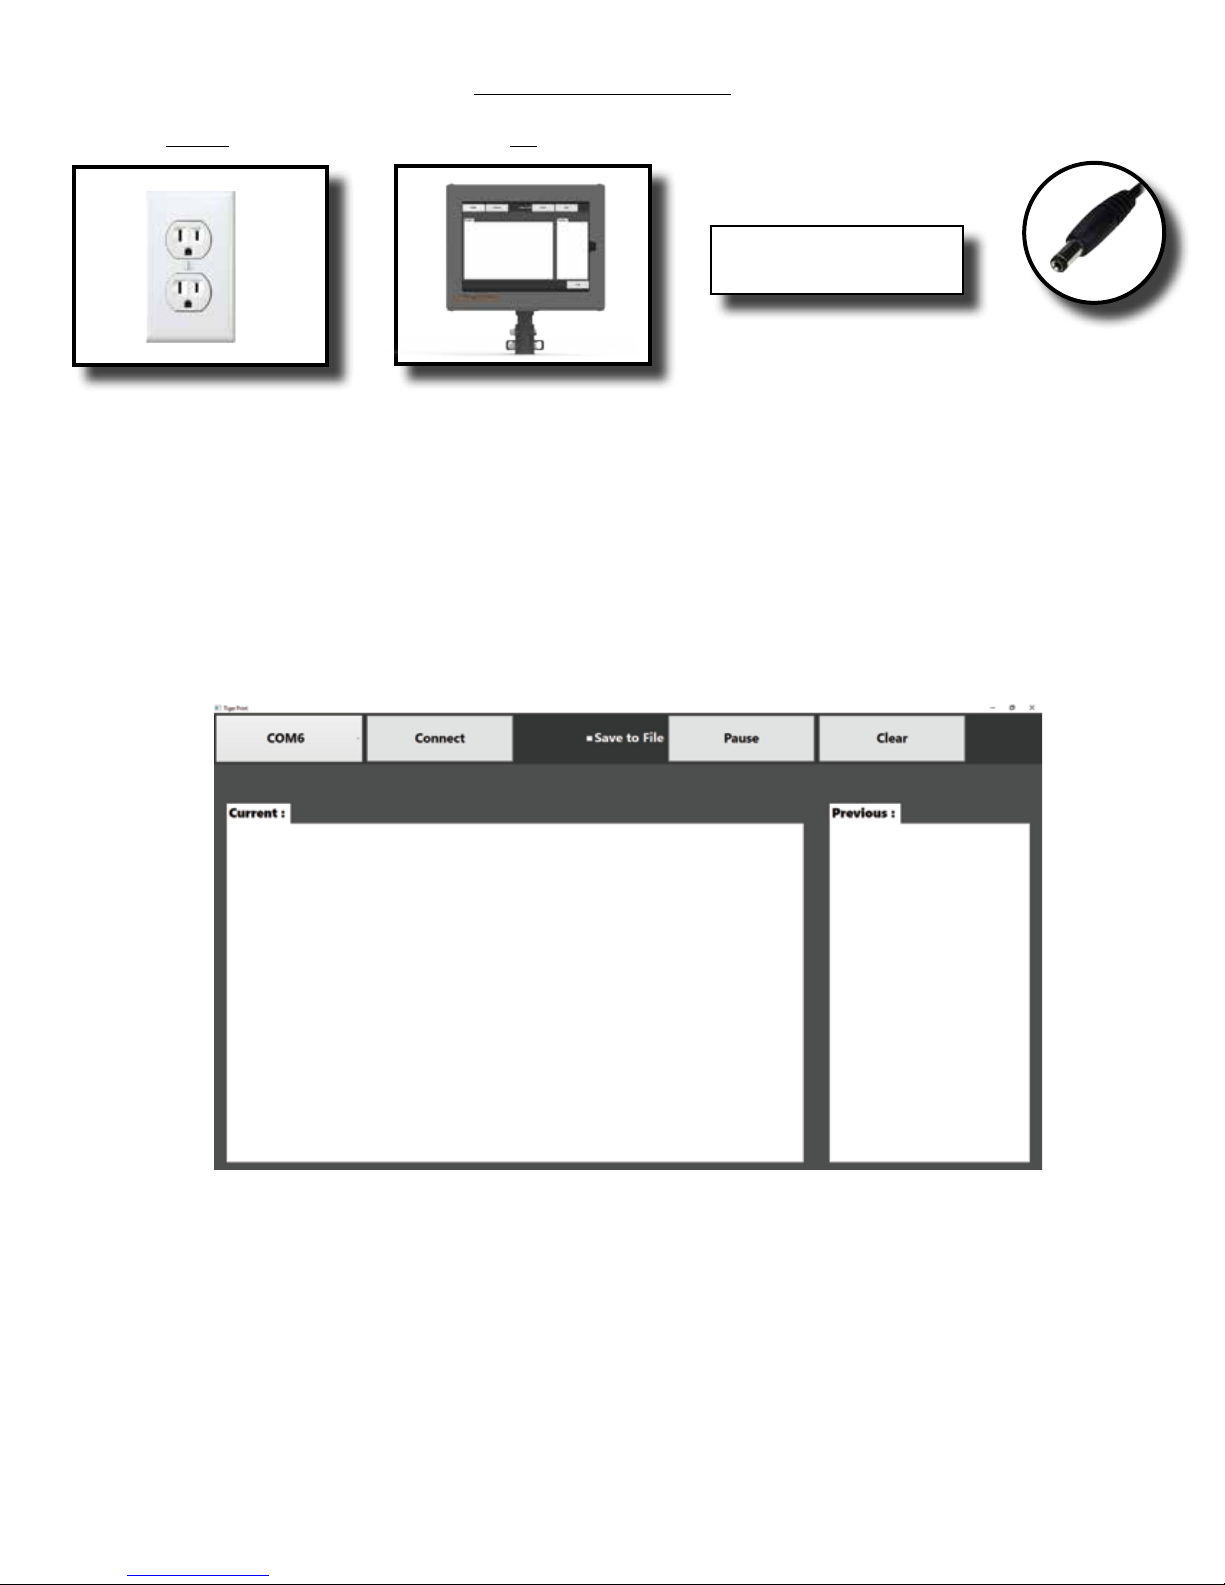
Tablet Power Connections
From To
Attached to AC power
adapter
Wall Power
(120VAC)
Using TigerPrint Display
Using TigerPrint Display
Run TigerPrint Display by double clicking the icon on the desktop of your touch screen.
Tablet
(Power Port)
Power
Connector
Connect Software to TigerStop
1. From the main screen, choose your communication port from the drop down box in the lower right
corner of the screen and press the Connect button.
TigerPrint Display will now display all TigerStop print data.
15
Page 16
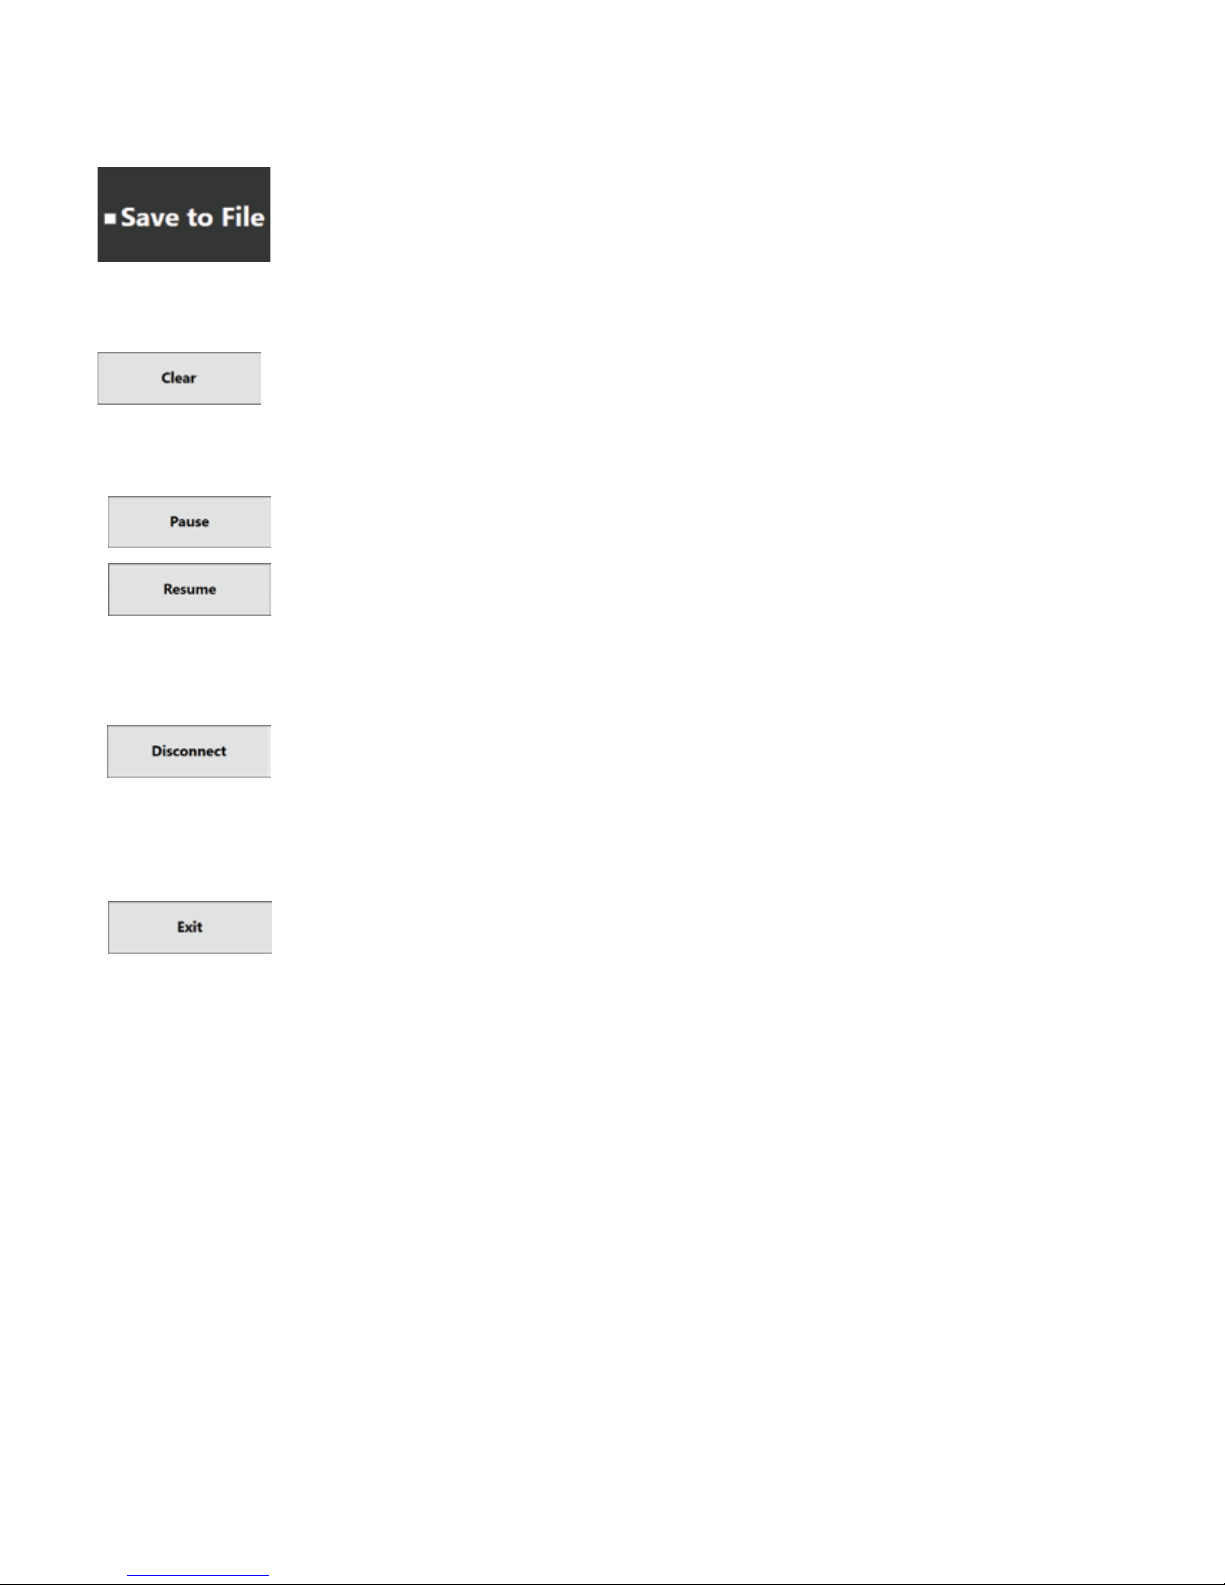
TigerPrint Display Options
Save to File
Clear
Pause/Resume
The ‘Save to le’ option will create a text le on the desktop called Tiger
Print Data.txt. This log will record all data shown on the screen with a
time stamp.
‘Clear’ will clear the label display from the screen.
Pause will stop all data from showing on the screen. During pause mode,
print data will not displayed and will be lost. The pause button will turn
into the Show button when pressed. Press Show to exit pause mode.
Connect/Disconnect
Exit
Pressing Disconnect will disable communication from the TigerStop.
TigerPrint Display will cease to display or log information until connected
again.
Closes the TigerPrint Display program.
16
Page 17

17
Page 18

18
Page 19

19
Page 20
FIND US ONLINE AT
www.tigerstop.com
12909 NE 95th Street
Vancouver, WA 98682-2426
TigerStop B.V. Holland
1.360.254.0661
31 546 575 171
20
 Loading...