

Tigersheds Flex Apex Assembly
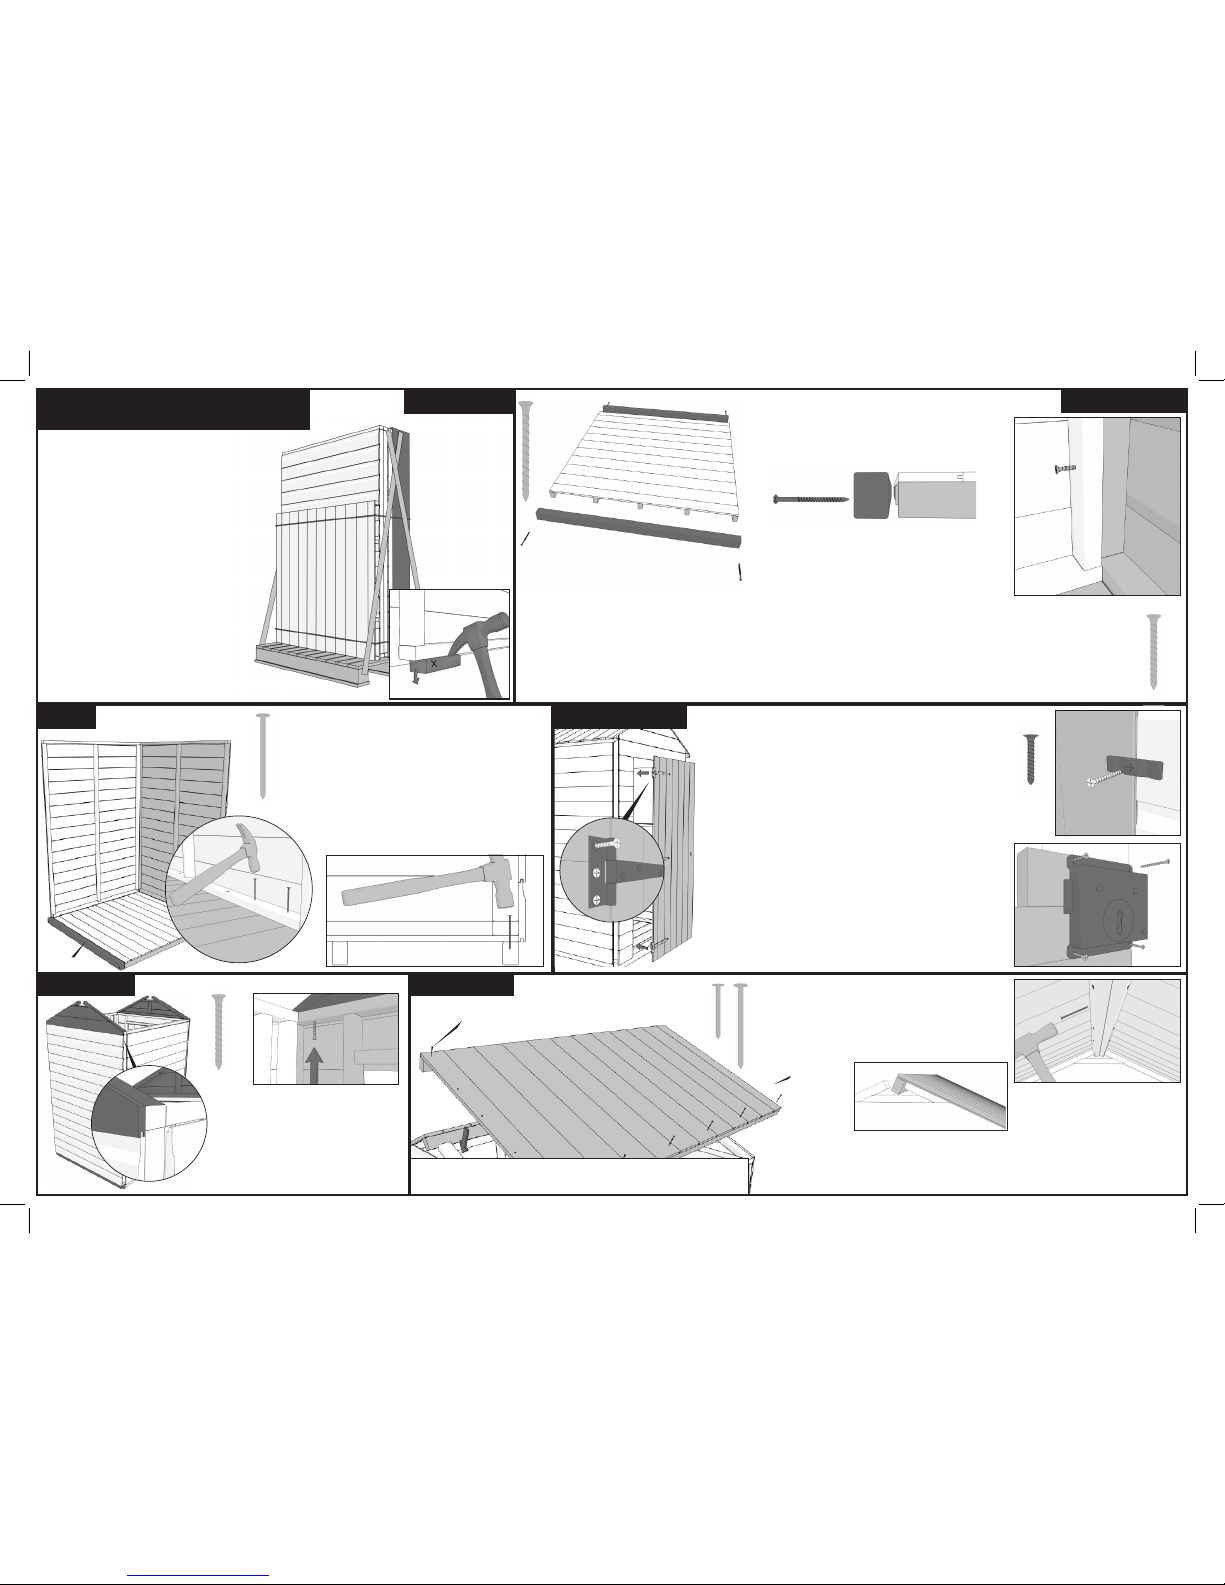
1. Pre Assembly
2. Floor and Walls
2.a Lay down the oor and place the heavy
duty bearers running parallel with the oor
boards and ush with the oor. Screw them in
place with the 80mm screws .
2.b Lay out the completed oor in the desired
location and think about where you want to
position the walls. The gables of the building
will sit on top and in line with the heavy duty
bearers.
Important:
The oor panel must be laid on a rm and
level base.
Gable End
3.a
50mm Screws
65mm Nails
2.d
3.b
4. Hanging the Door
Important: The door has been manufactured so it can be left or
right hand hinged to suit your needs.
4.a Choose whether you want your door to be right or
left hand hinged and line it up in the framing accordingly.
4.b Secure the hinges in place using the 25mm black
hinge screws provided. Make sure it is level or your door
will stick/not close properly.
4.c Fix the turn button in place. Chose a place close to
the top of the door. Don’t screw in too tightly or it won’t
turn.
4.d Line up the lock with the pre-drilled hole in the door
and x this in place with the screws. Make sure the lock
is on the inside of the shed when you close the door.
25mm Hinge Screws
4.b
4.c
4.d
5.a Line up the gable tops with the
panel, remembering to place them
above the heavy duty bearers.
5.b Secure with 50mm screws
from the inside, screwing upwards
into the framing.
50mm Screws
5. Gable Tops
5.a
5.b
65mm Nails
40mm Nails
6.a Place roof panels in position and secure
these internally to each other with the 65mm nails
provided.
6.b Nail the roof to the gable and side frame with
the 40mm and 65mm nails provided.
Important: Ensure the overhang
of the roof is equal at each gable
end.
Troubleshoot: If at this point the roof panels do not align correctly, the door does not
open/close properly or the building looks twisted at all, then it would suggest that the
base is not correctly level. Therefore, one or more corners of the building may need
adjusting so the base is square/level.
6.a
Note: See back for sizes greater
than 4x4
Note: See back for sizes greater than 4x4
Note: See back for sizes greater than 4x4
40mm Nails
65mm
Nails
6. Roof Panels
Flex Apex Assembly 4ft Kit
3.a When you have secured all of the wall
panels to each other. Attach them to the oor
using the 65mm nails.
3.b Ensure that the nails are driven through
the side/gable base rails, through the oor
boards and in a position where they will nally
penetrate the oor joist.
2.c Place a side panel at a right angle to the panel positioned on
the gable end. Secure the panels together from the inside, using the
50mm screws provided.
2.d Place the next side wall in position and secure this to one of the
other side panels, again using the 50mm screws provided.
3. Walls
Page 1 of 2
80mm Screws
2.a
Important: Before securing the roof in place, ensure that the side
walls sit inside the gables. If they are not, the roof will not t.
1.a Unpack all of the components and
check that you have all of the parts
required. Please use the check list on
this page.
1.b Carefully remove the
untreated timber that makes up the
pallet your building was
delivered on and discard this.
1c. The underside of the oor must be
treated with a quality wood preserver.
1d. Before starting assembly you
may need to remove transport blocks
(marked x) from the bottom of some
panels.
1d.
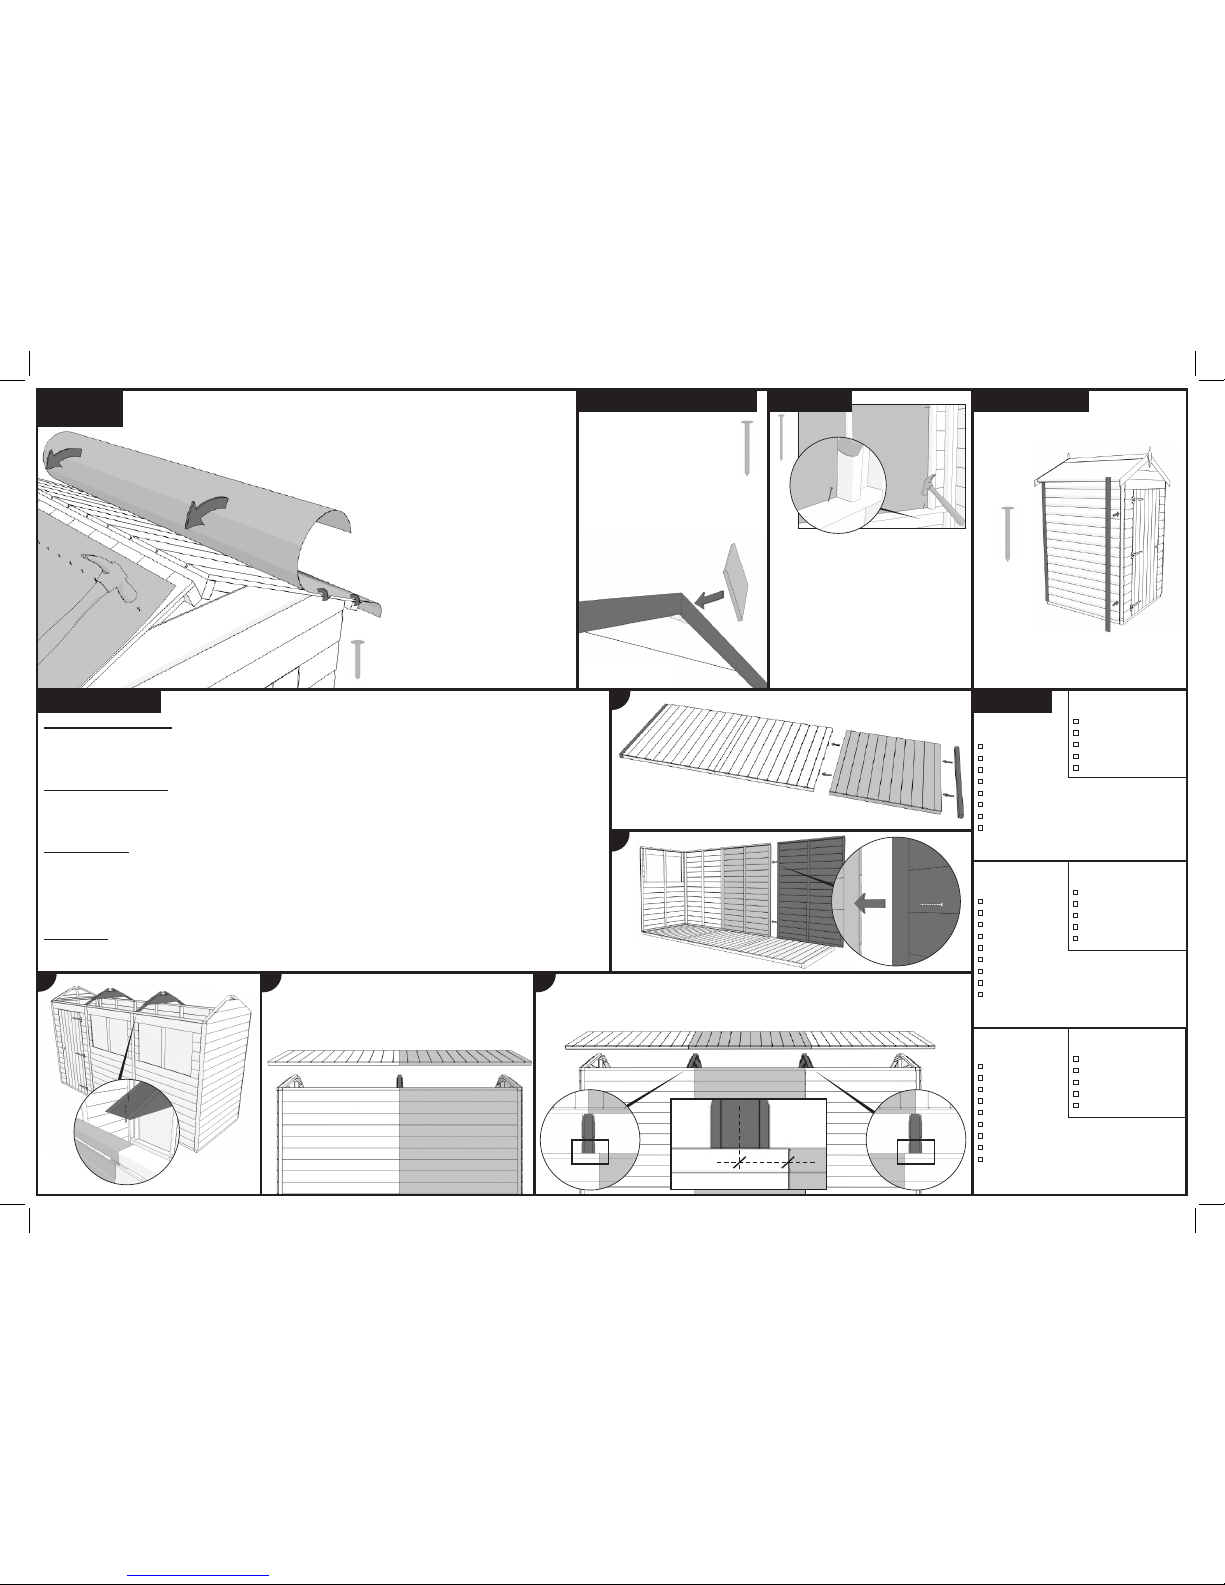
7. Roof Felt
7.a Roll out the mineral roong felt along the lower part of one side of the roof.
Allow sucient overhang to fold down onto the roof framing (but not the underside of the roof).
Clout Nails
8. Bargeboards and Finials
40mm Nails
8.a Fit the bargeboards to
the roof panels, trapping
the overhanging end of the
felt in between to provide a
weatherproof seal.
8.b Secure the diamond
nials over the top of the
bargeboards.
9.a Glaze the windows by securing
the glass or perspex from the inside
with the panel pins supplied.
Important: All windows must be
sealed inside and out with silicone or
any other watertight solution of your
choice (not supplied).
Panel Pins
9. Windows
Important: Please do not confuse these
corner strips as window beading. Also
please be aware that the strips may need
cutting to length.
10.a Secure the corner strips at each
corner of the shed with the 40mm
nails provided.
10. Corner Strips
40mm Nails
Check List
4x4 Pack
x1 Floor
x2 Gable Tops
x2 Blank Panels
x1 Window Panel
x1 Door Panel
x1 Door
x2 Roof Panels
x2 Heavy Duty Bearers
(found in polytube pack)
x4 Bargeboards
x2 Diamond Finials
x4 Corner Strips
Fixing Kit
Instructions
8x4 Pack
x2 Floor
x2 Gable Tops
x3 Blank Panels
x2 Window Panels
x1 Door Panel
x1 Door
x4 Roof Panels
x2 Heavy Duty Bearers
x1 Truss
(found in polytube pack)
x4 Bargeboards
x2 Diamond Finials
x6 Corner Strips
Fixing Kit
Instructions
12x4 Pack
x3 Floor
x2 Gable Tops
x4 Blank Panels
x3 Window Panels
x1 Door Panel
x1 Door
x6 Roof Panels
x2 Heavy Duty Bearers
x2 Trusses
(found in polytube pack)
x4 Bargeboards
x2 Diamond Finials
x8 Corner Strips
Fixing Kit
Instructions
11. Larger Models
A.
B.
E.
D.
C.
8x4: The truss should be centered over the top of
the join of the two side panels and xed in place.
The roof can then be tted in the same way, again
centering the join of the two panels over the middle of the truss.
12x4: Each truss should be positioned to the outside of the join between each side
panel, to make this more accurate measure 56mm out from the join and use this
as the centre point for your truss. You should then attach the centre roof panel rst.
Again make sure the roof panel join is centered over the truss.
56mm
Joining the Floor Panels
These are simply butted up against each other. There is no need for any xings as the shed, which is built on top,
will hold them together. Don’t forget to attach the heavy duty bearers to the panels, one on each end of the complete
oor. See Image A.
Joining the Side Panels
These are attached using the 50mm screws provided, through the internal framework. You are supplied extra cover
strips to cover the external join. These can be tted at the end of the build as you would with smaller models. See
Image B.
Internal Trusses (8ft and 12ft Models Only)
Not to confuse with the gable tops, they can be identied by cladding xed to both sides of the framing. The truss
should be xed by nailing down through the framing in to the side panels using 65mm nails (Image C). The larger
models come with 1 or 2 trusses to support the weight and the joins of the roof, because of the way the Flex Apex is
manufactured, assembly of the the roof/trusses varies with each size, please See Image D and E below for instruc-
tions on 8x4 and 12x4 roofs.
Roof Panels
These are tted in much the same way as the smaller model, just make sure on the larger models that the join of
the panels is centered over the truss. See Image D and E
If you have the 8x4 or 12x4 model, there are a few extra steps you will need to take to
complete your building.
Tip: Leaving the backing lm on whilst
installing will prevent scratches on
your perspex or glass.
7.c Fold the overhanging felt at the
gable ends under the roof boards
and tack in place, you could cut the
felt at the corners to make it t if you
wish.
7.b Use clout nails to tack along top edge of felt in to framing.
Repeat this process on the other side of the roof.
7.d As these sheds are only 4ft
wide, there will be adequate felt
to cover the ridge, by folding the
pieces over the ridgeline. You
must make sure you don’t set
the pieces too low so that you
have enough to do this.
Page 2 of 2
 Loading...