

Page 1
JKT-S
JKT-S10U
JKT-S18U
For household use
IH Rice Cooker
OPERATING INSTRUCTIONS
Thank you for purchasing this TIGER rice cooker/warmer.
Please read these instructions carefully before use and observe them during use.
Pour usage domestique
Cuiseur à riz à par induction
MODE D'EMPLOI
Nous vous remercions d'avoir fait l'achat d'un cuiseur à riz/chauffe-riz de marque TIGER.
Veuillez lire attentivement ces instructions avant d'utiliser l'appareil et respectez-les
attentivement.
家庭用
IH 炊飯電子鍋
使用說明書
感謝您購買TIGER(虎牌)炊飯電子鍋。
使用前請務必仔細閱讀本操作說明的全部內容。
가정용
IH 전기밥솥
취급 설명서
타이거 전기밥솥을 구매해주셔서 감사합니다.
사용하기 전에 본 취급 설명서를 자세히 읽고 설명에 따르십시오.
家庭用
IH炊飯ジャー
取扱説明書
このたび は、タイガー 炊 飯ジャーをお買い上げいただきまことにありがとうございます。
ご使用になる前に、この取扱説明書を最後までお読みください。
Page 2

IMPORTANT SAFEGUARDS
When using electrical appliances, basic safety precautions should always be followed including
the following:
1. Read all instructions.
2. Do not touch hot surfaces. Use handles or knobs.
3. To protect against electrical shock do not immerse cord, plugs, or (state specic part or
parts in question) in water or other liquid.
4. Close supervision is necessary when any appliance is used by or near children.
5. Unplug from outlet when not in use and before cleaning. Allow to cool before putting on or
taking off parts.
6. Do not operate any appliance with a damaged cord or plug or after the appliance
malfunctions or has been damaged in any manner. Return appliance to the nearest
authorized service facility for examination, repair, or adjustment.
7. The use of accessory attachments not recommended by the appliance manufacturer may
cause injuries.
8. Do not use outdoors (this item may be omitted if the product is specically intended for
outdoor use).
9. Do not let cord hang over edge of table or counter, or touch hot surfaces.
10. Do not place on or near a hot gas or electric burner, or in a heated oven.
11. Extreme caution must be used when moving an appliance containing hot oil or other hot
liquids.
12. Always attach plug to appliance rst, then plug cord into the wall outlet. To disconnect, turn
any control to “off”, then remove plug from wall outlet.
13. Do not use appliance for other than intended use.
2
Page 3
345
Page 4

Page 5

Contents
1 Safety Instructions ..................................................................................................... 6
2 Names and Functions of Component Parts ...........................................................11
Menu options and features ..................................................................................... 13
Tips on making delicious rice ................................................................................. 14
3 Before Cooking Rice ................................................................................................ 16
4 How to Cook Rice .................................................................................................... 18
Cooking time guidelines ......................................................................................... 19
5 Once the Rice Is Done Cooking .............................................................................. 20
6 How to Cook Oatmeal (“Oatmeal” menu) .............................................................. 21
7 Setting the Timer ......................................................................................................22
8 Keeping the Rice Warm ...........................................................................................24
9 Reheating Cooked Rice ........................................................................................... 25
10 Cooking Rice and Side Dishes Together (“Synchro-Cooking” Menu) ................ 27
11 Slow Cooking (“Slow Cook” Menu) ....................................................................... 29
12 How to Bake Bread (“Bread Fermentation” and “Bread Bake” menus) ............. 31
13 Cleaning and Maintenance ...................................................................................... 36
14 If Rice Does Not Cook Properly .............................................................................. 42
15 If Synchro-Cooking Does Not Go As Expected .....................................................44
16 If Slow Cooking or Bread Baking Does Not Go As Expected ..............................45
17 Troubleshooting ....................................................................................................... 46
If these indications appear
Setting the present time .......................................................................................... 48
Specications ........................................................................................................... 49
In case of a power outage ....................................................................................... 49
Purchasing consumables and optional accessories ........................................... 49
...................................................................................... 47
English
Page 6
1
Read and follow all safety instructions before using the rice cooker.
•
The precautions described here are intended to protect the user and other individuals from physical harm
and to safeguard against damage to property. Be sure to follow the instructions since they are important
safeguards.
• Do not remove any safety labels attached to the rice cooker.
Safety Instructions
Safety instructions are classied and described as shown below,
according to the level of harm and damage caused by improper
use that results from ignoring instructions.
This warning sign indicates that
“There is a possibility of death or
Warning
Caution
*1 “Serious injury” here refers to loss of sight, injuries, burns
(high-or low-temperature burns), electric shocks, broken
bones, poisoning, and other medical conditions, which may
result in aftereffects and/or which require hospitalization or
long-term outpatient care.
*2 “Injury” here refers to physical injuries, burns, or electric
shocks which do not require hospitalization or long-term
outpatient care.
*3 “Damage to property” here refers to extended damage to
buildings, household effects, domestic animals, pets, etc.
serious injury
is handled improperly.
This caution sign indicates that
“There is a possibility of personal
*2
injury
if the rice cooker is handled
improperly.
*1
” if the rice cooker
or damage to property*3”
Description of symbols used
The symbol indicates
a warning or caution. The
specic details of the warning
or caution are indicated inside
the symbol or in an illustration
or text near the symbol.
The symbol indicates a
prohibited action. The specic
details of the prohibited
action are indicated inside the
symbol or in an illustration or
text near the symbol.
The symbol indicates an
action that must be taken or
an instruction that must be
followed. The specic details
of the action or instruction are
indicated inside the symbol or
in an illustration or text near
the symbol.
Warning
General safety precautions
D
o not modify the rice cooker.
Disassembly or repair should only
be performed by a qualied service
representative.
Modifying the rice cooker yourself in any
way may result in re, electric shock, or
injury.
6
Stop using the rice cooker immediately
in the event of trouble.
Failure to do so may result in re, electric
shock, or injury.
Examples of trouble:
• The power cord or plug becomes
abnormally hot during use.
• Smoke is emitted from the rice cooker or
a burning odor is detected.
• The rice cooker is cracked, or there are
loose or rattling parts.
• The inner pot is deformed.
•
There are other problems or abnormalities.
Immediately disconnect the power plug from
the outlet and contact the place of purchase
for inspection and repair.
Page 7
Warning
English
Who should use the rice cooker
Do not allow children to use the rice
cooker unsupervised. Keep out of
reach of infants.
Unsupervised use by children or infants
may result in burns, electric shock, or
injury.
This rice cooker is not intended for use by
persons with physical difculties or lack
of adequate knowledge of its proper use.
A person with sufcient knowledge
should always be present to conrm
the appropriate use of the rice cooker.
Inappropriate use may result in burns,
electric shock, or injury.
Using the rice cooker
Do not use the rice cooker in any
ways not specically covered in this
instruction manual (and the supplied
“COOKBOOK”).
Doing so may enable steam or the
contents of the rice cooker to spray out,
resulting in burns or other injury.
Examples of procedures that should not
be performed:
• Heating ingredients or seasoning
inside of plastic bags, etc.
• Using a cooking sheet or other utensil
to cover food in the rice cooker.
Power supply
Use only 120 V AC power.
Use of any other power source may
result in re or electric shock.
Power cord and plug
Do not use a damaged power cord.
Also, be careful not to damage the
power cord yourself.
(Do not modify, forcibly bend, pull, twist, or
bundle the cord. Do not expose it to heat.
Do not rest anything heavy on the power
cord or sandwich it between any objects.)
Doing so may result in re or electric
shock.
Clean the power plug if it is dirty.
Failure to do so may result in re.
Insert the power plug fully into the
outlet.
Failure to do so may result in electric
shock, short-circuiting, smoke, or re.
Do not use the rice cooker if there
is any damage to the power cord or
plug, or if the plug cannot be securely
inserted into the outlet.
Doing so may result in electric shock,
short-circuiting, or re.
Do not connect or disconnect the
power plug with wet hands.
Doing so may result in electric shock or
injury.
Do not expose the power plug to
steam.
Doing so may result in electric shock or
re. When using the rice cooker on a
sliding tabletop, position the cooker so
that the power plug is not exposed to the
emitted steam.
Use an independent outlet rated for
15 A or higher.
Connecting other instruments to the
same outlet may cause the branch
socket to overheat, resulting in re.
7
Page 8
Warning
Handling the rice cooker
Do not immerse the rice cooker in or
splash it with water.
Doing so may result in short-circuiting or
electric shock.
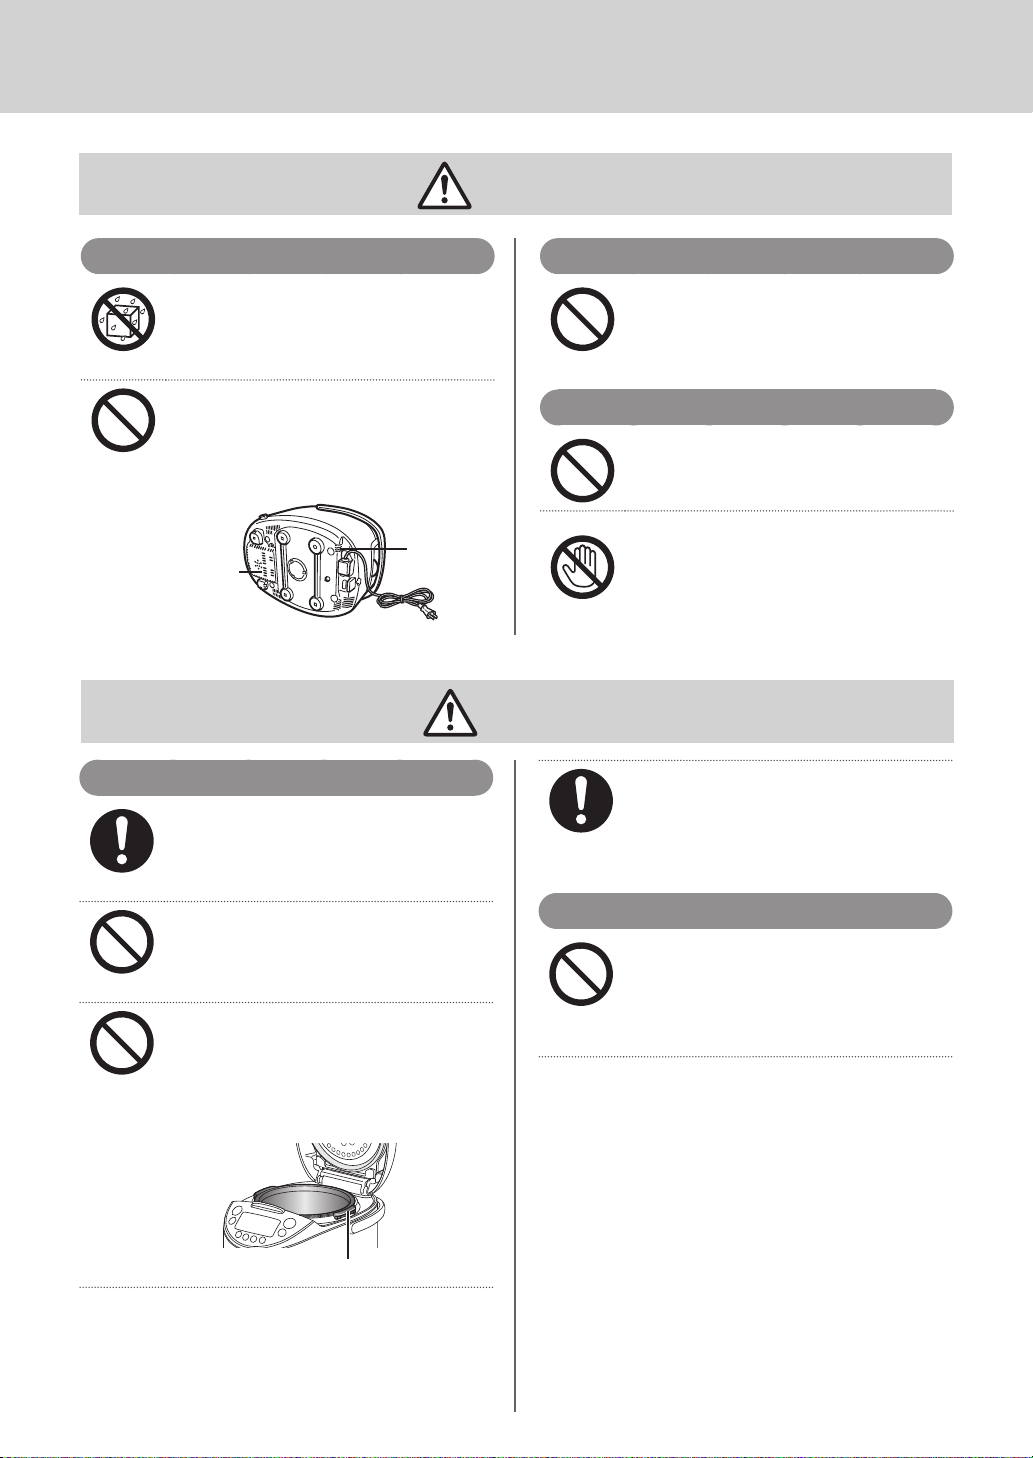
Do not insert pins, needles, or other
metal objects, etc., into the air inlet or
air outlet, or gaps between parts.
Doing so may result in electric shock or
in injury due to malfunction.
Air outlet
Air inlet
General safety precautions
Handle the rice cooker with care.
Dropping the rice cooker or exposing it
to a strong impact may result in injury or
in malfunction of the unit itself.
Only use the cooking plate supplied
with this rice cooker.
Using another cooking plate may result
in re or burns.
Do not touch the handle of the inner
pot with your bare hands when the
rice cooker is or has recently been in
operation; use oven mitts to pick up
the pot.
Touching the hot pot may result in burns.
Starting to cook
Do not use the cooking plate without
the inner pot.
Doing so may result in re, smoke, or
burns.
During and after cooking
Never open the lid during cooking.
Doing so may result in burns.
Do not place your face or hands near
the steam cap or steam vent.
Doing so may result in burns. Be
especially careful to keep out of reach of
small children.
Caution
People who use medical pacemakers
should consult a medical specialist
before using the rice cooker.
Operation of the rice cooker may cause
adverse effects on pacemakers.
Environment for use
Do not use the rice cooker on
unstable surfaces or heat sensitive
tables or mats.
Doing so may result in re or damage to
the table or mat.
Handle of the inner pot
8
Page 9
Caution
English
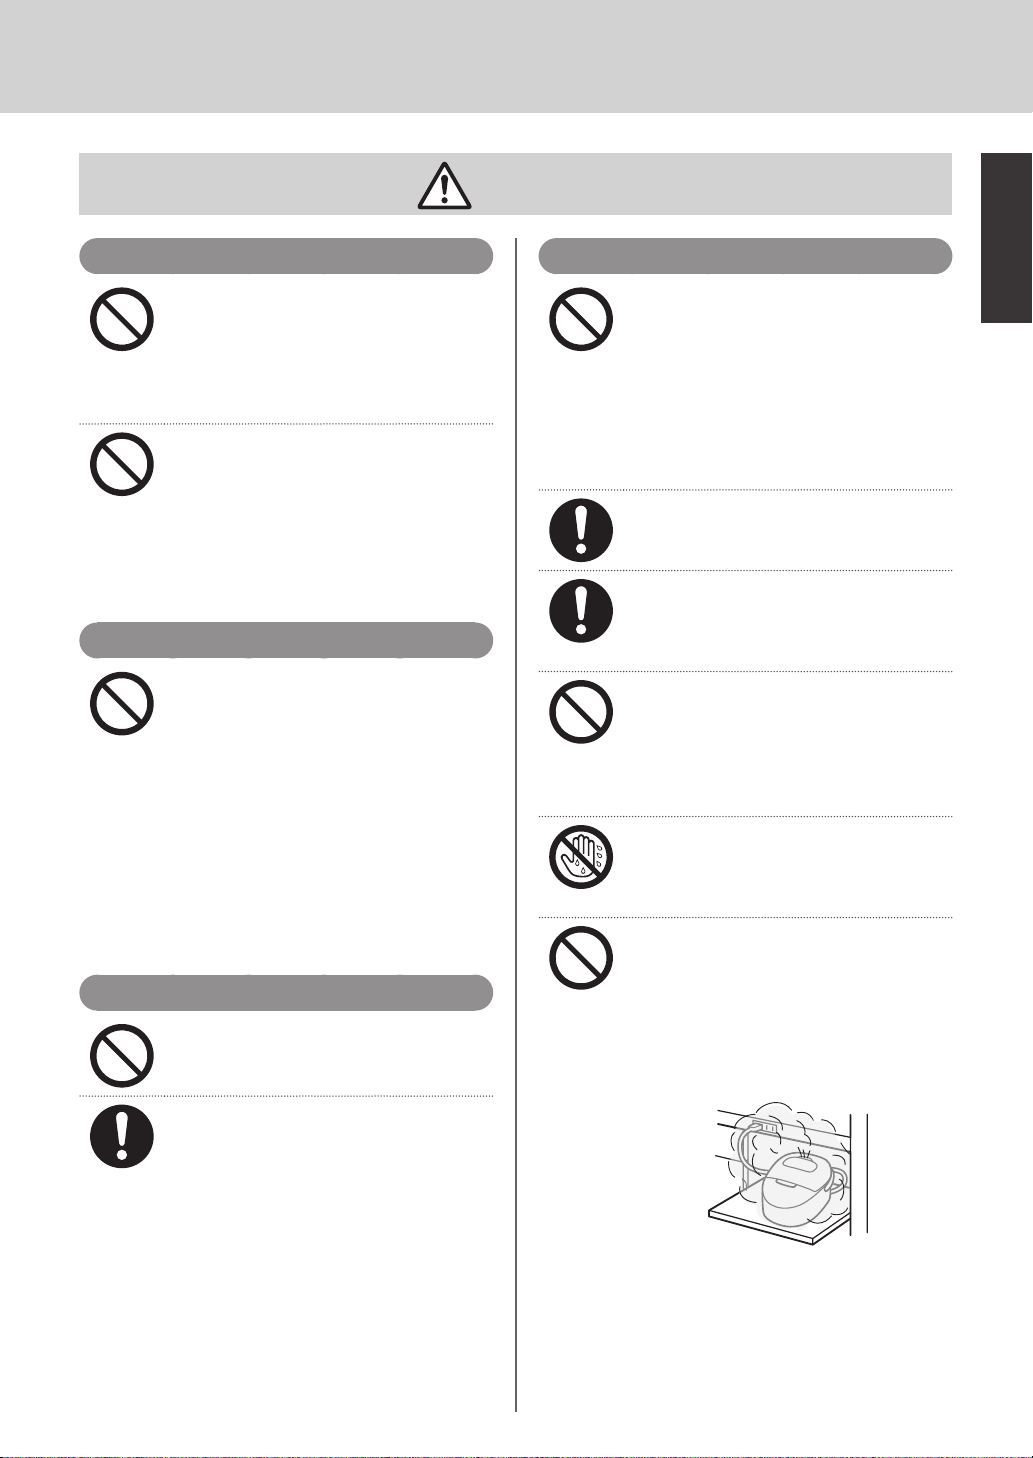
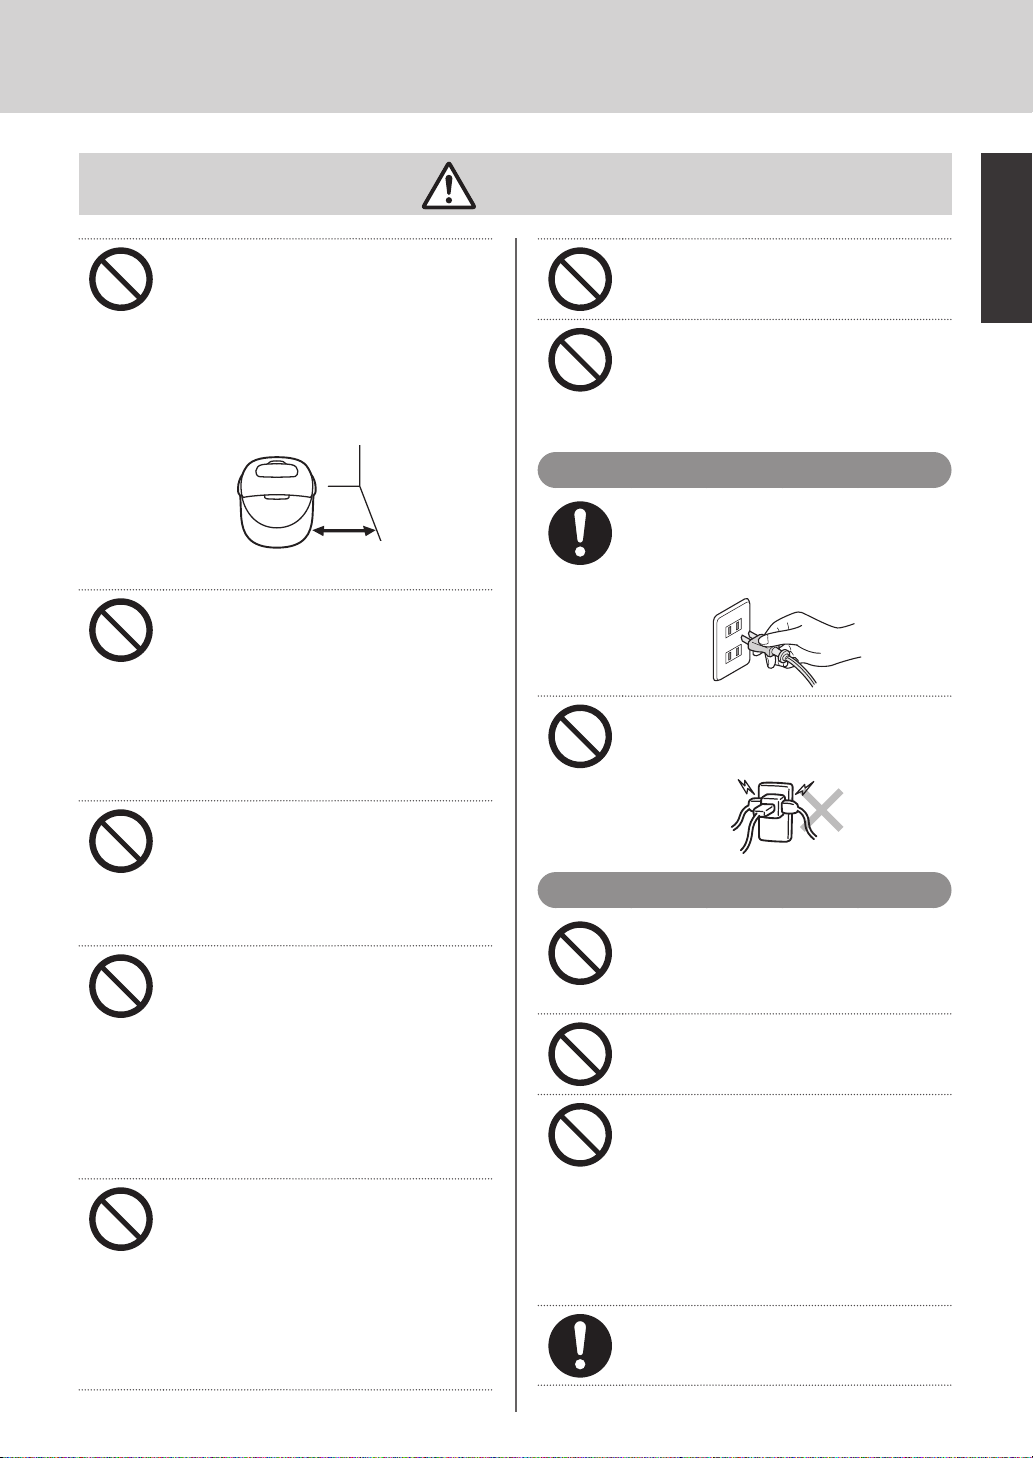
Do not use the rice cooker near walls
or furniture.
Steam and heat may cause damage,
discoloration and/or deformation. Use the
rice cooker at least 11.81 inches (30 cm)
away from walls or furniture. When using
the rice cooker in a hide-away-type of shelf
or counter, be careful not to allow the steam
to remain trapped inside the enclosed area.
At least 11.81
inches (30 cm)
Do not use the rice cooker on a
sliding tabletop that can not easily
bear its weight.
Falling from the tabletop may result in
injury, burns, or malfunction of the unit
itself.
Before using the rice cooker, conrm
that the sliding tabletop is sufciently
able to bear its weight.
Do not use the rice cooker near a heat
source or where it may be splashed
with water.
Doing so may result in electric shock,
short-circuiting, re, or deformation or
malfunction of the rice cooker.
Do not use the rice cooker in a small
space where the operation panel is
exposed to steam.
Steam and heat may result in deformation
of the operation panel, and/or damage,
discoloration, deformation, and/or
malfunction of the rice cooker. When
using the rice cooker on a sliding tabletop,
pull the tabletop out so that the operation
panel is not exposed to the emitted steam.
Do not use the rice cooker in
situations where the air inlet or air
outlet may be blocked or where the
room temperature is high.
Do not place the rice cooker on top of
carpets, plastic bags, etc.
Doing so may result in electric shock,
short-circuiting, re, or malfunction of
the rice cooker.
Do not use the rice cooker on an IH
cooking heater.
Doing so may result in malfunction.
Do not use the rice cooker on an
aluminum sheet or electric carpet.
Doing so may generate heat from the
aluminum material, which could result in
smoke or re.
Power cord and plug
Be sure to hold the power plug when
disconnecting the cord from an outlet.
Failure to do so may cause an electric
shock or short-circuiting, resulting in re.
Do not plug multiple appliances into
a single outlet.
Doing so may result in re.
Handling the rice cooker
Only use the inner pot made
exclusively for this rice cooker.
Using any other pot may result in
overheating or malfunction.
Do not cook with the inner pot empty.
Doing so may result in overheating or
malfunction.
Do not place anything susceptible to
magnetism near the rice cooker, as the
rice cooker generates magnetic waves.
If the rice cooker is located near a TV
or radio, it may generate noise in the
TV or radio. If it is located near a cash
card, commuter pass for automatic ticket
gates, cassette tape, or video tape, it
may erase the data on those devices.
Be careful of the escaping steam
when opening the lid.
Exposure to steam may result in burns.
9
Page 10
Caution
Disconnect the power plug from the
outlet when the rice cooker is not in
use.
Failure to do so may result in injury or
burns, or in electric shock or a short-
circuit-induced re due to degradation of
the insulation.
Do not touch the open/lock button
while carrying the rice cooker.
Doing so may cause the lid to open,
resulting in injury or burns.
During and after cooking
Do not touch hot parts during or
immediately after cooking.
Doing so may result in burns.
Cautions towards enabling the
long-term use of this rice cooker
● Remove burned rice and any other remaining
grains of rice.
Failure to do so may cause steam to leak out or
the contents to boil over, resulting in a malfunction
of the unit or simply in improperly cooked rice.
● Do not cover the rice cooker with a cloth or other
object during cooking.
Doing so may cause the rice cooker or the lid to
become deformed or discolored.
● The holes on the rice cooker are designed
to maintain its functions and performance. In
extremely rare cases, dust or even insects may
enter these holes and cause a malfunction.
prevent this, a commercially available insectprevention sheet, etc., is recommended. If a
malfunction does occur due to this problem, it will
not be covered by warranty. Contact the place of
purchase.
● The inner pot’s uorocarbon resin coating may
wear and peel with extended use. This material is
harmless to humans and this situation presents no
hindrance to actual cooking or to the rice cooker’s
heat insulating capability.
If you would like, or if the inner pot becomes
deformed or corroded, a new one may be
purchased. Contact the place of purchase.
To
Do not move the rice cooker during
cooking.
Doing so may result in burns or enable
the contents to boil over.
Cleaning the rice cooker
Wait until the rice cooker has cooled
down before cleaning it.
Failure to do so may result in burns.
Do not wash the entire rice cooker.
Do not wash the entire rice cooker or
pour water into the rice cooker or its
bottom section. Doing so may result in
short-circuiting or electric shock.
● Strictly observe the following to keep the
uorocarbon resin coating from blistering or
peeling:
•
Do not place the inner pot over a gas re, or
use it on an electromagnetic cooker or in a
microwave oven, etc.
•
Use the Keep W
(rinse-free rice) only; do not use for seasoned
rice, etc.
Do not use vinegar inside the inner pot.
•
• Use only the supplied spatula or a wooden
spatula.
• Do not use hard utensils such as metal
ladles, spoons, or whisks.
• Do not place a basket inside the inner pot.
• Do not place tableware and other hard
utensils or objects inside the inner pot.
•
Do not clean the inner pot with hard materials
such as metal spatulas or nylon scouring
sponges.
Do not use a dishwasher/dryer to clean the
•
inner pot.
•
Be careful not to scratch the inner pot when
washing rice.
•
If the inner pot becomes deformed, contact
the place of purchase.
arm function for white rice
1010
Page 11
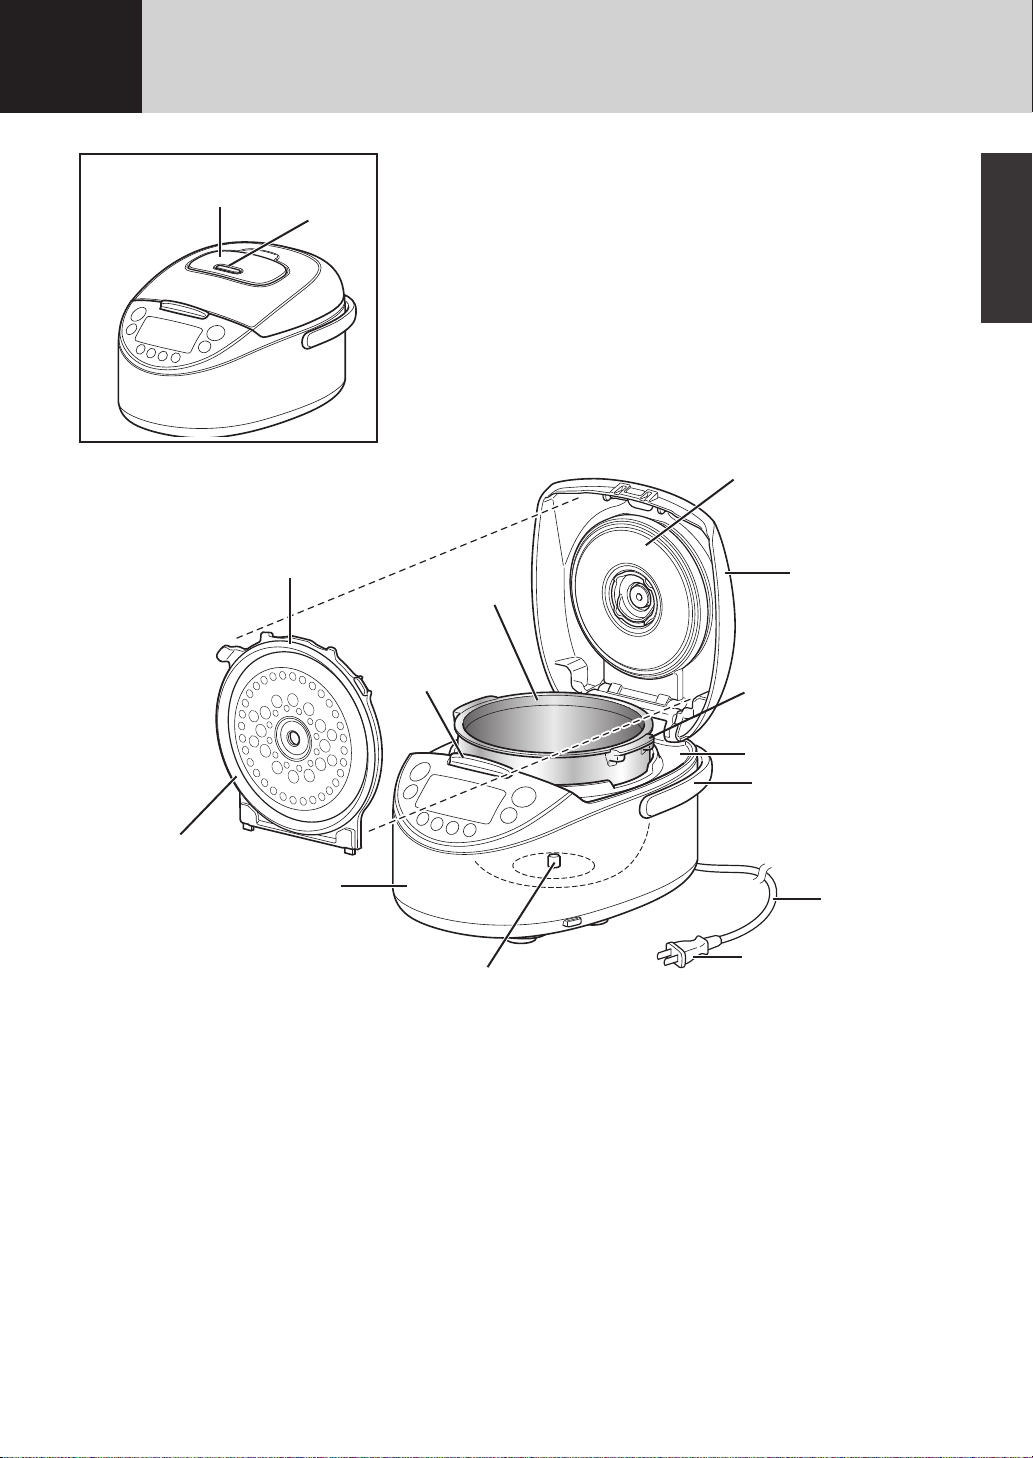
2
Names and Functions of Component Parts
Steam cap
(See p.40 to 41.)
Inner lid gasket
This gasket is not removable;
do not attempt to remove it.
Inner lid (See p.38.)
Steam
vent
Open/lock button
Push to open the lid.
English
Heating plate
Lid
Inner pot
Handle of the inner pot
Upper casing
Carrying handle
Use when carrying
the rice cooker.
Rice cooker
Power cord
(120 V)
Power plug
Center sensor
11
Page 12
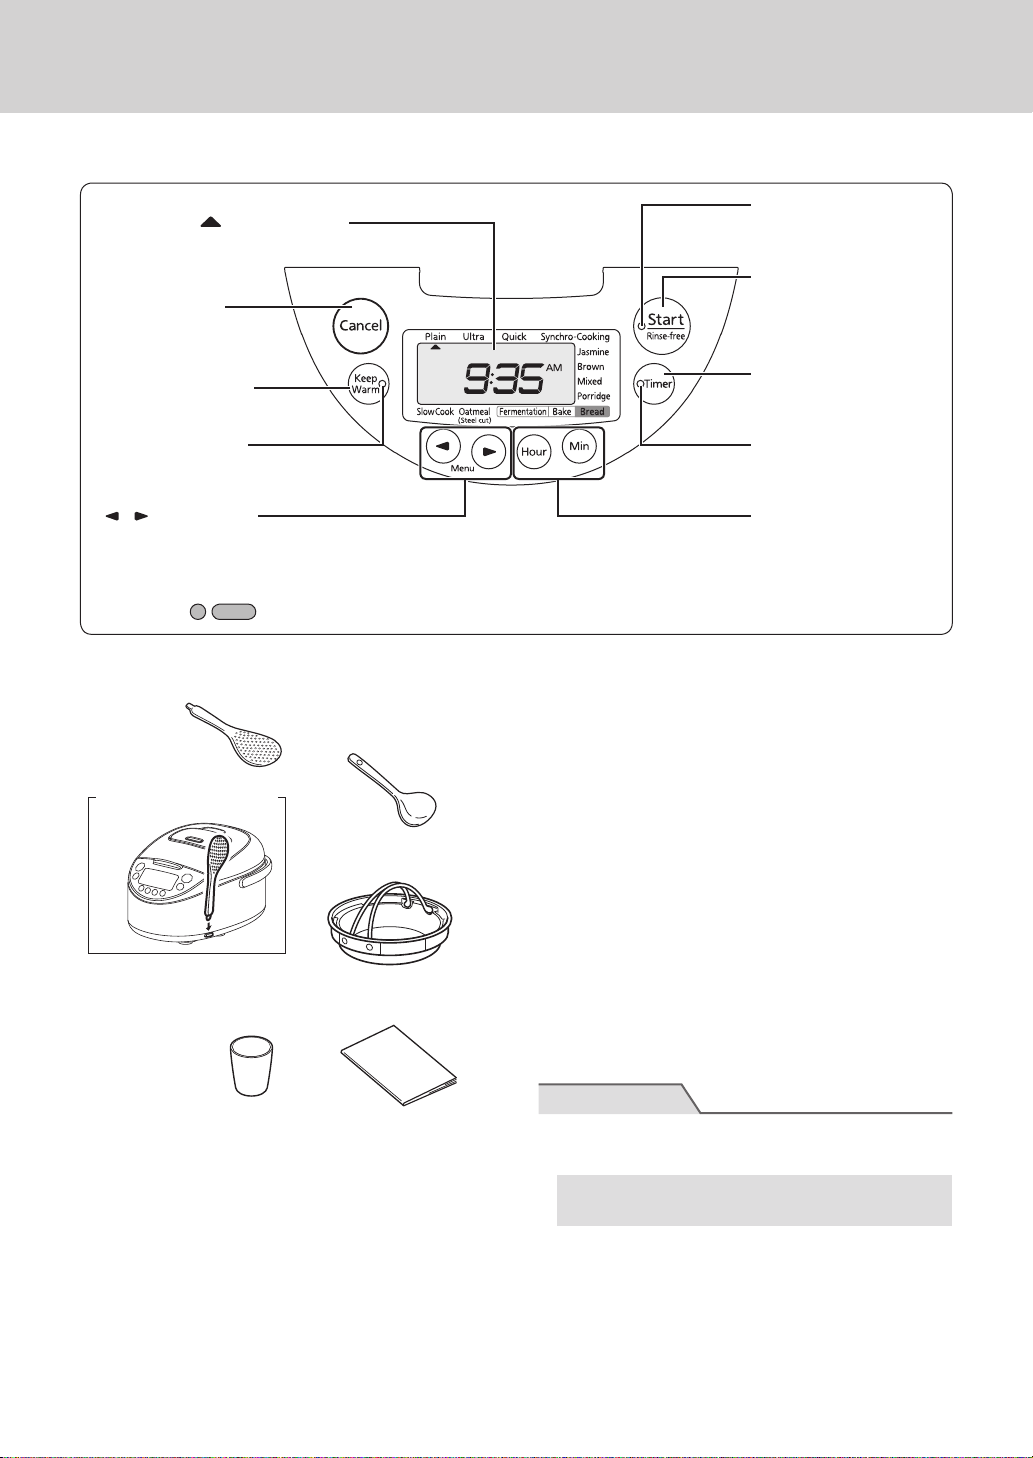
Operation panel
Display
Displays the
cursor) and the present time, etc.
[Cancel] key
Press to cancel the Keep
Warm function or to cancel
the current operation.
[Keep Warm] key
Used to keep the rice warm.
Keep Warm lamp
Lit when the Keep Warm
function is on.
[
] [ ] (Menu) key
Press to select the desired
cooking menu.
The reliefs (
symbol (menu
) on the [Start/Rinse-free] and [Cancel] keys are to aid persons with a visual impairment.
Checking the accessories
Spatula Ladle
Start lamp
Lit or blinks during
cooking, etc.
[Start/Rinse-free] key
Press to start cooking,
etc.
[Timer] key
Press to select the
desired Timer setting.
Timer lamp
Lit or blinks when the
Timer function is set.
[Hour] and [Min] keys
Use to set the present
time and the time under
the Timer function.
Checking the present time
The time is displayed in a 12-hour format. It should
be adjusted if the correct time is not displayed.
(See p.48.)
The spatula can be
inserted into this holder.
Cooking plate
Measuring cup
About 1 cup (0.18 L),
about 5.29 oz (150 g)
COOKBOOK
Sounds emitted by the rice cooker
The following sounds coming from the rice cooker
during cooking, reheating, or when the Keep Warm
function is on is normal and does not indicate a
problem:
• Humming (This is the sound of the rotating fan.)
• Buzzing or twittering (This is the sound of IH
operation.)
The lithium battery
The rice cooker has a built-in lithium battery that
stores the present time and the preset timer settings
even with the power plug disconnected.
• This lithium battery has a four-to-ve-year life
expectancy with the power plug disconnected.
• If the lithium battery runs out, “0:00” will blink on
the display when the power cord is plugged back
in. Normal cooking is still possible, but the present
time, preset timer settings, and elapsed Keep
Warm time will no longer be stored in memory
when the power plug is disconnected.
Note
● Do not attempt to replace the lithium battery
yourself.
To replace the battery, contact the place of
purchase.
12
Page 13
Menu options and features
Menu
Plain ○ ○ ○ Select when cooking white rice (rinse-free rice).
Ultra ○ ○ ○
Quick ○ N/A ○ Select when quickly cooking white rice (rinse-free rice).
Synchro-
Cooking
Jasmine N/A ○ ○ Select when cooking long-grain rice.
Brown N/A ○ ○ Select when cooking brown rice and/or multi-grain rice.
Mixed ○ N/A
Porridge ○ ○ ○ Select when making porridge.
Oatmeal
(Steel cut)
Rinse-free
rice function
availability
○ N/A
N/A ○ N/A Select when cooking steel cut oatmeal.
Timer
function
availability
Keep Warm
function
availability
Feature
Select when cooking white rice (rinse-free rice) to bring
out its maximum sweetness, avor, and stickiness.
Cooking using this menu will soak the rice twice as long
as with the “Plain” menu and take extra time to heat and
cook delicious rice.
Select when using the cooking plate to cook rice and side
dishes together.
Select when cooking seasoned rice or steamed sweet
rice.
See p.49 for cooking capacities.
: Rice can be kept warm. However, its avor may not be maintained.
Note
● Rinse-free rice can be cooked using the “Plain”, “Ultra”, “Quick”, “Synchro-Cooking”, “Mixed”, and
“Porridge” menus. You can cook delicious rinse-free rice easily without being concerned about the
water amount or soaking time.
Since the bran has already been removed, rinse-free rice does not require washing. It is also good for
the environment because the water left over after rinsing the rice does not affect the rivers or ocean.
● When using the “Porridge” menu, the porridge can become pasty if kept warm for too long; serve as
soon as possible.
English
13
Page 14

Tips on making delicious rice
Read p.16 to 17 for preparations
before cooking rice, and p.18 to 23
for how to cook rice.
Select high quality rice and store it in a
cool location.
Choose freshly polished, glossy rice with a
uniform grain size. Store in a cool, dark, wellventilated place.
Carefully measure the rice with the
supplied measuring cup.
One cup equals about 5.29
oz (0.18 L). Use the supplied
measuring cup for rinse-free
rice as well.This product
contrives the cooking method.
It is not necessary to use the
measuring cup for rinse-free
rice.
Wash the rice quickly.
Stir the rice around with your hand in a generous
amount of water, pour out the water, and repeat
until the water remains clear.
When cooking germinated brown rice,
whole rice or semi-polished rice, select
the “Plain” or “Ultra” menu.
Cooking rinse-free rice
• Add the rinse-free rice and water, and then stir
well from the bottom so that every individual
grain of rice becomes immersed in the water.
(Merely adding water to the rice will prevent
it from soaking in the water and may result in
improperly cooked rice.)
• If the added water turns white, we recommend
you wash the rice thoroughly by replacing the
water once or twice. (The water turning white
is due to the starch in the rice and not its bran;
however, cooking it with the starch left in the
water may result in burned rice, the contents
boiling over, or improperly cooked rice.)
Adding other ingredients to the rice
The total amount of ingredients should be no
more than 2.5 oz (70 g) per cup of rice. Stir in any
seasoning well and then add the extra ingredients
on top of the rice. If other ingredients are to be
added to the rice, be sure to use no more than the
acceptable maximum amount (refer to the table
below).
Type of rice
Synchro-Cooking 2 cups or less 4 cups or less
Brown 3 cups or less 5 cups or less
Mixed 4 cups or less 6 cups or less
Sweet 3 cups or less 5 cups or less
Porridge • Hard 0.5 cups or less 1.5 cups or less
1.0 L (5.5-cup)
type
1.8 L (10-cup)
type
• Add water prior to adding the ingredients.
Adding water after the ingredients will result in
the cooked rice being too rm.
Add water according to the type of rice
and your personal preference.
Amount of water to add
Corresponding scale (Use the
Type of rice
Plain
Quick
SynchroCooking
Ultra
Mixed
Jasmine “Jasmine” scale
Brown “Brown” scale
Porridge
• Water levels in the above table also apply to
rinse-free rice.
• If you choose to use more or less water than
the recommended amount, do not deviate from
that amount by any more than 1/3 of one line.
• When cooking germinated brown rice, whole
rice or semi-polished rice, use the “Plain” or
“Ultra” scale as a reference.
• When cooking steamed sweet rice, use the
“Sweet” scale as a reference.
When cooking sweet and non-sweet rice mixed
together, use the scale between “Plain” and
“Sweet” as a reference. (In this case, add a little
extra water to the level used when cooking only
sweet rice.)
• If the amount of water to add is specied on
a package of germinated brown rice or multigrain rice, follow those directions and add water
according to your personal preference.
• When cooking paella or pilaf described in the
supplied “COOKBOOK”, use the “Plain” scale
as a reference.
corresponding scale on the inner pot
as a guide and add water according
to your personal preference.)
“Plain” scale
“Ultra” scale
Hard porridge: “Porridge • Hard”
scale
Soft porridge: “Porridge • Soft” scale
14
Page 15

Cooking brown rice and/or multi-grain
rice mixed in with white rice
• If the rice to be cooked includes more brown
rice and/or multi-grain rice than white rice, use
the “Brown” menu.
• If there is an equal amount of brown rice and
white rice, or there is more white rice than
brown rice, use the “Plain” menu. (The brown
rice should be soaked separately for 1 to 2
hours before cooking.)
• If there is an equal amount of multi-grain rice
and white rice, or there is more white rice than
multi-grain rice, use the “Plain” menu. (The
multi-grain rice should be soaked separately for
1 to 2 hours before cooking.)
Cooking sweet rice
When cooking sweet rice, select the “Mixed”
menu.
Wash the rice, and then level it out so that all of
the rice is under water.
Cooking grains together with white rice
• The amount of multi-grain rice should equal
less than 20% of the volume of the white rice.
The maximum acceptable amount for the
combination of white rice and grains is 5.5 cups
with the 1.0 L type and 10 cups with the 1.8 L
type.
• The grains should be placed on top of the
white rice. Mixing them together may result in
improperly cooked food.
Cooking grains together with brown rice
• Always use the “Brown” menu.
• The maximum acceptable amount for the
combination of brown rice and grains is 3.5
cups with the 1.0 L type and 6 cups with the 1.8
L type.
Cooking short-grain rice
• When cooking short-grain rice, select the “Plain”
menu.
When cooking seasoned rice with various
ingredients using short-grain rice, select the
“Mixed” menu.
Selecting any other menu may result in the
contents boiling over or in improperly cooked
food.
Cooking long-grain rice
• When cooking long-grain rice, select the
“Jasmine” menu. When cooking seasoned rice
with various ingredients using long-grain rice,
select the “Mixed” menu. Selecting any other
menu may result in the contents boiling over.
English
15
Page 16
3
Before Cooking Rice
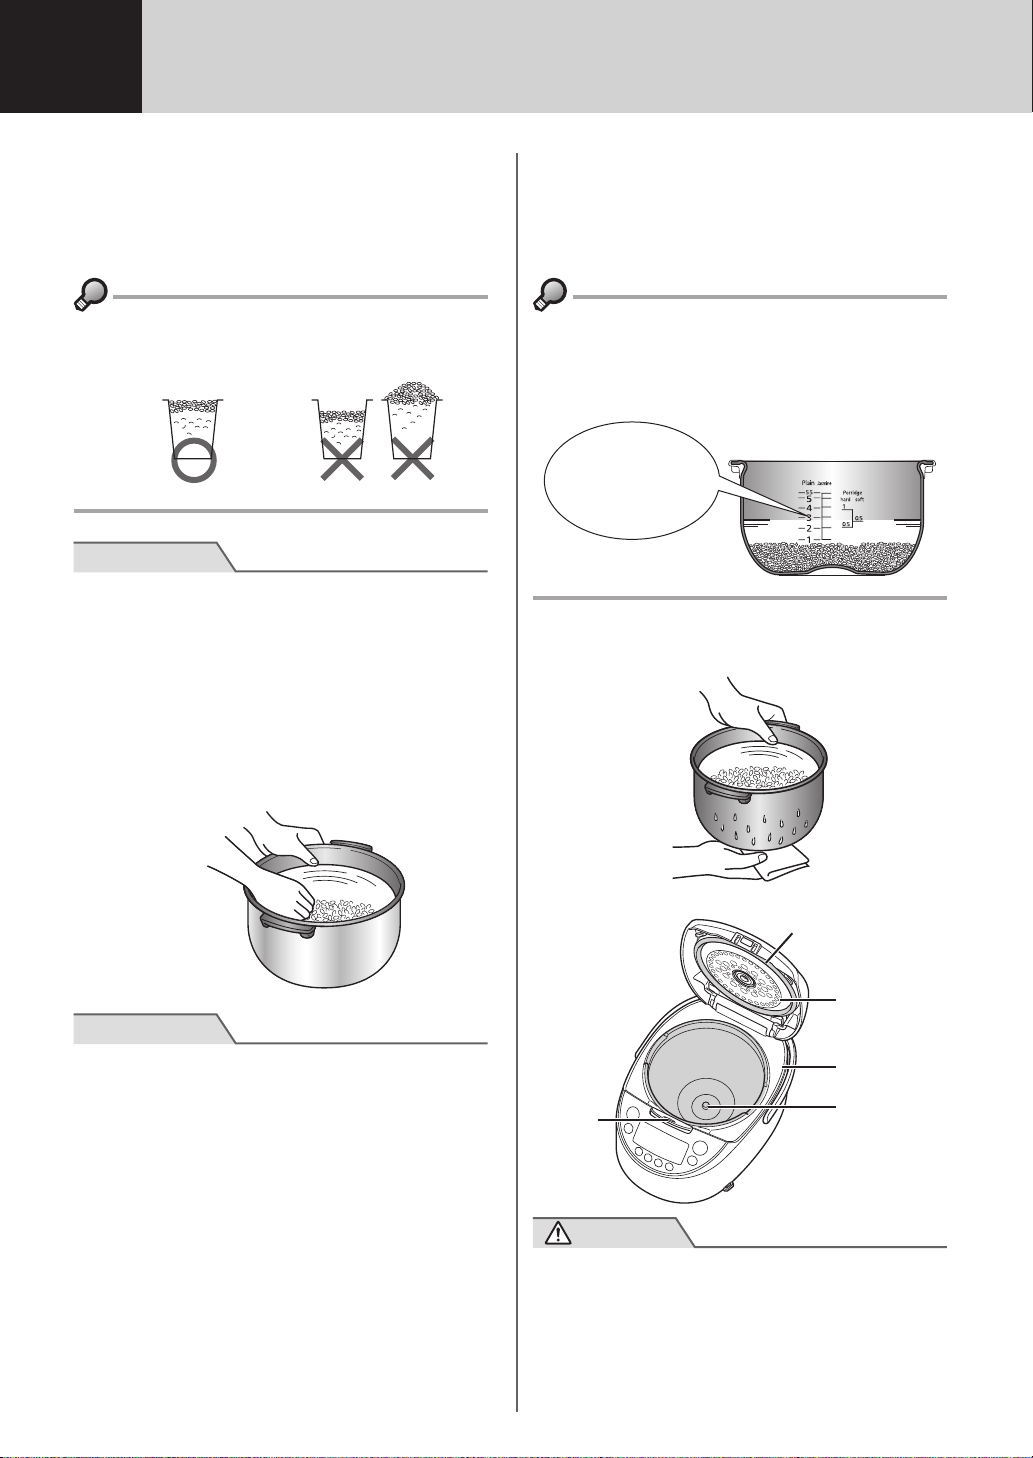
Measure the rice.
1
Always use the measuring cup supplied with
the rice cooker (for rinse-free rice as well).
A level lling of rice in the supplied measuring
cup equals about 5.29 oz (0.18 L).
● Fill the measuring cup as shown below.
Correct
measurement
Note
● Always use the specied volume of rice (see
“Specications” on p.49). Otherwise the rice may
not cook properly.
If other ingredients are to be added to the rice,
see p.14.
Incorrect
measurement
Wash the rice. (This can be
2
done using the inner pot.)
For rinse-free rice, see p.14.
Adjust the water level.
3
Place the inner pot on a level surface and
adjust the water level to the appropriate line
of the corresponding scale on the inside of
the pot.
● The water level should be selected according
to the type of rice and the selected cooking
menu, but can be ne-adjusted to your personal
preference. (See the guidelines on p.14.)
When cooking 3
cups of white rice,
adjust the water
level to line “3” on
the “Plain” scale.
Wipe off any water and rice, etc.
4
<Outer surface and brim of the inner pot>
Note
● Do not use hot water (over 95˚F [35˚C]) to wash
the rice or when adding water. It may prevent the
rice from cooking properly.
1616
<Inside the rice cooker>
Inner lid gasket
Inner lid
Upper casing
Open/lock
button
Caution
● Be sure to remove any rice or other material
adhering to and around the center sensor, upper
casing, and the open/lock button. (See p.37.)
Adhering material can prevent the lid from
closing, allow steam to leak out during cooking, or
enable the lid to open and the contents to spray
out, resulting in burns or other injury.
Center
sensor
Page 17
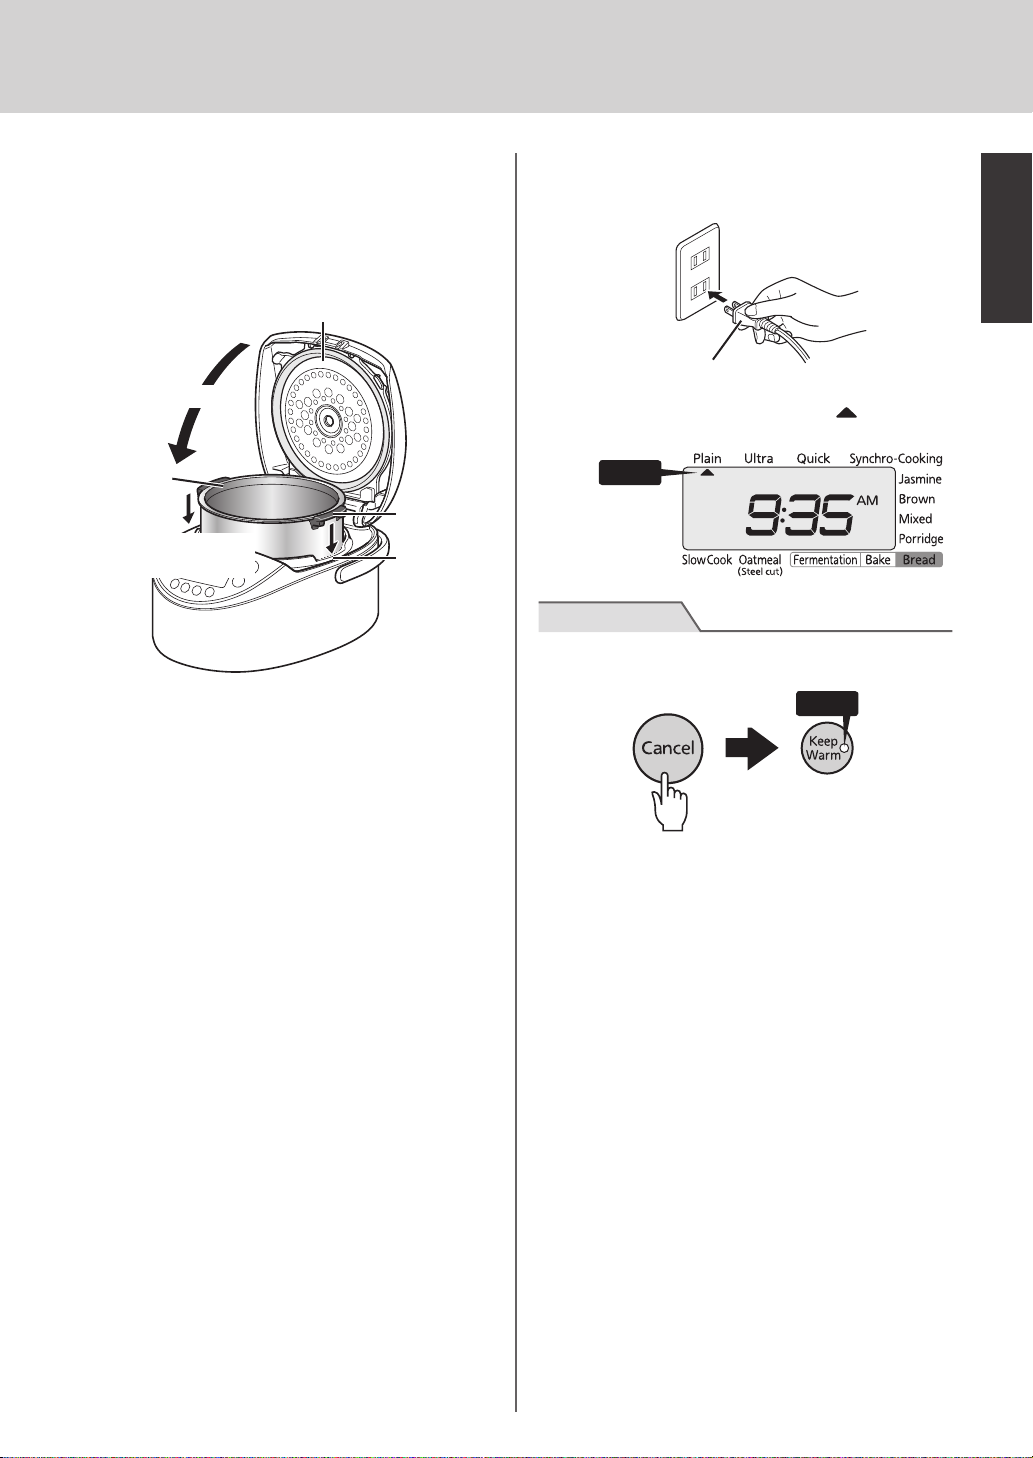
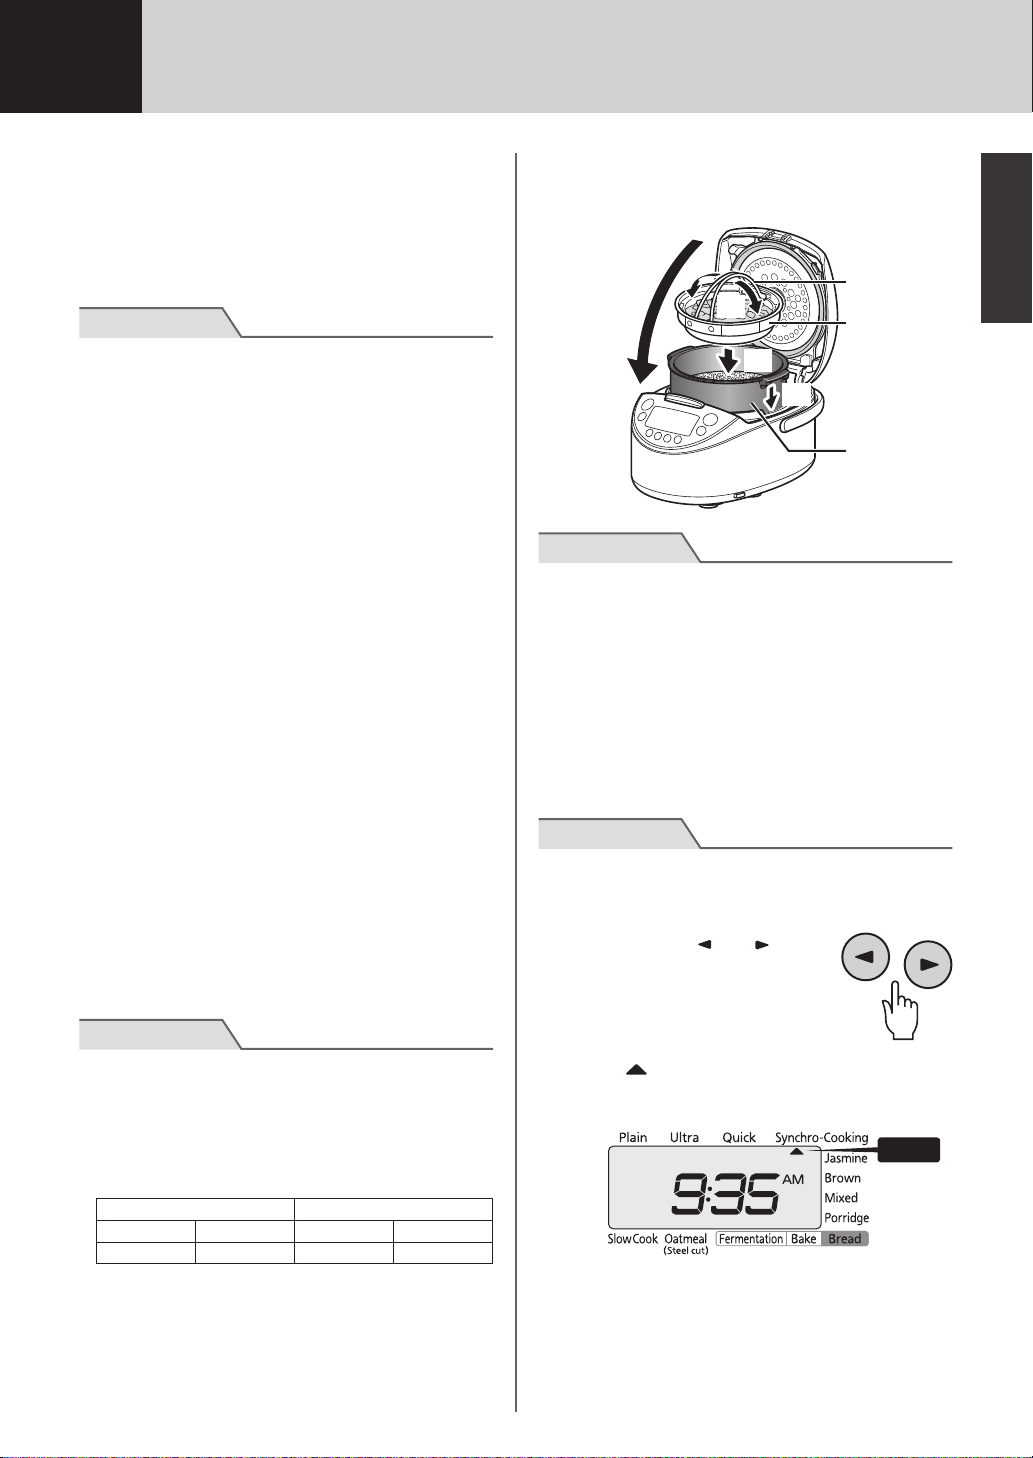
Place the inner pot in the rice
Off
5
cooker.
(1) Be sure to set the pot properly (not set at
an angle).
(2) Close the lid.
Conrm that the inner
lid is set in place.
(2) Close lid.
Connect the power plug to an
6
outlet.
Power plug
The power will turn on and the symbol will
blink.
English
Inner pot
(1) Set pot inside rice
cooker.
Blinks
Handle of
the inner pot
Concave
side
Note
● If the Keep Warm lamp is on, press the [Cancel]
key to turn off the lamp.
1717
Page 18
4
On
How to Cook Rice
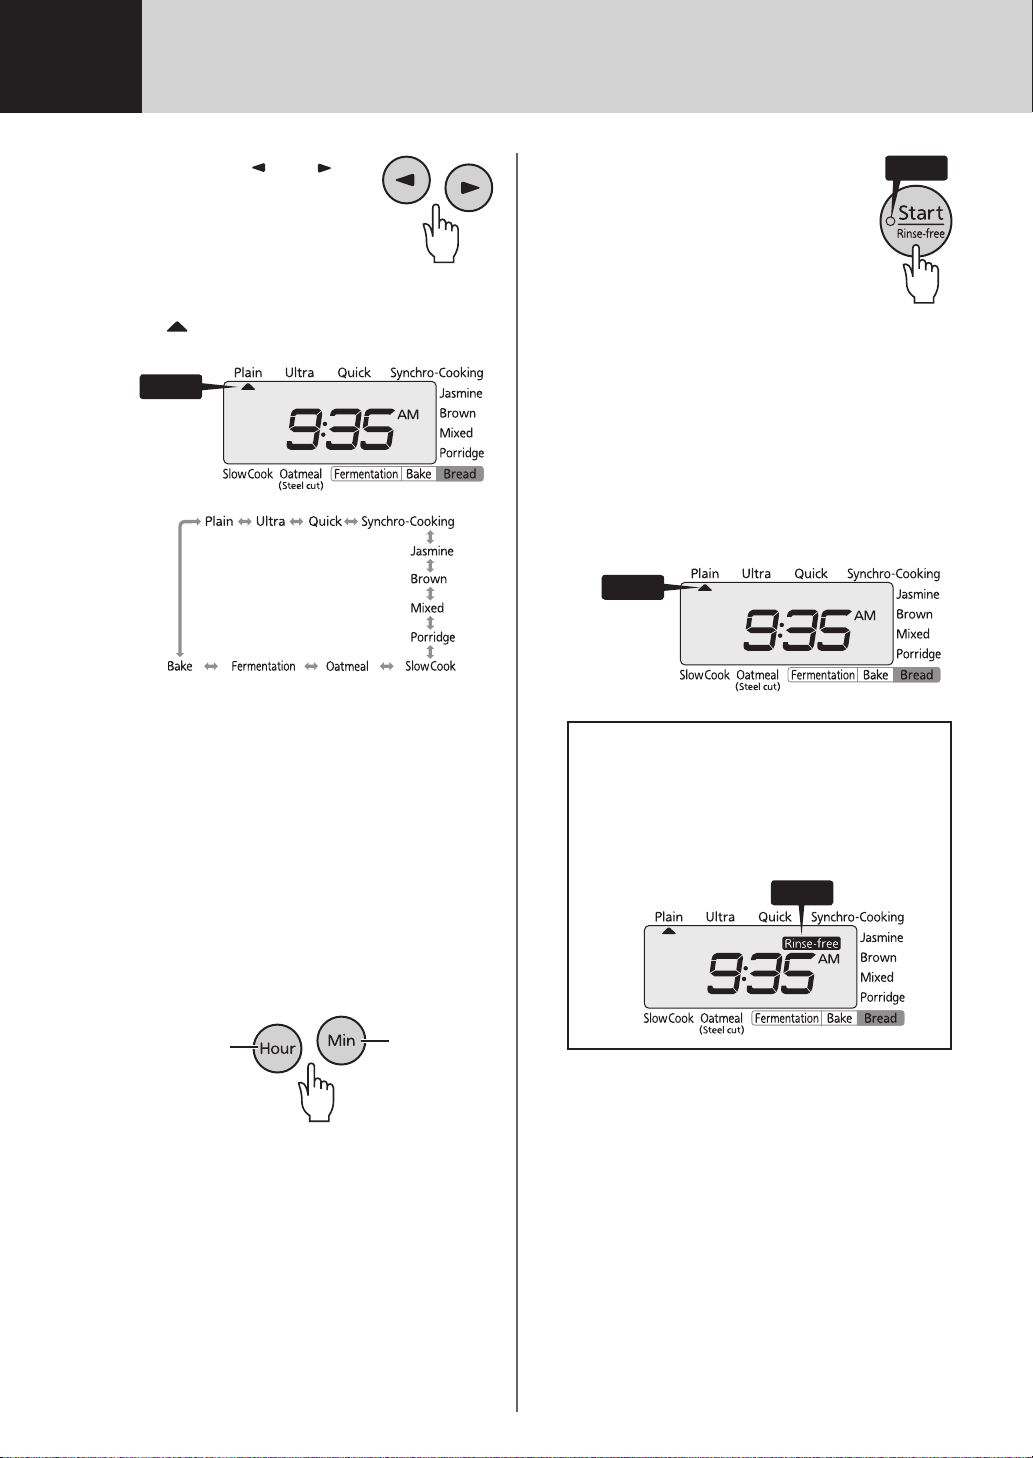
Press the [ ] or [ ]
1
key to select the
desired menu.
Each time the [Menu] key
is pressed, the selected menu will change in
the order shown below.
The
symbol will blink while the menu is
being selected.
Blinks
• It is not necessary to press the [Menu] key if
the desired menu is already selected.
If you selected the “Porridge”
2
menu, use the [Hour] and [Min]
keys to set the desired cooking
time.
• Each time the [Hour] key is pressed, the
set time will increase by 5 minutes. Each
time the [Min] key is pressed, that time will
decrease by 5 minutes.
• The cooking time can be set to any 5-minute
increment between 40 and 90 minutes.
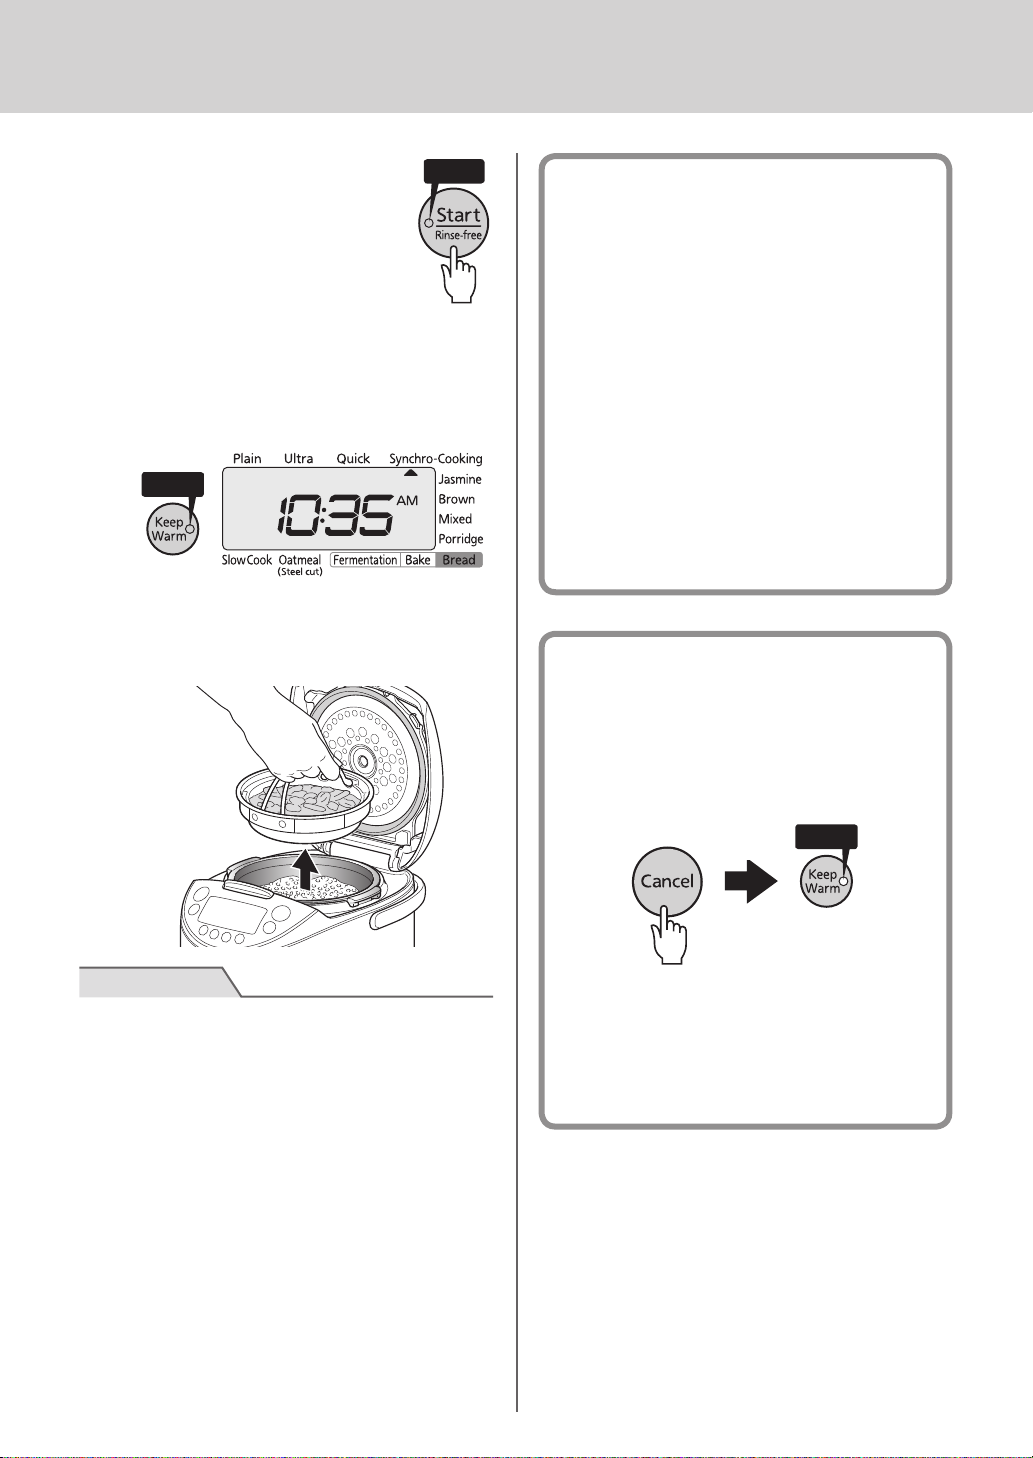
Press the [Start/Rinse-
3
free] key once.
When cooking rinsefree rice, press the key
twice.
• Rinse-free rice can be cooked under the
“Plain”, “Ultra”, “Quick”, “Synchro-Cooking”,
“Mixed”, and “Porridge” menus.
• To cancel “Rinse-free”, press the [Start/
Rinse-free] key again within 20 seconds.
For normal cooking
When you selected the “Plain” menu, a oneshort, one-long beep alarm will sound. In
other menus, only a one-beep alarm will
sound.
On
When cooking rinse-free rice
“Rinse-free” appears on the display.
When you selected the “Plain” menu, a
one-short, one-long, another one-short
beep alarm will sound. In other menus, a
one-long, one-short beep alarm will sound.
On
1818
Increases
by 5 min.
• The default setting is for 60 minutes. Adjust
as desired.
Decreases
by 5 min.
Cooking will start.
Page 19
Appropriate amounts
See p.14 to 15 for the appropriate amounts of grains and ingredients.
Cooking time guidelines
English
Type of rice
Unit size
1.0 L (5.5-cup) type 41 to 49 min 63 to 71 min 17 to 35 min 41 to 48 min
1.8 L (10-cup) type 44 to 51 min 65 to 73 min 18 to 35 min 50 to 62 min
Type of rice
Unit size
1.0 L (5.5-cup) type 16 to 34 min 63 to 73 min 39 to 61 min 42 to 46 min
1.8 L (10-cup) type 16 to 34 min 72 to 80 min 40 to 61 min 43 to 47 min
• The above times indicate the amount of time to the end of steaming after cooking is completed when the
rice is not soaked prior to cooking. (Voltage: 120 V, Room temperature: 73.4˚F [23˚C], Water temperature:
73.4°F [23˚C], Amount of water: normal level)
• When rinse-free rice is selected, cooking takes 1 to 10 minutes longer than each menu time.
• Cooking times will differ somewhat depending upon the amount being cooked, the type of rice, the type
and quantity of ingredients, the room temperature, the water temperature, the amount of water, electrical
voltage, and whether the Timer function is used or not, etc.
Plain Ultra Quick Synchro-Cooking
Jasmine Brown Mixed Oatmeal (Steel cut)
19
Page 20
5
On
Once the Rice Is Done Cooking
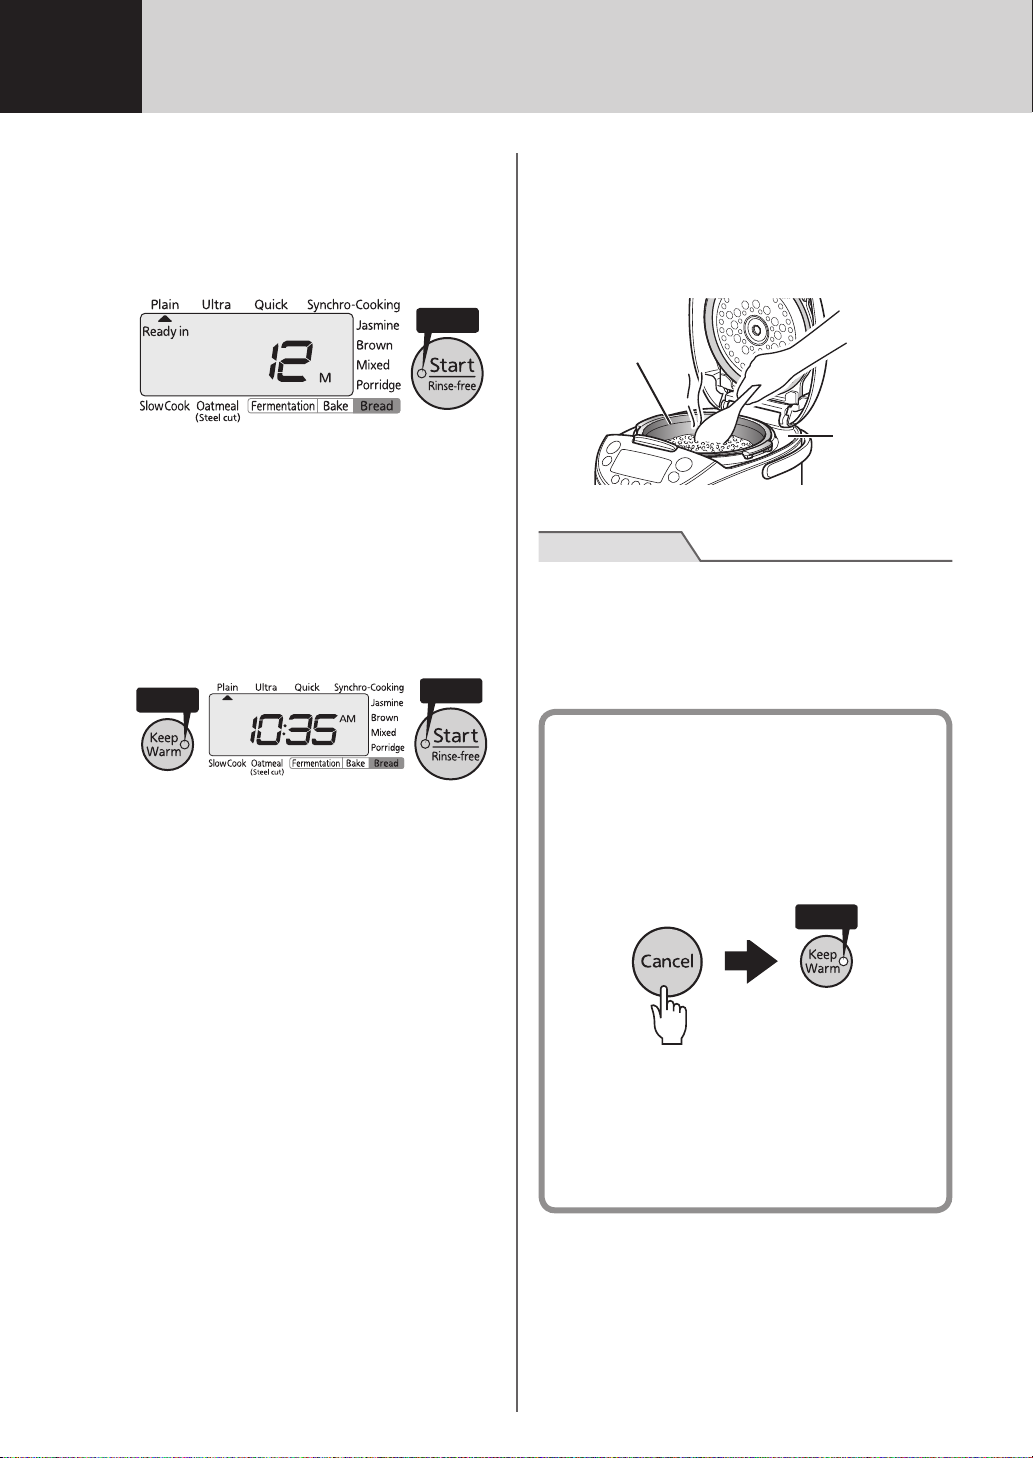
Once the nal steaming process
begins, the remaining time will
be displayed.
The time until steaming is completed will be
shown on the display in 1-minute increments.
On
• Steaming times will vary depending upon the
selected menu.
Once the rice is full y cooke d ,
the Keep Warm function will
automatically engage (the Start
lamp will turn off).
The Keep Warm lamp will turn on and an
alarm (8 beeps) will sound.
Off
• If you added ingredients under the “Porridge”
menu, or a longer cooking time is required,
etc., you can set the desired additional
cooking time. Simply press the [Hour] and
[Min] keys once the Keep Warm lamp turns
on, and then press the [Start/Rinse-free]
key. The cooking time can be extended up
to 15 minutes in increments of 1 minute, a
maximum of 3 times.
• Stir the rice well before reheating.
Stir and loosen the cooked rice.
1
Be sure to stir and loosen the rice as soon as
cooking is complete.
• Due to the shape of the inner pot, the rice is
slightly sunken at the center when cooking is
nished.
Inner pot
Condensation
will collect
in the upper
casing.
Note
● Be sure to wipe off any hot water that collects on
the upper casing or that runs onto the outside of
the rice cooker when you open the lid immediately
after cooking or while the Keep Warm function is
on.
When you are done using the
rice cooker...
Press the [Cancel] key to turn off the
1
Keep Warm function.
The Keep Warm lamp will turn off.
Off
2020
Disconnect the power plug from the
2
outlet. (See p.11.)
Clean the rice cooker. (See p.36 to
3
41.)
Page 21
6
Blinks
How to Cook Oatmeal (“Oatmeal” menu)
You can easily make oatmeal (steel cut).
Set oatmeal and water into the
1
inner pot, and close the lid.
• Amount of oatmeal
1.0 L type 1.8 L type
1.0 to 2.5 cups 1.0 to 3.0 cups
• Amount of water to add
Be sure to use the measuring cup supplied
with the rice cooker.
Amount of
oatmeal
1.0 cup 3.0 cups 3.5 cups
1.5 cups 4.5 cups 4.5 cups
2.0 cups 5.0 cups 5.0 cups
2.5 cups 5.5 cups 6.5 cups
3.0 cups – 7.0 cups
Connect the power plug to an
2
outlet. (See p.17.)
Press the [ ] or [ ] key to select
3
[Oatmeal (Steel cut)].
1.0 L type 1.8 L type
Once cooking is completed, an
5
alarm (8 beeps) will sound (the
Start lamp will turn off).
The Keep Warm lamp will blink and the
present time will appear on the display.
Blinks
Stir the oatmeal well and even it
6
out in the inner pot.
• Serve the cooked oatmeal as soon as
possible, as it is not kept warm.
When you are done using the
rice cooker...
Press the [Cancel] key to turn off the
1
Keep Warm function.
The Keep Warm lamp will turn off.
English
Blinks
Press the [Start/Rinse-
4
free] key once.
• The Rinse-free function is not
available.
A one-long beep will sound and cooking will
start.
On
Off
Disconnect the power plug from the
2
outlet. (See p.11.)
Clean the rice cooker. (See p.36 to
3
41.)
2121
Page 22

7
Off
Setting the Timer
When cooking
rinse-free rice,
1
press the key twice.
6
4
2 3, 5
Using the Timer function (Timer 1 /
Timer 2)
You can preset the time that you want cooking
to be actually completed.
• Select either “Timer 1” or “Timer 2” and set the
desired completion time. The start of cooking will
be automatically adjusted so that the operation is
completed at the preset time.
• Each timer can be set to different times. e.g.
“Timer 1” for breakfast and “Timer 2” for dinner.
• The preset timer settings will be stored in
memory.
Blinks
• Conrm that the Keep Warm lamp is off.
• It is not necessary to press the [Menu] key if
the desired menu is already selected.
If you selected the “Porridge”
3
menu, use the [Hour] and [Min]
keys to set the desired cooking
time.
• Each time the [Hour] key is pressed, the
set time will increase by 5 minutes. Each
time the [Min] key is pressed, that time will
decrease by 5 minutes.
• The cooking time can be set to any 5-minute
increment between 40 and 90 minutes.
Increases
by 5 min.
Decreases
by 5 min.
● Example setting: If “Timer 1” is set to 1:30 PM,
cooking will be completed at 1:30 PM.
Check the present time.
1
Blinks
• See p.48 for the procedure to set the present
time.
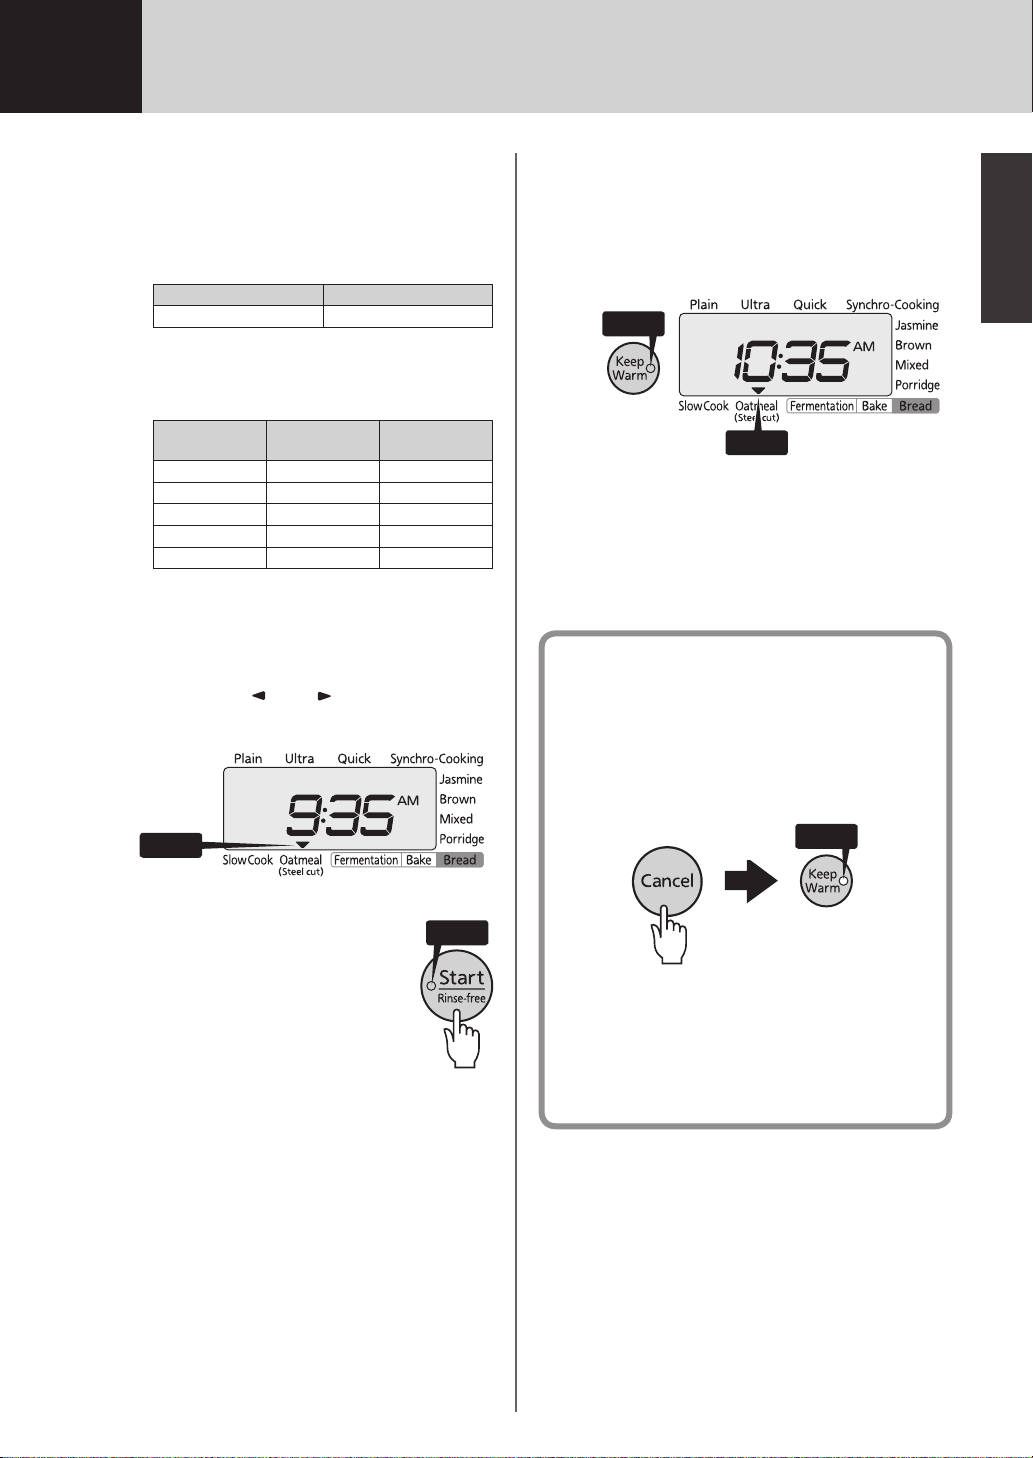
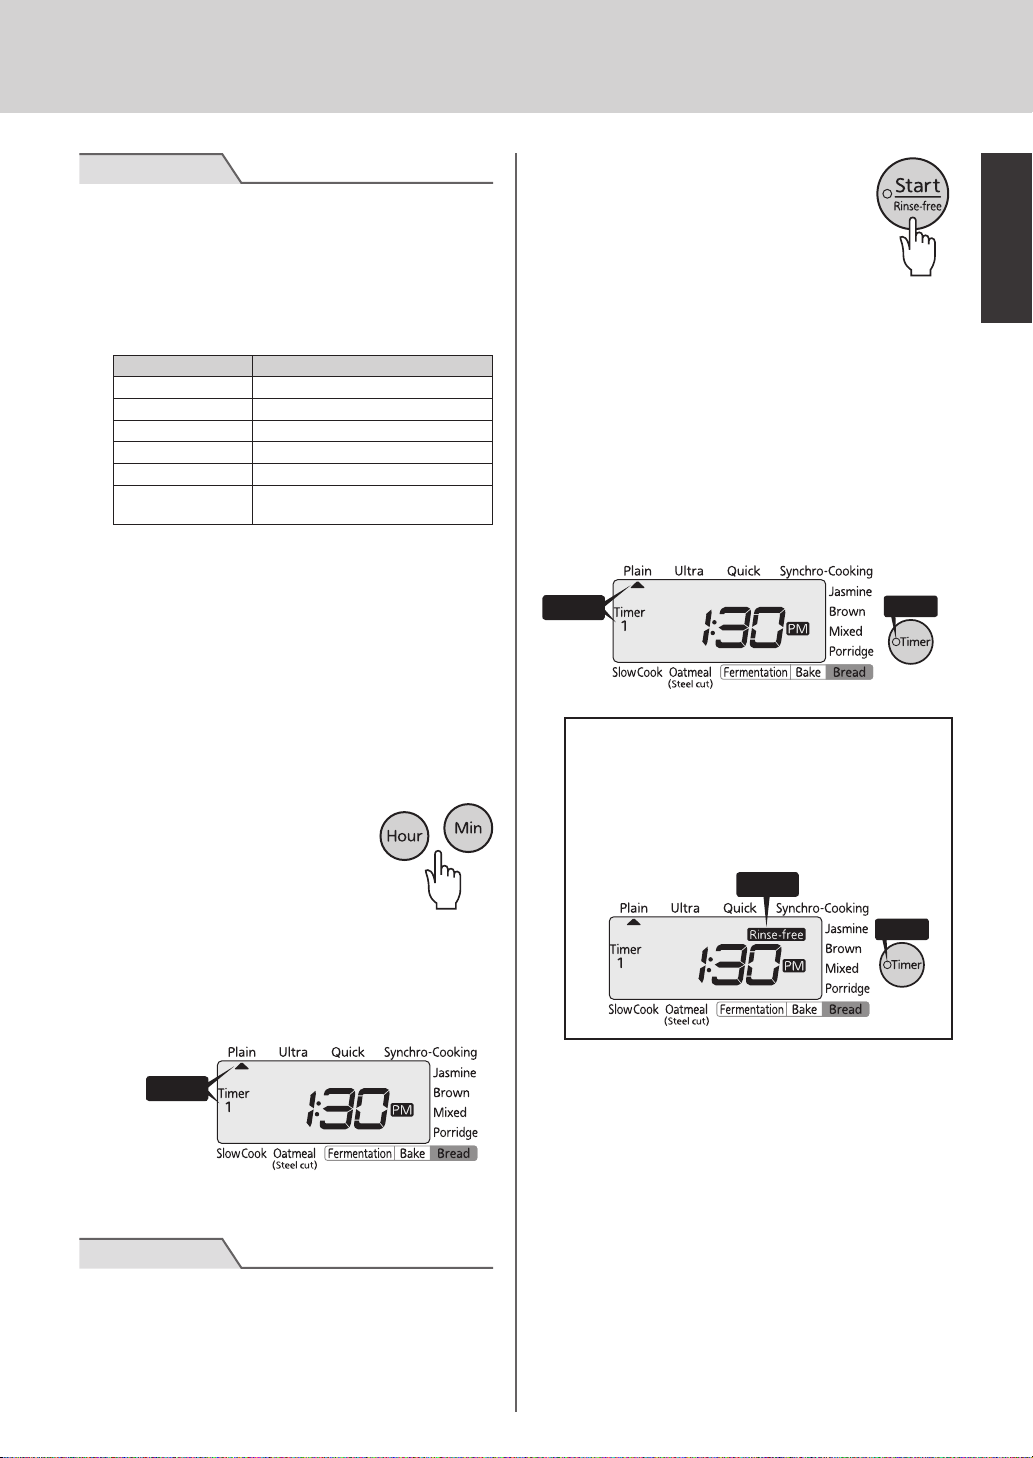
Press the [ ] [ ] key
2
to select the desired
menu.
The symbol will blink
while the menu is being selected.
2222
• The default setting is for 60 minutes. Adjust
as desired.
Press the [Timer] key to
4
select either “Timer 1”
or “Timer 2”.
The selected setting will switch back
and forth between “Timer 1” and
“Timer 2” each time the [Timer] key is pressed.
Both the Timer lamp and the displayed “Timer
1” or “Timer 2” will blink.
Blinks
• The previously preset time will be displayed.
It is not necessary to set the timer again if the
desired completion time is already displayed.
Blinks
Page 23
Note
● The Timer function is not available in the following
cases.
• When the “Quick”, “Synchro-Cooking”, “Mixed”,
“Bread” or “Slow Cook” menu is selected
• When the preset time is less than that indicated
in the following table (The times in the table
below also apply to rinse-free rice.)
Menu Minimum preset time
Plain 1 h 5 min
Ultra 1 h 30 min
Jasmine 45 min
Brown 1 h 30 min
Porridge Cooking time + 1 min
Oatmeal
(Steel cut)
• When “0:00” is blinking on the display
● If the Keep Warm lamp is on, press the [Cancel]
key to turn off the lamp. (The Timer function is not
available while the Keep Warm lamp is on.)
● If you do not operate the rice cooker within about
30 seconds after pressing the [Timer] key, an
alarm (3 beeps) will sound.
● If the [Timer] or [Start/Rinse-free] key is pressed
while the rice cooker is in a state where the Timer
function is not available, an alarm (3 beeps) will
sound.
55 min
Use the [Hour] and
5
[Min] keys to set the
desired completion
time.
Press the [Hour] key to change the set time
in 1-hour increments. Press the [Min] key to
change that time in 10-minute increments.
Hold down the corresponding key to change
the time more rapidly.
Press the [Start/Rinse-
6
free] key once.
When cooking rinsefree rice, press the key
twice.
The Timer lamp will turn on and the Timer
function is set.
• Rinse-free rice can be cooked under the
“Plain”, “Ultra”, and “Porridge” menus.
For normal cooking
When you selected the “Plain” menu, a oneshort, one-long beep alarm will sound. In
other menus, only a one-beep alarm will
sound.
On
When cooking rinse-free rice
“Rinse-free” appears on the display.
When you selected the “Plain” menu, a
one-short, one-long, another one-short
beep alarm will sound. In other menus, a
one-long, one-short beep alarm will sound.
On
English
On
On
Blinks
• The time is displayed in a 12-hour format.
Note
● Do not set the timer to more than 12 hours, as it
may result in spoiled rice.
● Check whether “AM” or “PM” currently displayed.
• If you make a mistake or otherwise want to
reset the timer, press the [Cancel] key and
repeat the procedure from step
on p.22.
2
2323
Page 24
8
Keeping the Rice Warm
The Keep Warm function will especially maintain the
shiny, delicious taste of white rice (rinse-free rice).
The Keep Warm function will automatically engage
when cooking is completed.
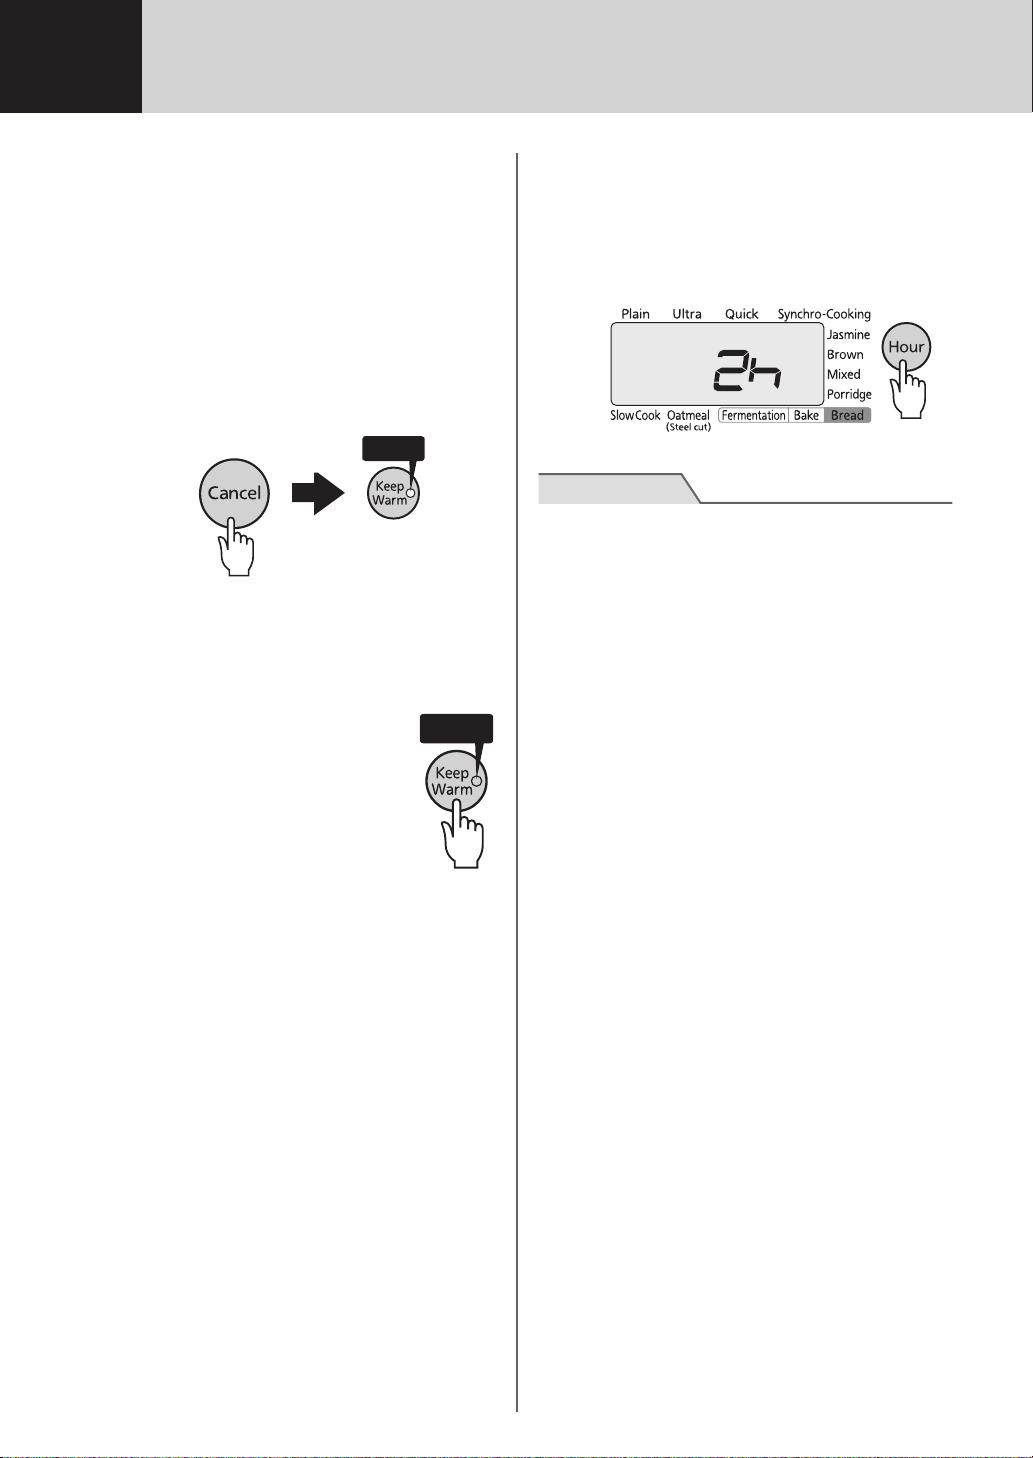
Turning off the Keep Warm
function
Press the [Cancel] key.
The Keep Warm lamp will turn off.
Off
Restarting the Keep Warm
function
Conrm that the Keep
On
Warm lamp is off and
press the [Keep Warm]
key.
The Keep Warm lamp will turn
on.
Keeping a small amount of rice
warm
Gather the rice at the center of the inner pot; serve
as soon as possible.
Elapsed Keep Warm time display
Hold down the [Hour] key to display the elapsed
Keep Warm time. The elapsed time will be displayed
in 1-hour increments up to 24 hours (“24h”).
After 24 hours have elapsed, “24” will blink and “h”
will turn on.
Note
● Avoid the following, as they may result in unusual
odors, dryness, discoloration, and spoiling of the
rice, or corrosion of the inner pot.
• Using the Keep Warm function with cold rice
• Adding cold rice to rice that is being kept warm
• Leaving a spatula in the inner pot while the
Keep Warm function is on
• Using the Keep Warm function with the power
plug disconnected
• Using the Keep Warm function for longer than
24 hours
• Keeping less than the minimum required
amount of rice warm (See “Specications” on
p.49.)
• Using the Keep Warm function for anything
other than white rice (including rinse-free rice)
● When using the “Porridge” menu, the porridge
can become pasty if kept warm for too long; serve
as soon as possible.
● Be sure to remove any grains of rice that adhere
to the brim of the inner pot as well as to any
gaskets. Failure to do so can result in dryness,
discoloration, odors, and stickiness of the rice
being cooked.
● Serve cooked rice as soon as possible in cold
climates and high temperature environments.
● Do not leave the cooking plate or food cooked
using the cooking plate inside the rice cooker
while the Keep Warm function is on.
2424
Page 25
9
On
Reheating Cooked Rice
For piping hot rice, reheat the rice that is being kept
warm before serving it.
Note
● Rice will not be fully heated if more than half of
the inner pot is full.
● The rice will end up being dry if reheated under
any of the following conditions.
• The rice is still hot, such as immediately after
cooking.
• There is less than the minimum required
amount of rice (1 cup with the 1.0 L type, 2
cups with the 1.8 L type).
• The rice is reheated 3 times or more.
Stir and loosen the rice that was
1
being kept warm.
Add 1 to 2 tablespoons of water
2
evenly over the rice.
Press the [Start/Rinse-
4
free] key .
The Start lamp will blink and
reheating will start.
The remaining time will be
displayed and an alarm (3 long
beeps) will sound when the
operation is completed.
• To stop reheating, press the [Cancel] key.
• Reheating is not available if the rice is too
cold (131˚F [55˚C] or lower as a guideline).
In this case, a repeated beeping alarm will
sound.
Stir and loosen the reheated
5
rice well, and even it out in the
inner pot.
Blinks
English
● Adding water will prevent the rice from drying out
and result in plumper rice.
Make sure that the Keep Warm
3
lamp is on.
• Reheating is not available if the Keep Warm
lamp is not on. If the lamp is not on, press
the [Keep Warm] key. (See p.24.)
2525
Page 26
How to reheat oatmeal
Note
● Oatmeal will end up being dry if reheated under
any of the following conditions.
• The oatmeal is reheated without adding water
or milk.
• The volume of oatmeal is below the minimum
required volume (1 cup).
• The oatmeal is reheated 3 times or more.
Stir the cooked oatmeal.
1
● You can add some water or milk to the cooked
oatmeal and reheat it.
Note
● When adding water or milk, add it immediately
after cooking. Otherwise, the temperature will
decrease and the oatmeal may not be reheated.
• Maximum cooking amount when adding
some
water or
1.0 L type: 5.5 scale for “Plain”
1.8 L type: 8 scale for “Plain”
milk to reheat oatmeal
Press the [Start/Rinse-
3
free] key .
The Start lamp will blink and
reheating will start.
The remaining time will be
displayed and an alarm (3 long
beeps) will sound when the
operation is completed.
Note
● Reheating is not available if the oatmeal is too
cold (131˚F [55˚C] or lower as a guideline). In this
case, a repeated beeping alarm will sound.
Blinks
Stir the heated oatmeal well and
4
even it out in the inner pot.
2626
Make sure that the
2
Keep Warm lamp is
blinking.
• Reheating is not available if the [Cancel]
key is pressed after the oatmeal has been
cooked.
Blinks
Page 27
10
Cooking Rice and Side Dishes Together (“Synchro-Cooking” Menu)
You can use the cooking plate to cook side dishes
described in the supplied “COOKBOOK” at the
same time as you cook rice. You can also add
water to the inner pot and cook side dishes without
making rice.
Refer to the supplied “COOKBOOK” for directions.
Note
● Do not make dishes other than those described in
the supplied “COOKBOOK”.
● Do not cook with a greater volume of ingredients
than that indicated in the supplied “COOKBOOK”.
Doing so may cause the contents to boil over or
result in improperly cooked food.
● Be careful of the following points when using the
cooking plate.
• When cooking dishes with a strong odor, the
odor may adhere to the cooking plate.
• When cooking ingredients with a strong color,
that color may be transferred to the cooking
plate through the broth, etc.
• Do not use sharp instruments like kitchen
knives, table knives, or forks inside the cooking
plate.
Prepare the ingredients and
1
place them in the cooking plate.
Stacking ingredients on top of each other
may result in the contents boiling over or in
improperly cooked food. Spread ingredients
over the whole of the cooking plate.
Make the necessary
2
preparations for cooking rice.
(See p.16.)
Note
● Refer to the following table for the acceptable
amounts of rice that can be cooked concurrently
with food. Do not cook more than the acceptable
maximum or less than the minimum required
amounts. Doing so may cause the contents to boil
over or result in improperly cooked food.
1.0 L type 1.8 L type
Maximum Minimum Maximum Minimum
2 cups 1 cup 4 cups 2 cups
Place the cooking p l ate inside
3
the inner pot and close the lid.
Carrying
(3)
(4)
(2)
(1)
Note
● Always place the cooking plate inside the inner
pot.
● Make sure that the cooking plate is level (not set
at an angle).
● Tilt the carrying handle of the cooking plate
outward before closing the lid.
handle
Cooking
plate
Inner pot
Connect the power plug to an
4
outlet.
Note
● If the Keep Warm lamp is on, press the [Cancel]
key to turn off the lamp.
Press the [ ] or [ ]
5
key to select the
“Synchro-Cooking”
menu.
The symbol will blink while the menu is
being selected.
Blinks
Always select the “Synchro-Cooking” menu
when cooking concurrently.
English
2727
Page 28
Press the [Start/Rinse-
6
free] key .
The Start lamp will turn on and
concurrent cooking will start.
On
Cooking without making rice
Add water up to the scale of white
1
rice (1.0 L type: scale 2, 1.8 L type:
scale 4), place the cooking plate in
the inner pot, and then close the lid.
Once cooking is completed, an
7
alarm (8 beeps) will sound (the
Start lamp will turn off).
The Keep Warm lamp will turn on.
On
Remove the cooking plate and
8
stir and loosen the rice.
Select the “Slow Cook” menu.
2
Set the desired cooking time. (See
3
p.29.)
Set the cooking time to between 20 and
30 minutes, depending on the type of food
being cooked.
When cooking is completed, press
4
the [Cancel] key and remove the
cooking plate.
When you are done using the
rice cooker...
Press the [Cancel] key to turn off the
1
Keep Warm function.
The Keep Warm lamp will turn off.
Off
Note
● Do not leave the cooking plate in the rice cooker
while the Keep Warm function is on.
● Be careful when removing the cooking plate after
cooking, as it will be hot.
● Do not tilt the cooking plate while removing it.
The broth, etc., may spill out and result in burns.
● Do not return the cooking plate to the inner pot
after removing it.
Doing so may result in the rice spoiling or not
being kept warm.
● When cooking with ingredients that release a lot
of liquid, oils or fats when heated, or that expand
during heating, such as eggs and the like, some
of the broth may overow down into the rice.
2828
Disconnect the power plug from the
2
outlet. (See p.11.)
Clean the rice cooker. (See p.36 to
3
41.)
Page 29
11
Slow Cooking (“Slow Cook” Menu)
Refer to the supplied “COOKBOOK” for directions.
With this menu, food is rst brought to near boiling,
the heat is then lowered to about 199˚F (93˚C)
and the food left to simmer. The temperature is
then lowered even further to about 190˚F (88˚C)
and simmering is continued. By gradually lowering
the heating temperature in this way, avors are
enhanced and the liquids do not boil down even
when heated for a long period of time.
Menu examples
Salmon chowder, yuzu citrus-avored oden
● For how to cook “salmon chowder” and
“yuzu citrus-avored oden”, see the supplied
“COOKBOOK”.
Note
● Caution should be exercised when making
dishes other than those described in the supplied
“COOKBOOK”, as they may boil over.
● Stir well before cooking to prevent seasonings
from settling at the bottom of the inner pot.
● When simmering foods in broth, cool the broth
before cooking.
● When thickening with starch, add the starch at the
end of cooking.
● Since sh-paste products like “chikuwa” tube-
shaped sh paste and “kamaboko” sh paste
cake will swell when heated, the amount being
used should be adjusted with that in mind.
Connect the power plug to an
3
outlet.
Note
● If the Keep Warm lamp is on, press the [Cancel]
key to turn off the lamp.
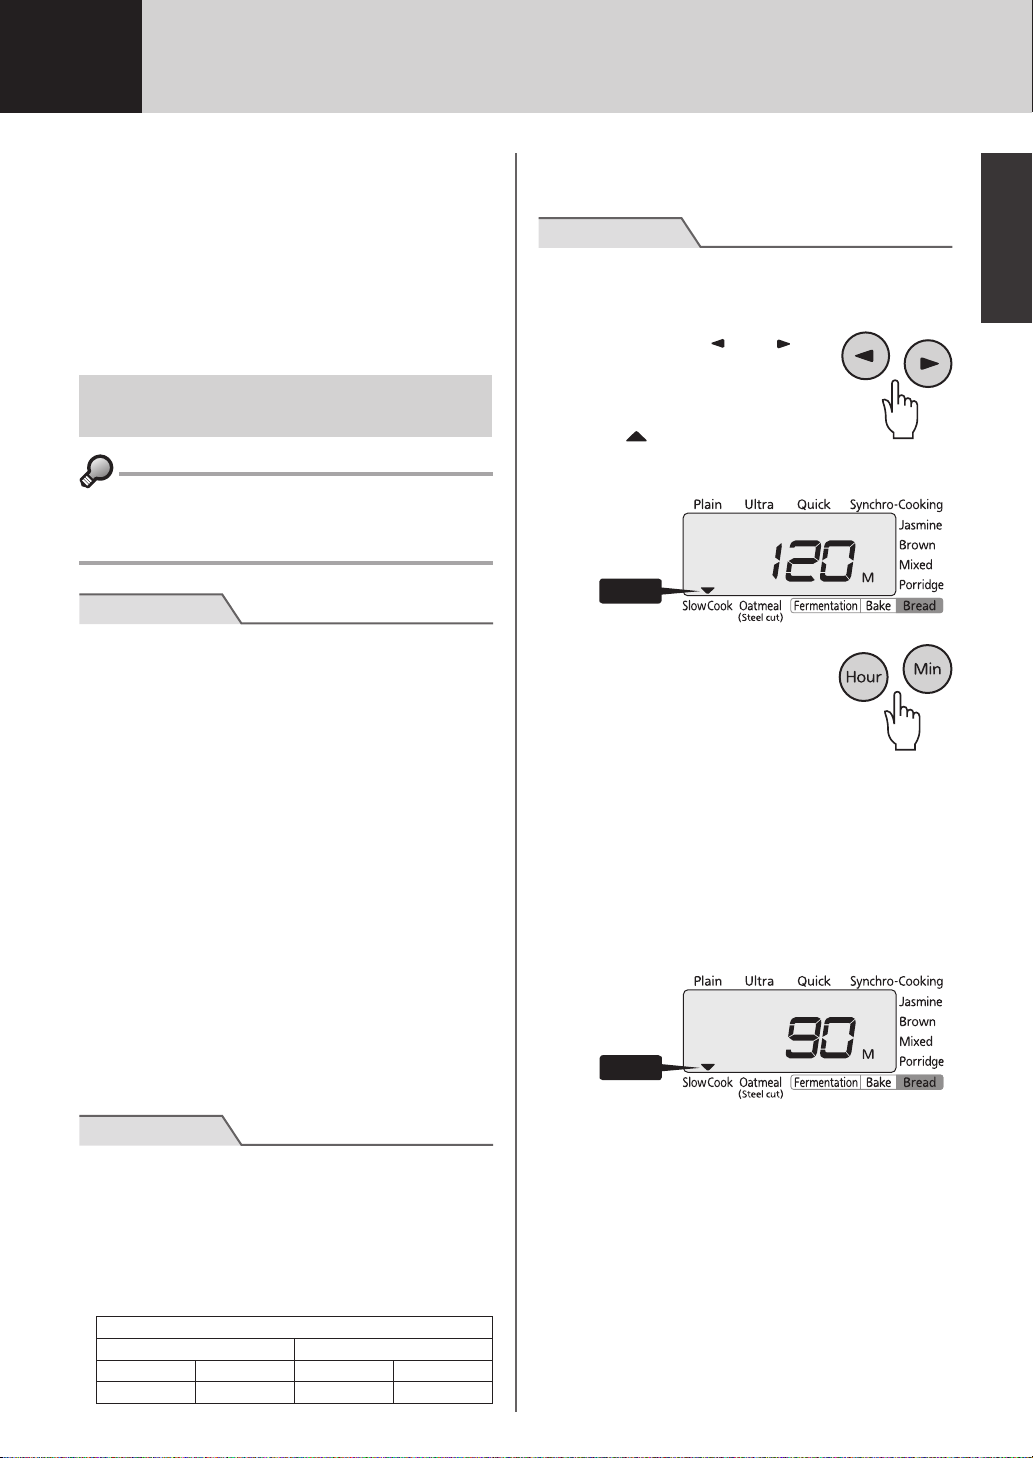
Press the [ ] or [ ]
4
key to select the
“Slow Cook” menu.
The symbol will blink while
the menu is being selected.
Blinks
Use the [Hour] and
5
[Min] keys to set
the desired cooking
time.
Each time the [Hour] key is pressed, the set
time will increase by 5 minutes. Each time the
[Min] key is pressed, that time will decrease
by 5 minutes.
The cooking time can be set to any 5-minute
increment between 5 and 180 minutes.
English
Prepare the ingredients.
1
Add ingredients to the inner pot
2
and close the lid.
Note
● Use the “Plain” scale on the inside of the inner pot
as a reference. Using more than the maximum
acceptable amount (see the table below) can
prevent proper boiling or cause the contents to
boil over. Be careful also not to use less than the
minimum required amount either, as that can also
cause the contents to boil over.
“Plain” scale
1.0 L type 1.8 L type
Maximum Minimum Maximum Minimum
5.5 or below 2 or above 8 or below 3 or above
Blinks
2929
Page 30
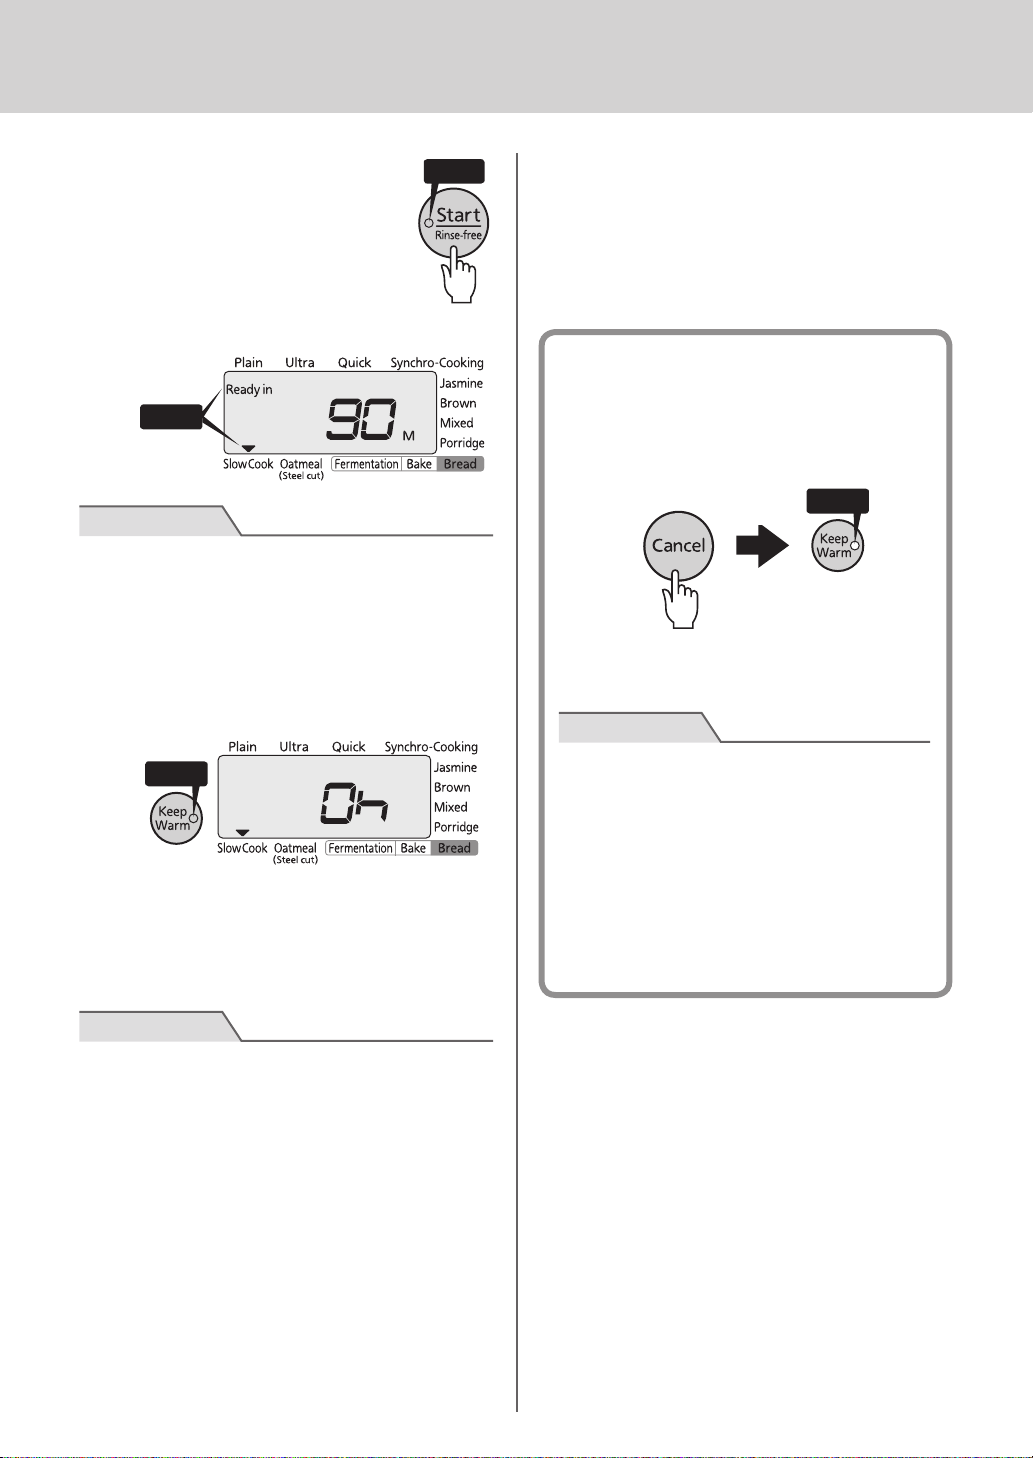
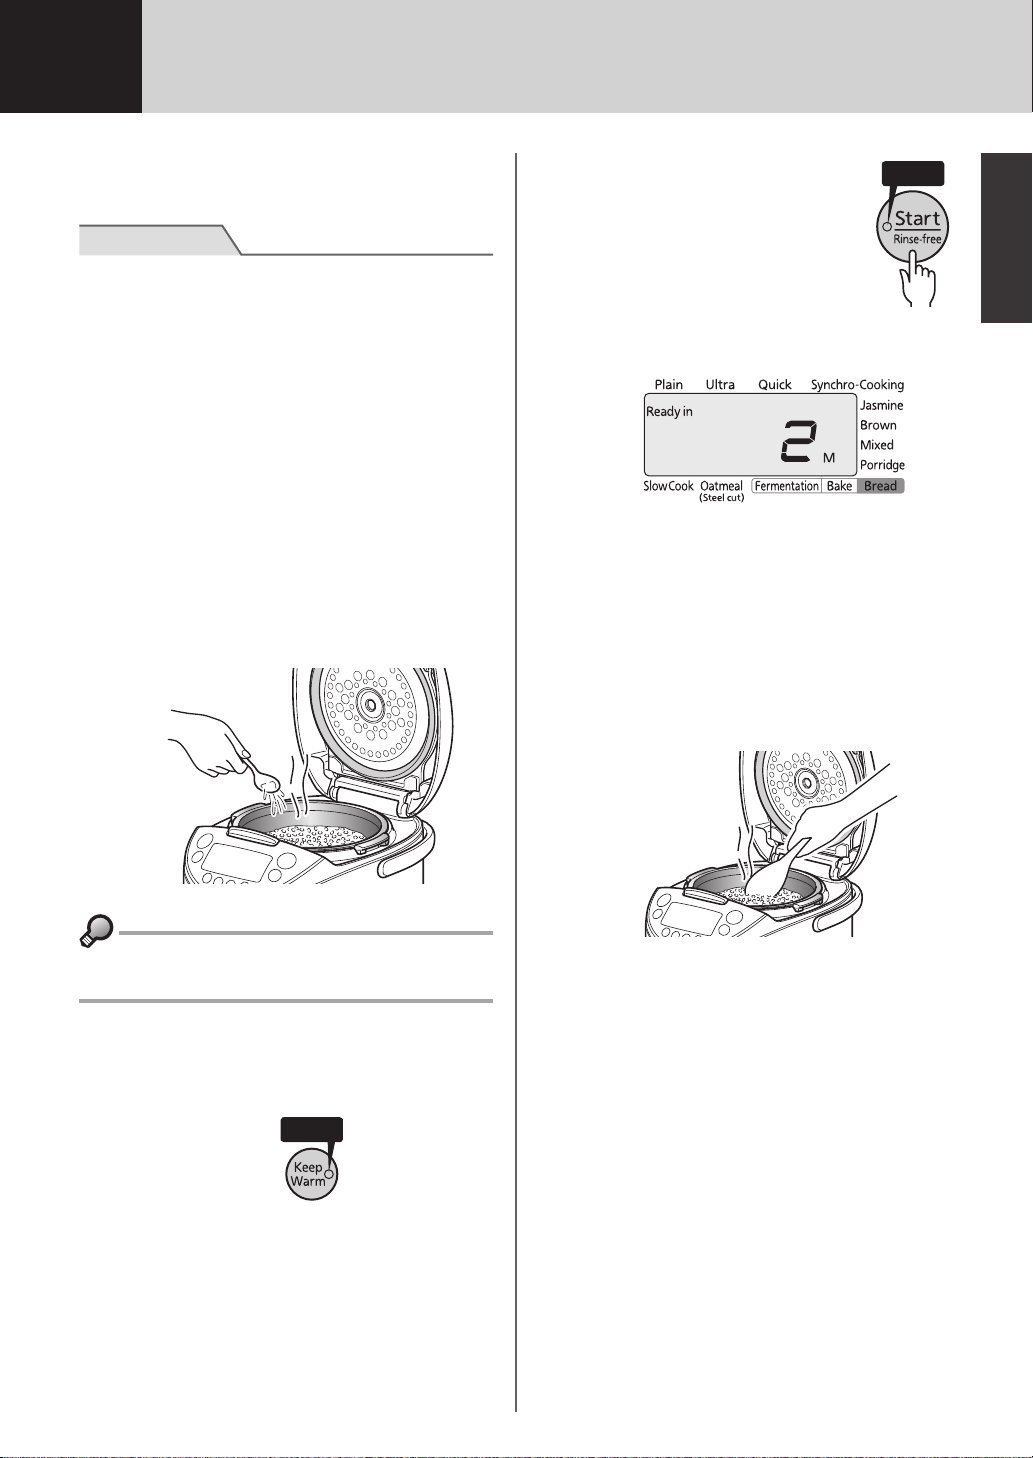
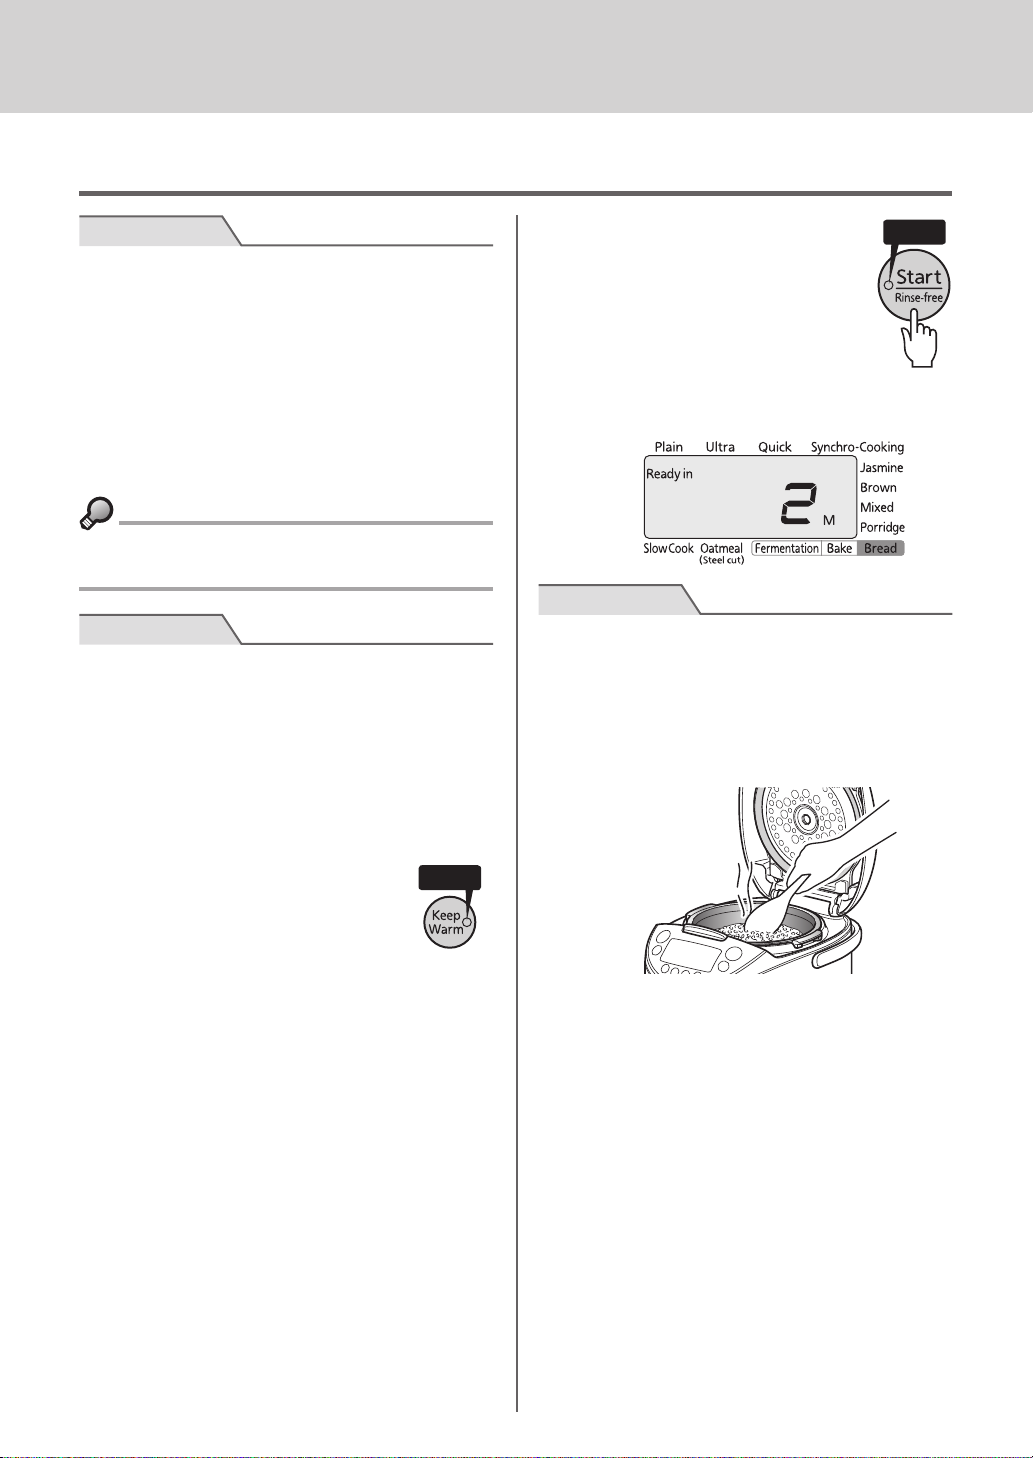
Press the [Start/Rinse-
On
6
free] key .
The Start lamp will turn on and
cooking will start.
“Ready in” will appear on the
display.
On
Note
● Do not open the lid during cooking.
Once cooking is completed, an
7
alarm (8 beeps) will sound (the
Start lamp will turn off).
The Keep Warm lamp will turn on and “0h”
will be displayed.
On
Rinse-free] key when the Keep Warm lamp is
on in order to reheat that food. The remaining
reheating time will be displayed and an alarm
(3 long beeps) will sound when the operation is
completed. After reheating, the Keep Warm lamp
will turn on and the elapsed Keep Warm time will
be displayed.
Once cooking is completed...
Press the [Cancel] key to turn off the
1
Keep Warm function.
The Keep Warm lamp will turn off.
Off
Remove any odors. (See p.41.)
2
Note
• To simmer the food further, use the [Hour]
and [Min] keys to set the additional cooking
time and then press the [Start/Rinse-free]
key. The cooking time can be extended up to
30 minutes, a maximum of 3 times.
Note
● When food is not sufciently cooked, do not press
the [Cancel] key before additional cooking. Doing
so will cause the Keep Warm lamp to go out and
additional cooking will not be possible. If you
mistakenly pressed the [Cancel] key, perform the
following procedure.
1. Remove the inner pot and set it on a wet towel
or cloth.
2. Leave the rice cooker lid open and cool
down the unit and the inner pot for about 10
minutes.
3. Place the inner pot back inside the rice
cooker.
4. Repeat the procedure from step
● If you want food that is being kept warm to be
piping hot before serving it, press the [Start/
3030
on p.29.
4
● If the [Cancel] key is not pressed when
cooking is completed , th e Kee p Warm
function will automatically engage and the
elapsed Keep Warm time will be displayed in
hourly increments from the rst hour (“1h”) up
to 6 hours (“6h”) after that. After 6 hours has
elapsed, “6h” will blink on the dis p l ay.
● Do not use the Keep Warm function
continuously for more than 6 hours as some
foods will lose their taste.
Page 31

12
How to Bake Bread (“Bread Fermentation” and “Bread Bake” menus)
You can bake bread according to the following
procedure. You can also bake other types of bread
described in the supplied “COOKBOOK”.
Note
● Do not try to bake types of bread other than those
described in the supplied “COOKBOOK”, as they
may not be baked properly.
● Only use dry yeast to leaven the bread.
Ingredients (Measure the
ingredients accurately
1.0 L type (2 to 3 servings)
Bread our .......................... 1-1/2 cups (7 oz / 200 g)
Dry yeast ............................ 1 teaspoon
Sugar .................................. 1-1/2 teaspoons
Salt ..................................... 1/3 teaspoon
Butter .................................. 1-1/4 tablespoons
Dry skim milk ...................... 1-1/3 tablespoons
Lukewarm water (Approx. 86ºF [30ºC]) ... 1/2 cup (130 ml)
1.8 L type (3 to 4 servings)
Bread our ..........................
Dry yeast ............................1-1/2 teaspoons
Sugar ..................................3 teaspoons
Salt .....................................1/2 teaspoon
Butter ..................................2 tablespoons
Dry skim milk ......................2 tablespoons
Lukewarm water (Approx. 86ºF [30ºC]) ...3/4 cup (200 ml)
2-1/4 cups (10-1/2 oz / 300 g)
.)
Place the dough on a counter and
2
knead it for about 20 minutes.
Knead the dough well by stretching it out and
folding it over several times.
When the dough is smooth on the outside
and can be stretched thinly without tearing, it
has been sufciently kneaded.
Roll the dough into a ball and
3
place it in the center of the inner
pot.
English
Put all the ingredients into a
1
bowl and roll them into a ball.
1. Sift the bread our and soften the butter by
warming it at room temperature.
2. Put the bread our into a bowl, and then
add the dry skim milk, sugar, and dry yeast
in the given order. Add the salt so that it
does not directly contact the dry yeast.
3. Add the butter and pour lukewarm water
over the dry yeast.
Using
4.
a wooden spatula, mix all the
ingredients together and roll them into a
ball by hand.
Place the inner pot in the rice
4
cooker.
(1) Be sure to set the pot properly (not set at
an angle).
(2) Close the lid.
Conrm that the inner
lid is set in place.
(2) Close lid.
Inner pot
(1) Set pot inside
rice cooker.
Connect the power plug to an
5
outlet.
Handle
of the
inner pot
Concave
side
3131
Page 32

Press the [ ] or [ ]
Blinks
6
key to select the
“Fermentation”
menu.
The symbol will blink while the menu is
being selected.
Leaven the dough (rst rise). The default
rising time is set to 40 minutes.
Blinks
Open the lid and check that the
8
dough has risen.
In the rst rise, the dough grows by 2 to 2.5
times from its original size.
Coat a nger with bread our and press the
center of the dough. If a hole remains, the
rst rise is complete.
• To change the rise time from 40 minutes, rst
select “Fermentation” and set the time using
the [Hour] and [Min] keys, and then press the
[Start/Rinse-free] key.
Each time the [Hour] key is pressed, the
set time will increase by 5 minutes. Each
time the [Min] key is pressed, that time will
decrease by 5 minutes.
Press the [Start/Rinse-
7
free] key .
The Start lamp will turn on and
the dough will start to rise.
When the rst rise is completed, the Keep
Warm lamp and “0” will start blinking on the
display, and an alarm (8 beeps) will sound.
The Start lamp will turn off.
Blinks
On
• If the hole disappears, the dough has not yet
risen enough. In this case, press the [Hour]
key with the Keep Warm lamp blinking, set
the additional rise time, and then press the
[Start/Rinse-free] key. The cooking time can
be extended up to 15 minutes in increments
of 5 minutes, a maximum of 3 times.
Press the [Cancel] key.
9
The Keep Warm lamp will turn off.
Blinks
Slightly press on the dough to
10
release any trapped gas.
On
3232
Page 33

Roll the dough back into a
On
11
neatly shaped ball, place it in
the center of the inner pot, and
then close the lid.
Press the [Start/Rinse-
13
free] key .
The Start lamp will turn on and
the dough will start to rise.
English
● When the second rise is completed, the dough
will have grown by 1.5 to 2 times in size, therefore
remember this size.
Conrm that the “Fermentation”
12
menu is selected.
Conrm that “40” is displayed.
Leaven the dough (second rise).
On
Blinks
When the second rise is completed, the Keep
Warm lamp and “0” will start blinking on the
display, and an alarm (8 beeps) will sound.
The Start lamp will turn off.
Open the lid and check that the
14
dough has grown from 1.5 to
2 times its origin a l s i ze after
releasing the gas as described
in step
Close the lid and press
15
the [Cancel] key.
Menus can now be selected.
The Keep Warm lamp will turn off.
Press the [ ] or [ ]
16
key to select the
“Bake” menu.
The symbol will blink
while the menu is being selected.
11.
Blinks
• To change the bake time from 40 minutes,
rst select “Bake” and set the time using the
[Hour] and [Min] keys, and then press the
[Start/Rinse-free] key.
Each time the [Hour] key is pressed, the
set time will increase by 1 minutes. Each
time the [Min] key is pressed, that time will
decrease by 1 minutes.
3333
Page 34

Press the [Start/Rinse-
On
17
free] key .
The Start lamp will turn on and
baking will start.
When the baking is completed, the Keep
Warm lamp and “0” on the display will start
blinking, and an alarm (8 beeps) will sound.
The Start lamp will turn off.
Open the lid and poke the center
18
of the bread with a bamboo
skewer.
If the bamboo skewer comes out clean, the
bread is baked on the inside.
• If dough sticks to the bamboo skewer,
press the [Hour] key with the Keep Warm
lamp blinking, set the additional bake time,
and then press the [Start/Rinse-free] key.
The cooking time can be extended up to
15 minutes in increments of 5 minutes, a
maximum of 3 times.
Remove the inner pot, and turn
19
it over to take out the bread.
Note
● Wear oven mitts, etc. when removing the inner
pot. Be careful not to touch it with your bare
hands. Doing so may result in burns.
● Serve the bread as soon as baking is completed.
If it is left in the rice cooker, condensation on the
inner lid will drip onto the bread, making it sticky.
Note
● Do not press the [Cancel] key before additionally
baking the bread or darkening the bread crust.
Doing so will cause the Keep Warm lamp to go
out and additional baking will not be possible. If
you have mistakenly pressed the [Cancel] key,
perform the following procedure.
1. Remove the inner pot and set it on a wet
cloth.
2. Leave the rice cooker lid open and cool
down the unit and the inner pot for about 10
minutes.
3. Place the inner pot back inside the rice
cooker.
4. Select “Bake” and set the additional bake
time, and then bake the bread.
3434
Page 35

To darken the crust
To darken the crust of the baked bread, bake it
again using the following procedure.
Place the bread in the inner pot with
1
the unbaked side of the bread facing
down.
Note
Once bread baking is
completed…
Press the [Cancel] key to turn off the
1
Keep Warm function.
The Keep Warm lamp will turn off.
Off
Disconnect the power plug from the
2
outlet. (See p.11.)
English
● Wear oven mitts, etc. Be careful not to touch
the inner pot with your bare hands.
Place the inner pot back inside the
2
rice cooker .
Press the [Hour] key with the
3
Keep Warm lamp blinking
and set the bake tim e t o 10
minutes.
Press the [Start/Rinse-
4
free] key.
The Start lamp will turn on.
On
Remove any odors. (See p.41.)
3
When the baking is completed, take out the
bread according to step
19 on p.34.
3535
Page 36

13
Perform cleaning and maintenance procedures as described on the following p.36 to 41.
Any other servicing should be performed by an authorized service representative.
Clean all parts by hand. Do not use a dishwasher/dryer.
To maintain cleanliness, always clean the rice cooker on the same day it is used. Also clean the rice cooker at
regular intervals as well.
The rice cooker should also be cleaned on the day that it is used in order to remove any odors that remain
from cooking or bread baking. (See p.41.)
Cleaning and Maintenance
Note
● Be sure to disconnect the power plug and allow the rice cooker, inner pot, inner lid, and steam cap to cool
down before cleaning.
● When cleaning the rice cooker with a detergent, use only standard kitchen detergent (for tableware and
kitchen utensils).
● Clean with a soft sponge and cloth.
● Rinse the parts thoroughly since detergent constituent remaining on them may result in deterioration and
discoloration of part’s materials such as resin.
Parts to wash after every use
Clean with a soft sponge and with tap or lukewarm
1
water.
Inner pot
Measuring cup
Spatula
Inner lid
Cooking plate
Ladle
Wipe off water with a dry cloth and completely dry
2
all parts.
Note
● Do not clean the inner pot with the abrasive side of a heavy-
duty scrub sponge. Doing so may damage the uorocarbon
resin coating.
Do not use the abrasive
side of a heavy-duty
scrub sponge.
● Do not wash dishes, etc., inside the inner pot. Also, do not
place the inner pot upside down on top of dishes, etc., to
dry. Doing so may damage the uorocarbon resin coating or
cause it to peel.
36
Page 37

Steam cap
(Can be disassembled
into two parts. See
p.40 to 41.)
Lid
Parts to wash when dirty
Heating
plate
Center
sensor
Power cord
Upper
casing
These parts can be washed under running water.
Clean with a sponge us ing tap or lukewarm water.
1
Wipe off water with a dry cloth and completely dry
2
all parts.
Note
● Do not wash parts in the following manners as they can
cause those parts to become deformed.
• Washing with hot water
• Soaking
• Washing the hot inner pot with running water immediately
after cooking rice
● Always wash the steam cap after cooking with grains
(amaranths, etc.). The steam cap may clog and cause
problems, like preventing the lid from opening, resulting in
improperly cooked food.
Inside and outside the rice cooker
Wet a towel or cloth, wring out excess water, and wipe.
Center sensor
Remove burned rice and any other adhering grains of rice.
If adhering objects are hard to remove, use commercially
available sandpaper (around #320), then wet a towel or cloth,
wring out excess water, and wipe.
English
Around the upper casing and open/lock button
Power plug
Open/lock
button
Power cord and plug
Remove any adhering grains of rice, etc.
Note
● Do not allow water to get inside the rice cooker unit.
● Do not immerse the power cord in or splash it with water.
Doing so may result in short-circuiting or electric shock.
Wipe with a dry cloth.
Note
● Always keep the inner pot and lid clean to prevent corrosion and odors.
● Do not clean the rice cooker or its parts with thinner, cleanser, bleach, disposable cloth, metal spatulas,
nylon scouring sponges or the like.
● Always clean each part separately.
37
Page 38

● Do not immerse the steam cap, measuring cup, spatula or ladle in hot water. Doing so may cause them to
become deformed.
● Do not use a dishwasher/dryer to clean the rice cooker or its parts. Doing so may cause them to become
deformed.
● When cleaning the rice cooker with a detergent, do not use alkaline kitchen detergent.
Removing and attaching the inner lid
Removing the inner lid
Push down and pull the inner lid levers to the front to
detach.
Attaching the inner lid
Set the inner lid securely in the lid as shown in the
gure below.
(2) Set in place
Inner lid
Do not pull the
inner lid gasket.
Note
● Do not pull the lid gasket.
Once it is detached, it cannot be reattached. If the lid gasket
is detached, contact the place of purchase.
38
(1) Set in place
Inner lid gasket
Inner lid
Page 39

Removing and attaching the lid
Remove the steam cap, and then fully open the lid and pull it upwards.
Remove the inner lid.
1
Remove the lid as shown in the
2
gure below.
To attach it, reverse the above steps.
Note
● As the heat sink is extremely hot immediately after use, wait until the lid has been cooled enough before
removing it.
English
39
Page 40

Removing and attaching the steam cap
Removing the steam cap
Attaching the steam cap
Insert your nger into the hole
1
in the lid and lift the steam cap
upward.
Steam cap
Note
● Be careful of the hot steam contained in the
steam cap immediately after cooking.
Flip the steam cap over and
2
remove the cap lid as shown in
the gure below.
(2) Open
Hook the cap lid onto the cap.
1
Cap lid
Cap body
Align here
to hook
Push the lid until you can here it
2
clicks.
Attach the cap lid securely onto
3
the cap body.
4040
(1) Push
This part is not
removable; do not
attempt to remove it.
(3) Remove
Page 41

Installing the steam cap gaskets
Set the gaskets securely onto the steam cap as
shown in the gure below. If the gaskets are not
set securely, they can become loose and this may
result in problems due to steam leaking out, etc.
Note
English
Small gasket
Large gasket
Steam
cap
● Do not remove the O-ring. If it is removed, set it back
in place securely.
If it is difcult to attach, slightly moisten the O-ring with
water to make it easier to attach.
Removing odors
The following procedure should be performed each time after cooking, or if odors become bothersome.
Note
● Be careful of the hot inner pot, cooking plate, and rice cooker after cleaning. Touching them may result in
burns.
Rice cooker
Do not place the cooking plate inside the inner pot.
(When odors remain in the rice cooker and/or cooking plate)
Allow the rice cooker and all
3
parts to dry in a well-ventilated
O-ring
location.
Fill the inner pot to about 70
1
to 80% with water, select the
“Plain” menu and press the
[Start/Rinse-free] key .
Cooking plate
Immerse the cooking plate in hot water and allow it
to soak for about 1 hour.
Conrm that the Keep Warm
lamp is on and press the
[Cancel] key.
Note
● If odors become bothersome, use about 0.71 oz (20
g) of citric acid added to the water for more effective
deodorizing.
It may be impossible to remove some odors
completely. In this case, contact the place of
purchase.
Wash the inner pot, inner lid,
2
and steam cap with a standard
kitchen detergent, and then
rinse sufciently with water.
4141
Page 42

14
If Rice Does Not Cook Properly
Check the following points if you experience a problem with the cooked rice or with the operation of the rice
cooker, etc.
Was the amount of rice,
ingredients, and water, or the
Check point
Problem
Is too hard ● ● ● ● ● ● ● ●
Cooked rice
Is too soft ● ● ● ● ● ● ● ●
Is not cooked
completely
Has a hard center ● ● ● ● ● ● ●
Is burned ● ● ● ● ●
During cooking
Steam leaks ● ● ●
ratio of multi-grain rice, correct?
● ● ● ● ● ● ●
Was more than the maximum
acceptable amount cooked?
Was cooking done with
alkaline ionized water (pH 9
or higher)?
Was cooking done with hard
water like mineral water?
Was the correct menu
selected?
Was the Timer function used?
Was the [Start/Rinse-free] key
pressed after cooking without
turning off the Keep Warm function?
Are there grains of burned rice or water
drops adhering to the outside bottom of
the inner pot or the center sensor?
Is the inner pot deformed?
loosened well?
Was the rice stirred and
Was there a prolonged power
outage?
Boils over ● ● ●
The cooking time is
excessively long
Reference page
Check point
Problem
Is too hard ● ● ● ● ●
Is too soft ● ● ● ● ● ● ●
Cooked rice
Is not cooked
completely
Has a hard center ● ● ● ●
Is burned ● ● ● ● ●
Smells like rice bran ●
During cooking
Steam leaks ● ● ●
● ● ● ● ●
14-16,
49
of the inner pot, etc.?
49 – – 18 – 20
Are there any grains of rice
adhering to gaskets or the brim
Was the rice (other than rinse-
free rice) washed sufciently?
Was hot water (over 95˚F [35˚C])
used to wash the rice or adjust
the water level?
● ● ●
Was the rice left soaking in the
water too long after washing?
Was the rice left in a colander
after washing?
Was the lid closed securely?
16,
36-41
Was the rice mixed with other
ingredients or multi-grain rice?
Were seasonings stirred well?
– 20 49
Were there a lot of cracked
grains of rice?
immediately after the initial
cooking?
Was cooking continued
Was the rice cooker and its parts
cleaned sufciently?
42
Boils over ● ● ● ●
The cooking time is
excessively long
Reference page
●
16,
36-41
14, 16 16 – –
17,
36-41
14 – – 36-41
Page 43

Problem Cause
There is a thin lm covering
the rice.
Rice sticks to the inner pot. Soft rice and sticky rice can easily stick to the pot.
Check point
Problem
Rice being kept warm
Has an odor ● ● ● ● ● ● ●
Is discolored ● ● ● ● ●
Is dry ● ● ● ● ● ●
Is sticky ● ● ● ● ● ● ●
Reheated rice is dry ● ● ●
Reference page
Check point
A thin, tissue-like lm is formed by melted and dried starch. This is not harmful to your
health.
Was the amount of rice and
water correct?
14-16, 4916,
Is other than white rice or rinse-
free rice being kept warm?
Are there any grains of burned
rice on the outside bottom of the
inner pot or the center sensor?
36-41
kept warm or reheated?
Was the rice stirred and
loosened well?
20
Was less than the minimum
required amount of rice being
pot)?
Are there any grains of rice adhering
to gaskets, the brim of the inner pot,
or the inner lid, etc.?
16,
36-41
the outer portions of the inner
pot (less rice in the middle of the
14, 16 25 23 24 – 49
Is the rice concentrated around
Was the rice (other than rinse-
free rice) washed sufciently?
Was cold rice added?
Was the rice or food reheated 3
or more times?
pot?
Was the Timer function set for
more than 12 hours in advance?
24 hours?
Was a spatula left in the inner
Was the rice cooker and its parts
cleaned sufciently?
Was the Keep Warm function
used continuously for more than
cooker with the Keep Warm
function turned off?
Did you try to reheat rice that
was just cooked and was still
hot?
English
Was the rice left in the rice
Was there a prolonged power
outage?
Were odors removed after
cooking or bread baking?
Problem
Rice being kept warm
Has an odor ● ● ● ● ● ●
Is discolored ● ● ● ● ●
Is dry ● ● ● ● ●
Is sticky ● ● ● ●
Reheated rice is dry ● ●
Reference page 24 24, 25 – 24 24 36-41 25 30, 35, 41
43
Page 44

15
Check the following points when you experience a problem with food cooked concurrently using the cooking
plate.
Problem
Cooked rice
If Synchro-Cooking Does Not Go As Expected
Were more ingredients and
seasonings used than indicated
Check point
Is too hard ● ● ● ●
Is too soft ● ● ● ● ●
Is not cooked
completely
Has a hard center ● ● ●
Is burned ● ● ● ● ●
Has an odor ● ● ● ● ●
in the “COOKBOOK”?
Were the ingredients arranged
unevenly in the cooking plate?
Were more than the acceptable
maximum or less than the
minimum required amounts
used?
● ● ● ●
Was a menu other than
“Synchro-Cooking” used?
Was a recipe other than one
included in the “COOKBOOK”
used?
Was there a power outage
during cooking?
Is sticky ● ● ● ● ●
Is too hard ● ● ● ● ●
Cooked food
Is too soft ● ● ● ● ●
Is not fully heated ● ● ● ● ● ●
Overows into the
rice
During cooking
Steam leaks ● ● ● ● ●
Boils over ● ● ● ● ●
The cooking time is
excessively long
Reference page – 27 27 – – 49
● ● ● ●
● ● ● ● ●
44
Page 45

16
If Slow Cooking or Bread Baking Does Not Go As Expected
Check the following points if you experience a problem with the cooked food, leavened dough, or baked
bread, etc.
Were the appropriate ingredients and
amounts used?
Were more than the maximum
acceptable ingredients added?
Were less than the minimum required
ingredients added?
Were ingredients kneaded well?
Was the wrong rise time set?
Did the dough rise enough?
Did the dough rise too much?
Was the dough leavened immediately without being left in
a refrigerator (was the temperature of the dough too low)?
Was the cooking or bread baking time
too short?
Was the cooking or bread baking time
too long?
Was only one side baked?
Check point
*1
*2
Problem
Cooked food
Does not boil ● ● ● ● ● ●
Boils over ● ● ●
Boils down ● ● ●
Leavened dough
Does not rise/Did not
rise enough
Rose too much ● ● ●
● ● ● ● ● ● ●
Was the baked bread left in the rice cooker?
Are there grains of burned rice, any other remaining
grains of rice, or water drops adhering to the outside
bottom of the inner pot or the center sensor?
Is the inner pot deformed?
Are there any grains of burned rice or any
other remaining grains of rice adhering to
gaskets or the brim of the inner pot, etc.?
Was the lid closed securely?
English
Was there a power outage during
cooking?
Is sticky ● ● ●
Small and hard ● ● ● ●
Coarse grain and dry ● ● ●
Sticky inside (Bread
is uncooked)
Sticks to inner lid
(Rose too much)
Baked bread
Burnt ● ● ● ●
Does not brown on
outside
Smells ● ●
Wrinkled ● ● ●
Uneven browning on
outside
Sticky on outside ●
Reference page 29, 31 29 31-33 – 29, 33 35 34
*1 Dough does not rise enough if its temperature is low, the wrong ingredients or proportions are used, or the rising time is too short.
*2 Dough rises too much if its temperature is high, the wrong ingredients or proportions are used, or the rising time is too long.
● ● ● ● ● ●
● ●
● ● ● ●
●
16,
36-41
16,
–
36-41
16,
36-41
49
45
Page 46

17
Troubleshooting
Check the following before requesting repair service.
Symptom Check point Action
The rice have not been cooked.
The food has not been cooked.
Rice was not cooked completely by
the preset time.
The Timer function cannot be set. Does the display show the correct
The display is blurred. Are there any grains of burned rice
Reheating is disabled. An alarm (3 beeps) will sound if you
Sound is heard during cooking,
reheating, or when the Keep Warm
function is on.
An alarm (3 beeps) will sound if you
press the [Start/Rinse-free] or [Keep
warm] key.
An alarm (3 beeps) sounds when the
Timer function is set.
Water or rice has gotten inside the
rice cooker unit.
When setting the present time,
pressing the [Hour] or [Min] key does
not access the time setting mode.
The Keep Warm lamp is blinking. Was “Oatmeal” or “Bread” menu
The elapsed Keep Warm time blinks
on the display when the [Hour] key
is pressed while the Keep Warm
function is on.
Is the power plug properly connected
to an outlet?
Does the display show the correct
present time?
Check “The cooking time is excessively long” under “If Rice Does Not Cook
Properly” and take the necessary action.
present time?
Is “0:00” blinking on the display? Set the present time.
Was the “Quick”, “Synchro-Cooking”,
“Mixed”, “Bread”, or “Slow Cook”
menu selected?
Was an unacceptable time set? Set a time that is acceptable under
or any other remaining grains of rice
adhering to gaskets or the brim of
the inner pot?
Is the outer surface of the inner pot
wet?
press the [Start/Rinse-free] key.
Is the Keep Warm lamp off? Press the [Keep Warm] key and
Do you hear a humming sound? The fan is operating.
Do you hear a buzzing or twittering
sound?
Do you hear a completely different
sound from the above?
Is the inner pot set in the rice
cooker?
An alarm will sound if you do not operate the rice cooker within about 30
seconds after pressing the [Timer] key. Continue setting the Timer function.
Water or rice inside the rice cooker unit may cause problems. Contact the
place of purchase.
The time cannot be set during cooking, when the Keep Warm function is
on, when the Timer function is in use, or during reheating. 48
set?
Was the Keep Warm function used
continuously for more than 24
hours?
Was the Keep Warm function used
continuously for more than 6 hours
under the “Slow Cook” menu?
Insert the power plug fully into an
outlet.
Set the correct present time.
Set the correct present time.
The Timer function is not available
under those menus.
the Timer function.
Completely remove all remaining
rice.
Wipe with a dry cloth.
The rice is cold. Rice of below
approximately 131ºF (55ºC) cannot
be reheated.
check that the Keep Warm lamp
lights up. Then, press the [Start/
Rinse-free] key again.
It is not a malfunction.
The IH is operating.
It is not a malfunction.
Contact the place of purchase.
Set the inner pot in the rice cooker.
Oatmeal can become pasty or bread
can become sticky if they are left in
the rice cooker. Serve them as soon
as possible.
The elapsed Keep Warm time will
blink on the display when the Keep
Warm function has been on for more
than 24 hours.
The elapsed Keep Warm time will
blink on the display when the Keep
Warm function has been on for more
than 6 hours.
Reference
page
17
48
42
48
23
16,
36-41
25
23
12
–
17
23
–
21
24
30
46
Page 47

Symptom Check point Action
The present time, preset timer
settings, and elapsed Keep Warm
time are lost when the power plug is
disconnected.
The lid will not open, or it opens
during cooking.
Nothing happens when a key is
pressed.
Sparks y from the power plug. Inserting/disconnecting the power plug may sometimes cause small electric
There is a smell of plastic. Such smells may occur when the rice cooker is rst used, but they should
There are stripes or waves on plastic
parts.
Bubbles can be seen coming from
the steam vent of the steam cap
during cooking.
The lid cannot be closed. Is the inner lid attached? Attach the inner lid. 38
Food adheres to the inner lid during
concurrent cooking.
Does “0:00” blink on the display
when the power plug is connected
again?
Are there any grains of rice adhering
to the upper casing, inner lid gasket,
or around the open/lock button?
Is the power plug properly connected
to an outlet?
Is the Keep Warm lamp on? Press the [Cancel] key to turn off the
sparks. This is specic to the IH feature and therefore not a malfunction.
go away over time as the rice cooker gets used.
Such stripes and waves are produced when the resin is being molded.They
do not affect the performance of the rice cooker.
It is due to boiling and therefore not a malfunction.
When cooking with ingredients that expand during heating, such as eggs
and the like, some of that may adhere to the inner lid. If it is bothersome,
reduce the amount of the ingredients.
The lithium battery has run out.
Contact the place of purchase.
Completely remove all remaining
rice.
Insert the power plug fully into an
outlet.
Keep Warm function, then try the
operation again.
Reference
36-41
If these indications appear
page
12
16,
17
17
–
–
–
–
–
English
Display Action
“Err” appears on the display and a longlasting or continuous beeping alarm
sounds.
If the rice cooker is placed on the carpet or where the room
temperature is high, the air inlet and outlet can be blocked, causing
the temperature inside to rise. In this case, the rice cooker may not
respond to any key operations. Resolve the problem according to the
following procedure.
(1) Disconnect the power plug.
(2) Relocate the rice cooker to where the air inlet and outlet are not
blocked and the room temperature is low.
(3) Insert the power plug into the outlet again and operate the keys.
If the rice cooker does not respond to key operations, it is a malfunction
of the rice cooker. Disconnect the power plug and contact the place of
purchase.
Reference
Plastic parts
Plastic parts that come into contact with heat or steam will deteriorate over time. In this case, contact the
place of purchase.
page
–
47
Page 48

Setting the present time
The present time is displayed in a 12-hour format.
The time cannot be set during cooking, when the Keep Warm function is on, when the Timer function is in
use, or during reheating.
Example: Changing the present time from “9:30” to “9:35”
Connect the power plug to an
1
outlet.
Display the time
2
setting mode.
Press the [Hour] or [Min]
key to display
On
.
Set the present
3
time.
Set the hour with the [Hour]
key and the minute with the
[Min] key.
Hold down the corresponding key to change
the time more rapidly.
Once you are nished
4
setting the time, press
the [
The present time is set.
Note
● The present time setting may vary about 30 to 120
seconds a month from the actual time depending
on room temperature and the conditions of use.
] key.
will go out and “:” will blink on the display.
Blinks
4848
Page 49

Specications
Unit size 1.0 L (5.5-cup) type 1.8 L (10-cup) type
Power source 120 V, 60 Hz
Rated power (W) 1,080 1,198
Plain 0.18 to 1.0
Ultra 0.18 to 1.0
Quick 0.18 to 1.0
Synchro-Cooking 0.18 to 0.36
Cooking capacity (L)
Jasmine 0.18 to 1.0
Brown 0.18 to 0.63
Mixed 0.18 to 0.72
Sweet 0.18 to 0.54
Porridge Hard 0.09 to 0.18
Soft 0.09
Oatmeal (Steel cut) 0.18 to 0.45
Maximum amount of bread (oz) Bread our: 7.05 (200 g) Bread our: 10.58 (300 g)
Outside
dimensions
(inch)
Weight (oz) 158.7 (4.5 kg) 201.0 (5.7 kg)
Width 10.2 (26.0 cm) 11.3 (28.8 cm)
Depth 13.9 (35.4 cm) 15.2 (38.6 cm)
Height 8.4 (21.3 cm) 9.8 (25.0 cm)
(1 to 5.5 cups [5.29 to 29.10 oz])
(1 to 5.5 cups [5.29 to 29.10 oz])
(1 to 5.5 cups [5.29 to 29.10 oz])
(1 to 2 cups [5.29 to 10.58 oz])
(1 to 5.5 cups [5.29 to 29.10 oz])
(1 to 3.5 cups [5.29 to 18.52 oz])
(1 to 4 cups [5.29 to 21.16 oz])
(1 to 3 cups [5.29 to 15.87 oz])
(0.5 to 1 cup [2.65 to 5.29 oz])
(0.5 cups [2.65 oz])
(1 to 2.5 cups [5.29 to 13.23 oz])
(2 to 10 cups [10.58 to 52.91 oz])
(2 to 10 cups [10.58 to 52.91 oz])
(2 to 10 cups [10.58 to 52.91 oz])
(2 to 4 cups [10.58 to 21.16 oz])
(2 to 10 cups [10.58 to 52.91 oz])
(2 to 6 cups [10.58 to 31.74 oz])
(2 to 6 cups [10.58 to 31.74 oz])
(2 to 5 cups [10.58 to 26.48 oz])
(0.5 to 2 cups [2.65 to 10.58 oz])
(0.5 to 1.5 cups [2.65 to 7.94 oz])
(1 to 3 cups [5.29 to 15.87 oz])
0.36 to 1.8
0.36 to 1.8
0.36 to 1.8
0.36 to 0.72
0.36 to 1.8
0.36 to 1.08
0.36 to 1.08
0.36 to 0.9
0.09 to 0.36
0.09 to 0.27
0.18 to 0.54
English
Note
● One cup of white rice is about 5.29 oz (150 g).
In case of a power outage
If a power outage does occur, the rice cooker will resume its normal functions once power is restored.
State when power
outage occurs
While the Timer
function is set
During cooking
(reheating)
While the Keep
Warm function is on
Once power is restored
The timer will resume operation. (If the power outage lasts for an extended period of time and the
preset time has passed when power is restored, the rice cooker will immediately begin cooking.)
The rice cooker will resume cooking (reheating).
Cooking may not be completed properly.
The Keep Warm function is cancelled in case of a power outage for over 30 minutes.
Purchasing consumables and optional accessories
Gaskets will need replacing over time. Though the amount of wear will vary according to conditions of use,
gaskets will wear down as they are used. For stubborn dirt, odors, or serious damage, contact the place of
purchase.
The inner pot’s uorocarbon resin coating may wear and peel with extended use. (See p.10.)
49
Page 50

50
Page 51

Table des matières
1 Consignes de sécurité ............................................................................................. 52
2 Noms des pièces et fonctions ................................................................................ 57
Options du menu et fonctions ................................................................................ 59
Comment faire du riz délicieux ............................................................................... 60
3 Avant de cuire le riz .................................................................................................62
4 Comment faire cuire le riz ....................................................................................... 64
Directives sur les temps de cuisson ...................................................................... 65
5 Lorsque la cuisson est terminée ............................................................................ 66
6 Comment faire cuire le gruau (menu « Oatmeal ») ............................................... 67
7 Réglage de la minuterie ........................................................................................... 68
8 Maintenir le riz au chaud ......................................................................................... 70
9 Réchauffer le riz ....................................................................................................... 71
10 Cuire ensemble du riz et d’autres aliments (Menu « Synchro-Cooking ») ......... 73
11 Cuisson lente (menu « Slow Cook ») ..................................................................... 75
12 Comment cuire du pain (menus « Bread Fermentation » et « Bread Bake ») .... 77
13 Nettoyage et entretien ............................................................................................. 82
14 Si le riz est mal cuit .................................................................................................. 88
15 Lorsque « Synchro-Cooking » donne pas de mauvais résultats ........................ 90
16 Lorsque « Slow Cook » (Cuisson lente) ou « Bread » (Cuisson du pain)
donne de mauvais résultats .................................................................................... 91
17 Dépannage ................................................................................................................ 92
Lorsque ces indications s’afchent ....................................................................... 93
Réglage de l’heure ................................................................................................... 94
Spécications techniques ....................................................................................... 95
Lors d’une panne de courant .................................................................................. 95
Achat de pièces non durables et d’accessoires optionnels ................................ 95
Français
51
Page 52

1
Lisez et suivez toutes les consignes de sécurité avant d’utiliser le cuiseur à riz.
•
Les précautions décrites ici sont destinées à protéger l’utilisateur et d’autres personnes contre des dommages
physiques et matériels. Soyez certain de suivre les consignes, car elles sont des mesures de protection importantes.
• Ne pas enlever les étiquettes de sécurité xées au cuiseur à riz.
Les consignes de sécurité sont classées et décrites comme
illustrées ci-dessous, selon le niveau des dangers et des dommages
susceptibles d’être causés par une utilisation inappropriée du
cuiseur découlant du non-respect de ces consignes.
*1 Par « blessures graves », on entend un trouble de santé comme
*2 Par « blessures », on entend des blessures physiques, des brûlures
*3 Par « dommages matériels », on entend des dommages pouvant
Consignes de sécurité
Ce symbole d’avertissement indique
Avertissement
Mise en garde
la perte de la vue, des blessures, brûlures (brûlures à haute ou
à basse température), des chocs électriques, des fractures ou
des empoisonnements qui auront des répercussions et/ou qui
nécessiteront une hospitalisation ou un suivi médical de longue durée.
ou des chocs électriques qui ne nécessiteront pas une hospitalisation
ou un suivi médical de longue durée.
atteindre les édices, effets mobiliers, animaux domestiques, animaux
de compagnie, etc.
« l’existence d’un risque de blessures
graves, voire mortelles
à riz n’est pas manipulé correctement.
Ce symbole de mise en garde indique
qu’ « il y a un risque de blessures
ou de dommages matériels
le cuiseur à riz n’est pas manipulé
correctement.
*1
» si le cuiseur
*2
*3
» si
Description des symboles utilisés
Le symbole indique un
avertissement ou une mise en
garde. Les détails spéciques de
l’avertissement ou de la mise en
garde sont indiqués à l’intérieur du
symbole ou dans une illustration
ou un texte à côté du symbole.
Le symbole indique une
action interdite. Les détails
spéciques de l’action interdite
sont indiqués à l’intérieur du
symbole ou dans une illustration
ou un texte à côté du symbole.
Le symbole indique une
action qui doit être prise ou une
instruction qui doit être suivie.
Les détails spéciques de
l’action ou de l’instruction sont
indiqués à l’intérieur du symbole
ou dans une illustration ou un
texte à côté du symbole.
52
Avertissement
Mesures de sécurité générales
N
e modiez pas le cuiseur à riz. Le
démontage ou la réparation ne doit
être effectué que par un représentant
de service qualié.
Modier le cuiseur à riz par vous-même
peut provoquer un incendie, un choc
électrique ou des blessures.
Arrêtez d’utiliser le cuiseur à riz
immédiatement en cas d’anomalie.
Sinon, il peut entraîner un incendie, un choc
électrique ou des blessures.
Exemples de problèmes :
• Le cordon d’alimentation ou la che
électrique devient excessivement chaud
au cours de l’utilisation.
• Le cuiseur à riz dégage de la fumée ou
une odeur de brûlé s’en échappe.
•
Le cuiseur à riz est ssuré ou certaines de
ses pièces sont desserrées ou mobiles.
• Le récipient intérieur est déformé.
•
Il ya d’autres problèmes ou anomalies.
Débranchez la che électrique de la prise
immédiatement et contactez votre détaillant
pour demander une inspection ou une
réparation de l’appareil.
Page 53

Avertissement
Qui devrait utiliser le cuiseur à riz
Ne pas permettre aux enfants d’utiliser
le cuiseur à riz sans surveillance. Garder
hors de la portée des jeunes enfants.
L’usage sans supervision par des enfants
ou des bébés de cet appareil peut entraîner
des brûlures, des chocs électriques ou des
blessures.
Ce cuiseur à riz n’est pas destiné à être
utilisé par des personnes ayant des
difcultés physiques ou qui n’ont pas
assez de connaissance sur sa bonne
utilisation.
Une personne ayant une connaissance
sufsante de son mode d’emploi doit
toujours être présente pour vérier que le
cuiseur à riz est utilisé de la bonne façon.
L’usage inapproprié peut entraîner des
brûlures, des chocs électriques ou des
blessures.
Utiliser le cuiseur à riz
N’utilisez pas ce cuiseur à riz pour
d’autres usages que ceux indiqués
dans ce mode d’emploi (et dans le
« COOKBOOK » fourni).
Cela pourrait entraîner des brûlures ou
blessures provoquées par le jaillissement de
vapeur ou de contenu du cuiseur à riz.
Exemples de choses à ne pas faire :
•
Chauffer les ingrédients ou l’assaisonnement
dans des sacs en plastique, etc.
• Utiliser une plaque de cuisson ou un autre
ustensile pour couvrir les aliments dans le
cuiseur à riz
Alimentation électrique
N’utilisez ce cuiseur qu’avec un courant
électrique de 120 V CA.
L’utilisation de toute autre source
d’alimentation peut provoquer un incendie ou
un choc électrique.
Le cordon d’alimentation et la che électrique
Ne pas utiliser un cordon d’alimentation
endommagé. En même temps, veillez à ne
pas endommager le cordon d’alimentation
vous-même.
(Ne pas modier, plier avec force, tirer,
tordre, ou enrouler le cordon. Ne pas
l’exposer à la chaleur. Ne pas poser des
objets lourds sur le cordon d’alimentation ou
le coincer entre des objets.)
Cela peut provoquer un incendie ou un choc
électrique.
Nettoyez la che électrique si elle est
sale.
Ne pas le faire pourrait entraîner un incendie.
Insérez la che électrique complètement
dans la prise.
Le non-respect de cette consigne peut
causer un choc électrique, un court-circuit, la
formation de fumée ou un incendie.
Ne pas utiliser le cuiseur à riz s’il ya des
dommages au cordon d’alimentation ou
à la che électrique, ou si la che ne peut
pas être insérée fermement dans la prise.
Cela peut entraîner un choc électrique, un
court-circuit ou un incendie.
Ne pas brancher ou débrancher la che
électrique avec des mains mouillées.
Cela peut entraîner un choc électrique ou
des blessures.
Ne pas exposer la che électrique à la
vapeur.
Cela peut entraîner un choc électrique ou un
incendie. Quand vous utilisez le cuiseur à riz
sur une table coulissante, positionnez-le de
manière que la che électrique ne soit pas
exposée à la vapeur émise.
Français
Utilisez une prise électrique indépendante
doté d’un courant nominal de 15 A ou plus.
Brancher d’autres appareils sur la même prise
électrique par l’entremise d’une prise multiple
pourrait faire surchauffer cette dernière et
provoquer un incendie.
53
Page 54

Avertissement
Manipuler le cuiseur à riz
Ne pas plonger le cuiseur à riz dans l’eau
ou l’éclabousser avec de l’eau.
Cela pourrait causer un court-circuit ou une
décharge électrique.
Ne pas insérer d’épingles, d’aiguilles ou
d’autres objets métalliques dans l’entrée
d’air ou la sortie d’air, ou les interstices
situés entre les pièces.
Cela peut entraîner un choc électrique ou
des blessures en raison de défaillance.
Sortie
Entrée
d’air
d’air
Mise en garde
Mesures de sécurité générales
Manipulez le cuiseur à riz avec soin.
Faire tomber le cuiseur à riz ou l’exposer
à un choc violent peut entraîner des
blessures ou une défaillance de
l’appareil lui-même.
N’utilisez que le plateau de cuisson
fourni avec ce cuiseur à riz.
Utiliser un autre plateau de cuisson peut
entraîner un incendie ou des brûlures.
Ne pas toucher la poignée du
récipient intérieur avec vos mains
nues quand le cuiseur à riz est ou
a été utilisé récemment, utilisez
des gants de cuisine pour retirer le
récipient.
Toucher le récipient chaud peut
entraîner des brûlures.
Commencer à faire la cuisson
Ne pas utiliser le plateau de cuisson sans
le récipient intérieur.
Cela peut entraîner un incendie, un
dégagement de fumée ou des brûlures.
Pendant et après la cuisson
Ne jamais ouvrir le couvercle pendant la
cuisson.
Cela peut entraîner des brûlures.
Ne pas mettre votre visage ou vos mains
près du bouchon vapeur ou des évents de
vapeur.
Cela peut entraîner des brûlures. Il faut
porter une attention particulière à garder cet
appareil hors de la portée des jeunes enfants.
Les personnes utilisant des stimulateurs
cardiaques médicaux devraient consulter
un spécialiste médical avant d’utiliser le
cuiseur à riz.
Le fonctionnement du cuiseur à riz peut
provoquer des effets indésirables sur les
stimulateurs cardiaques.
Environnement d’utilisation
Ne pas utiliser le cuiseur à riz sur des
surfaces instables ou des tables ou des
tapis sensibles à la chaleur.
Cela peut entraîner un incendie ou des
dommages à la table ou au tapis.
54
Poignée du récipient intérieur
Page 55

Mise en garde
Ne pas utiliser le cuiseur à riz près des
murs ou des meubles.
La vapeur et la chaleur peuvent causer des
dommages, la décoloration et/ou la déformation.
Utilisez le cuiseur à riz au moins 11,81 pouces (30
cm) des murs ou des meubles. Quand vous utilisez
le cuiseur à riz dans une tablette ou un comptoir de
type escamotable, veillez à ne pas laisser la vapeur
de s’accumuler à l’intérieur de l’espace clos.
Le cordon d’alimentation et la che électrique
Au moins 11,81
pouces (30 cm)
N’utilisez pas le cuiseur à riz sur un
dessus de table coulissant qui ne peut
facilement supporter le poids de l’appareil.
Une chute depuis la table pourrait causer des
blessures, des brûlures ou un dysfonctionnement
de l’appareil lui-même.
Avant d’utiliser le cuiseur à riz, assurez-vous que
le dessus de table coulissant est sufsamment
apte à soutenir le poids de l’appareil.
Ne pas utiliser le cuiseur à riz à proximité
d’une source de chaleur ou à un endroit
exposé à l’eau.
Cela peut entraîner un choc électrique, un
court-circuit, un incendie ou provoquer la
déformation ou la défaillance du cuiseur à riz.
Ne pas utiliser le cuiseur à riz dans
un espace restreint où le tableau de
commande est exposé à la vapeur.
La vapeur et la chaleur pourraient entraîner la
déformation du tableau de commande et/ou des
dommages, une décoloration, une déformation,
et/ou un dysfonctionnement du cuiseur à riz.
Quand vous utilisez le cuiseur à riz sur une
table coulissante, sortez cette dernière de
manière à ce que le tableau de commande ne
soit pas exposé à la vapeur émise.
Ne pas utiliser le cuiseur à riz dans des
situations où l’entrée ou la sortie d’air
pourrait être bloquée, ou lorsque la
température de la pièce est élevée.
Ne pas placer le cuiseur à riz sur des tapis,
sacs en plastique, etc.
Cela peut entraîner un choc électrique, un court-
circuit, un incendie ou défaillance du cuiseur à riz.
N’utilisez pas le cuiseur à riz sur un
dispositif chauffant de cuisson IH.
Faire cela peut provoquer un mauvais fonctionnement.
N’utilisez pas le cuiseur à riz sur une feuille
d’aluminium ou sur un tapis électrique.
Faire cela peut générer de la chaleur du matériel
en aluminium, qui peut provoquer de la fumée ou
un incendie.
Assurez-vous de tenir la che électrique lorsque
vous débranchez le cordon de la prise murale.
Ne pas le faire pourrait entraîner un choc électrique
ou un incendie provoqué par un court-circuit.
Ne pas brancher plusieurs appareils sur une
seule prise électrique.
Cela peut entraîner un incendie.
Français
Manipuler le cuiseur à riz
N’utilisez que le récipient intérieur conçu
exclusivement pour ce cuiseur à riz.
Utiliser tout autre récipient peut entraîner
une surchauffe ou une défaillance.
Ne pas faire la cuisson avec le récipient
intérieur vide.
Cela peut entraîner une surchauffe ou une défaillance.
Ne placez rien de sensible au magnétisme
près du cuiseur à riz, car ce dernier génère des
ondes magnétiques.
Si le cuiseur à riz est placé près d’un téléviseur
ou d’une radio, il pourrait produire du bruit dans
ces appareils. S’il se trouve près d’une carte de
paiement, d’un passe de transport en commun
pour les portes automatiques à billets, d’une
cassette audio, ou d’une cassette vidéo, le cuiseur
à riz peut effacer les données sur ces appareils.
Faites attention à la vapeur qui s’échappe
lors de l’ouverture du couvercle.
L’exposition à la vapeur peut causer des brûlures.
55
Page 56

Mise en garde
Débranchez la che électrique de la prise
quand le cuiseur à riz n’est pas utilisé.
Ne pas débrancher la che peut provoquer
l’usure prématurée de l’isolant et entraîner
un court-circuit, des blessures ou des
brûlures, un choc électrique ou un incendie.
Ne pas toucher le bouton de verrouillage
pendant le transport de cuiseur à riz.
Cela peut provoquer l’ouverture du couvercle
et entraîner des blessures ou des brûlures.
Pendant et après la cuisson
Ne pas toucher les pièces chaudes pendant
ou immédiatement après la cuisson.
Cela peut entraîner des brûlures.
Des mises en garde qui
contribueront à prolonger la durée
de vie de votre cuiseur à riz
● Retirez le riz brûlé et tout autre grain de riz restant.
Ne pas le faire pourrait entraîner une fuite de vapeur,
un débordement, une défaillance ou des résultats de
cuisson insatisfaisants.
● Ne pas couvrir le cuiseur à riz avec un chiffon ou un
autre objet pendant la cuisson.
Cela pourrait entraîner une déformation ou une
décoloration du cuiseur à riz ou de son couvercle.
●
Les orices dont est muni le cuiseur à riz sont conçus
pour maintenir un bon fonctionnement et un bon
rendement. Dans de très rares cas, de la poussière
ou des insectes peuvent pénétrer dans ces orices et
provoquer une défaillance de l’appareil. Pour éviter
ce type de problèmes, prenez quelques mesures de
protection, par exemple en utilisant une feuille insectifuge,
disponible dans certains magasins. Les défaillances
provoquées par l’intrusion de corps étrangers ne sont
pas couvertes par la garantie. Contactez votre détaillant.
●
Avec le temps, le revêtement à base de résine
uorocarbonée du récipient intérieur peut s’user et
s’écailler. Ce matériau est inoffensif pour l’être humain
et cette situation n’a aucun effet sur l’actuelle cuisson du
riz ou sur les propriêtés iso-thermiques du cuiseur à riz.
Si le récipient intérieur est déformé ou corrodé, il est
possible de vous en procurer un nouveau. Contactez
votre détaillant.
5656
Ne pas déplacer le cuiseur à riz pendant
la cuisson.
Cela peut entraîner des brûlures ou causer
le débordement du contenu.
Nettoyer le cuiseur à riz
Attendez que le cuiseur à riz soit refroidi
avant de le nettoyer.
Sinon, il peut entraîner des brûlures.
Ne plongez pas le cuiseur à riz dans l’eau
pour le laver.
Ne plongez pas le cuiseur à riz dans l’eau
pour le laver et ne laissez pas d’eau pénétrer
à l’intérieur ou dans la partie inférieure de
l’appareil. Cela pourrait causer un courtcircuit ou une décharge électrique.
● Respectez strictement les consignes suivantes
pour empêcher le revêtement à base de résine
uorocarbonée de cloquer ou de s’écailler :
• Ne pas mettre le récipient intérieur sur un
feu de gaz, ou l’utiliser sur une cuisinière
électromagnétique ou dans un four à micro-
ondes, etc.
• Utilisez la fonction de maintien au chaud pour
le riz blanc (riz sans rinçage) seulement, ne
pas l’utiliser pour le riz assaisonné, etc.
• Ne pas utiliser de vinaigre à l’intérieur du
récipient intérieur.
• Utilisez seulement la spatule fournie ou une
spatule en bois.
• Ne pas utiliser d’ustensiles durs tels que
des louches, des cuillères ou des fouets en
métal.
•
Ne pas mettre de panier dans le récipient
intérieur
Ne pas mettre de vaisselle et d’autres
•
ustensiles durs ou objets dans le récipient
intérieur
Ne pas nettoyer le récipient intérieur avec
•
des matériaux durs comme des spatules
métalliques ou des éponges à récurer en
nylon.
• Ne pas nettoyer le récipient intérieur au lavevaisselle.
• Prenez garde de ne pas rayer le récipient
intérieur pendant le nettoyage du riz.
• Si le récipient intérieur devient déformé,
contactez votre détaillant.
.
.
Page 57

2
Noms des pièces et fonctions
Bouchon vapeur
(voir p.86 à 87.)
Joint de couvercle intérieur
Ce joint n’est pas amovible,
ne pas essayer de l’enlever.
Couvercle intérieur
(voir p.84.)
Cuiseur à riz
Évents de
vapeur
Récipient
intérieur
Bouton de
verrouillage
Poussez pour ouvrir
le couvercle.
Capteur central
Français
Plaque chauffante
Couvercle
Poignée du récipient
intérieur
Partie supérieure du
boîtier
Poignée
Utilisez-la pour
transporter le cuiseur
à riz.
Cordon
d’alimentation
(120 V)
Fiche
électrique
57
Page 58

Tableau de commande
Afcheur
Afche le symbole (curseur
du menu) et l’heure actuelle, etc.
Touche [Cancel]
Appuyez pour annuler la
fonction de maintien au
chaud ou pour annuler
l'opération en cours.
Touche [Keep Warm]
Utilisé pour garder le riz au
chaud.
Témoin Keep Warm
Allumé quand la fonction de
maintien au chaud est activée.
[
] [ ] Touche (Menu)
Appuyez sur la touche pour sélectionner
le menu de cuisson désiré.
• Les surfaces en relief ( ) sur les touches [Start/Rinse-free] et [Cancel] sont destinées aux malvoyants.
Vériez les accessoires
Spatule Louche
La spatule peut être
insérée dans ce support.
Plateau de cuisson
Tasse à mesurer
Environ 1 tasse (0,18 L),
environ 5,29 oz (150 g)
Les bruits émis par le cuiseur à
COOKBOOK
riz
Les bruits suivants que vous pouvez entendre
pendant la cuisson, le réchauffage ou le maintien
au chaud sont normaux et n’indiquent pas une
défaillance :
• Bourdonnement (c’est le bruit du ventilateur qui
tourne.)
• Ronement ou gazouillement (c’est le bruit du
fonctionnement IH.)
Vériez l’heure actuelle
L’heure est afchée au format de 12 heures. Elle
devrait être ajustée si la bonne heure n’est pas
afchée. (Voir p.94.)
La pile au lithium
Le cuiseur à riz est muni d’une pile au lithium
intégrée qui sauvegarde l’heure actuelle et les
réglages préprogrammés de la minuterie même si
la che électrique de l’appareil est débranché.
• Cette pile au lithium a une vie moyenne de quatre
à cinq ans avec la che électrique débranchée.
• Si la pile au lithium est épuisée, « 0:00 »
clignotera sur l’afcheur lorsque le cordon
d’alimentation sera rebranché. Il sera toujours
possible de faire cuire du riz, mais l’heure
actuelle, les réglages préprogrammés de la
minuterie et le temps de maintien au chaud
écoulé ne seront plus stockés dans la mémoire
lorsque la che électrique de l’appareil sera
débranché.
Remarque
● N’essayez pas de remplacer la pile au lithium
vous-même.
Pour remplacer la pile, contactez votre
détaillant.
Témoin Start
Allumé ou clignoté pendant
la cuisson, etc.
Touche [Start/Rinse-free]
Appuyez sur la touche
pour commencer la
cuisson, etc.
Touche [Timer]
Appuyez sur la touche pour
sélectionner le réglage de
la minuterie désiré.
Témoin de la minuterie
S’allume ou clignote lorsque
la minuterie est activée.
Touches [Hour] et [Min]
Utilisez pour régler l’heure
actuelle et l’heure de la minuterie.
58
Page 59

Options du menu et fonctions
Disponibilité
Menu
Plain ○ ○ ○
Ultra ○ ○ ○
Quick ○ N/D ○
Synchro-
Cooking
Jasmine N/D ○ ○
Brown N/D ○ ○
Mixed ○ N/D
Porridge ○ ○ ○ Sélectionnez ce menu lorsque vous préparez du gruau.
Oatmeal
(Steel cut)
de la
fonction
de riz sans
rinçage
○ N/D
N/D ○ N/D
Disponibilité
de la
minuterie
Disponibilité
de la
fonction de
maintien au
chaud (Keep
Warm)
Fonctions
Sélectionnez ce menu lors de la cuisson du riz blanc (riz
sans rinçage).
Sélectionnez ce menu lors de la cuisson du riz blanc (riz
sans rinçage) pour faire pleinement ressortir sa douceur,
sa saveur et son collant.
La cuisson à l’aide de ce menu va faire tremper le riz
deux fois plus longtemps qu’avec le menu « Plain » et va
prendre du temps supplémentaire pour chauffer et pour
faire cuire un riz délicieux.
Sélectionnez ce menu lors de la cuisson rapide du riz
blanc (riz sans rinçage).
Sélectionnez ce menu lorsque vous utilisez le plateau de
cuisson pour cuire le riz et les autres aliments ensemble.
Sélectionnez ce menu lors de la cuisson du riz à grains
longs.
Sélectionnez ce menu lorsque vous désirez faire cuire du
riz brun et/ou du riz multigrain.
Sélectionnez ce menu si vous désirez cuire du riz
assaisonné ou faire du riz gluant à la vapeur.
Sélectionnez ce menu lors de la cuisson de gruau
découpé.
Voir p.95 pour les capacités de cuisson.
: Le riz peut être gardé chaud. Cependant, sa saveur peut ne pas se garder.
Français
Remarque
● Le riz sans rinçage peut être cuit en utilisant les menus « Plain », « Ultra », « Quick », « Synchro-
Cooking », « Mixed », et « Porridge ». Vous pouvez cuire facilement un délicieux riz sans rinçage sans
vous soucier de la quantité d’eau ou du temps de trempage.
Puisque le son a déjà été enlevé, le riz sans rinçage n’a pas besoin d’être lavé. Il est également bon
pour l’environnement car l’eau laissée après le rinçage du riz n’affecte pas les cours d’eau ou l’océan.
● Lorsque vous utilisez le menu « Porridge », le gruau peut devenir pâteux si vous le maintenez au
chaud pendant trop longtemps. Donc, servez-le dès que possible.
59
Page 60

Comment faire du riz délicieux
Lisez p.62 à 63 pour les préparations avant
la cuisson de riz, et p.64 à 69 pour savoir
comment faire cuire le riz.
Sélectionnez un riz de haute qualité et
conservez-le dans un endroit frais.
Choisissez un riz fraîchement poli, brillant et avec
une grosseur de grain uniforme. Conservez-le dans
un endroit frais, bien aéré et à l’abri de la lumière.
Mesurez soigneusement le riz avec la
tasse à mesurer fournie.
Une tasse égale environ 5,29
oz (0,18 L). Utilisez la tasse à
mesurer fournie pour mesurer
aussi le riz sans rinçage.
Cette pièce harmonise la
méthode de cuisson. Mais il
n’est pas nécessaire d’utiliser
la tasse à mesurer pour le riz
sans rinçage.
Nettoyez le riz rapidement.
Remuez le riz en cercle avec votre main dans une
grande quantité d’eau, versez l’eau et répétez
jusqu’au moment où l’eau devient claire.
Lors de la cuisson du riz brun germé,
du riz complet ou du riz blanc demi
poli, sélectionnez le menu « Plain » ou
« Ultra ».
Cuire le riz sans rinçage
• Ajoutez le riz sans rinçage et l’eau, puis remuez
bien à partir du fond de telle sorte que chaque
grain de riz individuel soit immergé dans l’eau.
(Un simple ajout de l’eau au riz l’empêcherait
de bien tremper dans l’eau, ce qui pourrait
entraîner une mauvaise cuisson du riz.)
• Si l’eau ajoutée devient blanche, nous vous
conseillons de laver le riz à fond en remplaçant
l’eau une ou deux fois. (Ce n’est pas le son
du riz qui fait blanchir l’eau mais son amidon;
cuire le riz avec son amidon peut conduire à
l’obtention d’un riz brûlé ou mal cuit, ou causer
le débordement du cuiseur.)
Ajouter d’autres ingrédients au riz
La quantité totale des ingrédients ne devrait
pas être supérieure à 2,5 oz (70 g) par tasse de
riz. Incorporez bien tous les assaisonnements
(le cas échéant), puis ajoutez les ingrédients
supplémentaires au-dessus du riz. Si d’autres
ingrédients doivent être ajoutés au riz, veillez
à ne pas utiliser plus que la quantité maximale
acceptable (voir le tableau ci-dessous).
Type de riz
SynchroCooking
Brown 3 tasses ou moins 5 tasses ou moins
Mixed 4 tasses ou moins 6 tasses ou moins
Sweet 3 tasses ou moins 5 tasses ou moins
Porridge • Hard
Cuiseur de 1,0 L
(5,5 tasses)
2 tasses ou moins 4 tasses ou moins
0,5 tasses ou
moins
Cuiseur de 1,8 L
(10 tasses)
1,5 tasses ou
moins
• Ajoutez de l’eau avant d’ajouter les ingrédients.
L’ajout de l’eau après les ingrédients donnera
un riz trop ferme.
Ajoutez de l’eau selon le type de riz et
votre préférence personnelle.
● Quanti té d’eau à ajouter
Échelle graduée (utilisez l’échelle
Type de riz
Plain
Quick
SynchroCooking
Ultra
Mixed
Jasmine Échelle « Jasmine »
Brown Échelle « Brown »
Porridge
•
Les niveaux d’eau dans la table ci-dessus
concernent également le riz sans rinçage.
• Si vous décidez d’augmenter ou de réduire
la quantité d’eau par rapport à la quantité
recommandée, ne modiez pas cette quantité de
plus du tiers (1/3) d’une ligne.
• Lors de la cuisson du riz brun germé, du riz complet
ou du riz blanc demi poli, utilisez l’échelle « Plain »
ou « Ultra ».
• Lors de la cuisson à la vapeur du riz gluant, utilisez
l’échelle « Sweet » comme référence.
Lors de la cuisson du riz gluant et du riz non gluant
mélangés ensemble, utilisez l’échelle entre « Plain »
et « Sweet » comme référence. (Dans un tel cas,
ajoutez un petit peu d’eau supplémentaire au niveau
utilisé lors de la cuisson seule de riz gluant.)
•
Si la quantité d’eau à ajouter est spéciée sur le
paquet de riz brun germé ou de riz multigrain que vous
utilisez, suivez ces directives et augmentez ou réduisez
légèrement la quantité d’eau selon vos préférences.
• Lors de la cuisson de la paella ou du pilaf comme
décrit dans le « COOKBOOK » fourni, utilisez
l’échelle « Plain » comme référence.
graduée associée à l’aliment à cuire
située dans le récipient intérieur
comme guide et ajoutez de l’eau
selon vos préférences.)
Échelle « Plain »
Échelle « Ultra »
Gruau dur : échelle « Porridge • Hard »
Gruau mou : échelle « Porridge • Soft »
60
Page 61

Cuisson du riz brun et/ou du riz
multigrain avec du riz blanc
• Si le riz à cuire contient plus de riz brun et/ou
de riz multigrain que de riz blanc, utilisez le
menu « Brown ».
• Si la quantité de riz brun et de riz blanc est
égale, ou s’il y a plus de riz blanc que de riz
brun, utilisez le menu « Plain ». (Le riz brun doit
être trempé séparément pendant 1 à 2 heures
avant la cuisson.)
• Si la quantité de riz multigrain et de riz blanc
est égale, ou s’il y a plus de riz blanc que de
riz multigrain, utilisez le menu « Plain ». (Le riz
multigrain doit être trempé séparément pendant
1 à 2 heures avant la cuisson.)
Cuisson du riz gluant
Pour faire cuire du riz gluant, sélectionnez le
menu « Mixed ».
Nettoyez le riz, puis nivelez-le pour que tout le riz
soit sous l’eau.
Cuisson de grains mélangés à du riz
blanc
• La quantité de riz multigrain ne doit pas
dépasser 20 % du volume du riz blanc.
La quantité maximale acceptable pour la
combinaison de riz blanc et de grains est 5,5
tasses pour le cuiseur de 1,0 L et de 10 tasses
pour le cuiseur de 1,8 L.
• Les grains devraient être placés au-dessus du
riz blanc. Les mélanger pourrait entraîner de
mauvais résultats de cuisson.
Cuisson de mélanges grains/riz brun
• Utilisez toujours le menu « Brown ».
• La quantité maximale acceptable pour la
combinaison de riz brun et de grains est de 3,5
tasses pour le cuiseur de 1,0 L et 6 tasses pour
le cuiseur de 1,8 L.
Cuisson de riz à grains courts
• Pour faire cuire du riz à grains courts,
sélectionnez le menu « Plain ».
Lors de la cuisson de riz assaisonné avec
divers ingrédients utilisant du riz à grains
courts, sélectionnez le menu « Mixed ».
La sélection de n’importe quel autre menu
peut causer le débordement du contenu ou
l’obtention de mauvais résultats de cuisson.
Cuisson de riz à grains longs
• Pour faire cuire du riz à grains longs,
sélectionnez le menu « Jasmine ». Lors de
la cuisson de riz assaisonné avec divers
ingrédients utilisant du riz à grains longs,
sélectionnez le menu « Mixed ». La sélection
de n’importe quel autre menu peut causer le
débordement du contenu.
Français
61
Page 62

3
Avant de cuire le riz
Mesurez le riz.
1
Utilisez toujours la tasse à mesurer fournie
avec le cuiseur à riz (cela s’applique aussi au
riz sans rinçage).
Une tasse comble de riz dans la tasse à
mesurer correspond à environ 5,29 oz (0,18
L).
● Remplissez la tasse à mesurer comme illustré ci-
dessous.
Mesures
exactes
Remarque
● Utilisez toujours le volume de riz spécié (voir
« Spécications techniques » à la p.95). Sinon, le
riz ne pourra être cuit correctement.
Si d’autres ingrédients doivent être ajoutés au riz,
voir p.60.
Mesures inexactes
Ajustez le niveau d’eau.
3
Placez le récipient intérieur sur une surface
plane et ajustez le niveau d’eau jusqu’à
la ligne appropriée de l’échelle graduée
correspondant aux aliments à cuire à
l’intérieur du récipient.
● Le niveau d’eau doit être choisi en fonction du
type de riz et du menu de cuisson sélectionné,
mais il peut être afné selon votre préférence
personnelle. (Voir les directives à p.60.)
Lors de la cuisson de
3 tasses de riz blanc,
ajustez le niveau
d’eau à la ligne « 3 »
sur l’échelle « Plain ».
Essuyez l’e a u et ret i re z l e r i z et
4
les grains.
<Surface extérieure et rebord du récipient
intérieur>
Lavez le riz. (Vous pouvez
2
utiliser le récipient intérieur
pour ce faire.)
Pour le riz sans rinçage, voir p.60.
Remarque
● N’utilisez pas d’eau chaude (plus de 95°F
[35°C]) pour laver le riz ou lors de l’ajout d’eau.
Cela pourrait donner des résultats de cuisson
insatisfaisants.
<À l’intérieur du cuiseur à riz>
Bouton de
verrouillage
Joint de couvercle
intérieur
Couvercle
intérieur
Partie
supérieure
du boîtier
Capteur
central
6262
Page 63

Mise en garde
Arrêt
● Assurez-vous d’enlever tout le riz et toute autre
matière collante sur et autour du capteur central,
de la partie supérieure du boîtier et du bouton de
verrouillage. (Voir p.83.)
Les matières collées peuvent empêcher le
couvercle de fermer, ce qui permettrait à la
vapeur de s’échapper pendant la cuisson, ou
pourrait entraîner l’ouverture du couvercle et le
débordement du contenu, ce qui pourrait causer
des brûlures ou d’autres blessures.
Placez le récipient intérieur
5
dans le cuiseur à riz.
(1) Assurez-vous que le récipient repose bien
au fond du cuiseur (il ne doit pas être
placé en angle).
(2) Fermez le couvercle.
Conrmez que le couvercle
intérieur est bien en place.
(2) Fermez le
couvercle.
Branchez la che électrique à
6
une prise.
Fiche électrique
L’appareil sera sous tension et le symbole
clignotera.
Clignote
Remarque
● Si le témoin Keep Warm est allumé, appuyez sur
la touche [Cancel] pour éteindre le témoin.
Français
Récipient
intérieur
(1) Placez le récipient
à l’intérieur du cuiseur
à riz.
Poignée du
récipient
intérieur
Côté
concave
6363
Page 64

4
Marche
Comment faire cuire le riz
Appuyez sur la
1
touche [
] ou [ ]
pour choisir le menu
désiré.
À chaque pression de la touche [Menu], le
menu sélectionné changera dans l’ordre
indiqué ci-dessous.
Le symbole
menu.
Clignote
• Il n’est pas nécessaire d’appuyer sur la
touche [Menu] si le menu désiré est déjà
sélectionné.
clignotera lors du choix du
Si vous avez sélectionné le
2
menu « Porridge », utilisez les
touches [Hour] et [Min] pour
régler le temps de cuisson
désiré.
• À chaque pression de la touche [Hour], la
durée de cuisson augmentera de 5 minutes.
À chaque pression de la touche [Min], la
durée de cuisson diminuera de 5 minutes.
• Le temps de cuisson peut être réglé par
intervalles de 5 minutes pour toute durée
comprise entre 40 et 90 minutes.
Appuyez sur la touche
3
[Start/Rinse-free] une
fois.
Lors de la cuisson
du riz sans rinçage,
appuyez deux fois sur la touche.
• Le riz sans rinçage peut être cuit en utilisant
les menus « Plain », « Ultra », « Quick »,
« Synchro-Cooking », « Mixed », et
« Porridge ».
• Pour annuler « Rinse-free », appuyez de
nouveau sur la touche [Start/Rinse-free] endedans de 20 secondes.
Pour la cuisson normale
Si vous avez sélectionné le menu « Plain »,
un bip court et un bip long se feront entendre.
Dans les autres menus, un seul bip retentira.
Marche
Lors de la cuisson du riz sans
rinçage
L’afcheur montrera « Rinse-free ».
Si vous avez sélectionné le menu « Plain »,
un bip court, un bip long puis un autre bip
court se feront entendre. Dans les autres
menus, un bip long suivi d’un bip court se
feront entendre.
Marche
6464
Augmente
de 5 min.
• Le réglage par défaut est de 60 minutes.
Adjust as desired.
Diminue de
5 min.
La cuisson commencera.
Page 65

Quantités appropriées
Voir p.60 à 61 pour connaître les quantités de grains et d’ingrédients appropriées.
Directives sur les temps de cuisson
Type d e ri z
Dimension du cuiseur
Cuiseur de 1,0 L (5,5 tasses)
Cuiseur de 1,8 L (10 tasses) 44 à 51 min 65 à 73 min 18 à 35 min 50 à 62 min
Type d e ri z
Dimension du cuiseur
Cuiseur de 1,0 L (5,5 tasses) 16 à 34 min 63 à 73 min 39 à 61 min 42 à 46 min
Cuiseur de 1,8 L (10 tasses) 16 à 34 min 72 à 80 min 40 à 61 min 43 à 47 min
• Les temps ci-dessus correspondent aux temps de cuisson à la vapeur lorsque le riz n’a pas été laissé dans
l’eau avant sa cuisson. (Tension : 120 V, température ambiante : 73,4°F [23°C], température de l’eau :
73,4°F [23°C], quantité d’eau : niveau normal)
• Lorsque le riz sans rinçage est sélectionné, la cuisson prend 1 à 10 minutes de plus que chaque temps de
menu.
• Les temps de cuisson varieront légèrement selon la quantité de riz à cuire, le type de riz, le type et la
quantité des ingrédients utilisés, la température ambiante, la température de l’eau, la quantité d’eau, la
tension électrique, et si la minuterie est utilisée ou non, etc.
Plain Ultra Quick Synchro-Cooking
41 à 49 min 63 à 71 min 17 à 35 min 41 à 48 min
Jasmine Brown Mixed Oatmeal (Steel cut)
Français
65
Page 66

5
Marche
Lorsque la cuisson est terminée
Le temps restant à la cuisson
à la vapeur s’afchera après le
début de processus de cuisson.
Jusqu’à la n de la cuisson à la vapeur, le
temps restant s’afchera et s’écoulera par
intervalles de 1 minute.
Marche
• Les temps de cuisson à la vapeur varieront
selon le menu sélectionné.
Une fois le riz complètement
cuit, la fonction de maintien
au chaud s’activera
automatiquement (le témoin
Start s’éteindra).
Le témoin Keep Warm s’allumera et un signal
sonore (8 bips) retentira.
Arrêt
Remuez et égrainez le riz une
1
fois cuit.
Assurez-vous de bien remuer et d’égrainer le
riz dès que la cuisson est terminée.
• À cause de la forme du récipient intérieur,
le riz est légèrement enfoncé au centre du
récipient lorsque la cuisson est terminée.
Récipient
intérieur
De la
condensation
s’accumulera
dans la partie
supérieure du
boîtier.
Remarque
● Assurez-vous d’essuyer l’eau chaude qui aurait
pu s’accumuler sur la partie supérieure du
boîtier ou qui pourrait couler sur l’extérieur du
cuiseur à riz lorsque vous ouvrez le couvercle
immédiatement après la cuisson ou pendant que
la fonction de maintien au chaud est activée.
• Si vous avez rajouté des ingrédients sous le
menu « Porridge », ou si vous avez besoin
d’un plus long temps de cuisson, etc., vous
pouvez régler le temps supplémentaire de
cuisson désiré. Appuyez simplement sur
les touches [Hour] et [Min] une fois que
le témoin Keep Warm s’est allumé, puis
appuyez sur la touche [Start/Rinse-free]. Le
temps de cuisson peut être prolongé jusqu’à
15 minutes en incréments de 1 minute, 3 fois
au maximum.
• Bien remuer le riz avant de le réchauffer.
Quand vous avez ni d’utiliser
le cuiseur à riz ...
Appuyez sur la touche [Cancel] pour
1
éteindre la fonction de maintien au
chaud (Keep Warm).
Le témoin Keep Warm s’éteindra.
Arrêt
Débranchez la che électrique de la
2
prise. (Voir p.57.)
Nettoyez le cuiseur à riz. (Voir p.82 à
3
87.)
6666
Page 67

6
Clignote
Comment faire cuire le gruau (menu « Oatmeal »)
Vous pouvez facilement préparer du gruau
(découpé).
Placez le gruau et l’eau dans le
1
récipient intérieur et refermez le
couvercle.
• Quantité de gruau
Cuiseur de 1,0 L Cuiseur de 1,8 L
1,0 à 2,5 tasses 1,0 à 3,0 tasses
• Quantité d’eau à ajouter
Assurez-vous de toujours utiliser la tasse à
mesurer fournie avec le cuiseur à riz.
Quantité de
gruau
1,0 tasse 3,0 tasses 3,5 tasses
1,5 tasses 4,5 tasses 4,5 tasses
2,0 tasses 5,0 tasses 5,0 tasses
2,5 tasses 5,5 tasses 6,5 tasses
3,0 tasses – 7,0 tasses
Branchez la che électrique à
2
une prise. (Voir p.63.)
Appuyez sur la touche [ ] ou
3
[
] pour sélectionner le menu
[Oatmeal (Steel cut)].
Cuiseur de
1,0 L
Cuiseur de
1,8 L
Lorsque la cuisson est
5
terminée, un signal sonore (8
bips) retentira (le témoin Start
s’éteindra).
Le témoin Keep Warm clignotera et l’heure
actuelle apparaîtra sur l’afcheur.
Clignote
Bien remuer le gruau et
6
distribuez-le uniformément dans
le récipient intérieur.
• Servez le gruau cuit dès que possible, car il
ne se garde pas chaud.
Quand vous avez ni d’utiliser
le cuiseur à riz ...
Appuyez sur la touche [Cancel] pour
1
éteindre la fonction de maintien au
chaud (Keep Warm).
Le témoin Keep Warm s’éteindra.
Français
Clignote
Appuyez sur la touche
4
[Start/Rinse-free] une
fois.
• La fonction Rinse-free n’est pas
disponible.
Un bip unique long se fera entendre et la
cuisson démarrera.
Marche
Arrêt
Débranchez la che électrique de la
2
prise. (Voir p.57.)
Nettoyez le cuiseur à riz. (Voir p.82 à
3
87.)
6767
Page 68

7
Arrêt
Réglage de la minuterie
Lors de la cuisson du riz
sans rinçage, appuyez
deux fois sur la touche.
1
6
4
2 3, 5
Utilisation de la minuterie (Timer 1 /
Timer 2)
Vous pouvez programmer l’heure à laquelle se
terminera la cuisson de vos aliments.
• Sélectionnez soit « Timer 1 » ou soit « Timer 2 » et réglez
l’heure de la n de la cuisson. L’heure du début de la cuisson
sera automatiquement ajustée de sorte que la cuisson se
termine à l’heure que vous avez préprogrammée.
•
Chaque minuterie peut être programmée à des heures
différentes. Par exemple « Timer 1 » pour le petit déjeuner
et « Timer 2 » pour le dîner.
• Les réglages de la minuterie programmée sont
conservés dans la mémoire du cuiseur.
Clignote
• Vériez que le témoin Keep Warm est éteint.
• Il n’est pas nécessaire d’appuyer sur la touche
[Menu] si le menu désiré est déjà sélectionné.
Si vous avez sélectionné le menu
3
« Porridge », utilisez les touches
[Hour] et [Min] pour régler le
temps de cuisson désiré.
•
À chaque pression de la touche [Hour], la durée
de cuisson augmentera de 5 minutes. À chaque
pression de la touche [Min], la durée de cuisson
diminuera de 5 minutes.
• Le temps de cuisson peut être réglé par
intervalles de 5 minutes pour toute durée
comprise entre 40 et 90 minutes.
Augmente
de 5 min.
Diminue de
5 min.
6868
● Exemple de réglage : si « Timer 1 » est réglé à
1:30 PM, la cuisson sera terminée à 1:30 PM.
Vériez l’heure actuelle.
1
Clignote
• Voir p.94 pour la procédure sur comment
régler l’heure actuelle.
Appuyez sur la touche
2
[
] [ ] pour choisir le
menu désiré.
Le symbole clignotera
lors du choix du menu.
• Le réglage par défaut est de 60 minutes.
Adjust as desired.
Appuyez sur la touche
4
[Timer] pour sélectionner
soit «
Timer 1 » ou soit
« Timer 2 ».
Le réglage sélectionné basculera
entre « Timer 1 » et « Timer 2 » chaque fois que
vous appuierez sur la touche [Timer].
Le témoin de la minuterie et le témoin « Timer
1 » ou « Timer 2 » clignoteront.
Clignote
• L’heure précédemment programmée sera
afchée. Il n’est pas nécessaire de régler la
minuterie de nouveau si l’heure désirée pour
la n de la cuisson est déjà afchée.
Clignote
Page 69

Remarque
● La minuterie n’est pas disponible dans les cas
suivants.
•
Lorsque le menu « Quick », « Synchro-Cooking »,
« Mixed », « Bread », ou « Slow Cook » est choisi
•
Lorsque le temps de cuisson programmé est
moindre que ce qui est indiqué dans la table qui suit
(les temps dans la table ci-dessous s’appliquent
également au riz sans rinçage.)
Menu Heure programmée minimale
Plain 1 h 5 min
Ultra 1 h 30 min
Jasmine 45 min
Brown 1 h 30 min
Porridge Temps de cuisson+1 min
Oatmeal
(Steel cut)
• Lorsque « 0:00 » clignote sur l’afcheur
●
Si le témoin Keep Warm est allumé, appuyez sur la touche
[Cancel] pour éteindre le témoin. (La minuterie n’est pas
disponible lorsque le témoin Keep Warm est allumé.)
●
Si vous ne faites pas fonctionner le cuiseur à riz dans un
délai d’environ 30 secondes après avoir appuyé sur la
touche [Timer], un signal sonore (3 bips) se fera entendre.
● Si vous appuyez sur la touche [Timer] ou [Start/Rinse-
free] lorsque la minuterie du cuiseur à riz n’est pas
disponible, un signal sonore (3 bips) se fera entendre.
55 min
Utilisez les touches
5
[Hour] et [Min] pour
régler l’heure de n
de cuisson souhaitée.
Appuyez sur la touche [Hour] pour régler l’heure
de n de cuisson par intervalles de 1 heure.
Appuyez sur la touche [Min] pour régler cette
heure par intervalles de 10 minutes.
Maintenez la touche correspondante enfoncée
pour changer l’heure plus rapidement.
Appuyez sur la touche
6
[Start/Rinse-free] une fois.
Lors de la cuisson du riz
sans rinçage, appuyez
deux fois sur la touche.
Le témoin de la minuterie s’allumera et la
minuterie est maintenant réglée.
• Le riz sans rinçage peut être cuit en
utilisant les menus « Plain », « Ultra », et
« Porridge ».
Pour la cuisson normale
Si vous avez sélectionné le menu « Plain »,
un bip court et un bip long se feront entendre.
Dans les autres menus, un seul bip retentira.
Marche
Lors de la cuisson du riz sans
rinçage
L’afcheur montrera « Rinse-free ».
Si vous avez sélectionné le menu « Plain »,
un bip court, un bip long puis un autre bip
court se feront entendre. Dans les autres
menus, un bip long suivi d’un bip court se
feront entendre.
Marche
Français
Marche
Marche
Clignote
• L’heure est afchée au format de 12 heures.
Remarque
●
Ne réglez pas la minuterie pour une cuisson
dépassant 12 heures, vous risqueriez de gâter le riz.
●
Vériez si « AM » ou « PM » est actuellement afché.
• Si vous faites une erreur ou si vous voulez
réinitialiser la minuterie, appuyez sur la
touche [Cancel] et répétez la procédure de
l’étape
de la p.68.
2
6969
Page 70

8
Maintenir le riz au chaud
La fonction de maintien au chaud (Keep Warm)
permettra de conserver la brillance et le goût
délicieux du riz blanc (riz sans rinçage).
La fonction de maintien au chaud s’active
automatiquement lorsque la cuisson est terminée.
Désactiver la fonction de maintien
au chaud
Appuyez sur la touche [Cancel].
Le témoin Keep Warm s’éteindra.
Arrêt
Redémarrer la fonction de
maintien au chaud
Conrmez que le témoin
Keep Warm est éteint et
appuyez sur la touche
[Keep Warm].
Le témoin Keep Warm s’allumera.
Maintenir une petite quantité de
riz à chaud
Rassemblez le riz au centre du récipient intérieur;
servez dès que possible.
7070
Marche
Afcher le temps de maintien au
chaud écoulé
Maintenez enfoncée la touche [Hour] pour afcher
le temps de maintien au chaud écoulé. Le temps
écoulé sera afché en intervalles de 1 heure jusqu’à
24 heures (« 24h »).
Après que 24 heures se soient écoulées, « 24 »
clignotera et « h » s’allumera.
Remarque
● Évitez les utilisations suivantes de la fonction de
maintien au chaud car elles pourraient entraîner
la formation d’odeurs inhabituelles, provoquer la
sécheresse, la décoloration ou la perte du riz cuit,
ou causer la corrosion du récipient intérieur.
• Utiliser la fonction de maintien au chaud avec
du riz froid
• Ajouter du riz froid au riz maintenu au chaud
• Laisser une spatule dans le récipient intérieur
pendant le maintien au chaud du riz
• Utiliser la fonction de maintien au chaud avec la
che électrique débranchée
• Utiliser la fonction de maintien au chaud
pendant plus de 24 heures
• Maintenir au chaud une quantité de riz inférieure
à la quantité minimale de riz requise (voir
« Spécications techniques » à la p.95.)
• Utiliser la fonction de maintien au chaud autre
chose que du riz blanc (y compris le riz sans
rinçage)
● Lorsque vous utilisez le menu « Porridge », le
gruau peut devenir pâteux si vous le maintenez
au chaud pendant trop longtemps. Donc, servezle dès que possible.
● Assurez-vous d’enlever les grains de riz qui
sont collés sur le rebord supérieur du récipient
intérieur ou sur les joints du cuiseur pour éviter de
faire sécher et décolorer le riz, de provoquer des
odeurs et de faire coller le riz en cours de cuisson.
Sinon, il peut entraîner un riz cuit sec, décoloré,
malodorant et collant.
● Servez le riz cuit dès que possible dans les
climats froids et les environnements à haute
température.
● Ne laissez pas le plateau de cuisson ou des
aliments cuits avec le plateau de cuisson à
l’intérieur du cuiseur à riz pendant l’utilisation de
la fonction de maintien au chaud.
Page 71

9
Marche
Réchauffer le riz
Si vous désirez servir un riz très chaud, réchauffez
le riz qui a été maintenu au chaud avant de le servir.
Remarque
● Le riz ne sera pas entièrement chauffé si le
récipient intérieur est rempli plus qu’à moitié.
● Vous obtiendrez un riz trop sec si vous le
réchauffez dans l’une des conditions suivantes.
• Le riz est encore chaud, par exemple
immédiatement après la cuisson.
• Il y a moins que la quantité de riz minimale
requise (1 tasse avec le cuiseur de 1,0 L, 2
tasses avec le cuiseur de 1,8 L).
• Le riz est réchauffé 3 fois ou plus.
Remuez et égrainez le riz qui
1
était maintenu au chaud.
Ajoutez 1 à 2 cuillères à soupe
2
d’eau uniformément sur le riz.
Appuyez sur la touche
4
[Start/Rinse-free].
Le témoin Start clignotera et le
réchauffage commencera.
Le temps restant sera afché et
un signal sonore (3 longs bips)
retentira lorsque le réchauffage
du riz sera terminé.
• Pour arrêter le réchauffage, appuyez sur la
touche [Cancel].
• Le réchauffage n’est pas disponible si le
riz est trop froid (131˚F [55˚C] ou plus bas
comme ligne directrice). Dans ce cas, un
signal sonore répété retentira.
Remuez et égrainez bien le
5
riz réchauffé et distribuez-le
uniformément dans le récipient
intérieur.
Clignote
Français
● Ajouter l’eau empêchera le riz de sécher et
donnera un riz plus goné.
Assurez-vous que le témoin
3
Keep Warm est allumé.
• Le réchauffage n’est pas disponible si le
témoin Keep Warm n’est pas allumé. Si le
témoin n’est pas allumé, appuyez sur la
touche [Keep Warm]. (Voir p.70.)
7171
Page 72

Comment réchauffer le gruau
Remarque
● Le gruau va terminer sec si vous le réchauffez
dans l’une des conditions suivantes.
• Le gruau est réchauffé sans ajouter d'eau ou
de lait.
• Le volume de gruau est sous le volume
minimum requis (1 tasse).
• Le gruau est réchauffé 3 fois ou plus.
Mélangez le gruau cuit.
1
● Vous pouvez ajouter un peu d’eau ou de lait au
gruau cuit et le réchauffer.
Remarque
● Lors de l’ajout d’eau ou de lait, ajoutez-le
immédiatement après la cuisson. Sinon, la
température va diminuer et le gruau pourra ne
pas être réchauffé.
• Le temps maximum de cuisson lors de l’ajout
d’un peu d’eau ou de lait pour réchauffer le
gruau
Cuiseur de 1,0 L : échelle 5,5 pour « Plain »
Cuiseur de 1,8 L : échelle 8 pour « Plain »
Appuyez sur la touche
3
[Start/Rinse-free].
Le témoin Start clignotera et le
réchauffage commencera.
Le temps restant sera afché et
un signal sonore (3 longs bips)
retentira lorsque le réchauffage
du riz sera terminé.
Remarque
● Le réchauffage n’est pas disponible si le gruau
est trop froid (131˚F [55˚C] ou plus bas comme
ligne directrice). Dans ce cas, un signal sonore
répété retentira.
Clignote
Bien remuer le gruau chauffé et
4
distribuez-le uniformément dans
le récipient intérieur.
7272
Assurez-vous que le
2
témoin Keep Warm
clignote.
• Le réchauffage n’est pas disponible si vous
appuyez sur la touche [Cancel] après la
cuisson du gruau.
Clignote
Page 73

10
Cuire ensemble du riz et d’autres aliments (Menu « Synchro-Cooking »)
Vous pouvez utiliser le plateau de cuisson pour f air e
cuire les plats d’accompagnement (simultanément
avec votre riz cuit) comme décrits dans le
« COOKBOOK » fourni. Vous pouvez également
ajouter de l’eau dans le récipient intérieur an de
faire cuire des aliments sans faire cuire de riz.
Reportez-vous au « COOKBOOK » fourni pour les
directives.
Remarque
● Ne préparez pas de plats autres que ceux décrits
dans le « COOKBOOK » fourni.
● N’utilisez pas de quantités d’ingrédients
supérieures à celles indiquées dans le
« COOKBOOK » fourni.
Cela pourrait entraîner un débordement ou
donner des résultats de cuisson insatisfaisants.
● Tenez compte des points suivants lorsque vous
utilisez le plateau de cuisson.
• La préparation d’aliments à forte odeur peut
laisser une odeur au plateau de cuisson.
• La couleur des ingrédients très colorés peut se
transférer au plateau de cuisson à travers le
bouillon lors de leur cuisson.
• N’utilisez pas d’instruments pointus tels que
des couteaux de cuisine, des couteaux de
table, ou des fourchettes à l’intérieur du plateau
de cuisson.
Préparez les ingrédients et
1
placez-les dans le plateau de
cuisson.
Empiler les ingrédients les uns sur les
autres peut entraîner un débordement du
contenu ou de mauvais résultats de cuisson.
Distribuez les ingrédients à cuire sur toute la
surface du plateau de cuisson.
Faites les préparatifs nécessaires
2
pour la cuisson du riz. (Voir p.62.)
Remarque
Placez le plateau de cuisson à
3
l’intérieur du récipient intérieur
et refermez le couvercle.
Poignée
(3)
(4)
(2)
(1)
Remarque
● Placez toujours le plateau de cuisson à l’intérieur
du récipient intérieur.
● Assurez-vous que le plateau de cuisson repose
bien dans le récipient intérieur (il ne doit pas être
posé en angle).
● Inclinez la poignée du plateau de cuisson vers
l’extérieur avant de fermer le couvercle.
Plateau de
cuisson
Récipient
intérieur
Branchez la che électrique à
4
une prise.
Remarque
● Si le témoin Keep Warm est allumé, appuyez sur
la touche [Cancel] pour éteindre le témoin.
Appuyez sur la
5
touche [
] ou [ ] pour
sélectionner le menu
« Synchro-Cooking ».
Le symbole clignotera lors du choix du
menu.
Français
● Le tableau ci-dessous présente la quantité de
riz que vous pouvez faire cuire en même temps
que les aliments. Ne dépassez pas la quantité
d’aliments maximale et minimale indiquées. Cela
pourrait entraîner un débordement ou donner des
résultats de cuisson insatisfaisants.
Cuiseur de 1,0 L Cuiseur de 1,8 L
Maximum Minimum Maximum Minimum
2 tasses 1 tasse 4 tasses 2 tasses
Clignote
Sélectionnez toujours le menu « SynchroCooking » lorsque vous désirez effectuer une
cuisson simultanée.
7373
Page 74

Appuyez sur la touche
Arrêt
6
[Start/Rinse-free].
Le témoin Start s’allumera et la
cuisson simultanée démarrera.
Lorsque la cuisson est terminée,
7
un signal sonore (8 bips) retentira
(le témoin Start s’éteindra).
Le témoin Keep Warm s’allumera.
Marche
Retirez le plateau de cuisson,
8
puis remuez et égrainez le riz.
Marche
Cuisson d’aliments sans riz
Ajoutez de l’eau jusqu’à l’échelle de
1
riz blanc (cuiseur de 1,0 L : échelle 2,
cuiseur de 1,8 L : échelle 4), placez le
plateau de cuisson dans le récipient
intérieur, puis fermez le couvercle.
Choisissez le menu « Slow Cook ».
2
Réglez le temps de cuisson désiré.
3
(Voir p.75.)
Réglez le temps de cuisson entre 20 et 30
minutes, selon le type d’aliment à cuire.
Lorsque la cuisson est terminée,
4
appuyez sur la touche [Cancel], et
retirez le plateau de cuisson.
Quand vous avez ni d’utiliser
le cuiseur à riz ...
Appuyez sur la touche [Cancel] pour
1
éteindre la fonction de maintien au
chaud (Keep Warm).
Le témoin Keep Warm s’éteindra.
7474
Remarque
● Ne laissez pas le plateau de cuisson dans le cuiseur à
riz lorsque la fonction de maintien au chaud est activée.
● Soyez prudent lorsque vous enlèverez le plateau de
cuisson après la cuisson, car il sera chaud.
● N’inclinez pas le plateau de cuisson lors de son retrait.
Le bouillon ou d’autres aliments pourraient se renverser
et causer des brûlures.
● Une fois le plateau de cuisson retiré de l’appareil, ne le
remettez pas dans le récipient intérieur.
Cela pourrait gâter le riz ou nuire au fonctionnement du
maintien au chaud.
● Il est possible que du liquide déborde sur le riz lorsque
si vous faites cuire des ingrédients ayant tendance
à libérer beaucoup de liquide, d’huile ou de graisse
lorsqu’ils sont chauffés, ou qui augmentent de volume
pendant le chauffage, tels que des œufs et d’autres
aliments similaires.
Débranchez la che électrique de la
2
prise. (Voir p.57.)
Nettoyez le cuiseur à riz. (Voir p.82 à
3
87.)
Page 75

11
Cuisson lente (menu « Slow Cook »)
Reportez-vous au « COOKBOOK » fourni pour les directives.
En activant cette fonction, le cuiseur chauffera les
ingrédients jusqu’au point d’ébullition, puis réduira leur
température à environ 199°F (93°C) de façon à les faire
mijoter pendant un certain temps. Par la suite, le cuiseur
réduira encore plus sa température de mijotage à environ
190°F (88°C), puis le mijotage continuera. Cette réduction
progressive de la température améliore la saveur des
aliments et empêche l’évaporation des liquides même
s’ils sont chauffés pendant une longue période.
Exemples de menu
Chaudrée de saumon, oden à saveur de citron yuzu
● Pour savoir comment cuire une « chaudrée de
saumon » et un « oden à saveur de citron yuzu »,
veuillez voir le « COOKBOOK » fourni.
Remarque
●
La mise en garde devrait être observée quand vous
préparez des plats autres que ceux décrits dans le
« COOKBOOK », car ils peuvent déborder.
●
Mélangez bien les ingrédients avant la cuisson pour
éviter que les assaisonnements s’accumulent au fond
de récipient intérieur.
● Quand vous mijotez les aliments dans le bouillon,
refroidissez le bouillon avant la cuisson.
● Si vous souhaitez épaissir le plat avec de l’amidon,
ajoutez ce dernier en n de cuisson.
●
Dans la mesure où les produits alimentaires à base
de pâte de poisson comme le « chikuwa » (pâte de
poisson en forme de tube) et le « kamaboko » (gâteau
à base de pâte de poisson) se gonent lorsqu’ils
sont chauffés, on doit tenir compte de ce phénomène
lorsque ce type d’aliments est utilisé dans le cuiseur.
Préparez les ingrédients.
1
cela pourrait aussi causer un débordement du contenu.
Échelle « Plain »
Cuiseur de 1,0 L Cuiseur de 1,8 L
Maximum Minimum Maximum Minimum
5,5 ou moins 2 ou plus 8 ou moins 3 ou plus
Branchez la che électrique à
3
une prise.
Remarque
● Si le témoin Keep Warm est allumé, appuyez sur
la touche [Cancel] pour éteindre le témoin.
Appuyez sur la touche
4
[
] ou [ ] pour choisir
le menu « Slow Cook ».
Le symbole clignotera lors
du choix du menu.
Clignote
Utilisez les touches
5
[Hour] et [Min] pour
régler le temps de
cuisson désirée.
À chaque pression de la touche [Hour], la
durée de cuisson augmentera de 5 minutes.
À chaque pression de la touche [Min], la
durée de cuisson diminuera de 5 minutes.
La durée de la de cuisson peut être réglée
par intervalles de 5 minutes pour toute durée
comprise entre 5 et 180 minutes.
Français
Ajoutez les ingrédients dans le
2
récipient intérieur et refermez le
couvercle.
Remarque
●
Utilisez l’échelle graduée « Plain » à l’intérieur du
récipient intérieur comme référence. Utiliser plus que la
quantité maximale d’aliment acceptable (voir le tableau
ci-dessous) peut entraver l’ébullition ou causer un
débordement. Assurez-vous également de ne pas utiliser
moins que la quantité minimale d’aliments requise, car
Clignote
7575
Page 76

Appuyez sur la touche
Marche
6
[Start/Rinse-free].
Le témoin Start s’allumera et la
cuisson commencera.
« Ready in » apparaîtra sur
l’afcheur.
Marche
4. Répétez la procédure de l’étape
● Si vous désirez que les aliments qui sont
maintenus au chaud soient réchauffés avant
d’être servis, appuyez sur la touche [Start/Rinse-
free] lorsque le témoin Keep Warm est allumé.
Le temps de réchauffage restant sera afché
et un signal sonore (3 bips longs) retentira une
fois l’opération terminée. Après le réchauffage,
le témoin Keep Warm s’allumera et le temps de
maintien au chaud écoulé sera afché.
surp.75.
4
7676
Marche
Remarque
● N’ouvrez pas le couvercle du cuiseur pendant la
cuisson.
Lorsque la cuisson est terminée,
7
un signal sonore (8 bips) retentira
(le témoin Start s’éteindra).
Le témoin Keep Warm s’allumera et « 0h »
sera afché.
• Pour prolonger le mijotage des aliments, utilisez
les touches [Hour] et [Min] pour régler le temps
de cuisson supplémentaire, puis appuyez sur la
touche [Start/Rinse-free]. Le temps de cuisson
peut être prolongé jusqu’à 30 minutes, 3 fois au
maximum.
Remarque
● Lorsque la nourriture n'est pas bien cuite,
n'appuyez pas sur la touche [Cancel] avant toute
cuisson supplémentaire. Cela ferait éteindre le
témoin Keep Warm et rendrait impossible l’ajout
d’un temps de cuisson. Si vous avez appuyé
sur la touche [Cancel] par erreur, effectuez la
procédure suivante.
1. Retirez le récipient intérieur et posez-le sur
une serviette ou un chiffon humide.
2. Laissez le couvercle du cuiseur à riz ouvert
et laissez refroidir l’appareil et le récipient
intérieur pendant environ 10 minutes.
3. Replacez le récipient intérieur à l’intérieur du
cuiseur à riz.
Lorsque la cuisson est terminée ...
Appuyez sur la touche [Cancel] pour
1
éteindre la fonction de maintien au
chaud (Keep Warm).
Le témoin Keep Warm s’éteindra.
Arrêt
Éliminez les odeurs. (Voir p.87.)
2
Remarque
● Si vous n’appuyez pas sur la touche [Cancel]
une fois la cuisson terminée, la fonction de
maintien au chaud (Keep Warm) s’activera
automatiquement et le temps de maintien au
chaud écoulé s’afchera par intervalles de
1 heure depuis la première heure (« 1h »)
jusqu’à un maximum de 6 heures (« 6h »).
Une fois que 6 heures de maintien au chaud
se seront écoulées, « 6h » clignotera sur
l’afcheur.
● Ne pas utiliser la fonction de maintien au
chaud de façon continue pendant plus de 6
heures, car certains aliments perdront leur
goût.
Page 77

12
Vous pouvez cuire du pain selon la procédure
suivante. Vous pouvez aussi cuire d’autres types de
pains décrits dans le « COOKBOOK » fourni.
Remarque
● N’essayez pas de cuire des types de pains autres
que ceux décrits dans le « COOKBOOK » fourni,
car ils pourraient ne pas bien cuire.
● Utilisez seulement de la levure sèche pour lever
le pain.
Comment cuire du pain (menus « Bread Fermentation » et « Bread Bake »)
Ingrédients (mesurez les
ingrédients avec précision.)
Type 1,0 L (2 à 3 portions)
Farine enrichie ...........1-1/2 tasses (7 oz / 200 g)
Levure sèche .............1 cuillère à thé
Sucre .........................1-1/2 cuillères à thé
Sel .............................1/3 cuillère à thé
Beurre ........................1-1/4 cuillères à table
Lait écrémé ................1-1/3 cuillères à table
Eau tiède (environ 86ºF [30ºC]) ....... 1/2 tasse (130 ml)
Type 1,8 L (3 à 4 portions)
Farine enrichie ...........2-1/4 tasses (10-1/2 oz / 300 g)
Levure sèche .............
Sucre .........................3 cuillères à thé
Sel .............................1/2 cuillère à thé
Beurre ........................2 cuillères à table
Lait écrémé ................2 cuillères à table
Eau tiède (environ 86°F [30°C]) ...... 3/4 tasse (200 ml)
1-1/2 cuillères à thé
Placez la pâte sur un comptoi r et
2
pétrissez-la pendant environ 20
minutes.
Pétrissez bien la pâte en l’étirant et en la
repliant sur elle-même plusieurs fois.
Lorsque la pâte est moelleuse à l’extérieur
et peut être étirée nement sans qu’elle se
brise, elle est alors sufsamment pétrie.
Roulez la pâte en un e bo ule et
3
placez-la au centre du récipient
intérieur.
Français
Mettez tous les ingrédien ts da ns
1
un bol et les rouler en une boule.
1. Tamisez la farine enrichie et faites
ramollir le beurre en le réchauffant à la
température ambiante.
2. Mettez la farine enrichie dans un bol,
puis rajoutez le lait écrémé, le sucre et la
levure sèche dans cet ordre. Ajoutez le sel
de façon à ce qu’il n’entre pas directement
en contact avec la levure sèche.
3. Ajoutez le beurre et versez de l’eau tiède
sur la levure sèche.
4. À l’aide d’une spatule en bois, mélangez
ensemble tous les ingrédients et roulez-les
en une boule à l’aide de vos mains.
Placez le récipient intérieur
4
dans le cuiseur à riz.
(1) Assurez-vous que le récipient repose bien
au fond du cuiseur (il ne doit pas être
placé en angle).
(2) Fermez le couvercle.
Conrmez que le couvercle
intérieur est bien en place.
(2) Fermez
le couvercle.
Récipient
intérieur
(1) Placez le
récipient à
l’intérieur du
cuiseur à riz.
Branchez la che électrique à
5
une prise.
Poignée du
récipient
intérieur
Côté
concave
7777
Page 78

Appuyez sur la
6
touche [
] ou [ ] pour
sélectionner le menu
« Fermentation ».
Le symbole clignotera lors du choix du
menu.
Faites lever la pâte (première levée). Le
temps de levée par défaut est conguré à
40 minutes.
Clignote
Ouvrez le couvercle et vériez
8
que la pâte ait levé.
Dans la première levée, la pâte grossit par 2
à 2,5 fois de sa grosseur originale.
Enrobez un doigt avec de la farine enrichie et
appuyez sur le centre de la pâte. Si un trou reste
présent, alors la première levée est terminée.
• Pour modier le temps de levée de
40 minutes, choisissez premièrement
« Fermentation » et congurez l’heure en
utilisant les touches [Hour] et [Min], puis
appuyez sur la touche [Start/Rinse-free].
À chaque pression de la touche [Hour], la
durée de cuisson augmentera de 5 minutes.
À chaque pression de la touche [Min], la
durée de cuisson diminuera de 5 minutes.
Appuyez sur la touche
7
[Start/Rinse-free].
Le témoin Start s’allumera et la
levée commencera.
Lorsque la première levée est terminée, le
témoin Keep Warm et « 0 » commenceront à
clignoter sur l’afcheur, et une alarme (8 bips)
se fera entendre.
Le témoin Start s’éteindra.
Clignote
Marche
• Si le trou disparait, alors la pâte n’a pas assez
levé. Dans ce cas, appuyez sur la touche
[Hour] avec le témoin Keep Warm clignotant,
congurez le temps supplémentaire de levée,
puis appuyez sur la touche [Start/Rinse-free].
Le temps de cuisson peut être prolongé jusqu’à
15 minutes en incréments de 5 minutes, 3 fois
au maximum.
Appuyez sur la touche
9
[Cancel].
Le témoin Keep Warm s’éteindra.
Marche
Clignote
Appuyez légèrement sur la pâte
10
pour libérer tout air emprisonné.
7878
Clignote
Page 79

Roulez la pâte en un e bo ule
Marche
11
bien formée, placez-la dans le
centre du récipient intérieur,
puis fermez le couvercle.
● Lorsque la seconde levée est terminée, la pâte
aura grossit de 1,5 à 2 fois sa grosseur originale,
donc tenez compte de ce dernier point.
Conrmez que le menu
12
« Fermentation » est sélectionné.
Conrmez que « 40 » est afché.
Faites lever la pâte (seconde levée).
Marche
Appuyez sur la touche
13
[Start/Rinse-free].
Le témoin Start s’allumera et la
levée commencera.
Lorsque la seconde levée est terminée, le témoin
Keep Warm et « 0 » commenceront à clignoter sur
l’afcheur, et une alarme (8 bips) se fera entendre.
Le témoin Start s’éteindra.
Ouvrez le couvercle et vériez
14
que la pâte ait grossi de 1,5 à 2
fois sa grosseur originale après
que l’air ait été libéré comme
décrit dans l’étape
Fermez le couvercle et
15
appuyez sur la touche
[Cancel].
Les menus peuvent maintenant
être choisis.
Le témoin Keep Warm s’éteindra.
11.
Français
Clignote
Appuyez sur la
16
touche [
pour sélectionner le
menu « Bake ».
Le symbole clignotera lors du choix du
menu.
•
Pour modier le temps de levée de 40 minutes,
choisissez premièrement « Bake » et congurez
l’heure en utilisant les touches [Hour] et [Min],
puis appuyez sur la touche [Start/Rinse-free].
À chaque pression de la touche [Hour], la
durée de cuisson augmentera de 1 minutes. À
chaque pression de la touche [Min], la durée de
cuisson diminuera de 1 minutes.
] ou [ ]
Clignote
7979
Page 80

Appuyez sur la touche
Marche
17
[Start/Rinse-free].
Le témoin Start s’allumera et la
cuisson commencera.
Lorsque la cuisson est terminée, le témoin
Keep Warm et « 0 » commenceront à
clignoter sur l’afcheur, et une alarme (8 bips)
se fera entendre.
Le témoin Start s’éteindra.
Ouvrez le couvercle et donnez
18
un petit coup au centre du pain
avec une brochette en bambou.
Si la brochette en bambou ressort propre, le
pain est cuit à l’intérieur.
• Si la pâte colle à la brochette en bambou,
appuyez sur la touche [Hour] avec le témoin
Keep Warm clignotant, congurez le temps
supplémentaire de levée, puis appuyez
sur la touche [Start/Rinse-free]. Le temps
de cuisson peut être prolongé jusqu’à 15
minutes en incréments de 5 minutes, 3 fois
au maximum.
Enlevez le récipient intérieur, et
19
retournez-le pour sortir le pain.
Remarque
● Portez des gants de cuisine, etc. lorsque vous
enlevez le récipient intérieur. Faites attention à ne
pas le toucher avec vos mains nues. Cela peut
entraîner des brûlures.
● Servez le pain dès que la cuisson est terminée.
Si le pain est laissé dans le cuiseur à riz, alors
de la condensation sur le couvercle intérieur
s’égouttera sur celui-ci, le rendant collant.
8080
Remarque
● N’appuyez pas sur la touche [Cancel] avant
d’avoir fait cuire le pain ou fait noircir sa croûte.
Cela ferait éteindre le témoin Keep Warm et
rendrait impossible l’ajout d’un temps de cuisson.
Si vous avez appuyé sur la touche [Cancel] par
erreur, effectuez la procédure suivante.
1. Retirez le récipient intérieur et posez-le sur un
linge humide.
2. Laissez le couvercle du cuiseur à riz ouvert
et laissez refroidir l’appareil et le récipient
intérieur pendant environ 10 minutes.
3. Replacez le récipient intérieur à l’intérieur du
cuiseur à riz.
4. Choisissez « Bake » et congurez le temps
supplémentaire de cuisson, puis cuisez le
pain.
Page 81

Pour noircir la croûte
Pour noircir la croûte du pain cuit, cuisez-le de
nouveau en suivant la procédure qui suit.
Retournez le pain et placez-le dans
1
le récipient intérieur avec le côté non
cuit du pain faisant face vers le bas.
Une foi que la cuisson du pain
est terminée…
Appuyez sur la touche [Cancel] pour
1
éteindre la fonction de maintien au
chaud (Keep Warm).
Le témoin Keep Warm s’éteindra.
Arrêt
Français
Remarque
● Portez des gants de cuisine, etc. Faites
attention à ne pas toucher le récipient
intérieur avec vos mains nues.
Replacez le récipient intérieur à
2
l’intérieur du cuiseur à riz.
Appuyez sur la touche [Hour]
3
avec le témoin Keep Warm
clignotant et congurez le
temps de cuisson à 10 minutes.
Appuyez sur la touche
4
[Start/Rinse-free].
Le témoin Start s’allumera.
Marche
Débranchez la che électrique de la
2
prise. (Voir p.57.)
Éliminez les odeurs. (Voir p.87.)
3
Lorsque la cuisson est terminée, retirez le
pain selon l’étape
19 sur p.80.
8181
Page 82

13
Effectuer vous-mêmes les procédures de nettoyage et d’entretien décrites aux p.82 à 87 qui suivent.
Tout autre travail d’entretien doit être réalisé par un technicien autorisé.
Nettoyez toutes les pièces à la main. Ne les lavez pas au lave-vaisselle.
Pour conserver la propreté de votre cuiseur à riz, nous vous conseillons de le nettoyer le jour même qu’il a
été utilisé. Il est également recommandé de le nettoyer régulièrement.
Le cuiseur à riz devrait être nettoyé le jour même de son utilisation an d’éliminer les odeurs de cuisson
restantes. (Voir p.87.)
Nettoyage et entretien
Remarque
● Avant de procéder au nettoyage, assurez-vous de débrancher la che électrique et de laisser le cuiseur à
riz, le récipient intérieur, le couvercle intérieur et le bouchon vapeur se refroidir.
● Lorsque vous nettoyez le cuiseur à riz avec du détergent, n’utilisez qu’un détergent de cuisine standard,
conçu pour la vaisselle et les ustensiles de cuisine.
● Nettoyez avec une éponge douce et un chiffon.
● Rincez soigneusement les pièces puisque le détergent restant sur celles-ci pourrait entraîner une
détérioration et une décoloration du matériau des pièces, comme dans le cas de la résine.
Pièces à nettoyer après chaque utilisation
Nettoyez à l’aide d’une éponge douce imbibée
1
d’eau du robinet ou d’eau tiède.
Récipient intérieur
Tasse à
mesurer
Couvercle intérieur
Spatule
Plateau de
cuisson
Louche
Essuyez l’eau avec un linge sec et séchez toutes
2
les pièces complètement.
Remarque
● Ne nettoyez pas le récipient intérieur avec le côté abrasif
d’une éponge pour gros travaux. Cela pourrait endommager
le revêtement à base de résine uorocarbonée.
Ne pas utiliser le côté
abrasif d’une éponge
pour gros travaux.
● Ne pas faire la vaisselle, etc., à l’intérieur du récipient
intérieur. Aussi, ne pas placer le récipient intérieur à l’envers
sur le dessus de la vaisselle, etc., pour le sécher. Cela peut
endommager le revêtement à base de résine uorocarbonée
ou causer son écaillage.
82
Page 83

Ces pièces peuvent être lavées sous l’eau courante.
Nettoyez à l’aide d’une éponge douce imbibée
1
d’eau du robinet ou d’eau tiède.
Essuyez l’eau avec un linge sec et séchez toutes
2
les pièces complètement.
Remarque
Bouchon vapeur
(peut être désassemblé
en deux pièces. Voir
p.86 à 87.)
Pièces à nettoyer dès qu’elles deviennent sales
Capteur
central
Bouton de
verrouillage
Couvercle
Plaque
chauffante
Partie
supérieure
du boîtier
Cordon
d’alimentation
Fiche
électrique
● Ne lavez pas les pièces selon les façons qui suivent car cela
peut les déformer.
• Laver avec de l’eau chaude
• Trempage
• Lavez le récipient intérieur chaud avec de l’eau courante
immédiatement après la cuisson du riz
● Nettoyez toujours le bouchon vapeur après la cuisson de
grains (amarantes, etc.). Le bouchon vapeur peut s’obstruer
et entraîner des problèmes, comme un blocage du couvercle,
susceptible d’entraîner de mauvais résultats de cuisson.
Intérieur et extérieur du cuiseur à riz
Mouillez une serviette ou un chiffon, essorez l’excès d’eau,
puis essuyez.
Capteur central
Retirez le riz brûlé et tout autre grain de riz collé.
Si des éléments collés sont difciles à enlever, utilisez du papier
abrasif disponible sur le marché (grain no 320 ou similaire), puis
mouillez une serviette ou un chiffon, essorez l’excès d’eau, puis
essuyez.
Autour de la partie supérieure du boîtier et du bouton de
verrouillage
Retirez les grains de riz ou les autres particules d’aliments collés.
Français
Le cordon d’alimentation et la che
électrique
Remarque
● Ne laissez pas d’eau pénétrer à l’intérieur du cuiseur à riz.
● Ne trempez pas le cordon d’alimentation dans l’eau et évitez
de l’éclabousser avec de l’eau. Cela pourrait causer un courtcircuit ou une décharge électrique.
Essuyez avec un chiffon sec.
83
Page 84

Remarque
● Gardez toujours le récipient intérieur et le couvercle propres pour prévenir la corrosion et l’apparition
d’odeurs.
● Ne nettoyez pas le cuiseur à riz ou ses pièces avec du diluant, des produits nettoyants, de l’eau de javel,
un chiffon jetable, une spatule en métal, une éponge à récurer en nylon ou un objet similaire.
● Nettoyez toujours chaque pièce séparément.
● N’immergez pas le bouchon vapeur, la tasse à mesurer, la spatule ou la louche dans l’eau chaude. Cela
pourrait les déformer.
● Ne nettoyez pas le cuiseur à riz ou ses composants au lave-vaisselle. Cela pourrait les déformer.
● Lors du nettoyage du cuiseur à riz avec un détergent, n’utilisez pas de détergent de cuisine alcalin.
Retrait et xation du couvercle intérieur
Retrait du couvercle intérieur
Poussez vers le bas et tirez les bras du couvercle
intérieur vers l’avant pour le retirer.
Couvercle intérieur
Ne tirez pas le joint
du couvercle intérieur.
Fixation du couvercle intérieur
Placez de manière sécuritaire le couvercle intérieur
dans le couvercle comme montré dans la gure ci-
dessous.
(2) Mettre en
place
(1) Mettre en
place
Remarque
● Ne tirez pas le joint du couvercle.
Une fois qu’il est retiré, il ne peut être xé de nouveau. Si le
joint de couvercle est retiré, contactez votre détaillant.
Joint de couvercle
intérieur
Couvercle intérieur
84
Page 85

Retrait et xation du couvercle
Retirez le bouchon vapeur, puis ouvrez complètement le couvercle et tirez-le vers le haut.
Retrait du couvercle intérieur.
1
Retirer le couvercle comme
2
montré dans la gure ci-
dessous.
Pour le xer, effectuez les étapes ci-
dessus en sens inverse.
Remarque
● Comme le dissipateur de chaleur est extrêmement chaud immédiatement après utilisation, attendez jusqu’à
ce que le couvercle se soit assez refroidi avant de le retirer.
Français
85
Page 86

Retrait et xation du bouchon vapeur
Retrait du bouchon vapeur
Fixation du bouchon vapeur
Insérez votre doigt dans
1
l’ouverture du couvercle et
soulevez le bouchon vapeur.
Bouchon vapeur
Remarque
● Faites attention à la vapeur chaude contenue
dans le bouchon vapeur immédiatement après la
cuisson.
Retournez le bouchon vapeur
2
et enlevez le couvercle du
capuchon comme montré dans
la gure ci-dessous.
Fixez le couvercle du capuchon
1
au capuchon.
Couvercle du
capuchon
Corps du capuchon
Alignez ici
pour xer
Poussez le couvercle jusqu’à ce
2
que vous l’entendiez cliqueter.
8686
(2) Ouvrir
(1) Pousser
Cette pièce ne peut
être retirée, n’essayez
pas de l’enlever.
(3) Retirer
Fixez de manière séc u r it a i re
3
le couvercle du capuchon au
corps du capuchon.
Page 87

Installation des joints du bouchon vapeur
Assemblez de manière sécuritaire les joints dans le
bouchon vapeur comme montré dans la gure cidessous. Si ces joints ne sont pas solidement xés,
ils peuvent devenir lâches et entraîner des anomalies
causées entre autres par la libération de vapeur.
Remarque
● Ne retirez pas le joint torique. S’il est retiré, remettez-
le en place de manière sécuritaire.
Si le joint torique est difcile à xer, mouillez-le
légèrement avec de l’eau pour rendre le tout plus
facile à joindre.
Élimination des odeurs
La procédure suivante devrait être effectuée après chaque cuisson, ou si des odeurs deviennent gênantes.
Remarque
● Faites attention au récipient intérieur chaud, au plateau de cuisson, et au cuiseur à riz après le nettoyage.
Les toucher peut entraîner des brûlures.
Cuiseur à riz
Ne pas placer le plateau de cuisson dans le
récipient intérieur.
(si des odeurs persistent dans le cuiseur à riz et/ou dans le plateau de cuisson)
Petit joint
Gros joint
Bouchon
vapeur
Joint
torique
Laissez sécher le cuiseur à riz et toutes
3
ses pièces dans un endroit bien aéré.
Plateau de cuisson
Remplissez le récipient intérieur avec de
1
l’eau à environ 70 à 80 % de sa capacité
Plongez le plateau de cuisson dans l’eau chaude et
laissez tremper pendant environ 1 heure.
maximale, sélectionnez le menu
« Plain » et appuyez sur la touche [Start/
Rinse-free].
Vériez que le témoin Keep Warm soit
allumé et appuyez sur la touche [Cancel].
Français
Remarque
● Si les odeurs deviennent gênantes, ajoutez à l’eau
environ 0,71 oz (20 g) d’acide citrique pour obtenir
une désodorisation plus efcace.
Il sera peut-être impossible de supprimer
complètement certaines odeurs. Dans ce cas,
contactez votre détaillant.
Nettoyez le récipient intérieur, le
2
couvercle intérieur et le bouchon vapeur
avec un détergent de cuisine standard,
puis rincez avec sufsamment d’eau.
8787
Page 88

14
Si le riz est mal cuit
Vériez les éléments suivants si votre riz n’est pas bien cuit ou si vous éprouvez des problèmes avec le
fonctionnement du cuiseur à riz.
Est-ce que la quantité de riz, des
ingrédients et d’eau, ou le pourcentage
Élément à vérier
Problème
Est trop dur ● ● ● ● ● ● ● ●
Le riz cuit
Est trop mou ● ● ● ● ● ● ● ●
Pas assez cuit ● ● ● ● ● ● ●
Dur au centre ● ● ● ● ● ● ●
Est brulé ● ● ● ● ●
Pendant la cuisson
De la vapeur
s’échappe
Le contenu déborde ● ● ●
Le temps de cuisson
est trop long
Page de référence
de riz multigrain étaient corrects?
● ● ●
● ● ● ● ●
60-62,
95
Est-ce que l’on avait fait cuire
plus que la quantité maximale
acceptable?
95 – – 64 – 66
Est-ce que la cuisson a été
faite avec de l’eau ionisée
alcaline (pH 9 ou plus)?
Est-ce que la cuisson a été
faite avec de l’eau dure
comme de l’eau minérale?
Est-ce que le bon menu a été
sélectionné?
Est-ce que la minuterie a été
utilisée?
Est-ce que l’on a appuyé sur la touche [Start/
Rinse-free] après la cuisson sans avoir arrêté la
fonction de maintien au chaud (Keep Warm)?
Y a-t-il des grains de riz brûlés ou des
gouttes d’eau qui collent au dessous du
récipient intérieur ou sur le capteur central?
62,
82-87
Est-ce que le récipient
intérieur est déformé?
– 66 95
Est-ce que le riz a été bien
remué et égrainé?
Y a-t-il eu une panne de
courant prolongée?
Problème
Est trop dur ● ● ● ● ●
Est trop mou ● ● ● ● ● ● ●
Le riz cuit
Pas assez cuit ● ● ●
Dur au centre ● ● ● ●
Est brulé ● ● ● ● ●
Odeur de son de riz ●
Pendant la cuisson
De la vapeur
s’échappe
Le contenu déborde ● ● ● ●
Le temps de cuisson
est trop long
Page de référence
88
Élément à vérier
Y a-t-il des grains de riz qui collent
aux joints ou sur le rebord supérieur
du récipient intérieur, etc.?
● ● ●
●
62,
82-87
Est-ce que le riz (autre que
le riz sans rinçage) a été
sufsamment lavé?
60, 62 62 – –
Est-ce que de l’eau chaude (plus de
95°F [35°C]) a été utilisée pour laver
le riz ou pour ajuster le niveau d’eau?
Est-ce que le riz a été laissé
dans l’eau trop longtemps après
son nettoyage?
nettoyage?
Est-ce que le riz a été laissé
dans une passoire après son
Est-ce que le couvercle a été
bien fermé?
63,
82-87
Est-ce que le riz a été mélangé à d’autres
ingrédients ou à du riz multigrain?
Est-ce que les assaisonnements ont bien
été remués?
60 – – 82-87
Y avait-il beaucoup de grains de
riz concassés?
Est-ce que la cuisson a été
continuée immédiatement après
la cuisson initiale?
Est-ce que le cuiseur à riz et
ses pièces ont été sufsamment
nettoyés?
Page 89

Problème Cause
Un mince lm recouvre le riz. De l’amidon fondu et séché a formé un lm mince comme du papier. Cela n’est pas nocif
Le riz colle au récipient
intérieur.
Élément à vérier
Problème
Le riz qui était gardé au chaud
A une odeur ● ● ● ● ● ● ●
Est décoloré ● ● ● ● ●
Est sec ● ● ● ● ● ●
Est collant ● ● ● ● ● ● ●
Le riz réchauffé est sec ● ● ●
Page de référence
pour votre santé.
Le riz mou et le riz collant peuvent facilement coller au récipient.
Est-ce que la quantité de riz et
d’eau est correcte?
60-62, 9562,
Y a-t-il des grains de riz brûlés
sur le fond extérieur du récipient
intérieur ou sur le capteur central?
82-87
Est-ce que le riz a été bien
remué et égrainé?
66
Y a-t-il des grains de riz qui collent aux
joints, au rebord supérieur du récipient
intérieur ou au couvercle intérieur, etc.?
62,
82-87
le riz sans rinçage) a été
sufsamment lavé?
60, 62 71 69 70 – 95
Est-ce que le riz (autre que
Est-ce que le riz ou les aliments
ont été réchauffés 3 fois ou
plus?
Est-ce que la minuterie a été
réglée plus de 12 heures à
l’avance?
Est-ce que la fonction de maintien au
chaud (Keep Warm) a été utilisée de façon
continue pendant plus de 24 heures?
Est-ce que le riz a été laissé dans
le cuiseur à riz avec la fonction de
maintien au chaud désactivée?
prolongée?
Y a-t-il eu une panne de courant
Français
Est-ce que d’autres aliments que
le riz blanc ou le riz sans rinçage
Élément à vérier
Problème
Le riz qui était gardé au chaud
A une odeur ● ● ● ● ● ●
Est décoloré ● ● ● ● ●
Est sec ● ● ● ● ●
Est collant ● ● ● ●
Le riz réchauffé est sec ● ●
Page de référence 70 70, 71 – 70 70 82-87 71 76, 81, 87
étaient maintenus au chaud?
Est-ce que la quantité de riz
maintenu au chaud ou réchauffé
était inférieure à la quantité
minimale requise?
Est-ce que les grains de riz se sont
regroupés sur les surfaces internes
du récipient intérieur (moins de riz
au centre du récipient)?
Est-ce que du riz froid a été
ajouté?
Est-ce qu’une spatule a été
laissée dans le récipient
intérieur?
nettoyés?
Est-ce que le cuiseur à riz et
ses pièces ont été sufsamment
Avez-vous tenté de réchauffer
du riz venant tout juste d’être
cuit et encore chaud?
Est-ce que les odeurs ont été
enlevées après la cuisson
normale ou celle du pain?
89
Page 90

15
Vériez les points suivants lorsque vous éprouvez un problème avec la cuisson simultanée d’aliments en
utilisant le plateau de cuisson.
Problème
Le riz cuit
Lorsque « Synchro-Cooking » donne pas de mauvais résultats
Avez-vous utilisé
plus d’ingrédients et
d’assaisonnements que la
quantité indiquée dans le
Élément à vérier
Est trop dur ● ● ● ●
Est trop mou ● ● ● ● ●
Pas assez cuit ● ● ● ●
Dur au centre ● ● ●
Est brulé ● ● ● ● ●
A une odeur ● ● ● ● ●
« COOKBOOK »?
Est-ce que les ingrédients ont
été inégalement répartis dans le
plateau de cuisson?
Avez-vous utilisé plus ou moins
d’ingrédients que les quantités
maximales et minimales
recommandées?
Est-ce qu’un menu autre que
« Synchro-Cooking » a été
utilisé?
Est-ce qu’une recette autre
que celles incluses dans le
« COOKBOOK » a été utilisée?
Est-ce qu’il y a eu une panne de
courant pendant la cuisson?
Est collant ● ● ● ● ●
Les aliments cuits
Est trop dur ● ● ● ● ●
Est trop mou ● ● ● ● ●
N’est pas
complètement
chauffé
Déborde dans le riz ● ● ● ●
Pendant la cuisson
De la vapeur
s’échappe
Le contenu déborde ● ● ● ● ●
Le temps de cuisson
est trop long
Page de référence – 73 73 – – 95
● ● ● ● ● ●
● ● ● ● ●
● ● ● ● ●
90
Page 91

Lorsque « Slow Cook » (Cuisson lente) ou « Bread »
16
Vériez les éléments suivants si vous éprouvez un problème avec la nourriture cuite, la pâte levée, ou le pain
cuit, etc.
Problème
Les aliments cuits
(Cuisson du pain) donne de mauvais résultats
Est-ce que les bons ingrédients et les
quantités adéquates ont été utilisés?
Avez-vous ajouté plus d’ingrédients que
la quantité maximale recommandée?
Avez-vous ajouté moins d’ingrédients
que la quantité minimale recommandée?
Est-ce que les ingrédients ont bien été pétris?
Est-ce qu’un mauvais temps de levée a été conguré?
Est-ce que la pâte a assez levé?
Est-ce que la pâte a trop levé?
Est-ce que la pâte a levé immédiatement sans être restée dans un
réfrigérateur (est-ce que la température de la pâte était trop basse)?
Est-ce que le temps de cuisson a été
trop court?
Est-ce que le temps de cuisson a été
trop long?
Est-ce que seulement un côté a cuit?
Élément à vérier
*2
*1
Ne bout pas ● ● ● ● ● ●
Le contenu déborde ● ● ●
Est-ce que le pain cuit est demeuré dans le cuiseur à riz?
Y a-t-il des grains de riz brûlés ou d’autres restants
de grains de riz, ou des gouttes d’eau qui collent au
dessous du récipient intérieur ou sur le capteur central?
Est-ce que le récipient intérieur est déformé?
Y a-t-il des grains de riz brûlés ou d’autres
grains de riz qui sont restés collés aux joints ou
au rebord supérieur du récipient intérieur, etc.?
Est-ce que le couvercle a été bien
fermé?
Est-ce qu’il y a eu une panne de courant
pendant la cuisson?
Français
Tout le liquide s’est
évaporé
Ne lève pas/Ne lève
Pâte levée
pas sufsamment
A trop levé ● ● ●
Est collant ● ● ●
Petit et dur ● ● ● ●
Céréale secondaire
et sèche
Collant à l’intérieur (le
pain n’est pas cuit)
Colle au couvercle
intérieur (a trop levé)
Pain cuit
Brûlé ● ● ● ●
N’est pas brun à
l’extérieur
Odeurs ● ●
Ridé ● ● ●
D’un brun inégal à
l’extérieur
● ● ●
● ● ● ● ● ● ●
● ● ●
● ● ● ● ● ●
● ●
● ● ● ●
●
Collant à l’extérieur ●
Page de référence 75, 77 75 77-79 – 75, 79 81 80
*1 La pâte n’a pas assez levé si sa température est basse, si les mauvais ingrédients ou les mauvaises proportions sont utilisées, ou si le
temps de levée est trop court.
*2 La pâte a trop levé si sa température est élevée, si les mauvais ingrédients ou les mauvaises proportions sont utilisées, ou si le temps de
levée est trop long.
62,
82-87
62,
–
82-87
62,
82-87
95
91
Page 92

17
Dépannage
Vériez les points suivants avant de faire appel au service de réparation.
Symptôme Élément à vérier Mesure à prendre
Le riz n’a pas cuit.
La nourriture n’a pas cuit.
Le riz n’était pas complètement cuit après le
temps de cuisson programmé.
La minuterie ne peut pas être réglée. Est-ce que l’afcheur indique la bonne heure
L’afcheur est brouillé. Y a-t-il des grains de riz brûlés ou d’autres
Le réchauffage est désactivé. Une alarme (3 bips) va sonner si vous
Il est possible d’entendre un son pendant la
cuisson, le réchauffage ou lorsque la fonction
de maintien au chaud (Keep Warm) est
activée.
Une alarme (3 bips) va sonner si vous
appuyez sur la touche [Start/Rinse-free] ou
sur la touche [Keep warm].
Un signal sonore (3 bips) retentit lorsque la
minuterie est activée.
De l’eau ou du riz a pénétré à l’intérieur du
cuiseur à riz.
Vous ne pouvez accéder au mode de réglage
de l’horloge à l’heure actuelle même si vous
appuyez sur les touches [Hour] ou [Min].
Le témoin Keep Warm clignote. Est-ce que le menu « Oatmeal » ou « Bread »
Le temps de maintien au chaud écoulé
clignotera sur l’afcheur lorsque vous
appuyez sur la touche [Hour].
Est-ce que la che électrique est branchée
correctement à une prise?
Est-ce que l’afcheur indique la bonne heure
actuelle?
Consultez la section « Le temps de cuisson est trop long » sous « Si le riz est mal cuit » et
prenez les mesures correctrices nécessaires.
actuelle?
Est-ce que « 0:00 » clignote sur l’afcheur? Réglez l’horloge à l’heure actuelle.
Laquelle des options parmi « Quick »,
« Synchro-Cooking », « Mixed », « Bread »,
ou « Slow Cook » a été choisie?
Une heure non valide a-t-elle été entrée? Entrez une heure valide pour la minuterie.
grains de riz qui sont restés collés aux joints
ou au rebord supérieur du récipient intérieur?
Est-ce que la surface extérieure du récipient
intérieur est mouillée?
appuyez sur la touche [Start/Rinse-free].
Est-ce que le témoin Keep Warm est éteint? Appuyez sur la touche [Keep Warm] et
Entendez-vous un bourdonnement? La ventilation est en marche.
Entendez-vous un ronement ou un
gazouillis?
Avez-vous entendu un bruit complètement
différent de ceux mentionnés ci-dessus?
Est-ce que le récipient intérieur se trouve
dans le cuiseur à riz?
Un signal sonore retentira si vous ne faites pas fonctionner le cuiseur à riz dans un délai
d’environ 30 secondes après avoir appuyé sur la touche [Timer]. Poursuivez votre réglage de
la minuterie.
L’eau ou le riz qui se trouve à l’intérieur du cuiseur à riz peut entraîner des anomalies.
Contactez votre détaillant.
L’heure ne peut pas être réglée pendant la cuisson, lorsque la fonction de maintien au chaud
est activée, lorsque la minuterie est utilisée ou pendant le réchauffage.
a été conguré?
Est-ce que la fonction de maintien au chaud a
été utilisée de façon continue pendant plus de
24 heures?
Est-ce que la fonction de maintien au chaud
(Keep Warm) a été utilisée de façon continue
pendant plus de 6 heures lors de l’utilisation
du mode de cuisson lente « Slow Cook »?
Insérez la che électrique complètement dans
la prise.
Réglez l’horloge à l’heure actuelle.
Réglez l’horloge à l’heure actuelle.
La minuterie n’est pas disponible lors de
l’utilisation de ces modes de cuisson.
Enlevez tout le riz restant.
Essuyez avec un chiffon sec.
Le riz est froid. Le riz au-dessous d’environ
131°F (55°C) ne peut être réchauffé de
nouveau.
vériez que le témoin Keep Warm s’allume.
Puis, appuyez de nouveau sur la touche
[Start/Rinse-free].
Il ne s’agit pas d’une anomalie.
Le IH est en marche.
Il ne s’agit pas d’une anomalie.
Contactez votre détaillant.
Placez le récipient intérieur dans le cuiseur à
riz.
Le gruau peut devenir pâteux ou le pain peut
rapidement devenir collant s’ils sont laissés
dans le cuiseur à riz. Servez-les dès que
possible.
Le temps de maintien au chaud écoulé
clignotera sur l’afcheur lorsque cette fonction
est en marche depuis plus de 24 heures.
Le temps de maintien au chaud écoulé
clignotera sur l’afcheur lorsque cette fonction
est en marche depuis plus de 6 heures.
Page de
référence
63
94
88
94
69
62,
82-87
71
69
58
–
63
69
–
94
67
70
76
92
Page 93

Symptôme Élément à vérier Mesure à prendre
L’heure actuelle, les réglages préprogrammés
de la minuterie, et le temps de maintien au
chaud écoulé sont perdus lorsque la che
électrique de l’appareil sera débranché.
Le couvercle ne s’ouvrira pas ou s’ouvre
pendant la cuisson.
Rien ne se passe quand vous appuyez sur
une touche.
Des étincelles jaillissent de la che électrique. Le branchement/débranchement de la che électrique peut parfois provoquer de petites
Il ya une odeur de plastique. De telles odeurs peuvent se dégager lorsque le cuiseur à riz est utilisé pour la première fois,
Il y a des rayures ou des ondulations sur des
pièces en plastique.
L’on voit des bulles sortir des évents de
vapeur du bouchon vapeur pendant la
cuisson.
Le couvercle ne peut être fermé. Est-ce que le couvercle intérieur est xé? Fixez le couvercle intérieur.
Les aliments collent au couvercle intérieur
pendant la cuisson simultanée.
Est-ce que « 0:00 » clignote sur l’afcheur
quand la che électrique est de nouveau
branchée?
Des grains de riz sont-ils collés sur la partie
supérieure du boîtier, le joint de couvercle ou
autour du bouton de verrouillage?
Est-ce que la che électrique est branchée
correctement à une prise?
Est-ce que le témoin Keep Warm est allumé? Appuyez sur la touche [Cancel] pour éteindre
étincelles électriques. C’est spécique à l’option IH et donc, ce n’est pas un mauvais
fonctionnement.
mais elles devraient disparaître avec le temps et l’utilisation du cuiseur.
De telles rayures et vagues sont produites lors du moulage de la résine. Elles n’affectent en
rien la performance du cuiseur à riz.
C’est à cause de l’ébullition et ce n’est donc pas un mauvais fonctionnement.
Lorsque vous cuisez des aliments qui augmentent de volume pendant leur chauffage, tel que
des œufs et des aliments similaires, certains d’entre eux peuvent coller au couvercle intérieur.
Si ce phénomène est trop important, réduisez la quantité des aliments à cuire.
La pile au lithium est épuisée.
Contactez votre détaillant.
Enlevez tout le riz restant.
Insérez la che électrique complètement dans
la prise.
la fonction de maintien au chaud (Keep
Warm), puis essayez l’opération à nouveau.
Page de
référence
82-87
58
62,
63
63
–
–
–
–
84
–
Français
Lorsque ces indications s’afchent
Afcheur Mesure à prendre
« Err » apparaît sur l’afcheur et un
bruit d’alarme de longue durée ou
continu se déclenche.
Si le cuiseur à riz est mis sur le tapis ou à un endroit où la température
ambiante est élevée, l’entrée et la sortie d’air peuvent être bloquées,
causant ainsi une élévation de la température intérieure. Dans ce cas,
le cuiseur à riz peut ne pas répondre à toute pression de touches.
Ref. : Résoudre le problème selon la procédure suivante.
(1) Débranchez la che électrique.
(2) Déplacez le cuiseur à riz à un endroit où l’entrée et la sortie d’air ne
sont pas bloquées et que la température ambiante est basse.
(3) Insérez de nouveau la che électrique dans la prise électrique et
faites fonctionner les touches.
Si le cuiseur à riz ne répond pas aux fonctionnements de touches,
il s’agit d’un mauvais fonctionnement concernant le cuiseur à riz.
Débranchez la che électrique et contactez votre détaillant.
Pièces en plastique
Les pièces en plastique qui entrent en contact avec la chaleur ou la vapeur se détérioreront avec le temps.
Dans ce cas, contactez votre détaillant.
Page de
référence
–
93
Page 94

Réglage de l’heure
L’heure actuelle est afchée en format 12 heures.
L’heure ne peut pas être réglée pendant la cuisson, lorsque la fonction de maintien au chaud est activée,
lorsque la minuterie est utilisée ou pendant le réchauffage.
Exemple : Modier l’heure actuelle de « 9:30 » à « 9:35 »
Branchez la che électrique à
1
une prise.
Afchez le mode de
2
réglage de l’heure.
Appuyez sur la touche
[Hour] ou [Min] pour afcher
.
Marche
Réglez l’horloge à
3
l’heure actuelle.
Réglez l’heure avec la
touche [Hour] et les minutes
avec la touche [Min].
Maintenez la touche correspondante
enfoncée pour changer l’heure plus
rapidement.
Une fois que vous avez
4
terminé le réglage de la
minuterie, appuyez sur
la touche [
L’heure actuelle est réglée.
s’éteindra et « : » clignotera sur l’afcheur.
Remarque
].
Clignote
9494
● Le réglage de l’heure actuelle peut varier
d’environ 30 à 120 secondes par mois de l’heure
réelle en fonction de la température ambiante et
des conditions d’utilisation.
Page 95

Spécications techniques
Dimension du cuiseur Cuiseur de 1,0 L (5,5 tasses) Cuiseur de 1,8 L (10 tasses)
Source d’alimentation 120 V, 60 Hz
Puissance nominale (W) 1 080 1 198
Plain 0,18 à 1,0
Ultra 0,18 à 1,0
Quick 0,18 à 1,0
Capacité de cuisson (L)
Synchro-Cooking 0,18 à 0,36
Jasmine 0,18 à 1,0
Brown 0,18 à 0,63
Mixed 0,18 à 0,72
Sweet 0,18 à 0,54
Porridge Hard 0,09 à 0,18
Soft 0,09
Oatmeal (Steel cut) 0,18 à 0,45
Quantité maximum de pain (oz) Farine enrichie : 7,05 (200 g) Farine enrichie :10,58 (300 g)
Dimensions
extérieures
(pouces)
Poids (oz) 158,7 (4,5 kg) 201,0 (5,7 kg)
Largeur 10,2 (26,0 cm) 11,3 (28,8 cm)
Profondeur 13,9 (35,4 cm) 15,2 (38,6 cm)
Hauteur 8,4 (21,3 cm) 9,8 (25,0 cm)
(1 à 5,5 tasses [5,29 à 29,10 oz])
(1 à 5,5 tasses [5,29 à 29,10 oz])
(1 à 5,5 tasses [5,29 à 29,10 oz])
(1 à 2 tasses [5,29 à 10,58 oz])
(1 à 5,5 tasses [5,29 à 29,10 oz])
(1 à 3,5 tasses [5,29 à 18,52 oz])
(1 à 4 tasses [5,29 à 21,16 oz])
(1 à 3 tasses [5,29 à 15,87 oz])
(0,5 à 1 tasse [2,65 à 5,29 oz])
(0,5 tasse [2,65 oz])
(1 à 2,5 tasses [5,29 à 13,23 oz])
(2 à 10 tasses [10,58 à 52,91 oz])
(2 à 10 tasses [10,58 à 52,91 oz])
(2 à 10 tasses [10,58 à 52,91 oz])
(2 à 4 tasses [10,58 à 21,16 oz])
(2 à 10 tasses [10,58 à 52,91 oz])
(2 à 6 tasses [10,58 à 31,74 oz])
(2 à 6 tasses [10,58 à 31,74 oz])
(2 à 5 tasses [10,58 à 26,48 oz])
(0,5 à 2 tasses [2,65 à 10,58 oz])
(0,5 à 1,5 tasses [2,65 à 7,94 oz])
(1 à 3 tasses [5,29 à 15,87 oz])
0,36 à 1,8
0,36 à 1,8
0,36 à 1,8
0,36 à 0,72
0,36 à 1,8
0,36 à 1,08
0,36 à 1,08
0,36 à 0,9
0,09 à 0,36
0,09 à 0,27
0,18 à 0,54
Français
Remarque
● Une tasse pleine de riz blanc pèse environ 5,29 oz (150 g).
Lors d’une panne de courant
Si une panne de courant se produit, le cuiseur à riz reprendra ses fonctions normales une fois que le courant est rétabli.
Indiquez quand la panne
de courant se produit
Lorsque la minuterie
est activée
Pendant la cuisson
(réchauffage)
Pendant le
fonctionnement du
maintien au chaud
Une fois que le courant est rétabli
La minuterie reprendra son fonctionnement. (Si la panne de courant dure longtemps et que
l’heure de départ programmée a été dépassée au moment du retour du courant, le cuiseur à riz
commencera la cuisson immédiatement.)
Le cuiseur à riz reprendra la cuisson (réchauffage).
La cuisson peut ne pas être effectuée entièrement.
La fonction de maintien au chaud (Keep Warm) est annulée lors d’une panne de courant durant plus
de 30 minutes.
Achat de pièces non durables et d’accessoires optionnels
Les joints devront être remplacés avec le temps. Bien que leur degré d’usure variera selon les conditions d’utilisation,
ces joints s’useront inévitablement avec l’usage. Pour les taches et les odeurs tenaces ainsi que les dommages
importants, contactez votre détaillant.
Avec le temps, le revêtement à base de résine uorocarbonée du récipient intérieur peut s’user et s’écailler. (Voir p.56.)
95
Page 96

96
Page 97

目錄
安全注意事項
1
各部名稱及用途
2
從選單可選的功能與特點
煮出美味可口米飯的秘訣
煮飯前的準備
3
煮飯方法
4
煮飯所需的時間
米飯煮好後
5
燕麥穀物的炊煮方法(“
6
定時煮飯的預約煮熟方法
7
保溫
8
9
10
11
12
13
14
15
16
17
................................................................................................................................................... 115
再次加熱的方法
米飯與料理同時烹調(“
烹調方法(“
麵包的製作方法(“
清潔保養方法
無法將飯煮好時
覺得“
Synchro-Cooking
覺得“
Slow Cook
出現故障時
出現下列顯示訊息時
時間的調整方法
規格
................................................................................................................................................... 138
停電時
消耗品與另售品的購買方法
..............................................................................................................................................138
....................................................................................................................................98
.............................................................................................................................102
.................................................................................................................................107
..........................................................................................................................................109
.............................................................................................................................110
......................................................................................................................................111
............................................................................................................................. 116
Slow Cook
.................................................................................................................................126
............................................................................................................................. 131
......................................................................................................................................135
............................................................................................................................. 137
...........................................................................................................104
...........................................................................................................105
Oatmeal
”功能選單)
.......................................................................112
...........................................................................................................113
Synchro-Cooking
”功能選單)
Bread Fermentation
”或“
”做不好時
Bread
.......................................................................................... 133
”做不好時
”功能選單)
....................................................... 118
........................................................................................120
”、“
Bread Bake
”功能選單)
............................122
............................................................................... 134
.................................................................................................................... 136
....................................................................................................... 138
中 文
97
Page 98

1
使用前請仔細閱讀並遵守。
•
此處所顯示的注意事項旨在防止對使用者或他人造成人身傷害或財產損害。屬於有關安全方面的重要內容,
請務必遵守。
•
請勿撕下主體上黏貼的有關注意事項的貼紙。
安全注意事項
透過以下內容,將因疏忽注意事項而錯誤操作,導致的危害及損
害程度,加以區分說明。
表示進行假設錯誤操作時,可能導致使
用者死亡或重傷
告
警
表示進行假設錯誤操作時,可能會造成
使用者受到傷害
意
注
所謂重傷是指由於失明、受傷、燙傷(高溫、低溫)、觸電、骨
*1
折、中毒等留下後遺症,以及需要住院治療甚至長期複診。
所謂傷害是指不需要入院治療或長期複診的燙傷或觸電等。
*2
所謂物資損害是指波及到房屋、家產以及家畜、寵物等的擴大
*3
性損害。
的內容。
*1
的內容。
*2
,或者出現物資損害
警
*3
告
一般安全注意事項
不可改造。請勿讓非維修技術人員對本
產品進行分解或維修。
可能會產生火災、觸電或受傷。
圖形符號的說明
符號表示警告、注意。具體
注意內容會在圖形符號裡或者
旁邊用圖片或文字表示。
符號表示該行為屬於禁止行
為。具體禁止內容會在圖形符
號裡或者旁邊用圖片或文字表
示。
符號表示強制行為或指示行
為的內容。具體指示內容會在
圖形符號裡或者旁邊用圖片或
文字表示。
致使用本產品的用戶
請勿讓孩子單獨使用,也不要在幼兒可
觸摸範圍內使用。
可能會出現燙傷、觸電或受傷。
98
發生異常或故障時,請立即停止使用。
如果繼續使用,可能會引發火災、觸電
或人身傷害。
異常、故障範例
<
•
使用過程中,電源線或電源線插頭異常
發熱。
•
電子鍋冒煙或出現焦糊氣味。
•
電子鍋的某個部位出現破裂、鬆動或晃
動。
•
內鍋變形。
•
出現其他異常或故障。
立即拔下電源線插頭,請洽詢原購買處
進行檢查、維修。
>
請勿讓身障人士或無法充分理解使用方
法者單獨使用本產品。
使用時必須要有可充分理解使用方法者
在一旁確認後陪同使用。
可能會出現燙傷、觸電或受傷。
本產品的用途
請 勿 將 產 品 用 於 使 用 說 明 書(隨 附 的
COOKBOOK
的其他用途。
如果有蒸氣或米飯、食材噴出,則可能
會造成燙傷或受傷。
〈禁止進行的烹調範例〉
•
將食材或調味料放入塑料袋中進行加熱
的烹調方法。
•
將烹飪紙取代鍋蓋使用的烹調方法。
烹調指南)所記載用途以外
Page 99

警
告
電源
請勿使用交流電
會造成火災或觸電。
請單獨使用額定
如果與其他器具並用,多孔插座可能出
現異常發熱現象,恐導致著火。
120V
以上的插座。
15A
以外的電源。
電源線、電源線插頭
電源線如果出現破損,禁止繼續使用。
此外,請勿破壞電源線。
(加工 、過度彎 曲、靠近 高溫部位 、拉
扯、扭動、捆束、裝載重物、夾入物體
等)
會造成火災或觸電。
電源線插頭如果附著了灰塵,請立即擦
拭乾淨。
可能造成火災發生。
將電源線插頭牢固地插入到根部。
可能會導致觸電、短路、冒煙或著火。
電源線或電源線插頭受到損傷,或插入
插座時感到不牢固時禁止繼續使用。
可能會造成觸電或短路、著火。
請勿在手潮濕的情況下拔插電源線插頭。
有可能會觸電或受傷。
操作本產品時
請勿用水浸泡或淋濕本產品。
否則可能引起短路或觸電。
請勿在吸、排氣孔或空隙間插入異物,
例如別針、鐵絲等金屬物體。
否則可能由於觸電或異常情況對人身產
生傷害。
排氣孔
吸氣孔
開始烹調時
未安裝內鍋的情況下不可使用料理盤。
可能造成著火、冒煙或燙傷。
烹調中、烹調後
煮飯過程中,請勿打開鍋蓋。
否則可能會造成燙傷。
請勿將臉或手靠近蒸氣孔蓋或蒸氣孔。
否則可能會造成燙傷。特別是注意不要
讓嬰幼兒碰觸。
中 文
請勿讓蒸氣對準電源線插頭。
可能引發火災、觸電或著火。在滑動式
桌子上使用時,請勿在蒸氣可影響範圍
內使用電源線插頭。
99
Page 100

注
意
一般安全注意事項
請小心操作。
如果跌落或加諸較強撞擊,可能造成傷
害或故障。
請勿在其他產品上使用本產品的料理盤。
可能造成火災或燙傷。
使用中觸摸內鍋提把時,要使用連指手
套,而不要用手直接觸摸。
因為已經變成高溫,會造成燙傷。
內鍋提把
使用醫療用心律調節器等的人士,使用
本產品時,請先向專科醫師諮詢後再行
使用。
本產品的操作可能對心律調節器造成影
響。
使用環境
請勿在蒸氣可能接觸到控制面板的狹小
空間中使用本產品。
以免因蒸氣熱度,而導致控制面板變形
或 電 子 鍋 主 體 損 傷 、 變 色 、 變 形 、 故
障。在滑動式桌子上使用時,請將桌子
完全拉出,避免產品接觸到蒸氣。
請勿在可能阻塞吸、排氣孔的場所,及
室溫較高的場所使用本產品。
請勿在產品上方放置毯子、塑膠袋等物
品。
否則可能導致觸電或漏電,乃至引發火
災或產品故障。
請勿在IH調理器的上方使用本產品。
可能會導致產品故障。
請勿在鋁板、電熱毯上使用本產品。
鋁材會發熱,進而產生煙霧或造成火災。
電源線、電源線插頭
必須握住電源線插頭拔下。
否則可能導致觸電或短路,從而導致起
火。
100
請勿在不穩定場所、耐熱性差的桌子或
地毯上面使用。
可能導致火災,或傷到桌子、地毯。
請勿在靠近牆壁或家具的位置使用。
蒸 氣 或 者 熱 度 可 能 會 造 成 損 傷 、
變 色 或 變 形 ,
11.8inch/30cm
納櫃等時,請注意切勿在蒸氣無法散發
的環境中使用。
請勿在承重 強度不足的 邊桌(滑 動式桌
子)使用本產品。
以免產品掉落造成受傷、燙傷或故障。
使用前請確認承重強度足夠。
請勿在可能沾水的位置或火源附近使用。
否則可能導致觸電、漏電或主體變形,
乃至引發火災或產品故障。
因 此 請 離 牆 壁 或 家 具
以上。使用廚房專用收
11.8inch/30cm
以上
禁止同時使用多孔插座。
否則可能會導致火災。
操作本產品時
不可使用非專用內鍋。
可能造成過熱或異常情況。
不可空燒。
可能造成故障、過熱或異常情況。
 Loading...