

Page 1

Contents
1. INTRODUCTION .............................................................................. 2
2. EQUIPMENT CHECKLIST ............................................................ 2
3. INSERTING/REPLACING BATTERIES ....................................... 2
4. OPENING HEADSTART COMPUTER..........................................3
5. MOUSE ............................................................................................... 3
6. THE LCD SCREEN ........................................................................... 4
7. KEYBOARD ....................................................................................... 4
8. CHOOSING A CATEGORY............................................................. 5
9. CHOOSING AN ACTIVITY ............................................................. 6
10. ACTIVITIES
1. SPELLING Category .................................................................... 7
2. VOCABULARY Category ............................................................. 8
3. WORD GAMES + Category..........................................................9
4. MATH Category .......................................................................... 11
5. NUMBER GAMES Category ..................................................... 12
11. EXPANSION CARTRIDGES ......................................................... 13
12. TROUBLESHOOTING ................................................................... 13
13. CARE AND MAINTENANCE ........................................................ 14
14. 90-DAY LIMITED WARRANTY ................................................... 14
1
Page 2
1. INTRODUCTION
Headstart Computer teaches basic learning skills with 30 activities, a builtin mouse, over 450 vocabulary words and an onscreen menu … all in a unique
laptop style! Headstart Computer focuses on 5 major educational
categories: Spelling, Vocabulary, Math, Word Games and Number Games.
Your child can learn and have fun at the same time!
2. EQUIPMENT CHECKLIST
- Headstart Computer unit
- Mouse is attached to the unit
- Instruction Manual
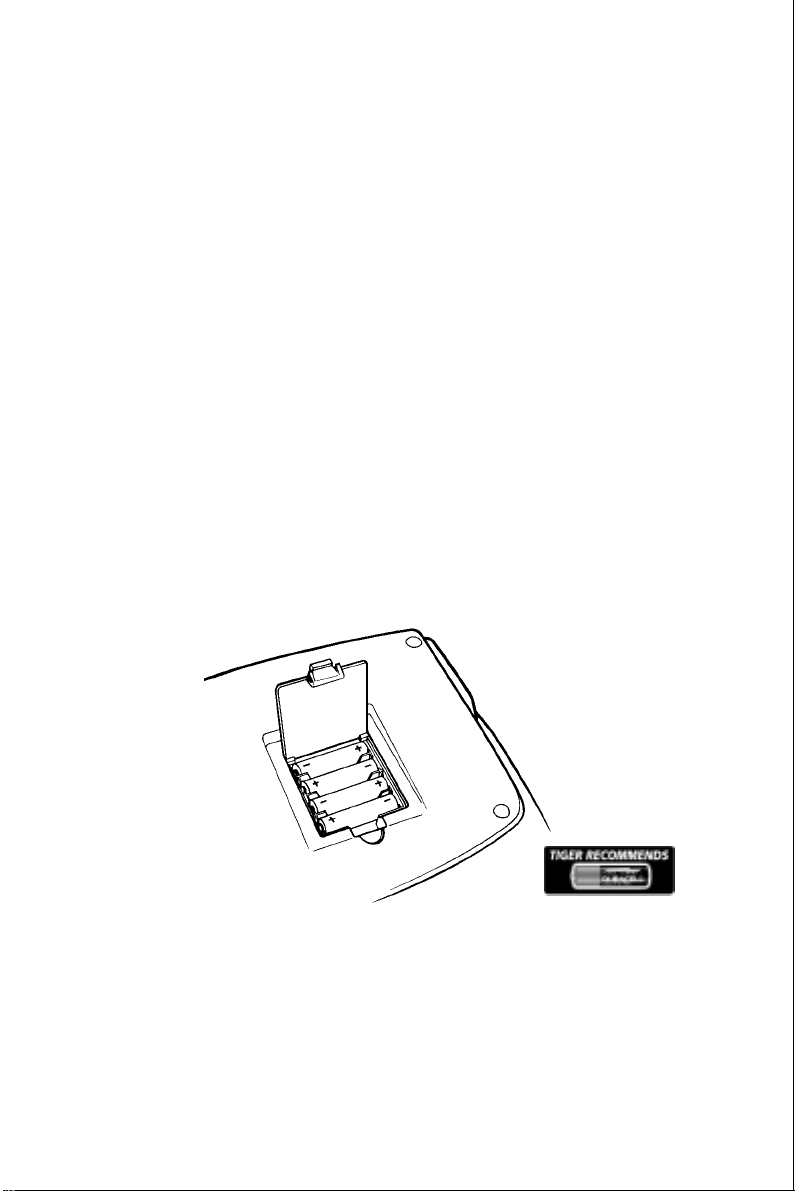
3. INSERTING/REPLACING BA TTERIES
IMPORTANT:
Battery installation should be done by an adult. Always install the batteries
correctly according to the positive (+) and negative (-) signs on the batteries.
When inserting/replacing batteries, make certain that the unit is turned OFF.
- Place the unit face down on a flat surface. Lift the battery compartment
cover.
- Insert 4 “AA” / LR6 size batteries, as shown below.
- Close the battery compartment cover, making certain that it snaps shut.
To ensure proper function of Headstart Computer :
- Do not mix old and new batteries.
- Do not mix alkaline, standard or rechargeable batteries.
- Non-rechargeable batteries are not to be recharged.
- Rechargeable batteries are to be removed from the unit before being
charged.
- Rechargeable batteries are only to be charged under adult supervision.
2
Page 3
- Only batteries of the same or equivalent type as recommended are to be
used.
- Batteries are to be inserted with the correct polarity.
- Exhausted batteries are to be removed from the unit.
- The supply terminals are not to be short-circuited.
- Alkaline batteries are recommended.
- Remove all batteries if you will not use the unit for an extended period of
time.
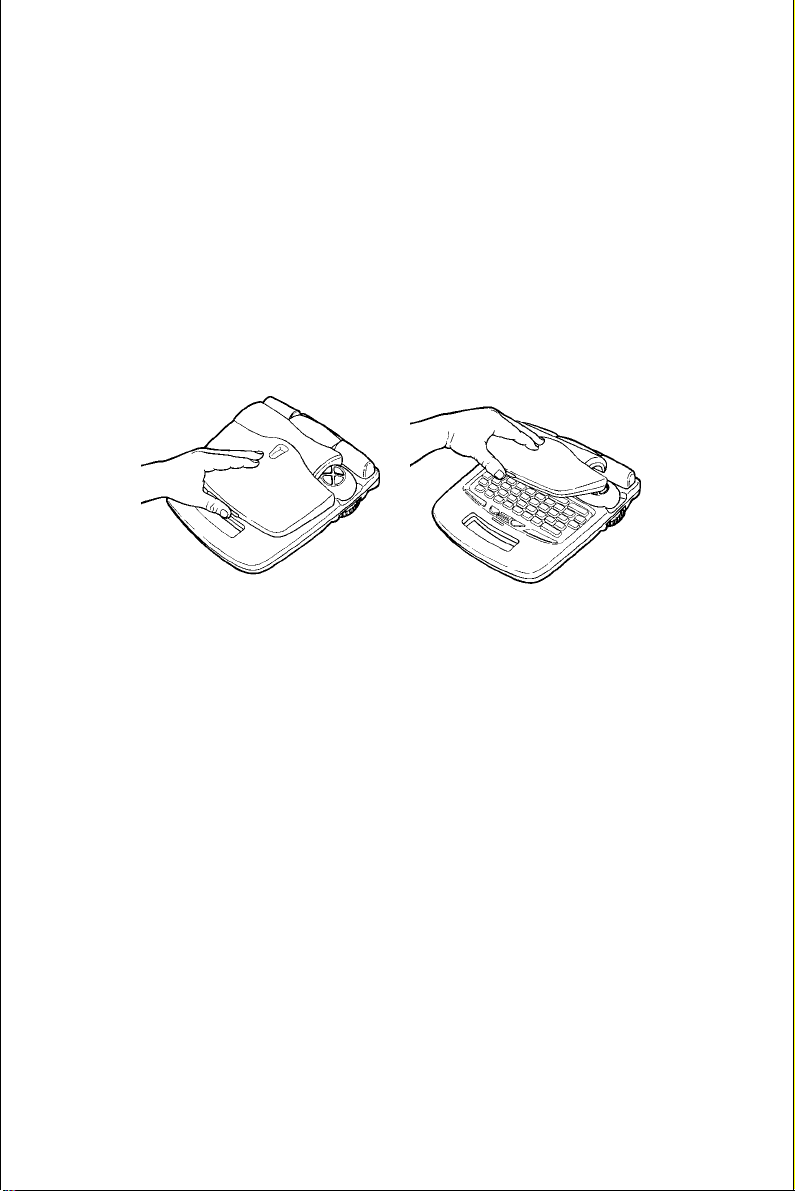
4. OPENING HEADSTART COMPUTER
To open Headstart Computer , press the orange release button on the front of
the cover (see illustration below). Lift the top of the unit to reveal the keyboard
and screen.
5. MOUSE
Headstart Computer includes a functioning mouse. The mouse is
permanently connected to the unit. Do not attempt to disconnect the mouse as
this will cause damage to the mouse.
To release the mouse from the unit, gently pull out the mouse from the storage
area. The cable is approximately 20” long.
To retract the mouse and place it back into the storage area, locate the green
dial found on the right side of the unit. Turn the dial in a clockwise direction
until the entire mouse cable is rewound and the mouse fits into the storage area
on the unit.
To use the mouse, make certain the mouse rests on a flat surface.
The mouse has 4 directional-arrow keys and an ENTER key. The mouse will
work in every activity in which the arrow keys would be used. Any time you
would use the arrow keys on the keyboard, you could use the mouse arrow
keys instead.
3
Page 4
6. THE LCD SCREEN
The LCD screen is 12 characters wide and 2 lines high. All activities will be
shown on this screen.
The CONTRAST button is located below the screen on the left side of the lid.
To change the CONTRAST of the screen, slide the CONTRAST button to the
right to make the screen lighter or to the left to make the screen darker.
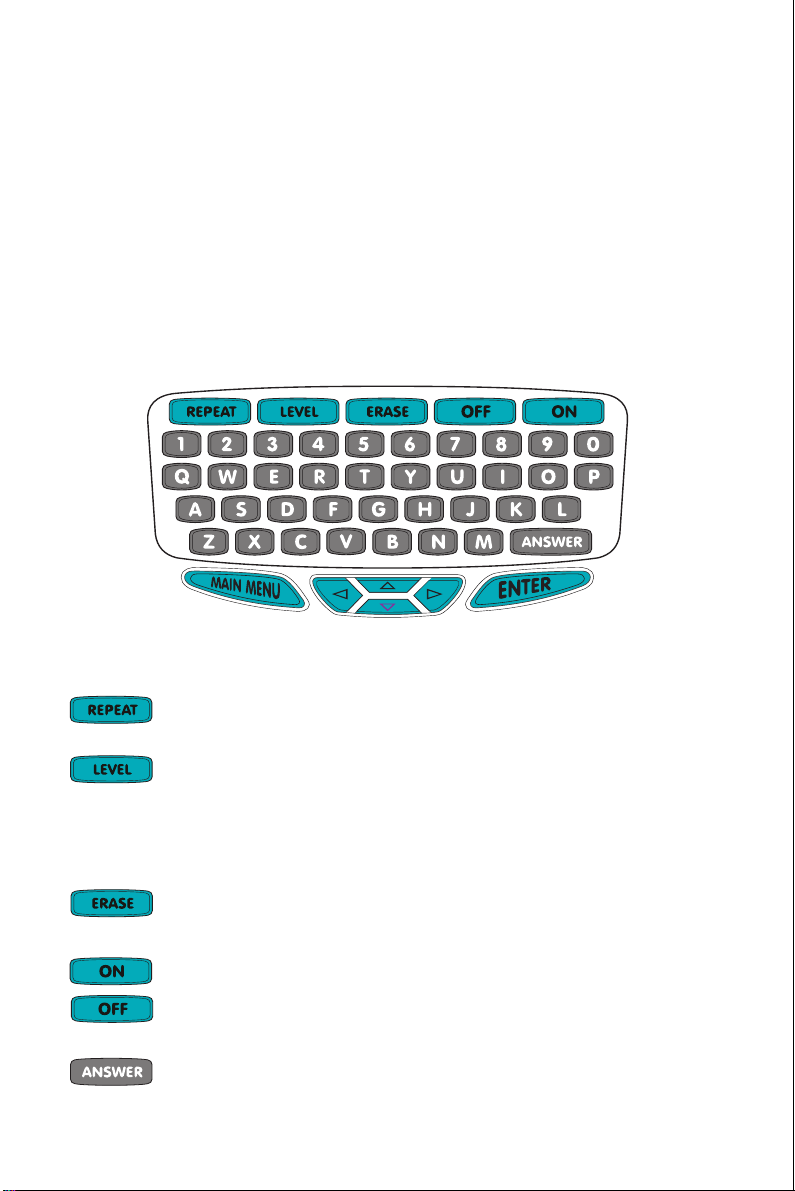
7. KEYBOARD
Headstart Computer has a raised, QWERTY keyboard. Take a moment to
review the keyboard before you begin to play.
Press this key when you want the unit to repeat a question in
an activity.
Most activities have two levels. To change levels, press the
LEVEL key and the unit will switch from Level 1 to Level 2
or from Level 2 to Level 1. Level 2 activities are more
difficult than Level 1 activities.
In an applicable activity, press this key to erase an entire
entry before pressing the ENTER key.
Press the ON key to turn on the unit. Press the OFF key to
turn off the unit. The unit will automatically shut off after
three minutes of inactivity.
Press this key when you want the unit to provide you with
the answer to a question.
4
Page 5

Press this key to view the main menu. You can press this key
at any time during an activity to return to the main menu.
Press these keys, one at a time, to move the cursor up, down,
left or right.
Press this key to choose a category and an activity from the
main menu or after entering your answer to a question.
8. CHOOSING A CA TEGOR Y
Headstart Computer focuses on 5 major educational categories. The 5
categories to choose from are:
Spelling
Vocabulary
Word Games +
Math
Number Games
To select a category, turn ON the unit and wait for the unit to ask you to “Pick
a Category.” Using the up or down arrow keys on the keyboard or on the
mouse, scroll down the list of categories until the cursor is next to the
category you want to select. Press the ENTER key on the keyboard or on the
mouse.
If you change your mind and want to return to the main menu of categories,
simply press the MAIN MENU key and you will be returned to the list of
categories.
Note: There is a selection in this menu for choosing CARTRIDGE. This
function can only be used if you insert a cartridge (sold separately) into the
unit. This category selection will not function unless a cartridge is inserted.
Details of this function will be explained in the cartridge manual.
5
Page 6

9. CHOOSING AN ACTIVITY
Each category has 5 or more activities listed in menu format. After selecting a
category, you will enter the activity menu. Using the up or down arrow keys
on the keyboard or on the mouse, scroll down the list of activities until the
cursor is next to the activity you want to select. Press the ENTER key on the
keyboard or on the mouse.
The following is a list of each category and the activities that are within that
category:
Spelling
Letter I.D. Letter Match
First & Last Letters Word Match
What’s Missing Spelling
ABC Order Scrambled Word
Vocabulary
Definitions Rhyme Time
Homonyms Category Game
Fill In The Blank Sentence Jumble
Word Games +
What Am I? Search A Word
How Many? Odd One Out
Word Search Music Fun
Math
Number Match 123 Order
Add One Bigger or Smaller?
Math Mania
Number Games
Nonstop Numbers First & Next Numbers
Number Rally Number Search
Guess the Number
For a complete description of each activity, please review the section titled
ACTIVITIES below.
10.ACTIVITIES
The following is a description of each activity within each category. In most
activities, if you enter the correct answer, the unit will give you a positive
response. If you enter an incorrect answer, you will be given two tries to enter
the correct answer. After the second incorrect try, the correct answer will be
displayed and the unit will move onto the next question.
6
Page 7

1. SPELLING Category
LETTER I.D.
The object of this activity is to identify a specific letter of the alphabet and
type it on the keyboard. The unit will ask you to type a specific letter. Type in
the letter.
LETTER MATCH
The object of this activity is to use short-term memory recall to find matching
pairs of letters, one letter in each row. This activity has two levels. The letters
are hidden behind two lines of blank squares. The unit will ask you to “Find
the correct answers.” Using the left or right arrow keys, move the cursor to
any blank square on the top line and press ENTER. A letter will be revealed
and the cursor will automatically move to the bottom line of squares. Again
using the left or right arrow keys, move the cursor to any blank square where
you think the matching letter is hidden and press ENTER. If the letter on the
bottom line matches the letter on the top line, the unit will give a positive
response and the two squares will disappear. If the letter does not match, the
two letters will "turn over" again. Continue uncovering squares until all the
letters in the puzzle have been matched.
FIRST & LAST LETTERS
The object is to determine the first or last letter of a given word. This activity
has two levels. The unit will ask you a question. Type in the correct letter and
press ENTER. For example, “Bake starts with which letter?” The answer to
the question is the letter “B”. In this example, type in “B” and press ENTER.
WORD MATCH
The object is to find a given word in a list of other words. This activity has
two levels. One word will appear on the first line of the screen for
approximately 5 seconds and then disappear. The screen will then display four
words. Using your arrow keys, move the cursor to the original word within the
list of 4 words and press ENTER. Press the REPEAT key at any time to view
the original word.
WHAT’S MISSING
The object is to add a missing letter to complete a specific word. The unit will
display a word with one letter missing on the top line of the screen. There will
be several letters on the bottom line of the screen. The unit will ask you to
find the correct answer and then tell you the word. You can choose the correct
letter to complete the word by using one of the following two methods: 1)
Using the left and right arrow keys, move the cursor under the correct letter
and press ENTER or 2) Using the keyboard, type in the correct letter. The
letter will jump up to the first line into the blank space.
7
Page 8

SPELLING
The object is to recognize and type letters that form words which are given by
the unit. This activity has two levels. The unit will say, “Type” and then it will
spell a word. Using the keyboard, type in the letters exactly how the unit asked
you to type them and press ENTER.
ABC ORDER
The object is to recognize letters or words that come first alphabetically. This
activity has two levels. The unit will ask you “Which comes first?” and then 4
letters will appear on the screen. Using the arrow keys, move the cursor to the
letter that would come before the other letters in the alphabet and press
ENTER. For example, if the following letters appear on the screen, “F, B, R,
U”, you would move the cursor to the letter “B” and press ENTER. The letter
“B” comes before F, R, and U in the alphabet.
SCRAMBLED WORD
The object is to unscramble a word. This activity has two levels. The unit will
ask you to “Enter the correct answer.” There are two methods to unscramble a
word: 1) Using the left and right arrow keys, move the cursor under the first
letter and press ENTER. Continue to select the letters in the correct order until
all the letters have spelled a word on the bottom line of the screen or 2) Using
the keyboard, type in the first letter of the unscrambled word. Continue to type
in the letters in the correct order until all the letters have spelled a word on the
bottom line of the screen.
2. VOCABULARY Category
DEFINITIONS
The object is to match a word with the correct definition of that word. This
activity has two levels. The unit will ask you to “Find the correct answer.” One
word will appear on the screen and then disappear. After the word disappears,
four definitions will appear on the screen. Using your up and down arrow keys,
scroll through the list of definitions until you find the definition that matches
the word. When the cursor is next to the correct definition, press ENTER.
Press the REPEAT key at any time to view the original word.
RHYME TIME
The object is to identify a word that rhymes with the given word. This activity
has two levels. The unit will ask you “What rhymes with” and then tell you a
given word. Four words will appear on the screen. Find the word that rhymes
with the given word. Use the arrow keys to move the cursor to the correct word
and press ENTER.
HOMONYMS
A homonym is a word that sounds the same as another word, but is spelled
8
Page 9

differently. This activity has two levels. A word will appear on the top of the
screen and the cursor will appear on the bottom of the screen. Using the
keyboard, type in a word that sounds the same as the word on the top, but that
is spelled differently. For example, if “TIDE” appears on the top, type in
“TIED” on the bottom. Both words sound the same, but are spelled
differently.
CATEGORY GAME
The object is to recognize words that fit into a specific category. This activity
has two levels. A category will appear on the screen and then disappear. After
the category disappears, words will begin to flash on the screen. When a word
appears on the screen that fits into the category, press ENTER. There is more
than one correct answer. Continue to choose all the words that fit into the
category. When the unit says "Great Job!", you have found all the correct
answers. Press the REPEAT key at any time to view the category again.
FILL IN THE BLANK
The object is to find the correct word that best completes the sentence. This
activity has two levels. A sentence will appear on the screen with one word
missing. The sentence will disappear and four words will appear on the
screen. Using the arrow keys, move the cursor to the word that best completes
the sentence, then press ENTER. Press the REPEAT key at any time to view
the sentence again.
SENTENCE JUMBLE
The object is to unscramble the sentence that appears on the screen. A
scrambled sentence will appear on the screen. Look at the sentence and decide
which is the first word of the sentence. Using the left and right arrow keys,
move the cursor to the first word of the sentence and press ENTER. Continue
to select words in the correct order - pressing ENTER after each selection
until the entire sentence has been unscrambled.
3. WORD GAMES + Category
WHAT AM I?
The object is to guess the word by reading the clue that appears on the screen.
This activity has two levels. Read the clue that appears on the screen. After a
few seconds, the clue will disappear. Type in the word that the clue describes
and press ENTER. The first letter and dashes representing the remaining
letters of the word will be shown on the screen to help you identify the correct
word.
SEARCH A WORD
The object is to find the hidden word . This activity has two levels. A set of
letters will appear on the screen. Hidden within those letters is a specific
9
Page 10

word. Using the arrow keys, move the cursor to the first letter of the hidden
word and press ENTER. If you have found the correct word, the unit will say,
"CORRECT" and wait for you to find the second letter of the hidden word.
Continue to move the cursor to each letter of the hidden word, pressing
ENTER each time. When you have underlined the entire word, the unit will
say, "Great Job!"
NOTE: The hidden word will not be shorter than 3 characters or longer than 8
characters and will either be on the top row or the bottom row; it will not be
split between the two rows.
HOW MANY?
The object is to recognize and count specific letters and types of letters. This
activity has two levels. The unit will ask a question. For example, “How many
letters in train?” Using the numbers on the keyboard, type in “5” and press
ENTER.
ODD ONE OUT
The object is to find the word that DOES NOT belong in a given category.
This activity has two levels. The unit will display 4 words on the screen and
ask you to find the correct answer. Using the arrow keys, move the cursor to
the word that DOES NOT belong with the other words and press ENTER. For
example, if the screen displayed: CAKE, LAKE, HILL and CAVE, move the
cursor to the word CAKE because it is the word that does not belong in this
category.
WORD SEARCH
The object is to find the letter or word given by the unit. The letter or word is
hidden within the letters that appear on the screen. This activity has two
levels. The unit will ask you to find a specific letter or word. A set of letters
will appear on the screen. Using the arrow keys, move the cursor to the letter
or word the unit asked you to find and press ENTER.
NOTE: In level 2, words may not be entirely on one line. For example, if the
word is FINGER, the FIN may be on the top line and GER may be on the
bottom line. However, the letters will always be connected. Underline the
letters in the correct order.
MUSIC FUN
Sing the tune to your favorite song! Press a number 1 through 9 of the song
you want to hear and that song will begin to play. To hear another song, press
another number. The songs are:
1. Row, Row, Row Your Boat
2. Twinkle, Twinkle Little Star
3. Old Macdonald Had a Farm
10
Page 11

4. Pop! Goes the Weasel
5. Oh! Susanna!
6. Camptown Races
7. The Farmer in the Dell
8. Over the River and Through the Woods
9. I’ve Been Working on the Railroad
4. MATH Category
NUMBER MATCH
The object of this activity is to use short-term memory recall and digit
identification to find the matching pairs of numbers. This activity has two
levels. The numbers are hidden behind two lines of blank squares. The unit
will ask you to “Find the correct answers.” Using the left or right arrow keys,
move the cursor to any blank square on the top line and press ENTER. A
number will be revealed and the cursor will automatically move to the bottom
line of squares. Again using the left or right arrow keys, move the cursor to
any blank square where you think the matching number is hidden and press
ENTER. If the number on the bottom line matches the number on the top line
the unit will give a positive response and the two squares will disappear. If the
number on the top line does not match the number on the bottom line, the two
numbers will "turn over" again. Continue uncovering squares until all the
numbers in the puzzle have been matched.
123 ORDER
The object is to find the sequential order (lowest number to highest number)
for the four given numbers. Four numbers will appear on the top line of the
screen. Using the left and right arrow keys, move the cursor to the lowest
number and press ENTER. That number will jump to the bottom line.
Continue to select the lowest number from the top line, pressing ENTER
after each selection, until all four numbers are on the bottom line in ascending
order.
ADD ONE
The object is to add “1” to the number that is displayed on the screen. Using
the number keys on the keyboard, type in the correct answer and press
ENTER. For example, “Add 1 to 38” will appear on the screen. Type “39” and
press ENTER.
BIGGER OR SMALLER?
The object is to recognize which number is biggest or smallest. This activity
has two levels. Four numbers will appear on the screen. The unit will either
ask “Which is biggest?” or “Which is smallest?” Using the arrow keys, move
the cursor to the correct answer and press ENTER.
11
Page 12

MATH MANIA
The object is to solve the given mathematical equation. This activity has two
levels. A mathematical equation will appear on the top line of the screen.
Using the number keys on the keyboard, type in the answer to the equation
and press ENTER.
5. NUMBER GAMES Category
NONSTOP NUMBERS
The object is to recognize and type the digits needed to make a number that is
given verbally. This activity has two levels. The unit will ask you to type a
number. For example, the unit will say, “Type thirty-two.” Using the number
keys on the keyboard, type in the correct answer and press ENTER.
FIRST & NEXT NUMBERS
The object is to recognize which number comes before or after a number. This
activity has two levels. Four numbers will appear on the screen. The unit will
ask a question. For example, the unit will ask “Which number comes before
45?” The four numbers on the screen are 20, 17, 7, 44. Look at the four
numbers on the screen. Using the arrow keys, move the cursor to the correct
answer and press ENTER. In the example, move the cursor to “44” and press
ENTER.
NUMBER RALLY
The object is to find the numbers that fit into a specific category. This activity
has two levels. A category will appear on the screen and then disappear. Then
5 numbers will flash on the screen, one at a time. As soon as you recognize a
number that fits into the category, press ENTER. There are three correct
answers for each category. For example, if the clue is “Numbers that have a 4”
and the 5 numbers flashing on the screen are 24, 49, 34, 59, 13, you would
press ENTER when 24 appears on the screen, 49 appears on the screen, and
when 34 appears on the screen.
NUMBER SEARCH
The object is to identify the number that is given by the unit. The number is
hidden within other numbers on the screen. This activity has two levels. Two
rows of numbers will appear on the screen. The unit will ask you to find a
specific number. Using the arrow keys, move the cursor to the first digit of the
number and press ENTER. If the number you are searching for has more than
one digit, continue to move the cursor to each digit, pressing ENTER after
each digit found.
GUESS THE NUMBER
The object is to determine a specific number using the three clues that are
provided. This activity has two levels. The unit will ask you to enter the
12
Page 13

correct answer and then a question mark will appear on the bottom line of the
screen. To view the first clue, press the ENTER key. The first clue will appear
on the screen and then disappear, replaced with a question mark. If you think
you know the answer, type it in now and press ENTER. If you don’t know the
answer, press ENTER again for the 2nd and 3rd clues. A new clue will
automatically appear if you enter an incorrect answer. You will always have
the opportunity to enter an answer after each clue is given when the question
mark appears on the screen.
11.EXPANSION CAR TRIDGES
Headstart Computer is expandable with an additional cartridge (sold
separately). To use a cartridge, follow the steps below:
1.Turn OFF the power for Headstart Computer .
2.Gently push the cartridge into the cartridge slot that is located on the left
side of the unit’s base. The cartridge label must face up and the open end of
the cartridge must face towards the unit. Make certain the cartridge snaps into
place.
3.Turn ON the power for Headstart Computer .
4.To activate the content of the cartridge, you must choose the last selection
on the main menu titled “CARTRIDGE”.
NOTE: Be sure to follow the instruction manual that is included with your
cartridge purchase for complete details of an expansion cartridge.
12.TROUBLESHOOTING
In the event of any malfunction, check the following:
1. Check the battery connection and make sure all batteries are properly
inserted.
2. Change batteries:
- 4 "AA" (LR6) size batteries are required
- Alkaline batteries are recommended
3. Check the battery compartment cover to make certain it is securely shut.
If you are still having trouble after checking all of the above, please call our
toll free number at 1-800 TIGER ED and a representative will be happy to
help you.
13
Page 14

13.CARE AND MAINTENANCE
Clean HEADSTART
COMPUTER with a soft,
damp cloth.
Please do not put the
HEADSTART COMPUTER
in direct sunlight or near any
source of heat.
Please remove the batteries if
you won't be using the
HEADSTART COMPUTER
for a long period of time.
Adults should examine this unit periodically. If there is any damage, this unit must not be used
until the damage has been properly removed or repaired by Tiger Electronics, Inc.
Do not use any chemical
solvents to clean
HEADSTART COMPUTER
Don't spill anything on the
HEADSTART COMPUTER
For indoor use only.
Do not immerse in water.
14.90-DAY LIMITED WARRANTY
Tiger Electronics, Inc. (Tiger) warrants to the original consumer purchaser of this product that
the product will be free from defects in materials or workmanship for 90 days from the date of
original purchase. This warranty does not cover damages resulting from accident, negligence,
improper service or use or other causes not arising out of defects in materials or workmanship.
During this 90-day warranty period, the product will either be repaired or replaced (at Tiger’s
option) without charge to the purchaser, when returned with proof of the date of purchase to
either the dealer or to Tiger.
Product returned to Tiger without proof of the date of purchase or after the 90-day warranty
period has expired, but prior to one year from the original date of purchase, will be repaired or
replaced (at Tiger’s option) for a service fee of U.S.$16.00. Payments must be by check or
money order payable to Tiger Electronics, Inc.
The foregoing states the purchaser’s sole and exclusive remedy for any breach of warranty with
respect to the product.
All product returned must be shipped prepaid and insured for loss or damage to:
Tiger Electronics, Inc. Repair Dept.
980 Woodlands Parkway
Vernon Hills, Illinois 6006l U.S.A.
The product should be carefully packed in the original box or other packing materials sufficient
to avoid damage during shipment. Include a complete written description of the defect, a check
if product is beyond the 90-day warranty period, and your printed name, address and telephone
number.
THIS WARRANTY IS IN LIEU OF ALL OTHER WARRANTIES AND NO OTHER REPRESENTATIONS OR
CLAIMS OF ANY NATURE SHALL BE BINDING ON OR OBLIGATE TIGER IN ANY WAY. ANY IMPLIED
WARRANTIES APPLICABLE TO THIS PRODUCT, INCLUDING WARRANTIES OF MERCHANTABILITY AND
FITNESS FOR A PARTICULAR PURPOSE, ARE LIMITED TO THE NINETY (90) DAY PERIOD DESCRIBED
ABOVE. IN NO EVENT WILL TIGER BE LIABLE FOR ANY SPECIAL, INCIDENTAL, OR CONSEQUENTIAL
DAMAGES RESULTING FROM POSSESSION, USE, OR MALFUNCTION OF THIS TIGER PRODUCT.
Some states do not allow limitations as to how long an implied warranty lasts and/or exclusions
or limitations of incidental or consequential damages, so the above limitations and/or exclusions
of liability may not apply to you. This warranty gives you specific rights, and you may also
have other rights which vary from state to state.
14
Page 15

15
Page 16

®, TM, & © 1997 Tiger Electronics, Inc.
All rights reserved.
980 Woodlands Parkwary,
Vernon Hills, Illlinois 60061, U.S.A.
TIGER ELECTRONICS (UK) LLC.
Belvedere House, Victoria Avenue, Harrogate,
North Yorkshire GG1 1EL, England.
9015101IWT1E-01
Printed in Hong Kong
16
Page 17

For Ages 5-8
Model 9-015-1
Instruction Manual
17
 Loading...