

Page 1

User Manual
Including:
TIGA Sub4
TIGA Junior
TIGA TX
EN
MANUAL WHEELCHAIR
Page 2
Need replacement parts?
Take advantage of our online pricing policy at ; www.rgklife.com
User Manual
Issue No: 16 | 2016
2
We hope the product and service you have received has met your expectations. Please take time to read the instructions
contained within, to familiarise yourself with your new RGK chair and to ensure you get maximum performance and
longevity from it.
Russel Simms,
Commercial Director
Thank you
for buying RGK…
WARNING:!
Do not operate this equipment without rst reading and understanding this manual.
If you are unable to understand the warnings and instructions, contact a healthcare
professional (doctor / therapist) before attempting to use this equipment - otherwise
injury or damage may result.
User Manual | Thank you
As the manufacturer, RGK Wheelchairs
declares that the lightweight
wheelchairs conform to the 93/42/EEC
/ 2001/47/EEC guideline.
Please contact RGK or your local authorised RGK dealer if
you have any questions regarding the use, maintenance
or safety of your wheelchair.
RGK Wheelchairs, Units 8a/b/c , Ring Road, Zone 2 ,
Burntwood Business Park, Burntwood, Staordshire, WS7
3JQ, United Kingdom
[email protected]
Page 3

Need replacement parts?
Take advantage of our online pricing policy at ; www.rgklife.com
User Manual
Issue No: 16 | 2016
3
User Manual | Contents
Contents
4 Special Notes
4 Denitions of words used in this manual
4 Wheelchair Selection
5 Transportation
5 Safety Summary
5 Safety Summary
5 Environment
5 Finger Traps
6 Weight Training
6 Stability and Balance
7 General safety notes and driving restrictions
9 Lifetime
10 RGK TIGA Manual Propelled Wheelchair
10 Product Description
11 RGK TIGA Manual Propelled Wheelchair
12 Identication / Serial Number – Bespoke to you
13 Safety Handling of your Wheelchair
13 Tilting
14
Method 1
14
Method 2
15 Reaching, Leaning and Bending - Forward
15 Transferring to and from other seats
16
Transferring to and from other seats
17 Lengthening and shortening the wheelbase
17 Manoeuvring your RGK wheelchair
18 Safety Inspection Checklist
19 Troubleshooting Guide Mechanical
20 Maintenance
20
Suggested Maintenance Procedures
21 Procedure 1
21
Adjusting / replacing the back upholstery
22 Procedure 2
22
Seat Upholstery Replacement
23 Procedure 3
23 Removing rear wheels and attaching them to
and from your wheelchair.
24 Procedure 4
25 Procedure 5
25 Handrim replacement
25 Repairing / replacing rear wheel, tyre & tube
26 Procedure 6
26
Adjusting / replacing the camber bar
27 Procedure 7
27 Replacing Fork Assembly
27 Replacing Front Castor Wheels
28 Procedure 8
28 Wheel Locks - Adjustment / Replacement
29 Procedure 9
29
Adjusting / replacing the footrest
29 Angle adjusting the footrest platform
30 Procedure 10
30 Folding your backrest with cord support
31 Procedure 11
31 Height adjustable push handles
31 Flip-down push handles
31 Screw in Pushing Handles
32 Procedure 12
32 Adjusting the Anti-tipper
33 Procedure 13
33 Fixed Sideguards (All Materials)
33 Height Adjustable Armrest
Height Adjustment
34 Procedure 14
34 Location of the strapping
35 Technical Data
35 Recycling/Disposal
36 Warranty
36 GUARANTEE
Page 4

Need replacement parts?
Take advantage of our online pricing policy at ; www.rgklife.com
User Manual
Issue No: 16 | 2016
4
Special Notes
The manual must be read thoroughly to avoid damage when handling and using your RGK Wheelchair.
User Manual | Special Notes
Denitions of words used in this manual
DANGER!
Advice to the user of a Potential Risk of serious injury or
death if the advice is not followed.
WARNING:
Advice to the user of a Potential Risk of
injury if the advice is not followed.
CAUTION:
Advice to user that Potential Damage to equipment may
occur if the advice is not followed.
NOTE:
General advice or best practice.
Wheelchair Selection
As a manufacturer of wheelchairs, RGK endeavours to
supply a wide variety of wheelchairs to meet many needs
of the end user. However, nal selection of the type of
wheelchair to be used by an individual rests solely with the
user and his/her health care professional capable of making
such a selection.
DO NOT use the footplate as a platform when getting in or
out of the wheelchair.
Always wear your seat restraint, if recommended.
The wheelchair shown and described in this user guide
may not correspond in every detail exactly to your own
model and accessories.
However, all instructions are completely relevant,
regardless of additions that you may have added at the
time of order
The expected life of your RGK wheelchair is 5 years of
normal use by a single user. The expected life of your
wheelchair is above all dependent on the user’s disability
and the maintenance of the wheelchair. Dierent users may
experience both a shorter and a longer service life for their
wheelchair than those stated above.
Please DO NOT use or t any third party components to
the wheelchair unless they are ocially approved by RGK
Wheelchairs Ltd.
NOTE:
The information contained in this document is subject to
change without notice.
Page 5
Need replacement parts?
Take advantage of our online pricing policy at ; www.rgklife.com
User Manual
Issue No: 16 | 2016
5
Safety Summary
User Manual | Safety Summary
“Safety and Handling” of the wheelchair requires the close attention of the wheelchair user as well as the assistant.
This manual points out the most common procedures and techniques involved in the safe operation and maintenance of the
wheelchair. It is important to practice and master these safe techniques until you are comfortable in manoeuvring around the
frequently encountered architectural barriers.
Use this information only as a “basic” guide. The techniques that are discussed on the following pages have been used
successfully by many.
Individual wheelchair users often develop skills to deal with daily living activities that may dier from those described in his
manual.
RGK recognises and encourages each individual to try what works best for him/her in overcoming architectural obstacles that
they may encounter.
Techniques in this manual are a starting point for the new wheelchair user and assistant with “safety” as the most important
consideration for all.
Transportation
WARNING:
Wheelchair tie-down restraints and seat restraints.
• RGK recommends that wheelchair users not
be transported in vehicles of any kind while in
wheelchairs.
• It is RGK’s position that users of wheelchairs should
be transferred into appropriate seating in vehicles
for transportation and use be made of the restraints
made available by the auto industry.
• RGK cannot and does not recommend any
wheelchair transportation systems.
• As regards restraints-seat belts, it is the obligation
of the dealer, therapists and other health care
professionals to determine if a seating restraint
is required to ensure the safe operation of this
equipment by the user.
• Serious injury can occur in the event of a fall from a
wheelchair.
• DO NOT use the footplate as a platform when getting
in or out of the wheelchair.
Safety Summary
Never exceed the maximum user weight load, this
includes any additional items carried or attached on the
wheelchair. If you exceed the maximum load, this can lead
to permanent damage to your RGK wheelchair or you may
fall, tip over, lose control which may lead to serious injury to
either yourself or third parties.
Environment
WARNING:
Any products left in extreme hot or cold climates could
result in hot/cold surfaces which could result in personal
injury.
WARNING:
Do not expose the product or any of its accessories to any
form of excessive heat or naked ame.
Finger Traps
WARNING:
This product has moving parts and therefore could trap the
user’s ngers. Use extreme caution when moving.
Page 6
Need replacement parts?
Take advantage of our online pricing policy at ; www.rgklife.com
User Manual
Issue No: 16 | 2016
6
User Manual | Safety Summary
Weight Training
RGK DOES NOT recommend the use of its wheelchairs as a
weight training apparatus. RGK products have NOT been
designed or tested as a seat for any kind of weight training.
If occupant uses said wheelchair as a weight training
apparatus, RGK shall NOT be liable for bodily injury and the
warranty will be voided immediately.
Stability and Balance
To assure stability and proper operation of your wheelchair,
you must at all times maintain proper balance. Your
wheelchair has been designed to remain upright and stable
during normal daily activities as long as you do not move
beyond the centre of gravity.
Virtually all activities which involve movement in the chair
have an eect on the centre of gravity.
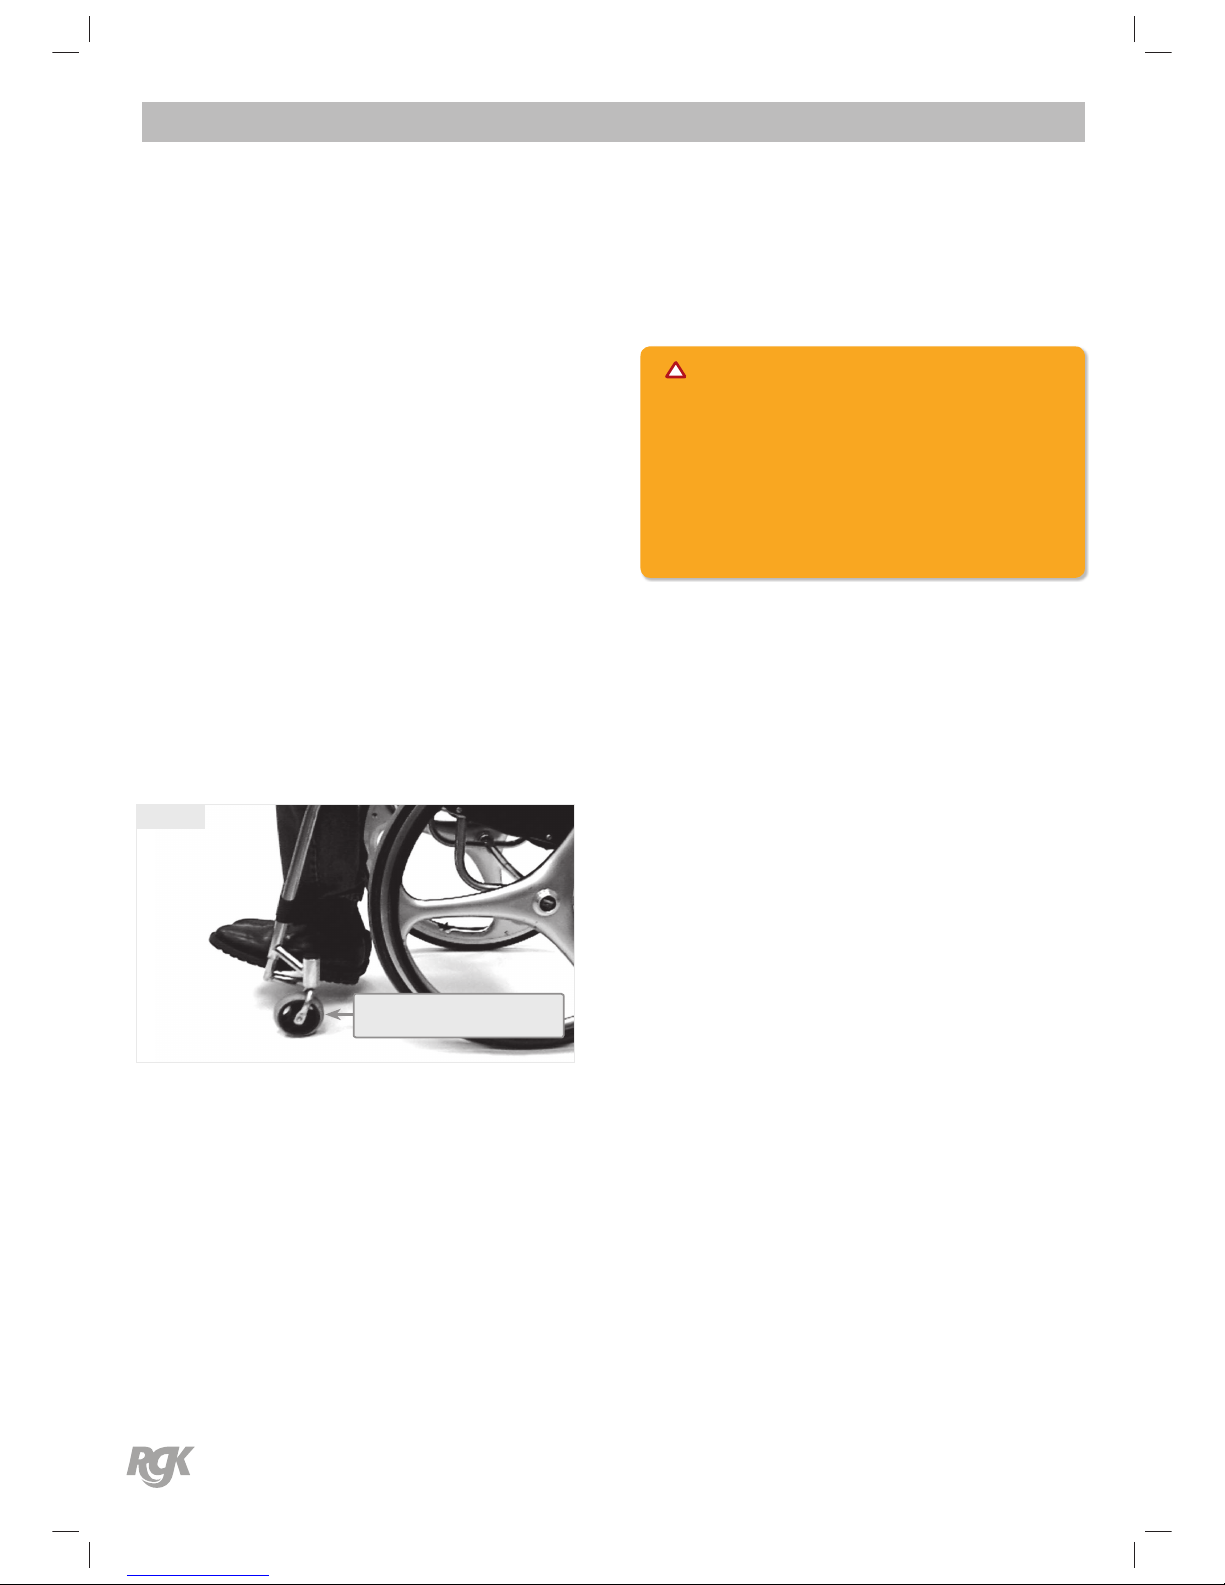
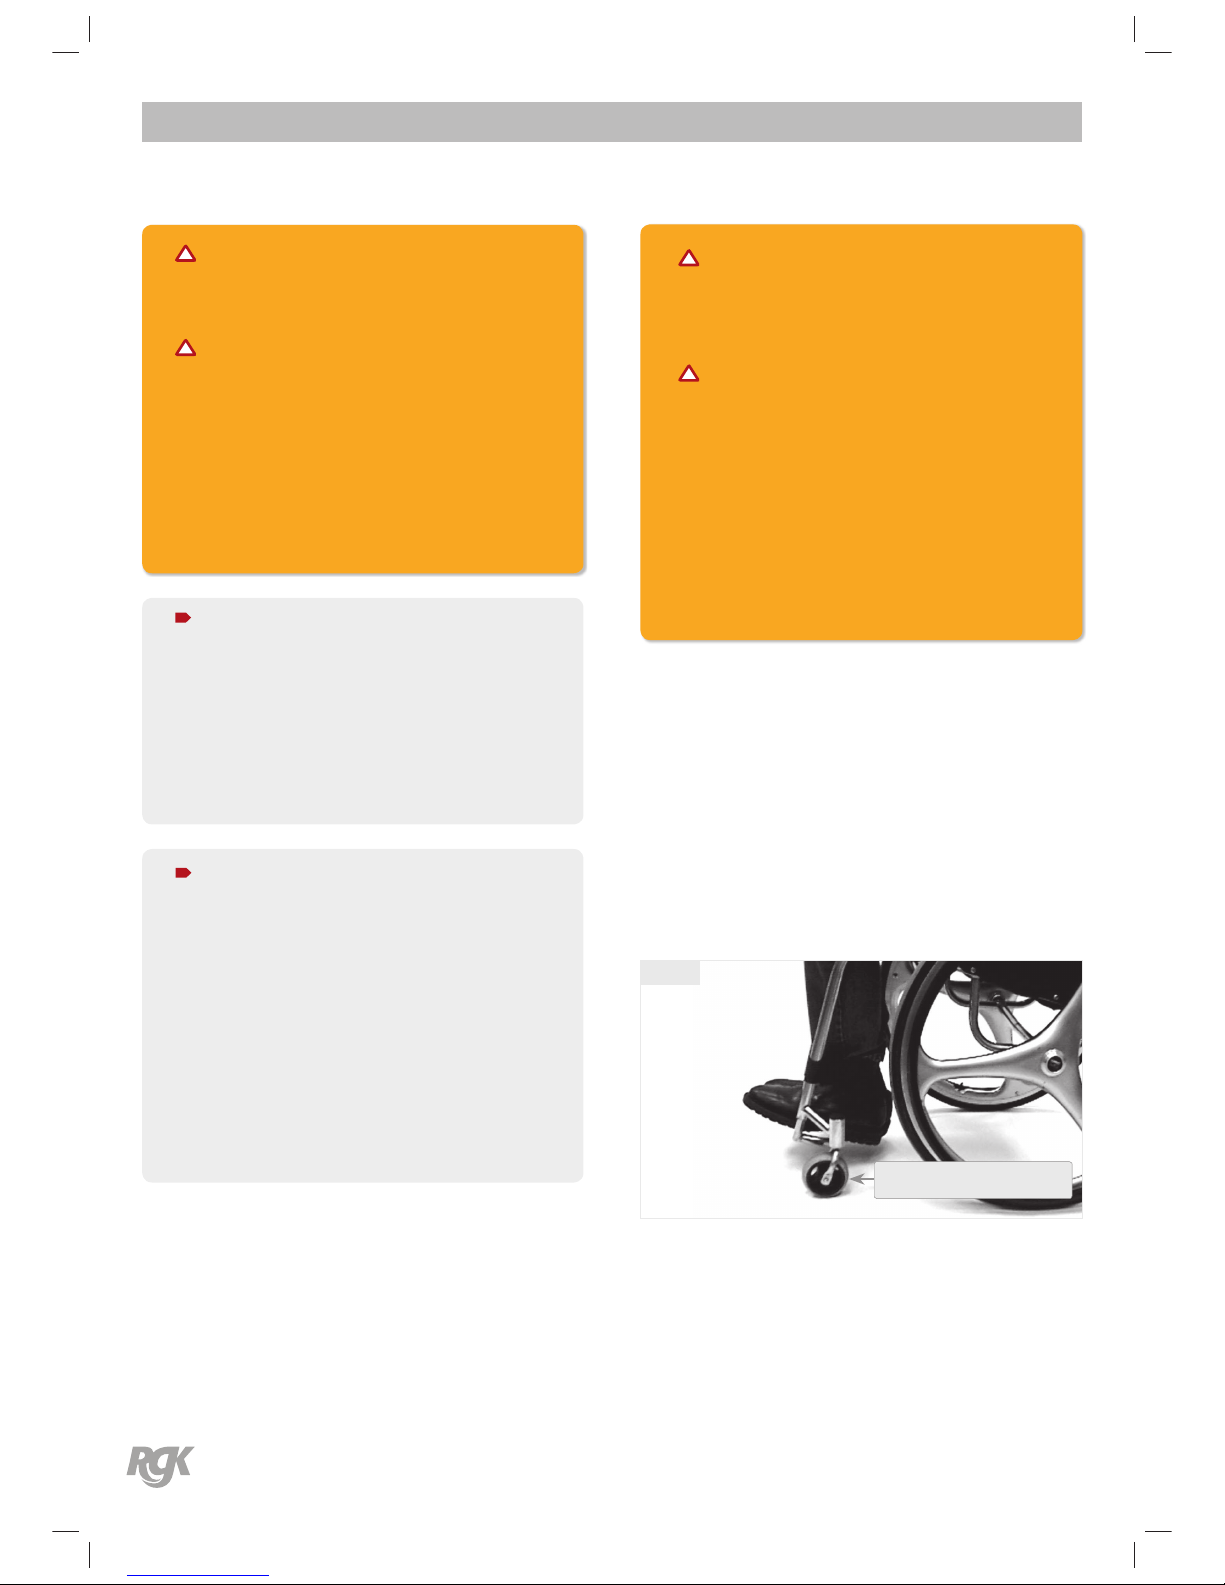
Make sure the castors are pointing in the forward position
whenever you lean forward. This can be achieved by
advancing the chair and then reversing it in a straight line.
See Fig 1.
Fig 1
Castors pointing forward
Coping with the irritation of everyday obstacles can be
alleviated somewhat by learning how to manage your
wheelchair. Keep in mind your centre of gravity to maintain
stability and balance.
Safety Summary
WARNING:
The position of the footrest, camber tube, height, as well as
the tautness of the back upholstery are directly related to
the chairs stability. Any change to one or any combination
of the three may cause the chair to decrease in stability. Use
EXTREME caution when using a new seating position for
the rst time.
Page 7

Need replacement parts?
Take advantage of our online pricing policy at ; www.rgklife.com
User Manual
Issue No: 16 | 2016
7
User Manual | Safety Summary
General safety notes and driving restrictions
The engineering and construction of this wheelchair has
been designed to provide maximum safety. International
safety standards currently in force have either been
fullled or exceeded in parts. Nevertheless, users may put
themselves at risk by improperly using their wheelchairs.
For your own safety, the following rules must be strictly
observed.
Unprofessional or erroneous changes or adjustments
increase the risk of accident. As a wheelchair user you are
also part of the daily trac on street and pavements, just
like anyone else. We would like to remind you that you are
therefore also subject to any and all trac laws.
Be careful during your rst ride in this wheelchair.
Get to know your wheelchair.
Before each use, the following should be checked:
• Quick-release axles on the rear wheels.
• Velcro on seats and backrests.
• Tyres, tyre pressure and wheel locks.
Before changing any of the adjustments of this wheelchair,
it is important to read the corresponding section of the
user´s manual.
It is possible that potholes or uneven ground could cause
this wheelchair to tip over, especially when riding uphill or
downhill. When riding over a step or up an incline frontally,
the body should be leaning forward.
DANGER!
NEVER exceed the maximum load of 125kg for TIGA/TX,
110kg for TIGA Sub4, 80kg for TIGA jnr. for driver plus
any items carried on the wheelchair. Please note the
weight information for lighter weight options, which
are quoted separately. If you exceed the maximum
load, this can lead to damage to the chair, or you may
fall or tip over, lose control and may lead to serious
injury of the user and other people.
Safety Summary
WARNING:
CHOKING HAZARD – This mobility aid uses small parts
which under certain circumstances may present a choking
hazard to young children.
• If and whenever possible, during a journey in a
specially fitted vehicle for disabled people, vehicle
occupants should use the seats in the vehicle and
the appropriate restraint system. This is the only way
to ensure that occupants will have the maximum
protection if there is an accident.
• To avoid falls and dangerous situations, you should first
practice using your new wheelchair on level ground
with good visibility.
• This wheelchair should be used exclusively to convey
one person at a time. Any other use does not comply
with the intended purpose.
• When getting on or off the wheelchair, do not use the
footboards. These should be flipped up beforehand
and swung to the outside as far as possible.
• Depending on the diameter and setting of the
castors, as well as the centre of gravity setting of the
wheelchair, the castors may begin to wobble at high
speeds. This can lead to the castors being blocked and
the wheelchair may tip over. Therefore, please make
sure that the castors are adjusted correctly (see the
Chapter “Castors”).
• In particular, do not travel on an incline without
brakes, travel at a reduced speed. This product
has been tested to a maximum speed of 10 kph. At
higher speeds, depending on the configuration and/or
physique/physical capabilities of the user, there may
be unexpected castor wobble. This can lead to injury of
the user.
• Riding sideways on to a slope or incline, increases the
possibility of the wheelchair tipping over sideways.
• Explore the effects of changing the centre of gravity
on the behaviour of the wheelchair, for example on
inclines, slopes, all gradients or when overcoming
obstacles. Do this with the secure aid of a helper.
• We recommend that novice users use anti-tip tubes.
Page 8

Need replacement parts?
Take advantage of our online pricing policy at ; www.rgklife.com
User Manual
Issue No: 16 | 2016
8
User Manual | Safety Summary
• Anti-tip tubes should prevent the chair tipping over
backwards unintentionally. Under no circumstances
should they take the place of transit wheels, and be
used to transport a person in a wheelchair with the rear
wheels removed.
• With extreme settings (e.g. rear wheels in the most
forward position) and less than perfect posture, the
wheelchair may tip over even on a level surface.
• Lean your upper body further forward when going up
slopes and steps.
• Lean your upper body further back when going down
slopes and steps.
• Do not hang heavy items such as shopping bags or
backpacks, on the push handles, head rest or backrest
of the wheelchair.
• These can change the tipping point and there is a risk
of tipping backwards.
• When reaching for objects (which are in front of, to the
side or behind the wheelchair) make sure that you do
not lean too far out of the wheelchair, as if you change
the centre of gravity there is a risk of tipping or rolling
over.
• Only use your wheelchair properly. For example, avoid
travelling against an obstacle without braking (step,
kerb edge) or dropping down gaps.
• Only attempt stairs with the help of an attendant. There
is equipment available to help you, e.g. climbing ramps
or lifts, please use them. If there is no such equipment
available, then the wheelchair must be tipped and
pushed over the steps (2 helpers).
• In general, any anti-tip tubes fitted must be set
beforehand, so that they cannot touch the steps,
as otherwise this could lead to a serious tumble.
Afterwards the anti-tip tubes must be set back to their
correct position.
• Make sure that the attendant only holds the wheelchair
using securely mounted parts (e.g. not on the footrests
or the side guards).
• When using the lifting ramp make sure that the anti-tip
tubes fitted are positioned outside the danger area.
• Secure your wheelchair on uneven ground or when
transferring (e.g. into a car) by using the wheel locks.
Safety Summary
• For high amputees you must use anti-tip tubes.
• Before setting off, check that your tyre pressure is
correct. For rear wheels it should be at least 3.5 bar (
350 kPa). The max. pressure is indicated on the tyre.
• The knee-lever brakes will only work if there is
sufficient tyre pressure and if the correct setting has
been made (see the Chapter on “Wheel locks”).
• The wheel locks are not intended to brake your
wheelchair. They are only there to ensure that your
wheelchair does not begin rolling unintentionally. When
you stop on uneven ground, you should always use the
wheel locks to prevent such rolling. Always apply both
wheel locks; otherwise, your wheelchair could tip over.
• The wheel locks have not been designed to be used as
brakes for a moving wheelchair.
• Always make use of elevators and ramps. If these
are not available, you should request the help of an
attendant. They should only grip the wheelchair at
securely mounted parts. If anti-tip tubes are fitted these
must be folded away. A wheelchair should never be
lifted with an occupant; it should only be pushed.
• If the seat and back sling are damaged, you must
replace them immediately.
• Do not lift or carry the wheelchair by the back tubes or
the push handles.
• Do not fit any unauthorized electronic equipment,
powered or mechanically operated mobility drives,
hand-bike or any other device that changes the
intended use or the structure of the wheelchair.
• Any combination with other medical devices requires
the approval of Sunrise Medical.
• Be careful with fire, in particular with burning cigarettes.
Seat and back slings can be set alight.
• Always make sure that the quick-release axles on the
rear wheels are set properly and lock in. If the button
on the quick-release axle is not pressed in, the rear
wheel cannot be removed.
• In particular when using lightweight metal hand rims,
fingers will easily become hot when braking from a high
speed or on long inclines.
Page 9

Need replacement parts?
Take advantage of our online pricing policy at ; www.rgklife.com
User Manual
Issue No: 16 | 2016
9
User Manual | Safety Summary
• If the wheelchair is subject to direct sunlight for a long
period of time, then parts of the wheelchair (e.g. frame,
leg rests, brakes and side guard) may become hot
(>41°C).
• To avoid hand injuries do not grab in between the
spokes or between the rear wheel and wheel lock
when driving the wheelchair.
• When using the chair outside, always wear leather
gloves which will increase your grip and protect the
fingers from dirt and overheating.
• Do not use the wheelchair on slopes > 10°.
• The Dynamic safe slope is dependant on the chair
configuration, the users abilities and the style of riding.
As the users abilities and style of riding cannot be
pre-determined then the max safe slope cannot be
determined. Therefore this must be determined by the
user with the assistance of an attendant to prevent
tipping. It is strongly recommended that inexperienced
users have Ant-tips fitted.
• Do not use your wheelchair on muddy or icy ground.
• Do not use your wheelchair where pedestrians are not
allowed.
• With all moving parts there is a natural risk of finger
traps. Please handle with care.
• The wheelchair should not be used in heavy rain,
snow, slippery, or unsound surfaces.
• Do not use the wheelchair in hazardous environments.
Lifetime
The expected lifetime of this product is 5 years.
Safety Summary
NOTE :
• The effect of the wheel locks as well as the
general driving characteristics are dependant
on tyre pressure. The wheelchair is significantly
lighter and easier to manoeuvre when the rear
wheels are pumped up correctly and both wheels
have the same pressure.
• Make sure that your tyres have sufficient tread!
• Please note that you are subject to any and all
traffic laws when driving in public traffic.
• When it is dark, please wear light clothing or
clothing with reflectors, so that you can be seen
more easily. Make sure that the reflectors on
the side and back of the wheelchair are clearly
visible. We would also recommend that you fit an
active light.
• Always be careful with your fingers when working
or adjusting the wheelchair!
• The products shown and described in this manual
may not be exactly the same in every detail as
your own model. However, all instructions are still
entirely relevant, irrespective of detail differences.
• The manufacturer reserves the right to alter
without notice any weights, measurements or
other technical data shown in this manual. All
figures, measurements and capacities shown
in this manual are approximate and do not
constitute specifications.
• Adjustments to your wheelchair, especially to
security-relevant components as for example
wheel-locks, anti-tip or backrest must be
performed by authorized dealers.
• When using add-on mobilty devices, such as
hand bikes, power add-ons etc, ensure that your
wheelchair is equipped with appropriate castor
forks intended for such use.
Page 10

Need replacement parts?
Take advantage of our online pricing policy at ; www.rgklife.com
User Manual
Issue No: 16 | 2016
10
User Manual | Product Description
Product Description
The TIGA range, is a manually propelled wheelchair which is
suitable for a wide range of users whose mobility has been
reduced or removed by a disability or chronic illness. The
TIGA range is hand built from aerospace grade aluminium.
Two frame design options are available, either open frame
or a closed frame design, delivering a lightweight and
versatile wheelchair. The design incorporates an aluminium
frame, with either an integrated aluminium camber bar and
footrest suited to the more experienced users looking for
the lightest option, or can be prescribed with an adjustable
aluminium camber bar and adjustable height footrest,
scissor or push to lock brakes, adjustable tension seat sling,
backrest and calf strap all as standard, with further options
available.
The design accommodates a wide range of disabilities for
all ages of user up to a maximum user weight of 125kg for
TIGA/TX, 110kg for TIGA Sub4, 80kg for TIGA jnr.
Suitability is dependent upon the degree and nature of
disability and must be determined through a thorough
client risk assessment carried out by a qualied medical
professional or RGK personnel. This wheelchair is suitable
for a means of transfer from one location to another where
physical mobility is impaired or reduced and is not designed
for any other purpose.
Consideration must be given at point of prescription to
required usage with regard to the capabilities of the user
and the environment and terrain on which the product will
be used.
RGK TIGA Manual Propelled
Wheelchair
The TIGA range, manufactured by RGK Wheelchairs Ltd, is
CE marked as a Class 1 Medical Device and complies with
the Essential Requirements of the Medical Device Directive
93/42/EEC.
By denition all wheelchairs are marketed as a medical
device where a “medical device”* means an instrument,
apparatus, appliance, material or other article, whether
used alone or in combination, together with any software
necessary for its proper application, which-
(a) is intended by the manufacturer to be used for human beings
for the purpose of(i) diagnosis, prevention, monitoring, treatment or alleviation of
disease,
(ii) diagnosis, monitoring, treatment, alleviation of or
compensation for an injury or handicap,
(iii) investigation, replacement or modication of the anatomy or
of a physiological process, or
(iv) control of conception; and
(b) does not achieve its principal intended action in or on the
human body by pharmacological, immunological or metabolic
means, even if it is assisted in its function by such means.
* denition taken from the Medical Devices Directive 93/42/EEC
Page 11
Need replacement parts?
Take advantage of our online pricing policy at ; www.rgklife.com
User Manual
Issue No: 16 | 2016
11
User Manual | Product Description
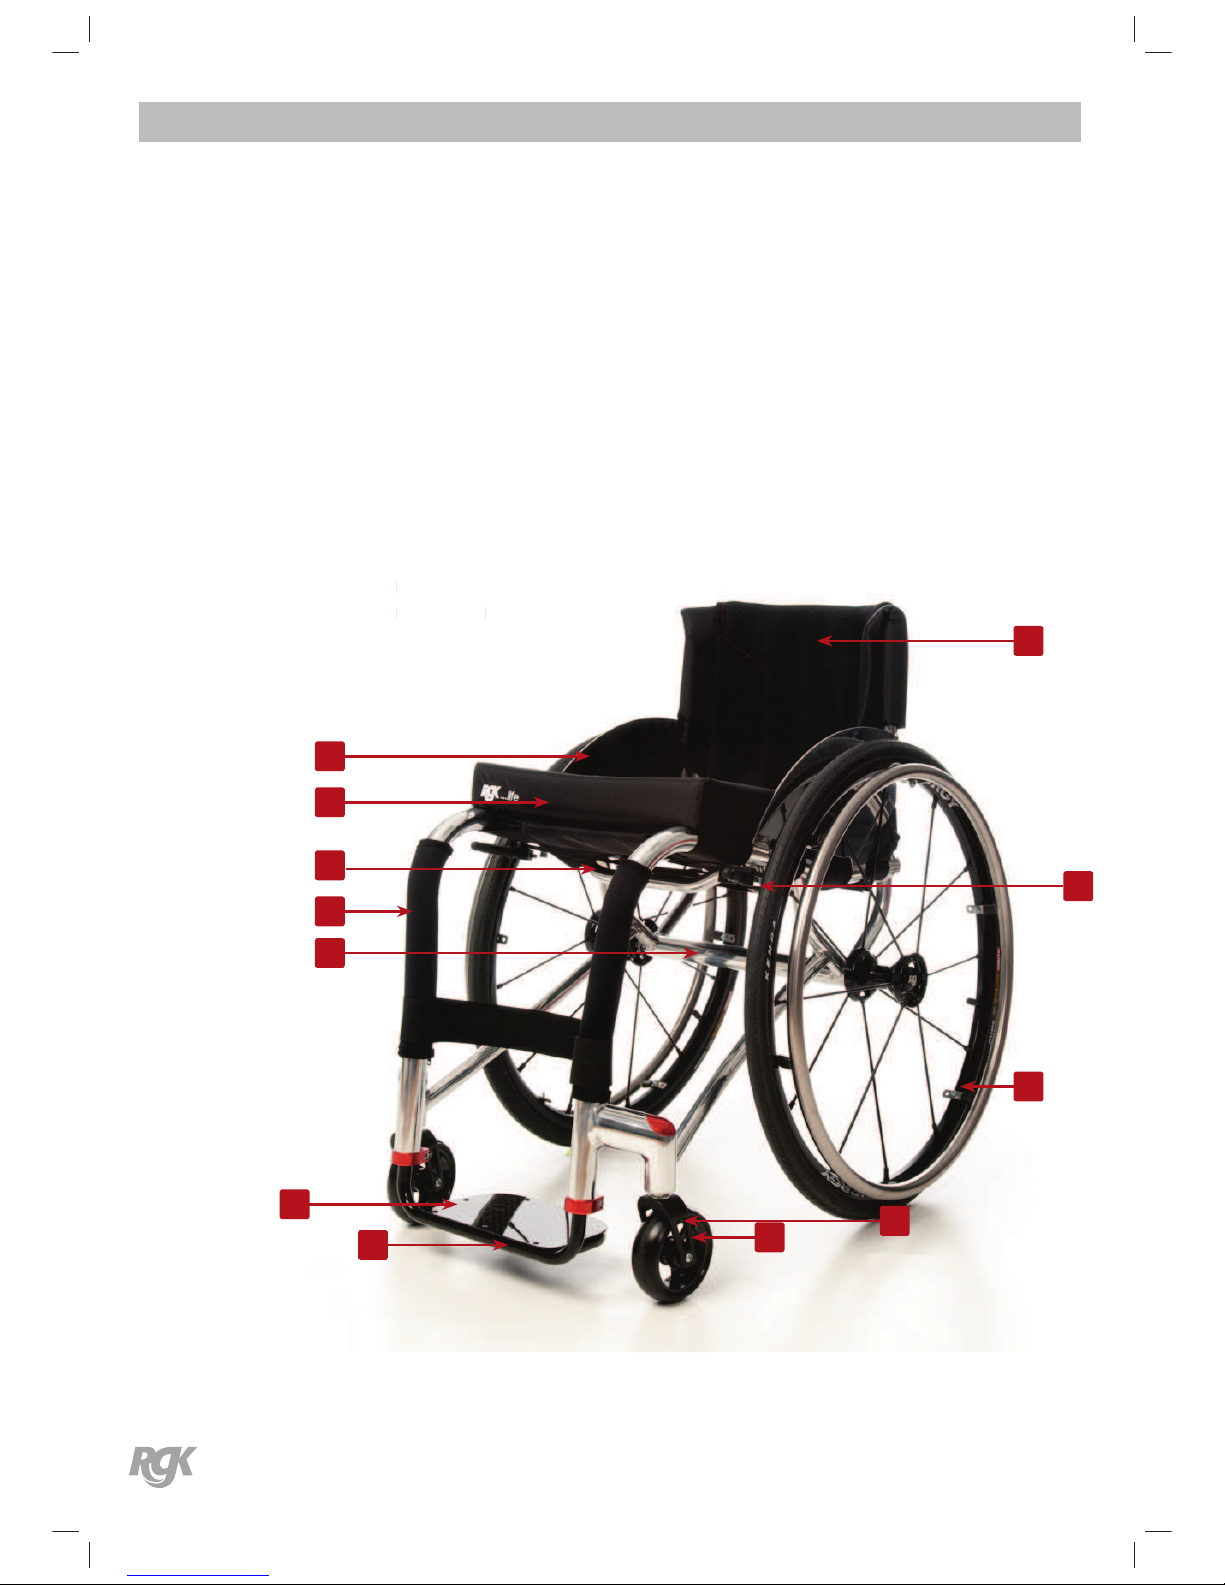
A Backrest
B Brakes
C Rear Wheel
D Front Castor
E Front Castor Forks
F Footplate
G Footplate cover
H Camber Bar
I Frame
J Under Seat Brace Bar
K Cushion & Cover
L Sideguard
RGK TIGA Manual Propelled
Wheelchair
orks
J
Under Seat Brace Bar
K
Cushion & Cove
r
d
A
D
E
C
F
G
K
L
J
I
H
B
Page 12
Need replacement parts?
Take advantage of our online pricing policy at ; www.rgklife.com
User Manual
Issue No: 16 | 2016
12
User Manual | Identification / Serial Number
Identication / Serial Number –
Bespoke to you
The serial number of your bespoke product is located on either the under seat
cross brace bar (J Product Description) or camber bar (H Product Description) or inside the backrest
upholstery (A).
Please provide the following information whenever you have to order replacement parts.
Serial Number
Name
Dealer
TIGA Sub-4 TGA001 1/2013
00 44 (1) 543 67 00 77
MAX USER WEIGHT 125KG
RGK Wheelchairs Ltd
Unit 8 b/c Ring Rd, Zone 2
Burntwood Ind Est
Burntwood, Staffs
England WS7 3JQ
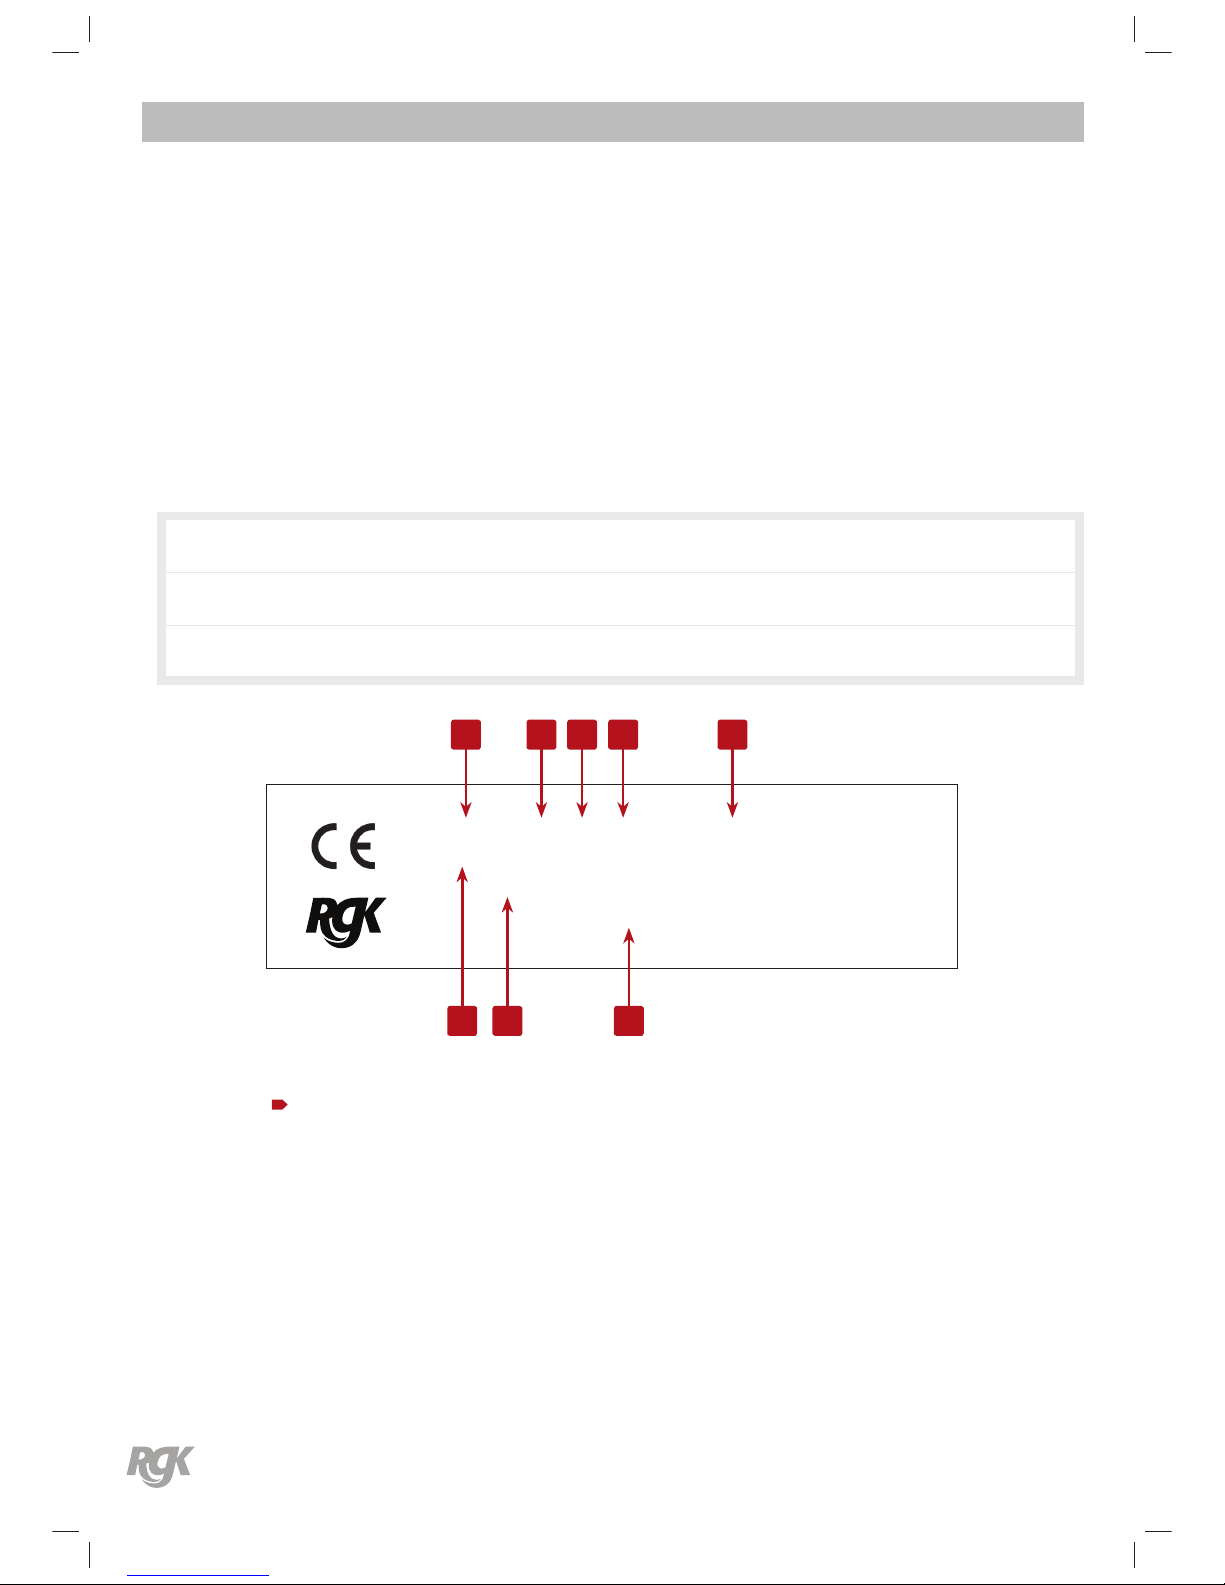
A Model
B Chair Serial Number
C Month Manufactured
D Year Manufactured
E Manufacturer Address
F Manufacturer Contact Number
G Manufacturer Email Address
H Maximum User Weight
RGK Chair Label Information
A
F G H
B C D E
EXAMPLE:
Page 13
Need replacement parts?
Take advantage of our online pricing policy at ; www.rgklife.com
User Manual
Issue No: 16 | 2016
13
Safety Handling of your Wheelchair
Tilting
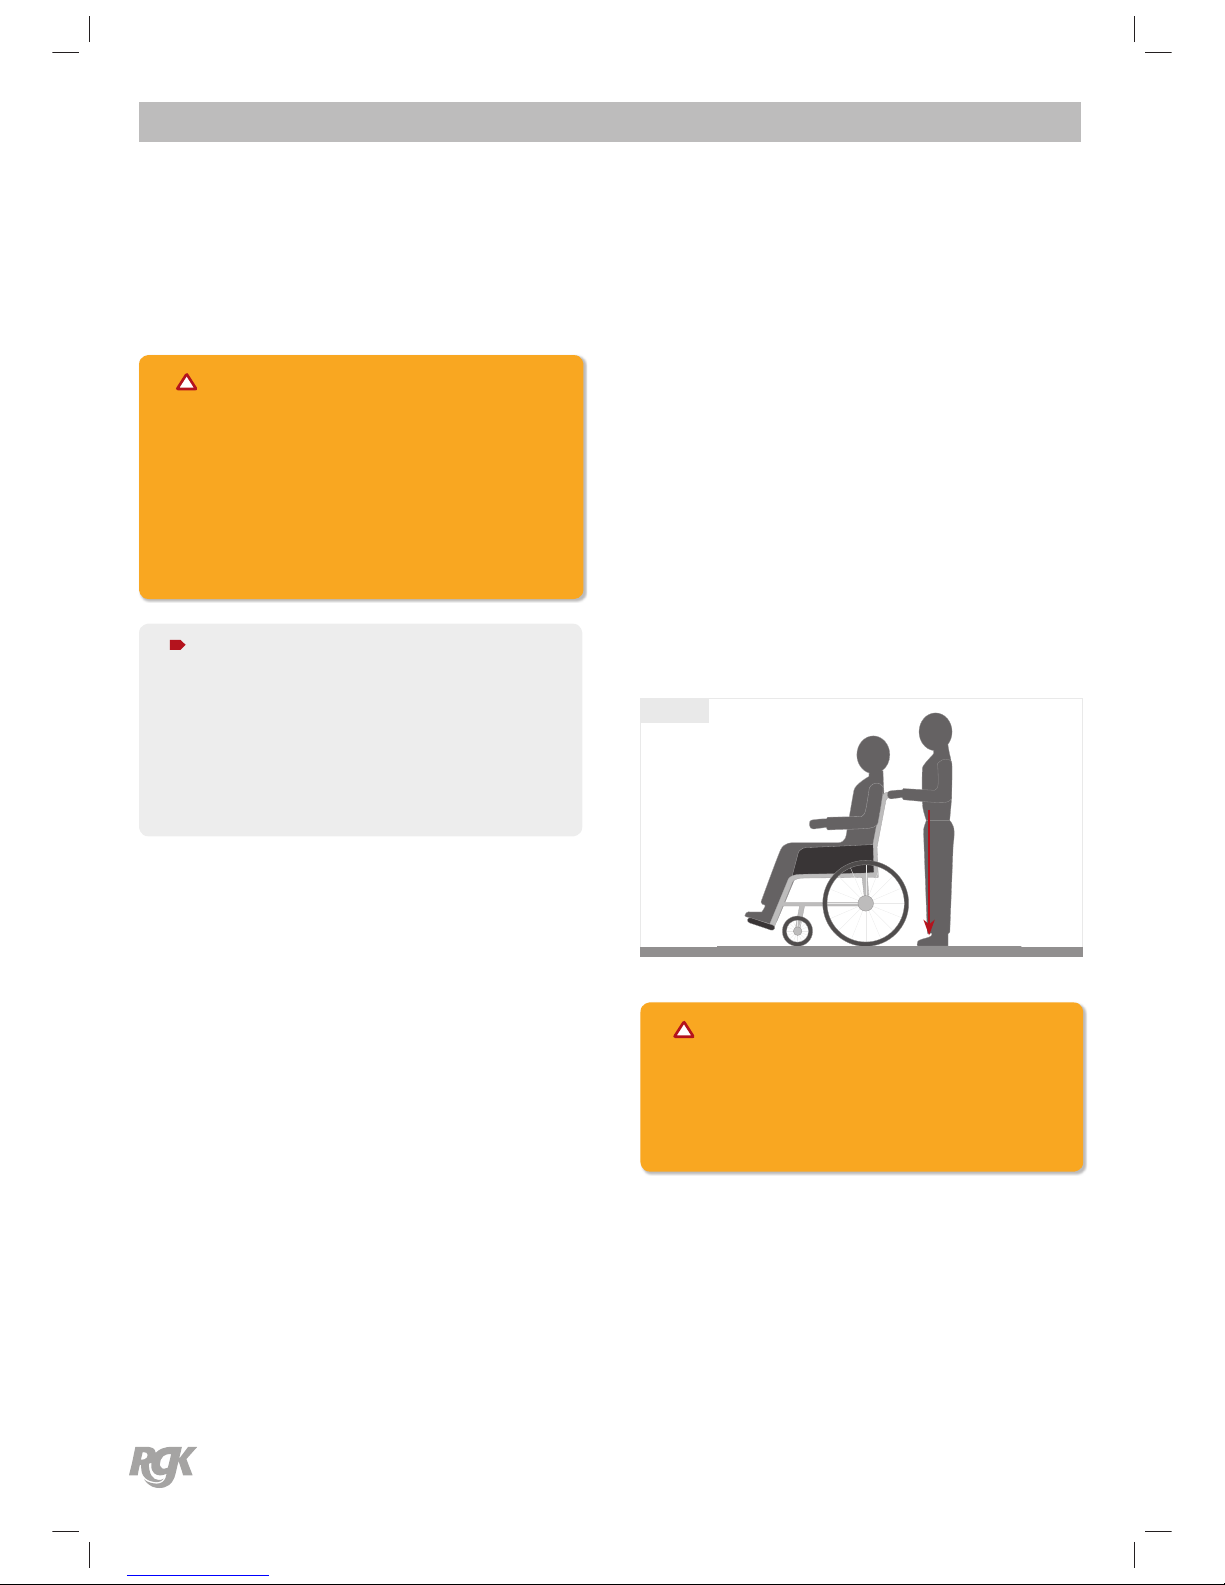
When tilting the wheelchair, an assistant should grasp the
back of the chair on a non-removable (non-detachable)
part. Inform the chair occupant before tilting the chair and
remind him/her to lean back.
Be sure the occupant’s feet and hands are clear of all wheels.
Apply a continuous motion until the balance point is
achieved.
At this point, the assistant will feel a dierence in the
weight distribution. Turn the chair in the desired direction
if necessary. Slowly lower the chair in one continuous
movement. See Fig 2.
DO NOT let the chair drop the last few inches
to the ground. This could result in injury to
the occupant.
Fig 2
CAUTION:
DO NOT tilt the chair without assistance. After mastering
the techniques of tilting the chair, use this procedure to
tackle kerbs, short stairs, etc.
User Manual | Handling of Wheelchairs
WARNING:
A note to wheelchair assistants
DO NOT attempt to lift the wheelchair by any removable
(detachable) parts.
Lifting by means of any removable (detachable) parts
of a wheelchair may result in injury to you the assistants
and damage your wheelchair.
NOTE: WHEELCHAIR ASSISTANTS
When assistance to the wheelchair user is required,
remember to use good body mechanics. Keep your
back straight and bend your knees whenever tilting the
wheelchair or traversing kerbs, or any other impediments
Page 14
Need replacement parts?
Take advantage of our online pricing policy at ; www.rgklife.com
User Manual
Issue No: 16 | 2016
14
User Manual | Handling of Wheelchairs
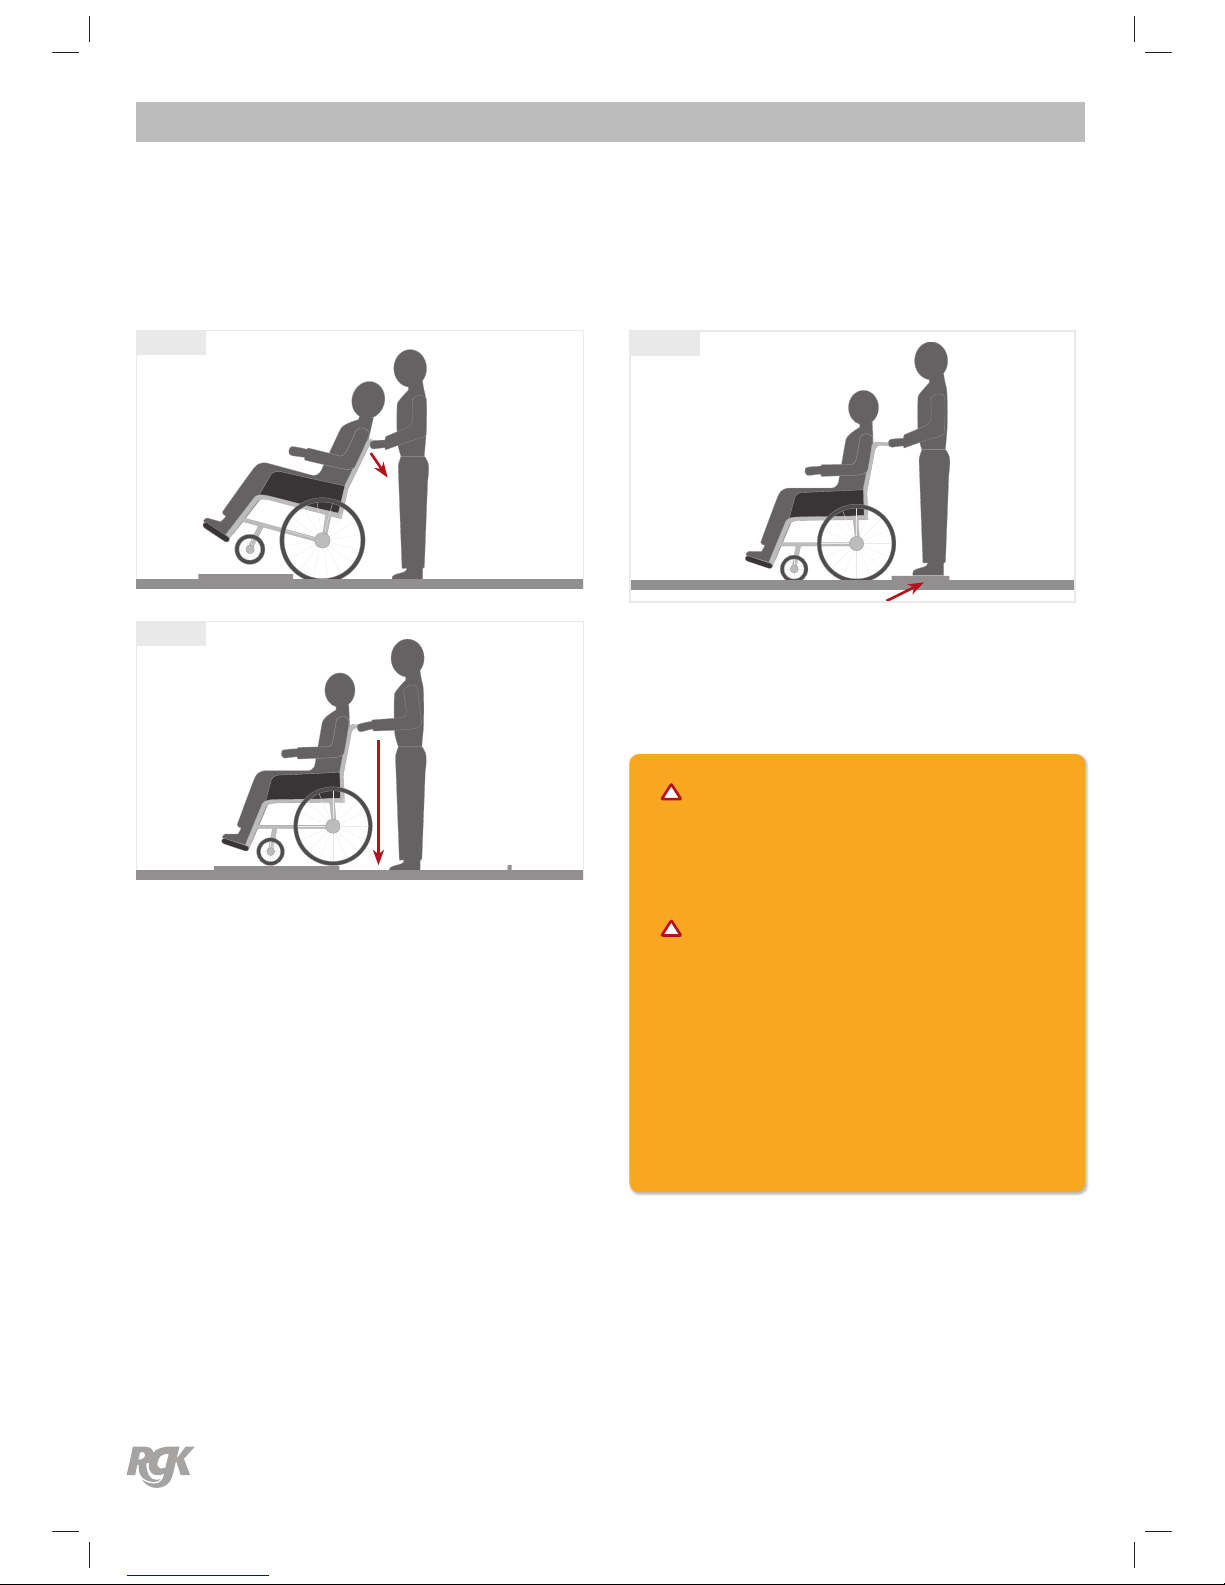
Method 1
The assistant should tilt the chair until the front castors clear
the kerb. Roll the chair forward and lower the front castors to
the pavement. Push the chair forward until the rear wheels
roll up and over the kerb. See Fig 3 and Fig 4.
Fig 3
Fig 4
Method 2
The assistant should stand on the pavement and turn the chair
so that the rear wheels are against the kerb. The chair should
be tilted back to the balance point and, in one continuous
movement, the rear wheels should be pulled up and over the
kerb. See g 5.
Fig 5
DO NOT return the front castors to the ground until the chair
back has been pulled backward far enough to clear the edge
of the kerb. Unless the assistant has exceptional upper body
strength, it is recommended that two assistants be utilised
when choosing Method 2.
WARNING:
DO NOT attempt to lift a wheelchair by lifting on any
removable (detachable) parts. Lifting by means of any
removable (detachable) parts of a wheelchair may result in
injury to the user or damage to the wheelchair.
WARNING:
Extreme caution is advised when it is necessary to move
an occupied wheelchair up or down the stairs. RGK
recommends using two assistants and making thorough
preparations. Make sure to use ONLY secure, nondetachable parts for hand-hold supports.
Page 15
Need replacement parts?
Take advantage of our online pricing policy at ; www.rgklife.com
User Manual
Issue No: 16 | 2016
15
Reaching, Leaning and Bending - Forward
When reaching for any objects either in front, to the side or
behind your wheelchair make sure that you do not lean too
far out of your wheelchair, as this will change your centre of
gravity, and there is a risk of tipping or losing your balance.
The hanging of additional loads such as a laptop bag
or back pack on your backrest can aect the rearward
stability of your chair. This can cause your wheelchair to
lift at the front and the chair to tip backwards, potentially
causing injury or property damage.
WARNING
User Manual | Handling of Wheelchairs
DANGER!
DO NOT use an escalator to move a wheelchair between
oors as this could cause serious personal injury or
property damage.
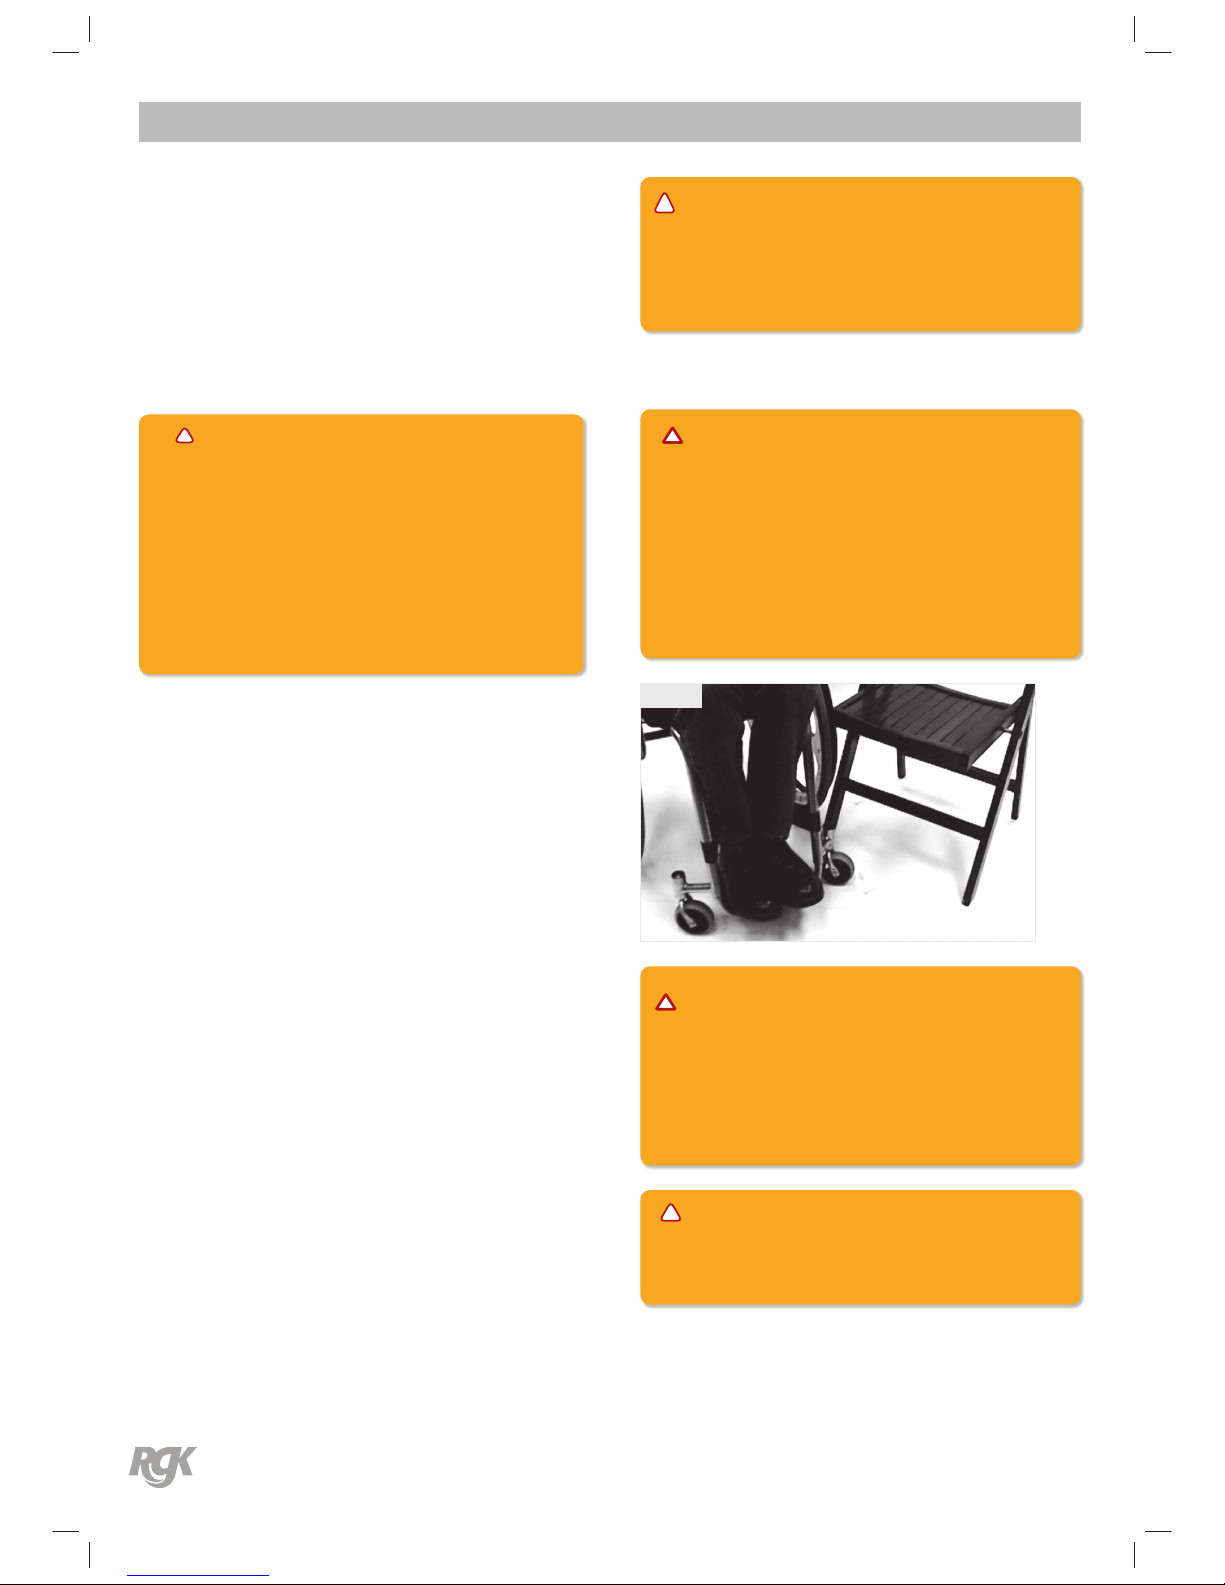
Transferring to and from other seats
WARNING:
BEFORE attempting to transfer in or out of the wheelchair,
every precaution should be taken to reduce the gap
distance. Turn both castors toward the object you are
transferring onto. See Fig 6. Also be certain the wheel locks
are engaged to help prevent the wheels from moving.
Fig 6
CAUTION:!
When transferring, position yourself as far back as possible
in the seat. This will prevent damaged upholstery and the
possibility of the chair tipping forward.
WARNING:
Do not stand on footplate during transfer.
Page 16
Need replacement parts?
Take advantage of our online pricing policy at ; www.rgklife.com
User Manual
Issue No: 16 | 2016
16
WARNING:
DO NOT attempt to reach objects if you have to move
forward in the seat or pick them up from the oor by
reaching down between your knees.
WARNING:
The position of the footrest, camber tube and rear seat
height, as well as the tautness of the back upholstery
are directly related to the chairs stability. Any change to
one or any combination of the four may cause the chair
to decrease in stability. Use EXTREME caution when
using a new seating position for the rst time.
Many activities require the wheelchair owner to reach, bend
and transfer in and out of the wheelchair. These movements
will cause a change to the normal balance, the centre of
gravity, and the weight distribution of the wheelchair.
To determine and establish your particular safety limits,
practice bending, reaching and transferring activities
in several combinations in the presence of a qualied
health professional BEFORE attempting active use of the
wheelchair.
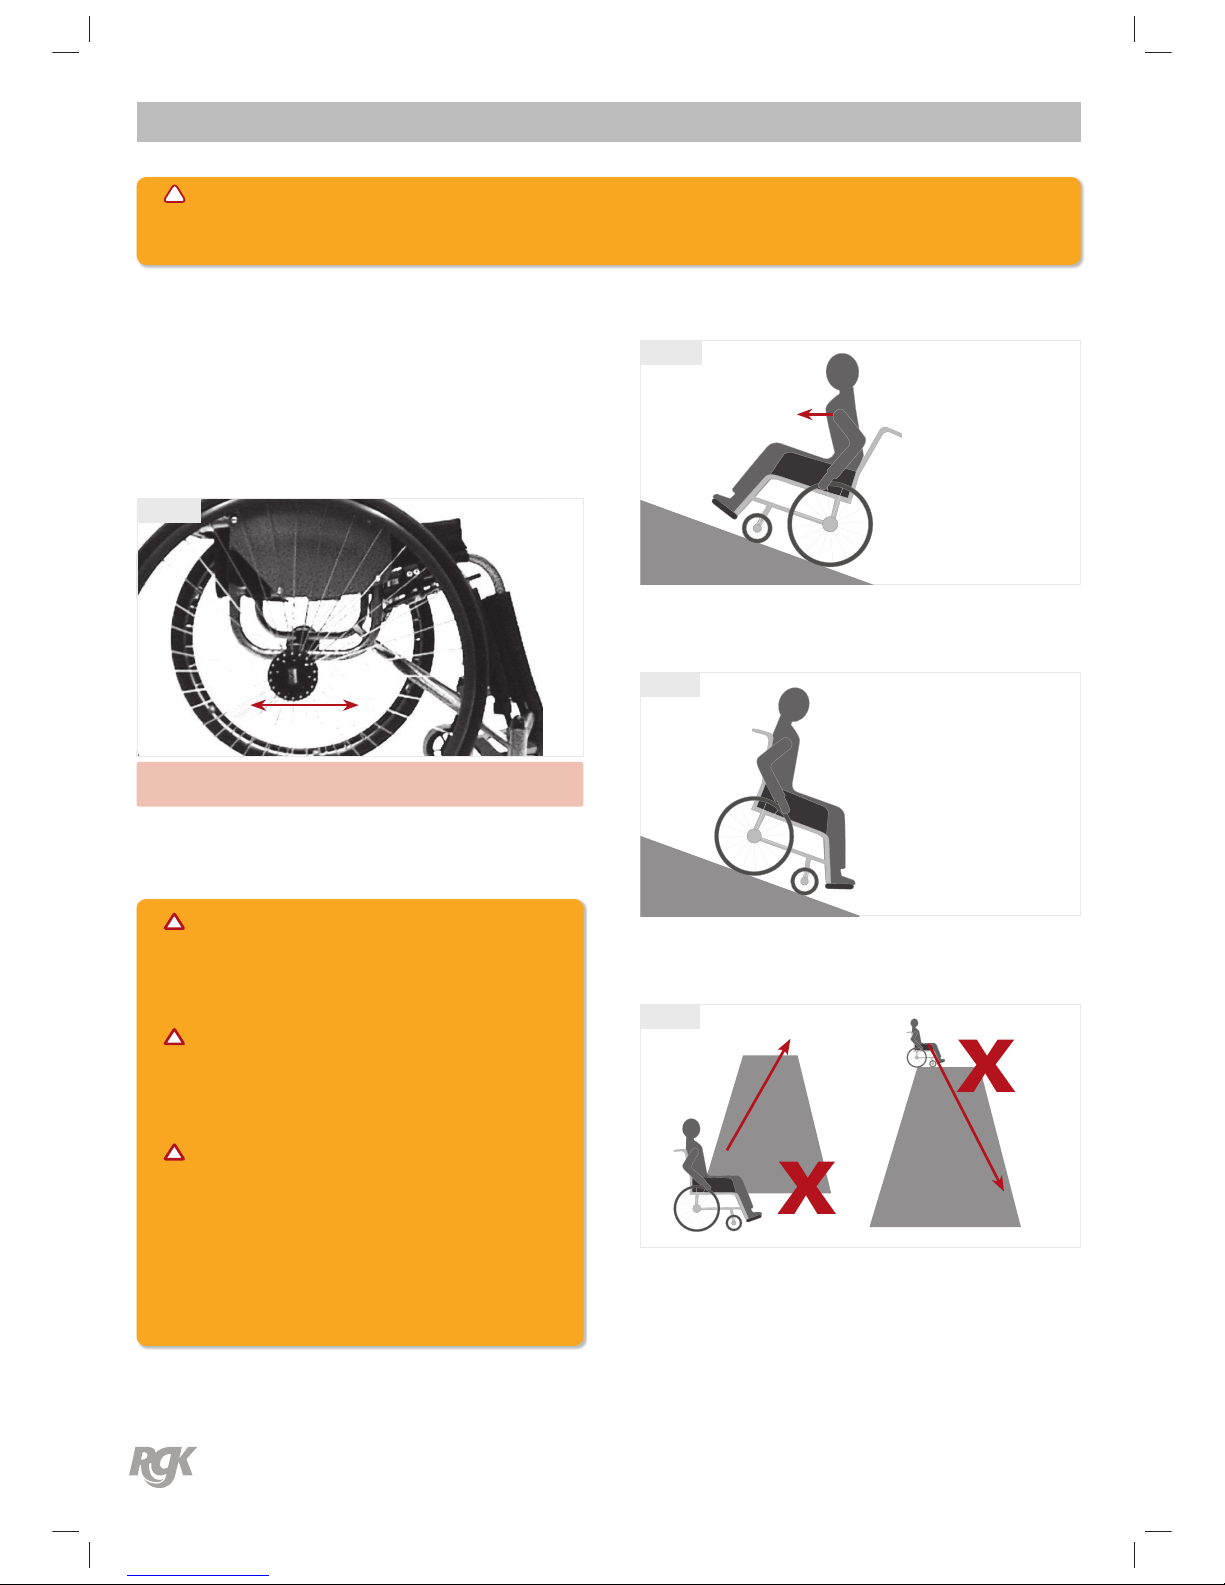
Proper positioning is essential for your safety. When
reaching, leaning, bending or bending forward, it is
important to use the front castors as a tool to maintain
stability and balance. See Fig 7.
Fig 7
Castors pointing forward
User Manual | Handling of Wheelchairs
Transferring to and from other seats
WARNING:
RGK does NOT recommend that your wheelchair be
transported up or down stairways with you in it.
WARNING:
DO NOT attempt to lift the wheelchair by any
removable (detachable) parts. Lifting by means of any
removable (detachable) parts of a wheelchair may
result in injury to you the assistants and damage your
wheelchair.
NOTE:
Wheelchair Assistants
When assistance to the wheelchair user is required,
remember to use good body mechanics. Keep your
back straight and bend your knees whenever titling
the wheelchair or traversing kerbs, or any other
impediments.
NOTE:
This activity may be performed independently provided
you have adequate mobility and upper body strength.
Position the chair as close as possible along side the
seat to which you are transferring, with the front castors
pointing toward it, engage wheel locks. Shift body
weight into seat with transfer.
During independent transfer, little or no seat platform
will be beneath you. Use a transfer board if at all possible.
Page 17
Need replacement parts?
Take advantage of our online pricing policy at ; www.rgklife.com
User Manual
Issue No: 16 | 2016
17
Lengthening and shortening the wheelbase
Lengthening the wheelbase will increase the stability and
maintain standard manoeuvrability of the chair.
Shortening the wheelbase will increase the manoeuvrability
and distribute additional weight onto the rear wheels.
To lengthen the wheelbase move Camber Bar toward the
rear of the frame. See Fig 8.
To shorten the Wheelbase move the Camber Bar toward the
front of the frame. See Fig 8.
A = Rearward / Lengthen B = Forward / Shorten
Fig 10
A B
Fig 8
Manoeuvring your RGK wheelchair
WARNING:
BEFORE attempting to manoeuvre your new wheelchair it
is important to practice and master these techniques until
you are comfortable and competent.
WARNING:
During operation, handrims can get hot when being used
to slow down. Extra caution is to be used when going
downhill.
WARNING:
Manoeuvring across a slope may aect the stability of the
wheelchair. Use extreme caution on slopes.
User Manual | Handling of Wheelchairs
WARNING:
Any change in axle position can aect your centre of gravity and stability.
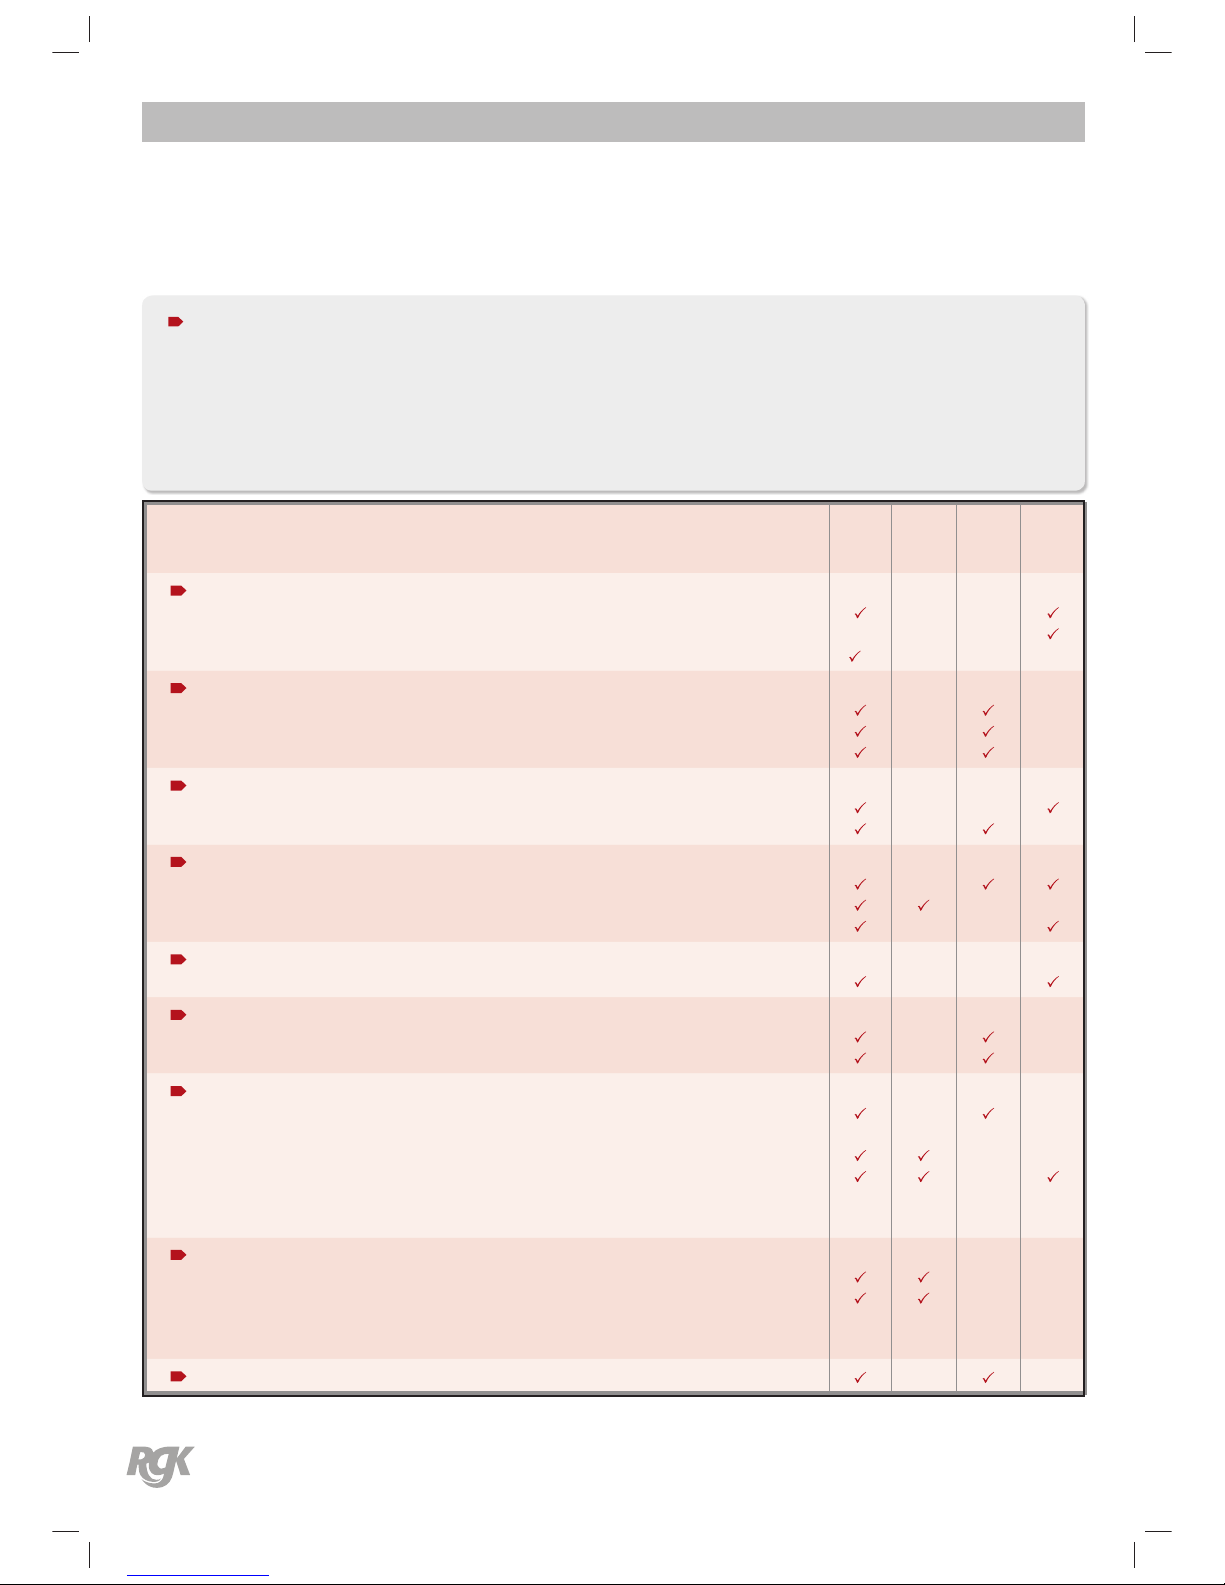
Remember to lean your upper body further forward when
going up slopes and steps. See Fig 9.
Fig 11 Fig 9
Remember to lean your upper body further back when
going down slopes and steps. See Fig 10.
Fig 12 Fig 10
Never try to climb or descend a slope diagonally.
See gure 11.
Fig. 11
Page 18
Need replacement parts?
Take advantage of our online pricing policy at ; www.rgklife.com
User Manual
Issue No: 16 | 2016
18
Safety Inspection Checklist
Item
Initially
Inspect /
Adjust
Weekly
Inspect /
Adjust
Monthly
Inspect /
Adjust
Yearly
General
• Wheelchair rolls straight (no excessive drag or pull to one side).
• Frame - Inspect frame for cracks and damage
• Fasteners - Inspect all fasteners are secured
Wheel Locks
•
Do not interfere with tyres when rolling
• Pivot points free of wear and looseness
• Wheel locks easy to engage
Seat and Back Upholstery
•
Inspect for rips or sagging.
• Inspect fastening aps to ensure they securely latch
Rear Wheels
•
Adjustable Axle Position Camber Bar is securely tightened.
• Quick/Quad release axles lock properly
• No excessive side movement or binding when lifted and spun.
Handrims
•
Inspect for signs of rough edges or peeling.
Spokes
• Inspect for bent or broken spokes.
• All spokes uniformly tight.
Front Castor
•
Inspect wheel/fork assembly for proper tension by spinning castor;
caster should come to gradual stop.
• Loosen / tighten locknut if wheel wobbles noticeably or binds to a stop.
• Wheel bearings are clean and free of moisture.
CAUTION: As with any vehicle, the wheels and tyres should be checked
periodically for cracks and wear, and should be replaced when necessary.
Tyres
•
Inspect for at spots and wear
• If pneumatic tyres check for proper ination.
CAUTION: As with any vehicle, the wheels and tyres should be checked
periodically for cracks and wear, and should be replaced when necessary.
Cleaning
User Manual | Safety Inspection Checklist
NOTE:
Regular cleaning will reveal loose or worn parts and enhance the smooth operation or your wheelchair. To operate properly
and safely, your wheelchair must be cared for just like any other vehicle.
Routine maintenance will extend the life and eciency of your wheelchair. Initial adjustments should be made to suit your
personal body structure and preference. Thereafter follow these maintenance procedures.
Page 19
Need replacement parts?
Take advantage of our online pricing policy at ; www.rgklife.com
User Manual
Issue No: 16 | 2016
19
User Manual | Troubleshooting Guide Mechanical
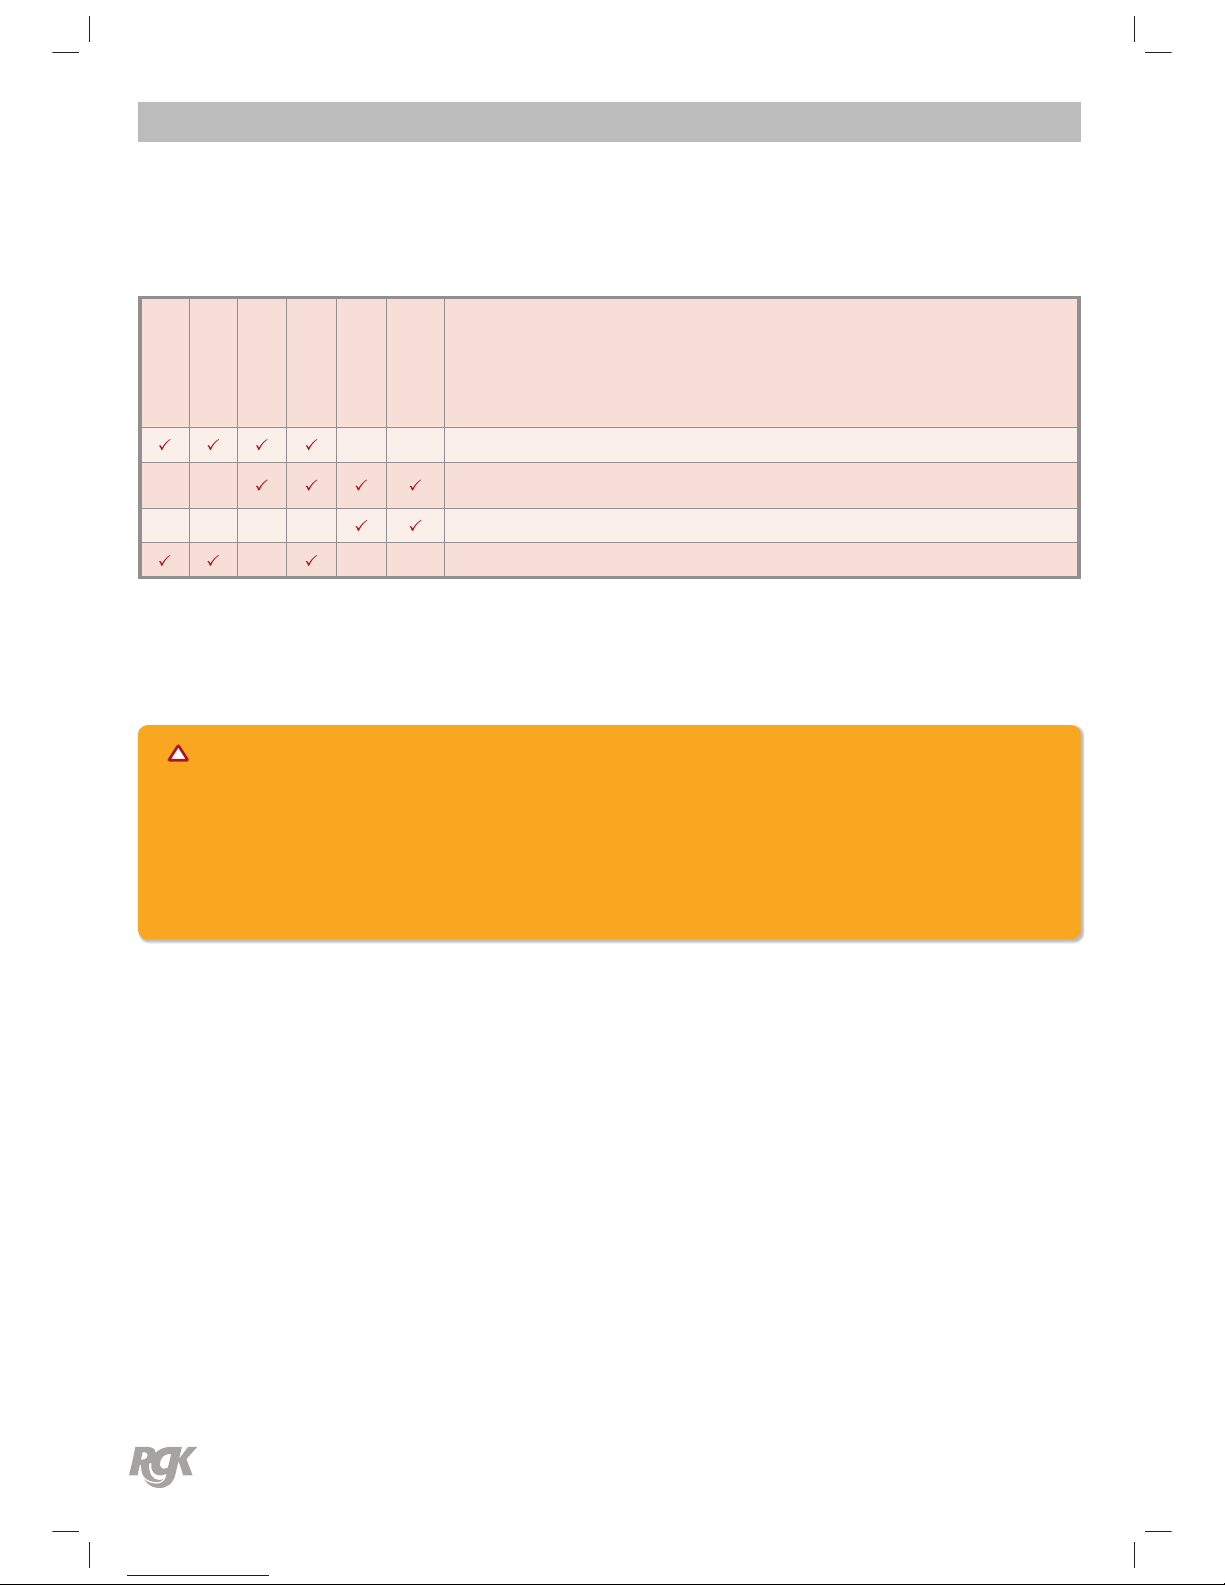
Troubleshooting Guide Mechanical
Chair veers right
Chair veers left
Sluggish turn or
performance
Castor utters
Squeaks
and rattles
Loose-ness
in chair
Solutions
Check tyres for correct and equal pressure
Check for loose castor stem nuts
Check all xtures are secure and tight.
Check spokes and nipples for tension
Check that both castors contact the ground at the same time
WARNING:
After making adjustments, always make sure that parts are properly tightened BEFORE using the wheelchair.
DO NOT over-tighten hardware attaching to the frame. This could cause damage to the frame tubing.
Page 20
Need replacement parts?
Take advantage of our online pricing policy at ; www.rgklife.com
User Manual
Issue No: 16 | 2016
20
Suggested Maintenance Procedures
1. Before using your RGK Wheelchair, make sure all nuts
and bolts are tight. Check all parts for damage or wear
and replace. Check all parts for proper adjustment.
Adjustments should always be carried out by an
authorised RGK dealer.
2. Keep quick / quad-release axles free of dirt to ensure
positive locking and proper operation. Refer to adjusting
the quick-release axle or adjusting the quad-release axle
in Procedure 3 of this manual.
3. Clean and polish Quick-Release Axles once a month – DO
NOT OIL.
4. Recommended tyre pressure is listed on the side wall of the
tyre.
5. The wheels and tyres should be checked periodically for
cracks and wear, and should be replaced when necessary
at your authorised dealer.
6. Regularly check for loose spokes in the rear wheels. If loose,
have them adjusted at your authorised dealer.
WARNING:
Do not use the wheelchair unless it has the proper tyre
pressure (P.S.I). DO NOT over inate the tyres. Failure to
follow these suggestions may cause the tyre to explode
and cause bodily harm.
7. Periodically check handrims to ensure they are secured
to the rear wheels. Refer to handrim replacement in
procedure 5 of this manual.
8. Periodically adjust wheel locks in correlation to tyre
wear. Refer to adjusting wheel locks in procedure 8 of
this manual.
9. Periodically check castor wheel bearings to make sure
they are clean and free from moisture. Refer to replacing
your front castor wheels in procedure 7 of this manual.
10. Check upholstery for sagging, rips or tears. Adjust or
replace as necessary
User Manual | Troubleshooting Guide Mechanical
Maintenance
11. The seat upholstery is secured by means of Velcro straps
around the frame. The upholstery can easily be removed
from the frame by loosening the straps under the seat.
Refer to placing your seat upholstery see procedure 2 of this
manual.
12. The backrest upholstery is removed by loosening the cover,
detaching the centre pad and wings, Refer to adjusting /
replacing your upholstery see procedure 1.
13. Wipe down the seat and backrest upholstery with a clean
damp cloth. It is important to keep the wheelchair clean,
both for your own comfort and longevity of the chair. Clean
the frame with a non-abrasive cleaning agent.
NOTE:
It is recommended to clean and disinfect the frame and
upholstery frequently.
Store wheelchair in a cool, dry place out of direct sunlight and
in original packaging.
WARNING:
Do not reuse single use fasteners. Contact your authorised
dealer for more information.
WARNING:
Exclusively use genuine RGK spare parts. Never use thirdparty parts that are not approved by RGK.
Page 21
Need replacement parts?
Take advantage of our online pricing policy at ; www.rgklife.com
User Manual
Issue No: 16 | 2016
21
Procedure 1
This Procedure includes the following: Adjusting / Replacing the Back Upholstery
The backrest upholstery is individually adjustable by
adjusting either the Velcro straps or Velcro securing wings
located under the centre pad.
Adjusting / replacing the back upholstery
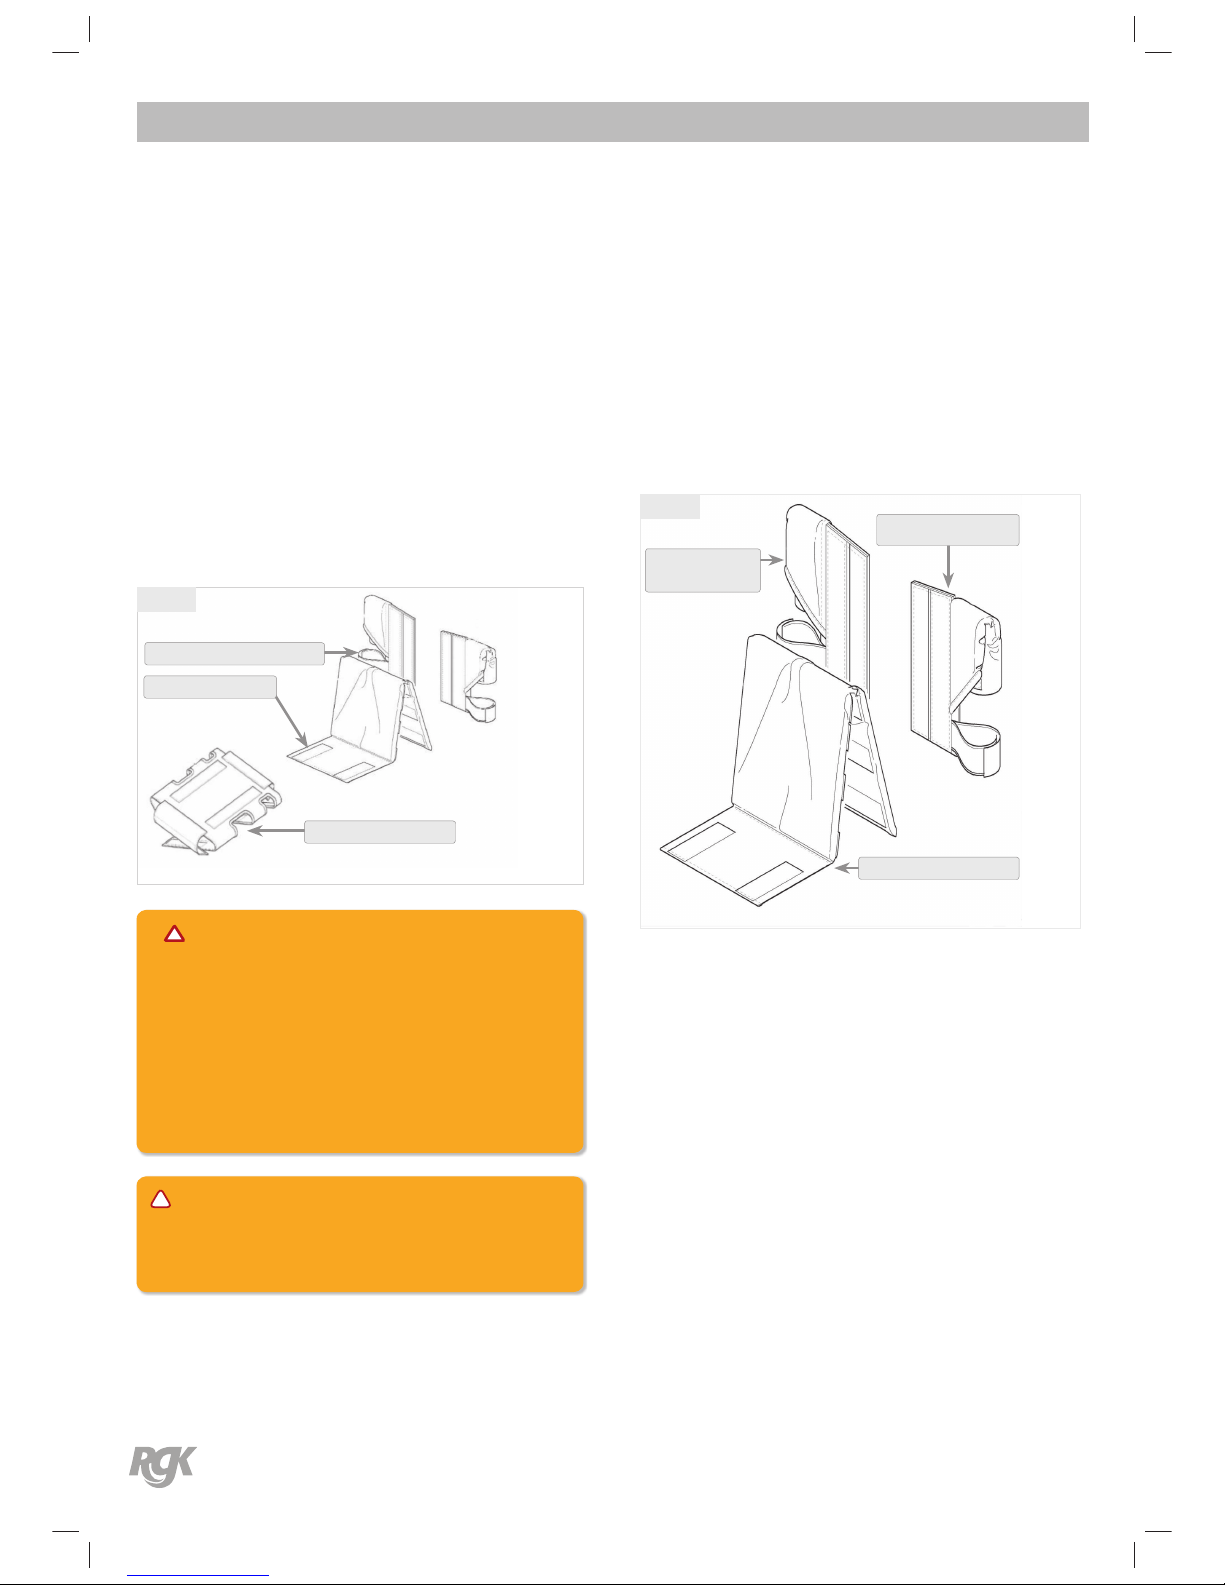
To remove back upholstery, remove cushion, release backrest
tail from seat sling, release side securing straps and lift
upholstery squarely o.
To re-t reverse above procedure. See Fig 12.
Fig 12
Side Securing Straps
Backrest Tail
Seat Sling
WARNING:
The position of the footrest, camber tube and rear seat
height, as well as the tautness of the back upholstery are
directly related to the chairs stability. Any change to one
or any combination of the four may cause the chair to
decrease in stability. Use EXTREME caution when using a
new seating position for the rst time.
CAUTION:
Velcro used on upholstery may cause property damage if
contacted closely.
User Manual | Procedure 1
To adjust tension, pull centre pad up from the rear (side
with RGK logo) Re-position side wings to increase/decrease
tension and securely re-t centre pad.
See Fig 13.
With strap adjustable backrest upholstery use straps to
decrease/increase tension (not illustrated).
Fig 15 Fig 13
Right-hand Side Wing
Left-hand Side Wing
Centre Pad
Page 22
Need replacement parts?
Take advantage of our online pricing policy at ; www.rgklife.com
User Manual
Issue No: 16 | 2016
22
Procedure 2
This Procedure includes the following: Replacing the Seat Upholstery
Seat Upholstery Replacement
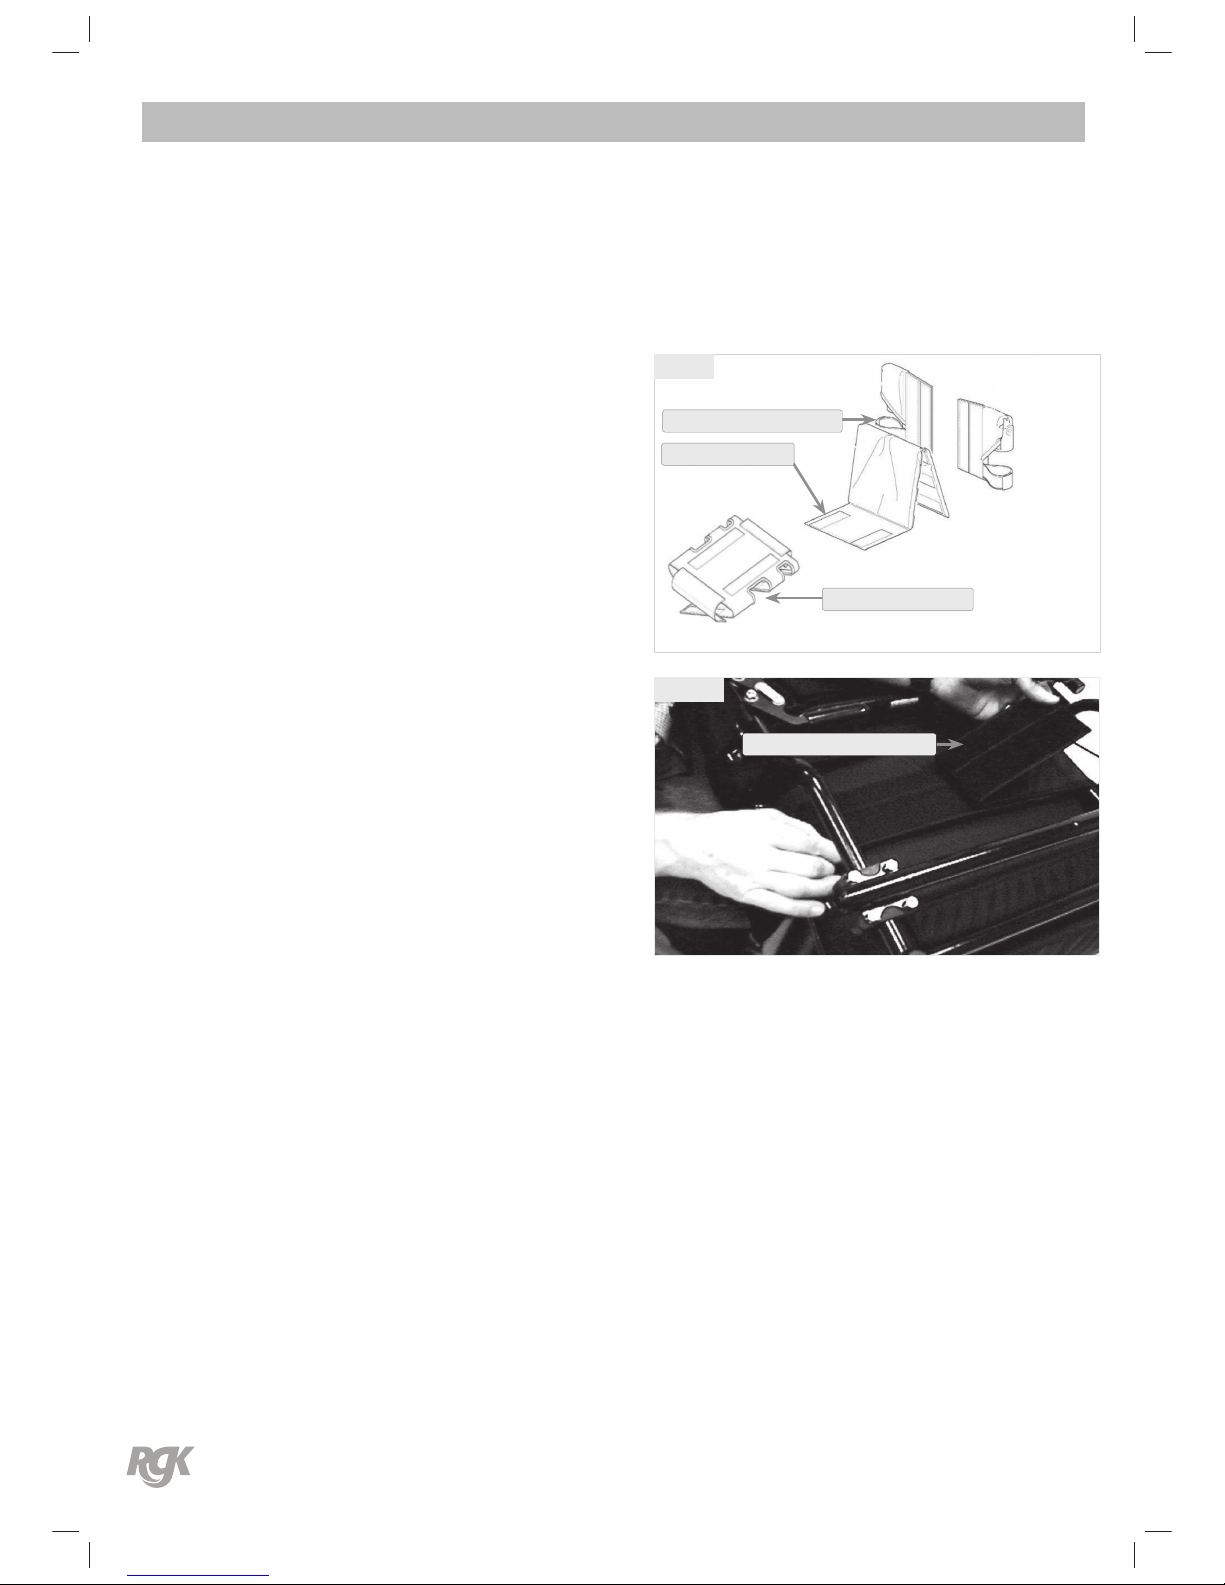
1. Remove the seat cushion and back upholstery tail from
the seat sling. See Fig 14.
2. Remove rear wheels from chair.
3. Unlatch the fastening aps that secure the seat
upholstery to the chair frame. See Fig 15.
4. Remove the existing seat upholstery, by peeling apart
the velcro straps.
5. Install the NEW seat upholstery making sure the
fastening aps hang over the right and left sides of the
chair frame.
6. Place the front fastening aps in front of the cross frame
bar and securely latch together.
7. Securely latch the remaining fastening aps together.
8. Ret rear wheels. See procedure 3
9. Reinstall the back upholstery and seat cushion onto
the chair. Refer to adjusting the back upholstery in
procedure 1 of this manual.
User Manual | Procedure 2
Fig 14
Side Securing Straps
Backrest Tail
Seat Sling
Fig 16 Fig 15
Fastening Flap
Page 23
Need replacement parts?
Take advantage of our online pricing policy at ; www.rgklife.com
User Manual
Issue No: 16 | 2016
23
Procedure 3
This Procedure includes the following:
Removing rear wheels and attaching them to and from your wheelchair.
The wheels can, therefore, be installed or removed without using tools.
Removing rear wheels and attaching them to
and from your wheelchair.
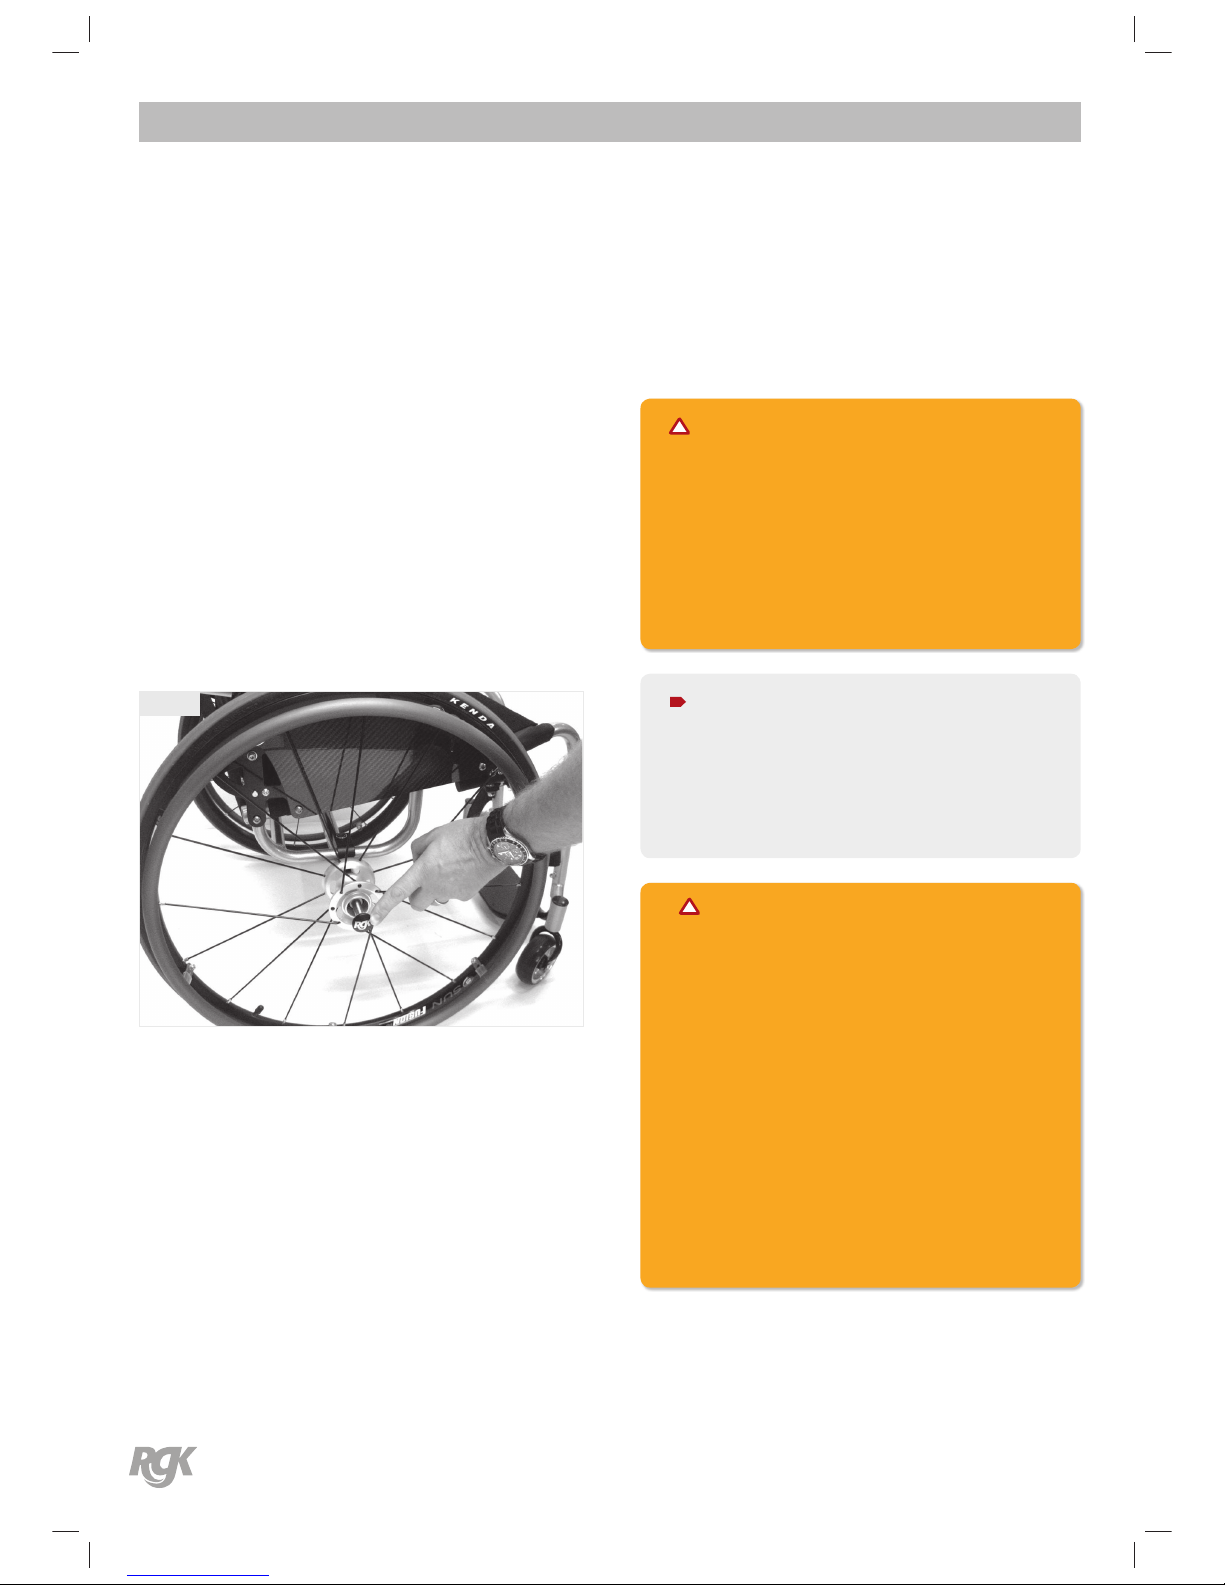
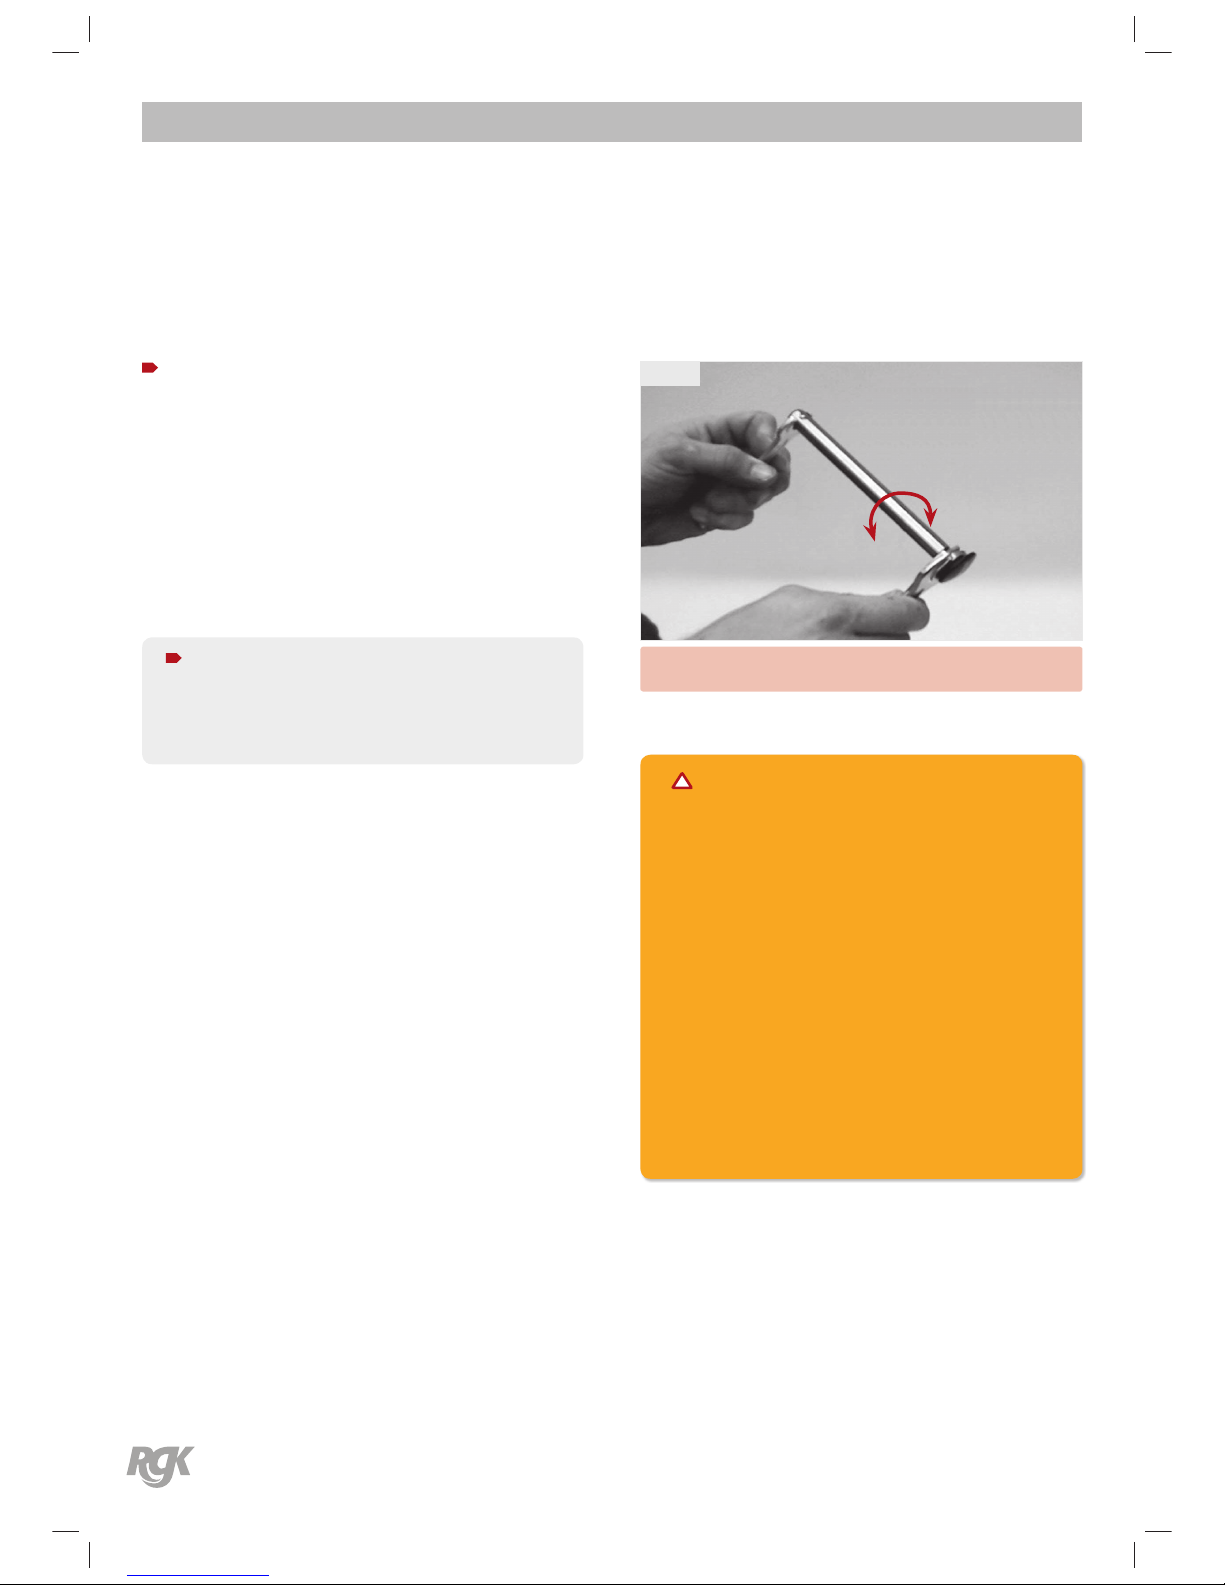
1. Push in the detent/RGK button of the quick-release axle.
Pull both axle and wheel away from your wheelchair. See
Fig 16.
2. Repeat STEP 1 for the opposite wheel
3. To reinstall the rear wheels onto your wheelchair. Push
in the detent/RGK button of the quick-release axle and
insert quick release axle into the camber bar. Pushing
both axle and wheel towards your wheelchair.
Fig 16
User Manual | Procedure 3
WARNING:
Changing the size of your rear wheels can
aect the performance of the wheelchair.
Please contact RGK Wheelchairs Ltd. before changing
rear wheel size.
The telephone number is located on the back of this
manual.
NOTE:
Pull on the rear wheels to make sure the detent pin / RGK
cap of the quick release axle are fully released before
operating the wheelchair.
WARNING:
Any adjustments to your quick release pins – then YOU
must ensure your wheels lock on both sides of your
wheelchair.
When attaching the rear wheels, always check that they
are securely mounted. Pull on the rear wheels to make
sure the detent pin/RGK cap of the quick release axle
are fully released before operating the wheelchair.
You should NOT be able to pull the rear
wheel o.
Page 24
Need replacement parts?
Take advantage of our online pricing policy at ; www.rgklife.com
User Manual
Issue No: 16 | 2016
24
Procedure 4
This Procedure includes the following: Adjusting the Quick-Release Axle
Adjusting the Quick-Release Axle
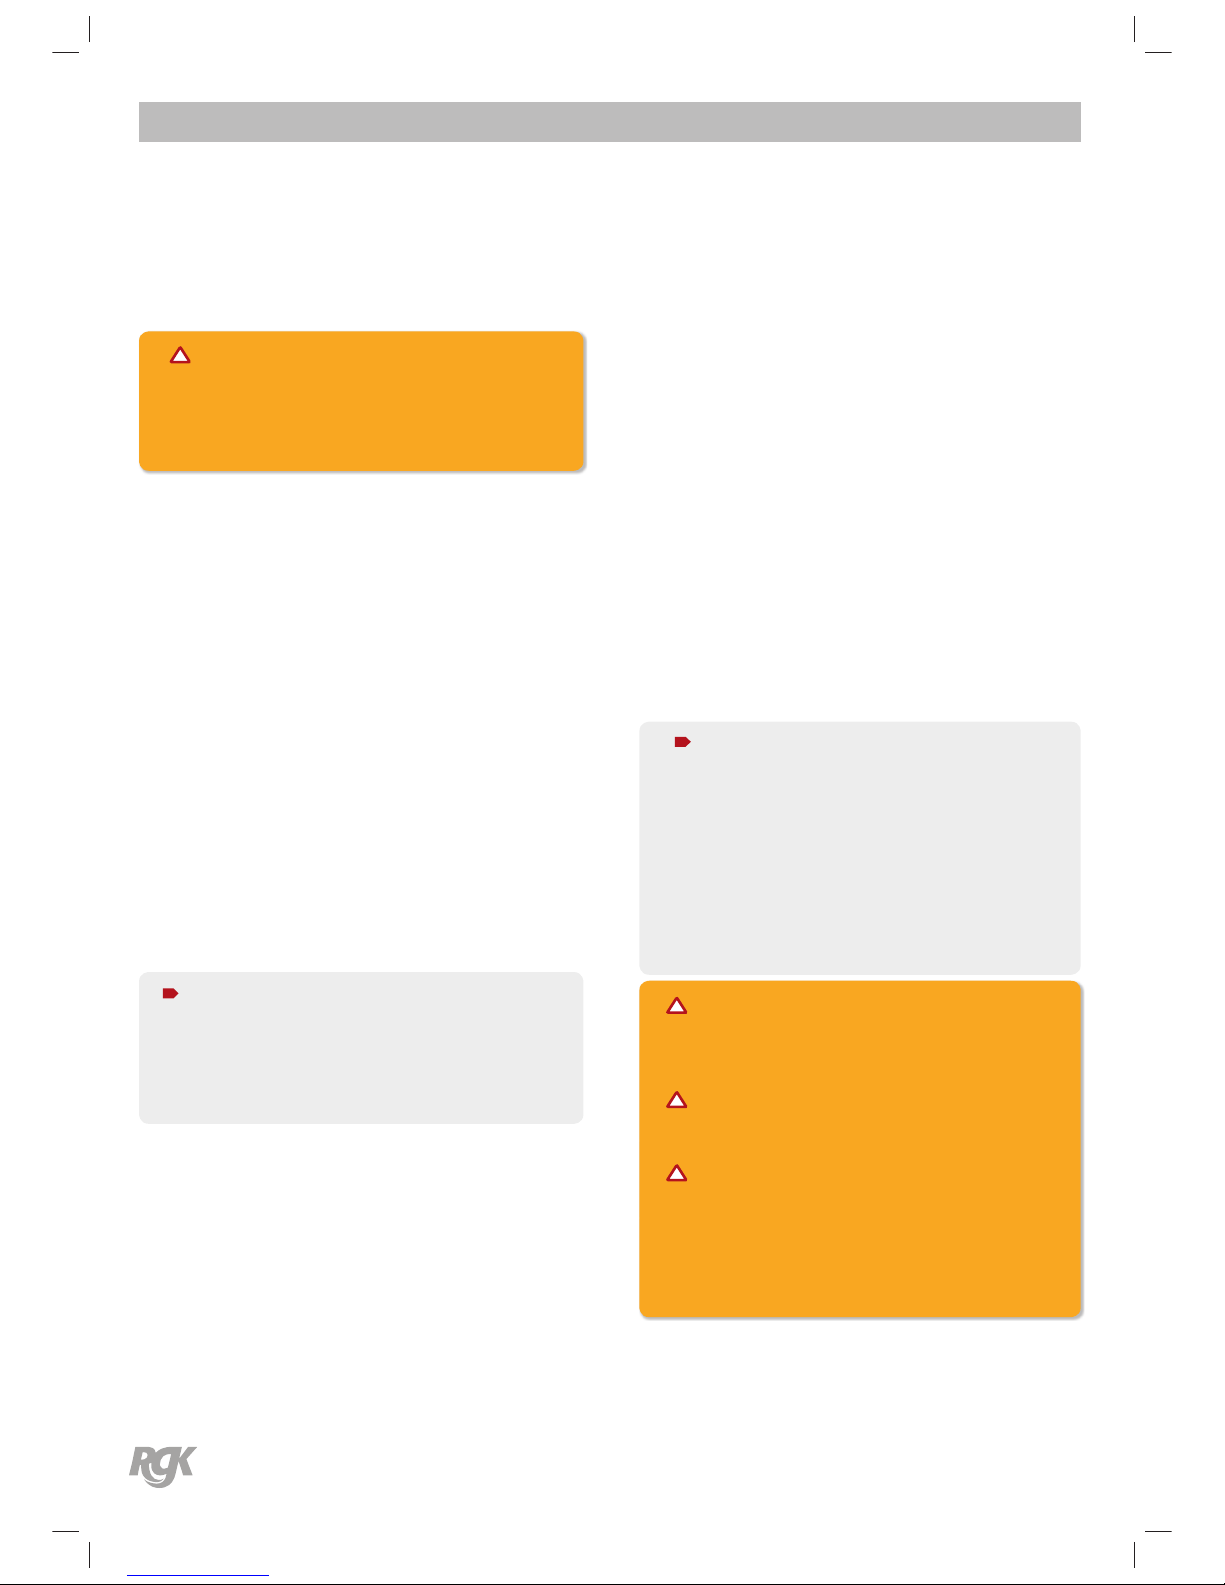
1. Remove rear wheel and quick-release axle from the chair.
2. Remove quick release axle from the wheel by depressing
detent pin/RGK button in the quick-release axle and
slide axle through the wheel hub. See Fig 17.
3. Release detent pin/RGK button ensuring that the locking
pins are fully released. Increase or decrease end play by
adjusting the locknut on the end of the quick-release
axle. See Fig 17.
4. Reinstall rear wheel onto the chair.
NOTE:
Please note the quick release axle is removable and
can be adjusted in length.
User Manual | Procedure 4
Fig 17
A
B
A = Lengthen B = Shorten
WARNING:
Any adjustments to your quick release pins – then YOU
must ensure your wheels lock on both sides of your
wheelchair.
When attaching the rear wheels, always check that they
are securely mounted. Pull on the rear wheels to make
sure the detent pin / RGK cap of the quick release axle
are fully released before operating the wheelchair.
You should NOT be able to pull the rear wheel o.
Page 25
Need replacement parts?
Take advantage of our online pricing policy at ; www.rgklife.com
User Manual
Issue No: 16 | 2016
25
Procedure 5
This procedure includes the following: Replacing the Hand Rim; Repairing/Replacing rear wheel, tyre/tube;
WARNING:
If a handrim should become damaged it could lead to
injury, and should be replaced.
Handrim replacement
1. Remove the rear wheel from the chair by depressing the
detent/RGK button.
2. Remove all air from the tube by pressing down on the pin
in the centre of the valve stem
3. While carefully holding the tyre, tube and rim strip to one
side, hold the allen head screws and remove the locknuts
that secure the handrim to the rear wheel.
4. Remove the existing handrim.
5. Install the NEW handrim by reversing the above
procedures.
6. Inate the tyre to the correct psi rating on the sidewall of
the tyre.
7. Reinstall rear wheel to the chair.
8. Repeat the procedure for the opposite rear wheel if
necessary.
NOTE:
It is not necessary to remove tyre and tube when replacing
hand rim on either Spider or X-Core Wheels.
User Manual | Procedure 5
Repairing / replacing rear wheel, tyre & tube
1. Remove the rear wheel from the chair..
2. Remove all air from the tube by pressing down on the
pin in the centre of the valve stem.
3. Unscrew the valve securing ring (Presta valves only).
Using tyre levers, remove outside tyre bead from wheel
rim, unscrew valve securing ring (Presta valves only)
remove tube. Remove tyre from rim. Reverse procedure
to t tyre/tube.
4. Inate the tyre to the correct psi rating on the side wall
of the tyre.
5. Reinstall rear wheel to the chair.
6. Repeat the procedure for the opposite rear wheel if
necessary.
NOTE:
If replacing the rear wheels or tyres with a dierent size
than what was originally on the chair please note this
will raise or lower the rear of the chair and may have an
adverse eect on your balance.
Please contact your dealer or mobility advisor for
additional advice.
WARNING:
Tyre MUST be deated before any disassembly procedures
are performed.
WARNING:
DO NOT inate tyre until it is completely assembled.
WARNING:
Make sure the detent/RGK button of the quick release
axle is fully released BEFORE operating the wheelchair.
Page 26
Need replacement parts?
Take advantage of our online pricing policy at ; www.rgklife.com
User Manual
Issue No: 16 | 2016
26
Procedure 6
This procedure includes the following: Adjusting or Replacing your camber bar
Adjusting / replacing the camber bar
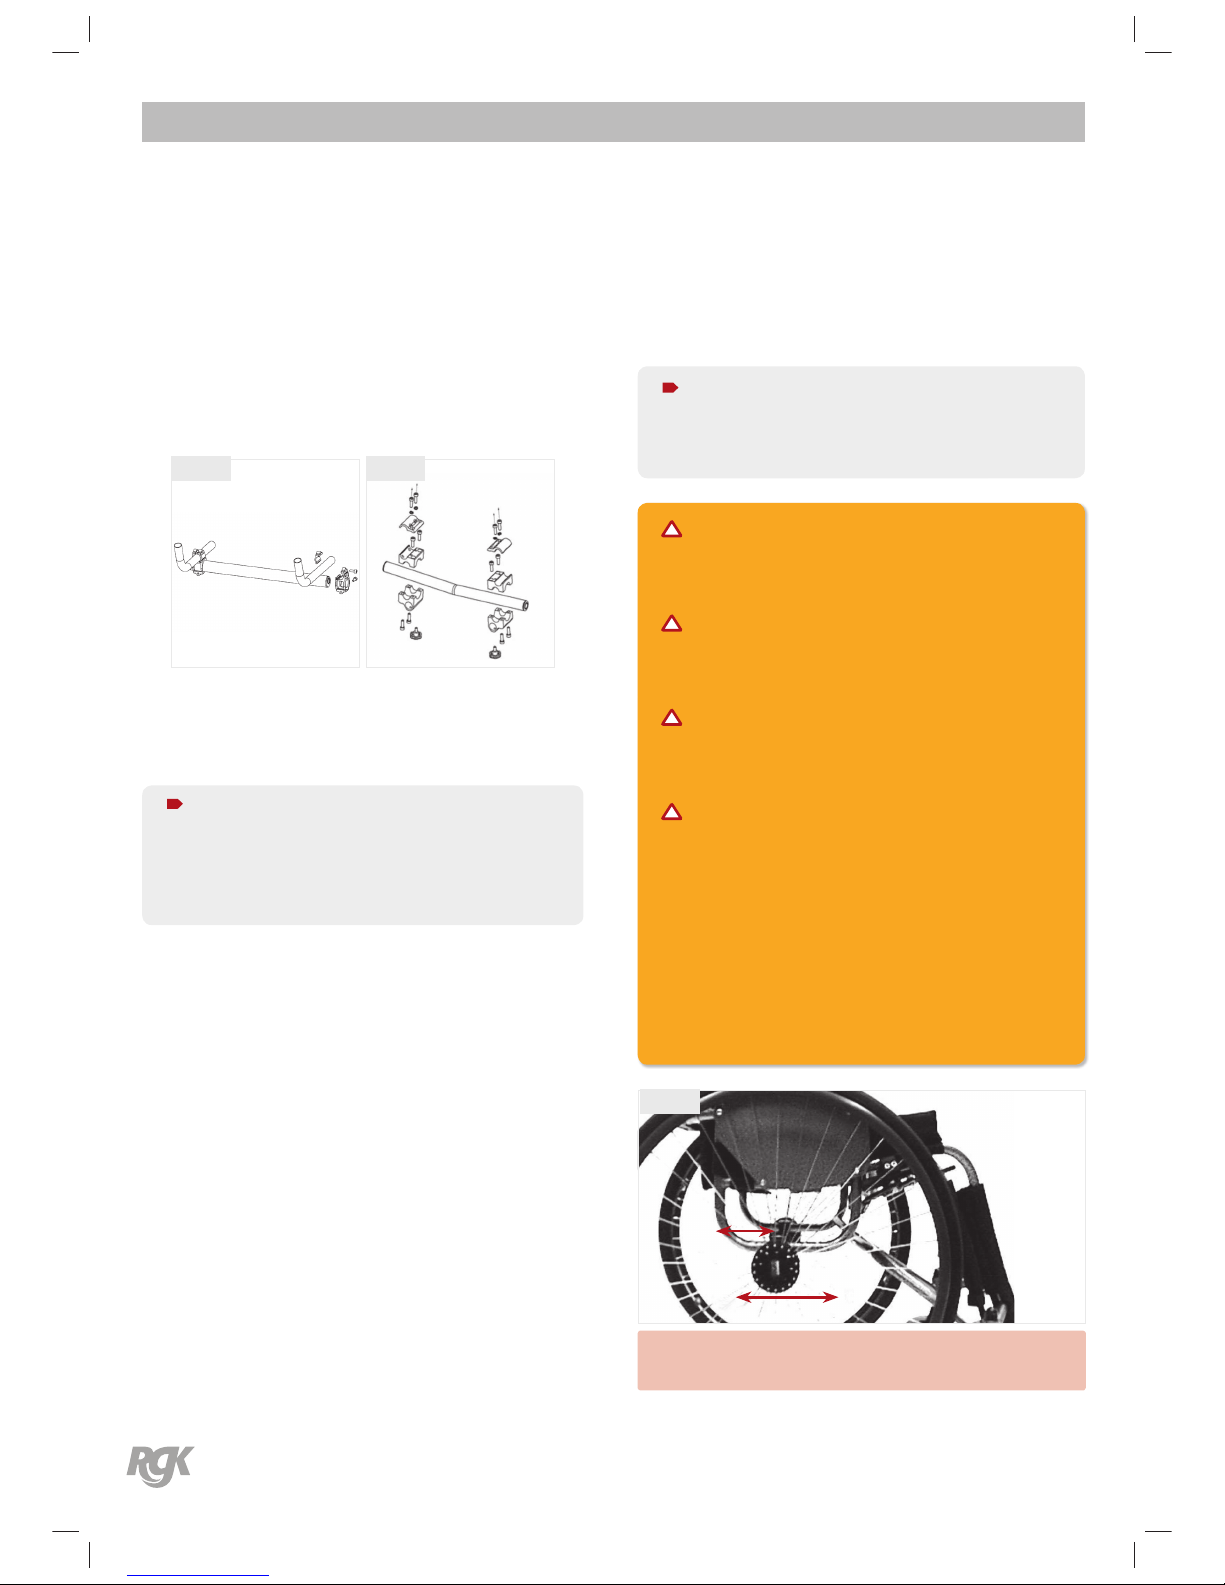
This procedure applies to two dierent camber bar types,
both requiring a 5mm allen key.
Fig 18 Fig 19
1. Remove the rear wheels from the chair.
(As procedure 3)
2. Loosen ONLY the allen head screws that secure the
adjustable camber bar to the chair frame.
NOTE:
Ensure the allen head screws are loose enough to allow
the adjustable camber bar to move freely along the chair
frame to avoid scratching the chair frame.
3. Move the adjustable axle position camber bar forward
or back along the chair frame to adjust. Lengthening
the wheelbase will increase the stability and maintain
standard manoeuvrability of the chair. Shortening
the wheelbase will increase the manoeuvrability and
distribute additional weight onto the rear wheels.
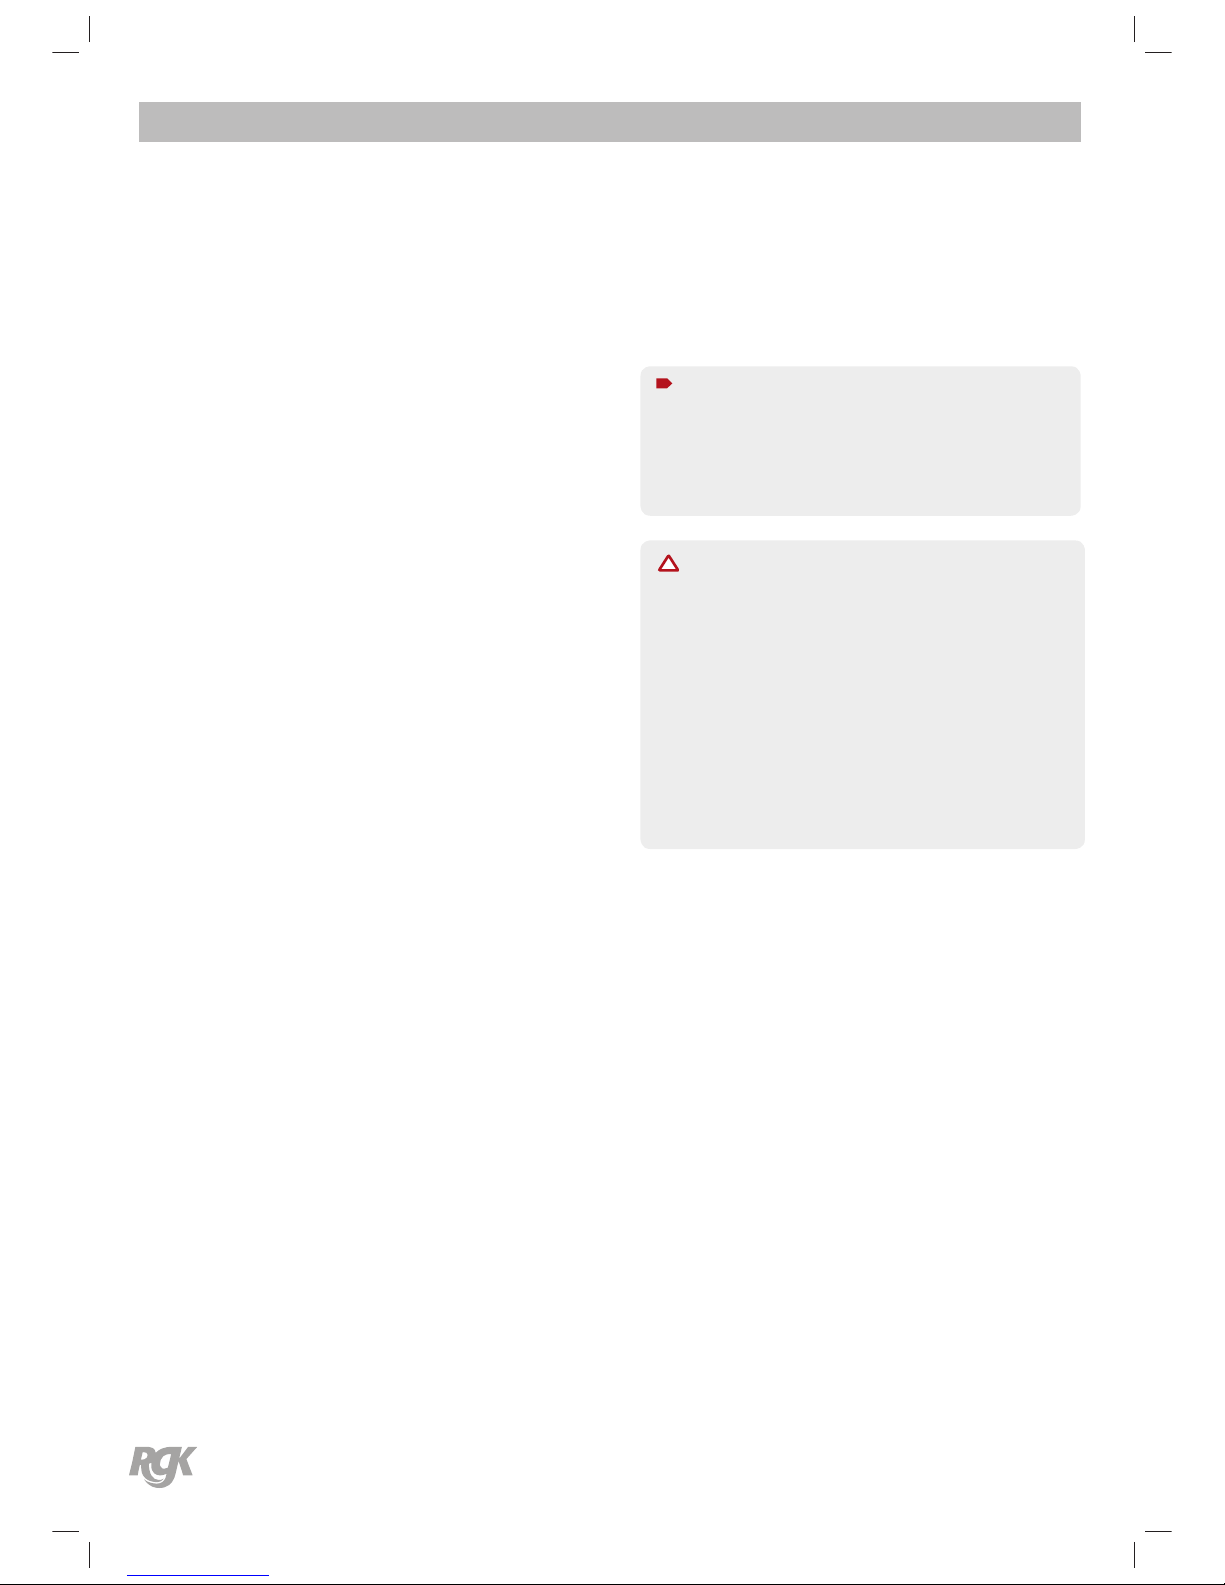
4. Measure both attaching points of the adjustable axle
position camber bar from both back posts to ensure the
adjustable camber bar is positioned at a 90° angle to the
chair frame.
5. Securely tighten the allen head screws that secure the
adjustable camber bar to the chair frame.
6. Reinstall the rear wheels onto the chair.
7. Move the chair before using to make sure there is no
excessive drag to either side.
User Manual | Procedure 6
NOTE:
If drag to either side occurs, repeat the above procedures
until the chair rolls correctly.
WARNING:
Tyre MUST be deated before any disassembly procedures
are performed.
WARNING:
DO NOT inate tyre until it is
completely assembled.
WARNING:
Make sure the detent pin of the quick/quad release axle is
fully released BEFORE operating the wheelchair.
WARNING:
The position of the footrest, camber bar,
as well as the tautness of the back upholstery, are directly
related to the chairs stability.
Any change to one or any combination of the three may
cause the chair to decrease in stability. Use EXTREME
caution when using a new seating position for the rst time.
A = Rearward / Lengthen
B = Forward / Shorten
Fig 20
A
D
B
C
Page 27
Need replacement parts?
Take advantage of our online pricing policy at ; www.rgklife.com
User Manual
Issue No: 16 | 2016
27
Procedure 7
This procedure includes the following: Replacing the Front Castor Fork assembly and Castor
Wheels
Replacing Fork Assembly
1. Remove cap.
2. Remove the bolt and locknut that secure the front fork
assembly.
3. Remove the front castor fork assembly using 19mm
socket spanner downwards through the castor housing
noting any washer sequence.
4. Install the NEW front castor fork and reverse steps 2 - 1 to
ret.
5. Repeat the procedure for the opposite front castor if
necessary.
Replacing Front Castor Wheels
1. Using two 4mm Allen keys, remove 1 of the 2 screws that
locate the castor axle.
2. Remove the castor axle by sliding it out. Remove the
castor wheel and spacers from the castor fork.
3. Install the NEW castor wheel, castor axle and spacers to
the castor fork, by reversing STEPS 1 & 2.
User Manual | Procedure 7
NOTE:
Bearings must be tted by an authorised dealer.
Failure to do so will result in invalid warranty on the parts.
RGK DO NOT recommend replacing the front castor forks
or castor wheels with a dierent size other than what was
originally supplied on the chair.
By changing to a dierent size castor fork or castor wheel
will have an adverse eect on the running of the chair and
the end users balance.
CAUTION:
Page 28
Need replacement parts?
Take advantage of our online pricing policy at ; www.rgklife.com
User Manual
Issue No: 16 | 2016
28
Procedure 8
This procedure includes the following: Adjusting / Replacing Wheel Locks
NOTE:
Before adjusting or replacing any style of wheel lock
ensure that the tyres are inated to the recommended
pressure as indicated on the tyre.
Wheel Locks - Adjustment / Replacement
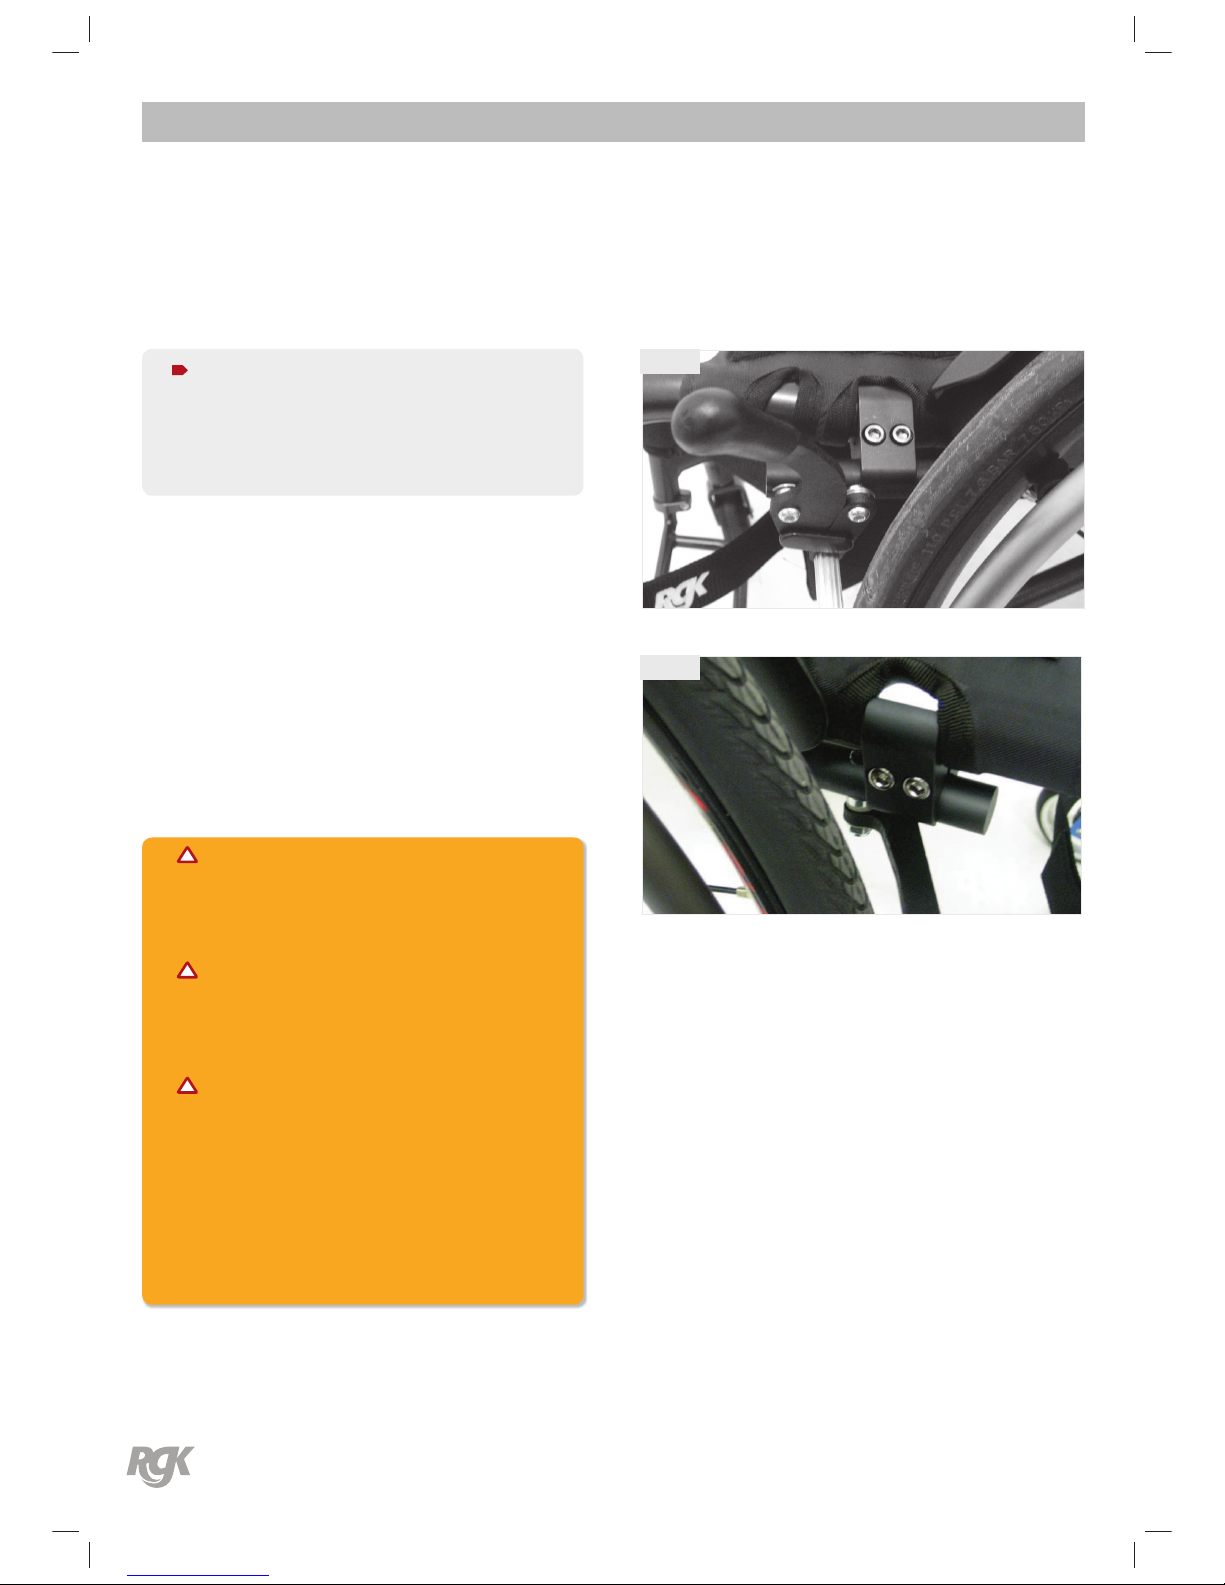
1. To replace push/pull wheel lock: See Fig 21.
2. Loosen the two allen head screws in the clamp/plate
which secure the wheel lock to the frame. Slide wheel
lock out of clamp/plate. Fit new wheel lock by reversing
procedure.
3. To replace under seat scissor lock: Use same procedure
as push/pull lock. See Fig 22.
4. Adjustment - All wheel lock styles:
5. The wheel lock tyre pressure bar should embed by
5-7mm into the (pneumatic) tyre when engaged. Adjust
to give satisfactory locking of the chair wheels.
WARNING:
After any adjustments, repair or service and before use,
make sure all attaching hardware is tightened securely –
otherwise injury or damaged may result.
WARNING:
If wheel locks do not hold occupied wheelchair in
place please adjust as above, or contact your dealer –
otherwise injury or damages may occur.
WARNING:
The wheel locks are designed to work when your
wheelchair is static. Wheel locks should not be applied
during use and tyre pressure should be as indicated on
the tyre.
User Manual | Procedure 8
Fig 21
Fig 22
Page 29
Need replacement parts?
Take advantage of our online pricing policy at ; www.rgklife.com
User Manual
Issue No: 16 | 2016
29
Procedure 9
This Procedure includes the following: Adjusting the footrest height / angle, and replacing the footrest.
User Manual | Procedure 9
Adjusting / replacing the footrest
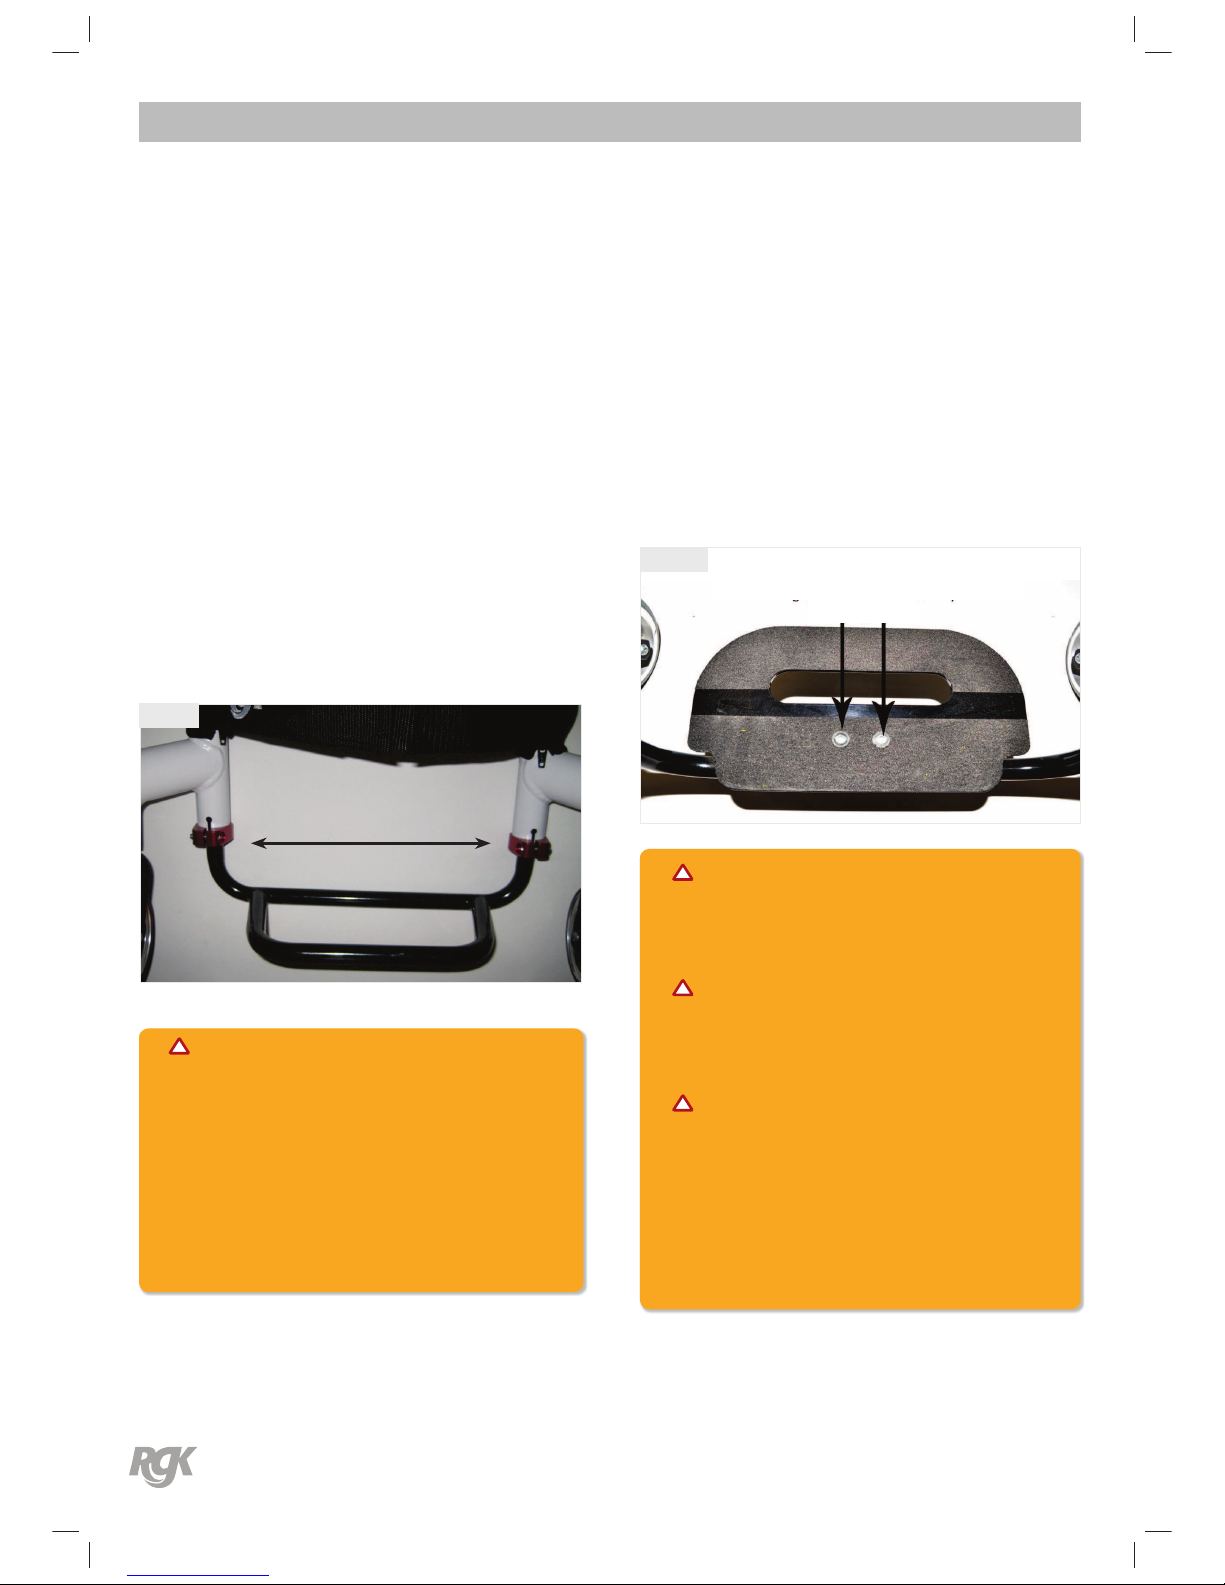
1. Loosen the two Allen head screws that secure the
footrest to the chair frame. (Located at the rear of the
frame, see Fig 25). On the TIGA Sub4, there are no clamps.
The screws are directly on the rear of the frame.
2. Remove footrest – ensuring the footrest is removed with
equal pressure.
3. Remove existing and install NEW footrest.
4. Position the NEW / existing footrest to a determined
height.
5. Tighten the two allen head screws “A”
that secure the footrest to the chair frame. See Fig 23.
Fig 23
Footrest height adjustement
A
WARNING:
The position of the footrest, camber tube and rear seat
height, as well as the tautness of the back upholstery are
directly related to the chairs stability. Any change to one
or any combination of the four may cause the chair to
decrease in stability. Use EXTREME caution when using a
new seating position for the rst time.
Angle adjusting the footrest platform
1. To adjust the angle on your angle adjustable footrest.
Loosen two button head allen screws “A” (see g 24) on
top of foot platform.
2. Rotate until desired angle is achieved.
3. Securely tighten two button head allen screws.
Angle adjustable footrest assembly
Fig 24
A
WARNING:
The footrest assembly MUST be at least 40mm above the
ground/oor to avoid hitting protruding objects when
using this wheelchair.
WARNING:
Do not stand on the footrest/footplate! Even if the user is
sitting in the chair, there is still a risk of tipping over and
injury.
WARNING:
When transferring, do not stand on the footboard, there
is a risk of tipping over and injury.
Page 30
Need replacement parts?
Take advantage of our online pricing policy at ; www.rgklife.com
User Manual
Issue No: 16 | 2016
30
Procedure 10
This Procedure includes the following: Unfolding / Folding the backrest.
User Manual | Procedure 10
WARNING:
Your folding back MUST be locked securely in place before
using your wheelchair.
Folding your backrest with cord support
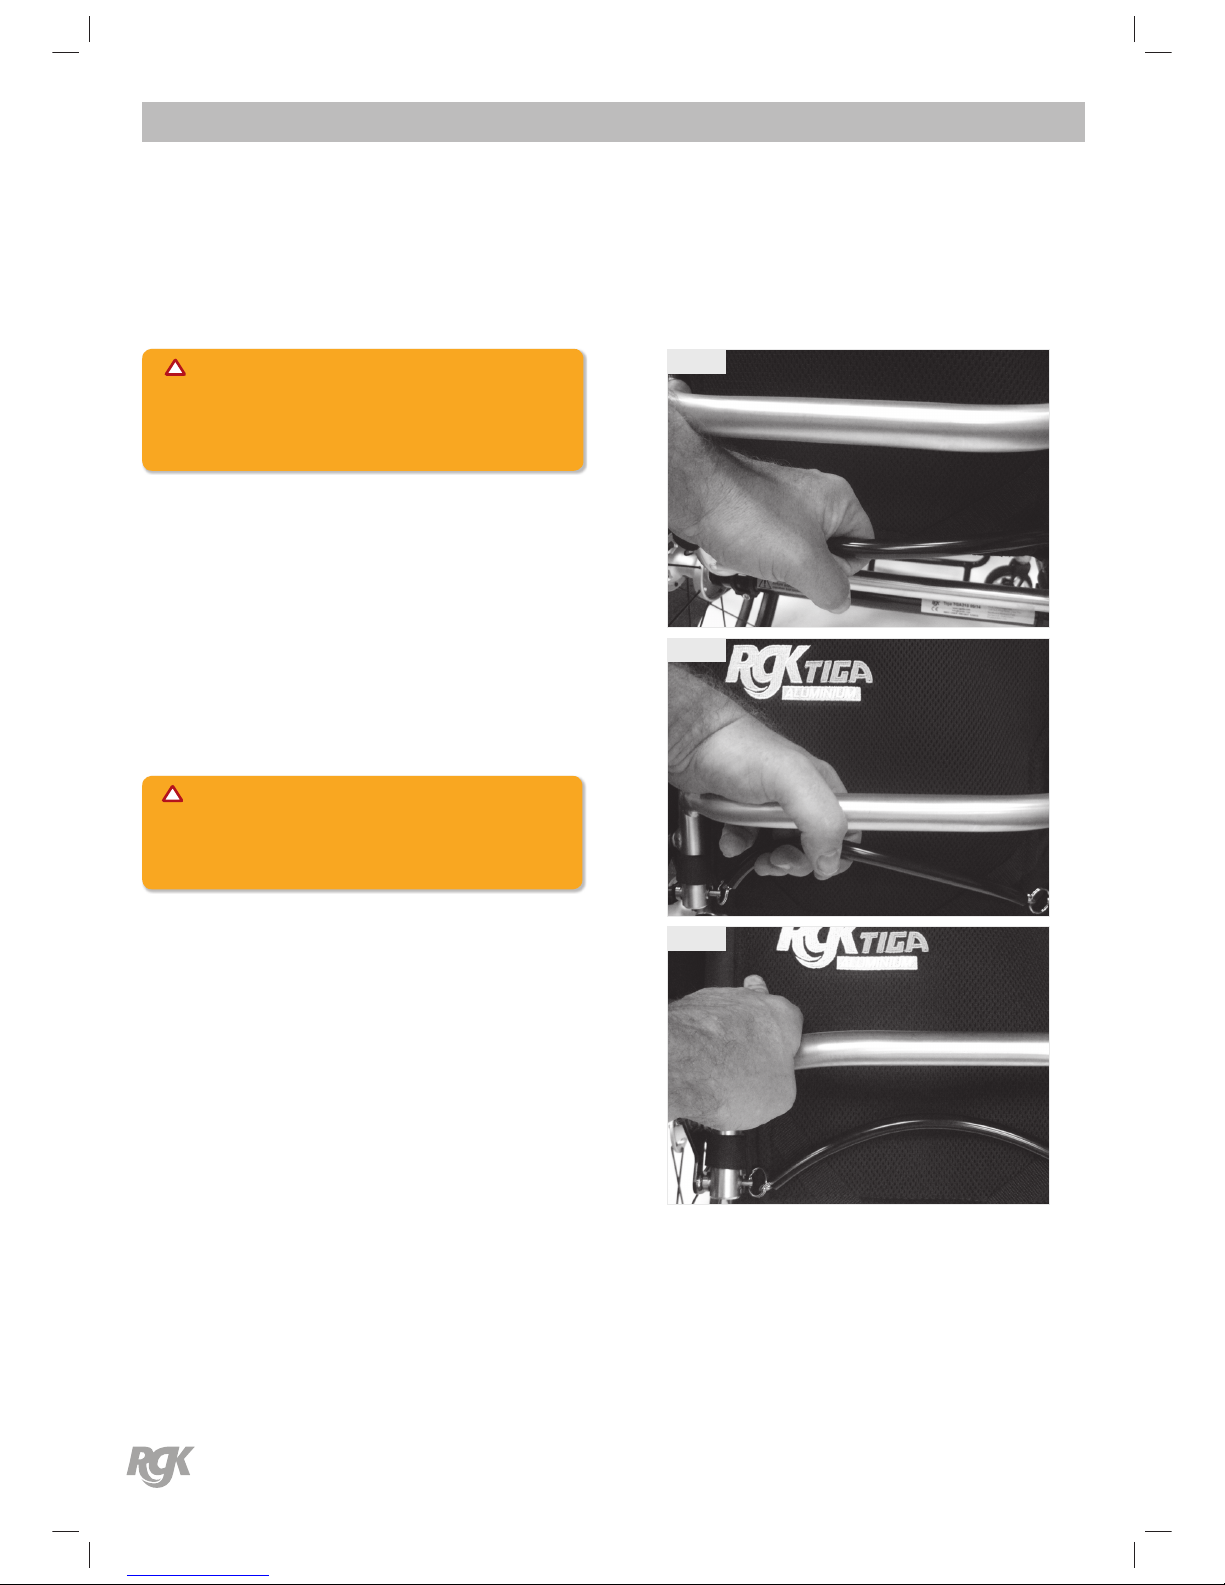
1. To fold the backrest, grasp cord support. See Fig 25.
2. Pull the cord strap towards the brace bar. See Fig 26 this
will release both locking pins, allowing the backrest to
fall forward.
3. Push the backrest rmly down ensuring that the pins
locate in the locking holes.
4. To unfold the backrest, reversing STEPS 1, 2 & 3 – Ensure
that the locking pins are secure and located in the pivot
plate.
CAUTION:
This product contains moving parts.Beware of nger
trapping.
Fig 25
Fig 26
Fig 27
Page 31
Need replacement parts?
Take advantage of our online pricing policy at ; www.rgklife.com
User Manual
Issue No: 16 | 2016
31
Procedure 11
This Procedure includes the following: Height adjustable pushing handles, Fold-down push handles.
User Manual | Procedure 11
WARNING:
DO NOT attempt to lift the wheelchair by any removable
(detachable) parts.
This includes Height adjustable pushing handles, Folddown push handles & Screw
in Push handles
Lifting by means of any removable (detachable) parts of
a wheelchair may result in injury to you the assistants and
damage your wheelchair.
Height adjustable push handles
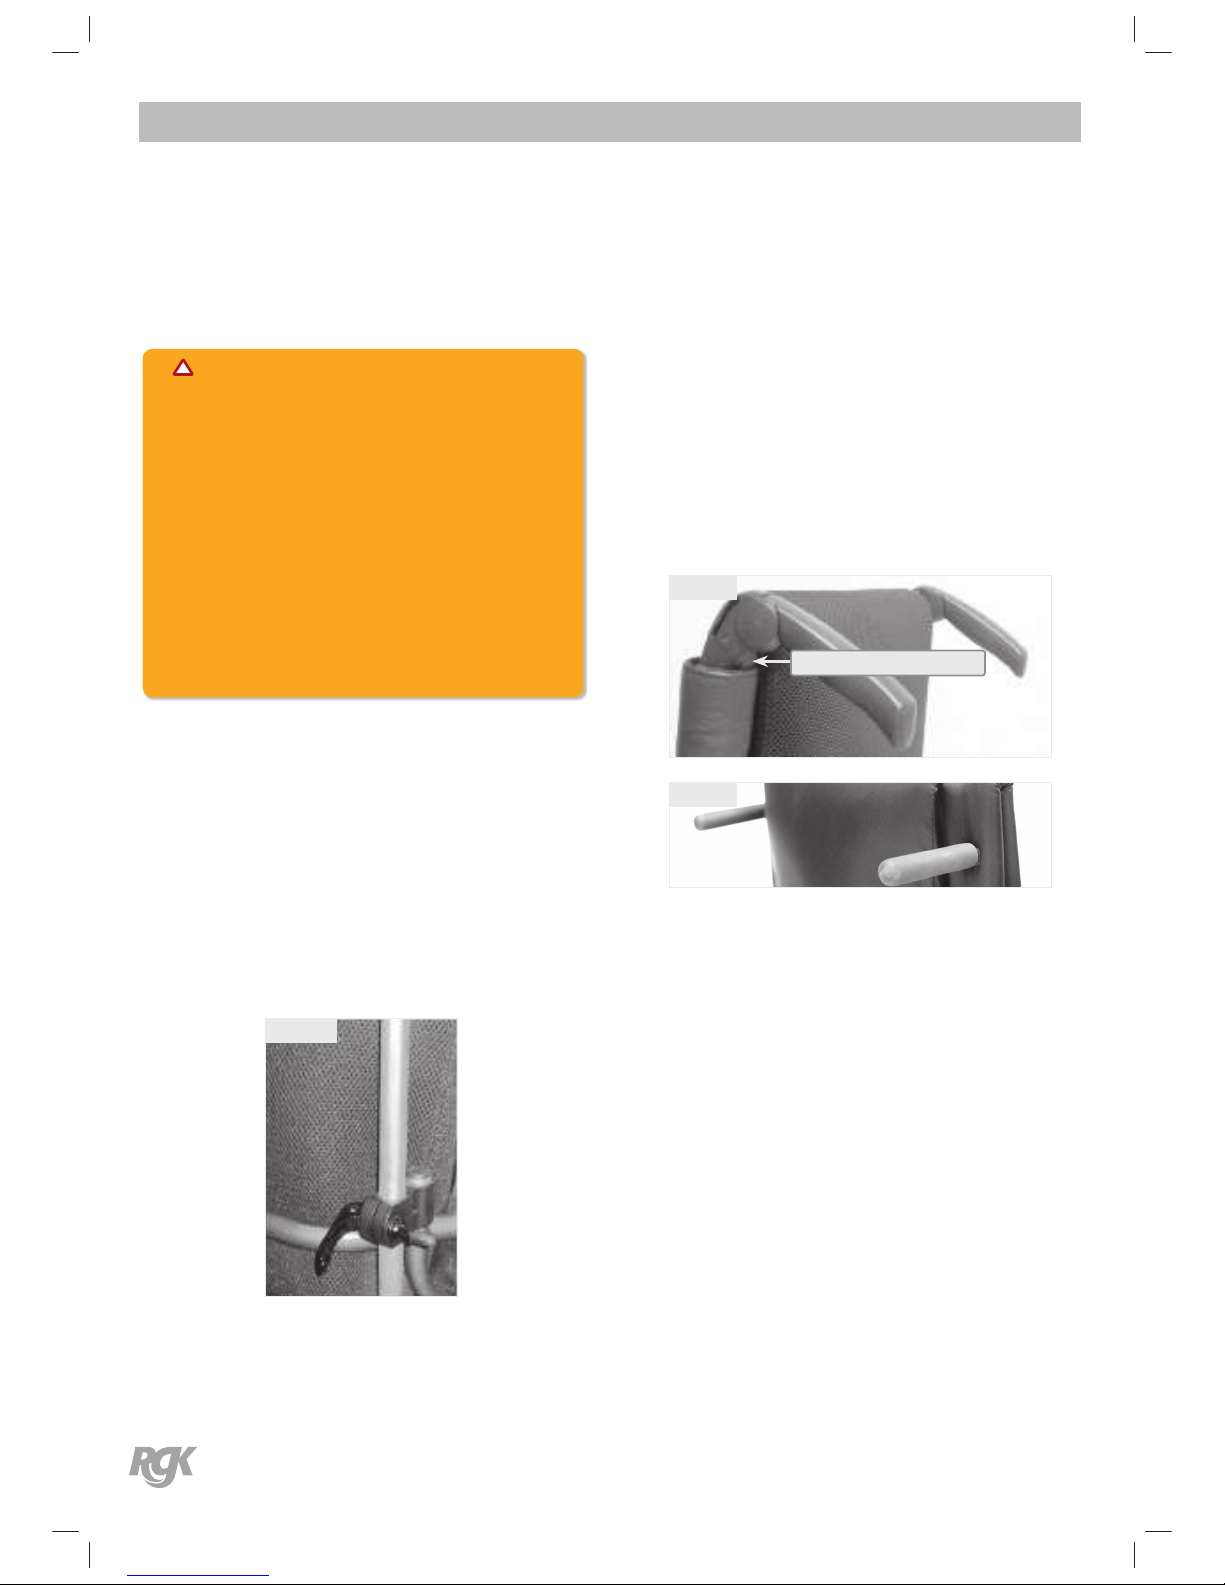
1. To operate this style of pushing handle open the mini
quick release leaver as indicated (Fig 28). By opening
the quick release lever allows the stroller handle to be
adjusted in height.
2. Once the desired height is achieved then close the mini
lever.
3. If the lever becomes loose, then the nut on the mini
release lever requires tightening. (The nut on the mini
release lever determines on how tightly the clamp is
applied).
Fig 28
Flip-down push handles
To fold down your pushing handles, depress the button (2)
when required again, simply lift back into position and lock.
See Fig 29.
Screw in Pushing Handles
These are screwed into position by turning the handle clock
wise, and anti clockwise to remove.
See Fig. 30.
Button Release
Fig 29
Fig 30
Page 32
Need replacement parts?
Take advantage of our online pricing policy at ; www.rgklife.com
User Manual
Issue No: 16 | 2016
32
Procedure 12
This Procedure includes the following: Adjusting the Anti-Tipper.
User Manual | Procedure 12
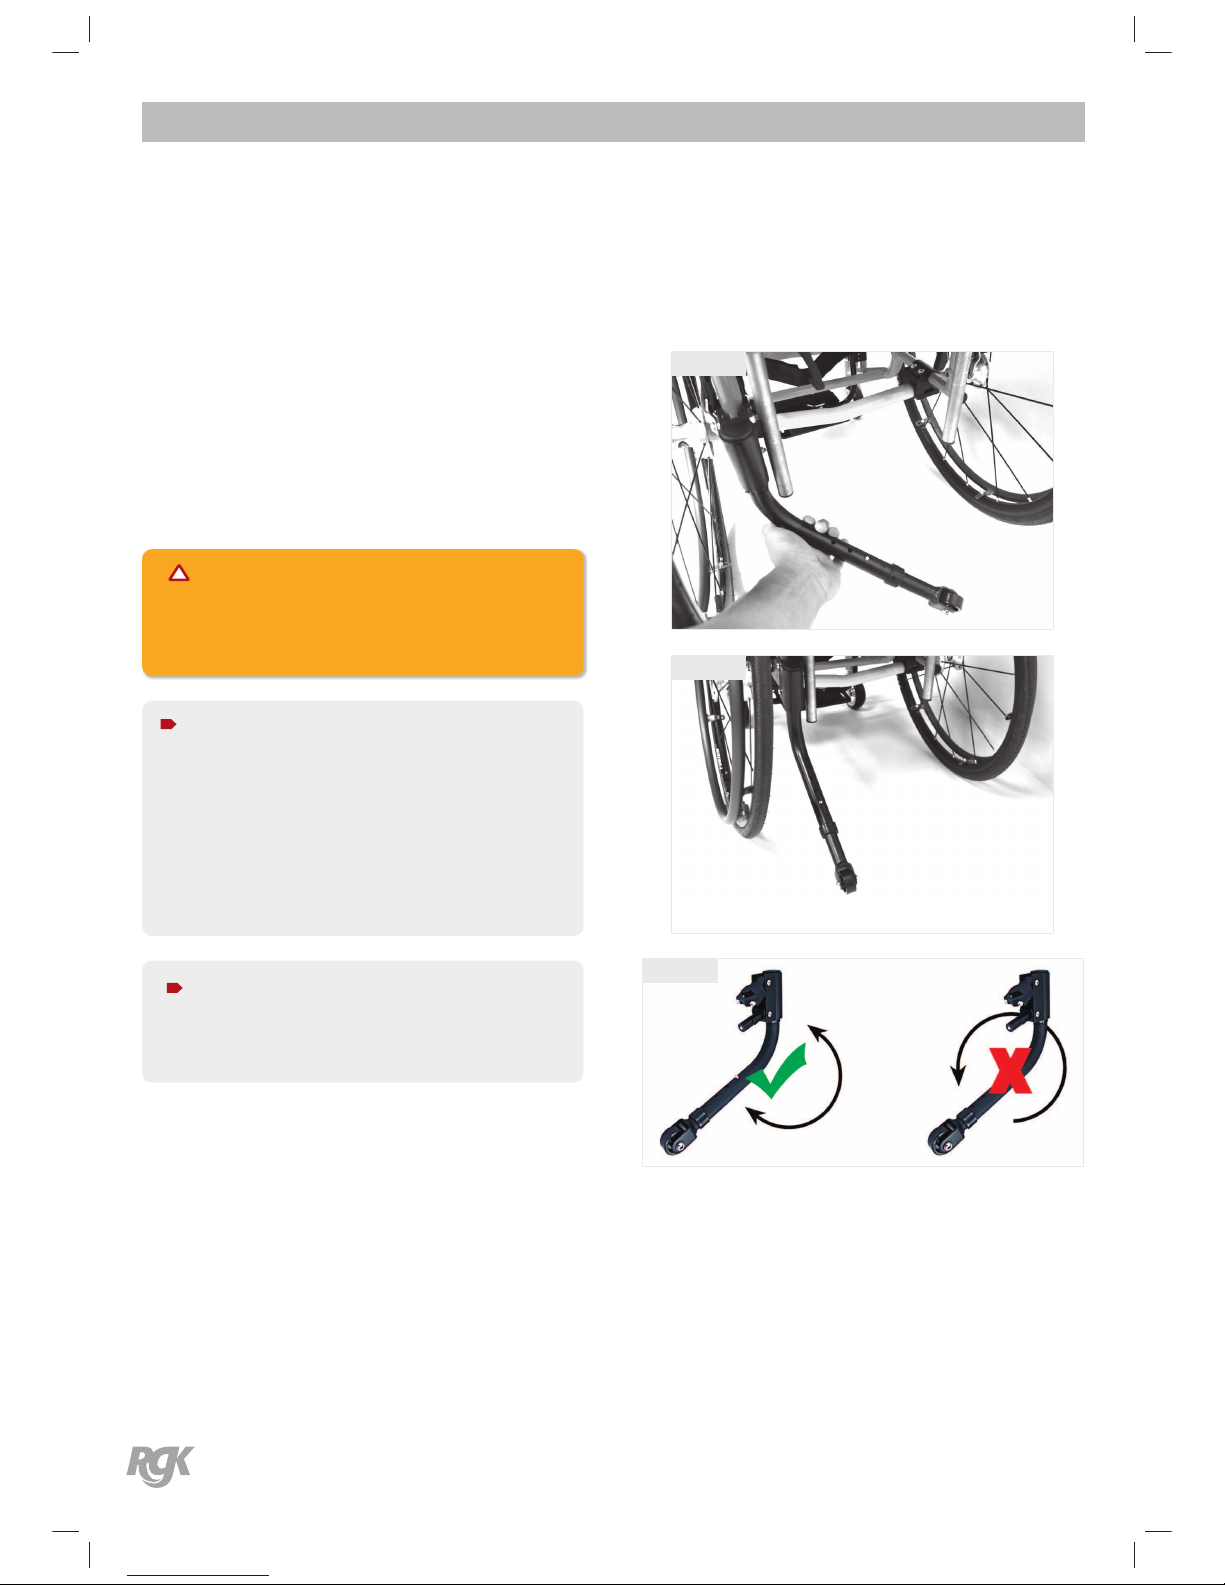
Adjusting the Anti-tipper
1. Press in the release buttons that secures the anti-tipper
wheel to the anti-tipper bar.
2. Adjust the height of the anti-tipper wheels to between
25mm and 50mm of the ground.
3. Repeat steps 1 – 2 for the opposite anti-tipper.
WARNING:
RGK strongly recommends ordering the anti-tips as an
additional safeguard for the wheelchair user.
NOTE:
Anti-tippers MUST be fully engaged. Ensure the release
button of the anti-tipper fully protrudes out of the hole in
the anti-tipper socket.
Ensure both anti-tippers are adjusted to the same height.
NOTE:
Only rotate anti-tipper 180˚. Do not rotate 360˚
Fig 31
Fig 32
Fig 33
Page 33
Need replacement parts?
Take advantage of our online pricing policy at ; www.rgklife.com
User Manual
Issue No: 16 | 2016
33
Procedure 13
This Procedure includes the following: Sideguards and Armrest
User Manual | Procedure 13
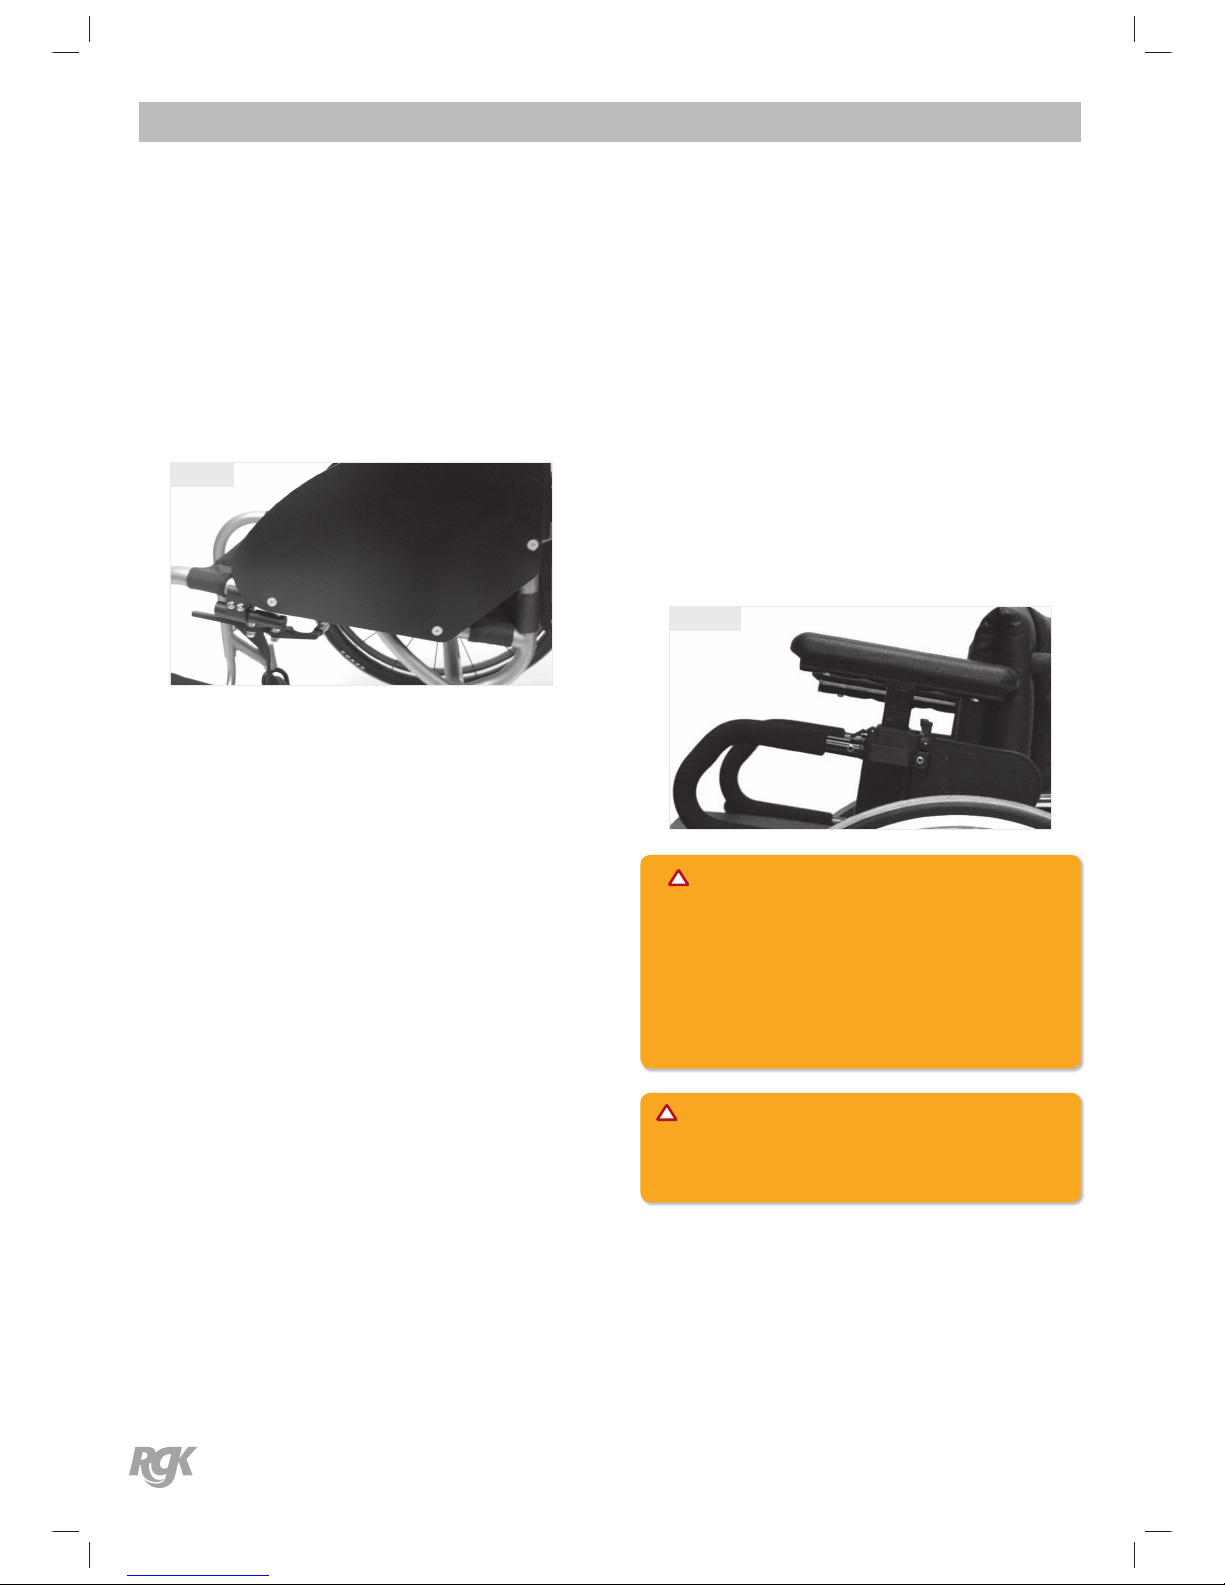
Fixed Sideguards (All Materials)
The sideguard is tted by means of either
3/4/5/6 screws dependant on the conguration of your
wheelchair
Fig 34
Height Adjustable Armrest
Height Adjustment
1. Rotate height release lever (2) to the second position.
2. Slide the armrest pad up or down to the required height.
3. Return the lever to the locked position against the
armrest
4. Push the arm pad until the upper arm post locks rmly
into place.
Fig 35
WARNING:
RGK Wheelchairs DOES NOT encourage the
transportation of any person in a vehicle using a lapbelt/
strap as a method of restraint. The end user should
be transferred into the vehicle seating system and
restraints.
CAUTION:
This product has moving parts. Be aware of nger
trapping.
Page 34
Need replacement parts?
Take advantage of our online pricing policy at ; www.rgklife.com
User Manual
Issue No: 16 | 2016
34
Procedure 14
This procedure include the following: Strapping:
User Manual | Procedure 14
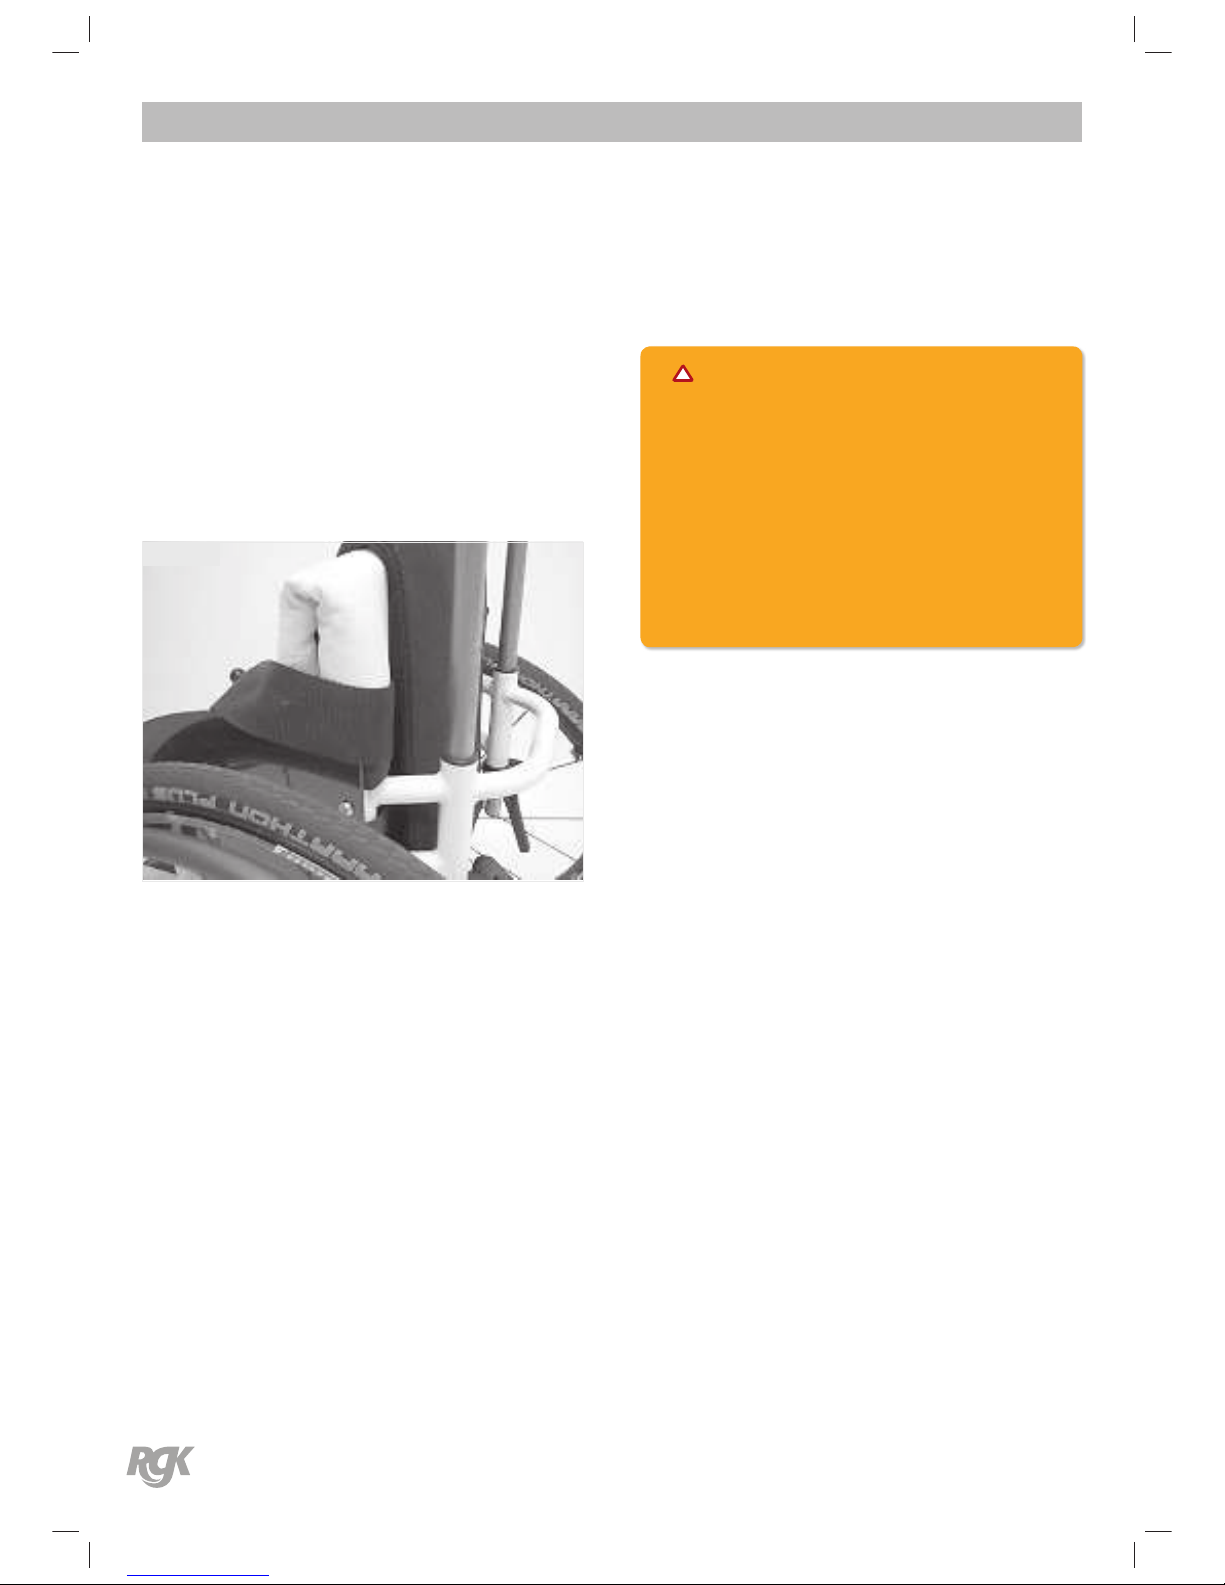
Location of the strapping
The strap can positioned either, under the wheelchair and
passing up between the side guards (if tted) and fastened
across the lap or pelvis. Other option is passing around the
back and inserted in between the insides of the centre pad
as per Fig 36.
This style of strap is a positioning strap only.
Fig 36
WARNING:
It is not designed for use as a safety device to
withstanding high stress loads such as auto safety belts.
With regards to chest positioning straps – it is the
obligation of the therapists and other healthcare
professionals to determine if a chest strap/harness is
required.
Page 35
Need replacement parts?
Take advantage of our online pricing policy at ; www.rgklife.com
User Manual
Issue No: 16 | 2016
35
Technical Data
User Manual | Technical Data
Recycling/Disposal
Prior to the wheelchair being re-used, it must be carefully prepared. All surfaces which come into contact with the user must be
cleaned down and treated with a disinfection spray.
In the following section, there is a description of the materials used on our wheelchairs.
Aluminum:
Castor forks, Wheels, side guards, Armrest, Footrest, Hand Rims, Anti-Tippers, Frame, Footplate covers
Steel:
Fixing points, Quick release axle pins, Footrest, Anti-tippers, Frame Wheels, Fixings, Wheel Locks, Footplate covers
Titanium:
Castor Forks, Quick release axle, Fixings, Side guards Anti-Tippers, Frame, Footrest
Plastic:
Handles, Tube stoppers, Castors, Footplate covers, Arm pads
Packing:
Plastic bags made from polyethylene, cardboard
Upholstery:
Woven polyester Cotton Leather
Disposal or recycling should be carried out by a disposal company or at a public disposal point. You could also
return your wheelchair to your dealer for disposal (There may be a charge imposed).
NOTE:
RGK Wheelchairs Ltd are bespoke and individually made for
you, therefore your wheelchair may fall below or over the
above mentioned sizes
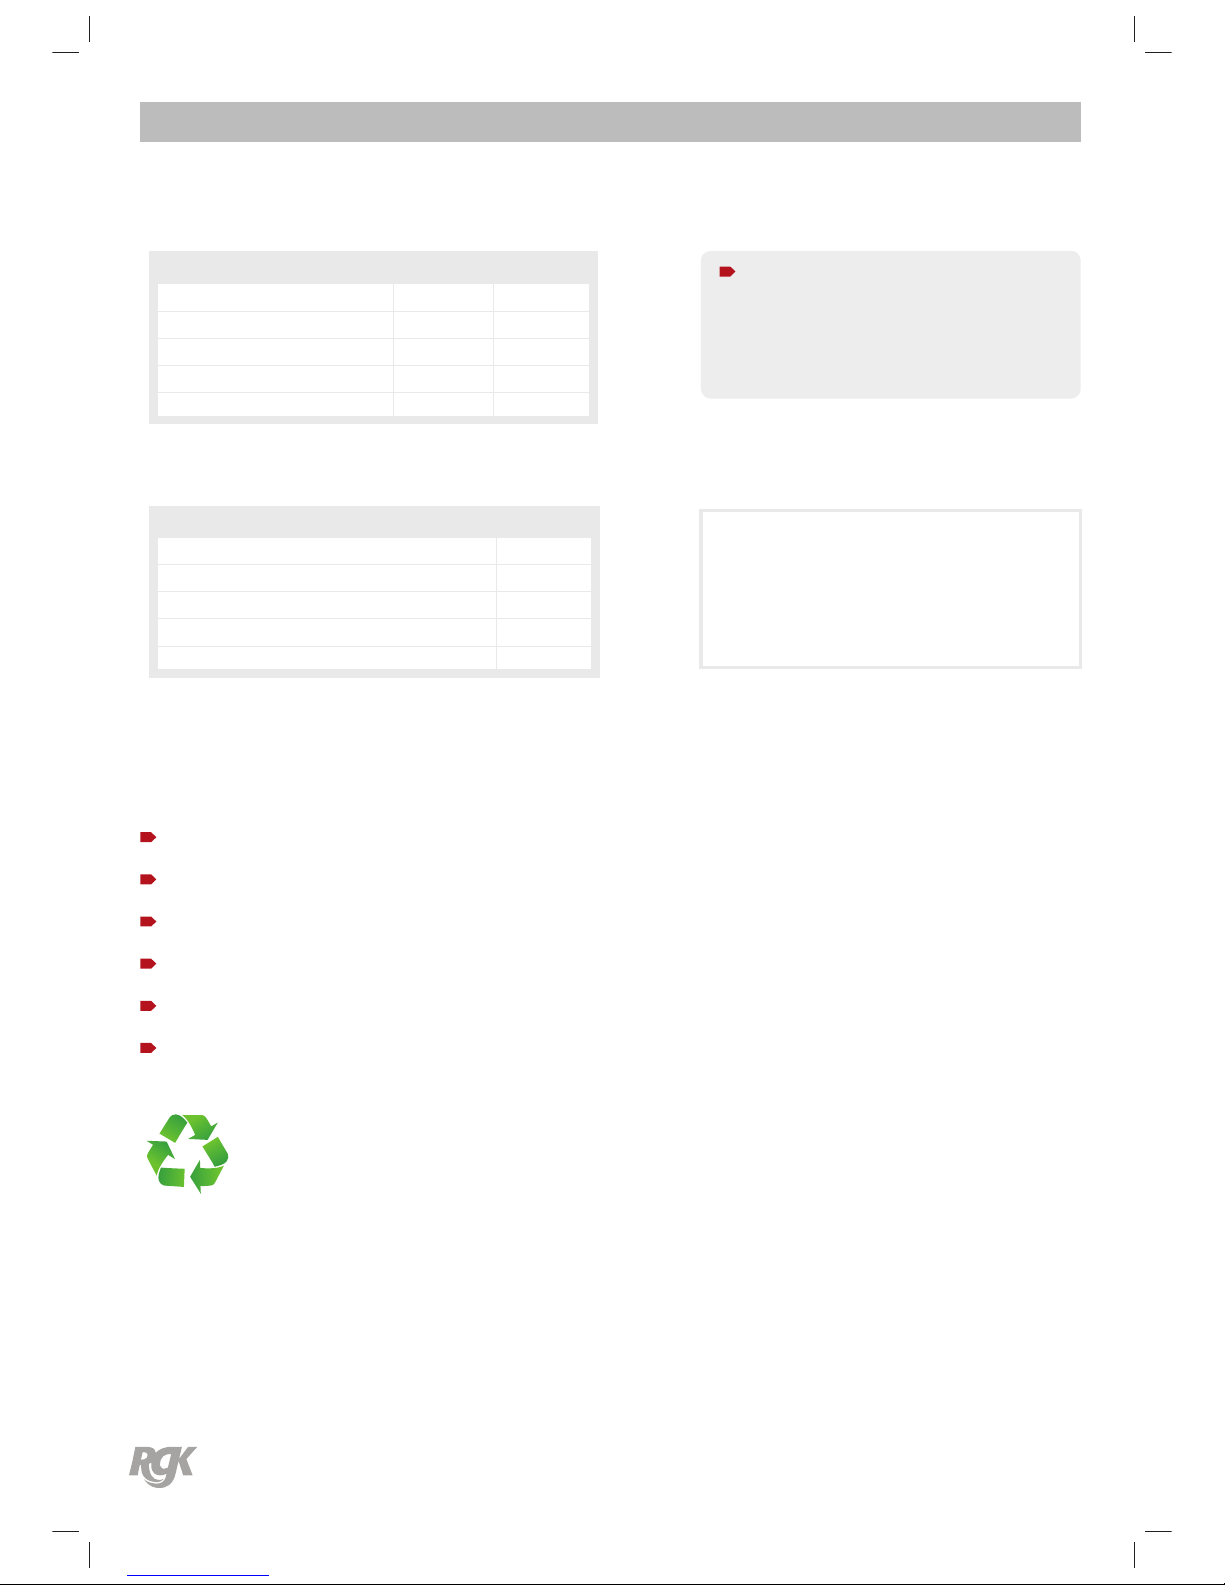
ITEM TORQUE
Backrest Pivot Plate 10 Nm
Wheel Lock 10 Nm
Camber Bar 10 Nm
Footrest Adjustment Height 10 Nm
All other items 10 Nm
ITEM Min Max
Overall Width 250 mm 500 mm
Overall Seat Height 300 mm 600 mm
Overall Frame Length 400 mm 800 mm
Weight in Kg 7 kg* -
User Weight - 125 kg*
* Values may vary depending on product. Refer to Order Form
for guidance.
Page 36

Need replacement parts?
Take advantage of our online pricing policy at ; www.rgklife.com
User Manual
Issue No: 16 | 2016
36
Warranty
GUARANTEE
THIS GUARANTEE DOES NOT AFFECT YOUR LEGAL RIGHTS IN ANY WAY.
Sunrise Medical* provides a guarantee, as set out in the warranty conditions, for wheelchairs to its customers covering
the following
Warranty conditions
1. Should a part or parts of the wheelchair require repair or replacement as a result of a manufacturing and/or material
fault within 24 months or for frame and cross-braces within 5 years after delivery to the customer, then the affected
part or parts will be repaired or replaced free of charge. (Batteries are guaranteed for a period of 12 months subject to
the correct battery care plan being followed)
2. To enforce the warranty, please contact Sunrise Medical Customer Service with the exact details of the nature
of the difficulty. Should you be using the wheelchair outside the area covered by the Sunrise Medical customer
service agent, repairs or replacement will be carried out by another agency as designated by the manufacturer The
wheelchair must be repaired by a Sunrise Medical designated Customer Service agent, (dealer).
3. For parts, which have been repaired or exchanged within the scope of this warranty, we provide a warranty in
accordance with these warranty conditions for the remaining warranty period for the wheelchair in accordance with
point 1).
4. For original spare parts which have been fitted at the customer’s expense, these will have a 12 months guarantee,
(following the fitting), in accordance with these warranty conditions.
5. Consumable parts such as pads, tyres, inner tubes and similar parts are excluded from the warranty, except in the
case that premature wear of the part is the direct result of a manufacturing fault.
6. Claims from this warranty shall not arise, if a repair or replacement of a wheelchair or a part is required for the
following reasons:
a) The product or part has not been maintained or serviced in accordance with the manufacturer’s recommendations as
shown in the User Instructions and/or the Service Instructions.
b) Accessories have been used which are not specified as original accessories.
c) The wheelchair or part having been damaged by neglect, accident or improper use.
d) Changes/modifications have been made to the wheelchair or parts, which deviate from the manufacturer’s
specifications.
e) Repairs have been carried out, before our Customer Service has been informed of the circumstances.
7. This guarantee is subject to the law of the country in which the product was purchased from Sunrise Medical“
* Means the Sunrise Medical facility from which the product was purchased.
User Manual | Warranty
Page 37

Need replacement parts?
Take advantage of our online pricing policy at ; www.rgklife.com
User Manual
Issue No: 16 | 2016
37
Please make a reference of your chair model and serial number (found on sticker on your camber bar) and quote this whenever
calling the oce regarding your chair. For example if you would like to order replacement parts; we will be able to nd out the
ones you have and also alternatives that t your chair.
Chair Model: Serial No:
Sunrise Medical
Thorns Road
Brierley Hill
West Midlands
DY5 2LD
England
Phone: 0845 605 66 88
Fax: 0845 605 66 89
www.SunriseMedical.co.uk
User Manual | Warranty
Page 38

Need replacement parts?
Take advantage of our online pricing policy at ; www.rgklife.com
User Manual
Issue No: 16 | 2016
38
Page 39

Need replacement parts?
Take advantage of our online pricing policy at ; www.rgklife.com
User Manual
Issue No: 16 | 2016
39
Page 40
OM_TIGA _EU_EN_Rev.16.0_2016_11_23
Head office address…
Unit 8 A/B/C Ring Road Zone 2,
Burntwood Industrial Estate,
Burntwood, Staffordshire, WS7 3JQ
Call: +44(0)1543 670 077
Fax: +44(0)1543 670 088
Email: [email protected]
Sunrise Medical GmbH & Co. KG
Kahlbachring 2-4
69254 Malsch/Heidelberg
Deutschland
Tel.: +49 (0) 7253/980-0
Fax: +49 (0) 7253/980-222
www.SunriseMedical.de
Sunrise Medical
Thorns Road
Brierley Hill
West Midlands
DY5 2LD
England
Phone: 0845 605 66 88
Fax: 0845 605 66 89
www.SunriseMedical.co.uk
Sunrise Medical S.L.
Polígono Bakiola, 41
48498 Arrankudiaga – Vizcaya
España
Tel.: +34 (0) 902142434
Fax: +34 (0) 946481575
www.SunriseMedical.es
Sunrise Medical Poland
Sp. z o.o.
ul. Elektronowa 6,
94-103 Łódź
Polska
Telefon: + 48 42 275 83 38
Fax: + 48 42 209 35 23
E-mail: [email protected]
www.Sunrise-Medical.pl
Sunrise Medical B.V.
Groningenhaven 18-20
3433 PE NIEUWEGEIN
The Netherlands
T: +31 (0)30 – 60 82 100
F: +31 (0)30 – 60 55 880
E: [email protected]
www.SunriseMedical.nl
Sunrise Medical HCM B.V.
Vossenbeemd 104
5705 CL Helmond
The Netherlands
T: +31 (0)492 593 888
E: [email protected]
www.SunriseMedical.nl
www.SunriseMedical.eu (International)
Sunrise Medical S.A.S
ZAC de la Vrillonnerie
17 Rue Mickaël Faraday
37170 Chambray-Lès-Tours
Tel : + 33 (0) 247554400
Fax : +30 (0) 247554403
www.sunrisemedical.fr
Sunrise Medical S.r.l.
Via Riva, 20 – Montale
29122 Piacenza
Italia
Tel.: +39 0523 573111
Fax: +39 0523 570060
www.SunriseMedical.it
Sunrise Medical AG
Lückhalde 14
3074 Muri/Bern
Schweiz/Suisse/Svizzera
Fon +41 (0)31 958 3838
Fax +41 (0)31 958 3848
www.SunriseMedical.ch
Sunrise Medical AS
Delitoppen 3
1540 Vestby
Norge
Telefon: +47 66 96 38 00
Faks: +47 66 96 38 80
[email protected]
www.SunriseMedical.no
Sunrise Medical AB
Box 9232
400 95 Göteborg
Sweden
Tel: +46 (0)31 748 37 00
Fax: +46 (0)31 748 37 37
www.SunriseMedical.se
MEDICCO s.r.o.
H – Park, Heršpická 1013/11d,
625 00 Brno
Czech Republic
Tel.: (+420) 547 250 955
Fax: (+420) 547 250 956
www.medicco.cz
[email protected]
Bezplatná linka 800 900 809
Sunrise Medical ApS
Park Allé 289 G
DK-2605 Brøndby
Tlf. 70 22 43 49
Email: [email protected]
www.SunriseMedical.dk
Sunrise Medical Pty. Ltd.
6 Healey Circuit, Huntingwood, NSW
2148,
Australia
Phone: 9678 6600,
Orders Fax: 9678 6655,
Admin Fax: 9831 2244.
Australia
www.sunrisemedical.com.au
Sunrise Medical
North American Headquarters
2842 Business Park Avenue
Fresno, CA, 93727, USA
(800) 333-4000
(800) 300-7502
www.SunriseMedical.com
 Loading...