

Page 1
Warnings Supplied Components
he Lowel SoftCore™ is a professional lighting
T
system. Read these instructions and lamp
anufacturers warnings before operating.
m
Not for household use. Use only for photo-
n
graphic lighting (video & film imaging) purposes.
Do not leave SoftCore unattended.
n
Do not exceed maximum rated wattage for unit,
n
or lampheads.
Use maximum 100 Watt lamps.
n
n Consult chart for proper stand choice when
hanging lampheads, lamps, & softboxes.
c
n Always unplug unit and allow to cool before
elamping, changing lampheads, or storing.
r
Tighten lamps securely in lamp socket by
n
holding lamp at plastic base.
Make certain that lamp voltage matches power
n
source voltage. The units use lamps of different volt
ges (example: never connect a 120 volt lamp to
a
a 230 volt source).
n Do not use near standing water or in damp
ocations.
l
n Never bypass plug’s ground pin.
Do not interfere with unit’s ventilation.
n
n Make sure proper power cable is attached,
for voltage being used.
Always use Safety Cables, when mounting
n
SoftCore overhead.
n Always use a stand with sufficient support
hen using larger lampheads & softboxes.
w
n Do not attempt to open unit, no user serviceable
arts inside.
p
n Unplug before cleaning. Do not operate while
fixture is damp.
n Always operate Softcore with softbox attached.
Do not use a softbox too small for the lamps installed
(example: do not use a softbox where the lamp is in
contact with the softbox or where the softbox applies
any pressure to the lamp).
Fluorescent Warnings
n Avoid looking directly at the tubes for extended
periods of time.
n Fluorescent tubes contain highly poisonous
mercury.
n In the event of lamp breakage, avoid contact
with broken pieces, and dispose of properly.
n Read lamp manufacturers information fully.
H
o
R
o
t
a
t
i
o
n
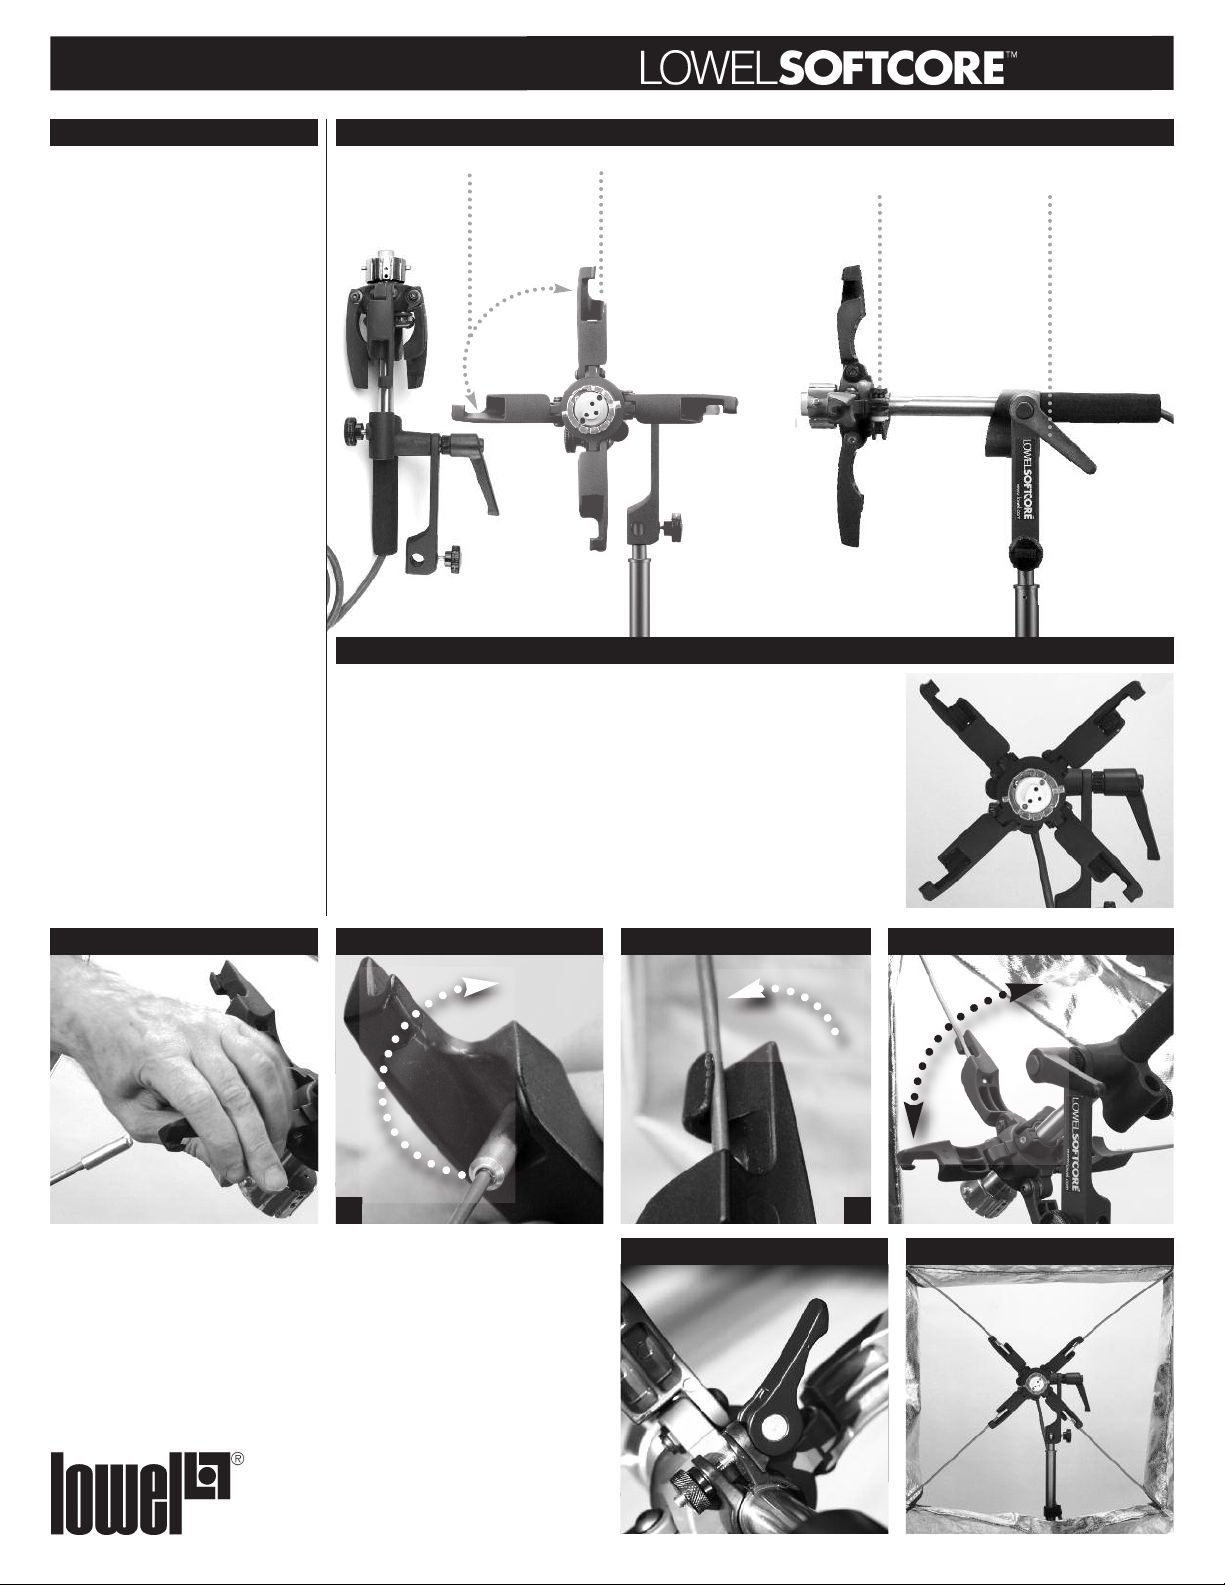
SoftCore™ has 4 rotating fold-out arms
to hold conventional softbox attachments
(video or strobe). The 4 Hook Arm
Connectors are specially designed to
make softbox attachment quick & convenient. Familiarize yourself with the
above details before setting up.
The setup process is slightly different,
depending on whether your softbox
has a front diffuser that is removable,
or permanently attached. We will first
show installation with a removable
diffuser softbox.
o
The Lowel SoftCore™
k
(code SX-10) has several quick
exchange accessory lamphead
options.
SoftCore™ has an IEC connector
at the end of its integral power
cable to attach to its supplied
switched AC cable.
As shown above, attach SoftCore™
to 5/8” stand stud and tighten stand locking
knob. Important: the Tilt-lock Lever should
be on the right side if viewed from the front.
Point the Softcore downward slightly and
tighten Tilt-lock Lever. Fold out the 4 Hook
Arm Connectors, and rotate them so they
are oriented in an “X” position. Your softbox
should have its 4 flexible rods installed
in its 4 corner guides before attaching
to the SoftCore.
SoftCore should be unplugged for setup.
Rotation
Lock Lever
n
o
cti
u
str
n
I
Tilt-lock
Lever
Setting Up SoftCore™
s
Hold Firmly Hold FirmlyHold Firmly
Rod into Arm Receptacle
Having rotated the arms to an “X” orientation, begin by attaching the stud end of one of the
softbox rods using the technique shown above (A & B). Holding the Arm firmly, place the
stud end of a rod into the ‘cup’ of the Hook Arm receptacle from the front, and then flex the
rod around the hook from behind so that it rests inside the hook.
Rotate the arms slightly for convenience as you attach the remaining 3 rods to arms in the
same manner. If needed during attachment, you can loosen or tighten the rotation of arms
with the Rotation Lock lever, behind the arms. (Note: tightness of the Rotation Lock can
be adjusted with the screw-threaded nut on its underside).
With a little practice, installation becomes easy.
Completed Rod installation should look as shown from
the front of the softbox (bottom Right). Release the
Rotation Lock lever to rotate the softbox, if needed.
Flex Around to Hook
Rotate to Attach Next Arm
BA
Hold FirmlyRotation Lock & Adjustment Hold FirmlySoftbox Attached
Page 2

Using SoftCore™with eXchange™Lampheads
FLO-X3 Lamphead
Switch
From the front of SoftCore/softbox, with the diffuser removed, install the unlamped FLO-X3 lamphead by lining up the
hook-shaped cutouts on its sides with the pins on the sides of the center base of the SoftCore. Hold light / stand for stability,
as you push in & twist lamphead in a clockwise direction to lock it in place. Note: the pins and cutouts are 2 different sizes,
and will only fit one way.
n
o
cti
u
str
n
I
Install the 3 lamps carefully, holding each by its large plastic
base as they are tightened. Each lamp socket is individually
switched on the lamphead.
SoftCore with
FLO-X3 & Softbox
s
When complete, install front diffuser
on Softbox, using its velcro edges.
Attach power cord to SoftCore, plug in,
and turn on the cable switch. Control
individual lamps with their switches.
FLO-X1 Lamphead
The FLO-X1 lamphead has a single Edison
socket and is switchless. Used with the
SoftCore, it holds a single screw-threaded
fluorescent lamp, for use with smaller softboxes where a lower output from a closer
range is needed.
1 2 3 4
For Softboxes With Permanent Front Diffusers
To set up SoftCore™ using a softbox with a permanently mounted front diffuser, install lamphead and
lamps before attaching the softbox. Carefully place softbox, with rods installed, over lamphead & lamps
from the front of the SoftCore. Install rods in same order as described previously. Make sure that stand
fittings & Tilt-lock Lever are tightly secured. Also use extra caution when placing the softbox over the
lamphead and lamps. Center the lamphead & lamps over a stand leg for added stability and balance.
Installing FLO-X1
Use the same basic steps as if installing the FLO-X3. Make sure unit is unplugged. (If your softbox has a removable
front diffuser, attach the softbox first.)
Push & twist the FLO-X1 head to install on the SoftCore. Carefully install fluorescent lamp by holding it at its base. Softboxes with attached front
diffusers can be installed now.
Attach power cord to
SoftCore, plug in, and turn on
the cable switch.
Page 3

The FLO-X5 lamphead has 5 individually
switched Edison sockets. It is designed to be
used with larger softboxes & stands, and
SoftCore will need to be counterbalanced
using a Lowel Half Pole and Weight for stability on the light stand.
Use the same basic steps to install the softbox as shown with the FLO-X3,on page 1.
Make sure unit is unplugged, and SoftCore is
securley mounted on stand. Orient the stand
so a leg is centered underneath the front end
of the SoftCore.
I
For this example, we will install using a larger style softbox with attached diffuser.
1
Push & twist the FLO-X5 head
to install on the SoftCore.
4
Using SoftCore™with eXchange™Lampheads
FLO-X5 Lamphead
2 3
nsert 5/8” stud from Half Pole fully into
arefully install all fluorescent lamps by
C
holding them at their base.
5 Tilt Lock
I
receptacle at base of SoftCore.
s
n
o
cti
u
str
n
Tighten the Tilt-lock lever on the side, to prevent light from falling forward when larger
softbox & lamphead are attached. (If your
softbox has a removable front diffuser, attach
the softbox first.)
Switches
Install Weight fully into back end receptacle
of Half Pole. Tighten Locking Knob on back
end of Half Pole.
6a 6b 6c
Install Softbox as previously described in Setting Up.
Use extreme caution when installing softbox housing & rods over the glass fluorescent lamps.
Tilt Lock
First slightly loosen Tilt Lock on SoftCore (arrow). Then loosen extension collar lock on Half
Pole. Extend Half Pole carefully to get a working balance of the SoftCore, lamphead/lamps,
and Pole counter-balance on stand. Tighten Tilt Lock on SoftCore, and lock Collar Knob on
Half Pole. Note: be prepared to adjust balance after adding the softbox.
Collar Knob
When tilting the SoftCore, you may need
to rebalance.
Tilt the SoftCore by loosening the Tilt- lock
Lever slightly. Loosen the Collar knob
on the Half Pole to adjust.
Tilting the SoftCore
Page 4

s
n
o
cti
u
str
n
I
Important Information Regarding SoftCore Lampheads
n SoftCore shares some fluorescent lampheads with the Lowel Rifa eXchange System.
n Other lampheads for Rifa eXchange use tungsten-halogen lamps and will not fit on the
SoftCore.
n If you purchase accessory lampheads for SoftCore, they may come with instructions for use
with Rifa eX fixtures.
n Disregard the lamphead & lamp info in those instructions and refer to the below information
instead.
Lamps & Lamp/Beam Data
FLO-X1 – Single socket, no switch (switch is in AC cord)
Lamps – Fluorescent, Edison Screw-thread
E1-80
E1-27
Lamp/Beam Data
Lamp Code Volts Watts °K Avg Life FC (lux) 5' FC (lux) 10'
E1-27 120 27 5500 8000 hr 8 (91) 3 (29)
E1-27E 230 25 5500 8000 hr 9 (97) 3 (31)
E1-80 120 80 5500 8000 hr 23 (246) 7 (77)
E1-80E 230 80 5500 8000 hr 23 (251) 8 (81)
Problems, info, repairs, etc.
Lowel equipment and kits are sold through authorized Lowel Dealers and, in some countries,
Authorized Lowel Distributors. Repairs, problems, suggestions, and requests for brochures,
instructions, parts lists may be handled by your authorized Lowel Dealer (Distributor) or
directly with Lowel. Electrical repairs should be made only by Lowel or a qualified electrician.
Lowel SoftCore Patent Nos.: 6,176,598, 7,416,316.
FLO-X3 – 3 sockets, with switches
Lamps – Fluorescent, Edison Screw-thread
E1-80
E1-27
Individually
switched
lamps
Lamp/Beam Data (with all 3 Lamps Lit)
Lamp Code Volts Watts °K Avg Life FC (lux) 5' FC (lux) 10'
E1-27 120 27 5500 8000 hr 23 (247) 7 (77)
E1-27E 230 25 5500 8000 hr 24 (256) 7 (81)
E1-80 120 80 5500 8000 hr 59 (632) 18 (189)
E1-80E 230 80 5500 8000 hr 61 (656) 18 (194)
s
tche
i
w
s
th
wi
ts,
ocke
s
– 5
5
O-X
FL
d
a
thre
La
E1-80
mp
s –
Fluoresc
Edison Scre
nt,
e
w-
E1-27
witc
s
5 Indiv
he
idua
mp
la
d
Lamp/Beam Data (with all 5 Lamps Lit)
Lamp Code Volts Watts °K Avg Life FC (lux) 5' FC (lux) 10'
E1-27 120 27 5500 8000 hr 40 (429) 12 (129)
E1-27E 230 25 5500 8000 hr 42 (448) 14 (150)
E1-80 120 80 5500 8000 hr 92 (997) 29 (309)
E1-80E 230 80 5500 8000 hr 94 (656) 31 (331)
lly
s
Lowel-Light Manufacturing, Inc.
90 Oser Avenue, Hauppauge, N.Y. 11788
Call: 800 645-2522 or 631 273-2500
Fax: 631 273-2557
e-mail: info@lowel.com
www.lowel.com
© 2010 Lowel-Light Mfg., Inc. Version: 1.0 180
 Loading...