

Page 1

Lowel Rifa eX Retrofit Instructions
Warnings
Retrofitting the Rifa-lite to upgrade it to the Rifa eX is
a multi-step process. First you must remove both the
IEC connector from the power cord and the lamp socket core from the Rifa. Next you will replace the old
core with the new Rifa eX core and lamphead. Finally
you will wire the new replacement IEC connector.
Some steps require a small flat head screwdriver, in
addition to the supplied Allen Wrench.
n Warning - Risk of Fire / Electric Shock if
improperly wired.
n This retrofit kit should only be installed by
a qualified electrician. If you have any questions about the
process described below, contact Lowel.
n Reminder: Lowel does factory upgrades of Rifa.
n Read enclosed Updated Warnings Label fully,
and follow these warnings in addition to original warning
label (sewn onto Rifa shell). Also read all supplied Rifa eX
instructions fully.
Supplied Parts List
A
B
C
D
or
E
F
Step 1 - Removing the Core Step 2 - Installing the New Core
1a
**
Place original Rifa-lite on a stand, open fully but do not tighten the rear locking knob. The light should be oriented so
the Warning/Lamp label on the exterior is on the bottom *(its
normal position is on top). If necessary, loosen rear locking
lever (
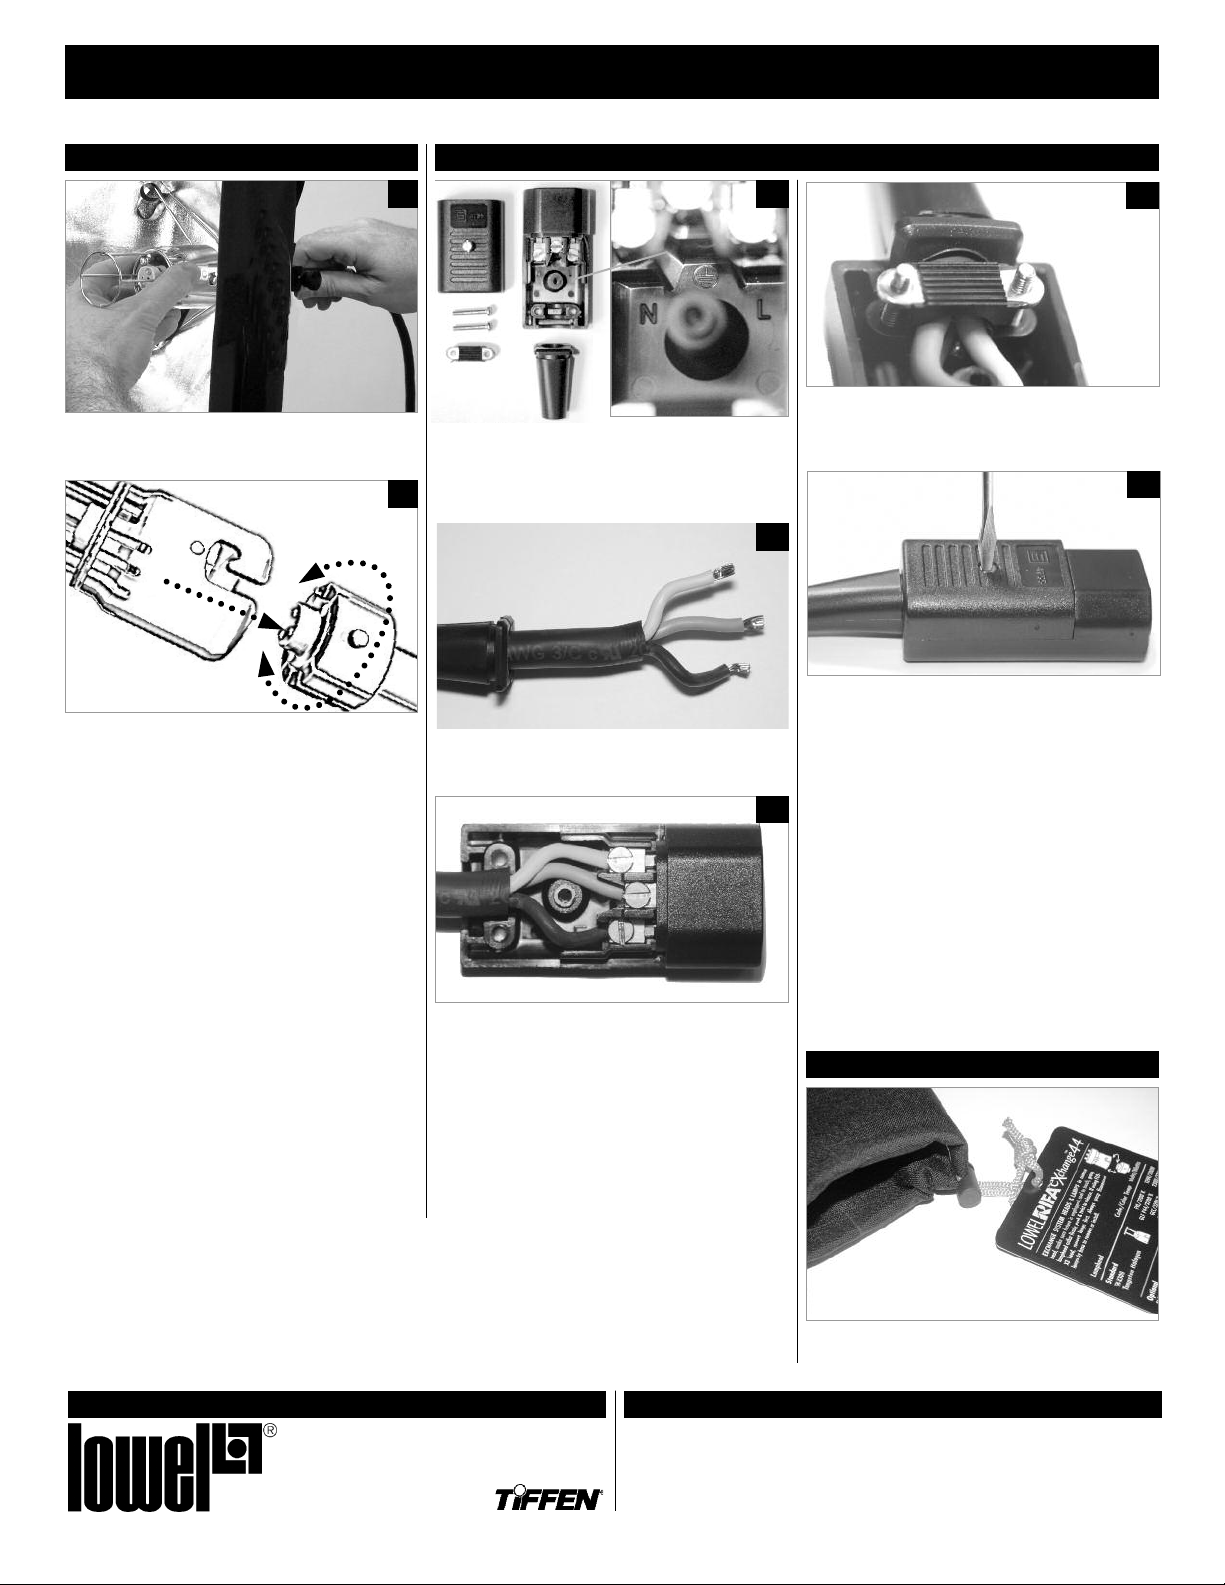
Using a flat head screwdriver, disassemble the power cord’s IEC
Connector, and remove the wires from their terminals. Slide
rubber strain relief sleeve from power cord. Discard old IEC
Connector.
), rotate light, and relock. Do not attach front diffuser.
**
*
Remove the yellow safety cap from new eXchange core.
1b
Take the new eXchange core and thread its power cable through
the Rib Collar and Frame Tube, so that it appears out the back
of the light. Push the core into place, seating the Rib Collar
directly behind the base of the new core, so the Rifa shell is
1c
fully opened.
2a
2b
2c
Parts & their codes for all Retrofit Kits
A
Rifa eX Core with Base Cap
core for Rifa eX 44 (10535)
core for Rifa eX 55, 66, 88 (17224)
base cap for all cores (17232)
B IEC Connector (10004/2)
C 3/32” Allen Wrench (17999)
D Updated Warnings Label
for Rifa eX 44 only (17944)
for Rifa eX 55 only (17955)
for Rifa eX 66 only (17966)
for Rifa eX 88 only (17988)
E Standard eX Lamphead for Rifa eX 44 (TH-X300)
F Standard eX Lamphead for Rifa eX 55, 66, 88 (TH-X1000)
Codes for User & Lowel Repair Retrofits
Model User Retrofit Kit Lowel Repair Retrofit
Rifa 44 LC-74 LC-741
Rifa 55 LC-75 LC-751
Rifa 66 LC-76 LC-761
Rifa 88 LC-78 LC-781
Locate the Allen Set Screw, at the top of the rib collar behind
the large lamphead core. If you don’t find it there, feel around
the ring until you locate it. Using supplied Allen Wrench,
loosen Set Screw but do not remove.
Pull center Rifa lamp core assembly straight out and discard.
Rotate the core so that the larger of the 2 side pins is on the
right when viewed from the front (see arrow).
1d
1e
Using the supplied Allen Wrench, re-tighten the Set Screw in
the Rib Collar firmly. If more tightening leverage is needed,
use the other end of the wrench.
2d
Loosen spring tension of Rib Arms by pulling Rib Collar gently
forward so it separates from frame tube and hangs loose.
1
Page 2
Lowel Rifa eX Retrofit Instructions continued
Step 3 - Installing the Lamphead Step 4 - Wiring the IEC Connector
3a
Detail
Tighten locking knob on rear of Rifa, and grasp rear stem firmly
as you install lamphead.
Disassemble the new IEC Connector completely by removing its
Cover, Plug Strain relief, & 2 screws holding the Strain Relief
Bar. Note that inside the IEC Connector, one screw is labeled N
3b
and the other is labeled L. Center screw is Ground (see Detail).
4a
Slide the IEC Strain Relief along the cable and return it to its
cutout channel in the IEC Connector. Replace the Strain Relief
bar and tighten firmly.
4b
4d
4e
Line up the J-hook cutouts on the side of the lamphead with the
side pins on the core. Note that 1 pin is larger than the other.
Push & twist to install the removable lamphead on the core.
When complete, remove Rifa from stand to wire the new IEC
connector.
Take the Power Cable of new core and feed it through the
Rubber IEC Strain Relief.
4c
Place the conductors into terminal holes as shown, with White
wire to N, Black wire to L, and Green wire to Center. Install &
tighten the Green wire last. Tighten all firmly. After tightening,
position the Green wire so it clears center screw post.
Warning: Before closing IEC Connector, visually confirm that wires are connected to proper terminals.
White - N terminal
Black - L terminal
Green - Center terminal
Reinstall the Plug Cover, and tighten IEC housing screw.
Attaching Warning Label
Lowel-Light Manufacturing, Inc.
90 Oser Avenue, Hauppauge, N.Y. 11788
Call: 800 645-2522 or 631 273-2500
e-mail: info@lowel.com
www.lowel.com
Untie the Rifa Carry Bag closure cord, and thread the Updated
Warnings label into it. Securely retie the knot.
Problems, info, repairs, etc.
Lowel equipment and kits are sold through authorized Lowel Dealers and, in some countries, Authorized
Lowel Distributors. Repairs, problems, suggestions, and requests for brochures, instructions, parts lists
may be handled by your authorized Lowel Dealer (Distributor) or directly with Lowel. Electrical repairs
should be made only by Lowel or a qualified electrician. Rifa-lite®is a registered trademark of LowelLight Manufacturing, Inc. U.S. Patent No. 4594645, © 2009 Lowel-Light Mfg., Inc. ver: 1.1 117
2
 Loading...