

Page 1
eneral Warnings
G
The Lowel Rifa eX is a professional lighting instrument.
Read these instructions and
lamp manufacturer’s warnings
carefully before operating.
n Do not pull power cable
to open fixture.
n Always operate with diffuser
safety panel in place.
n Not for household use,
use only for photographic lighting
(film; video; imaging) purposes.
n When setting Rifa eX up
always orient it with Warning Label
on top.
n Do not leave Rifa eX
unattended.
n Always unplug unit and
allow it to cool before lamping,
changing lampheads, storing.
n Do not use more than one
diffuser, nor any diffuser other than
the Lowel Rifa diffuser supplied.
n Make certain that lamp
voltage matches power source
voltage. The units use lamps of
different voltages (example: never
connect a 120 volt lamp to a 230 volt
source, or a Rifa-44-EX with 12 or 30
volt lamp to any higher voltage).
n Do not exceed maximum
rated wattage for unit.
n Make certain to attach
appropriate approved power cable
for voltage being used.
n Do not interfere with unit’s
ventilation.
n Never touch hot parts.
n Units such as this emit
considerable light and heat, if not
properly used could be dangerous.
n Avoid placing unit too close
to faces, delicate objects or
flammable materials.
n Do not use near
standing water or in damp locations.
n When mounting light overhead use Safety Cables.
n Unplug before cleaning
material. Handle reflector with care.
Clean with a damp cloth only,
as soap or chemical cleaners may
damage material. Do not operate
while fixture is damp.
n Do not fold Diffuser when
storing. Roll it up onto supplied
cardboard tube to prevent cracking.
Lamp Warnings
n Always unplug unit and allow
it to cool before lamping,
changing lampheads, storing.
n Avoid touching glass with bare
fingers. Insert lamps carefully to
avoid breaking. Lamps must be
pressed firmly and fully into socket.
Not doing so will cause socket damage and shortened lamp life.
n Never exceed maximum
rated wattage of unit.
n Rifa-44EX socket is designed
to accept lamps with 2 different pin
configurations. Use extra caution
when installing & removing
lamps, contacts may be stiff at
first.
Lowel Rifa®eXchange®Instructions
Lowel Rifa eXchange Models
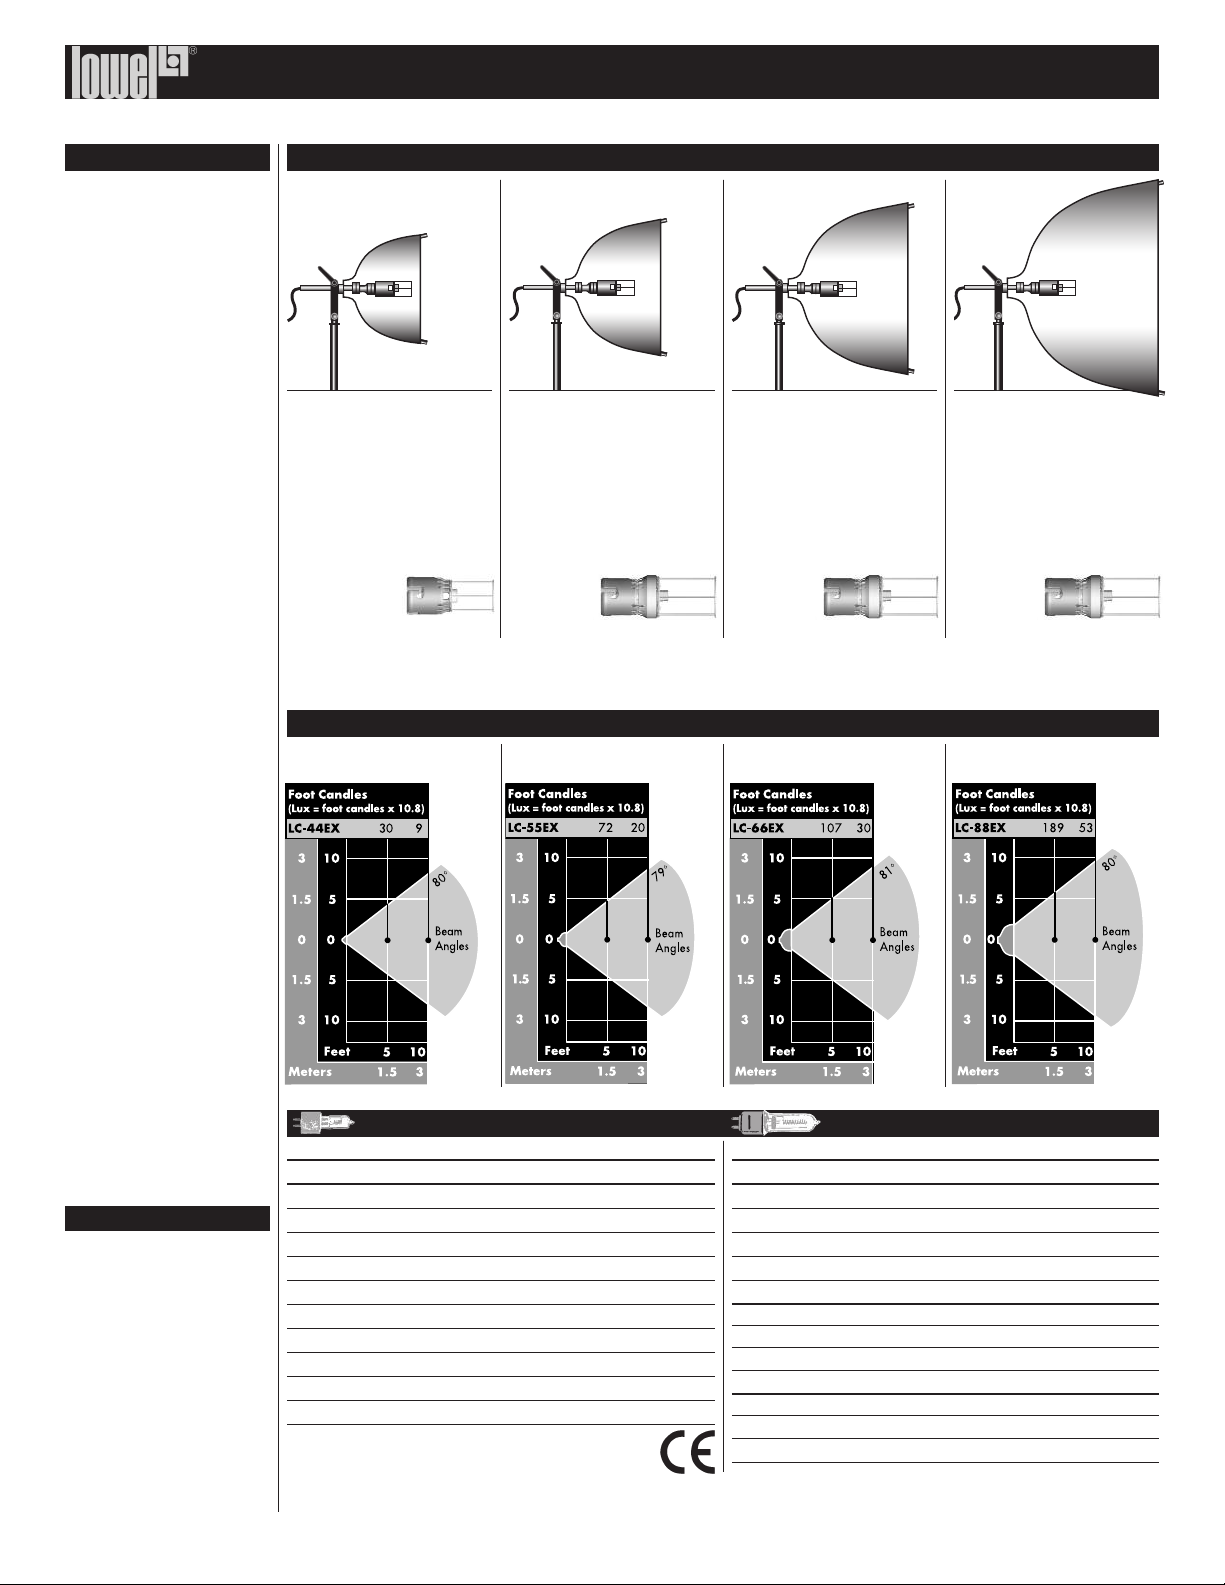
Rifa®eX 44 Rifa®eX 55 Rifa®eX 66 Rifa®eX 88
Code: LC-44EX
Front size: 16 x 16" (40 x 40 cm)
Collapsed length: 21" (53 cm)
Max. wattage: 300
Max. amperage: 2.5 at 120v
Weight: 2.1 lbs (1 kg)
w/ 4' captive cable
U.S. Patents: 459645, 7081001,
7153153
Supplied Lamphead: TH-X300
It is not necessary to remove supplied Standard Lamphead when storing or transporting Rifa eX.
Remove only to exchange for accessory lampheads.
LC-44EX
with 120v, 200w, 3200°K, FVL lamp
Lamp Code Volts Watts °K Avg Life FC(lux) 5' FC(lux) 10'
LC-44EX – Maximum 300w
JCV14.5-50WC 12/14 50 3200 100 hr 7 (80) 2 (22)
GCC 12 100 3200 100 hr 8 (81) 2 (22)
GCB 30 200 3200 100 hr 20 (220) 5 (58)
FSH 120 125 3200 100 hr 15 (166) 4 (46)
FVM 120 105 3200 250 hr 14 (148) 4 (40)
FVL** 120 200 3200 200 hr 33 (356) 9 (100)
GCA 120 250 3200 100 hr 39 (418) 10 (111)
CP/96* 120 300 3400 75 hr 49 (532) 14 (147)
GLF/P44 230 235 3200 100 hr 35 (381) 9 (102)
CP/97* 230 300 3200 75 hr 54 (582) 15 (159)
*Different lamp base, Rifa-44EX supplied standard
lamphead socket accepts this base.
NOTE: Above lamps are for Standard lampheads as supplied with models of Rifa eX System and pre-2007 models of Rifa-lite.
See instructions for Accessory Lampheads or www.lowel.com for information on use and different lamp options.
Code: LC-55EX
Front size: 21 x 21" (53 x 53 cm)
Collapsed length: 24" (61 cm)
Max. wattage: 500
Max. amperage: 4.2 at 120v
Weight: 2.5 lbs (1.1 kg)
w/ 4' captive cable
U.S. Patents: 459645, 7081001,
7153153
Supplied Lamphead: TH-X1000
Beam Angles — points at which intensity drops to 50% of maximum
LC-55EX
with 120v, 500w, 3200°K, EHC lamp
Code: LC-66EX
Front size: 25 x 25"
(63.5 x 63.5 cm)
Collapsed length: 30" (76 cm)
Max. wattage: 750
Max. amperage: 6.25 at 120v
Weight: 3.5 lbs (1.6 kg)
w/ 4' captive cable
U.S. Patents: 459645, 7081001,
7153153
Supplied Lamphead: TH-X1000
LC-66EX
with 120v, 750w, 3200°K, EHF lamp
Code: LC-88EX
Front size: 32 x 32" (81 x 81 cm)
Collapsed length: 34" (86 cm)
Max. wattage: 1000
Max. amperage: 8.3 at 120v
Weight: 4.5 lbs (2 kg)
w/ 4' capt. cable
U.S. Patents: 459645, 7081001,
7153153
Supplied Lamphead: TH-X1000
LC-88EX
with 120v, 1000w, 3200°K, FEL lamp
Lamp/Beam Data
Lamp Code Volts Watts °K Avg Life FC(lux) 5' FC(lux)10'
LC-55EX – Maximum 500w
EHC 120 500 3200 300 hr 72 (778) 19 (209)
EHD 120 500 3000 2000 hr 69 (745) 18 (198)
JCV 220V-500WBM 220 500 3000 2000 hr 78 (846) 21 (228)
JCV 240V-500WBM 240 500 3000 2000 hr 66 (710) 17 (188)
LC-66EX – Maximum 750w (May also use lamps for LC-55EX)
EHF 120 750 3200 300 hr 109 (1180) 30 (326)
EHG 120 750 3000 2000 hr 89 (962) 24 (262)
FKR/240 240 650 3200 300 hr 92 (990) 25 (270)
LC-88EX – Maximum 1000w (May also use lamps for LC-66EX)
FEL 120 1000 3200 300 hr 195 (2110) 56 (608)
FEP 240 1000 3200 150 hr 160 (1730) 45 (491)
FEP/240 240 1000 3200 150 hr 148 (1598) 40 (432)
Page 2
Lowel Rifa®eXchange®Instructions
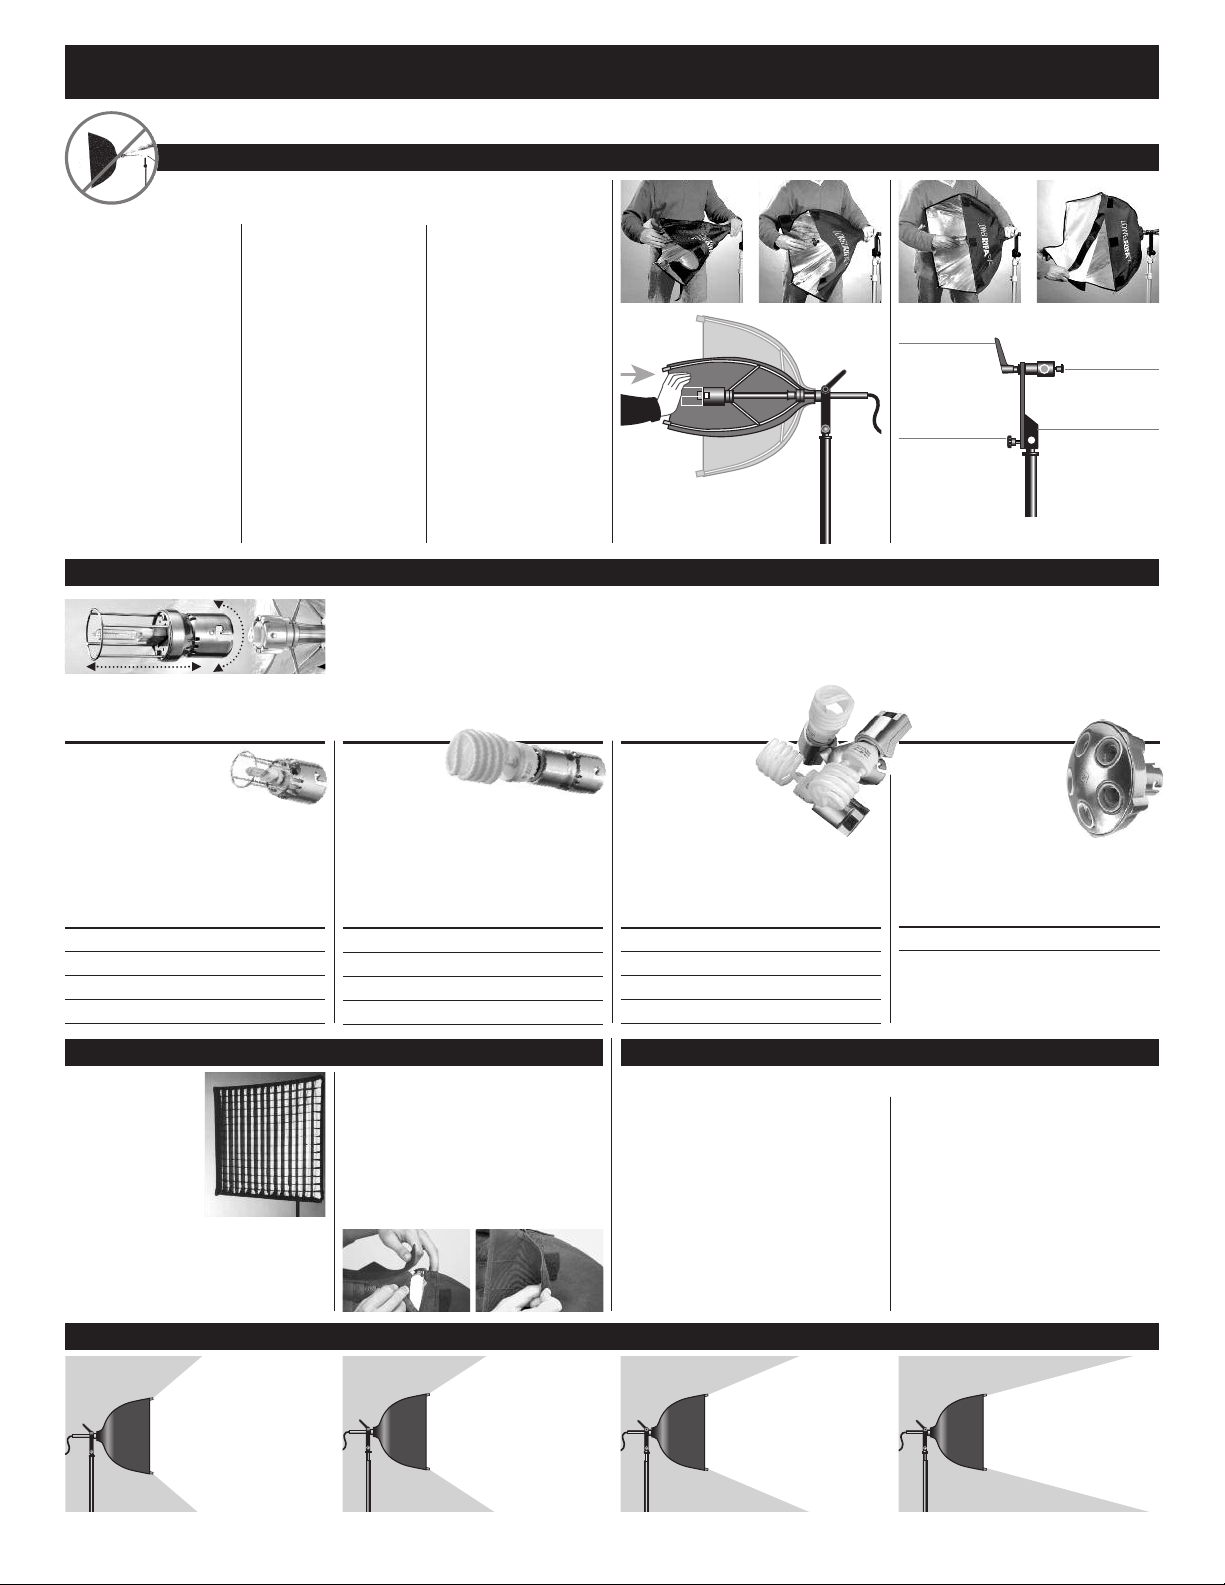
Setting up Rifa eX
Warning: Do not pull power cable to open light. Doing so may dam-
age the cable & fixture. Make sure fixture is unplugged before setup.
n Remove the Rifa eX unit
from its sleeve and mount and
lock on suitable stand.
n Release tilt lock handle,
tilt light to horizontal, relock
tilt handle, release the Velcro
strap around the folded
assembly.
n Reaffix the strap to itself.
Unfurl Rifa-lite reflector material until assembly loosens.
n Loosen thumbscrew located on back end of fixture.
n While holding the assembly base push the socket/lamp
cage assembly (avoid touching lamp) inward until the
assembly “click-locks”
into position.
n Tighten thumbscrew clockwise to lock fixture open.
Warning: The fixture must
be locked open before using,
failure to do so may cause the
fixture to close during operation, damaging the fixture.
Note: Make sure tilt lock
handle is on left side when
viewed from rear, this will
cause lock to tighten if light
droops forward on stand.
n Orient on stand with one
leg extending straight out
under Rifa for best balance.
n For increased balance, use
Rifa Balance Bar accessory.
n Attach diffuser panel by
placing it over the front of the
light inserting the corner pins
of the reflector frame through
the grommets of the diffuser,
securing it with Velcro strips
located around the reflector.
n Never use more than one
diffuser at a time.
Always operate Rifa-lite
with diffuser panel in
place.
n Attach 16' extending
(switched) power cord to
captive cable IEC connector.
eXchange™System Accessory Lampheads (See eXchange System Lamphead Instructions Sheet for more information)
Lowel Rifa eX uses quick-swapping accessory lampheads of the eXchange System, to increase versatility in lamps & output.
It is not necessary to remove supplied Standard Lamphead when storing or transporting Rifa eX.
n To remove standard (supplied) lamphead, make sure fixture is
unplugged & cool to touch. With diffuser removed, fixture open, on
TH-X1000 Standard lamphead supplied
with Rifa eX 55, 66, & 88. Can not be used
with Rifa eX 44.
TH-X300
stand, hold rear fixture stem, and push in & twist lamphead to release.
FLO-X1
FLO-X3
1
n Use same method to install accessory head, taking note of proper
bayonet pin / cutout alignment.
2 3
Tilt lock
handle
Stand lock
Stand orientation viewed from behind
FLO-X5
4
Thumbscrew
Stand mounting
bracket
For all Rifa eX models
Standard lamphead that is supplied with the
Rifa eX 44. It will also fit the other models of
Rifa eX as an accessory head, allowing use of
lower wattage, as well as some lower voltage
DC powered, lamps.
Wattage / Voltage
125 - 300W at 120V
235 - 300W at 240V
50 - 100W at 12V
200W at 30V
For all Rifa eX models
This accessory lamphead is designed to take
screw-thread edison base (normal household
socket) daylight fluorescent lamps. It will also
allow use of low wattage incandescent lamps
(27W or less)
Wattage / Voltage Model
27W or 80W @ 120/240V, 65W @ 120V Rifa eX 88
27W at 120/240V or 65W at 120V Rifa eX 66
27W at 120/240V Rifa eX 55
27W at 120/240V Rifa eX 44
For all Rifa eX models
This accessory lamphead is
designed to take screw-thread edison
base (normal household socket) daylight
fluorescent lamps, switched separately.
Wattage / Voltage Model
27W or 80W @ 120/240V, 65W @ 120V Rifa eX 88
27W or 80W @ 120/240V, 65W @ 120V Rifa eX 66
27W or 80W @ 120/240V, 65W @ 120V Rifa eX 55
27W at 120/240V Rifa eX 44
Attaching Soft Egg Crates Packing & Storing Rifa eX
Soft Fabric Egg Crates
are a valuable accessory
for controlling the aproximately 80˚beam angle
of Rifa, which can cause
unintended light spill in
other areas of your shot.
They can also help prevent a moving subject from becoming overlit
as they approach the light. Egg Crates are
available in 3 different dispersion angles (30,
40 & 50 degree) for each model of Rifa. Egg
Crates will lower output of Rifa eX.
n 1 Unfold Egg Crate accessory. With the
diffuser already attached, place the Soft Egg
Crate over the front of the light, inserting the
corner pins of the reflector frame into the metal
tube sockets located in the egg crate corners.
n 2 Secure the egg crate to the body of the
Rifa with Velcro strips located around the edge
of the reflector housing.
12
Unplug light and allow to cool for at least five minutes before disassembly.
n Detach Soft Egg Crate (if used)
and front diffuser. To prevent damage to the
diffuser, wrap material around tube and place
in pocket of light storage sleeve.
n Accessory flourescent lampheads & lamps
will prevent Rifa eX from collapsing fully.
Remove lamps and head before collapsing.
Place supplied protective caps on head & post.
Rifa eX Beam Angles with Soft Egg Crates (Beam Angle = Point at which intensity drops to 50% of maximum)
Rifa alone - 75° Rifa with 30° Egg CrateRifa with 40° Egg CrateRifa with 50° Egg Crate
For Rifa eX 88 only
Uses screw-thread edison base
lamps. Designed for maximum
output from Rifa eX 88, especially when used
with the 80w lamp. Use with Rifa Balance Bar
for improved balance on stand.
Wattage / Voltage Model
27W or 80W @ 120/240V, 65W @ 120V Rifa eX 88
n Hold stand mounting bracket, loosen
thumbscrew on mounting arm assembly and
push shaft forward until frame has collapsed.
n Smooth reflector material, and secure with
Velcro strap, tilt light down, remove unit from
light stand and place in sleeve.
2
Page 3

The Rifa eX is a dedicated soft light,
3:009:00
C
B
A
Camera
B
3:009:00
A
Camera
with quick set-up and beautiful output.
With a little practice, good results are
easy to achieve.
First, a brief overview...
Soft light is soft because the size of its source
is large when compared to the size of the subject being lit. The larger the ratio of light source
size to subject size, the softer the light. If you
stand outside on an overcast day, you will have
very little shadow because the size of the
source (the whole sky) is so much larger than
you are.
Hard light is hard because the size of
its source is small when compared to the subject being lit. In a fixture such as a Pro-light,
the physical size of the source is much smaller.
This makes the light very directional and as a
result, the shadows it throws are sharper. A
clear sunny day will result in sharper shadows
because of the smaller (harder) source.
Distance from source to
object
well. The further away from the subject the
source is, the smaller the source appears to be
& therefore the harder its shadows.
becomes a factor in sharpness as
Rifa eX Models
There are 4 models of Rifa, with front
diffusers in sizes of
• 16 x 16" (Rifa 44-EX)
• 21 x 21" (Rifa 55-EX)
• 25 x 25" (Rifa 66-EX)
• 32 x 32" (Rifa 88-EX)
So logically, at same distance, the 88 will be
softest of all because its source (the lit diffuser)
is the largest.
Rifa eX 55, 66, & 88 all
use the same standard
lamphead & socket.
While you should never use higher wattage
lamps than the maximum recommended for
each model, you can use lower wattage lamps
in the larger models for increased softness at
the same wattage / output.
For example, using the 500 watt EHC lamp in
the Rifa eX 55 at a distance of 5 feet will give
you 72 foot candles of light with the amount of
softness from a 24 square inch source, yet
using the same 500 watt EHC lamp in the Rifa
88 from a distance of 5 feet, will give you the
aprox. the same 72 foot candles of light, yet a
greater amount of softness because its now
coming from a larger 32 square inch source.
The TH-X300 Accessory Lamphead can quickly swap to allow greater use of lower wattage
lamps in larger sized Rifa’s, to reduce output
while retaining softness. It is the supplied
standard lamphead for Rifa eX 44
Postitioning the Rifa
Soft light falls off in output strength much
more quickly than a hard source of identical
wattage, because the soft source is so much
larger in size (light is dispersed in a wider
direction). As a result, soft sources, like Rifa
are designed to be used fairly close to the subject. This can create problems of light spill on
the areas behind the subject. The first step in
minimizing background spill is to move the
subject away from walls, by 6 feet or so if possible. This will allow a light placed on a stand
higher than the subject to fall off towards the
floor, before hitting the wall.
Lowel Rifa®eXchange®Instructions
n Introduction to Rifa eX for the New Pro
A
Using Fabric Egg Crates
Another situation that can arise as a result of
using soft sources close to the subject is fluctuation in exposure level that can occur if the
subject moves back & forth in relation to the
light source. With the source being so close,
its effect can be noticable in the camera. An
easy solution to this, which can also help
reduce the light spill described previously, is to
add an accessory fabric egg crate to the front
of the light. Soft fabric egg crates are available
in different degrees of dispersion, so where the
Rifa's have an output that will cast light in
almost 180 degrees (with the strongest portion
of the output being in the center 70- 75
degrees), the egg crates will trim this to either
30, 40 or 50 degrees, depending on the model
of egg crate used. They do a great job of preventing the subject from "burning up" if they
happen to get too close to the light source for
your exposure.
Mixing with daylight
For setups when you are shooting in a room
that also has windows, where the desire is to
mix the output of the Rifa with daylight, there
are 2 options.
First, using Accessory eXchange Lampheads,
you have the option of removing the supplied
tungsten-halogen lamphead and swapping to
one of several heads that take screw-threaded
daylight fluorescent lamps. Use only professional photography lamps, such as our 'OnColor' 80w, not hardware store specials. They
may be "daylight" but their low Color
Rendering Index will mean poor color rendtiton
across the light spectrum. See eXchange
System Lamphead Instructions Sheet or
lowel.com for more information.
The second option involves using some level
of daylight color correction gel. The goal is to
match the warmer 3200k tungsten lamp in the
Rifa, with the cooler daylight color (50006500k). Because daylight can vary in color,
depending on whether its direct sun, overcast
clouds, blue sky or any combination of the
above, you will need to choose either 1/4, 1/2
or full day blue to most closely match the Rifa
to the daylight in the room. Rifa Day Blue Gels
are custom cut to fit the Rifa's. They are sized
to cover the front diffuser with enough excess
to allow them to be clipped to the velcro pockets on the side of the light. You can use
clothespins, Lowel Gel-jawz, or any small
spring loaded clip.
These are just some
starting suggestions.
For an in-depth understanding of the creative
decisions involved in the art of lighting, we
suggest a visit to Lowel's EDU section at
lowel.com. You will find an in-depth
lesson on using the eXchange lampheads of Rifa eX. .
www.lowel.com
Basic Starter Setups using Rifa eX
Setup 1
Soft source close = Softest shadow
Same soft source further back =
Less soft shadow
Setup 2
Directional Sources have
smaller surfaces
Direct (small) source = Hardest shadows
1 Rifa, 1 Tota-light
To light an interview subject with the Rifa eX alone, You can place the
light at a 45º angle, 2-3 feet higher than the subject, with the light tilted
down towards the subject. From there, you can arc the angle of the
Rifa-lite out in either direction from 6:00 (at camera - this will give the
most even lighting) to either 3:00 or 9:00, depending on how much
dramatic contrast & fall off you want in your shot. Place the broad throw
Tota so it lights the background without spilling onto the subject.
A Rifa eX with 250 - 500W lampSetup Keys: B Pro-light with 100 - 250W lamp C Tota-light with 300 - 500W lamp
1 Rifa, 1 Pro-light, 1 Tota-light
To light an interview subject with 1 Rifa eX and 1 Pro-light (250w
focusable hard source), try using the Pro-light as a back light to give the
subject separation from the background. Vary the angle to the subject
while keeping the 2 lights facing each other for increased dramatic
results. As you approach a 9:00 / 3:00 placement, the Pro becomes a
hard / dramatic key, as the Rifa becomes soft fill. Note: watch for lens
flare from the back light (Pro). Place the broad throw Tota so it lights
the background without spilling onto the subject.
3
Page 4

Lowel Rifa®eXchange®Accessories
Male
Female
16'
MaleFemale
16'
MaleFemale
16'
Female Male
5'
Male
Female
10'
Female Male
1'
Female Male
1'
Light Controls
Replacement
Diffusers
Standard light diffuser replacements
for all 4 models of Rifa.
Diffuser must always be used to protect against lamp explosion.
For LC-44EX
Code: LC-44D
Size: 16 x 16" (40 x 40 cm)
For LC-55EX
Code: LC-55D
Size: 21 x 21" (53.3 x 53.3 cm)
For LC-66EX
Code: LC-66D
Size: 25 x 25" (66 x 66 cm
For LC-88EX
Code: LC-88D
Size: 32 x 32" (81.3 x 81.3 cm)
Rifa Daylight Gel Sets
For correcting Rifas to mix with
varying strengths of daylight,
they attach to Rifa’s velcro pockets
with clothespins.
Each set contains 3 sheets:
Day Blue; 1/2 Blue; & 1/4 Blue
(1 sheet each).
For LC-44EX
Code: LC-47
Size: 23 x 16" (58.4 x 40.6 cm)
For LC-55EX
Code: LC-57
Size: 29 x 22" (73.7 x 56 cm)
For LC-66EX
Code: LC-67
Size: 33 x 26" (84 x 66 cm)
For LC-88EX
Code: LC-87
Size: 39 x 32" (99 x 81.3 cm)
Soft Egg Crates
For better light control.
Each Egg Crate
attaches quickly
and afterwards
folds up to be
stored in its
own small
light-weight
bag.
30° x 30° Egg Crate
Soft Egg Crate with 30°
dispersion angle.
30° Egg Crate for LC-44EX
Code: LC-44EC/30
Weight: 8 oz (228 g)
30° Egg Crate for LC-55EX
Code: LC-55EC/30
Weight: 9.5 oz (266 g)
30° Egg Crate for LC-66EX
Code: LC-66EC/30
Weight: 12.5 oz (345 g)
30° Egg Crate for LC-88EX
Code: LC-88EC/30
Weight: 1 lb (448 g)
40° x 40° Egg Crate
Soft Egg Crate with 40°
dispersion angle.
40° Egg Crate for LC-44EX
Code: LC-44EC/40
40° Egg Crate for LC-55EX
Code: LC-55EC/40
40° Egg Crate for LC-66EX
Code: LC-66EC/40
40° Egg Crate for LC-88EX
Code: LC-88EC/40
50° x 50° Egg Crate
Soft Egg Crate with 50°
dispersion angle.
50° Egg Crate for LC-44EX
Code: LC-44EC/50
50° Egg Crate for LC-55EX
Code: LC-55EC/50
50° Egg Crate for LC-66EX
Code: LC-66EC/50
50° Egg Crate for LC-88EX
Code: LC-88EC/50
Mounts
Uni TO Stand
Code: UN-55
Weight: 2.6 lbs
(1.2 kg)
Size: 21.5"
(55.2 cm) folded.
Maximum height:
7' (2.2 m)
Base diameter: 46"
New stand, based on design
combination of Uni-stand &
Omni-stand. More stable than
Uni-stand, more compact than
Omni-stand. For Rifa 44.
KS Jr. Stand
Code: DT-33
Size: Maximum
height: 7'7" (2.3 m),
Collapsed length: 2.3' (65 cm)
Weight: 3.5 lbs (1.6 kg)
Wide based, sturdy, lightweight
stand with 5/8" (1.59 cm)
stud and solid bar legs.
For Rifa 44, 55, 66.
KS Stand
Code: KS
Size: Maximum height:
9' (2.74 m),
Collapsed length:
3' (91 cm)
Weight:
4 lbs (1.8 kg)
Wide based, sturdier, lightweight
stand with 5/8" (1.59 cm) stud.
For all 4 Rifas.
KSA Stand
Code: KSA
Black-anodized, air-cushioned
stand. Otherwise same as above.
Tota-clamp
Code: T1-30
Weight: 4 oz (113 g)
Clamps onto pipes,
shelves, etc. up to
1 7/8" (4.78 cm) thick.
5/8" (1.59 cm) stud locks in two
positions and accepts a light.
Also accepts two Flexi-shafts with
flags or flectors.
Safety Cable (3)
Code: CM-50
Weight: 2 oz (57 g)
Recommended for extra security
when attaching Rifa-lites
|overhead. (Set of 3).
Balance Bar
Code: LC-30
Size: 12.5" (31.8 cm)
Weight: 6.5 oz (184 g)
The Rifa Balance Bar is an extension
arm accessory that mounts between
the Rifa-lite and its stand fitting.
When installed, it can shift the Rifa’s
center of gravity to allow better stand
balance. It can facilitate angling and
tilting of the light when necessary,
such as on a boom arm, without the
need to overtighten stand fitting
knob. Install Balance Bar as shown,
orienting conical washers as
shown (*).
Rifa
Support
Tube
Conical
*
Washers
Rifa Stand-
fitting
Cables
16' Switched AC Cable
Code: T1-80
Weight: 13 oz (369 g)
Standard #18/3; with switch.
10' Unswitched Cable
Code: T1-808
Weight: 1.1 lbs (.5 kg)
For portable stage lighting use.
“Hard service” #18/3 cable.
16' (5 m) Eurocord
Code: T1-801
Weight: 13 oz (369 g)
#18/3 (.75 mm/3) with double pole
switch and male CEE-7 plug.
16' (5 m) T/O UK Cord
Code: T1-802
Weight: 13 oz (369 g)
#18/3 (.75 mm/3) with double
pole switch and male fused BS
1363A plug.
5' Omni 30v Cable
Code: O1-81
Adapts Rifa-44 for use with
30 volt battery #18/3; with switch
and 2 pin “Amphenol Type” connector for batteries.
4-pin XLR Switched Cable
Code: R2-82
Adapts the Rifa-44
or use with appropriate 12 volt
batteries. No wiring required.
1' 12v Switched Cigarette
Lighter/Car Adaptor Cable
Code: R2-85
Adapts Rifa 44 IEC Connector for
use with some 12 volt batteries and
automobile cigarette lighter sockets.
No wiring required.
Lowel-Light Manufacturing, Inc.
90 Oser Avenue, Hauppauge, N.Y. 11788
Call: 800 645-2522 or 631 273-2500
Fax: 631 273-2557
e-mail: info@lowel.com
www.lowel.com
Problems, info, repairs, etc.
Lowel equipment and kits are sold through authorized Lowel Dealers and, in some countries, Authorized Lowel
Distributors. Repairs, problems, suggestions, and requests for brochures, instructions, parts lists may be handled by
your authorized Lowel Dealer (Distributor) or directly with Lowel. Electrical repairs should be made only by Lowel
or a qualified electrician. Rifa-lite
Manufacturing, Inc. U.S. Patent No. 4594645
®
, Rifa®, and eXchange®are registered trademarks of Lowel-Light
, ver: 6.7 © Lowel-Light Mfg., Inc. 2010 120
4
 Loading...