

Page 1
LOWEL
O
MNI
L
IGHT
Lowel Omni-light Instructions
The Lowel Omni-lights are professional
lighting fixtures. Read these instructions
and lamp manufacturer’s warnings fully
before operating.
n Not for household use, use only for
film, video or imaging purposes.
n Do not leave lit fixture unattended.
n Unplug lights when unattended
or when relamping.
n Make certain that lamp voltage
matches power source voltage.
The unit uses lamps of different voltages
(example: never connect a 120 volt lamp
to a 220/240 volt source).
n Lights such as these emit
considerable light and heat and, if not
properly used, could be dangerous.
n The Protective Screen must be used
to protect people
and property
in the unlikely
event of a
defective lamp
exploding.
n Open faced
lights should
not be posi-
tioned extremely
close to people. Ultraviolet light ray emissions
can cause damage to the eyes and reddening
of the skin. The likelihood of either occurring
is increased with length of exposure, focus
intensity and proximity. Therefore, lights
should be kept away from people or a
dichroic, frosted glass, or clear glass should
be used. Bounce illumination also reduces
this problem.
n Avoid aiming the light at,
or placing close to, people, delicate objects
or flammable materials.
n Do not interfere with ventilation
by covering the lights in any way.
n Never touch hot parts.
n Do not use near standing water.
n Lights should be operated with
lamp filament horizontal.
Yes
n Avoid mounting lights directly
over people unless secured with a safety
cord or cable.
n Do not focus Omni to spot when using
with umbrella accessory.
arnings
W
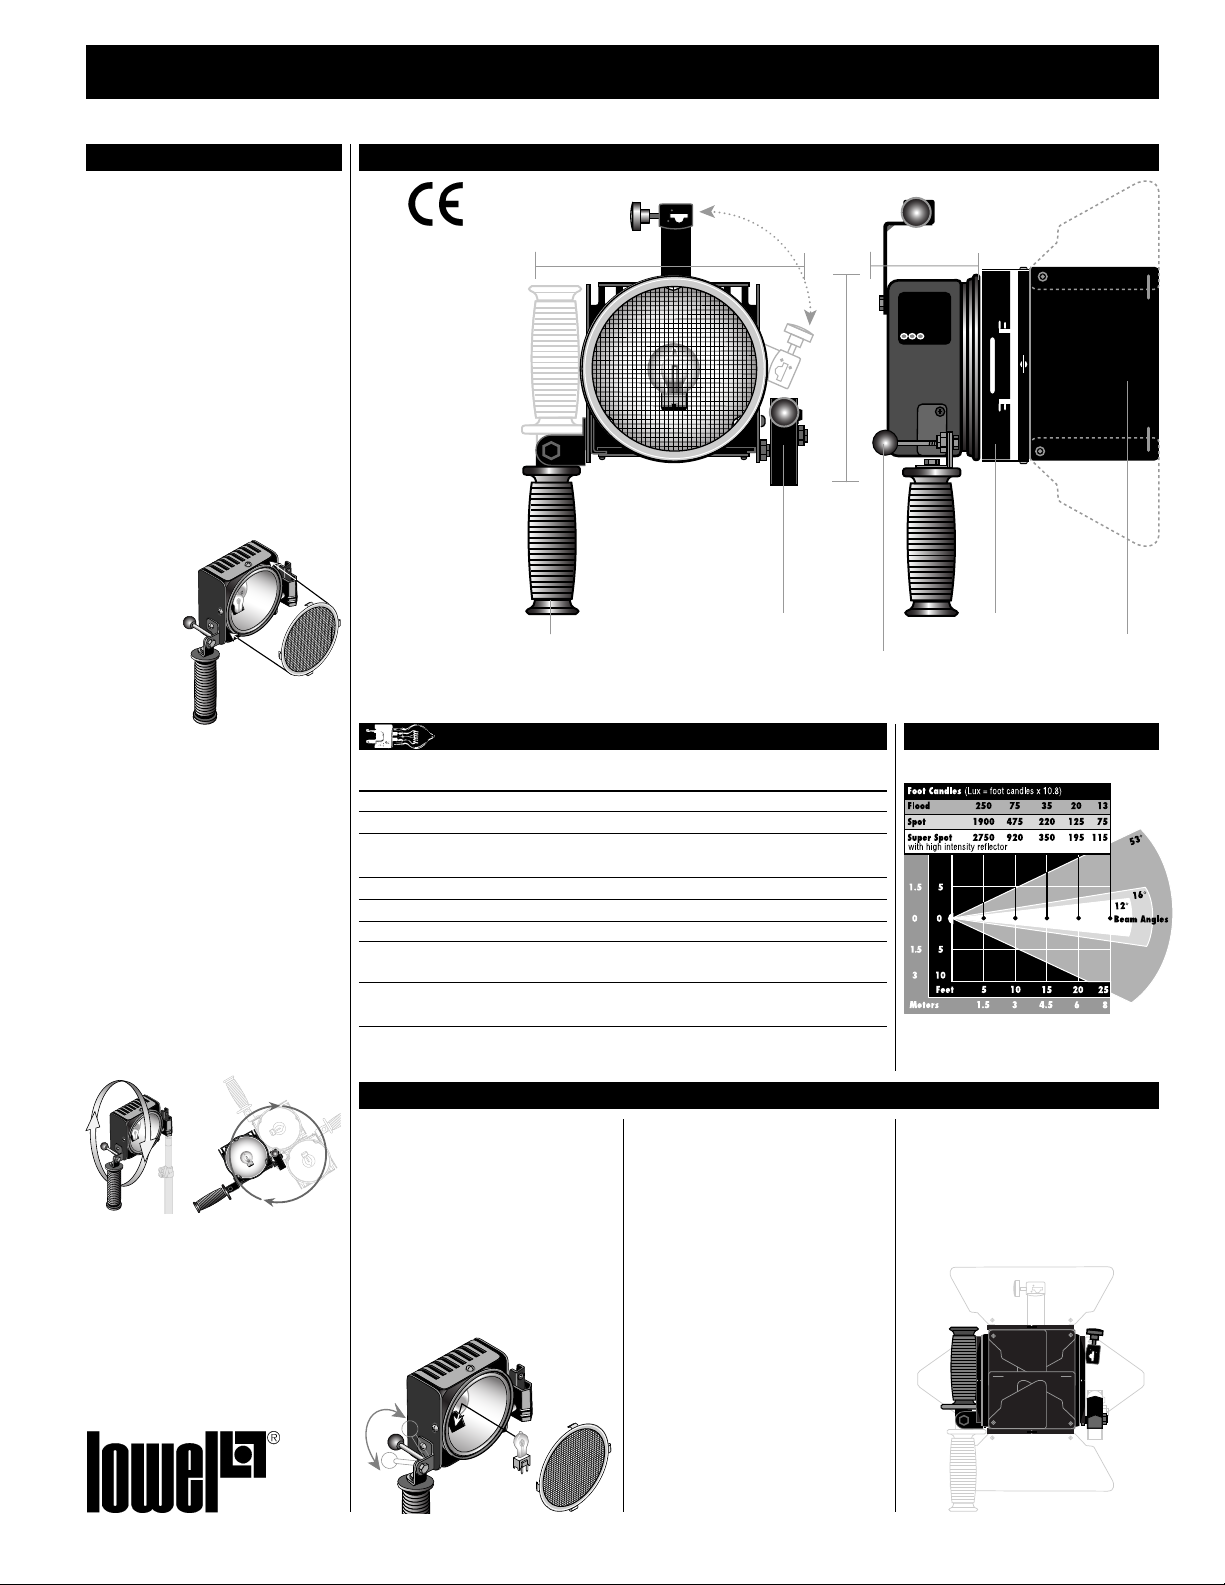
2 position
bracket for
umbrella and
gel-frame
Gel-frame
8” (20 cm)
Technical Data
Weight less cable:
1.7 lbs (771 g)
With 16' cable: 2.6 lbs
Max. wattage: 500w at
120v and 220/240v
Max. amperage:
8.3 at 30v & 12v
Beam control:
continuously variable
Fits on: studs 5/8"
(1.59 mm) and smaller
Materials: primarily
aluminum alloy
Cable: 12, 120, 220,
240v: 16' #18/3 wire;
30v: 5' #18/3 wire
Switch: in-line
U.S. Patent: 4187531
Large cool
handle pivots
in for storage
Stand fitting with
constant tension tilting
(275° with barndoors,
360° without)
Lamp/Beam Data Performance
Lamp Volts Watts °K Avg Foot Candles at 10' (3 m), w/prot. screen
Code Life Flood Spot Focus Range Super Spot
EYL 12 100 3200 50 hr 14 (150) 111 (1200) 8:1 242 (2600)
DYG 30 250 3400 15 hr 37 (400) 311 (3350) 8:1 753 (8100)
JCD120V/300WC
120 300 3200 70 hr 32 (345) 278 (3000) 9:1 444 (4800)
EKB 120 420 3200 75 hr 66 (715) 390 (4200) 6:1 753 (8100)
FTK 120 500 3200 100 hr 75 (810) 475 (5130) 6:1 920 (9936)
GCY 230 500 3150 150 hr 75 (813) 295 (3200) 4:1 490 (5290)
JCD230V-300WC
230 300 3200 75 hr 27 (290) 222 (2400) 8:1 361 (3900)
JCD240V-500WC
240 500 3200 50 hr 47 (510) 370 (4000) 8:1 833 (9000)
No
Omni Lamps Replacement
Always unplug unit before relamping.
Lamps must be operated at their rated voltage.
Avoid touching “glass” with bare fingers. Insert
lamp carefully, to avoid breaking. Due to inconsistencies in lamp (bulb) production, an individual lamp may function for more or less than
its average rated life. Some lamp manufactures
are of better quality than others and may provide longer life and better performance. Lamps
may be changed with reflectors installed or
removed.
B
A Remove safety screen
B Hold focus knob in spot position
C Rock lamp gently from
side to side while lifting from socket.
The electrical contacts of the Omni lamp
socket are very “stiff” and require considerable lamp insertion pressure to properly seat
the lamp. If the lamp is not fully inserted,
it can cause arcing and pitting of
both the socket and lamp pins reducing
both lamp and socket life. Replace
safety screen. Never operate light without
Protective Screen, metal scrim or safety glass
accessory. We suggest that you do not
remove the lamp from the fixture when transporting the light, locally.
Umbrella
5.5” (14 cm)
Focus knob,
Flood to Spot
mni-light
O
3” (7.6 cm)
Barndoor Frame
rotates 360°
and accepts front
accessories
With 120v, 500w, 3200°K, FTK lamp
Beam angles-points at which intensity drops to
50% of maximum
4 Expandable
Barndoor
Panels
Omni Operations
To Store Omni
When fixture is cool to the touch, disconnect
plug on rear of light, swing handle up, swing
gel-brella bracket down, rotate stand fitting up
45°. Swing in extending flaps on large doors
and “square” barn-door with unit. It is not
necessary to remove barndoor or flaps.
C
A
Page 2
Lowel Omni-light Instructions
LOWEL
O
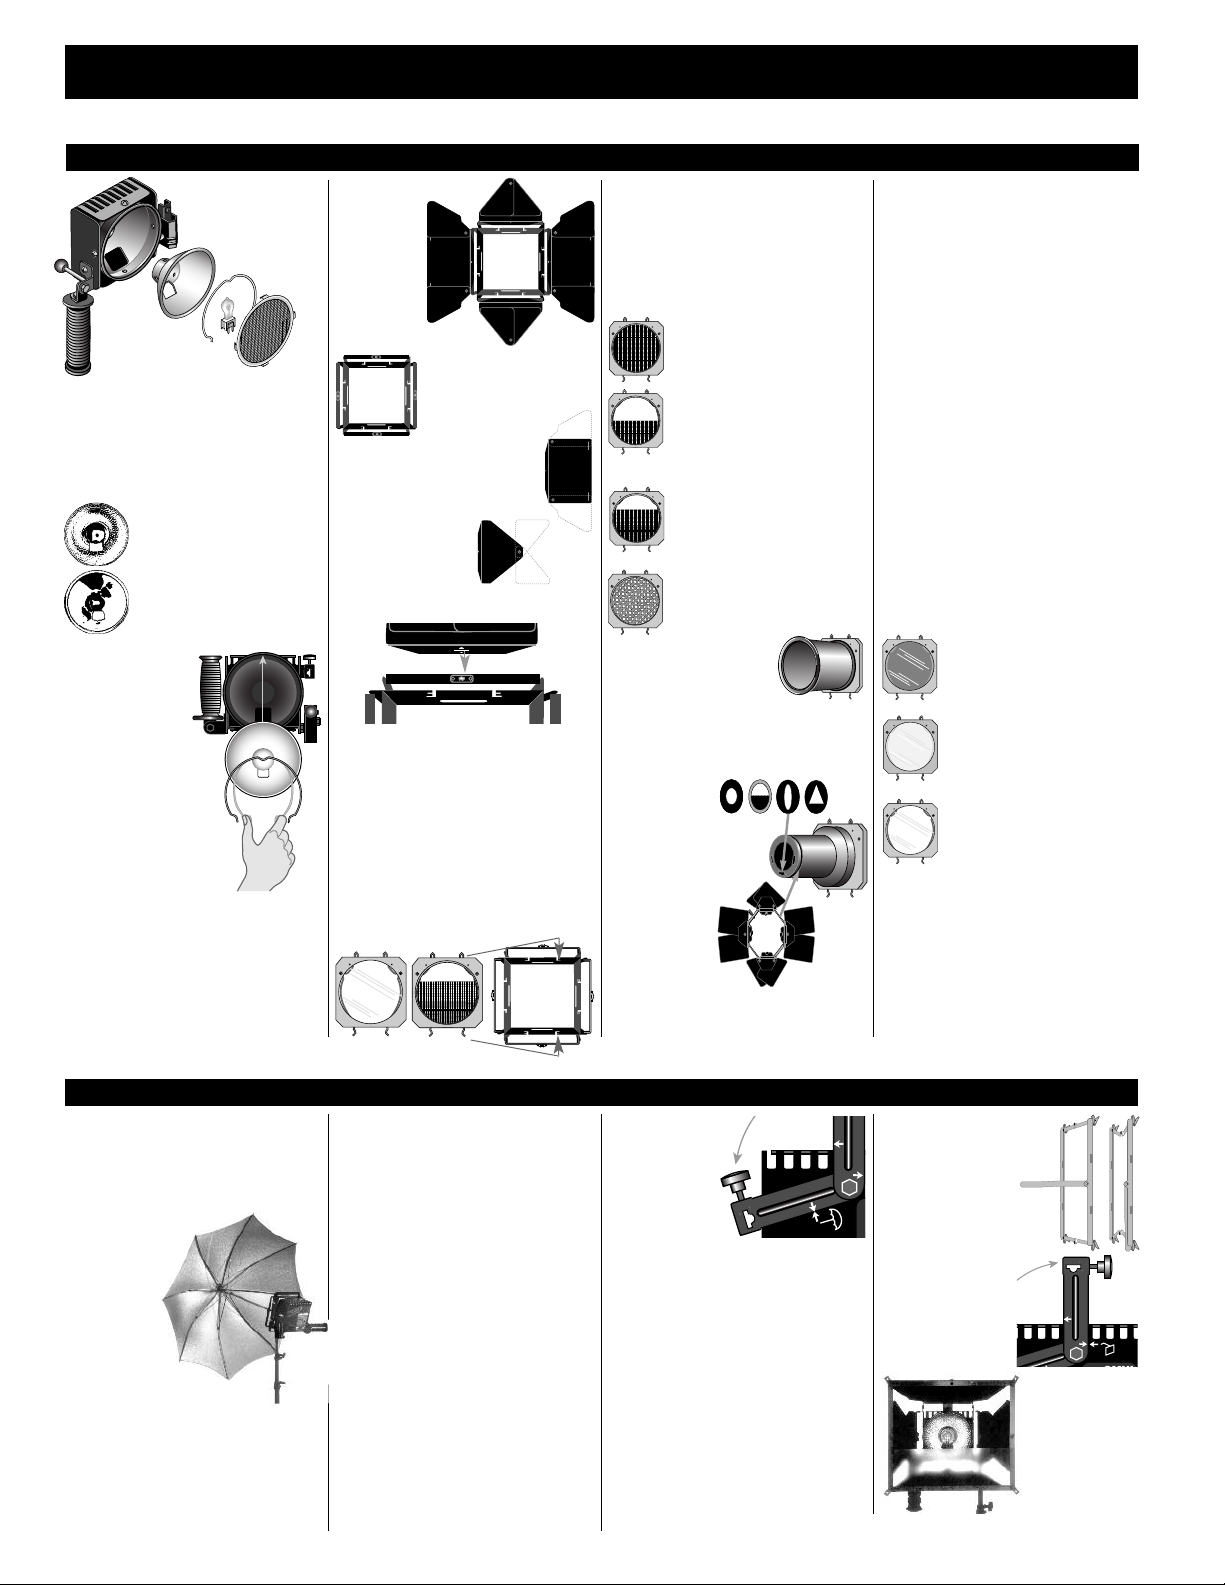
Omni Reflectors
The Omnilight uses
two pin prefocus
tungsten halogen lamps
of different voltages and filament config-
urations. To solve the optical problems most
efficiently, the fixture has two different standard focusing reflectors. In addition two special purpose reflectors are also available. For
identification each has a number embossed
on the reflector.
#1 Standard focusing reflector:
for all voltages.
#3 High intensity, super spot:
long “throw,” non-focusing
reflector for all voltages.
Changing
Omni
Reflectors
When fixture is cool
to the touch.
Disconnect plug on rear of
light. Remove Protective
Screen then remove reflector retaining spring by first
pulling either end of spring
inward. Focus lamp to spot
position and tilt Omni-light
down slightly. Reflector can be
lifted around the lamp. To install reflector, tilt
Omni-light up, keep lamp focused to spot,
insert reflector around lamp and onto registration pin. Replace reflector spring and
Protective Screen. Never operate light
without Protective Screen.
Omni Barndoor
Barndoor
frame snaps
onto rim on
front of light. It
can be removed
by pushing out
on two adjacent sides while
pulling that corner forward.
The frame holds any two
accessories, rotates 360°
and joins two snoots.
Large door has two extending
wings which stop in open position,
this stop may be bypassed.
The Triangular door
has two extending wings
to increase their area or
create special shadowing
effects. The Locking Fastener requires 1/4
turn to remove or install doors. If barndoor
frame fails to maintain proper tension on light,
the frame should be removed and squeezed
inward, very slightly.
Omni Barndoor
Accessories
Each barndoor frame can hold any two
barndoor accessories. Handles on the accessories are sprung together to insert or remove
accessory.
First accessory used
should be positioned in rear slots. Second
accessory or snoot can then be used in forward slots.
When a wire scrim and glass
accessory are used simultaneously,
the wire scrim should be placed
closest to the lamp, to reduce the
possibility of glass breakage.
Full scrim: reduces light
intensity by approximately 50%.
Half scrim: covers half of
reflector and rotates 360°.
Darkens washed out foregrounds,
compensates for talent “burning
up” as they approach a light.
Graduated scrim:
same principle as half scrim
but effect is more gradual and
more extreme.
Cookaloris: produces an overall,
soft shadow pattern, can be used to “breakup”
a plain background.
Snoot: produces a reduced circle of
light; two Snoots may be joined with an additional barndoor frame to produce a smaller
and sharper circle of light. Barndoors and
barndoor accessories may also be
added to the end of
the Snoot.
Narrow Snoot: produces
smaller diameter circular
cutoff
(2.25" diameter).
Accepts Fren-L
patterns as well
as Pro-light barn
doors & swing-in accessories.
mni Light Controls
O
Accessory Front Glass
Instructions & Warnings
These Glass Accessories:
• act as safety shields in the event of
a violent lamp failure
• reduce the harmful effects of UV rays
• are made of Pyrex ® and will break if
dropped or mishandled, care should be
taken to avoid chipping and deep scratch
ing of the glass as this will weaken it
• should be allowed to cool before being
stored or shipped
• should be wrapped for protection when
stored or shipped
• should be used in the forward barn door
frame position (further from the lamp),
if a second accessory (such as a scrim)
is used, place that accessory in the rear
position of the frame (closer to the lamp)
• require when cleaning the surface of the
dichroic filter to avoid damaging the
coated surface
Dichroic filter:
converts 3200K lamps to average
daylight; absorbs U.V. Iight rays
Light loss approximately 65%.
Clear glass filter:
absorbs U.V. Iight rays. Light loss
approximately 5%.
Diffused glass:
softens highlights and shadows.
Absorbs U.V. Iight rays Light loss
approximately 40% in flood
setting.
See www.lowel.com for more information.
The following components are shared
by both the Tota and Omni-lights.
Their attachment may differ slightly
between Tota and Omni, see Tota
instructions for more information.
Umbrellas
Photographic
umbrellas convert
relatively hard
light sources,
such as spotlights, into relatively soft sources
that provide soft shadows and highlights. Although not
appropriate for every subject or
mood, the quality of light can be very beautiful. There are two Umbrellas designed for use
with the Omni-light, a woven, soft silver Totabrella (T1-25) and a softer white Tota-brella
(T1-26) that produces a softer light and also
may be used as a large diffuser.
Warning: When using umbrella with
Omni, do not focus light to spot.
Warning: When lights with umbrellas are
extended very high, or used on undersized
stands or in areas of heavy “traffic”, it is
advisable to add weight (such as the Lowel
weight) to the base of the stand. This reduces
the chance of lights falling over which could
damage the umbrella, the lamp, and possibly
cause personal injury.
Using Umbrellas
Remove entire barndoor (or just the four flaps
if an accessory such as a dichroic filter
is used). Set gel-brella bracket to umbrella
position (line up arrow guides on back panel).
Insert umbrella through hole until shaft
Tota/Omni Shared Light Control Accessories
appears through
opposite hole.
Do not position
umbrella further
into the
fixture than the
automatic stop
(clip) allows, or scorching may occur. Lock
with knob. For best soft-light effect, focus
Omni to full flood position. To prevent damage to umbrella, do not focus to spot or halfspot position as scorching of the umbrella
may occur. Since the gel frame cannot be
attached when the umbrella is inserted, the
dichroic filter should be used for daylight correction. When using the DP Umbrella the tilt
tension of the light may have to be increased.
This can be done easily by tightening the nut
located on the stand fitting with a 7/16"
wrench. Do not over tighten!
Tota-frame
Set Gel-brella bracket
in gel frame position
(line up guides on
back panel). Unfold
frame, extending frame
bar and insert through
front hole of gel-brella
holder until shaft
appears through
opposite hole.
Lock with knob.
Page 3

Lowel Omni-light Instructions
Male
Female
16'
MaleFemale
16'
MaleFemale
16'
Male
Female
10'
Female Male
5'
LOWEL
OMNI
LIGHT
ota/Omni Shared Light Control Accessories Continued
T
Tota/Omni Gels
Gels are secured to the frame with corner
spring clips. Gels should not be doubled up.
Precut, tough, fade resistant Lowel gels are
available in daylight blue, frost diffusion, &
neutral density. When gels are used, the Omni
should not be spotted-down excessively.
(See gel instruction sheet.)
Tota-flag & Tota-flector
Omni Power Cords
16' Tota/Omni Cable
Code: T1-80
Standard #18/3; with switch & standard
Edison wall plug.
16' (5 m) Tota Eurocord
Code: T1-801
#18/3 (.75 mm/3) with
double pole switch and male CEE-7 plug.
16' (5 m) Tota UK Cord
Code: T1-802
#18/3 (.75 mm/3) with double pole switch
and male fused BS 1363A plug.
5' Omni 30v Cable
Code: O1-81
#18/3; with switch and 2 pin “Amphenol
Type” connector for batteries.
10' Unswitched Cable
Code: T1-808
For portable stage lighting use.
“Hard service” #18/3 cable.
Tota flags can be
used separately, or
snapped together
end to end or side
to side. Flags can
be attached to the
light with a flexishaft. Flags block or
“feather” light off
background, subject, or camera lens.
Tota-flectors can be
attached in the same
way and used to
redirect some of the
light. It can also
provide close-up fill
illumination from
the sun or other source over a small area.
Slight convex bowing of the surface will
reduce the intensity and increase the area
illumination. Avoid mounting flags or reflectors directly over people unless secured with
a safety cord or cable.
Flexi-shaft
A flexible arm to position Tota-flags
and Tota-flectors. Its fixed
end snaps into a female
connector on the Tota &
Omni-lights, Tota-clamp
and other Tota components. The rotating end
snaps on to the flag, flector
etc. Avoid overstressing
connectors while bending
and twisting.
Tota-tatch
Spring clamp attaches
Tota-flags and Tota-flectors with or without Flexishafts, to stands, pipes, and
flat surfaces. The snap-in fitting rotates
to help position flags, cards etc.
Gel-jawz attach to barndoor
leaves to hold gels.
Lampaks
Lampaks provide transparent, semi rigid foam
filled storage for spare lamps. Always remove
lamps from fixture &
store in Lampak if the kit
will be travelling for an
extended period
(example: flights or
cargo).
Never put hot
lamps in
Lampak.
Omni Lampak
Code: O1-61
Stores 6 Omni lamps in foam
filled plastic case. (lamps not
included)
Tota/Omni Lampak
Code: TO-61
Stores 2 Tota & 4 Omni lamps
in foam filled plastic case.
(lamps not included)
ounts
M
Omni-stand
Code: O1-33
Weight: 2.6 lbs
(1.2 kg)
Size: (2.74 m), 27"
(69 cm) folded
Sturdy and lightweight;
extends to 9'. Collar
clamping;
standard 5/8"
(1.59 cm) stud.
Uni TO Stand
Code: UN-55
Weight: 2.6 lbs (1.2 kg)
Size: 21.5" (54.6 cm) folded.
Maximum height:
7'11" (2.4 m)
Base diameter: 43"
New stand, based
on design
combination
of Uni-stand &
Omni-stand. More stable than
Uni-stand, more compact than
Omni-stand.
Tota-clamp
Code: T1-30
Clamps onto pipes and objects up
to 1 7/8" (4.8 cm) thick.
5/8" (1.59 cm) stud locks in
two positions and accepts a light.
Two Flexi-shafts with Tota-flags
can be attached.
Tota-mount
Code: T1-32
Hangs on doortops,
Gaffer-tapes to windows
and most wall surfaces
to support Tota, Omni and
other small lights. Folds
for storage.
Scissor-mount (2)
Code: CM-20
Attaches small lights and
accessories to grid of
dropped-ceilings in
offices and other areas.
(Set of 2).
Lobo
Code: F1-30
Attaches Lobo Arm to top or any part of a
stand to make a miniature boom. Also mounts
large umbrellas, flags, etc.
Lobo Arm
Code: F1-40
22" (55.9 cm) shaft with 5/8" (1.59 cm) stud.
Extends, articulates and booms small lights,
reflectors, etc.
Safety Cable (3)
Code: CM-50
Size: 34" (86.4 cm)
Braided stainless-steel cable adds security
to lights and accessories that are attached to
overhead pipes, beams, dropped- ceiling
grids, etc. (Set of 3).
Omni Adjustments
A
B
C
D
Omni has four constant-tension (torque)
pivot points. All have flat spring washers to
maintain proper tension and can be adjusted,
if necessary, with a 7/16" wrench.
A Gel-brella bracket tension can be
adjusted by the bolt attaching the bracket
to the rear of the light.
B Focus “drag” can be adjusted with the
nut located just in front of the stand fitting on
the opposite side of the fixture.
C Tilt tension can adjusted with the nut
located on the stand fitting.
D Handle tension can be adjusted by the
nut located on the handle mounting bracket.
Do not over tighten!
Page 4

CameraA
D
A
Camera
C
B
Lowel Omni-light Instructions
CameraAB
mni-light for the New Pro
O
he wide focusing range of the Omni-light makes it a flexible key, fill or
T
back-light. Adding accessories will extend its creative possibilities.
Use the focusing knob to move from
Spot (narrow beam) to Flood (wide beam).
Its 6:1 focus ratio (when used with supplied
#1 reflector & an FTK lamp) means that the
spot setting will be approximately 6 times as
bright as the flood setting.
Omni is an open face (lensless) fixture.
It is capable of throwing sharp shadows. Add a
diffusion glass accessory, diffusion gel with a
Tota-frame, or attach an umbrella to create a softer source. Use
one Omni without diffusion and another with diffusion, to create
the classic “hard key & soft fill” lighting setup common in many
interview & still life settings.
Use the rotating barndoors to trim unwanted output spill,
(for example: to reduce risk of shadow in your shot caused by
use of overhead boom microphones). Flexi-shafts & Tota-flags
can also be attached for increased light control options.
Because the Omni is a tungsten-halogen source,
its color temperature will be in the 3000–3200°K range,
depending on lamp choice. To use Omni in locations where
its output will mix with daylight (5600–6500°K ), its color
temperature can be converted by attaching a Dichroic Filter
accessory, or adding day blue gels to the Tota-frame. Both will
give more realistic daylight white-balancing in video or film.
To simply raise the ambient level of light in a room,
point the Omni-light at a white wall or ceiling (from a safe
distance of several feet or more), and focus to flood setting.
Position the light so it won't be in your shot.
The Omni-light can use different wattage lamps, from
300–500W @ 120V.This increases its versatility, especially
when mixing with other fixtures of different max. wattages.
See the lamp chart for more information.
For special use applications, Omni can be converted in the
following ways. (see Accessories for more information):
Swap the power cord & lamp, for a battery powered, handheld light at 12 or 30V. (see lamp chart)
Swap to the #3 reflector for non-focusing
higher output Super-Spot. This can be useful when
lighting a smaller area from a greater distance when
higher output is needed.
Or use the #4 reflector for warmer color output to
simulate late day sun or when lighting a pale skin complexion.
For more reduced spill, consider adding either the
Omni Snoot or the Omni Narrow Snoot which allows front
accessories, for further control options.
Other front accessories can help vary the quality
of the light output. For example, the rotating half-scrim can
allow you to reduce light output on a close subject while still
illuminating subjects further away with full output. The full
scrim reduces output without the use of a dimmer which can
shift the color temperature warmer as the lamp is dimmed.
The oversimplified diagram above shows some of the
ramifications of positioning lights for different subject types &
lighting effects. This diagram is only useful as a starting point
for new pros. All subjects & scenes are different and make different demands upon lighting. The height of the lights & camera, and the subjects angles & reflectivity must be considered.
When finished setting multiple lights, it’s a good idea to
check the effect of each light by powering them all down &
looking at your set with one light on at a time. This will help
you better understand the components of lighting and how
each fixture contributes to the final image.
These are just some starting suggestions.
For additional introductory information, see the Resources
section of the complete Lowel catalog. For an in-depth
understanding of the creative decisions involved in the art of
lighting, we suggest Ross Lowell's acclaimed book, Matters of
Light & Depth, available from many of our dealers.
Example Setups using Omni-light
Setup 1
These 3 setups show some ways the Omni can be used;
alone, with Tota-brella, or with diffusion, in a small lighting
setup. Position of the lights and distance to the subject can
be varied for different creative results. Varying the distance of
either light from the subject will vary the contrast ratio
between Key & Fill lights. Tip: position your subject away
from walls to avoid shadows and give more a sense of depth.
Setup #1 shows single fixture use, and can be set on either
side of the camera. Varying the position of the light will
increase shadow & contrast on the subject.
Setup 2
Setup #2 uses 2 Omni’s, one with only barn doors, as
hard key, and the other with a Tota-brella as soft fill. Vary
the position of the lights, as shown. Be aware of reflection
in eyeglasses or reflective surfaces.
Setup #3uses 2 Omni’s as hard key/soft fill, with a Tota to
evenly light the background. An additional Omni from high up
behind the subject as a back hair-light, lighting the back of the
head & shoulders, will create a sense of separation from the
background. Be careful to keep the light output of the back light
from spilling into the camera lens which will cause lens flare.
Problems, info, repairs, etc.
Lowel equipment and kits are sold through authorized Lowel Dealers and, in some countries, Authorized Lowel Distributors.
Repairs, problems, suggestions, and requests for brochures, instructions, parts lists may be handled by your authorized
Lowel Dealer (Distributor) or directly with Lowel. Electrical repairs should be made only by Lowel or a qualified electrician.
Lowel Omni-system, Lowel Omni-light, Lowel Tota-system and Tota-light are trademarks of Lowel-Light Manufacturing, Inc.
Lowel Patent Nos.: 3852582, 4187531, version: 5.4 © Lowel-Light Mfg., Inc. 2009 725
Setup 3
Setup Keys
A Key light Omni with barndoors
B Fill light Omni with umbrella
C Background Tota
D High back light Omni with Tota-frame & diffusion
Lowel-Light Manufacturing, Inc.
90 Oser Avenue, Hauppauge, N.Y. 11788
Call: 800 645-2522 or 631 273-2500
Fax: 631 273-2557
e-mail: info@lowel.com
www.lowel.com
 Loading...