

Page 1
Operating Instructions
Fast, Simple, Beautiful
The Lowel Ego
digital imaging light
is ideal for shooting
tabletop stills with
digital (or film)
cameras. It can also
be used as a
closeup portrait light
for stills or video.
To begin lighting
with it, simply set it
on the table, & plug
it in. Use it by itself
from either side of
the camera for soft,
yet dramatic,
effects. Or add the
enclosed bounce
reflector card for
more evenly lit
images.
IMPORTANT SAFETY INSTRUCTIONS
n Warning: Risk of fire, use only lamps rated
at 30 Watts or lower each (60 W total).
n This portable lamp has a polarized plug
(one blade is larger than the other) as a feature
to reduce the risk of electric shock. This plug
will fit in a polarized outlet only one way. If the
plug does not fit fully in the outlet, reverse the
plug. If it still does not fit, contact a qualified
electrician. Never use with an extension cord
unless plug can be fully inserted.
Do not alter plug.
n Do not use lamp housing with diffuser/shade
removed.
n Do not interfere with unit’s ventilation.
n Use only in dry locations.
n Grasp lamps by their base, when tightening
or loosening in sockets, to prevent breakage.
n LowelEgo comes supplied with (2) 27 watt
fluorescent lamps in daylight color
temperature.
n The lamps are switched on & off as a pair.
n See back page for lamp change
instructions.
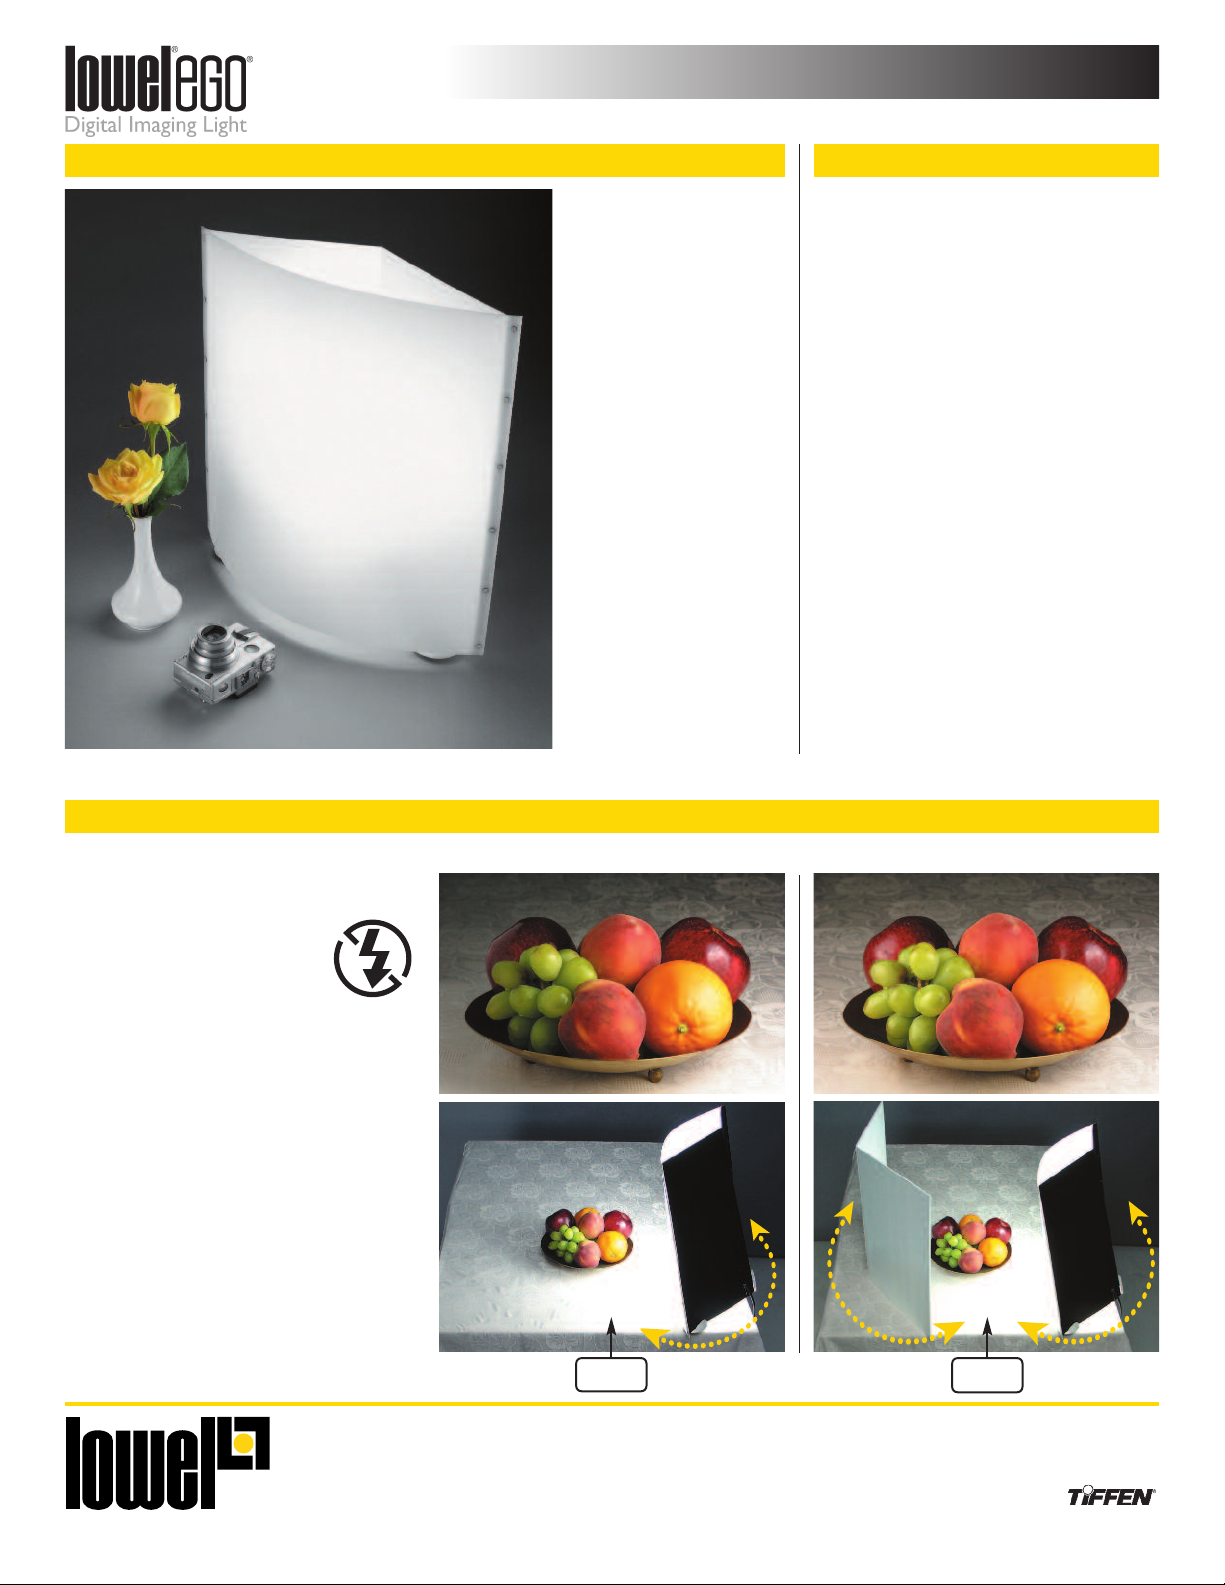
Shooting Tabletop Shots Quickly
Turn off your Flash. For most
point & shoot digital cameras
there are several settings
for the flash. This symbol
means that the flash
has been switched off.
n Place your camera on a tripod
and frame your shot.
n Place the LowelEgo on the table to the
right or left of the camera and experiment
with placement to find a positon & angle
that gives desired results.
n Check the shot on the camera’s LCD
screen to make sure the light isnt visible
in the frame.
n If you want more even lighting across
the subject, add the bounce reflector card
as shown, on the opposite side of the light.
n Experiment with placement of light &
reflector, as shown with arrows. Also try
adjusting rear tilt dial (see back page).
Ego light alone
Ego light with reflector
To get this To get this
Do this Do this
CameraCamera
®
Lowel-Light Manufacturing, Inc.
90 Oser Avenue, Hauppauge, N.Y. 11788
Call: 800 645-2522 • (631) 273 2557
www.lowel.com info@lowel.com
Learn to light using Lowel Ego at www.lowel.com
Lowel Ego light is a product of Lowel-Light, the Academy Award winning World Leader in Location
Lighting. To learn more about our professional lighting equipment for film & digital imaging, visit
www.lowel.com
© 2009, Lowel-Light Mfg., Inc. ver. 1.5 868
Page 2
Digital Imaging LightOperating Instructions Continued
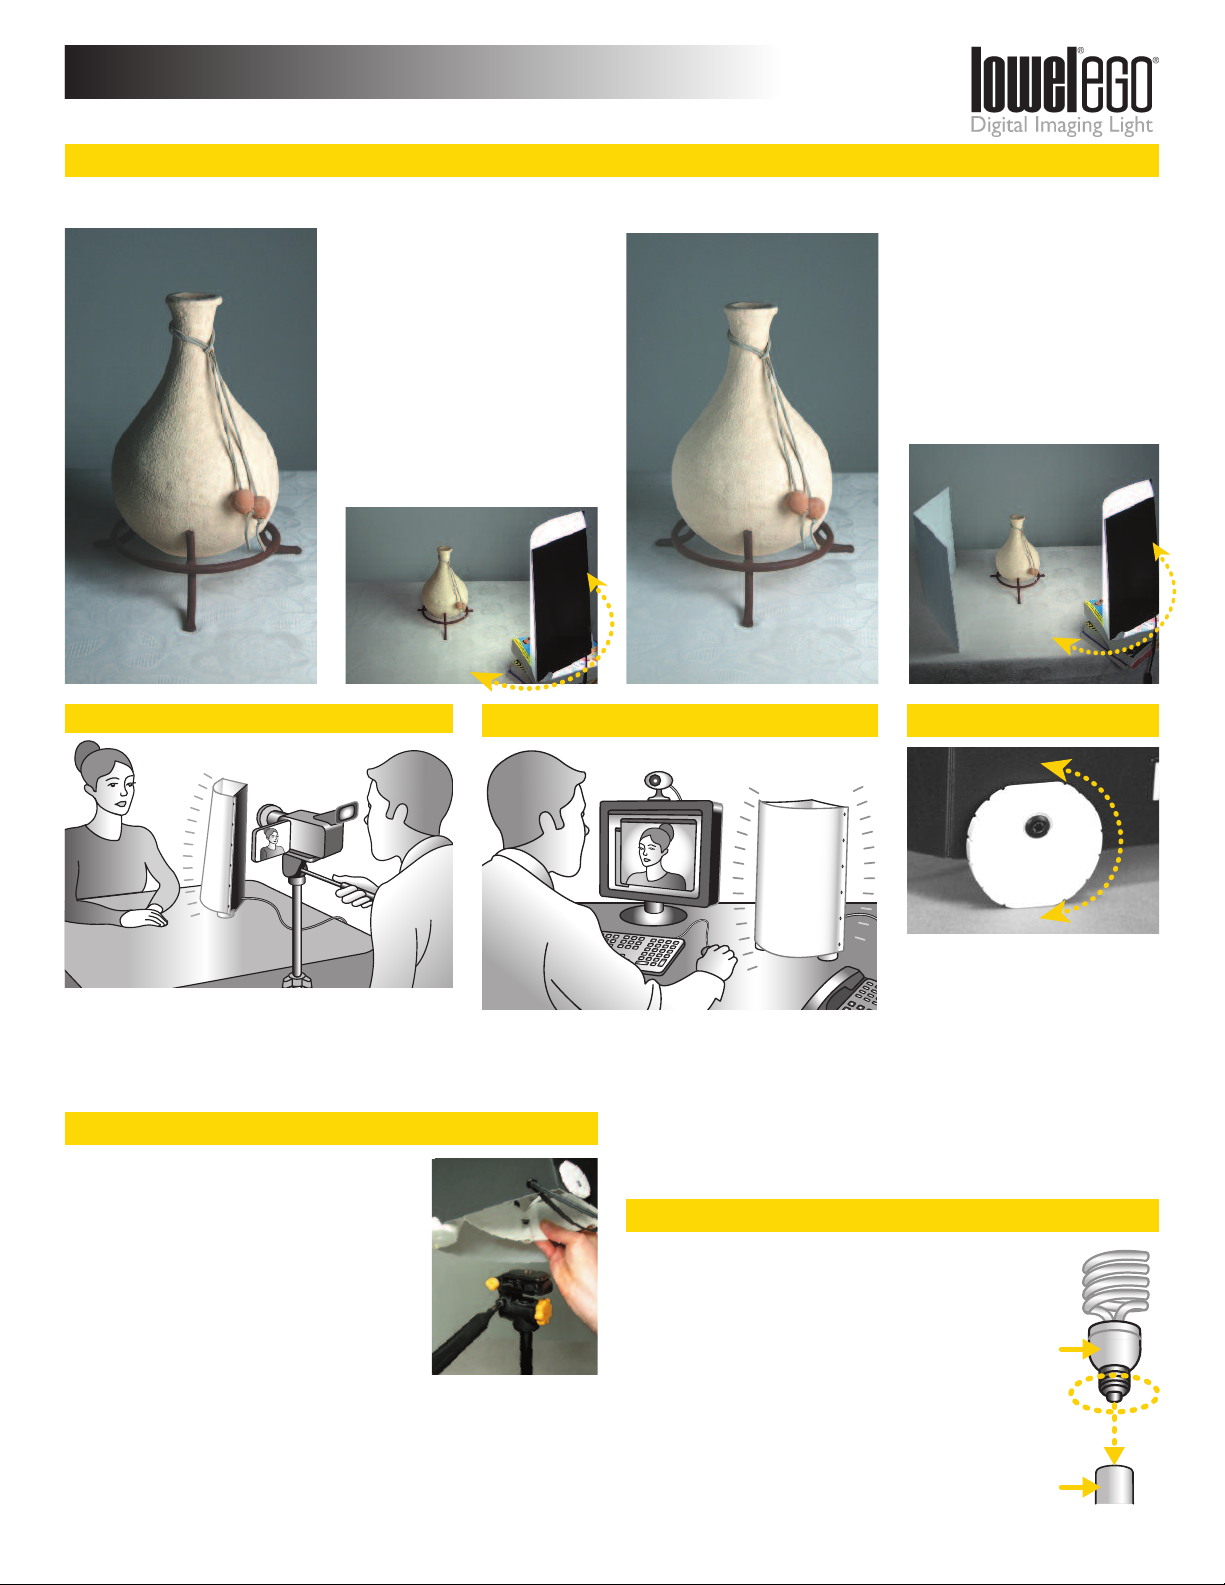
Shooting Taller Objects
go light alone
E
To get this
When shooting taller objects,
raise the position of the light by
p
under the Lowel Ego.
Experiment with the rear tilting
dial to vary the angle of the light
and find the desired result.
Note: There is a 1/4-20 screw
thread hole in the underside of
the ego lamp socket housing that
will accomodate a small tabletop
tripod which can also be used
for this purpose.
Portraits & Video Interviews
lacing 1 or more large books
Do this
go light with reflector
E
o get this
T
It is not necessary to raise
the position of the reflector
ounce card to match the light.
b
By tilting the Ego, either with
its rear dial or all the way
forward so it’s front diffuser
rests on the books, the light
output will point towards the
reflector card and be bounced
as fill light to the object.
Do this
Tilt DialWebcam Conferencing
When shooting portraits or video of adults seated
at a table, you may also want to experiment by
placing Ego on top of a few large books,
to elevate the light source closer to face level.
Place the Ego light on the desk next to your
computer monitor on either side. Experiment with
placement to avoid glare in your eyes.
Tripod Use Instructions
The Ego includes a 1/4-20 screw-threaded
fitting on the bottom of the light, to attach the
Ego to a standard tripod mounting screw.
Please be cautious when using a tripod.
Select a tripod that is sturdy and will not tip
over under the weight of the Ego. We
recommend the Ego be used with a table top
tripod if possible. If you use the Ego with a
floor standing tripod, make sure the feet are
fully spread apart. When on a tripod, the Ego
can be used to a maximum height of 6 feet, from the floor to the
center of the installed lamps. Disconnect from power before
attaching to tripod. When attaching the tripod mounting plate to the
1/4-20 fitting on the bottom of the light, do not twist the light on to
the tripod screw. This could cause damage to the power supply cord.
n Rotate the dial/wheel on back
of the Ego to fine-tune the up
& down angle of light output.
n For maximum effect, tilt the
light forward so the front of the
diffuser shade rests on the table.
n Check the camera viewfinder
to make sure the light isn’t in
the shot.
Lamp Change
To change the lamps, first switch the unit off and unplug
its power. If hot, let the lamps cool sufficiently to touch.
n Reach down into the diffuser/shade and grasp the
lamp by its base A. Do not attempt to loosen it by
grasping the glass top of the lamp, as it may shatter.
n When the lamp has been unscrewed most of the
way, you can gently grasp it by its glass top to finish
unscrewing it from the socket B & remove.
Replace lamp the same way, making sure to gently
tighten by holding the lamp at its base.
A
B
 Loading...