

Page 1
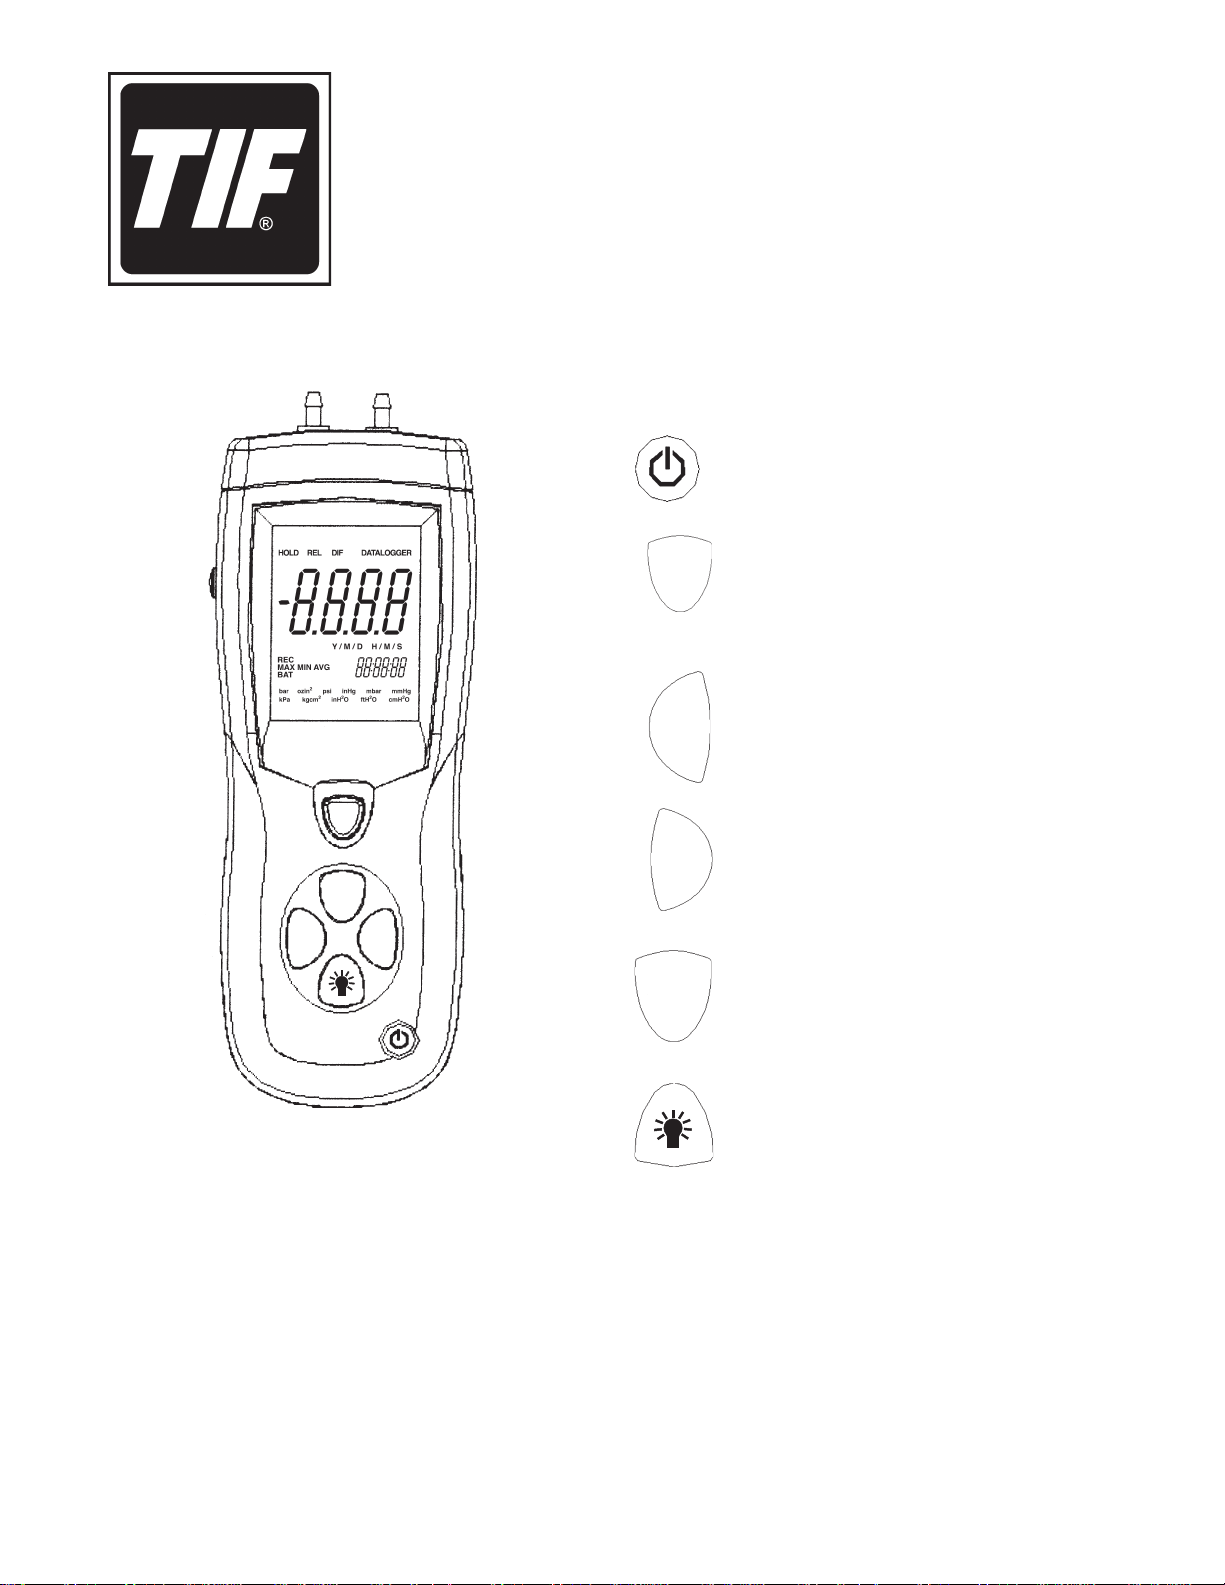
Dual Port Manometer
BUTTONS
= Power ON or OFF.
= Switch between: inH2O, psi, bar, mbar,
UNITS
kPa, inHg, mmHg, ozin2, ft H2O, cmH2O,
or kgcm2 units of measure.
TIF3420
UNITS
DIF
HOLD
REC
FEATURES
•
Measures gauge or differential pressure up to
±2 psi (± 55.4 inH2O).
• Eleven selectable units of measure: inH
psi, bar, mbar, kPa, inHg, mmHg, ozin
cmH
O, kgcm2.
2
O,
2
2
, ft H2O,
• Additional features include: Data hold, select-
able auto shutdown, and recording of times
when maximum, minimum, and average values
occur.
= Record times when maximum, minimum,
REC
and average values occur.
HOLD
= Freeze and unfreeze display readings.
= Displays differential pressure
DIF
measurement.
= Press once to turn ON backlight. Turns
OFF automatically after 40 seconds.
© 2008 SPX Sheet 1 of 2
Page 2
SPECIFICATIONS
HOLD REL DIF DA T ALOGGER
bar ozin2 psi inHg mbar mmHg
kPa kgcm
2
inH2O ftH2O cmH2O
0 0.00.00
00.00.00
REC
MAX MIN AVG
BAT
Y / M / D H / M / S
0 0 0 0
-
0.0.0.0
Function Range Resolution
inH2O 55.40 0.01
psi 2.000 0.001
mbar 137.8 0.1
kPa 13.79 0.01
inHg 4.702 0.001
mmHg 103.4 0.1
Display ..........................................LCD
Accuracy .......................................±0.3% Full Scale Output (25 °C)
Repeatability .................................±0.2% (Max.+/ -0.5% Full Scale Output)
Linearity/Hysteresis ......................±0.29% Full Scale Output
Pressure Range............................± 2 psi
Maximum Pressure.......................10 psi
Response Time.............................0.5 seconds typical
Over Range Indicator ...................Err.1
Function Range Resolution
ozin
ftH2O 4.612 0.001
cmH2O 140.6 0.1
kgcm
bar 0.137 0.001
2
2
32.00 0.01
0.140 0.001
Under Range Indicator .................Err.2
Operating Conditions ....................0 to 50 °C
Storage Conditions .......................-10 to 60 °C
Power Supply ...............................1 x 9V Battery
Note: REL, DATALOGGER,
and Y/M/D functions will
display on the LCD only when
the unit is rst powered ON.
2
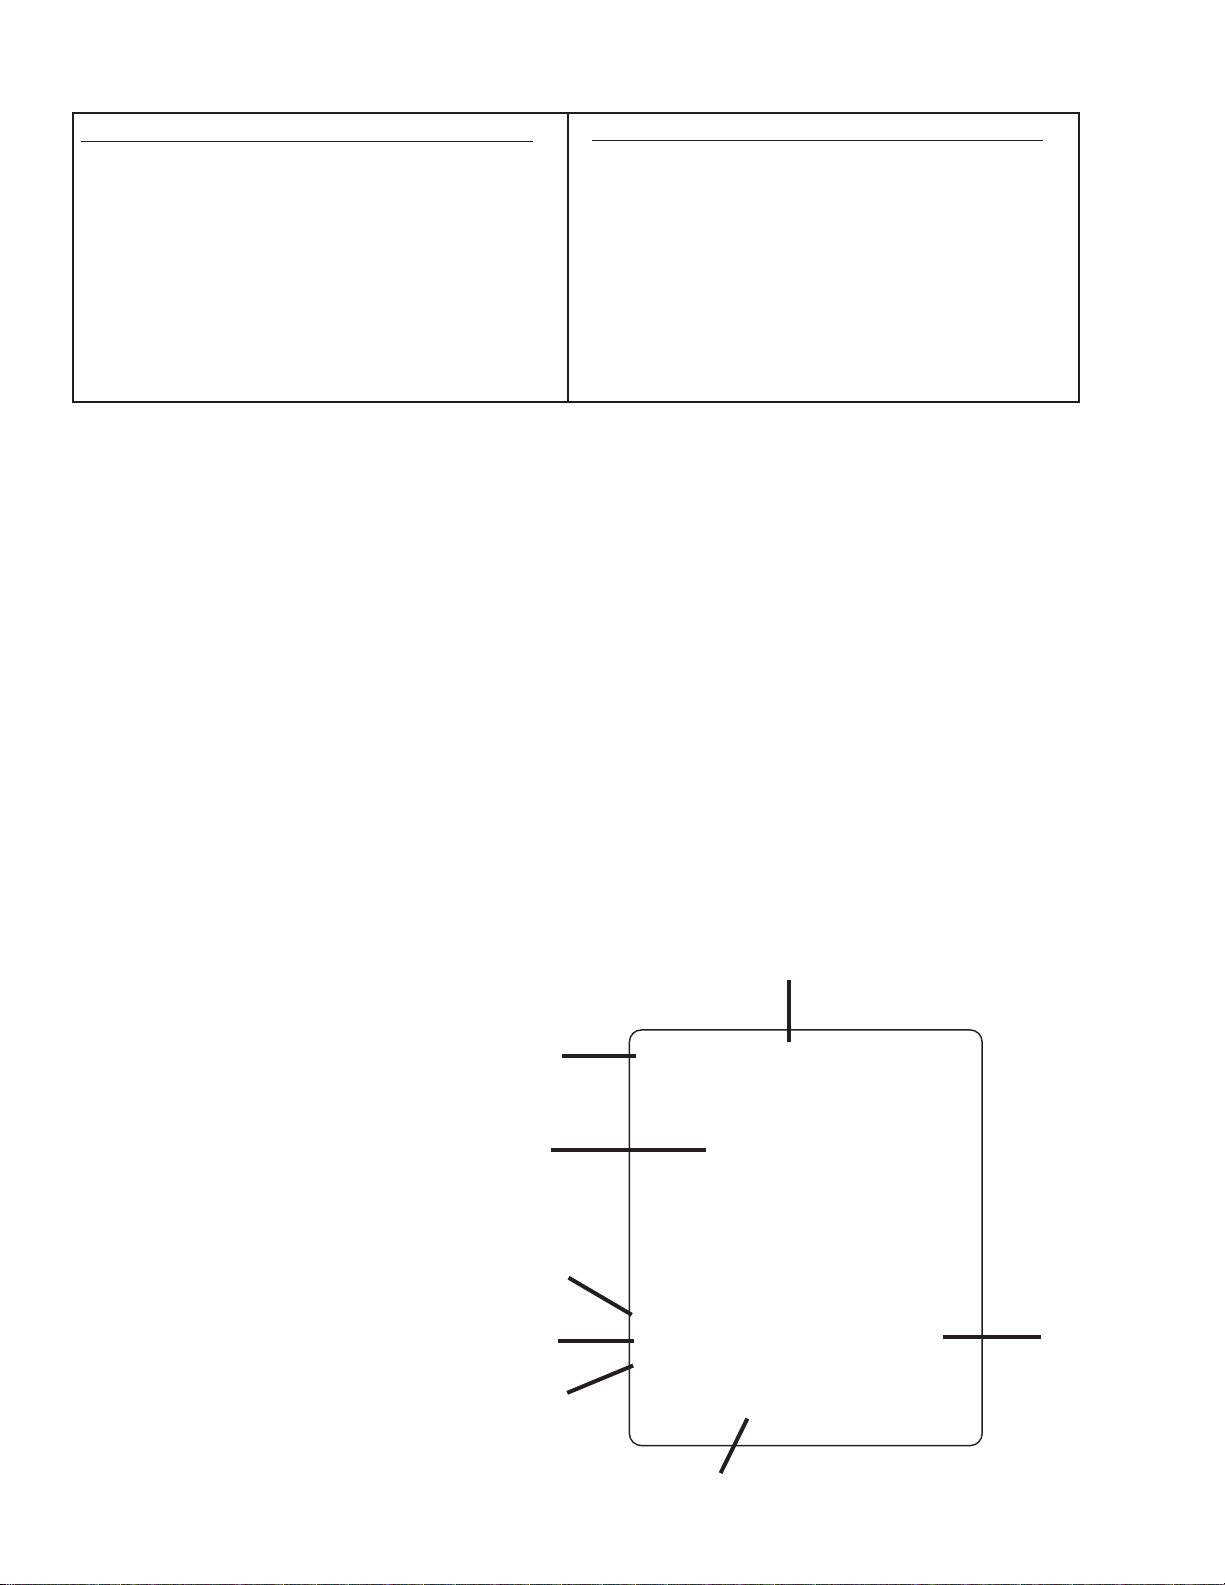
DISPLAY ELEMENTS
1. Hold Function
2. Differential Mode
3. Primary Data screen
4. Record Mode
5. MAX/MIN/AVG
6. Low Battery indicator
Back sheet 1 of 2 © 2008 SPX
7. Pressure Unit indicator
8. Relative Time Clock
1
3
4
5
6
7
These functions are not available on this unit.
8
Page 3

OPERATING INSTRUCTIONS
POWER
1. Press to power the manometer ON or OFF.
When turned ON, the manometer will perform a
short self-test, then defaults to the setting used
during the last operation.
ZERO ADJUST AND OFFSET
1.Beforeuseandwithoutttingsattachedtothe
meter, press the HOLD button for longer than
two seconds to zero the meter. The meter will
reset, displaying “0000” from right to left. Then
the display shows 0.000.
2. If it is desired to offset the meter and display,
press the DIF button while taking a measurement. Subsequent readings will be the difference between the current measurement and
the measurement that was on the display when
the DIF button was pressed.
3. Press the REC button to display the minimum
(MIN) reading with the relative time.
4. Press the REC button to display the average
value (AVG) reading with the relative time.
5. Press the REC button again to continue record-
ing MAX/MIN/AVG measurements.
6. To exit the MAX/MIN/AVG mode and return to
normal operation, press the REC button for at
least three seconds.
BACKLIGHT DISPLAY
Press the button to turn the display backlight
ON. It will remain ON for forty seconds.
DATA HOLD
1. Press the HOLD button momentarily to freeze
the displayed reading. The HOLD icon will appear in th upper left corner of the display. If the
pressure value is over the range an error code
will display. Press the HOLD button again to
return to normal operation.
RECORD
The MAX/MIN mode allows the user to view only
the highest (MAX), lowest (MIN), or average
(AVG) readings with relative time stamp.
1. Press the REC button once. REC will appear
on the display. All other functions are locked
out except for power and backlight. The relative time clock also appears in the secondary
display and starts counting.
AUTOMATIC SHUTDOWN
The manometer will automatically shutdown after
twenty minutes to conserve battery life. To disable
Auto Shutdown, hold down the HOLD button and
press the to power ON the manometer. An
“n” will appear in the display indicating that Auto
Shutdown is disabled. The manometer will return to
normal operation when it is powered OFF.
ERROR CODES
An error message will display if the manometer
fails an internal diagnostic test. An error message
freezes all function buttons.
1. Err.1: Pressure value is over the range.
2. Err.2: Pressure value is under the range.
3. Err.3: DIF function, the differential pressure
value is over range.
4. Err.4: DIF function, the differential pressure
value is under range.
2. Press the REC button again and MAX appears
on the display. The display now shows the
maximum pressure and relative time that it was
recorded.
© 2008 SPX Sheet 2 of 2
Page 4

MAINTENANCE
REPLACING THE BATTERY
1. The thermometer must be OFF when
changing the battery. Press the to
power OFF the thermometer.
2. On the back side of the thermometer,
locate the symbol.
3. While holding the thermometer, place
your thumb on the . With gentle pressure push downward and pull backward;
the battery cover will begin to open. Use
your other hand to grasp the cover and
pull downward. Lift cover up and off.
4. Lift out the 9-volt battery and disconnect
it from the connector.
WARRANTY
This product has been produced to provide unlimited service. Should it become inoperable after
the user has performed the recommended maintenance, a no charge repair or replacement will
be made to the original purchaser. This applies to
all repairable units that have not been damaged
or tampered with. The claim must be made within
One Year of the date of purchase.
5. Connect a new 9-volt battery and place it
into the battery cavity.
6. Replace the battery cover by setting it
over the battery and pushing upward until
it snaps into place.
7. Dispose of the old battery according to
local, state, and federal regulations.
655 Eisenhower Drive
Owatonna, MN 55060
Toll Free: (800) 327-5060
Fax: (866) 287-7222
www.TIF.com
Back sheet 2 of 2
Form No. 545329 Rev B January 15, 2009 © 2008 SPX
 Loading...