

Tieline TLR5200 User Manual

Genie Distribution
IP / I SDN / PO TS
Codec User Manual
Software Version: 2.14.88
Manual Version: v.1.6
September, 2015

Geni e Distribution User Ma nual v1.62
© Tieline Pty. Lt d. 2015
Table of Contents
Part I Warnings & Safety Information
6
Part II H ow to Use the Documentation
7
Part III Glossary of Terms
8
Part IV Gett i ng to know Genie
Distribution
10
Part V Genie Distribution Rear Panel
Connections
12
Part VI Genie Front Panel Controls
14
Part VII Menu N avigation
16
Part VIII Genie Distribution Input Levels
and PPMs
23
Part IX Configuring AES3 Input A udio
29
Part X Genie Distribution
Headphone/A ux Output
31
Part XI Inserting Hardware Modules
34
Part XII About ISDN Modules
35
... . . . . . . . . . . . . . . . . . . . . . . . . . . . . . . . . . . . . . . . . .... . . . . . . . . . . . . . . . . . . . . . . . . . . . . . . . . . . . . . . . . . . . . .... . . . . . . . . . . . . . . . . . . . . . . . . . . . . . . . . . . . . 361 ISDN Module Settings
... . . . . . . . . . . . . . . . . . . . . . . . . . . . . . . . . . . . . . . . . .... . . . . . . . . . . . . . . . . . . . . . . . . . . . . . . . . . . . . . . . . . . . . .... . . . . . . . . . . . . . . . . . . . . . . . . . . . . . . . . . . . . 392 ISDN Ans wering Configuration
Part XIII A bout POTS Modules
42
... . . . . . . . . . . . . . . . . . . . . . . . . . . . . . . . . . . . . . . . . .... . . . . . . . . . . . . . . . . . . . . . . . . . . . . . . . . . . . . . . . . . . . . .... . . . . . . . . . . . . . . . . . . . . . . . . . . . . . . . . . . . . 431 POTS Module Settings
... . . . . . . . . . . . . . . . . . . . . . . . . . . . . . . . . . . . . . . . . .... . . . . . . . . . . . . . . . . . . . . . . . . . . . . . . . . . . . . . . . . . . . . .... . . . . . . . . . . . . . . . . . . . . . . . . . . . . . . . . . . . . 462 POTS Answering Configuration
Part XIV Language Selection
48
Part XV About Program Dialing
49
Part XVI Multiple Stream Programs
51
Part XVII 2 and 3 x Stereo Programs
51
Part XVIII 2 x Mono + 2 x Stereo Programs
52
Part XIX Stereo + 4 x Mono Programs
52

3Contents
© Tieline Pty. Lt d. 2015
Part XX 6 x Mono Programs
52
Part XXI Other Multiple Stream Programs
53
Part XXII Gett i ng Connected Quickly
54
... . . . . . . . . . . . . . . . . . . . . . . . . . . . . . . . . . . . . . . . . .... . . . . . . . . . . . . . . . . . . . . . . . . . . . . . . . . . . . . . . . . . . . . .... . . . . . . . . . . . . . . . . . . . . . . . . . . . . . . . . . . . . 541 Steps to Connect over IP
... . . . . . . . . . . . . . . . . . . . . . . . . . . . . . . . . . . . . . . . . .... . . . . . . . . . . . . . . . . . . . . . . . . . . . . . . . . . . . . . . . . . . . . .... . . . . . . . . . . . . . . . . . . . . . . . . . . . . . . . . . . . . 572 Monitoring IP Connections
... . . . . . . . . . . . . . . . . . . . . . . . . . . . . . . . . . . . . . . . . .... . . . . . . . . . . . . . . . . . . . . . . . . . . . . . . . . . . . . . . . . . . . . .... . . . . . . . . . . . . . . . . . . . . . . . . . . . . . . . . . . . . 593 Steps to Connect over ISDN
... . . . . . . . . . . . . . . . . . . . . . . . . . . . . . . . . . . . . . . . . .... . . . . . . . . . . . . . . . . . . . . . . . . . . . . . . . . . . . . . . . . . . . . .... . . . . . . . . . . . . . . . . . . . . . . . . . . . . . . . . . . . . 624 Monitoring ISDN Connections
... . . . . . . . . . . . . . . . . . . . . . . . . . . . . . . . . . . . . . . . . .... . . . . . . . . . . . . . . . . . . . . . . . . . . . . . . . . . . . . . . . . . . . . .... . . . . . . . . . . . . . . . . . . . . . . . . . . . . . . . . . . . . 635 Steps to Connect over POTS
... . . . . . . . . . . . . . . . . . . . . . . . . . . . . . . . . . . . . . . . . .... . . . . . . . . . . . . . . . . . . . . . . . . . . . . . . . . . . . . . . . . . . . . .... . . . . . . . . . . . . . . . . . . . . . . . . . . . . . . . . . . . . 656 Monitoring POTS Connections
... . . . . . . . . . . . . . . . . . . . . . . . . . . . . . . . . . . . . . . . . .... . . . . . . . . . . . . . . . . . . . . . . . . . . . . . . . . . . . . . . . . . . . . .... . . . . . . . . . . . . . . . . . . . . . . . . . . . . . . . . . . . . 667 Load and Dial Cus t om Programs
... . . . . . . . . . . . . . . . . . . . . . . . . . . . . . . . . . . . . . . . . .... . . . . . . . . . . . . . . . . . . . . . . . . . . . . . . . . . . . . . . . . . . . . .... . . . . . . . . . . . . . . . . . . . . . . . . . . . . . . . . . . . . 668 Disc onnecting a Connection
... . . . . . . . . . . . . . . . . . . . . . . . . . . . . . . . . . . . . . . . . .... . . . . . . . . . . . . . . . . . . . . . . . . . . . . . . . . . . . . . . . . . . . . .... . . . . . . . . . . . . . . . . . . . . . . . . . . . . . . . . . . . . 679 Redialing a Connection
... . . . . . . . . . . . . . . . . . . . . . . . . . . . . . . . . . . . . . . . . .... . . . . . . . . . . . . . . . . . . . . . . . . . . . . . . . . . . . . . . . . . . . . .... . . . . . . . . . . . . . . . . . . . . . . . . . . . . . . . . . . . . 6710 Configuring Auto Reconnect
... . . . . . . . . . . . . . . . . . . . . . . . . . . . . . . . . . . . . . . . . .... . . . . . . . . . . . . . . . . . . . . . . . . . . . . . . . . . . . . . . . . . . . . .... . . . . . . . . . . . . . . . . . . . . . . . . . . . . . . . . . . . . 6711 Speed Dialing Connections
... . . . . . . . . . . . . . . . . . . . . . . . . . . . . . . . . . . . . . . . . .... . . . . . . . . . . . . . . . . . . . . . . . . . . . . . . . . . . . . . . . . . . . . .... . . . . . . . . . . . . . . . . . . . . . . . . . . . . . . . . . . . . 6812 Dial/Disc onnect Multiple Audio Stream Programs
... . . . . . . . . . . . . . . . . . . . . . . . . . . . . . . . . . . . . . . . . .... . . . . . . . . . . . . . . . . . . . . . . . . . . . . . . . . . . . . . . . . . . . . .... . . . . . . . . . . . . . . . . . . . . . . . . . . . . . . . . . . . . 6913 Dialing SIP Peer-to-Peer
... . . . . . . . . . . . . . . . . . . . . . . . . . . . . . . . . . . . . . . . . .... . . . . . . . . . . . . . . . . . . . . . . . . . . . . . . . . . . . . . . . . . . . . .... . . . . . . . . . . . . . . . . . . . . . . . . . . . . . . . . . . . . 7014 Dialing SIP Addresses
... . . . . . . . . . . . . . . . . . . . . . . . . . . . . . . . . . . . . . . . . .... . . . . . . . . . . . . . . . . . . . . . . . . . . . . . . . . . . . . . . . . . . . . .... . . . . . . . . . . . . . . . . . . . . . . . . . . . . . . . . . . . . 7015 Creating a Multicast Server Program
... . . . . . . . . . . . . . . . . . . . . . . . . . . . . . . . . . . . . . . . . .... . . . . . . . . . . . . . . . . . . . . . . . . . . . . . . . . . . . . . . . . . . . . .... . . . . . . . . . . . . . . . . . . . . . . . . . . . . . . . . . . . . 7316 Creating a Multicast Client Program
... . . . . . . . . . . . . . . . . . . . . . . . . . . . . . . . . . . . . . . . . .... . . . . . . . . . . . . . . . . . . . . . . . . . . . . . . . . . . . . . . . . . . . . .... . . . . . . . . . . . . . . . . . . . . . . . . . . . . . . . . . . . . 7617 Deleting Programs
... . . . . . . . . . . . . . . . . . . . . . . . . . . . . . . . . . . . . . . . . .... . . . . . . . . . . . . . . . . . . . . . . . . . . . . . . . . . . . . . . . . . . . . .... . . . . . . . . . . . . . . . . . . . . . . . . . . . . . . . . . . . . 7618 Selecting Algorithm Profiles
... . . . . . . . . . . . . . . . . . . . . . . . . . . . . . . . . . . . . . . . . .... . . . . . . . . . . . . . . . . . . . . . . . . . . . . . . . . . . . . . . . . . . . . .... . . . . . . . . . . . . . . . . . . . . . . . . . . . . . . . . . . . . 7819 Genie Dist ribution Algorithm Profiles
... . . . . . . . . . . . . . . . . . . . . . . . . . . . . . . . . . . . . . . . . .... . . . . . . . . . . . . . . . . . . . . . . . . . . . . . . . . . . . . . . . . . . . . .... . . . . . . . . . . . . . . . . . . . . . . . . . . . . . . . . . . . . 7920 Genie Dist ribution Backup Options
... . . . . . . . . . . . . . . . . . . . . . . . . . . . . . . . . . . . . . . . . .... . . . . . . . . . . . . . . . . . . . . . . . . . . . . . . . . . . . . . . . . . . . . .... . . . . . . . . . . . . . . . . . . . . . . . . . . . . . . . . . . . . 8121 USB File Playback
... . . . . . . . . . . . . . . . . . . . . . . . . . . . . . . . . . . . . . . . . .... . . . . . . . . . . . . . . . . . . . . . . . . . . . . . . . . . . . . . . . . . . . . .... . . . . . . . . . . . . . . . . . . . . . . . . . . . . . . . . . . . . 8222 Lock or Unlock a Program in the Codec
... . . . . . . . . . . . . . . . . . . . . . . . . . . . . . . . . . . . . . . . . .... . . . . . . . . . . . . . . . . . . . . . . . . . . . . . . . . . . . . . . . . . . . . .... . . . . . . . . . . . . . . . . . . . . . . . . . . . . . . . . . . . . 8323 Locking the Front Panel
Part XXIII Connecting to the ToolBox
Web-GUI
85
... . . . . . . . . . . . . . . . . . . . . . . . . . . . . . . . . . . . . . . . . .... . . . . . . . . . . . . . . . . . . . . . . . . . . . . . . . . . . . . . . . . . . . . .... . . . . . . . . . . . . . . . . . . . . . . . . . . . . . . . . . . . . 861 Opening the Java or HTML5 Web-GUI & Login
... . . . . . . . . . . . . . . . . . . . . . . . . . . . . . . . . . . . . . . . . .... . . . . . . . . . . . . . . . . . . . . . . . . . . . . . . . . . . . . . . . . . . . . .... . . . . . . . . . . . . . . . . . . . . . . . . . . . . . . . . . . . . 892 Changing the Default Pas sword
Part XXIV Using the Java Toolbox Web-GUI
90
... . . . . . . . . . . . . . . . . . . . . . . . . . . . . . . . . . . . . . . . . .... . . . . . . . . . . . . . . . . . . . . . . . . . . . . . . . . . . . . . . . . . . . . .... . . . . . . . . . . . . . . . . . . . . . . . . . . . . . . . . . . . . 981 Configuring IP Settings
... . . . . . . . . . . . . . . . . . . . . . . . . . . . . . . . . . . . . . . . . .... . . . . . . . . . . . . . . . . . . . . . . . . . . . . . . . . . . . . . . . . . . . . .... . . . . . . . . . . . . . . . . . . . . . . . . . . . . . . . . . . . . 1022 Configuring ISDN
... . . . . . . . . . . . . . . . . . . . . . . . . . . . . . . . . . . . . . . . . .... . . . . . . . . . . . . . . . . . . . . . . . . . . . . . . . . . . . . . . . . . . . . .... . . . . . . . . . . . . . . . . . . . . . . . . . . . . . . . . . . . . 1093 Configuring POTS
... . . . . . . . . . . . . . . . . . . . . . . . . . . . . . . . . . . . . . . . . .... . . . . . . . . . . . . . . . . . . . . . . . . . . . . . . . . . . . . . . . . . . . . .... . . . . . . . . . . . . . . . . . . . . . . . . . . . . . . . . . . . . 1154 Configuring Input/Output Settings
... . . . . . . . . . . . . . . . . . . . . . . . . . . . . . . . . . . . . . . . . .... . . . . . . . . . . . . . . . . . . . . . . . . . . . . . . . . . . . . . . . . . . . . .... . . . . . . . . . . . . . . . . . . . . . . . . . . . . . . . . . . . . 1185 Configure Mono or Stereo Peer-to-Peer Programs
... . . . . . . . . . . . . . . . . . . . . . . . . . . . . . . . . . . . . . . . . .... . . . . . . . . . . . . . . . . . . . . . . . . . . . . . . . . . . . . . . . . . . . . .... . . . . . . . . . . . . . . . . . . . . . . . . . . . . . . . . . . . . 1276 Configure 2 Mono Peer-to-Peer Dialing Connections in Genie
... . . . . . . . . . . . . . . . . . . . . . . . . . . . . . . . . . . . . . . . . .... . . . . . . . . . . . . . . . . . . . . . . . . . . . . . . . . . . . . . . . . . . . . .... . . . . . . . . . . . . . . . . . . . . . . . . . . . . . . . . . . . . 1407 Configure 2 or 3 Stereo Peer-to-Peer Programs

Geni e Distribution User Ma nual v1.64
© Tieline Pty. Lt d. 2015
... . . . . . . . . . . . . . . . . . . . . . . . . . . . . . . . . . . . . . . . . .... . . . . . . . . . . . . . . . . . . . . . . . . . . . . . . . . . . . . . . . . . . . . .... . . . . . . . . . . . . . . . . . . . . . . . . . . . . . . . . . . . . 1498 Configure 2 x Stereo + 2 x Mono Peer-to-Peer Dialing Programs
... . . . . . . . . . . . . . . . . . . . . . . . . . . . . . . . . . . . . . . . . .... . . . . . . . . . . . . . . . . . . . . . . . . . . . . . . . . . . . . . . . . . . . . .... . . . . . . . . . . . . . . . . . . . . . . . . . . . . . . . . . . . . 1579 Configure Stereo + 4 x Mono Peer-to-Peer Dialing Programs
... . . . . . . . . . . . . . . . . . . . . . . . . . . . . . . . . . . . . . . . . .... . . . . . . . . . . . . . . . . . . . . . . . . . . . . . . . . . . . . . . . . . . . . .... . . . . . . . . . . . . . . . . . . . . . . . . . . . . . . . . . . . . 16610 Configure 6 x Mono Peer-to-Peer Dialing Programs
... . . . . . . . . . . . . . . . . . . . . . . . . . . . . . . . . . . . . . . . . .... . . . . . . . . . . . . . . . . . . . . . . . . . . . . . . . . . . . . . . . . . . . . .... . . . . . . . . . . . . . . . . . . . . . . . . . . . . . . . . . . . . 17511 Configure Multi-Unicas t Dialing Programs
... . . . . . . . . . . . . . . . . . . . . . . . . . . . . . . . . . . . . . . . . .... . . . . . . . . . . . . . . . . . . . . . . . . . . . . . . . . . . . . . . . . . . . . .... . . . . . . . . . . . . . . . . . . . . . . . . . . . . . . . . . . . . 18112 Configure Multicas t Server Programs
... . . . . . . . . . . . . . . . . . . . . . . . . . . . . . . . . . . . . . . . . .... . . . . . . . . . . . . . . . . . . . . . . . . . . . . . . . . . . . . . . . . . . . . .... . . . . . . . . . . . . . . . . . . . . . . . . . . . . . . . . . . . . 18513 Configure Multicas t Client Programs
... . . . . . . . . . . . . . . . . . . . . . . . . . . . . . . . . . . . . . . . . .... . . . . . . . . . . . . . . . . . . . . . . . . . . . . . . . . . . . . . . . . . . . . .... . . . . . . . . . . . . . . . . . . . . . . . . . . . . . . . . . . . . 18814 Configure SIP Settings
... . . . . . . . . . . . . . . . . . . . . . . . . . . . . . . . . . . . . . . . . .... . . . . . . . . . . . . . . . . . . . . . . . . . . . . . . . . . . . . . . . . . . . . .... . . . . . . . . . . . . . . . . . . . . . . . . . . . . . . . . . . . . 19015 Configure Peer-to-Peer SIP Programs
... . . . . . . . . . . . . . . . . . . . . . . . . . . . . . . . . . . . . . . . . .... . . . . . . . . . . . . . . . . . . . . . . . . . . . . . . . . . . . . . . . . . . . . .... . . . . . . . . . . . . . . . . . . . . . . . . . . . . . . . . . . . . 19316 Multiple Peer-to-Peer SIP Programs
... . . . . . . . . . . . . . . . . . . . . . . . . . . . . . . . . . . . . . . . . .... . . . . . . . . . . . . . . . . . . . . . . . . . . . . . . . . . . . . . . . . . . . . .... . . . . . . . . . . . . . . . . . . . . . . . . . . . . . . . . . . . . 19317 Dial and Disconnect a Program
... . . . . . . . . . . . . . . . . . . . . . . . . . . . . . . . . . . . . . . . . .... . . . . . . . . . . . . . . . . . . . . . . . . . . . . . . . . . . . . . . . . . . . . .... . . . . . . . . . . . . . . . . . . . . . . . . . . . . . . . . . . . . 19418 Dial/Dis connect Multiple Audio Streams
... . . . . . . . . . . . . . . . . . . . . . . . . . . . . . . . . . . . . . . . . .... . . . . . . . . . . . . . . . . . . . . . . . . . . . . . . . . . . . . . . . . . . . . .... . . . . . . . . . . . . . . . . . . . . . . . . . . . . . . . . . . . . 19619 View/Edit/Delete Programs
... . . . . . . . . . . . . . . . . . . . . . . . . . . . . . . . . . . . . . . . . .... . . . . . . . . . . . . . . . . . . . . . . . . . . . . . . . . . . . . . . . . . . . . .... . . . . . . . . . . . . . . . . . . . . . . . . . . . . . . . . . . . . 19720 Edit File Playback Settings
... . . . . . . . . . . . . . . . . . . . . . . . . . . . . . . . . . . . . . . . . .... . . . . . . . . . . . . . . . . . . . . . . . . . . . . . . . . . . . . . . . . . . . . .... . . . . . . . . . . . . . . . . . . . . . . . . . . . . . . . . . . . . 19721 Reset Factory Default Settings
... . . . . . . . . . . . . . . . . . . . . . . . . . . . . . . . . . . . . . . . . .... . . . . . . . . . . . . . . . . . . . . . . . . . . . . . . . . . . . . . . . . . . . . .... . . . . . . . . . . . . . . . . . . . . . . . . . . . . . . . . . . . . 19822 Backup and Rest ore Functions
... . . . . . . . . . . . . . . . . . . . . . . . . . . . . . . . . . . . . . . . . .... . . . . . . . . . . . . . . . . . . . . . . . . . . . . . . . . . . . . . . . . . . . . .... . . . . . . . . . . . . . . . . . . . . . . . . . . . . . . . . . . . . 20023 Lock or Unlock Programs
... . . . . . . . . . . . . . . . . . . . . . . . . . . . . . . . . . . . . . . . . .... . . . . . . . . . . . . . . . . . . . . . . . . . . . . . . . . . . . . . . . . . . . . .... . . . . . . . . . . . . . . . . . . . . . . . . . . . . . . . . . . . . 20124 Configuring SNMP in the Codec
... . . . . . . . . . . . . . . . . . . . . . . . . . . . . . . . . . . . . . . . . .... . . . . . . . . . . . . . . . . . . . . . . . . . . . . . . . . . . . . . . . . . . . . .... . . . . . . . . . . . . . . . . . . . . . . . . . . . . . . . . . . . . 20225 Download Logs
... . . . . . . . . . . . . . . . . . . . . . . . . . . . . . . . . . . . . . . . . .... . . . . . . . . . . . . . . . . . . . . . . . . . . . . . . . . . . . . . . . . . . . . .... . . . . . . . . . . . . . . . . . . . . . . . . . . . . . . . . . . . . 20326 Configuring Alarms
... . . . . . . . . . . . . . . . . . . . . . . . . . . . . . . . . . . . . . . . . .... . . . . . . . . . . . . . . . . . . . . . . . . . . . . . . . . . . . . . . . . . . . . .... . . . . . . . . . . . . . . . . . . . . . . . . . . . . . . . . . . . . 20827 RS232 Data Configuration
... . . . . . . . . . . . . . . . . . . . . . . . . . . . . . . . . . . . . . . . . .... . . . . . . . . . . . . . . . . . . . . . . . . . . . . . . . . . . . . . . . . . . . . .... . . . . . . . . . . . . . . . . . . . . . . . . . . . . . . . . . . . . 21028 Creating Rules
... . . . . . . . . . . . . . . . . . . . . . . . . . . . . . . . . . . . . . . . . .... . . . . . . . . . . . . . . . . . . . . . . . . . . . . . . . . . . . . . . . . . . . . .... . . . . . . . . . . . . . . . . . . . . . . . . . . . . . . . . . . . . 21229 Upgrading Codec Firmware
Part XXV Using the H TML5 Toolbox
Web-GUI
214
... . . . . . . . . . . . . . . . . . . . . . . . . . . . . . . . . . . . . . . . . .... . . . . . . . . . . . . . . . . . . . . . . . . . . . . . . . . . . . . . . . . . . . . .... . . . . . . . . . . . . . . . . . . . . . . . . . . . . . . . . . . . . 2271 Using the HTML5 Toolbox Quick Connect Web-GUI
... . . . . . . . . . . . . . . . . . . . . . . . . . . . . . . . . . . . . . . . . .... . . . . . . . . . . . . . . . . . . . . . . . . . . . . . . . . . . . . . . . . . . . . .... . . . . . . . . . . . . . . . . . . . . . . . . . . . . . . . . . . . . 2342 Configuring IP Settings
... . . . . . . . . . . . . . . . . . . . . . . . . . . . . . . . . . . . . . . . . .... . . . . . . . . . . . . . . . . . . . . . . . . . . . . . . . . . . . . . . . . . . . . .... . . . . . . . . . . . . . . . . . . . . . . . . . . . . . . . . . . . . 2383 Configuring ISDN
... . . . . . . . . . . . . . . . . . . . . . . . . . . . . . . . . . . . . . . . . .... . . . . . . . . . . . . . . . . . . . . . . . . . . . . . . . . . . . . . . . . . . . . .... . . . . . . . . . . . . . . . . . . . . . . . . . . . . . . . . . . . . 2454 Configuring POTS
... . . . . . . . . . . . . . . . . . . . . . . . . . . . . . . . . . . . . . . . . .... . . . . . . . . . . . . . . . . . . . . . . . . . . . . . . . . . . . . . . . . . . . . .... . . . . . . . . . . . . . . . . . . . . . . . . . . . . . . . . . . . . 2515 Configuring Input/Output Settings
... . . . . . . . . . . . . . . . . . . . . . . . . . . . . . . . . . . . . . . . . .... . . . . . . . . . . . . . . . . . . . . . . . . . . . . . . . . . . . . . . . . . . . . .... . . . . . . . . . . . . . . . . . . . . . . . . . . . . . . . . . . . . 2536 Configure SIP Settings
... . . . . . . . . . . . . . . . . . . . . . . . . . . . . . . . . . . . . . . . . .... . . . . . . . . . . . . . . . . . . . . . . . . . . . . . . . . . . . . . . . . . . . . .... . . . . . . . . . . . . . . . . . . . . . . . . . . . . . . . . . . . . 2567 Load, Unload and Dial a Program
... . . . . . . . . . . . . . . . . . . . . . . . . . . . . . . . . . . . . . . . . .... . . . . . . . . . . . . . . . . . . . . . . . . . . . . . . . . . . . . . . . . . . . . .... . . . . . . . . . . . . . . . . . . . . . . . . . . . . . . . . . . . . 2598 Reset Factory Default Settings
... . . . . . . . . . . . . . . . . . . . . . . . . . . . . . . . . . . . . . . . . .... . . . . . . . . . . . . . . . . . . . . . . . . . . . . . . . . . . . . . . . . . . . . .... . . . . . . . . . . . . . . . . . . . . . . . . . . . . . . . . . . . . 2609 Backup and Restore Functions
... . . . . . . . . . . . . . . . . . . . . . . . . . . . . . . . . . . . . . . . . .... . . . . . . . . . . . . . . . . . . . . . . . . . . . . . . . . . . . . . . . . . . . . .... . . . . . . . . . . . . . . . . . . . . . . . . . . . . . . . . . . . . 26210 Lock or Unlock Programs
... . . . . . . . . . . . . . . . . . . . . . . . . . . . . . . . . . . . . . . . . .... . . . . . . . . . . . . . . . . . . . . . . . . . . . . . . . . . . . . . . . . . . . . .... . . . . . . . . . . . . . . . . . . . . . . . . . . . . . . . . . . . . 26311 Configuring SNMP in the Codec
... . . . . . . . . . . . . . . . . . . . . . . . . . . . . . . . . . . . . . . . . .... . . . . . . . . . . . . . . . . . . . . . . . . . . . . . . . . . . . . . . . . . . . . .... . . . . . . . . . . . . . . . . . . . . . . . . . . . . . . . . . . . . 26412 Download Logs
... . . . . . . . . . . . . . . . . . . . . . . . . . . . . . . . . . . . . . . . . .... . . . . . . . . . . . . . . . . . . . . . . . . . . . . . . . . . . . . . . . . . . . . .... . . . . . . . . . . . . . . . . . . . . . . . . . . . . . . . . . . . . 26613 Configuring Alarms
... . . . . . . . . . . . . . . . . . . . . . . . . . . . . . . . . . . . . . . . . .... . . . . . . . . . . . . . . . . . . . . . . . . . . . . . . . . . . . . . . . . . . . . .... . . . . . . . . . . . . . . . . . . . . . . . . . . . . . . . . . . . . 27214 RS232 Data Configuration
... . . . . . . . . . . . . . . . . . . . . . . . . . . . . . . . . . . . . . . . . .... . . . . . . . . . . . . . . . . . . . . . . . . . . . . . . . . . . . . . . . . . . . . .... . . . . . . . . . . . . . . . . . . . . . . . . . . . . . . . . . . . . 27315 Creating Rules
... . . . . . . . . . . . . . . . . . . . . . . . . . . . . . . . . . . . . . . . . .... . . . . . . . . . . . . . . . . . . . . . . . . . . . . . . . . . . . . . . . . . . . . .... . . . . . . . . . . . . . . . . . . . . . . . . . . . . . . . . . . . . 27716 Upgrading Codec Firmware

5Contents
© Tieline Pty. Lt d. 2015
Part XXVI Front Panel Configuration Tasks
278
... . . . . . . . . . . . . . . . . . . . . . . . . . . . . . . . . . . . . . . . . .... . . . . . . . . . . . . . . . . . . . . . . . . . . . . . . . . . . . . . . . . . . . . .... . . . . . . . . . . . . . . . . . . . . . . . . . . . . . . . . . . . . 2781 Configuring IP via the Front Panel
... . . . . . . . . . . . . . . . . . . . . . . . . . . . . . . . . . . . . . . . . .... . . . . . . . . . . . . . . . . . . . . . . . . . . . . . . . . . . . . . . . . . . . . .... . . . . . . . . . . . . . . . . . . . . . . . . . . . . . . . . . . . . 2812 Selecting an Algorithm
... . . . . . . . . . . . . . . . . . . . . . . . . . . . . . . . . . . . . . . . . .... . . . . . . . . . . . . . . . . . . . . . . . . . . . . . . . . . . . . . . . . . . . . .... . . . . . . . . . . . . . . . . . . . . . . . . . . . . . . . . . . . . 2883 Configuring the Jitter Buffer
... . . . . . . . . . . . . . . . . . . . . . . . . . . . . . . . . . . . . . . . . .... . . . . . . . . . . . . . . . . . . . . . . . . . . . . . . . . . . . . . . . . . . . . .... . . . . . . . . . . . . . . . . . . . . . . . . . . . . . . . . . . . . 2924 Configuring Forward Error Correction
... . . . . . . . . . . . . . . . . . . . . . . . . . . . . . . . . . . . . . . . . .... . . . . . . . . . . . . . . . . . . . . . . . . . . . . . . . . . . . . . . . . . . . . .... . . . . . . . . . . . . . . . . . . . . . . . . . . . . . . . . . . . . 2945 Configuring Encode/Decode Direction
... . . . . . . . . . . . . . . . . . . . . . . . . . . . . . . . . . . . . . . . . .... . . . . . . . . . . . . . . . . . . . . . . . . . . . . . . . . . . . . . . . . . . . . .... . . . . . . . . . . . . . . . . . . . . . . . . . . . . . . . . . . . . 2946 Enabling Relays & RS232 Data
... . . . . . . . . . . . . . . . . . . . . . . . . . . . . . . . . . . . . . . . . .... . . . . . . . . . . . . . . . . . . . . . . . . . . . . . . . . . . . . . . . . . . . . .... . . . . . . . . . . . . . . . . . . . . . . . . . . . . . . . . . . . . 2957 Configuring TCP/UDP Ports
... . . . . . . . . . . . . . . . . . . . . . . . . . . . . . . . . . . . . . . . . .... . . . . . . . . . . . . . . . . . . . . . . . . . . . . . . . . . . . . . . . . . . . . .... . . . . . . . . . . . . . . . . . . . . . . . . . . . . . . . . . . . . 2978 Configuring QoS for IP Packets
... . . . . . . . . . . . . . . . . . . . . . . . . . . . . . . . . . . . . . . . . .... . . . . . . . . . . . . . . . . . . . . . . . . . . . . . . . . . . . . . . . . . . . . .... . . . . . . . . . . . . . . . . . . . . . . . . . . . . . . . . . . . . 2989 Configuring Data Packet Time-to-Live
... . . . . . . . . . . . . . . . . . . . . . . . . . . . . . . . . . . . . . . . . .... . . . . . . . . . . . . . . . . . . . . . . . . . . . . . . . . . . . . . . . . . . . . .... . . . . . . . . . . . . . . . . . . . . . . . . . . . . . . . . . . . . 30010 Reset and Restore Factory Default Settings
... . . . . . . . . . . . . . . . . . . . . . . . . . . . . . . . . . . . . . . . . .... . . . . . . . . . . . . . . . . . . . . . . . . . . . . . . . . . . . . . . . . . . . . .... . . . . . . . . . . . . . . . . . . . . . . . . . . . . . . . . . . . . 30111 Configuring SNMP Settings
... . . . . . . . . . . . . . . . . . . . . . . . . . . . . . . . . . . . . . . . . .... . . . . . . . . . . . . . . . . . . . . . . . . . . . . . . . . . . . . . . . . . . . . .... . . . . . . . . . . . . . . . . . . . . . . . . . . . . . . . . . . . . 30112 Test Mode
Part XXVII Reference
302
... . . . . . . . . . . . . . . . . . . . . . . . . . . . . . . . . . . . . . . . . .... . . . . . . . . . . . . . . . . . . . . . . . . . . . . . . . . . . . . . . . . . . . . .... . . . . . . . . . . . . . . . . . . . . . . . . . . . . . . . . . . . . 3021 Regular Maintenance
... . . . . . . . . . . . . . . . . . . . . . . . . . . . . . . . . . . . . . . . . .... . . . . . . . . . . . . . . . . . . . . . . . . . . . . . . . . . . . . . . . . . . . . .... . . . . . . . . . . . . . . . . . . . . . . . . . . . . . . . . . . . . 3032 Inst alling the Codec at the Studio
... . . . . . . . . . . . . . . . . . . . . . . . . . . . . . . . . . . . . . . . . .... . . . . . . . . . . . . . . . . . . . . . . . . . . . . . . . . . . . . . . . . . . . . .... . . . . . . . . . . . . . . . . . . . . . . . . . . . . . . . . . . . . 3093 Underst anding IP Networks
... . . . . . . . . . . . . . . . . . . . . . . . . . . . . . . . . . . . . . . . . .... . . . . . . . . . . . . . . . . . . . . . . . . . . . . . . . . . . . . . . . . . . . . .... . . . . . . . . . . . . . . . . . . . . . . . . . . . . . . . . . . . . 3114 Tips for Creating Reliable IP Connections
... . . . . . . . . . . . . . . . . . . . . . . . . . . . . . . . . . . . . . . . . .... . . . . . . . . . . . . . . . . . . . . . . . . . . . . . . . . . . . . . . . . . . . . .... . . . . . . . . . . . . . . . . . . . . . . . . . . . . . . . . . . . . 3125 Testing IP Network Connections
... . . . . . . . . . . . . . . . . . . . . . . . . . . . . . . . . . . . . . . . . .... . . . . . . . . . . . . . . . . . . . . . . . . . . . . . . . . . . . . . . . . . . . . .... . . . . . . . . . . . . . . . . . . . . . . . . . . . . . . . . . . . . 3146 Tes t ing ISDN Connections
... . . . . . . . . . . . . . . . . . . . . . . . . . . . . . . . . . . . . . . . . .... . . . . . . . . . . . . . . . . . . . . . . . . . . . . . . . . . . . . . . . . . . . . .... . . . . . . . . . . . . . . . . . . . . . . . . . . . . . . . . . . . . 3147 Connecting Tieline ISDN to other Codecs
... . . . . . . . . . . . . . . . . . . . . . . . . . . . . . . . . . . . . . . . . .... . . . . . . . . . . . . . . . . . . . . . . . . . . . . . . . . . . . . . . . . . . . . .... . . . . . . . . . . . . . . . . . . . . . . . . . . . . . . . . . . . . 3288 Using Answer Routes for Sessionless ISDN Calls
... . . . . . . . . . . . . . . . . . . . . . . . . . . . . . . . . . . . . . . . . .... . . . . . . . . . . . . . . . . . . . . . . . . . . . . . . . . . . . . . . . . . . . . .... . . . . . . . . . . . . . . . . . . . . . . . . . . . . . . . . . . . . 3319 POTS Connection Tips & Precautions
... . . . . . . . . . . . . . . . . . . . . . . . . . . . . . . . . . . . . . . . . .... . . . . . . . . . . . . . . . . . . . . . . . . . . . . . . . . . . . . . . . . . . . . .... . . . . . . . . . . . . . . . . . . . . . . . . . . . . . . . . . . . . 33310 Genie Compliances and Certifications
... . . . . . . . . . . . . . . . . . . . . . . . . . . . . . . . . . . . . . . . . .... . . . . . . . . . . . . . . . . . . . . . . . . . . . . . . . . . . . . . . . . . . . . .... . . . . . . . . . . . . . . . . . . . . . . . . . . . . . . . . . . . . 33311 FCC Compliance Statements
... . . . . . . . . . . . . . . . . . . . . . . . . . . . . . . . . . . . . . . . . .... . . . . . . . . . . . . . . . . . . . . . . . . . . . . . . . . . . . . . . . . . . . . .... . . . . . . . . . . . . . . . . . . . . . . . . . . . . . . . . . . . . 33512 Software Licences
... . . . . . . . . . . . . . . . . . . . . . . . . . . . . . . . . . . . . . . . . .... . . . . . . . . . . . . . . . . . . . . . . . . . . . . . . . . . . . . . . . . . . . . .... . . . . . . . . . . . . . . . . . . . . . . . . . . . . . . . . . . . . 34513 Trademarks and Credit Notices
Part XXVIII Genie Distribution Specifications
346
Part XXIX Appendix A: RS232 and Control
Port Wiring
348
Part XXX Appendix B: DB25 Wi ring
349
Index 351

6 Geni e Distribution User Ma nual v1.6
© Tieline Pty. Lt d. 2015
1 Warnings & Safety Information
1. Both appliance power cables mus t be removed from t he devic e for Power Disconnection.
2. Remove the phone cable from the POTS interface before servic i ng.
THUNDERSTORM AND LIGHTNING WARNING:
DO NOT USE Tieline codecs during thunderstorms and lightning. You may suffer an injury
using a phone, Tieline codec, or any device connected to a phone during a thunderstorm.
This can lead to personal injury and in extreme cases may be fatal. Protective devices can
be fitted to the line, however, due to the extremely high voltages and energy levels involved
in lightning strikes, these devices may not offer protection to the users, or the Tieline codec
and equipment connected to the codec.
Secondary strikes can occur. These secondary strikes are induced by lightning strikes and
also produce dangerously high currents and energy levels. You only need to be near an
object struck by lightning to lead to personal injury or damage to equipment. e.g. if you are
located near a lighting tower at a sports facility, water features and drains on golf courses,
you may be affected by these secondary strikes.
Damage to personnel and Tieline codecs may occur during thunderstorm, even if the codec
is turned off but remains connected to the phone or ISDN system, LAN or the power.
ANY DAMAGE TO A TIELINE PRODUCT CAUSED BY LIGHTNING or an ELECTRICAL
STORM WILL VOID THE WARRANTY. Use of this product is subject to Tieline's
SOFTWARE LICENSE and WARRANTY conditions, which should be viewed at
www.tieline.com/support before using this product.
DIGITAL PHONE SYSTEM WARNING:
DO NOT CONNECT YOUR TIELINE CODEC TO A DIGITAL PHONE SYSTEM.
PERMANENT DAMAGE MAY OCCUR! If you are unfamiliar with any facility, check that the
line you are using is NOT a digital line. If the Tieline codec becomes faulty due to the use
of a digital phone system, the WARRANTY WILL BE VOID.
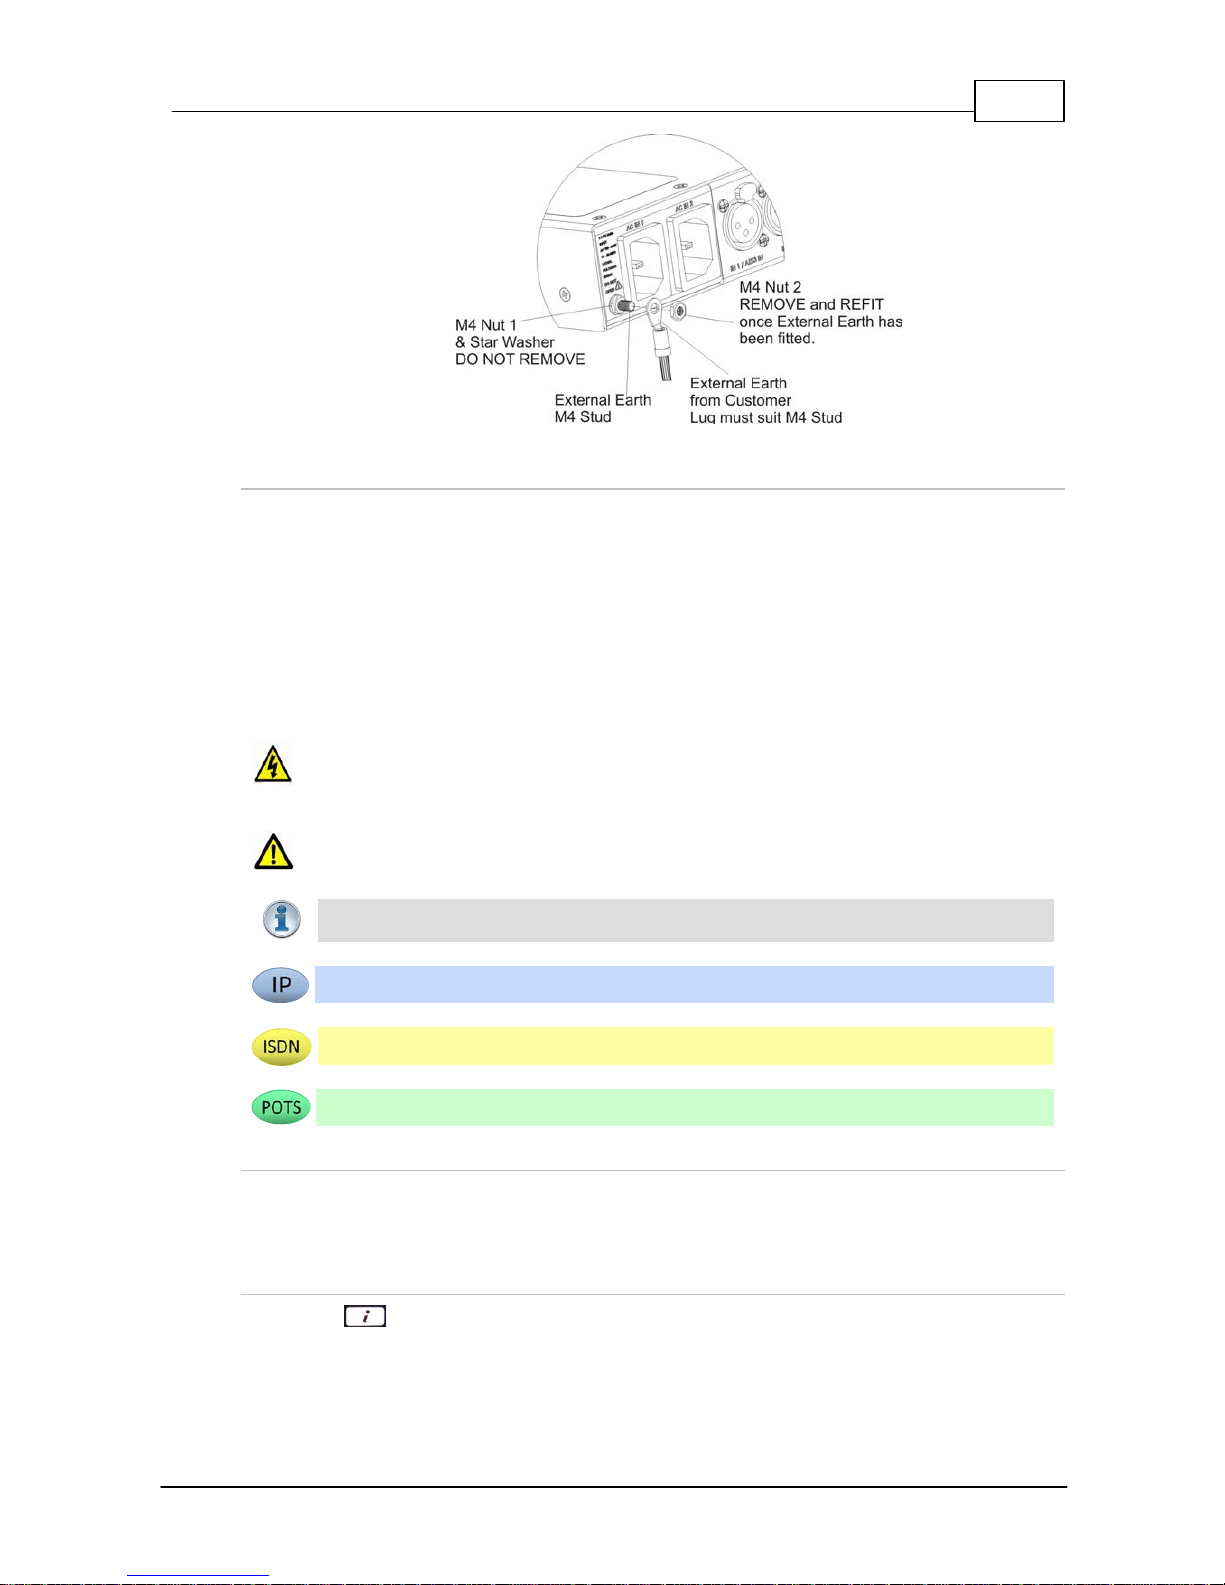
WARNING:
HIGH LEAKAGE CURRENT. EARTH CONNECTION ESSENTIAL BEFORE CONNECTING
SUPPLY.
If the total leakage current exceeds 3.5 mA, or if the leakage current of the connected
loads is unknown, connect the supplementary ground terminal to a reliable ground
connection in your facility.
Supplementary ground connection
A supplementary ground terminal is provided on the codec to connect the unit to a ground
connection. The ground terminal has an M4 stud with M4 retaining nuts and is compatible
with all grounding wires. Remove only NUT 2 to connect your ground wire. The ground wire
must have a suitable lug. When refitting NUT 2 ensure that both NUT 1 & NUT 2 are
correctly tightened to establish and maintain a proper earth connection.
7
© Tieline Pty. Lt d. 2015
Geni e Distribution User Ma nual v1.6
Disclaimer
Whilst every effort has been made to ensure the accuracy of this manual we are not responsible for
any errors or omissions within it. The product specifications and descriptions within this manual will
be subject to improvements and modifications over time without notice, as changes to software and
hardware are implemented.
2 How to Use the Doc u mentation
Manual Conventi ons
Warnings: Instructi ons t hat, i f ignored, could result in death or serious personal injury
caused by dangerous voltages or incorrect operation of the equipment. These must be
observed for safe operation.
Cautions: Instructions warning against potential hazards, or to detail practic es t hat mus t
be observed for safe operation and to prevent damage to equipment or pers onnel.
Importa n t Note: Information you should know to connect and operate your codec
successfully.
Information specific t o IP connections.
Information specific t o ISDN connecti ons.
Information specific t o POTS connections.
Typographic Conventions
· Codec software elements are in Arial bold, e.g. Contacts
· Codec hardware elements are in bold Capitals, e.g. KEYPAD
Help Butt on
Press the (information/help) button when navigating codec menus to display a dialog
suggesting the actions which can be performed from within the current menu.

8 Geni e Distribution User Ma nual v1.6
© Tieline Pty. Lt d. 2015
3 Glo ssary of Terms
AES/EBU
Digital audio standard used to carry digital audio signals between devices
AES3
Official term for the audio standard referred to often as AES/EBU
BRI
Basic Rate Interface for ISDN services
DN
Directory Number for ISDN
DNS
The Domain Name System (DNS) is used to assign domain names to IP
addresses over the World-Wide Web
Domain
A group of computers or devices on a network which are administered with
common rules and procedures. Devices sharing a common part of the IP
address are said to be in the same domain
DSCP
The Differentiated Services Code Point is a field in an IP packet header for
prioritizing data when traversing IP networks
Failover
Method of switching to an alternative backup audio stream if the primary
connection is lost.
GUI
Graphical User Interface
IFB
Interrupted Foldback/Interruptible Foldback: an intercom circuit consisting of a
mix-minus program feed sent to talent, which can be interrupted and replaced
by a producer's or director's intercom microphone
ISDN
Integrated Services Digital Network
ISP
Internet Service Providers (ISPs) are companies that offer customers access to
the internet
IP
Internet Protocol; used for sending data across packet-switched networks
LAN
Local Area Network; a group of computers and associated devices sharing a
common communications link
Latency
Delay associated with IP networks and caused by algorithmic, transport and
buffering delays
MIB
A management information base (MIB) is a database used for managing the
entities in a communications network. This term is associated with the Simple
Network Management Protocol (SNMP).
Multicast
Efficient one to many streaming of IP audio using multicast IP addressing
Multi-unicast
A multi-unicast program (also known as multiple unicast) can transmit a single
audio stream with common connection settings to a number of different
destinations.
MSN
Multiple Subscriber Number for ISDN
Netwo rk Address
Translation
(NAT)
A system for forwarding data packets to different private IP network addresses
that reside behind a single public IP address.
Packet
A formatted unit of data carried over packet-switched networks.
Port Address
Translation
(PAT)
Related to NAT; a feature of a network device that allows IP packets to be
routed to specific ports of devices communicating between public and private IP
networks
POTS
Plain old telephone system: copper phone network infrastructure
PSU
Power Supply Unit
QoS (Qual i ty of
Service)
Priority given to different users or data flows across managed IP networks. This
generally requires a Service Level Agreement (SLA) with a Telco or ISP
RTP
A standardized packet format for sending audio and video data streams and
ensures consistency in the delivery order of voice data packets
SDP
SDP defines the type of audio coding used within an RTP media stream. It
works with a number of other protocols to establishes a device’s location,
determines its availability, negotiates call features and participants and adjusts

9
© Tieline Pty. Lt d. 2015
Geni e Distribution User Ma nual v1.6
session management features
SIP
SIP is a common protocol which works with a myriad of other protocols to
establish connections with other devices to provide interoperability
SLA
Service Level Agreements (SLAs) a contractual agreement between an ISP and
a customer defining expected performance levels over a network
SNMP
Simple Network Management Protocol: Simple Network Management Protocol:
a protocol used mostly in network management systems to monitor devices for
conditions that warrant administrative attention.
SPID
Service Profile ID for identifying devices over ISDN networks
STL
Studio-to-transmitter link for program audio feeds
STS
Studio-to-studio audio link
TCP
TCP protocol ensures reliable in-order delivery of data packets between a
sender and a receiver
TTL
Time-to-Live is the setting used in muliticast servers to ensure data packets
have a finite life and don't cause congestion over networks.
UDP
User Datagram Protocol: the most commonly used protocol for sending internet
audio and video streams. UDP packets include information which allows them
to travel independently of previous or future packets in a data stream
Unicast
Broadcasting of a single stream of data between two points
VLAN
Virtual Local Area Network: partitioning of a single layer-2 network to create
multiple distinct broadcast domains
WAN
Wide Area Network; a computer network spanning regions and/or countries to
connect separate LANs
10 Geni e Distribution User Ma nual v1.6
© Tieline Pty. Lt d. 2015
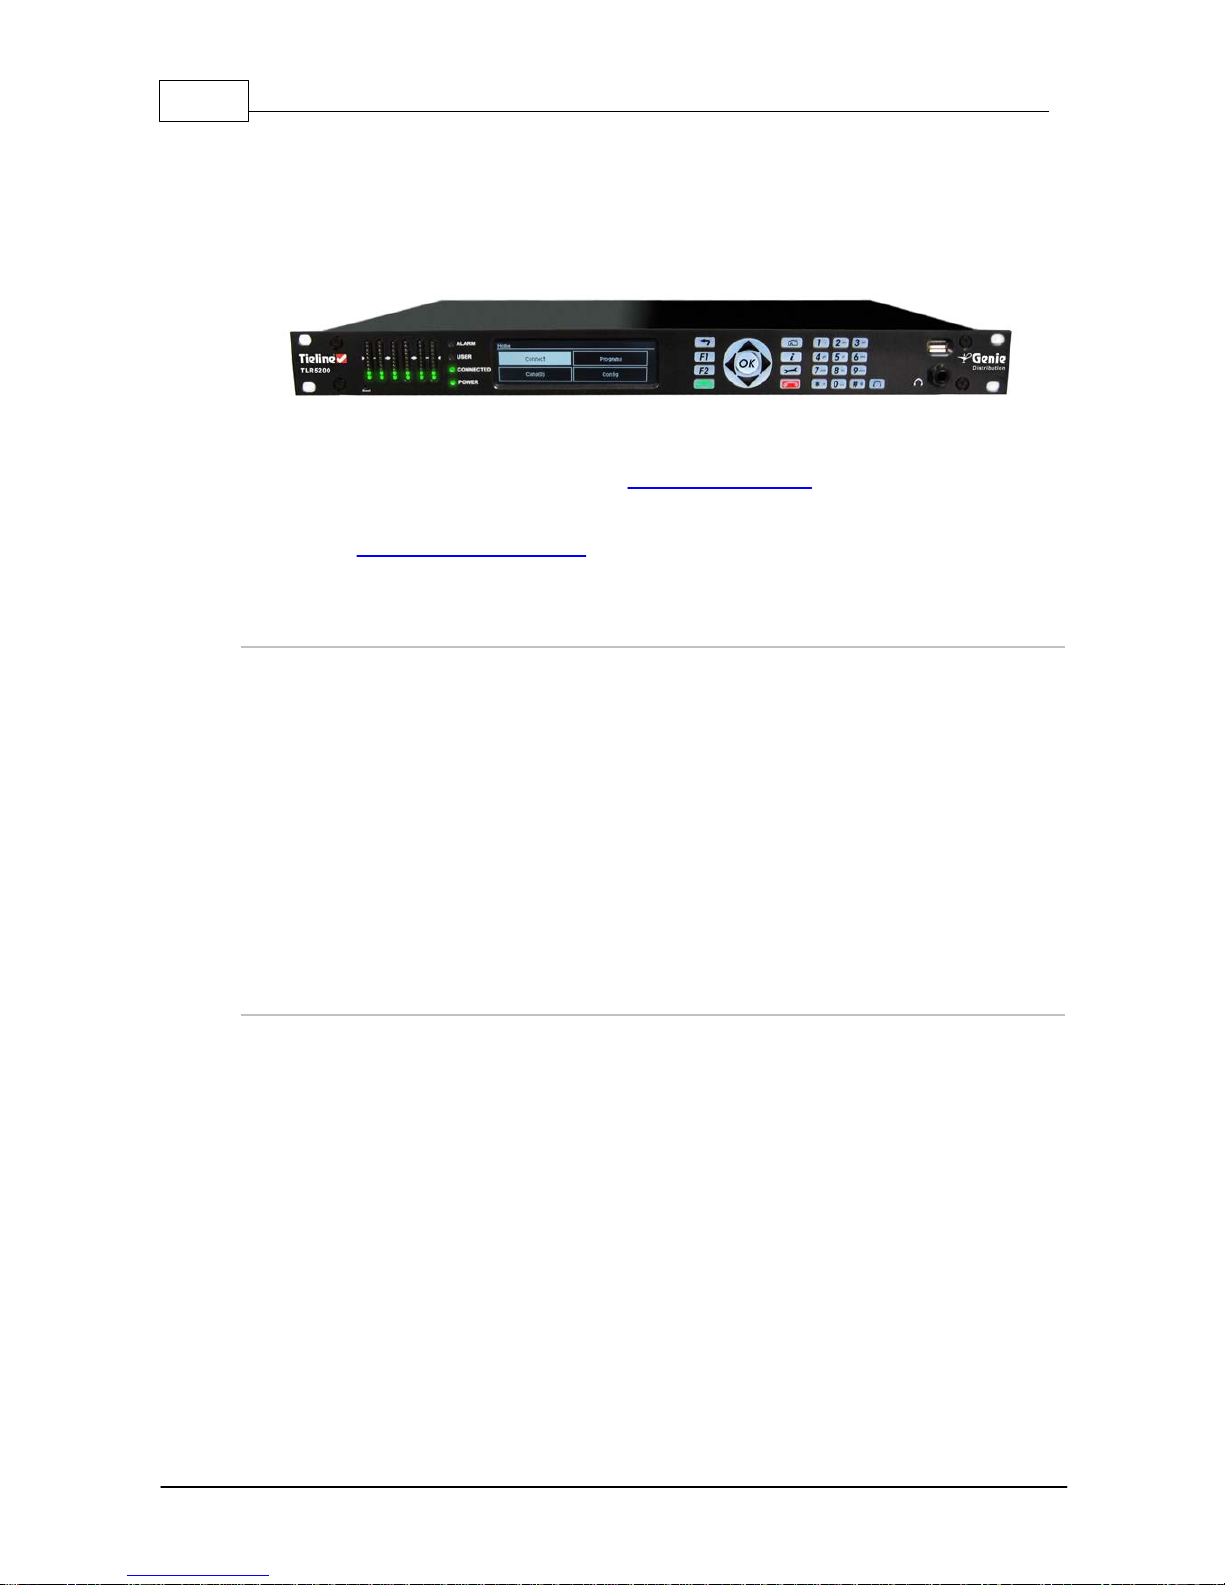
4 Getting to know Genie Dis tribution
Tieline's Genie Distribution is the world's most powerful DSP-based audio codec for mission critical
point-to-point connections and studio-to-transmitter links, with multiple levels of power, audio and
network redundancy. Designed for the latest digital IP broadcast networks, you can connect to IP
codecs, as well as ISDN and POTS codecs via optional plug-in transport modules.
Use this manual to learn how to:
· Configure codec 'programs' (please read About Program Dialing for more info).
· Adjust audio and connection settings within the codec.
Please read Getting Connected Quickly for an overview of how to adjust and store audio and
connection settings in your codec using 'programs'.
Applications
Genie Distribution delivers superior quality audio over IP (AoIP) on all types of IP networks. It is
specifically designed for continuous operation over mission critical audio paths throughout broadcast
IP networks and is ideal for:
· Distributing up to 6 channels between two codecs.
· 3 x bidirectional stereo connections.
· 2 x stereo and 2 x mono bidirectional connections.
· 1 x stereo and 4 x mono bidirectional connections.
· 6 x mono bidirectional connections..
· Simultaneously distributing up to 3 separate mono or stereo IP multi-unicast audio streams to
a maximum of 50 endpoints in total.
· Broadcasting up to 3 separate stereo IP multicast audio streams in multicast server mode
and distributing each of these streams to unlimited endpoints over compatible IP networks.
Codec Features
· DSP-based architecture designed for continuous operation.
· 24 Bit 96kHz audio sampling (32kHz audio quality).
· Dual Gigabit (10/100/1000) Ethernet ports with automatic switching for redundancy.
· Auto switching, dual redundant AC power supplies.
· Uncompressed PCM audio plus the low-delay, cascade resilient aptX® Enhanced algorithm.
· Other popular algorithms including LC-AAC, HE-AAC v1 and v2, AAC-LD, AAC-ELD, AAC-ELDv2,
Opus, MPEG-1 Layer II and III, Tieline Music and MusicPLUS, G.722 and G.711.
· SmartStream PLUS redundant streaming for high reliability over the public internet.
· IPv4 & IPv6 compatible and ready.
· Supports ISDN and POTS connections via optional interface modules.
· Asymmetric algorithmic encode/decode*
· SNMP and integrated alarm management including automatic silence detection.
· Java or HTML5 Toolbox GUI enables remote codec control over WANs.
· Low latency in-band RS-232 auxiliary data channel.
· Programmable software rules engine via a GUI for Control Port functions.
· Streamlined codec wizards and GUI for configuration and control.
· Support for multiple languages: English, Spanish, Portuguese, French and Chinese.

11
© Tieline Pty. Lt d. 2015
Geni e Distribution User Ma nual v1.6
· Connect to all Tieline IP codecs and Report-IT Enterprise Edition.
* Supported in later releases.
12 Geni e Distribution User Ma nual v1.6
© Tieline Pty. Lt d. 2015
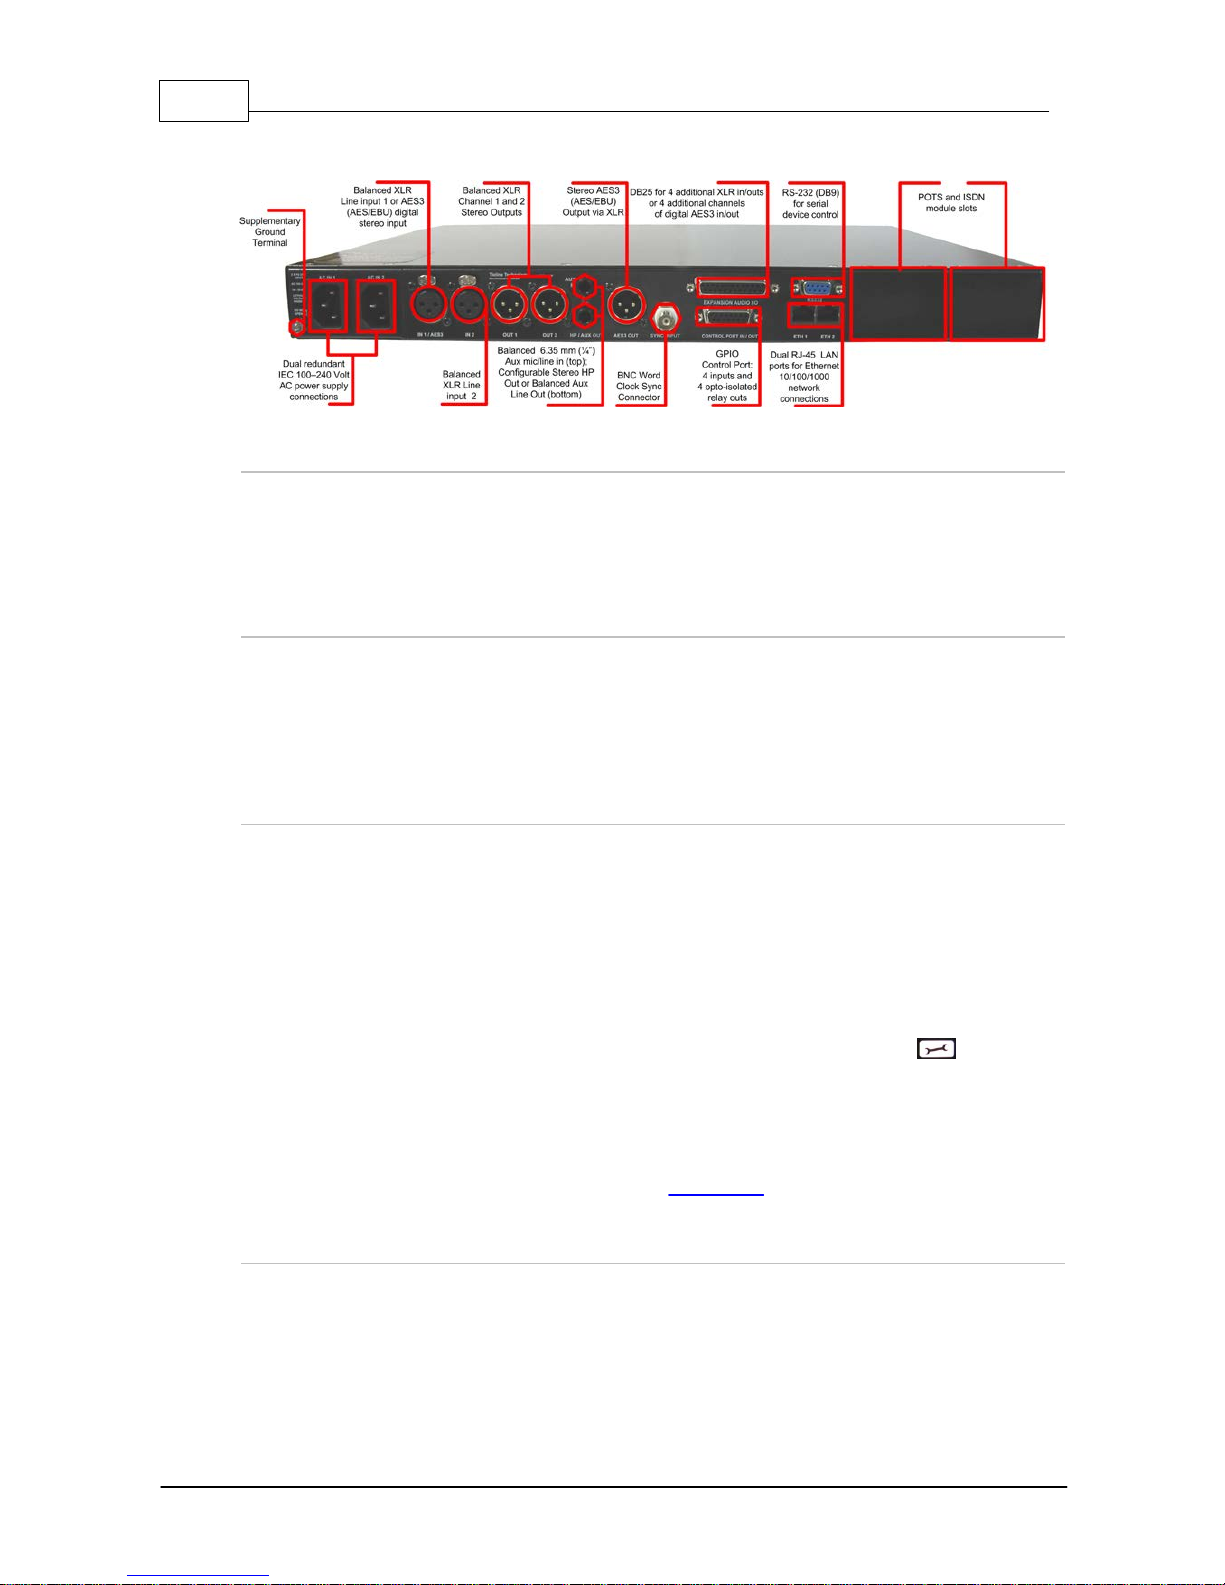
5 Genie Dis tribution Rear Panel Connections
XLR Anal og and AES3 Inputs
XLR IN1/AES3 and IN 2 are balanced line inputs.
Input 1 can also be used as an AES3 (AES/EBU) digital input. This input accepts both mono and
stereo digital AES3 signals.
XLR Anal og and AES3 Outputs
XLR OUT 1 and 2 are balanced analog audio line outputs.
AES3 OUT is an AES/EBU digital audio output. Both the analog and digital outputs can be used
simultaneously and the AES3 output can send both mono and stereo signals via the single XLR
output.
DB-25 Input/ O utput Expansion Connector
Genie Distribution codecs have a female DB25 connector for attaching a male DB25 Tascam (pinout) breakout cable, providing 4 additional analog XLR in/outs, or 4 additional channels of digital
AES3 audio in/out. Please note that expansion inputs/outputs 3, 4, 5 and 6 must be either all
analog or all digital AES.
The additional audio inputs/outputs are grouped in pairs: inputs 3 and 4 and inputs 5 and 6. By
default, if you program analog or digital audio in on expansion inputs then you will get the same
output; i.e. analog in = analog out, or digital in = digital out. This can be adjusted if required. E.g.
you can configure analog in on inputs 3, 4, 5 and 6 and AES3 digital out on outputs 3, 4, 5 and 6, or
vice versa. Adjust the output setting independently if required via SETTINGS > Audio >
Output Type > [Select Outputs 3 to 6] > [Select output type].
For analog sources use XLR input cables 3, 4, 5 and 6. For digital AES3 sources use input 3 for
channels 3 and 4 and use input 4 for channels 5 and 6. Similarly, for analog outs use XLR output
cables 3, 4, 5 and 6. For digital AES3 audio out use output 3 for channels 3 and 4 and use output 4
for channels 5 and 6. DB25 pin outs are available in Appendix B.
Dual Gigabit Ethernet Ports
The codec features two Gigabit (10/100/1000) RJ-45 Ethernet ports for IP connections. By default,
the codec assumes ETH1 is the primary LAN connection and ETH2 is the backup LAN connection
when in use. If you are only using one Ethernet port, always use ETH1.

13
© Tieline Pty. Lt d. 2015
Geni e Distribution User Ma nual v1.6
Aux Mi c/Li ne Input
AUX IN 6.35mm (1/4") balanced auxiliary mic or line input.
Headphone Out/A ux Line Out
HP/AUX OUT 6.35mm (1/4") software configurable stereo headphone output, or balanced auxiliary
line output. The front panel HEADPHONE output and rear panel HP/AUX OUT share the same
hardware output. This means both are switched and configured together. I.e. both outputs are either
a stereo headphone output (default setting), or a balanced mono auxiliary output.
Sync Input
BNC type SYNC INPUT for attaching Word Clock sync to the codec. Note: This is not available on
the WheatNet-IP capable model of the Genie Distribution.
Command & Control Interf aces
1. Four relay inputs and four opto-isolated outputs for machine control via the DB15 CONTROL
PORT IN/OUT connector.
2. A nine pin female RS-232 serial connection for local and remote control of equipment at either
end of the link.
Dual Redundant AC Power Inputs
The codec is powered by dual 100-240 volt redundant AC power supplies, which use standard IEC
connectors.
Dual Module Slots
Two additional module slots for inserting optional POTS or ISDN modules.
Supplement ary G round Terminal
Supplementary ground terminal for connecting the unit to a ground connection. See Warnings and
Safety Information for more details.
14 Geni e Distribution User Ma nual v1.6
© Tieline Pty. Lt d. 2015
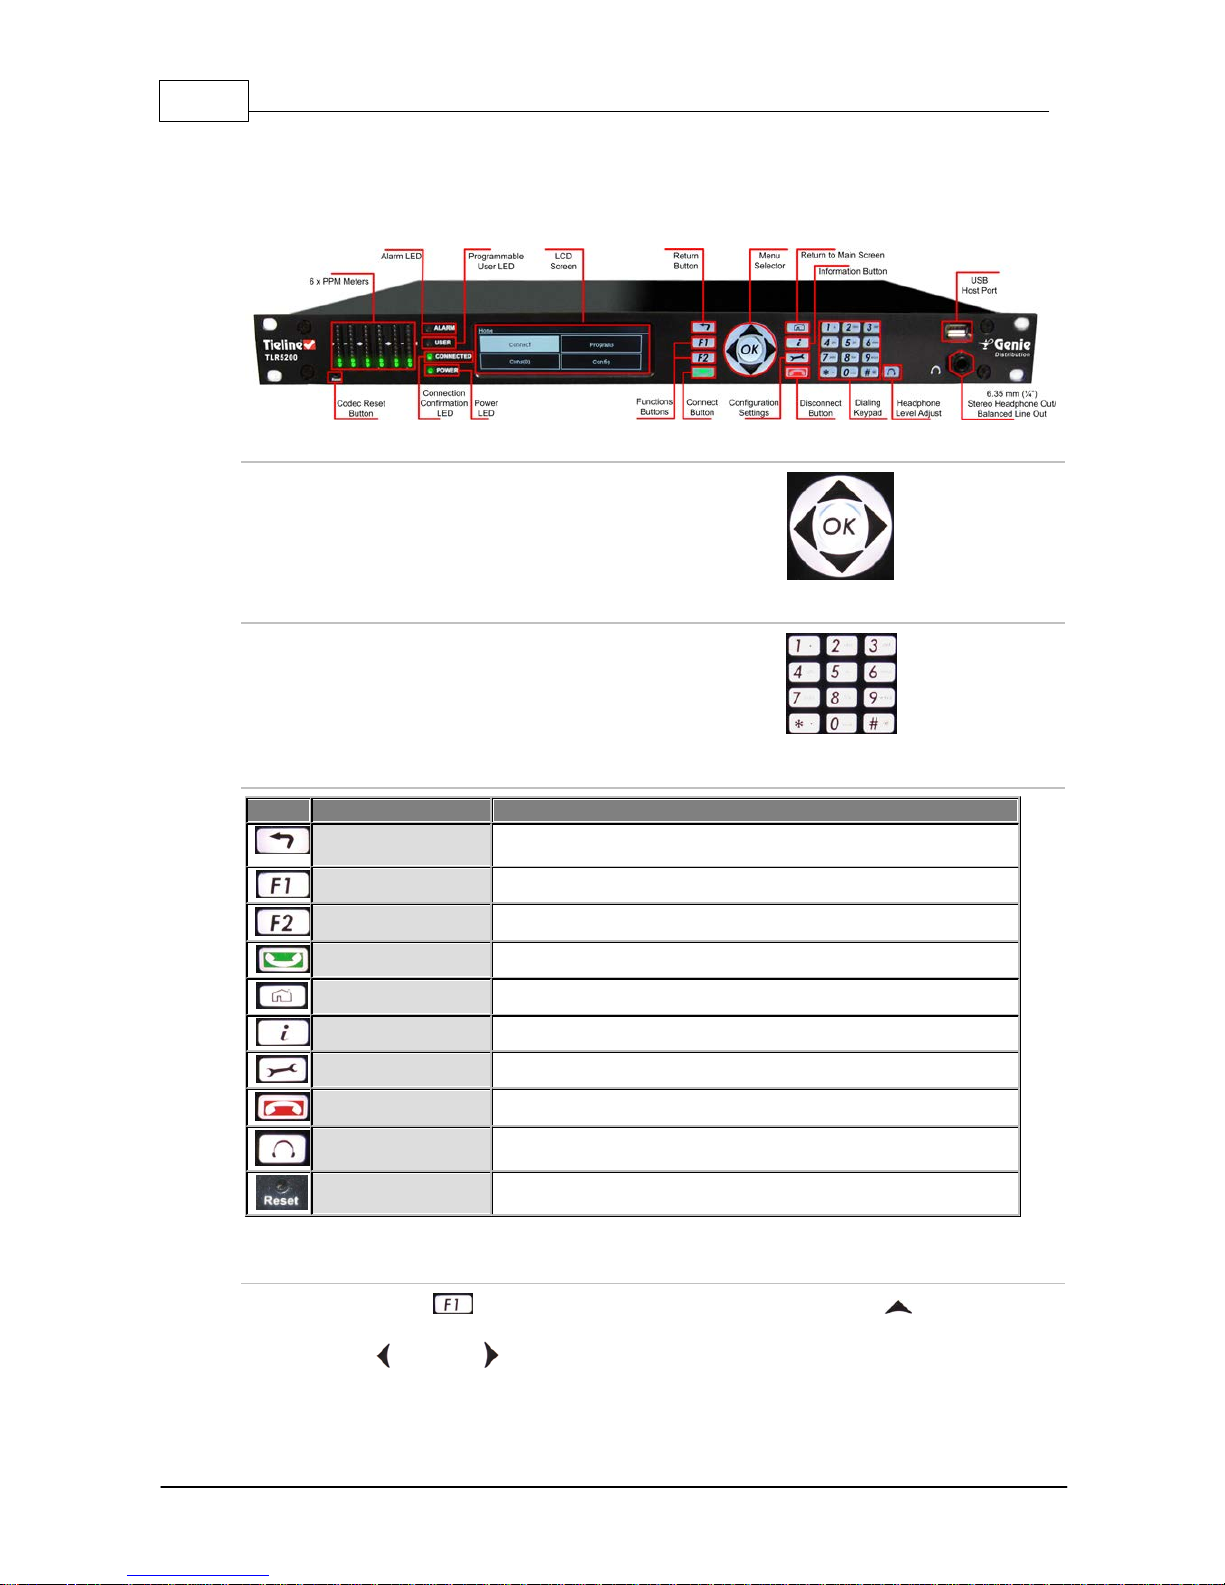
6 Genie Front Panel Controls
The hardware front panel interface features menu navigation buttons, an LCD display with PPM
metering and a dialing keypad.
Navigation Buttons
The codec has four arrow shaped navigation
buttons for navigating codec menus and
adjusting levels, and an OK button for
selecting menu items.
Dialing Keypad
The keypad has alpha-numeric buttons, plus
star and hatch (pound) buttons, which can
be used to enter contact and program
information into the codec.
Operati on Button Descri pti ons
Features
Operation Button Descriptions
Return Button
Press to move back through menus & delete characters
Function Button 1
Press to activate codec user functions
Function Button 2
Press to activate codec user functions
Connect Button
Press to create an IP connection
Home Button
Press to return to home screen
Information Button
Press to view a help menu onscreen
Settings Button
Press to adjust codec settings
Disconnect Button
Press to end a connection
Headphone Button
Press to adjust headphone audio levels
Reset Button
Press to reboot the codec
Adjusti ng LCD Screen Contrast Levels
1. Press and hold the button and then press and release the arrow up button to display
the Contrast adjustment screen.
2. Use the left and right arrow buttons to adjust the LCD screen contrast until viewing is
optimized.

15
© Tieline Pty. Lt d. 2015
Geni e Distribution User Ma nual v1.6
3. Press when you have finished.
Contrast can also be adjusted by pressing the HOME button, selecting Settings, then
System, and using the down button to navigate to Contrast.
Stereo RTS Headphone Output
The codec has a 6.35mm (1/4") RTS stereo HEADPHONE output for audio monitoring and this can
also be switched to a balanced mono auxiliary line output. The front panel HEADPHONE output and
rear panel HP/AUX OUT share the same hardware output. This means both are switched and
configured together. I.e. both outputs are either a stereo headphone output (default setting), or a
balanced mono auxiliary output.
USB 2.0 Host Port
USB 2.0 host port, which can be used for playback of backup audio files and firmware upgrades.
16 Geni e Distribution User Ma nual v1.6
© Tieline Pty. Lt d. 2015
7 Menu Navigation
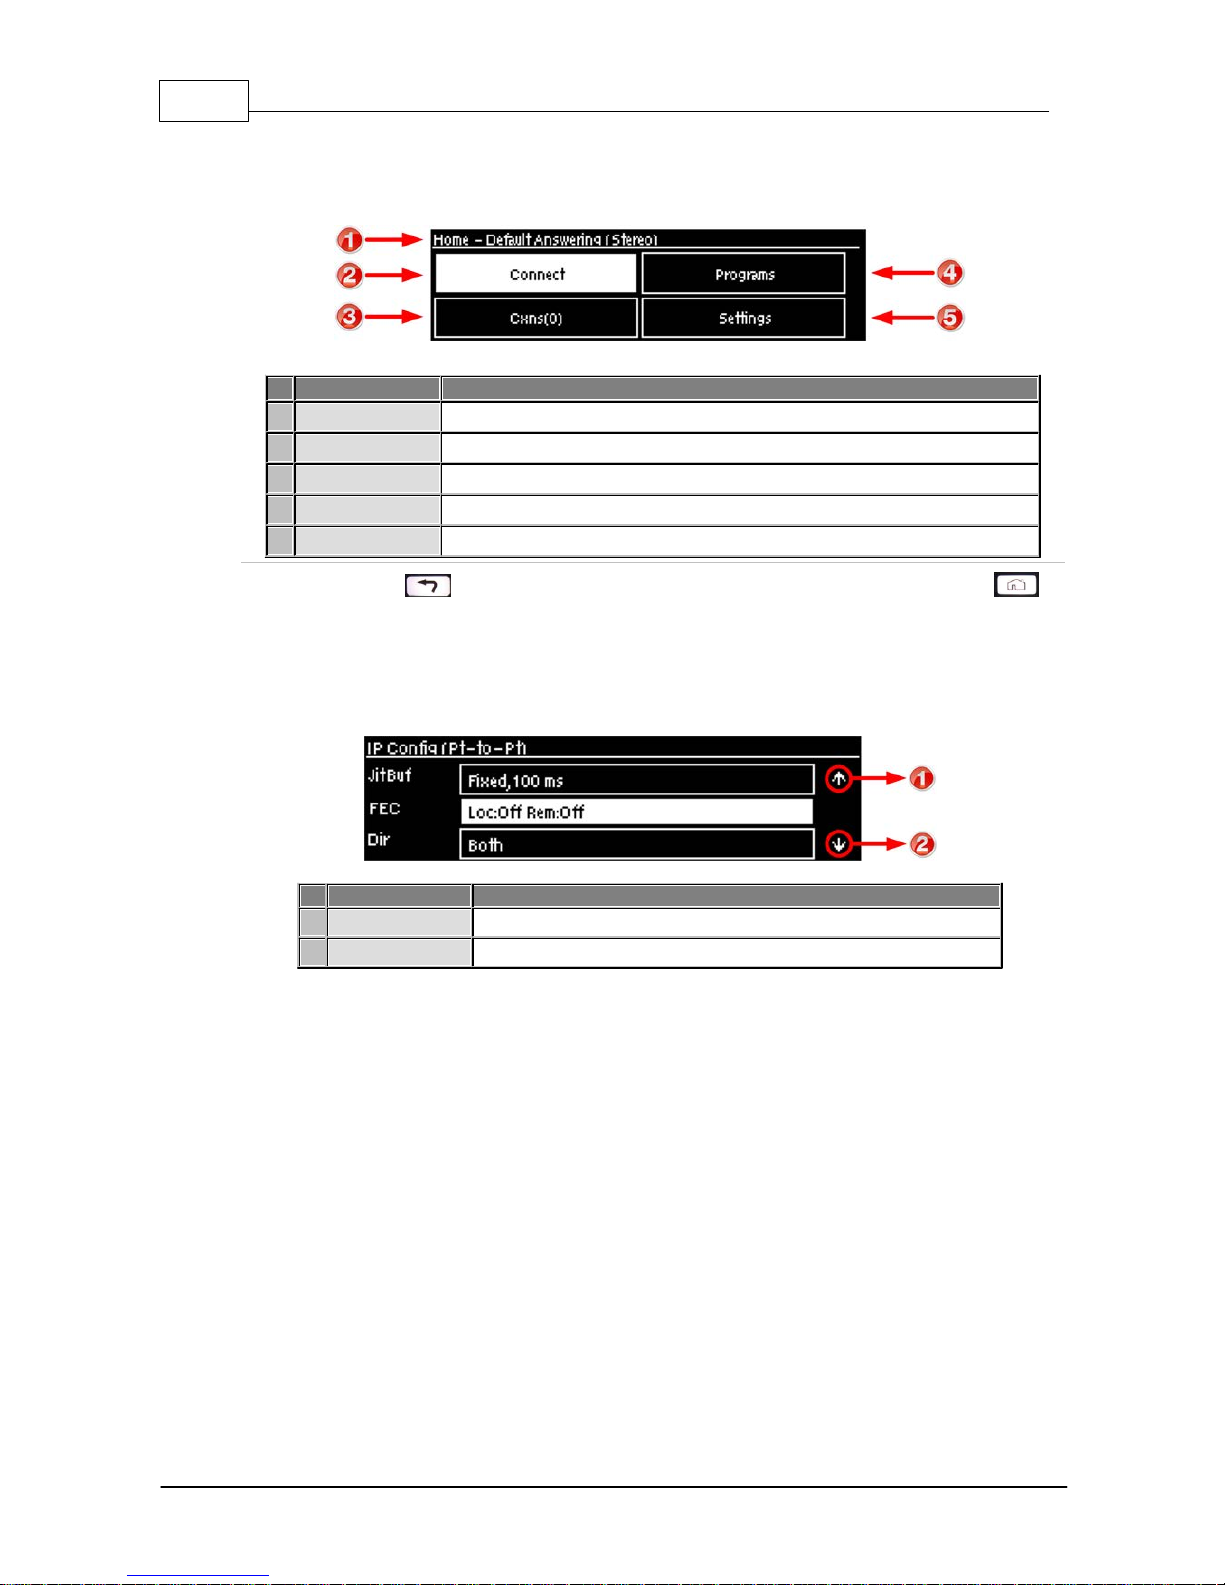
All main codec menus can be launched from the Home screen which includes:
Features
Codec Home S cre en Elem ents
1
Screen Name
The name of the current screen
2
Connect
Select to connect and adjust connection settings
3
Cxns
Displays the number of current connections and connection details
4
Programs
View and edit Program configurations
5
Settings
Select to configure codec settings
Press the RETURN butt on to navigate back wards through menus, or press t he HOME
button to return to the Home scree n fro m any menu.
If a c omplete menu cannot be viewed on a s ingle codec screen, arrows on the right hand side of the
sc reen indicate that the current menu has options below and/or above the vis ible it ems . Use the
navigation arrows to sc roll up and down.
Features
Codec Home S cre en Elem ents
1
Up Arrow
Arrow indicating menus can scroll upwards
2
Down Arrow
Arrow indicating menus can scroll downwards
17
© Tieline Pty. Lt d. 2015
Geni e Distribution User Ma nual v1.6
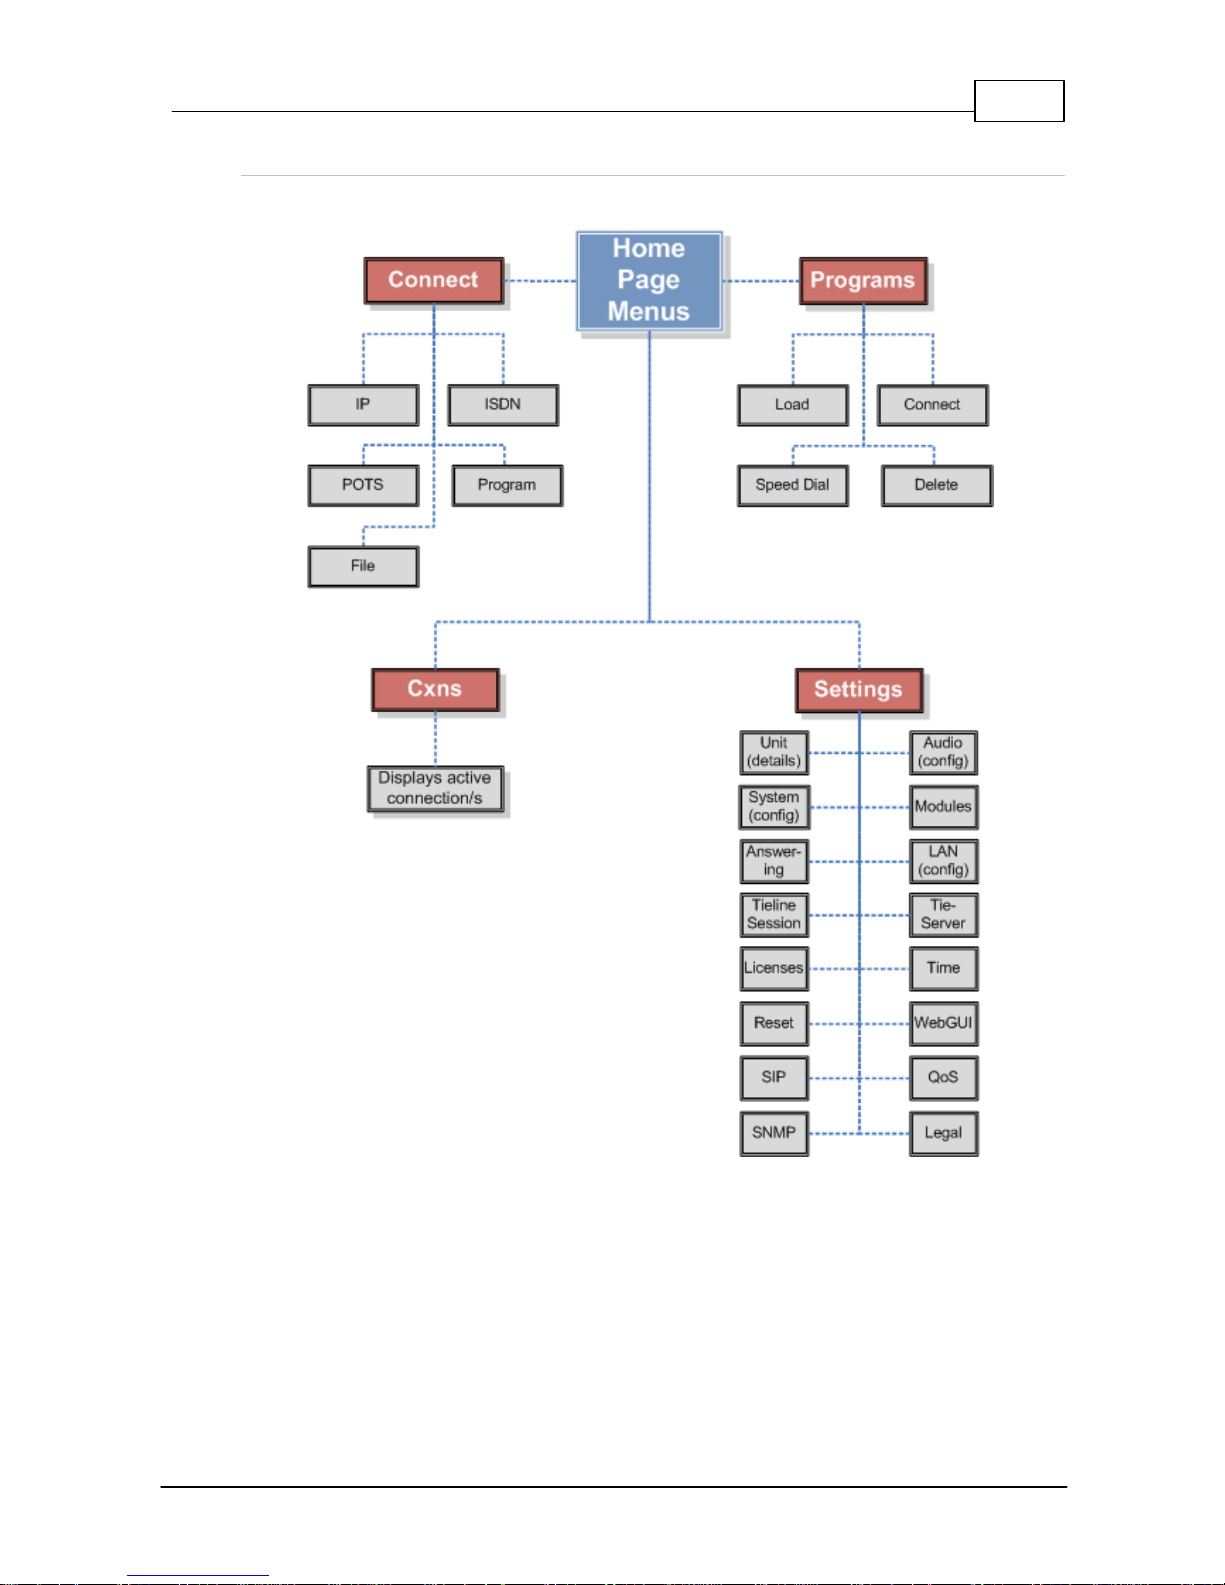
Codec Menu Overview
Following is an overview of the codec menus from the Home screen.
18 Geni e Distribution User Ma nual v1.6
© Tieline Pty. Lt d. 2015
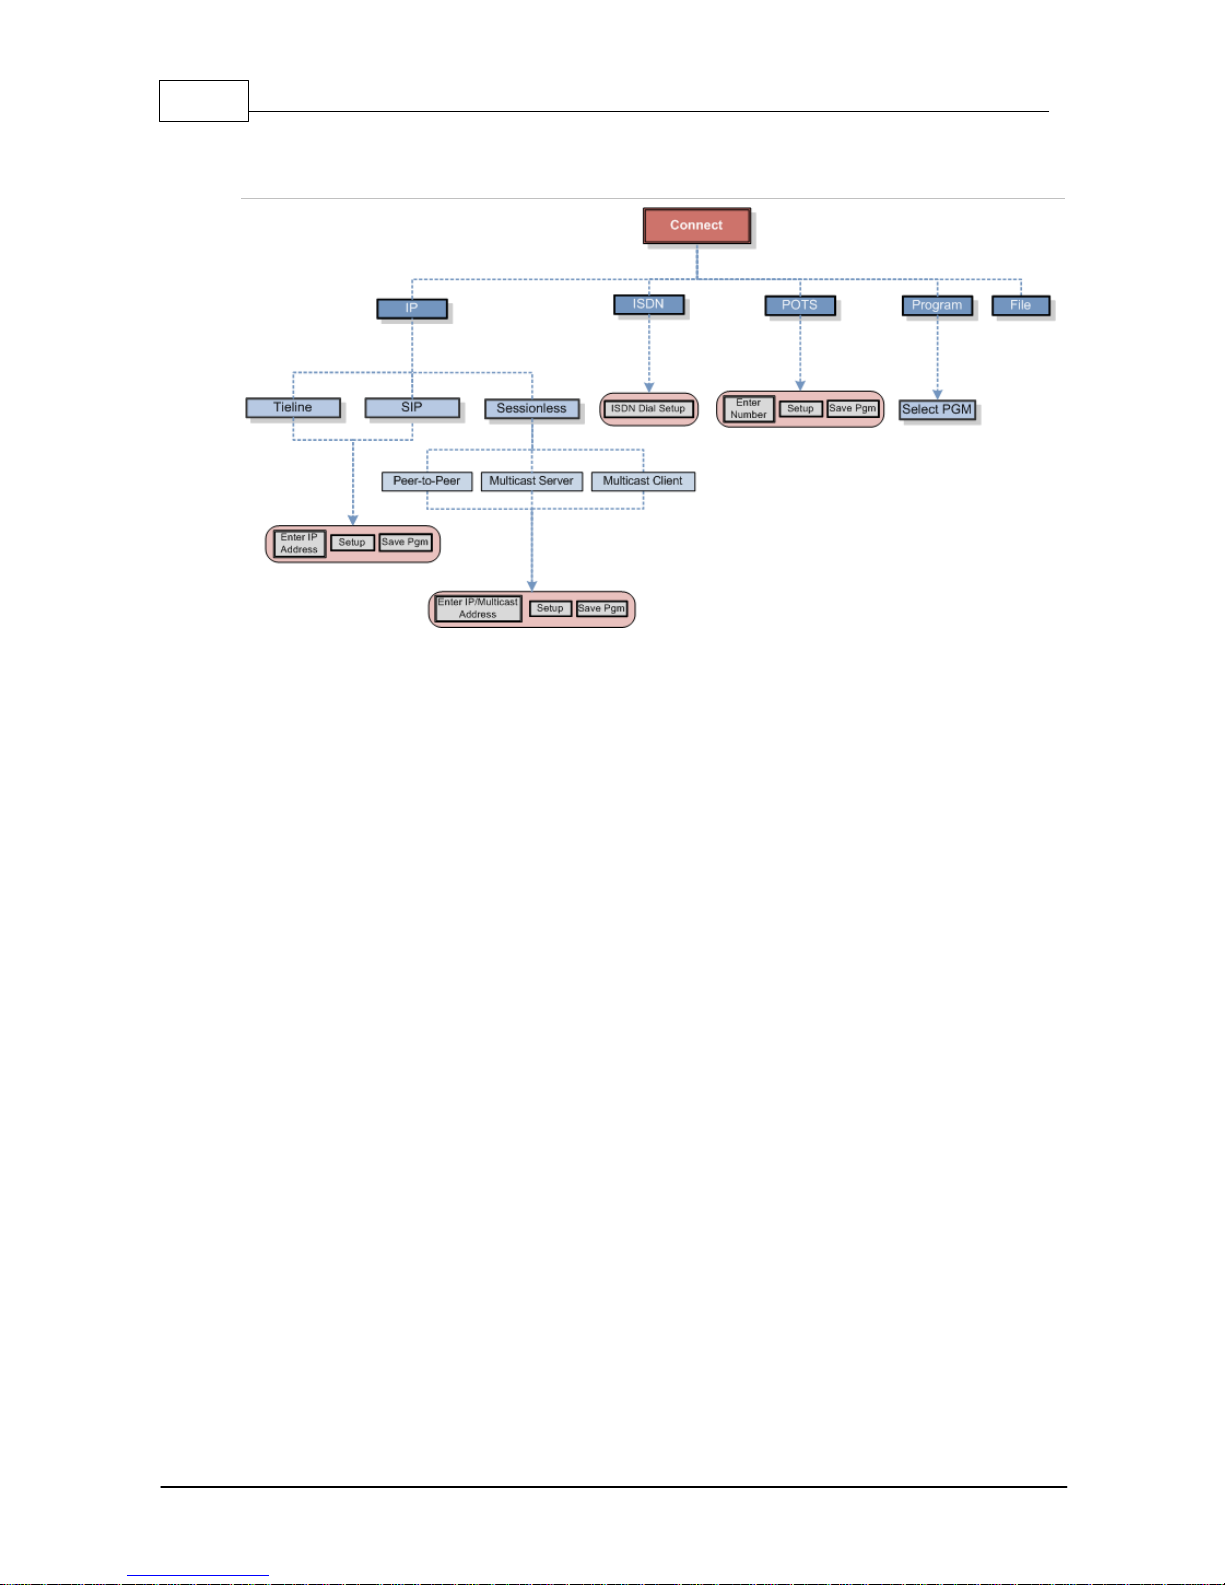
Connect Menu
19
© Tieline Pty. Lt d. 2015
Geni e Distribution User Ma nual v1.6
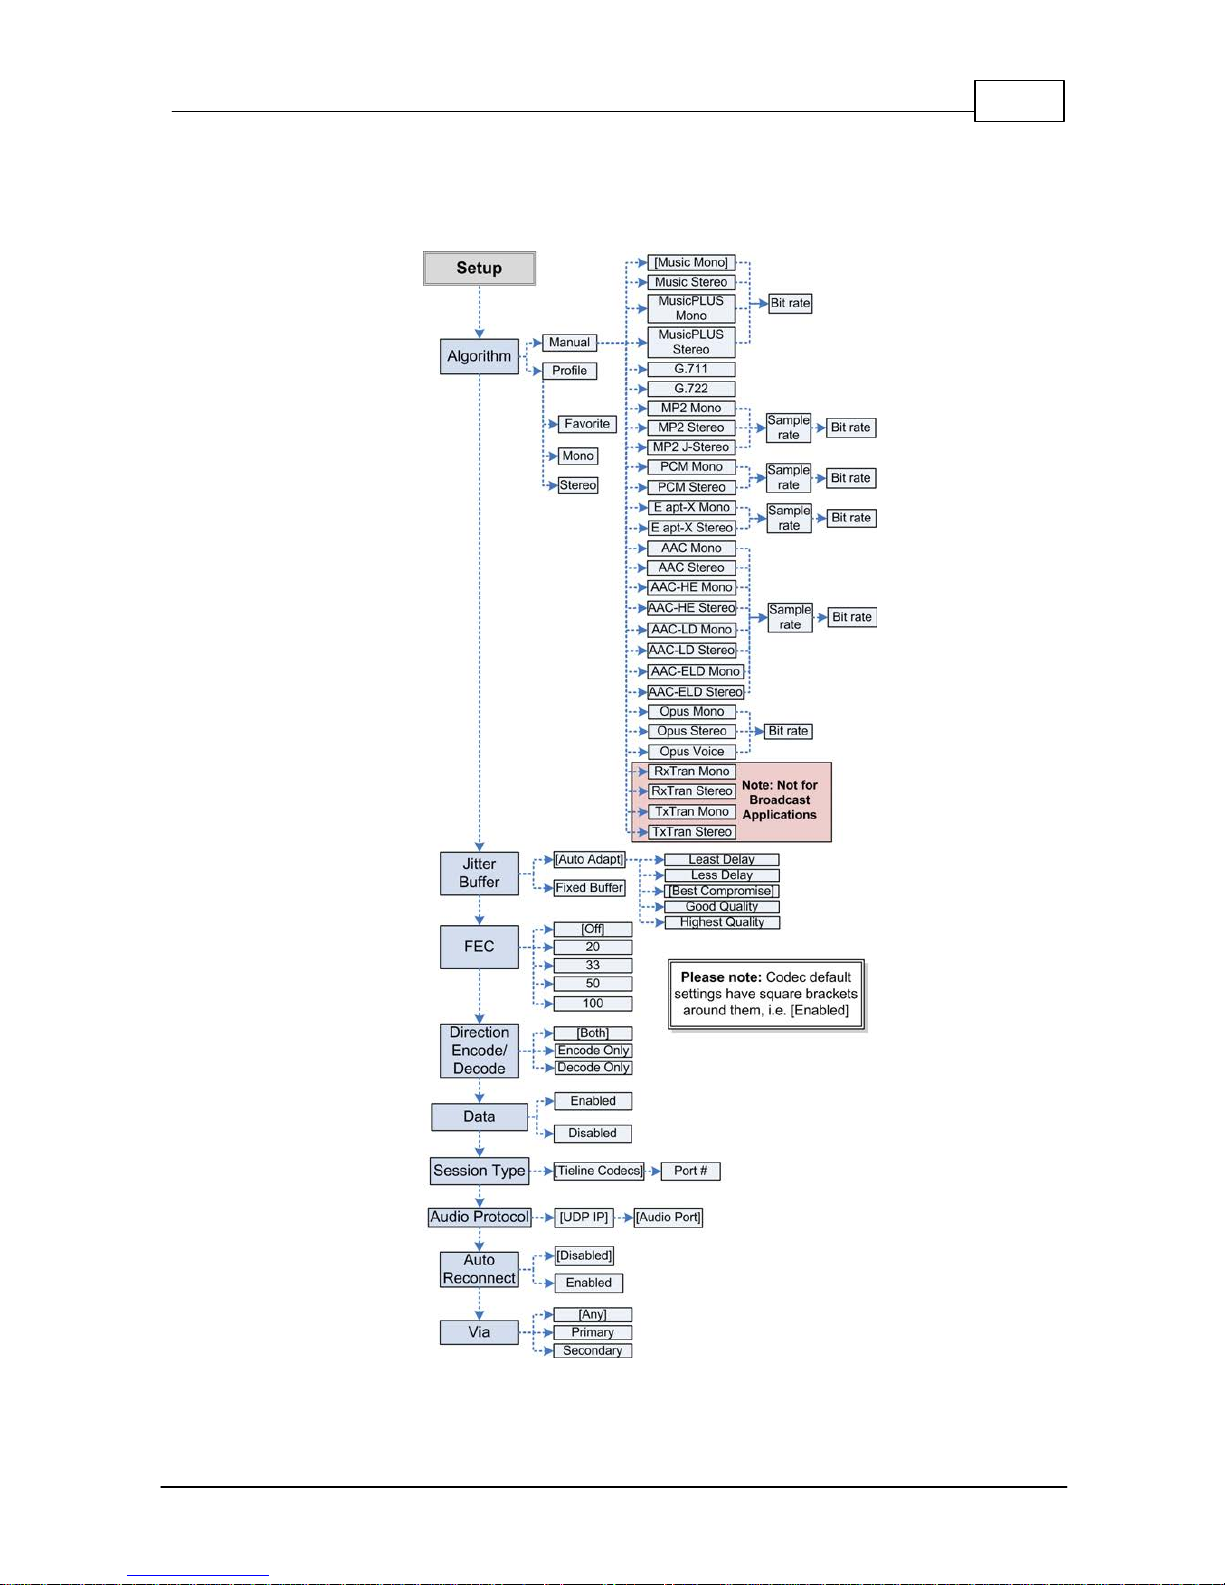
IP Setup Menu Navigation
After selecting IP and a connection mode use Setup to adjust connection settings.
20 Geni e Distribution User Ma nual v1.6
© Tieline Pty. Lt d. 2015
Importa n t Notes:
· Depending on the session ty pe select ed in the codec, not all options are displayed.
E.g. S essi o n Type and Data are not displayed when configur ing Sessionless IP
connections.
· Default sett ings may also change depending on the session type selected, e.g. Tieline
Session versus SIP or Sessionless.
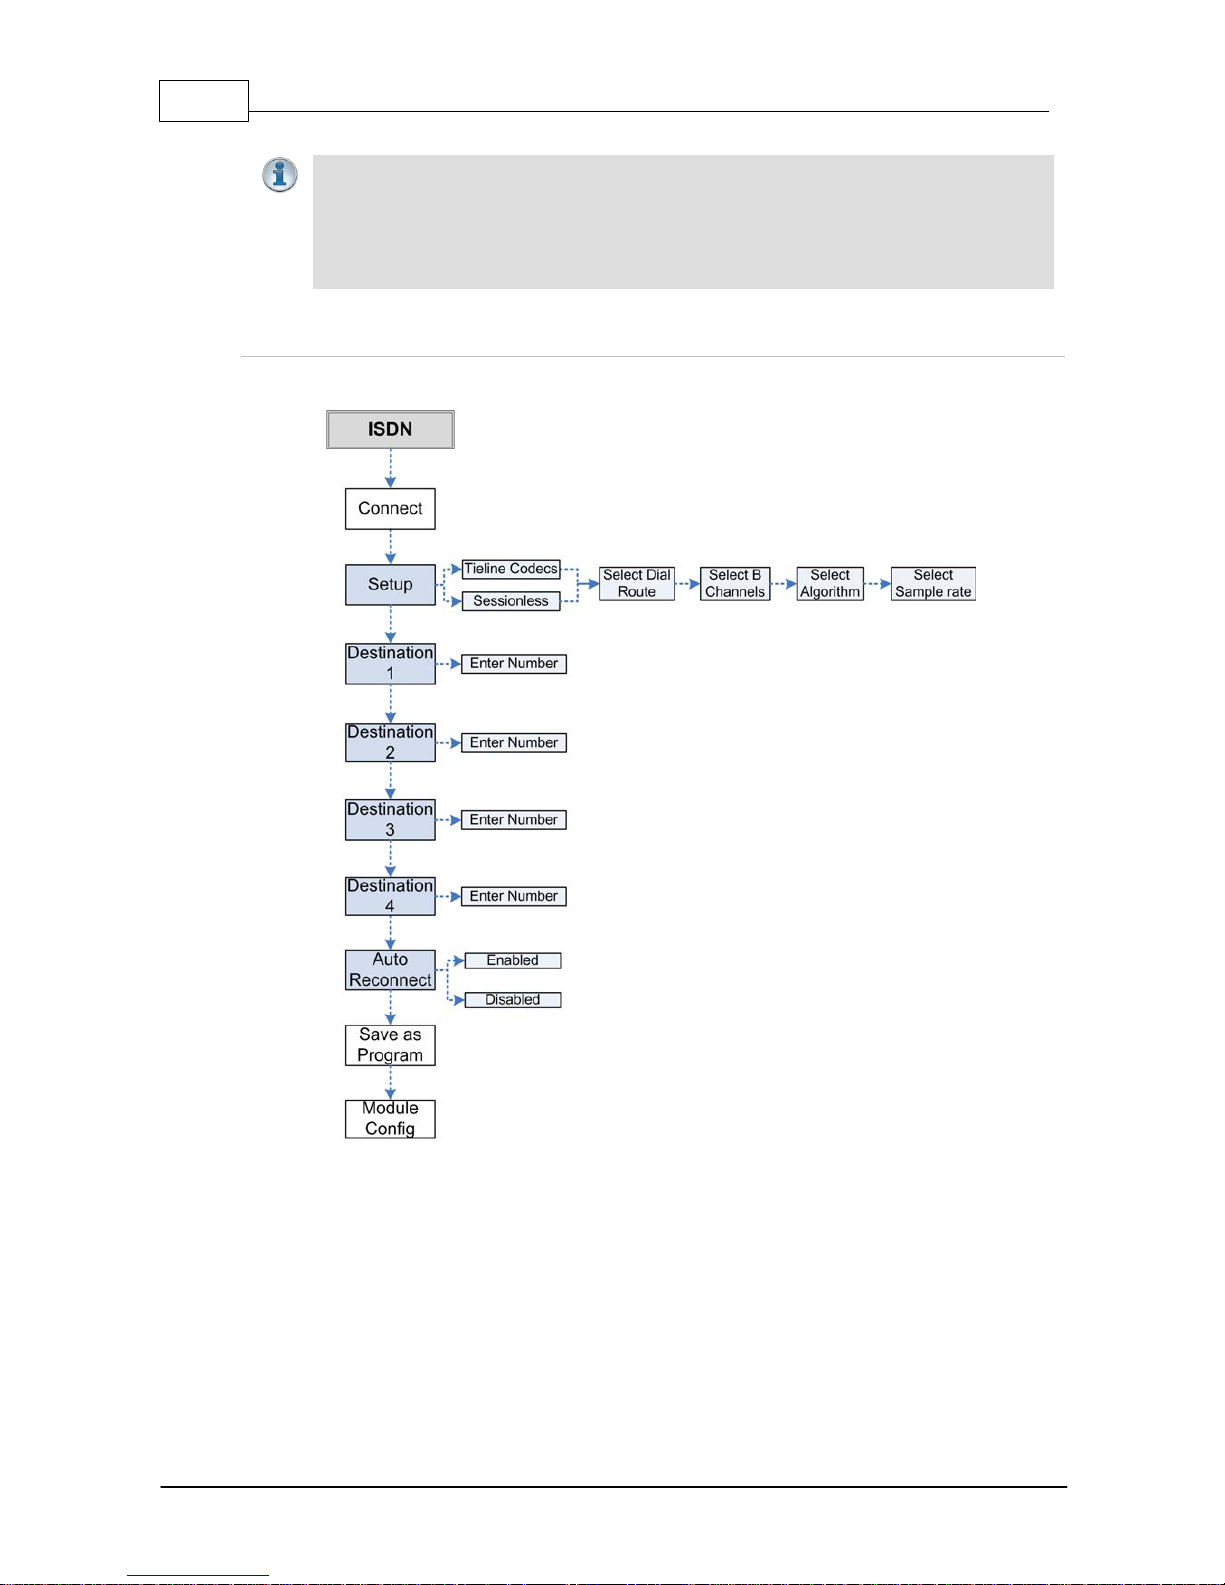
ISDN Menu Navigation
Select Connect > ISDN to configure ISDN dialing settings using the codec front panel.
21
© Tieline Pty. Lt d. 2015
Geni e Distribution User Ma nual v1.6
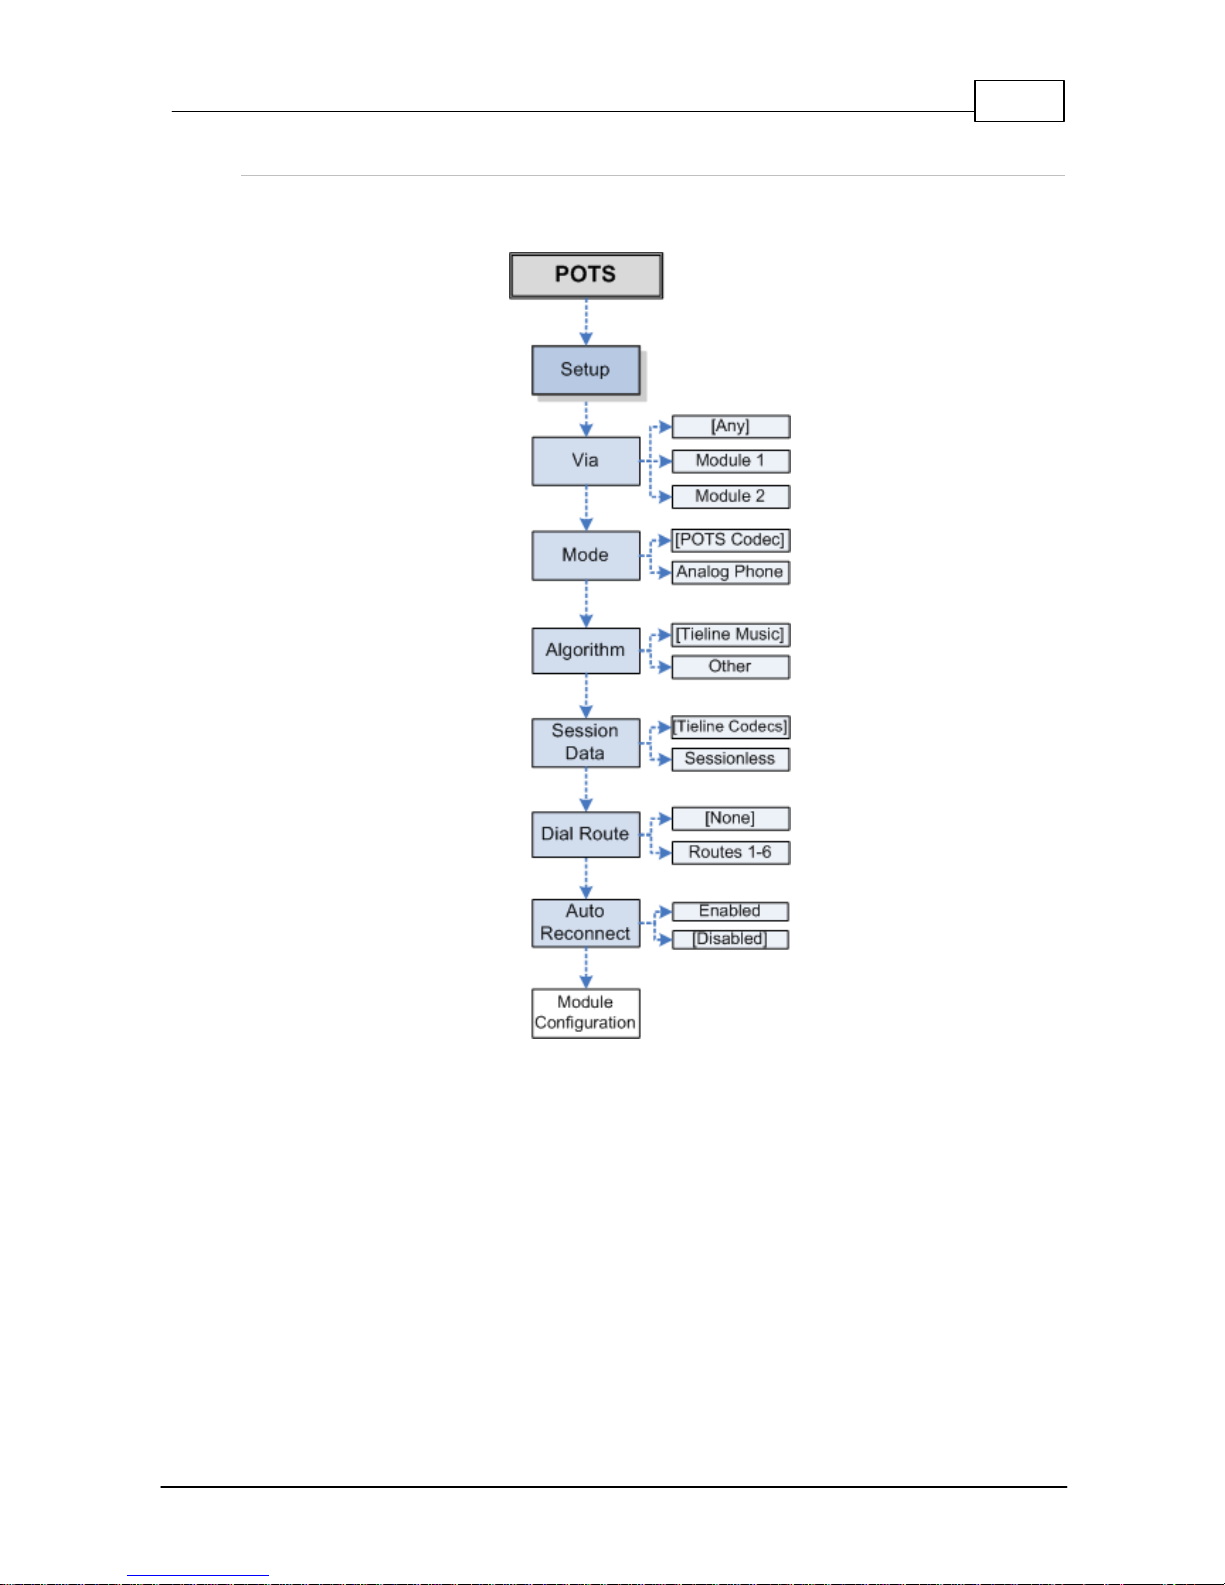
POTS Menu Navigati on
Select Connect > POTS to configure POTS dialing settings using the codec front panel. Note:
default settings are surrounded by square brackets.

22 Geni e Distribution User Ma nual v1.6
© Tieline Pty. Lt d. 2015
Settings Menu
Press the SETTINGS button on the codec front panel to access a wide range of configuration
settings.
23
© Tieline Pty. Lt d. 2015
Geni e Distribution User Ma nual v1.6
8 Genie Dis tribution Input Levels and PPMs
Importa n t Note:
· Input levels c an only be adjusted on analog inputs. Digital AE S 3 s ource audio is not
adjustable. See Configuring AES3 audio for more informati on about digital in/outs. Input
audio functions can also be configured using the Toolbox Web-GUI. See Configuring
Input/Output Sett i ngs.
· Genie Distribution supports input expansion with inputs/ outputs 3, 4, 5 and 6.
Expansion inputs 3 to 6 must be either all analog or all digital. Expansion outputs 3 t o
6 must als o be either all analog or all digit al. B y default the output selection follows the
input selecti on, however, inputs and outputs c an be configured differently. F or example,
if you configure expansion inputs 3 to 6 as analog, you can configure all expansion
outputs 3 t o 6 as digital AE S3. Adjust the output set ting independently if required via
SETTINGS > Audio > Output Type > [Sele ct Outputs 3 to 6] > [Sel ect output
type].
Audio Levels and Default PPM Metering
The PPM meters use dBu to express nominal operating, headroom and noise floor levels. Set audio
levels so that audio peaks average at the nominal 0vu point indicated on the front panel PPM
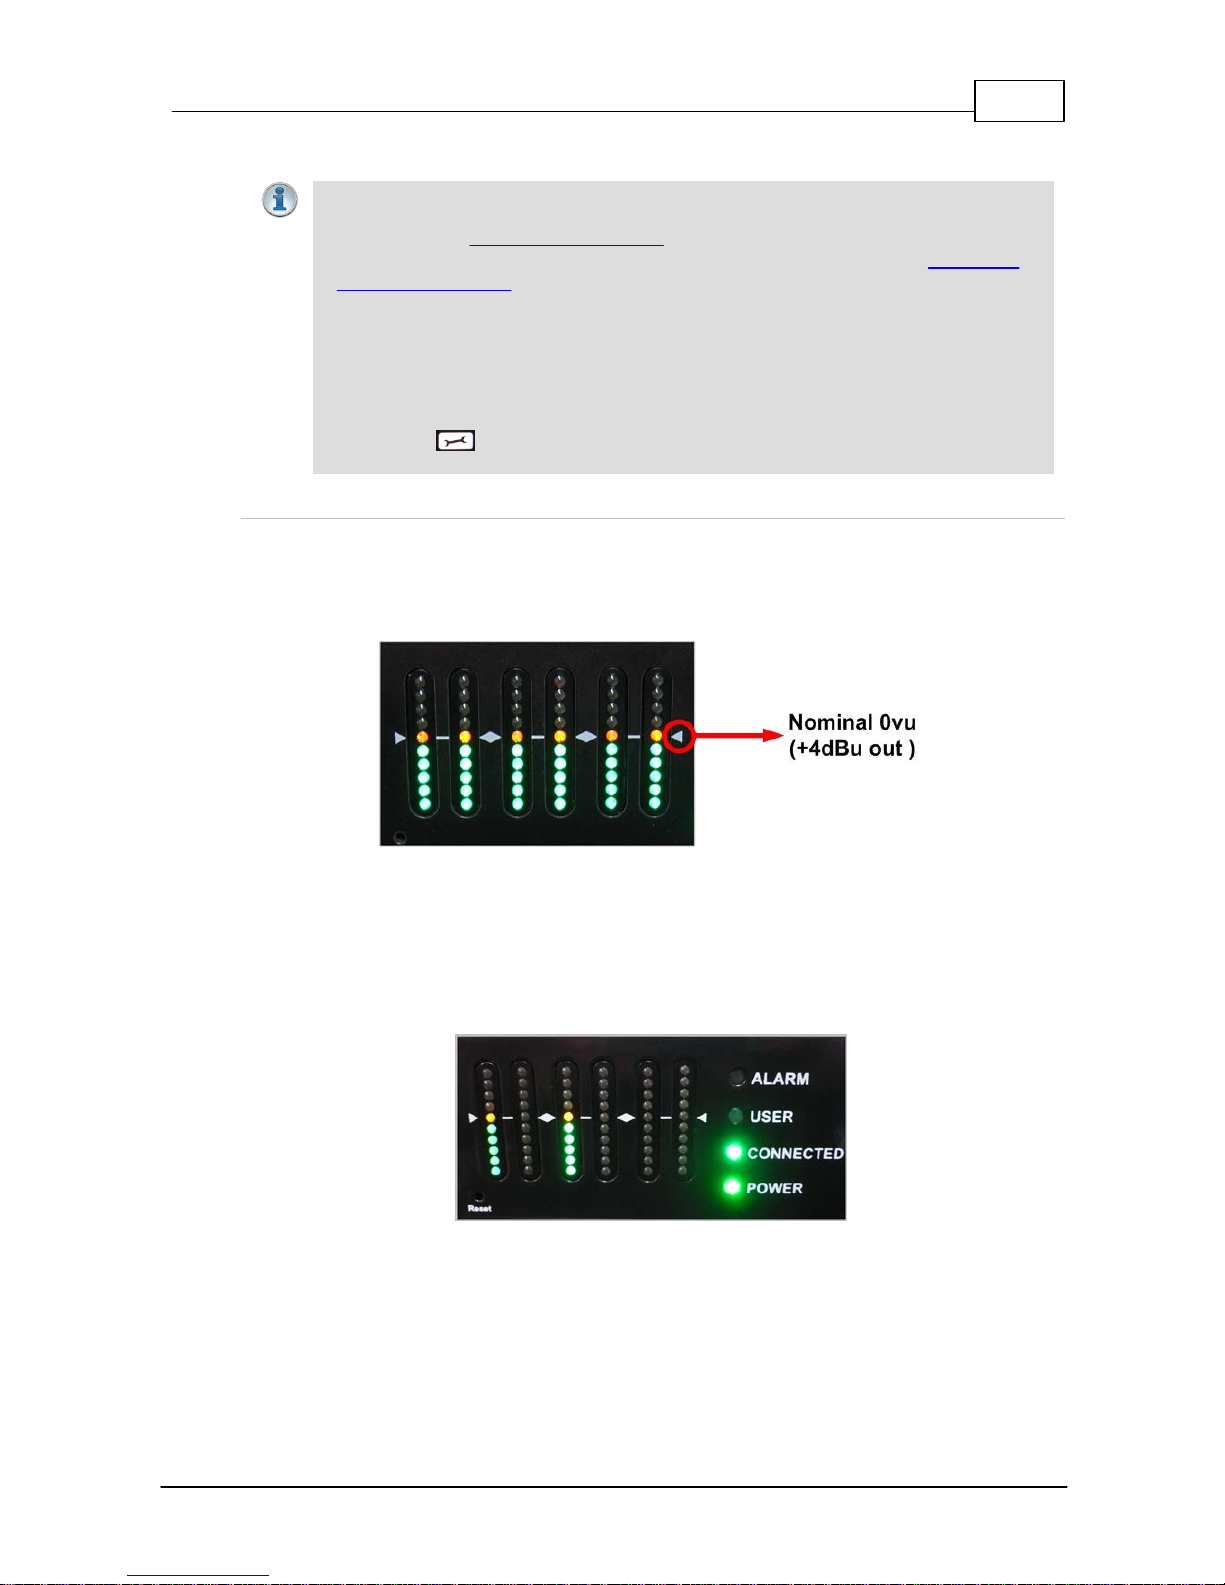
meters. This represents a program level of +4 dBu leaving the codec. Audio peaks can safely reach
+22 dBu without clipping, providing 18dBu of headroom from the nominal 0vu point.
The following PPM settings are displayed by default in the codec. The default settings can be
adjusted via Settings > Audio > PPM Mode.
Mono and Stereo Metering
When connected with a mono program the codec will display a mix of inputs 1 and 2 on PPM1.
PPM 3 displays the level of return audio.
Mono connection displaying audio on
PPMs 1 and 3
When connecting with a stereo program, the codec displays audio on PPM1 & 2 for inputs 1
and 2 and PPM 3 & 4 for the return program audio.
24 Geni e Distribution User Ma nual v1.6
© Tieline Pty. Lt d. 2015
Stereo connection with PP Ms 1-4 displaying
input a nd return audi o
Importa n t Note: When sending an audio st ream to multiple endpoints using a multi-
unicast program, the codec PPMs will dis play t he same audio monitoring as for a
standard mono or stereo connection. The return audio PP M met ering will display return
audio from the first connection dialed within the multi-unicast program.
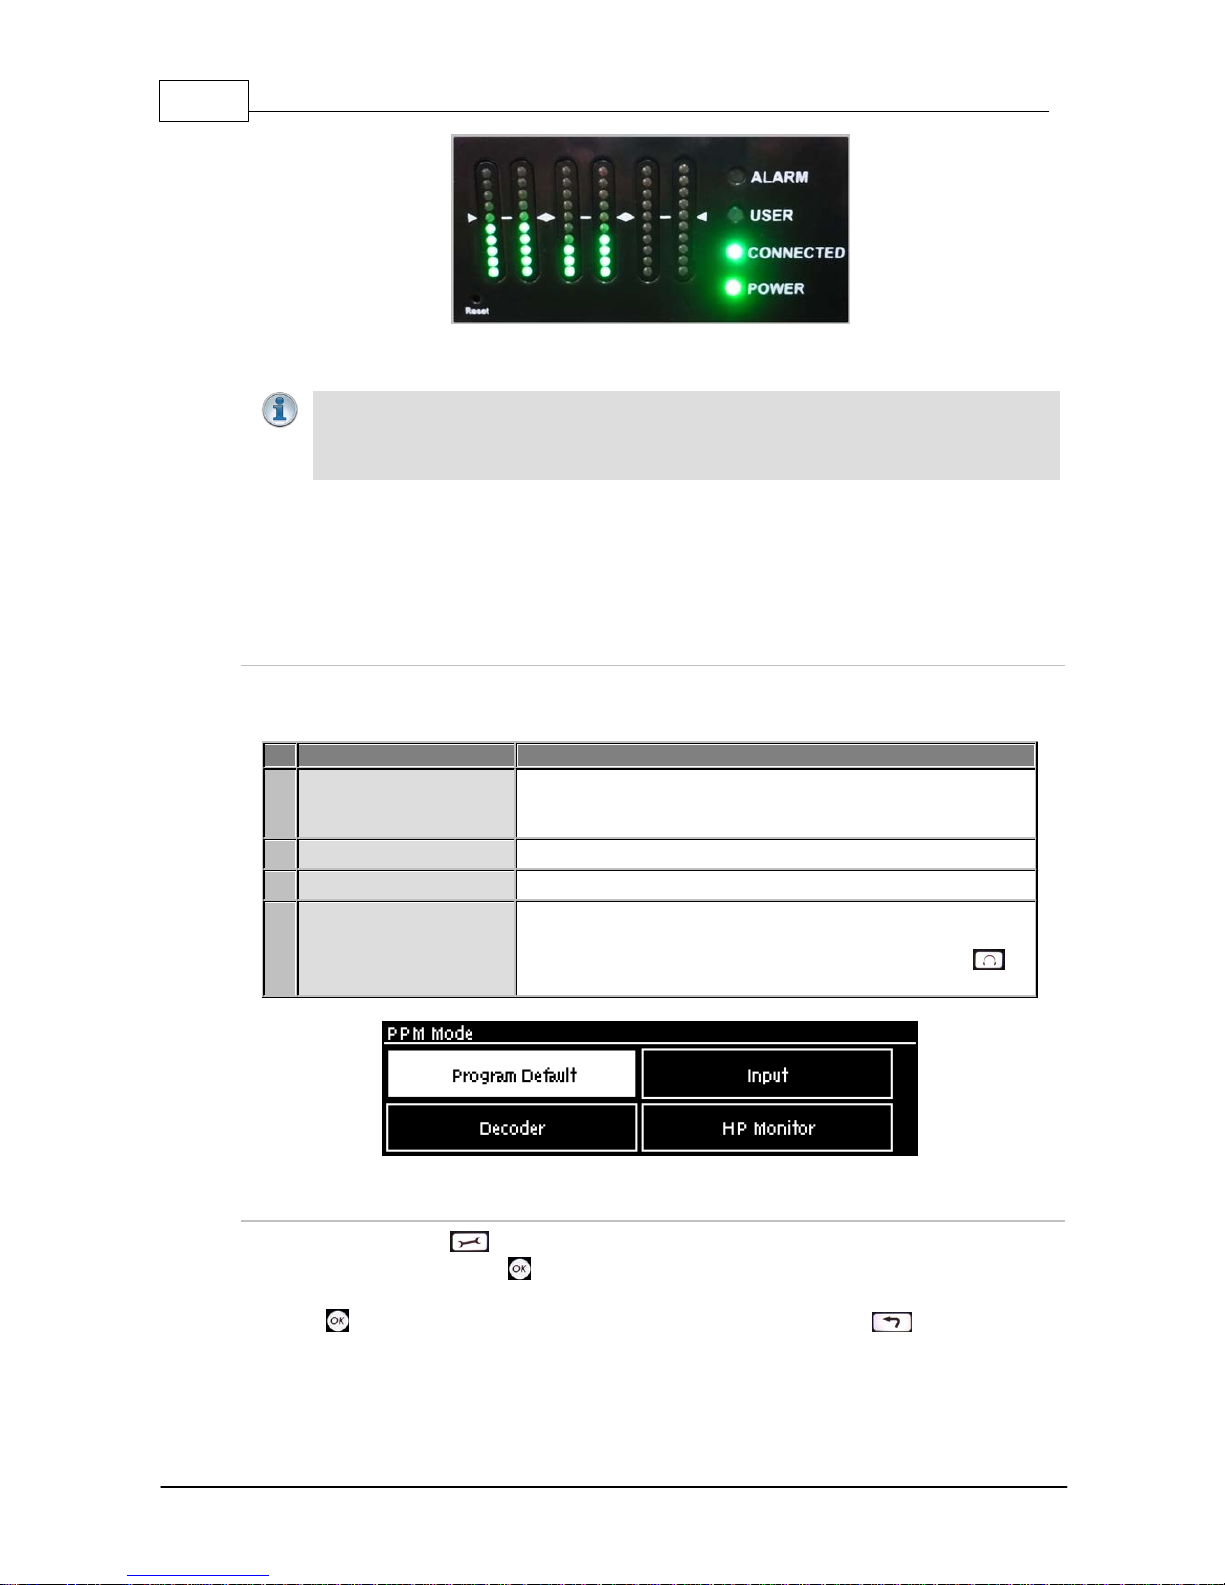
Metering 2 or 3 Peer-to-Peer Stereo Audio Streams
The PPMs by default will display input audio levels when 2 or 3 stereo audio streams are
configured within a program. Inputs 1-6 are mapped to PPMs 1-6.
Adjusti ng Default PPM Meter i ng
The default PPM metering settings can be adjusted via Settings > Audio > PPM Mode. The
options include:
PPM M ode
Description
1
Program Default (default)
Displays default program PPM meter settings (i.e. the
settings described previously for mono, stereo, 2 x stereo, 3 x
stereo and multi-unicast programs).
2
Input
Maps input encoders 1 to 6 with PPM meters 1 to 6.
3
Decoder
Maps decoders 1 to 6 with PPM meters 1 to 6.
4
HP Monitor
Maps PPM meters to inputs/outputs currently selected via the
headphone monitoring function. The default headphone
monitoring setting is accessed via HEADPHONE >
Monitor Source > [Select audio Source].
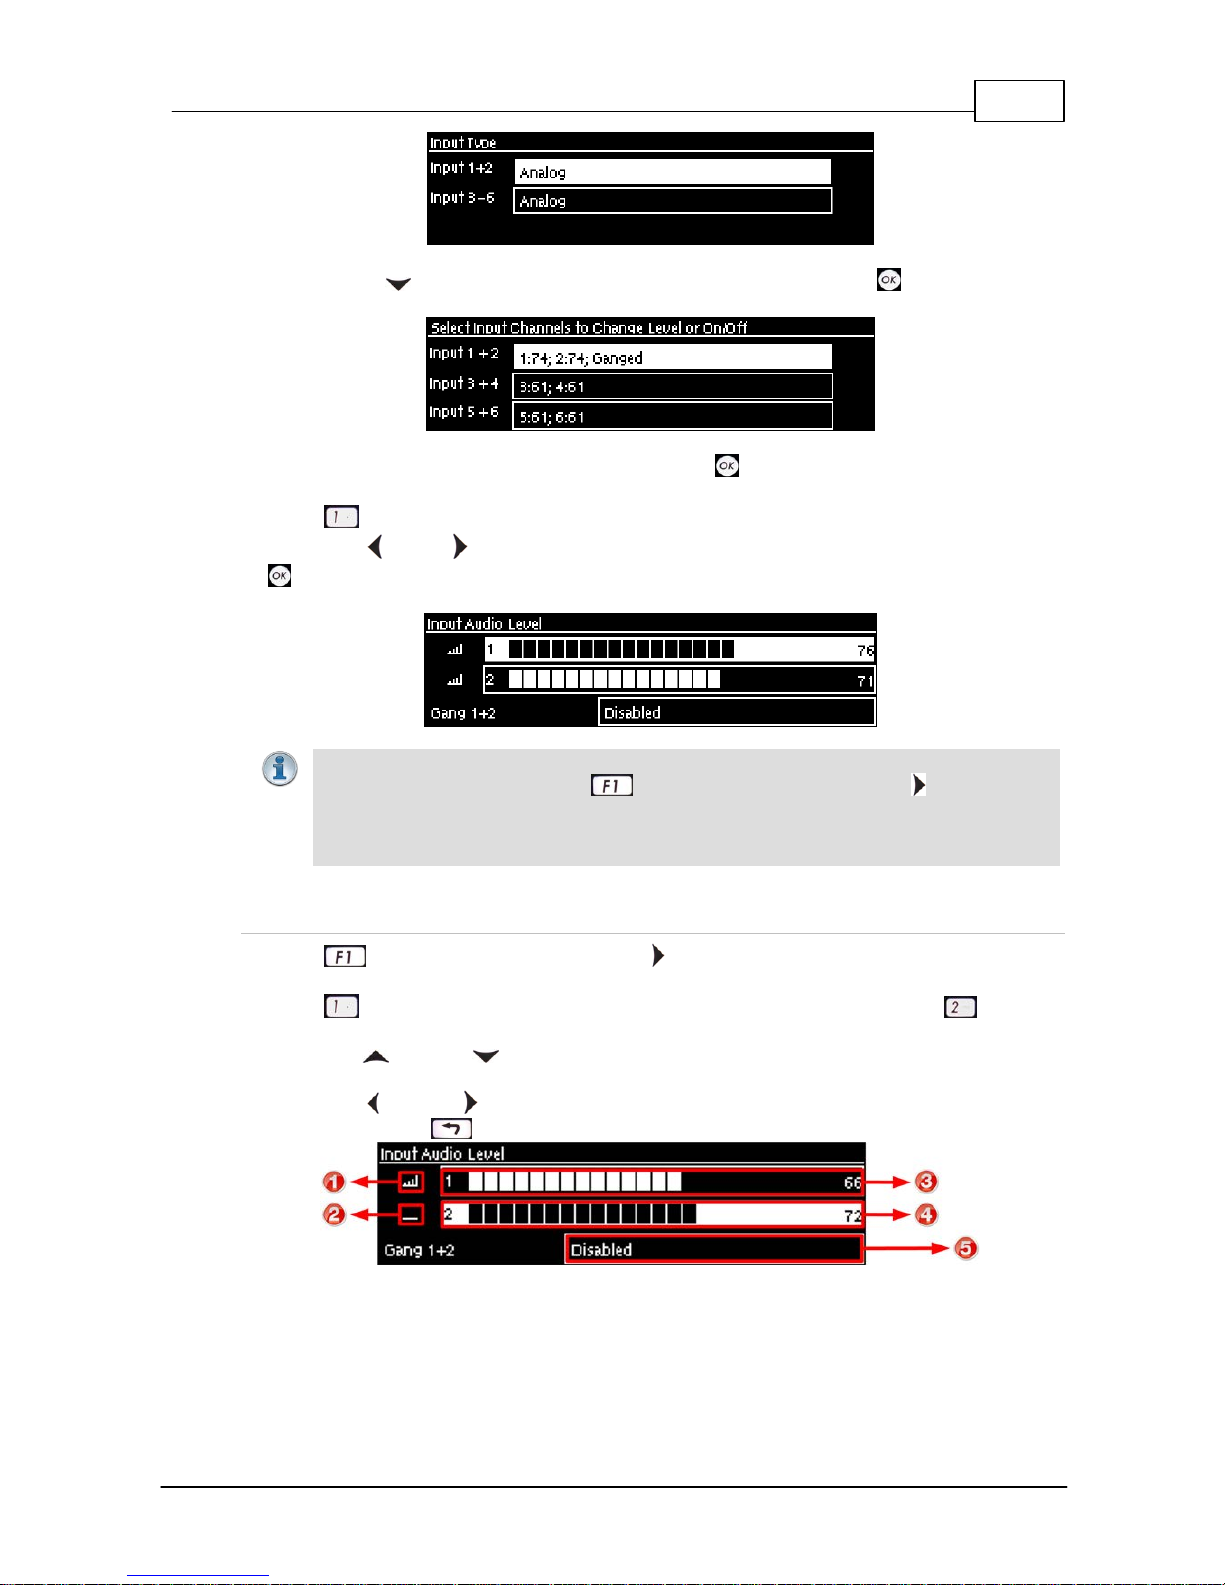
Selecting Analog Inputs and Adjusti ng Input Levels
1. Press the SETTINGS button.
2. Navigate to Audio and press .
3. Inputs 1 and 2 and inputs 3 to 6 are grouped under Input Type and should be set to Analog;
press to toggle between Analog and AES3 and press the RETURN button to exit the
menu.
25
© Tieline Pty. Lt d. 2015
Geni e Distribution User Ma nual v1.6
4. Use the down navigation button to highlight Input Level and press the button.
5. Navigate to the channels you want to adjust and press .
6. Press the number on the keypad corresponding to the channel you want to toggle on or off. E.g.
press on the numeric keypad to toggle channel 1 on and off.
7. Use the left or right navigation buttons to select the appropriate gain setting, then press the
button to save the settings.
Importa n t Note:
· To adjust levels quickly press and press and release the right arrow button to
open the Input Audio Level adjustment screen.
· 15 volt phantom power can only be supplied on the auxiliary input; this is disabled by
default.
Quick Level A djustm ent of I nput 1 and 2
1. Press and press and release the right arrow button to open the Input Audio Level
adjustment screen.
2. Press on the numeric keypad to toggle channel 1 on and off and press to toggle
channel 2 on and off.
3. Use the up and down arrow buttons to navigate to the channel you want to adjust. Note: A
channel is highlighted when selected.
4. Use the left and right arrow buttons to adjust the input levels up or down.
5. Press the RETURN button to exi t t he sc reen.
26 Geni e Distribution User Ma nual v1.6
© Tieline Pty. Lt d. 2015
Input Audio Fe atures
Description
1
Channel On Symbol
Symbol indicates a channel is turned on
2
Channel Off Sy mbol
Symbol indicates a channel is turned off
3
Input 1 Level Control
Ch 1 level indication with percentage of gain indicated, i.e. 66
4
Inp ut 2 Level Con trol
Ch 1 level indication with percentage of gain indicated, i.e. 72
5
Ch1/2 Gang Indication
Indicates whether ganging is enabled or disabled
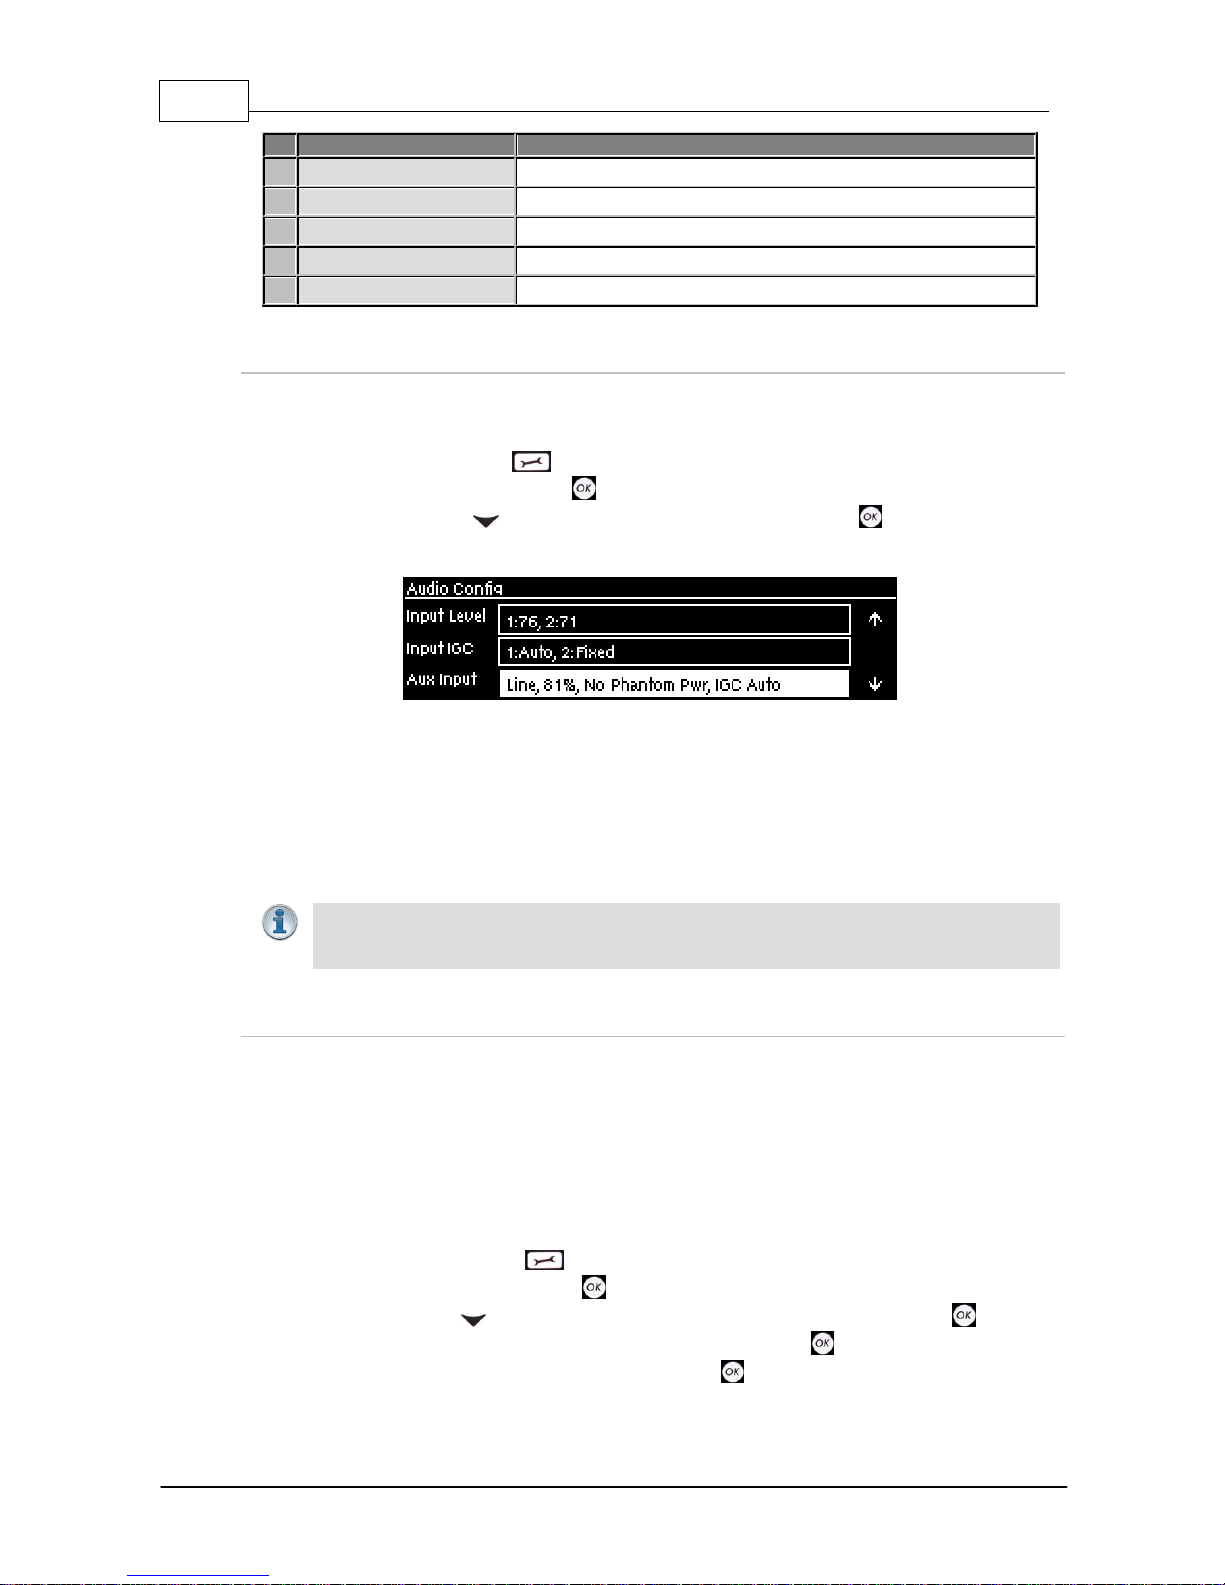
Auxil i ary I nput Adj ustm ent
The codec has 1 x 6.35mm (1/4") Mic/Line level Jack on the rear panel. By default the input is Off
and can be configured by:
1. Selecting the SETTINGS button.
2. Navigate to Audio and press the button.
3. Use the arrow-down button to select Aux Input and press the button to view menu
options.
Input settings which can be adjusted include:
· Input on/off.
· Input level.
· Input Type: High Gain Mic, Medium Gain Mic, Low Gain Mic, Unbalanced and Line Level.
· Phantom power (15V available when enabled).
· IGC.
Importa n t Note: When the auxiliary input (AUX IN) is On the default mixer configuration
sends audio to all inputs. If you are not using the auxiliary i nput ensure it i s Off to avoid
additional noise in program audio.
Ganging Audio Channels
It is possible to gang channels together and adjust the audio level of the ganged channels
simultaneously. When channels are ganged together:
· Both channels highlight together when selected.
· The gain setting for both channels is automatically set to match the gain level of the lowest of
the two channels when ganging is first configured.
· If one channel is turned on when ganging is first configured then the other one will be turned
on automatically.
1. Press the SETTINGS button.
2. Navigate to Audio and press .
3. Use the down navigation button to highlight Input Level and press the button.
4. Navigate to the channels you want to gang and press the button.
5. Navigate to the Gang function and press the button to toggle between Enabled or
Disabled.
27
© Tieline Pty. Lt d. 2015
Geni e Distribution User Ma nual v1.6
6. Use the up and down arrow buttons to highlight and select the audio channels.
7. Use the left and right arrow buttons to adjust the levels for both inputs up or down
simultaneously.
8. Press the RETURN or HOME buttons to exit the screen.
Importa n t Note:
· To gang channels quickly press and press and release the right arrow button to
open the Input Audio Level adjustment screen and follow the preceding instructions.
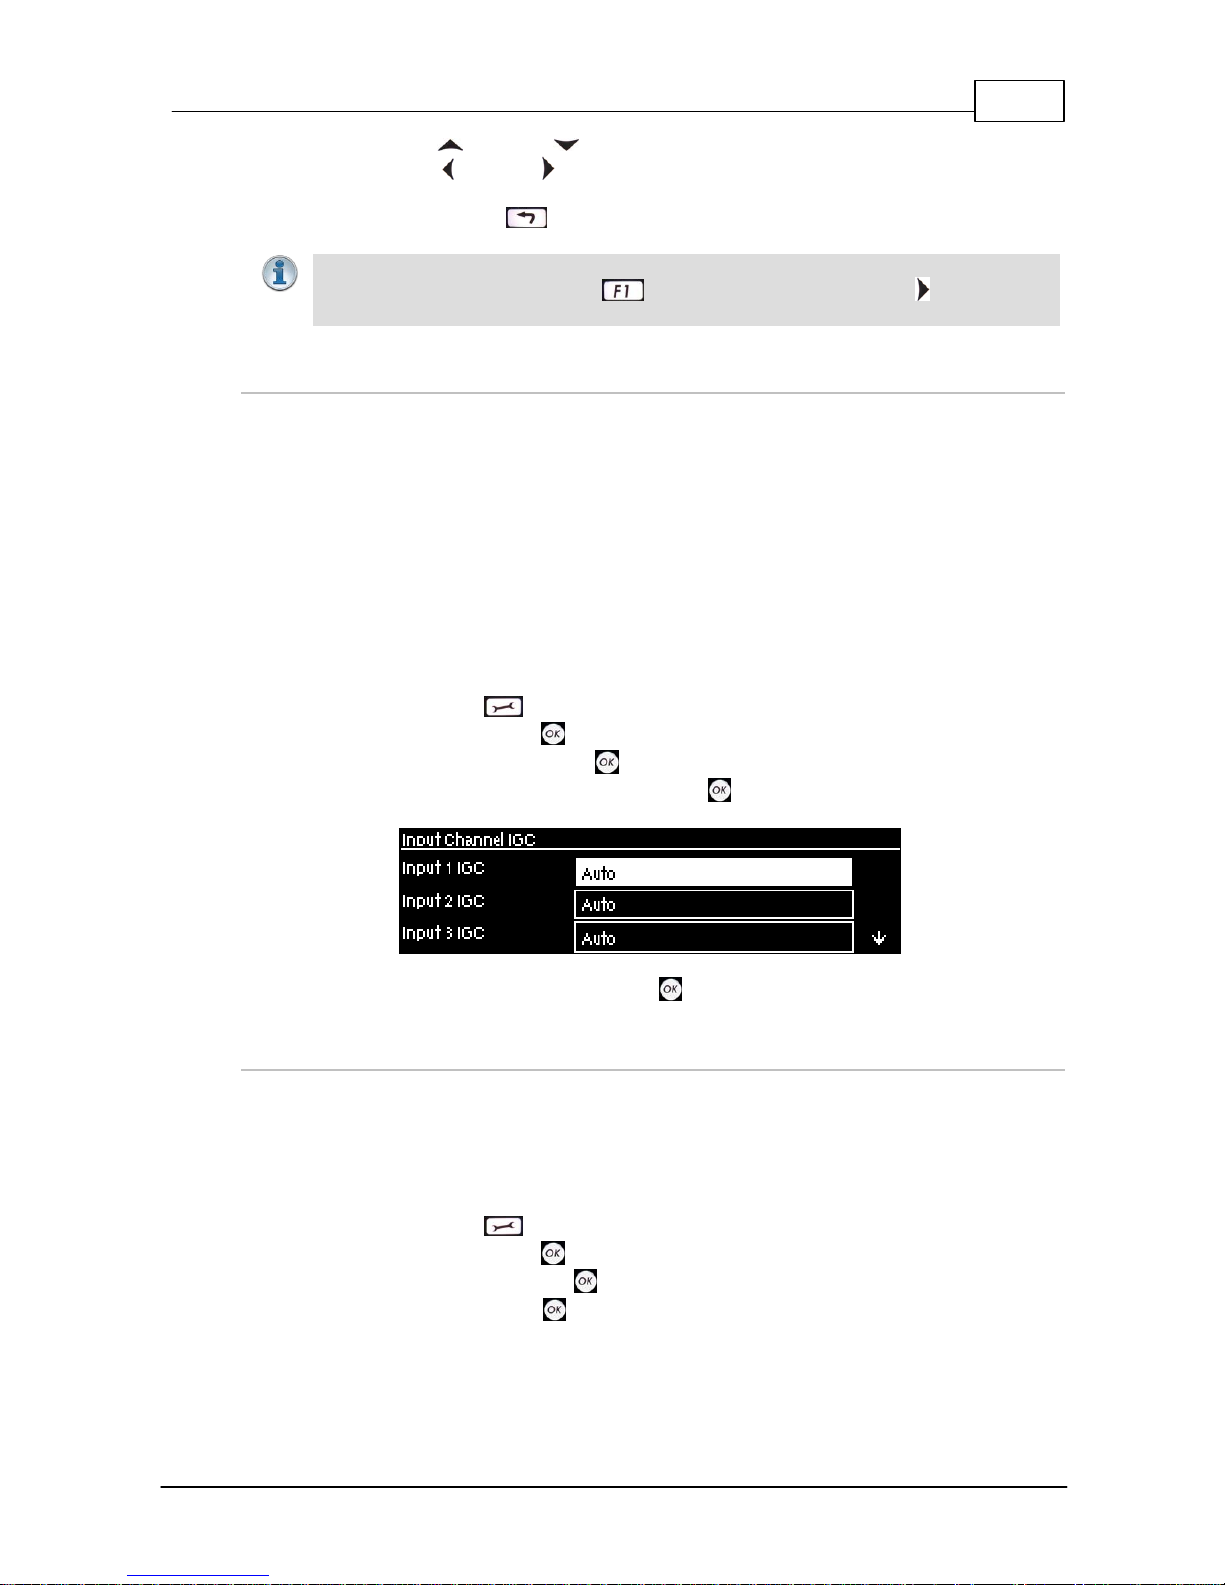
Intell i gent G ai n Control (I G C)
The codec's inbuilt DSP limiter automatically takes care of any instantaneous audio peaks that
occur in demanding broadcast situations. Input IGC (Intelligent Gain Control) is enabled by default
and is automatically activated at +20 dBu (G5 audio scale) and +14dBu (G3 audio scale) to prevent
audio clipping.
There are three settings; Auto, Fixed and Off. If Auto is configured the codec will detect when
incoming audio levels have reduced sufficiently and automatically return input levels to the gain
setting prior to IGC being activated. The codec takes just 250 milliseconds to detect audio levels
have returned to normal (after IGC Level has been initiated) and will return the levels to the previous
setting within half a second. This response is linear.
To adjust this setting in the codec:
1. Press the SETTINGS button.
2. Navigate to Audio and press .
3. Navigate to Input IGC and press .
4. Select the channel you want to adjust and press .
5. Navigate to the preferred setting and press .
Configure Audio Reference Metering when Connecti ng to Tieli ne G 3 Codecs
New generation Genie, Merlin and Bridge-IT IP codecs have more audio headroom than Tieline G3
audio codecs, therefore the audio metering reference scale needs to be adjusted when connecting
to a Commander or i-Mix G3 codec with one of these codecs. The G3 metering scale is between 11dBu and +18dBu. Tieline codecs perform this metering adjustment automatically when they
connect to each other or this can be programmed to occur by default.
1. Press the SETTINGS button.
2. Navigate to Audio and press .
3. Navigate to Ref Level and press .
4. Select Tieline G3 and press .
Audio levels should average around the nominal 0vu point and audio peaks should not exceed
+16dbu as indicated by the PPM meter.

28 Geni e Distribution User Ma nual v1.6
© Tieline Pty. Lt d. 2015
Features
Description
1
-11dBu
PPM meter low point
2
+4dBu
Nominal 0vu reference level at +4dBu
3
+16dBu
+16 indication where audio will clip/distort
Importa n t Note: If your codec (Genie Distribution and Bridge-IT) supports s ending multiunicast connections and the Auto (default) reference level is s elect ed, t he first codec y ou
connect with will configure the reference level used for all subsequent multi-unicast
connections.
29
© Tieline Pty. Lt d. 2015
Geni e Distribution User Ma nual v1.6
9 Configuring AES3 Input Audio
T he codec has an IN1/AES3 input on the rear panel of the codec for AES3 (AES/ E BU) format audio.
This balanced 110 ohm female XLR input can operate effec t ively over distances of up to 100 meters
and accepts both mono and stereo AES3 s ignals. If your codec s upports multiple channels of AES
audio use the DB25 EXPANSION AUDIO I/O connection to send/receive up to 4 additional channel s
of AES3 audio. Please note that expansion inputs/ outputs 3, 4, 5 and 6 must be either all analog or
all digital AES. See Appendix B for the DB25 wiring pin-outs.
1. Press the SETTINGS button.
2. Navigate to Audio and press .
3. Select Input Type and press the button.
4. Navigate to the inputs you want to configure and press the button to toggle between
Analog and AES3.
The 3 pin male XLR AES3 OUT connector is capable of sending both mono and stereo AES3
signals.
Importa n t Notes: Input levels are set at 100% automatic ally for AES3 c onnections. If you
switc h back t o the analog input sett ing after selecting AES 3, t he previous analog settings
will be recov ered .
AES3 Sample Rate Conversion
The codec contains two sample rate converters.
Input Sa mple Rate Converter
The codec implements an Asynchronous Sample Rate Converter (ASRC) to convert the sample
rate of an AES3 input to the sample rate set in the codec. The codec sample rate is determined
by the selected algorithm. For example, if you select the Music algorithm, the sample rate will
be set to 32kHz.
By default the codec will up-sample all channel 1 and 2 AES3 input sources to 96kHz sampling
unless your audio source uses a 44.1kHz sample rate.
Important Notes: If your codec supports up to six AES3 inputs, the three AES3 stereo
inputs are multiplexed onto analog inputs 1, 3 and 4. There are also three AES3 stereo
outputs via the AES3 Out XLR and two are multiplexed onto outputs 3 and 4 (see
Appendix B for pin-outs of inputs 3 and 4 and outputs 3 and 4).
The inputs have asynchronous sample rate converters to facilitate sources with different
sample rates being attached to the codec. For example, IN1-AES (Inputs 1 and 2) can be
48kHz AES-IN2 (IN3&4) can be 32kHz and AES-IN3 (IN5&6) can be 96kHz
Output Sample Rate Converter
The sample rate of the AES3 output is configured using the clock source setting via the
SETTINGS button and then Audio > Input Type > AES3 Out. This configures the sample
rate frequency of all AES3 output signals and there are three possible settings.

30 Geni e Distribution User Ma nual v1.6
© Tieline Pty. Lt d. 2015
Locked to AES3 Input
If this setting is used, the codec will use the sync information received by the AES3 input to set
the output sample rate in the codec (Note: this is the same as the AES Rx Clock setting in
Tieline G3 codecs). The codec will initially try to use the signal on AES inputs 1 and 2 as the
clock to which the AES outputs are synchronised. If unavailable, it will then attempt to use
inputs 3 and 4 or inputs 5 and 6 in that order. If you select this option, all AES inputs must
always be synchronised to the same clock source, e.g. if AES3 inputs 1 and 2 use 48kHz
sampling then inputs 3 and 4 and inputs 5 and 6 must also be synchronised to the same clock.
Wordclock Sync In
This setting configures the codec for a word clock source via the SYNC INPUT on the codec
rear panel (this is the same as the External Word Clock setting in Tieline G3 codecs). Often
this will be a studio reference signal (D.A.R.S., or Digital Audio Reference Signal). In television
broadcasting facilities, the audio reference signal should be locked to the video reference if there
is one available. The sample rate being received is recognized by the codec and automatically
adjusted within it. Sample rates from 32 kHz to 96 kHz are accepted, including the most
popular rates of 32 kHz, 44.1 kHz and 48 kHz.
Fixed Sample Clock
Select from a range of fixed output sample rates.
 Loading...