

Tieline Genie STL, Genie Distribution, Merlin, Merlin PLUS Quick Start Manual

Codec Quick Start for
Genie STL, Genie Distribution,
Merlin and Merlin PLUS
Software Version: 2.18.xx
Manual Version: 2.0
September, 2018

Genie and Merlin Quick Start Manual v.2.02
© Tieline Research Pty. Ltd. 2018
Table of Contents
Part I Warnings & Safety Information
3
Part II Install the Codec and Configure
Network Settings
5
Part III Getting Connected Quickly
10
................................................................................................................................... 111 Steps to Connect over IP
................................................................................................................................... 142 Monitoring IP Connections
................................................................................................................................... 153 Steps to Connect over ISDN
................................................................................................................................... 194 Monitoring ISDN Connections
................................................................................................................................... 195 Steps to Connect over POTS
................................................................................................................................... 226 Monitoring POTS Connections
................................................................................................................................... 237 Load and Dial Custom Programs
................................................................................................................................... 238 Disconnecting a Connection
3Warnings & Safety Information
© Tieline Research Pty. Ltd. 2018
1 Warnings & Safety Information
1. Both appliance power cables must be removed from the device for Power Disconnection.
2. Remove the phone cable from the POTS interface before servicing.
THUNDERSTORM AND LIGHTNING WARNING:
DO NOT USE Tieline codecs during thunderstorms and lightning. You may suffer an injury
using a phone, Tieline codec, or any device connected to a phone during a thunderstorm.
This can lead to personal injury and in extreme cases may be fatal. Protective devices can
be fitted to the line, however, due to the extremely high voltages and energy levels involved
in lightning strikes, these devices may not offer protection to the users, or the Tieline codec
and equipment connected to the codec.
Secondary strikes can occur. These secondary strikes are induced by lightning strikes and
also produce dangerously high currents and energy levels. You only need to be near an
object struck by lightning to lead to personal injury or damage to equipment. e.g. if you are
located near a lighting tower at a sports facility, water features and drains on golf courses,
you may be affected by these secondary strikes.
Damage to personnel and Tieline codecs may occur during thunderstorm, even if the codec
is turned off but remains connected to the phone or ISDN system, LAN or the power.
ANY DAMAGE TO A TIELINE PRODUCT CAUSED BY LIGHTNING or an ELECTRICAL
STORM WILL VOID THE WARRANTY. Use of this product is subject to Tieline's
SOFTWARE LICENSE and WARRANTY conditions, which should be viewed at
www.tieline.com/support before using this product.
DIGITAL PHONE SYSTEM WARNING:
DO NOT CONNECT THE ANALOG POTS MODULE TO A DIGITAL PHONE SYSTEM.
PERMANENT DAMAGE MAY OCCUR! If you are unfamiliar with any facility, check that the
line you are using is NOT a digital line. If the Tieline codec becomes faulty due to the use
of a digital phone system, the WARRANTY WILL BE VOID.
WARNING:
HIGH LEAKAGE CURRENT. EARTH CONNECTION ESSENTIAL BEFORE CONNECTING
SUPPLY.
If the total leakage current exceeds 3.5 mA, or if the leakage current of the connected
loads is unknown, connect the supplementary ground terminal to a reliable ground
connection in your facility.
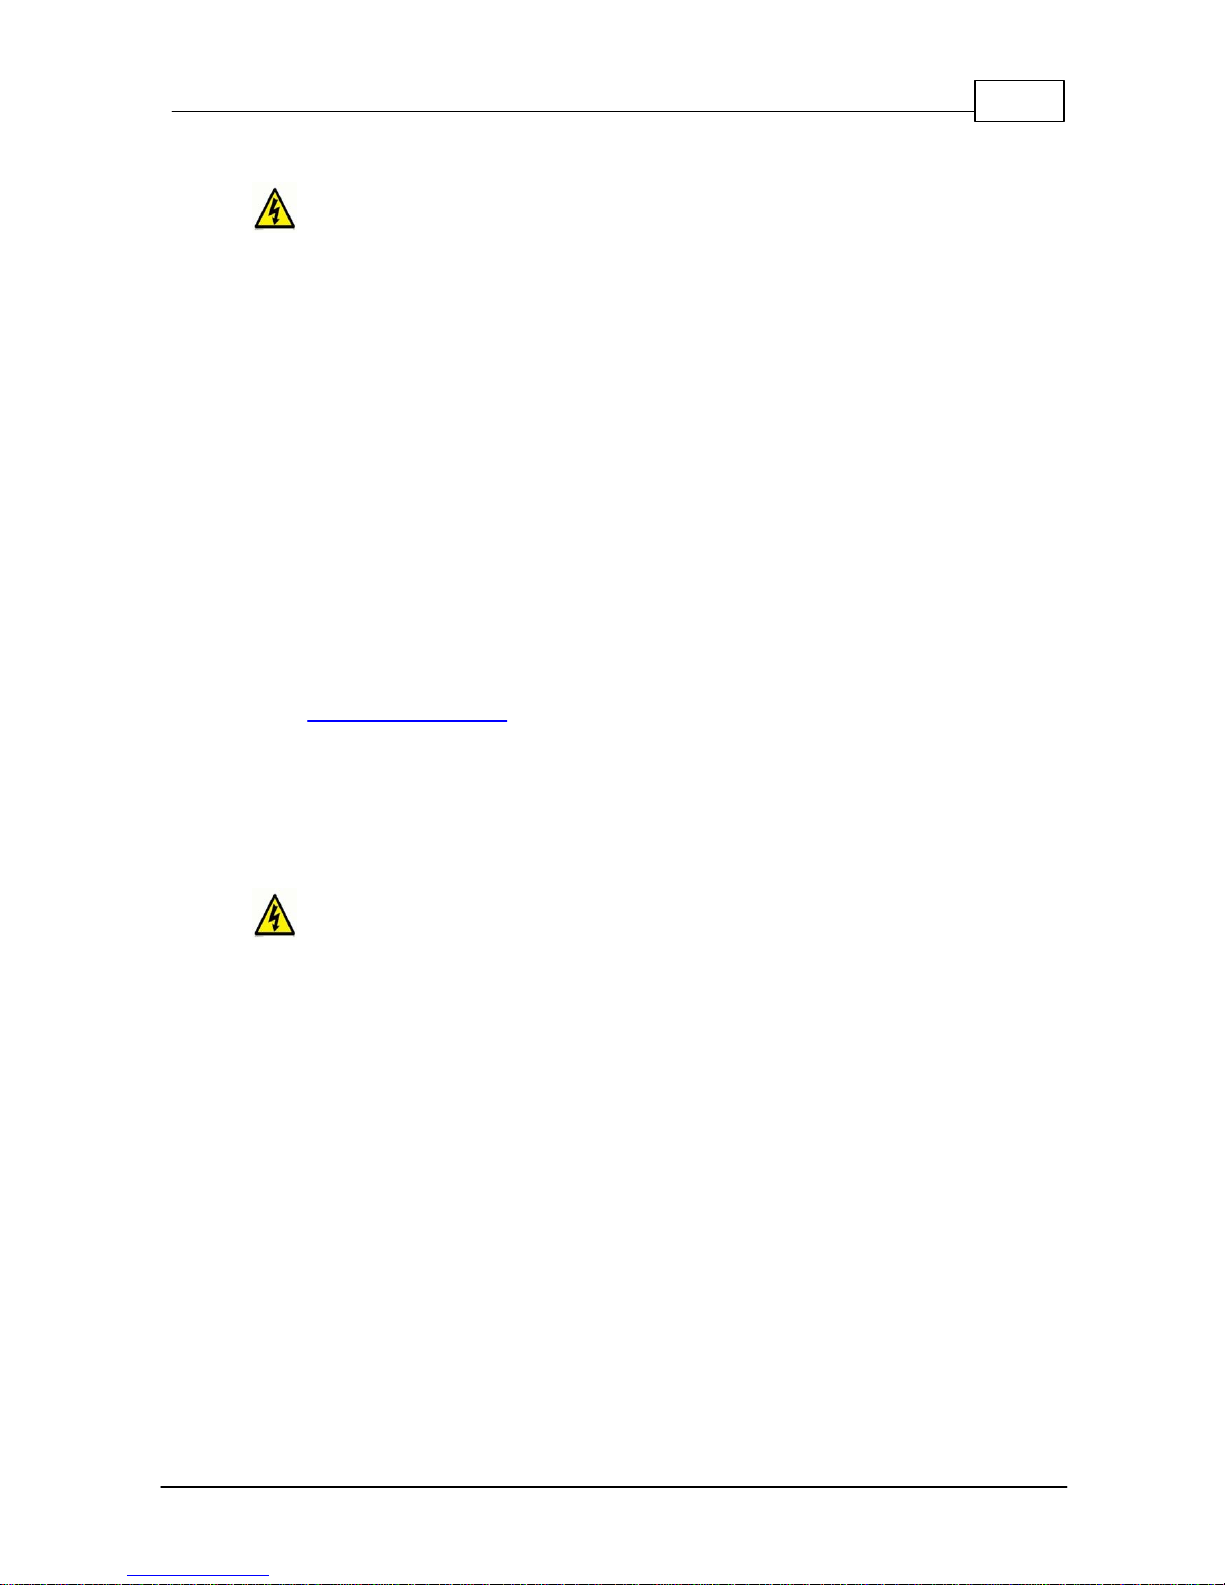
Supplementary ground connection
A supplementary ground terminal is provided on the codec to connect the unit to a ground
connection. The ground terminal has an M4 stud with M4 retaining nuts and is compatible
with all grounding wires. Remove only NUT 2 to connect your ground wire. The ground wire
must have a suitable lug. When refitting NUT 2 ensure that both NUT 1 & NUT 2 are
correctly tightened to establish and maintain a proper earth connection.
4 Genie and Merlin Quick Start Manual v.2.0
© Tieline Research Pty. Ltd. 2018
SAFE LISTENING GUIDANCE
WARNING: LISTENING TO AUDIO AT EXCESSIVE VOLUMES CAN CAUSE
PERMANENT HEARING DAMAGE. USE AS LOW A VOLUME AS POSSIBLE.
Over exposure to excessive sound levels can damage your ears resulting in permanent
noise-induced hearing loss (NIHL). Please use applicable health and safety authority
guidelines on maximum exposure limits. As a rule of thumb, avoid extended periods
listening to sound pressure levels (SPLs) of 85dBA or higher.
Warranty and Disclaimer
This equipment manufactured by Tieline is warranted by Tieline against defects in material and
workmanship for two years from the date of original purchase. During the warranty period, we will
repair or, at our option, replace at no charge a product that proves to be defective, provided you
obtain return authorization from Tieline and return the product, shipping prepaid, to Tieline. For return
authorization, contact Tieline's US or Australian office (see http://www.tieline.com/Contact-Us).
This Warranty does not apply if the product has been damaged by accident or misuse or as the
result of service or modification performed by anyone other than Tieline. With the exception of the
warranties set forth above, Tieline makes no other warranties, expressed or implied or statutory,
including but not limited to warranties of merchantability and fitness for a particular purpose, which
are hereby expressly disclaimed. Use of this product is subject to Tieline's SOFTWARE LICENSE
and WARRANTY conditions, which should be viewed at http://www.tieline.com/Support/Product-
Warranty before using this product.
In no event will Tieline, its directors, officers, employees, agents, owners, consultants or advisers
(its “Affiliates”), or authorized dealers or their respective Affiliates, be liable for incidental or
consequential damages, or for loss, damage, or expense directly or indirectly arising from the use of
any Product or the inability to use any Product either separately or in combination with other
equipment or materials, or from any other cause.
Whilst every effort has been made to ensure the accuracy of this manual we are not responsible for
any errors or omissions within it. The product specifications and descriptions within this manual will
be subject to improvements and modifications over time without notice, as changes to software and
hardware are implemented. Tieline takes no responsibility for any damage to equipment attached to
the codec.
5Warnings & Safety Information
© Tieline Research Pty. Ltd. 2018
2 Install the Codec and Configure Network Settings
Studio IP Streaming Setup for Tieline Audio Codecs
The following instructions are intended to help you configure your internet connection and Tieline
codecs at the studio to enable incoming calls over the internet from a remote Tieline codec. It is
assumed that you have a basic understanding of your IP network and how to configure IP devices. If
you have limited IT network knowledge, we recommend you engage the services of an IT
professional to install the public IP address and perform the Network Address Translation (NAT) and
port forwarding between the public internet and your private Local Area Network (LAN) at the studio.
Getting Started at the Studio
To perform a typical codec installation at the studio you will need to:
1. Contact your Internet Service Provider and organize a dedicated high speed broadband
connection at the studio for your codec with a public static IP address. Do not share this
connection with other devices.
2. Install your codec at the studio and attach an active RJ-45 LAN cable to the “LAN” or
“Ethernet” port on the rear of the codec. Please note:
· The green LED underneath the “LAN” or "Ethernet" port will illuminate and the orange
LED will flash steadily if you are connected to an active LAN connection.
· The Genie and Merlin families of IP codecs support two simultaneous Ethernet
connections.
3. If you are connecting a single codec to a router without a firewall you can enter the public IP
address, Subnet Mask and Gateway directly into the codec and your work is done. Note:
your Telco should be able to provide this information.
4. Alternatively, if you are connected to a router with a firewall, configure Network Address
Translation (NAT) in your router. NAT is performed between the public internet and your
private Local Area Network (LAN) by your router. Your remote codec sends IP data packets
to the studio router's public static IP address and the router performs NAT, which forwards
these data packets to the private IP address allocated by the router to your codec. As part
of this process we recommended you:
· Connect to your router using a web-browser.
· Configure it to allocate a static private IP address for each codec.
Important Note: The IP address may change if the codec is allocated a DHCP IP
address by the router and it loses power or is temporarily disconnected from the LAN.
This will cause problems for remote codecs attempting to dial and connect.
5. Ensure your router's firewall is configured with the relevant TCP and UDP IP ports open to
allow data traffic between your codec and the remote codec. The process is fairly simple if
you use the following procedure:
a. Connect to your router using a web-browser.
b. Navigate to https://portforward.com/router.htm
c. Select your router manufacturer from the list.
d. Next, select your router model from the list.
e. Follow the instructions to complete port forwarding. Note: It is necessary to select the
device you are configuring in the drop-down "Application" menu (usually step 4). Select
"Tieline Bridge-IT", "Tieline-G3" or "Tieline -G5" to suit the codec you are configuring.
6. Visit www.portforward.com and download the port checking application to verify your router's
ports are open.
7. Configure the static IP address in your codec using the instructions in the next section. To
allow multiple codecs to share a single public static IP address behind a firewall and route
6 Genie and Merlin Quick Start Manual v.2.0
© Tieline Research Pty. Ltd. 2018
the calls correctly, your codecs and the firewall need to be configured similarly to the
example diagram which follows. Ensure the port, IP address, Subnet Mask and Gateway
settings in your codecs match those configured in your router.
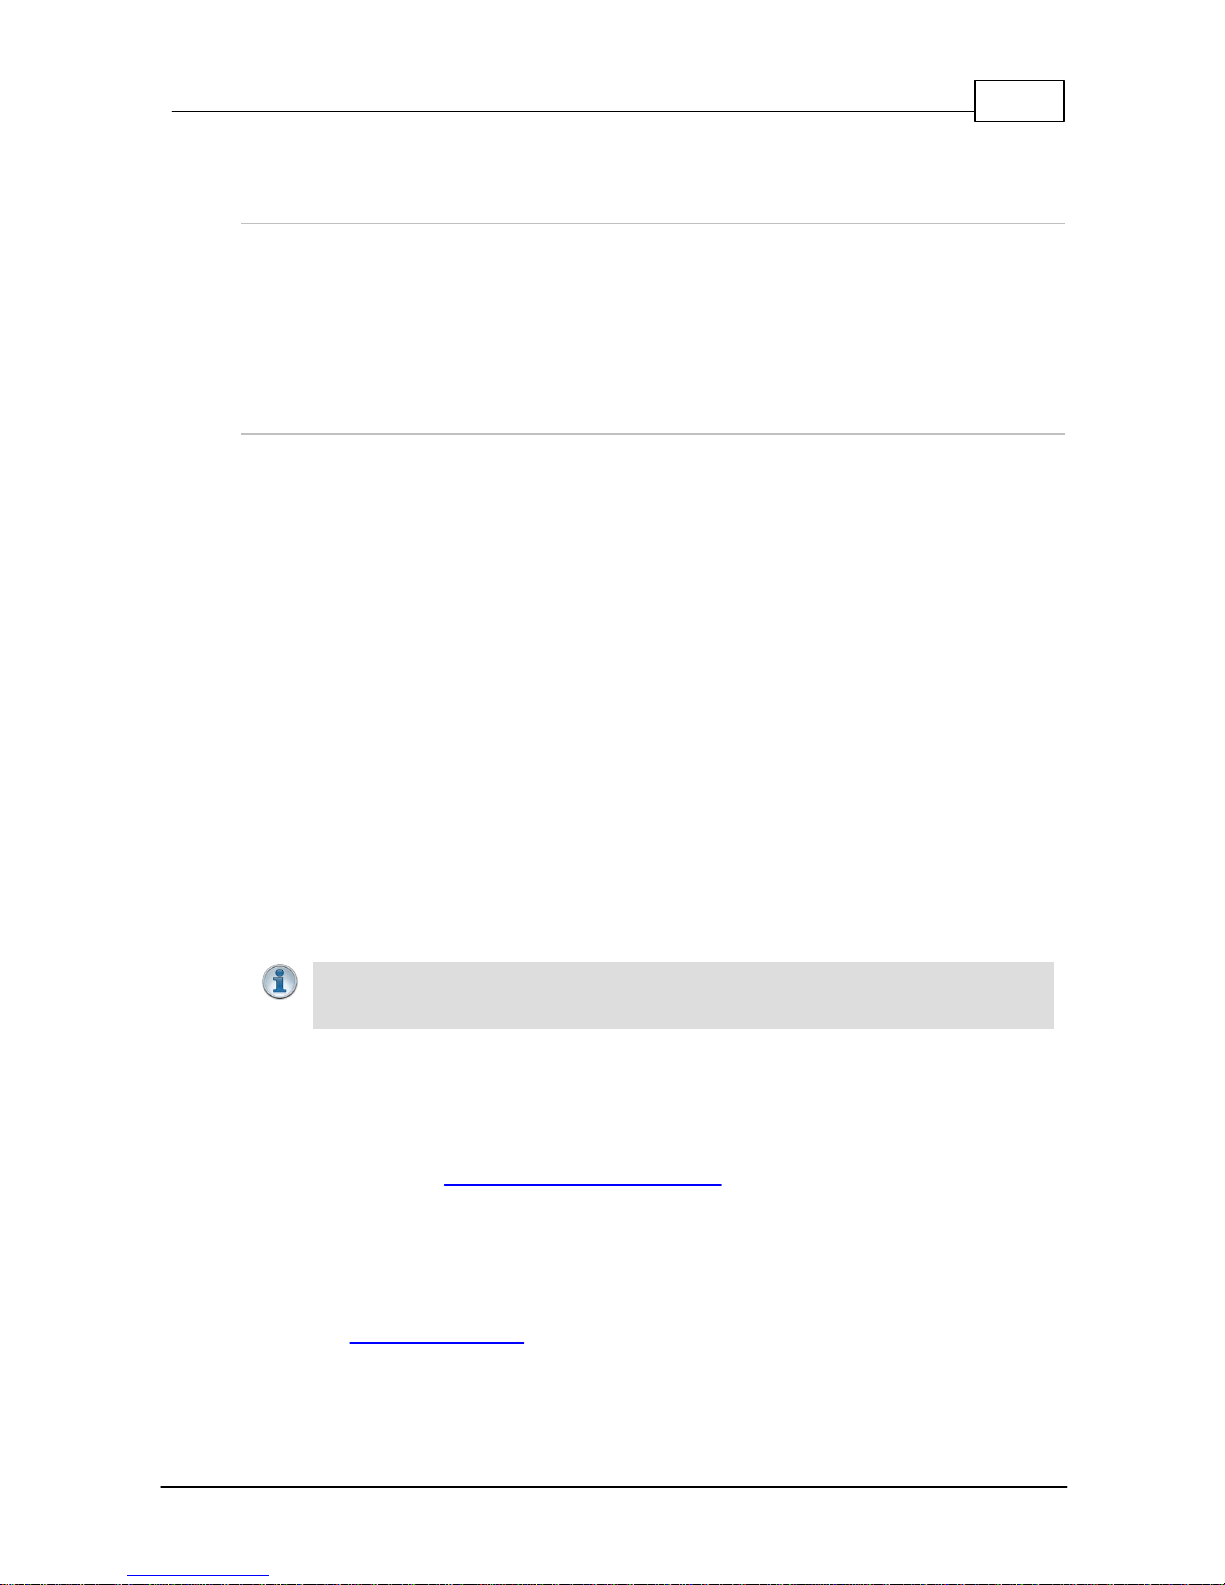
Port Forwarding to 3 Studio Codecs Sharing a Public Static IP Address
Important Note:
· The most common studio configuration issue is a firewall which blocks the incoming
and/or outgoing TCP and UDP ports, or not configuring NAT and port forwarding
correctly. The following table lists the firewall ports you need to open for each model of
Tieline codec if they are dialing your router at the studio. If the remote codec is also
connected to a LAN with a firewall you may also need to open the ports at the remote
end of the link to connect successfully.
· Some firewalls require symmetric port configuration. The codec supports configuration
of the "send" audio port (codec port at the remote end of the link to which you are
sending audio) and "return" audio port (port used by the local codec to receive audio
from the remote codec).

7Install the Codec and Configure Network Settings
© Tieline Research Pty. Ltd. 2018
Firewall Ports
Commander G3 /
i-Mix G3
Bridge-IT / Bridge-IT
XTRA
Merlin and Genie
Codec Families
ViA Codec
Cloud
Codec
Controller
TCP
UDP
TCP
UDP
TCP
UDP
TCP
UDP
TCP
IP1
Session
Port: 9002
IP1 Audio
Port:
9000
Session
Port
(Sess):
9002
Audio
(Proto):
9000
Session
Port:
9002
Audio Port
Stream 1:
9000
Session
Port:
9002
Audio Port
Stream 1:
9000
HTTP
80
IP2
Session
Port: 9012
IP2 Audio
Port:
9010
Web-GUI:
80
SIP
Session:
5060
Alternative
Session:
9012
Audio Port
Stream 2:
9010
Alternative
Session:
9012
Audio Port
Stream 2:
9010
HTTPS
443
Toolbox
Software:
5550
Toolbox
Software:
5550
Alternative
Session:
9012
SIP Audio:
5004
Web-GUI:
80
Audio Port
Stream 3:
9020
Web-GUI:
80
SIP
Session:
5060
SIP
Session:
5060
Alternative
Web-GUI:
8080
Fuse-IP
8999
Alternative
Web-GUI:
8080
Audio Port
Stream 4:
9030
Alternative
Web-GUI:
8080
SIP Audio:
5004-5054
SIP
Audio:
5004
TLS/SSL
443
TLS/SSL
443
Audio Port
Stream 5:
9040
TLS/SSL
443
Fuse-IP
8999
Audio Port
Stream 6:
9050
SIP
Session:
5060
SIP Audio:
5004-5054
Fuse-IP
8999
Configuring a Static Public or Private IP Address in Genie, Merlin and
Bridge-IT (v.2.x firmware) Codecs
Static IP addresses are fixed addresses which are recommended for studio installations. Using a
static IP address ensures remote codecs can connect reliably using the same IP address over time.
To enter a static IP Address into the codec for NAT:
1. Press the SETTINGS button.
2. Select Network and press the button.
3. Use the down navigation button to select ETH1, ETH2, Wi-Fi or a VLAN interface.
4. Select Config and then Usage and then the appropriate control and/or streaming mode for
the connection. Next, press the button.
5. Select IPv4 Mode and press the button.
6. Select Static and press the button.
7. Navigate to IPv4 Static and enter the IP address, then press the button.
8. Navigate to IPv4 Subnet and enter the Subnet Mask, then press the button.
9. Navigate to IPv4 Gateway and enter the Gateway details, then press the button.
 Loading...