

Page 1
“G5”
Stainless Steel Disc
Brake Owner’s Manual
Page 2

Stainless Steel Disc Brake Instructions
The advantages disc brakes have over drum brakes include:
• Greater fade resistance • Self-cleaning
• Self-adjusting • Less maintenance
• Greater stopping power • Easy visual inspection without removing any parts
Tie Down Engineering G5 Stainless Steel disc brakes with aluminum caliper have
many exclusive features not found on automotive type brakes modified for trailer use.
Please visit our web site www.tiedown.com for further information on features and benefits.
G5 Stainless Steel disc brakes are designed to activate when the vehicle’s brakes
are applied. As the vehicle stops or slows, the momentum of the trailer pushes
forward developing pressure in the actuator (master cylinder), used to apply pressure to
the brakes.
Operating Information
Read and understand the towing instructions for your tow vehicle, trailer and actuator.
Check your trailer frequently for any leaks in the hydraulic system, which includes the
actuator, brake lines and brakes.
If the trailer is used in salt water, it is highly recommended that you rinse off the
brakes with fresh water after each use to reduce the effects of saltwater corrosion and
salt build-up (residue).
Your trailer should tow easily. Disc brakes operate at a higher temperature than
drum brakes. This is normal and is very similar to the way disc brakes operate on your
vehicle. If for any reason your trailer does not tow easily or wants to veer to one side,
stop and investigate immediately and solve the problem.
Towing a trailer (even a trailer with brakes) puts an added load on the tow vehicle’s
handling and braking capabilities. Do not follow to closely; you will need extra distance
to maneuver and to stop.
Towing downhill puts added stress on both the tow vehicle and the trailer. Slow
down before you start on an incline and maintain a controlled downhill speed with
repeated application of brakes followed by a cooling period when brakes are not
applied. It is very important to start off with a slow speed and maintain it rather than
trying to slow down from a higher speed. Should you feel the brakes on the trailer or
tow vehicle are running hot or showing signs of fade, stop immediately on the side of
the road and allow the brakes to cool before resuming your trip.
Page 3

Stainless Steel Disc Brake Instructions
Should you feel that the tow vehicle brakes or trailer brakes are not working
properly; have the tow vehicle and trailer brake system inspected. Make sure your
trailer’s GVWR is within the tow vehicles capacity. If your trailer has multiple axles,
verify that the GVWR of the trailer does not exceed the capacity of the brakes, which
is 3750 lbs on 10-inch (5 lug) brakes and 6000 lbs on 12-inch (6 lug) brakes, per axle.
Some states require brakes on all axles.
Check with your state laws and the state laws of where you will be using your trailer
prior to towing.
After long trips or downhill towing, your brakes could become very hot and it is a
good idea to let them cool down before submerging in cold water. The change in
temperature of very hot brakes submerged in water creates additional stress on the
parts and could cause damage to your brakes.
Pads must be replaced when the friction material is 3/32°± or less. Original Tie
Down Engineering brake pads for the G5 Stainless Steel disc brakes have a ceramic
pad material and a stainless steel backing plate that aids in corrosion resistance.
Disc brakes require the use of flexible brake lines attached to the caliper. The calipers
“float” and should not be used with metal brake lines that will restrict movement and
cause overheating or brake failure. If you are replacing existing brakes and using the
existing metal brake lines, either replace metal brake lines with a Tie Down Engineering
brake line kit or add flexible extensions to the metal lines to connect to the disc brake
calipers.
Disc brakes require the use of an actuator designed for disc brakes. If you are
replacing drum brakes, you must also change the actuator to a disc brake model. Using
a drum brake actuator with disc brakes will cause overheating, loss of braking power
and possible brake failure.
Use DOT 3 brake fluid only. DOT 3 can be labeled as “synthetic”.
DO NOT USE SILICONE BASED BRAKE FLUID.
When backing a trailer with disc brakes, you must have a lockout device on the
actuator or preferably an electrically operated solenoid to stop brake pressure to the
disc brakes. The solenoid is mounted at the rear of the actuator, between the master
cylinder and brake line. The solenoid has a wire that is connected to your back up
lights. When the tow vehicle transmission is put in reverse, the reverse light voltage
activates the solenoid. This will either stop or redirect the brake fluid to keep the brakes
from operating while in reverse.
2
Page 4
Caliper
Mounting
Bracket
Slider Pin
“G5” Installation/Replacement Instructions for
9.6” 5-Lug Stainless Steel Disc Brakes
1. Elevate the trailer on a level surface using the trailer manufacturer’s instructions.
Always use jack stands for support. Do not depend on a jack to support the trailer.
Block wheels to keep trailer from rolling.
2. If installation is on a completed trailer, remove tire/wheel.
3. Disc Brakes require the use of flexible brake lines attached to the caliper. The
calipers “float” and should not be used with metal brake lines that will restrict
movement and cause overheating or brake failure. If you are replacing existing
brakes and have metal brake lines, either replace the metal brake lines with a Tie
Down Engineering flexible brake line kit or add flexible extensions to the metal lines
to connect to the disc brake calipers.
4. Remove existing brakes or hubs. Clean spindles with a soft cloth to remove old
grease and containments. Coat the spindle with a light coat of clean oil or grease to
allow a smooth installation of the hub/rotor.
5. Place the G5 hub/rotor on the spindle. Install the washer and castle nut supplied
with your axle, Rotate the hub while tightening the spindle nut to approximately
50 ft lbs. This translates into full hand pressure with a 12” long set of pliers or
12” long wrench.
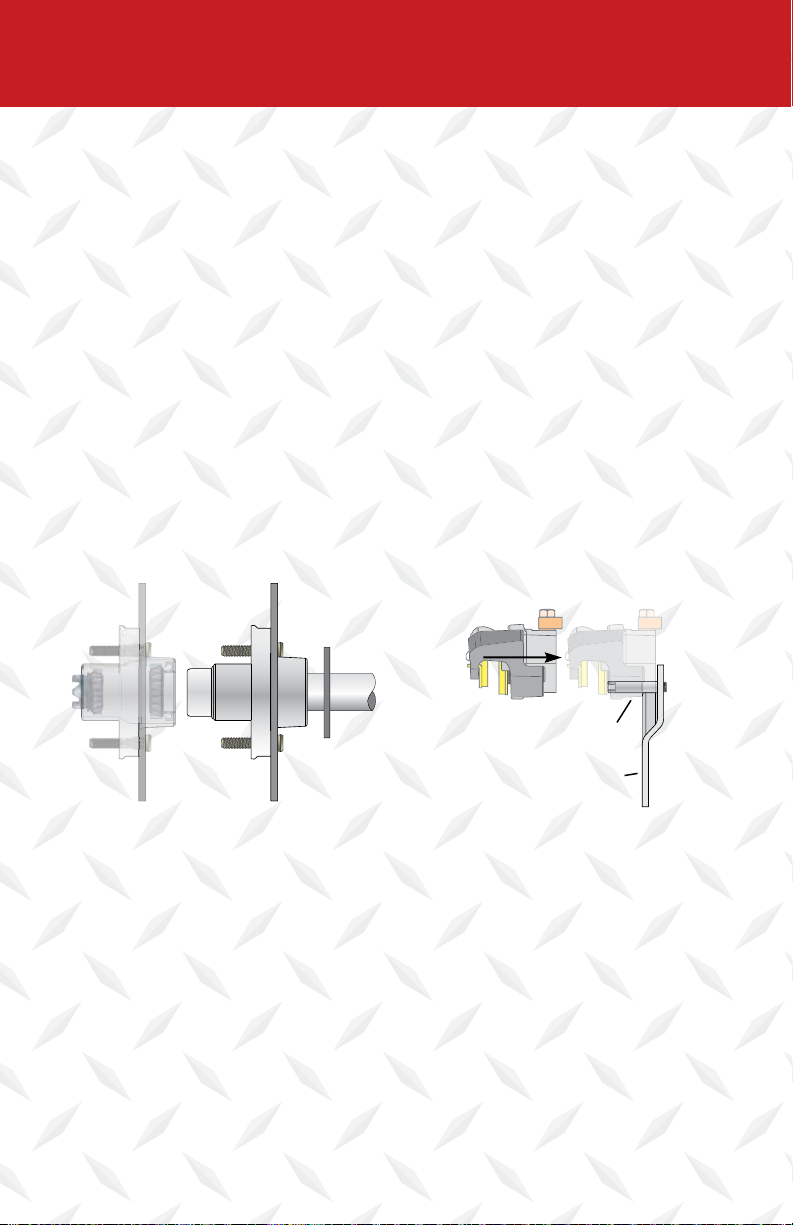
Rotor/Hub
Install rotor/hub on spindle Slide caliper onto the slider pins
6. Loosen the spindle nut to remove the torque, do not rotate hub.
7. Tighten the spindle nut until snug, backing out only to line up the locking tang
washer or cotter pin to the first available position.
8. Bend the locking tang tab or cotter pin in place.
9. Your G5 brakes come with pre-assembled mounting brackets and stainless steel
slider pins. DO NOT REMOVE SLIDER PINS. If the slider pins are removed for any
reason the threads must be cleaned and a new coat of “permanent” Loctite®
must be applied. Clean and apply Loctite® to threads on the mounting plate. Be
careful not to get Loctite® on slider pins or bushings. Torque slider pins
to 40 ft. lbs
3
Caliper
Slider Pin
Mounting
Bracket
Page 5

Bolt & Nyloc Nut
Bolt &
Nyloc Nut
Brake
Flange
Rotor/Hub
Caliper
Caliper
Mounting
Bracket
Slider Pin
Brake Lin
e
Caliper
Mounting
Bracket
Slider Pin
e
Brake Lin
Mounting
Bracket
Brake
Flange
Slide caliper/mounting bracket
10. Slide the assembled caliper onto the slider pins. Attach the assembled mounting
plate to the brake flanges on the axle, after sliding the caliper over the stainless
steel rotor. Preferred positions are 12:00, 9:00 and 3:00 “o-clock” or to the
backside. The brake flange will determine the exact positioning. Use 7/16”x 1-1/4”
zinc hex bolts, lock nuts/washers and torque to 40 ft. lbs.
11. Replace grease cap.
12. Caliper has a swivel inlet connector for the brake hose and a stainless steel bleeder
valve. The bleeder valve should have the top or highest position on the caliper.
Position the swivel brake connector so that the brake line easily connects to the
caliper. Tighten the bolt on the swivel connector to 20 ft. lbs.
13. Connect the flexible brake line to the swivel connector.
14. Repeat this assembly for the other wheels.
15. Install tire/wheel assembly(s), tighten wheel nuts to Trailer manufacturer or wheel
manufacture’s specifications. Test wheel for excessive tightness or excessive play.
Re-tension spindle nut if necessary.
16. Bleed brakes according to the trailer actuator’s instructions.
17. Road test vehicle in a safe place before traveling on main roads in traffic.
over rotor
Bolt mounting bracket to the
brake flange
Bolt &
Nyloc Nut
Brake
Flange
Bolt & Nyloc Nut
VERY IMPORTANT,
RE-CHECK LUG NUTS FOR PROPER TORQUE AFTER 25 MILES OF USE.
4
Page 6

Rotor/Hub
Rotor/Hub
“G5” Installation/Replacement Instructions for
12” 6-Lug Stainless Steel Disc Brakes
1. Elevate the trailer on a level surface using the trailer manufacturer’s instructions.
Always use jack stands for support. Do not depend on a jack to support the trailer.
Block wheels to keep trailer from rolling.
2. If installation is on a completed trailer, remove tire/wheel.
3. Disc Brakes require the use of flexible brake lines attached to the caliper. The
calipers “float” and should not be used with metal brake lines that will restrict
movement and cause overheating or brake failure. If you are replacing existing
brakes and have metal brake lines, either replace the metal brake lines with a Tie
Down Engineering flexible brake line kit or add flexible extensions to the metal lines
to connect to the disc brake calipers.
4. Remove existing brakes or hubs. Clean spindles with a soft cloth to remove old
grease and containments. Coat the spindle with a light coat of clean oil or grease to
allow a smooth installation of the hub/rotor.
Mounting
Bracket
Brake
Flange
Bolts & Nyloc Nuts
Install rotor/hub on spindleBolt the mounting bracket to the
front of the brake flange
5. Attach the mounting bracket to the front of the brake flanges on the axle.
Preferred positions are 12:00, 9:00 and 3:00 “o-clock” or to the backside. The
brake flange will determine the exact positioning. Use 7/16”x 1-1/4”
zinc hex bolts, lock nuts/washers and torque to 40 ft. lbs.
6. Place the G5 hub/rotor on the spindle. Install the washer and castle nut supplied
with your axle, Rotate the hub while tightening the spindle nut to approximately
50 ft lbs. This translates into full hand pressure with a 12” long set of pliers or
12” long wrench.
7. Loosen the spindle nut to remove the torque, do not rotate hub.
8. Tighten the spindle nut until snug, backing out only to line up the locking tang
washer or cotter pin to the first available position.
9. Bend the locking tang tab or set cotter pin in place.
10. Replace dust/grease cap.
5
Page 7

Brake
Flange
Rotor/Hub
Mounting
Bracket
Caliper
Slider Pin
Bolts & Nyloc Nuts
Swivel Brake
Line Connector
Brake Lin
e
Rotor/Hub
e
Swivel Brake
Line Connector
Brake Lin
Slider Pin
Slide the caliper over the
mounting bracket and rotor
11. Slide the G5 caliper over the rotor and between both brake pads
12. Install slider pins. Clean and apply Loctite® to threads on the mounting plate. Be
careful not to get Loctite® on slider pins or bushings. Torque slider pins to 40 ft.
lbs. NOTE: The slider pins come pre-coated with Loctite®. If the slider pins are
installed then REMOVED for any reason the threads must be cleaned and a new coat
of “permanent” Loctite® must be applied.
13. Caliper has a swivel inlet connector for the brake hose and a stainless steel bleeder
valve. The bleeder valve should have the top or highest position on the caliper.
Position the swivel brake connector so that the brake line easily connects to the
caliper. Tighten the bolt on the swivel connector to 20 ft. lbs.
14. Connect the flexible brake line to the swivel connector.
15. Repeat this assembly for the other wheels.
16. Install tire/wheel assembly(s), tighten wheel nuts to Trailer manufacturer or wheel
manufacture’s specifications. Test wheel for excessive tightness or excessive play.
Re-tension spindle nut if necessary.
17. Bleed brakes according to the trailer actuator’s instructions.
18. Road test vehicle in a safe place before traveling on main roads in traffic.
Install and tighten the slider pins
to 40 ft. lbs. Attach brake lines
VERY IMPORTANT,
RE-CHECK LUG NUTS FOR PROPER TORQUE AFTER 25 MILES OF USE.
6
Page 8

Caliper
t
Swivel Brake Line Connector
Slider Pin
Intergal Style Rotor
11.5” & 12”
G5 Stainless
Steel Disc
Brake
Assembly
Stainless
Steel
Rotor
Caliper
Intergal Style Rotor
Mounting
Bracket
Spindle
Nut/Bolt
Brake
Flange
9.6”
G5 Stainless
Steel Disc
Brake
Assembly
Swivel Brake
Line Connector
Slider Pin
Mounting
Bracket
Nut/Bol
Brake
Stainless
Steel
Rotor
7
Flange
Page 9

Replacing Brake Pads
1. Elevate the trailer on a level surface using the trailer manufacturer’s instructions.
Always use jack stands for support. Do not depend on a jack to support the trailer.
Block wheels to keep trailer from rolling.
2. Remove the tire/wheel assembly. Inspect the rotor surface. Check for excessive
wear or grooves that may affect braking. Original rotor thickness is .313 in.;
minimum thickness is .25 in.
3. Inspect brake pads. Minimum thickness is 3/32°±. Pads should be replaced if less
then minimum thickness.
9.6” G5 Brake Pad Replacement
4. Remove the caliper by first removing the four mounting bolts from the mounting
bracket and brake flange. Lift the mounting bracket and caliper assembly off of the
rotor. Be careful to hold the caliper in place so that it does not fall and pull on the
brake hose The inside pad is spring loaded in the caliper piston. Pry this pad out
gently with a flat blade screwdriver. The outside pad is held in place with a center
mounted spring tab. After removing the inside pad, the outside pad can be pulled
from the caliper.
5. Clean the rotor with a brake cleaning spray. Replace brake pads in the reverse
order. For ease of assembly, make sure the piston in the caliper is fully depressed
into the caliper.
6. Re-attach the mounting bracket to the axle brake flange, sliding the caliper over
the rotor. Tighten the four mounting bracket bolts. Torque bolts to 40 lbs.
7. Should you remove the slider pins for any reason, clean the threads on the slider
bolt and mounting plate and apply a coating of Loctite or similar brand of thread
lock. Tighten slider pins to 40 ft lbs. DO NOT REASSEMBLE WITHOUT APPLYING
LOCTITE® TO THE SLIDER PIN THREADS AND THE BACKING PLATE. SLIDER
PINS WITH OUT LOCKTITE® APPLIED COULD BACK OUT AND CAUSE
PERMANENT DAMAGE TO YOUR BRAKES AND TRAILER.
12” G5 Brake Pad Replacement
4. Remove the caliper by first removing the two slider pins from the mounting
bracket. Be careful to hold the caliper in place so that it does not fall and pull
on the brake hose. The inside pad is spring loaded in the caliper piston. Pry this
pad out gently with a flat blade screwdriver. The outside pad is held in place with
a center mounted spring tab. After removing the inside pad, the outside pad can be
pulled from the caliper.
5. Clean the rotor with a brake cleaning spray. Replace brake pads in the reverse
order. For ease of assembly, make sure the piston in the caliper is fully depressed
into the caliper.
6. Re-attach the caliper to the mounting bracket, sliding the caliper over the rotor.
Before installing the slider pins, the threads must be cleaned and a new coat
of “permanent” Loctite® must be applied. Clean and apply Loctite® to threads
on the mounting plate. Be careful not to get Loctite® on slider pins or bushings.
Torque slider pins to 40 ft. lbs.
8
Page 10

17
2D
16
2D
15
14
4A
4B
5
4C
4D
2
2A
2B
2C
3
1
11
13
12
10
9
8
6
3,500# Axle,
9.6” Rotor
Mounting Bracket
9
6
6
6
7
7
6,000# Axle,
11.5” Rotor
Mounting Brackets
6,000# Axle,
12” Rotor
Mounting Brackets
7
Page 11

G5 - Stainless Steel Disc Brake Kits 9.6” 11.5” 12”
# Description 3,500# 6,000# 6,000#
1 Stainless Steel Rotor w/GalvXL Hub 46911X 46914XA 46912X
2 Caliper Assembly 46910A 46910A 46910A
2A Piston 42080AZ 42080AZ 42080AZ
2B Piston Rubber Boot 17472 17472 17472
2C Piston Seal 17447 17447 17447
2D Bronze Busings 10010 10010 10010
3 Ceramic/Stainless Steel Brake Pads 11350/51 11350/51 11350/51
4 Adjustable Banjo Assembly 11341 11341 11341
4A Stainless Steel Banjo Bolt 11338 11338 11338
4B Copper Crush Washer 11339 11339 11339
4C Brass Banjo Fitting 11348 11348 11348
4D O-Ring 17473 17473 17473
5 Stainless Steel Bleed Valve(1) 11246SS 11246SS 11246SS
6 Stainless Steel Slider Pins (2) 12114 12114 12114
7 Mounting Bracket
8 Dust Cap 17094 46494 46494
Super Lube Dust Cap 17093 46495 46495
Super Lube Rubber Grommet 46963 46963 46963
9 Cotter Pin 1/8” x 1-3/4” Zinc 10551 10551 10551
10 Castle Nut - 6 position 10665 10665 10665
10 Castle Nut - 12 position 10634 10634 10634
11 Washer - Flat Spindle 1” 10520 10520 10520
12 Bearing Outer (Cone) 1-1/16” (L44649) 11054 ---- --- Bearing Outer (Cone) 1-1/4” (15123) ---- 11056 11056
13 Cup Outer (Race) 1-1/16” (L44610) 11055 ---- --- Cup Outer (Race) 2-1/2” (15245) ---- 11066 11066
14 Studs 1/2”- 20 x 2.0” OAL 11123 11133 11133
15 Cup Inner (Race) 1-3/8” (L68111) 11061 ---- --- Cup Inner (Race) 3.27” (25520) ---- 11067 11067
16 Bearing Inner (Cone) 1-3/8” (L68149) 11060 ---- --- Bearing Inner (Cone) 1-3/4” (25580) ---- 11064 11064
17 Seal - Triple Lip 1.72” (171255UC) 11088 ---- --- Seal - Triple Lip 2.25 (225255UC) ---- 11086 11086
with slider pins installed
44687GA 70518X 44688GA
Replacement Kits:
Ceramic Brake Pad Kit (Consumer Aftermarket) 81252
Ceramic Brake Pad Kit (OEM) 81114
Caliper Rebuild Kit 46304RB
1 - Piston (#2A)
1 - Piston Rubber Boot (#2B)
1 - Piston Seal (#2C)
2 - Bronze Busings (#2D)
10
Page 12

G5 Stainless Steel Disc
Brake Owners Manual
For up to date instructions visit
www.tiedown.com
TIE DOWN ENGINEERING
255 Villanova Drive S.W. • Atlanta Georgia 30336
(800) 241-1806 • (404) 344-0000 • Fax (404) 349-0401
ISO 9001:2008 Registered Firm
Trade, brand, names and drawings are the intellectual property of
TIE DOWN ENGINEERING. ©2014 TIE DOWN, Inc.
Manual #08134 (Rev. 11-25-14)
112514,c1154
 Loading...