

Page 1

Tie
Onyx 2, 3, 4 & VS
• Service and Programming Manual
Page 2
KELLATRONICS,
Page 3
TABLE OF CONTENTS
Section 1
Features
Table of Contents
Introduction.
Before Reading This Section
Using This Section
User-Programmable Features (VS Only)
Modular and Non-Modular
How to Use this Section With Section 2
....................................
............................l-l
.................................
.....................
.......................
.....................
Account Code Capability . . . . . . . , . . . . . . . . . . , . . . , . . . . . . 1-14
Enter an Account Code to classify your outside call.
Alphanumeric Display . . . . . . . . . . . . . . . . . . , . , . . . . . . , . .
The display telephone has an alphanumeric display for feature status
messages.
Alternate Attendant. . . . . . , . . . . . . . . . . . . . . . . . . . . . . . . .
The attendant can forward calls to another
Alternate Attendant, Attendant Console (ONYX IV) . . , , . . . . . . . .
The attendant with an Attendant Console can forward calls to an Alternate
Attendant group.
Analog Station Interface . . . . . . . . . , . . . . . . . . . . . . . . . . . . I’
Have standard 2500 set DTMF service at any extension port.
Attendant Console (ONYX IV) . . . . . . . , . . . . . . . . . . . . . . . .
To speed call processing, the attendant can use a special Attendant Console.
Attendant Positions . . . . . . . . . , . . . . . . . . . . . . . . . . . . . . . .
Attendants have some unique features.
Automated Attendant
Refer to the Operator Assistance and Voice Mail Compatibility features.
Automatic Answer (ONYX IV) . . . . . . . . . . . . . . . . . . . . . . .
Attendants with can have Automatic Answer -just like attendants
with Attendant Consoles.
Automatic Call Distribution . . . . . . . . . . . . . . . . . . . . . . . . . . .
ACD distributes incoming calls among ACD group members.
Automatic Call Distribution (ONYX IV) . . . . . . . . . . . . . . . . . . .
ONYX IV provides enhanced Automatic Call Distribution.
Automatic Fault Reporting (With Remote Maintenance/Programming) . . l-33
The system automatically reports faults if they occur.
Automatic Handsfree . . . . . . . . . . . . . . . . . . . . . . . . . . . . . . .
Place or answer a call by just pressing a key.
Automatic (ONYX IV) . . . . . . . . . . . . . . . . . . . . . .
An or ESL extension can automatically a programmed
destination when the user lifts the handset.
Automatic Route Selection . . . . . . . . . . . . . . . . . . . . . . . . . . . .
ARS routes calls according to the digits a user dials.
Background Music . . . , . . . . . . . , . . . . . . . . . . . . . . . . . . . . .
and ESL sets can broadcast music through their speakers.
Battery Backup. . . . . , . . . . . . . . , . . . . . . . . . . . . . . . . . . . .
T’he system can operate normally during a power failure.
Call Coverage Keys . . . . . . . . . . . , , . . . . . . . . . . . . . . . . . . . l-43
Simplify extension coverage with Call Coverage Keys.
Call Forwarding . . . . . , . . . . . . . . . . . . . . . . . . . . . . . . . .
Redirect calls to another extension.
Call Forwarding Cancel . . . . . . . . . . . . . . . . . . . . . . . , , . . . . . l-48
Cancel all Call Forwards in the system (attendants only).
Call Parking. . . . . . . . . . . . , . . . . . . . . . . . . . . . . . . . . . . . . l-49
Place an outside call in a waiting state, so it can be picked up from another
phone.
l-l
l-l
1-2
l-42
.
Issue 1-O
FEATURES l-i
Page 4

TABLE OF CONTENTS
Table of Contents (Cont’d)
Call Timer. . . . . . . .
Time outside calls (display . . . . .
Call Waiting (Camp-On). . . . . . . . . . . . . . . . . . . . . . . . . . 1-53
Wait in line for a busy extension without hanging up.
Callback . . . . . . . . . . . , . . . . . .
Leave a request for a return call at a busy extension.’ . .
l-55
Central Office Calls, Answering . . . . . . . . . . . . . . . . . . . . . . . . . l-57
Answer outside calls.
Central Office Calls, Placing . . . . . . . . . . . . . . . , . . . . . . . . . . .
Place outside calls.
Centralized Attendant Service . . , .
An attendant in a hub system can
Compatible Feature Keys . . . . . . . . . .
Customize programmable keys with
Class of Service . . . . . . . . . . . . . . . . . .
Sets various features and dialing options for .
trunks.
Conference . . . . . . .
Data.
. . . . . . . . . . . .
The system provides
. . . . . . . . . . . . . . . . . . . . . . . .
DP and DTMF Compatibility . . . . . . . . . . . . . .
The system works with Dial Pulse and tone . .
Pulse to Tone Conversion.
Dialing Number Preview . . . . . . . . . .
Dial, review and correct your number the’
. .
systems.
. . . . . . . . . . . .
. S-67
. . . . . . . .
1-61
l-64
.l-65
l-69
.l-71
. l-72
Direct Inward Dialing (DID) . . . . . . . . . . . . . . . . . . . . . . . . . . , l-73
Outside callers can directly dial extensions.
Direct Inward Line (DIL) . . . . . . . . . . . . . . . . . . . . . . . . . . . .
A trunk can ring an extension directly.
Direct Inward System Access (DISA) . . . . . . . . . . . , . . . . . . . . . .l-78
Outside callers can directly access system features.
Direct Station Selection, DSS Console . .
A DSS Console has 80 keys for one-button
features.
.
Direct Station Selection, Extension . . . . . . . . . . . . . . . . . . . . . . . 1-83
From your 30-button have simplified extension calling and Transfer.
Direct Trunk Access . . . .
Seize an individual
1-85
Directed Call Pickup . . . . . . . . . . . , . . . . . . . . . . . . . . . . . . . . l-86
Intercept a call ringing another extension.
Directory Dialing , . . . , . . . . . , . . . . . . . . . . . . . . . . . . . . . .
Use Speed Dial or Intercom by selecting a name instead of dialing.
Directory Dialing (ONYX IV). . . . . . . , . . . . . . . . . . . . . . . . .
An Attendant Console or user can have a specially programmed key
for Intercom Directory Dialing.
Distinctive Ringing, Tones and Flash Patterns . . . . . . . . . . . . . . . .
Each extension provides audible and visual call status signals.
Do Not Disturb. . . . . . . . . . . . . . . . . .
Your extension can block Page, ringing and .
announcements.
. . . .
l-90
Dual Line Appearance (ONYX IV) . . . . . . . . . . . . . . . . . . . . . .
Have two line appearance keys for placing and answering calls.
Equal Access Compatibility . . . . . . . . . . , . . . . . . . . . . . . . . . .
The system is compatible with Equal Access dialing, has it.
Extended Ringing. . . . . . . . . . . . . . . . . . . . . . . . . . . . . . . . . .l-94
Unanswered calls can ring 15 times before the system reroutes them.
Extension Hunting . , . . . , , . . . . . . . . . . . . . . . . . . . . . . . . . .
Hunting routes calls to a predefined group of extensions.
l-ii FEATURES
Issue 1-O
Page 5
TABLE OF CONTENTS
Table of Contents (Cont’d)
External Alerting Devices. . . . , . . . . . . . . . . . . . . . . l-100
can customer-provided alerting devices.
Flash . . . . .
Flash a trunk access
l-102
Flexible Numbering Plan . . . . . . . . . . . . . . . . . .
The administrator can change the digits users dial to access features.
Forced Trunk Disconnect . . . . . . . . . . , . . . . . . . l-105
Disconnect another extension’s active outside call.
Group
Group
Group
Call Pickup. . . . . . . . . . . . . . . . . . . . . . . . . . . . . . l-107
Answer a call ringing an extension in a pickup group.
Listen . .
Talk on the
telephone speaker.
.
Ring (Ring Groups) . . . . . . . . . . . . . . . . . . , . . . . . . l-l 10
Extensions can be in Ring Groups for answering calls.
Handsfree (Speakerphone) and Monitor . . . . . . . . . . . , . . . . . . . . l-l 12
Use the speaker and microphone in the telephone (instead of the handset).
Headset Compatibility . . . . . . . . . . . . . . . . . . . . . . . . . . . . .
Use a customer-provided headset instead of the handset.
Put a call in a temporary waiting state.
14
Hotline. . . . . . . . . . . . . . , . , . , . , , . , , . . . . . . . . . . . . .
Get one-button calling and Transfer to another extension.
Intercept of Calls. . . . . . . . . . . . . . . . . . . . . . . . . . . . . . . .
The system may intercept (prevent) certain types of calls.
Intercom. . . . . . . . . . . . . . . . . . . . . . . . . . . . . . . . . . . . . . l-122
Call any other extension in the system.
Intrusion (Barge-In). . . . . . . . . . . . . . . . . , . . . . . . . . . . . . . J-125
Break into another user’s conversation.
Last Number Redial . . . . . . . . . . . . . , . . . . . . . . . , . . . . . . . J-127
Quickly the last number you dialed.
Least Cost Routing (Hybrid) . . . . . . . . . . . . . . . . . . . . . . . . . .
LCR
routes and restricts calls user’s dial.
Line (Trunk) Queuing. . . . . . . . , . . . . . . . . . . . . . . . . . . . . . l-132
Wait in line for a busy trunk or trunk group to become free.
Line (Trunk) Rotaries (Hybrid) . . . . . . . . . . . . . . . . . . . . . . . . . l-134
Place a call over a trunk in a group, rather than a specific trunk.
Loop Keys. . . . . . . . . . . . . . . . . . . . . . . . . . . . . . . . . .
Loop keys simplify placing
Meet-Me Conference. . . . . . . . . . . . . . . , . . . . . . . . . . . . . .
Set up a Conference with two other inside parties.
Message Waiting. . . .
Leave an indication
Microphone Mute . . . . , . . . . . . . . . . . . . . . . . . . . . . . . . . .
Turn off your phone’s Handsfree microphone at any time.
Multiple Directory Numbers (ONYX IV) , . . . . . . . . . . . . . . . .
You can have more than one extension number for answering calls.
Music On Hold. . . . . . . . . . . . . . , . . . . . . , . . . . . , . . , . . . l-142
Have music play to calls on Hold.
Night Answer (Off-Hours Ringing) . . . . . . . . . . . . . . . . . . . . . .
The attendant can put the system in the night mode. This can activate
Assigned Night Answer or Universal Night Answer.
Non-Blocking Architecture . . . . . . . . . . . . . . . . . . . . . . . . . . . 1-146
All extensions and trunks can be on calls simultaneously, without blocking.
Off-Hook Signaling . . . . . . . . . . . . . . . . . . , . . . . , . . . . . . . .l-147
Send an off-hook signal to a busy
Off-Premise Extension . . . . . . . . . . . . . . . . . . , , . . . , . . . . . . l-150
The system provides connections for Off-Premise Extensions.
and answering trunk calls.
. . 1-139
Issue 1-O FEATURES
l-iii
Page 6
TABLE OF CONTENTS
Table of Contents
Operator Assistance (OPA) . . . . . . . . . . . . . . . . . , . . . l-163
OPA answers calls and provides dialing options to callers [not available in
Paging. . . . . . . . . . . . . . . . . . . . . . . . . . . . J-167
Broadcast announcements to other extensions external
speakers.
Compatibility. . . . . . . . . . . . . . . .
The system can connect to lines.
Personal Greeting. . . . . . . . . . . . . . . . . . . . . . . . . . . l-173
Record a Personal Greeting for incoming callers (not available in VS).
Prime Line Selection . . . . . . . . . . . . . . . . . . . . . . . . . l-175
Place or answer an outside call by just lifting the handset.
Privacy. . . . . . . . . . . . . . . . . . . , . . . . . . . . . . , . . . l-177
Privacy blocks incoming Intrusion attempts.
Privacy Groups . . . . . . . . , . . . . . . . . . . . . . . . . . . . . . . . . l-178
Easily join another Privacy Group member’s outside call.
Private Line. . . . . . . . . . . , . . . . . . . . . . . . . . . . . . , . . . l-180
Have a Private Line for placing and answering calls.
Programmable Keys, . . . . . . . . . . . . . . . . . . . . . . . . . . . . . . l-182
Programmable keys simplify placing and answering calls and using certain
features.
Release Key. . . . . . . . . . . . . . . . . . , . . . . . . . . . . . . . . . . . l-184
Disconnect a call by pressing the Release key, rather than hanging up.
Removing Trunks and Extensions From Service . . . . . . . . . . . . .
The attendant can remove problem trunks and extensions from service.
Reverse Voice Over (ONYX IV). . . . . . . . . . , , . . . . . . . . . .
While on a call, make a private Intercom call to an idle co-worker.
Ringing Line . . . . . . . , . . . . . . . . . . . . . . . . . .
Answer a ringing call by just lifting the handset.
Save. , . . . . , . . . . . . . . . . . . . . . . . . . , . . . . . . . . . . . . . .l-189
Save your last outside number and easily redial it later on.
Selectable Display Messages. . . . . . . . . . . . . . . . , . . . . . . . . . . l-191
Select a preprogrammed display message for your phone that your
incoming callers see.
Silent Monitor. . . . . . . . . . . . . . . . . . . . . . . . . . . . . . . . . . l-193
Listen to the conversation at a busy extension.
Special Services and OCC Compatibility. . . . . . . . . . . . . . , . . . . l-195
The system is compatible with special long distance services such as
or GTE Sprint.
MCI
Special Trunk Interface . . . . . . . , , . . . . . . . . . . . . . . . . . . . l-197
The Special Trunk Interface provides circuits for connecting OPX, DID and
tie trunks (except in VS).
Speed Dial. . . . . . . . . . . . . , . . . . . , . . . . . . . , . . . . . . , . l-198
Get quick access to frequently dialed numbers.
Split. . . . . . . . , . . . , . . . . . . . . . , . . . . . . . . . . . . . .
Alternate between your current call and a new call.
Station Message Detail Recording, . . . . . . . , . . . . . . . . . . . . . . l-208
SMDR provides a record of the system’s calls.
System Identification . . . . . . . . . . . . . . . . . . . . . . . . . . . . .
For Automatic Fault Reporting, a four-line text field contains site
identification information.
System Programming Password Protection . . . . . . , . , . . . . . . . . . l-213
The system administrator must enter a password before programming.
System Reports, Diagnostics and Maintenance Utilities . . . . . . . . . .
Reports. diagnostics and utilities help a technician troubleshoot the system
from the programming terminal.
System Timers . , . . . . . . . . . . . , , . . . . . . . . . . . . . . . . . .
The system administrator can change the settings for the System
Timers.
Tandem Calls (Tandem . . . , . . . . . . . . . . . . . . . . . . . 1-219
Join two outside calls in a trunk-to-trunk Conference.
l-iv FEATURES
Issue 1-O
Page 7

TABLE OF CONTENTS
Table of Contents (Cont’d)
Tenant Service. . . . . . . . . . . . . . . . . . . . . . . . . . . .
The system administrator divide the system into different
Tie Lines. . . . . . . . . . . . . . . .
The system provides connection . . .
Time and Date Setting. . . . . . , . . . . . . . . . . . . . . . . . . . . . . . .
Time and Date appears on display and various reports.
Toll Restriction . . . . . . . . . . . .
Toll Restriction limits the . .
. . l-224
l-228
l-230
Management Reporting . . . . . . . . . . . . . . . . . . . . . . . . . l-233
The TMS report provides a record of call activity.
Traffic Management Reporting (ONYX IV) . . . . . . . . . . . . . . . . l-235A
ONYX IV offers enhanced TMS reports.
Transfer. .
Send
. . . . . . . . . . . . . . . . .
Voice Mail Compatibility . . . . . . . . . . . . . . . . . . . . . .
The system is fully compatible with Integrated Voice Messaging
l-236
. . 1-239
Voice Prompting Messages. . . . . . . . . . . . . . . . . . . . . . . . . . . l-244
Voice messages announce your call status (not available in VS).
Volume Controls. . . . . . . . . . . .
Adjust the speaker volume at . .
. l-246
Class of Service. . . . . . . . . . . . . . . . . . . . . . . . . . . . l-248
emporarily override Class of Service Dialing restrictions.
List of Illustrations
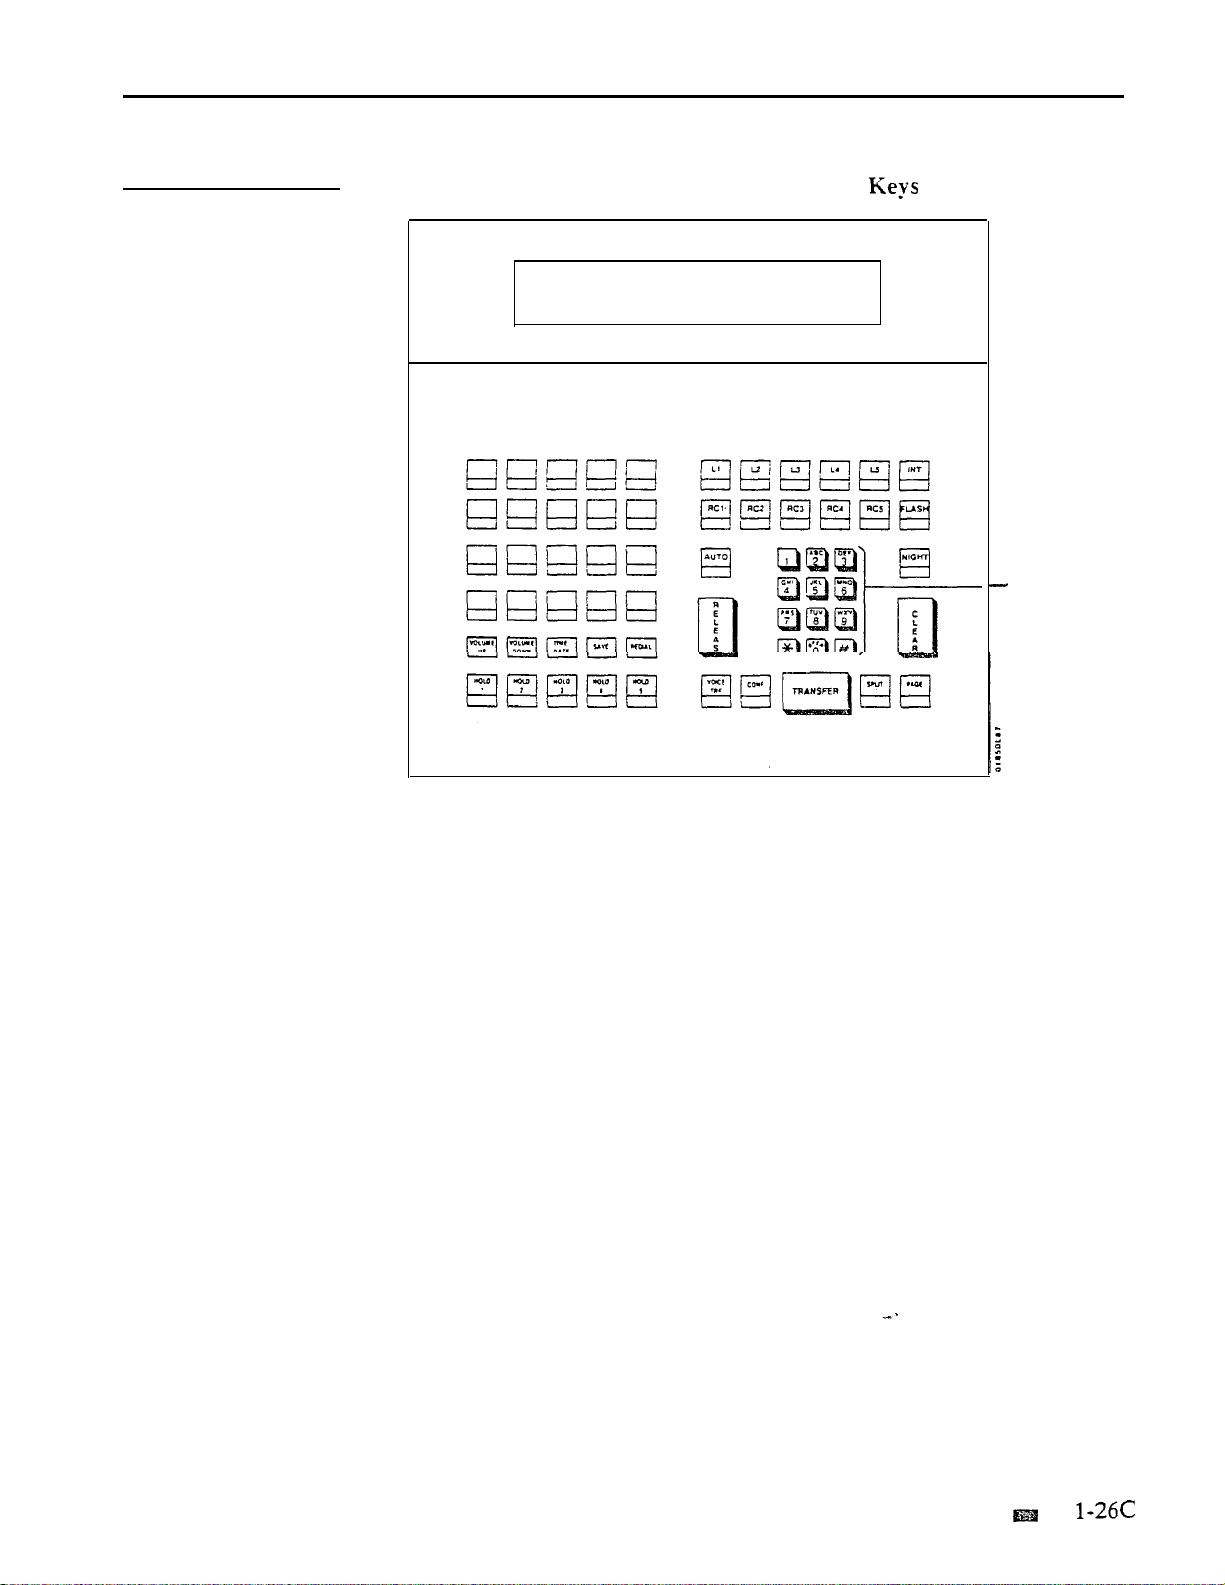
Figure l-l, Multibutton Telephones.
......................
Figure l-2, Attendant Telephone (P/N 88254)
Figure l-3, DSS Console.
.............................
...................
.l-3
l-4
Figure l-4, Console (ONYX IV)
Figure l-5, Electronic Single Line
Figure l-6, Analog Station Interface
Telephone
..............
.......................
-1-6
l-7
Issue 1-O
List of
Table l-l, System Flash Rates
Table l-2, System Ring Rates
Table l-3, System Tones
Table
System Number Plan.
Table l-5, Attendant Displays.
...........................
..........................
.............................
........................
.........................
Table l-6, ACD Supervisor Displays
Table l-7, Telephone Displays
.........................
......................
FEATURES
l-8
l-10
l-11
1-17
. l-19
l-v
Page 8
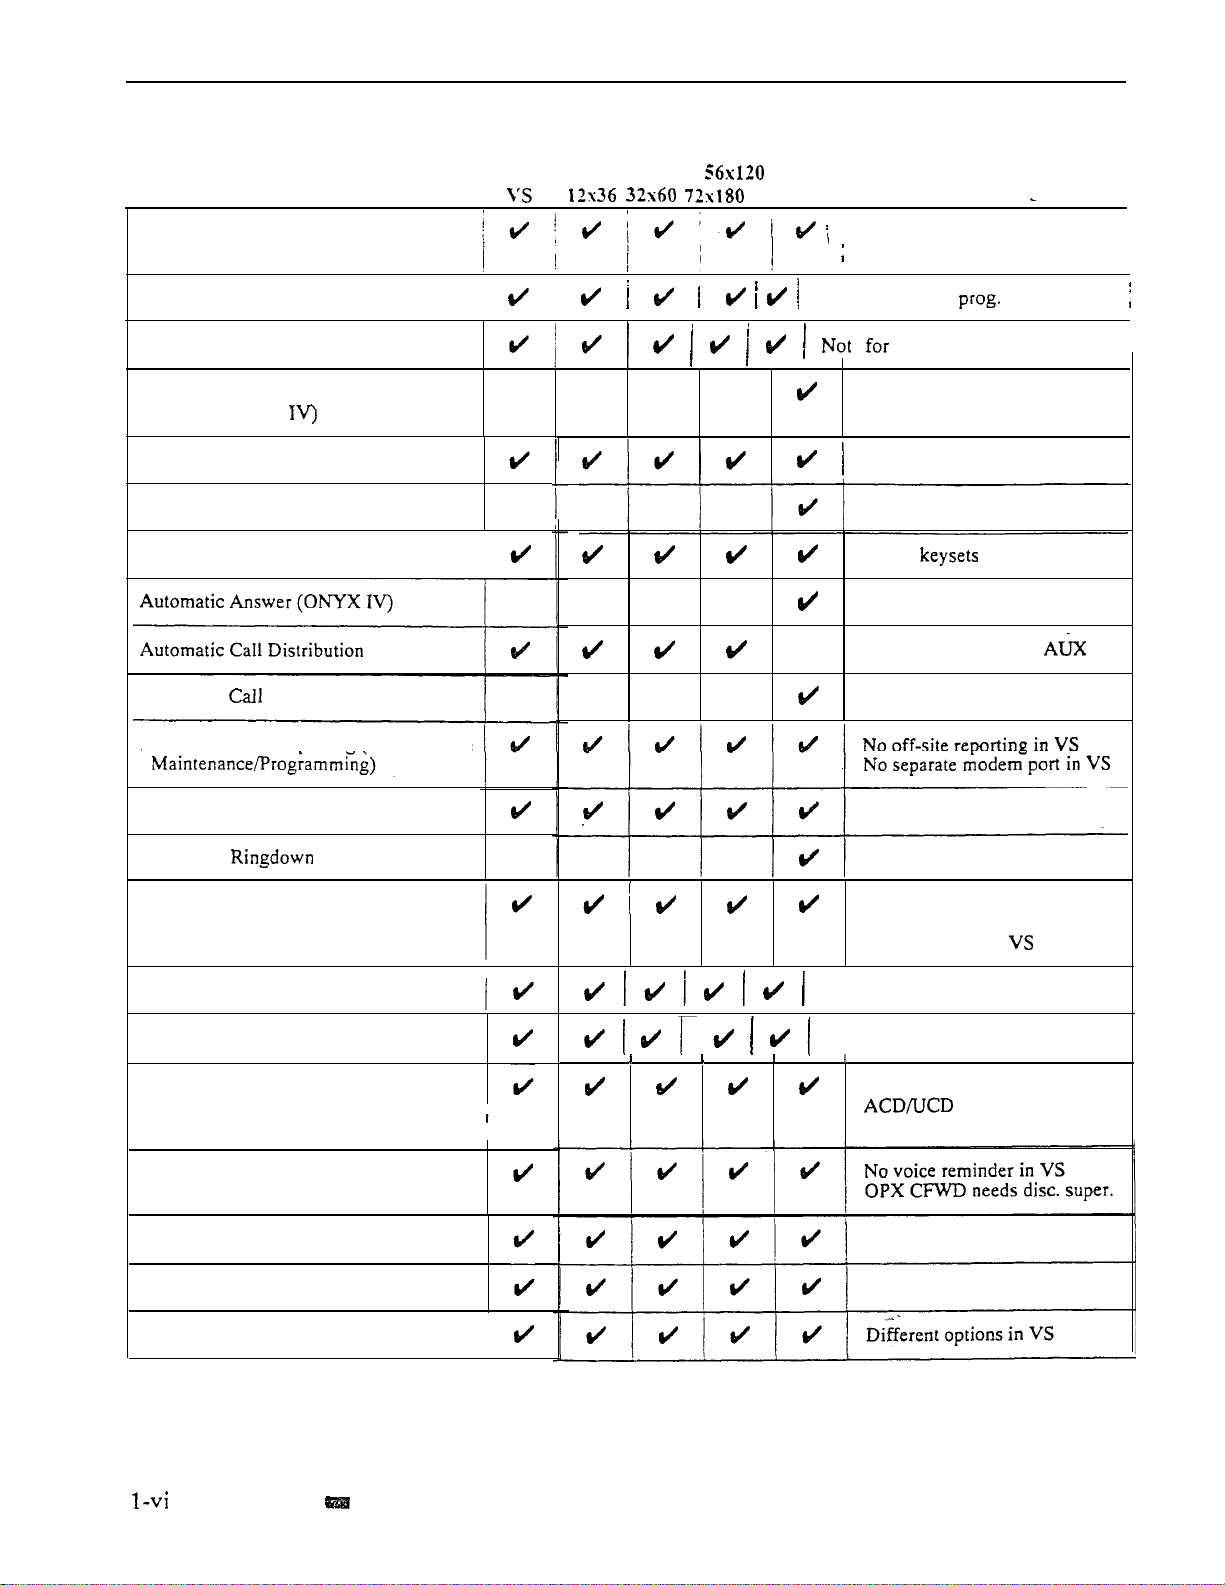
TABLE OF CONTENTS
Feature Cross Reference (Page 1 of 5)
Account Code Capability
Alphanumeric Display
Alternate Attendant
Alternate Attendant, Attendant
Console (ONYX
Analog Station Interface
Attendant Console (ONYX IV)
Attendant Positions
Automatic Distribution (ONYX IV)
Automatic Fault Reporting (With Remote
i ,
IV
VS has phone displays
Comments
400 codes in VS. 601 in-others
IV has additional option
IV
att. console
Console only
Only 89749 in VS
IV has and/or consoles
VS sup. display needs
IV has many additional options
Automatic Handsfree
Automatic
Automatic Route Selection
Background Music
Battery Backup
Call Coverage Keys
Call Forwarding
Call Fotwarding Cancel
Call Parking
Call Timer
(ONYX IV)
i
Different connections in VS
Different unit for VS
Not in key systems
64 codes in VS, 184 in others
Requires AUX in
Interacts with DSS prog in VS
cck needs VS AUX
VS user-programmable
FEATURES
Issue
1-O
Page 9
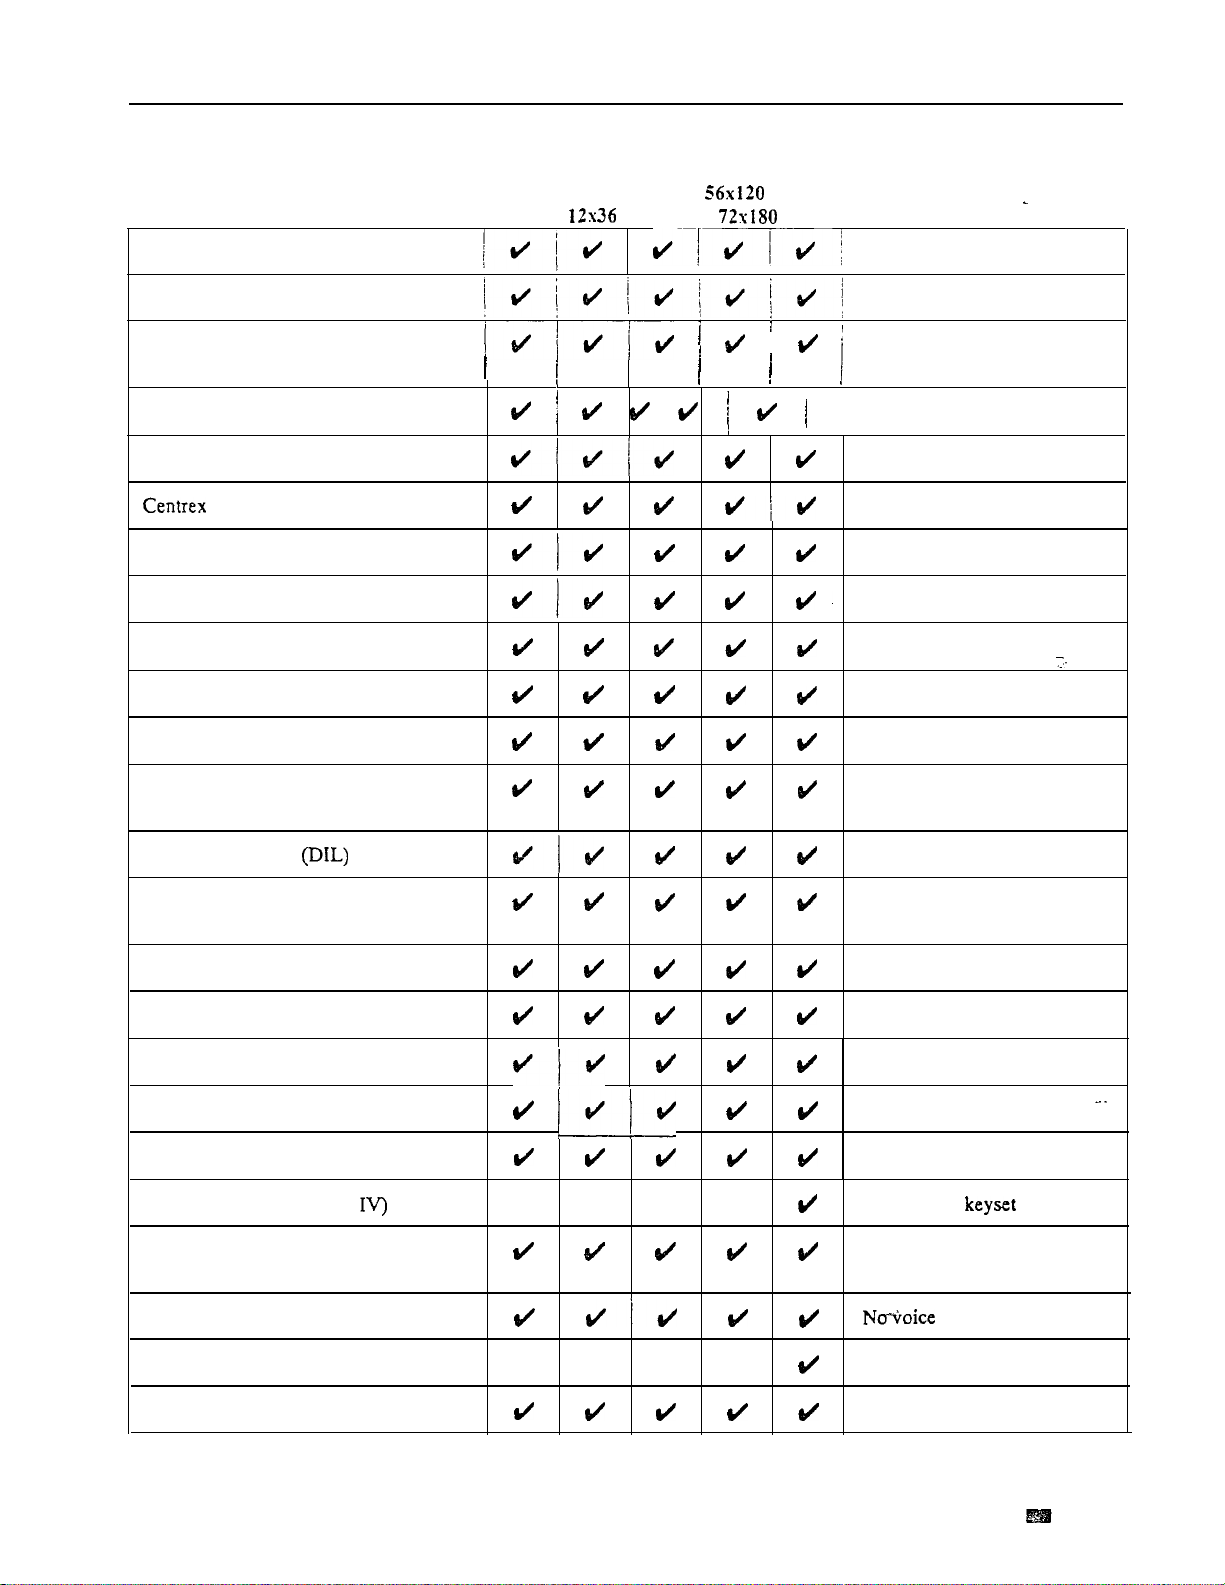
Feature Cross Reference (Page 2 of 5)
TABLE OF CONTENTS
Call Waiting (Camp-On)
Callback
Central Office Calls, Answering
Central Office Calls, Placing
Centralized Attendant Service
Compatible Feature Keys
Class of Service
Conference
Data
DP and DTMF Compatibility
Dialing Number Preview
Direct Inward Dialing (DID)
vs
32x60 IV
Different capacities
!
Comments
Different capacities
VS user-programmable
Future module in VS
41 total in VS, 565 in others
Additional option in IV
Requires AUX in VS
Future module required in
Different Camp-On in IV
VS
Direct Inward Line
Direct Inward System Access (DISA)
Direct Station Selection, DSS Console
Direct Station Selection, Extension
Direct Trunk Access
Directed Call Pickup
Directory Dialing
Directory Dialing (ONYX
Distinctive Ringing, Tones
Flash Patterns
Do Not Disturb
Dual Line Appearance (ONYX IV)
Equal Access Compatibility
and
Future module required in VS
VS supervised loop only
4 blocks in VS, 20 in others
Full Dir. Dial. needs
Uses special key
reminder in VS
VS
AUX
Issue 1-O
FEATURES
l-vii
Page 10
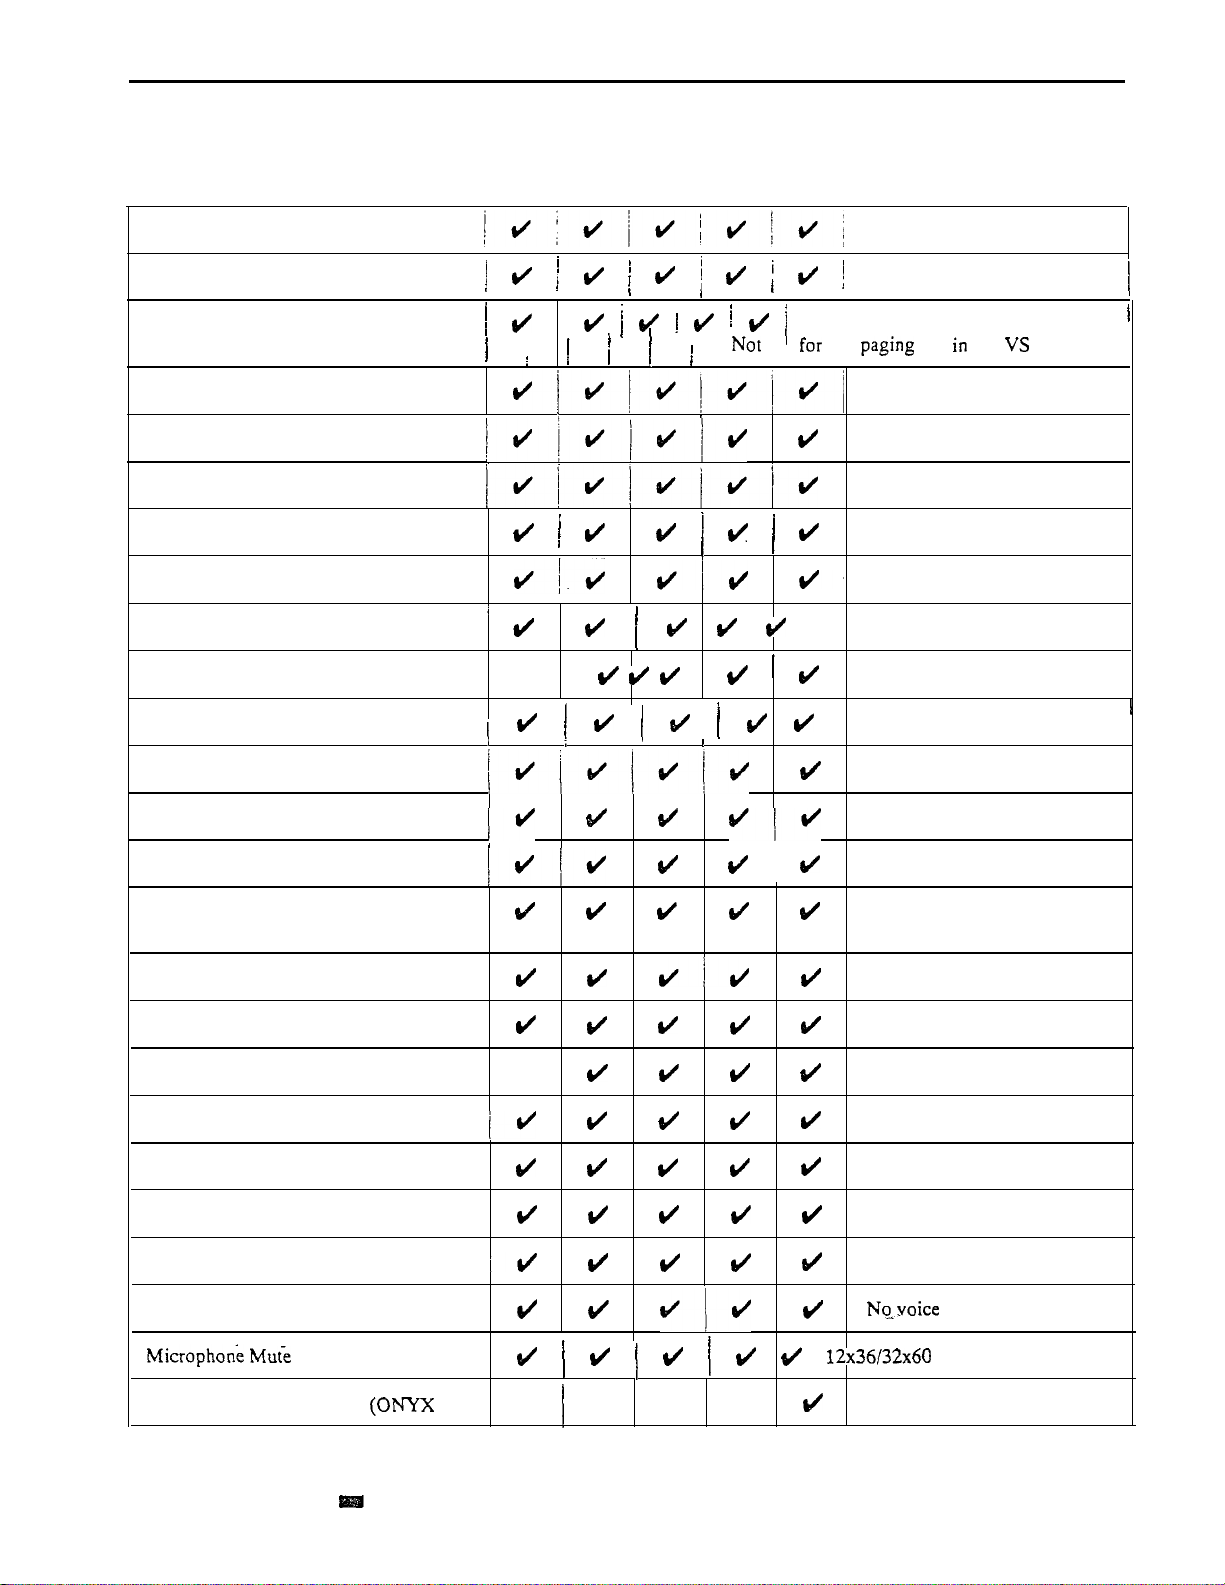
TABLE OF CONTENTS
Extended Ringing
Feature Cross Reference (Page 3 of 5)
56x120
vs
12x36 32x60 72x180 IV
Comments .
Extension Hunting
External Alerting Devices
Flash
Flexible Numbering Plan
Forced Trunk Disconnect
Group Call Pickup
Group Listen
Group Ring (Ring Groups)
Handsfree (Speakerphone) and Monitor
. Headset Compatibility
Hold
Hotline
,
VS user-programmable
Two relays in VS, 4 in others
Different group numbers
No UCD announcement in VS
Requires AUX in VS
VS user-programmable
VS user-programmable
Intercept of Calls
Intercom
Intrusion (Barge-In)
Last Number Redial
Least Cost Routing (Hybrid)
Line (Trunk) Queuing
Line (Trunk) Rotaries (Hybrid)
Loop Keys
Meet-Me Conference
Message Waiting
Multiple Directory Numbers
IV)
mutes handset
I
Different capacities
VS user-programmable
Not in VS or key systems
Not in key systems
Key systems incoming only
reminder in
VS
l-viii
FEATURES
Issue
1-O
Page 11

Feature Cross Reference (Page 4 of 5)
TABLE OF CONTENTS
Music On Hold
Night Answer (Off-Hours Ringing)
Non-Blocking Architecture
Off-Hook Signaling
Off-Premise Extension
Operator Assistance (OPA)
Paging
Compatibility
Personal Greeting
VS
,
12x36 32x60 IV
Different connections in VS
Voice over VS user-prog.
I
Comments
Different UNA prog. in VS
IV has
VS user-programmable
Requires future module in VS
Not in VS
2 ext zones in VS, 4 in others
Different prog in VS
No page relays in VS
Auto Page only in IV
VS user-programmable
Not in VS
Prime Line Selection
Privacy
Privacy Groups
Private Line
Programmable Keys
Release Key
Removing Trunks and Extensions
From Service
Reverse Voice Over (ONYX IV)
Ringing Line Preference
Save
Selectable Display Messages
Silent Monitor
I
VS user-programmable
Different capacities
Different options VS and IV
DSS Console only
VS user-programmable
16 in VS, 64 in others
16 preset in VS without
Special Services and OCC Compatibility
Issue 1-O
FEATURES
l-ix
Page 12
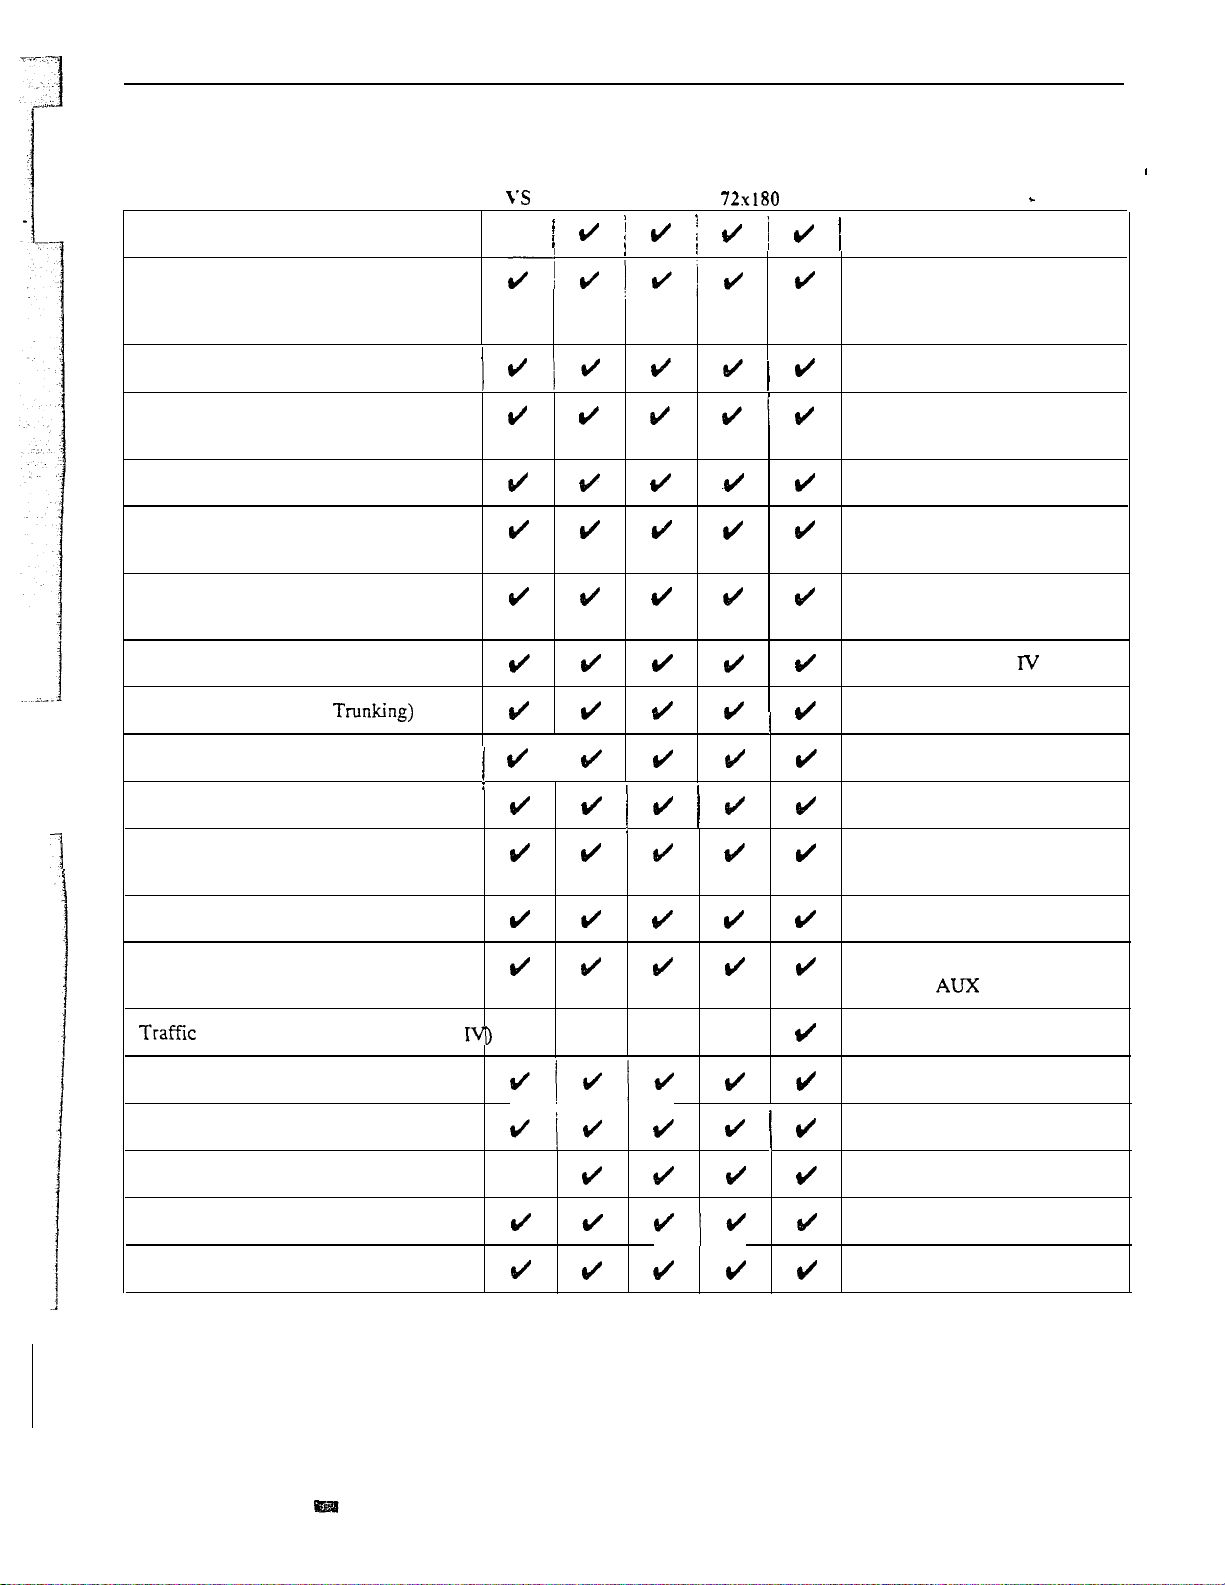
TABLE OF CONTENTS
Special Trunk Interface
Feature Cross Reference (Page 5 of 5)
56x120
12x36 32x60 IV
Comments
Not in VS
Speed Dial
Split
Station Message Detail Recording
System Identification
System
System Reports, Diagnostics and
System Timers
Tandem Calls (Tandem
Tenant Service
Tie Lines
Time and Date Setting
t
Toll Restriction
Programming Password
Protection
Maintenance Utilities
I
Different number of blocks
Names in VS needs AUX
VS user-programmable
Split key in IV
No separate modem port in VS
Requires AUX in VS
VS uses first line only
Different passwords
Additional timer in
Needs disconnect supervision
Different prog in VS
VS requires future module
No voice time in VS
VS user-programmable
No voice prompt in VS
Traffic Management Reporting
Management Reporting (ONYX
Transfer
Voice Mail Compatibility
Voice Prompting Messages
Volume Controls
Walking Class of Service
l-x FEATURES
No modem in VS
Requires in VS
Different options in IV
Additional option in IV
Not in VS
Tssue 1-O
Page 13

INTRODUCTION
Before Reading .
This Section
!
Using This Section
This section provides detailed information on the system’s features. If you
don’t know what the various features are, review the feature
provided as part of this section’s Table of Contents. After reviewing the
feature summary, turn back to this section for the specifics.
The features in this section are in alphabetical order, like a dictionary. This
section subdivides each feature definition into headings as follows:
Description
the Description are the
tells what the feature is and describes its benefits. Along with
Conditions
and
Default Configuration.
Conditions
provides the feature’s operational limits (if any). Default Configuration
outlines how the feature works with the default programming. When
initially installed, the system uses the default configuration.
Programming
feature. Some features require programming; others don’t. You
customize the
Programming
explains the system programming that lets you customize the
must
Required Programming
to make the feature work.
Other
lists additional programs you should consider when setting
up the feature. If you decide to customize a feature, use Section 2 to:
Enter the change in the system
Record the change on the Program Record Form (PRF)
Refer to the System Programmable Options chart at the end of this manual
for a handy Feature-to-Program troubleshooting reference.
Related Features presents the feature interaction.
Feature Operation consists of instructions on how to use each feature. The
instructions also show the various flash and ring rates and system tones
(Tables
through l-3). This tells the user what to expect before
and
after each instruction step. For example:
Look for: Line key On (red/green)
Listen for:
Dial tone
indicates that both red and green in the line key are on and the user
listens to dial tone. If a user has an Electronic Single Line (ESL) set, the
Look for
instructions do not apply.
VS User-Program-
mable Features
Issue 1-O
With the correct access level, a user can customize selected features from the
telephone. The user-programmable features are abbreviated in this manual:
+ + Line key + Y(es) or N(o) + SAVE
and
press
Press line key
Press SAVE
User-programmable features include (refer to the system Administrator’s
Guide for the specifics):
Call Coverage Keys
Central Office Calls, Answering
Intercom
Group Call Pickup
Headset Compatibility
Hotline
Off-Hook Signaling
Paging
Prime Line Selection
Ringing Line Preference
Speed Dial
Time and Date Setting
Night Answer
FEATURES l-l
Page 14
INTRODUCTION
Modular and
Modular
Your system may have modular and/or non-modular Modular
have red and green non-modular have only red
Some feature operations have different LED flash rates for modular
modular For other features, the rate applies to both Note
that the color green only applies to modular
to Use This
Section With
Section 2
For example, if you see:
you know that the LED on a non-modular is On (red).
Section 1, Features, works closely with Section 2, Software Configuration
(see the Illustration below).
Look for:
If a feature has a required program, go to Section 2 for the details on the
-program.
The
Feature Reference
that program is required.
If a feature has more than one required program, the
heading in Section 2 lists these options. While learning about one
program, this shows you the other programs you have to consider to get the
feature to work.
On(green)
heading in Section 2 lists all the features for which
Programming
1-2 FEATURES
The program references
the feature here.
If the feature has
other required
programming here...
L
The program shows
it as related
programming here.
Issue 1-O
Page 15
INTRODUCTION
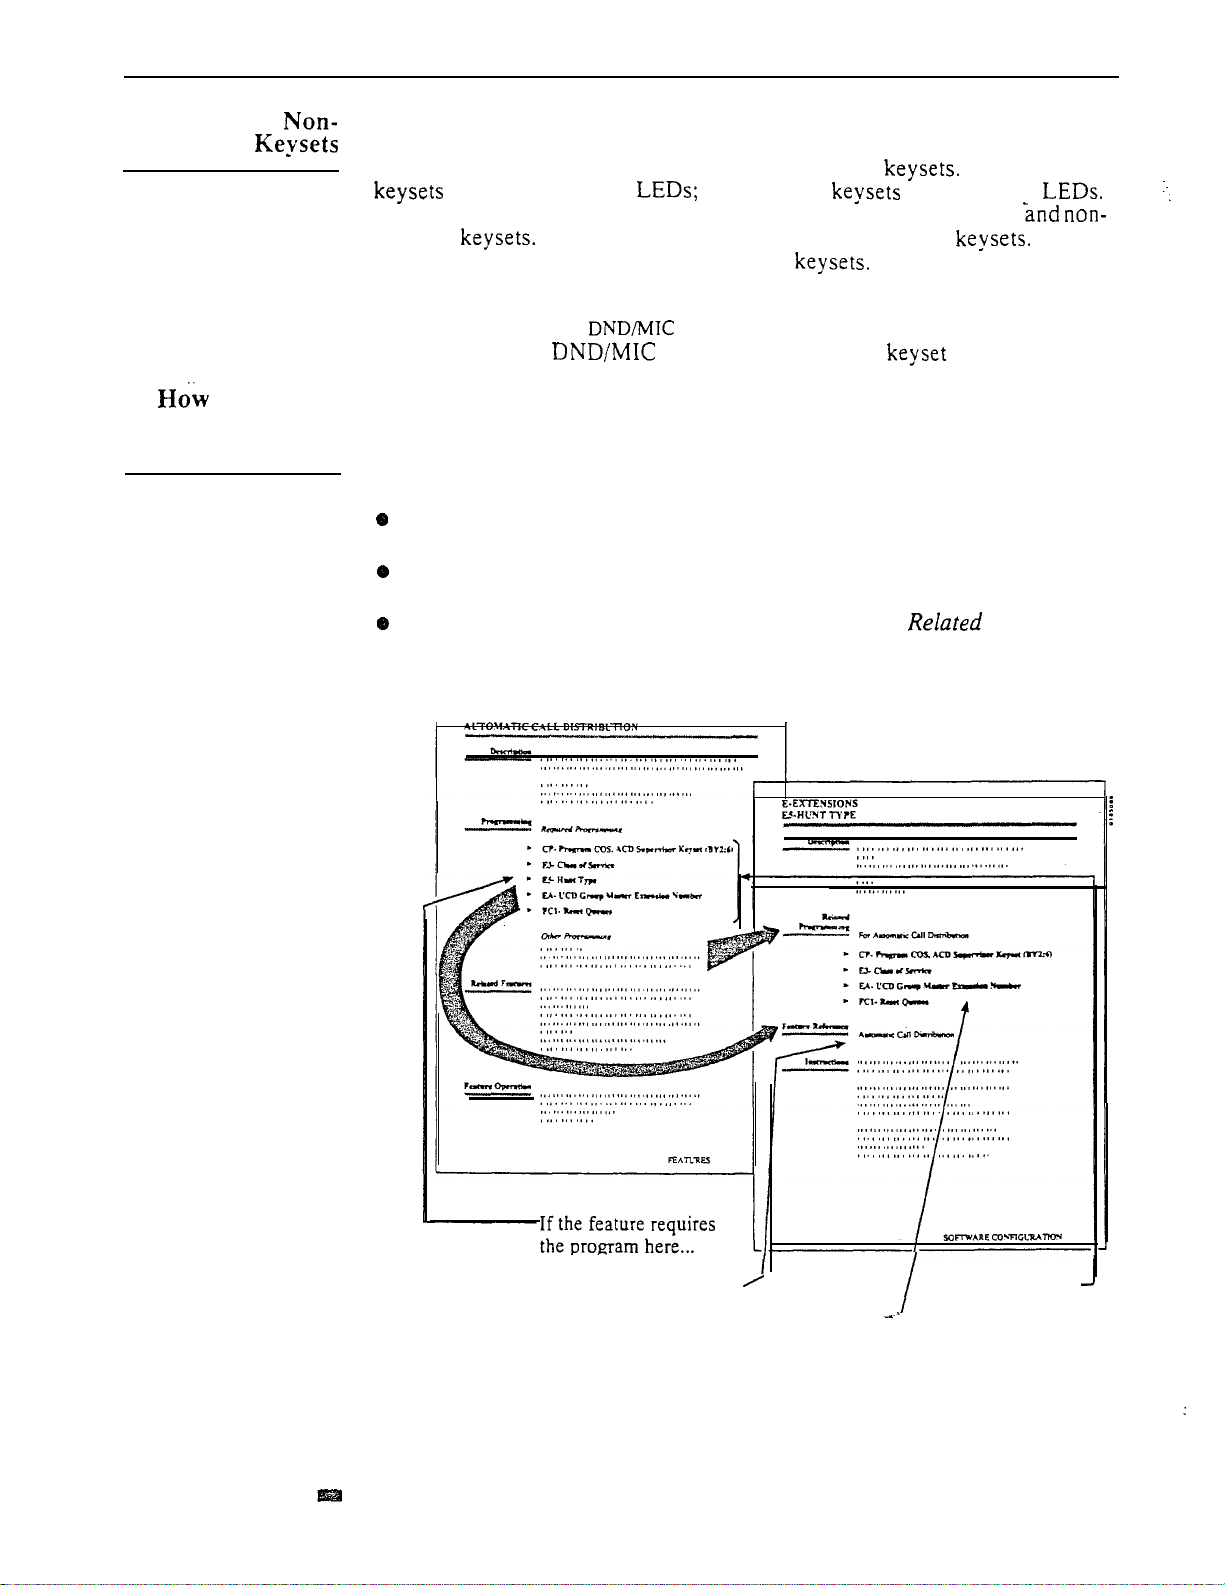
Display
Programmable
Keys
Programmable
Feature Keys
Hold,
Background Music
Conference
Automatic Answer
(ONYX IV Attendant)
Last
Number
Redial
Volume Up
Volume Down
Feature, Flash
Programming
Mode
-Message Waiting
Handsfree
(Attendant’s Intercom Loop Key)
“Do Not Disturb,
Microphone Mute
(Attendant’s Night Answer Key)
Issue 1-O
Figure l-l MULTIBUTTON TELEPHONES
FEATURES
1-3
Page 16
INTRODUCTION
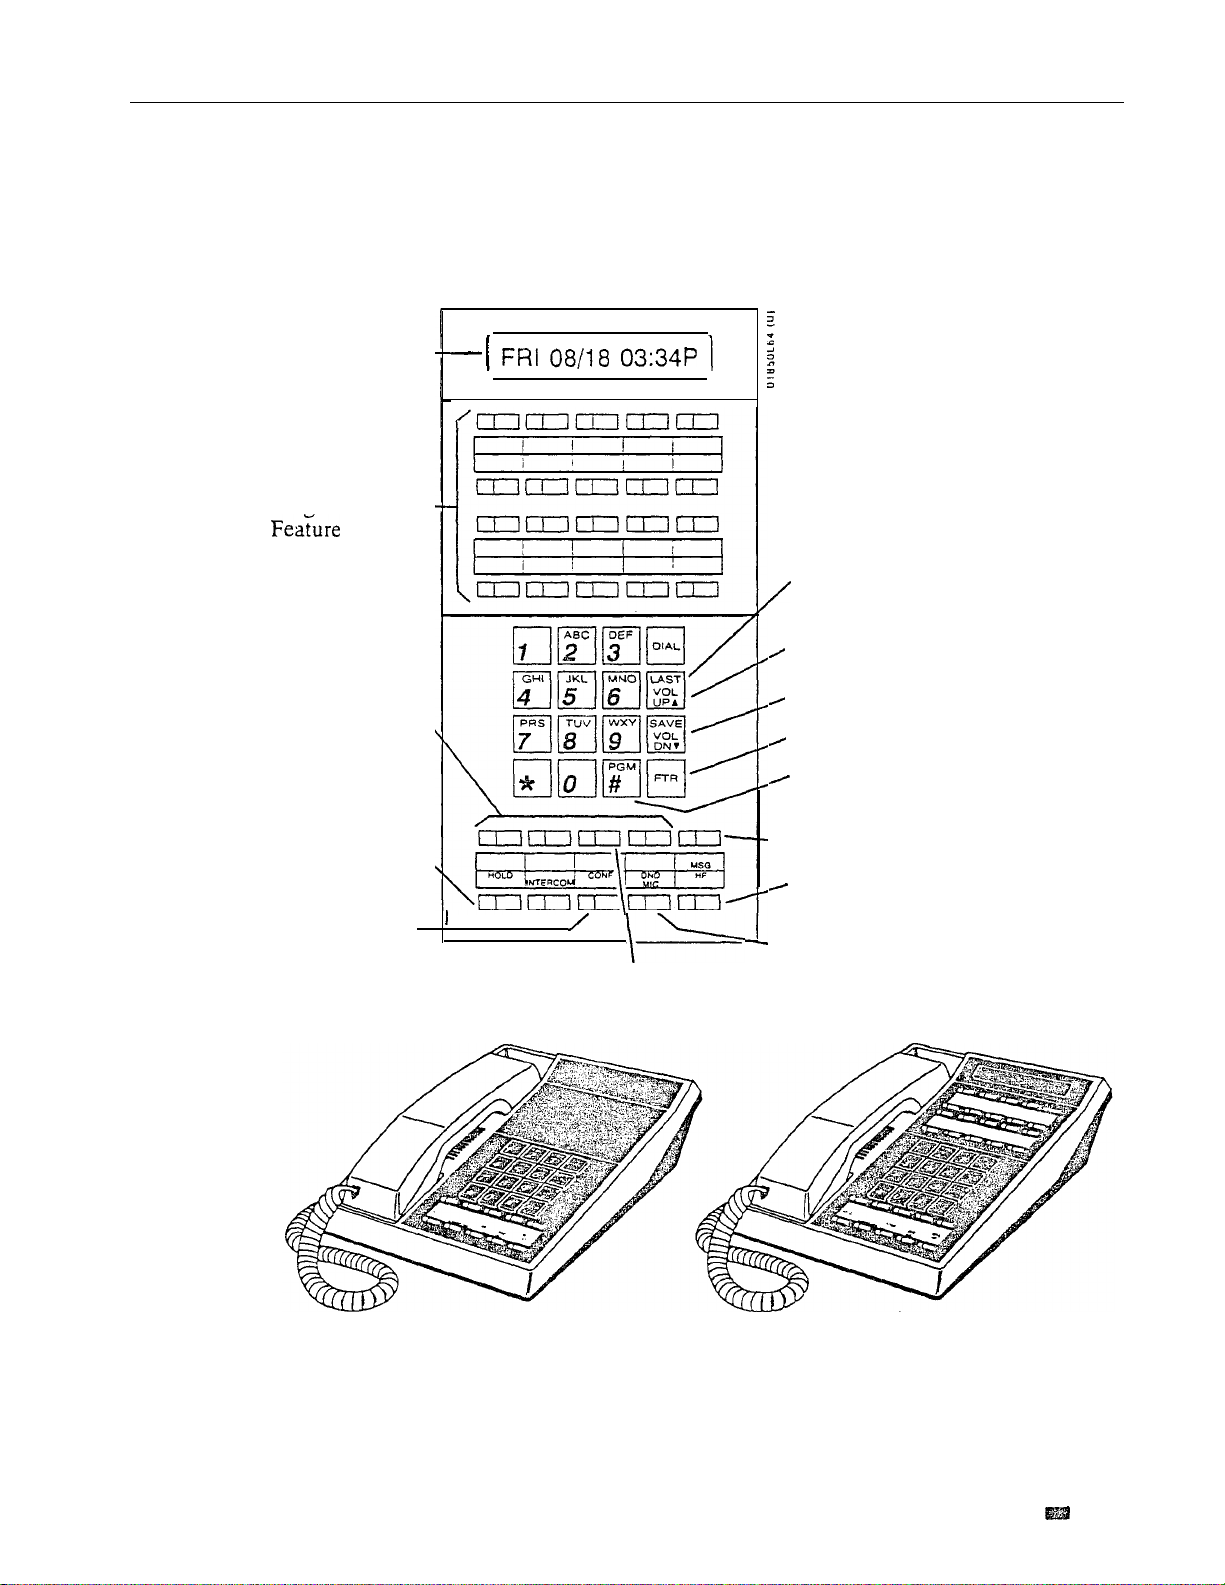
Programmable
Feature Keys
Conference
\
Message Waiting,
Automatic Answer
(ONYX IV Attendant)
Volume Controls
, Last Number
Unassigned
(No Function)
Intercom
FEATURES
Figure 1-2 ATTENDANT TELEPHONE (P/N
Issue 1-O
Page 17
INTRODUCTION
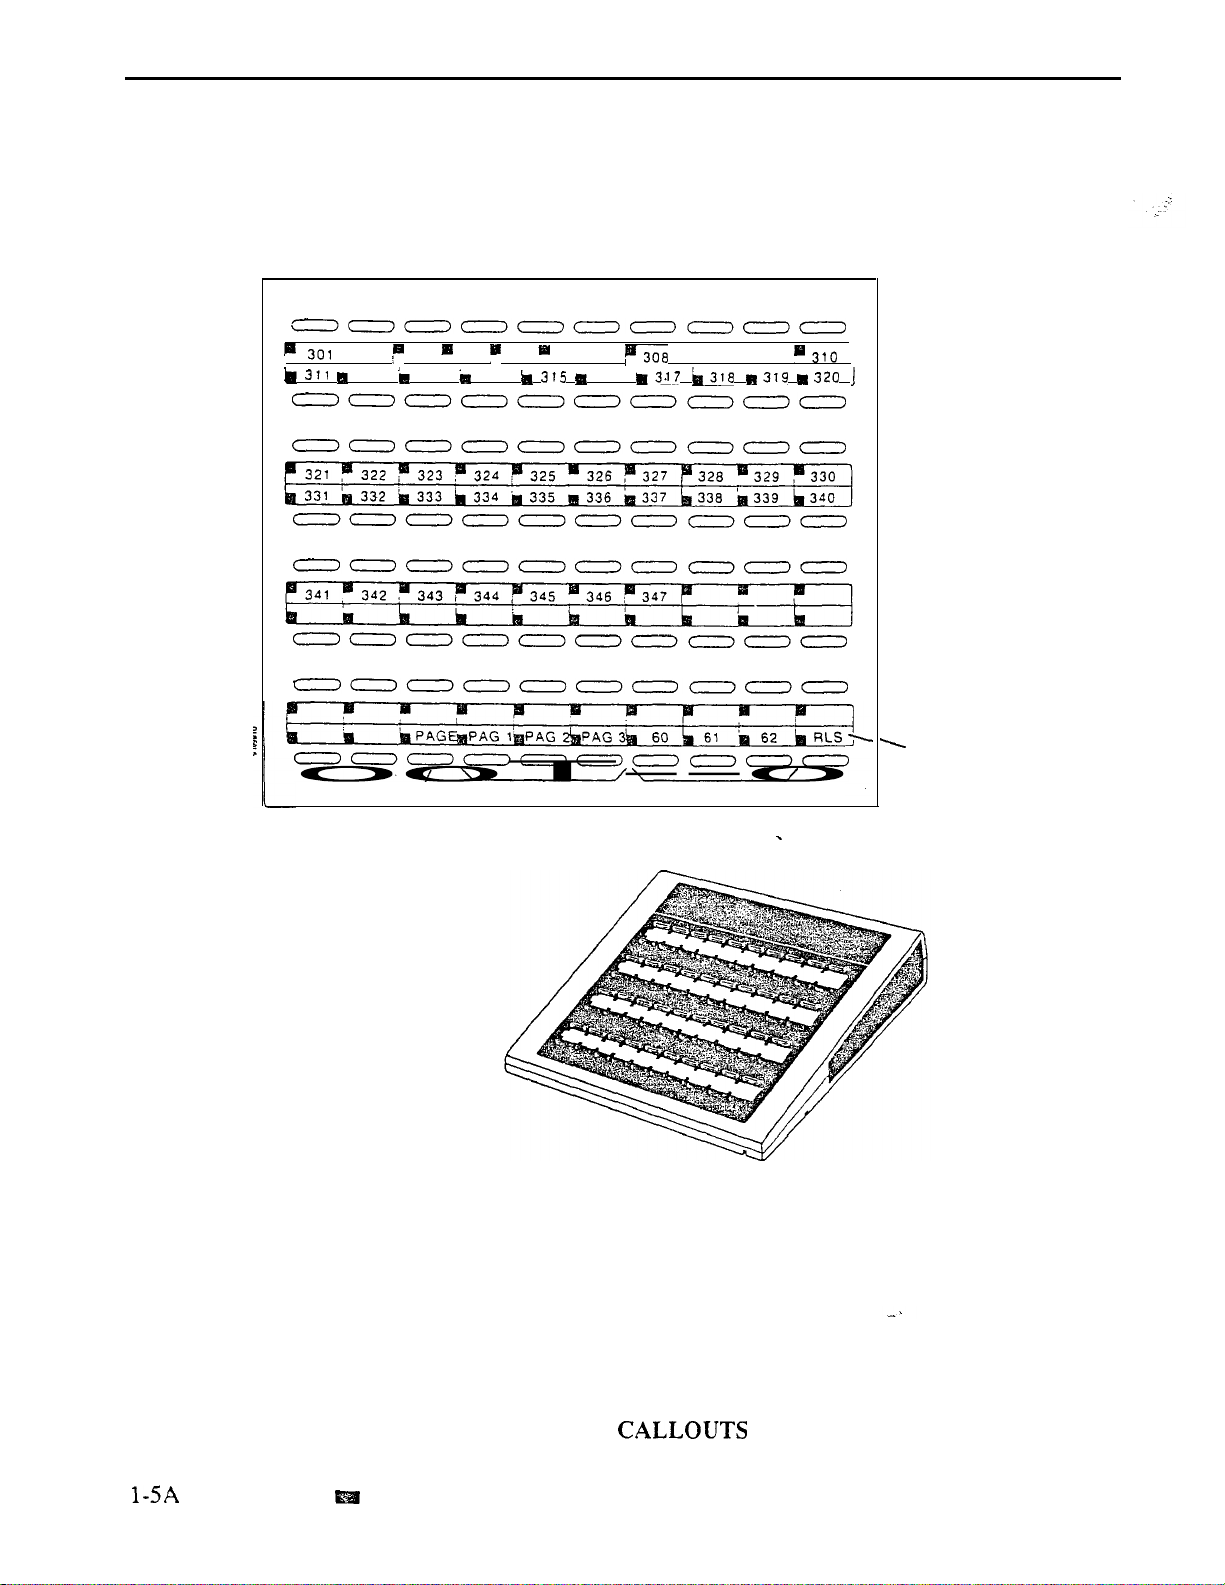
All Call Page
Page Zones
Release
Park Orbits
Issue 1-O
(P/N 88255)
Figure 1-3 DSS CONSOLE
WITH ONYX II/III/IV KEY
(Page 1 of 4)
FEATURES
Page 18
INTRODUCTION
q
302 303 304 305 306 “$307
312 313 314
All Call Page
Page Zones
q 3O9
316
Park Orbits
Release
FEATURES
(P/N 88255)
Figure 1-3 DSS CONSOLE
WITH ONYX VS KEY
(Page 2 of 4)
Issue 1-O
Page 19

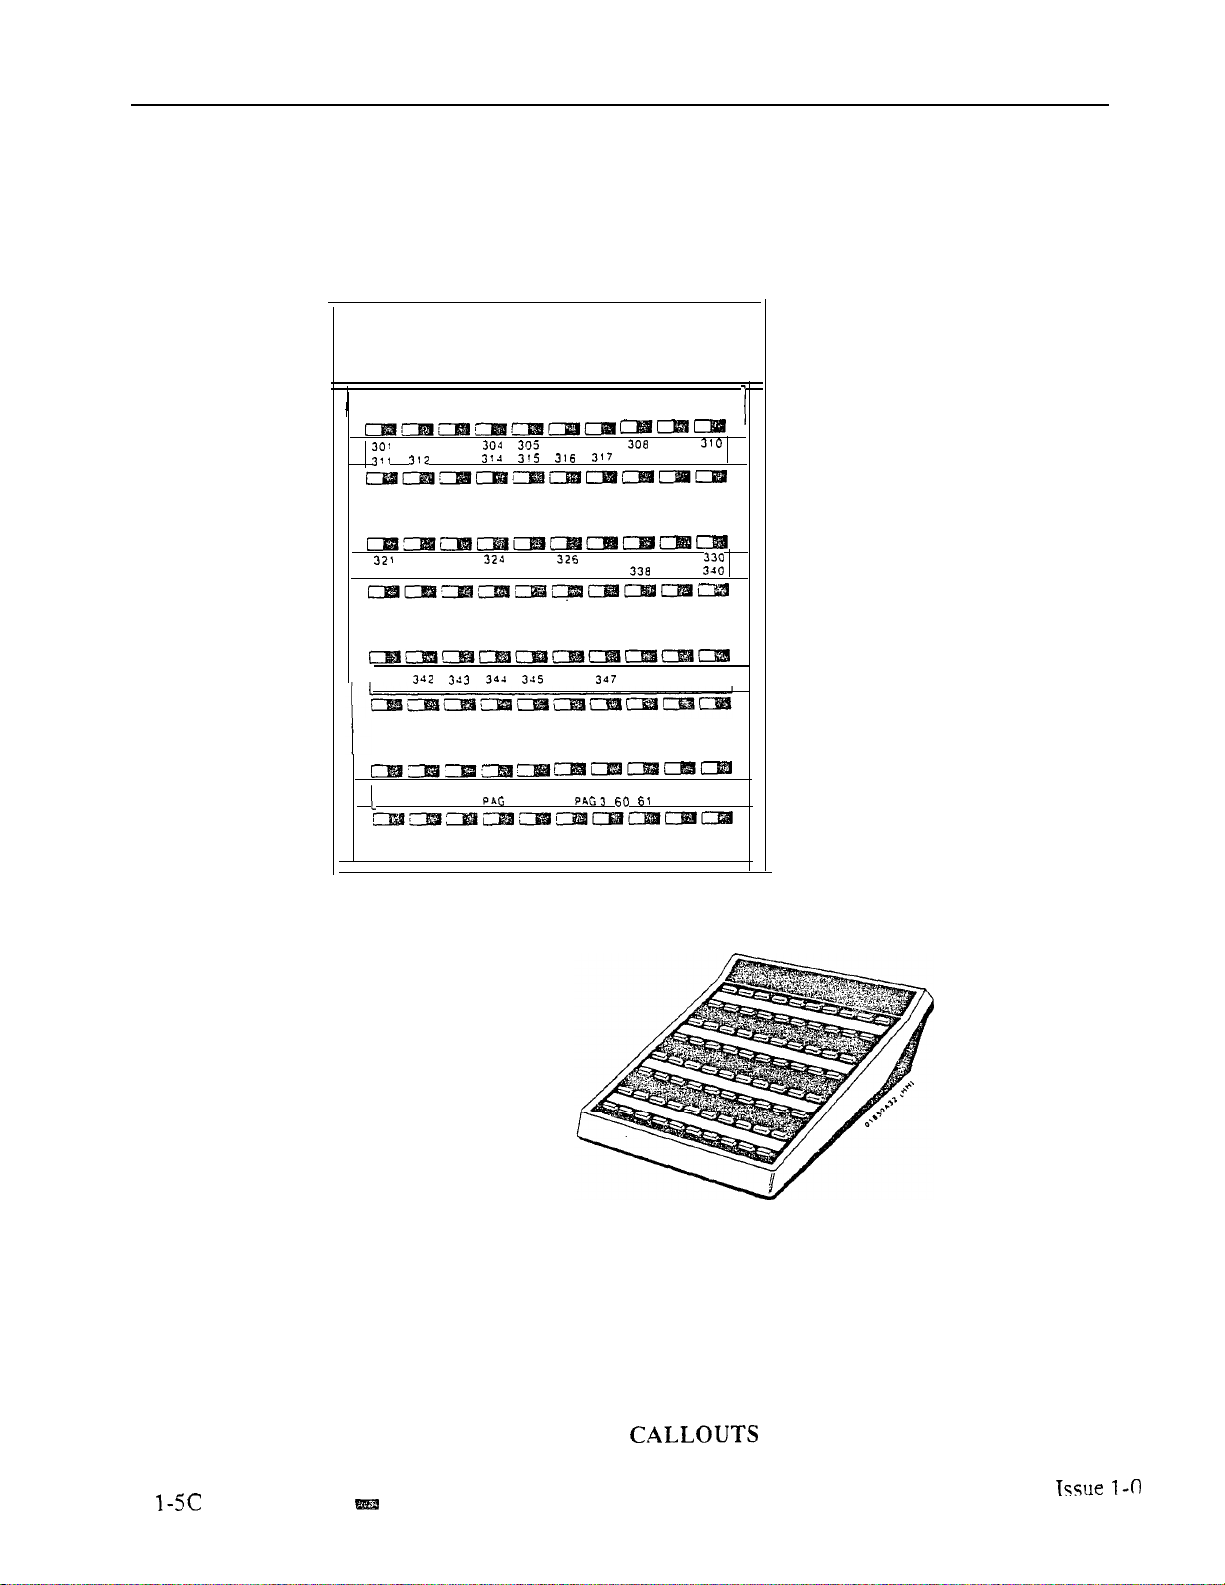
INTRODUCTION
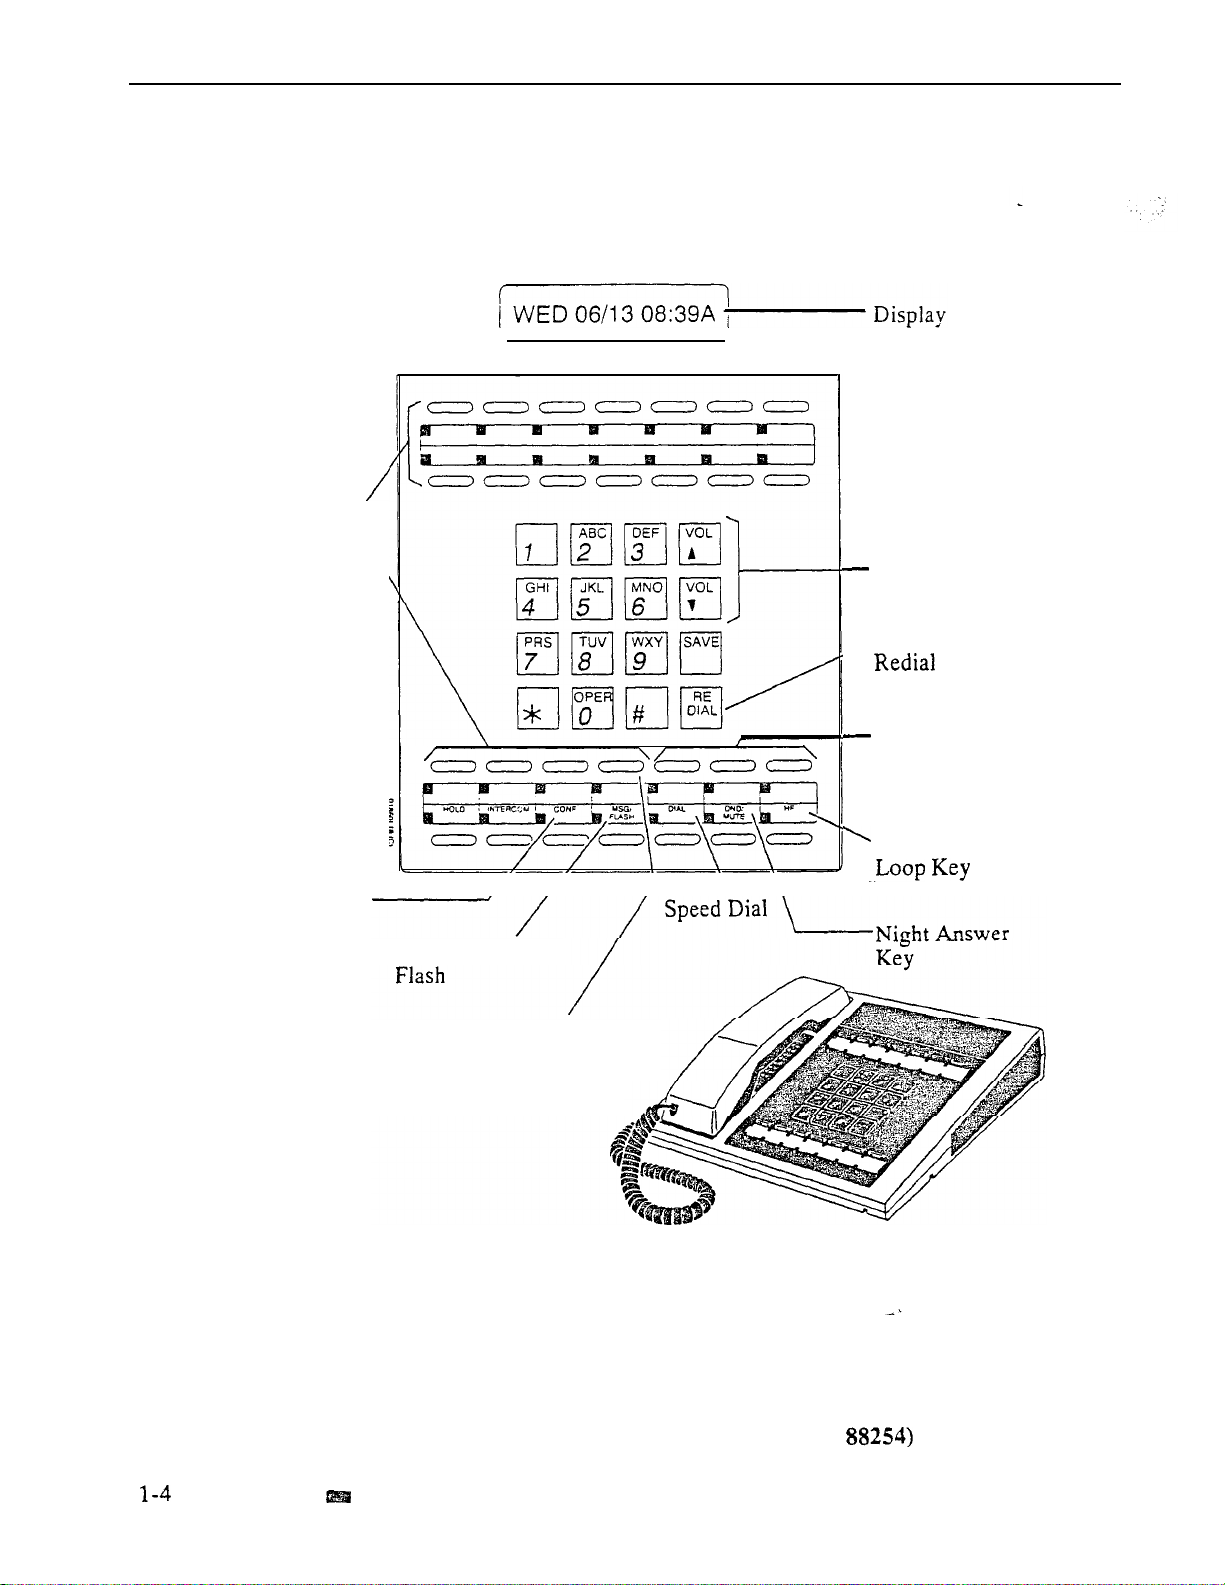
365
375
366
PAGE
367
PAG
366
PAG
369
PAG
370
60
371
61
372
62
373
RLS
Issue 1-O
Figure 1-3 DSS CONSOLE
WITH ONYX II/III/IV KEY
(Page 3 of 4)
FEATURES
Page 20
INTRODUCTION
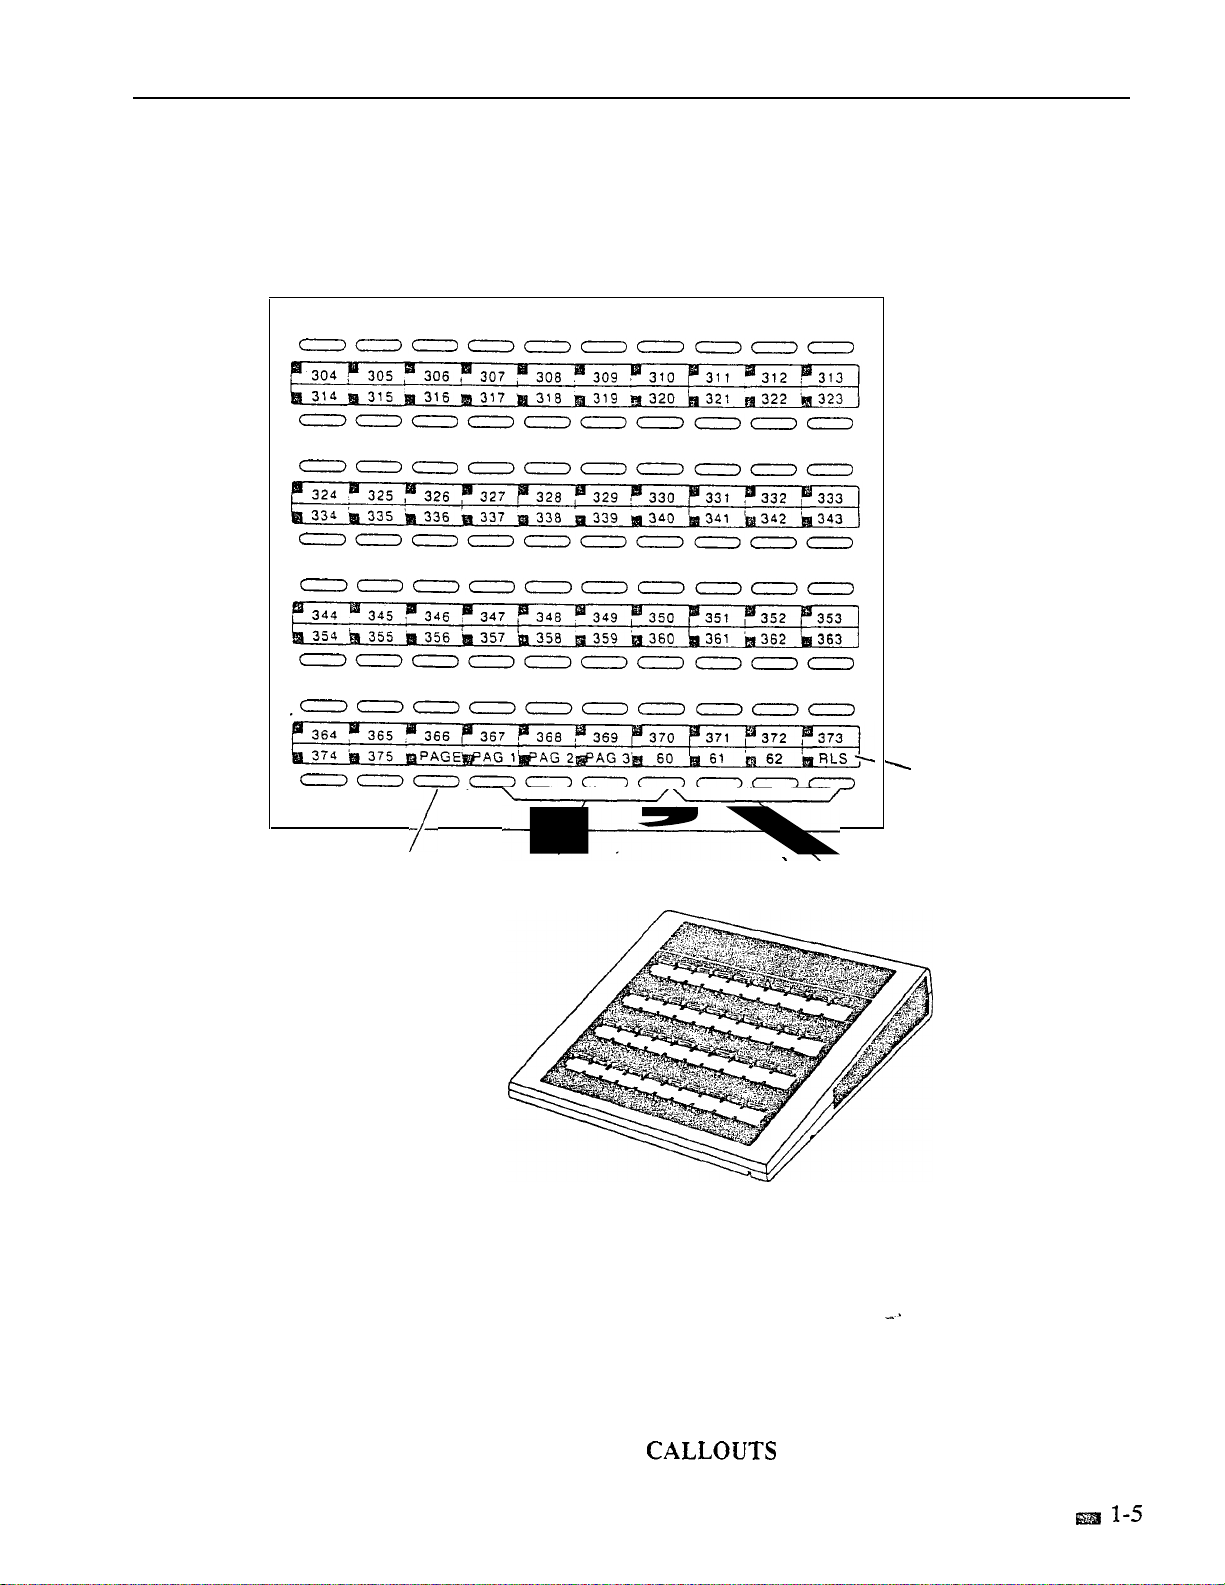
331
341
302 303
3’3
322 323
332 333
PAGE I PPG 2
334
325
335 336
306
346
307
318
327 328
337
309
319
329
339
62
320
I
RLS
FEATURES
Figure 1-3 DSS CONSOLE
WITH ONYX VS KEY
(P/N 88555)
(Page 4 of 4)
Page 21
INTRODUCTION
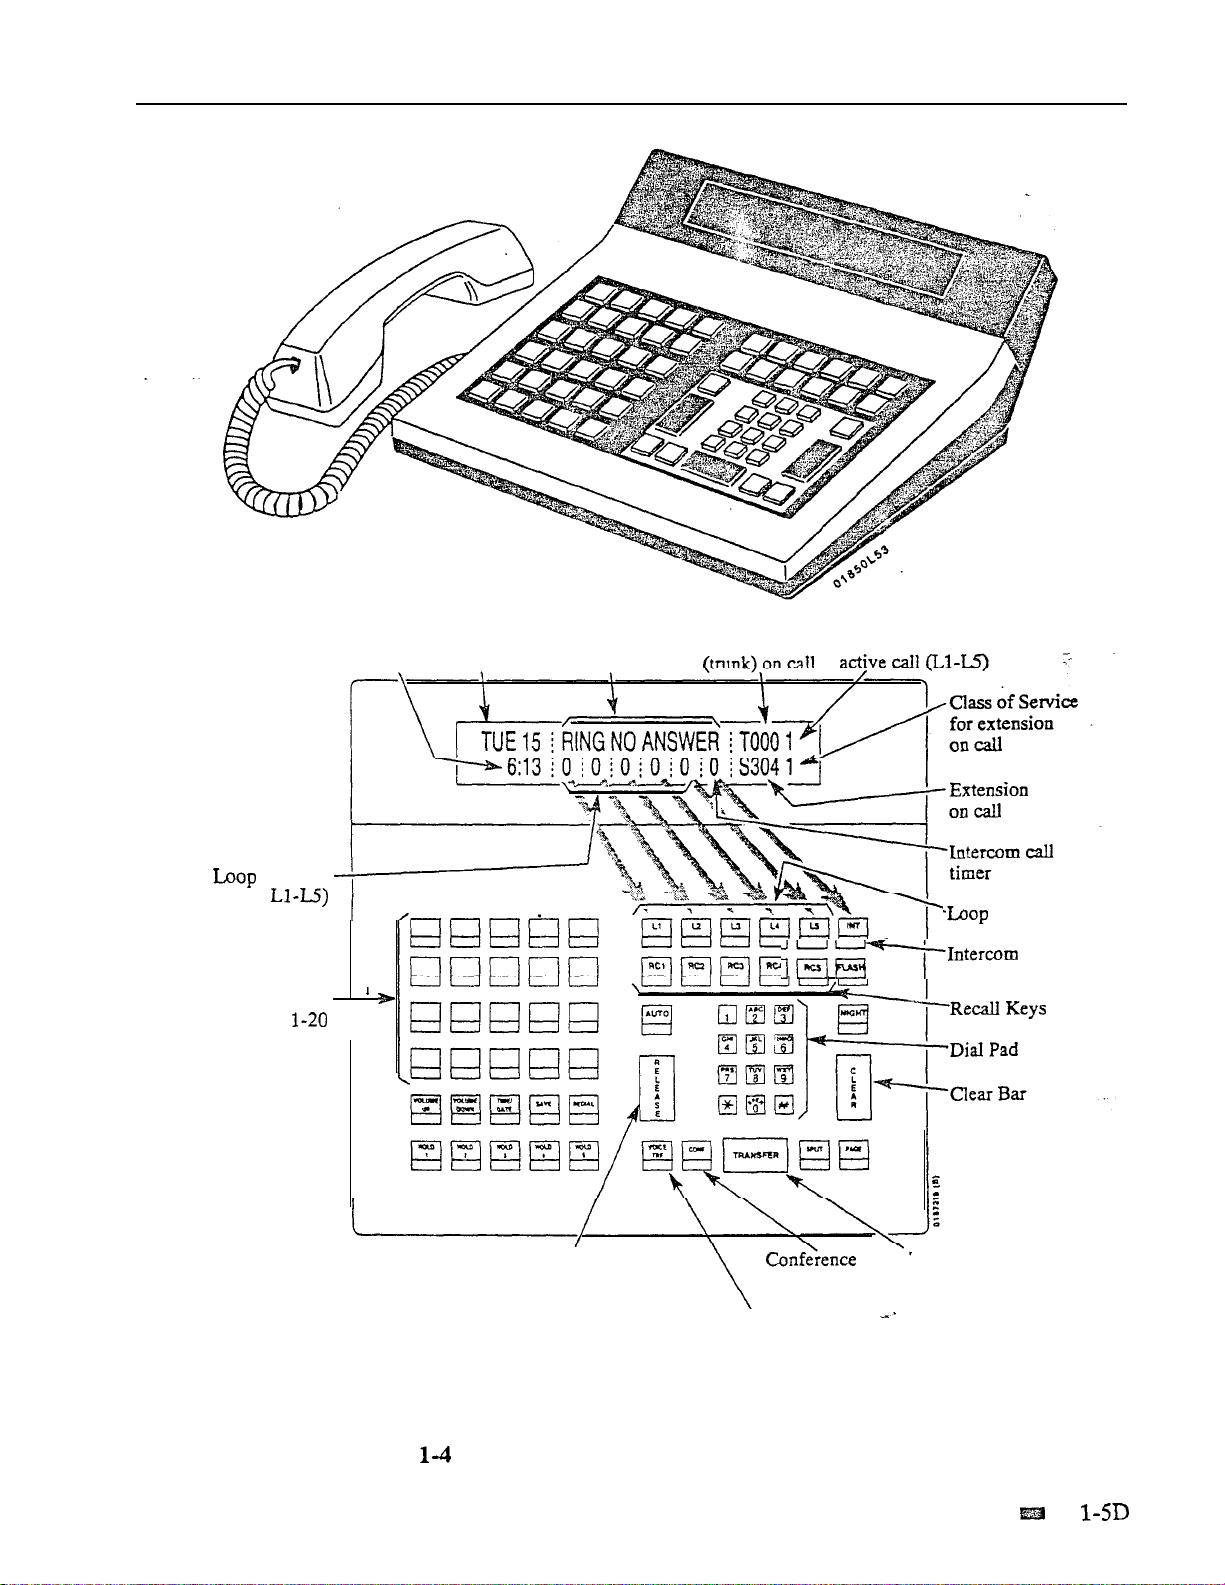
timers (for
Key call
Programmable
Keys
Time
Date
Feature status
Outside Line
Loop Key for
(line) Keys
Issue 1-O
Release Bar
Voice Transfer
Note:
For additional information on the Attendant Console’s keys, refer to the
Attendant Console (ONYX IV) feature.
Figure ATTENDANT CONSOLE (ONYX IV Only)
Transfer Bar
FEATURES
Page 22
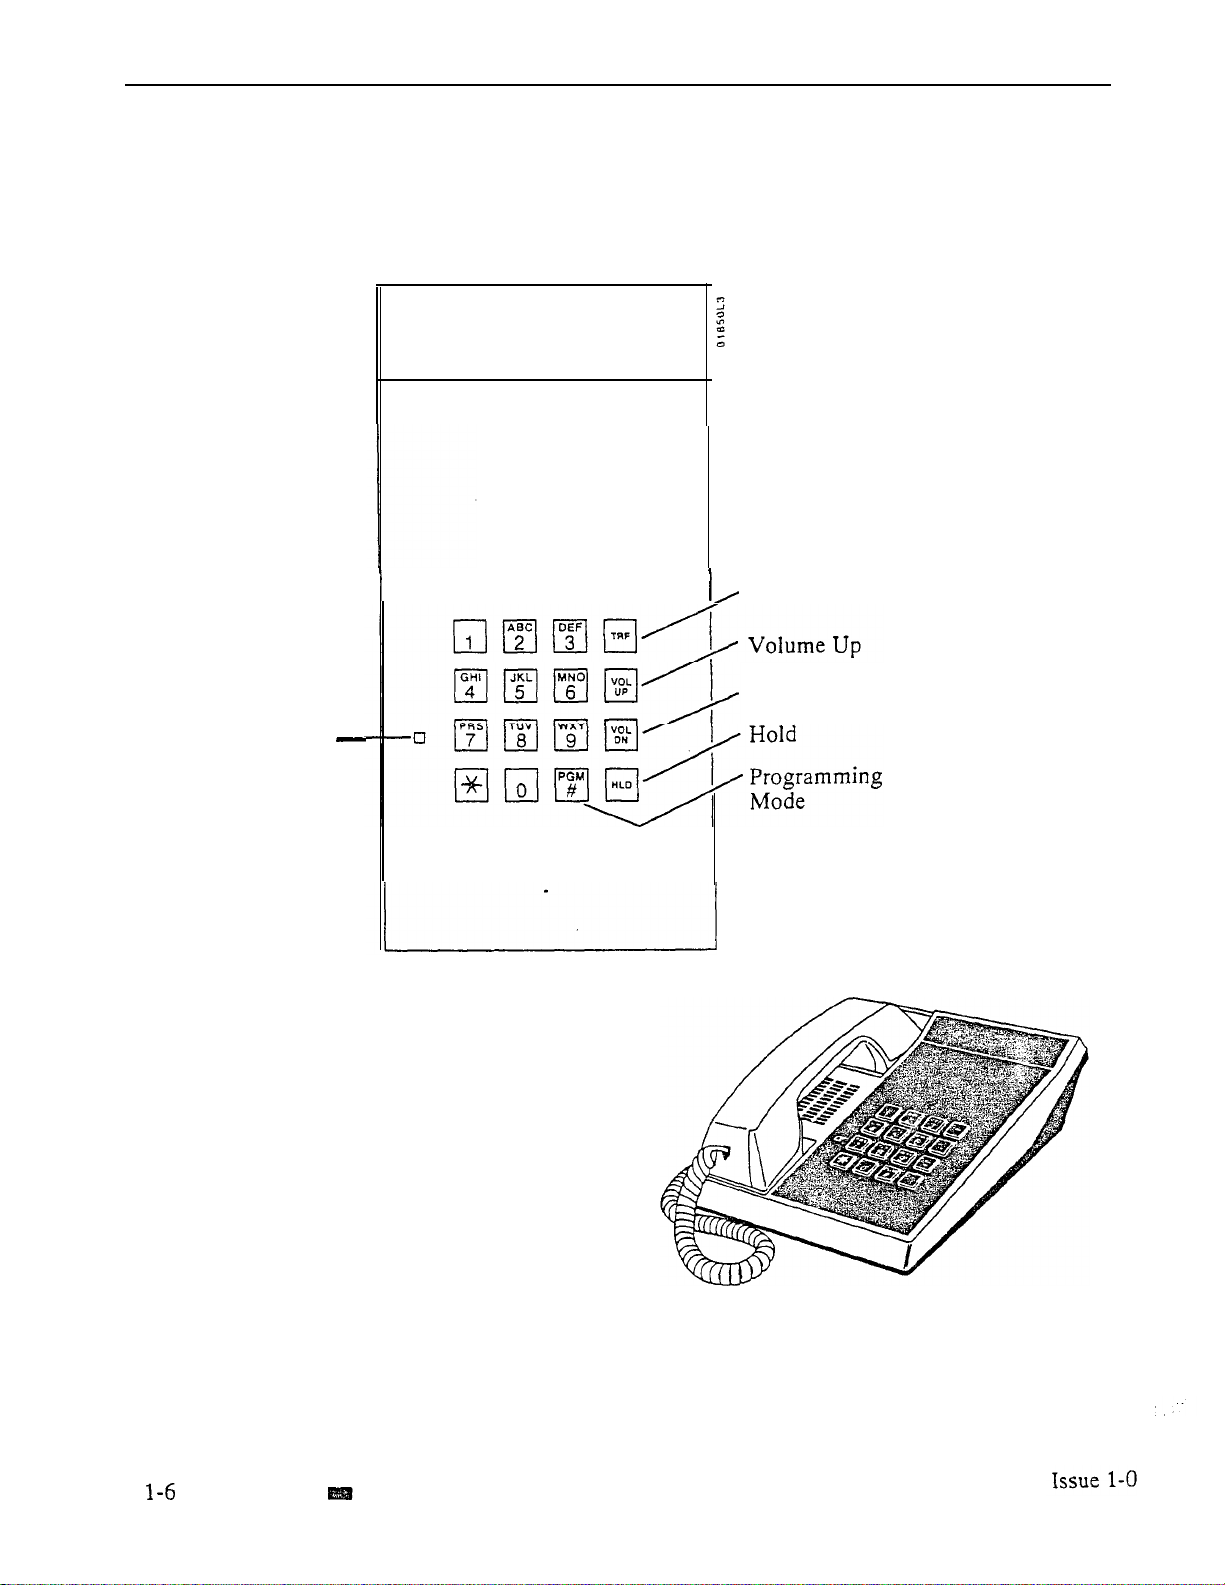
INTRODUCTION
Transfer
Message
Waiting LED
Volume Down
FEATURES
Figure l-5 ELECTRONIC SINGLE LINE (ESL) TELEPHONE
Page 23
Flashes when
telephone rings
telephone off-hook
INTRODUCTION
To Extension Modular Jack
Issue 1-O
2500 Set
Figure
1-6 ANALOG STATION INTERFACE
FEATURES
Page 24
INTRODUCTION
SLOW FLASH
MEDIUM FLASH
HOLD FLASH
EXCLUSIVE HOLD
(DSS Console Only)
DND FLASH
(DSS Console Only)
FAST FLASH
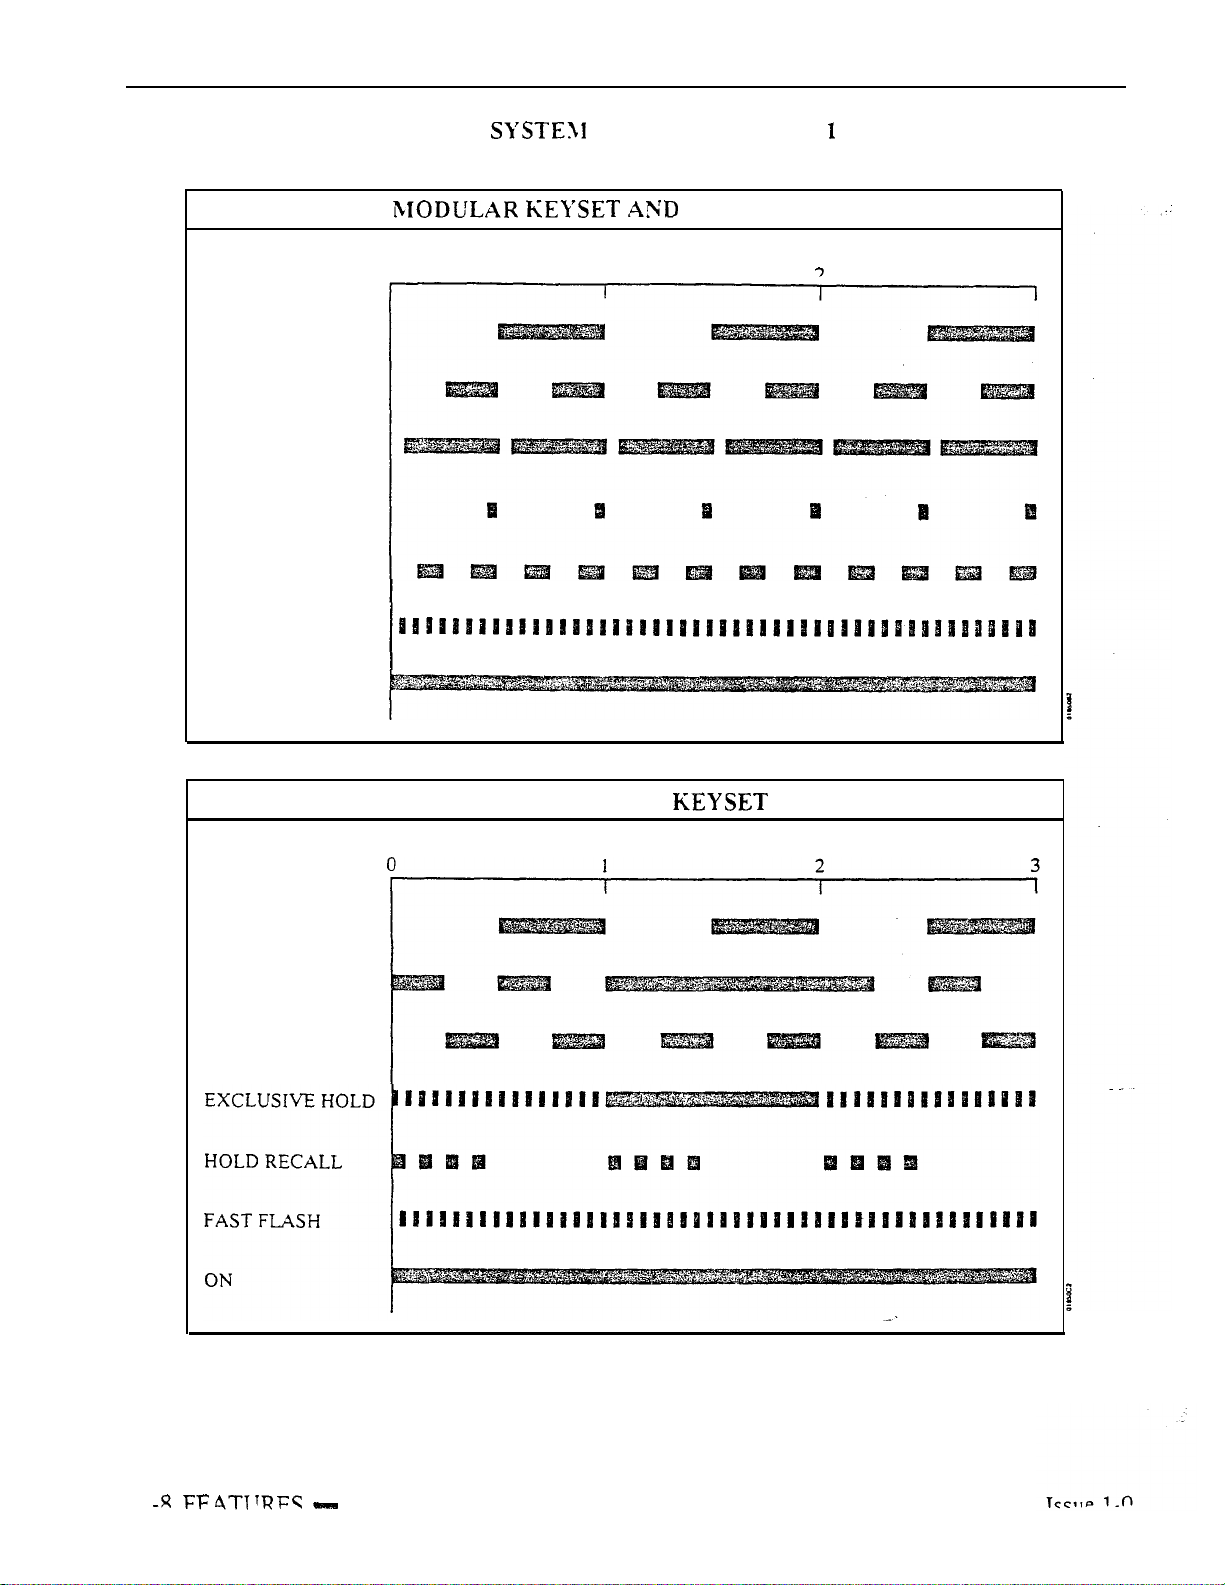
Table l-l FLASH RATES (Page of 2)
DSS CONSOLE
(Seconds)
0
1
3
ON
SLOW FLASH
I-HOLD
HOLD FLASH
NON-MODULAR
(Seconds)
1
Page 25

Table FLASH RATES (Page 2 of 2)
INTRODUCTION
SLOW FLASH
HOLD FLASH
EXCLUSIVE HOLD
I-HOLD
FAST FLASH
ATTENDANT
(Seconds)
ATTENDANT CONSOLE (ONYX IV)
(Seconds)
0
1
3
2
3
SLOW FLASH
I-HOLD
(HOLD KEY)
(LINE KEY)
HOLD RECALL
KEY)
Issue 1-O
FEATURES 1-9
Page 26
INTRODUCTION
ICM
CALLBACK
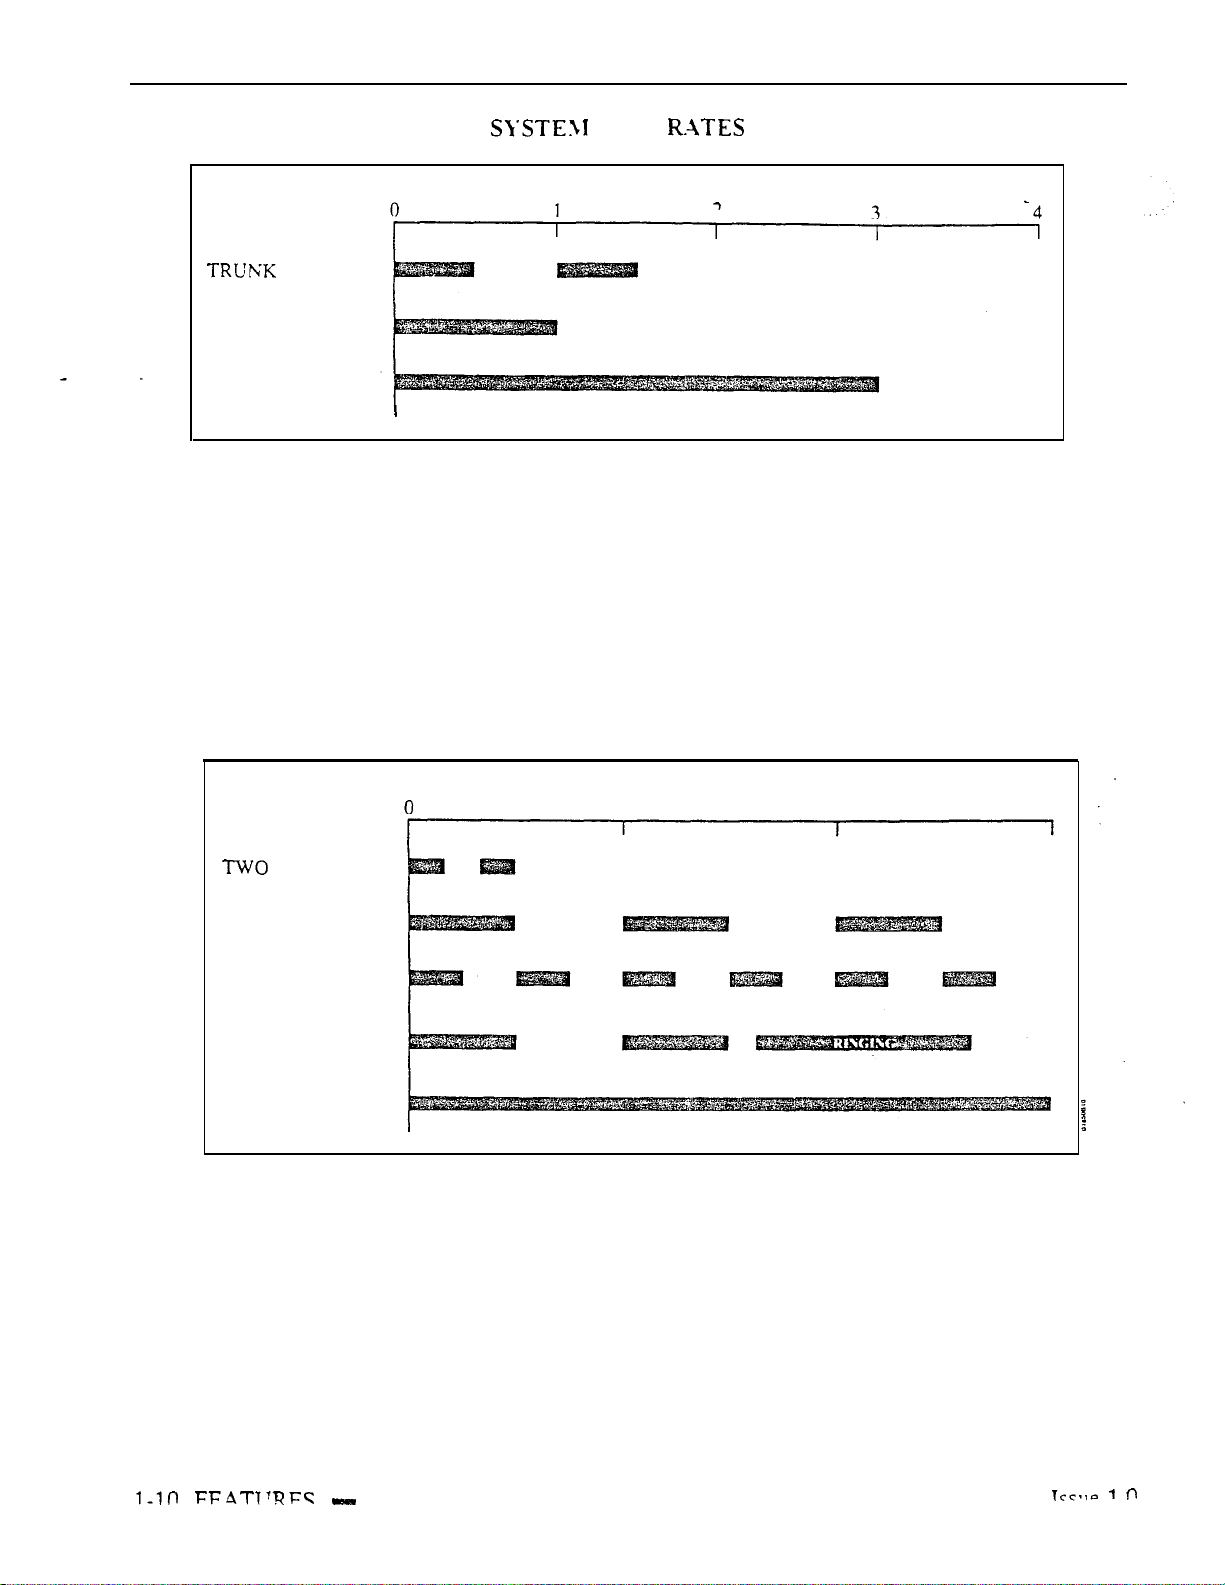
Table 1-Z RING
(Seconds)
Note:
BEEPS
BUSY TONE
FAST BUSY
RING BUSY
Each group of four extensions rings with different tones. This is called
Distinctive Ringing.
For example, extension 300 rings differently than
extension 301. Extension 301 rings differently than extension 302.
Every fourth extension, the Distinctive Ringing pattern repeats. For example,
extension 300 rings the same as extension 304. Extension 301 rings the same
as extension 305, and so on.
Table 1-3 SYSTEM TONES
(Seconds)
1
2
3
DIAL TONE
Page 27

Table SYSTEM NUMBER PLAN (Page 1 of 3)
INTRODUCTION
Code
dig.
or 6
#+DSS Con.+4
#+DSS Con.+7
#
1
Note:
Account Codes
Account Code number
ACD agent puts self back in service
ACD agent removes self
Erase
ACD supervisor puts agent back in service
ACD supervisor removes agent from service
Call Forwarding
Cancel Call Forwarding
Call Forwarding option 1 (ring no answer)
Call Forwarding option 2 (ring no answer and busy)
Call Forwarding option 3 (all calls)
Call Parking
Park Orbits
At transfer call to Park Orbits 60-69
Call Timer
Call Timer
Call Waiting
Call Waiting (answering a waiting call from an ESL set)
All the functions below are from Intercom dial tone (except where noted).
Function
Call Distribution
service
messages (dial 9) or abort procedure (dial 6)
calls to main attendant
2
348-363
396-427
801-816
801-812
801-832
801-872
9
90-98
Callback
When hearing busy/ring busy, dial 2 and hang up to leave Callback
Cancel Callback left at own
Cancel all Callbacks at own extension
Central
VS trunk numbers
12x36 trunk numbers
32x60 trunk numbers
1
VS trunk access codes
12x36 trunk access codes
trunk access code-s
Single digit access to group 1 (90)
Trunk group access (groups l-9)
Conference
Meet-Me Conference
Retrieve Conference from Hold at
Dialing Number Preview
While idle, dial * or to activate Dialing Number Preview
Directed Call Pickup
VS Directed Call Pickup codes
56x 120/72x 180 Directed Call Pickup codes
Calls (Trunk Numbers and Access
trunk numbers
access codes
Directed Call Pickup codes
Codes)
1-O
FEATURES
l-l 1
Page 28
INTRODUCTION
Code
3
37
#
364-371
428-435
548-555 .
556-563
Table l-4
Note:
Directory Dialing
While idle, dial 3 to activate Directory Dialing
While idle, dial 32 to access the Company-Wide Directory
While idle, dial 34 to access the Directory
While idle, dial 37 to access the Personal Speed Dial directory
Forced Line Disconnect
Flash
Flash the trunk
Group Call Pickup
Group Call Pickup
From idle, assign delayed ringing to pickup key
From idle, assign lamp-only (no ringing) to pickup key
From idle, assign immediate ringing to pickup key
Group Ring
VS Ring Groups
All the functions below are from Intercom dial tone (except where noted).
hearing busy, dial to disconnect trunk
Ring Groups
180 Ring Groups (when programming
SYSTEM NUMBER PLAN (Page 2 of 3)
Function
Ring Groups (for transfer and calling)
+ ext
300-347
300-395
300-479
4
VS retrieve trunk call from Hold
12x36 retrieve trunk call from Hold
retrieve call from Hold
Intercom
Intercom call, forced ringing
VS extension numbers
120/72x180 extension numbers
Your attendant
Attendants 1-4
While idle, incoming Voice Announce off
While idle, incoming Voice Announce on
Intrusion
When hearing busy/ring busy, dial 4 to intrude
Last Number Redial
Last Number Redial
From idle, redial last number dialed
Message Waiting
While hearing busy tone at set, dial 6 to send message
Retrieve
Cancel all Messages Waiting left at own extension
Night Answer
Pick up night mode call ringing External Paging
Pick up night mode call ringing operator (ONYX IV only)
retrieve trunk call from Hold
extension numbers
Message
Waiting
Operator Assistance
Record OPA message 02-07
or 6
Listen to previously recorded message 02-07
Erase
FEATURES
messages (dial 9) or abort procedure (dial 6)
Issue 1-O
Page 29
INTRODUCTION
Code
2’
7’
DIAL SAVE
6
Table
Note:
,
Paging
All Call Paging
Page Zone
Page Zone 2
Page Zone 3
Page Zone 4
Page Zone 5
Page Zone 6
Page Zone 7
Removing Lines and Extensions from Service
Remove extension from service
Save
Steps for saving the last number dialed or dialing a saved number
Selectable Display Messages
VS
Select messages 600-663
Silent Monitor
Activate Silent Monitor for extension dialed
When busy/ring busy, dial 6 to activate Silent Monitor
All the functions below are from Intercom dial tone (except where
select messages 600-6 15
NUXIBER PLAN (Page 3 of 3)
Function
20-29
70-7999
6
8
Speed Dial
Personal Speed Dial bins (second 10 bins)
Personal Speed Dial bins (first 10 bins)
System Speed Dial bins
Program Personal Speed Dial (second 10 bins)
Program Personal Speed Dial (first 10 bins
Program System Speed dial bins
From idle, program One-Touch Speed Dial key
From idle, dial Speed Dial number stored under key
Split
Retrieve second call
Time and Date
Set Time
Set Date
While idle. dial 6 to hear the extension number
While idle, dial 8 to hear the time
Walking Class of Service
Digits dialed before Walking Class of Service code
Miscellaneous
From attendant, set baud rate of COM ports (see page 2-2)
After attendant dials
After attendant dials
dial 1 to program modem baud rate or 2 to set local baud rate (see page 2-2)
or sets baud rate (see page 2-2)
not available on 56x120 and 72x180 systems))
Issue 1-O
FEATURES
3
Page 30

ACCOUNT CODE
Description
Account Codes are user-dialed codes associated with trunk calls. An
extension user may enter an Account Code while placing a call or any time
while on a call. The system administrator uses Account Codes to restrict and
classify trunk calls. The Account Codes print along with the other call data on
the SMDR record after the call completes. Account Codes can be up to 10
digits long, using the digits O-9.
There are two modes of Account Code Operation:
Mandatory
Verifiable
With Mandatory Account Codes, a user must enter an Account Code when
placing a trunk call. If the user fails to enter the code, the system cuts off the
call.
With Verifiable Account Codes, a user must enter an Account Code from the
Verifiable Account Code list when placing a trunk call. If the user fails to
enter the code enters a code not on the list), the system cuts off the call.
The system administrator can enter up to 601 Verifiable Account Codes into
system memory. A Verifiable Account Code must be at least two digits long.
In VS, you must have an AUX Module to have Verifiable Account
Also, the VS Account Code list holds 400 codes. (The larger systems have
601
codes).
Conditions
a. Users can enter Account Codes for incoming calls. However, the system
cannot make these codes Mandatory or Verifiable.
b. The system never requires a user to enter an Account Code for a 911 call.
Default Configuration
Mandatory and Verifiable Account Codes disabled. Users can optionally
enter unverified Account Codes.
rogramming
Required Programming
QI- Verifiable Account Code List Enter up to 601 codes into the Verifiable
Account Code List. The codes must be at least two digits long.
QL- Codes, Mandatory Account Codes
Enable/disable Mandatory Account Codes.
QL- Codes, Verifiable Account Codes Enable/disable
Verifiable Account Codes.
QL- Codes, Account Codes for Toil Calls Only
Enable/disable Mandatory Account Codes for all outside calls or just for toll
calls.
QL- Codes, Minimum COS for Mandatory Account
Codes
Codes. For example, if you enter 00,
Other Programming
Set the minimum COS number that requires Mandatory Account
00-27 must enter Account Codes.
E- Extensions, Class of Service Assign a of Service to each
extension. See QL-LCR/ARS/Account Codes, Minimum COS for Mandatory
Account Codes.
Suppress When Speed Dialing For ONYX IV, enter Y(es) to
allow users to enter Account Codes without interrupting their call (see Feature
Operation below).
FEATURES
Issue 1-O
Page 31

Related Features
Feature Operation
Step 1
Step
2
Step 3
Step 4
ACCOUNT CODE CAPABILITY
Automatic Route Selection
The system can Account Codes and ARS Authorization Codes for the same
call. If you want to use Account Codes with ARS, make sure you
Account Codes in the QL option.
Speed Dial
A extension user can have One-Touch Speed Dial keys for simplified Account Code
entry. However, the user cannot then implement Last Number Redial or Save
redial the call.
To enter an Account Code when placing an outside call:
If you use a One-Touch Speed Dial key instead of the procedure below, the system
will reverify your account code (if verification is applicable).
Place call.
If you have the Account Code in a One-Touch Speed Dial key, you can press the key
instead of using steps 2-4.
Press PGM# immediately after dialing the number.
Enter Account Code.
Press PGM# again.
Entering # again, additional digits and another # may change your Code.
Step
1
Step 2
Step 3
Step 4
Step
Step 6
Step
1
Step 2
Step 3
Step 4
To enter an Account Code for the call you are on:
If you use a One-Touch Speed Dial key instead of the procedure below, the
will reverify your account code (if verification is applicable).
Do not hang up.
Press INTERCOM.
If you have ESL Set, press HLD instead.
Look for: INTERCOM On
Listen for: Dial tone
(Modular) -- HOLD Fast Flash (green), Slow Flash (red)
(Non-Modular) -- HOLD Exclusive Hold
Press
Listen for: Dial tone stops
Enter Account Code.
Press
again.
Press
INTERCOM and HOLD go out
Line key On (red/green)
Listen for:
To enter an Account Code
You return to the call
without interrupting the you
(ONYX IV only):
Place call.
Look for:
Listen for:
You must wait at least six seconds (from the last digit dialed) for the call to go
through.
Line key On
Conversation with caller
Dial
You can continue to converse while entering the code.
Enter the Account Code.
Dial
system
are on
Issue 1-O
FEATURES
1-15
Page 32

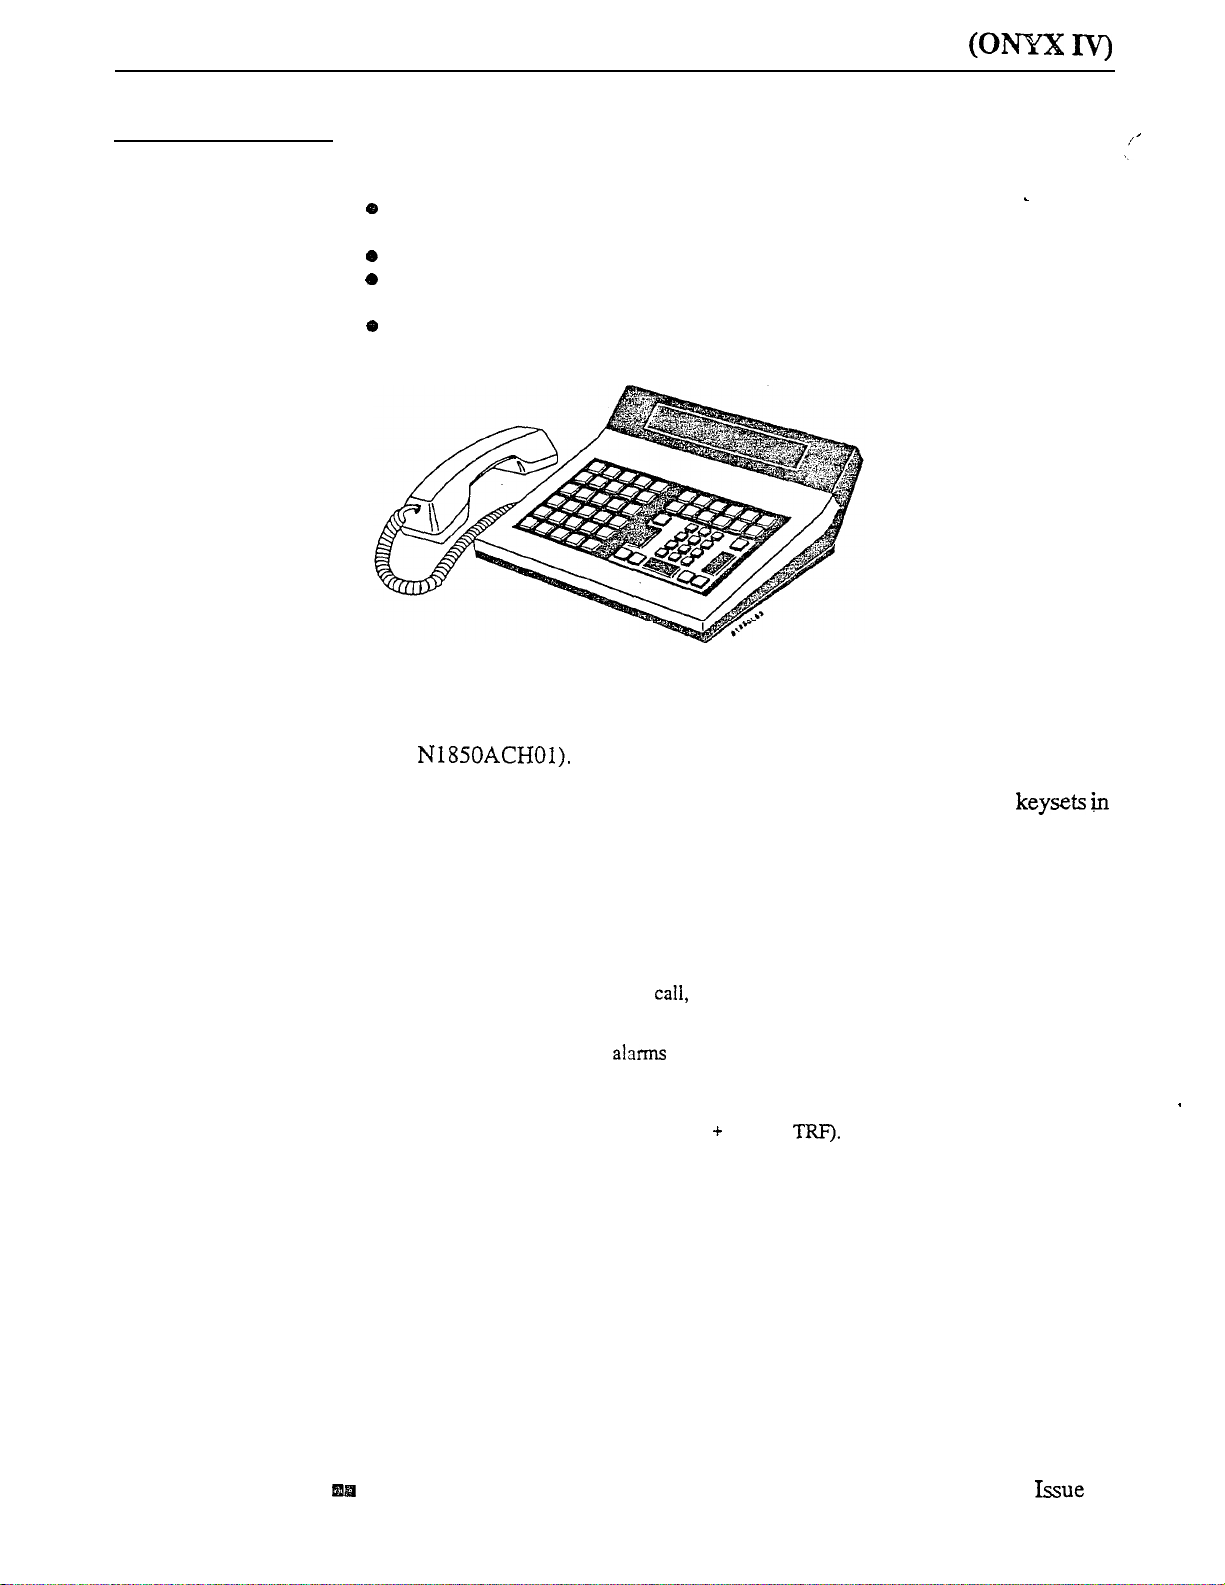
ALPHANUMERIC DISPLAY
Description
Each Multibutton Display Telephone has a
that provides various feature status messages. These messages (Tables
through l-7) help the display telephone user process calls, identify callers and
customize features. Note that Time and Date always display when the
extension is idle.
There are four categories of Alphanumeric Displays:
Attendant Displays (Table which can occur only at attendant
extensions
ACD Supervisor Displays (Table which can occur only at the ACD
supervisor extensions
Other Telephone Displays (Table which can occur at any display
telephone
Telephone programming displays (VS only). Refer to the Administrator’s
Guide for the specifics.
alphanumeric display
Non-Modular display
telephone’s display (see Feature Operation).
Conditions
None
Default Configuration
None
users can adjust the brightness of their
Page 33

ALPHANUMERIC DISPLAY
Table l-5 DISPLAYS
This display... Appears when using...
Terminal Programming
Terminal Programming
300
-1200
2400
9600
19200
ABORTED
ALT OPR ASSIGNED
CANCEL ALT OPR
COMPLETED
DELETE ALL MSG ?
EXPD KSU FAILED
LINE nnn FAILED
LINECRD nn FAILED
MAJOR ALARM
MAJOR/MINOR ALRM
MINOR ALARM
NIGHT MODE OFF
NIGHT MODE ON
PARKED IN nn
STA nnn FAILED
Terminal Programming
Terminal Programming
Terminal Programming
Terminal Programming
Terminal Programming
Terminal Programming
Selectable
Alternate Operator
Alternate Operator
Selectable Display Messages
Automatic Fault Reporting
Automatic Fault Reporting
Automatic Fault Reporting
Automatic Fault Reporting
Automatic Fault Reporting
Automatic Fault Reporting
Night Answer
Night Answer
Park
Automatic Fault Reporting
Messages
And shows...
Attendant has dialed INTERCOM, 0,
selected port to program (1 or
system is asking for port speed entry
Attendant has dialed INTERCOM.
and
(1 or 2)
Port speed of 300 baud selected
Port speed of 1200 baud selected
Port speed of 2400 baud selected
Port speed of 4800 baud selected
Port speed of 9600 baud selected
Port speed of 19,200 baud selected
Attendant has dialed N to abort the
procedure which cancels all Selectable
Display Message selections
Attendant just enabled Alternate Operator
Attendant pressed
Alternate Operator
Attendant has dialed Y to cancel all
Selectable Display Message selections
cancel all messages
In VS, shows attendant that expansion KSU has
failed
Trunk circuit nnn failed
Trunk/Line PCB
Major alarm(s) has occurred in system
Both major and minor alarms have occurred
in system
Minor alarm(s) has occurred in system
Attendant pressed to disable
Night Mode operation
Attendant pressed to enable
Night Mode operation
Attendant parked call in orbit
Extension nnn failed
is asking for port selection
dialed INTERCOM to
failed
and
0
to cancel
Issue 1-O
FEATURES
Page 34

ALPHANUMERIC DISPLAY
Table 1-6 ACD SUPERVISOR DISPLAYS
This
x-304
01 L-01
I
-ABORTED
COMPLETED
DELETE ALL MSG ?
I
Appears when using...
Automatic Call Distribution
Automatic Call Distribution
Automatic Call Distribution
Selectable
Selectable Display Messages
Selectable Display Messages
Display Messages
And shows...
Two calls are waiting and extension 304
has
the longest waiting call (1 minute.
23 seconds)
Line 01 has one call waiting for
ACD Supervisor dialed INTERCOM and
pressed DSS Console key for member
extension
ACD supervisor has dialed N to abort the
procedure which cancels all Selectable
Display Message selections
ACD supervisor has dialed Y to cancel all
Selectable Display Message selections
ACD supervisor
to cancel Selectable Display Messages
selected by extension users
1-18 FEATURES
Tssue 1-O
Page 35

ALPHANUMERIC DISPLAY
Table 1-7 DISPLAYS (Page of 3)
This display...
KEY
A-Y O=SPACE Z
ACCESS DENIED
AUTHORIZATION NO
AUTO TIMER ON
AUTO TIMER OFF
B Assigned name
BUSY RECALL
CALL FROM
CALL FROM
nnn
nnn
Lnn
CALL FROM ORBIT
CALL WAITING
Callers name
FROM nnn
COMPANY WIDE DIR
CONFERENCE CALL
COST
Date and Time
DIAL PREVIEW
Digits
DIRECTORY
OFF
DND ON
DO NOT DISTURB
DSS FIELD
?
Appears when using...
Intercom. Speed Dial
Speed Dial
Directory Dialing
Directory Dialing
ARS
Call Timer
Call Timer
Transfer
Transfer
Call Waiting, Intercom,
Hotline. Station Cal! Coverage
Central Office Calls, Answ.
Park
Call Waiting
Call Waiting, Intercom, Hotline,
Station Call Coverage,
Central Office Calls
Call Forwarding
Directory Dialing
Conference, Privacy
Least Cost Routing
Time and Date Setting
Station Call Coverage
Dialing Number Preview
Central Office Calls, Last
Number Redial, Save,
Speed Dial
Directory Dialing
Do Not Disturb
Do Not Disturb
Intercom, Station Call
Coverage
Intercom, Direct Station
Selection
Call DSS,
Selectable Display Messages
shows...
Options when programming Intercom
Voice Announce. Group Call Pickup ringing
and One-Touch Speed Dial keys
In the Speed Dial programming mode. user
has dialed Y to program Speed Dial names
After dialing
Dialing. user dials
P or C for Directory
for options
User tries to use company-wide directory
(System Speed Dial) from a restricted
phone
User places an outside call and ARS
requests an Authorization Code
activates Call Timer
User deactivates Call Timer
User answered Trunk recalling from busy
extension (with indicated name) after an
incomplete Transfer
User answered Trunk recalling from busy
extension nnn after an incomplete Transfer
Intercom call from extension nnn
User presses a line key to answer a trunk
without an assigned name
retrieved from Orbit
Caller (with programmed name) waiting
Call from extension or trunk
with indicated name
Call forwarded from extension nnn
User dialed C for company-wide directory
User established Conference or joined a
call using Privacy Release
Cost of current outside call
The current date and time (while the
extension is idle)
User is programming ringing options for a
Call Coverage key
User dialed
to activate Dialing
Number Preview
Digits as trunk call dials out
User dials D when extension is on hook to
view Directory Dialing options
User disabled DND
User enabled DND
User called extension in DND
User pressed INTERCOM and enabled
DSS keys
User dialed INTERCOM and system
shows selection options
Issue 1-O
FEATURES
1-19
Page 36

ALPHANUMERIC DISPLAY
Table 1-7 TELEPHONE DISPLAYS (Page 2 of 3)
This display... Appears when using...
ENTER A/C CODE L C R
ENTER BIN
ENTER FEAT. CODE
EXT
F Assigned name
TO nnn
GROUP-R PICK-UP
CIRCUIT BUSY
HOLD RECALL Lnn
HOLD RECALL nnn
HOLD/WAIT
ICM ANNOUNCE ON
ICM ANNOUNCE OFF
DIRECTORY
LINE
MIKE MUTED
MSG. FRM.
Name
NO INSTALLED
NO SPEED DIAL
NO. OF
NUMBER SAVED
Speed Dial
Speed Dial
Call Forwarding
Selectable Display Messages
Call Forwarding, Intercom
Group Ring
Intercom
Hold
Hold
Transfer
Intercom
Intercom
Directory Dialing
Speed Dial
Central Office Calls
Microphone Mute
Message Waiting
Central Office Calls,
Intercom, Hotline,
Message Waiting,
Station Call Coverage
Directory Dialing
Speed Dial
Voice Mail Compatibility
SAVE
And shows...
User places an outside call and LCR
requests an Account Code
User is programming Speed Dial bins
User is programming Intercom Feature in a
Speed
Speed Dial key)
User (with DSS suppressed) dials
INTERCOM
options
User placed Intercom call to extension
forwarded to extension nnn
User answered an outside call ringing a
Ring Group (of which the user’s extension
is not a member)
User places an Intercom call to a dual
channel Data Set that has both channels
busy. Also occurs if user tries to use
Handsfree and no system Speakerphone
circuits are available
Tie line has a trunk on Hold
User picks up a call abandoned on Hold
by extension nnn
User is Transferring a to a busy
extension that has xx
calls camped-on (waiting)
User dialed
voice announcements
User dialed
Voice announcements
User dialed I (or pressed D key in ONYX IV)
for Intercom directory
User
One-Touch Speed dial key, and system is
asking for a trunk number
User placing an outside
trunk nn
User pressed to mute the
phone’s mic
User is viewing messages, and has
Message Waiting from extension nnn
User is placing a call, answering a call,
or viewing a message for an extension with
a programmed name
User trying to use Directory Dialing in a
system with a MEM-A PCB or a VS without an
Aux Module
User is trying to enter the users Personal
Directory with no Speed
assigned in programming
User pressed MSG to check the number of
Voice Mail messages waiting
Number accepted as Saved number
(ONYX Iv
bin (or under a One-Touch
and system shows selection
on Hold and
to allow incoming Intercom
to block incoming Intercom
is
programming a Speed Dial bin or
has seized
blocks
Page 37

ALPHANUMERIC DISPLAY
Table 1-7 TELEPHONE DISPLAYS (Page 3 of 3)
display...
This
ORBIT RECALL nnn
P Assigned name
PARKED IN nn
PERSONAL DIR.
PRIVACY
PRIVATE CALL
PROGM NAME
PROG MESSAGE
R Assigned
RELEASE PRIVACY
RING NO ANS nnn
SELECTED IDLE LINE
SET DATE MMDDW
SET TIME HHMMSS
SPEED DIAL BINS
Speed Dial name
TEL NUMBER?
UNLISTED NAME
V Assigned name
VACANT NO nnn
VACANT NUMBER
WELCOME
FROM nnn
name
Appears when using...
Park
Directed Call Pickup.
Group Pickup
Park
Directory Dialing
Group Call Pickup
Privacy Groups
Privacy Groups
Speed Dial
Personal Greeting
Hold, Park, Transfer
DID
Privacy
Hold, Park, Transfer
DID
Dialing Number Preview
Time and Date Setting
Time and Date Setting
Speed dial
Speed Dial
Speed Dial
Directory Dialing
DID
DID
Direct Station Selection
And shows...
Call user parked is recalling user
extension (nnn)
User has picked up a call from
extension with assigned name
User Parks call in orbit
User dialed P for personal directory
User picked up a call ringing
nnn
User presses line key to have privacy
User pressed line key for trunk that has
Privacy enabled by Hotline partner. Trunk
normally must have Privacy released.
User is programming Speed Dial and
system is asking for a name entry
User is programming a Personal Greeting
User answered recalling trunk call from
extension with assigned name
User answered call routed from extension
with Assigned name via DID RNA
Intercept
User pressed a line key to release privacy
on a call where privacy was previously
established
User answered trunk call recalling from
extension nnn
User answered call routed from extension
nnn via DID RNA Intercept
After entering number, user pressed DIAL
to place call
User is setting system date
User is setting system time
User presses DIAL to program or use
Speed dial
User dialing out a Speed Dial with a stored
name
User is programming Speed Dial and the
system is requesting a number
User tries to access Directory Dialing, and
the system has no names programmed
User answered call routed from extension
with assigned name via DID Vacant
Number Intercept
User answered call routed from extension
nnn via DID Vacant Number Intercept
User has pressed an undefined DSS
Console key
Initial message after system start-up or reset
Issue 1-O
FEATURES
1-21
Page 38
ALPHANUMERIC DISPLAY
Programming
Required Programming
E- Extensions. Circuit Type
l
Display Telephone.
Other Programming
None
Related Features
Refer to the features indicated in Tables through 1-7.
Operation
Refer to the features indicated in Tables 1-5 through 1-7.
To adjust the brightness of telephone’s display (if you have a
modular
Step
Press VOL UP A or VOL DN while telephone is idle.
Your phone must be idle (not ringing), with Background Music off.
Assign circuit type 02 to each Multibutton
.
i-n
Page 39

Description
Programming
ALTERNATEATTENDANT
Alternate Attendant lets the attendant forward calls to another
extension. This is useful when the attendant must temporarily leave the phone
but does not want calls to go unanswered. After activating Alternate
Attendant, outside calls that ring the attendant also ring the alternate.
Intercom calls to the attendant normally ring only at the Alternate
If
the alternate is busy, however. Intercom calls ring the attendant. After
activating Alternate Attendant. the attendant may still place calls and use
other attendant features.
Conditions
For maximum performance, the Alternate Attendant should be a 30-button
telephone with display.
Default Configuration
Alternate Attendant allowed.
Required Programming
CP- Inhibit Call Forwarding
P
capability. To
Alternate Attendant, this bit should always be 0 in COS
00.
Enable or disable Call Forwarding
Attendant.
Related Features
Other Programming
Extensions, Circuit Type
The Alternate Attendant must by a
(type 01-04).
Attendant Positions
The Alternate Attendant cannot be another attendant.
Automatic Fault Reporting
Attendant alarm indications do not display at the Alternate Attendant.
Call Forwarding
The system cancels Call Forwarding at the extension the attendant designates
alternate. In addition, the alternate cannot forward calls once designated as the
alternate.
Do Not Disturb
The cancels Do Not Disturb at the extension the attendant designates as the
alternate. If an Alternate Attendant enables Do Not Disturb, the system cancels the
Alternate Attendant assignment.
Removing Trunks and Extension From Service
The Attendant cannot remove trunks and extensions from service.
Speed Dial
The attendant can have a One-Touch Speed Dial key or Personal Speed Dial bin for
the Alternate Attendant code.
as
the
Issue 1-O
FEATURES
1-23
Page 40

ATTENDANT
Feature Operation
To reroute calls to the Alternate Attendant:
Step l
step 2
Step 3
Step
Step
Step 6
Step
step
Lift handset.
can press a One-Touch Speed Dial key instead of using Steps
l
Press INTERCOM.
Look for:
Listen for:
l
Dial
l
Dial the alternate’s extension number.
Listen for:
INTERCOM On
Dial tone
Dial tone stops
Dial 3.
Look for: MSG Slow Flash (green)
Flash (red)
Hang up.
Look for:
INTERCOM Off
To cancel the Alternate Attendant routing (and return pour calls to you):
Do not lift handset.
Press DND/MIC
MSG and go out.
FEATURES
Page 41

ALTERNATE ATTENDANT, ATTENDANT CONSOLE (ONYX IV)
Description
An attendant with an Attendant Console can forward calls to an Alternate
Attendant group. This is helpful when the attendant must temporarily leave
the console but does not want calls to go unanswered. The attendant presses a
specially programmed Alternate Attendant group key to activate and
deactivate Alternate Attendant. After activating Alternate Attendant, calls
that ring the Attendant Console also ring the Alternate Attendant group.
calls ring the group like Group Ring calls: an Alternate Attendant group
member just lifts the handset to answer. Alternate Attendant Group members
can be any telephone type.
This feature is only available in ONYX IV and requires an Attendant Console
(P/-N 89055A).
Conditions
None
Default Configuration
No Alternate Attendant groups programmed.
Attendant Console key 20 is undefined.
Programming
Required Programming
Extensions, EE- Ring Group
the Alternate Attendant group number (Al-A4).
QC- Operator Programming, DSS
extensoin number to enable Alternate Attendant at the Attendant Console.
For each Alternate enter
Enter the console’s own
Related Features
Other Programming
E- Extensions, Circuit Type
Assign the Attendant Console circuit type
06. Refer to the Attendant Console feature for addition programming.
Attendant Console/Attendant Position
The Alternate Attendant cannot be another attendant.
Automatic Fault Reporting
Attendant alarm indications do not display at the Alternate Attendant.
Group Ring (Ring Groups)
A phone in an Alternate Attendant group cannot
also
be
in a Ring
Group.
Removing Trunks and Extension From Service
The Alternate Attendant cannot remove and extensions from service.
Issue 1-O
FEATURES
l-24A
Page 42

ALTERNATE ATTENDANT, ATTENDANT CONSOLE (ONYX IV)
Feature Operation
To enable Alternate Attendant at an Attendant Console:
Step 1
Step 1
Press Alternate Attendant kev.
Look for:
You cannot use the
+ 3) instead.
Attendant On
Alternate procedure (i.e., + ext.
To disable Alternate Attendant at an Attendant Console:
Press Alternate Attendant key.
Look for:
Alternate Attendant key Off
.
Step 1
To answer an Alternate Attendant group call:
INTERCOM Fast Flash (if an Intercom call)
Line key On (red/green) if an outside call
Conversation with caller
Lift handset.
l
Listen for:
Look for:
Listen for:
If you have a loop key for the call. the key lights only after you answer the call.
Page 43
ANALOG STATION INTERFACE
AS1 Modules
The Analog Station Interface module provides standard 2500 set
service at any extension port. Install the AS1 when the site requires-a limited
number of analog interfaces -ports. This lets the installer easily connect auxiliary equipment such as
Integrated Voice Messaging without using Special Trunk Interface ports. The
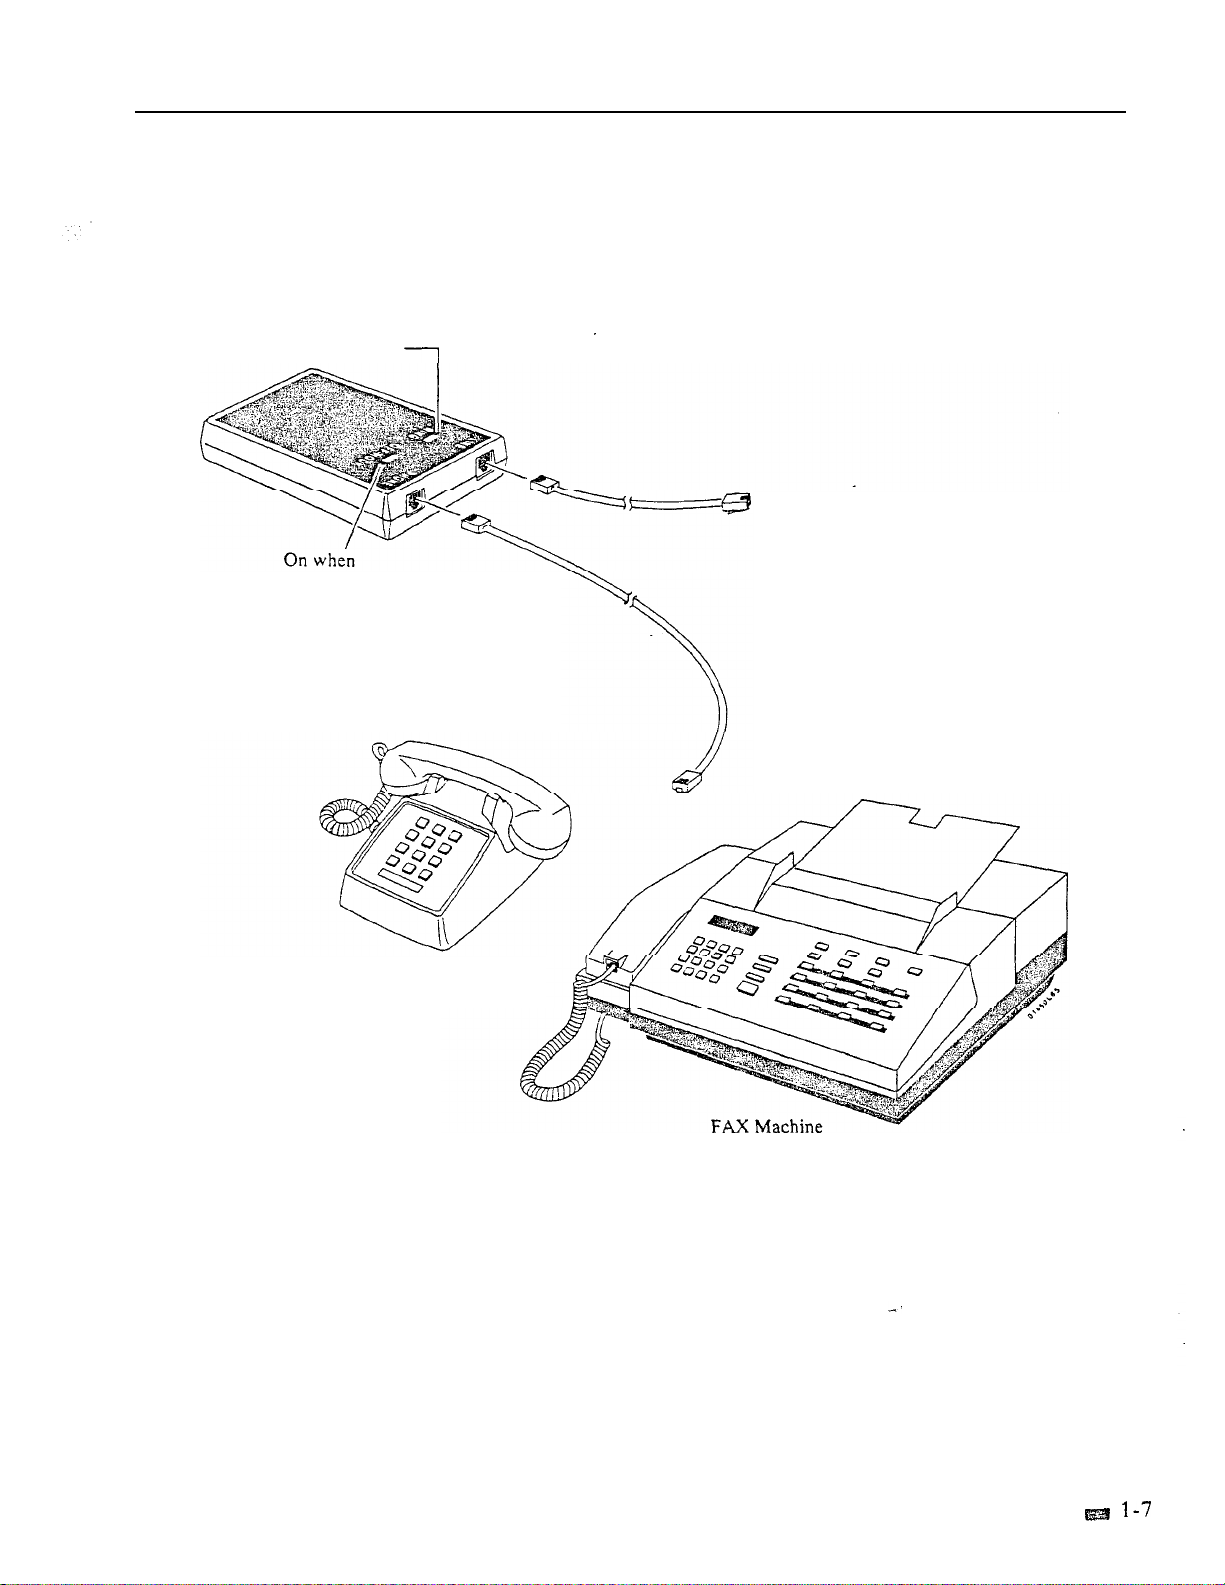
AS1 module can also support on-premise 2500 type telephones. The system
requires an AS1 module for each 2500 type port.
There are two types of AS1 modules: P/N 89748 (without a DTMF receiver)
and P/N 89749 (with an integral DTMF receiver). AS1 P/N 89748 requires
detection (i.e., a system DTMF receiver) for outgoing calls. When the
number of
system, the
the system passes dial tone to the AS1 on a first
limit contention, use the following table to determine the maximum number of
allowable. Note that other features (e.g., DISA and OPX) may also
require DTMF receivers, which reduces the total available to the
exceeds the number of DTMF receivers available in the
may “contend” for a receiver. When a receiver is available,
without reducing the number of Line/Trunk
served basis. To
Dialing
Light
Medium
Heavy
To have DTMF receivers, the large systems must have either a VAU or
PCB.
four trunk circuits.
VAU or
available).
AS1 89749 does not require a system receiver for outgoing calls.
PCB
The 8SLU PCB (P/N 88122) provides eight ports. It plugs into a
Station
The 8SLU PCB provides all the capabilities of AS1 P/N 89748, plus:
Multiple ports (up to eight connected devices)
500 (Dial Pulse) service
Two integral DTMF receivers (shared by the eight ports)
PCB slot in the large system CEU and replaces 12 extensions.
DTMF
Receivers
2
4
2
4
Each of these provides two receivers, and replaces
Heavy
The VS must have a PCU Module (not currently
10
24
8
20
6
14
may require the installation of the and
.
Issue 1-O
If the SLU ports have heavy outgoing
use of a system DTMF receiver. Keep this in mind when allocating
receivers. Also, the 8SLU PCB requires an external power supply/ring
generator. Refer to the system hardware manual for the specifics.
traffic, the SLU may require the
FEATURES
l-25
Page 44

ANALOG STATION INTERFACE
Description
(Cont’d)
Conditions
a. modules do not support Dial Pulse (500 type) telephones.
b. The device connected to the
for Type ringers (with a REN of 1 or less). For outdialing, the device
connected must provide standard DTMF signals. Do not connect a
telephone with an electro-mechanical ringer.
c. Do not install a telephone connected to an
the system to the
AWG two-pair twisted wire. Wiring from the modular jack to the analog
device should not exceed 100 feet using 22 AWG two-pair twisted wire.
d. Analog devices which use automated
detection, particularly in applications with heavy dialing traffic.
e. The system dedicates a DTMF receiver to a P/N 89748 AS1 for six seconds
after the user dials a digit (or until dial tone times out). After that interval,
the receiver becomes available to other users.
Default Configuration
None
Programming
Required Programming
(AS1 extensions use E- Extension programming for features, not E- Trunk
programming.)
must
meet the FCC Part 68 requirements
off-premise. Wiring from
modular jack should not exceed 2500 feet using 22
should incorporate dial tone
.
Related Features
Feature Operation
E- Extensions, Et- Circuit Type
ports.
Assign type 51 for P/N 89749.
Other Programming
Assign type 05 for AS1 P/N 89748 and the
IT- Activate/Deactivate Decoders Activate or deactivate the system
decoders (receivers). A service technician may have to do this during
troubleshooting to isolate a faulty receiver.
Off-Premise Extension (OPX)
A 2500 set connected to an offers the same features as an Off-Premise
Extension. Refer to the Off-Premise Extension feature for more
details.
Voice Mail Compatibility
can provide the DTMF interface for Voice Messaging.
Refer to the Off-Premise Extension feature.
DTMF
FEATURES
Page 45

STATION INTERFACE
For Your Notes
Issue 1-O
FEATURES
Page 46
Description
ATTENDANT CONSOLE
The ONYX IV system allows up to four Attendant Consoles. The Attendant
Console offers unique features that streamline call processing for operators.
These features include:
Special function keys that simplify placing and answering calls,
transferring calls and putting calls on Hold.
Feature keys for speeding up other common attendant functions
20 programmable keys for one button access to extensions and selected
features
A 40-character, two-row alphanumeric display for comprehensive call
status messages
Note:
The following paragraphs summarize the features and related benefits
available with the Attendant Console. For complete details on all the
Attendant Console features, refer to the Attendant Console Feature Handbook
(P/N
You can mix any combination of Attendant Consoles and attendant
the same system.
Attendant Console Special Function Keys
The Attendant Console has oversized, easy-to-use keys for the most
frequently-used functions.
This key...
RELEASE
CLEAR
TRANSFER
Disconnect a clear alarms or get Intercom dial tone (to place
Intercom calls).
call).
Display (remember to write them down before pressing Release
to clear them). Press this key also to clear the display without releasing.
active call.
Initiate a screened Transfer (TRANSFER + ext.) or Handsfree Transfer
(TRANSFER + ext. VOICE For an unscreened Transfer of an
incoming call, just dial the destination extension number while on a
call.
Lets the attendant...
Press this key also to clear the display (while not on a
l-26B FEATURES
1-O
Page 47
Description
(Cont’d)
ATTENDANT CONSOLE (ONYX IV)
Attendant Console Special Function
Dial Pad
Issue 1-O
FEATURES
Page 48

ATTENDANT CONSOLE (ONYX IV)
Description
Attendant Console Loop. Recall and Hold
The five loop keys are for placing and outside (trunk) calls. In
programming.
groups.
a trunk-group call or press it
trunk
an assigned key. that attendant can tell the type of trunk by the key
it rings. Refer to Programming Loop Keys below.
The Attendant Console has Recall keys for calls that have been Parked,
Transferred or placed on Hold and then not picked up. These calls eventually
recall to their assigned incoming loop key.
type of recalling trunk call
When the attendant places a call on Hold, it waits on one of the five Hold
keys. The calls remain on the Hold keys until picked up or until they recall
the appropriate RC (recall) key.
Hold, the attendant can visually keep track of the held calls.
assign a loop to incoming trunks and outgoing trunk
each loop a dual function: Press it idle to place
flashing to answer a trunk call. Since each
This lets the attendant identify the
before answering it.
By having separate keys for each call on
This key...
HOLD (1-I)
(Loop
Keys
(Recall
Put
key. Trunk calls left on Hold too long recall to their respective RC
(recall) keys.
Place and answer trunk calls. For answering calls, you assign each
trunk to a specific loop key. For placing calls, you assign each
key to a trunk group.
Retrieve unanswered trunk calls previously placed on Hold,
Transferred or Parked. Trunks ring the recall key that corresponds to
their incoming loop key. For example, if a trunk would normally ring
Lets the attendant...
a call on
it recalls RCI .
Hold (five
Hold.
maximum). The console
calls
left on Hold too long recall to the
does not
If a loop key is busy, additional incoming calls queue (stack up) on the busy
loop key. The system processes the calls on a first-come, first-served basis
when the key becomes idle.
Recalls occur after the QT- Hold Recall Time interval.
Page 49

Description
ATTENDANT CONSOLE (ONYX IV)
Attendant Console Loop. Recall and Hold Keys
(line) Keys
-Recall Keys
Hold Keys
Issue 1-O
FEATURES
1-26E
Page 50

ATTENDANT CONSOLE (ONYX IV)
Description
(Cont’d)
Attendant Console Feature
The Attendant Console has dedicated feature keys. Some of thess-feature
keys. like SAVE and CONF. and are the same as those on the
like AUTO and INT. have functions unique to the console.
Others,
This key...
DOWN
SAVE
REDIAL
AUTO
TRF
CONF
SPLIT
PAGE
FLASH
NIGHT
Lets the attendant...
UP
Set the handset and incoming ringing volume. Also use these to
set the display contrast and select from the Intercom Directory
list.
Change the system time + HHMMSS RELEASE) or
date
Save an outside number (press SAVE after placing call) or redial a
Saved Number (press SAVE while idle). The display shows,
“NUMBER SAVED.”
Redial an outside number (press REDIAL while idle)
Enable or disable Automatic Answer.
Make a Handsfree Transfer (TRANSFER ext. + VOICE
Set up a Conference (first call + CONF + second call + CONF)
Alternate between two calls (first call + SPLIT to get newest waiting
call)
Make an All Call Page
Answer incoming Intercom calls or Intercom recalls
Flash a trunk (place
Messaging
Enable or disable the Night Mode
twice + MMDDYY + RELEASE)
or
System
answer call FLASH) or respond to
Message Waiting
a Voice
FEATURES
Issue 1-O
Page 51

Description
(Cont’d)
ATTENDANT CONSOLE (ONYX IV)
Aitendant Console Feature
Intercom
Issue 1-O
FEATURES
l-26G
Page 52

ATTENDANT CONSOLE (ONYX IV)
Description
(Cont’d)
Attendant Console Programmable
The 20 programmable keys on the Attendant Console give the operator one-
button access to estensions and selected features. The programmable keys are
similar to those on the DSS Console.
attendant’s phone.
Alternate Attendant Group (key 20 only). See Alternate Attendant in this
supplement.
Call Parking orbits
Central Office Calls. line keys
Directory Dialing (ICM Directory). See Directory Dialing in this
supplement.
Hotline
Paging
Speed Dial, Personal and System
Many of the options are the same as those available to DSS Consoles.
However, the Alternate Attendant Group key is unique to the Attendant
Console programmable keys.
that they are on the
can program the keys with the following options:
FEATURES
Page 53

Description
(Cont’d)
ATTENDANT CONSOLE (ONYX IV)
Attendant Console Programmable
aaaaa
Programmable
Keys
Each Attendant Console can have up to three SO-Button DSS Consoles for
additional programmable keys. You use and program these consoles the same
way as in the ONYX
Direct Station Selection, DSS Console.
aaaaa
systems. For more information, refer to
Issue 1-O
FEATURES
l-261
Page 54

ATTENDANT CONSOLE (ONYX IV)
Description
(Cont’d)
Alphanumeric
The 40-character two-row alphanumeric display shows at a glance
information about the Attendant Console’s active call:
This display...
Date
Time
Feature Status
Loop
Call Timers
intercom
Call Timer
Outside Call
Loop Key
Extension
Class of
Service
Date
Time
\
Shows the attendant...
The current date (date and day of week only)
The current time (2-l hour clock)
The status of the current (active) call. For a complete list of the
messages. refer
How many seconds the call has been ringing the loop key. The timer
clears when the call is answered. There is one timer for each loop key.
If a second call is ringing a busy loop key, this timer shows how long
the second call has been ringing. The maximum time is 99 seconds.
the Feature and Programming Manual.
How many seconds a-call has been ringing the key. The call can
be an Intercom call or an unassigned trunk call (no loop number and no
0 loop key). The maximum time is 99 seconds.
The
trunk number for an active outside call (e.g., 001 for trunk 801)
The loop key used for the current (active) call
The extension
The Class of Service of the extension
number for an active Intercom call
on an active Intercom call_
Alphanumeric Display
Feature status
Outside Line
Loop
timers (for
Key call
Intercom call
timer
Loop Key for
active call
Class of
Service
for
extension
on call
‘Extension
on call
:
l-265 FEATURES
Issue 1-O
Page 55

Description
(Cont’d)
ATTENDANT CONSOLE (ONYX IV)
Parallel and Independent Operation
In a system with more than one Attendant Console, you can program the
consoles for Parallel Operation or Independent Operation. With Parallel
Operation, the programming and operation of the consoles is the same. For
example, if trunk 801 rings
This is helpful if both attendants should cover the same calls.
With Independent Operation. the programming and operation is unique to
each console. For example, trunks
trunks 805-810 ring
on console 2.
when the attendant coverage should not overlap.
Conditions
When installing an Attendant Console with a separate power supply (P/N
Plug the power supply into the console
Plug the console into a dedicated 120 V AC receptacle
Assign the console circuit type 06 in Circuit Type (see programming
below)
Designate the console extension as an operator in QC- Operator
Programming (see programming below)
Plug the console line cord into the console and the console’s modular jack
on console it rings on console 2 as well.
ring on console 1, while
Independent operation is appropriate
Programming
Default Configuration
No Attendant Consoles programmed.
All incoming loop keys are loop 0 (in QC- Loop Keys).
All outgoing loop keys have no rotaries assigned (in QC-
Keys).
The console’s 20 DSS keys are undefined (in QC- DSS Key
All trunks have no loop number (in EL- Loop Number).
Required Programming
To program loop keys...
E- Trunks, EL- Loop Number
Assign trunks to one of four loop numbers.
Trunks ring the Attendant Console according to the trunk loop number and the
loop
key loop number (see LOOP
KEYS)
below.
QC- Operator Programming, Loop Keys Assign each console loop key a
loop number (l-4). Trunks ring their associated loop key. For example, if
you enter 1 for
QC- LOOP KEY
and
EL- LOOP NUMBER
for trunk I, trunk.1
rings loop key 1. All trunks without a loop number ring the 0 loop key, if
there is one. If there is no 0 loop key, the trunks without a loop number ring
the INT key.
QC- Operator Programming, Keys For outgoing calls, correlate
each loop key to a trunk group. This option assigns a trunk group
to
each of the five loop keys. Refer to the Line (Trunk) Rotaries feature when
programming trunk groups.
Issue 1-O
FEATURES
Page 56

ATTENDANT CONSOLE (ONYX IV)
Programming
Required Programming (Cont’d)
To
Related Features
program
l
QC- Operator Programming,
programmable keys with any of the functions listed below.
For this function... . Enter this code...
Alternate Attendant
Group . . . . . . . .
Hotline . . . . . . . . . Extension number
ICM Directory . . . . D
Orbit . . . . . . . . . . 60-69
Page. . . . . . . . . . PO-P7
Personal Speed Dial .
System Speed Dial . .
Trunks . . . . . . . . .
To set additional Attendant Console programming...
l
E- Extensions,
06. You must do this for each console -- the console doesn’t auto-ID.
l
QC- Operator Programming, Operator Extensions
extension as an attendant.
Other Programming
E- Extensions, ED- Trunk Control
console’s ED programming.
Direct Station Selection, DSS Console
Headset Compatibility
The following features
Call Forwarding
4 Prime Line Selection
An Attendant Console can have a DSS Console.
An Attendant Console can use a customer-provided headset.
Call Coverage (Station Call Coverage keys)
Call Timer
Do Not Disturb
Monitor
Paging (receiving Pages and placing an Auto-Page)
Personal Greeting
the Attendant Console Programmable Keys...
Circuit Type
DSS KEY
Program the DSS Console
(for key 20 only)
7
Bin (usually 00-99)
Trunk number (801-872)
Assign the Attendant Console circuit type
Calls ring the console according the
do
not apply to the Attendant Console:
Designate the console
Feature Operation
l-26L FEATURES
Refer to the Attendant Console Feature Handbook (P/N
Issue 1-O
Page 57

Description
ATTENDANT POSITIONS
The attendant is the focal point for call processing within the svstem. The
system can have up to four attendants. To maximize call handling efficiency,
the attendant should have a
(Refer also to the Direct Station Selection. Console feature.)
display telephone and a DSS Console.
In addition to the features of a standard
unique features (see below). Go to the feature descriptions for the specifics.
o Automatic Answer (ONYX IV)
Automatic Fault Reporting (i.e.. viewing and clearing alarms)
Automatic Hold (refer to the Hold feature)
o Alternate Attendant
Forced Trunk Disconnect
Removing Trunks and Extensions from Service
The following features are not available to attendants:
Automatic Call Distribution (member)
Call Forwarding
Callback
Do Not Disturb
Group Listen
Handsfree and Monitor
Line (Trunk) Queuing
o Message Waiting
Off-Hook Signaling
o Paging (Receive and Auto-Page)
o Personal Greeting
Conditions
The system’s main attendant should be port 00 (usually extension 300).
the attendant also has several
Programming
Default Configuration
The system has one attendant, located at port 00 (extension 300).
Required Programming
QC- Operator Programming Designate additional attendant extensions
(other than port
Other Programming
E- Extensions, Circuit Type Assign circuit type 04 to Attendant
Telephone
E- Extensions, ES- Line Access Options, Off-Hook Ringing
Hook Ringing for each attendant.
E- Extensions,
attendant reached when the extension user dials 0.
88254.
Attendant (Operator) Assignment Assign the
300).
Allow
Off-
Issue 1-O
FEATURES
l-27
Page 58
ATTENDANT POSITIONS
Related Features
Central Office Calls
Class of Service
Flexible Numbering Plan
Handsfree and Monitor
Night Answer
Off-Hook Signaling
Ringing Line Preference
Tenant Service
Toll Restriction
The attendant has the same flexibility for placing and answering calls as does a
attendant
Attendant’s estensions use COS 30. This COS follows the programming
options of COS 0.
option to change the extension to a non-attendant COS (00-27).
Flexible numbering allows the Administrator to change the operator access
digit (normally 0) to any other
Attendants do not have Handsfree or Monitor.
Two attendants can be in a Circular Hunt Group (consisting onlv of themselves) for
special night mode operation. Both attendants must activate Night Answer to put
their trunks in the night mode. Following is an example for attendants 300 and 304:
Ext E4
300
304
An attendant should have off-hook ringing. This allows the attendant extension to
ring while it displays alarms.
Intercom calls to an attendant follow Ringing Line Preference programming.
Tenants can share the same Attendant Position.
An extension in a tenant group can have night mode restriction (e.g., CPOnly Calls at Night is 1). The restriction takes effect when the
extension’s operator activates Night Answer.
you an attendant (in QC). use the Class of Service
(I-9).
Feature Operation
To call an attendant:
Step
Step
Step 3
Lift handset.
l
Press INTERCOM
Dial attendant code.
If you have an ESL set, step 3.
Look for:
Listen for:
You can dial:
0 (for your operator) or 01 for main attendant
02-04 for attendants 2, 3 and 4
Attendant’s extension number
Listen for:
In a multiple attendant system. the system waits four seconds for a second digit.
Your call then goes through to the main operator.
INTERCOM On
Dial tone
Ringing
Page 59

Description
AUTOMATIC ANSWER (ONYX
A attendant position can have Automatic Answer. With Automatic
Answer, the attendant never has to press a line/loop key to answer a call -- or
decide which call to answer. The system automatically selects the oldest call
for them. Automatic Answer is particularly helpful to an attendant with a
headset and DSS Console. The attendant just presses the Release key on the
DSS Console to automatically answer each new call.
Programming
All attendant
have key 23 permanently assigned as the Auto Answer
key. There is no programming required. To enable and disable Automatic
Answer, the
attendant just presses the Auto Answer key (key 23).
Although Automatic Answer works like Ringing Line Preference, it has two
advantages:
The attendant can enable or disable Automatic Answer by pressing a key
The attendant hears two alert tones just before the system answers the call
Automatic Answer is only available in the PBX.
Conditions
With Attendant 88254, key 18 is Automatic Answer key.
Default Configuration
Ail attendant have key 23 permanently assigned as the Auto Answer
key.
Required Programming
None
Other Programming
QC- Operator Programming, Operator Extensions
Assign a as an
attendant.
Related Features
Feature Operation
step 1
Step 1
Issue 1-O
Attendant Console
An attendant
Answer at the console. Refer to the Attendant Console Handbook (P/N
with an Attendant Console can press AUTO to activate Automatic
for the specifics.
Data
Since Auto Answer uses key 23, the attendant cannot be a Data
To enable or disable Automatic Answer:
l
Press key (key 23).
Auto Answer key Off when Automatic Answer disabled
Auto Answer key On when Automatic Answer enabled
To answer a call with Automatic Answer you have a headset and a
DSS Console):
Press RLS on DSS Console.
Look for:
Listen for:
Line key On, or
INTERCOM key Fast Flash
Two beeps, then conversation with caller
FEATURES
Set.
l-28A
Page 60

AUTOMATIC ANSWER (ONYX IV)
Feature Operation
(Cont’d)
To answer a call with Automatic Answer (If you have a headset and don’t
a DSS Console):
Step
Step 2
Remove handset from cradle.
Your phone answers
Press and release the hook switch to get your next call.
first incoming call.
Step 1
Step
To answer a call with
(If you don’t have a headset or a
DSS Console):
Lift handset.
l
Press and release the hook to your next call.
l
Your phone automatically answers
first incoming call.
Page 61

Description
CALL DISTRIBUTION
Automatic Call Distribution (ACD) uniformly distributes incoming calls
among members of a programmed ACD group. Each ACD group consists of
member estensions. called agents. and a master number. When a call rings
the master number. the system automatically routes the call to the agent that
has been idle (on hook) the longest. The call can be a transferred call or
Intercom call to the master number. ACD obsoletes the need to have a
receptionist or attendant screen and route calls to group members.
Functions
Each ACD group can have a supervisor extension. The supervisor must have
a 30-button
monitor the status of the ACD group and each agent extension. When all
ACD agents are busy. the supervisor’s display
The number of calls waiting
The trunk or extension that has been waiting the longest (this is the next
extension/trunk in the ACD queue)
How long the trunk or extension has been waiting
The supervisor can also take agent extensions in and out of service as traffic
into the ACD group changes. ACD agents can also remove and reinstall their
own extensions. However, the supervisor can always reinstall an extension if
it was removed by an agent.
telephone a DSS Console. This lets the supervisor
The supervisor’s DSS Console should have a Hotline key for each ACD agent.
This shows at a glance the status of each agent.
When DSS key is...
Agent is...
Off. . . . . . . . .
On. . . . . . . . . . . .
Flashing . . . . . . . . . from service
DND Flash . . . . . , .
Do Not Disturb
Optionally. the supervisor’s DSS can have a Hotline key for the ACD
master number.’ This shows the status of the entire ACD group. When all
ACD agents are busy, the key for the ACD master number lights. As soon as
an agent becomes free, the DSS key for the ACD master number goes out.
In VS, ACD supervisor displays require an AUX Module. If the VS doesn’t
have an AUX module, the supervisor’s display does not show how long a call
has been waiting for an available agent.
Agents Busy Announcement
Callers into the ACD group can optionally hear an All Agents Busy
announcement. This announcement occurs when all ACD agents are busy and
the system automatically queues the call for a free agent. The system
processes the queued calls on a first-in. first-out basis. The supervisors and
attendant can customize the All Agents Busy announcement, if desired. The
announcement cannot exceed 12 seconds. The system provides one All
Agents Busy announcement, shared by all ACD groups.
see the Alphanumeric Display feature.
Issue 1-O
The system can have any number of ACD groups, any number of agents
within each group. An agent can only be a member of one ACD group.
The ACD busy announcement requires a VAU or
available in VS). The VAU or
PCB replaces four trunk circuits.
FEATURES
PCB (not
1-29
Page 62
AUTOMATIC CALL DISTRIBUTION
Description
(Cont’d)
For information on the ACD enhancements available in the PBX (ONYX IV),
Programming
refer to
Conditions
The maximum call waiting time that displays on the supervisor’s extension is
(four minutes, seconds).
Default Configuration
No ACD Groups programmed.
Required Programming
CP- ACD Supervisor
supervisor’s extension.
E- Extensions, Circuit Type
with type X (uninstalled). The master extension must be a port that has no
phone connected to it.
Extensions, Class of Service
for the supervisor’s extension.
E- Extensions, Hunt Type
Each member agent in the ACD group.
The ACD group master extension.
Make sure the supervisor extension has hunt type 00.
never be an ACD group member.
l
E- Extensions, EA- UCD Group Extension Number
master extension number to:
Each member agent
The supervisor extension
The ACD group master extension
l
Reset Queues
I-32A.
Reset system queues after initial ACD programming.
Set the Supervisor bit for the
Program the master extension number
Assign a unique COS with set
Assign hunt type 06 to:
The supervisor should
Assign the
l
Related Features
Other Programming
E- Extensions, Next Extension in Hunt Group
number, designate an
or another ACD group as the ovefflow
For the master ACD
destination. The overflow cannot be an ACD supervisor. With no
Camp-On is indefinite. Also, enter 300 for this option for all group members.
QT- System Timers, Camp On Time
Enter the interval a call to a busy
ACD group should Camp-On before routing to the overflow extension.
QT- System Timers, Number of Rings Before Recall
Set how long a
rings an extension in an ACD group before ringing the next group member.
KD- Programming Keys for DSS
Program the supervisor’s DSS
Console to have a Hotline key for each agent and the ACD master number.
This automatically makes the console’s
assignment the supervisor.
Coverage Keys/Hotline
A Call Coverage or Hotline key for the ACD master extension provides an ACD
group BLF and simplified Transfer. Call Coverage activates when all group
members are busy. In VS, this option requires an AUX Module.
Forwarding
If an extension is in an ACD Group, forwarding calls at that extension disrupts
normal ACD operation. An extension user can, however, forward calls to an
master number,
Direct Inward Line
Trunks terminated to the ACD group master number ring the group directly.
FEATURES
Page 63

Related Features
Feature Operation
Step
step
Step 3
Step
Step
Step 6
AUTOMATIC CALL DISTRIBUTION
Direct Inward Access
Do Not
Extension Hunting
System Reports and Diagnostics
Traffic Management Reporting
Transfer
To remove or install a member agent (from the supervisor’s extension):
Lift handset.
Press INTERCOM
Press
Press DSS Console key for agent you want to change.
Dial 7 to remove an agent; 4 to install.
Hang up.
To allow to record the ACD message. enable the following in the
trunk’s COS:
Call
ACD Supervisor )
Putting an extension in Do Sot Disturb temporarily removes it from it’s ACD
A terminal hunt can route to an ACD master number.
The system reports provide data on ACD group agent and incoming call activity.
The reports also show details on calls received
If an ACD caller hangs up listening to the ACD all agents busy announcement,
the call is not logged
Any user can Transfer a call to the ACD master number.
Look for: INTERCOM On
Listen for: Dial tone
Listen for: Dial tone stops
the report as Aborted.
all agents were busy.
group.
Step 1
Step 2
Step 3
Step
Step 1
Step 2
Step 3
Step
Step
Step 6
To remove or install yourself as an agent (from your agent extension):
l
Lift handset.
l
Press INTERCOM
Dial 6 to remove
Press and
Look for:
Listen for:
Listen for:
Look for:
INTERCOM On
Dial tone
yourself as an agent; 4 to install.
Dial tone stops
hang up.
At supervisor’s DSS Console, key for your extension flashes
Medium Flash
To record the ACD All Agents announcement (from a supervisor or
attendant extension):
Lift handset.
l
Press INTERCOM
Look for:
Listen for: Dial tone
l
Press
Listen for: Dial tone stops
On
Dial 686.
Listen for:
Voice message, “Please start recording.”
Record message when you hear the tone.
Hang up when you are done.
Issue 1-O
FEATURES
l-31
Page 64

AUTOMATIC CALL DISTRIBUTION
Feature Operation
(Cont’d)
To erase the ACD All Agents announcement (from attendant
Step
Step I
Step
3
Step
Step
Step 6
or ACD Supervisor
1
l
Lift handset.
l
Press INTERCOM.
Press
l
Dial
Press
This also erases all the Assistance and Personal
Greetings.
Look for: INTERCOM On
Listen for:
Listen for:
Listen for: Dial tone
Press 9 to delete the announcement.
Press to abort the procedure and leave the announcement unchanged.
estension I:
Dial tone
Dial tone stops
OR
FEATURES
Page 65

Description
CALL DISTRIBUTION (ONYX IV)
Automatic Call Distribution (XCD) in the PBX provides the following
enhancements:
Enhanced Supervisor Functions
Simplified ACD Programming
Overflow to Voice Mail
Priority
Announcement Message Options
Programmable Agent Work Time
Programmable
Extended Supervisor’s Timer
For more information on the basics of ACD, refer to Automatic Call
Distribution on page l-29.
Enhanced Supervisor Functions
The supervisor has programmable alert for waiting calls. With programmable
alert, the supervisor’s phone can alert (ring) for calls that wait while all agents
are busy. The alert can occur after a set number of calls are waiting, after a
call has been waiting a programmed interval, or both. This option permits the
supervisor to easily cover ACD calls when the agents have more work than
they can handle.
The supervisor can also put the ACD group in the night mode. This lets the
supervisor redirect trunks when all the ACD agents are off-duty. Once in the
night mode, trunks terminated to the ACD group ring their night destinations.
For example, a trunk’s
Direct Trunk Termination assignment can be the
ACD master number. The trunk rings the ACD group directly during the day.
When the supervisor activates night mode for the ACD group, trunk routes to
the EI- Night
Routing Destination.
When programming supervisor alert and night mode options, refer to the chart
Setting Functions
in Programming.
An extension can be a supervisor for more than one ACD group. The
supervisor extension must have a DSS Console with a Hotline key for each of
their ACD group master numbers. When assigning a supervisor to an ACD
group, refer to the chart
Setting Functions
in Programming.
Simplified ACD Supervisor Programming
When assigning an ACD supervisor, assign an extension a Class of Service
with the Supervisor option enabled
Then, assign the
EU- ACD Group Setup. There is no need to program the and EA
options for the supervisor. Remember, the supervisor must have a DSS
Console (refer to the KD option).
When programming supervisors, refer to the chart
Programming.
Setting Supervisor
Issue 1-O . FEATURES
Page 66

AUTOMATIC CALL (ONYX IV)
Description
(Cont’d)
Overflow to
When all agents in the ACD group are busy. waiting calls can
(divert) to the Voice Mail. an extension or another group.
Overflow can occur immediately or after a programmed interval. Setting the
overflow is helpful for ACD groups that have an alternate answerer. Calls
don’t just wait in queue --
When programming overflow options. refer to the chart
Options
in Programming.
Priority Answering
ACD can route calls according to the priority of agents and trunks. With
agent priority, ACD can route calls to the highest priority available agent,
bypassing lower priority agents. The lower priority agents receive calls only
when all the higher prtority agents are busy. Using agent priority, ACD can
automatically route the most calls to the more experienced agents.
When all agents are busy, trunk priority will send the highest priority trunk to
the first free agent. Trunk priority routes calls based on the trunk’s priority
number, instead of how long the trunk has been waiting. This lets ACD
differentiate between trunks in queue. For example, if important sales calls
are queued with routine service calls, ACD can handle the sales calls first.
they go to the alternate answerer.
the
When programming priority answering, refer to the chart
Agents Trunks
for
in Programming.
Setting
Priorities
Announcement Message Options
The PBX provides two types of ACD announcements, the initial
announcement and the repetitive announcement. Callers to an ACD group
can hear an initial announcement instead of ringing. The initial
announcement can occur as soon as the
comes in or after a programmed
interval. Additionally, the announcement can play automatically for all
callers, or just when all agents are busy. The initial announcement can be
from the Voice Messaging System, the OPA or the standard Voice Prompting
Messages.
If all ACD agents are busy, the ACD caller can hear a different (repetitive)
announcement while waiting for an agent. This repetitive announcement can
be from the Voice Messaging System or the OPA. Additionally, the system
administrator can program the announcement to repeat at specific intervals.
The repetitive announcement assures waiting callers that they have not been
forgotten. Note that enabling overflow disables the repetitive announcement
message. When programming announcements, refer to
in programming.
Setting the
Programmable Agent Work Time
After an agent completes an ACD call, the programmable agent work time
allows them time complete desk work before accepting a new call. After the
agent’s work time expires, ACD routes the next waiting call to the agent.
When setting the agent’s work time option, refer to the chart
ACD Functions
in Programming.
Setting
Page 67

Description
CALL DISTRIBUTION (ONYX IV)
Programmable
Each ACD member can have a programmable key assigned as an
Dutv When the member presses the key, they remove themselves from
(i.e.. become Off can no longer receive ACD group calls.
To return
presses the
Supervisor’s Timer
The maximum call waiting time that displays on the supervisor’s extension is
99 minutes. In the ONYX
and 15 seconds.
Conditions
None
Configuration
ACD not programmed.
No On/Off Duty keys defined.
to (i.e.. become On Duty). the member just
again. While Off Duty. the agent can still receive non-ACD
systems. the maximum time is 4 minutes
Programming
Required Programming
KS- Programming Keys for To give an extension an On/Off
key, enter I for an available key.
For additional programming information, see the following charts.
Other Programming
None
An agent remains Off-Duty until returned to On-Duty.
Issue
FEATURES
Page 68

AUTOMATIC CALL DISTRIBUTION (ONYX IV)
Options A and B can overlap.
For example, if A is
call rings) and B is 30
seconds, supervisor
after 1st call has waited
30 seconds. Supervisor
always rings for 2nd call.
OPTION
A
OPTION
B
For
EST.
enter the supervisor’s
number. An extension cnn be a
for many groups.
NO
For EC-NO.
OF
BEFORE
enter 0.
OF CALLS
BEFORE
the number of that can
before
Range is
to
have second waiting
CALL WAITING
ALERT,
ACD should wait
rings.
Page 69

For EST.
AUTOMATIC DISTRIBUTION (ONYX IV)
SETTING THE OPTIONS
ST.4
For EST.
enter number of
which calls should overflow.
Overflow can also be an
master.
When all agents are busy. shoul
call
overflow
or
master number.
Mailbox for ACD master number.
O-255
If you enter 0,
Issue 1-O
FEATURES
Page 70

AUTOMATIC CALL DISTRIBUTION (ONYX IV)
PRIORITIES FOR
START
PRIORITY to set the priority
(O-99). The idle agent with the
priority gets the
first. Calls cycle normally amoung
agent5 with same priority.
For each trunk, use
PRIORITY to set the
priority (O-99). The trunk with
the highest priority gets answered
first. If waiting trunks have same
priority. ACD routes calls FIFO.
Page 71

SETTING THE MESSAGES
NT
ANSWERING WITH
enter
AUTOMATIC CALL DISTRIBUTION (ONYX IV)
Only when
START
extension number of first
For VAU
RECORDING
the
you want to answer the call.
enter
message
range
is O-255
For EU-INITIAL
For EU-(INITIAL)
MAILBOX ACCESS CODE,
enter the node mailbox that should
For EU-(INITIAL) DELAY
BEFORE ANSWERING WITH
THE VOICE MAILBOX, enter
the delay before the node greeting
plays to the caller. The range is
O-255
For
EU-(INITIAL) DELAY
BEFORE ANSWERING WITH
THE VAU, enter
the delay before the
plays the message to the caller.
The range is O-25.5
Issue 1-O
(Continued on next page.)
FEATURES
l-32G
Page 72

AUTOMATIC CALL DISTRIBUTION (ONYX IV)
SETTING THE MESSAGES
(Continued from previous page)
all
enter 300.
When
caller hear an
agents busy,
should
repetitive
announcement be
AU or Voice Mail?
ACCESS DIGIT for
Voice Mail master extension.
For EU-(REPETITIVE
ANNOUNCEMENT)
MAILBOX ACCESS CODE,
enter the node mailbox that
answers the call. All options
should be Exit.
f
number of first
For EU-PLAYBACK
INTERVAL WITH VAU, enter
how often the repetitive
announcement should repeat.
The range is
If
enter 0. the wait is
l-32H FEATURES
For EU-PLAYBACK
INTERVAL WITH VOICE
MAILBOX, enter
how often the repetitive
announcement should repeat.
The range is O-255,
If you enter 0, the wait is
1 min 30
EU-OVERFLOW must be 300.
Issue 1-O
Page 73
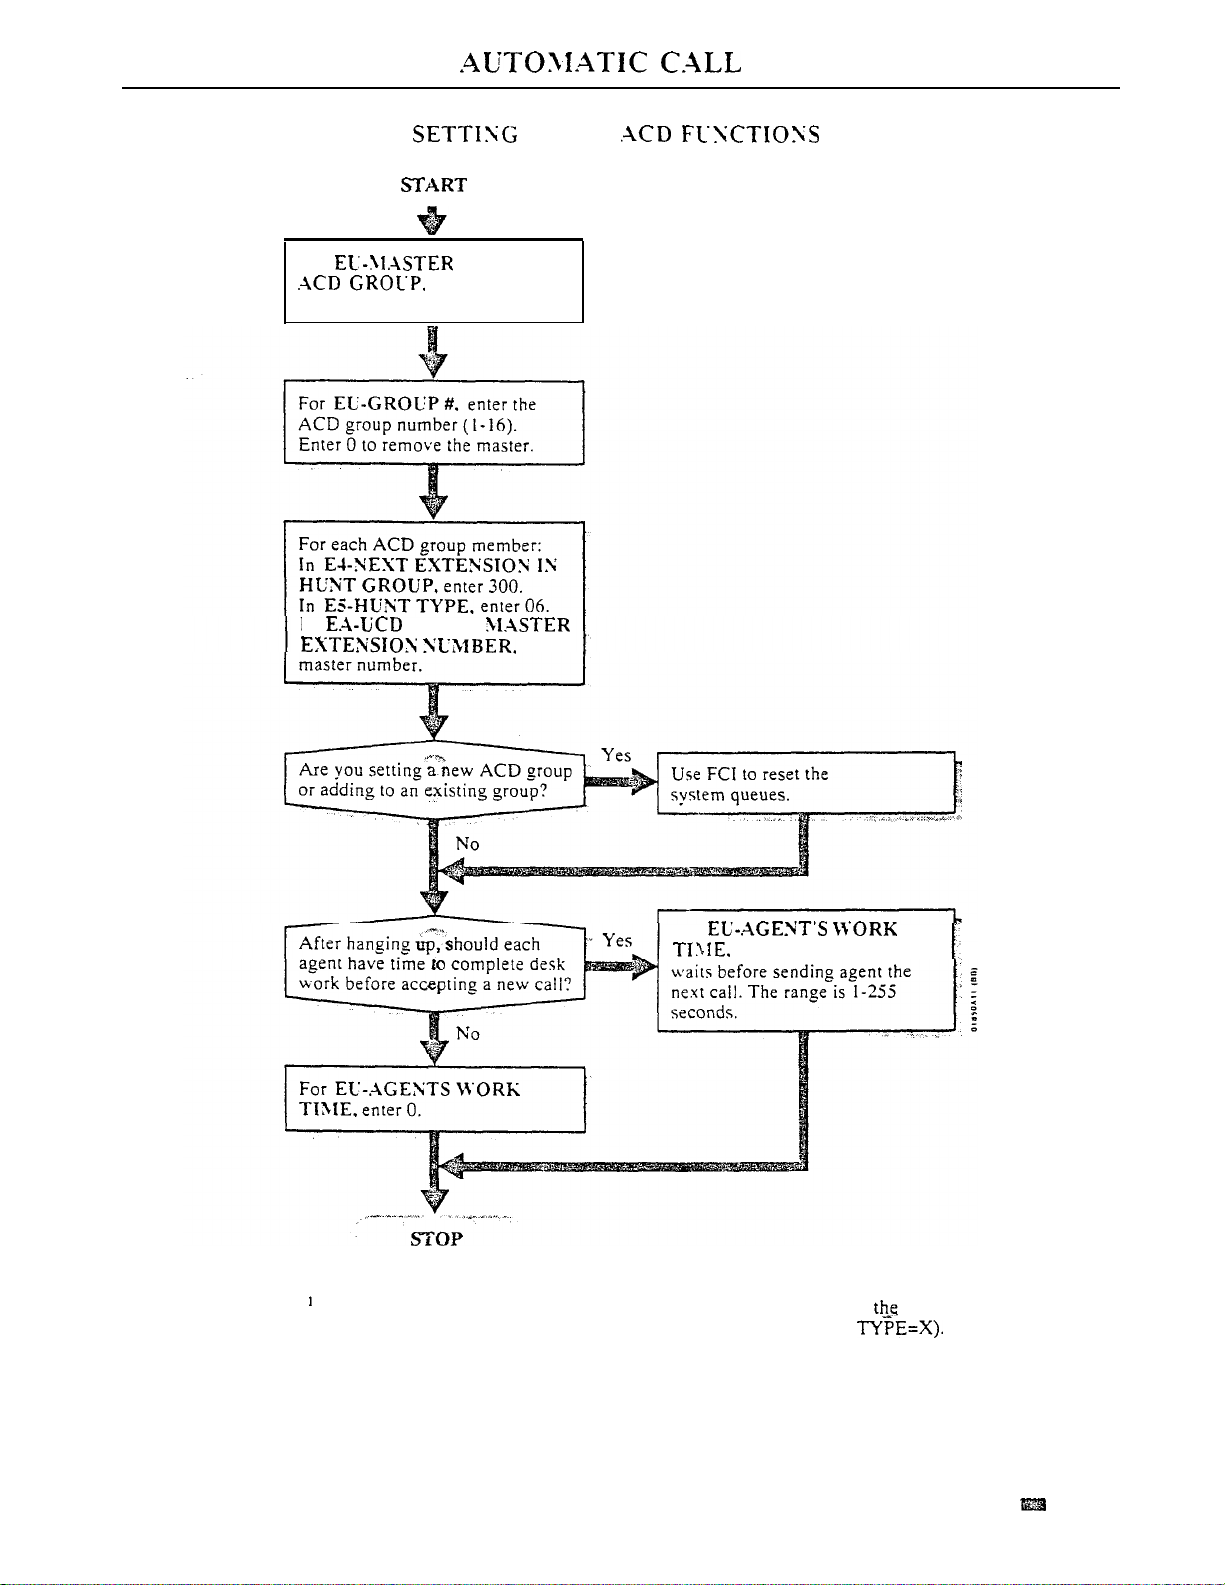
DISTRIBUTION (ONYX IV)
. OTHER
For
number IO the ACD group.’
In
EST OF
assign a master
GROUP
enter
Issue
1-O
For
enter the interval ACD
Enter ? to see a list of the available ACD master numbers. Make sure
master number is uninstalled (i.e. E-EXTENSIONS. EZ-CIRCUIT
FEATURES
l-321
Page 74
AUTOMATIC CALL DISTRIBUTION IV)
Related Features
See Related Features for ACD on page l-29.
Feature Operation
To night mode for an Group (Supervisor
Step
l
Lift handset.
Step
l
Step 3
Step
Step 5
Step
Step 1
Press INTERCOM.
Look for:
Listen for:
Dial tone
Dial
Listen for:
l
Press DSS Console key for ACD master number.
Dial 4 to return the ACD group to the day mode.
l
Dial tone stops
Dial 7 to activate night mode for group.
To remove yourself from service:
l
Press On/Off Duty Key.
Look for:
To put yourself back into service:
Press On/Off Duty Key.
Look for:
On/Off Duty key Off
On
OR
Duty key On
Step
Step
Step 3
Step
To override the agents work time (for your next waiting call):
You must repeat this procedure for each waiting call.
Lift handset
INTERCOM.
Look for:
Listen for:
INTERCOM On
Dial tone
Dial PGM#.
Listen for:
Dial tone stops
Dial 5 and hang up.
Listen for:
Next waiting call ringing in.
FEATURES
Page 75
Description
AUTOMATIC FAULT REPORTING (With Remote
Maintenance/Programming)
The system constantly monitors the status of extensions and trunks, and
automatically reports faults if they occur. There are two types of Automatic
Fault Reporting:
Alarm indications at the attendant’s extension
Automatic Fault to an off-site service center (except in VS)
The VS constantly monitors the status of extensions, trunks and the expansion
CEU. Unlike the large systems, it does not monitor or report on the status of
individual modules.
Attendant’s Alarm Indications
There are three categories of alarms displayed on the attendant’s extension:
major alarms, minor alarms and major/minor alarms.1 The system reports a
minor alarm if an extension or trunk fails. The system reports a major alarm
if an extension or trunk PCB fails. Major/minor alarms include both major
and minor alarms.
After viewing the alarms, the can selectively remove extensions or
trunks from service. (See the Removing Lines and Extensions from Service
feature.) This allows the system to operate normally, bypassing the affected
port. In a multiple-attendant system, each attendant must independently clear
their alarms. Once viewed, the same alarm will not display again.
Automatic Fault Reporting to the
Service Center
After displaying a major alarm at the attendant’s extension, the system also
reports the fault to an off-site service center (if installed). The fault identifies
the reporting telephone system and indicates the fault. A technician at the
service center can then call the system, view the various system reports and
work around the problem.
Automatic Fault Reporting can occur if:
The off-site service center has...
An ASCII terminal connected to a Hayes-compatible modem, or
An IBM-compatible PC with the Backup and On-Line Program
88216) installed -- connected to a compatible modem
The remote system has...
A
Hayes-compatible modem connected to the COM
PCB
modem port’
A DTMF CO line connected to the modem
Remote Programming
If the off-site service center has the Backup and On-Line Program (P/N
88216) installed on an IBM compatible PC, the off-site technician can:
Use modem commands to call a remote system
Program the remote system’s database3
Backup the system’s database on the service center’s PC
Upload a database from the service center’s PC to the remote
the Alphanumeric Displav feature.
Refer to the system Hardware for details on connecting a modem to the COM PCB.
After accessing the remote system,
system local port, and enables the modem port.
The systems you back up from and restore to must
types.
88216 is not currently compatible with VS.
the
installer should press
use the same type MEM (A or B). You cannot PCB
ENTER on the PC three
times. This locks the remote
Issue 1-O .
FEATURES
1-33
Page 76

AUTOMATIC FAULT REPORTING (With Remote
Maintenance/Programming)
Description
(Cont’d)
The installer can also use the Backup and On-Line Program on-site,in lieu of
a programming terminal. Refer to the system hardware manual for more
details.
The VS also allows Remote Programming through the main CEU AUX
Module serial port. The VS does not provide Automatic Fault Reporting to an
off-site service center. Also, the VS does not have a modem port.
Conditions
None
Default Configuration
Attendant’s Alarm Indications always occur.
System will not report faults to a remote service center.
Programming
Required Programming
J- Communications Port Parameters, Port Speed Set the baud rate for
Port A (modem) and Port B (local) to match the connected device. (The
attendant can set these options from the telephone. See page 2-2.)
J- Communications Port Parameters, Modem
Automated Answer ring count to match the setting of the connected modem.
QC- Operator Programming, Suppress Operator Alarms
alarm indications at attendant extensions.
QK- CEU Identification Enter the text that identifies the system to the
site service center.
QV- Trouble Report Telephone Number This is the number the system‘
dials to report a major alarm to the off-site service center.
Ring Count
Set the
Suppress/allow
l
Related Features
Other Programming
QS- Install Printed Circuit Boards The system reports a Line/Trunk PCB
failure only if you program the PCB as installed.
QZ- SMDR Printout All The Time
If you connect the Backup and On-Line
Program PC to the upper (local) COM PCB port, you must disable this option
to use the LOAD and BACKUP options.
Off-Hook Signaling
When an alarm displays, the attendant’s phone does not ring normally for
calls. If the extension has Off-Hook Ringing, it rings with a single beep (repeated).
If the attendant’s extension does not have Off-Hook Ringing, calls do not ring while
the alarm displays.
incoming
System Reports, Diagnostics and Maintenance Utilities
After calling the remote system, the remote service center technician can use the
various reports and diagnostics to troubleshoot the system.
Traffic Management Reporting
The Backup and On-Line Program also backs up and restores the report data.
During restore, the system overwrites the existing TMS data.
.
l-34
1-n
Page 77

Feature Operation
Step
1
Step
Step
Step
AUTOMATIC FAULT REPORTING
To
view alarms (at attendant
Look for:
Do not lift handset.
Press MSG.
Look for:
Press MSG again to view additional alarms.
Lift and replace handset to return to normal time and date display.
To clear alarms (at your attendant
Look for:
Do Not lift handset.
Press RLS on DSS Console.
Lift and replace handset.
Display showing type of alarm
Display showing alarm
Display showing type of alarm
Remote
Maintenance/Programming)
OR
Issue 1-O
FEATURES
l-35
Page 78
AUTOMATIC HANDSFREE
Description
Automatic Handsfree allows a user to place or answer a call Handsfree
by just pressing a key. There is no need to press HF first. The system always
provides Automatic Handsfree for:
Dialing Number Preview
Directory Dialing
Intercom (when user presses INTERCOM)
Last Number Redial
One-Touch Speed Dial
Save
Speed Dial (when user presses DIAL)
Automatic Handsfree is programmable system-wide for:
Central Office Calls (for all types of line keys)
Group Call Pickup (with a pickup key)
Paging (with a Page key)
Park (with an orbit key)
Station Call Coverage (with a call coverage key)
Conditions
a. If an extension does not have a handsfree module (P/N the user can
implement Automatic Handsfree but must lift the handset to speak.
b. The system allows 12 simultaneous Handsfree conversations per cabinet.
Programming
Related Features
Feature Operation
Step
Step
Default Configuration
Automatic Handsfree enabled.
Required Programming
QE- Automatic Handsfree
wide.
Other Programming
KS- Programming Keys for
Attendant Positions
Attendant extensions cannot have Automatic Handsfree.
Headset Compatibility
An extension with Headset Compatibility cannot also have Automatic Handsfree.
To use Automatic Handsfree:
l
Do not lift handset.
Press key for desired feature.
Look for: HF On
Enable/disable Automatic Handsfree system-.
a programmable keys.
Page 79
Description
(ONYX IV)
With Automatic Ringdown. an ESL or extension automatically calls
a programmed destination when the user lifts the handset. This would be
helpful. for example. in a hotel lobby
soon as the caller lifts the handset. the phone rings the reservation desk. The
phone cannot access system features, The phone can. however,
calls.
dedicated reservation pliones. As
Programming
Related Features
Feature Operation
Automatic
extensions.
None
Default
No Automatic destination programmed.
Automatic
Required Programming
is only in ONYX and only with ESL and
disabled.
E- Extensions, Attendant (Operator)
Automatic
Enter 300 for no Rinedown destination.
E- Extensions, king Down
Other
None
Intercom
Automatic Intercom Voice-Announce programming.
destination. The destination cannot be a trunk number.
Enable/disable Automatic Ringdown.
To use Automatic Ringdown:
Enter the
Issue 1-O
Step 1
Lift handset.
Listen for:
If you hear ringing, wait for called party to answer.
you hear two beeps, you may begin speaking.
Two beeps or ringing
FEATURES
Page 80

AUTOMATIC
Page 81

Description
ROUTE
Automatic Route Selection
based on the digits a user dials. ARS lets the
SELECTION
provides call routing and call restriction
system
administrator obtain the
most cost-effective use of the system’s connected long distance carriers.
ARS is an on-line call routing program that the system administrator can
customize from the programming terminal. The program accommodates over
8.000 call routing choices --
a custom-ordered rate structure database.
ARS allows the system administrator to make modifications to the routing
choices
and easily.
This is often necessary as the cost structure of the
connected services change.
ARS provides:
Call Routing
ARS can apply
(Area Code) and 6-digit (Area Code and Exchange)
analysis to every number
Dialing Translation (Special Dialing Instructions)
ARS can automatically execute stored dialing instructions when it chooses
a route for a call
Time of Day Selection
The system administrator can program route selection according to the
time of day/day of week.
Hierarchical Class of Service Control
ARS allows or denies call route choices based on an
Class of
Forced Authorization Code
Designated routes may require the user to enter an Authorization Code
before ARS allows routing. This code is verifiable and is enforced by an
extension’s Class of Service.
Separate Routing for Operator Assisted, International and Equal
Calls
To provide unique control, the system administrator may program separate
routing instructions for Operator Assisted, International and Equal Access
calls.
Independently Programmed Restriction for Exchanges 976 and 555
Restriction for these exchanges is hierarchical according to an extension’s
Class of Service.
In VS, Automatic Route Selection requires an AUX Module. If desired, you
can program up to 64 ARS Authorization codes. (The large systems have 184
codes.)
For complete details on ARS, including instructions for using the ARS editor
(GA command). refer to Appendix A.
a. Do not use ARS behind a In addition, ARS is intended for
areas that use the North American Number Plan (NANP).
b. ARS requires a MEM-B PCB (large systems) or an AUX Module (VS).
Class
enabled
Issue 1-O
Default Configuration
ARS not programmed.
of
Service options
the extension cannot use
may with For example, if Allow Intercom Calls at Night
at night.
FEATURES
is
1-37
Page 82
AUTOMATIC ROUTE SELECTION (HYBRID ONLY)
Programming
Required
E- Trunks. Trunk
l
trunk rotaries. This prompt determines the selection sequence for
within each rotary.
E- Trunks. Trunk Service Number
trunk used for ARS. ARS routes calls to Service Numbers. not individual
trunks.
l
E- Trunks, Trunk Group
Group trunks in rotaries by assigning each one the same First Trunk in Group
number.
ARS Editor
Program the ARS options. Refer to Appendix A for
complete details.
QL- Codes, LCR or ARS Enable
ARS.
QL- Codes. Number of Services
services (trunk rotaries) ARS will use.
QL- Codes, Service Line Numbers
rotary master number for each of the rotaries used by ARS. This should
correspond to the
Other Programming
EA- First Trunk in Group
E- Extensions, Class of Service
Class of Service number.
E- Extensions, ES- Line Access Options, Allow Line Code Dial-Up
enabled. users may be able to dial trunk access codes (e.g., 801) to bypass
ARS.
E- Extensions. Line Access Options, Access to Groups 90-95 Allow
access to group 90 (the ARS access code). If you allow access to 91-95, users
may be able to dial these codes to bypass ARS. Users can always dial groups
96-98.
E- Extensions, Line Access Options, Key Access to Outbound Lines
If enabled, user be able to press a line key to bypass ARS.
E- Extensions, ED- Trunk Control, Access Control
have access to the trunks selected by ARS.
E- Extensions, ED- Trunk Control, Call-Out Control
have Call-Out to the trunks selected by ARS.
E- Trunks, Circuit
should have the same
KS- Programming Keys
ARS access.
QC- Operator Programming, Operator Extension
operator is port 00 extension 300).
QF- Line Group Access Trunk in Group)
in a trunk rotary (e.g.,
801) to one of nine trunk rotary numbers (90-98). The
system requires this correlation when setting up trunk rotaries. Use the trunk
access code (e.g., 801 or
Group entry.
QQ- Prefix Requited for NPA Calls
enter Y. Enter N if the system is not in a conflict area. See Appendix A for
more details.
l
QT- System Timers, Detection Count
tone detection interval. ARS Dial Treatments (option P) use this interval. See
Appendix A for more details.
in
Outbound Rotary
Assignment
Trunks within each ARS Service Group
tvpe.
that corresponds to the EA- First Trunk in
ARS
requires outbound
Assign a Service Number each
(First Trunk in Group)
Enter 2 to enable
Designate how many
Indicate the trunk
entry.
ARS routing is based on an extension’s
An extension must
An extension must
An extension can have a loop key for
Make sure the
Correlate the first trunk
If the system is in a conflict area,
the length of the dial
.
Page 83

Features
AUTOMATIC SELECTION (HYBRID ONLY)
ARS Authorization Codes If required. enter ARS Dial Treatment
Authorization codes. See Appendix A
QX- Suppress
Speed Dialing If ARS Dial Treatments
the digit. enter N. To suppress outdialing the enter See Appendix A
for more details.
Single Digit Line Access If enabled. users can dial 9 (instead of 90) for
ARS.
Account Code Capability
ARS can optionally utilize the system’s Account Codes.
Least Cost Routing
Least Cost also routes trunk calls, and can be an alternative to ARS. The
system can have ARS or LCR. not both.
Speed Dial
Speed Dial can route calls through ARS or optionally bypass ARS routing.
Tenant Service
Each system can have only one ARS package. shared by all tenants.
Toll Restriction
When a user dials 9 or 90 for ARS. ARS overrides Toll Restriction.
more details.
Feature Operation
Step 1
Step
Step 3
Step
To place a call using
For more information on placing calls using ARS, refer to Appendix A.
Lift handset.
If you have an ARS loop key. press it and skip
Press INTERCOM.
Look for:
Listen for:
Dial tone
Dial ARS access code (9 or 90).
Listen for:
Another (higher pitched) dial tone
Dial number.
On
to step
4.
Issue 1-O
FEATURES
1-39
Page 84

BACKGROUND MUSIC
Background Music (BGM) sends music from a customer-provided music
source to the speakers in
activates it. BGM plays whenever the user’s extension is idle. Incoming calls
and Page announcements override BGM. Optionally. BGM can also play
over the external paging zones.
Background Music requires a customer-provided music source and an unused
trunk circuit.
Conditions
a. In the large systems, the customer-provided music source connects to an
unused trunk port (on an installed PCB). The music source (tape deck,
receiver, etc.) must be compatible with the following system specifications:
Refer to the system Hardware Manual for additional installation details.
b. In VS, Background Music uses the fourth trunk circuit on the first CO
Module in the main CEU. Although you connect to the CEU MOH
terminals, you cannot use the fourth trunk circuit for trunks. The music
source (tape deck. receiver, etc.) must be compatible with the following
system specifications:
Refer to the system Hardware Manual for additional installation details.
c. A system reset turns off BGM at all extensions.
and ESL telephones. If an extension user
Input Impedance . .
Maximum Input, .
-10
Ohms
(244 AC)
Input Impedance, . . Ohms
Maximum Input. . .
-10
(244 AC)
.
Programming
l
l
Related Features
Default
BGM trunk not assigned.
Required Programming
E- Trunks, Circuit The trunk used for BGM must be circuit type
X. If you want to use the BGM trunk later on for another function, remember
to:
Remove the assignment in QM- BGM Line Number
Reset the associated line/trunk PCB (using IR- Reset Line/Trunk Card
large systems only)
Change the trunk to the desired circuit tvpe (using the E2 option)
Perform a side tone test on the trunk (using the IS- Side Tone Test option)
Music and Relay Control, BGM Line Number In the large systems,
enter the number of the trunk connected to the BGM source. In VS, enter
Y(es).
Other Programming
Music and Relay Control, to All External Page Zones
Allow/disallow BGM to play over the external paging zones. For proper
operation, access the Paging zone once after enabling this option.
Attendant Positions
BGM does not play at attendant extensions.
Do Not Disturb
When a user activates
DND, BGM
turns off. Once the user deactivates DND, BGM
remains off.
Music on Hold
BGM and Music on
Hold can
share the same music source, if desired.
FEATURES
1-n
Page 85

Feature Operation
Step
Step 2
Step
BACKGROUND MUSIC
To turn Background
Do not lift handset.
l
Press HOLD.
To adjust the volume of Background
Press UP A or while feature is active or telephone is idle.
This incoming and Paging announcements.
on or off:
Issue 1-O
FEATURES
l-41
Page 86

BATTERY BACKUP
Description
Battery Backup allows the system to operate normally during AC power
failures and brownouts. For each large system CEU. Battery Backup requires
the installation of an optional Battery Backup Kit (P/N 88107) and two
customer-provided batteries. For each VS CEU, the Valcom VB260 Battery
Backup Unit‘is recommended. Battery Backup will power a fully loaded
system for about two hours.
The batteries listed below are compatible with the P/N 88107 Battery Backup
Kit. Both batteries must be from the same manufacturer.
Eagle CFMP
Powersonic PS 12300
Yuasa 12
In the large systems. the system Memory PCB provides short-term backup of
system memory and the system time and date (Real Time Clock). The
Memory PCB cannot. however. run the system. The chart below shows how
long each MEM PCB backs up system memory. In a newly installed system,
allow 12 hours for the
PCB to reach full charge.
.
Programming
Related Features
Feature Operation
MEM-A
Svstem Memory
and Date
In the Real Time Clock is available in systems with an AUX
Module. The Real Time Clock maintains the correct date and time for at least
one week without AC power.
stores the time of the power failure in memory. The system starts from that
stored time when power is restored.
Conditions
The MEM-B PCB and AUX Module use a permanently installed “supercap”
capacitor. The MEM-A PCB uses a battery that must be installed on site.
Default Configuration
None
At least 2 weeks
At least 2 weeks
If the VS doesn’t have an AUX Module, it
MEM-B
At least 2 weeks
At least 12 hours
None
None
If installed, Battery Backup is automatic during AC power failures and
brownouts.
Page 87
CALL COVERAGE KEYS
A Call Coverage an estension user one-touch call pickup. Transfer
and Intercom for the assigned extension. This simplifies phone operation for
co-workers that frequently cover each other’s calls, Additionally,
extension user can program the ringing options for their Call Coverage keys.
Programming
A Call Coverage
When the key is...
also the status of the covered extension:
The covered extension is...
Off. . . . . Idle
On. . . . . . . Busv
Flashing slowly .
Flashing fast . . . . . DND
None
Default
No Call Coverage Keys programmed.
Required Programming
KS- Programmable Keys for
l
Designate programmable keys as
Call Coverage keys. Also, program the ringing option for Call Coverage
Keys (no ring, delayed ring or immediate ring).
Other
E- Extensions, ED- Trunk Control, Access Control
To intercept outside
calls, the extension must have access to the covered extension’s trunks.
QT- System Timers, Delayed Ring Interval
Set the Delayed Ring Interval
for Call Coverage Keys with delayed ringing.
Related Features
Feature Operation
Step
Step 2
Step 3
Attendant Positions
An Attendant cannot program Call Coverage Key
ringing options from their
telephone.
Automatic Call Distribution/Extension Hunting
An extension can have a Call Coverage key for an
activates only when all group members are busy. In
system has an
AUX Module.
VS, this can only occur if
hunt group. The
key
Automatic Handsfree
If the system has Automatic Handsfree, the extension
user can just press the
Coverage key.
Off-Hook Signaling
Call Coverage keys always activate Off-Hook Signaling (if allowed
destination). In addition, an extension with Off-Hook Signaling receives off-hook
signals for calls
its covered extensions.
at the
To place a call to your covered extension:
1
Lift handset.
Press key.
INTERCOM Fast Flash
Call Coverage Key On (green)
If you hear two beeps, go ahead and speak.
OR
If you hear ringing, wait for the called part to answer.
Issue 1-o
FEATURES
l-43
Page 88
CALL COVERAGE KEYS
Feature Operation
(Cont’d)
To Transfer a to a covered estension:
Step 1
Step
Press Call Coverage key.
If you hear two beeps.
If you hear ringing. wait for called party to answer.
If you hear busy or fast busy. hang up to have the call wait at the covered
extension.
Hang up to Transfer the call unannounced.
Look for:
(Modular) -- Line Hold Flash (red) Flash (green)
(Non-Modular) -Call Coverage key On (green)
announce
key Hold
call.
OR
OR
You can also press the line to return the call.
OR
Your phone may start ringing again. depending on your Coverage key ring
options.
Step
Step
Step
Step 3
Step
To pick up a call ringing a covered extension:
Look for:
Listen for:
l
Press flashing Call Coverage key.
Look for:
Listen for:
Call Coverage key Slow Flash
(Optional) Trunk or Ring
Line key On
Conversation with calling party
To program ringing for your Call Coverage keys:
This procedure is not available in VS. Use the User-Programmable Features instead.
Press
Look for:
HF On
Press Call Coverage key.
l
Dial 3 for delayed ringing.
OR
Dial 7 for immediate ringing.
OR
Dial for no ringing (lamp only).
Listen for:
Press up.
l
Listen
Dial tone
HF goes
Dial tone stops
User-Programmable Feature...
In VS, use this procedure to change the ringing for your Call
Coverage keys,
Ring Assignment
+ RA + Line key or N(o) + SAVE
Delayed Ring Assignment
+
Line key + or N(o) SAVE
You can change the assignment for your Call Coverage keys.
DSS
DSS key + ext. SAVE
1
1
Page 89

Description
Programming
CALL FORWARDING
Call Forwarding permits an extension user to redirect their calls to another
extension. Optionally. the user can also redirect calls to an outside telephone
number (Off-Premise Call Forwarding). Call Forwarding ensures that the
user’s calls are
only the extension receiving the
the forwarding extension.
Conditions
a. Off-Premise Call Forwarding requires either ground start trunks or loop
start trunks with disconnect supervision. Up to eight extensions can
forward their calls off-premise at the same time.
b. A power failure cancels Call Forwarding. In VS, a system reset also
cancels Forwarding.
c. Extension users can
who then forwards to 310). The system prevents the chain from looping
back to the first extension (e.g., 304).
Default Configuration
Call Forwarding allowed at all extensions.
Required Programming
CP- Inhibit Call Forwarding
Forwarding.
CP- Allow Off-Premise Call Forwarding
deny Off-Premise Call Forwarding.
E- Extensions, Class of Service
are away from their work area. that
calls can place an Intercom call to
their Call Forwarding (e.g., 304 forwards to 306,
For each COS, allow or deny
For each COS, allow or
Assign a COS to each extension.
Related Features
Other Programming
E- Extensions, ED- Trunk Control, Access Control
The extension
activating Off-Premise Call Forwarding must have access for the trunk
selected. The caller to the forwarded extension must also have access (unless
Transferred),
E- Extensions, ED- Trunk Control, Call-Out Control
l
The extension
calling an Off-Premise Extension must have call-out for the selected trunk
(unless transferred). If not, the call won’t go through. The extension
activating the forwarding does not need call-out for the selected trunk.
Q J- Intercom Call Control, Alerts
Allow or deny the Call Forwarding
reminder message.
QT- System Timers, Number of Rings Before Recall
Set how many times
a call should ring an extension with type 1 or 2 Call Forwarding before
rerouting.
E- Trunks, EI- Tandem Trunk
Enable Tandem Trunking for trunks used
for Off-Premise Call Forwarding. (See Transfer in Related Features).
Alternate Attendant
An extension cannot use Call Forwarding if activated as an Alternate Attendant.
Automatic Call Distribution
An extension user can forward calls to an ACD
Call Coverage
Call does not reroute calls ringing a Call Coverage Key.
Central Office Calls, Answering
Call Forwarding does not reroute calls ringing line or loop keys (except
Issue 1-O
FEATURES
1-45
Page 90

CALL FORWARDING
Related Features
Central Office Calls. Placing
Direct Inward Line
Do Not Disturb
Extension Hunting
Group Ring
Line (Trunk) Rotaries
Multiple Directory Numbers (ONYX
Paging/Personal Greeting/Selectable Display Messages
Speed Dial
Transfer
Voice Prompting Messages (except in VS)
Voice Mail Compatibility
An extension can forward calls off-premise over lines to which the user
normally has access and call-out.
Call Forwarding reroutes
Do Disturb cancels Call
If an is in a Hunt Group. forwarding calls at that extension disrupts normal
hunting. An extension user can. however. forward calls to a UCD master number.
Call does not reroute Ring Group Calls.
An estension user should not forward calls off-premise using a trunk group (codes 9
or 90-98).
You cannot Call Forward a Multiple Directory Number. You can, however, Call
Forward a
Call cancels an Auto-Page. Personal Greeting or Selectable Display
Message in
Forwarding also affects Selectable Display Messages.
An extension user can have Call Forwarding codes stored with a One-Touch Speed
Dial
An extension user can Transfer a call to an extension with Off-Premise
If an attendant does this. the system places the trunk used for dialing the off-premise
destination on Hold.
When making a screened Transfer of a trunk call to an extension with Off-Premise
Call Forwarding. implement Tandem
A voice can periodically announce when an extension’s are forwarded.
For Off-Premise Call Forwarding. a voice prompt plays when the system reroutes the
call.
An extension can forward calls to the Voice Messaging System.
to a Multiple Directory Number.
at an extension. Any programming or user action that affects
activated. To abort the procedure, the user can return to the initial
when the off-premise user answers.
call.
FEATURES
Page 91

Feature Operation
Step
Step
To forward your calls to another estension:
Lift handset.
If a One-Touch Dial can press the instead
steps
Press INTERCOM.
Look for:
Listen for:
If an ESL skip this step.
Dial tone
On
CALL FORWARDING
Step
Step
Step
Step 6
Step 1
Step
Step 3
Step
Step
Press
Listen for:
Dial stops
Dial extension number to receive calls.
You can optionally press a DSS Hotline or dial an operator (0 or
you dial an operator. system automatically inserts code 3 in the next step.
OR
Press MSG to forward your calls to your mailbox.
Skip to step 6.
l
Dial 1 to forward ringing calls you do not answer.
OR
Dial to forward ringing calls you do not answer and calls to your phone
when it is busy.
Dial 3 to forward all your calls.
OR
Hang up.
Look for:
MSG Slow Flash (green)
To forward your calls off-premise:
l
Lift handset.
If you have a One-Touch Speed Dial key, you can press the key instead of using
steps
Press INTERCOM.
Look for:
Listen for:
If you have an ESL set, skip this step.
INTERCOM On
Dial tone
Press
Listen for:
Dial tone stops
Dial 1.
Select the trunk vour forward will use.
You can the trunk number (e.g.. 01) or trunk extension number (e.g.,
Issue 1-O
Step 6
Step 7
Step 1
Step
Step 3
Step
Dial telephone number that will receive your calls.
l
Hang up.
Look for:
MSG Flash (green)
To cancel Call Forwarding:
for:
Lift handset.
Press INTERCOM.
Look for:
Listen for: Dial tone
If have an ESL set. skip this step.
INTERCOM On
Press
Dial tone stops
MSG off
l
Listen for:
Hang up.
Look for:
FEATURES
l-47
Page 92

CALL FORWARDING CANCEL
Description
The attendant
The attendant
week. This ensures that the system directs calls normally at the start-of the
next business
Conditions
None
Default
None
Programming
Required
QC- Operator Programming. Operator Extensions Designate extensions
as operators.
er Programming
None
Related Features
Do Not Disturb/Paging
Messages
Cancelling Forwarding also cancels Auto-Pages, Personal Greetings and
Selectable Display Messages system-wide.
cancel all Call Forwards in the system.
want to do this at the end of the business day or business
(Auto-Page)/Personal Greeting/Selectable
Display
Feature Operation
Step
Step 2
Step 3
Step
Step
To cancel Call Forwarding system-wide from your attendant’s extension:
Lift handset.
Press INTERCOM.
l
Press
Dial
l
Look for: INTERCOM On
Listen for:
Listen for:
Listen for:
Dial Tone
Dial Tone stops
Dial tone
Hang up.
Look for:
INTERCOM Off
FEATIJRES
l-48
Page 93

Description
CALL PARKING
Call Parking places an outside call in a waiting state (called a Park orbit) so
that any extension user may pick it up. There are two types of Park orbits:
System Park and Personal Park. With System Park, a user may Park a call in
one of ten system orbits (numbered 60-69). With Personal Park, a user may
park a call at an extension. After parking the call, the user can Page the
person receiving the call and hang up. The paged party just dials the orbit
code from any extension to pick up the call. With Park, it is not necessary to
locate a person to handle their calls.
If a call remains parked longer than the Park Orbit Recall interval, it recalls
the extension that initially parked it. If still unanswered, the call recalls all
extensions that normally ring for the trunk.
The system allows only one call at a time to be parked in the same System
Park orbit. However, any number of users can park a call in the same
Personal Park orbit. The user retrieves the Personal Parked calls on a first in
first out (FIFO) basis. A call in Personal Park goes on Exclusive Hold at the
destination and at the extension that parked it. The call does not ring the
destination.
Conditions
a. Park Orbits 68 and 69 have a five-minute fixed recall interval.
b. The code to retrieve a Personal Park is the same as Directed Call Pickup
and remote Hold Retrieve. When a user dials the code, the system picks up
calls at the dialed extension in the following order:
1. Ringing Intercom calls (see Directed Call Pickup)
2. Personal Park calls (see Call Park)
3. Ringing outside calls and
(see Directed Call Pickup)
4. Calls on Hold (see Hold)
,
Programming
l
Related Features
Default Configuration
Park enabled.
Required Programming
Extensions, ED- Trunk Control, Access Control An extension can only
pick up a parked call on trunks to which it has access. Program access for
each desired trunk.
QT- System Timers, Park Orbit Recall Time For Park Orbits 60-67, set
the Park Orbit Recall Time.
Other Programming
QA- Number Plan, Park Orbit Access Digit If desired, change the first
digit of the Park Orbit codes (factory set at 6).
Analog Station Interface/Off-Premise Extension
A 2500 set connected
to an or
OPX has
Call Parking
capability.
Direct Station Selection, DSS Console
An extension user with a DSS Console can have a number stored with a
DSS key.
Speed Dial
An extension user can have the Park functions stored
Key.
a One-Touch
Speed Dial
Issue 1-O
FEATURES
1-49
Page 94

CALL PARKING
Feature Operation
Step
To Park your call in a system Park Orbit:
If you have a One-Touch Speed Dial Key or a DSS key with Park Orbit, you
can press the key
of using steps l-3.
At a press INTERCOM.
Look for:
Listen for: Dial Tone
INTERCOM On
(Modular) -- HOLD Hold Flash (red), Fast Flash (green)
(Non-modular) -- HOLD Exclusive Hold
At ESL set, press TRF.
Step 2
Step 3
Step 4
Step 1
Step 2
Step 3
Step 4
Step 5
Dial code
If you
Optionally, you can press a DSS Console key.
busy tone. INTERCOM and try another orbit.
Kev On (red)
Page party to receive call and announce the Park Orbit code.
l
Hang up.
To Park your call at an extension (Personal Park):
If you have a One-Touch Speed Dial Key or a DSS key, you can press the key
instead of using steps 1-3.
At a press INTERCOM.
Look for: INTERCOM On
Listen for:
(Modular) -- HOLD Hold Flash (red), Fast Flash (green)
(Non-modular) -- HOLD Exclusive Hold
Dial Tone
At ESL set, press TRF.
Listen for:
Dial tone
Dial
Listen for:
Dial tone stops
Dial extension number where you want call parked.
Look for: Line Key On (red)
If you hear busy tone, press INTERCOM and try another extension.
Optionally, you can press a DSS Console key.
l
Page party to receive call and announce the extension number.
Hang up.
At your extension and at the extension where you parked the call:
Look for:
At all other extensions (with a key for the trunk):
Look for:
(Modular) -- Line key Hold Flash (red), Fast Flash (green)
(Non-Modular) -- Line key Exclusive Hold
Line key On (red)
Step 1
Step 2
Step 3
step 4
l-50 FEATURES
To pick up a parked call:
Listen for announced Park code.
Lift handset.
Press INTERCOM.
(Personal Park only) Dial
l
Dial announced Park code (60-69 or extension number).
If you have a One-Touch Speed Dial key or a DSS Console key, you can press the
key instead of using steps 2 and 3.
Look for:
Listen for:
If you have an ESL set, skip this step.
Listen for:
INTERCOM On
Dial tone
Dial tone stops
1-O
Page 95

Related Features
Feature Operation
Step I
step
Step
Group Ring
The can be group number. The for calls to the ring
group.
Paging
The administrator use external relays to ate external paging
To answer
Lift handset.
Press flashing line kev.
Look Line On
Listen for:
l
Press INTERCOM.
Look for: INTERCOM On
Listen for:
Dial
Listen for:
Dial 0 or 01-04..
Look for: Line key On
Listen for: Conversation
If
the owner is not the attendant. dial the owner’s extension or group number.
EXTERNAL ALERTING DEVICES
to manual.
a call hear ringing over the External Alerting Device:
ith
OR
Dial tone
Dial tone stops
caller
hear Reorder tone. you cannot pick up the call from your extension.
Issue 1-O
FEATURES
l-101
Page 96

FLASH
Programming
Description
Flash an extension user to access certain CO or PBX features
interrupting trunk loop current. Flash lets an extension user take full
of features the connected telco or PBX offers. The
system administrator must set the Flash parameters for
connected telco.
The system provides a loop current interruption when flashing a ground start
trunk. The system does not
Default
ground Flash.
The default flash for a is 7 tenths of a second (700
Required
l
CP- Inhibit Flash for Single Line Telephones Enable/disable
Flash for ESL sets.
E- Extensions,
l
l
QT- System Timers. Flash Response Time Set the length of the loop
Class of Service Assign Class of Service to extensions.
current interruption the system provides to a trunk (l-25 tenth seconds). Enter
0 to deny Flash system-side. This option applies to flash from a
the
only.
Related Features
Feature Operation
Step
1
Other Programming
E- Extensions, ED- Trunk Control,
have
enabled in order to Flash incoming calls.
Call-Out
Analog Station Interface
Single set users connected to an cannot flash a trunk. When the user
hookflashes a trunk, the system places the trunk on Hold. This operation does
flash the trunk.
Off-Premise Extension
users cannot flash a trunk. The system provides a Flash that applies only
OPX extensions. OPX flash is the loop current interruption that occurs when the
OPX user hookflashes. This operation places a trunk on Hold, it does not flash the
trunk.
PBX Compatibilitv
the system-is behind a PBX. Flash gives the extension user access to
If
many PBX features.
Tie Lines
The system provides a Flash timer setting that applies only to tie lines.
Toll Restriction
The system applies Toll (if applicable) to the number
flashing a trunk.
To flash the trunk you are on (from your
Press FTR or MSG.
Control An extension must
no!
a user dials after
Step
l-102 FEATURES
To flash the trunk you are
l
Press and release hookswitch (approximately second).
on
(from your ESL set):
Issue l-0
Page 97

Description
FLEXIBLE NUMBERING PLAN
Flexible Numbering Plan lets the system administrator change the digits users
dial to access features. This helps the administrator customize the standard
number plan (shown in Table
example, that extension users are accustomed to an older system
extension numbers in the 500s and 600s. The system can
change the first digit used to access extensions so users can still dial familiar
numbers.
page l-l 1) for each customer. Assume. for
CAUTION:
Do not change the standard numbering plan unless absolutely necessary.
Changing the standard plan affects many features (including program entry).
The following chart shows some of the features affected when the
administrator changes the System Numbering Plan. Refer to Table 1-4 (page
l-l 1) for additional number plan information.
Changing this
digit... Affects the operation of this feature...
Group Call Pickup
Intercom (Forced Ringing)
Meet-Me Conference (Conference codes)
Call)
Paging (Zone 1)
Call
Waiting (answering waiting call at
Speed Dial (Personal Speed Dial bins)
3
4
Central Office Calls (Trunk access codes)
Intercom (first 100 extensions)
Paging (Zone 2)
Automatic Call Distribution (putting agents in service)
Group Ring
Intercom (Second 100 extensions)
group numbers)
ESL set)
Paging (Zone 3)
Call Parking (from
Central Office Calls. Placing (56x 170 and trunk numbers
Paging (Zone
6
Speed Dial (Personal bins)
Automatic Call Distribution (agents putting themselves out of service)
Call Parking (first access digit)
Message Waiting (access digit)
Paging (Zone 5)
7
Selectable Messages (first access digit)
Automatic
(supervisor putting agents out of service)
Paging (Zone 6)
Speed Dial (System Speed Dial first access digit)
8
Split (retrieve second call at ESL set)
Central Office Calls (trunk access codes)
Paging (Zone 7)
Time
9
0
and Date (setting the time)
Central Office Calls (trunk group numbers and single-digit access)
Time and Date (setting
Attendant Positions (attendant access digit)
Night Answer (pick up call ringing External Paging)
the date)
Issue 1-O
Conditions
a. The system prohibits the administrator from changing the digits * and
b. In VS, Flexible Numbering Plan requires an AUX Module.
Default Configuration
Refer to the Table 1-4, System Number Plan (page l-11).
FEATURES
l-103
Page 98

FLEXIBLE NUMBERING PLAN
Programming
Required Programming
Plan Customize the function of digits O-9.
Other
None
Related Features
Refer to Table System Number Plan (page l-l 1).
Feature Operation
Refer to Table System Number Plan (page l-l 1).
l-104 FEATURES
Issue 1-O
Page 99

Description
Programming
FORCED TRUNK DISCONNECT
An extension user can implement Forced Trunk Disconnect to disconnect
(release) another estension’s
on the released trunk. Forced Trunk Disconnect lets a user access a
trunk in an emergency. no other trunks are Maintenance
technicians can also use Forced Trunk Disconnect to release a trunk on which
there is no conversation. This can happen if a trunk does not properly
disconnect
The system administrator normally permits Forced Trunk Disconnect only at
attendants and selected extensions.
the outside party up.
None
Default
Forced Trunk Disconnect allowed fdr attendants and
Required Programming
CP- Direct Trunk Access and Trunk Camp-On Assign Direct
Trunk Access to each extension that should have Forced Trunk Disconnect
capability.
E- Extensions, COS, Class of Service Assign Class of Service to
extensions.
outside call. The user can then place a
extensions with COS 00.
Related Features
Other Programming
E- Extensions, ES- Line Access Options, Key Access to Outbound Lines
If enabled, user can press a line key to place a call (if also allowed by ED
programming).
E- Extensions,
enabled, user can dial
E- Extensions, ED- Trunk Control, Access Control
each
trunk on which the user should be able to place calls.
E- Extensions, ED- Trunk Control, Call-Out Control
each trunk on which the user should be able to place calls.
KS- Programming Keys for
Line Access Options, Allow Line Code Dial-Up If
to trunks l-72.
Assign access for
Enable call-out for
Program the types of keys that allow
the extension user to place trunk calls.
Restriction
The subjects the call on
Toll Restriction.
the
released trunk to normal
routing or--
Direct Trunk Access
Speed
Forced Trunk Disconnect requires that the extension have Direct Trunk
capability.
Dial
An extension with Forced Trunk Disconnect/Direct
System Speed Dial numbers.
Trunk Access can also program
Access
Issue 1-O
FEATURES
l-105
Page 100

FORCED TRUNK DISCONNECT
Feature Operation
To disconnect a trunk dialing a code):
Step 1
Step
Step 3
Step
Lift handset.
l
Press Intercom.
Look for:
Listen ‘for:
If you have an ESL set. skip this step.
Dial trunk number (e.g..
key.
Look for:
Listen for:
If you dial the trunk access code. for voice prompt to complete.
l
Dial
Listen for:
To place a call on the trunk just disconnected. repeat step 3.
Dial tone
On
or trunk access code (e.g., or press line
Line On (unless dial trunk number)
Busy tone
Dial tone
Step
Step
Step 3
To disconnect a trunk pressing a line key):
Look for:
Line On
Lift handset.
Press illuminated line kev.
Listen for:
tone
Dial
Look for:
Listen for: Dial tone
To place a call on the trunk you just disconnected, press line key again.
Line key Off
FEATURES
l-l
Issue 1-O
 Loading...