

Page 1

*** USER’S MANUAL ***
FCC ID : XOJGA1000
Page 2

The Federal Communication Commission Statement
This equipment h as been tested a nd found to compl y with the limits fo r a Class B Digit al Device, pursuant to
Part 15 of the FCC rules. These limits are designed to provide reasonable protection against harmful
interferenc e in a residential installation. Th is equipment gen erates, uses a nd can radiate r adio frequency
energy and, if not i nstal led and us ed in acc ord ance with the instr uction, may c ause harm ful inter feren ce to
radio communication. However, there is no guarantee that interference will not occur in a particular
installation. If this equipm ent doe s cause h armful interfer ence to r adio or televi sion r eceptio n, whic h can
be determined by turning the equipment off and on, the user is encouraged to try to correct the
interference by one of more of the following measures: -
- Reorient or relocate the receiving antenna.
- Increase the separation between the equipm e nt and rec ei ver.
- Connect the eq uipment i nto an outle t on a c ircuit dif ferent from that to which the receiver is
connected.
- Consult the dealer or an experi enced Radio/TV technician for help.
Use only shielded cables to connect I/O devices to this equipment. You are cautioned that change or
modifications no t expressl y approved by th e party respon sible for compli ance could void yo ur authority to
operate the equipment.
THIS DEVICE COMPLIES WITH PART 15 OF FCC RULES. OPERATION IS SUBJECT TO THE
FOLLOWING TWO CONDITIONS: -
1. This device may not cause harmful interferenc e and
2. This device must accept any interference received, including interference that may cause undesired
operation.
The antenna used for this transmitter must not be collocated or operation in conjunction
with any other antenna or transmitter.
Page 3

TIDE and Tibbo BASIC User ManualI
Table of Contents
Taiko R2
................................................................................................................................... 1Legal Information
Overview 4
................................................................................................................................... 4Our Language Philosophy
................................................................................................................................... 7System Components
............................................................................................................................................................... 8Objects
............................................................................................................................................................... 8Events
Getting Started 9
................................................................................................................................... 9Preparing Your Hardware
................................................................................................................................... 10Starting a New Project
................................................................................................................................... 11Writing Code
................................................................................................................................... 14Building, Uploading and Running
................................................................................................................................... 15Compiling a Final Binary
Programming with TIDE 15
................................................................................................................................... 15Managing Projects
............................................................................................................................................................... 15The Structure of a Project
............................................................................................................................................................... 17Creating, Opening and Saving Projects
............................................................................................................................................................ 17Templates
............................................................................................................................................................... 18Adding, Removing and Saving Files
............................................................................................................................................................... 20Resource Files
............................................................................................................................................................... 20Built-in Image Editor
............................................................................................................................................................... 22Coding Your Project
............................................................................................................................................................ 22Project Browser
............................................................................................................................................................ 23Code Auto-completion
............................................................................................................................................................ 24Code Hinting
............................................................................................................................................................ 24Tooltips
.......................................................................................................................................................... 26Supported HTML Tags
............................................................................................................................................................... 26Making, Uploading and Running an Executable Binary
............................................................................................................................................................ 27Two Modes of Target Execution
............................................................................................................................................................... 28Debugging Your Project
............................................................................................................................................................ 28Target States
.......................................................................................................................................................... 29Exceptions
............................................................................................................................................................ 30Program Pointer
............................................................................................................................................................ 30Breakpoints
............................................................................................................................................................ 31The Call Stack and Stack Pointer
............................................................................................................................................................ 32Stepping
............................................................................................................................................................ 33The Watch
.......................................................................................................................................................... 37Scopes in Watch
............................................................................................................................................................ 37Code Profiling
............................................................................................................................................................... 38Project Settings
................................................................................................................................... 39Programming Fundamentals
............................................................................................................................................................... 39Program Structure
............................................................................................................................................................... 40Code Basics
............................................................................................................................................................... 42Naming Conventions
............................................................................................................................................................... 43Introduction to Variables, Constants and Scopes
............................................................................................................................................................ 43Variables And Their Types
1
©2000-2008 Tibbo Technology Inc.
Page 4

............................................................................................................................................................ 45Type Conversion
............................................................................................................................................................ 48Type conversion in expressions
............................................................................................................................................................ 49Compile-time Calculations
............................................................................................................................................................ 50Arrays
............................................................................................................................................................ 54Structures
............................................................................................................................................................ 55Enumeration Types
............................................................................................................................................................ 57Understanding the Scope of Variables
............................................................................................................................................................ 60Declaring Variables
............................................................................................................................................................ 60Constants
............................................................................................................................................................... 62Introduction to Procedures
............................................................................................................................................................ 64Passing Arguments to Procedures
............................................................................................................................................................ 66Memory Allocation for Procedures
............................................................................................................................................................... 67Introduction to Control Structures
............................................................................................................................................................ 67Decision Structures
............................................................................................................................................................ 68Loop Structures
............................................................................................................................................................ 68Doevents
............................................................................................................................................................... 71Using Preprocessor
............................................................................................................................................................ 73Scope of Preprocessor Directives
............................................................................................................................................................... 74Working with HTML
............................................................................................................................................................ 76Embedding Code Within an HTML File
............................................................................................................................................................... 77Understanding Platforms
............................................................................................................................................................ 78Objects, Events and Platform Functions
IIContents
Language Reference 78
................................................................................................................................... 79Statements
............................................................................................................................................................... 79Const Statement
............................................................................................................................................................... 79Declare Statement
............................................................................................................................................................... 81Dim Statement
............................................................................................................................................................... 82Doevents Statement
............................................................................................................................................................... 82Do... Loop Statement
............................................................................................................................................................... 84Enum Statement
............................................................................................................................................................... 85Exit Statement
............................................................................................................................................................... 86For... Next Statement
............................................................................................................................................................... 87Function Statement
............................................................................................................................................................... 88Goto Statement
............................................................................................................................................................... 89If.... Then... Else Statement
............................................................................................................................................................... 90Include Statement
............................................................................................................................................................... 91Select-Case Statement
............................................................................................................................................................... 93Sub Statement
............................................................................................................................................................... 94Type Statement
............................................................................................................................................................... 95While-Wend Statement
................................................................................................................................... 96Keywords
............................................................................................................................................................... 96As
............................................................................................................................................................... 97Boolean
............................................................................................................................................................... 97ByRef
............................................................................................................................................................... 97Byte
............................................................................................................................................................... 97ByVal
............................................................................................................................................................... 97Char
............................................................................................................................................................... 97Else
............................................................................................................................................................... 97End
............................................................................................................................................................... 98False
............................................................................................................................................................... 98For
............................................................................................................................................................... 98Integer
............................................................................................................................................................... 98Next
............................................................................................................................................................... 98Public
............................................................................................................................................................... 98Short
............................................................................................................................................................... 98Step
©2000-2008 Tibbo Technology Inc.
Page 5

TIDE and Tibbo BASIC User ManualIII
............................................................................................................................................................... 98String
............................................................................................................................................................... 98Then
............................................................................................................................................................... 99Type
............................................................................................................................................................... 99To
............................................................................................................................................................... 99True
............................................................................................................................................................... 99Word
................................................................................................................................... 99Operators
................................................................................................................................... 101Error Messages
............................................................................................................................................................... 101C1001
............................................................................................................................................................... 101C1002
............................................................................................................................................................... 102C1003
............................................................................................................................................................... 102C1004
............................................................................................................................................................... 102C1005
............................................................................................................................................................... 103C1006
............................................................................................................................................................... 103C1007
............................................................................................................................................................... 104C1008
............................................................................................................................................................... 104C1009
............................................................................................................................................................... 104C1010
............................................................................................................................................................... 105C1011
............................................................................................................................................................... 105C1012
............................................................................................................................................................... 106C1013
............................................................................................................................................................... 106C1014
............................................................................................................................................................... 106C1015
............................................................................................................................................................... 107C1016
............................................................................................................................................................... 107C1017
............................................................................................................................................................... 107C1018
............................................................................................................................................................... 108C1019
............................................................................................................................................................... 108C1020
............................................................................................................................................................... 108C1021
............................................................................................................................................................... 109C1022
............................................................................................................................................................... 109C1023
............................................................................................................................................................... 110C1024
............................................................................................................................................................... 110L1001
............................................................................................................................................................... 110L1002
............................................................................................................................................................... 111L1003
............................................................................................................................................................... 111L1004
............................................................................................................................................................... 111L1005
............................................................................................................................................................... 111L1006
............................................................................................................................................................... 112L1007
............................................................................................................................................................... 112L1008
............................................................................................................................................................... 112L1009
................................................................................................................................... 113Objects, Properties, Methods, Events
Development Environment
................................................................................................................................... 113Installation Requirements
................................................................................................................................... 113User Interface
............................................................................................................................................................... 114Main Window
............................................................................................................................................................... 114Operation Modes
............................................................................................................................................................... 115Menu Bar
............................................................................................................................................................ 115File Menu
............................................................................................................................................................ 116Edit Menu
............................................................................................................................................................ 117View Menu
............................................................................................................................................................ 117Project Menu
............................................................................................................................................................ 118Debug Menu
............................................................................................................................................................ 119Image Menu
............................................................................................................................................................ 119Window Menu
113
©2000-2008 Tibbo Technology Inc.
Page 6

............................................................................................................................................................... 120Toolbars
............................................................................................................................................................... 126Status Bar
............................................................................................................................................................... 126Dialogs
............................................................................................................................................................... 128Panes
............................................................................................................................................................... 131Language Element Icons
IVContents
............................................................................................................................................................ 120Help Menu
............................................................................................................................................................ 120Project Toolbar
............................................................................................................................................................ 121Debug Toolbar
............................................................................................................................................................ 122Image Editor Toolbar
............................................................................................................................................................ 122Tool Properties Toolbar
.......................................................................................................................................................... 123Selection Tool Properties
.......................................................................................................................................................... 123Paint Tool Properties
.......................................................................................................................................................... 123Eraser Tool Properties
.......................................................................................................................................................... 123Text Tool Properties
.......................................................................................................................................................... 124Line Tool Properties
.......................................................................................................................................................... 124Rectangle Tool Properties
.......................................................................................................................................................... 125Ellipse Tool Properties
.......................................................................................................................................................... 126Zoom Tool Properties
............................................................................................................................................................ 127Project Settings
............................................................................................................................................................ 127New Project
............................................................................................................................................................ 128Add File to Project
............................................................................................................................................................ 128Graphic File Properties Dialog
............................................................................................................................................................ 128Call Stack
............................................................................................................................................................ 129Output
............................................................................................................................................................ 129Project
.......................................................................................................................................................... 129Browser
.......................................................................................................................................................... 130Files
............................................................................................................................................................ 130Watch
............................................................................................................................................................ 130Colors
Glossary of Terms 131
................................................................................................................................... 131Compilation Unit
................................................................................................................................... 131Compiler
................................................................................................................................... 132Construct
................................................................................................................................... 132Cross-Debugging
................................................................................................................................... 132Identifier
................................................................................................................................... 132Keyword
................................................................................................................................... 132Label
................................................................................................................................... 132Linker
................................................................................................................................... 132P-Code
................................................................................................................................... 132Syscall
................................................................................................................................... 133Target
................................................................................................................................... 133Virtual Machine
Platforms 133
................................................................................................................................... 133Platform Specifications
............................................................................................................................................................... 134EM202 Platform
............................................................................................................................................................ 134Memory Space
............................................................................................................................................................ 134Supported Variabled Types
............................................................................................................................................................ 134Supported Functions (Syscalls)
............................................................................................................................................................ 135Supported Objects
............................................................................................................................................................ 135Platform-dependent Constants
.......................................................................................................................................................... 136Enum pl_redir
©2000-2008 Tibbo Technology Inc.
Page 7

TIDE and Tibbo BASIC User ManualV
.......................................................................................................................................................... 136Enum pl_io_num
............................................................................................................................................................ 136Platform-dependent Programming Information
............................................................................................................................................................... 139EM1000 and EM1000W Platforms
............................................................................................................................................................ 140Memory Space
............................................................................................................................................................ 140Supported Objects
............................................................................................................................................................ 140Platform-dependent Constants
.......................................................................................................................................................... 141Enum pl_redir
.......................................................................................................................................................... 142Enum pl_io_num
.......................................................................................................................................................... 144Enum pl_int_num
.......................................................................................................................................................... 145Enum pl_sock_interfaces
............................................................................................................................................................ 145Platform-dependent Programming Information
............................................................................................................................................................... 149EM1202 and EM1202W Platforms
............................................................................................................................................................ 149Memory Space
............................................................................................................................................................ 150Supported Objects
............................................................................................................................................................ 150Platform-dependent Constants
.......................................................................................................................................................... 150Enum pl_redir
.......................................................................................................................................................... 151Enum pl_io_num
.......................................................................................................................................................... 153Enum pl_int_num
.......................................................................................................................................................... 154Enum pl_sock_interfaces
............................................................................................................................................................ 154Platform-dependent Programming Information
............................................................................................................................................................... 158EM1206 and EM1206W Platforms
............................................................................................................................................................ 158Memory Space
............................................................................................................................................................ 159Supported Objects
............................................................................................................................................................ 159Platform-dependent Constants
.......................................................................................................................................................... 159Enum pl_redir
.......................................................................................................................................................... 160Enum pl_io_num
.......................................................................................................................................................... 162Enum pl_int_num
.......................................................................................................................................................... 162Enum pl_sock_interfaces
............................................................................................................................................................ 163Platform-dependent Programming Information
............................................................................................................................................................... 166DS1202 Platform
............................................................................................................................................................ 167Memory Space
............................................................................................................................................................ 167Supported Objects
............................................................................................................................................................ 167Platform-dependent Constants
.......................................................................................................................................................... 167Enum pl_redir
.......................................................................................................................................................... 169Enum pl_io_num
.......................................................................................................................................................... 170Enum pl_int_num
.......................................................................................................................................................... 170Enum pl_sock_interfaces
............................................................................................................................................................ 171Platform-dependent Programming Information
............................................................................................................................................................... 174DS1206 Platform
............................................................................................................................................................ 175Memory Space
............................................................................................................................................................ 175Supported Objects
............................................................................................................................................................ 175Platform-dependent Constants
.......................................................................................................................................................... 175Enum pl_redir
.......................................................................................................................................................... 177Enum pl_io_num
.......................................................................................................................................................... 178Enum pl_int_num
.......................................................................................................................................................... 179Enum pl_sock_interfaces
............................................................................................................................................................ 179Platform-dependent Programming Information
............................................................................................................................................................... 182Common Information
............................................................................................................................................................ 183Supported Variable Types (T1000-based Devices)
............................................................................................................................................................ 183Supported Functions (T1000-based Devices)
............................................................................................................................................................ 184LED Signals
............................................................................................................................................................ 185Debug Communications
............................................................................................................................................................ 186Project Settings Dialog
.......................................................................................................................................................... 187Device Explorer
................................................................................................................................... 189Function Reference
............................................................................................................................................................... 189Asc Function
............................................................................................................................................................... 190Bin Function
............................................................................................................................................................... 190Cfloat Function
©2000-2008 Tibbo Technology Inc.
Page 8

............................................................................................................................................................... 191Chr Function
............................................................................................................................................................... 191Date Function
............................................................................................................................................................... 192Daycount Function
............................................................................................................................................................... 192Ddstr Function
............................................................................................................................................................... 193Ddval Function
............................................................................................................................................................... 194Ftostr Function
............................................................................................................................................................... 195Hex Function
............................................................................................................................................................... 195Hours Function
............................................................................................................................................................... 196.Insert Function
............................................................................................................................................................... 197Instr Function
............................................................................................................................................................... 197Lbin Function
............................................................................................................................................................... 198Left Function
............................................................................................................................................................... 198Len Function
............................................................................................................................................................... 199Lhex Function
............................................................................................................................................................... 199Lstr Function
............................................................................................................................................................... 200Lstri Function
............................................................................................................................................................... 200Lval Function
............................................................................................................................................................... 201Md5 Function
............................................................................................................................................................... 202Mid Function
............................................................................................................................................................... 203Mincount Function
............................................................................................................................................................... 203Minutes Function
............................................................................................................................................................... 204Month Function
............................................................................................................................................................... 205Random Function
............................................................................................................................................................... 205Right Function
............................................................................................................................................................... 205Sha1 Function
............................................................................................................................................................... 207Str Function
............................................................................................................................................................... 207Strgen Function
............................................................................................................................................................... 208Stri Function
............................................................................................................................................................... 209Strsum Function
............................................................................................................................................................... 209Strtof Function
............................................................................................................................................................... 210Val Function
............................................................................................................................................................... 210Vali Function
............................................................................................................................................................... 211Weekday Function
............................................................................................................................................................... 211Year Function
................................................................................................................................... 212Object Reference
............................................................................................................................................................... 212Sys Object
............................................................................................................................................................ 212Overview
.......................................................................................................................................................... 212On_sys_init Event
.......................................................................................................................................................... 213Buffer Management
.......................................................................................................................................................... 214System Timer
.......................................................................................................................................................... 215PLL Management
.......................................................................................................................................................... 216Serial Number
.......................................................................................................................................................... 217Miscellaneous
............................................................................................................................................................ 217Properties, Methods, Events
.......................................................................................................................................................... 217.Buffalloc Method
.......................................................................................................................................................... 218.Currentpll R/O Property (Selected Platforms Only)
.......................................................................................................................................................... 218.Freebuffpages R/O Property
.......................................................................................................................................................... 219.Halt Method
.......................................................................................................................................................... 219.Newpll Method (Selected Platforms Only)
.......................................................................................................................................................... 220On_sys_init Event
.......................................................................................................................................................... 220On_sys_timer Event
.......................................................................................................................................................... 220.Onsystimerperiod Property (Selected Platforms Only)
.......................................................................................................................................................... 221.Reboot Method
.......................................................................................................................................................... 221.Runmode R/O Property
.......................................................................................................................................................... 221Serialnum R/O Property
.......................................................................................................................................................... 222Setserialnum Method
.......................................................................................................................................................... 222.Resettype R/O Property
.......................................................................................................................................................... 223.Timercount R/O Property
VIContents
©2000-2008 Tibbo Technology Inc.
Page 9

TIDE and Tibbo BASIC User ManualVII
.......................................................................................................................................................... 223.Totalbuffpages R/O Property
.......................................................................................................................................................... 223.Version R/O Property
............................................................................................................................................................... 224Ser Object
............................................................................................................................................................ 224What's new in V1.1
............................................................................................................................................................ 225Overview
.......................................................................................................................................................... 225Anatomy of a Serial Port
.......................................................................................................................................................... 225Three Modes of the Serial Port
....................................................................................................................................................... 226UART Mode
....................................................................................................................................................... 229Wiegand Mode
....................................................................................................................................................... 232Clock/Data Mode
.......................................................................................................................................................... 234Port Selection
.......................................................................................................................................................... 236Serial Settings
.......................................................................................................................................................... 239Sending and Receiving Data (TX and RX buffers)
....................................................................................................................................................... 239Allocating Memory for Buffers
....................................................................................................................................................... 240Using Buffers
....................................................................................................................................................... 240Buffer Memory Status
....................................................................................................................................................... 241Receiving Data
....................................................................................................................................................... 243Sending Data
....................................................................................................................................................... 244Handling Buffer Overruns
....................................................................................................................................................... 245Redirecting Buffers
....................................................................................................................................................... 245Sinking Data
............................................................................................................................................................ 246Properties, Methods, Events
.......................................................................................................................................................... 248.Autoclose Property
.......................................................................................................................................................... 248.Baudrate Property
.......................................................................................................................................................... 249.Bits Property
.......................................................................................................................................................... 249.Ctsmap property (Selected Platforms Only)
.......................................................................................................................................................... 250.Dircontrol Property
.......................................................................................................................................................... 250.Div9600 R/O Property
.......................................................................................................................................................... 251.Enabled Property
.......................................................................................................................................................... 251.Escchar Property
.......................................................................................................................................................... 251.Esctype Property
.......................................................................................................................................................... 253.Flowcontrol Property
.......................................................................................................................................................... 253.Getdata Method
.......................................................................................................................................................... 254.Interchardelay Property
.......................................................................................................................................................... 255.Interface Property
.......................................................................................................................................................... 255.Mode Property
.......................................................................................................................................................... 256.Newtxlen R/O Property
.......................................................................................................................................................... 257.Notifysent Method
.......................................................................................................................................................... 257.Num Property
.......................................................................................................................................................... 258.Numofports R/O Property
.......................................................................................................................................................... 258On_ser_data_arrival Event
.......................................................................................................................................................... 258On_ser_data_sent Event
.......................................................................................................................................................... 259On_ser_esc Event
.......................................................................................................................................................... 259On_ser_overrun Event
.......................................................................................................................................................... 260.Parity Property
.......................................................................................................................................................... 260.Redir Method
.......................................................................................................................................................... 261.Rtsmap Property (Selected Platforms Only)
.......................................................................................................................................................... 262.Rxbuffrq Method
.......................................................................................................................................................... 262.Rxbuffsize R/O Property
.......................................................................................................................................................... 263.Rxclear Method
.......................................................................................................................................................... 263.Rxlen R/O Property
.......................................................................................................................................................... 264.Send Method
.......................................................................................................................................................... 264.Setdata Method
.......................................................................................................................................................... 265.Sinkdata Property
.......................................................................................................................................................... 265.Txbuffrq Method
.......................................................................................................................................................... 266.Txbuffsize R/O Property
.......................................................................................................................................................... 266.Txclear Method
.......................................................................................................................................................... 266.Txfree R/O Property
.......................................................................................................................................................... 267.Txlen R/O Property
©2000-2008 Tibbo Technology Inc.
Page 10

............................................................................................................................................................... 267Net Object
............................................................................................................................................................ 268Overview
.......................................................................................................................................................... 268Main Parameters
.......................................................................................................................................................... 269Checking Ethernet Status
............................................................................................................................................................ 269Properties, Methods, Events
.......................................................................................................................................................... 269.Mac R/O Property
.......................................................................................................................................................... 270.Ip Property
.......................................................................................................................................................... 270.Netmask Property
.......................................................................................................................................................... 270.Gatewayip Property
.......................................................................................................................................................... 271.Failure R/O Property
.......................................................................................................................................................... 271.Linkstate R/O Property
.......................................................................................................................................................... 271On_net_link_change Event
.......................................................................................................................................................... 272On_net_overrun Event
............................................................................................................................................................... 272Button Object
............................................................................................................................................................ 273On_button_pressed Event
............................................................................................................................................................ 273On_button_released Event
............................................................................................................................................................ 274.Pressed R/O Property
............................................................................................................................................................ 274.Time R/O Property
............................................................................................................................................................... 274Sock Object
............................................................................................................................................................ 275Overview
.......................................................................................................................................................... 276Anatomy of a Socket
.......................................................................................................................................................... 276Socket Selection
.......................................................................................................................................................... 277Handling Network Connections
....................................................................................................................................................... 278TCP connection basics
....................................................................................................................................................... 278UDP "connection" basics
....................................................................................................................................................... 279Accepting Incoming Connections
....................................................................................................................................................... 281Accepting UDP broadcasts
....................................................................................................................................................... 281Understanding TCP Reconnects
....................................................................................................................................................... 283Understanding UDP Reconnects and Port Switchover
....................................................................................................................................................... 286Incoming Connections on Multiple Sockets
....................................................................................................................................................... 287Establishing Outgoing Connections
....................................................................................................................................................... 288Sending UDP broadcasts
....................................................................................................................................................... 290Closing Connections
....................................................................................................................................................... 292Checking Connection Status
....................................................................................................................................................... 294More On the Socket's Asynchronous Nature
.......................................................................................................................................................... 297Sending and Receiving data
....................................................................................................................................................... 297Allocating Memory for Buffers
....................................................................................................................................................... 298Using Buffers in TCP Mode
....................................................................................................................................................... 299Using Buffers in UDP Mode
....................................................................................................................................................... 300TX and RX Buffer Memory Status
....................................................................................................................................................... 301Receiving Data in TCP Mode
....................................................................................................................................................... 303Receiving Data in UDP Mode
....................................................................................................................................................... 304Sending TCP and UDP Data
....................................................................................................................................................... 306"Split Packet" Mode of TCP Data Processing
....................................................................................................................................................... 307Handling Buffer Overruns
....................................................................................................................................................... 308Redirecting Buffers
....................................................................................................................................................... 309Sinking Data
.......................................................................................................................................................... 309Working With Inband Commands
....................................................................................................................................................... 309Inband Message Format
....................................................................................................................................................... 310Inband-related Buffers (CMD, RPL, and TX2)
....................................................................................................................................................... 311Processing Inband Commands
....................................................................................................................................................... 313Sending Inband Replies
.......................................................................................................................................................... 314Using HTTP
....................................................................................................................................................... 315HTTP-related Buffers
....................................................................................................................................................... 317Setting the Socket for HTTP
....................................................................................................................................................... 318Socket Behavior in the HTTP Mode
....................................................................................................................................................... 319Including BASIC Code in HTTP Files
....................................................................................................................................................... 320Generating Dynamic HTML Pages
....................................................................................................................................................... 322URL Substitution
VIIIContents
©2000-2008 Tibbo Technology Inc.
Page 11

TIDE and Tibbo BASIC User ManualIX
....................................................................................................................................................... 323Working with HTTP Variables
....................................................................................................................................................... 323Simple Case (Small Amout of Variable Data)
....................................................................................................................................................... 324Complex Case (Large Amount of Variable Data)
....................................................................................................................................................... 326Details on Variable Data
............................................................................................................................................................ 327Properties, Methods, and Events
.......................................................................................................................................................... 327.Acceptbcast Property
.......................................................................................................................................................... 327.Allowedinterfaces Property
.......................................................................................................................................................... 328.Bcast R/O Property
.......................................................................................................................................................... 328.Close Method
.......................................................................................................................................................... 329.Cmdbuffrq Method
.......................................................................................................................................................... 329.Cmdlen R/O Property
.......................................................................................................................................................... 330.Connect Method
.......................................................................................................................................................... 330.Connectiontout Property
.......................................................................................................................................................... 331.Currentinterface R/O Property
.......................................................................................................................................................... 331.Discard Method
.......................................................................................................................................................... 331.Endchar Property
.......................................................................................................................................................... 332.Escchar Property
.......................................................................................................................................................... 332.Event R/O Property (Obsolete)
.......................................................................................................................................................... 332.Eventsimple R/O Property (Obsolete)
.......................................................................................................................................................... 333.Getdata Method
.......................................................................................................................................................... 333.Gethttprqstring Method
.......................................................................................................................................................... 334.Getinband Method
.......................................................................................................................................................... 334.Httpmode Property
.......................................................................................................................................................... 335.Httpnoclose Property
.......................................................................................................................................................... 335.Httpportlist Property
.......................................................................................................................................................... 336.Httprqstring R/O Property
.......................................................................................................................................................... 337.Inbandcommands Property
.......................................................................................................................................................... 337.Inconenabledmaster Property
.......................................................................................................................................................... 338.Inconmode Property
.......................................................................................................................................................... 338.Localport R/O Property
.......................................................................................................................................................... 339.Localportlist Property
.......................................................................................................................................................... 339.Newtxlen R/O Property
.......................................................................................................................................................... 339.Nextpacket Method
.......................................................................................................................................................... 340.Notifysent Method
.......................................................................................................................................................... 340.Num Property
.......................................................................................................................................................... 341.Numofsock R/O Property
.......................................................................................................................................................... 341.Outport Property
.......................................................................................................................................................... 342On_sock_data_arrival Event
.......................................................................................................................................................... 342On_sock_data_sent Event
.......................................................................................................................................................... 343On_sock_event Event
.......................................................................................................................................................... 343On_sock_inband Event
.......................................................................................................................................................... 343On_sock_overrun Event
.......................................................................................................................................................... 344On_sock_postdata
.......................................................................................................................................................... 344On_sock_tcp_packet_arrival Event
.......................................................................................................................................................... 345.Protocol Property
.......................................................................................................................................................... 345.Reconmode Property
.......................................................................................................................................................... 346.Redir Method
.......................................................................................................................................................... 347.Remoteip R/O Property
.......................................................................................................................................................... 348.Remotemac R/O Property
.......................................................................................................................................................... 348.Remoteport R/O Property
.......................................................................................................................................................... 348.Reset Method
.......................................................................................................................................................... 349.Rplbuffrq Method
.......................................................................................................................................................... 350.Rplfree R/O Property
.......................................................................................................................................................... 350.Rpllen R/O Property
.......................................................................................................................................................... 350.Rxbuffrq Method
.......................................................................................................................................................... 351.Rxbuffsize R/O Property
.......................................................................................................................................................... 351.Rxclear Method
.......................................................................................................................................................... 352.Rxpacketlen R/O Property
.......................................................................................................................................................... 352.Rxlen R/O Property
©2000-2008 Tibbo Technology Inc.
Page 12

.......................................................................................................................................................... 353.Send Method
.......................................................................................................................................................... 353.Setdata Method
.......................................................................................................................................................... 354.Setsendinband Method
.......................................................................................................................................................... 354Sinkdata Property
.......................................................................................................................................................... 355.Splittcppackets Property
.......................................................................................................................................................... 355.State R/O Property
.......................................................................................................................................................... 358.Statesimple R/O Property
.......................................................................................................................................................... 359.Targetbcast Property
.......................................................................................................................................................... 359.Targetinterface Property
.......................................................................................................................................................... 359.Targetip Property
.......................................................................................................................................................... 360.Targetport Property
.......................................................................................................................................................... 360.Toutcounter R/O property
.......................................................................................................................................................... 361.Tx2buffrq Method
.......................................................................................................................................................... 362.Tx2len R/O Property
.......................................................................................................................................................... 362.Txbuffrq Method
.......................................................................................................................................................... 363.Txbuffsize R/O Property
.......................................................................................................................................................... 363.Txclear Method
.......................................................................................................................................................... 363.Txfree R/O Property
.......................................................................................................................................................... 364.Txlen R/O Property
.......................................................................................................................................................... 364.Urlsubstitutes
.......................................................................................................................................................... 365.Varbuffrq Method
............................................................................................................................................................... 365IO Object
............................................................................................................................................................ 365Overview
.......................................................................................................................................................... 366Line/Port Manipulation With Pre-selection
.......................................................................................................................................................... 367Line/Port Manipulation Without Pre-selection
.......................................................................................................................................................... 368Controlling Output Buffers
.......................................................................................................................................................... 369Working With Interrupts
............................................................................................................................................................ 370Properties, Events, Methods
.......................................................................................................................................................... 370.Enabled Property (Selected Platforms Only)
.......................................................................................................................................................... 370.Intenabled Property
.......................................................................................................................................................... 371.Intnum Property
.......................................................................................................................................................... 371.Invert Method
.......................................................................................................................................................... 371.Lineget Method
.......................................................................................................................................................... 372.Lineset Method
.......................................................................................................................................................... 372.Num Property
.......................................................................................................................................................... 373On_io_int Event
.......................................................................................................................................................... 373.Portenabled Property (Selected Platforms Only)
.......................................................................................................................................................... 373.Portget Method
.......................................................................................................................................................... 374.Portnum Property
.......................................................................................................................................................... 374.Portset Method
.......................................................................................................................................................... 375.Portstate property
.......................................................................................................................................................... 375.State Property
............................................................................................................................................................... 375Romfile Object
............................................................................................................................................................ 377.Find Method
............................................................................................................................................................ 378.Getdata Method
............................................................................................................................................................ 378.Offset R/O Property
............................................................................................................................................................ 379.Open Method
............................................................................................................................................................ 379.Pointer Property
............................................................................................................................................................ 379.Size R/O Property
............................................................................................................................................................... 380Stor Object
............................................................................................................................................................ 381.Base Property
............................................................................................................................................................ 381.Getdata Method (previously .Get)
............................................................................................................................................................ 382.Setdata Method (previously .Set)
............................................................................................................................................................ 383.Size R/O Property
............................................................................................................................................................... 384Pat Object
............................................................................................................................................................ 385.Channel Property
............................................................................................................................................................ 385.Greenmap Property
............................................................................................................................................................ 386On_pat Event
............................................................................................................................................................ 386.Play Method
XContents
©2000-2008 Tibbo Technology Inc.
Page 13

TIDE and Tibbo BASIC User ManualXI
............................................................................................................................................................ 387.Redmap Property
............................................................................................................................................................... 387Beep Object
............................................................................................................................................................ 388.Divider Property
............................................................................................................................................................ 388On_beep Event
............................................................................................................................................................ 389.Play Method
............................................................................................................................................................... 389RTC Object
............................................................................................................................................................ 390.Getdata Method (Previously .Get)
............................................................................................................................................................ 391.Running R/O Property
............................................................................................................................................................ 391.Setdata Method (Previously .Set)
............................................................................................................................................................... 392LCD Object
............................................................................................................................................................ 393Overview
.......................................................................................................................................................... 393Understanging Controller Properties
.......................................................................................................................................................... 395Preparing the Display for Operation
.......................................................................................................................................................... 395Working With Pixels and Colors
.......................................................................................................................................................... 396Lines, Rectangles, and Fills
.......................................................................................................................................................... 397Working With Text
....................................................................................................................................................... 400Raster Font File Format
.......................................................................................................................................................... 404Displaying Images
.......................................................................................................................................................... 405Improving Graphical Performance
............................................................................................................................................................ 408Supported Controllers/Panels
.......................................................................................................................................................... 408Samsung S6B0108 (Winstar WG12864F)
.......................................................................................................................................................... 410Solomon SSD1329 (Ritdisplay RGS13128096)
.......................................................................................................................................................... 411Himax HX8309 (Ampire AM176220)
............................................................................................................................................................ 412Properties and Methods
.......................................................................................................................................................... 414.Backcolor Property
.......................................................................................................................................................... 414.Bitsperpixel R/O Property
.......................................................................................................................................................... 415.Bluebits R/O Property
.......................................................................................................................................................... 415.Bmp Method
.......................................................................................................................................................... 416.Enabled Property
.......................................................................................................................................................... 417.Error R/O Property
.......................................................................................................................................................... 417.Fill Method
.......................................................................................................................................................... 418.Filledrectangle Method
.......................................................................................................................................................... 418.Fontheight R/O Property
.......................................................................................................................................................... 419.Fontpixelpacking R/O Property
.......................................................................................................................................................... 419.Forecolor Property
.......................................................................................................................................................... 420.Getprintwidth Method
.......................................................................................................................................................... 420.Greenbits R/O Property
.......................................................................................................................................................... 421.Height Property
.......................................................................................................................................................... 421.Horline Method
.......................................................................................................................................................... 422.Inverted Property
.......................................................................................................................................................... 422.Iomapping Property
.......................................................................................................................................................... 422.Line Method
.......................................................................................................................................................... 423.Linewidth Property
.......................................................................................................................................................... 423.Lock Method
.......................................................................................................................................................... 424.Lockcount R/O Property
.......................................................................................................................................................... 424.Paneltype R/O Property
.......................................................................................................................................................... 425.Pixelpacking R/O Property
.......................................................................................................................................................... 425.Print Method
.......................................................................................................................................................... 426.Printaligned Method
.......................................................................................................................................................... 427.Rectangle Method
.......................................................................................................................................................... 427.Redbits R/O Property
.......................................................................................................................................................... 428.Rotated Property
.......................................................................................................................................................... 428.Setfont Method
.......................................................................................................................................................... 429.Setpixel Method
.......................................................................................................................................................... 429.Textalignment Property
.......................................................................................................................................................... 430.Texthorizontalspacing Property
.......................................................................................................................................................... 430.Textorientation Property
.......................................................................................................................................................... 431.Textverticalspacing Property
.......................................................................................................................................................... 431.Unlock Method
©2000-2008 Tibbo Technology Inc.
Page 14

.......................................................................................................................................................... 432.Verline Method
.......................................................................................................................................................... 432.Width Property
............................................................................................................................................................... 433Fd Object
............................................................................................................................................................ 433Overview
.......................................................................................................................................................... 434Sharing Flash Between Your Application and Data
.......................................................................................................................................................... 435Fd. Object's Status Codes
.......................................................................................................................................................... 436File-based Access
....................................................................................................................................................... 436Formatting the Flash Disk
....................................................................................................................................................... 437Disk Area Allocation Details
....................................................................................................................................................... 439Mounting the Flash Disk
....................................................................................................................................................... 440File Names and Attributes
....................................................................................................................................................... 441Checking Disk Vitals
....................................................................................................................................................... 441Creating, Deleting, and Renaming Files
....................................................................................................................................................... 442Reading and Writing File Attributes
....................................................................................................................................................... 442Walking Through File Directory
....................................................................................................................................................... 443Opening Files
....................................................................................................................................................... 444Writing To and Reading From Files
....................................................................................................................................................... 445Removing Data From Files
....................................................................................................................................................... 446Searching Files
....................................................................................................................................................... 448Closing Files
.......................................................................................................................................................... 448Direct Sector Access
....................................................................................................................................................... 450Using Checksums
....................................................................................................................................................... 452Upgrading the Firmware/Application
.......................................................................................................................................................... 453File-based and Direct Sector Access Coexistence
.......................................................................................................................................................... 453Prolonging Flash Memory Life
.......................................................................................................................................................... 454Ensuring Disk Data Integrity
............................................................................................................................................................ 456Properties and Methods
.......................................................................................................................................................... 457.Availableflashspace R/O Property
.......................................................................................................................................................... 458.Buffernum Property
.......................................................................................................................................................... 458.Capacity R/O Property
.......................................................................................................................................................... 459.Checksum Method
.......................................................................................................................................................... 460.Close Method
.......................................................................................................................................................... 460.Copyfirmware Method
.......................................................................................................................................................... 461.Cutfromtop Method
.......................................................................................................................................................... 462.Create Method
.......................................................................................................................................................... 463.Delete Method
.......................................................................................................................................................... 463.Filenum Property
.......................................................................................................................................................... 464.Fileopened R/O Property
.......................................................................................................................................................... 464.Filesize R/O Property
.......................................................................................................................................................... 464.Find Method
.......................................................................................................................................................... 466.Flush Method
.......................................................................................................................................................... 467.Format Method
.......................................................................................................................................................... 467.Getattributes Method
.......................................................................................................................................................... 468.Getbuffer Method
.......................................................................................................................................................... 469.Getdata Method
.......................................................................................................................................................... 470.Getfreespace Method
.......................................................................................................................................................... 470.Getnextdirmember Method
.......................................................................................................................................................... 471.Getnumfiles Method
.......................................................................................................................................................... 472.Getsector Method
.......................................................................................................................................................... 472.Laststatus R/O Property
.......................................................................................................................................................... 473.Maxopenedfiles R/O Property
.......................................................................................................................................................... 474.Maxstoredfiles R/O Property
.......................................................................................................................................................... 474.Mount Method
.......................................................................................................................................................... 475.Numservicesectors R/O Property
.......................................................................................................................................................... 475.Open Method
.......................................................................................................................................................... 476.Pointer R/O Property
.......................................................................................................................................................... 476.Ready R/O Property
.......................................................................................................................................................... 477.Rename Method
.......................................................................................................................................................... 478.Resetdirpointer Method
XIIContents
©2000-2008 Tibbo Technology Inc.
Page 15

TIDE and Tibbo BASIC User ManualXIII
.......................................................................................................................................................... 478.Sector R/O Property
.......................................................................................................................................................... 478.Setattributes Method
.......................................................................................................................................................... 479.Setbuffer Method
.......................................................................................................................................................... 480.Setdata Method
.......................................................................................................................................................... 481.Setfilesize Method
.......................................................................................................................................................... 482.Setpointer Method
.......................................................................................................................................................... 483.Setsector Method
.......................................................................................................................................................... 483.Totalsize R/O Property
............................................................................................................................................................... 484Kp Object
............................................................................................................................................................ 484Possible Keypad Configurations
............................................................................................................................................................ 486Key States and Transitions
............................................................................................................................................................ 487Preparing the Keypad for Operation
............................................................................................................................................................ 489Servicing Keypad Events
............................................................................................................................................................ 492Properties, Methods, Events
.......................................................................................................................................................... 492.Autodisablecodes Property
.......................................................................................................................................................... 492.Enabled Property
.......................................................................................................................................................... 493.Longpressdelay Property
.......................................................................................................................................................... 493.Longreleasedelay Property
.......................................................................................................................................................... 494On_kp Event
.......................................................................................................................................................... 494On_kp_overflow Event
.......................................................................................................................................................... 495.Pressdelay Property
.......................................................................................................................................................... 495.Releasedelay Property
.......................................................................................................................................................... 496.Repeatdelay Property
.......................................................................................................................................................... 496.Returnlinesmapping Property
.......................................................................................................................................................... 497.Scanlinesmapping Property
............................................................................................................................................................... 497Wln Object
............................................................................................................................................................ 498Migrating From the WA1000
............................................................................................................................................................ 499Overview
.......................................................................................................................................................... 500Wi-Fi Parlance Primer
.......................................................................................................................................................... 500Wln Tasks
.......................................................................................................................................................... 503Wln State Transitions
.......................................................................................................................................................... 504Brining Up Wi-Fi Interface
....................................................................................................................................................... 505Allocating Buffer Memory
....................................................................................................................................................... 506Applying Reset
....................................................................................................................................................... 507Configuring Interface Lines
....................................................................................................................................................... 507Setting MAC Address (Optional)
....................................................................................................................................................... 508Selecting Domain
....................................................................................................................................................... 508Booting Up the Hardware
....................................................................................................................................................... 509Setting IP, Gateway, and Netmask (Optional)
....................................................................................................................................................... 509Setting TX Power (Optional)
.......................................................................................................................................................... 509Scanning for Wi-Fi Networks
.......................................................................................................................................................... 510Setting WEP Mode and Key
.......................................................................................................................................................... 511Associating With Selected Network
.......................................................................................................................................................... 512Creating Own Ad-hoc Network
.......................................................................................................................................................... 512Communicating via Wln Interface
.......................................................................................................................................................... 512Disassociating From the Network
.......................................................................................................................................................... 512Terminating Own Ad-hoc Network
.......................................................................................................................................................... 513Rebooting
.......................................................................................................................................................... 513Detecting Disassociation or Offline State
............................................................................................................................................................ 513Properties, Methods, Events
.......................................................................................................................................................... 513.Associate Method
.......................................................................................................................................................... 514.Associationstate R/O Property
.......................................................................................................................................................... 515.Boot Method
.......................................................................................................................................................... 515.Bssmode Property
.......................................................................................................................................................... 516.Buffrq Method
.......................................................................................................................................................... 516.Buffsize R/O Property
.......................................................................................................................................................... 517.Clkmap Property
.......................................................................................................................................................... 517.Csmap Property
.......................................................................................................................................................... 517.Defaultibsschannel Property
©2000-2008 Tibbo Technology Inc.
Page 16

.......................................................................................................................................................... 517.Dimap Property
.......................................................................................................................................................... 518.Disassociate Method
.......................................................................................................................................................... 518.Domain Property
.......................................................................................................................................................... 519.Domap Property
.......................................................................................................................................................... 519.Enabled R/O Property
.......................................................................................................................................................... 520.Gatewayip Property
.......................................................................................................................................................... 520.Ip Property
.......................................................................................................................................................... 520.Mac Property
.......................................................................................................................................................... 521.Netmask Property
.......................................................................................................................................................... 521.Networkstart Method
.......................................................................................................................................................... 522.Networkstop Method
.......................................................................................................................................................... 522On_wln_event Event
.......................................................................................................................................................... 523On_wln_task_complete Event
.......................................................................................................................................................... 524.Rssi R/O Property
.......................................................................................................................................................... 524.Scan Method
.......................................................................................................................................................... 525.Scanresultbssid R/O Property
.......................................................................................................................................................... 525.Scanresultbssmode R/O Property
.......................................................................................................................................................... 526.Scanresultchannel R/O Property
.......................................................................................................................................................... 526.Scanresultrssi R/O Property
.......................................................................................................................................................... 526.Scanresultssid R/O Property
.......................................................................................................................................................... 527.Settxpower Method
.......................................................................................................................................................... 527.Setwep Method
.......................................................................................................................................................... 528.Ssid Property
.......................................................................................................................................................... 528.Task R/O Property
.......................................................................................................................................................... 529.Wepkey1 Property
.......................................................................................................................................................... 529.Wepkey2 Property
.......................................................................................................................................................... 529.Wepkey3 Property
.......................................................................................................................................................... 529.Wepkey4 Property
.......................................................................................................................................................... 530.Wepmode Property
XIVContents
Update History (for this Manual) 530
©2000-2008 Tibbo Technology Inc.
Page 17

1 TIDE and Tibbo BASIC User Manual
Taiko R2
Taiko is a solution which allows you to create programs for Tibbo modules capable
of running TiOS (Tibbo Operating System), and products based on these modules.
With Taiko, you write your program in a language called Tibbo Basic (a close
relative of any other BASIC you might already know), using a PC software called
TIDE - Tibbo Integrated Development Environment. Your program is then compiled
into a binary file and uploaded onto a Tibbo module. The Virtual Machine of TiOS
then executes this binary.
Taiko allows you to easily create programs for a variety of Tibbo-based products.
These may include:
Alarm Panels
Security Systems (Access control terminals, etc)
Data Collection terminals, such as time clocks
Sensor monitors
Interface converters
Vending machines
Industrial process controllers
The solutions created with Taiko are very flexible. They are written using a
language similar to BASIC, and are stored on a Tibbo module separately from the
core OS of the module (TiOS). This allows for simple modification of your device
functionality, even by the end-user (if you so allow).
Tibbo Basic itself is exactly the same for all TiOS-enabled devices. Hardware
differences are expressed through so-called platforms. Change the platform, and
you're programming for a different device.
Last update: 29JUL2009
Legal Information
Manual Update History
1
530
Documentation Map
The documentation for Taiko includes:
Overview - The theory and background behind Taiko.
4
Getting Started - An example starter project.
Programming with TIDE -- An overview of TIDE itself, debug facilities, etc.
Language Reference -- Systematically covers Tibbo Basic statements, keywords
and operators.
Development Environment -- Systematically covers TIDE GUI elements.
Glossary of Terms -- Contains some basic terms used in Taiko.
Platforms -- Platform-specific documentation for each target device.
133
Legal Information
Tibbo Technology ("TIBBO") is a Taiwan corporation that designs and/or
manufactures a number of hardware products, software products, and applications
("PRODUCTS"). In many cases, Tibbo PRODUCTS are combined with each other
9
15
78
113
131
©2000-2008 Tibbo Technology Inc.
Page 18

2Taiko R2
and/or third-party products thus creating a PRODUCT COMBINATION.
Whereas you (your Company) wish to purchase any PRODUCT from TIBBO, and/or whereas you
(your Company) wish to make use of any documentation or technical information published by
TIBBO, and/or make use of any source code published by TIBBO, and/or consult TIBBO and
receive technical support from TIBBO or any of its employees acting in an official or unofficial
capacity,
You must acknowledge and accept the following disclaimers:
1. Tibbo does not have any branch office, affiliated company, or any other form of
presence in any other jurisdiction. TIBBO customers, partners and distributors in
Taiwan and other countries are independent commercial entities and TIBBO does
not indemnify such customers, partners or distributors in any legal proceedings
related to, nor accepts any liability for damages resulting from the creation,
manufacture, importation, advertisement, resale, or use of any of its PRODUCT or
PRODUCT COMBINATION.
2. BASIC-programmable devices ("PROGRAMMABLE DEVICES") manufactured by
TIBBO can run a variety of applications written in Tibbo BASIC ("BASIC
APPLICATIONS"). Combining a particular PROGRAMMABLE DEVICE with a specific
BASIC APPLICATION, either written by TIBBO or any third party, may potentially
create a combinatorial end product (”END PRODUCT”) that violates local rules,
regulations, and/or infringes an existing patent granted in a country where such
combination has occurred or where the resulting END PRODUCT is manufactured,
exported, advertised, or sold. TIBBO is not capable of monitoring any activities by
its customers, partners or distributors aimed at creating any END PRODUCT, does
not provide advice on potential legal issues arising from creating such END
PRODUCT, nor explicitly recommends the use of any of its PROGRAMMABLE
DEVICES in combination with any BASIC APPLICATION, either written by TIBBO or
any third party.
3. TIBBO publishes a number of BASIC APPLICATIONS and segments thereof ("CODE SNIPPETS").
The BASIC APPLICATIONS and CODE SNIPPETS are provided “as is” without warranty of any
kind, either expressed or implied, including, but not limited to, the implied warranties of
merchantability and fitness for a particular purpose. The entire risk as to the quality and
performance of BASIC APPLICATIONS and CODE SNIPPETS resides with you. BASIC
APPLICATIONS AND CODE SNIPPETS may be used only as a part of a commercial device based
on TIBBO hardware. Modified code does not have to be released into the public domain, and
does not have to carry a credit for TIBBO. BASIC APPLICATIONS and CODE SNIPPETS are
provided solely as coding aids and should not be construed as any indication of the
predominant, representative, legal, or best mode of use for any PROGRAMMABLE DEVICE.
4. BASIC-programmable modules ("PROGRAMMABLE MODULES"), such as the EM1000 device,
are shipped from TIBBO in either a blank state (without any BASIC APPLICATION loaded), or
with a simple test BASIC APPLICATION aimed at verifying correct operation of
PROGRAMMABLE MODULE's hardware. All other BASIC-programmable products including
boards, external controllers, and developments systems ("NON-MODULE PRODUCTS"), such
©2000-2008 Tibbo Technology Inc.
Page 19

3 TIDE and Tibbo BASIC User Manual
as the DS1000 and NB1000, are normally shipped with a BASIC APPLICATION pre-loaded. This
is done solely for the convenience of testing by the customer and the nature and function of
pre-loaded BASIC APPLICATION shall not be construed as any indication of the predominant,
representative, or best mode of use for any such NON-MODULE PRODUCT.
5. All specifications, technical information, and any other data published by TIBBO are
subject to change without prior notice. TIBBO assumes no responsibility for any
errors and does not make any commitment to update any published information.
6. Any technical advice provided by TIBBO or its personnel is offered on a purely technical basis,
does not take into account any potential legal issues arising from the use of such advice, and
should not be construed as a suggestion or indication of the possible, predominant,
representative, or best mode of use for any Tibbo PRODUCT.
7. Neither TIBBO nor its employees shall be held responsible for any damages resulting from the
creation, manufacture, or use of any third-party product or system, even if this product or
system was inspired, fully or in part, by the advice provided by Tibbo staff (in an official
capacity or otherwise) or content published by TIBBO or any other third party.
8. TIBBO reserves the right to halt the production or availability of any of its
PRODUCTS at any time and without prior notice. The availability of a particular
PRODUCT in the past is not an indication of the future availability of this PRODUCT.
The sale of the PRODUCT to you is solely at TIBBO's discretion and any such sale
can be declined without explanation.
9. TIBBO makes no warranty for the use of its PRODUCTS, other than that expressly
contained in the Standard Warranty located on the Company's website. Your use of
TIBBO PRODUCTS is at your sole risk. TIBBO PRODUCTS are provided on an "as is"
and "as available" basis. TIBBO expressly disclaims the warranties of
merchantability, future availability, fitness for a particular purpose and
non-infringement. No advice or information, whether oral or written, obtained by
you from TIBBO shall create any warranty not expressly stated in the Standard
Warranty.
10.LIMITATION OF LIABILITY. BY USING TIBBO PRODUCTS YOU EXPRESSLY AGREE
THAT TIBBO SHALL NOT BE LIABLE TO YOU FOR ANY DIRECT, INDIRECT,
INCIDENTAL, SPECIAL, CONSEQUENTIAL OR EXEMPLARY DAMAGES, INCLUDING,
BUT NOT LIMITED TO, DAMAGES FOR LOSS OF PROFITS, GOODWILL, OR OTHER
INTANGIBLE LOSSES (EVEN IF TIBBO HAS BEEN ADVISED OF THE POSSIBILITY OF
SUCH DAMAGES) RESULTING FROM THE USE OR THE INABILITY TO USE OF TIBBO
PRODUCTS.
11."Tibbo" is a registered trademark of Tibbo Technology, Inc.
12.Terms and product names mentioned on TIBBO website or in TIBBO
documentation may be trademarks of others.
©2000-2008 Tibbo Technology Inc.
Page 20

Overview
Below is a summary of the major fundamentals and theory behind TIDE. This may
sound intimidating, but it's actually quite simple. You should at least skim over the
material herein, because it explains much of what comes next. In here you will
find:
Our Language Philosophy
System Components
Objects (a very brief overview)
Events
8
8
Our Language Philosophy
Several principles have guided us through the development process of Tibbo Basic.
Understanding them would help you understand this manual better, and also the
language itself. See below:
A Bit of History
Years ago, programming for the PC was the nearly exclusive domain of engineers.
The languages traditionally available, such as C, simply required you to be an
engineer to program.
However, one day something interesting happened. Visual Basic* and Delphi**
saw the light of day. And that changed quite a lot on the PC front. Suddenly,
people who were not engineers were finding out that they could actually create
something cool on their PC. You could say VB* and Delphi democratized the PC
software market.
The situation on the embedded systems market today is quite similar to the
situation which existed for the PC market in the pre-VB era. Many embedded
systems vendors do offer customizable or programmable solutions -- but to
implement those solutions, you would really have to be an engineer and know C/C
++ quite well. So, there was clearly a need for an easy-to-use programming
system which would democratize this market, as well.
7
4Overview
4
Principle One: Easy To Write, Easy to Debug
Choosing BASIC as our inspiration was the natural thing to do, for us. It's a
language which doesn't require you to be a professional engineer. It is easy to
understand. This is why it is embedded into many non-programmer products, such
as the Office suite. So we went for BASIC.
Another part of the user experience, and a major one, too, is debugging. Writing
your application is just half the job. You also need to debug it and for embedded
systems, this is where things typically start getting rough around the edges. Many
times you have to buy expensive tools, such as ICE machines (In-Circuit
Emulators), just to figure out what your code is doing. Sometimes you don't even
have the luxury of such a machine, and you actually debug by guessing and trying
different things in your code.
With our system, one of our major goals was to offer a user experience which is
close to debugging on the PC -- without the need for special tools, such as an ICE
machine.
While your program is running on the target (embedded device), you actually see
how it runs on your PC. You can step through it, jump to specific functions, check
values of variables etc -- all from the comfort of your own PC.
©2000-2008 Tibbo Technology Inc.
Page 21

5 TIDE and Tibbo BASIC User Manual
Principle Two: Easy Doesn't Mean Sloppy
Some modern programming languages use certain techniques to make life 'easier'
for programmers. They might not require the programmer to explicitly declare the
variables he's going to use ('implicit declaration'), or might do away with the need
to specify the type for the variable (i.e, use 'variant variables' which can contain
anything).
This has several disadvantages. For one, it is just sloppy. After several days of
writing code like that, a programmer might not have a very clear-cut idea of what
his program is doing, or where things come from. While this is something which
may be subject to debate, the next disadvantage is quite real:
This is simply wasteful programming. These techniques can consume quite a lot of
resources, specifically memory. On the PC, a variant used to store just 2 bytes of
data might take up to 100 bytes. This isn't a problem, because PCs have so much
memory these days that it is barely felt.
However, embedded systems are often low-cost and bare-bones, so physical
memory is a truly valuable resource. Waste too much of it -- and you would find
that your code can do very little. But manage it prudently, and your code will be
capable of quite impressive feats even on your 'low-power' embedded system.
So our systems requires you to be more organized. The effort is worth it.
Principle Three: The Purity of Language
Programming systems on the PC usually make no clear distinction between the
'pure' language constructs which perform calculations and control program flow,
and hardware-dependant input/output. For example, many languages contain a
print statement which prints something to the screen.
Since all PCs in the world are similar, this works. However, this makes little sense
for embedded platform, which have vastly different input/output resources.
Depending on the device, it may or may not have a screen, a serial port,
networking etc etc.
In our system, we separated the language itself (what we call the core language)
from the input/output of a particular device. Thus, the language itself remains the
same, no matter what device you are programming for. The input/output part is
hardware dependant, and changes from platform to platform.
When writing for a specific platform, you are provided with a set of platformspecific objects. These provide rich functionality and allow you to do 'real' work,
such as printing messages to the serial port, communicating on the Internet or
controlling motors and sensors.
Ideally, Tibbo Basic could run on a fridge just as well as it could run on a time and
attendance terminal.
Principle Four: Thin and Agile
A lot of embedded systems are built by scaling down larger desktop systems, and
it shows. What's the point of using a super-fast processor if you load it with dozens
of layers of nested calls?
All the code TiOS includes has been designed from scratch for running on a very
simple processor, and optimized for control applications. It has been crafted to
have the minimum possible ROM and RAM footprint and to run as fast as possible.
We built TiOS with Pareto's principle in mind. In other words, if a certain
functionality is required by only 5% of applications and yet its existence adds 90%
overhead, we did not include it. For example, our BASIC only supports integer
©2000-2008 Tibbo Technology Inc.
Page 22

6Overview
calculations. Most other BASIC versions, by default, operate using floating point
arithmetic, but these are not usually useful to embedded control (and even get in
the way). Another decision was to use a static memory model for procedure
variables. Memory is not allocated and deallocated dynamically -- It is assigned on
compile-time, which results in great performance improvements.
Principle Five: No B.S
... that is, no babysitting. Development systems intended for rapid application
development on the PC will often try to handle every little error or problem the
programmer may encounter. If a variable overflows, for example, they will halt
execution and pop up an error to let him know. This makes sense for a PC-based
product, because you are right there to see it halt.
However, when you are creating an embedded system, you expect it to run at all
times, without halting. Nobody will be there to see any errors and babysit your
system. Your device is simply expected to work.
This is a major difference also for the development process. In essence, since the
whole language is built this way, you will also get much less errors even when
doing seemingly 'strange' things, such as putting large values into variables that
cannot hold them. The language will deal with it silently, in a very predictable and
logical way -- but will not pop up an error.
Principle Six: Event-Driven Programming
Users of VB and Delphi and other Windows-based tools will find this principle
familiar. However, if most of your experience with BASIC was under DOS, you
might find this slightly odd. Under DOS, you would expect a program to begin from
the beginning, then continue and stop. They execute from top to bottom. This may
be called linear execution.
For Tibbo Basic, this is not the case. The programs you will write will be event-
driven. Your program will consist of a number of event handlers which will be fired
(invoked) in response to specific things which happen to your system in real life. If
your platform was a fridge, you might want to write a handler for a 'door opening'
event. When the door is opened, an event is generated, and an event handler, with
your code in it, is fired.
So, you could say that your event-driven application has no beginning and no end.
Event handlers are called when events are generated, and in the order in which
they were generated.
* Windows, Visual Basic and VB are registered trademarks of Microsoft Corporation
Inc.
** Delphi is a registered trademark of Borland Inc.
©2000-2008 Tibbo Technology Inc.
Page 23
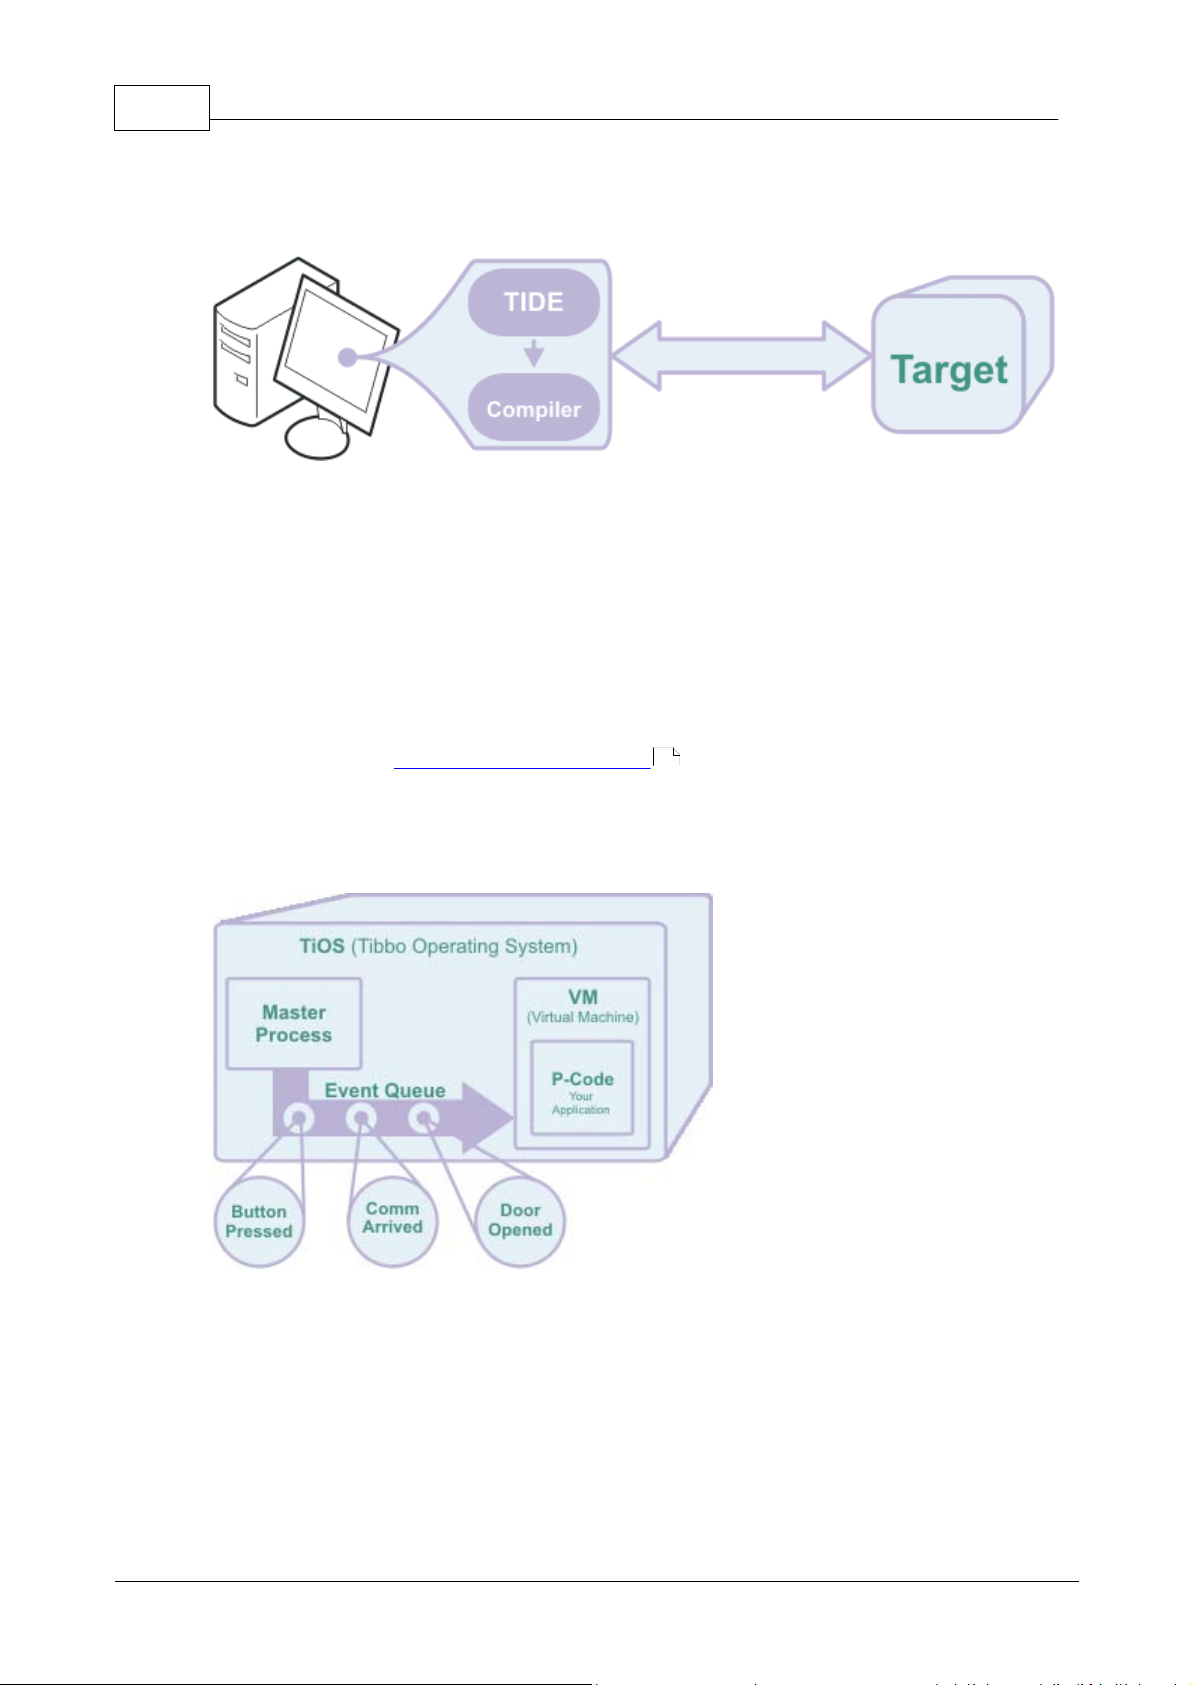
7 TIDE and Tibbo BASIC User Manual
System Components
Taiko is a compound system. It consists of the following components:
TIDE is an acronym for Tibbo Integrated Development Environment. This is the PC
program in which you will write your applications and compile them, and from
which you will upload them to your target and debug them.
The compiler is a utility program, used by TIDE. The compiler processes your
project files and creates an executable binary file (with a .tpc suffix, for Tibbo
PCode).
The target is a separate hardware device, on which your program actually runs.
When debugging code, it is connected to your computer running TIDE (see the link
above) and TIDE can monitor and control it. This is called cross-debugging.
As covered under Our Language Philosophy , Tibbo Basic is capable of running
on various hardware devices. Each type of hardware device on which Tibbo Basic
runs is called a platform.
And now, the anatomy of the target:
4
The target runs an operating system called TiOS (Tibbo Operating System).
TiOS runs two processes. One is the Master Process. This is the process which is
in charge of communications (including communications with TIDE) and of
generating events. The second process, which is under the control of the Master
Process, is called the VM (Virtual Machine).
The VM is what actually executes your application. In essence, the VM is a
processor implemented in firmware, which executes the compiled form of your
application. The instructions it understands are called P-Code, which is short for
pseudo-code. This is what the compiler produces. It is called pseudo-code because
©2000-2008 Tibbo Technology Inc.
Page 24

it is not native binary code which the hardware processor can understand directly;
instead, it is interpreted by the VM.
Since the VM is under the complete control of the Master Process, the actual
hardware processor will not crash because of an error in your Tibbo Basic
application. Your application may operate incorrectly, but you still will be able to
debug it. The Master Process can stop or restart the Virtual Machine at will, and
can exchange debug information with TIDE, such as report current execution state,
variable values, etc.
Simply put, you can think of the VM as a sort of a 'sandbox' within the processor.
Your application can play freely, without the possibility of crashing or stalling TiOS
due to some error.
The queue is used to 'feed' your program with events which it should handle.
The Master Process monitors the various interfaces of the platform and generates
events, putting them into the queue. The Virtual Machine extracts these events
from the other side of the queue and feeds your program with them. Various parts
of your program execute in response to events.
Objects
Objects represent the various component part of your platform. For example, a
platform with a serial port might have a ser object. A platform can be described as
a collection of objects.
Under Tibbo Basic, the set of object you get for each platform is fixed. You cannot
add new objects or create multiple instances of the same object.
Objects have properties, methods and events. A property can be likened to an
attribute of the object, and a method is an action that the object can perform.
Events are described in the next section.
Objects are covered in further detail under Objects, Events and Platform Functions
78
8Overview
8
8
.
Events
An event is something which happens to an object. Plain and simple. A fridge
might have door object with an on_door_open event, and a paper shredder might
have a detector object with an on_paper_detected event.
Events are a core concept in Tibbo Basic. They are the primary way in which code
gets executed.
The target device maintains an event queue. All events registered by the system
go into this queue. On the other end of the queue, the Virtual Machine takes out
one event at a time and calls an event handler for each event.
Event handlers are subroutines in your code which are 'fired' (executed) to handle
an event. Often, event handlers contain function calls which run other parts of the
program.
While processing an event, other events may happen. These events are then
queued for processing, and patiently wait for the first event to complete before
beginning execution.
All Tibbo Basic programs are single-threaded, so there is only one event queue. All
events are executed in the exact order in which they were queued.
It may sometimes seem that some events should get priority over other events.
This functionality is not supported under Tibbo Basic. This is not crucial, as events
©2000-2008 Tibbo Technology Inc.
Page 25

9 TIDE and Tibbo BASIC User Manual
This project would actually run also on the EM202, EM200 and EM120
modules. However, these modules cannot work on their own, and you
cannot easily test with them.
Of course, once you upload a device with the TiOS firmware, it is no
longer a Device Server! So you cannot see it under DS Manager. You
could program it so it would respond to DS Manager -- but by default it
is a 'clean slate', and does not respond to DS Manager broadcasts.
tend to execute very quickly, and the queue ensures events are not forgotten.
Getting Started
Below is a walk-through for a starter project which is written specifically for the
EM202-EV and DS202.
Once you are done with this project, you will be able to press the button on the
EM202-EV or DS202 and watch the LEDs blink "Hello World!" in Morse code.
Preparing Your Hardware
Preparing a DS202
Before starting to use TIDE, you should upload the correct firmware to a DS202.
Perform the following steps:
Get tios_EM202_xxx.bin firmware file (the latest version) from the Tibbo
website. _100 in this filename stands for version 1.00, for example.
Connect the DS202 to power (preferably, use adaptor supplied by Tibbo).
Connect the DS using a network cable (WAS-1499 or similar) to the same hub
your computer is connected to, or directly to the computer with a cross network
cable (WAS-1498 or similar).
Make sure your local firewall (such as the XP SP2 firewall) is disabled or does not
block broadcast UDP messages. This is essential for communications between
TIDE and the DS202 while debugging.
Run Device Explorer (Start > Programs > Tibbo > Tibbo IDE > Device Explorer).
You should see your device on the list. Select it.
Click Upload > Load Firmware Through the Network.
Select the firmware file, and click OK.
The firmware will now be uploaded.
For some firmware versions, you now have to manually reboot the DS
(Disconnect and reconnect the power cable). The red Status LED should now
blink rapidly. This is OK -- it means the TiOS firmware is loaded and the
application program memory is empty.
Proceed to Starting a New Project .
10
©2000-2008 Tibbo Technology Inc.
Page 26
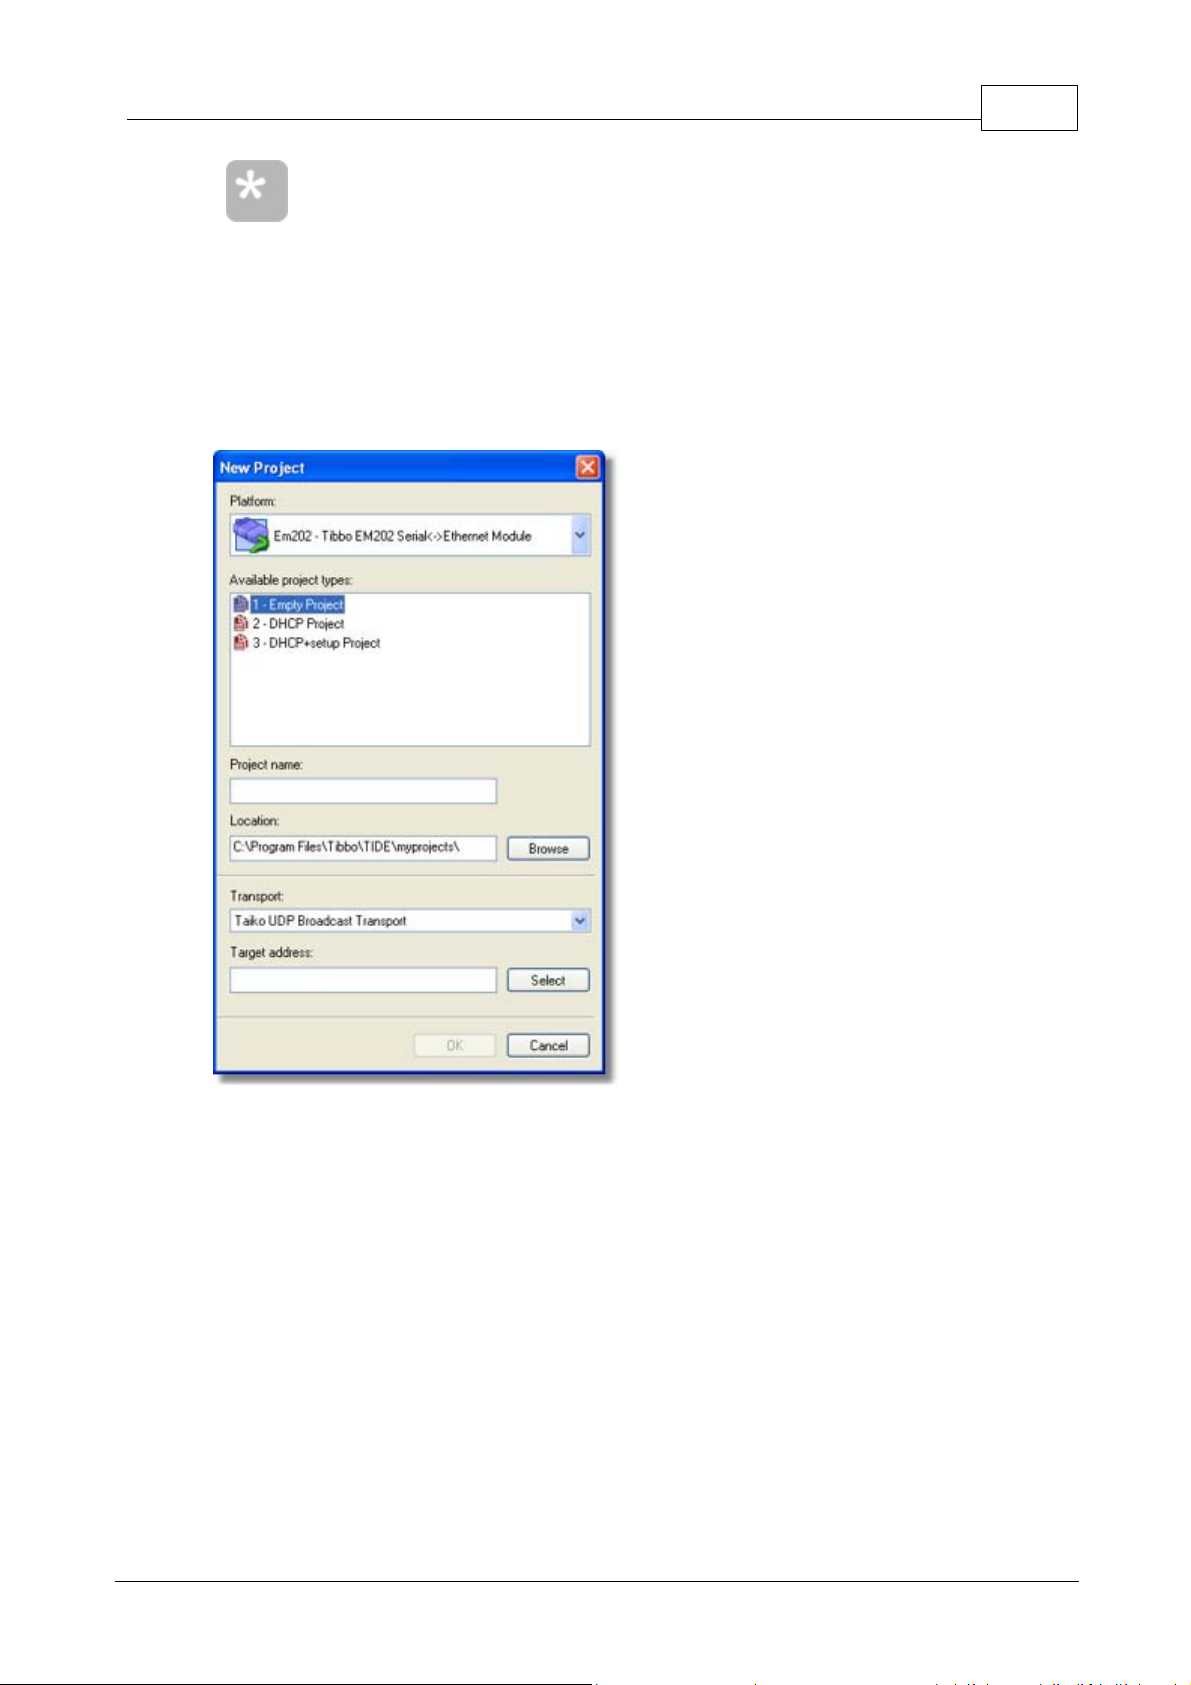
If for some reason you cannot perform a network upload, you can
perform a serial upload by selecting Upload > Load firmware Through
the Serial Port. You will then be prompted to select a COM port, turn
the device off and turn it back on while pressing the SETUP button.
Upload will then commence.
Starting a New Project
To begin a new project, select File > New. You will be presented with the following
dialog:
10Getting Started
Platform: Select EM202 (you can use EM1000 as well)
Available project types: Select Empty Project.
Project name: Type 'Hello World'.
Location: Leave untouched, unless you have a good reason to change it.
Transport: leave it as is ("Taiko UDP Broadcast Transport")
Target Address: Click Browse. You will be presented with the following dialog:
©2000-2008 Tibbo Technology Inc.
Page 27
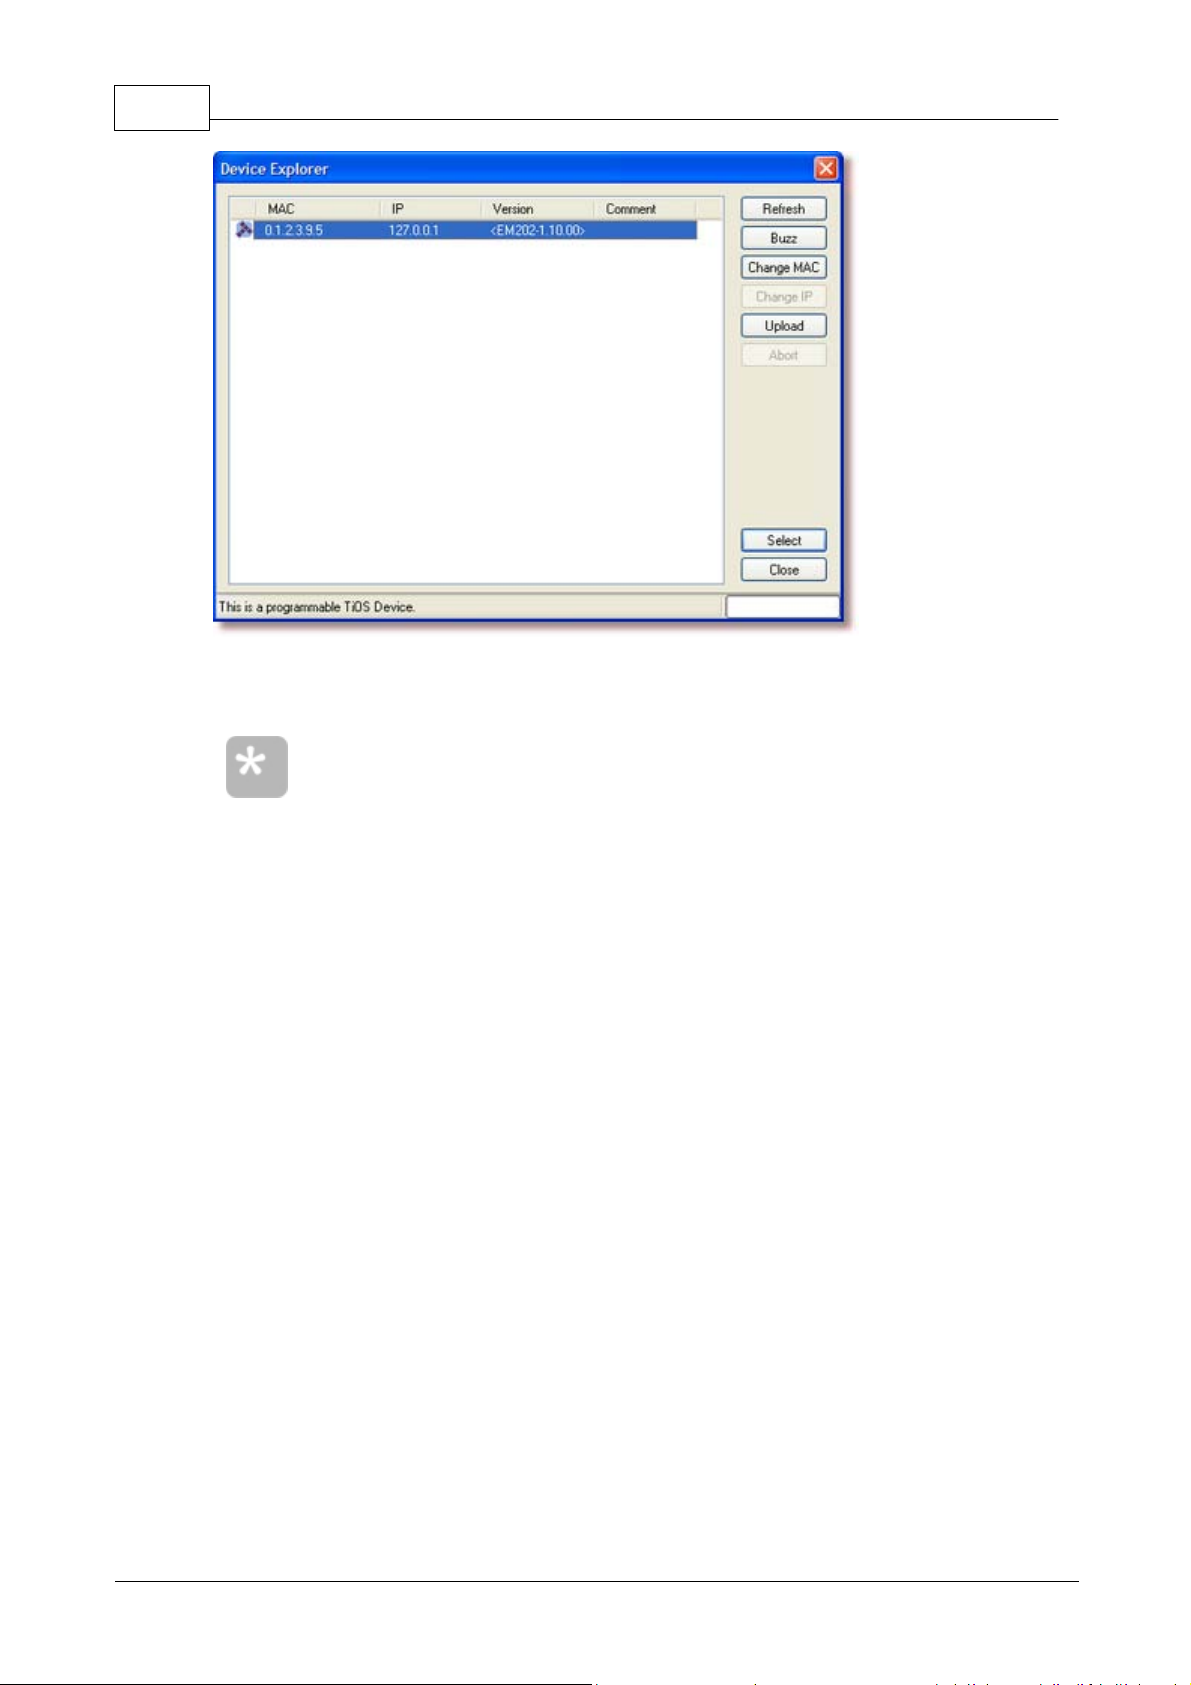
11 TIDE and Tibbo BASIC User Manual
If you see nothing in this dialog, it means your target isn't in
communication with the computer. This is probably a power problem,
or a networking problem. Perhaps you have a local firewall on the
computer which blocks UDP broadcasts, such as the Windows XP
Firewall. To fix this, disable the firewall or configure it to open a
specific port.
The number (hopefully) displayed is the MAC address of your target. If you select
it and click Buzz, you should see the LED pattern on your target switch off
momentarily. This means it is correctly detected.
Once you have located your target, click Select. You will be returned to the
previous dialog, and the MAC address for your target will appear under Target
Address.
You have now specified all of the required settings for a new project. Click OK and
proceed.
Writing Code
Once you have started your new project, you will be presented with a blank file
(main.tbs).
We will now begin writing the actual code in this file. We will construct this project
from beginning to end, step by step. For your convenience, the end of this section
contains a complete copy of the project without comments. You can copy and
paste the whole thing into TIDE, or just copy and paste the commented sections
one by one as they appear below.
Here goes:
©2000-2008 Tibbo Technology Inc.
Page 28

12Getting Started
' Comments cannot spill over to the next line. If you see this happening
in this manual, it is a result of the help system -- not an actual
feature.
Dim hello_world As String ' define a variable which will hold the whole
pattern we will play.
Dim length, play_position As Integer ' length is a calculated integer
which will contain the whole length of the string we will play, and
play_position will contain our current position in this string (how much
we have played so far).
Const PAT_PLAY_CHUNK_LENGTH = 15 ' define a constant for the size of the
chunk we will play. We will play one chunk of the pattern at a time, and
then move on to the next chunk. Each chunk is 15 'steps' long.
Declare Sub play_Next ' let the compiler know that there is a sub called
play_next. This sub will be used in code before being created so we must
declare it.
sub on_sys_init ' event handler for the init event. Fires whenever the
device powers on.
hello_world = ' here we define the contents of our string, in morse.
'R is Red LED, G is Green LED. GGG means a long pulse of the
green LED (line). R means a short pulse of the Red LED (dot). Line (-)
means both off.
'HELLO .... . .-.. .-.. ---
"R-R-R-R---R---R-GGG-R-R---R-GGG-R-R---GGG-GGG-GGG" +
"-------" + ' A period of silence between words
'WORLD .-- --- .-. .-.. -..
"R-GGG-GGG---GGG-GGG-GGG---R-GGG-R---R-GGG-R-R---GGG-R-R" +
"-------" +
'! ..--..
"R-R-GGG-GGG-R-R-"
length = len(hello_world) ' Calculate total length of string.
play_position = 1 ' Initialize play_position as we haven't played
anything yet.
end sub
Notice that we are defining a chunk above. The reason for this is that we are going
to play quite a long and complex pattern (over 130 steps in length), but the
pattern object (pat.) used to play the pattern only supports patterns of up to 16
steps. So we have to play our pattern in parts, one after the other, and track our
progress through the pattern (this is what the counters are for).
So far, we have prepared the ground. Let us move to the first piece of executable
code:
©2000-2008 Tibbo Technology Inc.
We will now write the event handlers for our code.
First, we want the pattern to start playing whenever you press the button. For this,
our platform offers a button object, which generates an on_button_pressed event.
Instead of typing, you can create the event handler for this event by doubleclicking on the event name in the project tree .
130
Page 29

13 TIDE and Tibbo BASIC User Manual
sub on_button_pressed ' event handler fired whenever the button is pressed
play_position = 1 ' start playing from the beginning of the pattern
play_next ' call the routine which plays the next chunk (the first
chunk, in this case)
end sub
sub on_pat ' this fires whenever a pattern (a chunk, in our case)
finishes playing.
play_next ' call the routine which plays the next chunk
end sub
sub play_next ' plays the next chunk of our large pattern.
if length < play_position then exit sub ' if we have reached the end
of the pattern, stop.
dim chunk_len as integer ' internal integer for the length of current
chunk to be played.
chunk_len = length - play_position + 1 ' calculate how much of the
large string is left.
if chunk_len > PAT_PLAY_CHUNK_LENGTH then chunk_len =
PAT_PLAY_CHUNK_LENGTH ' if too much is left, we bite off only a chunk we
can process.
dim chunk as string ' will contain the chunk which will actually play
now.
chunk = mid(hello_world, play_position, chunk_len) ' chunk is the
part of hello_world which begins at play_position and is as long as
chunk_len.
pat.play(chunk, YES) ' Play this chunk. YES means the pattern may be
interrupted -- you can press the button while the pattern is playing, and
it will start again from the top.
play_position = play_position + chunk_len ' advance play_position to
account for the chunk we played.
end sub
Notice that the play_next routine is not yet defined. In our code, it is first used and
then defined. This is why we have to declare it at the beginning.
Now, let us move on to the next event handler:
We have now completed writing our event handlers. Our program now knows what
it's supposed to do whenever you press the button, and whenever a chunk of the
pattern finishes playing. It just doesn't know how to do it yet. This comes next:
79
Here is the whole project, without comments:
©2000-2008 Tibbo Technology Inc.
Page 30

'=========================================================================
======
' HELLO WORLD IN MORSE CODE (for EM202-EV, DS202)
'=========================================================================
======
dim hello_world as string
dim length, play_position as integer
const PAT_PLAY_CHUNK_LENGTH = 15
declare sub play_next
'-------------------------------------------------------------------------
------
sub on_sys_init
hello_world =
"R-R-R-R---R---R-GGG-R-R---R-GGG-R-R---GGG-GGG-GGG" +
"-------" +
"R-GGG-GGG---GGG-GGG-GGG---R-GGG-R---R-GGG-R-R---GGG-R-R" +
"-------" +
"R-R-GGG-GGG-R-R-"
length = len(hello_world)
play_position = 0
end sub
'-------------------------------------------------------------------------
------
sub on_button_pressed
play_position = 1
play_next
end sub
'-------------------------------------------------------------------------
------
sub on_pat
play_next
end sub
'-------------------------------------------------------------------------
------
sub play_next
if length < play_position then exit sub
dim chunk_len as integer
chunk_len = length - play_position + 1
if chunk_len > PAT_PLAY_CHUNK_LENGTH then chunk_len =
PAT_PLAY_CHUNK_LENGTH
dim chunk as string
chunk = mid(hello_world, play_position, chunk_len)
pat.play(chunk, YES)
play_position = play_position + chunk_len
end sub
14Getting Started
Building, Uploading and Running
©2000-2008 Tibbo Technology Inc.
Once you are done with writing your project, it is time to build, upload and run it.
These three operations can be done by pressing F5.
Press F5 and wait. You will see your project compiling. The output pane will
129
Page 31

15 TIDE and Tibbo BASIC User Manual
display any errors (if you copied the project as it is, there should be no errors).
The status bar will show you the project building, uploading, and running.
126
Once the status bar says RUNNING, you may press the button on your device to
see it blink "Hello World" in Morse.
For further information about these topics, please see Making, Uploading and
Running an Executable Binary and Debugging Your Project below.
Compiling a Final Binary
The binary executable file you compiled in the previous step is called a debug
binary . This type of binary is used while creating your project and debugging it.
When you decide your project is ready to be deployed in the real world, you should
compile a release binary . To do this, select Project > Settings and uncheck the
Debug version checkbox.
The next time you will press F5, a release binary will be created and uploaded to
your target. It will automatically start running and will not provide any debug
information.
This release binary file also remains on your hard drive, inside your project folder
(see Starting a New Project ). You may take it and upload it to any number of
DSes.
27
27
10
26 28
Programming with TIDE
The topics below attempt to give you a general understanding about working with
Tibbo Basic. An attempt has been made to lay them out as logically as possible; it
would be advised to just read them from top to bottom and follow the links every
time you don't understand a term.
The section called Managing Projects provides an overview of the general
structure of a Tibbo Basic project, and also discusses the debugging process.
The next section, Programming Fundamentals , then delves into the specifics of
Tibbo Basic programming, including the differences between Tibbo Basic and other
languages you may know.
Managing Projects
Each program you will make with Tibbo Basic is actually a project. Projects include
certain files, and have a specific structure. They are compiled into binary files,
uploaded onto your target and debugged. Below you will learn about:
Creating, Opening and Saving Projects
Adding, Removing and Saving Files
Making, Uploading and Running an Executable Binary
Debugging Your Project
Project Settings
38
28
15
39
17
18
26
The Structure of a Project
A project is a collection of related files and resources, which are then compiled into
one final binary file, uploaded onto a target and run. It includes actual source files,
HTML files (if any), images (if any), etc.
The actual parts of a project are:
©2000-2008 Tibbo Technology Inc.
Page 32

16Programming with TIDE
Project file: A single file with a .tpr extension. Contains project
settings, and a list of all files included with the project.
Header files: Multiple files with a .tbh extension. Used for inclusion
into other files; usually contain declarations for global variables,
constants, etc.
BASIC files: Multiple files with a .tbs extension. Contain the actual
body of your program.
HTML files: Multiple files with an .html extension (displayed with
the currently associated icon). Contain webpages to be displayed by
the embedded webserver. These can include blocks of Tibbo Basic
code. See Working with HTML .
(Any
icon)
Resource files: Multiple files without any set extension. Contain
resources (such as images) needed for other files. Some resource
files (.cfg, .txt, .ini) can be edited from within TIDE:
.cfg, .txt, and .ini files are considered to be text files and can be
edited using TIDE's built-in text editor.
.bmp, .jpg, and .png files are graphical files; these will be opened
using TIDE's built-in image editor .
Note that the only really set extension is the one for the project file -tpr. This file contains references to the other files within the project.
These may use any extension, as long as their type is correctly stated
in the project file (this is selected when adding the file, as described
here ).
The extensions above are the default extensions which are associated
with TIDE, and we recommend maintaining them.
74
20
18
The project path is a folder containing all the files described above.
©2000-2008 Tibbo Technology Inc.
Page 33

17 TIDE and Tibbo BASIC User Manual
Creating, Opening and Saving Projects
To create a new project, select File > New. The following dialog will appear:
Platform: The platform on which your project will run.
Available project types: Various quick-start templates . Select the one which
is closest to what you are trying to achieve, and use the resulting project as a
basis for your work.
Project name: A short name for your project. TIDE will use this name to create a
folder for your project, and also to create a project file (.tpr) within this folder.
Location: A folder containing all of your projects. This folder which will contain the
project sub-folder. The actual files for your project will go into the project subfolder.
Target address: Platform-specific. See platform documentation. The address of
the target you will use for debugging and testing this project. This should be a
reachable address with a live target. Your project will still be created even if you
do not specify this parameter, but you will not be able to upload or debug until you
specify this setting using the Project Settings dialog.
Templates
4.1.2.1
Templates are 'shell' projects. They contain the various operational parts which
your project is likely to need. They are meant to be used as a starting point for
creating complete projects.
Templates may contain header files, source files, and any other thing you may
expect to find in a project. When you create a new project based on an existing
17
133
38
©2000-2008 Tibbo Technology Inc.
Page 34

18Programming with TIDE
[template1]
name=Simple Project
description=Simple project template
icon=em202\simple.ico
path=em202\simple\simple.tpr
To add new files to your project, click Project > Add File or click the Add
button on the Project Toolbar.
template, all files from the template folder are copied to your project folder, and
the name of the project filename (the .tpr file) is changed according to your own
project name.
Creating New Templates
It is also possible to create new templates for any platform. This is done by
creating a template folder and populating it with files. You would then have to
modify the platform file (.p file -- for example, em202.p) so that it would point to
this template. This file lists the available template files for this platform, along with
their paths (relative to the platform file).
For example:
The definition above would specify a template project called Simple Project, whose
path would be em202\simple\simple.tpr. Remember -- the folder and files for this
project would not be automatically created.
Adding, Removing and Saving Files
Files tab
You can see what files are included in your project at any given time using the
Files tab of the Project pane . It looks like this:
Adding New Files to Your Project
129
You will be presented with the following dialog:
©2000-2008 Tibbo Technology Inc.
Page 35

19 TIDE and Tibbo BASIC User Manual
Specify a name for your file under Filename. If you also specify an extension, the
Add as listbox is automatically updated. Automatically recognized file types are:
.tbs -- basic files
.h -- header files
.bmp, .jpg, .png, .gif, .ico, .pcx -- graphic resource files
.txt -- text resource files
all other file extensions are classified as binary resource files by default.
File type is set according to the selection in the Add as listbox, not the file
extension.
Adding image files to the project (.bmp, .jpg, .png, .gif, .ico, .pcx extension)
20
will prompt a request for additional information: file size in pixels and, if
appropriate for the file type, the color mode selection (RGB or palette). This last
selection won't be available if selected file type only supports true-color or paletted
mode.
Format listbox will be disabled if the type of the image file you are adding is
already known. Specifically:
If your image file extension is not .bmp, .jpg, .png, .gif, .ico, or .pcx, then the
listbox will be enabled.
If you did not provide any extension at all, then the listbox will be disabled and
the PNG type will be selected automatically.
If you ended the filename with the comma (i.e. "abc.") then the listbox will be
enabled.
Removing Files from Your Project
©2000-2008 Tibbo Technology Inc.
Page 36

20Programming with TIDE
To remove a file from your project, first select (single-click) it in the
project tree. Then click Project > Remove File or click the Remove button
on the Project Toolbar.
To manually save your work, select File > Save, press Ctrl+S, or click
the Save button on the Project Toolbar.
You will be presented with a prompt. If you're sure you want to remove the file,
select OK, and the file will be removed from the project. Note that it is not
physically deleted -- only removed from the project tree.
Renaming Files
To rename a file, highlight it in the tree (single-click) and press F2, or single-click
again.
Saving Files
Any of these actions would save all open and modified files in your project,
including the project file itself.
In addition, every time your project is compiled, all open and modified files are
saved.
Resource Files
Sometimes a project may need access to certain files which are not Tibbo Basic
code per se; these may be image files, sound files or any other fixed binary
data which is not to be interpreted or modified by the Tibbo Basic compiler but
simply used as-is within the project.
These files are not modified or compressed in any way; they are merely included
within the final, compiled binary file and may be accessed from within the
program or by the built-in HTTP server.
Resource files are included in the project tree under the Resource Files branch.
Built-in Image Editor
Beginning with release 2.0, TIDE features a simple image editor that "knows" how
to work with .bmp, .jpg, .png, and .gif files. The editor is primarily intended for
bitmap-level jobs such as preparing "screens" for a device with an LCD display.
All features of the image editor are fairly standard and we see no need in
discussing image editor's functionality in details. Image files are added to the
project as any other resource files. When adding an image file to the project you
will be presented with a choice of selecting RGB or palette color mode for this file.
Depending on your choice the Colors pane for this image will display available
palette colors...
20
26
129
18
130
©2000-2008 Tibbo Technology Inc.
Page 37

21 TIDE and Tibbo BASIC User Manual
... or RGB color selector:
Double-clicking on the image file with .bmp, .jpg, .png, or .gif extension opens the
image editor.
All image-related editing functionality is concentrated within Image menu ...
...and Image Editor toolbar :
122
119
©2000-2008 Tibbo Technology Inc.
Page 38

Coding Your Project
TIDE contains a code editor with the following facilities:
Syntax highlighting
Auto-Completion
Hinting
Tooltips for properties, events, functions, and even user-configurable tooltips
for user-defined functions.
24
24
22Programming with TIDE
23
Project Browser
4.1.6.1
The Project Browser contains a tree of all objects in the platform (with their
methods, properties and events), as well as all procedures and global variables of
your project. The tree is updated in real time, using a dynamic background parser
which constantly analyzes your source code.
The tree features icons for the various constructs.
An icon next to an event is grayed (inactive) if this event does not have an event
handler implemented in the project. The icon becomes "active" when the event
handler is created. An icon next to a procedure is grayed if this procedure is merely
declared but does not yet have a body. The icon becomes active once the
©2000-2008 Tibbo Technology Inc.
131
Page 39

23 TIDE and Tibbo BASIC User Manual
procedure is implemented ("gets" a body). Same applies to global variables -- gray
icon next to variables that are declared but not yet defined, active icon for defined
global variables.
Double-clicking on an event which does not yet have an event handler will create
an empty event handler procedure for this event at the bottom of the currently
active file. Double clicking on an event which already has an event handler will
make the cursor jump to this event handler.
Double-clicking on a procedure which does not yet have a body will make the
cursor jump to the location where this procedure is defined. Double-clicking on a
procedure which already has a body will make the cursor jump to this body.
Double-clicking on a global variable which is not yet defined (using the dim s
tatement ) will make the cursor jump to the location where this variable is
declared (using the declare statement ). Double-clicking on a defined global
81
79 79
variable will make the cursor jump to the location where this variable is defined.
Hovering the cursor over an item in the displays a tooltip for this item.
Additionally, when in debug mode, hovering the cursor over global variables and
object properties displays their current values.
Notice, that currently selected platform is displayed next to the project name in
the topmost tree node.
81 81
24
Code Auto-completion
4.1.6.2
If you type an object name followed by a dot, the TIDE will pop-up a codecompletion box. It looks like this:
This list also supports tooltips -- they are displayed as you scroll down the list.
You can also hover the mouse over an item in the list to see its tooltip.
Code completion box is also displayed for the structures in your project:
24
54
©2000-2008 Tibbo Technology Inc.
Page 40

You can also get a list of constants related to your construct. For example, by
By pressing Alt+Ctrl+T when the cursor is directly to the right of any
meaningful Tibbo Basic construct, you will get a pop-up list with the
appropriate contents for the current context. If the cursor isn't
immediately to the right of any such construct, you will get a list
containing all platform enumeration types, constants, objects and
events.
You may invoke code hinting manually by pressing Ctrl+Shift+space.
typing "ser.enabled=" you will get a list of possible values of this property:
24Programming with TIDE
Code Hinting
Tooltips
4.1.6.3
Code hinting is a feature which helps you see what are the arguments for a
function, while writing the code for it. It appears as soon as you type the opening
parentheses for a procedure. It looks like this:
You can see the number of arguments required and their types, as well as the
return type (if any). The highlighted part shows what syntax element you should
type in next.
4.1.6.4
When you hover your mouse over event handlers, object properties and methods,
constants, procedures, and variables the TIDE displays tooltips. These look like
this:
The tooltips are displayed when hovering over constructs in the code editor, the
Project Browser , Watch , and the Stack pane. They show a formal
construct definition and a comment, if available.
©2000-2008 Tibbo Technology Inc.
129 33 128
Page 41

25 TIDE and Tibbo BASIC User Manual
In the code editor, you may also display a tooltip with the keyboard by
pressing Ctrl+T when the cursor is within an event handler, a
procedure, a constant or a global variable.
function blink(num as integer) as boolean ' Blinks the lights.
Input:<br><b>num</b>- pattern # to "play". <b><font color=red> Do not set
to 0.</font>.
'... your code here ...
End Function
function blink(num as integer) as boolean ' USER-DEFINED. Blinks the
lights.
' This is a very important function.
' And must be included in every application.
'... your code here ...
End Function
Tooltip text for properties, methods, and events comes from the platform file for
the platform selected in your project. You can add your own custom comments
77
to the tooltips displayed for procedures and variables of your projects. What's
more, you can use HTML formatting to make these comments look more readable!
Here is an example:
This would yield the following tooltip when hovering over the "blink" identifier
(notice how HTML formatting improves tooltip readability):
Supported HTML Tags section details which tags you can use to beautify your
26
tooptips.
Your comment must be on the same line as the function definition, or immediately
following it. The comment can contain multiple lines, if every line begins with a
comment character. These lines must be consecutive -- with no blank lines in
between. For example:
This would yield a tooltip with the text "USER DEFINED. Blinks the lights. This is a
very important function." This would be as one paragraph -- line breaks are not
displayed within the tooltip, unless you use <br> element. The third comment
would not be included because it is preceded by a blank line.
As we will explain in the Introduction to Procedures , there is a procedure
62
definition (procedure body) and procedure declaration that merely states that the
procedure exists. If both have comments than the comment in the procedure
©2000-2008 Tibbo Technology Inc.
Page 42

definition wins (takes precedence) over the comment in the procedure declaration.
One peculiarity of the HTML renderer used in the TIDE software is that
it often requires you to add an extra space before the closing tag in the
tag pair. For example, if you write "<b>Bold</b> text" then you will
get this output: "Boldtext". Writing "<b>Bold </b> text" or
<b>Bold</b>text will produce correct result: "Bold text".
Once you have code which you wish to try out, you may build it by
selecting Project > Build, by pressing the shortcut key F7 or by clicking
the Build button on the Debug toolbar.
Variables also have declaration (declare statement ) and definition (dim s
81 81
tatement ). Comment in the definition wins.
79 79 81
Finally, your own comment placed in the event handler definition takes over the
comment for this event that comes from the platform file.
Supported HTML Tags
Here are the tags (HTML elements) that you can use:
Presentation markup tags: <b>, <i>, <big>, <small>, <s>, <u>, <font
[color=color] [size=size] [face=face]>
Headings <h1>...<h6>
Line break <br>
Comments: <!-- -->
All other tags (elements) cannot be used. Most of these tags are simply ignored,
but some lead to scrambled text output.
26Programming with TIDE
Making, Uploading and Running an Executable Binary
An Executable Binary File is a file (.tpc type) which contains your project in
compiled form, along with any resource files. It is uploaded to the target, where it
is actually executed by the TiOS Virtual Machine.
Making a Binary
If this is not the first time you're building this project, the build process will skip
any files which were unmodified since the last time the project was built. This
optimizes build speed.
To force the build of all files, even those which were not modified since the last
time, select Project > Rebuild All.
On build, the Output pane will display any errors. You can double-click on the
line describing an error to jump directly to the problematic line in your code.
Uploading a Binary
129
©2000-2008 Tibbo Technology Inc.
Page 43

27 TIDE and Tibbo BASIC User Manual
To upload your project, you must select Project > Upload or click the
Upload button on the Debug toolbar.
To begin execution, select Debug > Run, press the shortcut key F5 or
click the Run button on the Debug toolbar.
You may also reboot your device manually at any time by selecting
Debug > Restart or clicking the Restart button on the Debug toolbar.
These actions are incremental. This means that when uploading, a
build is performed if needed. When running, a build and an upload are
performed if needed.
Selecting Debug > Run, pressing F5 or clicking the Run button on the
Debug toolbar would send an explicit command to the target, to start
running the project.
Before uploading, TIDE checks if the project has been changed since it was last
built. If so, it builds the project again and attempts to upload the new build.
Also, the current project hosted on the target will be checked. If it is the same
(same project and same build number) as the project you are trying to upload,
uploading will not occur. Thus, trying to upload a project twice without making any
change in the project will not result in a second upload. Also, before uploading, the
firmware version is checked and if it is incompatible with the firmware version
specified in the platform file, the upload is aborted with an error message.
Running a Binary
For a debug version (the default version type), uploading the binary does not
38
automatically start its execution on the target. Once uploaded, it just sits there,
waiting to be executed.
This action optionally builds and uploads your application, if needed. If a new
upload was just performed, it also reboots the target before running it. This
ensures that target starts running the newly uploaded program from a 'fresh' state.
Two Modes of Target Execution
4.1.7.1
When you execute a program on the target, it can run in either of two modes
(depending on the setting selected under Project Settings) :
38
Debug Mode
In debug mode, your project runs with the assumption that you are right there,
watching the monitor and trying to see what's going on. This means that the
Debug menu is active. You can set up breakpoints , or step through your
project, watch the variables, etc.
This also means the project might stop if there's an error, such as division by 0.
And you can pause execution, stop it, etc.
Also, when uploading a project in debug mode, it does not begin to run by default.
By default, it waits for you to run it.
If the device reboots while a project is running in Debug Mode, the project will not
start running automatically after the reboot. You would have to run it explicitly.
30 32
©2000-2008 Tibbo Technology Inc.
Page 44

Release Mode
Run: This message means your program is currently running.
It doesn't mean any specific code is actually being executed
-- perhaps the target device is just sitting idle, waiting for an
event to happen. But the program is still running -- not
paused. This state is entered by pressing F5 or Debug > Run.
Break: This message occurs when the Virtual Machine on the
target was stopped while executing code. The easiest way to
get to this state is by setting and reaching a breakpoint in
code. You might also get to this state by selecting Debug >
Pause, if you happen to catch the Virtual Machine in the
midst of code execution. Once in this state, the program
pointer (a yellow line) is displayed and indicates the next
instruction that the Virtual Machine will execute when
started. You can now inspect and change various properties
and variables (both global and local) using the watch . This
is the only state which allows stepping .
Release mode means business. This is the mode in which you compile the final
files, deployed in the field. Under this mode, the working assumption is that you,
or anybody else, isn't there. Your box is just supposed to run and run, despite any
and all problems and errors.
This means that a release version does not respond to any debug commands. You
cannot stop it. It does not stop even when critical errors occur. It also means that
when you upload a release version to your target, it starts running immediately.
Even if you reboot your device, when it has a Release Mode binary in memory, it
will start running.
Debugging Your Project
One of the most common operations you will perform during your development
process is debugging. In essence, this involves controlled execution of your
project. While debugging you can step through your program, set breakpoints,
watch and change the state of various variables, see how control and decisions
statements are executed, etc.
One of the aspects of TIDE is that it employs a technique called cross-debugging.
Simply put, this means your code runs on a different machine than the one on
which you wrote it, and you can debug it from the computer on which you wrote
the program.
Thus, code is not debugged using some PC emulator or anything of this sort. It is
truly uploaded and run on your target -- just like it would run in real life.
As covered above , the first thing you would have to do to begin debugging a
debug binary would be to run it, using F5. Once you press F5 (or Debug > Run),
your project will be built (if necessary), uploaded (if necessary) and started.
Once execution has started, there are several ways in which you may control and
inspect it. These are listed below.
26
28Programming with TIDE
Target States
4.1.8.1
In debug mode, your target may be in one of several states at any given moment.
For this, the status bar displays several different status messages:
126
30
©2000-2008 Tibbo Technology Inc.
30
33
32
Page 45

29 TIDE and Tibbo BASIC User Manual
Pause: This message occurs when the Virtual Machine on the
target was stopped while not executing code (in other words,
it was caught between events). No program pointer is
displayed in this state, because no code is being executed.
You can check and modify the state of properties and global
variables, etc using the watch. This state is entered by
selecting Debug > Pause.
Abort (exception): This message indicates that an internal
error has occurred. The message in parentheses is a short
error code. If you hover your mouse over it, you will see a
more detailed report of the error. The program pointer will
appear at the problematic line. This state is similar to a
break, only it is not caused by a breakpoint but by an
abnormal condition. All possible causes for exception are
listed in Exceptions .
Communication in progress: The circle is green, and moves
from side to side. It advances one step whenever TIDE gets a
reply to a debug command.
Communication problem: The circle is yellow, and does not
move. This state means TIDE did not receive any reply to debug
commands for more than 6 seconds. The program may be still
running on the target.
No Communication: The circle is red, and does not move.
Occurs when TIDE did not receive any reply to debug
commands for more than 12 seconds. The program may be still
running on the target.
Cod
e
Description
Halt in
debug
mode?
Halt in
release
mode?
Communication States
While TIDE is in communication with the target, the status bar displays a moving
indicator of the communication state.
29
Exceptions
Exceptions are "emergency" halts of program execution. Exceptions are generated
when the Virtual Machine encounters something that really prevents it from
continuing normal operation. When exception happens you see "ABORT" target
state in the status bar, like this:
"(DIV0)" is an abbreviated problem description. Hover the mouse over this and you
will get a more detailed description.
Listed below are all possible exceptions. When you are in the debug mode any
exception from the list below causes the Virtual Machine to abort execution. In the
release mode, some "lesser" problems do not cause the halt. The logic here is
that there will probably be nobody to restart the problem or check what happened
anyway, so the Virtual Machine just tries to continue operation.
27
27
©2000-2008 Tibbo Technology Inc.
Page 46

30Programming with TIDE
DIV
0
Division by zero
Yes
No
OOROut of range (attempt to access past the
highest array member)
Yes
No
FPE
RR
Floating point error
Yes
No
IOC
Invalid opcode*
Yes
Yes
OUMAccess outside of user memory*
Yes
Yes
TDL
F
Failed to load binary library*
Yes
Yes
dim x as byte ' the program pointer won't stop here, as this isn't
executable code.
x = 1 ' the program pointer will stop here -- this is an actual
instruction to do something.
*This exception indicates that either TiOS or Tibbo Basic compiler is not functioning
properly. Let us know if you encounter this exception!
Program Pointer
4.1.8.2
The program pointer is a line, highlighted in yellow, which shows the present
location of program execution. It looks like this:
This means that the yellow line is now pending execution. It hasn't been executed
yet. The machine is waiting for you to tell it what to do. You can now control it by
stepping .
This line is displayed whenever the Virtual Machine has been paused while
executing code. This can be achieved by setting a breakpoint , or simply
selecting Debug > Pause at the "right" time.
The program pointer will only stop on lines which contain actual executable code.
32
30
Breakpoints
©2000-2008 Tibbo Technology Inc.
4.1.8.3
A breakpoint is a point marking a line of code in which you wish to have the
debugger pause. It is seen as a little red dot on the left margin of the code. Like
this:
This is what it looks like when the code is not executing.
Once the code begins to execute and the breakpoint is reached, the program
pointer is displayed at the line in which the breakpoint is placed:
30
Page 47

31 TIDE and Tibbo BASIC User Manual
Adding breakpoints slows down the performance of the Virtual
Machine. Having 16 breakpoints will have a noticeable effect on the
speed of execution of your program.
The yellow arrow over the red dot merely marks the program pointer; a breakpoint
is always marked by a red dot.
Where a Breakpoint May Be Placed
A breakpoint may be placed only on a line which contains executable code; before
compiling your project, you could place breakpoints anywhere. However, on
compile, these breakpoints will be shifted to the nearest lines following them which
contain executable code.
You could add breakpoints to your code at any time -- even while the code is
running. However, while the code is running, you may only add breakpoints next
to lines which contain executable code. If you click next to a line which does not
contain executable code, the closest line following this line which does contain
executable code will get a breakpoint.
You may have up to 16 breakpoints in your entire project. Breakpoints are saved
when the project is saved.
Toggling Breakpoints
Breakpoints may be toggled (set/cleared) by putting the cursor in the line in which
you wish to place (or remove) the breakpoint and pressing F9 or selecting Debug >
Toggle Breakpoint. Alternatively, you may also toggle a breakpoint by clicking on
the margin of the code at the point in which you wish to have a breakpoint.
You may remove all breakpoints from an entire project (including any files which
are not currently open) by selecting Debug > Remove All Breakpoints.
The Call Stack and Stack Pointer
4.1.8.4
During the execution of a program, procedures usually call other procedures. The
calling procedures are not just left and forgotten; they are placed on the call stack.
The call stack can be toggled by View > Call Stack. It lists the sequence of
procedure calls which lead to the current procedure (the one in which the Program
Pointer is located). The current procedure is listed at the top of the stack. Once
it finishes executing, execution returns to the caller (the procedure one line below
in the stack). In the caller procedure, execution resumes from the line immediately
following the one which called the procedure which has just ended.
So, if the procedure (event handler, actually) on_timer called the procedure
error_handler, which in turn called the procedure write_logfile, our call stack
would look like this:
30
©2000-2008 Tibbo Technology Inc.
Page 48

32Programming with TIDE
Technically speaking, the top function on the call stack isn't actually a
part of the stack itself, because it is currently executing, and the real
stack only contains functions to which execution should later return. It
still appears on the same list, for consistency and convenience.
When pausing a program in the midst of code execution, the program pointer
appears. In the Call Stack pane, the function which currently contains the program
pointer is highlighted in yellow. It is the currently executing function, so it is
always the first one on the Call Stack list.
The Stack Pointer
Double-clicking on any procedure within the call stack which is not the currently
executing procedure would display the stack pointer. This pointer would be
displayed in the source code, within the procedure you double-clicked, and would
highlight the line from which execution would resume once control returns to this
procedure. The watch pane would also interpret variables as relative to the
procedure you've just highlighted.
The stack pointer is light blue in color. On the call stack list, it looks like this:
33
30
In the code editing pane, it looks like this:
Once again, double-clicking on the functions in th call stack does not move actual
execution (the program pointer). Any sort of stepping would bring back the yellow
program pointer, both in the source code and in the call stack.
Stepping
4.1.8.5
The following commands in the Debug menu control stepping into, through and out
of various sections of your code:
©2000-2008 Tibbo Technology Inc.
Page 49

33 TIDE and Tibbo BASIC User Manual
Step Into: Steps through your code line by line. When the program
pointer reaches a procedure call, you would actually see it step into this
procedure (hence, the name). You could then see the inner workings of
this procedure as it is being executed, line by line.
Step Over: Steps through your code line by line. When the program
pointer reaches a procedure call, it executes this entire procedure, but
just does it all at once, and stops at the next line after the procedure
call. This is useful when you want to debug a body of code which
contains a call to a complex or lengthy procedure, which you do not want
to debug right now.
Step Out: If you are currently stepping through a function and wish to
exit it while you're still in the middle, use Step Out. This would bring you
to the line immediately following the line which called the function you
were in. This option is disabled when you cannot step out of the current
function (i.e, when your other function calls it -- such as in the case of
an event handler ).
Run to Cursor: The cursor, in this case, is the text insertion point. The
little blinking black line. You can place the cursor anywhere within the
body of your program and have the program execute until it reaches that
point. When, and if, that point is reached, the program pointer would
display.
Jump to Cursor: This command makes the program pointer
unconditionally move to the point where the cursor is. It will just jump
there, possibly skipping the execution of some code. This is explicit
control of program flow.
A step is an instruction to move the program pointer to another line in source
30
code. Stepping allows you to execute your code in a very controlled way, and work
your way along the program in a pace which you can analyze and understand.
8
The Watch
4.1.8.6
The watch is a facility which allows you to inspect and change the current value of
variables and object properties. You can only use this facility when you are in
debug mode and when the program execution is stopped. TIDE is unable to fetch
variable values while the Virtual Machine is running. Depending on the scope of the
variable, there may be additional limitations as to when you can inspect this
37
variable's value.
The watch updates variable values by reading them from the target every time the
Virtual Machine is stopped. If any item on the list changed its value since the
previous fetch, this item will be displayed in red.
Watch facility may be accessed by three different ways:
The Watch Pane
The watch can be toggled by View > Watch. It looks like this:
©2000-2008 Tibbo Technology Inc.
Page 50

34Programming with TIDE
There are several ways of adding variables and object properties to the
watch list. You can:
Press Insert while the watch pane has focus -- this will bring up an Add
to Watch List dialog. Type the name of a variable or property to watch
and press OK.
Alternatively, double-click on the empty space in the watch pane to
obtain the same result.
You can also select Debug > Add to Watch List from the Menu.
Additionally, there is an Add to Watch List button on the Debug
toolbar.
You can right-click on the variable or property in the source code and
select Add to Watch List from the context-sensitive menu.
You can also right-click on the property in the Project pane (Browser
tab) and select Add to Watch List.
On the above screenshot we can see the status of a short, a string, a property of
an object, a member of an array, one user-defined structure, and an undefined
variable. Notice, that the "x(y)" is displayed in red indicating that its value has
just changed. Notice also that this line shows an array indexed by another variable
(y). This is not the limit of the watch pane's abilities -- try entering more complex
expressions, it will work!
In the Add to Watch List dialog you may type multiple items to be added to the
watch by separating their names with commas (i.e. "i, j, k, ser.num"). For objects
you will get a drop-down list of available members:
©2000-2008 Tibbo Technology Inc.
Page 51

35 TIDE and Tibbo BASIC User Manual
Double-clicking the Name column in the watch pane will allow you to edit the
name of the item you want to watch.
The watch pane also allows you to change the value of any variable or object
property (provided it is not a read-only property). Double-click on the value field you will be prompted for a new value.
For numerical variables, you may use hex or binary notation (&h, &b). For strings,
you will be presented with the "HEX editor" allowing you to modify the string or the
HEX codes of its characters:
Once a new value is entered, it will be actually written to memory on the target,
and will be read again before being displayed in the watch. So when you see your
new value in the value column, that means it's actually in memory now -- what
©2000-2008 Tibbo Technology Inc.
Page 52

36Programming with TIDE
To remove a variable from the watch, select it and press Delete, select
Debug > Remove from Watch List or click the Remove from Watch List
button on the Debug toolbar.
For now, this won't work for arrays. If you want to inspect the values of
an array add this array to the watch list.
you see is what you get.
The watch pane is one of the places where enumeration types become very useful.
Look at sys.runmode above. Because its possible values are described through an
enum, you can see a meaningful state description, rather than just a number. This
is one of the main reasons for the existence of enumeration types in Tibbo Basic.
The Watch Tooltip
This is the watch tooltip:
When you hover the mouse cursor over an identifier in the source while in debug
mode you will see a tooltip with the current value for this identifier.
The Project Browser
The Project Browser is a tab in the Project pane, which can be toggled by View >
Project. It displays all objects for your platform, with the properties and methods
for each object. It also displays all procedures and global variables in your project.
While debugging, you can see the value of an object property or a global variable
by hovering over its identifier in the tree.
©2000-2008 Tibbo Technology Inc.
Page 53

37 TIDE and Tibbo BASIC User Manual
sub sub_one
dim x as byte
x = 1
end sub
sub sub_two
dim x as byte
x = 2
end sub
sub sub_two
dim i as integer
i = 5
end sub
This is the timer, located on the Status Bar.
Remember, as covered above , every additional breakpoint
somewhat slows down the speed of execution of your project.
Scopes in Watch
The watch facility is only active when the Virtual Machine is not running, i.e. the
execution is stopped. Naturally, the TIDE cannot fetch variable values while the
Virtual Machine is executing your program.
You already know that when the Virtual Machine it stopped, the state of your
target may be either "BREAK" or "PAUSE". Properties and global variables may
be inspected in the either state. Local variables only exist in their context. Hence,
a particular local variable can only be inspected when the state is "BREAK" (the
Virtual Machine is in the middle of a code execution -- there is an execution pointer
visible) and when this variable exists in the current context.
For example:
28
Let us say you add x to the watch list.
When the execution pointer highlights the end sub keyword for sub_one, the
value of x in the watch would be 1. When the pointer highlights the end sub for
sub_two, the value of x in the watch would be 2. Note that these are two different
local variables!
Similarly, when the execution pointer is at the end sub of sub_three, the x
variable in the watch will be undefined -- it will display a question mark.
These same rules apply to the watch tooltip, as well. Even if you hover the mouse
over the x of sub_one when the program pointer is at the end of sub_two, the
value displayed would be the one set in sub_two -- because this is the current
context!
Code Profiling
4.1.8.7
Code Profiling is the practice of measuring how long it takes for different portions
of your program to execute.
Each time execution begins or resumes in debug mode, the timer is reset and
starts counting. Once execution is stopped for whatever reason, the timer displays
the time elapsed since execution has begun or resumed.
30
©2000-2008 Tibbo Technology Inc.
Page 54

Project Settings
The Project-Settings dialog is platform specific. It can look like this:
38Programming with TIDE
Platform: This is the platform definition file. In the image above, EM202 is the
platform.
Customize: click to access the list of option available for your platform. These are
"global defines" (for a preprocessor) , which typically include options such as
71
whether a display is present, display type, etc.
Project name: A descriptive name for the project.
Debug version: If checked, the compiler will build a version of this project which
can be debugged using the various debugging facilities within the IDE, such as
step, watch, etc. Also, debug versions are not automatically run on upload or
reboot; release versions are run on upload or reboot, and cannot be debugged
using the various debug facilities. By default, this is checked. Once you've
debugged your project and wish to deploy it, uncheck this and build your final
version.
Output binary file name: The name for the bin file of the compiled project.
Transport: Ethernet is not the only potential means of communications between
the TIDE and the target. Depending on the hardware you are programming for
there may be no Ethernet interface at all. This selector allows you to choose an
alternative transport protocol for debug communications.
Target address: Platform specific. Different platforms use different
communication media between TIDE and target -- TCP/IP, serial, etc. Thus, their
target address may not always be a MAC address. This goes for the browse button
as well -- not all platforms have this button.
©2000-2008 Tibbo Technology Inc.
Page 55

39 TIDE and Tibbo BASIC User Manual
include "global.tbh"
dim foo, bar as integer
sub foo
...
end sub
function bar (a as integer) as byte
...
end function
Programming Fundamentals
This chapter attempts to provide a very quick run through the fundamentals of
creating a program in Tibbo Basic. It was written under the assumption that the
reader has some experience in programming for other languages.
There is a marked resemblance between Tibbo Basic and other types of BASIC that
you may already know. Thus, we stressed the differences between Tibbo Basic and
other BASIC implementations. Some sections begin with a seemingly introductory
statement, but the material quickly escalates into more advanced explanations and
examples.
This is not a programming tutorial. We do not attempt to teach you how to
program in general. There are many excellent books which already exist on this
subject, and we did not set out to compete with any of them. This is a mere
attempt at explaining Tibbo Basic -- no more, no less.
Good luck!
Program Structure
A typical Tibbo Basic source code file (a compilation unit with the .tbs
131 15
extension) contains the following sections of code:
Include Statement(s)
These are used to include other files from the same project (such as header files
15
[.tbh ] containing global variable definitions or utility functions). See:
90
Global Variables Definitions
Here you define any variables you wish to be accessible throughout the current
compilation unit:
Subs and Functions
These are procedures which perform specific tasks, and may be called from other
places within the project.
Event Handlers
Tibbo Basic is event-driven . Event handlers are platform-dependent subs, that
are executed when something happens. This 'something' depends upon your
8
©2000-2008 Tibbo Technology Inc.
Page 56

platform. If your Tibbo Basic program runs on a refrigerator, you would probably
sub on_door_open
light = 1 ' turn on the light when someone opens the door to your
fridge.
end sub
sub on_door_state(state as byte)
' turn the light on and off as the fridge door gets opened and closed
if state=0 then
light=0
else
light=1
end if
end sub
x = 1 + 1 ' I am a comment!
' x = y/0 <--- this line would not cause an error, because it won't even
execute! It is commented.
s = "That's a string!" ' Notice that the word that's contains an
apostrophe.
have an event handler for the door opening.
Just like any other sub, events can have arguments (input parameters):
Event handles are always subs and never functions (i.e. they never return any
value as there is nobody to return it to)!
40Programming with TIDE
Code Basics
There are several important things you should know about writing in Tibbo Basic:
You Can Put Comments in Your Code
The apostrophe character marks the beginning of a comment. Anything following
this character until the end of a line is considered to be a comment, and will not be
processed by the compiler .
The only exception to this is that when including an apostrophe within a string
(between double quotes) it is not counted as a comment. See:
131
Comments cannot span multiple lines. A line break terminates a comment. If you
want to make a multi-line comment, each line of your comment must begin with
an apostrophe.
Tibbo Basic Doesn't Care About Spaces!
See:
©2000-2008 Tibbo Technology Inc.
Page 57

41 TIDE and Tibbo BASIC User Manual
y = x + 5 ' is just like
y=x+5 ' and even this is OK:
y =
x
+
5
Z = X + Y ' is just like
z = x + y
r = Q + KeWL ' even something like this is legal.
DiM MooMoo As iNTeGER ' this, distatesful as it may be, is still legal. :)
s = "I am a string literal!"
s1 = s
dim b as byte
dim w as word
b = `q` ' the variable b now contains the value 113, which is the
character code for q.
w = `LM` ' this is also legal, see below.
So, spaces, tabs and linefeeds carry no special meaning in Tibbo Basic. Use them
or lose them, as you like. The only exceptions are the If.... Then... Else Statement
89
and comments.
Tibbo Basic Is Not Case Sensitive!
See:
Capital letters just don't matter. Really.
How to Use Double Quote Marks
Double quote marks are used for marking string literals. Simply put, a string literal
is a constant string value -- like "hello world".
How to Use Single Quote Marks
These are different than the apostrophes which begin a comment. An apostrophe
looks like this ' while a single quote mark looks like this ` and is usually located on
the tilde (~) key. Single quote marks are used to define a numerical constant
which contains the value for an ASCII code. For example:
The notation used in the second example above actually places the ASCII value of
L into the higher byte of a word-type variable, and the ASCII value of M into the
43
lower byte of that variable. It may seem confusing at first, but it is also legal.
©2000-2008 Tibbo Technology Inc.
Page 58

42Programming with TIDE
Note that a this isn't the same character as an apostrophe. An
apostrophe is ' and a single quote-mark is a `. Usually, the single
quote mark is found on the tilde (~) key, and the apostrophe is found
on the double-quote (") key.
q = 15 ' this is 15, in decimal.
q = &hF ' this is still 15, just in hex.
q = &b1111 ' and this is also 15, just in binary notation.
dim a123 as integer ' A legal example
dim 123a as integer ' An illegal example
dim a.something as integer ' Can contain dots.
sub my_sub (ARG1 as integer, ARG2 as string) ' This is also legal
ser.send ' Addressing the 'send' method of a 'ser' object.
x = ser.baudrate ' Assigning variable X with the value of the 'baudrate'
of a 'ser' object
How to Define Constants In Different Bases
Tibbo Basic allows you to assign values to constants using decimal, hexadecimal or
binary notation. Decimal notation is the default. To assign a hexadecimal value,
you must use the prefix &h before the first hexadecimal digit of your value. To
assign a binary value, you must use the prefix &b in the same manner. So:
These prefixes hold true whenever values are used -- there are no exceptions to
this rule. Whenever a numeric value is used, it may be preceded by one of these
prefixes and will be interpreted correctly.
How to Use Colons
Colons are actually not necessary in most parts of Tibbo Basic. They are a
traditional part of many BASIC implementations, and are often used to group
several statements in one line. However, since Tibbo Basic doesn't really care
about spaces anyway, they lose their relevance.
No Tibbo Basic statements require the use of colons.
Naming Conventions
Identifiers
An identifier is the 'name' of a constant, a procedure or a variable. It is case
insensitive. It may include letters (A-Z, a-z), digits (0-9) and the following special
characters: . ~ $ !. It must start with a letter, and cannot contain spaces.
For example:
Platform Objects, their Properties and Methods
The name of an object is used as a prefix, followed by a dot, followed by the name
of the property or the method you would like to access. For example:
©2000-2008 Tibbo Technology Inc.
Page 59

43 TIDE and Tibbo BASIC User Manual
sub on_ser_data_arrival ' event names may contain more than one word after
the object name.
Not every variable type is supported on every platform. You will find
related information in the "Supported Variable Types" topic in the
platform documentation. If you attempt to use a type which is not
supported by your platform you will most probably get "platform does
not export XXX function" error during compilation.
dim x as integer ' x is a variable of type 'integer'.
dim str as string(32) ' str is a variable of type 'string' with a maximum
length of 32 characters (bytes).
Events
Events are related to specific objects, just like properties and methods. However,
events are named differently. The pattern is on_objectname_eventname. Such as
on_door_open.
Introduction to Variables, Constants and Scopes
Variables and constants are a major part of any programming language, and Tibbo
Basic is no exception; below you will find explanations on the following:
Variables And Their Types
Type Conversion
45
Type Conversion in Expressions
Compile-time Calculations
Arrays
Structures
EnumerationTypes
50
54
55
Understanding the Scope of Variables
Declaring variables
Constants
60
60
43
48
49
57
Variables And Their Types
4.2.4.1
Variables are used to store values during the execution of an application. Each
variable has a name (the identifier used to refer to the value the variable
contains) and a type, which specifies how much data this variable can contain, and
also what kind of data it may contain.
Variables are defined using the Dim Statement prior to being used in code. The
simplest syntax for defining a variable would be something like:
A variable name must begin with a letter, and must be unique within the same
scope, which is the range from which the variable can be referenced.
132
81
©2000-2008 Tibbo Technology Inc.
Page 60

44Programming with TIDE
x = 15 ' x is now 15.
x = y ' x is now equal to y.
str = "foobar" ' str now contains the string 'foobar' (with no quotes).
Name
Description
byte
Hardware-level. Unsigned. Takes 1 byte in memory. Can
hold integer numerical values from 0 to 255 (&hFF).
word
Hardware-level. Unsigned. Takes 2 bytes in memory. Can
hold integer numerical values from 0 to 65535 (&hFFFF).
dword (new in
V2.0, not
available on all
platforms)
Hardware-level. Unsigned. Takes 4 bytes in memory. Can
hold integer numerical values from 0 to 4294967295
(&hFFFFFFFF).
char
Hardware-level. Signed. Takes 1 byte in memory. Can hold
integer numerical values from -128 to 127.
short
Hardware-level. Signed. Takes 2 bytes in memory. Can
hold integer numerical values from -32768 to 32767.
integer
Compiler-level. Synonym for short; substituted for short
at compilation. Exists for compatibility with other BASIC
implementations.
long (new in
V2.0, not
available on all
platforms)
Hardware-level. Signed. Takes 4 bytes in memory. Can
hold integer numerical values from -2147483648 to
2147483647
real (new in
V2.0, not
available on all
platforms)
Hardware-level. Signed, in standard "IEEE" floating-point
format. Can hold integer and fractional numerical values
from +/- 1.175494E-38 to +/- 3.402823E+38. Real
calculations are intrinsically imprecise. Result of
floating-point calculations may also differ slightly on
different computing platforms. Additionally, floating-point
calculations can lead to floating-point errors: #INF, -#INF,
#NaN. In the debug mode, any such error causes an FPERR
exception .
float (new in
V2.0, not
available on all
platforms)
Compiler-level. Synonym for real; substituted for real at
compilation. Exists for compatibility with other BASIC
implementations.
When you define a variable, some space is reserved for it in memory; later, while
the program executes, this memory space can hold a value.
Variables are assigned values like so:
Types of Variables
Tibbo Basic supports the following variable types:
29
©2000-2008 Tibbo Technology Inc.
Page 61

45 TIDE and Tibbo BASIC User Manual
string
Hardware-level. Takes up to 257 bytes in memory (max
string size can be defined separately for each string
variable). Strings can actually be up to 255 bytes long but
always begin with a 2-byte header -- 1 byte specifies
current length, and 1 byte specifies maximum length. Each
character is encoded using an ASCII (single-byte) code.
boolean
Compiler-level. Intended to contain one of two possible
values (true or false). Substituted for byte at compilation.
user-defined
structures(new
in V2.0)
Each user-defined structure can include several member
variables of different types. More about structures here .
user-defined
enumeration
types
Compiler-level. These are additional, user-defined, data
types. More about these under User-Defined Types .
Hardware-level types are actually implemented on the machine which
is used to run the final program produced by the compiler.
Compiler-level types are substituted by other variable types on
compile-time. The actual machine uses other variable types to
represent them; they are implemented for convenience while
programming.
dim x, y as byte
x = 5 ' x is now 5
y = x ' y is now 5 as well
C o n v e r t i n t o
54
55
Type Conversion
4.2.4.2
Variables can derive their value from other variables; in other words, you can
assign a variable to another variable. A simple example of this would be:
However, as covered above, there are several types of variables, and not all of
them can handle the same data. For example, what would happen if you assigned
a variable of type byte the value intended for a variable of type word?
Table below details all possible conversion situations.
©2000-2008 Tibbo Technology Inc.
Page 62

C
o
n
v
e
r
t
f
r
o
m
Byte
Word
Dwor
d
Char
Short
Lon
gReal
Stri
ng
Byte---OKOK
Reinter
pret
OK
OK
OK
OK
str
Wo
rd
Trun
cate
---
OK
Reinter
pret
Trunca
te
Reinte
rpret
OK
OK
OK
str
Dw
ord
Trun
cate
Trunc
ate
---
Trunca
te
Trunc
ate
Reint
erpr
et
OK
OK
lstr
Ch
ar
Reint
erpre
t
Reinte
rpret
Reinte
rpret
---OKOK
OK
OK
stri
Sh
ort
Reint
erpre
t
Trun
cate
Reinte
rpret
Reinte
rpret
Trunca
te
---
OK
OK
OK
stri
Lon
g
Reint
erpre
t
Trun
cate
Reinte
rpret
Trunca
te
Trunca
te
Trunc
ate
---
OK
OK
lstri
Re
al
Fract
ion
???
Fracti
on
???
Fractio
n
???
Fractio
n
???
Fracti
on
???
Fract
ion
????
---
OK
fstr*
Stri
ng
OK
valOKvalOKlvalOKvalOKvalOKlval
OK
str
tof
---
dim x as byte
dim c as char
x = 254
c = x ' c now contains the binary value of 254, which is interpreted as -2
207
207
199
208
208
46Programming with TIDE
200
210 200 210 210
210
*fstr is a functional equivalent of ftostr , but without mode and rnd parameters.
194
200
209
Conversions without loss
Conversions marked as "OK" incur no loss -- the value being passed from variable
of one type to variable of another type remains unchanged. For example,
conversion from word into dword is done without any loss, because 32-bit word
variable can hold any value that the 16-bit word variable can hold.
Conversions that cause reinterpretation
Conversions marked with "Reinterpret" mean that although binary data held by the
receiving variable may be the same this binary variable may be interpreted
differently on the destination "side". As an example, see this conversion from byte
into char:
©2000-2008 Tibbo Technology Inc.
Page 63

47 TIDE and Tibbo BASIC User Manual
dim x as byte
dim w as word
w = 12345 'hex representation of 12345 is 3039
x = w ' now x contains 57. Why? Because only '39' of '3039' could fit in,
and decimal of &h39 is 57.
dim x as byte
dim s as string
s = str(x) ' explicit invocation
s = x ' implicit invocation. Compiler is smart enough to use str for this
conversion
In the above example, both x and c will contain the same binary data. However, c
is a signed 8-bit value, so binary contents of 254 mean -2. Strictly speaking, this
reinterpretation will only happen if the value of x exceeds maximum positive
number that c can hold -- 127. If x<=127 conversion will not cause
reinterpretation. For example, if x=15 then doing c=x will result in c=15 as well.
In fact, in some cases, conversion from unsigned type to a signed time will never
result in the reinterpretation. This is when the maximum value that the source
unsigned variable can hold can always fit in the range of positive values that the
signed destination variable can hold. Example: conversion from byte (value range
0-255) to short (value range -32768 to 32767) will never result in the
reinterpretation.
Conversion from signed type into unsigned type will always cause reinterpretation
if the source variable contained a negative value.
Conversions that cause truncation
Conversions marked with "Truncate" mean that part of the binary data (on the
most significant side) may be lost during the conversion. For example, converting
from word type into byte type will only leave 8 bits of the original 16-bit value:
Notice, that some conversions will cause reinterpretation and truncation at the
same time!
Conversions that round the number (remove fractions)
Conversions from real type into any other numerical type will cut off the fraction,
as real is the only type that can hold fractions. Such conversions are marked as "
Fraction" in the table above.
Conversions that implicitly invoke functions available to the user
Some conversions automatically invoke functions (syscalls) available for use in
your program. In such cases the table above lists the name of the function
invoked. For example, conversion from byte into string relies on the str
207
function. Two ways of conversion below produce identical result:
Conversion of Boolean Variables
Boolean variables are actually stored as byte type variables; thus, all notes above
for byte type variables hold true for boolean variables as well.
©2000-2008 Tibbo Technology Inc.
Page 64

Conversion of Enumeration Types
dim x,y,z as byte
x=150
y=200
z=(x+y)/10 ' result of 35 is within byte variable's range, but
intermidiary calculations require 16-bit ariphmetic.
dim i,j,k as word
i=50000
j=60000
k=(i+j)/10 ' result will be 4446, which is incorrect. 32-bit ariphmetic
was not automatically used!
User-defined enumeration types are held in various variable types, depending on
the values associated with the constants within the enumeration type. This is
described in detail under User-Defined Types . Thus, they are converted
55
according to the variable type used to store them (described above).
48Programming with TIDE
Type conversion in expressions
4.2.4.3
In the Type Conversion we already explained what happens when you assign
45
the value of a variable of one type to a variable of another type. This section deals
the cases where variables of different types are used in expression. For example, if
x is byte and i is integer, what will happen when you do "x+i"?
The Virtual Machine operates on 16-bit values by default
Native data width for the Virtual Machine is 16 bits. When you are performing
calculations on 8-bit and/or 16-bit variables, result is always truncated to 16 bits.
Also, all intermediary calculations are done using 16-bit arithmetic. Consider the
following example first:
The above example will give correct result. Even though all three variables are of
byte type, internal calculations are 16-bit, so when x+y produces 350, which is
beyond the range of the byte variable, the Virtual Machine handles this in the right
way. Now, let's see another example:
This example requires 32-bit calculations because i+j will produce a number which
is outside the scope of 16-bit calculations. However, our compiler will not invoke
32-bit calculations automatically. Read on, this is not all...
Mixing in a 32-variable will cause the compiler to use 32-bit calculations
For the example above, turn i or j into a dword. Now, your calculations will be
correct. Mixing in any 32-bit variable will aotumatically upgrade calculations to 32
bits!
©2000-2008 Tibbo Technology Inc.
Page 65

49 TIDE and Tibbo BASIC User Manual
dim i,k as word
dim d as dword
i=50000
d=60000
k=(i+d)/10 ' result will be 11000. This is correct!
'Wrong!!!
dim x as byte
x=5+"6"
dim x,y as byte
y=5
x=5+10+y 'compiler will precalculate 5+10 and then the Virtual Machine
will only have to do 15+y
dim r as real
r=12345678901 'try to compile this and you will get "constant too big"
error.
dim r as real
r=12345678901.0 'that will work!
String and non-string variables cannot be mixed!
Yes, sorry, but you cannot do the following (compiler will generate type mismatch
104
error):
In case you are wondering why x="6" would work but x=5+"6" doesn't: the latter
is a mixed expression in which the compiler cannot decide what is implied:
conversion of string to value and then addition, or conversion of value to string
and then string concatenation!
Compile-time Calculations
4.2.4.4
Tibbo Basic always tries to pre-calculate everything that can be pre-calculated
during compilation. For example, if you write the following code:
Pre-calculation reduces program size and speeds up execution.
When processing a string like "x=50000" compiler first determines the variable of
what type would be necessary to hold the fixed value and chooses the smallest
sufficient variable type. For example, for 50000 it is, obviously, word. Next,
compiler applies the same rules of type conversion as between two actual
variables. Hence, in our example this will be like performing byte= word.
One additional detail. Large fixed values assigned to variables of real type must be
written with fractional part, even if this fractional part is 0. Consider the following
example:
45
Compiler will notice that this constant does not fit even into dword and will
generate an error. Now, try this:
©2000-2008 Tibbo Technology Inc.
Page 66

50Programming with TIDE
Index:
01234
Value:
15324
100
-30
dim x(5) as char
x(0) = 15
x(1) = 32
x(2) = 4
x(3) = 100
x(4) = -30
This is different from some BASIC implementations that understand x
(5) as "array x with the maximum element number of 5" (that is, with
6 elements). In Tibbo Basic declaring x(5) means "array of 5 elements,
with indices from 0 to 4".
On seeing ".0" at the end of the value compiler will realize that the value must be
treated as a real one (floating-point format) and process the value correctly.
So, why is it possible for compiler to automatically process values that fit into 8,
16, and 32 bits, but at the same time requires your conscious effort to specify that
the value needs to be treated as a floating-point one?
This is because floating-point calculations are imprecise. The value
"12345678901", when converted into a floating-point format, will not be exactly
the same! The floating-point value will only approximate the value we intended to
have!
For this reason we require you, the programmer, to make a conscious choice when
specifying such values. By adding ".0" you acknowledge that you understand
potential imprecision of the result.
Arrays
An array is a single variable which contains several elements of the same type.
Each element has a value and an index number, and may be accessed using this
number.
An example of a simple array would be:
The code to produce such an array in Tibbo Basic would look like this:
The first index in an array is 0. Thus, the array above contains 5 values, with
indices from 0 to 4.
4.2.4.5
Variable Types For Arrays
In the example above, the array was assigned the type char. This means that each
element within this array will be stored in a variable of type char . Starting
from Tibbo Basic V2.0 you can have arrays of variables of any type.
Accessing a Value Within an Array
To access a specific value within an array, include its index immediately after the
name of the array, in parentheses. The index may also be expressed through a
©2000-2008 Tibbo Technology Inc.
43
Page 67

51 TIDE and Tibbo BASIC User Manual
y = x(4) ' y would get a value of -30, according to the previous array
y = x(z) ' y would get the value of index z within array x.
dim x(5) as char
x(0) = 15
x(1) = 32
x(2) = 4
x(3) = 100
x(4) = -30
dim sum as integer
sum = 0
for i = 0 to 4 ' note that you do not necessarily have to iterate through
all elements in the array.
sum = sum + x(i)
next i
' now, at the end of this loop, sum contains the sum for the first three
elements (51)
dim x(5) as char
dim f as byte
f=5
x(f)=3 'index limiting will happen here (preceded by the OOR exception if
you are in the debug mode)
variable.
As an example, you could iterate through an array with a loop (such as a For...
Next Statement ) and execute code on each element in the array, by using a
86
variable to refer to the index of an element. Let's see how to calculate the sum of
the first three elements in the array we previously defined:
The TIDE and Tibbo Basic V2.0 introduced correct handling of array indices. It is
no longer possible for your program to point to an array element that does not
exist. For example, if your array only has 5 elements and you try to access
element number 5 the Virtual Machine will:
Generate an OOR (Out Of Range) exception and halt if your program is in the
debug mode. If you attempt to continue the Virtual Machine will access x(4)
27
29
-- the element with maximum available index.
When in the release mode, the OOR exception will not be generated but
27
"index limiting" will still occur.
Example:
Compiler is smart enough to notice out-of-range situations even at compile time.
For example, the following code will generate an error during compilation:
©2000-2008 Tibbo Technology Inc.
Page 68

52Programming with TIDE
dim x(5) as char
x(5)=3 'compiler will determine that this operation will be eccessing an
array element which does not exist!
Index:
01234
015324100
-30
17815-30
55
23248975
22
31318987
54
4323579124
3
57-9488
99
dim x(5,6) as char
x(0,0) = 15
x(0,1) = 32
x(0,2) = 4
......
x(5,2) = 48
x(5,3) = 8
x(5,4) = 99
Multi-Dimensional Arrays
The array in the example above is called a one-dimensional array. This is because
every element in the array has just a single index number. However, we could also
have an array which looks like this:
This is called two-dimensional array. Each element in the array is now identified by
an index consisting of two numbers (two coordinates). For example, the element
2, 0 contains the value 32. To create such an array, you would use the following
code:
Iterating through such an array would be done using a nested loop for each
dimension in the array. The array above contains only two dimensions, so we
would nest one loop within another. For an array containing six dimensions, we
would have to use six such nested loops. See:
©2000-2008 Tibbo Technology Inc.
Page 69

53 TIDE and Tibbo BASIC User Manual
dim x(5,6) as char
x(0,0) = 15
x(0,1) = 32
x(0,2) = 4
......
x(5,2) = 48
x(5,3) = 8
x(5,4) = 99
dim i, j, sum as integer
sum = 0
for i = 0 to 5
for j = 0 to 4
sum = sum + x(i,j)
next j
next i
' here, sum would be equal to the sum of the whole array. How much is
that? Try and see.
dim x(10) as byte
dim x as byte(10) 'you can think of it as '10 times of byte type' :-)
dim i(20,10) as byte 'two-dimensional array, 20x10 elements
dim i2(20) as byte(10) 'same! that is, 20 groups of byte x 10 -- exactly
same meaning
dim i3 as byte(20,10) 'yet another way -- same result!
dim s as byte(30) 'this string will have maximum length of 30 characters
(bytes)
In Tibbo Basic, you may define up to 8 dimensions in an array.
Alternative way of defining arrays
We have already explained that the following string means "an array x containing
10 elements of type byte":
In Tibbo Basic, the same can be expressed in a different way:
Both ways of defining arrays are completely identical and you can even mix them
together, as we can see on the following examples of 2-dimensional arrays:
Now, Tibbo Basic strings can be defined with an optional parameter specifying
maximum string length, for example:
So, how do we declare an array of string variables? Here are some examples:
©2000-2008 Tibbo Technology Inc.
Page 70

54Programming with TIDE
dim s(20,10) as string(30) 'two-dimensional array of 30-byte strings,
20x10 elements
dim s2(20) as string(30)(10) 'same!
dim s2 as string(30)(20,10) 'same!
'this is a structure with three members
type my_struct
x as byte
y as Long
s as string
end type
dim var1 as my_struct 'this is how you define a variable with type
'my_struct'
var1.x=5
var1.y=12345678
var1.s="Test"
Arrays introduce slight overhead
Each array occupies more space than the sum total of space needed by all
elements of an array. This is because each array also includes housekeeping data
that, for instance, defines how many elements are there in an array, array of what
type that is, etc.
Structures
4.2.4.6
Beginning with V2, Tibbo Basic supports structures. Structure is a combinatorial
user-defined data type that includes one or several member variables. Structures
are declared using type ... end type statements, as shown in the example
below:
In the above example, we declared a structure my_struct that has three member
variables: x, y, and s. This is just a declaration -- you still have to define a variable
with the new type you have created if you want to use the structure of this type in
your program:
94
After that, you can address individual elements of the structure as follows:
Structures you define may include members that are arrays or other structures.
Structure variables like var1 above can be arrays as well, of course. In total, Tibbo
©2000-2008 Tibbo Technology Inc.
Page 71

55 TIDE and Tibbo BASIC User Manual
type foo_struct 'structure with two members, and both are arrays
x(10) as byte
s(10) as string(4)
end type
type bar_struct 'structure with two members, one if which is another
structure
foo as foo_struct 'so, this member is a structure
w as word
end type
dim bar(20) as bar_struct 'we define an array of type 'bar_struct'
bar(1).foo.s(2)="test" 'oh-ho! we address element 2 of member s of member
foo of element 1 of bar!
dim i as integer
i = 2 ' i is an integer, and can only be assigned a numerical value. you
would have to remember that 2 is Monday.
dim d as dayofweek
d = monday ' now d is a user-defined type, dayofweek, and can be assigned
a value using the symbol Monday.
enum dayofweek
sunday = 1, ' if 1 is not specified, the default value associated
with the first constant is 0.
monday, ' by default, increments the previous value by 1. can
also be explicitly specified.
tuesday,
wednsday,
thursday,
friday,
saturday,
holiday = 99, ' as described above, values can be explicitly associated
with any constant in the list.
holiday2 'this will have the value of 100
end enum
Basic supports up to eight nesting levels (as in "array within a structure within a
structure within and array" -- each structure or array is one level and up to 8
levels are possible). Here is a complex example:
Structures introduce slight overhead
Each structure occupies more space than the sum total of space needed by all of
its members. This is because each structure also includes housekeeping data that,
for instance, defines how many members are there, what type they have, etc.
Enumeration Types
4.2.4.7
At times, it may be useful for a programmer to define his own enumeration data
types; for example, when working with the days of the week, it may be useful to
refer to them by name in code, rather than by number:
Enumeration definitions are made like this:
An enumeration type would then be used within the code as shown above (d =
©2000-2008 Tibbo Technology Inc.
Page 72

56Programming with TIDE
enum dayofweek
Sunday = 1,
Monday,
Tuesday,
Wednsday,
Thursday,
Friday,
Saturday,
holiday = 99
bestdayofweek = 7 ' bestdayofweek and Saturday are actually the
same!
fridaythethirteenth = -666 ' a negative constant.
end enum
Values associated with constants
do not exceed range
Actual variable type used to store
enum type
-128 to 127
char
0 to 255
byte
-32768 to 32767
short
0 to 65535
word
-2147483648 to 2147483647
long
0 to 4294967295
dword
Monday). Note that even though Monday is an identifier (i.e., an actual word,
132
and not just some number) it does not have to be surrounded by quote marks
(because it's not a string).
The value associated with each identifier within the enumeration type doesn't
necessarily have to be unique; however, when you associate the same value with
several constants, the distinction between these constants will be lost on compile
time.
Note that above,
7, and
bestdayofweek
saturday
was implicitly (automatically) associated with the value
was explicitly associated with the same value. Now, on
compile-time, they would both be considered to be just the same.
Type Mapping for Enum Types
When the project is being compiled, all enumeration types are substituted with
plain numerical values. the platform on which the code is running doesn't have to
know anything about Saturday or about the best day of the week; for the platform,
the number 7 is informative enough.
Hence, enumeration types are converted to various built-in numerical variable
types. The actual numerical type used to store the enumeration type depends on
the values associated with the constants within this enumeration type:
Notice, that enumeration types cannot be converted into real values, so you cannot
use fractional numbers in you enums.
Some examples:
©2000-2008 Tibbo Technology Inc.
Page 73

57 TIDE and Tibbo BASIC User Manual
enum tiny
tinyfoo,
tinybar
end enum ' this enum will be associated with a char type
enum medium
mediumfoo = 254
mediumbar
end enum ' this enum will be associated with a byte type
enum impossible
baddy = -1
cruise =
4294967295
end enum ' this enum will raise a compile error, as no single variable
type can hold its values
enum nofractions
thisisok =
4294967295
thisisnot = 125.25
end enum ' compiler won't accept this! Integer values only, please!
sub foobar(x as byte)
dim i, y as byte
y = x * 30
for i = 1 to y
dim r as short
r = x + 5
next i
r = x + 5 ' this would produce a compiler error
end sub
Enumeration types are helpful when debugging your code
For each enumeration type variable, the watch facility of the TIDE shows this
variable's current numerical value with a correct identifier associated with this
value. This usually proves to be very useful during debugging! After all, seeing
"dayofweek= 2- Monday" is much less cryptic than just "dayofweek= 2"!
Understanding the Scope of Variables
4.2.4.8
A scope is a section of code, from which you can 'see' a variable (i.e, assign it a
value, or read its value). For example:
So, in the example above, x and y could be seen from anywhere within the sub
procedure called foobar. However, r could be seen only from within the for...
next statement. Thus, trying to assign r a value from outside the for... next
statement would result in a compiler error, because it actually doesn't exist outside
of that loop.
One identifier can refer to several different variables, depending on the scope in
this identifier is used:
33
©2000-2008 Tibbo Technology Inc.
Page 74

dim x as byte ' this creates the variable x in the global scope.
sub foobar(x as byte) ' here we create x once more, in the scope of the
local sub (x as an argument).
dim f, y as byte
x = 5 ' right now, only the locally-created x (foobar agrument)
equls 5; global x remains unchanged.
y = x * 30
for f = 1 to y
dim x as byte
x = 30 ' the argument x outside the for... next statement
still equals 5. only this local x equals 30.
next f
end sub
Tibbo Basic supports several scopes:
dim s as string
sub foo
s = "foo" ' assigning a value to the global string variable s.
end sub
sub bar
dim i as short
i = 0
s = "" ' initialize s, in case it contains anything already (such
as 'foo').
for i = 1 to 5
s = s + "bar" ' note
next i
end sub ' at this point, s contains 'barbarbarbarbar'.
Beginning
End
Notes
sub
end sub
Cannot be nested.
function
end function
Cannot be nested.
for
next
while
wend
if... then... else
end if
No exit statement for
if... then... else.
do
loop
Global Scope
Every compilation unit has, in itself, one global scope. Variables declared in this
scope are accessible from within any sub or function in this compilation unit.
58Programming with TIDE
Local Scope
This is the scope which is between the beginning and the end of each of the
following statements:
©2000-2008 Tibbo Technology Inc.
Variables declared in this scope are accessible from within the construct in which
they were declared. Local scopes may be nested, for example, for...next scope
inside sub...end sub scope.
Page 75

59 TIDE and Tibbo BASIC User Manual
sub prc1(x as byte)
'some code here
end sub
sub prc2
dim prc1 as byte 'define a local variable with the same name as one
procedure we have
prc1=0 'this will generate no error -- in the current scope prc1 is a
variable
prc1(2) 'here, we try to invoke sub prc1 and this will cause a compiler
error.
end sub
This section applies only to platforms which include an HTTP server.
<!DOCTYPE HTML PUBLIC "-//W3C//DTD W3 HTML//EN">
<HTML>
<BODY>
BEGINNING OF OUTPUT<br>
<?
include "global.tbh"
declare i as integer ' i is defined somewhere else
for i = 1 to 10
?>
<i> Foo </i>
<?
next i
?>
<br>END OF OUTPUT<br>
</BODY>
</HTML>
A locally defined variable with the same name as a global variable takes
precedence in its context over any variable with the same name which is defined in
a 'wider' scope.
Local variable names also take precedence over procedure names. For example:
HTML Scope
This is a special scope, implemented in Tibbo Basic. HTML files included within a
project may contain embedded Tibbo Basic code. This code is executed when the
HTTP server processes an HTTP GET (or POST) request. Statements within an
HTML file are considered to be within one scope -- similarly to a function or sub
scope, with the exceptions that include and declare statements are
allowed.
90 79
Designing dynamic HTML pages always presents you with a choice: what to doinclude the BASIC code right into the HTML file or create a set of subs and
functions and just call them from the HTML file? In the first place you put a lot of
BASIC code into the HTML file itself, in the second case you just call subs and
©2000-2008 Tibbo Technology Inc.
Page 76

functions from the HTML file. So, which way is better?
public dim i as integer ' the integer i is defined in this file, and made
into a public variable. It can now be used from other compilation units.
i = i + 5 ' this would cause a compiler error. What is i?
' the correct way:
declare i as integer ' lets the compiler know that i is defined elsewhere.
i = i + 5
declare i as integer
i = 7 ' i has not been defined yet, but we let the compiler know that it
is defined elsewhere.
...
dim i as integer ' we now define i. Note that here it doesn't have to be
public, because it is used in the same compilation unit.
' this example is rather pointless, but just illustrates this single
principle.
Generally, we recommend to use the second way. First of all, this style of
programming is cleaner- a mixture of BASIC code and static HTML text usually
looks messy. Second, the second method consumes less variable memory.
Although the HTML scope is similar to a local scope of a function or a sub, its
variables get exclusive memory allocation as if they were global. When you avoid
writing a lot of BASIC code in the HTML file itself you usually avoid having to
create a lot of variables in the HTML scope and this saves you memory!
60Programming with TIDE
Declaring Variables
4.2.4.9
Usually, a variable is first defined by the dim s tatement and then used in
code; however, at times, a single global variable must be accessible from several
compilation units. In such cases, you must use the public modifier when
defining this variable, and use the declare statement in each compilation
unit from which this variable needs to be accessed.
For example, let us say this is the file foo.tbs:
And this is the file bar.tbs:
Also, if for some reason you would attempt to use a variable in a single compilation
unit before defining it using the dim statement, you will have to use a declare
statement before using it to let the compiler know that it exists. For example:
81 81 81
98
79 79
Constants
4.2.4.10
Constants are used to represent values which do not change throughout the
program; these values may be strings or numbers. They may either be stated
explicitly, or be derived as the result of an expression.
©2000-2008 Tibbo Technology Inc.
Some examples:
Page 77

61 TIDE and Tibbo BASIC User Manual
const universal_answer = 42
const copyright = "(c) 2005 Widget Systems Inc." ' this is a string
constant
const escape_char = `@` ' this constant will contain a numerical value --
the ASCII code for the char @.
const hexi = &hFB ' would create a constant with a value of 251 (&hFB in
hex)
const bini = &b00110101 ' would create a constant with a value of 53
(&b00110101 in binary)
const width = 10
const height = 15
const area = width * height ' constants may contain expressions which
include other constants
dim x as byte
const foo = x + 10 ' this will produce a compiler error. Constant
expressions may contain only constants.
When defining a list of related constants, it is often convenient to use
the Enum Statement and create one data type which contains this
list of constants. See also User-Defined Types above.
s = "abc"+chr(10)+chr(13) 'add LF/CR in the end
s = "abc\n\f" ''\n' means LF, '\f' -- CR
const STR1 = "abc\x10\x13" 'same result can be achieved using HEX codes of
the characters
Constants can be useful when you have some values which are used throughout
the code; with constants, you can define them just once and then refer to them by
their meaningful name. This has the added benefit of allowing you to easily change
the value for the constant any time during the development process -- you will just
have to change the definition of the constant, which is a single line of code.
84
55
When defining a constant within a scope , this constant is visible only from
57
within this scope. It is a good idea to define all constants within header files, and
include these files into each compilation unit.
90
String constants
String constants can include escape sequences to define unprintable characters.
This functionality is borrowed from C. Adding unprintable characters to the string
has always been rather inconvenient in BASIC language. The only way to do so
was like this:
In Tibbo Basic you can achieve the same by using escape sequences -- C style:
The following standard escape sequences are recognized:
"\0" for ASCII code 0
"\a" for ASCII code 7 (&h7)
"\b" for ASCII code 8 (&h8, BS character)
©2000-2008 Tibbo Technology Inc.
Page 78

"\t" for ASCII code 9 (&h9)
function multiply(a as integer, b as integer) as integer
multiply = a * b
end function
"\n" for ASCII code 10 (&hA, LF character)
"\v" for ASCII code 11 (&hB)
"\f" for ASCII code 12 (&hC)
"\r" for ASCII code 13 (&hD, CR character)
"\e" for ASCII code 27 (&h1B, ESC character)
Any ASCII character, printable or unprintable, can be defined using its HEX code.
The following format should be used: "\x00" where "00" is the HEX code of the
character. Notice, that two digits should be present on the code, for example:
"\x0A" -- leading zero must not be omitted.
\
Introduction to Procedures
A procedure is a named piece of code, which performs a designated task, and can
be called (used) by other parts of the program. In Tibbo Basic, there are two types
of procedures:
62Programming with TIDE
Function Procedures
A function is defined using the Function Statement . Functions can optionally
87
have one or several arguments. Functions always return a single value. They can,
however, change the value of the arguments passed to them using ByRef and
64
thus indirectly return more than one value. This would be an example of a
function:
Note how the function above returns a value: via a local variable with the same
name as the function itself. Such a variable is automatically created by the
compiler for each function.
Sub Procedures
Sub is short for subroutine; just like a function, a sub procedure can optionally
accept one or more arguments. However, unlike functions, sub procedures do not
return a value. It is defined using the Sub Statement . This would be an example
93
of a sub:
©2000-2008 Tibbo Technology Inc.
Page 79

63 TIDE and Tibbo BASIC User Manual
dim a(10) as byte ' a is a global variable -- outside the scope of the
function.
sub init_array
dim i as integer
for i = 0 to 9
a(i) = 0 ' the global variable gets changed.
next i
end sub
public function multiply(a as integer, b as integer) as integer ' the
value returns by this function is an integer
multiply = a * b
end function
declare function multiply(a as integer, b as integer) as integer '
declaring just the name isn't enough. Include also the arguments and the
types.
dim i as integer
i = multiply(3, 7)
Subs change the value of the arguments passed to them using ByRef and thus
64
indirectly return a value, or even several values. Of course, they may also change
the value of global variables.
Event handlers are like subs
Event handlers defined in the platform work exactly like sub procedures. Event
handler subs can accept arguments. Event handlers can never be function
procedures as each function has to return a value and the event handler has
nobody to return this value to.
Declaring Procedures
Usually, a procedure is first defined by the function or sub statements and
87 93
then used in code; however, at times, functions can reside in a different
compilation unit. In such a case, you must use the public modifier when
defining this function, and use the declare statement to let the compiler
79 79
98
know that the function exists.
For example, let us say this is the file utility_functions.tbs:
And this is the file program.tbs:
Declare statements are usually used within header files which are then included
into compilation units. Also, if for some reason you would attempt to use a
procedure in a single compilation unit before defining it, you will have to use a
declare statement to let the compiler know that it exists. For example:
©2000-2008 Tibbo Technology Inc.
Page 80

64Programming with TIDE
declare function multiply(a as integer, b as integer) as integer
dim i as integer
i = multiply(3, 7)
...
function multiply(a as integer, b as integer) as integer ' now this
function doesn't have to be public.
multiply = a * b
end function
sub foo(x as byte)
...
x = 1
...
end sub
sub bar
dim y as byte
y = 2
foo(y)
' at this point in code, y is still 2.
end sub
Event handler subs require no declaration as they are already declared in your
device's platform.
No Recursion
One thing you have to know is that procedures cannot call themselves. Also, two
procedures cannot call each other. This is due to TiOS not using dynamic memory
allocation. Such allocation would create a serious overhead for the system, and
would drastically slow everything down -- not just recursive procedures. For more
information, see Memory Allocation for Procedures .
66
Passing Arguments to Procedures
4.2.5.1
When calling subroutines or functions, it is often necessary to pass a certain value
for processing within the procedure. An example of this would be a function which
calculates the sum of two values; naturally, such a function would need to get two
arguments -- the values which are to be added up.
There are two different ways to pass arguments to such a procedure:
The Default: Passing By Value
When passing an argument to a procedure by value, this argument is copied to a
location in memory which was reserved for the local variables of this function.
Processing is then done on this local copy -- the original remains untouched. For
example:
This way of passing variables is the default used in Tibbo Basic.
Passing By Reference
©2000-2008 Tibbo Technology Inc.
In certain cases, copying is not the preferred solution; for example, when a
procedure has to modify several arguments passed to it and these later have to be
Page 81

65 TIDE and Tibbo BASIC User Manual
sub foo(byref x as byte)
...
x = 1
...
end sub
sub bar
dim y as byte
y = 2
foo(y)
' at this point in code, y is 1!
end sub
Here is our advice: when dealing with strings it is usually better (in
terms of performance) to pass them by reference. For all other types,
passing by value yields better performance.
sub bar(byref x as byte)
...
end sub
sub foo
bar("123") 'attempt to pass a string will generate a compiler error
bar(val("123")) 'this will work!
end sub
accessible. Another example would be when processing large strings -- copying
them would cause significant overhead.
In such cases, arguments are passed by reference. When passing by reference, the
actual values are not copied. Instead, the procedure receives a reference to the
location of the original values in memory -- hence, the name. For example:
When passing arguments by reference, the code within the procedure will access
these arguments using indirect addressing. This may cause possible overhead. The
only case where it does not cause overhead (relative to passing by value) is when
working with large strings; in this case, passing them by reference saves the need
to copy the whole string to another location in memory.
Strict byref argument match is now required!
Beginning with Tibbo Basic release 2.0, strict match is required between the type
of byref argument and the type of variable being passed. For example, trying to
pass a string for a byte will now cause a compiler error:
In the above example, sub bar takes a byte argument and we are trying to pass a
string. Wrong! Compiler understands that byref arguments can be manipulated by
the procedure that takes them. Therefore, it is important that actual variables
being passed match the type of argument that procedure expects. Automatic type
conversion won't apply here.
45
©2000-2008 Tibbo Technology Inc.
Page 82

66Programming with TIDE
Memory Allocation for Procedures
4.2.5.2
Variable memory (RAM) allocation in TiOS is not dynamic . Memory is allocated
for variables at compile-time.
The compiler builds a "tree" reflecting procedure calls within your project. When
two different procedures never call each other, it is safe to allocate the same
memory space for the variables of each of them. They will never get mixed.
Let us say we have two event handlers in our project: on_event_1, which needs 7
bytes of memory, on_event_2, which needs 5 bytes of memory. They do not call
each other. In this case, the total memory required for our project will be 7 bytes
-- they will share the same memory space because only one will be executing at
any given time.
However, sometimes procedures call other procedures. This affects memory
allocation.
43
As seen above, the event handler on_event_1 calls procedure A, which in turn calls
procedure B. The memory required for each procedure is listed in brackets. Since
on_event_1, procedure A and procedure B call each other, they may not share the
same memory space. If procedure A keeps a variable in memory, then obviously
procedure B cannot use the same space in memory to store its own variables,
because procedure A may need its variable once control returns to it after
procedure B has completed. Thus, the total memory required for this tree is 11
bytes.
Now, let us say we also have on_event_2 in our project, which calls procedure C,
which in turn calls procedure D. This is a completely separate chain:
©2000-2008 Tibbo Technology Inc.
Page 83

67 TIDE and Tibbo BASIC User Manual
dim x, y as byte
dim s as string
if x < y then
s = "x is less than y"
else
s = "x is greater than, or equal to, y"
end if
As can be seen, this chain takes up 7 bytes of memory. However, this memory can
be the same memory used for the on_event_1 chain, because these two chains will
never execute at the same time. Thus, the total memory required for our project
remains at 11 bytes.
A typical project usually includes a number of global variables . Naturally, these
variables are allocated their exclusive space that is not shared with local variables
of procedures. Variables of HTML scope, which are local by nature, are allocated
exclusive memory space as if they were global (this is an unfortunate byproduct of
the way compiler handles HTML pages). Hence, it is more economical to implement
necessary functionality in procedures invoked from HTML pages rather than include
BASIC code directly into the body of HTML files.
57
Introduction to Control Structures
Control Structures are used to choose what parts of your program to execute,
when to execute them, and whether to repeat certain blocks of code or not (and
for how many iterations).
The two main types of control structures are decision structures and loop
structures .
Decision Structures
4.2.6.1
Decision Structures are used to conditionally execute code, according to the
existence or absence of certain conditions.
Common uses for decision structures are to verify the validity of arguments, to
handle errors in execution, to branch to different sections of code, etc.
An example of a simple decision structure would be:
68
67
©2000-2008 Tibbo Technology Inc.
Page 84

The following decision structures are implemented in Tibbo Basic:
dim f, i as integer
f = 1
for i = 1 to 6
f = f * i
next i
' f is now equal to 1*2*3*4*5*6 (720).
If.... Then... Else Statement
Select-Case Statement
89
91
68Programming with TIDE
Loop Structures
4.2.6.2
Loop structures are used to iterate through a certain piece of code more than once.
This is useful in many scenarios, such as processing arrays, processing request
queues, performing string operations (such as parsing), etc.
An example of a simple loop structure would be:
The following loop structures are implemented in Tibbo Basic:
Do... Loop Statement
For... Next Statement
While-Wend Statement
82
86
95
Doevents
4.2.6.3
Although under Tibbo Basic, event-driven programming is the norm, there may be
special cases in which you just have to linger an overly long time in one event
handler. This will block execution of other events. They will just keep accumulating
in the queue (see System Components ).
To resolve this, a doevents statement has been provided. When this statement
82
is invoked within a procedure, the execution of this procedure is interrupted. The
VM then handles events which were present in the queue as of the moment of
doevents invocation. Once these events are handled, control is returned to the
procedure which invoked doevents.
If new events are added to the queue while doevents is executing, they will not be
processed on the same doevents 'round'. Doevents only processes those events
present in the queue at the moment it was invoked.
To summarize, doevents provides a way for a procedure to let other events
execute while the procedure is doing something lengthy.
7
©2000-2008 Tibbo Technology Inc.
Page 85

69 TIDE and Tibbo BASIC User Manual
'calculate sum of all array elements -- this will surely take time!
dim sum, f as word
sum = 0
for f = 0 to 49999
sum = sum + arr(f)
doevents 'don't want to stall other events so allow their execution
while we are crunching numbers
next f
Multiple Doevents Calls
Let us say we are in event handler on_event_1. This event handler executes a
doevents call. The VM begins processing other events in the queue, and starts
executing an event handler on_event_3, which also contains a doevents
statement.
In this case, a new doevents round will begin. Only when it completes, control will
be returned to event handler on_event_3, which will complete, and then return
control to the previous doevents (the one from event handler on_event_1).
The point here is that control will not be returned to on_event_1 until on_event_3
fully completes execution, since on_event_3 contains a doevents statement in
itself.
Memory Allocation When Using Doevents
When a procedure utilizes doevents, it means its execution gets interrupted, while
other procedures get control. We have no way to know which other procedures will
get control, as this depends on the events which will wait in the queue.
As a result, a procedure which utilizes doevents, and any procedures calling it
(directly or through other procedures) cannot share any memory space with any
other procedure in the project. This would lead to variable corruption -- procedures
newly executed will use the shared memory and corrupt variables which are still
needed for the procedures previously interrupted by doevents.
©2000-2008 Tibbo Technology Inc.
Page 86

70Programming with TIDE
Above we have the same two chains of procedures which appear under Memory
Allocation for Procedures , with one noticeable difference: Procedure C includes a
66
doevents statement. The on_event_1 chain takes up 11 bytes. But on_event_2 and
procedure C (which together take up 5 bytes) cannot share the same space with
the on_event_1 chain, because when the doevents statement is invoked, the state
of variables for on_event_2 and procedure C must be preserved. So these two get
their own exclusive memory space.
Procedure D, which is also a part of the on_event_2 chain, does not get its own
exclusive memory space. This is because it comes later on the chain than the
procedure which contains the doevents statement. There will never be a situation
where the variables of procedure D must be preserved while other chains are
executing.
Thus, the total memory requirements of the project depicted above would be 16
bytes -- 11 shared bytes plus 5 exclusive bytes. This is more than would have
been required had we not used doevents.
Sharing Procedures Which Utilize Doevents
Procedures which contain doevents statements, as well as all procedures which call
them (directly or through other procedures) cannot be shared between chains.
Let us say event handler on_event_1 calls procedure A. Procedure A calls
procedure B. Procedure B contains a doevents statement, and also calls procedure
C.
Next, we have event handler on_event_2. It cannot call procedure A or B, because
procedure B contains a doevents statement (and A calls B). If it could call
procedure A, we might get a situation whereby event handler on_event_1 fires,
calls procedure A. In it, procedure B is called, and doevents is executed. During
doevents, an event handler on_event_2 fires, and calls procedure A again -- while
the previous instance of A still holds variables in memory, waiting for control to
return to it. This would corrupt the values of variables used by the first A (if you
try to do something like this, the compiler will raise an error).
©2000-2008 Tibbo Technology Inc.
Page 87

71 TIDE and Tibbo BASIC User Manual
#define ABC x(5) 'now ABC will imply 'x(5)'
ABC=20 'now it is the same as writing x(5)=20
#define ABC x(5) 'define
...
#undef ABC 'destroy
...
ABC=20 'you will get a compilation error on this line (compiler will try
to process this as "=20")
However, note that in the example above we also have procedure C (which is
called by procedure B). This procedure can be shared by everyone -- because it is
later on the chain than the procedure which contains the doevents statement.
Doevents for Events of The Same Type
For some events, only one instance of the event may be present in the queue at
any given time. The next event of the same kind may only be generated after the
current one has completed processing. For other events, multiple instances in the
queue are allowed.
Let us say that for event_1, multiple instances are allowed, and that this event's
handler contains a doevents statement. When this statement executes, it may
happen that another instance of event_1 will be found on the queue, waiting to be
processed. If this happens, this new instance will just be skipped -- execution will
move on to the next event on the queue. Otherwise, we would once again get
recursion (execution of an event handler while a previous instance of this event
handler is already executing), which is not allowed under Tibbo Basic.
Using Preprocessor
Tibbo Basic compiler includes a preprocessor that understands several directives.
#define and #undef
The #define directive assigns a replacement token for an identifier. Before
compilation, each occurrence of this identifier will be replaced with the token, for
example:
The #undef directive "destroys" the definition made earlier with #define :
©2000-2008 Tibbo Technology Inc.
Page 88

#if - #else - #elif -- #endif
#define OPTION 0 'set to 0, 1, or 2 to select different blocks of code for
compilation
...
#If OPTION=0
s="ABC" 'will be compiled when OPTION=0
#elif OPTION=1
s="DEF" 'will be compiled when OPTION=1
#Else
s="123" 'will be compiled when OPTION=2, 3, etc.
#endif
#define RED 0
#define GREEN 1
#define BLUE 2
...
#define OPTION BLUE
...
#If OPTION=RED
s="ABC" 'will be compiled when OPTION=RED (0)
#elif OPTION=GREEN
s="DEF" 'will be compiled when OPTION=GREEN (1)
#Else
s="123" 'will be compiled when neither RED, nor GREEN
#endif
#If OPTION
x=33 'will be compiled in if OPTION evaluates to any value except 0.
Will not be compiled in if OPTION evaluates to 0.
#endif
#If WEIRDNESS 'undefined identifier
x=33 'will not be compiled in
#endif
These directives are used to conditionally include certain portions of the source
code into the compilation process (or exclude from it). Here is an example:
You can improve on this example and add meaning to 0, 1, and 2:
72Programming with TIDE
You can also write like this:
Preprocessor directives are not "strict". You don't have to define something before
using it. During #if evaluation, all undefined identifiers will be replaced with 0:
Do not confuse compile-time definitions such as "#define OPTION 2" and actual
©2000-2008 Tibbo Technology Inc.
application code like "const COLOR=2" or "x=3". They are from two different
worlds and you can't use the latter as part of #if directives. For example, the
following will not work:
Page 89

73 TIDE and Tibbo BASIC User Manual
#define OPTION 0 'preprocessor directive
Const COLOR=2 'constant used by your application
#If OPTION=COLOR 'to a confused programmer, this looks like 0=2, but COLOR
is not #defined, hence, it will be evaluated to 0
'hence, this code will be compiled in!
#endif
#define RED 0
#define GREEN 1
#define BLUE 2
...
#define OPTION 2
...
#If OPTION=GREEN+1
'will be compiled in, because GREEN=1, hence the entire expression
evaluates to 2, and OPTION=2
#endif
#ifdef OPTION
s="X" 'will be compiled if OPTION is defined
#Else
s="1" 'will be compiled if OPTION is not defined
#endif
#ifndef OPTION
s="X" 'will be compiled if OPTION is not defined
#Else
s="1" 'will be compiled if OPTION is defined
#endif
The #if directive also understands expressions, for example:
#ifdef - #else - #endif
#ifdef and #ifndef# are like #if, but instead of evaluating an expression they
simply checks if specified definition exists:
#ifndef is like #ifdef, but in reverse:
Scope of Preprocessor Directives
4.2.7.1
Each preprocessor directive applies only to its own compilation unit , not the
entire project. So, a #define directive in main.h will not be "visible" in main.tbs
unless the latter includes the main.h.
The only exception to the above are platform defines. These are globally visible
throughout your entire project. Platform defines determine options such as the
39
©2000-2008 Tibbo Technology Inc.
Page 90

presence or absence of a display, display type, etc. These options are selected
through the Customize Platform dialog, accessible through the Project Settings
dialog.
74Programming with TIDE
127
Working with HTML
One of the strengths of programmable is that they feature a built-in webserver (of
course, this is only true for devices that have a network interface and support TCP
communications). You can use this webserver as an engine for server-side
scripting; simply put, you can output dynamic HTML content by including Tibbo
Basic instructions within HTML pages.
Here is a simple example:
©2000-2008 Tibbo Technology Inc.
Page 91

75 TIDE and Tibbo BASIC User Manual
<!DOCTYPE HTML PUBLIC "-//W3C//DTD W3 HTML//EN">
<HTML>
<BODY>
BEGINNING OF OUTPUT<br>
<?
dim i as integer
for i = 1 to 10
?>
<i> Foo </i> <br>
<?
next i
?>
<br>END OF OUTPUT<br>
</BODY>
</HTML>
BEGINNING OF OUTPUT
foo
foo
foo
foo
foo
foo
foo
foo
foo
foo
END OF OUTPUT
In effect, this file would cause the following to appear in the browser window of the
user accessing this page:
When to Use HTML Pages In Your Project
For an embedded device, built-in webserver can provide a convenient interface to
this device; in fact, it is one of the best ways to allow your users to access your
device remotely. They would just have to enter an address in a web browser, and
voila, up comes your interface.
HTML support, as implemented in the Tibbo Basic, allows you complete control
over page structure. You can use client-side technologies such as JavaScript, CSS
etc., while still being able to dynamically generate HTML content within Tibbo
device.
Further information about creating HTML files with dynamic content can be found
in the next topic as well as Using HTTP topic (part of the sock object
76 314 274
documentation).
©2000-2008 Tibbo Technology Inc.
Page 92

76Programming with TIDE
<!DOCTYPE HTML public "-//W3C//DTD W3 HTML//EN">
<HTML>
<BODY>
BEGINNING OF OUTPUT<br>
<?
'<--------------- BASIC procedure starts here
dim i as integer
for i = 1 to 10
?>
<i> Foo </i> <br>
<?
next i
'<--------------- procedure ends here
?>
<br>end OF OUTPUT<br>
</BODY>
</HTML>
Embedding Code Within an HTML File
4.2.8.1
As covered in Understanding the Scope of Variables , each HTML file has a
special scope, and all code within the file resides within this scope.
To begin a block of Tibbo Basic code within an HTML file, you must use an escape
sequence -- <? . To close the section of code, use the reverse escape sequence -?> .
When the embedded HTTP server receives a GET (or POST) request, it begins to
output the requested HTML file. It simply reads the HTML file from top to bottom,
and transmits its contents with no alteration. However, the moment is encounters
a block of Tibbo Basic code, it begins executing it.
Tibbo Basic code inside HTML files does not differ from the code in "basic" files, but
it may not contain procedures. This is because the Tibbo Basic code in the HTML
file is considered to constitute a procedure in itself. Notice, that all code in one
HTML file is considered to be a single procedure, even if there are several
fragments of code in this HTML file. Consider this example:
57
There two code fragments, yet they both form one procedure. For example,
variable i declared in the first fragment is still visible in the second fragment.
The fact that entire code within each HTML file is considered to be a part of a
single procedure has implications in the way events are handled (reminder: there
is a single queue for all events). The next event waiting in the event queue
7
won't be executed until the end of the HTML procedure is reached. Just because
the HTML procedure consists of two or more fragments does not mean that other
events will somehow be able to get executed while the HTTP server outputs the
static data between those fragments ("<i> Foo </i> <br>" in our example). Use
doevents if you want other event handlers to squeeze in!
68
Tibbo Basic code in the code fragments may include decision structures or loop
structures that may cause various segments of HTML code to be output more
68
than once, to be skipped altogether, or to be output only when certain conditions
©2000-2008 Tibbo Technology Inc.
are true or false. In the above example the line "<i> Foo </i> <br>" will be
output 10 times because this line resides between two code fragments that
67
Page 93

77 TIDE and Tibbo BASIC User Manual
<!DOCTYPE HTML public "-//W3C//DTD W3 HTML//EN">
<HTML>
<BODY>
BEGINNING OF OUTPUT<br>
<?
dim i as integer
dim s as string
s="<i> Foo </i> <br>"
for i = 1 to 10
while sock.txfree<len(s) 'these free lines can be omitted for simple
doevents 'tests but are actually essential for
wend 'reliable output of large data chunks
sock.setdata(s) 'this prepares data for output
sock.send 'and this commits it for sending (see sock
object)
next i
?>
<br>end OF OUTPUT<br>
</BODY>
</HTML>
implement a cycle!
The same result could be achieved in a different manner:
Here we have a single code block and "printing" the same line several times is
achieved by using sock.setdata and sock.send methods of the sock object.
353 353 274
So, which of the two examples shows a better way of coding? Actually, both ways
are correct and equally efficient. The first way will have an advantage in case you
have large static blocks that may be harder to deal with when you need to print
them using sock.setdata method.
Further information about creating HTML files with dynamic content can be found
in Using HTTP (part of the sock object documentation).
314 274
Understanding Platforms
As an embedded language, Tibbo Basic may find itself within many various
hardware devices; each such device may have different capabilities in terms of
storage, physical interfaces, processing power, and other such parameters.
Thus, Tibbo Basic is not a one-size-fits-all affair; it is customized specifically for
every type of physical device on which TiOS runs. A function which initializes a
WiFi interface would make very little sense on a device which does not support
WiFi. The same would go for a function which clears the screen -- what if you have
no screen? This holds true even for string functions -- some platforms are so tiny,
they do not even need to support string processing!
Because of this, the 'core' of the Tibbo Basic language is actually very minimalistic
-- we call it "pure" -- it contains only the statements listed under Statements
below. Any other functionality is implemented specifically for each platform, and is
documented in detail for your platform under Platforms .
79
133
©2000-2008 Tibbo Technology Inc.
Page 94

78Programming with TIDE
ser.baudrate = 3 ' set the baudrate
x = ser.numofports ' find out how many serial ports the device has.
s = ser.getdata(50) ' gets up to 50 bytes of data into variable s.
ser.setdata(s) ' prepares up to 50 bytes of data for sending.
ser.send ' no arguments, returns nothing. Sends data.
sub on ser_data_arrival
' ... do something! ... <-- will be called when data arrives into the
serial port.
end sub
Objects, Events and Platform Functions
4.2.9.1
Each platform provides the following types of custom language constructs:
133
Objects
These provide a way to access the various facilities and subsystems of the host
platform. For example, in a platform which supports networking, we would have a
socket object that handles TCP/IP communication.
Each object has properties, methods and events:
A property of an object allows you to read or change an internal variable for this
object. For example, a serial port object may have a baudrate property. Change
the value of this property, and the actual physical baudrate changes. There are
also read-only properties which only provide information.
A method of an object is a way to make the object perform a certain action. It is
basically a procedure. It can optionally take arguments or return values. Our ser
object could have getdata and setdata methods, for instance.
An event of an object is something that 'happens' to this object in reality.
8
When TiOS registers an event, an event handler for it is automatically called, if it
exists in your source code. Event handlers are simply subs with no arguments.
Platform Functions
Many functions commonly available in other BASIC versions are implemented in
Tibbo Basic on the platform level and not on the "pure" language level; these
include also seemingly universal functions, such as string processing, or various
date and time functions. This is done so because not every platform would actually
need these functions, universal as they may seem. Some platforms may have very
limited resources, and not every platform needs to know what the time is, or how
to parse strings.
Language Reference
The text below provides a complete rundown of all built-in language statements
, keywords and operators . If you can't find something here, that means it is
platform-specific, and you would find it in your platform documentation.
96 99
79
133
©2000-2008 Tibbo Technology Inc.
Page 95

79 TIDE and Tibbo BASIC User Manual
Function:
Declares constants for use in place of literal values.
Syntax:
const name = value
Scope:
Global, HTML and local
See Also:
Enum Statement
Part
Description
name
The name of the constant, later used to refer to this
constant in code.
value
The value for the constant; this can be an expression.
const foo = "abc" + "fddf"
const bar = 123 + 56 * 56
const foobar = "dfdffgfg"
Function:
Declares a function or a subroutine or a variable for later
use.
The examples provided herein may not work on your platform -- they are given for
reference only.
Statements
Statements are used for directing the machine to perform a specific operation. A
statement is the smallest possible unit of code which would compile by itself. You
could say they are the programming-language equivalent of a sentence in human
speech.
Statements are built into Tibbo Basic itself, and are not platform-specific.
Const Statement
84
Details
This statement defines an identifier, and binds a constant value to it. During
compilation, when the compiler finds an identifier, it substitutes the identifier with
the value given for the constant.
When defining a constant, you can use any valid constant expression; this can be
another constant, a string, or a mathematical expression. Of course, constant
expressions cannot include variables, functions, or other elements of code which
are not constant (and, hence, cannot be resolved during compilation).
Global constants are usually declared in the header file .
Examples
Declare Statement
15
©2000-2008 Tibbo Technology Inc.
Page 96

80Language Reference
Syntax:
declare function name [ ( [ byref ] argument1 as
type1, [ byref ] argument2 as type2,...) ] as ret_type
or:
declare sub name [ ( [ byref ] argument1 as type1, [
byref ] argument2 as type2,…) ]
or:
declare name [ ( bounds1) ] [ , name2 [ ( bounds2 ) ] ]
as type [ ( max_string_size ) ]
Scope:
Global and HTML
See Also:
Function Statement , Sub Statement , Dim Statement
Part
Description
function
Optional. Used to specify that you are declaring a function
procedure .
sub
Optional. Used to specify that you are declaring a sub
procedure . If neither sub nor function appear, it is
assumed that the declare is used to declare a variable.
name
Required. Used to specify the name of the function, sub or
variable you are declaring.
byref
Optional. If present, arguments are passed by reference .
If not, arguments are passed By Value .
argument1[1,
2...]
Optional. The name of the argument to be passed to the
procedure. Only used if sub or function appear.
as
Required. Precedes the type definition.
type[1, 2...]
Optional (required if arguments are present). Specifies the
type of the argument to be passed to the procedure.
ret_type
Optional (required for functions, cannot be used for subs).
Used to specify the type of the return value from the
procedure.
bounds[1, 2...]
Optional (used only when declaring variables). Specifies the
boundary (finite size) of a dimension in an array.
87 93
81
62
62
43
Details
In large projects, you often define a function or variable in one compilation unit,
and use it from other units, so it is external to those units.
The unit which uses this external variable or function should refer to it in a way
which lets the compiler know that it does indeed exist externally.
The declare statement is used to refer to a variable or function in this manner, but
doesn't actually allocate any memory or produce any code; rather, it tells the
compiler about this external entity, so that the compiler knows about it and can
deal with it (see Dim Statement ).
81
Usually, variables and functions which are shared between compilation units are
declared in a header file, and this header is then included in the units (see Include
Statement ).
90
64
64
©2000-2008 Tibbo Technology Inc.
Page 97

81 TIDE and Tibbo BASIC User Manual
declare function hittest(x as integer, y as integer) as boolean
declare sub dosomething (s as byref string)
declare devicestate as integer
Function:
Defines a variable and allocates memory for it.
Syntax:
[ public ] dim name1 [ (bounds1) ] [ , name2 [
(bounds2) ] ]
as type [ (max_string_size) ]
Scope:
Global, HTML and local
See Also:
Declare Statement
Part
Description
public
Optional; may only be used in a global scope. If present,
makes the variable(s) public .
name[1, 2...]
Required. Specifies the name for the variable.
bounds[1, 2...]
Optional. Specifies the boundary (finite size) of a dimension
in an array. Several comma-delimited boundary values
make a multi-dimensional array.
as
Required. Precedes the type definition.
type
Required. Specifies the type of the variable.
max_string_size
Optional (can be used only when type is string). Sets the
maximum size for a string (default size is 255 bytes).
Example
Dim Statement
79
57
43
Details
The dim statement creates a variable in the current scope. It reserves memory
space for this variable. Hence, as part of a dim statement, you have to specify the
type of the variable; specifying the type also defines how much memory will be
allocated for this variable.
When creating strings, you can explicitly define their maximum size by including it
in parentheses immediately following the string keyword. The default maximum
size of strings is 255 bytes, but if you're sure a string will contain less than 255
bytes of data, it is better to constrain it to a lower size (and thus reduce the
memory footprint of your program).
The dim statement can also be used to create arrays . This is done by specifying
50
the number of elements in the array in parentheses immediately following the
name of the variable. Multi-dimensional arrays are created by specifying the
number of elements in each dimension, separated by commas.
Note that creating a variable using dim does not assign any value (i.e, 0) to this
variable.
There are alternative ways of specifying the number and size of each array
©2000-2008 Tibbo Technology Inc.
Page 98

dimension in an array. Please, examine the examples below.
dim x, y(5) as integer ' x is an integer; y is a one-dimensional array of
5 integers.
dim z(2, 3) as byte ' a two-dimensional array, 2x3 bytes.
dim z2(2) as byte(3) ' same -- a two-dimensional array, 2x3 bytes
dim z2 as byte(2,3) ' same again -- a two-dimensional array, 2x3 bytes
dim s as string(32) ' s is a string which can contain up to 32 bytes
dim s(10) as string(32) 'array of 10 strings with 32-byte capacity
dim s as string(32)(10) 'alternative way to make the same definition
Function:
Interrupts the current event handler and processes all
events in the queue at the moment of invocation.
Syntax:
doevents
Scope:
Global, HTML and local
See Also:
Declare Statement
'calculate sum of all array elements -- this will surely take time!
dim sum, f as word
sum = 0
for f = 0 to 49999
sum = sum + arr(f)
doevents 'don't want to stall other events so allow their execution
while we are crunching numbers
next f
Function:
Repeats a block of statements while a condition is True
or until a condition becomes True.
Examples
Doevents Statement
82Language Reference
Details
Executes events pending in the queue, then returns execution to current event
handler. See doevents above.
Examples
Do... Loop Statement
79
68
©2000-2008 Tibbo Technology Inc.
Page 99

83 TIDE and Tibbo BASIC User Manual
Syntax:
do [ while | until ] expression
statement1
statement2
…
[exit do]
...
statementN
loop
or:
do
statement1
statement2
…
[exit do]
...
statementN
loop [ while | until ] expression
Scope:
Local and HTML
See Also:
For... Next Statement , While-Wend Statement , Exit
Statement
Part
Description
expression
A logical expression which is evaluated either before or
after the first time the statements are executed.
statement[1,
2...]
Lines of code to be executed.
86 95
85
Details
The do-loop statement repeats a block of code. If the condition (while or until) is
included at the end of the loop (after the loop keyword), the block of code is
executed at least once; If the condition is included at the beginning of the loop
(after the do keyword), the condition must evaluate to true for the code to
execute even once.
Any number of exit do statements may be placed anywhere in the do... loop
85
as an alternate way to exit the loop. These can be used as an alternate way to exit
the loop, such as after evaluating a condition mid-loop using an if... then
statement. Exit do statements used within nested do-loop statements will
transfer control to the loop which is one nested level above the loop in which the
exit do occurs.
Examples
89
©2000-2008 Tibbo Technology Inc.
Page 100

dim i as integer
' example of the first syntax:
i = 0
do
i = i + 1
loop until i = 10
' example of the second syntax:
i = 0
do until i = 10
i = i + 1
loop
Enum Statement
Function:
Declares a type for an enumeration.
Syntax:
enum name
const1 [ = value1],
const2 [ = value2],
…
end enum
Scope:
Global and HTML
See Also:
Const Statement
Part
Description
name
Required. The name of the enum type. The name must be
a valid Tibbo Basic identifier, and is specified as the type
when declaring variables or parameters of the enum type.
const[1, 2...]
Required. The name for the constant in the enum.
value1
Optional. A value associated with the constant.
enum my_enum
my_const1, ' implicit value -- 0 is assumed
my_const2 = 5, ' explicit value of 5, counter is set to 5 too.
my_const3 ' Counter increments to 6,implicit value of 6.
end enum
84Language Reference
79
Details
Enum types can be useful for debugging purposes. When you add an enum type to
a watch, you will see the constant name within the enum, and not a meaningless
number.
By default, constants get incremental values, starting from 0 for the first item. You
can think of this as a counter, enumerating the items in the list. Explicit values
may be specified for any constant on the list. This also sets the counter to this
explicit value. The counter will continue to increment from this new value.
Examples
©2000-2008 Tibbo Technology Inc.
 Loading...