

Battery Operated Systems (BOS)
Stair Lift
Installation and Service Manual
For Do It Yourself (DIY)
Warning!
STRICT ADHERENCE TO THESE INSTALLATION INSTRUCTIONS is required and will promote the safety of those
installing this product, as well as those who will ultimately use it for the purpose intended.
Any deviation from these instructions will void the LIMITED WARRANTY that accompanies the product.
Additionally, any party installing the product who deviates from the INSTALLATION INSTRUCTIONS shall be
taken to agree to INDEMNIFY, SAVE AND HOLD HARMLESS the manufacturer from any and all loss, liability or
damage, including attorneys fees, that might arise out of or in connection with such deviation.
Part #470280
Rev. A
1

This stair lift Installation and Service Manual has been written
to provide clear and precise instructions for proper installation
procedures of the Citia BOS stair lift.
Please refer to the Owner's Manual for warranty information and
operating instructions. The Owner's Manual must be given to
the owner of the lift before it is put into service.
Any alterations to the equipment without written authorization
Table of Contents
I. PRELIMINARY CHECKS ...........................................3
A. Installation site requirements ............................................. 3
B. Tools required .................................................................. 3
C. Shipment ........................................................................ 3
II. TYPICAL COMPONENTS ...........................................4
III. INSTALLATION PROCEDURES ..................................4
A. Time the gear rack ........................................................... 5
B. Determine where the track will be installed ........................... 6
An Introduction to T Bolts .................................................. 7
C. Install the Lower End Cap .................................................. 8
D. Install mounting hardware ................................................ 9
E. Mount the track to the staircase ........................................10
F. Install the chassis assembly into the track ..........................11
G. Installing the fuse ............................................................13
H. Test run the chassis .........................................................13
I. Level the seat hub ...........................................................14
J. Install the seat ................................................................14
K. Adjust seat height ...........................................................15
L. Remote control label ........................................................15
M. Charging the batteries ......................................................15
N. Changing the orientation of the pendant holster ..................15
by ThyssenKrupp Access may void the warranty.
If you have questions concerning the installation or service of
the Citia BOS please contact the Service Department:
ThyssenKrupp Access
4001 East 138th Street
Grandview, MO 64030
800-409-3349
xxIM0805-470251
2
IV. COMPLETION PROCEDURES ..................................16
A. Completion Checklist ............................................................16
V. E.T.L. REQUIREMENTS ...........................................17
VI. SERVICE INFORMATION ........................................18
A. General specifi cations ......................................................18
B. Standard equipment ........................................................18
C. Control Board Operation Notes ..........................................19
D. Control Board Diagnostics ................................................19
E. Charging Circuit ..............................................................20
F. Up/Down Logic ...............................................................20
G. Beep Alerts.....................................................................20
H. What to do if the lift is stuck on a fi nal limit switch ...............20
I. Troubleshooting Flowchart if lift won’t run ...........................20
Important! It is imperative that this manual be read and understood
prior to attempting installation of the stair lift. Also, please observe
all cautions and warnings in this manual, as well as labels on the
equipment.

I. PRELIMINARY CHECKS
C. SHIPMENT
A. INSTALLATION SITE REQUIREMENTS
Dedicated* 115 VAC, 60 Hz, 3-wire
grounded outlet within 13’ of the top or
bottom of the staircase.
Stair angle between 25° and 45°.
Must be installed INDOORS
* NEC requirement
B. TOOLS REQUIRED
Set of Phillips head screwdrivers
Tape measure
3/8” reversible drill with 3/8” hex socket and
a 6” extension
3/16” Allen wrenches
Torque wrench rated to at least 18ft.lbs. of
torque
Safety items: steel toe shoes, safety
glasses, gloves, etc.
Torpedo level
Tools for removing hand rail if it interferes
with the travel of the stair lift
13mm socket
1/2" combination wrench
Verify all components are included with the
shipment:
Seat Box:
• Seat assembly
Chassis Box:
• Chassis assembly (mounted to loading tool)
• (1) Power supply
• (2) Remote controls
• (2) 9 volt batteries for remote controls
• Unit small parts
- (1) Set of Velcro
®
- (1) Fuse
Track Box:
• Track pieces (quantity will vary) with gear rack
and splice bars
• Track brackets (quantity will vary)
• (1) Charging wire
• (2) Track end caps
• Small parts kit:
- (1) Tube of lubricant
- (1) 4” long piece of gear rack for splice timing
- Fasteners for track brackets and track end
caps
- Track bracket covers (quantity will vary)
- Splice bars (to be placed in track, quantity will
vary)
4mm Allen wrench (included)
3mm Allen wrench (included)
1/8" Allen wrench
Something heavy to hold track in place
during install.
Mallet and fl athead screwdriver
3
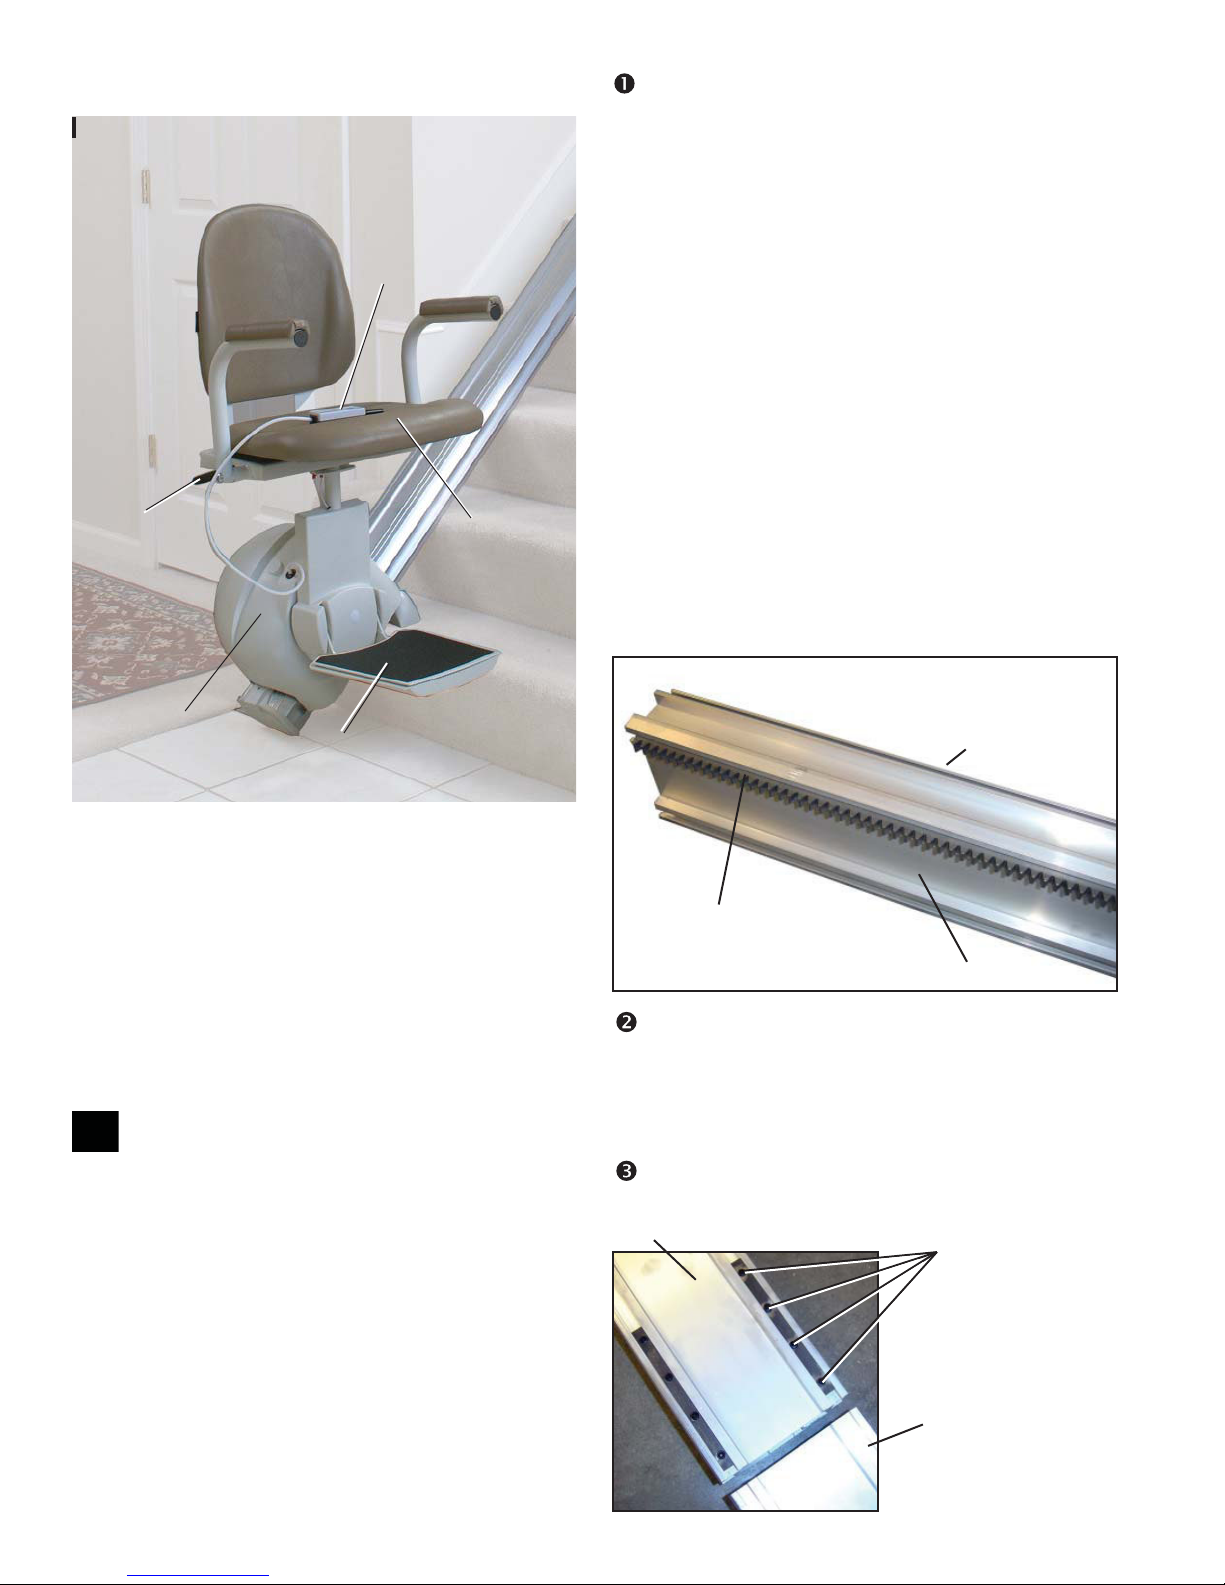
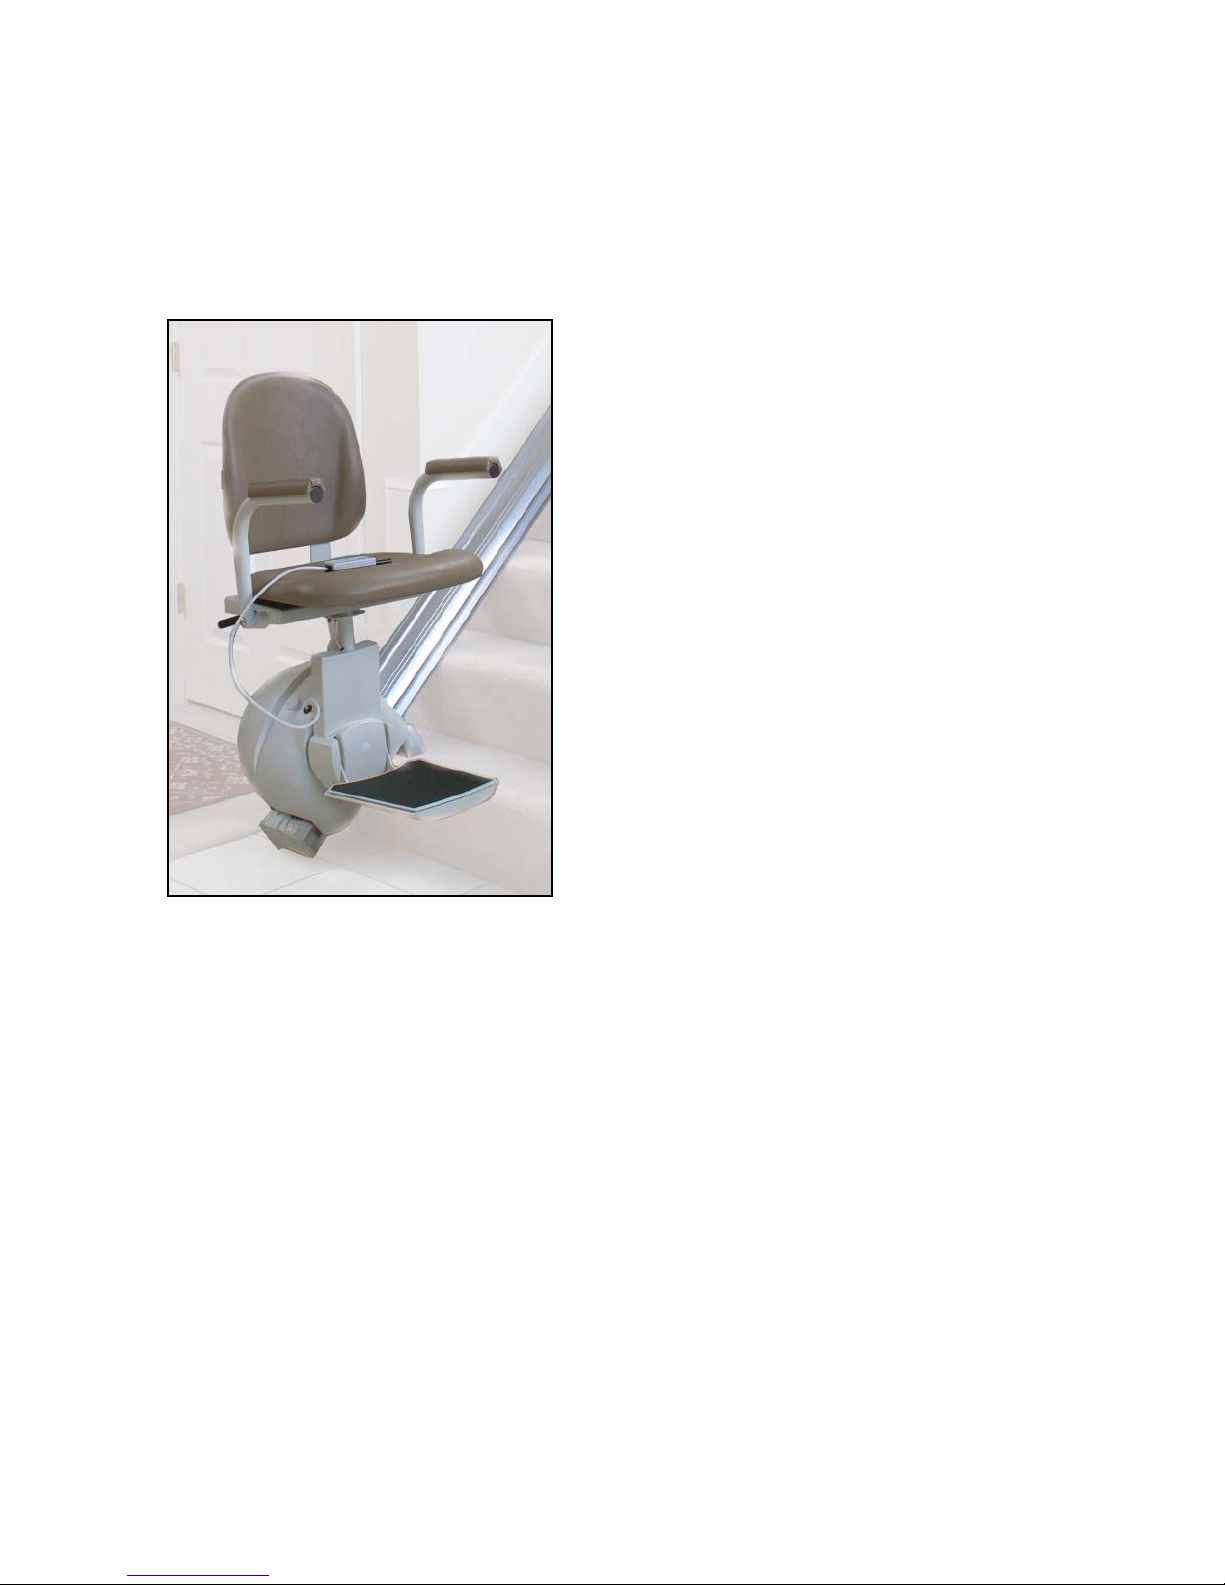
II. TYPICAL COMPONENTS
Swivel
Seat
Handle
Unit Control
Fixed or
Fold-Up Seat
(depends on
model)
Begin by laying out your track on the oor and
removing any plastic wrap that may be around
the track.
NOTE: While we begin laying out the track on the
oor, some people may nd it easier to lay out
the track on the staircase. If this is easier, you
may do it that way, however, make sure you have
something heavy to keep the track from sliding
down the stairs.
A stock unit may include as few as 1 or as many
as 4 custom cut sections of extruded aluminum
track. The track is cut at the factory. Make sure
the track is positioned so the bottom is facing up.
You may have extra gear rack in your track. Gear
rack should be installed on the SIDE of the track.
If you have any gear rack placed in the BOTTOM
of the track, use the supplied 3mm Allen wrench
and loosen, but do not rem
ove, the bolts from the
gear rack. Once loosened, slide the extra gear
rack out of the track.
Chassis
Folding
Footrest
Pictured above is a "Supreme" model. This line of stair
lifts features interchangeable seats. The seat on the
unit you are installing may not look exactly like this.
Regardless, the installation procedures are alike.
III. INSTALLATION PROCEDURES
Your stair lift will include three boxes:
Track Box
•
Chassis Box
•
Seat Box
•
IMPORTANT: The following instructions are for
building the track on the oor and then moving it
to the staircase. Keep in mind that with regard to
ceilings and doorways, a completed track, which
can easily exceed 10 feet long, can be very difcult to maneuver between rooms or doorways.
Some people may nd it easier to assemble the
unit directly on the staircase. This is perfectly
acceptable, however, please be advised of the
inherent danger of falling while working on a
staircase due to an uneven stance and smaller
working space.
Track with Gear Rack Installed
Top of track
Extra Gear Rack which
will need to be removed.
Bottom of track
Splice all the pieces of track together. With the
track laying so the bottom is facing up, line
up the sections of track you need to splice together.
Loosen the set screws in the splice bars with the
4mm Allen wrench.
Track
Set Screws
Track
4

Tip
If the splice bars do not slide in easily, use the
fl athead screwdriver and the mallet to gently tap
the splice bars into place.
Slide the two pieces of track together so that only a
hairline joint remains between them. Center the splice
bars on the joint as shown below and tighten the splice
bars onto the track.
Note the small, hair-line
joint between the two
pieces of track.
The splice bars are
centerd on the joint
between the two pieces
of track.
A. TIME THE GEAR RACK
Loosen the set screws in the top sections of gear
rack and slide them up until the gear rack in the
upper track section is 6' from the top.
Note: Multiple sections of gear rack need be slid into
the track. This may cause the gear rack to not
be fl ush with the bottom end of the track. This is
fi ne, as long as the gear rack stop no less than
5 ⅝ from the bottom of the track. Any longer
is fi ne.
The gear rack MUST be
6" from the top of the track.
Make sure this measurement is accurate.
6"
Track at top of
staircase
(side view)
Between each piece of gear rack, you will need to
"time" the teeth. To do this, use the short piece
of gear rack that comes in the small parts box.
Push the two pieces of gear rack close to each
other and then force the 4" piece of on top of
the gear splice, like this:
A short piece of gear rack
is provided in the small
parts kit to properly space
the gear rack splices.
Do not tighten gear rack until
the proper spacing has been
achieved.
The gear rack needs to
extend into this range for
correct installation.
5⅝"
Track at bottom of
(side view)
staircase
There may be a gap between two pieces of gear
rack when spacing the splice. This is acceptable
as long as the distance between the teeth is
consistent.
When the gear rack is timed, use the 4mm
Allen wrench to tighten the gear into place.
Note: There is not a top or bottom end of the gear
rack, however the gear rack will be needing to
face the wall, i.e., if it's a left hand installation,
the gear rack will need to face the left hand wall.
Make sure your track is oriented this way.
5
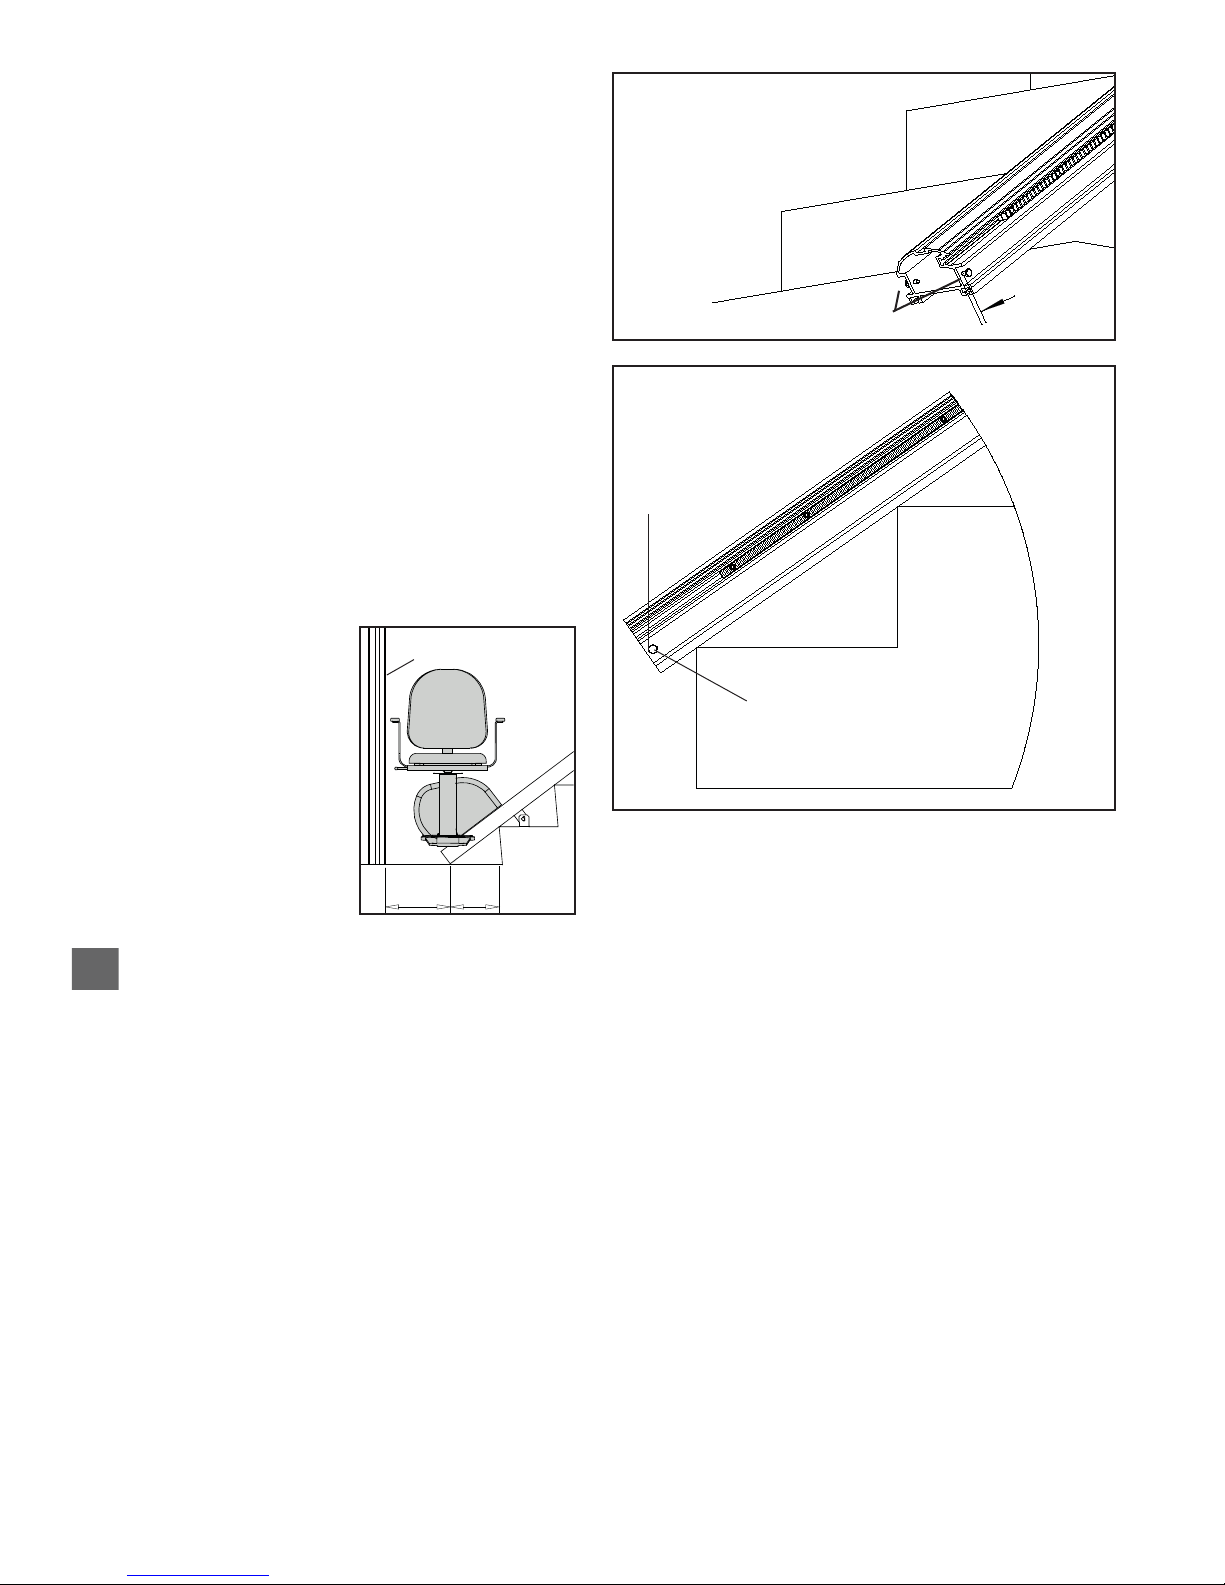
B. DETERMINE WHERE THE TRACK WILL BE
INSTALLED
Double check the orientation of your stair lift.
The chassis box of your stair lift will be marked as
either a Left Hand unit or a Right Hand Unit.
Optional Mounting (Angled View)
Stand at the bottom of the staircase on which you will
be installing the lift. A left hand unit will be traveling up
the left side of the staircase and a right hand unit will
be traveling up the right hand side of the staircase.
If the handedness of the unit is consistent with the lift
you ordered, continue the installation. If the handedness is wrong, please contact the authorized seller
fo the unit.
Verify there is adequate
clearance at the lower land-
Fig.1
Door jamb/other obstruction
ing for the track and seat.
Minimum clearance required
beyond the bottom step is
10" plus the depth of one
step (see Fig. 1).
3/8" [10mm]
1/4"-20NC Bolts
Optional Mounting Side View
Bolt is 3/8” from
end of track
1/4-20NC Bolt
Depth of
Step
10"
If you will be mounting the track so that it stops
at the bottom step instead of the lowest landing, you MUST drill a hole through the side of
the track and insert at least a 1/4"-20NC bolt
(supplied) on each side of end of the track to
act as a mechanical stop in case of complete
mechanical or electrical failure.
6
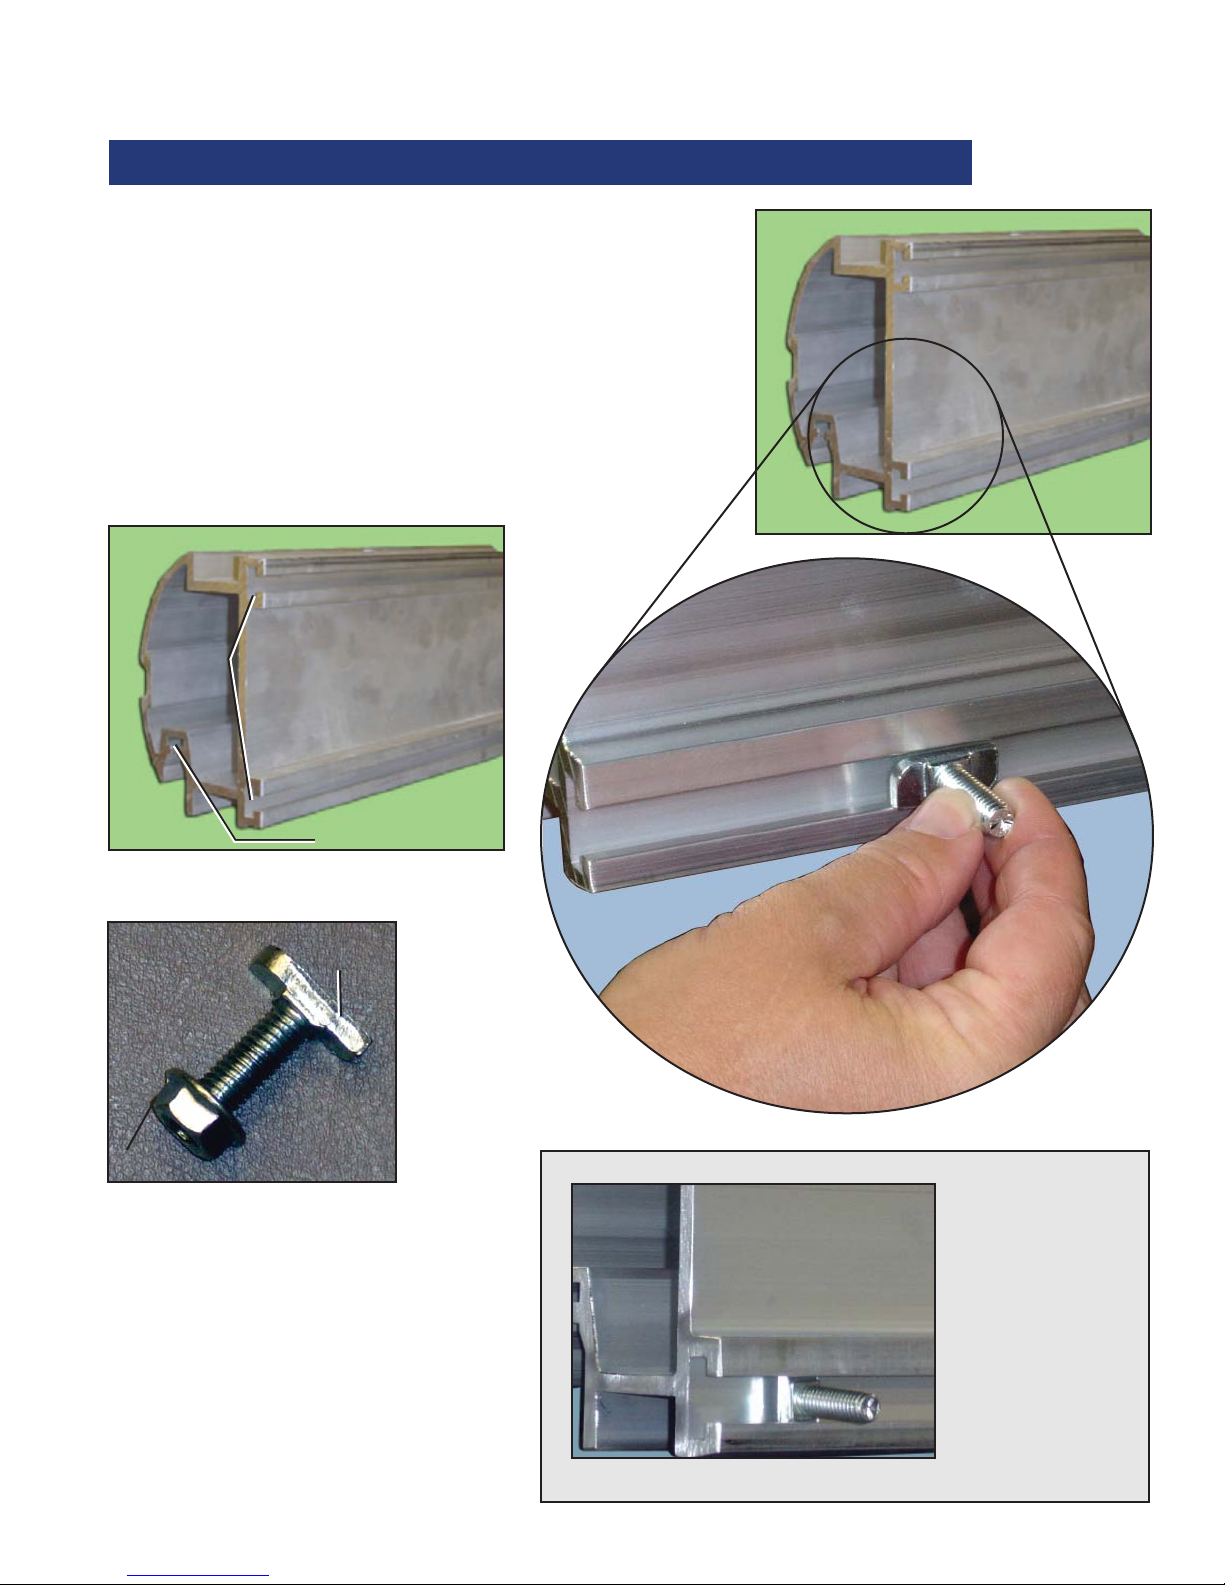
An Introduction to T-Bolts
T-bolts will
fit here
This is the
bottom of the
track
T-Bolt Nut
T-Bolt
The T head of
the bolt must be
placed parallel to
the channel in the
track. Push it into
the channel and
twist to lock in
place.
Throughout the installation of the track,
you'll be using T-bolts to attach track
brackets and a grounding bolt.
A T-bolt can be a tricky thing if you can't
see what you're doing, so we've included
this handy reference guide to walk
you through what should be going on
underneath the track.
This is the stair lift Track on its side:
This is the
T-bolts will
fit here
Gear Rack goes
in this channel
bottom of the
track
The T head of
the bolt simply
drops into the
channel on the
track. Once the
bolt is turned, the
T head catches
in the channnel
and a bolt can be
tightend down.
See pictures
below.
The T head of
the bolt must be
placed parallel to
the channel in the
track. Push it into
the channel and
twist to lock in
place.
Your T-Bolts look like this:
T-Bolt
T-Bolt Nut
The handy thing about a T bolt is that
even when the track is on the staircase,
you can reach to the underside of the
track, snap the bolt in place and screw
it in.
Now that the T
Bolt is locked in
the channel you
can apply the nut.
7

C. INSTALL LOWER END CAP
Feed the charging wire through the top of the track
to the bottom of the track.
Note: There is no up or down to the wiring har-
ness. Before putting the charging wire in the track,
decide where you will be plugging the stairlift unit
into the wall. Run the wire so that the end of the
charging wire with the extra plug and ring terminal
will be on the fl oor with the plug (see diagram on
page 9).
For instance, if you will be plugging the unit into an
outlet on the bottom fl oor, make sure the end of the
charging wire with the extra plug and ring terminal
are exiting the track on the bottom landing.
Tip
One of the
easiest ways
to feed the
charging wire
through the
track is to tape
the end of
the wire to a
tape measure
and feed the
tape measure
through the
track.
Plug the spade connector into the metal plug on
the inside of the end cap as shown below.
Slide the endcap on to the bottom of the track
Endcap
Fit this ridge into the track
Plug the Spade Connector
of the Charging wire here
Track (End View)
The dovetail portion of
the endcap fi ts into this
channel
Any extra wires will tuck
into this channel.
If your stairlift will be plugged into the wall at the
bottom of the staircase, you will have two extra
wires protruding from the lower endcap, one with
a ring terminal and one with a Molex® plug (see
diagram at right). Those other wires will need to
be routed to exit between the track and the end
cap and then tuck into the channel on the bottom
of the track (see illustration above). Take care to
make sure that the wires are not pinched.
NOTE: If the power supply will be on the top land-
ing you may skip this step and the next one, but
you will need to follow them when you install the
upper end cap, because you will have the extra
wiring at that end of the track.
8

A/C cord
Molex plug coming from transformer
Molex plug coming from track
Transformer
The harness is included with enough wire to cover
all installations. Most likely, you'll have more wire
than you need. DO NOT CUT THE WIRE. Simply
place excess wire inside the track.
If your track will not be resting on the lower
landing, but will be ending on the lowest step,
insert a second T bolt and bolt the endcap on
from the bottom (see below)
With the wires now routed out of the track you will
need to attach the grounding ring. Insert a T bolt
in the track, near the end cap. Slide the Grounding
Ring Terminal (see illustration at right) over the T
nut you just put in. Screw a nut over the T bolt to
tighten down the grounding ring.
Charging Wire
Spade Connector,
attaches to end
cap
Underside of track
End-
cap
Grounding
Wire
T nuts and
bolts
Track
Provide power to the unit by plugging the
molex plug from the track into the matching
plug from the transformer, then plug the A/C
cord into the other end of the transformer.
Finally, plug in the A/C cord to the wall.
Transformer
A/C cord
Spade
Connector,
attaches to
end cap
Power Supply
Ground Terminal
attaches to T bolt
Molex Plug
attaches to
Molex plug coming from track
Molex plug coming from transformer
D. ASSEMBLE MOUNTING HARDWARE
The track brackets come in 5 pieces: 1 riser,
2 feet and 2 covers for the feet. Assemble as
illustrated. When installing the T bolts into the
track bracket, make sure to thread the bolts
on, but do not tighten yet.
T bolts
Nut for cage bolt
Track Foot
5
/16-18 x ¾"
Cage bolts
(these will fi t into
the track)
Riser
9

E. MOUNT TRACK TO THE STAIRCASE
Track
T bolts holding track
bracket to track
Tip
Tread below the top landing
Tread above a track splice
Tread below a track splice
Center of each section of track
It's a good idea to put down a drop cloth during
your install so when y
the staircase you don't mark up carpet or scratch
hardwood stairs.
ou slide the track around on
Lay track along staircase. Make sure that:
The gear rack is facing the wall
•
The lower end cap is installed
•
The charging wire is oriented correctly
•
Tip
Note: These instructions are for mounting to a
standard wood staircase. For installation on
hard surface stairs, anchors may be needed
and different screws may be required. Consult
fl oor manufacturer for details
Place the
brackets on
the steps
where you
will be
installing
them.
Slide
each
bracket
under
the
track.
Once the track is laid on the stairs it will want
to slide down the staircase, so you will need
to put something to stop it, a toolbox or some
other heavy weight will work well.
Position the track in the middle of the staircase
with the underside of the track resting across the
stair nosings, and the lower track end cap resting
on the lower landing. With the track placed in the
middle of the staircase you'll have adequate room
to reach under and adjust the track brackets
The track brackets attach to the track with
the supplied T bolts. You will need to place 3
brackets per 8' section of track.
If you have spliced 2 pieces of track together,
you will need to place a track bracket on the
step directly above and the step directly below
the splice. A typical placement will have one
bracket at each of the following postions:
1st tread at the bottom of the
stair
10
Use the T nuts to attach the track to the
brackets.
Track
T bolts holding track
bracket to track
Underside view of the track bracket mounted to
the track. This side will be facing the steps.
For more specifi c help with T nuts refer to
pg. 7
Use a wrench to tighten everything up and
slide the track over 3½" from the wall.
Verify that both the bottom of the track and the
top are 3½" from the wall. If they are not, the
stairlift will not travel straight.
Note: This distance is needed for clearance of the seat
back in the riding and swivelled position.

Attach the track mounting brackets to the staircase.
Stair lift Chassis
Wooden Mounting Plank
Mounting Plates
Load Tool
The brackets attach to the stair treads with wood
screws.
The bottom of the track should be touching the
nose of stairs once the brackets are bolted down.
F. INSTALL THE CHASSIS ASSEMBLY INTO THE
TRACK
NOTE: If you will need to change remote frequencies
on the call/send remote controls do this PRIOR
to mounting the chassis on the track. With the
chassis close to the wall, it may become diffi cult
to remove the shroud and access the control
board. Refer to Step C of the Service Information
for instructions on changing the frequency of the
remote control.
Cut open the stair lift box, pull out the unit
which will be attached to a plank of wood.
Use the plank to support the unit, and
carefully transport the unit to the top of the
staircase.
Track Bracket installed.
Do not carry the unit by the plastic shroud!
Doing so could cause the unit to come away
from the shroud and cause serious injury!
Wooden Mounting Plank
Stair lift Chassis
Mounting Plates
Load Tool
Unbolt the mounting plates to free the stair
lift unit and load tool. There will be two bars
protruding from one end.
Track Bracket cover installed.
11

On The Track
Retaining Bolt
Tip
Ready To Load
Before loading the unit on the track, take the
power wires and lead them through the piece of
starter track the stair lift is mounted on, that way,
they won't fall down into the track.
Line up the splice bars of the starter track with the
top end of the track bolted to the staircase. Lift the
unit and insert the splice bars into the track.
Ready To Load
Grip the seat post and gently pull the chassis up
the track, not to move it, but just to take enough
pressure off the retaining bolt. Remove the bolt
from the starter track and gently slide the unit
down the track until the chassis is fully on the
mounted track and the gears have engaged.
Retaining Bolt
On The Track
Remove the starter track.
Install the top endcap by attaching the terminal of
the charging wire to the terminal on the inside of
the top end cap. Insert (1) T-bolt in each T-slot at
top of track, then fasten the end cap to the upper
end of the track with nuts provided.
12

Seat swivel switch
Seat Post
G. INSTALLING THE FUSE
Remove the front cover of the stairlift by removing
the screws located under the seat post
Install the fuse into the two spade connectors.
H. TEST RUN THE CHASSIS
Operate pendant control to verify that the stair lift
will go up and down properly, while holding the
seat swivel switch in. The seat swivel switch is
located on the back of the seat post (see illustration below) and the unit will not run if the switch
is not pressed in. Normally, the seat on the unit
will acctuate the switch, but because there is no
seat, you will need to do this manually.
Seat Post
Seat swivel switch
Fuse
Close up of fuse
Fuse
Chassis
NOTE: The green wire
is for diagnostic
purposes only,
and does not
need to attatch
to anything.
13

I. LEVEL THE SEAT HUB
Bolts
seat
Seat handle
Locking Mechanism
Seat Post
Seat Post
Seat Post Collar
Locking Mechanism
J. INSTALL THE SEAT
Loosen the three (3) bolts on the chassis behind
the footrest.
Place a torpedo level on either the seat hub or the
footrest.
Rotate mounting bracket on the bolts until the seat
mounting shaft is vertical and plumb.
Bolts
Footrest
Place the seat assembly onto the seat shaft.
Rotate the swivel seat handle and slide the seat
fully onto the shaft. Release the handle and make
sure the seat locks into position.
Rotate the swivel seat handle and check that the
seat locks in the loading, riding, and unloading
positions.
Locking Mechanism
seat
Seat handle
Note: If you run out of slot, remove the bolts and replace them
in different holes until the seat will plumb to vertical.
Tighten the bolts.
It is very important to torque the nuts to a mini-
mum of 18 ft. lbs. (24.4 Km) to lock the seat
hub into place.
Seat Post
Seat Post Collar
Locking Mechanism
Seat Post
14

K. ADJUST SEAT HEIGHT IF DESIRED
Pendant
Holster
Pendant Holster
with pendant
Loosen the Allen screws on the two seat
clamps.
O. CHANGING THE ORIENTATION OF THE PENDANT
HOLSTER
The stair lift comes with a Pendant Holster attached
under the armrest.
Slide the seat up or down as desired and
tighten the screws.
Install the front seat mounting cover into
position.
L. REMOTE CONTROL LABEL
Apply the appropriate directional label to the face
of the remote control, depending upon whether it
is a right hand or left hand installations. Confi rm
direction of remote buttons fi rst.
Note: Refer to Step C of the Service Information for
instructions on changing the frequency of the
remote control.
M. CHARGING THE BATTERIES
Connect the power supply to the charging
harness.
NOTE: The batteries come from the factory with a
small amount of charge already in them.
The pendant holster
comes from the factory
already attached, however,
you may need to change
which side the holster is
attached to for the comfort
Pendant Holster
of the user.
with pendant
The holster attaches in one
of two ways depending
on which model of stairlift
you're installing.
Option 1: There are two
screws under the armrest
which attach the armrest
to the chair arm. Undo
Pendant
Holster
these screws, remove
the holster, reattach the
armrest and install on the
other side.
Option 2: If there are no visible screws on the
bottom of the armrest, the armrest is most likely
snapped into place by the use some plastic, cone
shaped clips.
To change, gently pry up on the armrest carefully
as not to break the clips. Once detatched, slide the
pendant holster off and re-attach the armrest. Do
the same on the other arm to attach the pendant
holster (see illustration at right).
Plug the power supply into an electrical outlet.
Charge batteries for at least 12 hours.
N. VELCRO PENDANT CONTROL
Apply one side of Velcro to back of pendant control
and the other to the unit, so pendant will adhere
to the unit. Placement of pendant control is up to
the customer, The manufacturer recommends the
arm of the unit. Velcro will hold pendant to unit
when unit is not in use.
15

Right-Hand arm of stair lift
Armrest
Pendant Holster
IV. COMPLETION PROCEDURES
A. COMPLETION CHECKLIST
The following features must be verifi ed as operational
before the stair lift can be released for use:
Upper and lower limits: Verify the lift stops
automatically at the top and bottom of the
track.
Final limits: Verify the lift is inoperable in
both directions when each fi nal limit switch
is pressed.
Running Clearance: Verify the lift clears all
obstructions.
Track Mounting Brackets: Verify all track
mounting brackets are securely attached to
the stair treads, the track and at the pivot
points.
Pendant Holster
Right-Hand arm of stair lift
Armrest
Track Splice: Verify track joints are smooth
and free of burrs and gaps.
Gear Rack: Verify the gear rack is
suffi ciently lubricated.
Track End Covers: Verify the track end
covers are securely fastened to the track.
Track: Verify the inside of the track is free
of foreign objects.
Chassis Rollers: Verify the chassis roller
axles have been lubricated.
Footrest:
Verify the footrest clears all stair
nosings.
Verify the lift stops when the footrest
runs into an obstruction.
Verify the footrest folds up and stays
in the up position.
16
Verify the unit does not beep when it
stops at the upper and lower limits.
The unit will beep if stopped and not
on the charging strip

Seat:
V. E.T.L. REQUIREMENTS
Verify the seat is level.
Verify the seat swivels 70° towards
each landing and locks into position.
Verify the lift will not operate when
the seat is not locked in the riding
position.
For optional folding seat: Verify the
seat will fold up and stay in the up
position.
Verify the seat belt works properly.
Clean Up: Verify the lift is free of all grease,
dirt, etc.
This E.T.L. listed stairway lift must meet the latest
ASME A18.1a specifi cations for the E.T.L. listing to
be valid.
The following rules must be complied to at the installation site.
Rule 7.1.1
A free passage width of no less than 20 in. shall be
provided. If the seat and platform can be folded when
not in use, the distance shall be measured from the
folded position.
Rule 7.1.2
The structure on which the equipment is installed shall
be capable of safely supporting the loads imposed.
Rule 7.1.3
The installation of all electrical equipment and wiring
shall conform to the requirements ANSI/NFPA 70.
Rule 7.6.4
At no point in its travel shall the edge of the footrest
facing the upper landing be more than 24 in. above
the step or landing as measured vertically.
Rule 7.7.2
No lift shall be installed to operate on a greater incline
than 45 deg. as measured on the mean.
17

VI. SERVICE INFORMATION
A. GENERAL SPECIFICATIONS
Rated Load: 375 lbs. (170 kg)
Speed: 18-25 fpm (dependant on angle of install
and load)
Travel: 32’ max. (track length)
Power Supply: Dedicated* 115VAC, 60 Hz, 3-wire
grounded outlet
Incline Limits: 25° to 45°
ETL Listed when properly installed
B. STANDARD EQUIPMENT
Drive System: Rack and pinion
Motor: .5 hp, 24 VDC
Motor Controller: SoftStart/SoftStop
Brake: Self locking worm gear
Seat:
• Standard - 18” wide fi xed seat with two fi xed
arms OR
• Select - 18” wide fi xed, upholstered seat with
OR
• Excel - 19” wide folding seat with two fixed
arms
• Seat belt
• 70° locking swivel at upper and lower landings
Controls: Low voltage up-down hand-held control on
unit and two wireless remote controls
Safety Devices:
Footrest obstruction sensor
Swivel seat cut-off switch
Final limits
Warranty: Five years on drive train (motor and gear)
Two years on all component parts
Notes:
• The BOS model stair lifts are battery powered. Two
12V batteries are wired in series to provide 24V to
the control system. The batteries are charged by
a 33VDC power supply plugged into the 115 VAC
outlet. The batteries are charged only when the
lift is parked at the upper or lower landing.
• The call/send controls (transmitters) use infrared
signals. There are two infrared sensors located on
the chassis access cover. There is a combination
of 4 different frequencies the transmitters can be
set to (both transmitters must be set to the same
frequency).
• There is a half second delay after a control button
is pressed before the lift starts to move. After the
lift stops, the up/down controls are disabled for 3
seconds.
* ASME A18.1a / NEC Requirement
upper and lower fi nal limit
18
charge spring
upper and lower
stops

Caution!
The control board is sensitive to static charge. To avoid damage,
touch a metal surface on the lift to discharge yourself of static
charge. Never touch the chips on the control board.
Always disconnect the 115 VAC power and disconnect
the fuse when working on the lift.
D. CONTROL BOARD DIAGNOSTICSC. CONTROL BOARD OPERATION NOTES
The control board contains LED's that indicate various functions
or faults. A slow fl ash is 1 second on and 1 second off, a quick
fl ash is .25 seconds on and .25 seconds off.
Steady Green on PWR LED - Run Mode
Battery voltage is above 21 VDC and the lift is running. A green
test lead by the fuse allows the battery voltage to be measured
without removal of the shroud
First Power Up
To turn the controller board on after connecting the fuse, press
the unit controls Up or Down pendant switch. The seat must be
in the locked position and no obstructions can be in the way of
the footrest.
Once the controller board has been turned on, it will stay on as
long as the battery charger remains connected.
Remote Control (Transmitter) Frequencies
The standard wireless remote controls (transmitters) use infrared
signals. One button on the transmitter is UP and other button
is DOWN. There are two infrared sensors (receivers) located on
the chassis access cover.
A combination of 4 different transmitter frequencies allow for
more than one lift in a single home. The two transmitters must
be set to the same frequency (for each lift). For example 1 to
1, 2 to 2, etc.
To change a frequency:
Ensure the infrared receivers (in chassis cover) are connected
to the control board. Use the seat control to move the lift away
from the end of the track. Take the back off of the transmitters
and set the red jumpers (in each transmitter) to the same code.
Change the corresponding code in the control board J1 (see
chart). Press and hold the yellow "learn" button on the control
board, then press and hold one of the up/down buttons on one
of the transmitters. The controller board should beep and the
lift start to move after you release the transmitter button when
the frequency has been successfully changed.
Slow Flash Green on GRN LED - Stop Mode
Battery voltage is above 21 VDC and the lift is stopped.
Steady Yellow - Caution Low Battery
Battery voltage is between 11 VDC and 21 VDC.
Slow Flash Yellow - Under voltage
Battery voltage is below 11 VDC.
Quick Flash Yellow - Charging
Battery is charging. Charging begins approximately 2 minutes
after lift reaches upper or lower limit.
Slow Flash Red - Emergency Stop
Either the fi nal limit switch has been tripped, the swivel seat
switch is not in the operating position, or there is an obstruction
in the footrest path. If the fi nal limit switch has been reached the
stair lift must be manually moved using an 8mm socket.
Steady Red - Current Limit
Motor is loaded more than 120% of its rating. The motor will
continue to run in current limit for a preset time, however, the
speed will be reduced. The unit will sound 2 rapid beeps.
Note: Higher currents will allow for less run time.
Quick Flash Red - I2T
The motor has been overloaded for too long and the lift has timed
out. If the motor reaches 160% of full load for 6.0 seconds the
unit will time-out. To recover from this mode, the lift must be
put into stop mode. The unit will sound 2 rapid beeps.
Note that if the lift is on an upper or lower limit switch, the frequency may not be able to be changed.
To access the controller board the footrest support and shroud
must be removed. The footrest plug can be temporarily jumpered
out while changing frequencies.
Quick Flash Red/Yellow - Short Circuit
Short circuit is an unrecoverable fault and may only be reset by
disconnecting and reapplying the battery. Short circuit may be
caused by an excessive overload on the motor or failure of the
MOSFET power devices.
19

E. CHARGING CIRCUIT
F. UP/DOWN LOGIC
The charging circuit produces a DC voltage of 33 volts
plus or minus one volt. This must be read between
the charge strip on the charge (+DC) cam to the gear
rack on the track (-DC).
If you are not receiving 32 to 34 volts DC check the
following:
1. Verify that the power supply/charger is plugged
into the wall outlet. Check for 115 VAC at
outlet.
2. Verify that the charger is producing the 33
volts. This is done by checking voltage from B+
(pointed end of plug) to B- (fl at side of plug).
3. If this is all correct, verify the ring terminal B- is
mounted to a T-bolt on the track and tighten
down the nut to secure the ring terminal. This
will ensure that the proper ground is made
through the T-bolt or screw. Reconnect power
supply.
4. If you still do not get the 33 volts DC, verify
that your charging station is hooked up to one
of the white wires leading from the B+ wire.
Check voltage.
5. If you still do not get the 33 volts DC verify
that the gear rack screw on top and bottom
of each piece of gear rack is tight. This will
ensure proper grounding of the gear rack.
When the unit has been parked at the charge station
for three minutes, it should be receiving charge. If the
unit starts to beep while on the charge station, the unit
is still not receiving charge. Check the following:
When the lift is commanded to run, the controller board
will immediately sound a single beep and the lift will
pause momentarily before moving.
If the lift is commanded to stop by releasing a control
switch/button, the lift will decelerate to a stop in 1.5
seconds. However, if the switch/button is pressed
again, before the lift has reached a complete stop,
the lift will immediately start to accelerate.
The lift has a fi xed acceleration rate of 3.0 seconds.
The priority of the input signal to the lift for a direction
command is dependant on which input was received
fi rst.
G. BEEP ALERTS
The controller board will sound a single 0.35 second
departure beep upon receiving a signal to run.
The controller board will sound a 2.5 second beep
upon receiving a signal to run if the battery voltage is
low (11.0 VDC to 21.0 VDC) and will not run.
The control will sound two rapid beeps if current
overload occurs
The controller board will beep on and off for 20 seconds once every fi ve minutes when the charger is not
connected.
H. WHAT TO DO IF THE LIFT IS STUCK ON A FINAL
LIMIT SWITCH
(MANUALLY LOWERING THE LIFT)
1. Check that the charge springs are contacting
the tabs on the track.
2. Verify that all wires in the unit are connected
properly and that polarity is correct.
Remove the shroud to check DC voltage at charge
spring between 'charge +' and 'charge -' on board.
The unit should now be receiving the 33 volts DC
needed for proper charging of the batteries.
20
Remove the seat mount shroud.
Remove the fuse.
Note: Never perform manual lowering with the
stair lift circuit connected.
Insert an 8mm socket over the hex shaft located
at the end of the motor. Rotate the shaft to move
the stair lift off of the fi nal limit switch.
Install the fuse and cover

I. TROUBLESHOOTING FLOWCHART WHEN LIFT WON’T RUN
21

22
 Loading...