

Page 1
Page 2

User Manual
ThurayaDSL
Satellite IP Modem
Revision C
Page 3

Copyright 2005 Hughes Network Systems, LLC.
All rights reserved. This publication and its contents are proprietary to Hughes Network
Systems, LLC. No part of this publication may be reproduced in any form or by any means
without the written permission of Hughes Network Systems, LLC., 11717 Exploration Lane,
Germantown, Maryland 20876.
Hughes Network Systems, LLC., has made every effort to ensure the correctness and
completeness of the material in this document. Hughes Network Systems, LLC., shall not be
liable for errors contained herein. The information in this document is subject to change
without notice. Hughes Network Systems, LLC. makes no warranty of any kind with regard to
this material, including, but not limited to, the implied warranties of merchantability and fitness
for a particular purpose.
Trademarks
All trademarks, marks, names, or product names referenced in this publication are the property
of their respective owners, and Hughes Network Systems, LLC. neither endorses nor
otherwise sponsors any such products or services referred to herein.
HUGHES and Hughes Network Systems are trademarks of Hughes Network Systems, LLC.
THURAYA trademark is the sole and exclusive property of Thuraya Satellite
Telecommunications Company.
Page 4

Page 5
Safety Information
For your safety and protection, read this entire user manual before you attempt to
use ThurayaDSL Satellite IP Modem. In particular, read this safety section carefully.
Keep this safety information where you can refer to if necessary.
Warning Symbols Used in this Manual
This section introduces the various types of warnings used in this document to alert
you to possible safety hazards.
WARNING
Potential radio frequency (RF) hazard. Where you see this alert
symbol and WARNING heading, strictly follow the warning
instructions to avoid injury to eyes or other personal injury.
WARNING
Where you see this alert symbol and WARNING heading, strictly
follow the warning instructions to avoid personal injury.
DANGER
Electric shock hazard: Where you see this alert symbol and
DANGER heading, strictly follow the warning instructions to avoid
electric shock injury or death.
Warnings for ThurayaDSL
Do not stand in front of the Antenna.
This device emits radio frequency energy when in the transmit mode. To
avoid injury, do not place head or other body parts in front of the
satellite antenna when system is operational. Maintain a distance of one
meter away from the front of ThurayaDSL’s antenna.
Properly ground the Antenna
Failure to properly ground the optional external antenna may result in
severe personal injury or death. Do not attempt to ground the optional
external antenna unless you have the skills to do so in accordance with
local electrical codes.
ThurayaDSL Satellite IP Modem User Manual i
Page 6

Do not operate during Electrical Storms
Operation of ThurayaDSL during electrical storms may result in severe
personal injury or death. Disconnect ThurayaDSL from computer and
store unit indoors if lightning is anticipated in the area of operation.
General
Handle your ThurayaDSL with care. The enclosure is weather resistant
per IEC 60529 IP 54; however, do not submerge the unit or expose it to
severe rainstorms. Avoid exposing your ThurayaDSL to extreme hot or
cold temperatures. The operating temperature range of ThurayaDSL is 10ºC to +55ºC.
Avoid placing your ThurayaDSL close to cigarettes, open flames or any
source of heat.
Changes or modifications to ThurayaDSL not expressly approved by
Hughes Network Systems could void your authority to operate this
equipment.
Use a soft damp cloth only to clean your ThurayaDSL.
To avoid impaired ThurayaDSL performance, please ensure your
ThurayaDSL’s antenna is not damaged or covered with foreign material
like paint or labelling.
When inserting the SIM, do not bend the SIM or damage the contacts in
any way. When connecting the interface cables, do not use excessive
force.
In the vicinity of blasting work and in explosive environments
Never use ThurayaDSL where blasting work is in progress. Observe all
restrictions and follow any regulations or rules. Areas with a potentially
explosive environment are often, but not always, clearly marked. Do not
use ThurayaDSL while at a petrol filling station. Do not use near fuel or
chemicals.
ii ThurayaDSL Satellite IP Modem User Manual
Page 7
Qualified service
Do not attempt to disassemble your ThurayaDSL. ThurayaDSL does not
contain consumer-serviceable components. Only qualified service
personnel may install or repair equipment.
Batteries and accessories
Use approved batteries (HNS P/N 3003082-0002) and accessories only.
Use of non-approved accessories may result in loss of performance,
damage to ThurayaDSL, fire, electric shock or injury.
AC Mains power adapter (HNS P/N 3003612-0001) is for indoor use o n ly.
It has an indoor operating temperature range of -10ºC to +55ºC and
provides an output voltage of 12 VDC.
The storage capability of the battery decreases when operated below 10ºC. If the battery is charged at too high a temperature, the battery lig ht
will flash red.
Connecting devices
Never connect incompatible products. When connecting ThurayaDSL to
any other device, read the device’s User Manual for detailed safety
instructions.
Pacemakers
The various brands and models of cardiac pacemakers available exhibit a
wide range of immunity levels to radio signals. Therefore, people who
wear a cardiac pacemaker and who want to use a Satellite IP Modem
should seek the advice of their cardiologist. If, as a pacemaker user, you
are still concerned about interaction with ThurayaDSL, we suggest you
follow these guidelines:
• Maintain a distance of 15 cm between ThurayaDSL and your
pacemaker;
• Maintain a distance of one meter away from the front of
ThurayaDSL’s antenna;
• Refer to your pacemaker product literature for information on
your particular device.
If you have any reason to suspect that interference is taking place, turn off
your ThurayaDSL immediately!
ThurayaDSL Satellite IP Modem User Manual iii
Page 8

Hearing aids
Most new models of hearing aids are immune to radio frequency
interference from Satellite IP Modems that are more than 2 metres
away. Many types of older hearing aids may be susceptible to
interference, making it very difficult to use them near a Satellite IP
Modem. Should interference be experienced, maintain additional
separation between you and ThurayaDSL.
iv ThurayaDSL Satellite IP Modem User Manual
Page 9

Contents
SAFETY INFORMATION...............................................................................I
WARNING SYMBOLS USED IN THIS MANUAL........................................................................I
WARNINGS FOR THURAYADSL.............................................................................................I
CONTENTS.....................................................................................................V
INTRODUCTION........................................................................................... 1
COVERAGE...............................................................................................................................1
FIRST TIME SET-UP ...................................................................................... 2
UNPACKING ............................................................................................................................2
MINIMUM SYSTEM REQUIREMENTS AND SOFTWARE INSTALLATION..................................3
First Time Set-up Overview............................................................................................................4
Step 1: Unpack ThurayaDSL........................................................................................................4
Step 2: Unpack ThurayaDSL – Power.......................................................................................5
Step 3: Obtain Initial GPS Fix for ThurayaDSL........................................................................6
Step 4: Connect ThurayaDSL Using Ethernet..........................................................................7
Step 5: Rough Pointing to Satellite..............................................................................................8
Step 6: Fine Pointing to the Satellite........................................................................................ 11
Step 7: Exit Pointing Mode.........................................................................................................13
QUICK REFERENCE.................................................................................... 14
GLOBAL POSITIONING SYSTEM OPERATION......................................................................14
Stored GPS Location..................................................................................................................... 14
ANTENNA POINTING............................................................................................................15
CONTROLS AND INDICATORS.............................................................................................16
Power Light......................................................................................................................................16
Exit Pointing Button...................................................................................................................... 17
Pointing Mode Lights.................................................................................................................... 17
Battery Light...................................................................................................................................17
ThurayaDSL Antenna Protractor............................................................................................... 18
Compass..........................................................................................................................................18
MMI SCREENS........................................................................................................................19
Pointing Screen............................................................................................................................... 19
Home Screen.................................................................................................................................. 20
Properties Screen........................................................................................................................... 22
Restore Factory Defaults............................................................................................................. 22
Statistics Screen............................................................................................................................. 22
Status Screen.................................................................................................................................. 24
ThurayaDSL Satellite IP Modem User Manual v
Page 10

Settings Screens............................................................................................................................. 25
Network Settings Screen............................................................................................................. 25
Security Management Screen....................................................................................................26
Login Settings Screen................................................................................................................... 28
Advanced Settings Screen...........................................................................................................28
UPGRADE THURAYADSL.....................................................................................................30
Upgrading Software...................................................................................................................... 30
TROUBLESHOOTING ................................................................................ 30
GENERAL TROUBLESHOOTING............................................................................................31
FAULT CODES........................................................................................................................36
GLOSSARY.................................................................................................... 45
INDEX............................................................................................................ 47
vi ThurayaDSL Satellite IP Modem User Manual
Page 11
Introduction
Your ThurayaDSL is a Satellite IP Modem that provides portable, high-speed data
communications via satellite. Using “Always On” technology, you can remain
connected to the Internet while only sending or receiving the data that you need at
speeds of up to 144kbits/s, just as if you were sitting at your office desk. ThurayaDSL
works with your computer using an Ethernet connection. While ThurayaDSL
operates very similar to other data modems that you may be familiar with, there are a
few important operating differences to note. Please read this user manual carefully to
understand all the aspects of operating your ThurayaDSL.
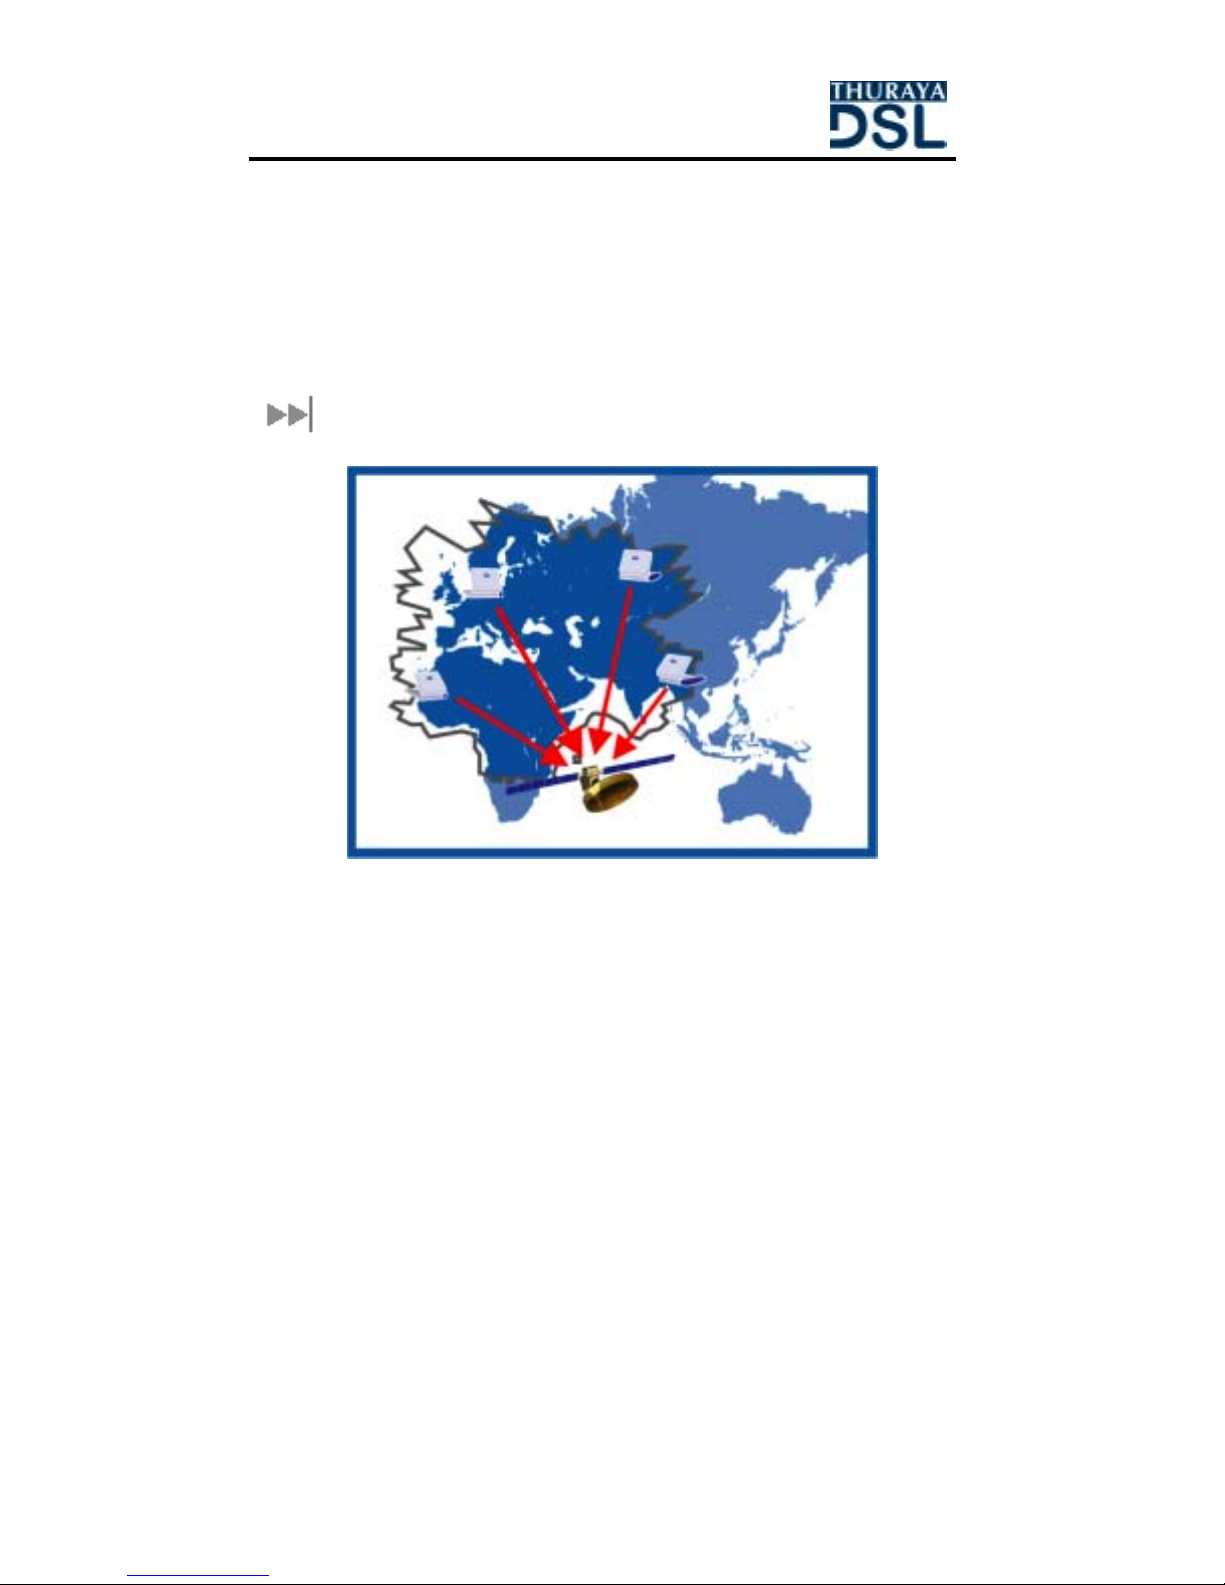
Coverage
THURAYA Coverage Area
The coverage map shows THURAYA coverage area and indicates the general
direction of the satellite relative to your position on the ground. Note that the actual
ability to get ThurayaDSL service in this coverage area is dependent upon a variety of
factors, including licensing conditions, and the figure does not represent a guarantee
of service in any particular location (contact your Service Provider for the latest
information on service coverage).
ThurayaDSL Satellite IP Modem User Manual
1
Page 12
First Time Set-Up
This section guides you through the process of setting up and configuring your
ThurayaDSL for the first time. The steps presented should be followed in the order
given. When you are finished, your computer and ThurayaDSL will both be set up and
ready to use.
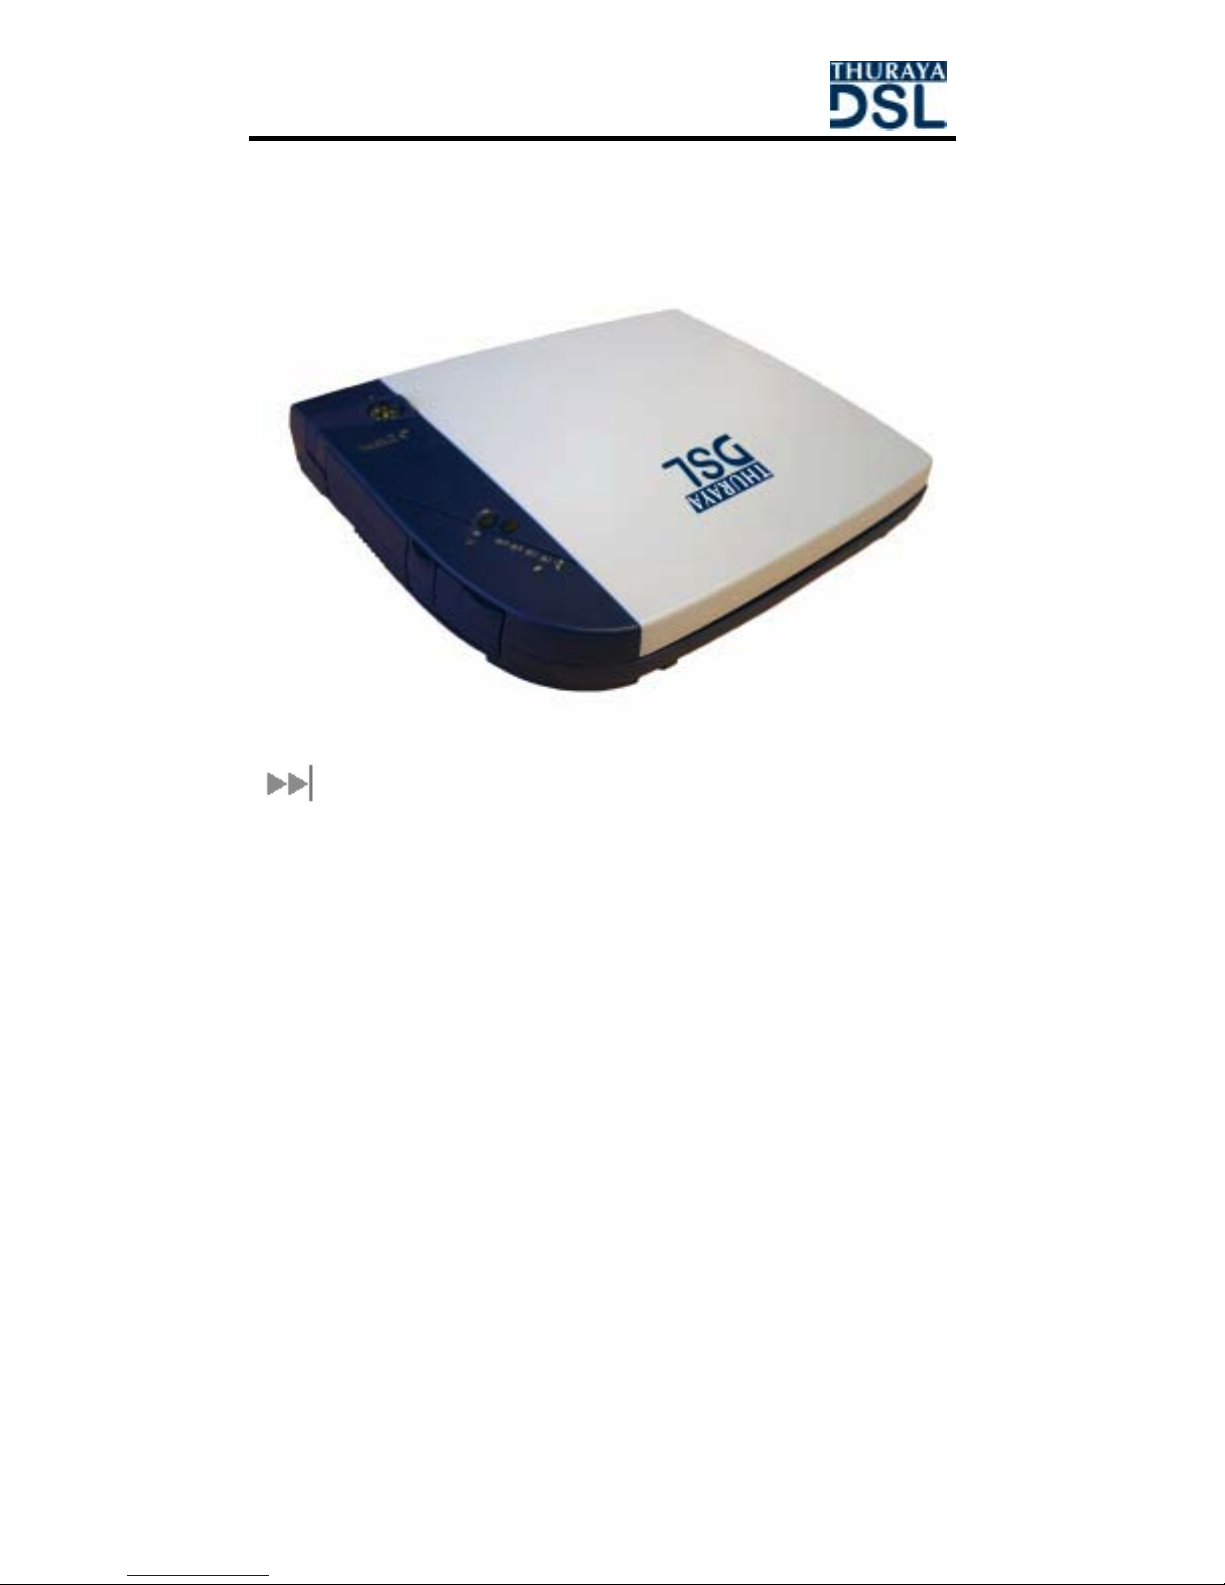
ThurayaDSL Satellite IP Modem
Unpacking
Unpack the ThurayaDSL and accessory box items.
! ThurayaDSL Satellite IP Modem
! AC Mains Power Adapter and cable (100 – 240 VAC)
! Rechargeable Lithium Ion Battery pack
! Ethernet cable (do not use cross-over cable)
! User Manual (this document)
! Tie-down Clips
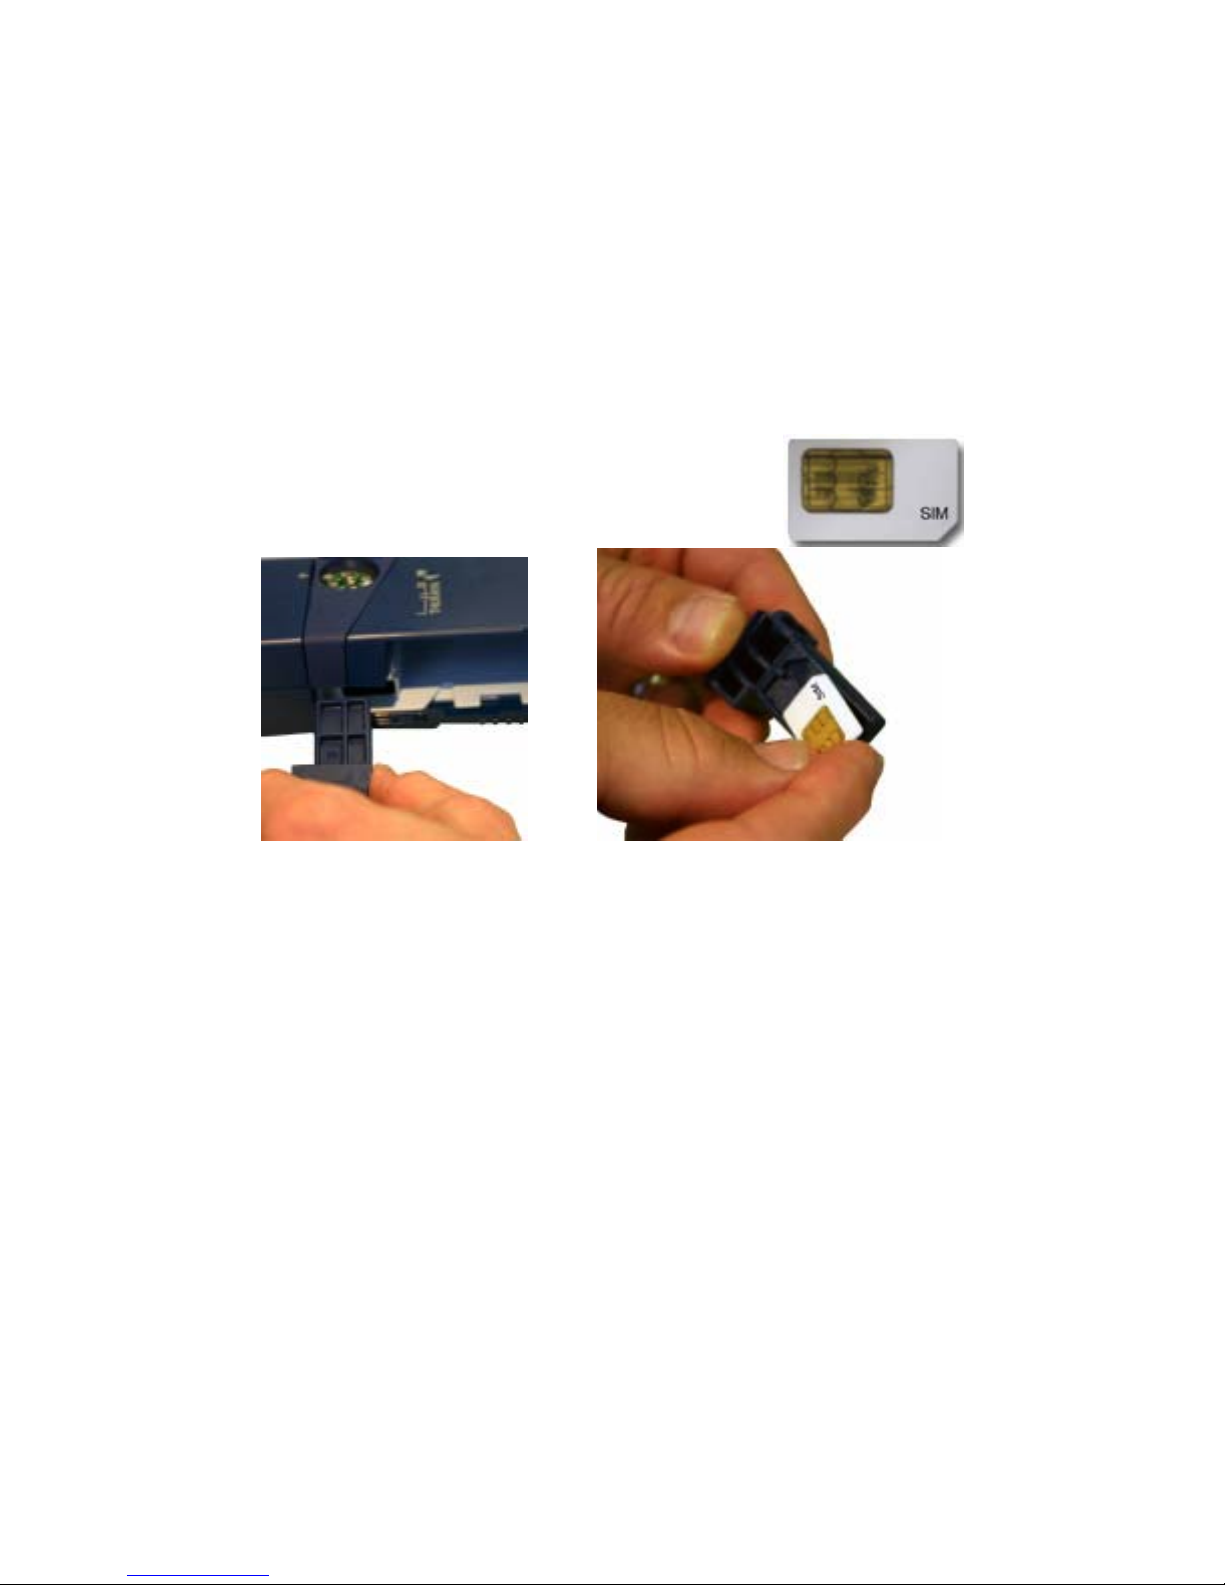
Your Service Provider will supply a Subscriber Identification Module (SIM) as shown
on page 4.
2 ThurayaDSL Satellite IP Modem User Manual
Page 13

Minimum System Requirements and Software
Installation
" You must have a desktop or laptop Personal Computer (PC) running one of the
following supported operating systems:
®
! Windows
! Windows 98 second edition
! Windows 2000
! Windows ME
! Windows XP
! Macintosh OS X v10.1 or later
" The computer must have one of the following supported Internet browsers.
! Microsoft Internet Explorer version 5.5 or later. Java Runtime
Environment (JRE) 1.3.1 or later must be i nst alled
! Netscape Communicator version 7.0 or later. Java must be active.
! Macintosh Safari 1.0 or later.
! Mozilla Firefox 1.0 or later.
" Your PC must support an Ethernet interface.
"
Note
NT 4.0 (service pack 3)
You must verify that the proxy server settings in your browser are
disabled. For Microsoft Internet Explorer, select Tools / Internet
Options / Connections / LAN Settings and uncheck the box labeled
‘Use a proxy server for your LAN’. For Netscape or Firefox, go to
Advanced Preferences and select ‘Direct connection to the Internet’.
For Safari, select System Preferences / Network / Built-in Ethernet /
Proxies and uncheck the box labelled ‘Web Proxy (HTTP).’ When
complete please close your browser.
DO NOT FORGET YOU MAY NEED TO RECHECK THIS BOX
ON RETURN TO YOUR OTHER INTERNET CONNECTION.
ThurayaDSL Satellite IP Modem User Manual
3
Page 14
First Time Set-up Overview
There are 7 basic steps to getting your ThurayaDSL up and running:
! Step 1: Unpack ThurayaDSL
! Step 2: Unpack ThurayaDSL – Power
! Step 3: Obtain Initial GPS Fix for ThurayaDSL
! Step 4: Connect Using Ethernet
! Step 5: Rough Pointing to Satellite
! Step 6: Fine Pointing to the Satellite
! Step 7: Exit Pointing Mode
Step 1: Unpack ThurayaDSL
Unpack the ThurayaDSL and accessories. Battery, AC mains power adapter, and
Ethernet cable are included with the ThurayaDSL.
Your service provider will have provided you with a SIM card.
Insert SIM provided by your Service Provider in SIM holder
and then insert the SIM holder as shown below.
4 ThurayaDSL Satellite IP Modem User Manual
Page 15
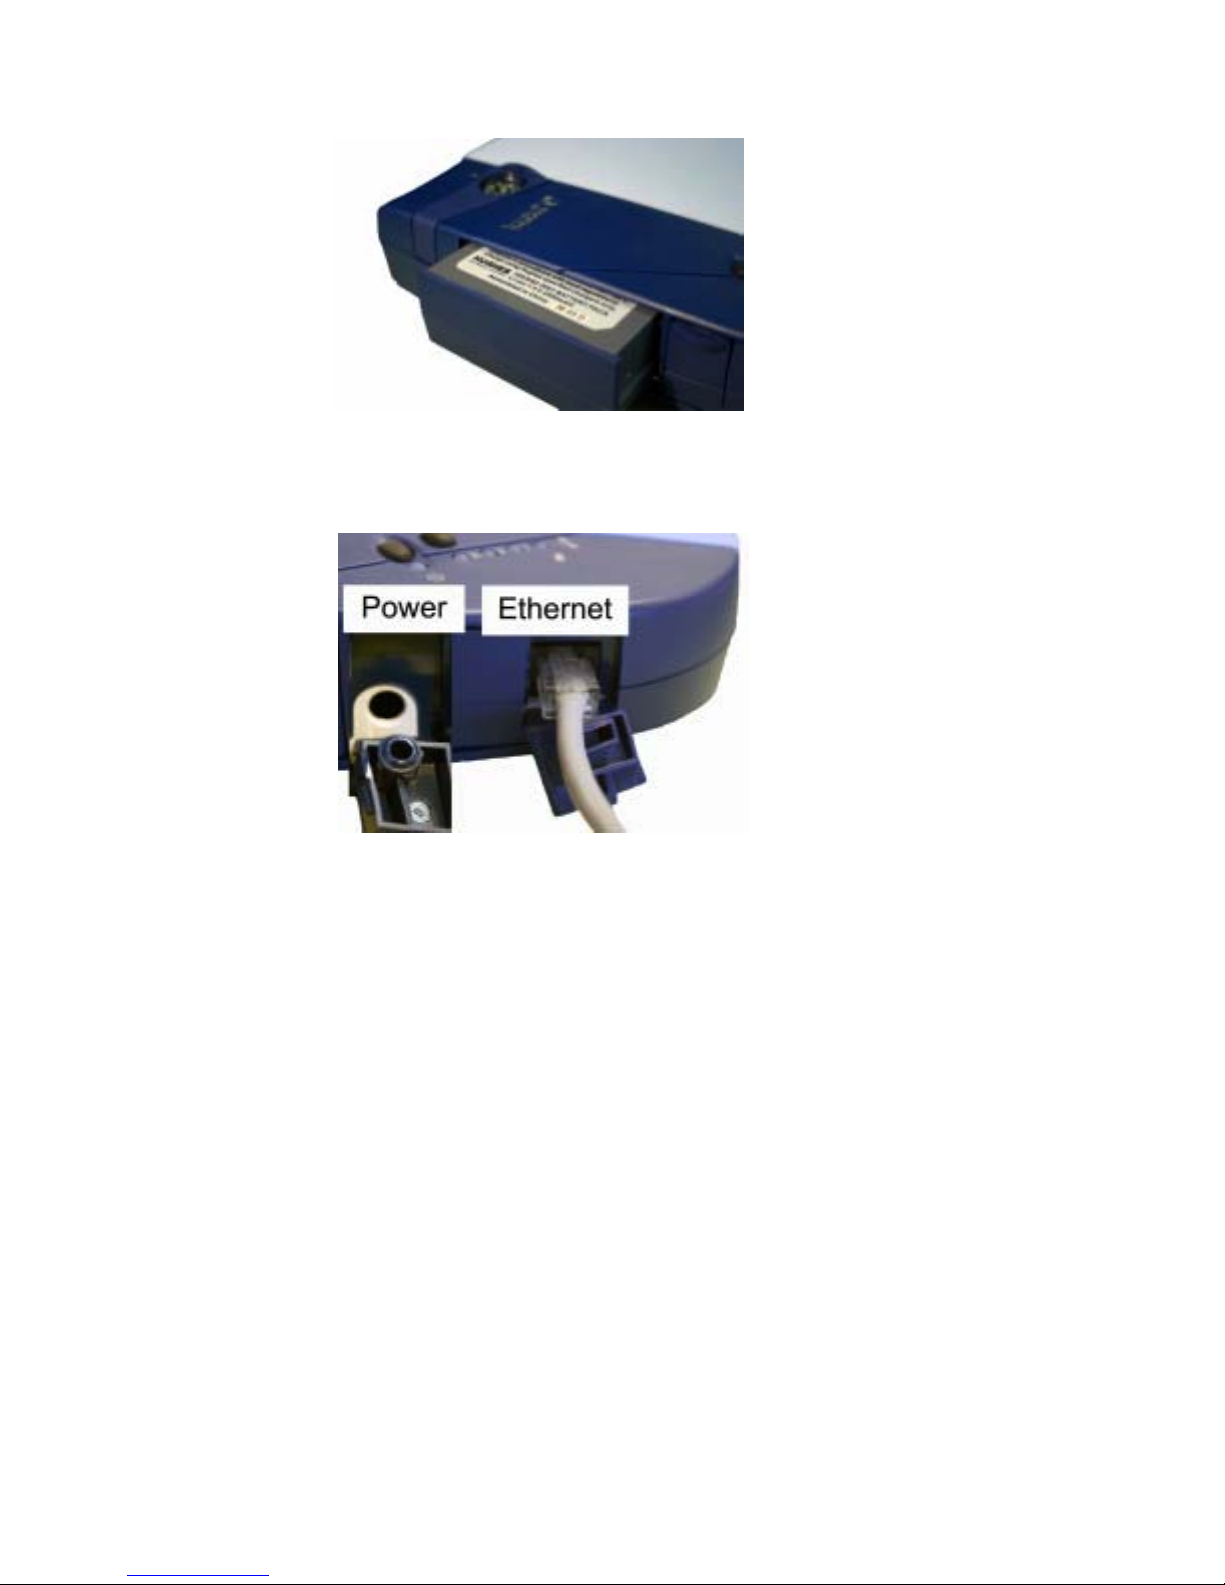
Step 2: Unpack ThurayaDSL – Power
1. Insert Battery after the SIM has been installed.
2. Plug in Power cable and charge the battery for 3 hours.
ThurayaDSL Satellite IP Modem User Manual
5
Page 16
Step 3: Obtain Initial GPS Fix for ThurayaDSL
The rest of the First Time Set-up section assumes that Antenna
"
Note
1. Place ThurayaDSL outside on a flat surface with a clear view of the sky.
2. Power up ThurayaDSL by pressing the Power button.
Pointing is enabled. See the section titled Advanced Settings Screen
to configure the terminal to point at powerup.
3. ThurayaDSL is now attempting to locate itself using GPS. This may take up to five
minutes. It is important that ThurayaDSL is placed away from buildings, trees and
other obstacles that might block a clear view of the sky.
For optimum GPS signal reception, make sure ThurayaDSL is
"
Note
positioned in a roughly horizontal placement with the lid closed.
Since GPS receivers must “see” a large part of the sky without
obstructions from buildings, mountains or trees, it may be necessary
to take your ThurayaDSL out to a clear space to obtain a new GPS
location. It may be possible to obtain a new GPS location in a less
favorable circumstance, but the time to completion may be longer.
6 ThurayaDSL Satellite IP Modem User Manual
Page 17
Wait – Power light alternating
red / amber
When the power light changes from a red/amber flash to an amber/green flash,
proceed to the next step. If the power light is solid green or flashing green,
ThurayaDSL is not in antenna pointing mode. Turn ThurayaDSL off and then turn it
back on.
Proceed – Power light
alternating green / amber
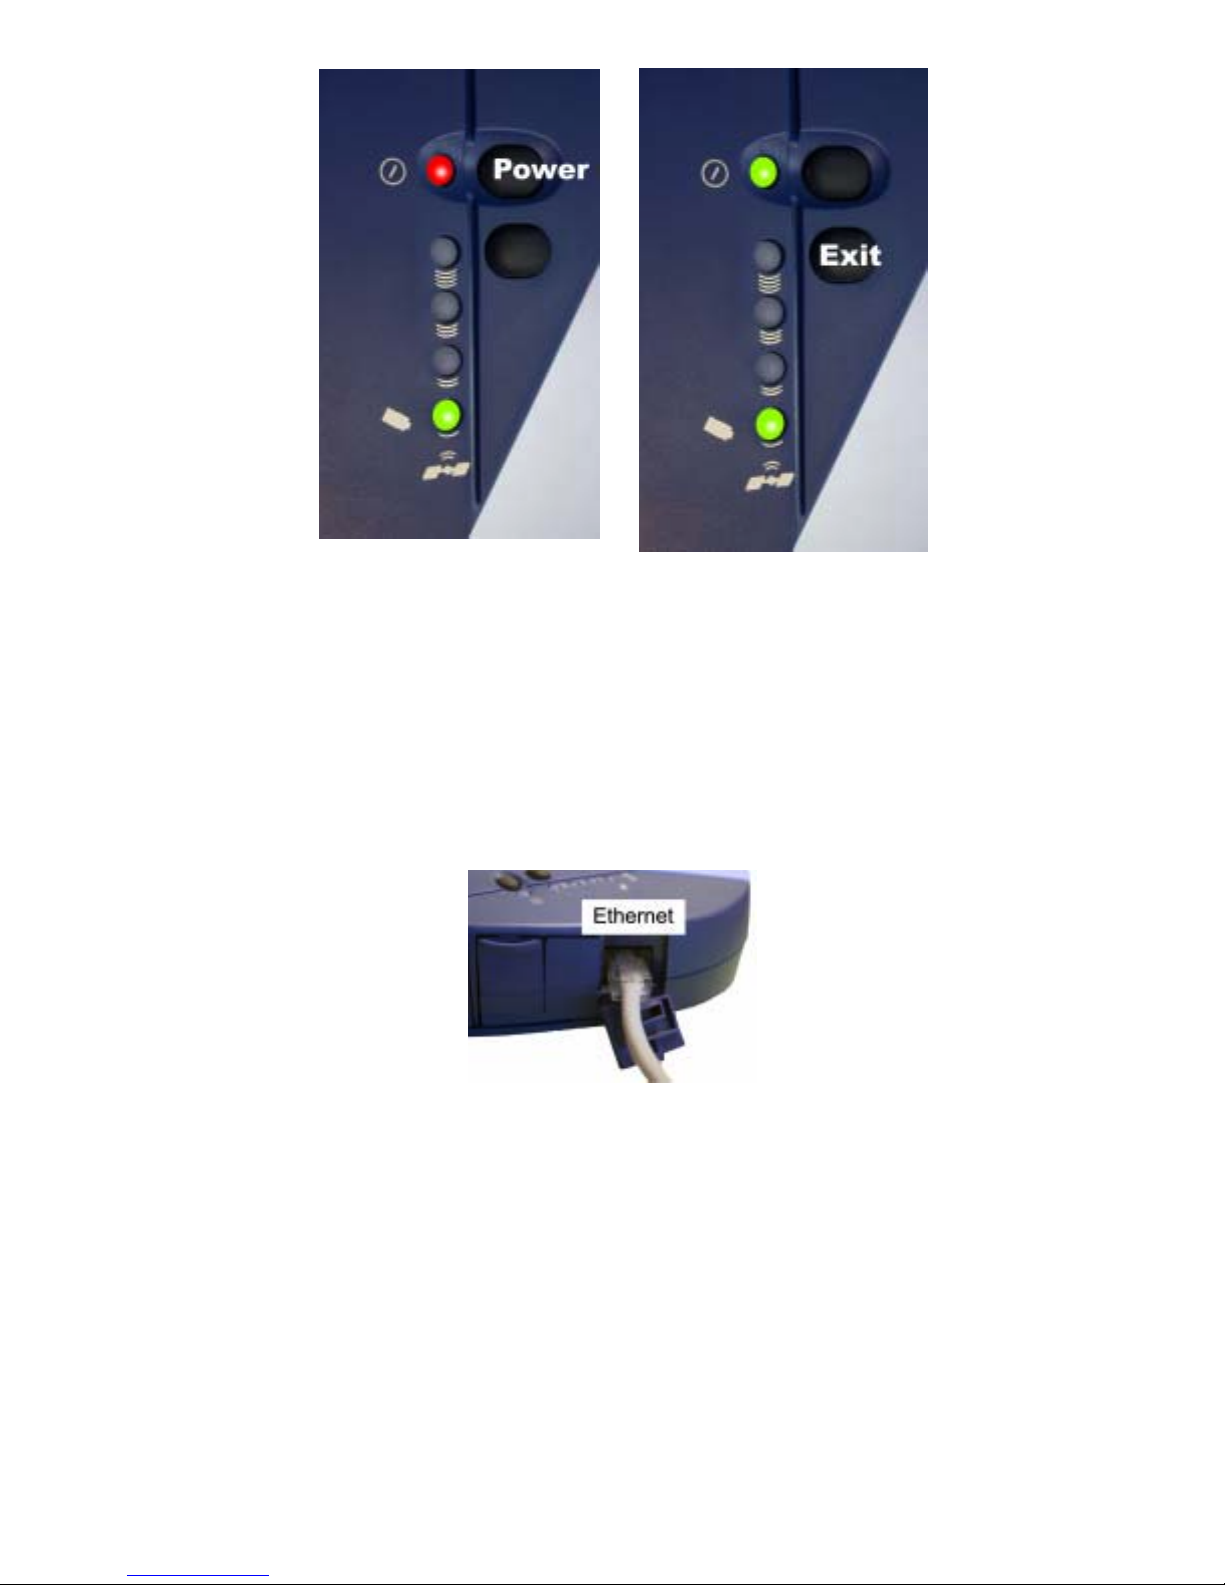
Step 4: Connect ThurayaDSL Using Ethernet
1. Connect the Ethernet cable to your laptop’s network interface and insert the
other end of the connector into the ThurayaDSL. Note: Any CAT 5 Ethernet
cable can be used to connect the laptop and ThurayaDSL as long as it is less
than100 meters in length.
ThurayaDSL Satellite IP Modem User Manual
7
Page 18

Step 5: Rough Pointing to Satellite
1. ThurayaDSL is controlled through a web browser interface. To activate the MMI
(ThurayaDSL’s user interface), open the ‘Internet Explorer or Netscape browser
on your laptop. Enter http://192.168.128.100
in the browser URL address field.
URL address field
You may want to store this URL in your “Favorites” folder in your
"
Note
2. If you have PIN security enabled on your SIM, you will be prompted to enter
your PIN before proceeding.
"
Note
browser.
IMPORTANT: Before accessing the MMI, you must verify that the
proxy server settings in your browser are disabled. For Microsoft
Internet Explorer, go to LAN Settings under the Connections tab and
uncheck the box next to ‘Use a proxy server for your LAN’. F o r
Netscape, go to Advanced Preferences and select ‘Direct connection to
the Internet.’
DO NOT FORGET YOU MAY NEED TO RECHECK THIS BOX ON
RETURN TO YOUR OTHER INTERNET CONNECTION.
You must have a valid GPS location for the compass direction and
Antenna Angle to be displayed. If the GPS is not valid, go back to step 3
and allow ThurayaDSL to obtain a GPS fix.
8 ThurayaDSL Satellite IP Modem User Manual
Page 19

Compass Direction Antenna Angle
3. Note the Compass Direction and Antenna Angle from the MMI as shown above;
these will be used to assist you in roughly pointing the ThurayaDSL antenna
towards the satellite. Rough pointing consists of determining the roug h direction
and elevation angle that the antenna needs to “see” the THURAYA Satellite.
4. Look at the MMI Pointing display and determine the Compass Direction needed
for the antenna. Rotate ThurayaDSL left or right to the correct compass
direction. The three LEDs on the left hand side of the terminal will sequential ly
turn to “Green”, as the signal strength gets stronger.
Following are sample compass directions.
ThurayaDSL Satellite IP Modem User Manual
Rotate left and right
9
Page 20

South Southwest Southeast
The Protractor should match the number on the MMI screen as shown in the
sample to the right.
5. Look at the MMI pointing screen and determine the elevation angle needed for
the antenna. Tilt antenna up and down to the correct antenna angle.
Antenna Angle
6. The small arrow on ThurayaDSL Protractor should point to the number that was
read off the MMI pointing screen.
10 ThurayaDSL Satellite IP Modem User Manual
Page 21

Step 6: Fine Pointing to the Satellite
IMPORTANT: The reliability and speed of your connection to the
network will be adversely impacted unless the antenna is correctly
pointed towards the satellite. Please follow these directions closely so
that your ThurayaDSL is optimally pointed.
Pointing Screen - Signal Strength
1. Use the MMI pointing screen to optimally fine point the antenna. The pointi ng
screen has a signal strength bar graph and numeric value to assist in accurate
antenna pointing. The orange peak-hold bar at the end of the blue bar identifies
the highest signal strength measured during antenna pointing and will help you
optimise the pointing direction. Note: Obtaining the highest signal strength
possible will ensure that you have an optimum connection to the network.
The power light must be flashing red/amber or amber/green. If this is
"
Note
ThurayaDSL Satellite IP Modem User Manual
not the case, turn the ThurayaDSL off and then back on to re-enter the
pointing display.
11
Page 22

To find the optimal antenna
pointing direction, rotate
ThurayaDSL slowly left or right
a small amount. Find the centre
peak of the signal strength using
one of the methods described
on the prior pages. Once a peak
signal has been found, keep
ThurayaDSL pointing in that
direction.
To find the optimal antenna
pointing elevation, tilt the
antenna slowly up and down a
small amount. Find the centre
peak of the signal strength using
one of the methods described
on the prior page. Once a peak
has been found keep
ThurayaDSL antenna at that
angle.
Rotate left or right slowly
Tilt antenna up and down
12 ThurayaDSL Satellite IP Modem User Manual
Page 23

Step 7: Exit Pointing Mode
1. Your antenna is now optimally pointed. Exit the pointing mode by either of the
following exit options:
Select the “Exit pointing” option on your MMI screen.
Exit Pointing
Or, press the Exit Pointing button on the terminal.
2. Congratulations! Your ThurayaDSL is successfully connected.
Note: If you are unable to successfully connect to the Internet, please see the
troubleshooting section of the ThurayaDSL Satellite IP Modem User Manual.
ThurayaDSL Satellite IP Modem User Manual
13
Page 24

Quick Reference
This section serves as a reference guide, identifying the key operational aspects of
using the ThurayaDSL system and the Controls and Indicators on ThurayaDSL and
their functions.
Global Positioning System Operation
ThurayaDSL Satellite IP Modem contains an integrated Global Positioning System
(GPS) receiver that is used to provide location information. GPS location information
is required for system access, and the reception of a new GPS location is attempted
automatically every time ThurayaDSL is powered on.
For optimum GPS signal reception, make sure ThurayaDSL is posit ioned in a roughly
horizontal placement with the lid closed. Since GPS receivers must “see” a large part
of the sky without obstructions from buildings, mountains or trees, it may be
necessary to take your ThurayaDSL out to a clear space to obtain a new GPS
location. It may be possible to obtain a new GPS location in a less favourable
circumstance, but the time to completion may be longer.
Once updated, ThurayaDSL remembers your location so the unit can be relocated to
a more convenient working area, such as inside a building by a window facing toward
the satellite.
Once you have established a session on ThurayaDSL you will not need another GPS
location while you remain connected in the “Always On” condition. This is
convenient if you inten d to op erat e from one location for an extended period of time
since there is no need to move ThurayaDSL to refresh the GPS receiver. Also, your
stored GPS location remains good for a period of time even if you power down and
move a short distance between sessions. When you believe this is the case, simply
skip the GPS location step and complete the ThurayaDSL satellite pointing operation
prior to going directly onto the network. Be sure to carefully point your unit every
time it is moved.
Stored GPS Location
The most recent GPS location is stored in ThurayaDSL even when powered down.
Upon power up, if this stored GPS location is available the display indicates “Using
Stored Location.” Even so, ThurayaDSL will attempt to update this GPS l ocation since
the Thuraya system will only allow access if your GPS location is not too old. If
ThurayaDSL is able to update the GPS location, the status changes from “Stored” to
“Valid.” GPS location is shown as “Invalid” only under special circumstanc es when the
stored information has been erased. In any case, you may wish to attempt network
access to see if service will be granted.
14 ThurayaDSL Satellite IP Modem User Manual
Page 25

Antenna Pointing
Establishing a new connection
requires the careful orientation of
ThurayaDSL towards the ThurayaDSL
Satellite. The more precise this
alignment, the faster your data will be
able to travel over the network. To
ensure precise alignment, the pointing
operation is divided into a rough
pointing operation followed by a fine
pointing operation.
To assist in rough ThurayaDSL
orientation, the stored GPS location
is used to obtain your location
relative to the satellite. Through use
of this geographic location data,
direction and elevation angle
information is supplied to you on
your computer’s display. You can use
this information in conjunction with
ThurayaDSL compass and elevation angle scale to obtain an initial orientation towards
the satellite.
Next, station yourself with your ThurayaDSL’s “lid” (the antenna) opened away from
you (like the display screen of a laptop computer) ensuring that nothing but open sky
is between the ThurayaDSL’s lid and the Thuraya Satellite. If the view is blocked by
trees, mountains, buildings or similar objects then you must relocate ThurayaDSL.
This manipulation is called the Rough Pointing procedure.
Do not stand in front of the Antenna
ThurayaDSL emits radio frequency energy when in the transmit mode.
To avoid injury, do not place head or other body parts in front of the
antenna when system is operational.
Once you have completed rough pointing, the connection can be “tu ned” using the
fine pointing procedure. The tuning consists of small changes in direction (rotation of
the ThurayaDSL) and small changes in elevation angle (small up and down movement
of the ThurayaDSL’s lid). Signal meters are located on the ThurayaDSL and computer
display; you can use either one to maximize your signal strength. Finding the
maximum for both the direction and elevation angle settings ensures the best
performance from your ThurayaDSL.
ThurayaDSL Satellite IP Modem User Manual
15
Page 26

Controls and Indicators
The figures below illustrate where the Control Buttons and Lights are located on
ThurayaDSL and the functions of each.
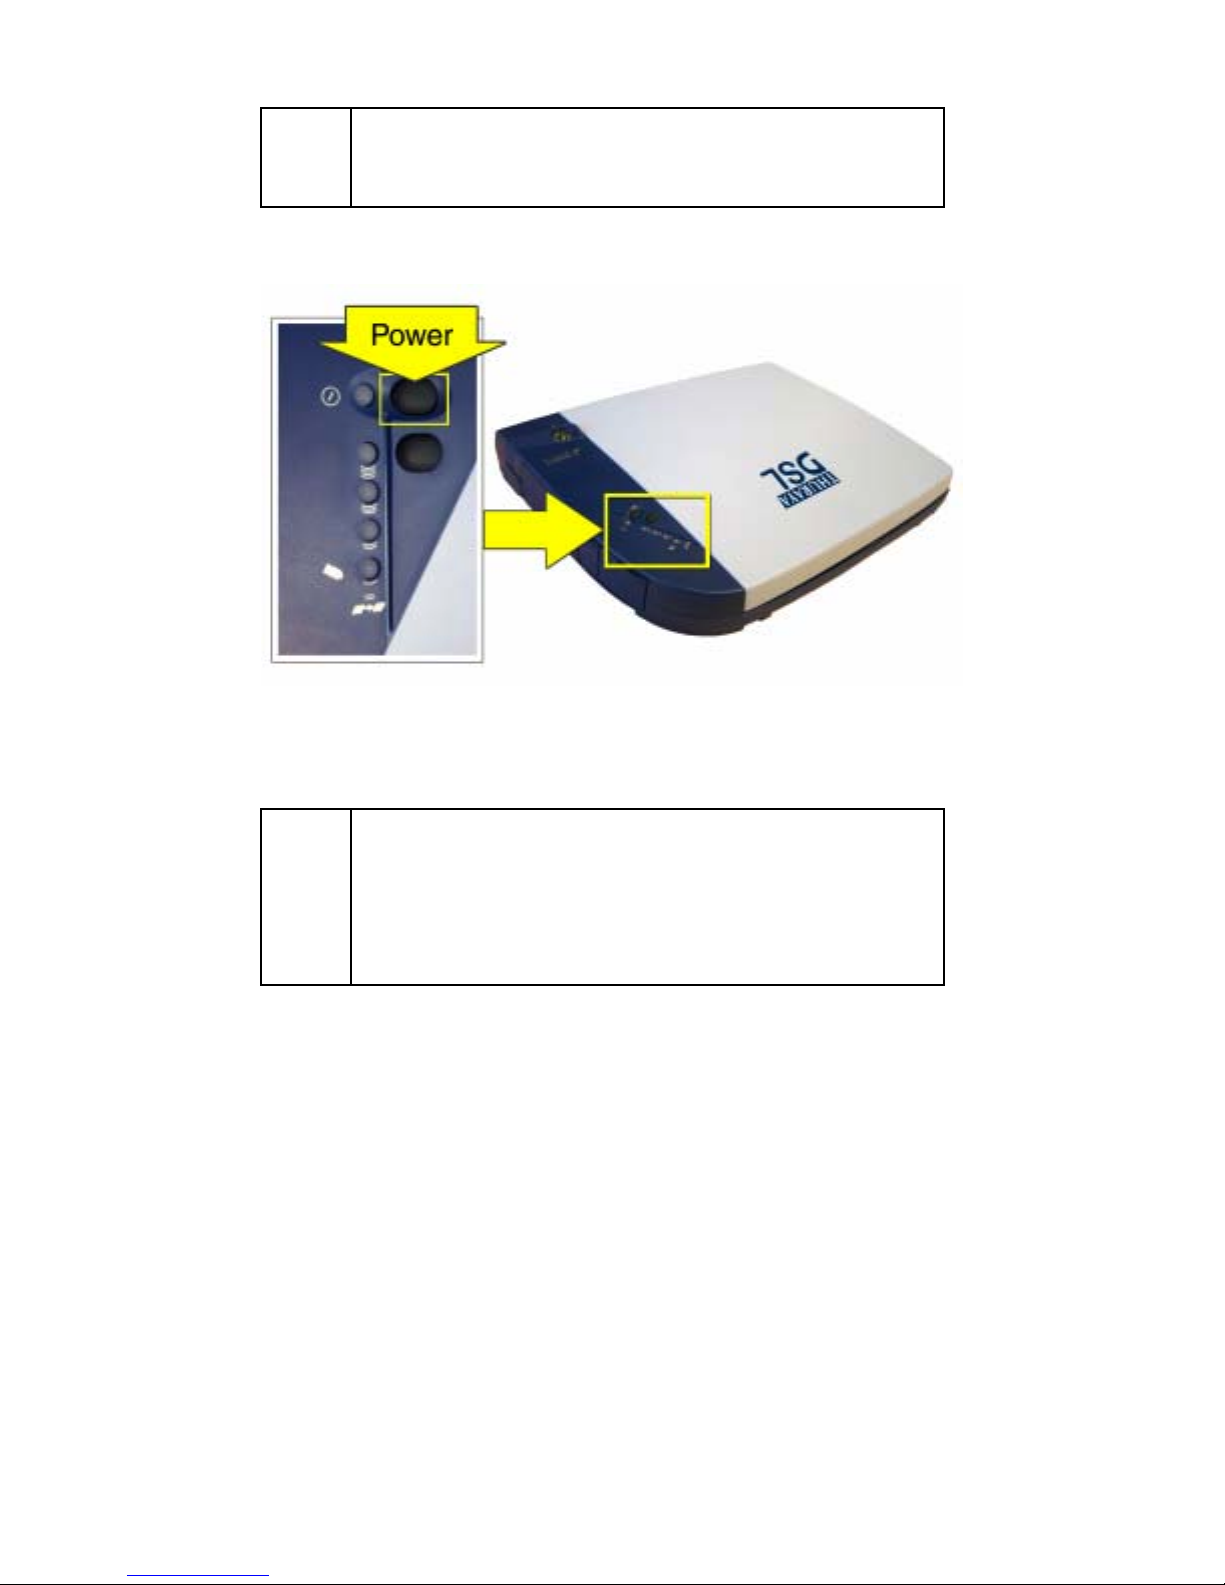
Power Button
The Power Button turns ThurayaDSL power on and off. To turn on the ThurayaDSL
Satellite IP Modem, push the Power button down until
the Power Light illuminates. To turn off ThurayaDSL,
push the Power button down until the Power Light
darkens (at least two seconds). The ThurayaDSL will
shut off a few seconds later.
Once ThurayaDSL is connected to the AC Mains power,
the ThurayaDSL will power up immediately. Note that
when ThurayaDSL is attached to AC Mains power, the
ThurayaDSL still supports battery charging while the
ThurayaDSL is turned off.
Power Light
When ThurayaDSL is powered down, the Power Light is
off.
Normal Operational Mode: The Power Light is on solid if the ThurayaDSL is
running on AC Mains power and flashing if the ThurayaDSL is on battery power. The
colour of the Power light will be amber if the terminal is not yet connected to the
network and green if the network is available for use.
Pointing Mode: The Power Light changes colour in order to indicate the status of
the GPS acquisition. If the Light is switching between red and amber, then the GPS
location has not been updated since power up. If the Light is switching between
amber and green, then the GPS location has been updated since power up.
If the Power Light is flashing red at anytime, there is a fault or error condition in
ThurayaDSL.
16 ThurayaDSL Satellite IP Modem User Manual
Page 27

Exit Pointing Button
Exit Pointing Mode: Pressing this button down for two seconds will cause the
terminal to exit pointing mode. If there is no response, you must check the MMI to
determine why (may require SIM PIN entry or other action).
Pointing Mode Lights
The Pointing Mode Lights are lit and used as a bar graph to indicate relative signal
strength. The Lights turn from red (poor signal strength) to amber (better signal
strength) to green (best signal strength) as the antenna is manipulated to get the
optimum signal.
Battery Light
The Battery Light is off when ThurayaDSL is powered down.
Normal Operational Mode: If the Battery Light is flashing amber, ThurayaDSL is
powered on and not connected to AC mains power. If the Light is flashing green,
the ThurayaDSL is connected to AC mains power and the battery is charging. If the
Light is green, the ThurayaDSL is connected to AC mains power and the battery is
fully charged. If the Light is flashing red, the battery is low and is not charging.
Pointing Mode: In this mode, the Battery Light is used as part of the bar graph to
indicate relative signal strength. The Light turns from red (poor signal strength) to
amber (better signal strength) to green (best signal strength) as the antenna is
manipulated to get the optimum signal.
When ThurayaDSL is on battery power (no AC Mains), the Power,
"
Note
ThurayaDSL Satellite IP Modem User Manual
and Battery Lights will flash to conserve power.
17
Page 28

ThurayaDSL Antenna Protractor
When you are positioning the antenna during
the Antenna Pointing process, the protractor
provides the current angle of the antenna so
that you can adjust it to the Antenna Angle
specified on the pointing screen.
Compass
Reference the compass during the Antenna Pointing process to
get the correct Compass Direction needed for the antenna.
The illustration shows an example of a South-West orientation.
The compass can be affected when close to magnetic fields or
"
Note
metallic objects.
18 ThurayaDSL Satellite IP Modem User Manual
Page 29

MMI Screens
Pointing Screen
The Pointing Screen provides the best way to orient ThurayaDSL towards the
satellite. Once ThurayaDSL is powered up, open your browser and enter
http://192.168.128.100
If you enable a SIM Personal Identification Number (PIN) and a Security
Code, you are prompted to enter these values before advancing to other
ThurayaDSL Administration pages in the MMI.
into the browser Address field
Pointing Screen
If Antenna Pointing is disabled, the Pointing Screen will be
"
Note
Follow the directions in First Time Set-up for using this screen while going through
the Pointing process.
GPS Validity: Invalid, Stored or Valid. See the Global Positioning System Operation
section for more details on GPS.
Point Antenna to These Settings: Compass Direction and Antenna Angle to help
orient ThurayaDSL toward the satellite. Once this rough pointing is accomplished, use
the Signal Strength meter below to optimise the pointing direction.
ThurayaDSL Satellite IP Modem User Manual
bypassed. See the Advanced Settings section for additional
information.
19
Page 30

Signal Strength: This blue bar moves to the right as the signal received from the
satellite gets stronger. The numeric display to the right of the bar is simply a digital
representation of the bar. The orange peak-hold bar at the end of the blue bar
identifies the highest signal strength measured during antenna pointing and will help
you optimise the pointing direction. Use this display when fine tuning Th urayaDSL’s
orientation to the satellite. Signal strength is only a relative measure of the satell ite
signal strength and may vary from location to location.
Switch GPS Antenna: You can switch between an Internal and External GPS
Antenna by selecting one of these two radio buttons. Once you have made the
change, select the Apply button to implement the change. The External option
should only be selected when using the optional external GPS antenna accessory.
Instructions on how to connect the optional external GPS antenna accessory are
included with the accessory package.
Mute/Unmute Signal Beep: An audible beep to provide a relative indicator of
signal status (faster beep = higher signal quality) can be emitted from your comp ut er
speaker during the Pointing Process. Select this button to Mute or Unmute the sound.
Exit Pointing: Select this button to leave the screen after optimum signal strength
has been achieved. This action will take you to the home screen on the MMI.
Home Screen
The Home screen displays summary status information about ThurayaD S L.
You can navigate among all the various MMI functions by selecting one of the Main
functions from the menu on the left side of the screen. Sub-menus will appear after
selecting one of these Main functions:
• Properties
• Statistics
• Status
• Settings
20 ThurayaDSL Satellite IP Modem User Manual
Page 31

Home Screen
Signal Quality: Displayed on all MMI screens, this bar graph provides an indication
of satellite signal quality. To save power, this indication updates slowly over time. To
ensure you have fresh information, press the reload button on your browser to
update the page display.
The Signal Quality status is a different measure of the received satellite
"
Note
Battery Level: Displayed on all MMI screens, this bar graph provides an indication of
remaining battery capacity.
To save power, this indication updates slowly over time. To ensure you have fresh
information, press the reload button on your browser to update the page display.
Battery Status: This displays either Charging, Not Charging or Fully Charged.
Network Status: Available, Acquiring, or Unavailable. If the status is Available then
ThurayaDSL is ready to send and receive your data over the network. If the status is
Unavailable then see the Fault Status for an indication of why a network connection is
not available.
ThurayaDSL Satellite IP Modem User Manual
signal than the Signal Strength status shown on the pointing screen. Seeing
differences between these two levels is normal and not an indication of a
problem with your ThurayaDSL.
! Green: normal indication of battery level
! Red: almost fully discharged
! Amber: charging under external power
21
Page 32

Fault Status: Any faults or errors detected by MMI are displayed near the bottom of
the screen
Properties Screen
The Properties screen displays a summary of current communications parameter
settings.
Properties
Current Settings: Software Version, Interface Mode, Public Network IP Address,
Private Satellite Modem IP Address, Satellite Modem International Mobile Equipment
Identity (IMEI), and Satellite Modem Media Access Control (MAC) Address.
Restore Factory Defaults
The Restore Factory Defaults screen is a subset of Properties.
Restoring the factory defaults returns ThurayaDSL's settings to their original, jus t out-
of-the-box state. This does not change the security code or SIM parameters. Please
exercise caution when proceeding. If you Restore Factory Defaults, you will need to
re-enter any configuration information supplied by your Service Provider.
Statistics Screen
Statistics: Click this link if you would like to view estimates of your data usage. Data
usage figures are obtained by counting the bytes in the IP packets received by and sent
from the ThurayaDSL terminal. You can view both “since power on” (per session)
and “Cumulative” (lifetime) data usage counts. To reset the data counters of a
session, simply select the reset button for either transmit or receive and click the
Apply button.
22 ThurayaDSL Satellite IP Modem User Manual
Page 33

"
Note
Statistics
The data usage figures provided on the screen are estimates only. This
feature is not tied into the actual billing system. HNS assumes no liability if
differences are found between data usage figures and your actual bill.
If ThurayaDSL is shutdown improperly, user data values on the lifetime
session may be lost and not recorded.
ThurayaDSL Satellite IP Modem User Manual
23
Page 34

Status Screen
The Status Screen is displayed as a separate window to provide a concise summary
of the ThurayaDSL status.
Status Window
This window gives you a summary of current ThurayaDSL system configuration and
performance. When the Status Window is open, its information is updated every
minute. If you are running on battery power, this will reduce your available operating
time.
Network Status: Available or Unavailable. If the status is Available then ThurayaDSL
is ready to send and receive your data over the network. If the status is Unavailable
then see the Fault Status for an indication as to why a network connection is not
available.
Battery Status: Battery, charging on AC Mains, or charged on AC Mains.
Signal Quality: This bar graph provides an indication of satellite signa l q uality.
Note: The Signal Quality status is a different measure of the received
satellite signal than the Signal Strength status shown on the pointing
screen. Seeing differences between these two levels is normal and not an
indication of a problem with your ThurayaDSL.
24 ThurayaDSL Satellite IP Modem User Manual
Page 35

Battery Level: This bar graph provides an indication of remaining battery capacity.
! Green: normal indication of battery level
! Red: almost fully discharged
! Amber: charging under external power
GPS Antenna: Internal or External.
Fault Status: Any current system faults or errors.
Settings Screens
From the Main menu you can select Settings which allows you to navigate among all
the various Settings functions from the menu on the left side of the screen:
• Network Settings
• Security Management Settings
• Login Settings
• Advanced Settings
• Status
• Home
Network Settings Screen
After executing the necessary First Time Set-up steps to configure ThurayaDSL, you
may want to select the Network Settings screen to check your network
configuration. On this screen, you should find the appropriate Domain Name Service
(DNS) and the Access Point Name (APN) information configured by your Service
Provider.
By default your Service Provider has already performed this configuration
"
Note
ThurayaDSL Satellite IP Modem User Manual
step for you.
Whenever you modify the DNS addresses on the Network Settings
screen, you must exit the MMI, reboot your computer, and power the
ThurayaDSL off and then back on so that the new settings can take effect.
25
Page 36

Network Settings
Use Static Public Network IP Address: If this radio button is not selected,
ThurayaDSL uses an IP address automatically assigned by the network during the
period when the ThurayaDSL connects to the network. By default this button is not
selected. If this box is selected, the ThurayaDSL uses the IP address you enter in the
Static Public Network IP Address field that follows. You should only check this box
and enter an IP address if directed to do so by your Service Provider.
DNS Host 1: Primary Host Domain Name Service (DNS) Address. An IP address is
required in this field and will be supplied by your Service Provider.
DNS Host 2: Secondary Host DNS Address.
APN Enable: If use of multiple Internet Service Providers is required, you can
check this box and enter the appropriate Access Point Name (APN) value. You
should modify these fields only if directed to do so by your Service Provider.
SAVE/ CANCEL: If you want the values you have entered to be processed, click
the SAVE button, exit the MMI, and reboot your computer. You will also need to
turn ThurayaDSL off and then on again so that the new settings can take effect. If you
want the values you have entered to be ignored because of error or uncertainty, click
the CANCEL button and the Network Settings remain as they were with no reboot
required.
Security Management Screen
The Security Management screen allows you to impose a tighter level of security
on your ThurayaDSL.
26 ThurayaDSL Satellite IP Modem User Manual
Page 37

Security Management
SIM PIN Enable: If this box is not checked, there is no prompt for a SIM PIN after
you invoke the MMI. If this box is checked, a prompt requests you to enter the SIM
PIN each time you run the MMI. This helps prevent unauthorised use of your SIM. To
change the setting, simply modify the check box as desired, enter the current SIM
PIN, and click the SAVE. Note: If the SIM PIN code is entered wrong three times,
the ThurayaDSL will be locked until the PUK (Pin Unlock Key) number is entered.
Consult your Service Provider if you do not remember your PUK number.
Change SIM PIN: If the SIM PIN Enable box is checked, and you would like to
change the existing PIN, click this link or choose the CHANGE SIM PIN option on
the menu. You will be required to enter the Old PIN, the New PIN, and the New PIN
again for confirmation.
Security Code Enable: If this box is not checked, there is no prompt for a Security
Code after you invoke MMI. If this box is checked, a prompt asks for the Security
Code entry each time you run the MMI with a different SIM than the one that was in
the ThurayaDSL when the Security Code was enabled. By default, the Security Code
is not enabled. Note: By default, the security code is eight (8) characters long.
Change Security Code: If the Security Code Enable box is checked, and you would
like to enter the Code for the first time or change an existing Code, click this option.
You will be required to enter the Old Code, the New Code, and the New Code
again for confirmation. Click SAVE to store the changes.
ThurayaDSL Satellite IP Modem User Manual
27
Page 38

If you forget the security code you will not be able to use ThurayaDSL
"
Note
with a different SIM.
When you enter the Security Code for the first time, no old Security
Code entry is required. Whenever you enter or modify the Security
Code, you must exit the MMI, and turn ThurayaDSL off and then on again
so that the new settings can take effect.
Login Settings Screen
The Login Settings screen is a subset of the Settings button.
Login Settings
Utilize this screen only if you have been given the necessary information from your
Service Provider.
Service Provider Security: If this box is checked, you can enter a User ID and
Password for authentication between ThurayaDSL and your Service Provider. Your
Service Provider will let you know if this step is required and give you the necessary
information.
To change the Service Provider Password, you are required to enter the Old
Service Provider Password, the New Password, and the New Password again
for confirmation. Click the Save button to store the changes.
Advanced Settings Screen
The Advanced Settings screen is a subset of Network Settings.
28 ThurayaDSL Satellite IP Modem User Manual
Page 39

Satellite Search Method: These are two radio buttons which determine the
method of locking onto the satellite. The default method is normal. This is the
method to use unless your Service Provider specifies the full method. The full
method takes longer and utilizes more resources since it will search all possible
frequencies for ThurayaDSL service. This full search can take up to 20 minutes.
Advanced Settings
Antenna Pointing: This dropdown menu determines whether the Pointing Display
comes up each time ThurayaDSL is booted. If the ThurayaDSL is not moved between
sessions, this option can be disabled to bypass the pointing state upon power up.
However, if ThurayaDSL is moved, antenna pointing must be enabled to ensure
optimum data throughput and performance.
Antenna Pointing Audio Signal: This dropdown menu allows you to enable or
disable (mute) audio through your computer speakers during pointing.
GPS Antenna Input: This dropdown menu allows you to select which kind of GPS
antenna that you are using; either Internal or External. The External option should
be selected only when using the optional external GPS antenna accessory.
Select the SAVE button to implement your modifications.
Whenever you modify any settings on the Advanced Network Settings
"
Note
ThurayaDSL Satellite IP Modem User Manual
screen, you must exit the MMI, and power ThurayaDSL off and then back
on so that the new settings can take effect.
29
Page 40

Upgrade ThurayaDSL
Occasionally, ThurayaDSL software upgrades are made available to you. These
upgrades may add new features or fix minor problems. The software can be
downloaded directly from the Internet using any available access method, including
ThurayaDSL.
Upgrading Software
In order to upgrade software you must first connect to the Internet and follow
the steps listed below:
! Connect your PC/Notebook to the Internet using ThurayaDSL (satellite
service), LAN, or dial up connection.
! Go to www.thuraya.com.
! Go to the section for ThurayaDSL updates.
! To download, select the latest upgrade package (if available). The browser
proceeds to retrieve the package.
! Once the package is downloaded, you are prompted to execute the package.
Select “Yes.”
! The package is a self-extracting set of files that will upgrade the terminal.
! Once the package is installed, it puts a shortcut on the desktop and prompts
you to upgrade now. Select this option and the program will allow you to
upgrade the terminal.
! The upgrader will query the current software version of the terminal. You
should choose whether you want to upgrade to the newer version of
software.
! If you choose to upgrade the terminal, the process automatically downloads
the new release of software and forces a terminal reboot.
! When the terminal returns from reboot, you can verify that the download
was successful via the Properties page in the MMI.
Troubleshooting
This section details the following:
• Some general hardware and software problems you may encounter in the
installation and operation of ThurayaDSL along with the possible source of
these problems and how to correct them.
• System fault codes and descriptions reported to you by ThurayaDSL on the
MMI screens, along with their possible causes and solutions.
30 ThurayaDSL Satellite IP Modem User Manual
Page 41

General Troubleshooting
Problem Possible Cause Action
ThurayaDSL will not
switch on, or will not
stay on when under
battery power.
SIM card error.
Battery needs
recharging.
The battery is not
inserted properly.
The battery contacts
are dirty or damaged.
The ThurayaDSL was
reset while under
battery power
SIM card or SIM card
contacts may be
damaged.
SIM card may not be
present.
SIM card may be
inserted incorrectly.
SIM card contacts may
be dirty.
Charge the battery. Check Battery Light
or MMI screen for battery charging
indication.
Remove and reinsert the battery. Make
sure the battery latch is in its farthest
right hand position after the battery is
inserted.
Check the battery contacts. Clean them
if necessary. If you find any damage,
replace battery.
When the ThurayaDSL is reset while
under battery power (no AC Mains
connected), you must turn it back on
manually. This is a normal operation for
the ThurayaDSL.
Visually inspect the SIM card and SIM
card contacts and return SIM card to
your Service Provider if it is damaged.
Remove the SIM boot according to the
instructions in User Manual and verify
that the SIM card is present.
Remove the SIM card and make sure that
it is inserted according to the
instructions in the User Manual.
Clean the SIM card contacts with a dry
cloth.
ThurayaDSL Satellite IP Modem User Manual
31
Page 42

Problem Possible Cause Action
The MMI does not
work from browser.
Primary LAN
connection to the
ThurayaDSL does not
function.
The compass does not
appear to work
correctly.
The Security Code
appears to be invalid.
The SIM PIN code
appears to be invalid.
The browser may not
be correctly configured.
The interface cable is
not plugged in
correctly.
The PC Windows
network settings may
not be configured
correctly.
The PC can only have
one active LAN
connection. When
connected to the PC,
the ThurayaDSL must
be the only active LAN
connection.
The compass is not
level or is near metal.
The code may have
been changed.
The code may have
been changed.
For Netscape, go to Advanced
Preferences and select ‘Direct
connection to the Internet.’
For Microsoft Internet Explorer, select
Tools / Internet Options / Connections /
LAN Settings and uncheck the box
labelled ‘Use a proxy server for your
LAN.’
For Safari, select System Preferences/
Network / Built-in Ethernet / Proxies
and uncheck the box labelled ‘Web
Proxy (HTTP).’
You May Need To Recheck This Box
Upon Returning To Your Other Internet
Connection.
Remove and reinsert the interface cable
from both the PC and the ThurayaDSL.
Make sure the Windows network
settings in the PC are set to choose IP
settings automatically (DHCP). Then
reboot the PC.
Disconnect all other LAN connections.
Make sure the ThurayaDSL is the only
active LAN connection.
Windows limits the number of network
bindings to six. If you have more than
six, you must remove one in order for
the PC to communicate with the
ThurayaDSL.
Place ThurayaDSL on a flat and level
surface away from metallic objects.
After three failed attempts to enter the
Security Code, you must switch the
ThurayaDSL off and on again. If you forgot the
Security Code, contact your Serv ice Provider.
If the SIM PIN is blocked, contact your
Service Provider to obtain the PUK (PIN
Unlock Key) code. Enter the PUK when
prompted.
32 ThurayaDSL Satellite IP Modem User Manual
Page 43

Problem Possible Cause Action
ThurayaDSL cannot
locate itself using GPS.
meter on the pointing
screen does not
change when moving
the antenna.
ThurayaDSL cannot
find the satellite.
ThurayaDSL cannot
access the internet
after successful
pointing.
No signal or weak
signal.
Determining GPS
position can take up to
5 minutes.
The ThurayaDSL is
configured to use an
external GPS antenna.
Java not enabled on the
browser.
Rough pointing not
completed correctly.
No signal or weak
signal.
You did not exit
antenna pointing mode.
The antenna may not
be pointed properly.
The ThurayaDSL
network settings may
not be correctly
configured.
Make sure no obstruction is blocking the GPS
antenna and that the ThurayaDSL has a clear
view of at least 3/4 of the sky. Make sure that
you do not place your hand or another object
over the GPS antenna.
Wait for 5 minutes. Switch the
ThurayaDSL off and on again.
Go to the Advanced Network Settings
page on the MMI and set ‘Switch GPS
Antenna’ to ‘internal.’
Enable Java applications on the browser. The Signal Strength
Follow the instructions in the User
Manual to correctly complete rough
pointing.
Make sure no obstruction is blocking the
satellite signal. Make sure that the ThurayaDSL
has a clear view of the sky in the direction of
the satellite. Be aware that window glass may
reduce the signal level.
Check that the antenna is pointed using the
correct compass direction and antenna angl e
from the MMI Pointing screen.
Check the antenna switch to make sure that ‘L’
is selected for ThurayaDSL service.
Click the ‘Exit Pointing’ button from the
Pointing page or press the “exit Pointing
button on the face of the terminal.
Turn ThurayaDSL off and then back on
again, and attempt antenna pointing again
to improve the signal strength. You may
need to reposition ThurayaDSL, verifying
that there are no obstructions blocking
the satellite signal and that the
ThurayaDSL has a clear view of the sky
in the direction of the satellite.
Refer to the network settings supplied
by your Service Provider. If the DNS
Host settings are changed, the PC must
be rebooted.
ThurayaDSL Satellite IP Modem User Manual
33
Page 44

Problem Possible Cause Action
The browser may not
be correctly configured.
No network access or
poor network
performance.
The battery will not
charge
.
ThurayaDSL stops
sending data even with
good network
connection and
sufficiently charged
battery. The indicator
lights blink red.
Interference from other
satellite mobile
terminals.
The battery is defective. Replace the battery. After several years
The battery contacts
are dirty or damaged.
ThurayaDSL/battery is
overheated.
For Netscape, go to Advanced
Preferences and select ‘Direct
connection to the Internet.’
For Microsoft Internet Explorer, select
Tools / Internet Options / Connections /
LAN Settings and uncheck the box
labelled ‘Use a proxy server for your
LAN.’
For Safari, select System Preferences/
Network / Built-in Ethernet / Proxies
and uncheck the box labelled ‘Web
Proxy (HTTP).’
YOU MAY NEED TO RECHECK THIS
BOX UPON RETURNING TO YOUR
OTHER INTERNET CONNECTION.
If you are near another satellite mobile
terminal, switch the other satellite
mobile terminal off or move as far away
as possible to avoid interference.
of average use, a gradual decline may be
expected.
Check the battery contacts. Clean them
if necessary. If the battery is damaged,
replace it.
Let the ThurayaDSL/battery cool down.
Wait until the Indicator Lights stop
blinking red to continue.
ThurayaDSL cannot
enter antenna pointing
mode while you are
trying to reposition
the antenna.
Antenna pointing mode
cannot be accessed
without power cycling
the ThurayaDSL.
The ThurayaDSL is
configured to skip
antenna pointing.
Turn the ThurayaDSL off and on again to
enter antenna pointing mode.
Go to the Advanced Network Settings
page on the MMI and check ‘Enable
Antenna Pointing Display.’
34 ThurayaDSL Satellite IP Modem User Manual
Page 45

Problem Possible Cause Action
After ThurayaDSL
exits antenna pointing
mode, the Signal
Quality meter on the
MMI changes from
time to time.
Antenna moves after
pointing.
Normal behaviour. There are several types of channels used
by the ThurayaDSL, each with different
signal strengths. Because the Signal
Quality meter measures the channel
currently in use, there may be slight
differences in what the meter shows as
channels are changed from one type to
another.
ThurayaDSL was
moved by the wind.
Use tie-down clips provided with the
ThurayaDSL to fix the unit in place.
ThurayaDSL Satellite IP Modem User Manual
35
Page 46

Fault Codes
Number and
Description
1 SIM card is not
installed. Power down,
install SIM card properly
and try again.
2 SIM card read/write
error. Power down and
try again.
Cause Solution
Absence or incorrect
installation of the SIM
card.
Failure to read from or
write to the SIM card.
SIM card may not be present. Remove the
SIM boot according to the instructions in
the User Manual and verify that th e SIM card
is present.
SIM card may be inserted in correctly.
Remove SIM card and make sure it is
inserted according to the instructions in th e
User Manual.
SIM card may be damaged. Visually inspec t
the SIM card and return it to your Service
Provider if damaged.
SIM card contacts may be dirt y. Clean the
SIM card contacts with a dry cloth.
If problem continues, replace SIM card with
a known good SIM card. If problem persists,
return the unit to your Service Provider for
service.
Power down ThurayaDSL and try again.
SIM card may be damaged. Visually inspec t
the SIM card and return it to your Service
Provider if damaged.
SIM card contacts may be dirt y. Clean the
SIM card contacts with a dry cloth.
If the problem continues, replace SIM card
with a known good SIM card. If the problem
persists, return the unit to your Service
Provider for service.
3 SIM card access has
been blocked. Please
contact your Service
Provider.
4 SIM card has been
improperly changed
during an active session.
Power down and try
Failure to access the SIM
card due to too many failed
attempts with an invalid
PIN.
You replaced a SIM
card with another after
the ThurayaDSL was
turned on.
This occurs after 3 failed attempts to
enter the PIN. The SIM card is locked.
Enter the PUK to unlock the SIM card.
The SIM card must be replaced when
the unit is turned off. Make sure the
unit is turned off before replacing the
SIM.
36 ThurayaDSL Satellite IP Modem User Manual
Page 47

Number and
Description
again.
5 SIM card is not
responding. Power down
and try again.
6 A required data field
could not be accessed
from the SIM card. Please
contact your Service
Provider.
7 You are not allowed to
connect to the network.
Please contact your
Service Provider.
Cause Solution
Hardware failure to
access the SIM card.
Absence of a required
data field on the SIM
card.
Network connection
failure because the user
is not allowed to
connect to the
Network.
Power down ThurayaDSL and try again.
SIM card may be damaged. Visually inspec t
the SIM card and return it to your Service
Provider if damaged.
SIM card contacts may be dirt y. Clean the
SIM card contacts with a dry cloth.
If problem continues, replace SIM card with
a known good SIM card. If problem persists,
return the unit to your Service Provider for
service.
SIM card was incorrectly programmed and
is missing one or more required fields. The
SIM card must be replaced by another fr om
your Service Provider.
Your authorisation has been removed
by your Service Provider (SIM card
IMSI is not authorised). Contact your
Service Provider to regain service.
8 Your ThurayaDSL
terminal is not allowed
to connect to the
network. Please contact
your Service Provider.
9 You have no
subscription, service is
not allowed. Please
contact your Service
Provider.
10 This ThurayaDSL
terminal was detached by
the network. Cause
unknown. Power down
and try again.
11 Network connection
failure – Invalid
Network connection
failure because the
ThurayaDSL is not
allowed to connect to
the Network.
Network connection
failure because you are
not identified as a
subscriber to the
service.
Network connection
broken with an
unknown cause.
Network connection
failure due to use of
ThurayaDSL Satellite IP Modem User Manual
The ThurayaDSL authorisation has
been removed by your Service
Provider (ThurayaDSL IMEI is not
authorised). Contact your Service
Provider to regain authorised service.
Contact your Service Provider to
receive authorised service. Your
Service Provider should check the
subscription entries in the Home
Location Registry.
Power down ThurayaDSL and try
again. If the problem continues,
contact your Service Provider.
Contact your Service Provider.
37
Page 48

Number and
Description
parameters used for
network attach
procedure. Please
contact your Service
Provider.
12 Network connection
failure - LLC or SNDCP
failure. Power down and
try again.
13 Network connection
failure – Unknown PDP
type. Please contact your
Service Provider.
14 Network connection
failure - User
authorisation failed.
Please contact your
Service Provider.
15 Network connection
failure – Service option
not supported. Please
contact your Service
Provider.
Cause Solution
invalid parameters.
Network connection
failure caused by LLC
or SNDCP failure.
Network connection
failure.
Network connection
failure because the user
is not authorised for
service.
Network connection
failure because the
service option is not
supported.
Power down ThurayaDSL and try
again. If the problem continues,
contact your Service Provider.
Power down ThurayaDSL and try
again. If the problem continues,
contact your Service Provider.
Contact your Service Provider to
regain authorised service. Your
Service Provider should check the
subscription entries in the Home
Location Registry.
Contact your Service Provider to
regain authorised service. The Service
Provider should check the
subscription entries in the Home
Location Registry.
16 Network connection
failure - Service option
not subscribed. Please
contact your Service
Provider.
17 Network connection
failure - N-SAPI has already
been used. Power down and
try again.
18 Network connection
failure – Regular PDP
deactivation by network.
Power down and try
again.
19 Network connection
Network connection
failure because user
was not subscribed to
the service option.
Network connection
failure because network
assigned an N-SAPI that is
already being used.
The connection was
deactivated by the
Network.
Connection failure due Power down ThurayaDSL and try
Contact your Service Provider to
regain authorised service. The Service
Provider should check the
subscription entries in the Home
Location Registry.
Power down ThurayaDSL and try again. If
the problem continues, contact your Servi ce
Provider.
Power down ThurayaDSL and try
again. If the problem continues,
contact your Service Provider.
38 ThurayaDSL Satellite IP Modem User Manual
Page 49

Number and
Description
failure - SM network
failure. Power down and
try again.
20 Network connection
failure – Too many
failures to activate PDP
context. Power down
and try again.
21 Network connection
failure - Network
assigned an invalid IP
address. Power down
and try again.
22 Network connection
failure – No response
from network. Power
down and try again.
23 Network connection
failure – Protocol error
received from network.
Power down and try
again.
Cause Solution
to SM network failure. again. If the problem continues,
contact your Service Provider.
Too many failed
attempts (4) to connect
to the Network.
Assignment of an invalid
IP address by the
network during
connection.
Network connection
failure due to lack of a
response from the
network.
Network connection
failure due to a
protocol error.
This failure may occur because of a
weak signal due to obstructions or
geographic position (such as extreme
latitude or longitude). Contact your
Service Provider to verify coverage for
your location.
Power down ThurayaDSL and try
again. If the problem continues,
contact your Service Provider. The
Service Provider should verify that
you have the correct network
settings.
Power down ThurayaDSL and try
again. If the problem continues,
contact your Service Provider.
Power down ThurayaDSL and try
again. If the problem continues,
contact your Service Provider.
24 Network connection
failure – GPRS stack
could not attach to MUX
interface. Power down
and try again.
25 Network connection
failure - GPRS stack
could not detach from
MUX interface. Power
down and try again.
26 SIM card error - IMSI
field is longer than 8
bytes and is invalid.
Please contact your
Service Provider.
Internal software error. Power down ThurayaDSL and try
Internal software error. Power down ThurayaDSL and try
SIM card may have
been programmed
incorrectly.
ThurayaDSL Satellite IP Modem User Manual
again. If the problem continues,
contact your Service Provider.
again. If the problem continues,
contact your Service Provider.
SIM card was incorrectly programmed.
The SIM card must be replaced by
another from your Service Provider.
39
Page 50

Number and
Description
27 GPRS software
internal failure - GPRS
stack message
subscription failure.
Please contact your
Service Provider.
28 Your PC has been
disconnected from the
ThurayaDSL terminal.
Please reconnect your
PC if you desire service
41 Your PC is opening large
numbers of TCP connections
(may be a virus generating
connections). The
ThurayaDSL terminal is
running out of resources.
42 TCP connection
resources are depleted
due to your PC opening
excessive connections.
You must restart your
terminal to regain service
to the network.
101 You were detached
by the network. The
ThurayaDSL terminal is
attempting to reattach…
Cause Solution
Internal software error. Power down ThurayaDSL and try
again. If the problem continues,
contact your Service Provider.
The connection between
PC and ThurayaDSL has
been removed, or
The interface cable
between PC and
ThurayaDSL is not plugged
in properly.
Applications (and
possibly viruses) on
your PC are generating
excessive Internet
connections.
Excessive TCP
connections by the PC
have consumed all
available connection
resources in the
terminal. The terminal
cannot recover from
this error.
Connection broken by
the Network.
Remove and reinsert the interface
cable from both the PC and the
ThurayaDSL. When done reboot the
ThurayaDSL.
Check your PC for applications that
may open large numbers of
connections and disable these
applications.
If the problem continues, contact your
Service Provider.
Clean up PC applications that are
consuming excessive TCP
connections. Power down
ThurayaDSL and try again. If the
problem continues, contact your
Service Provider.
Power down ThurayaDSL and try again. If
the problem continues, contact your Servi ce
Provider.
102 No network
connection – User
initiated detach from
network.
103 Network connection
failure – PLMN is not
allowed. Reacquiring
connection.
The ThurayaDSL
terminal has received
detach confirmation
from the network.
Network connection
failure due to PLMN
not allowed.
If the problem continues, contact your
Service Provider.
If the problem continues, contact your
Service Provider.
40 ThurayaDSL Satellite IP Modem User Manual
Page 51

Number and
Description
104 Network
connection failure - LA is
not allowed. Reacquiring
connection…
105 Network
connection failure –
Roaming is not allowed.
Reacquiring connection.
106 Network
connection failure ThurayaDSL terminal
implicitly detached by the
network. Reacquiring
connection…
107 Network service is not
available – Network
resources not available.
Reacquiring connection…
108 Network service is
not available. Reacquiring
connection…
Cause Solution
Network connection
failure because ThurayaDSL
is in a service not allowed
Location Area (LA) .
You are using a SIM
card from a carrier that
does not have a
roaming agreement
with your Service
Provider.
Network connection
failure because the
ThurayaDSL was
implicitly detached by
the Network.
Network service not
available due to lack of
network resources.
Network service not
available.
If the problem continues in other
areas where service is allowed,
contact your Service Provider.
If the problem continues with an
authorised SIM card, contact your
Service Provider.
If the problem continues, contact your
Service Provider.
The spot beam is dark and cannot be
illuminated for ThurayaDSL service . If the
problem continues, contact your Service
Provider.
The spot beam is dark and cannot be
illuminated for ThurayaDSL service . If the
problem continues, contact your Service
Provider.
109 Network service is not
available – No network.
Reacquiring connection…
110 Access to network is
not available at the mo ment,
ThurayaDSL terminal
acquiring network…
111 Network service is
not available – Limited
network service.
Reacquiring
connection…
112 Network service is
not available - Invalid
Network service not
available.
Network service not
available because cell access
is barred.
Network service not
available due to limited
service.
Network service not
available because the
ThurayaDSL Satellite IP Modem User Manual
If the problem continues, contact your
Service Provider.
If the problem continues, contact your
Service Provider.
If the problem continues, contact your
Service Provider.
You should verify that the
ThurayaDSL has an open view of the
41
Page 52

Number and
Description
position. Reacquiring
connection…
113 Network service is
not available – Invalid
position for the selected
Service Provider.
Reacquiring
connection…
114 Network service is
not available - Invalid
position for selected RAI.
Reacquiring
connection…
115 Network service is
not available – Unknown
cause. Reacquiring
connection…
116 Network
connection failure Insufficient resources.
Reacquiring
connection…
Cause Solution
GPS position is not
valid.
Network connection
failure because the of
an invalid GPS position.
The GPS fix does not
match the selected
Routing Area
Information (RAI).
Network service not
available – cause
unknown.
Network connection
failure due to
insufficient resources.
sky to get a GPS fix. If the problem
continues, contact your Service
Provider.
Verify that the ThurayaDSL has an
open view of the sky to get a GPS fix.
If the problem continues, contact your
Service Provider.
You should verify that the terminal
has an open view of the sky to get a
current GPS fix. If the problem
continues, contact your Service
Provider.
If the problem continues, contact your
Service Provider.
If the problem continues, contact your
Service Provider. Network may be
down.
117 Network
connection failure – PDP
rejected for unspecified
reason. Reacquiring
connection…
118 Network
connection failure Service option
temporarily out of order.
Reacquiring
connection…
119 Network
connection failure - PDP
deactivated by network.
Reacquiring
connection…
Network connection
failure – unknown
cause.
Network connection
failure because service
option is temporarily
out of order.
Network connection
failure.
If the problem continues, contact your
Service Provider. Network may be
down.
If the problem continues, contact your
Service Provider. Network may be
down.
If the problem continues, contact your
Service Provider. Network may be
down.
42 ThurayaDSL Satellite IP Modem User Manual
Page 53

Number and
Description
120 No network
connection - User
initiated PDP
deactivation.
121 Network
connection failure Missing or invalid APN.
Please provide correct
information and try again.
122 Network
connection failure Rejected by GGSN.
Please re-enter User
ID/Password and try
again.
123 Network
connection failure Subscribed QoS rejected
by network. Please
modify parameters and
try again.
Cause Solution
The ThurayaDSL was
powered down while
connected to the
network.
Network connection
failure because the
APN is missing or
invalid.
Network connection
failure due to rejection
by the GGSN.
Network connection
failure because the
requested QoS was
rejected by the
Network.
You will generally not see this code. In
order for you to deactivate the PDP,
you must power down the terminal. If
the problem continues, contact your
Service Provider.
Contact your Service Provider to get
the correct network settings.
Verify that your Service Provider User
ID and password are correctly set on
the Network Settings screen. If they
are correct and the problem
continues, contact your Service
Provider.
Modify the QoS settings and try again.
If the problem continues, set all QoS
settings to the default values and try
again. If the problem continues with
the default values, contact your
Service Provider.
124 Network
connection failure Invalid transaction id.
Reacquiring
connection…
125 Network
connection failure –
Unknown Session
Manager error.
Reacquiring
connection…
126 Network access
temporarily unavailable please wait, the
ThurayaDSL terminal
should automatically
Network connection
failure due to invalid
transaction ID.
Network connection
failure due to unknown
session manager error.
Network connection
failure because network
access is blocked.
ThurayaDSL Satellite IP Modem User Manual
If the problem continues, contact your
Service Provider.
If the problem continues, contact your
Service Provider.
Network access is blocked. The
network will send the ThurayaDSL a
timer value, and the ThurayaDSL will
attempt to connect again when the
timer is complete. If the problem
43
Page 54

Number and
Description
reacquire a connection
within 1-2 minutes.
127 Network access
blocked – Radio priority
is less than threshold.
ThurayaDSL terminal
waiting to be unblocked
by the network…
128 Network Blocked GPS fix is too old.
ThurayaDSL terminal will
attempt to reacquire
connection after
receiving a new GPS fix.
129 Network access
blocked - GPS location
may be too old. If
condition does not clear,
please obtain a new GPS
location.
Cause Solution
continues, contact your Service
Provider.
Network access is
blocked due to the
user’s priority.
Notification of a GPS
fix during or after
Network connection
procedure.
GPS fix may be too old.
You are blocked from Network
access due to your network priority. If
the problem continues, contact your
Service Provider.
A new GPS fix is sent to the network
that is more current than the one sent
when the connection was acquired.
The ThurayaDSL will reacquire the
connection. If the problem continues
and a new connection cannot be
made, contact your Service Provider.
Verify that the ThurayaDSL has an
open view of the sky to get a GPS fix.
If the problem continues, contact your
Service Provider.
44 ThurayaDSL Satellite IP Modem User Manual
Page 55

Glossary
APN: Access Point Name. APNs can be assigned to each external network interface
to allow communications among multiple Internet Service Providers (ISPs). If use
of multiple ISPs is required in your network, on ThurayaDSL MMI Network
Settings screen you can enable APN and enter the value supplied by your Service
Provider.
Compass: When going through the antenna Pointing Process, you reference the
compass on ThurayaDSL to get the correct direction needed for the antenna.
DHCP: Dynamic Host Configuration Protocol. DHCP is a communications protocol
that lets network administrators manage centrally and automate the assignmen t
of IP addresses in an organization's network. With use of the Internet Protocol,
each machine that can connect to the Internet needs a unique IP address. You
must make sure that the Windows network settings on your PC are set to allow
the network to choose IP settings automatically.
DNS: Domain Name Service, a static, hierarchical name service for TCP/IP hosts.
The network administrator configures the DNS with a list of host name s and IP
addresses, allowing users of workstations configured to query the DNS to specify
remote systems by host names rather than IP addresses. On ThurayaDSL MMI
Network Settings screen, a primary and possibly a secondary DNS address
supplied by your Service Provider must be assigned.
Ethernet: Ethernet is a local area networking method used widely throughout the
computer industry. It is the only communication interface suppor ted by
ThurayaDSL.
Fault Code: A number which uniquely references an error in a hardware or
software system. In ThurayaDSL, if there is a fault detected, the fault code and a
description are displayed at the bottom of the ThurayaDSL MMI Home and
Status screens.
GPS: Global Positioning System. When the GPS receiver in ThurayaDSL gets a
bearing on a GPS satellite, the receiver computes and stores the ThurayaDSL’s
location on earth. That location is used in the Pointing Process to obtain your
location relative to the ThurayaDSL Satellite .
Normal Operational Mode: In this mode, ThurayaDSL is connected to your
network, allowing you to perform standard system activities such as Internet
browsing. The other mode of ThurayaDSL operation is Pointing Mode.
Pointing Lights: The pointing lights on the ThurayaDSL panel serve as a bar graph
to indicate relative signal strength during Pointing Mode.
ThurayaDSL Satellite IP Modem User Manual
45
Page 56

Pointing Mode: In this mode, using ThurayaDSL Protractor and Compass, and
referencing the Pointing Screen for indications of signal strength, you manipulate
the ThurayaDSL antenna to get the optimum GPS location and Thuraya Satellite
signal strength for your network connection. Pointing is required during
ThurayaDSL set-up or if the ThurayaDSL has been moved from its previous
location. Once you have obtained the best antenna position, you can enter
Normal Operational Mode and be ready to perform standard activities.
Protractor: An instrument that measures angles, ThurayaDSL protractor provides
the current angle of the antenna so that you can adjust it to the antenna angle
specified on the Pointing Screen.
SIM: Subscriber Identification Module. Your Service Provider issues you a SIM,
containing your SIM Personal Identification Number (PIN) and other securityrelated information. You insert the SIM into ThurayaDSL SIM holder as part of
ThurayaDSL hardware setup. If you configure the ThurayaDSL to enable SIM PIN
security, each time you invoke the ThurayaDSL MMI after turning on the
ThurayaDSL, PIN authorisation is required in order to use the system.
SIM PIN: A Subscriber Identification Module (SIM) Personal Identification Number
(PIN) may be supplied by your Service Provider. If SIM PIN entry is enabled on
ThurayaDSL MMI Security Management screen, a prompt requests you to enter
the SIM PIN each time you run the MMI. This helps prevent unauthorised use of
your SIM.
Static IP Address: A static Internet Protocol (IP) address is a number that is
assigned to a computer by an Internet Service Provider (ISP) to be its permanent
address on the Internet. Computers use IP addresses to locate and talk to each
other on the Internet. If Static IP addressing is enabled on ThurayaDSL MMI
Network Settings screen, you must enter an IP address supplied by your Service
Provider in the Static Public Network IP Address field that follows.
ThurayaDSL: Satellite IP Modem referenced throughout this document as
ThurayaDSL.
46 ThurayaDSL Satellite IP Modem User Manual
Page 57

Index
A
NTENNA POINTING, 15
ONTROLS AND INDICATORS, 17
C
Battery light, 18
Compass, 19
Exit Pointing button, 18
Pointing mode lights, 18
Power button, 17
Power light, 17
ThurayaDSL antenna protractor, 19
OVERAGE AREA, 1
C
IRST TIME SET-UP, 2
F
Step 1: Unpack THURAYADSL, 4
Step 2: Unpack THURAYADSL – Power, 5
Step 3: Obtain initial GPS fix, 6
Step 4: Connect THURAYADSL using Ethernet, 7
Step 5:Rough Pointing to Satellite, 8
Step 6: Fine Pointing to Satellite, 11
Step 7:Exit Pointing Mode, 13
LOBAL POSITIONING SYSTEM OPERATION, 14
G
Stored GPS Location, 14
Glossary, 49
INIMUM SYSTEM REQUIREMENTS AND SOFTWARE INSTALLATION, 3
M
MMI Screens, 20
Advanced Settings screen, 30
Home screen, 21
Login Settings screen, 29
Network Settings screen, 26
Pointing screen, 20
Properties screen, 23
Restore Factory Defaults, 23
Security Management screen, 28
Settings screen, 26
Statistics screen, 24
Status screen, 25
UICK REFERENCE, 14
Q
AFETY INFORMATION, i
S
Warning Symbols Used in this Manual, i
Warnings for Thuraya, i
Batteries and accessories, iii
ThurayaDSL Satellite IP Modem User Manual
47
Page 58

Connecting devices, iii
Do not operate during electrical storms, ii
Do not stand in front of antenna, i
General, ii
Hearing aids, iv
In vicinity of blasting work or explosive environments, ii
Pacemakers, iii
Properly ground antenna, ii
Qualified service, iii
Troubleshooting, 32
Fault Codes, 38
General, 33
Unpacking ThurayaDSL, 2
Upgrade ThurayaDSL, 31
Upgrading Software, 31
48 ThurayaDSL Satellite IP Modem User Manual
Page 59

ThurayaDSL Satellite IP Modem User Manual
49
 Loading...