

1 Overview
Thundercomm AI KIT aims to help developers to evaluate, verify and develop their on-device AI products with
SDA845 AI platform, providing AI algorithm SDK, demo applications, tools and cloud service support.
2 Thundercomm AI KIT Product Specification
2.1 Hardware Specification
Module Item Spec
Qualcomm Snapdragon 845,
CPU
8x Qualcomm® Kryo™ 385 @ 2.8GHz
Computing
Memory
Camera
Display
GPU Adreno 630 GPU
DSP Hexagon 685 DSP
ISP Qualcomm Spectra™ 280 image sensor processor
RAM 8GB LPDDR4X
ROM 64GB UFS2.1
SD Card Support MicroSD Card
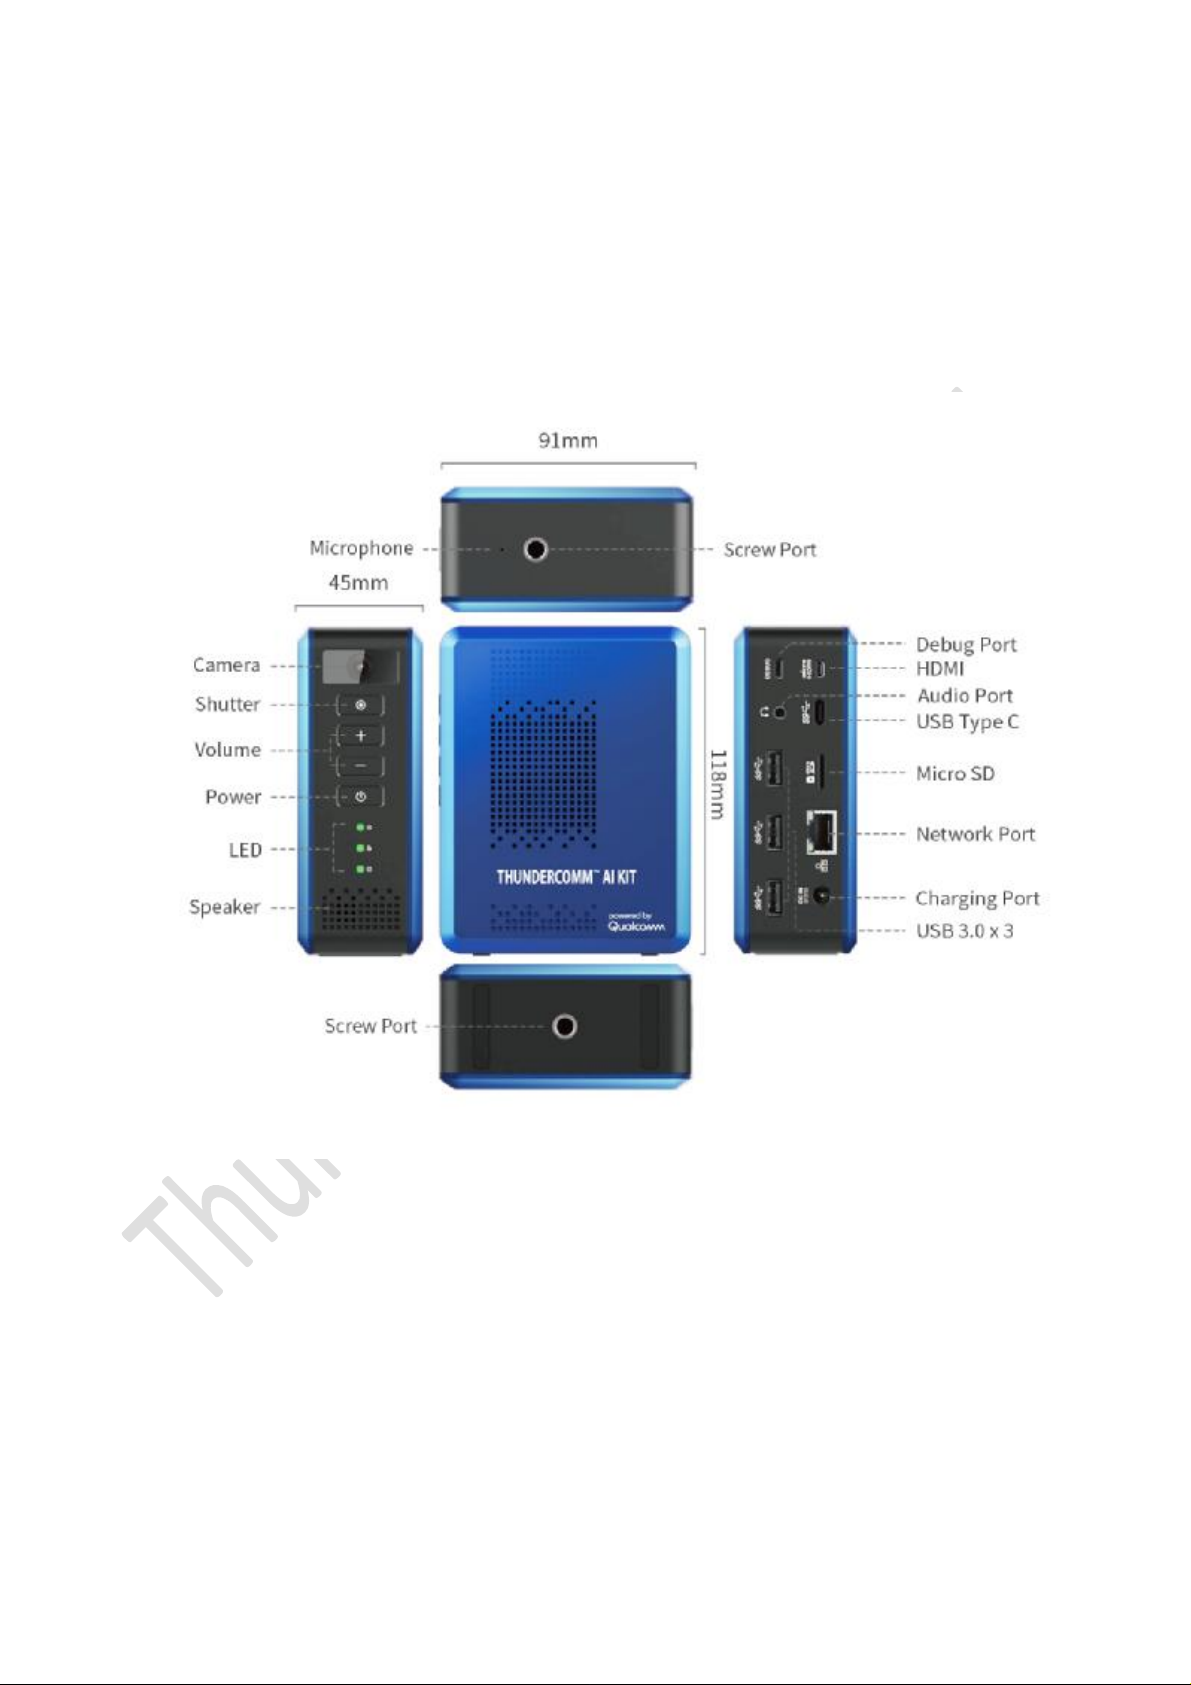
Built in Camera 8MP, FOV 120 degree;
external
USB3.0 camera
Camera
HDMI 1x Micro HDMI, 4k Ultra HD
Type C 4k Ultra HD
Video VPU
Speaker 1x speaker
Audio
Audio out 1x Headset out, only support line out.
Microphone 1x microphone
Support for HDR10, HLG, and H.265 (HEVC) 4k@60fps video
capture

Wireless Connectivity WIFI 2.4G/5G,802.11 a/b/g/n/ac 2x2 MIMO
USB 3x USB3.0 host, 1x 3.0 Type C
Wired Connectivity
Ethernet 1x GbE.
Debug Port Micro USB 1x Micro USB
Indicator LED RGB Led: Power status, WIFI status, Ethernet status;
Input Buttons Power key/ Volume up/down key/Camera snapshot key
Power Power charging 12v DC
Table 2.1-1
2.2 Software Specification
Module Feature
OS Android O
AI Framework Tensorflow, Tensorflow Lite, Caffe/Caffe2, ONNX,SNPE, Android NN
Face Detection & Face Recognition & Emotion Detection & Age Detection & Gender
AI Algorithm
SDK
AI Sample
Application
Detection algorithm
Object Detection algorithm
Face Recognition & Emotion Detection & Age Detection & Gender Detection algorithm
demo
Objection Detection algorithm demo
Camera Support USB Camera, UVC2.0,4k@30fps

Ultra HD camera preview, recording and snapshot
RTSP Client
Graphic OpenGLES3.2, OpenCL2.0 full
Table 2.2-1
3 Thundercomm AI KIT Basic Setup
3.1 Hardware Setup
l Plug in your 12V power supply into a wall outlet and then connect the power supply to your AI Kit. Your
AI Kit should be powered down at this point.
l This AI Kit's preinstalled OS is android, there are two method to show AI Kit's android UI.
Method 1:
1) Plugin in your micro HDMI cable to your AI Kit and then connect the micro HDMI cable to your
display screen with HDMI in interface. Note: Micro HDMI cable is not included in the AI kit but can
be purchased separately.
2) Press power button for about five or six seconds and release. Then AI Kit will be powered on and
start Android.
3) Then you can see Android UI from your display screen.
Method 2:
1) A terminal program is required on your computer.
If Ubuntu is on your computer, the terminal program "Vysor" can be used. Please download the latest
version from Chrome application store or from the website
http://www.vysor.io/download/?return=http%3A%2F%2Fwww.vysor.io%2F
If Windows is on your computer, the terminal program "Total Control" can be used. You can download it
from the website http://tc.sigma-rt.com.cn/
Install Vysor/Total Control or another terminal program of your choice.
2) Plug in your type C to USB cable to your AI Kit and then connect the typeC to USB cable to your
computer.
3) Then AI Kit will be powered on automatically and start Android.
4) Start your terminal program on your computer. After android start on AI Kit is completed, Android
UI can be showed on your terminal program.
l Connect usb mouse to your AI Kit and you can operate your AI Kit with the mouse. Note: USB mouse is
not included in the AI kit but can be purchased separately.

3.2 Software Setup
WiFi Connection
Method of WiFi configure as android's phone:
After entering android's launcher UI, open "settings" to configure WIFI to connect wireless router.
You can try to access internet with browser to make sure wifi connection works well.

FCC Caution:
Any Changes or modifications not expressly approved by the party responsible for compliance
could void the user's authority to operate the equipment.
This device complies with part 15 of the FCC Rules. Operation is subject to the following two
conditions: (1) This device may not cause harmful interference, and (2) this device must
accept any interference received, including interference that may cause undesired operation.
FCC Radiation Exposure Statement:
This equipment complies with FCC radiation exposure limits set forth for an
uncontrolled environment .This equipment should be installed and operated with
minimum distance 20cm between the radiator& your body.
This transmitter must not be co-located or operating in conjunction with any other antenna or
transmitter.
Note: This equipment has been tested and found to comply with the limits for a Class B digital
device, pursuant to part 15 of the FCC Rules. These limits are designed to provide
reasonable protection against harmful interference in a residential installation. This
equipment generates, uses and can radiate radio frequency energy and, if not installed and
used in accordance with the instructions, may cause harmful interference to radio
communications. However, there is no guarantee that interference will not occur in a
particular installation. If this equipment does cause harmful interference to radio or television
reception, which can be determined by turning the equipment off and on, the user is
encouraged to try to correct the interference by one or more of the following measures:
—Reorient or relocate the receiving antenna.
—Increase the separation between the equipment and receiver.
—Connect the equipment into an outlet on a circuit different from that to which the receiver is
connected.
—Consult the dealer or an experienced radio/TV technician for help.
 Loading...