

Thumpstar KXD, ZONGSHEN, FENGHONG, YX Owner's Manual
MANUAL # 3598
engine manual
Owner’s Manual
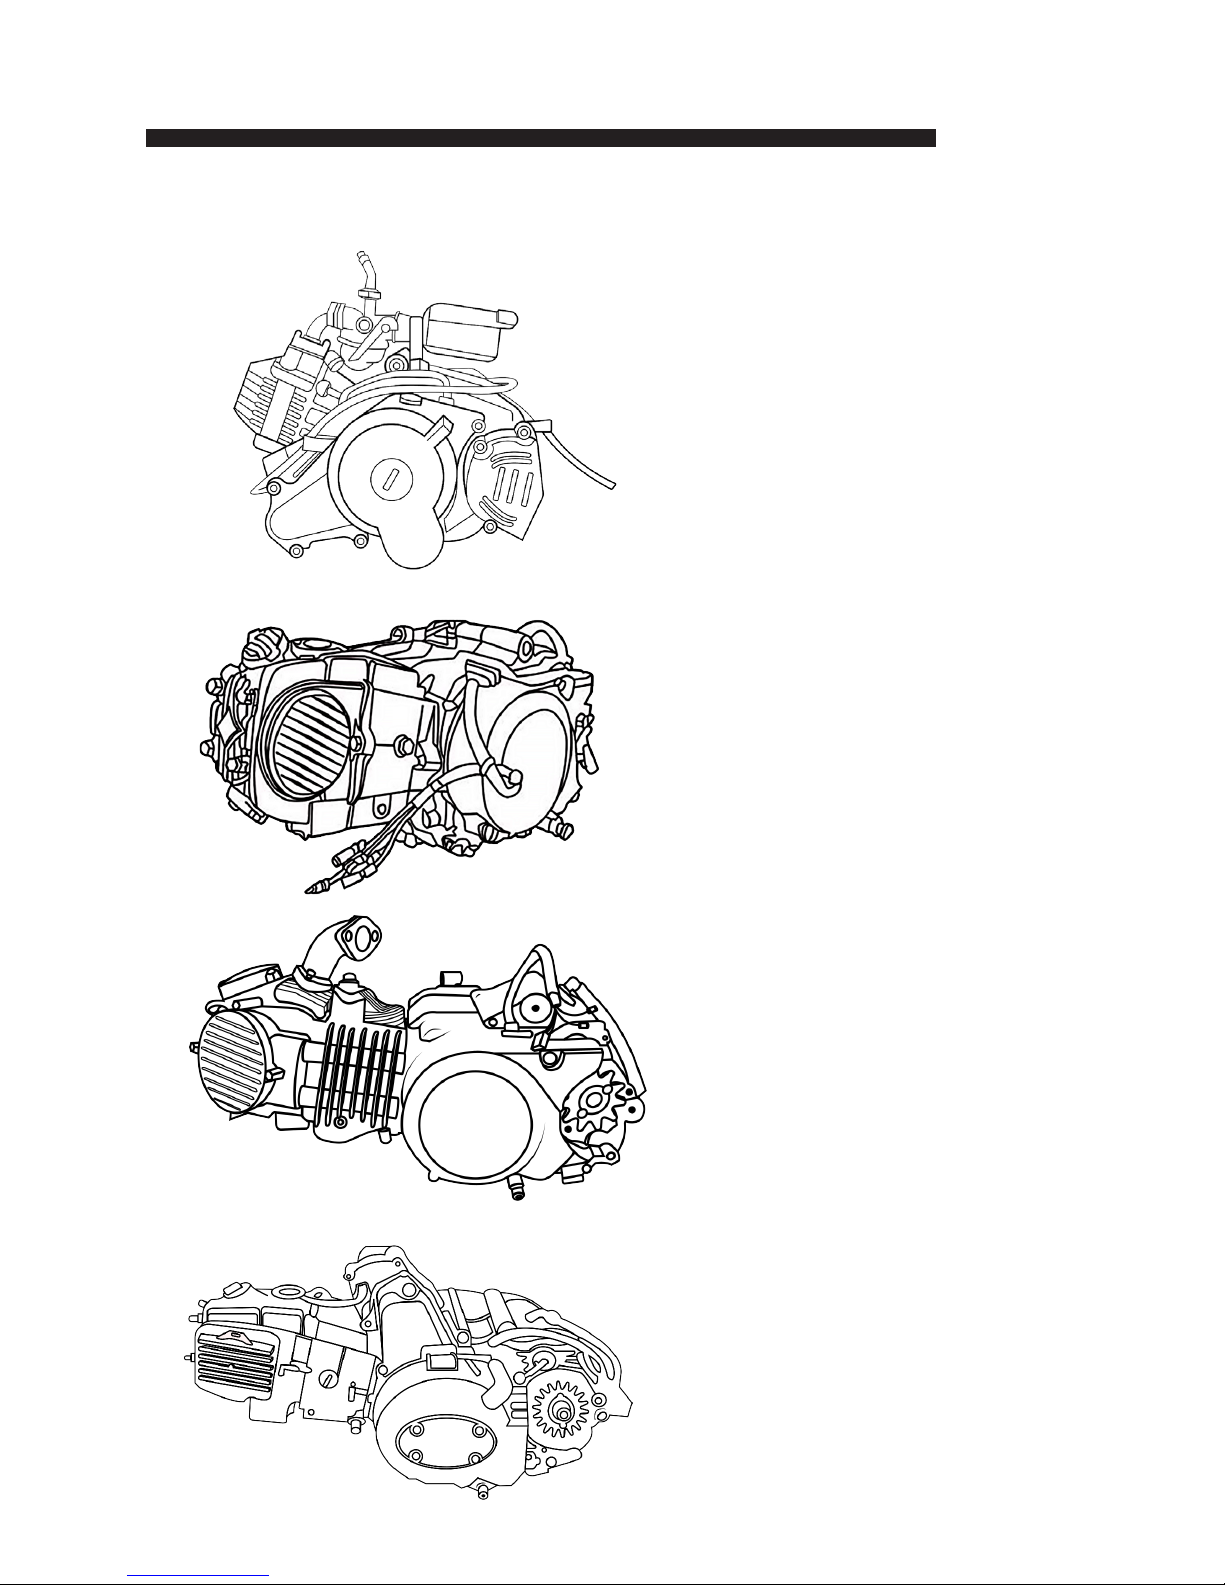
kxd
fenghong
YX
• 50cc
• 88cc
• 70cc
• 110cc
• 125cc
• 140cc
• 150cc
• 160cc
• 180cc
Zongshen
• 155cc
• 190cc

ese pages give an overview of the contents of your owner’s manual
Quick Reference .................................................................................... 1
Introduction ........................................................................................ 2
Motorcycle Assembly .......................................................................... 3
A Few Words About Safety .................................................................. 6
Motorcycle Safety ................................................................................. 7
Exhaust System ................................................................. 9
Fuel Handling .................................................................... 9
Safety Equipment ................................................................ 10
Message To Riders .............................................................................. 12
Loading, Accessories & Modications .............................................. 14
Safety Labels ........................................................................................ 16
Operating Controls ............................................................................. 17
Operation Component Locations ....................................... 17
Fuel Valve ......................................................................... 18
Choke Knob .................................................................... 19
Before Riding ..................................................................................... 20
Protective Gears ................................................................................. 21
Is Your Motorcycle Ready ................................................................... 22
Pre-Ride Inspection ........................................................................... 23
Basic Operation & Riding .................................................................. 25
Starting & Stopping the Engine ........................................................... 26
Shiing Gears ....................................................................................... 29
Braking ............................................................................................... 31
Parking ............................................................................................... 32
e Importance of your Maintenance ................................................ 33
Maintenance Safety ............................................................................. 35
Maintenance Schedule ........................................................................ 36
Maintenance ........................................................................................ 39
Front & Rear Brakes ....................................................... 39
Fuel Line and Tank ......................................................... 39
Oil Levels ........................................................................ 39
Replacing the Oil ............................................................. 40
Air Filter .......................................................................... 40
rottle ............................................................................. 41
Chain ................................................................................ 41
Contents

Contents
Tires ................................................................................. 42
General Cleanliness .......................................................... 42
Wiring Diagram .................................................................................. 43
Fuel ...................................................................................................... 44
Engine Oil ........................................................................................... 46
Carburetor Adjustment & Tuning Tips ............................................. 50
Air Cleaner .......................................................................................... 55
Cleaning ........................................................................... 56
rottle ............................................................................................... 57
Clutch System ..................................................................................... 60
Valve Clearance ................................................................................... 62
Engine Idle Speed ............................................................................... 64
Component Inspection ...................................................................... 65
Spark Plug ........................................................................ 65
Suspension ........................................................................ 68
Brakes ................................................................................ 70
Wheels .............................................................................. 73
Side Stand ......................................................................... 77
Tires & Tubes .................................................................... 78
Drive Chain ...................................................................... 82
Appearance Care ................................................................................ 86
Preparing for a Ride ........................................................................... 88
Transporting your umpstar ........................................................... 89
Storing your umpstar ..................................................................... 90
Troubleshooting ................................................................................. 92
You & the Environment ...................................................................... 95
Taking Care of the Unexpected .......................................................... 96
Vehicle Identication ........................................................................ 100
Oxygenated Fuels .............................................................................. 101
Specication ...................................................................................... 102
Spare Part Catalogue ......................................................................... 104
Torque Settings .................................................................................. 121
Parts Finder ....................................................................................... 126
Warranty ............................................................................................ 127
Disclaimer ......................................................................................... 128
Service Manual .................................................................................. 129
Title Ownership ................................................................................ 130
1
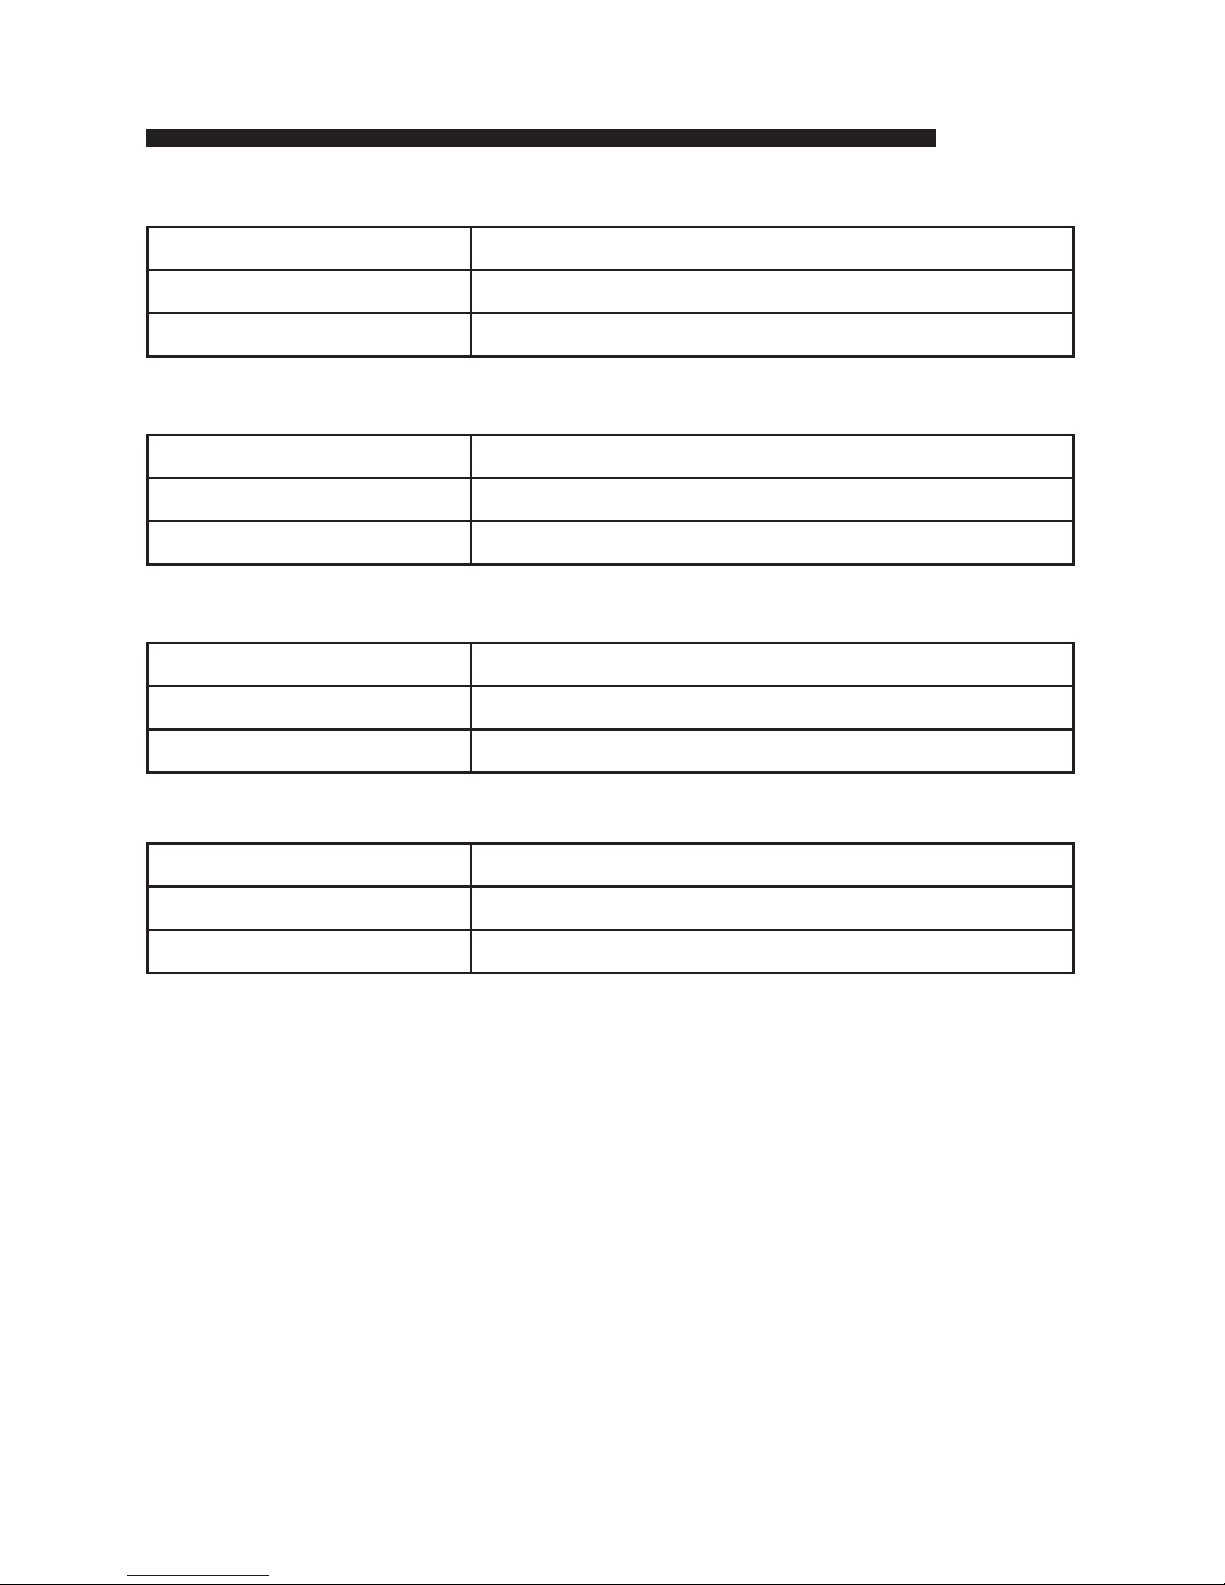
Quick Reference
Oil 4 Stroke10/40 950mls
Spark Plug Torch A7TC | NGK C7HSA
Valve Clearance .003” intake / .005” exhaust
Oil 4 Stroke10/40 950mls
Spark Plug Torch A7TC | NGK C7HSA
Valve Clearance .003” intake / .005” exhaust
Oil 4 Stroke10/40 950mls
Spark Plug Torch A7TC | NGK C7HSA
Valve Clearance .003” intake / .005” exhaust
Oil 4 Stroke10/40 950mls
Spark Plug Torch A7TC | NGK C7HSA
Valve Clearance .003” intake / .005” exhaust
KXD50CC|70cc
FENHONG70CC|110cc
YX125CC|140CC|150CC|160CC|180CC
ZONGSHEN155CC|190CC

2
Introduction
Congratulations in your decision to purchase a Genuine
umpstar Recommended Engine. e following manual has been
prepared to familiarise you with your engine, and the procedures
involved with operating and maintaining the engine.

3
Engine Installation
Always have a Qualied Mechanic to install your engine.
Tools Required:
• 8, 10, 12, 13, 14, 17, 19mm socket
and spanner
• Rubber Mullet
• Paint Pen
• read Lock Glue
• Zip Tie
Installing an engine into your motorcycle can be dierent for every
motorcycle. It depends on what brands you’ve purchase and what parts
you require cause some people will need new carburetor, electrical,
sprockets and cables. Some people are also doing straight replacement and
won’t need anything else but the engine.
e most important thing before you can install your new engine is to
make sure that your engine end frame has the universal crf50 engine
mounts. Sometimes both frame and engine has a universal crf50 engine
mounts but the frame can be slightly dierent to the engine mold and may
require some slight modications to get the engine t the frame perfectly.
Because every engine is dierent, we cannot give an exact guide on how to
install but we can just give you some recommendations. Before you install
your new engine, check you have the correct wiring, carburetion, cables
and sprocket otherwise your installation will not go smoothly but you can
install the engine and order this parts later on.
Remember to threadlock glue both engine mounts, footpeg mounts and
torque to the settings. (page 121)
When installing the carburetor make sure the right gasket is used at the
carburetor and the air lter is oiled.

4
Engine break-in
Run bike at no more than three quarter throttle & do not allow engine to
rev to a high speed. Engine break-in should be no less than one hour.
Aer one hours carry out the following checks & procedures:
□ Drain oil & replace with 950mls quality 10w 30w or 10w 40 4-stroke
engine oil (page 48)
□ Check all nuts & bolts & tighten where necessary (page 121)
□ Check wheel spokes (especially rear wheel drive side) & tighten where
necessary
□ Re-Adjust throttle cable & clutch cable if required (page 57 & 60)
□ Re-tension chain and lubricate
□ Check wheel bearings for any sign of wear of free-play
□ Check brake calliper operation & brake pad wear (page 70)
□ Check tire pressures (page 78)
Remember to do pre-ride inspection each time you ride (page 23)
FUEL HANDLING
Precautions should be taken when handling any type of petrochemicals.
Gasoline can catch re, and is toxic to life and the environment.
umpstar motorbikes recommend the following safety tips to avoid
accidents, injury/death:
Always turn o the engine when re-fuelling. Do not refuel right aer
the engine has been running and is still very hot. Do not spill gasoline on
the engine or exhaust pipe/muer when refuelling. When transporting the
machine in another motorcycle, be sure it is kept upright and that the fuel
cock is in the “OFF” position. Otherwise, fuel may leak out of the Carburetor or fuel tank.
Engine Installation

5
Starting & Stopping the Engine
Always follow the proper starting procedure described below.
PREPARATIONS
Before Starting, turn the fuel valve ON and make sure bike is in NEUTRAL.
Specially for TSX-C 125 Because it has to be started in Neutral. TSX-C
140 can be started in gear but recommended to start in NEUTRAL
STARTING PROCEDURE
To restart a warm engine, follow the procedure for High Air Temperature
on page 27.
Normal Air Temperature
10° 35°C (50° 95°F)
1. Push the choke knob up all the way to fully ON.
2. (Using the Kickstarter) Lightly depress the kickstarter until
resistance is felt.en let kickstarter return to the top of its stroke.
With the throttle slightly open, operate the kickstarter. Kick from the
top of the stroke through to the bottom with a rapid, continuous motion.
Choke Knob Kickstart

6
Starting & Stopping the Engine
NOTICE:
Allowing the kickstarter to snap back freely against the pedal stop
can damage the engine case.
3. Warm up the engine by opening and closing with the throttle
slightly open, press the start the throttle slightly.
4. About a quarter-minute aer the engine starts, push the choke
knob in all the way down to fully OFF.
5. If idling is unstable, open the throttle slightly.
High Air Temperature or to restart warm engine
35°C (95°F) or above
1. Do not use the choke.
2. Start the engine (See step 2 under Normal Air Temperature)
Low Air Temperature
10°C (50°F) or below
1. Follow steps 1- 2 under Normal Air Temperature.
2. Warm up the engine by opening and closing the throttle slightly.
3. Continue warming up the engine until it runs smoothly and
responds to the throttle when the choke knob is at fully OFF.
Note: Will take at least 5 to 10 minutes for your engine to be warmed up
and start smoothly

7
Starting & Stopping the Engine
NOTICE:
Extended use of the choke may impair piston and cylinder wall
lubrication and damage the engine.
FLOODED ENGINE
If the engine fails to start aer repeated attempts, it may be
ooded with excess fuel. To clear a ooded engine:
Using e Kickstarter
1. Push the choke knob all the way down to OFF.
2. Open the throttle fully.
3. Crank the engine several times with the kickstarter.
4. Follow the High Temperature starting procedure
HOW TO STOP THE ENGINE
To stop the engine, shi into neutral, then press the kill switch button.
8
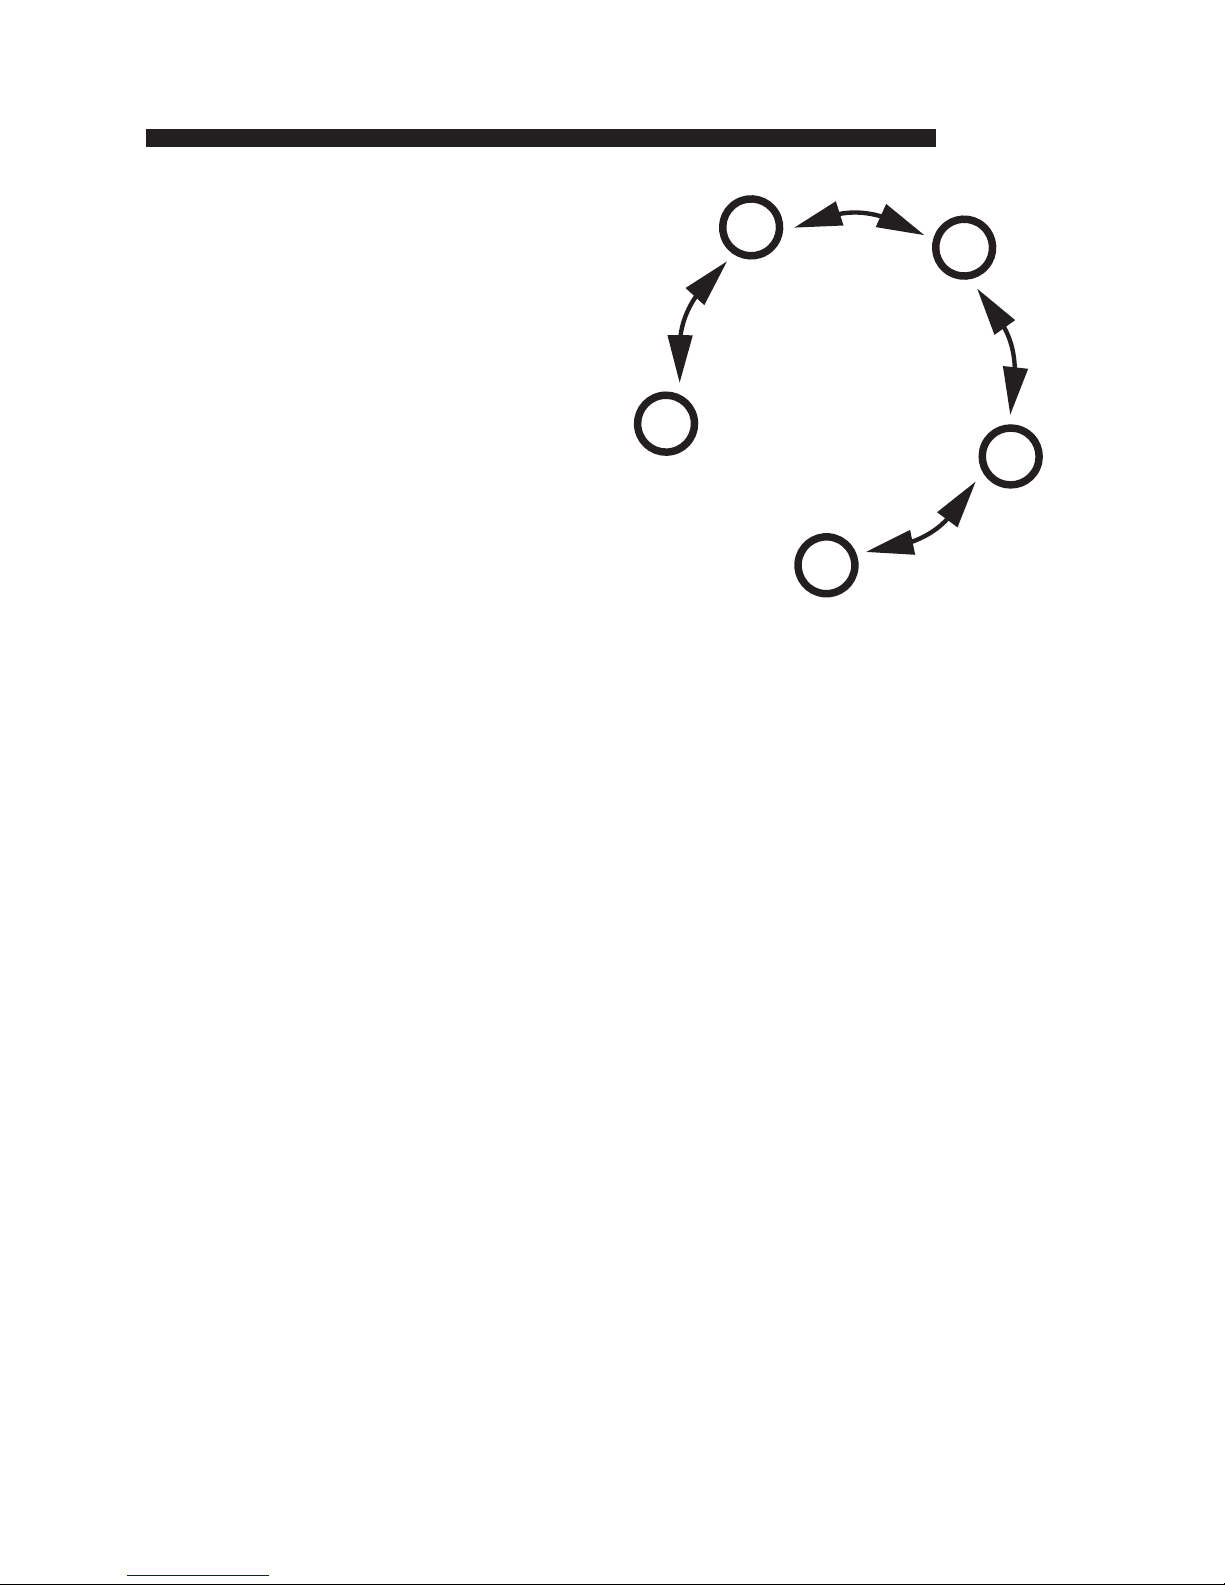
Shifting Gears
umpstar recommended engines
from 50cc to 180cc use this gear pattern
Some umpstars bike, ATV models and
Zongshen 190cc is using a dierent gear pattern
including an extra 5th gear.
Your motorcycle has four forward gears.
To start riding, aer engine has been warmed up and the
side stand raised:
1. Close the throttle and pull the clutch lever in.
2. Raise the shi lever from neutral up to rst gear.
3. Release the clutch lever. Gradually open the throttle.
4. When you attain a moderate speed, close the throttle, pull the clutch
lever in and raise the shi lever. Aer shiing, realese clutch and
apply the throttle.
5. To continue shiing up to each higher gear, repeat step 4.
6. To shi down to a lower gear, close the throttle, pull the clutch lever
in and depress the shi lever. Aer shiing, apply the throttle
Remember to close the throttle before shiing.
NOTICE:
Improper shiing may damage the engine, transmission, and drive train.
0
4
1
2
3
9
Shifting Gears
Upshi to a higher gear or reduce throttle before engine rpm (speed) gets
too high.
Downshi to a lower gear before you feel the engine laboring
(lugging) at low rpm.
NOTICE:
Downshiing can help slow your motorcycle, especially on downhills.
However, downshiing when engine rpm is too high can cause
engine damage.
NOTICE:
To prevent transmission damage, do not coast or tow the motorcycle
for long distances with the engine o .
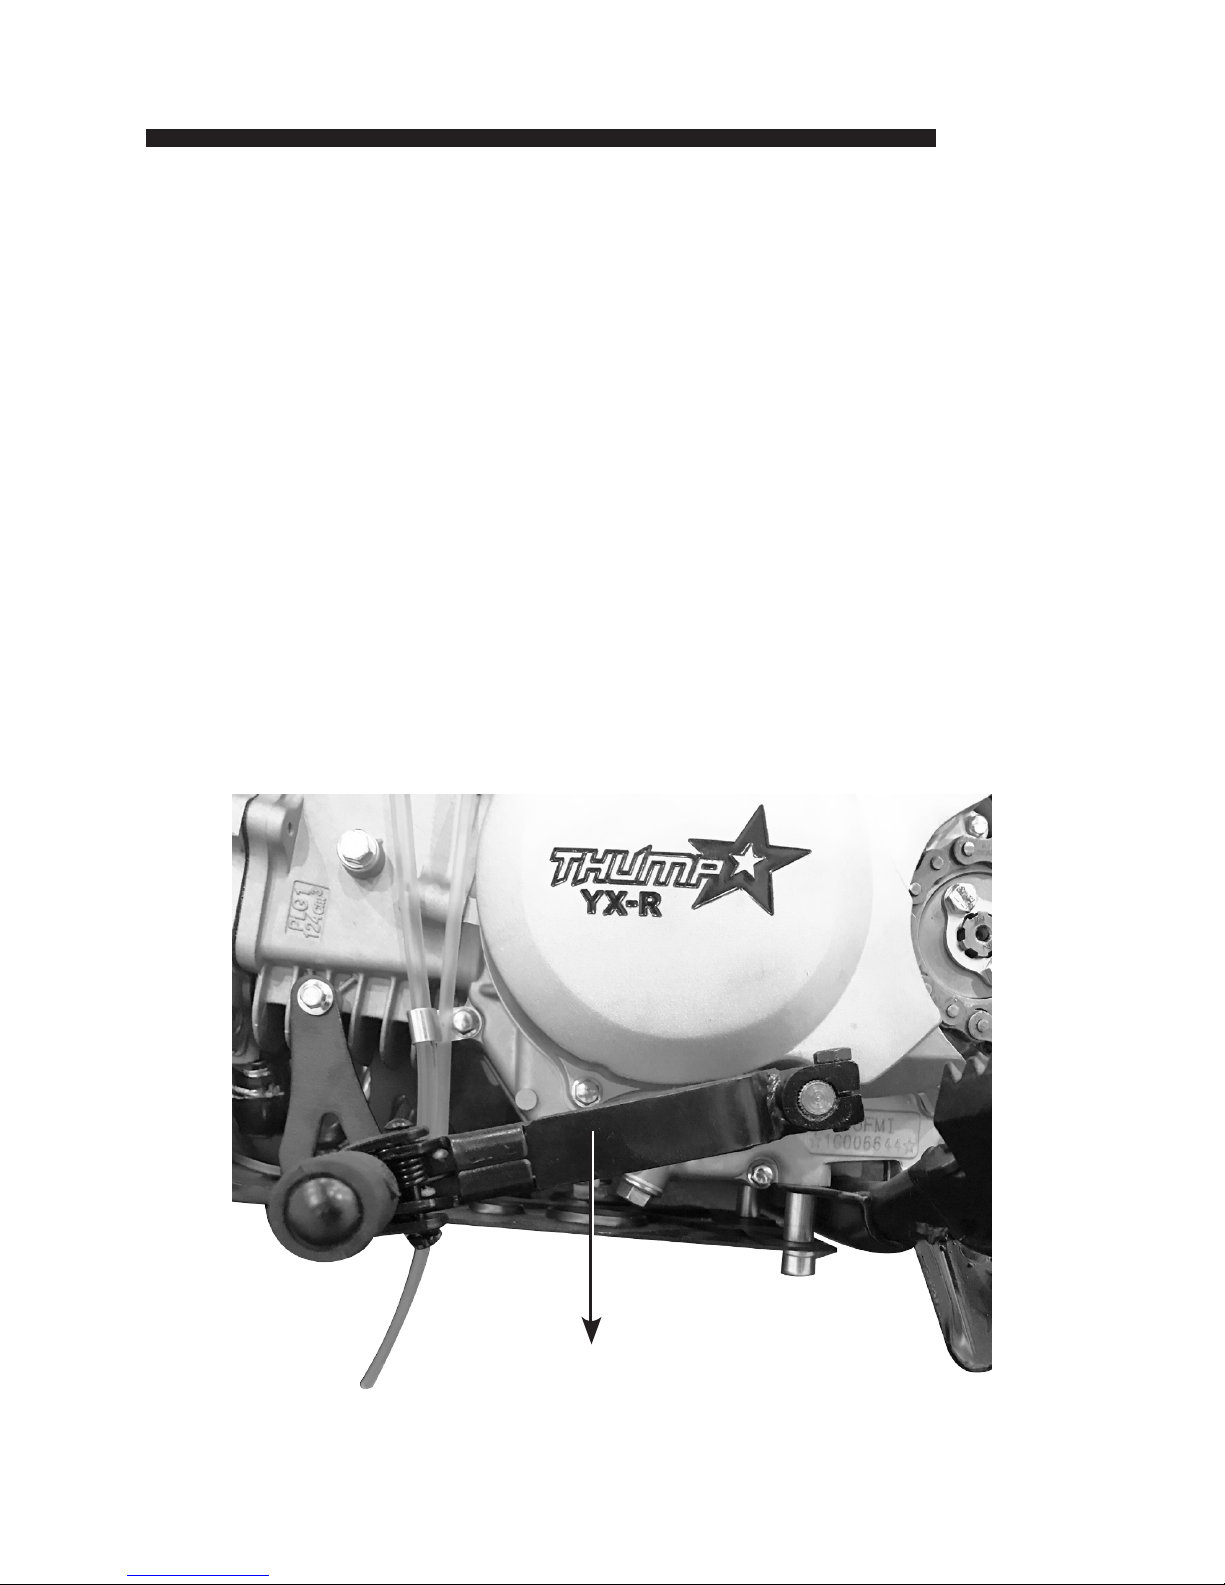
Gear Lever

10
Servicing Your Thumpstar
Keeping your motorcycle well maintained is absolutely essential
to your safety. It’s also a good way to protect your investment, get
maximum performance, avoid breakdowns, and have more fun.
To help keep your motorcycle in good shape, this section includes
a Maintenance Schedule for required servicing and step-by-step
instructions for specic maintenance tasks. You’ll also nd
important safety precautions, information on oils, and tips for
keeping your umpstar looking good.
Always use the ring
spanner end or socket
when possible
Maintenance Tip: e ring spanner or socket will
extend the life of the bolts

11
Maintenance Schedule
To maintain the safety and reliability of your motorcycle,
regular inspection and service is required as shown in the
Maintenance Schedule that follows.
e Maintenance Schedule lists items that can be performed
with basic mechanical skills and hand tools. Procedures for
these items are provided in this manual.
e Maintenance Schedule also includes items that involve
more extensive procedures and may require special training,
tools, and equipment. erefore, we recommend that you
have your Certied Motorcycle Mechanic perform these tasks
unless you have advanced mechanical skills and the required tools.
Procedures for items in this schedule are provided in a service manual
available for purchase from your dealer.
To avoid overlooking required service, we urge you to develop a convenient
way to record the number of days and/or miles you ride. If you do not feel
capable of performing a given task or need assistance, remember that your
Certied Motorcycle Mechanic knows your motorcycle best and is fully
equipped to maintain and repair it. If you decide to do your own maintenance, use only umpstar Genuine Parts or their equivalents for repair or
replacement to ensure the best quality and reliability.
MAINTENANCE PROCEDURES
X: Inspect and clean, adjust, lubricate, or replace, if necessary
C: Clean
A: Adjust
L: Lubricate
R: Replace

12
Maintenance
umpstar Motorbikes promote safety as paramount. As such, it is advised
that before each and every use of your bike that you actively walk around
your motorcycle and check that everything appears in order. Maintenance
should be undertaken regularly and servicing should be carried out by the
appropriate persons. umpstar recommend any work being carried out
on any of our range of dirt bikes should be done by an approved mechanic.
e following list has been provided for you by umpstar Motorbikes as
an advisory process before each ride.
FUEL LINE AND TANK
It is important to check for any fuel leaks around the tanks and along fuel
lines. Bike engines become hot during use and therefore pose a re risk.
(page 44)
OIL LEVELS
Oil Levels Should be checked prior to each usage, the “dipstick” can be
found on the right cover of the crack case, much like a car this is used to
check the oil levels, if the engine is low on oil top up to a suitable level. e
dipstick should always be replaced rmly and securely. e oil supplied
with the motorcycle is transport oil that should be changed aer the rst 4
hours of usage. (page 46)
REPLACING THE OIL
-Remove the “sump plug”
-Drain the oil from the engine
-Replace the sump plug
-Rell the engine with a high quality oil suitable for the engine
PLEASE NOTE: Never maintain the engine when it is hot as this can cause
injury, leaks of petrochemicals can cause res, explosions and even death.

13
Maintenance
Whether your Bike has a 2 – Stroke or 4 – Stroke engine, your bike engine
relies on a good supply of high quality engine oil. Failure to the oil supply
can permanently damage your engine, and oil leaks can cause the loss of
control to your Bike.
SPARK PLUG
. Remove the coil/lead from the spark plug
. Remove the spark plug with the correct tool
-Ensure the Gap at the contactors is 0.6-0.7mm
-Clean around the contactors (where the spark is emitted from) or replace
the unit (page 65)
AIR FILTER
Check the air lter aer each usage of the motorcycle. Where applicable
remove the air lter for cleaning
Wash the lter or soak it with an air lter cleaner or machine oil, if the
lter is in any way damaged, please source a replacement lter appropriate
for tting to the Carburetor.
CAUTION: Make sure the air lter is correctly tted to the bike; failure to
t the lter will result in contaminants entering the engine and cause fatal
damage to the engine components (page 55)
THROTTLE
e throttle of your motorcycle directly aects the speed of your bike, it
should be in perfect working order before each time you ride your bike.
Check and ensure that the cable and all mechanical parts included in the
throttle system are moving freely. (page 57)

14
Maintenance
e Carburetor is also considered part of the throttle system and may also
require adjustment. It is not advised to make adjustments whilst the engine is running. Repeat adjustments whilst the engine id o and test each
adjustment aerwards.
To adjust the Carburetor:
-Support the motorcycle by means of the side stand
-Adjust the idling speed using the adjustment screw (recommended r/min
are aprox. 1500 r/min)
PLEASE NOTE: Do not make adjustments to a cold engine as this is the
most changeable state of the engines running. Adjustments should not
be made by unqualied persons, if in doubt please consult a qualied
mechanic. (page 50)
PLEASE NOTE:
Some cleaning chemicals can remove oils and lubricants that are vital
to the running condition of the Bike. It is highly recommended that all
lubricated areas are treated with the correct lubricants. Do not use corrosive detergents for the cleaning of the motorcycle. Brakes can be rendered
ineective if wet or contaminated with detergents, please allow for drying
time prior to reusing the motorcycle aer cleaning.
15
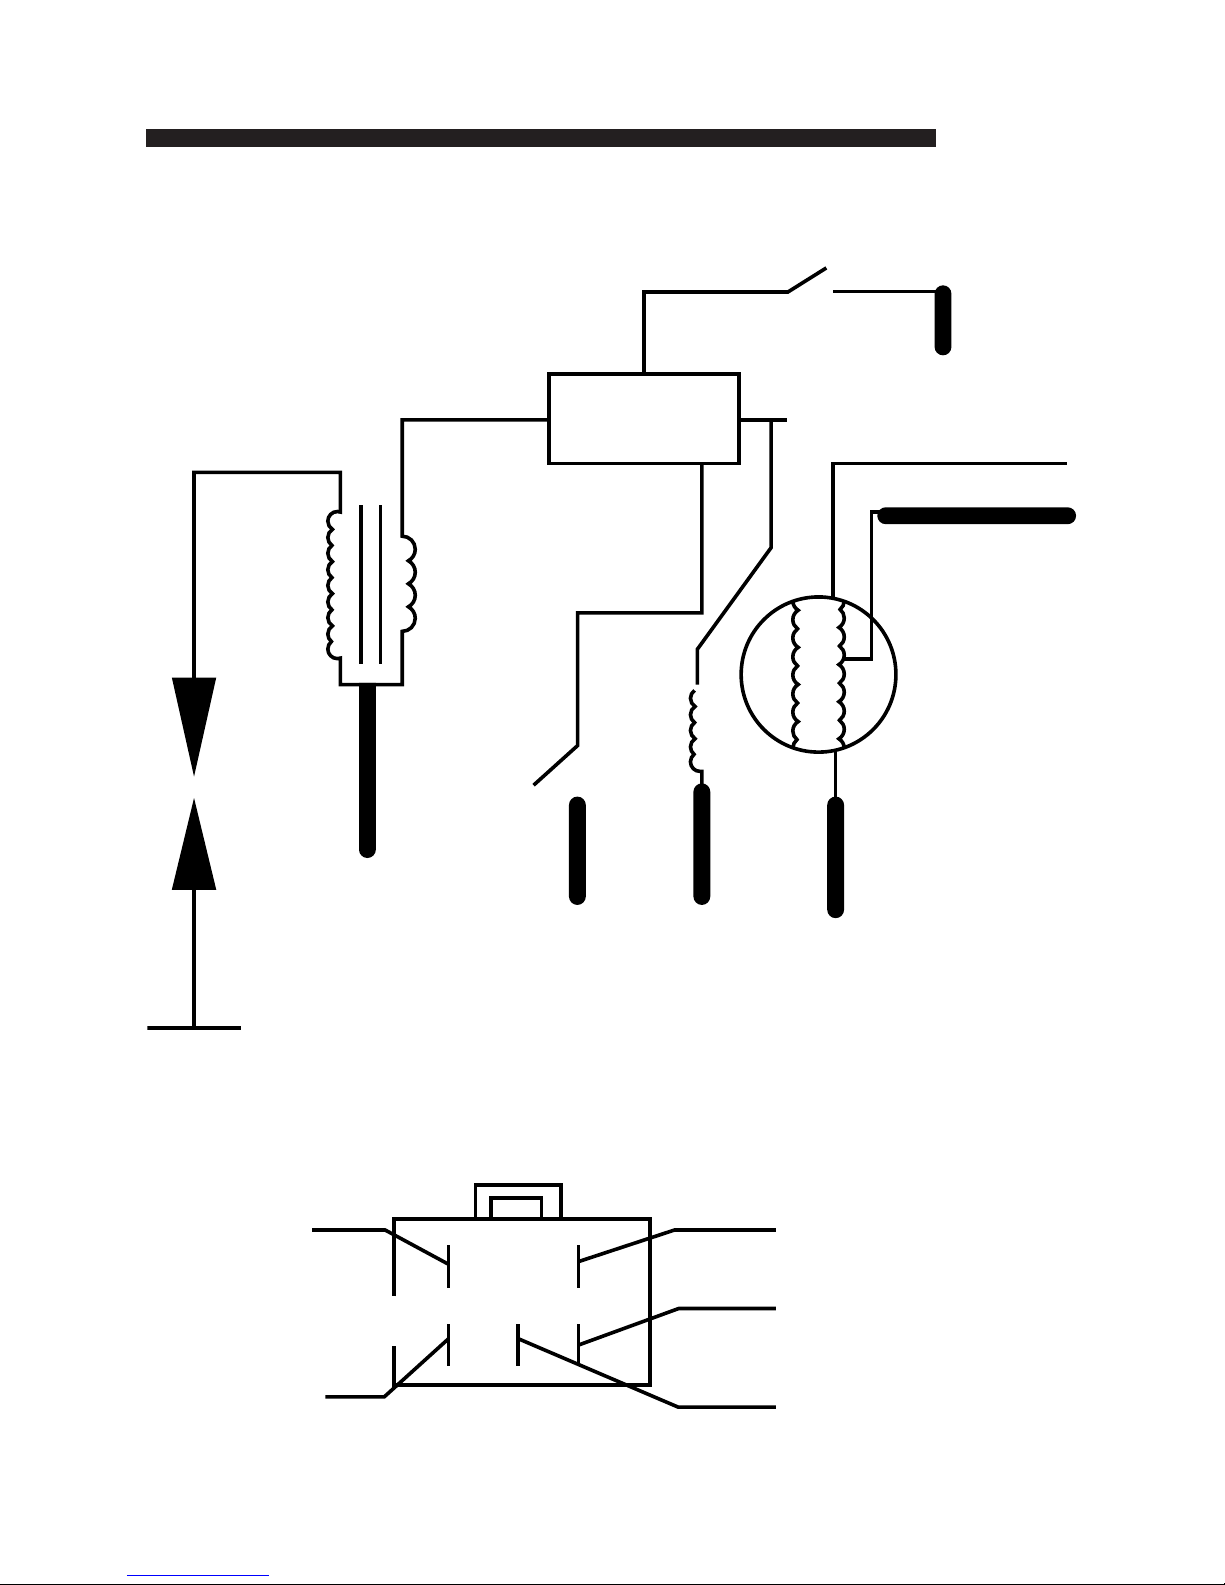
Wiring Diagram
G =
G
Pick Up
Pick Up
G
G
G
G
G
Ground / Green Wire
White/Black
Black/Yellow
Ignition
Coil
Black/White
Black/Red
White
Yel l o w
Spark Plug
Blue/White
Green
Black/Yellow
Black/Red
White/Black
Stator
Lighting Coil
Ignition Coil
Stator
Kill Switch
Kill Button

16
Fuel
FUEL RECOMMENDATION
Type Unleaded
Pump Octane Number 86 (or higher)
Your engine is designed to use any unleaded gasoline that has a pump
octane number of 86 or higher. Gasoline pumps at service stations
normally display the pump octane number.
Use of lower octane gasoline can cause persistent ‘‘pinging’’ or ‘‘spark
knock’’ (a louder rapping noise) which, if severe, can lead to engine
damage. (Light pinging experienced while operating under a heavy load,
such as climbing a hill, is no cause for concern.)
If pinging or spark knock occurs at a steady engine speed under normal
load, change brands of gasoline. If pinging or spark knock persists,
consult your Certied Motorcycle Mechanic.
Use only unleaded fuel in your umpstar. If you ride your umpstar in a
country where leaded fuel might be available, take precautions to use only
unleaded fuel.
Never use stale or contaminated gasoline or an oil/gasoline mixture. Avoid
getting dirt, dust, or water in the fuel tank.
Getting dirt or dust on your fuel can block you Carburetor which can
cause it to leak and cause other problems as well.
WARNING
Gasoline is highly flammable
and explosive. You can be
burned or seriously injured
when handling fuel. Stop the
engine and keep heat, sparks
and flame away. Handle fuel
only outdoors. Wipe up spills
immediately.

17
Fuel
REFUELING PROCEDURE
Fuel Tank Capacity, including reserve: 1.06 US gal (4.0 )
Reserve Capacity: 0.26 US gal (1.0 )
1. To open the fuel ll cap, pull the breather tube out of the steering stem
nut. Turn the fuel ll cap counterclockwise and remove it.
2. Add fuel until the level reaches the bottom of the ller neck. Avoid
overlling the tank. ere should be no fuel in the ller neck.
3. Aer refueling, turn the fuel ll cap clockwise until it is secure.
4. Insert the breather tube in the steering stem nut.
If you replace the fuel ll cap, use only a umpstar Genuine replacement
part.
Breather Tube
Fuel Fill Cap
Filler Neck
Steering Stem Nut
 Loading...