

Thump ATV110CC, ATV125CC Owner's Manual
MANUAL # 3627

Owner’s Manual
is vehicle is designed and manufactured for o-road use only.
It is illegal and unsafe to operate this machine on any public street, road
and highway
is vehicle complies with all applicable o-road noise level and spark
arrester laws and regulation in eect at the time of manufacture.
umpstar reserves the right to make changes at any time without
notice and without incurring any obligation.
is publication includes the latest production information available
before printing.
No part of this publication may be reproduced without written permission.
Please check your local riding laws and regulations before operating
this machine
FOR OFF-ROAD USE ONLY
atv 110cc
atv 125cc
vr:1
vr:1.1

Contents
ese pages give an overview of the contents of your owner’s manual
Introduction ........................................................................................ 1
Warning Labels .................................................................................... 2
Preface .................................................................................................. 4
Safe Riding Rules .................................................................................. 5
Protective Clothing .............................................................................. 6
Location of Parts .................................................................................. 7
Fuel and Oil Recommendations ......................................... 7
Le Handlebar .................................................................. 9
rottle Lever .................................................................... 10
Choke Lever .................................................................... 10
Equipment and Adjustments .................................................... 11
Fuel Tank Cap ................................................................. 11
Remote Engine Stop Switch .............................................. 12
Break-In (Running-In) .................................................... 14
Inspection Before Riding ................................................. 15
Starting the Engine ......................................................... 16
Braking .......................................................................... 19
Turning .......................................................................... 19
Skidding or Sliding ......................................................... 20
Operation on Hills .......................................................... 21
Stopping the Engine ........................................................ 24
Parking the Vehicle ......................................................... 24
Inspection and Maintenance ............................................................... 28
Maintenance Schedule .................................................... 28
Periodic Maintenance Chart ........................................... 29
Seat Removal ................................................................... 30
Air Cleaner ...................................................................... 30
Spark Plug ....................................................................... 31
Idle Speed Ajustment ....................................................... 32
rottle Cable Adjustment ............................................... 33
Fuel Hose ......................................................................... 33
Engine Oil ........................................................................ 33
Brake ............................................................................... 34
Brake Adjustment ............................................................ 34
Brake Oil ......................................................................... 35
Brake Friction .................................................................. 35

Contents
Tires ................................................................................ 36
Drive Chain .................................................................... 38
Front and Rear Wheel Removal ...................................... 40
Troubleshooting ................................................................................. 41
Cleaning Procedure ........................................................................... 46
Storage Procedure .............................................................................. 48
Circuit Diagram ................................................................................. 49
Preparing for a Ride ........................................................................... 50
Transporting your umpstar ........................................................... 51
You & the Environment ...................................................................... 52
Taking Care of the Unexpected .......................................................... 53
Technical Information ....................................................................... 57
Oxygenated Fuels ............................................................................... 58
Specication ....................................................................................... 59
Spare Part Catalogue ......................................................................... 60
Parts Finder ....................................................................................... 70
Warranty ............................................................................................ 71
Disclaimer ......................................................................................... 72
Service Manual .................................................................................. 73
Title Ownership ................................................................................ 74

1
Introduction
ank you for your purchase umpstar ATV 110 / 125
is manual will provide you with a clear understanding of the details and
operation of this vehicle. is manual includes all of the necessary safety
information. It provides information necessary to ride your vehicle and also
includes basic service and inspection procedures.
AN IMPORTANT SAFETY MESSAGE
• Read this manual carefully and completely before operating your
vehicle. Make sure you understand all instructions.
• Pay close attention to the warning and caution labels on the vehicle
• Never operate an atv without proper training or instruction.
IMPORTANT MANUAL INFORMATION
Failure to follow the warnings contained in this manual can result in serious
injury or death.
Particularly important information is distinguished in this manual by the
following notations:
WARNING
Failure to follow WARNING instructions could result in
severe injury or death to the vehicle operator a bystander
or a person inspecting or repairing the vehicle
CAUTION
A CAUTION indicates special precautions that must be
taken to avoid damage to the vehicle
NOTE
A NOTE provides key information to make procedures
easier or clearer
2
Warning Labels
Your safety, and the safety of others, is very important. And operating
this ATV safely is an important responsibility.
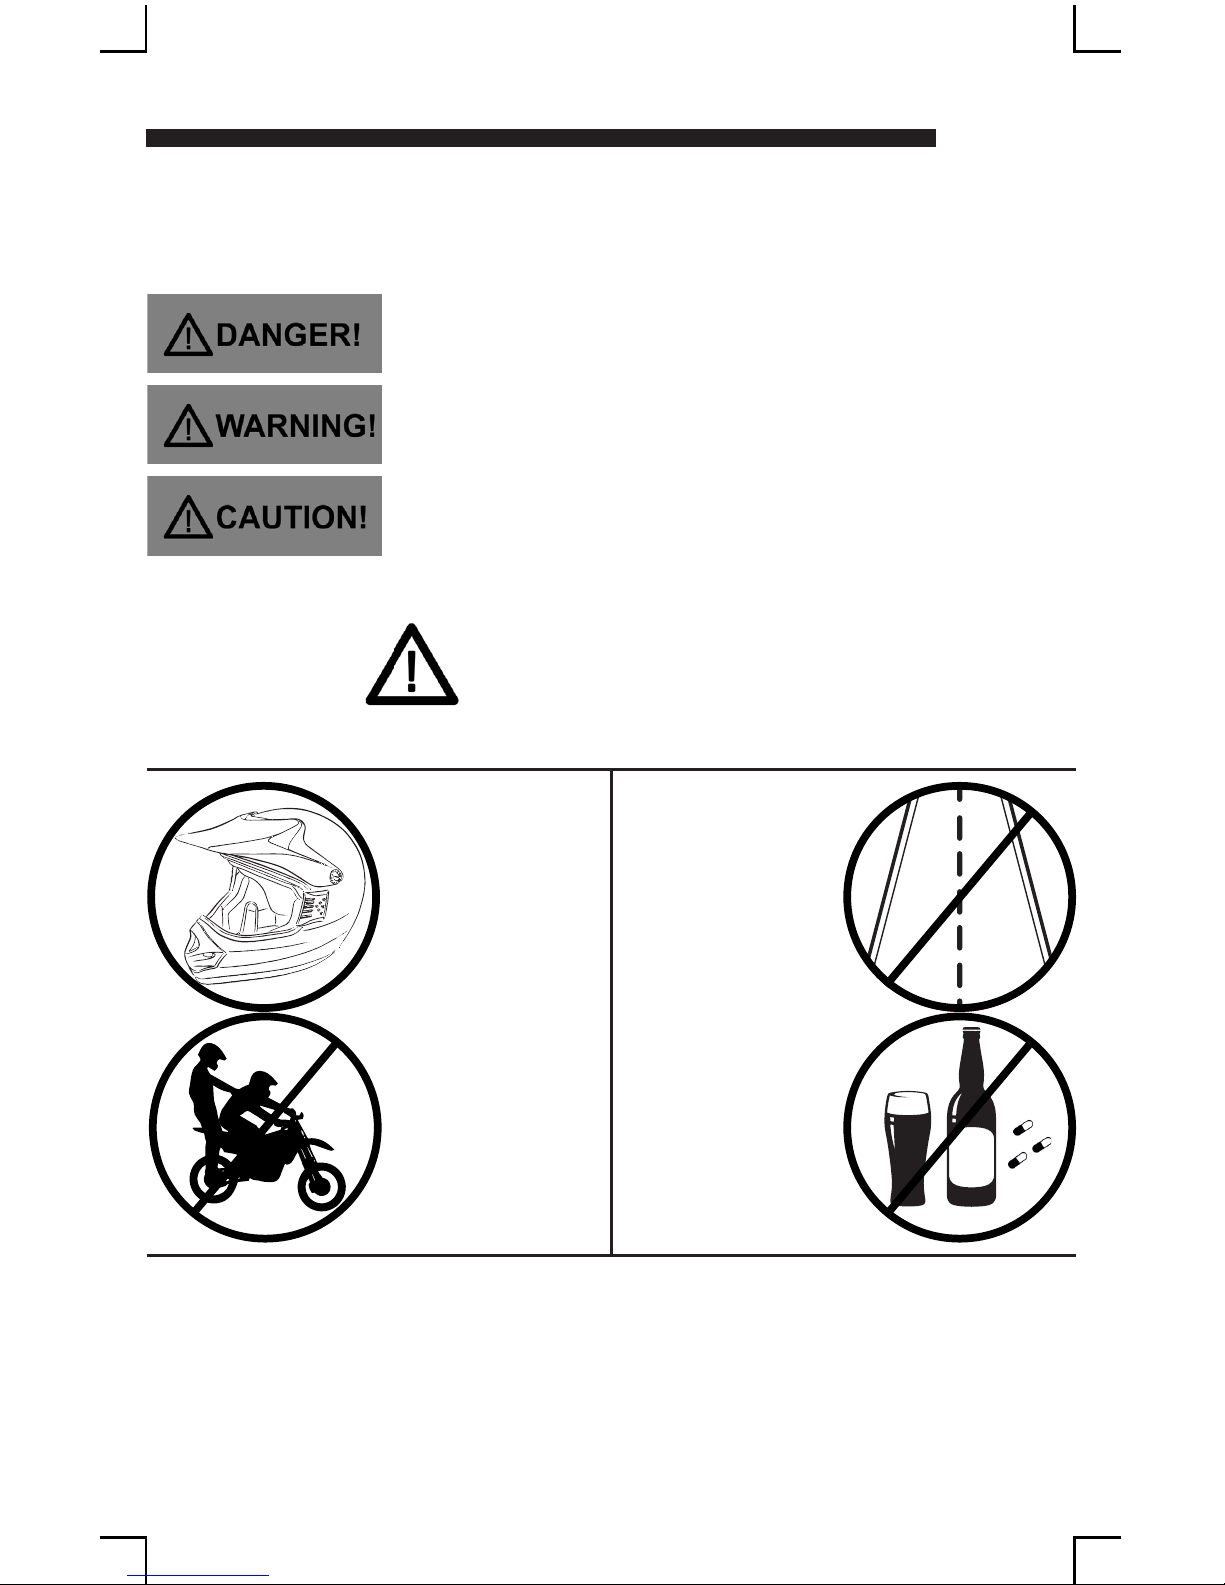
WARNING
Always use an
approved helmet &
protective gear
Never use
public roads
Never use with
drugs or alcohol
Never carry
passengers
is section presents some of the most important information and
recommendations to help you ride your motorcycle safely. Please take
a few moments to read these pages. is section also includes a
special message for parents and location information for the safety
labels on your motorcycle.
You WILL be KILLED or SERIOUSLY
HURT if you don’t follow instructions.
You CAN be KILLED or SERIOUSLY
HURT if you don’t follow instructions.
You CAN be HURT if you don’t follow
instructions.

3
Warning Labels
4
Preface
is manual describes the basic operation and maintenance for the All
Terrain Vehicle, which should be read carefully before operation. Proper
operation and maintenance will minimize problems with the All Terrain
Vehicle and keep it in optimal performance.
IMPORTANT NOTICE
Operator and Passenger
is All terrain vehicle is designed to carry only the operator. Never
exceed the maximum weight capacity as specied in the manual.
O-Road Use
is All Terrain Vehicle is designed to be used for o-road use only. Do not
ride on public road.
ALL TERRAIN VEHICLE SAFE RIDING
All Terrain Vehicle riding requires special eorts on your parts to ensure
your safety. Know these requirements below before you ride.
IMPORTANT NOTICE TO PARENTS
Even though the ATV has four wheels, it can tip over in any direction.
Improper turning on hills can lead to vehicle to tip over. Learn proper riding
techniques and avoid riding situations which can lead to tip the vehicle
over. e ATV and other all terrain vehicles (ATVs) have unique handling
characteristics. ATVs‘ handles dierently than motorcycles. Although
ATVs‘ have four wheels, they handle dierently than automobiles too. ATVs‘
require special riding techniques suited to their handling characteristics, so
be sure that all rides of the ATV practice and master the riding techniques
described in the owner’s manual,

5
Safe Riding Rules
1. No riders under the age of 16 years are permitted to ride this vehicle.
2. Both parents and their children must fully understand everything in this
Owner’s Manual before riding.
3. is vehicle is for OPERATOR ONLY.
4. For OFF-ROAD USE ONLY. is vehicle is designed to be operated only
oh level. O-road surfaces, free of obstacles.
5. It is illegal to ride this vehicle on public roads or highways. If it is
necessary to cross a public road, please get o this vehicle and push it
across.
6. Do not operate this vehicle while under the influence of alcohol or
drugs. is can impair judgment and result in serious injury or even death.
7. Keep safe distance between your vehicle and other o-road vehicle(s).
8. Never ride this vehicle unless it had been properly adjusted and
maintained.
9. Do not allow your child to ride without supervision,
10. Never run the engine in closed area. e exhaust gas contains poison-
ous carbon monoxide gas(CO).
11. Don’t touch any part of the engine and muer during and even aer
riding, because it is very hot.
12. Do not allow to ride at night. is vehicle is not equipped with a
headlight. Unseen obstacles could cause an accident resulting in injury or
even death to a rider.
13. Recommends taking a safety course before riding your vehicle.

6
Protective Clothing
1. Protective wear such as helmet with protective mask, dustproof glasses, boots
and gloves should be worn during operation for sake of personal safety.
ALWAYS wear a helmet.
2. Loose clothes are not suitable for All Terrain Vehicle operation as they may get
caught on the operating lever, kick lever, footrest or wheel,
resulting tl’l personal injury.
3. e exhaust system becomes hot during operation, and it remains hot for a
while even aer stopping the engine, Be careful not to touch the exhaust system
while it is hot. Wear clothing that fully covers your legs.
REFITTING
Retting of the All Terrain Vehicle, or removal of original parts, may
make the vehicle unsafe or illegal. Obey all national and local equipment
regulations.
LOADING
e incorrect loading could hurt the performance and reliability.
Max load limit: 75kG
ACCESSORIES
Genuine accessories by our company have been specically designed
and tested on the all terrain vehicle. Because our company won’t test
accessories manufactured by other companies, you are personally
responsible of selection, installation, and use of them. Always follow
the guidelines below:
1. Carefully inspect the accessory to make sure that it does not obscure any lights or
reflectors, reduce ground clearance, and banking angle, or limit suspension travel, steering
travel or control operation.
2. Accessories may increase the time that hands or feet operate controls, resulting in de-
creased reaction time in an emergency.
3. Do not add electrical equipment that will exceed the vehicle’s electrical system capacity
4. Do not add cooling device to the engine.
7
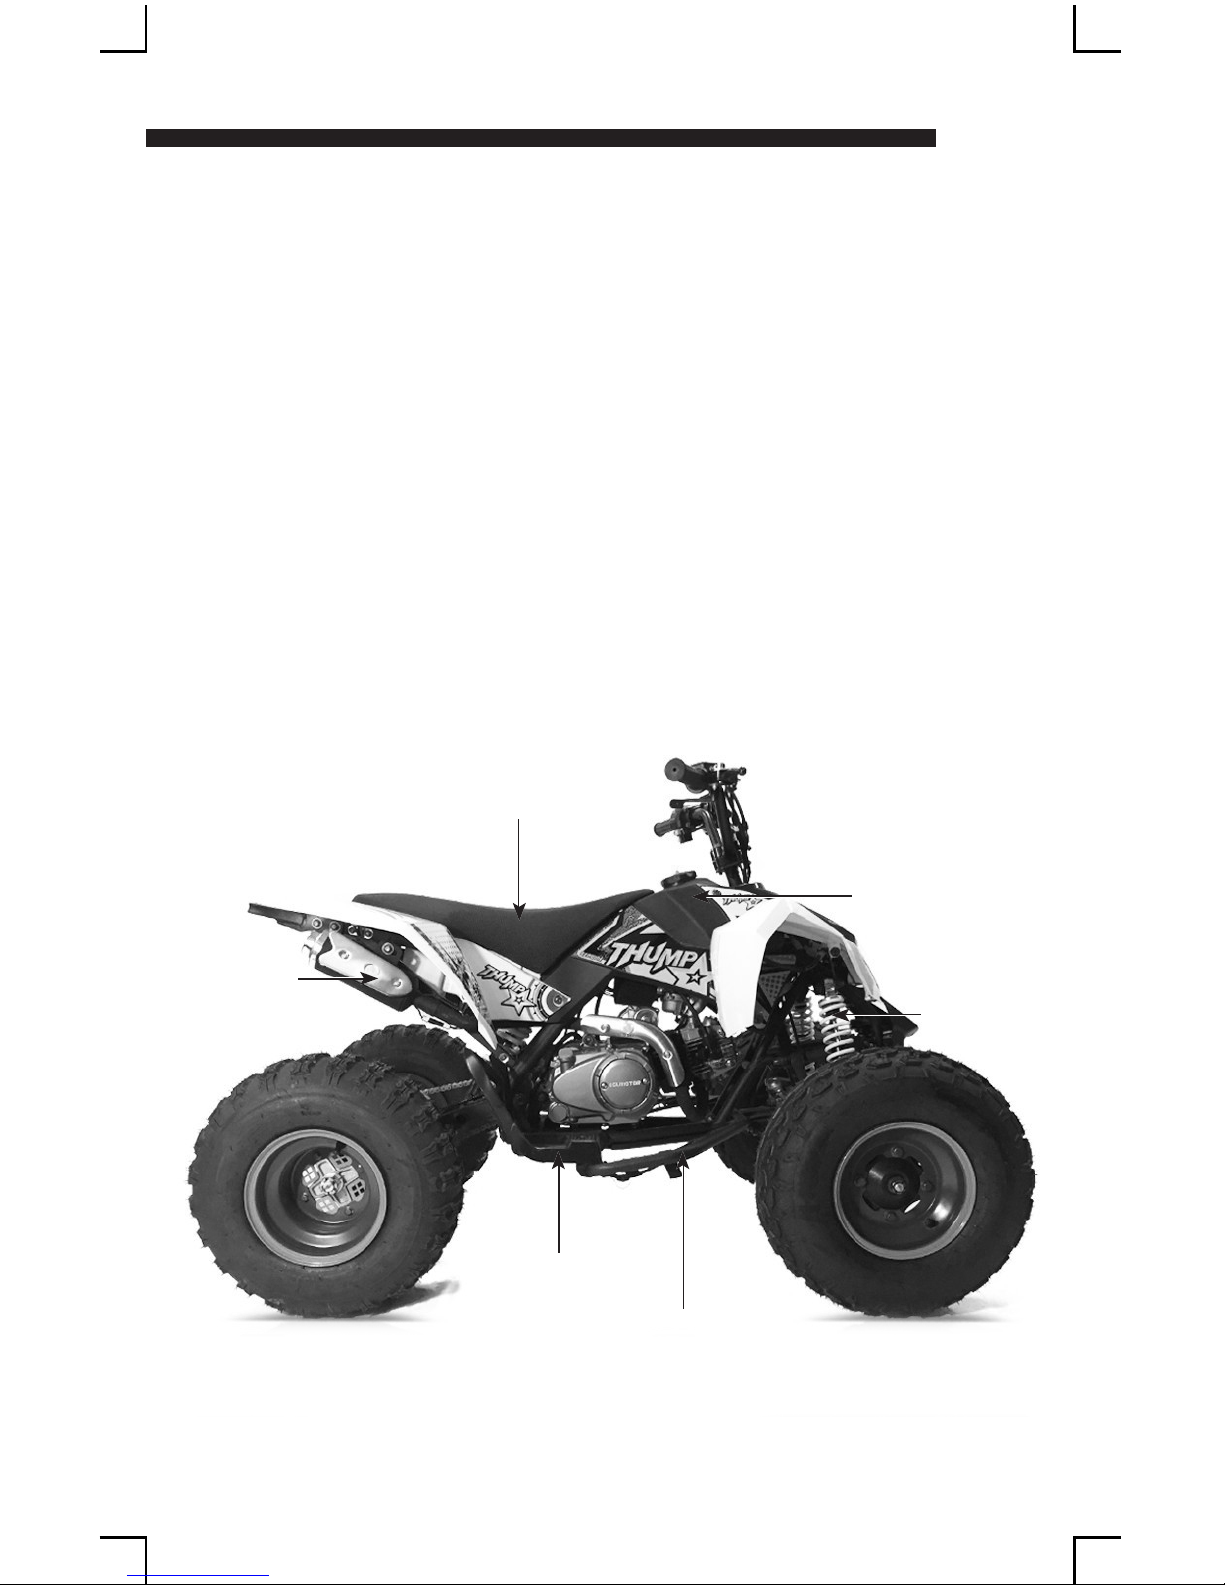
Location of Parts
FUEL AND OIL RECOMMENDATIONS
Fuel
Gasoline used should be graded 93 octane or higher. An unleaded type of
gasoline is recommended If engine pinging is experienced, substitute for
another brand.
Engine Oil
Use good quality SAE 10W/40 rnulti grade motor oil.
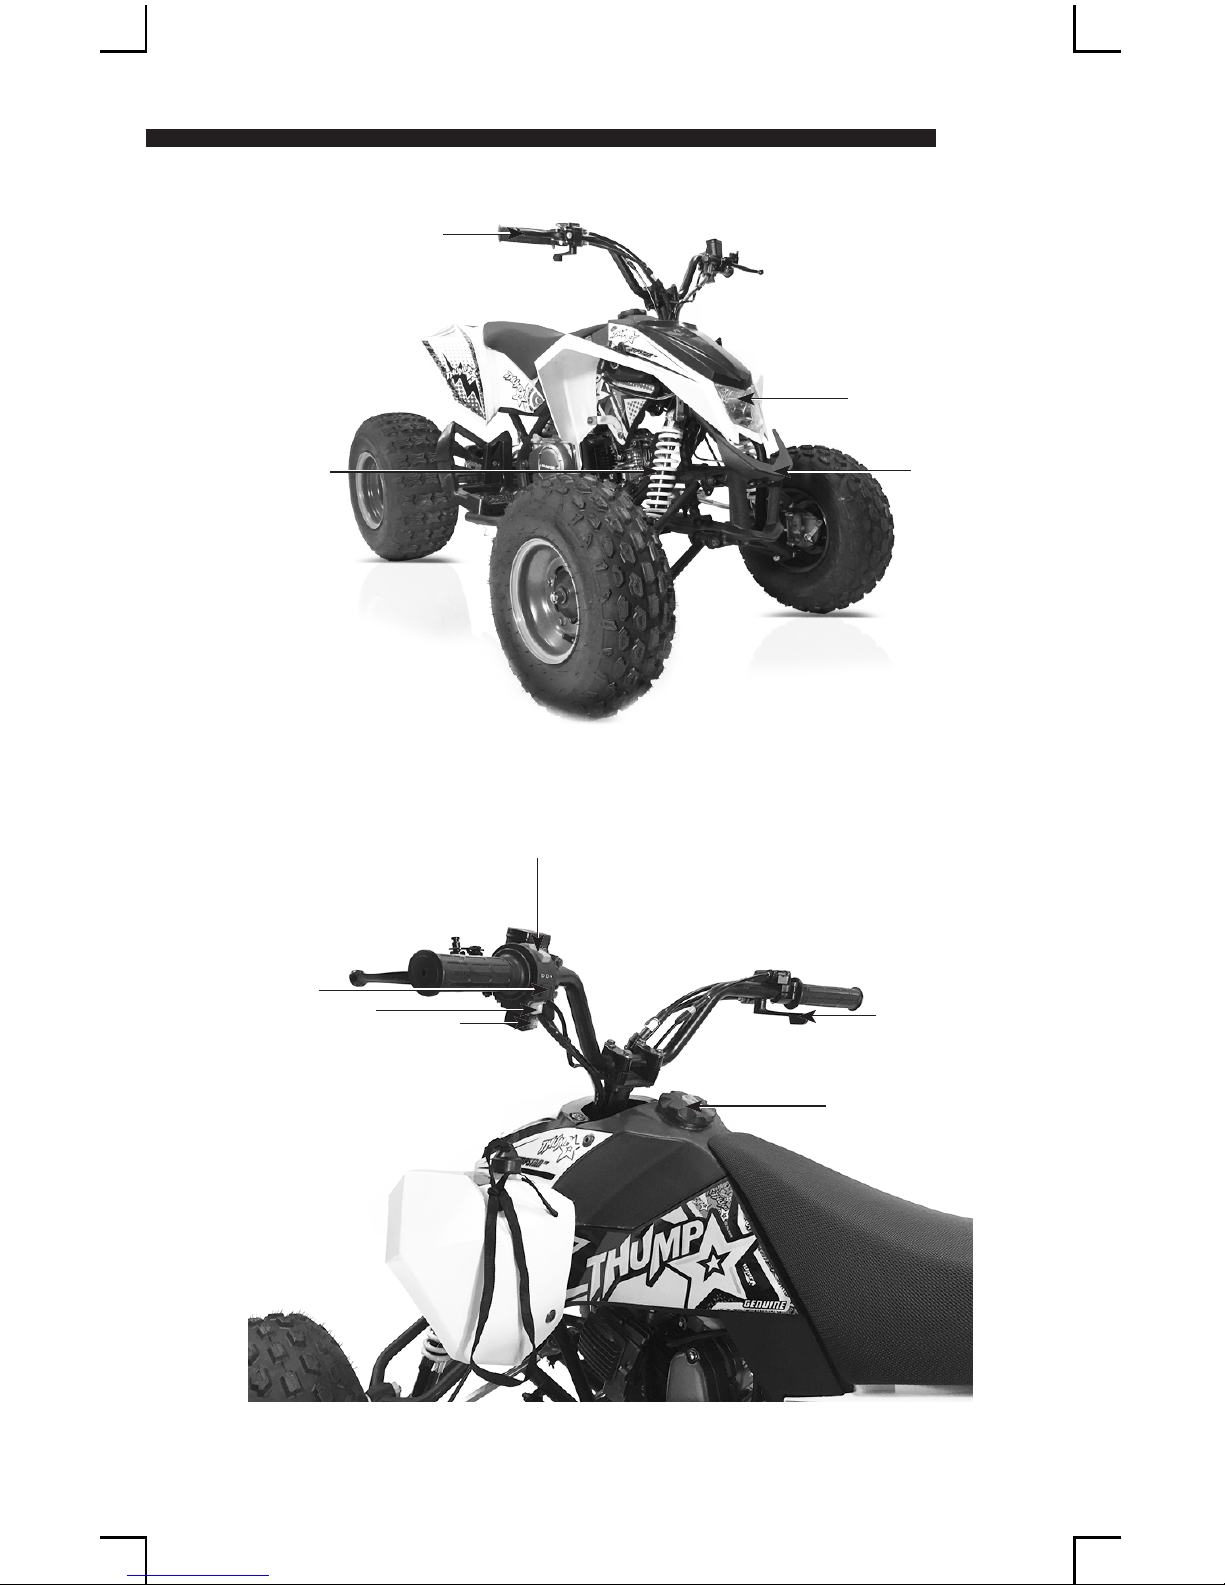
LOCATION OF PARTS
Seat
Foot Rest
Foot Brake
Exhaust
Fuel Tank
Suspension
8
Location of Parts
Bumper
Headlight
Indicator
Parking Brake
Stop Switch
rottle Lever
Fuel Tank Cover
Indicator Switch
Electric Start
Headlight Switch
9
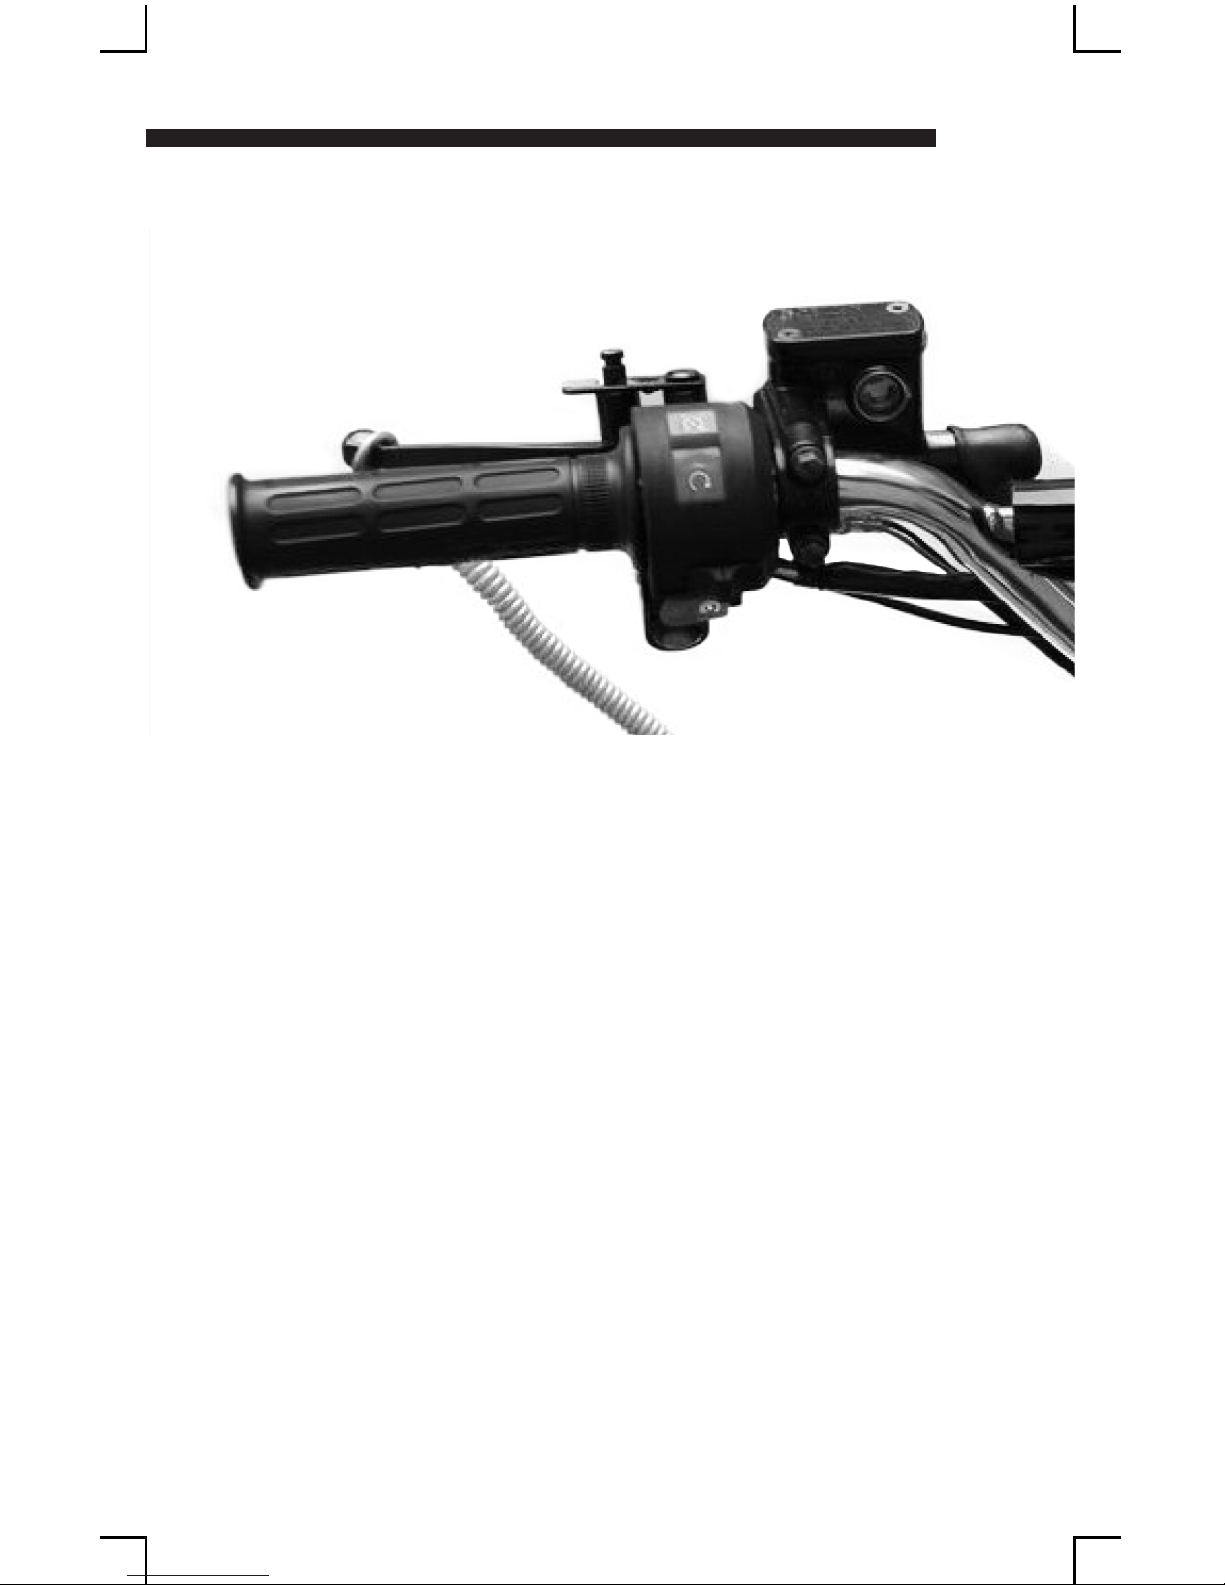
Control Functions
LEFT HANDLEBAR
Engine Stop Switch
“OFF” position
e ignition is o, e engine cannot start or run
“HUN” position
e ignition circuit is on the engine can run.
Rear Brake Lever
Apply the rear brake by squeezing the rear brake lever towards the grip
Parking Brake Knob
is knob is used to set the parking brake which is used to prevent the
ATV from moving when it is parked, being started or at idle. Set the parking brake by squeezing the rear brake lever and pushing the knob to lock
the lever in the squeezed position.
Engine Start Switch
Depress the button with the vehicle while in braking mode to start the
engine.

10
Control Functions
THROTTLE LEVER
with Parking Brake
Engine speed is controlled by the position of the throttle lever. Push it
forward to increase engine speed. Release it to decrease engine speed. is
lever is operated by the rider’s thumb.
CHOKE LEVER
When this lever is in the down position, a rich mixture is supplied by the
carburetor for starting the engine when it is cold. When the lever is in the
up position, the mixture supplied by the carburetor is optimum tor starting
a warm engine, and for normal operation.
Choke Lever
11
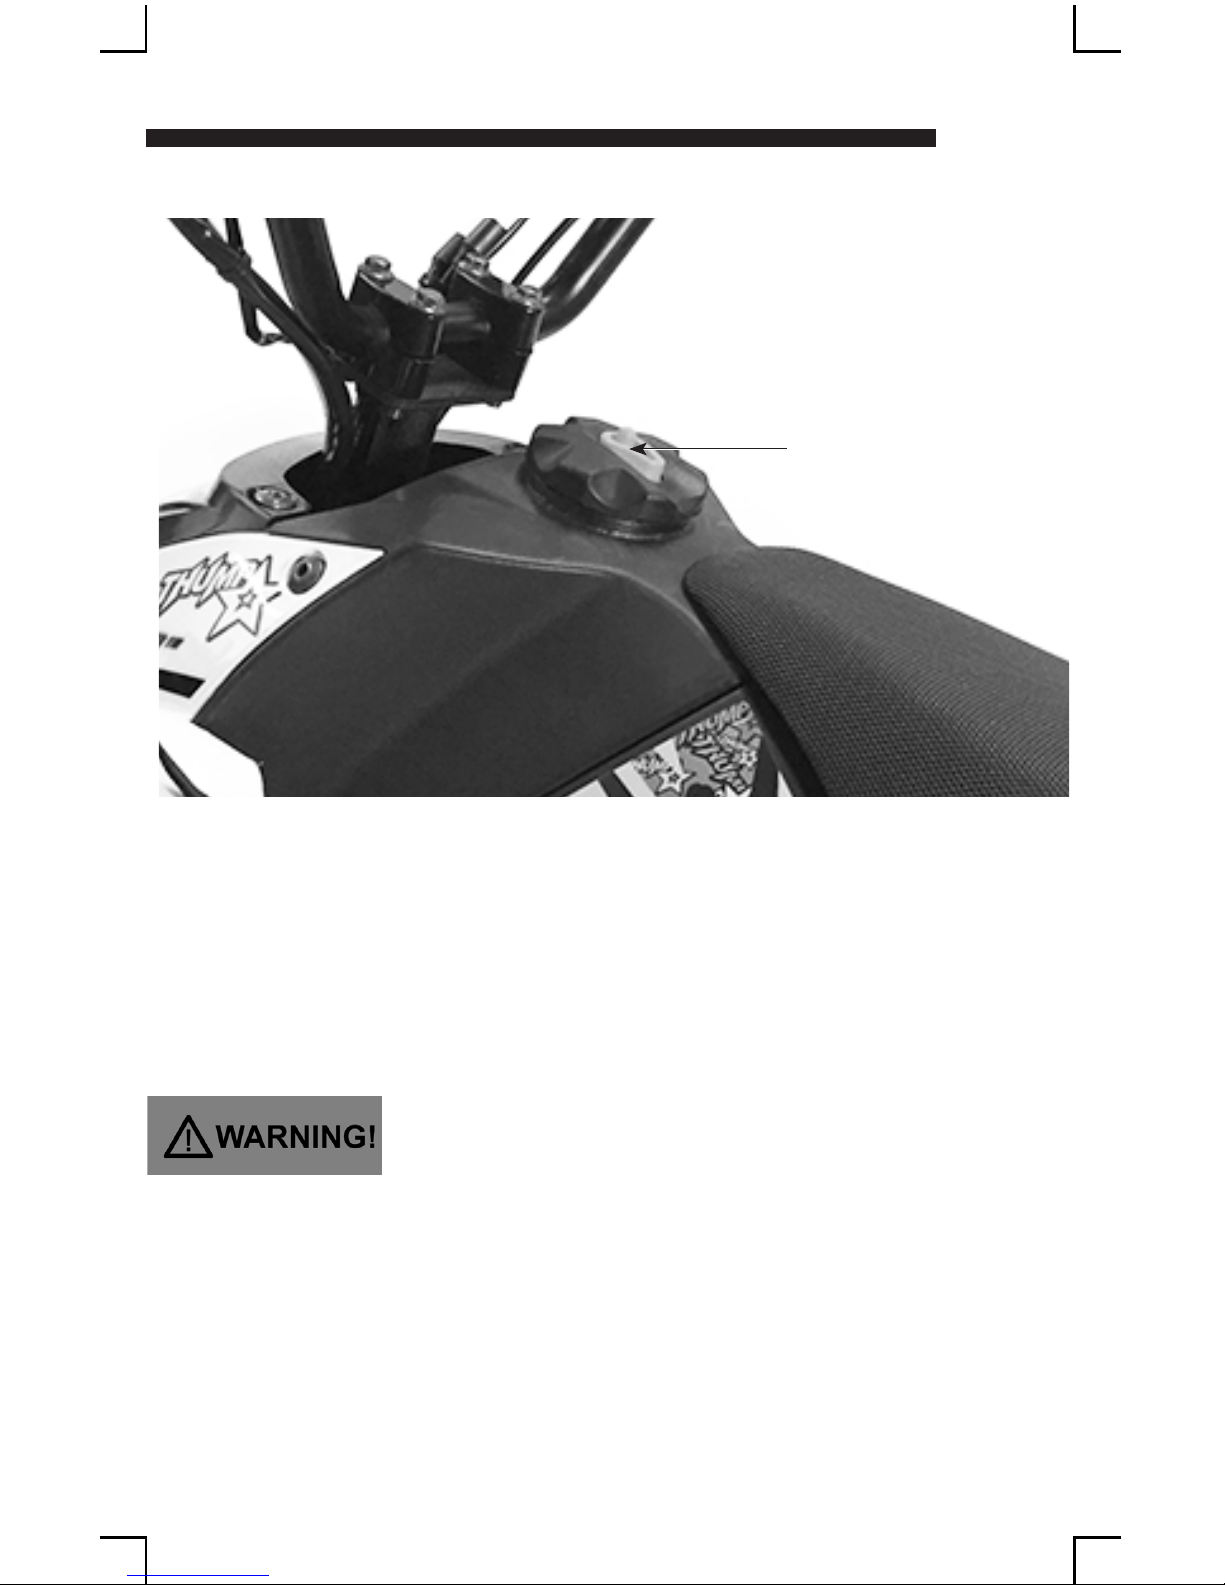
Equipment and Adjustments
FUEL TANK CAP
To open the fuel tank cap, remove the end of the vent tube from the hole in
the vehicle body and turn the fuel tank cap counterclockwise. To close the
fuel tank cap, turn it clockwise and tighten it securely. Be sure that the end
of the vent tube is reinstalled in the hole in the vehicle body and routed
properly as shown.
Do not overll the fuel tank. Stop adding fuel when the fuel lever reaches
the bottom of the ller neck as shown in the illustration. If you ll the tank
beyond this level, fuel may overflow when it expands due to engine heat or
by the sun.
Fuel Tank Cap

12
Equipment and Adjustments
Gasoline is extremely flammable and toxic. Always observe the following
precautions when refueling your ATV.
• Never permit vehicle refueling by anyone other than an adult.
• Refuel in a well ventilated area.
• Make sure the engine is o and avoid spilling fuel on a hot engine.
• Do not smoke; make sure that there are no open flames or sparks in
the area.
• Avoid prolonged contact with skin and breathing of gasoline vapors.
• Keep children and pets away during refueling.
REMOTE ENGINE STOP SWITCH
e ATV comes equipped with a remote engine stop switch which may be
operated by pulling the leash like lanyard attached to stop switch cap. An
adult supervising operation of the vehicle can use the lanyard to stop the
engine from a short distance. e adult who trains the young rider should
always use this lanyard until the rider develops sufficient skills for safe
operation of the vehicle.
is switch consists of a rubber cap fitted over a plastic body. When the
rubber cap is in place, the engine can operate. When the rubber cap is
removed from the switch body, the engine cannot be started. If the engine
is running and the mbber cap is removed by pulling the lanyard attached to
the cap, the engine will stop running.
To use the remote engine stop switch:
• Fit the rubber cap on the engine of the lanyard over the stop switch
body located on the rear end of the vehicle as shown. Put your ngers
through the loop at the other end of the lanyard.
• With the lanyard fastened to the vehicle and to your hand, follow
aer the moving vehicle. If you notice any driving hazard or unsafe
situation, pull the lanyard forcefully so that the rubber cap comes o.
is will activate the remote engine stop switch, stopping the vehicle’s
engine

13
Equipment and Adjustments
When the stop switch cap is pulled o, the engine will stop running. e
vehicle will continue to roll for some distance, however. Remember this
when judging when to operate the remote engine stop switch.
If you do not put your fingers through the loop in the lanyard, it may slip
from your grasp unexpectedly. is could make it impossible for you to
stop the engine in an unsafe situation.
e throttle limiter should always be set to the low power position when
the engine stop lanyard is used. Only children.
With enough skill for safe operation of the ATV without parental use of the
lanyard should be permitted to operate ATV with the throttle limiter set to
maximum power position. In addition. an adult trying to follow a moving
ATV with the throttle limiter set to maximum position may run in into
the rider if he stops, or may trip and fall down trying to keep up with the
vehicle.
Instruction for engine stop switch lanyard storage. e lanyard may
be stowed on the AT\/ when, in judgment of the parents, the rider has
developed sufficient skills to be able to safely operate the vehicle without
parental use of the lanyard.
To prevent unauthorized starting or unsupervised operation of the ATV,
remove the stop switch cap and lanyard aer each use and store then in a
safe place, out oi reach of children

14
Equipment and Adjustments
BREAK-IN (RUNNING-IN)
e rst 1 month is the most important in the life of your vehicle. Proper operation during this break-in period will help ensure maximum life
and performance from your new vehicle. e following guidelines explain
proper break in procedures.
MAXIMUM THORTTLE OPENING RECOMMENDATION
During the first 10 hours of vehicle operation, the maximum throttle
opening you should use is 1/2 throttle.
VARY THE ENGINE SPEED
e engine speed should varied during the break-in period. is allows
the parts to be “loaded”(aiding the mating process) and then “unloaded”
(allowing parts to cool). Although it is essential that some stress be placed
on the engine components during break-in, you must be careful not to
excessively load the engine.
AVOID CONSTANT LOW SPEED
Operating the engine at constant low speed (light load) can cause parts to
glaze and not seat properly .Allow the engine to accelerate freely through
the gears , without exceeding the maximum recommended throttle
opening .
OBSERVE YOUR INITIAL AND MOST CRITICAL SERVICE
e initial sevice (break-in maintenance) is the most important service
your vehicle will receive. During break in operation, all of the engine components will have mated together and seated. Maintenance required as part
of the initial sen/ice includes correction of all adlustments, tightening ofall
fasteners and replacement ofdirty oil.
Timely performance of this sen/ice will ensure optimum sen/ice life and
performance from.
15
Equipment and Adjustments
INSPECTION BEFORE RIDING
Failure to pertorm an inspection before riding may result in an accident
or serious damage to the vehicle. Check these items before each ride . Be
sure your ATV is in good condition for the personal satety of the rider and
protection of the vehicle.
All of the items below should be checked with the engine o, except the
functional check of the engine stop switch. Make sure your child doesn’t
get too close when you check the fuel level and drive chain, or he / she
might be injured.
WHAT TO CHECK CHECK FOR
Steering No rattle or looseness
Brakes Proper lever play
No “sponginess”
Parking brake effectiveness
Tires Proper pressure
Enough tread depth
No cracks , rips or other
damage
Fuel Enough fuel for the intended run
Fuel hose connected securely
No damage to fuel tank or cap
Tank cap closed security
Engine Stop Switch Proper operation
Engine Oil Proper level
Throttle Proper cable play
Smooth response
Quick return to idle position

16
Equipment and Adjustments
Drive chain Adequate lubrication
General condition Bolts and nuts are tight
No rattle from any part of the machine with
the engine running
No visible evidence of damage
Remote engine stop
switch (if used )
Proper operation
No damage to rubber cap
Secure attachment of lanyard to cap
RIDING TIPS
Finish reading this “Riding Tips “ section and then the “Instructing and
Young Rider “ section before starting the ATV or beginning riding instruction. is “riding Tips “ section contains important operating information
you will need to know before you go to the “Instructing the Young Rider “
section will guide you in teaching young riders how to operate and ride the
ATV using information you learn in this owner’s manual.
STARING THE ENGINE
Before attempting to start the engine, make sure:
1. e parking brake is engaged.
2. e engine stop switch is in the “ RUN “ position.
3. Verify that the remote engine stop switch cap is in place.
When the engine is cold:
1. Push down the choke lever as for as it Will go.

17
Equipment and Adjustments
2. Make sure that the choke lever can return smoothly to the o position
before starting the engine.
3. With the throttle closed, start the engine by pulling up on the recoil starter
roper forcefully.
4. Return the choke lever all the way back to its disengaged position.
When the engine is warm:
Operation of the choke system should not be necessary. Open the
throttle slightly and start the engine by pulling up on the recoil starter
rope forcefully.
Release the throttle immediately aer the engine has started.
1. Do not run the engine indoors or where there is little or no ventilation.
Exhaust gases contain carbon monoxide, a potentially lethal gas that is
colorless and odorless.
2. Never leave the vehicle running while unattended, even though for a short
time.

18
Equipment and Adjustments
STARTING OFF
Aer the engine has warmed up, disengage the parking brake. To release
the parking brake. Simply squeeze the brake lever until the lock knob disengages.
Before releasing the parking brake, make sure:
1. e choke lever has been returned to the fully OFF position.
2. e choke lever is fully closed.
3. e rider is completely ready to ride.
If you do not obsen/e these precautions, the vehicle can move fonivard
unexpectedly when the parking brake is released. is may result in an
accident and injury.
While operating the ATV, the rider should keep both feet on the footrest
all all times, or injuries resulting from accidents such as the rear wheels
running over the rider’s feet could occur, ere is no need for the rider to
move his/her feet from the footrests during operation or maneuvering of
the vehicle. Moving the rider’s teet from the footrests reduces the rider’s
ability to control the vehicle, and could lead to an accident.
Keep both hands on the handgrips at all times when riding removing your
hands from the handgrips reduces your ability to control the vehicle, and
could result in an accident.
Always open the throttle gradually to prevent front wheel liing failure to
observe this

19
Equipment and Adjustments
BRAKING
To stop the ATV release the throttle lever and apply the brake.
1. Avoid braking during turns. Use of the brake when turning could cause
the ATV to slide or roll over. Use the brake to slow down before entering the
turn.
2. Apply the brake lightly and with great care on slippery surfaces to avoid
skidding.
Never apply the parking brake lock when the ATV is moving. Rear wheels
will lock, and an accident could result with injury.
TURNING
To tum the ATV, the rider must learn a special technique, because its vehicle
has a solid rear axle, both rear wheels always turn at the same speed. is
means that if the rear wheels are getting equal traction, the vehicle will move
straight ahead, because the rear wheels will travel the same distance. For the
vehicle to tum, the outside rear wheel must travel a greater distance than the
inside rear wheel. To make this happen, the rider must learn how to create
less traction for the inside wheel , so that it can travel a shorter distance then
the outside wheel , even though both wheels at the same speed.
To turn the ATV the rider should use the following technique:
1. Turn the handlebars in the direction of the tum.
2. Shi body weight slightly fon/iiard and support your weight on the outer
footrest. is will
reduce the load on the inside rear wheel, reducing its traction.
3. Lean upper body into the turn,

20
Equipment and Adjustments
TURNING AT HIGHER SPEEDS
Use the same technique that you use for turning at low speeds, but lean
farther into the turn. Since natural turning forcesiwhich tend to push
the vehicle to the outside of the turn )increase as speed increases, you
must lean your upper body farther into the turn as you go faster, to the
outside of the turn. Remember though to keep your weight supported on
the outer footrest.
If the rider does not use the proper technique to turn the ATV, it may plow
straight ahead even though the front wheels are turned.
e rider should practice the above technique at low speeds in a wide open
area until he/she has mastered it.
SKIDDING OR SLIDING
If the rider experlences inadvertent skidding or sliding when not braking,
he/she may be able to overcome it by using the appropriate technique listed
below.
Front Wheel:
If front wheel skidding occurs, try to gain front wheel traction by reducing
the throttle opening and leaning your body weight slightly forward.
Rear wheel:
If rear wheel skidding occurs, steer in the direction of the skid (if space
permits), shi body away from the skid slightly, and avold using the
throttle or brakes until you regain directional control of the vehicle.
 Loading...