

Page 1
GATEWAY ( 2 BIKE CARRIER / PORTE-VÉLOS POUR 2 VÉLOS / SOPORTE PARA 2 BICICLETAS ) 9006XT
GATEWAY ( 3 BIKE CARRIER / PORTE-VÉLOS POUR 3 VÉLOS / SOPORTE PARA 3 BICICLETAS ) 9007XT
PARTS INCLUDED • PIÈCES INCLUSES • PIEZAS INCLUIDAS
I
H
A
G
D
E
B
part
pièce
parte
Gateway 2 or 3 bike carrier / Porte-vélos à 2 ou 3 vélos Gateway / Portabicicletas Gateway para 2 o 3 bicicletas
A
top strap assembly / sangle supérieure / ensamble de correa superior
B
holdfast cradle / berceau HoldFast / soporte HoldFast
C
side hook assembly w/buckle / sangle latérale avec boucle / ensamble de gancho con hebilla
D
bottom strap (narrow) w/hook / sangle inférieure (étroite) avec boucle / correa inferior (delgada) con gancho
E
anti-sway cage / cage stabilisatrice / jaula anti-balanceo
F
tie down strap / sangle d’attache / correa de atar
G
bike arm end cap / capuchon d’extrémité du bras de vélo / tapón del brazo de la bicicleta
H
end cap screw / vis du capuchon d’extrémité / tornillo de tapón
I
ripple strap / sangle crantée / correa ondulada
J
strap management device / dispositif de gestion de sangle / dispositivo de contención de correas
K
description
description
descripcion
F C
J K
part number
numéro de pièce
numero de parte
9006XT qty.
9006XT qté
9006XT cant.
— 1 1
753-2184 2 2
8523005001 4 6
753-2877 2 2
753-0035-07 2 2
8522903001 2 3
753-1492 1 1
8522904001 2 2
8535753 2 2
8523006001 6 9
8535414 4 4
9007XT qty.
9007XT qté
9007XT cant.
PRODUCT REGISTRATION / ENREGISTREMENT DE PRODUIT / REGISTRO DE PRODUCTO
Model # XXXXXXXXXXXXXXXXXXXXXXXXXXXXXXXXXXXXXXXXXXXXXX Purchase Date XXXXX/XXXXX/XXXXX Place of PurchaseXXXXXXXXXXXXXXXXXXXXXXXXXXXXXXX
Register online at www.thuleracks.com/register THULE 42 Silvermine Road Seymour, Connecticut 06483 (800) 238-2388
WARNINGS / LIMITATIONS • AVERTISSEMENTS / LIMITATIONS • ADVERTENCIAS / LIMITACIONES
• Number of bicycles carried should not exceed
designated carrying capacity for your specific
Gateway model.
• 9006XT (2 bike) max carrying capacity = 70lbs.
• 9007XT (3 bike) max carrying capacity = 105lbs.
• Check tightness of all bolts and knobs periodically.
• Check straps for wear and replace if worn.
• Not intended for off-road use.
• Not intended for tandems or recumbents.
• Do not install on a trailer or other towed vehicle.
• Failure to use blue safety strap may result in loss
of bicycles.
• Do not open your trunk/rear hatch with the rack
installed, it may cause damage to your vehicle.
• Le nombre de vélos transportés ne doit pas dépasser
la capacité de transport de votre modèle de
porte-vélos Gateway.
• Capacité de transport maxi du 9006XT (2 vélos) =
32 kg (70 livres).
• Capacité de transport maxi du 9007XT (2 vélos) =
43 kg (105 livres).
• Vérifiez régulièrement le serrage de toutes les vis et
des écrous.
• Vérifiez l’usure des sangles et remplacez-les si elles sont usées.
• N’est pas prévu pour une utilisation tout-terrain.
• N’est pas prévu pour les tandems ni les vélos à position
allongée (VPA).
• Ne l’installez pas sur une remorque ou un véhicule remorqué.
• L’absence d’utilisation de la sangle sécurité bleue peut entraîner la perte
de vélos.
• N’ouvrez pas votre coffre/hayon une fois le support installé; cela pourrait
causer des dommages à votre véhicule.
• La cantidad de bicicletas transportadas no debe superar la capacidad de carga designada para su modelo específico de Gateway.
• Capacidad máxima de carga del 9006XT (2 bicicletas) =
32kg (70 libras)
• Capacidad máxima de carga del 9007XT (2 bicicletas) =
43kg (105 libras)
• Comprobar periódicamente que todos los pernos y
perillas estén bien apretados.
• Revisar el estado de las correas y reemplazarlas si están desgastadas.
• No está diseñado para tándems ni bicicletas reclinadas.
• No destinado para el uso todoterreno.
• No instalar en un trailer ni otro vehículo a remolque.
• Si no se usa la correa de seguridad azul, se puede
perder alguna de las bicicletas.
• No abra el maletero / puerta trasera con el portaequipajes instalado,
ya que podría dañar su vehículo.
5015946_00 1 of 7
Page 2
1
2
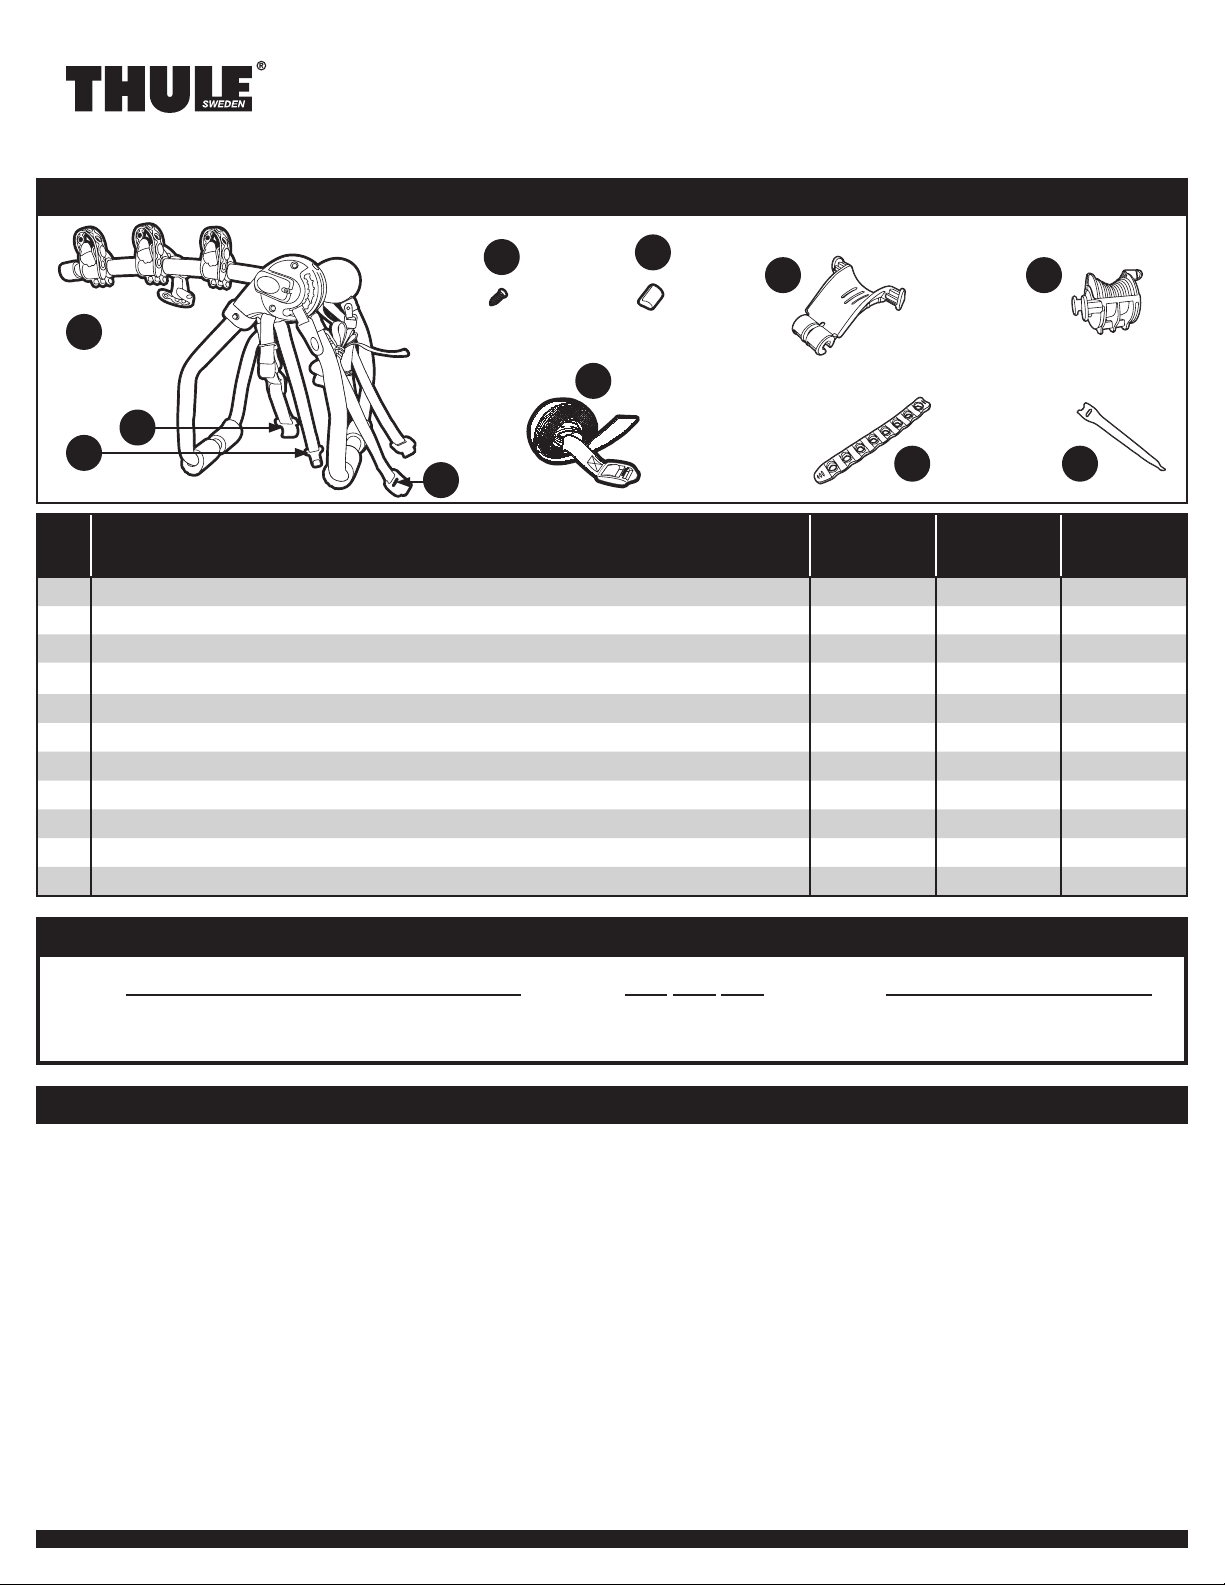
• Clean trunk/hatch and rear of car.
Nettoyez le couvercle du coffre ou du hayon et l’arrière de la voiture.
Limpie el portamaletas o puerta trasera y el parachoques de su vehículo.
• Look up your vehicle in the Fit Guide (included with these instructions) for recommended
fit number. BE SURE TO READ THE FIT TIPS THAT APPLY TO YOUR VEHICLE.
Recherchez votre véhicule dans le guide de réglage (accompagnant ces instructions) pour le numéro
de réglage recommandé. VEILLEZ À LIRE LES CONSEILS DE RÉGLAGE QUI S’APPLIQUENT À VOTRE
VÉHICULE.
Busque el número de ajuste recomendado para su vehículo en la Guía de Ajuste que se
incluye con estas instrucciones. ASEGÚRESE DE LEER LOS CONSEJOS DE AJUSTE QUE
APLICAN A SU VEHÍCULO.
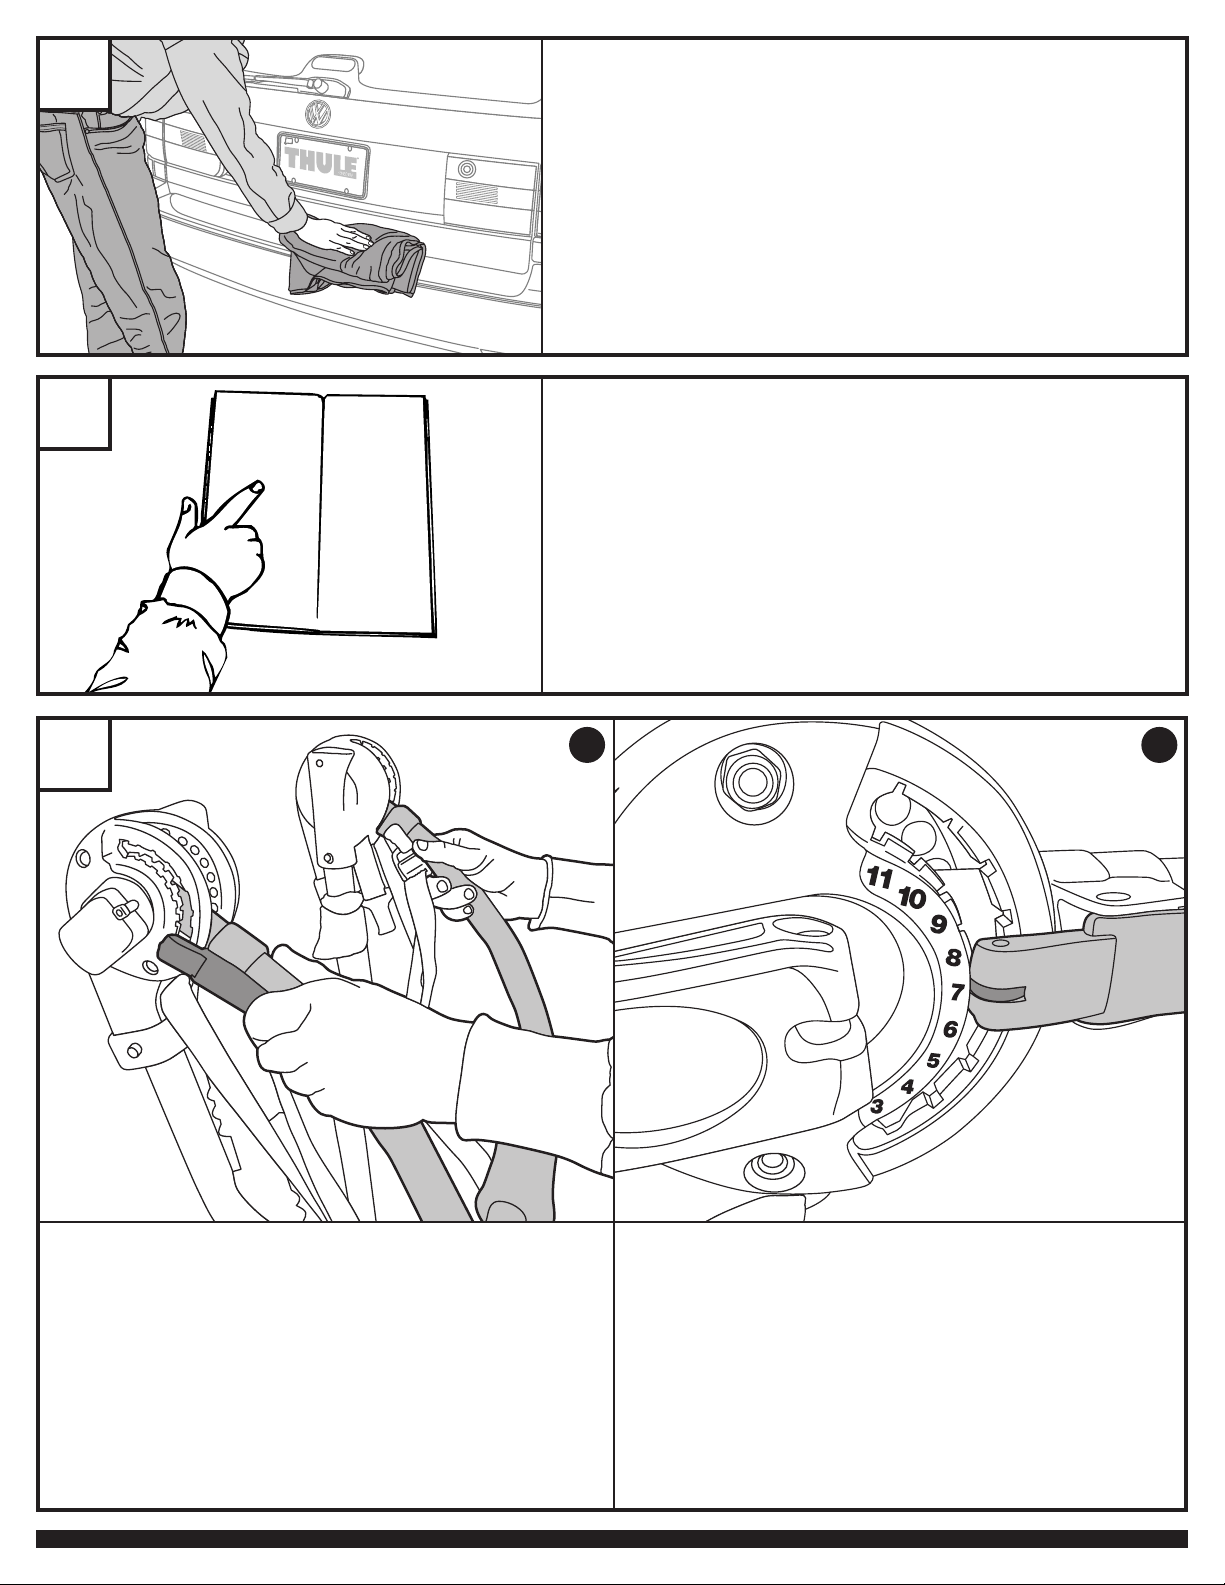
3
• Depress both angle adjusting levers simultaneously as shown.
Enfoncez simultanément les deux leviers d’ajustement d’angle, comme illustré.
Oprima simultáneamente las dos palancas de ajuste de ángulo tal y como se
muestra en la imagen.
A B
• With levers depressed, raise the trunk tube legs until the center of the lever
top matches the number listed in the fit guide for your vehicle.
En gardant les deux leviers enfoncés, soulevez les tiges du coffre arrière jusqu’à ce
que le dessus du centre du levier corresponde au numéro associé à votre véhicule
dans le guide de réglage.
Con las palancas oprimidas, suba las patas del tubo del maletero hasta que el
centro de la parte superior de la palanca coincida con el número que aparece
en la guía de modelos para su vehículo.
5015946_00 2 of 7
Page 3
4
• Mount carrier to the back of vehicle. Refer to Fit Tips for specific placement instructions.
Installez le porte-vélo à l’arrière du véhicule. Référez-vous aux Conseils de réglage pour déterminer
l’emplacement exact.
Monte el portabicicletas en la parte trasera de su vehículo. Refiérase a los puntos de encaje
para obtener instrucciones específicas de colocación.
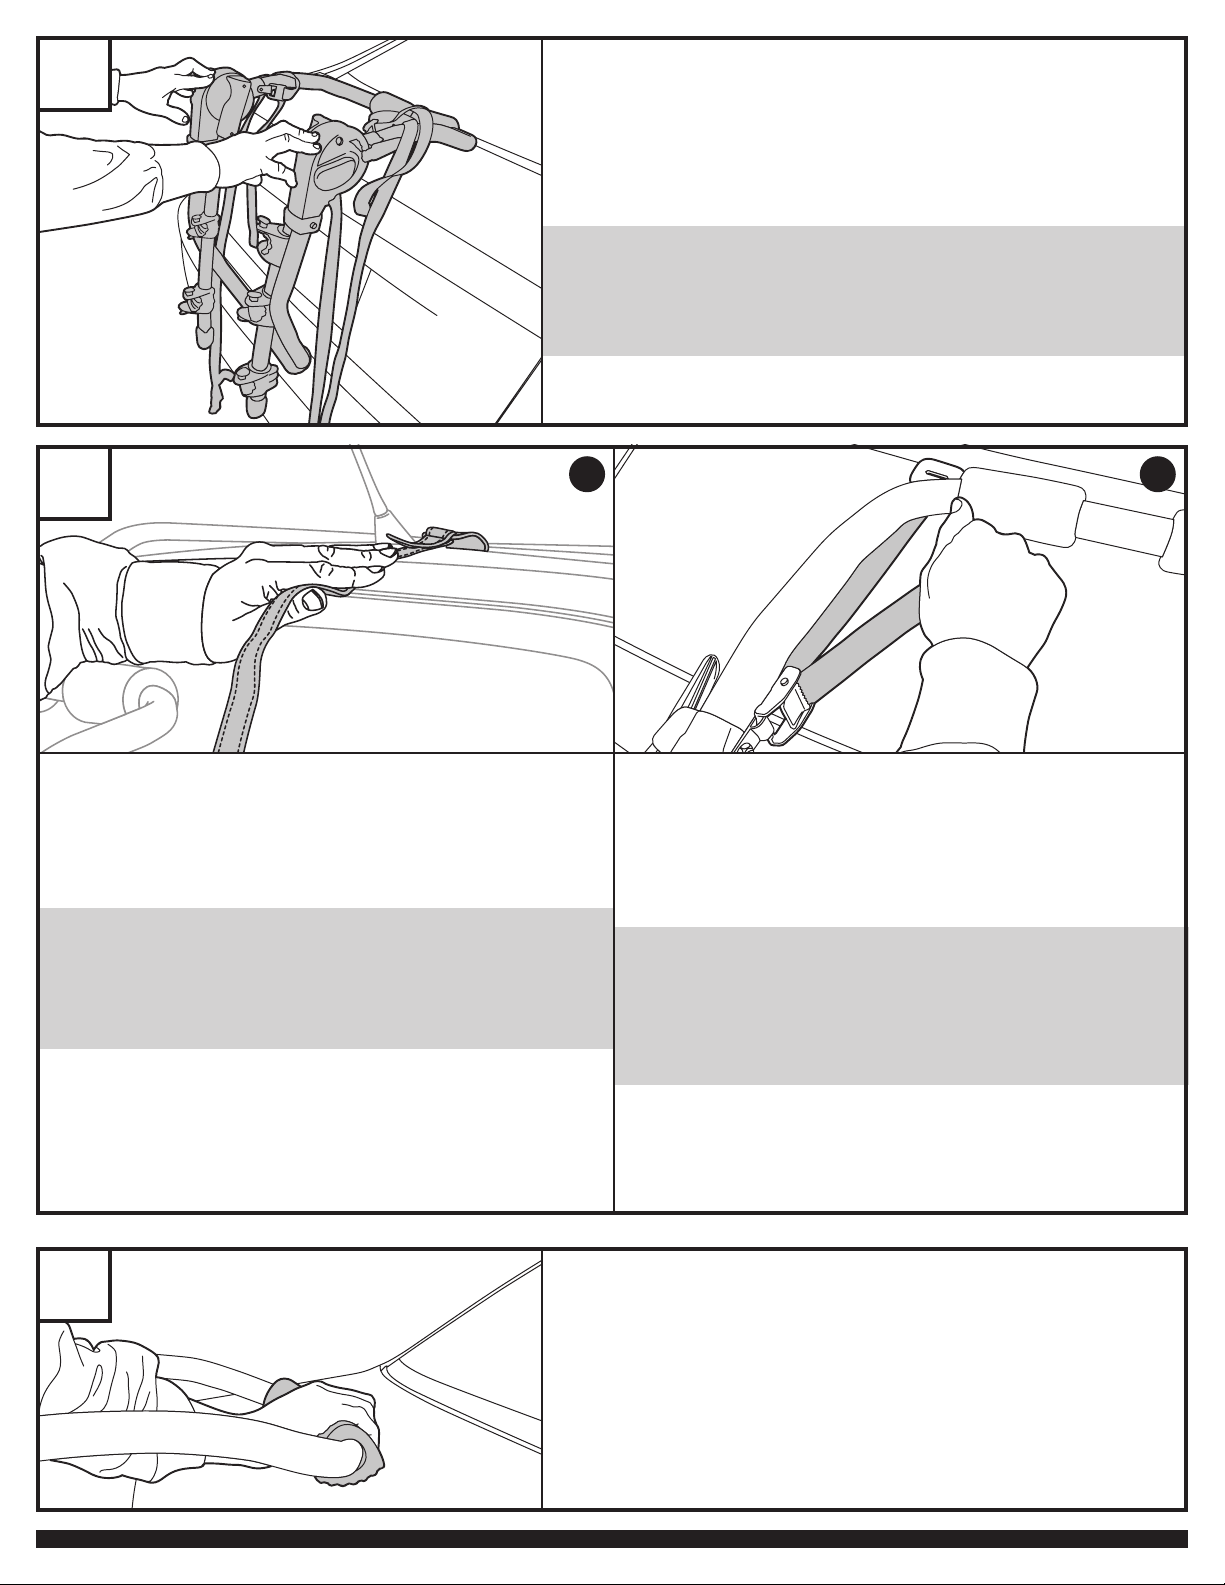
5
• Attach top strap according to the Fit Tips for your car.
Installez les sangles supérieures conformément aux Conceils de réglage s’appliquant
à votre véhicule.
Sujete la correa superior de acuerdo a los puntos de encaje para su carro.
NOTE: Do not open your trunk/rear hatch with the rack installed, it may cause damage
to your vehicle.
REMARQUE: N’ouvrez pas votre coffre/hayon une fois le support installé; cela pourrait causer
des dommages à votre véhicule.
NOTA: No abra el maletero / puerta trasera con el portaequipajes instalado, ya que
podría dañar su vehículo.
A B
• Tighten top straps, by pulling on the loose end, so the carrier stays
in position.
Serrez les sangles supérieures de façon à ce que le porte-vélo demeure en position.
Para asegurar que el portabicicletas permanezca en su posición, apriete las
correas, tirando el lado suelto de éstas.
NOTE: If versa clip is required for proper mounting, go to step 16 before
continuing.
REMARQUE: Si un crochet Versa-Clip est nécessaire pour une installation correcte,
veuillez passer à l’étape 16 avant de continuer.
NOTA: Si un Versa Clip es requerido para el montaje apropiado, vea el
paso 16 antes de continuar.
• You may need to route straps in from the sides to get straps into their
recommended place on the vehicle.
Il se peut que vous deviez faire passer les sangles depuis les côtés afin qu’elles
soient à la position recommandée sur le véhicule.
Puede ser necesario hacer pasar las correas por los costados para que
queden en el lugar recomendado del vehículo.
6
NOTE: Tighten straps only enough to hold rack in place without
changing its position as instructed in the fit tips.
REMARQUE: Ne tendez les sangles que pour maintenir le porte-vélo en place,
sans le déplacer, comme indiqué dans les conseils de réglage.
NOTA: Apriete las correas solamente lo suficiente para que la parrilla
permanezca en su sitio sin cambiar su posición según se indica
en los consejos de ajuste.
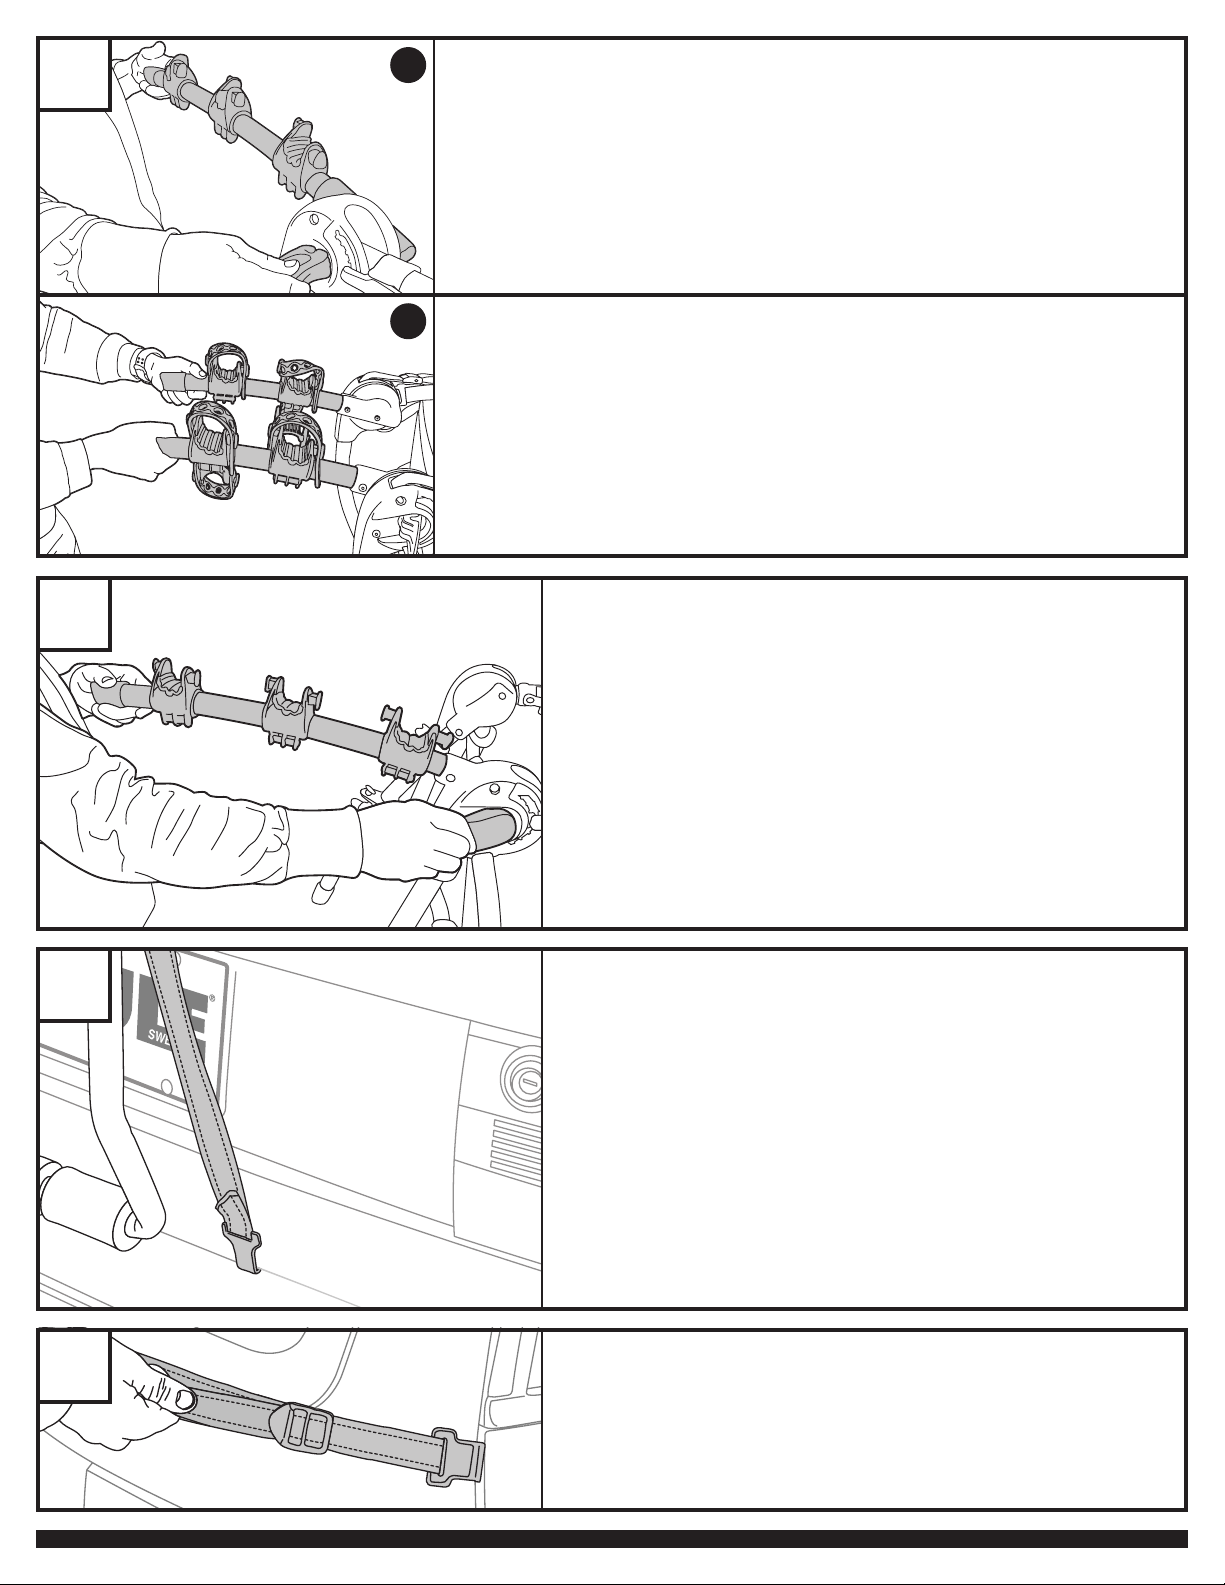
• Rotate all 4 foam pads so that the ribbed channels are flat against the vehicle surface.
Faites pivoter les 4 coussinets en mousse de façon à ce que les cannelures nervurées reposent à
plat sur la surface du véhicule.
Gire las 4 almohadillas de espuma de forma que los canales acolchados estén aplanados
contra la superficie del vehículo.
5015946_00 3 of 7
Page 4
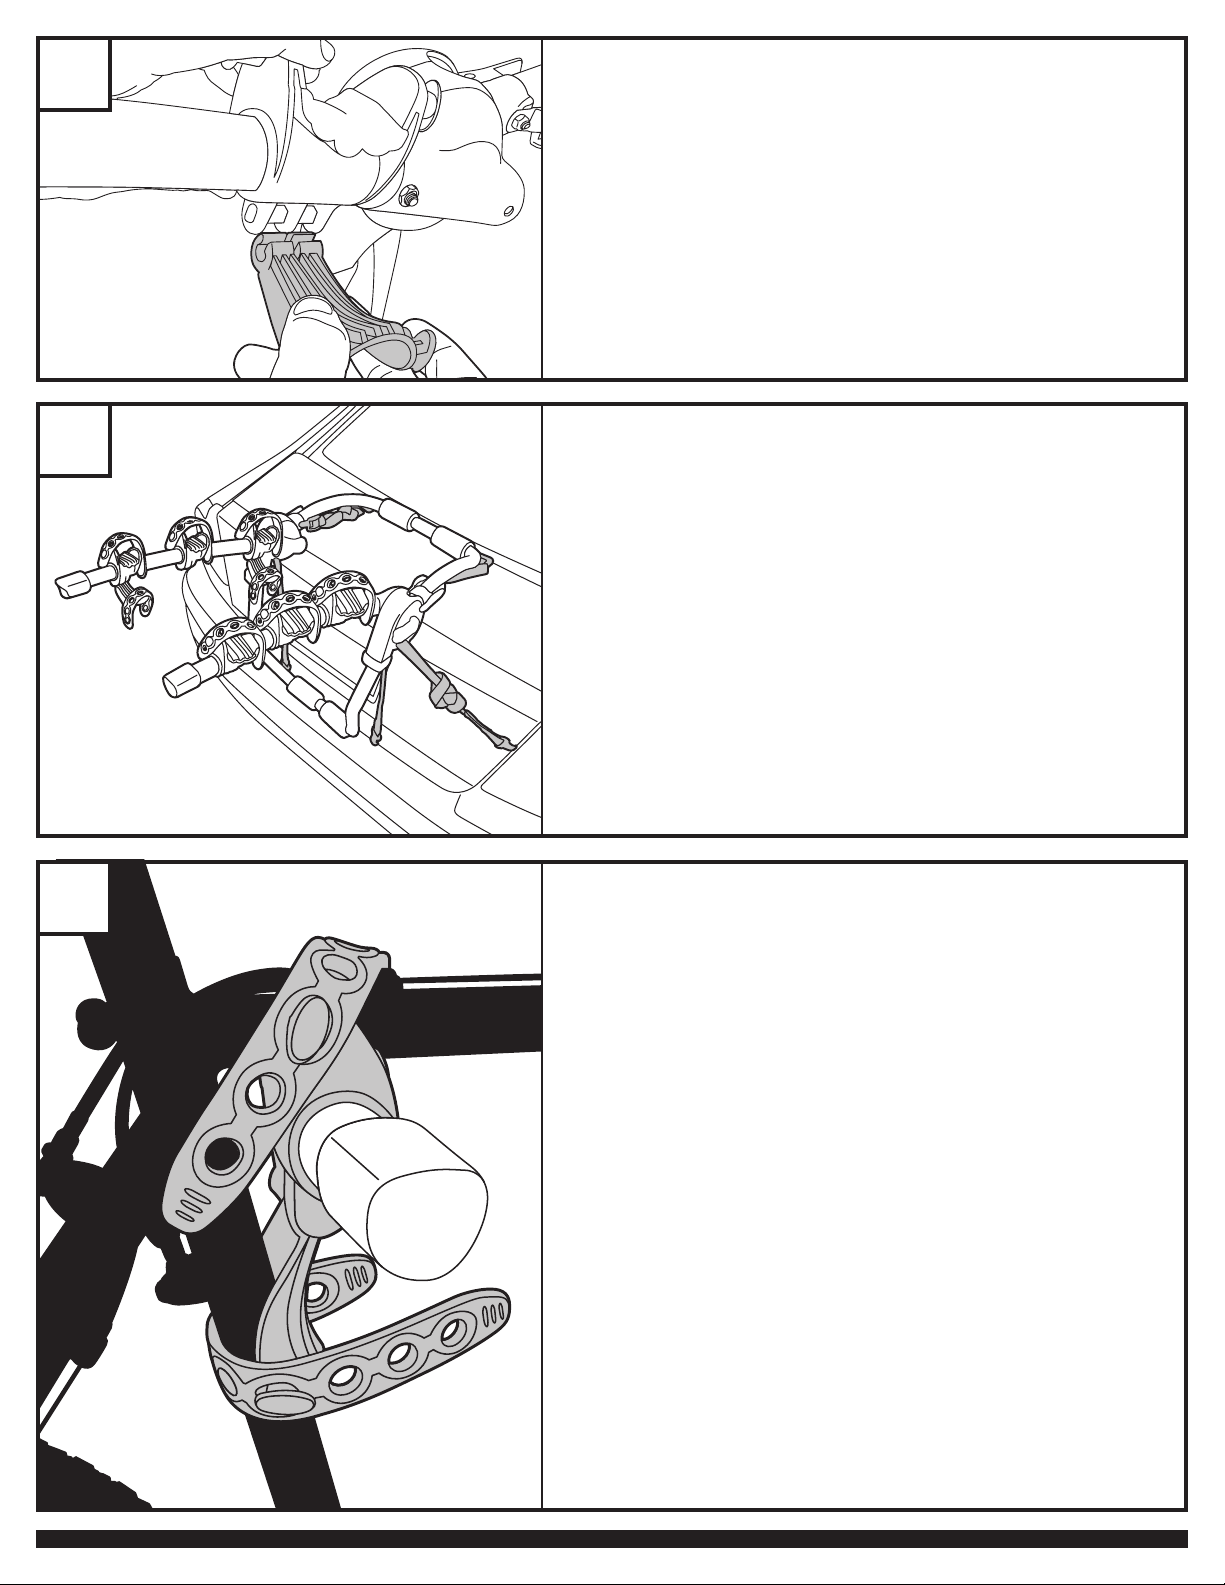
7
8
A
• Open one side’s cinching lever to raise bike arm. You may have to spin cinching lever counter-clockwise to
create gap between hub and bike arm engagement teeth. You may also push levers inward to create gap.
Ouvrez un côté du levier tendeur pour soulever le bras de vélo. Il se peut que vous deviez tourner le levier tendeur dans
le sens inverse des aiguilles d’une montre pour créer un écart entre le moyeu et la dent d’enclenchement du bras de
vélo. Vous pouvez également pousser les leviers vers l’intérieur pour créer un écart.
Abra la palanca de ajuste de un lado para subir el brazo de la bicicleta. Puede que tenga que girar la palanca
de ajuste en la dirección opuesta a las agujas del reloj para crear separación entre el cubo y el diente de
cierre del brazo de la bicicleta. También puede empujar las palancas hacia dentro para crear separación.
B
• One other hint to help raise or lower arms is to grab both ends of arms and push both toward middle to
disengage teeth in hubs as shown. Arms should be level or pointing slightly skyward. Then spin lever
clockwise to tighten.
Pour vous aider à soulever ou à abaisser les bras, saisissez l’extrémité des deux bras et poussez-les vers le centre afin
de désengager la dent des moyeux, comme illustré. Les bras doivent être au niveau ou pointer légèrement vers le haut.
Faites ensuite tourner le levier dans le sens des aiguilles d’une montre pour le serrer.
Otro consejo para ayudar a subir o bajar los brazos es agarrar ambos extremos de los brazos y empujar los
dos hacia el centro para desenganchar el diente en los cubos tal y como se muestra en la imagen. Los brazos
deberían estar al mismo nivel o bien apuntando ligeramente hacia el cielo. A continuación gire la palanca en la
dirección de las agujas del reloj para ajustarla.
• Close lever so it rests in hub cut-out channel. Lever should snap shut. If there is still a
noticeable gap between the hub and the bike arm hub, unsnap lever and tighten further
clockwise before closing again. Repeat for other bike arm setting.
Fermez le levier afin qu’il repose dans les cannelures du moyeu. Le levier doit s’enclencher. S’il y
a toujours un écart important entre le moyeu et le moyeu du bras de vélo, déclenchez le levier et
tournez-le encore une fois dans le sens des aiguilles d’une montre avant de le refermer. Répétez le
réglage pour l’autre bras de vélo.
Cierre la palanca de forma que se apoye en el canal de la ranura del cubo. La palanca
debería cerrarse a presión. Si todavía hay una separación evidente entre el cubo y el cubo
del brazo de la bicicleta, levante la palanca y ajuste más fuerte en la dirección de las agujas
del reloj antes de cerrar de nuevo. Repita el mismo proceso para ajustar el otro brazo de la
bicicleta.
9
• Attach bottom straps (narrow, grey hooks) according to the Fit Tips for your car. Always
make sure that straps are out of the way of hot exhaust gases and not in contact with the
muffler or exhaust pipe.
Installez les sangles inférieures conformément aux Conseils de réglage s’appliquant à votre véhicule.
Assurez-vous que les sangles n’entrent pas en contact avec le tuyau d’échappement ni avec le
silencieux.
Enganche las correas inferiores (gancho gris delgado) de acuerdo a los puntos de encaje
de su carro. Asegúrese siempre de que las correas estén lejos de las emisiones de gases
calientes y de que no estén en contacto con el tubo de escape.
• Be sure lower bumper legs are in correct position. It is recommended to rest the lower
leg tube pads on the bumper.
Assurez-vous que les tiges du pare-chocs inférieures sont dans la bonne position. Il est recommandé
d’appuyer les coussinets de la tige inférieure sur le pare-chocs.
Controle que las patas del parachoques inferior estén en la posición correcta. Se recomienda
apoyar las almohadillas tubulares de la pata inferior en el parachoques.
10
• Attach side straps to side seams of trunk, hatch, or door.
Fixez les sangles latérales sur les côtés du coffre, du hayon ou de la porte.
Enganche las correas laterales a las grietas del portamaletas o puerta trasera.
5015946_00 4 of 7
Page 5
11
12
• Insert anti-sway cages onto cradle bottoms by aligning open end of “C” slot as shown.
Smooth curved surface of cage should face outwards away from strap rack. Once it is
attached, rotate cage to vertical position.
Insérez les cages stabilisatrices sur le bas des berceaux en alignant l’extrémité ouverte de la rainure
en « C », comme illustré. La surface lisse et courbée de la cage doit faire face à l’extérieur, loin du
support à sangles. Une fois fixée, faites pivoter la cage à la verticale.
Coloque las jaulas antibalanceo sobre las partes inferiores del soporte; para ello, alinee el
extremo abierto de la ranura “C”, como se muestra. La superficie curvada blanda de la jaula
debe estar orientada hacia fuera, lejos del soporte con correas. Una vez que la jaula está
colocada, gírela hasta que quede en posición vertical.
• Retighten all straps to ensure a snug fit to vehicle.
Resserrez fermement toutes les sangles pour assurer une fixation correcte sur le véhicule.
Apriete una vez más para asegurar un buen calce en su vehículo.
• Roll up loose strap ends and secure.
Enroulez les bouts libres des sangles.
Enrolle los extremos sueltos de las correas.
13
• Cradles can be either rotated or shifted on bars to accommodate different bike
geometries.
Les berceaux peuvent être soit tournés soit changés sur les barres pour les adapter aux différentes
géométries de vélos.
Las cunas se pueden girar o deslizar en las barras para acomodar bicicletas de geometrías
diferentes.
• Alternate direction of bikes when loading.
Alternez le sens des vélos lors du chargement.
Alternar la dirección de las bicicletas cuando se carguen.
• Ensure straps are tightened securely around bike.
Vérifiez si les sangles sont bien serrées autour des vélos.
Asegúrese de que las correas de las abrazaderas estén apretadas alrededor de los tubos de
sus bicicletas.
• Place smooth curved surface of anti-sway cage against the bike’s down tube and and
tighten strap around bike tube.
Appuyez la surface lisse courbée de la cage stabilisatrice contre le tube oblique du vélo et serrez la
sangle autour du tube du vélo.
Coloque la superficie curvada blanda de la jaula anti-balanceo contra el tubo inferior de la
bicicleta y ajuste la correa alrededor del tubo de la bicicleta.
5015946_00 5 of 7
Page 6

14
15
• Mount second and third bike in the opposite directions. Ensure cradle straps are
tightened securely around each bike.
Placez la deuxième et la troisième bicyclettes en direction opposée. Vérifiez si les sangles sont bien
serrées autour du vélo.
Monte la segunda y tercera bicicleta en direcciones opuestas. Asegúrese que las correas
estén apretadas a sus bicicletas.
• Use the strap provided to secure the bikes to each other and to lower arms of rack.
Utilisez la sangle fournie pour fixer les vélos entre eux et au bras inférieur du porte-vélo.
Use la correa que se proporciona para fijar las bicicletas unas con la otras y para bajar los
brazos de la parrilla.
• After bikes are mounted re-check the tightness of all straps.
Une fois les vélos montés, vérifiez une nouvelle fois le serrage de toutes les sangles.
Después de haber montado las bicicletas vuelva a comprobar que las correas estén bien
apretadas.
• Using blue load strap provided secure all bikes
to the frame of the rack as illustrated.
À de la sangle de charge bleue fournie, fixez tous les
vélos sur le porte-vélos, comme illustré.
Usando la correa de carga azul que se suministra,
sujete todas las bicicletas en el portabicicletas
según se muestra en el dibujo.
A B
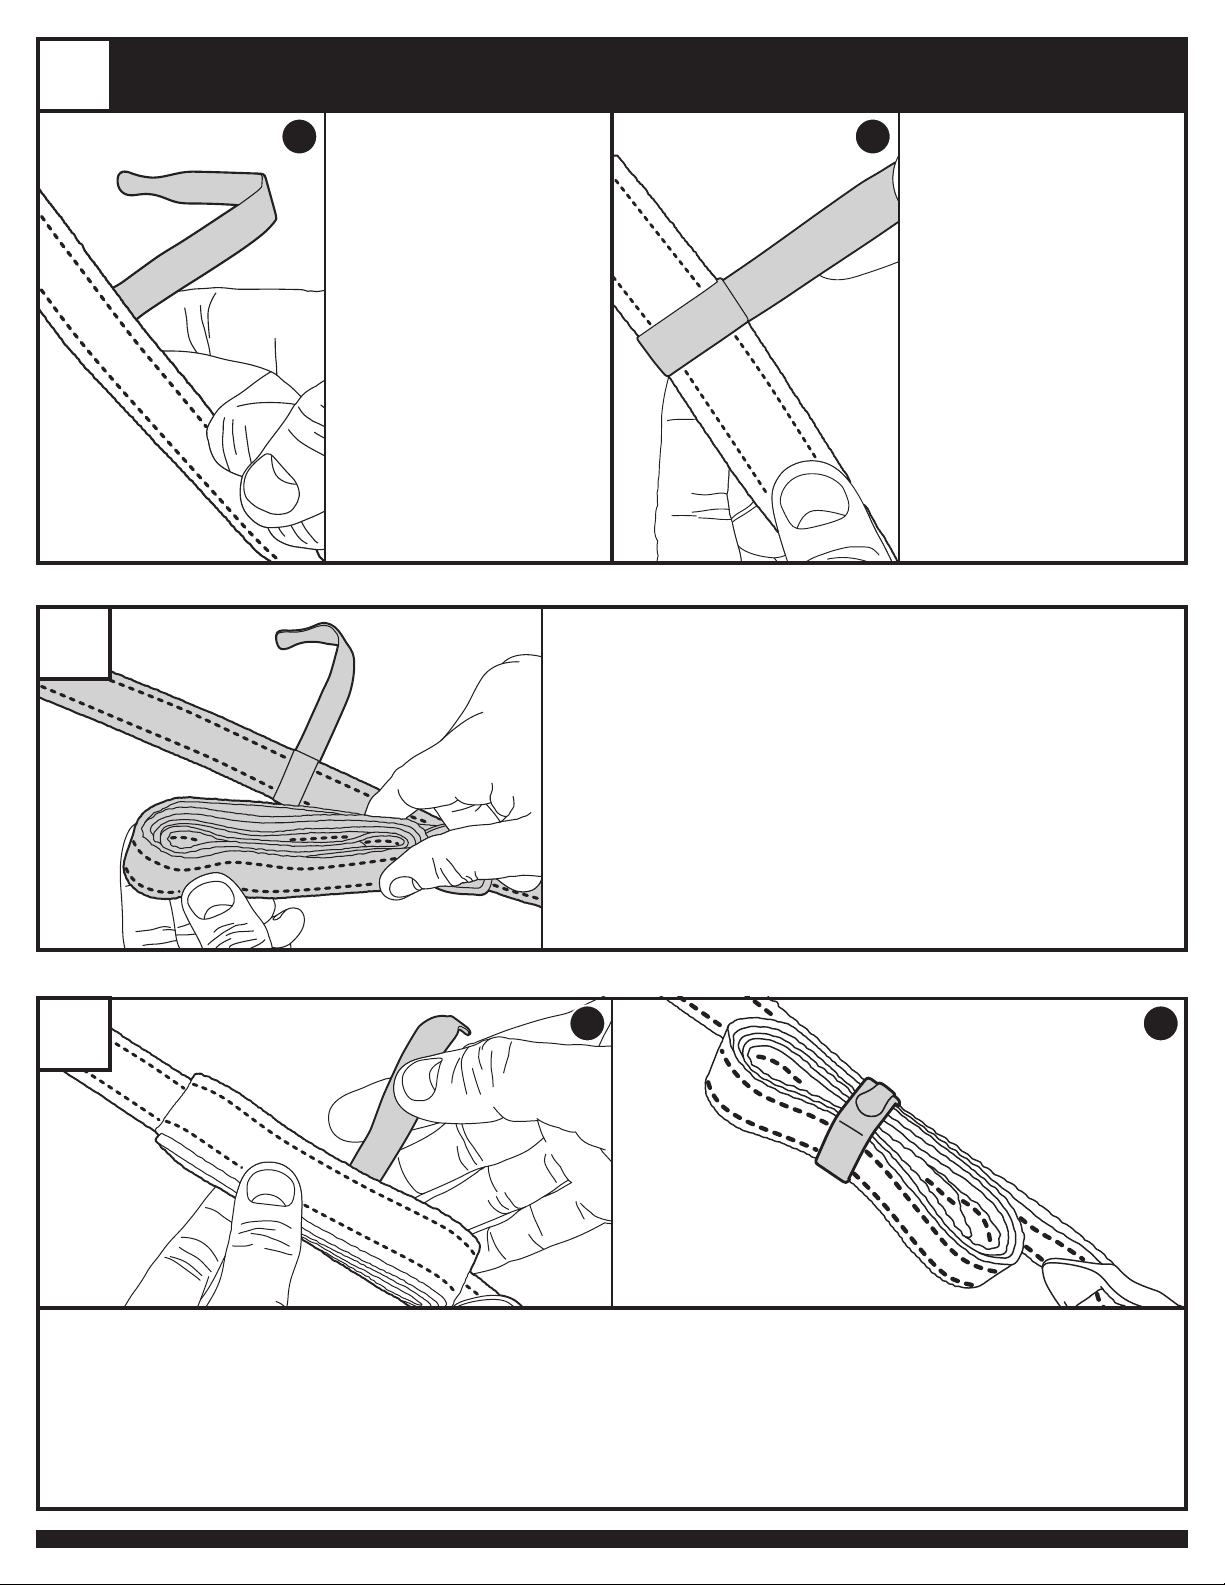
16
A
• Remove upper strap from carrier
buckle. Thread loose end through
slot in hook.
Retirez la sangle supérieure de la
boucle. Enfilez l’excédant de la sangle
dans la fente du crochet.
Remueva la correa superior, de la
hebilla del portabicicletas.
C
• Open hatch/trunk. Hang hook
inside trunk or vehicle.
Ouvrez le hayon / coffre. Suspendez
le crochet à l’intérieur du coffre ou
du véhicule.
Abra el portamaletas o puerta
trasera. Cuelgue el gancho
dentro del portamaletas de
su vehículo.
INSTALLATION AVEC LE CROCHET VERSA-CLIP
VERSA CLIP USE
INSTRUCCIONES DE USO DE VERSA CLIP
B
• Pull strap through.
Tirez la sangle.
Pase la correa a través del gancho.
D
• Close hatch, pull strap tight and
install carrier.
Refermez le coffre/hayon, tirez la
sangle et installez le porte-vélo.
Cierre el portamaletas,
recoja la correa e instale el
portabicicletas.
5015946_00 6 of 7
Page 7
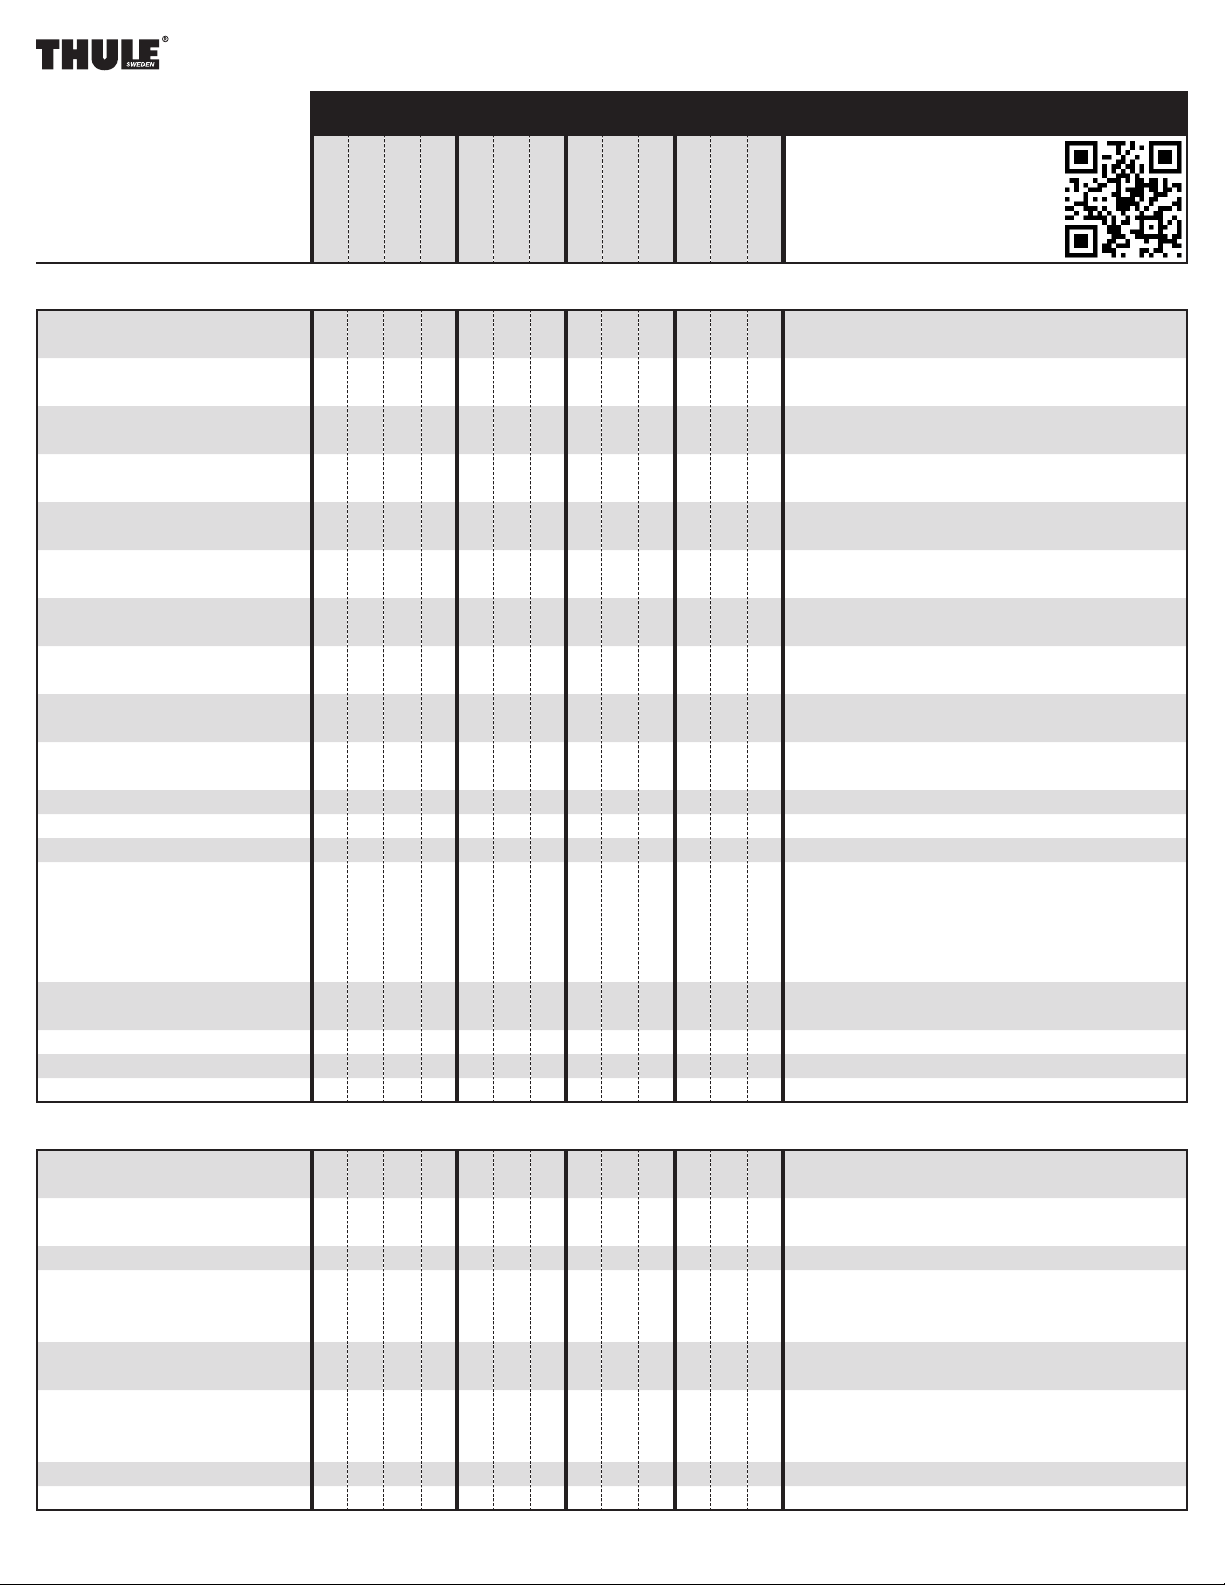
17
USING STRAP MANAGEMENT DEVICE
UTILISATION DU DISPOSITIF DE GESTION DE SANGLE
USO DEL DISPOSITIVO DE CONTENCIÓN DE CORREAS
A B
• Attach strap management
device to any of 4 tight straps
approximately three inches
behind buckle.
Fixez le dispositif de gestion de
sangle sur une des 4 sangles tendues
à environ trois pouces (7,6 cm)
derrière la boucle.
Coloque el dispositivo de
contención de correas junto a
cualquiera de las 4 correas firmes,
a una distancia aproximada de 7,6
cm (3 pulgadas) de la hebilla.
• Wrap strap management device
once around tight strap fastening
it onto itself.
Enroulez une fois le dispositif de
gestion de sangle autour de la sangle
tendue et fixez-le.
Use el dispositivo de contención
de correas para envolver una vez
la correa firme, y ajústelo hasta
que queden ceñidas.
18
19
• Roll up excess strap into four-inch loops.
Enroulez l’excédent de sangle en formant des boucles de quatre pouces (10,2 cm).
Enrolle el resto de la correa en bucles de 10,2 cm (4 pulgadas).
A B
• Wrap strap management device once around excess strap loops and fasten onto itself.
Enroulez une fois le dispositif de gestion de sangle autour de l’excédent de sangle et fixez-le.
Use el dispositivo de contención de correas para envolver los bucles del resto de la correa, y ajústelo firmemente.
• Repeat last three steps for other three strap management devices.
Répétez les trois dernières étapes pour les trois autres dispositifs de gestion de sangle.
Repita estos últimos tres pasos para los otros tres dispositivos de contención de correas.
5015946_00 7 of 7
Page 8

THULE RACK GUIDELINES DIRECTIVES POUR SUPPORT THULE
DIRECTIVES POUR SUPPORT THULE
When using Thule Load carriers and accessories, the
user must understand the precautions. The points
listed below will assist you in using the rack system
and will encourage safety.
• For quality fits and safety, use only the recommended rack or accessory as stated in Thule’s
current Fit Guide. Do not assume a rack will fit,
always check the current Fit Guide when obtaining
a new vehicle.
• Unless stated otherwise in these instructions, do
not carry more than 75 kg (165 lbs.) on Thule load
carriers. Thule load carriers do not increase gutter
or roof strength. Thule can not warranty loads that
exceed this limit. Total load = cargo weight plus
weight of accessories used to carry cargo.
• Always make sure all doors are open when mounting a roof rack system. Make sure all knobs, bolts,
screws, straps, and locks are firmly attached,
tightened and locked before every trip. Knobs,
bolts, screws, straps and locks must be periodically
inspected for signs of wear, corrosion, and fatigue.
Check your load at stops during the trip to ensure
continued fastening security.
• Check local and state laws governing projection of
objects beyond the perimeter of a vehicle. Be aware
of the width and height of your cargo since low
clearance branches, bridges, and parking garages
can affect the load. All cargo will affect the vehicle’s driving behavior. Never drive with any lock,
knob or rack in an open or unlocked position. All
long loads such as, but not limited to, sailboards,
surfboards, kayaks, canoes, and lumber must be
tied down front and rear to the bumpers or tow
hooks of the vehicle.
• Remove your Thule rack and accessories when they
are not in use and before entering automatic car
washes.
• All locks must be turned and moved periodically to
ensure smooth operation. Use graphite or dry lubricant to help this. Thule locks are designed to deter
vandalism and theft but should not be considered
theft proof. Remove valuable gear if your vehicle is
unattended for an extended period. Place at least
one key in the glove compartment.
• For safety to your vehicle and rack system, obey all
posted speed limits and traffic cautions. Adapt your
speed to the conditions of the road and the load
being carried.
• Do not use Thule load carriers and accessories
for purposes other than those for which they were
designed. Do not exceed their carrying capacity.
Failure to follow these guidelines or the product’s
instructions will void the warranty.
• All loads must be secured using the provided
straps.
• Consult with your Thule dealer if you have any
questions regarding the operations and limits of
Thule products. Review all instructions and warranty information carefully.
• Not for use on trailers or towed vehicles.
• Not for offroad use.
• Keep bicycle tires away from hot exhaust.
Lorsque vous utilisez les supports et accessoires Thule pour
voiture, vous devez observer les précautions suivantes. Les
conseils ci-dessous visent à faciliter l’emploi de votre galerie
et à l’utiliser en toute sécurité.
• Pour respecter les règles de sécurité et obtenir un ajustement
de qualité, utilisez uniquementle le produit ou l’accessoire
recommandé dans le guide actuel de correspondance de
Thule. Ne présumez pas qu’un produit sera adapté; consultex
toujours ce guide de correspondance lorsque vous achetez
un nouveau véhicule.
• Sauf indication contraire, ne dépassez pas la capacité
maximale de 75 kg (165 lb) permise pour les porte charges
de Thule. Ne transportez pas plus de 75 kg (165 lb) sur les
galeries Thule. Ces dernières ne renforcent pas votre toit ni
les points de fixation. Les charges dépassant cette limite ne
peuvent pas être garanties. Charge totale = poids du chargement + poids des accessoires utilisés pour le transporter.
• Assurez-vous toujours que les portes de la voiture sont
ouvertes lors de l’installation d’une galerie. Avant de prendre
la route, assurez-vous que les molettes, les boulons et les vis
sont bien serrés, les sangles bien attachées et les dispositifs
de verrouillage fermés à clés. Examinez régulièrement ces
éléments afin de déceler tout signe d’usure, de corrosion ou
de fatigue. Vérifiez votre chargement à tous les arrêts pendant votre voyage pour vous assurer qu’il est bien attaché.
• Vérifiez les lois locales ou provinciales sur le dépassement
d’objets sur les côtés d’un véhicule. Soyez conscient de la
largeur et de la hauteur de votre chargement pour passer
sous les branches basses, les ponts et les plafonds de
stationnement couverts. Tout chargement modifie la tenue de
route du véhicule. Ne conduisez jamais avec une serrure, une
barre ou un écrou ouverts ou non bloqués. Tous les chargements longs, de type surfs, planches à voile, kayaks, canoës,
bois, etc. doivent être attachés à l’avant et à arrière aux
pare-chocs ou aux crochets de remorquage du véhicule.
• Retirez votre galerie et vos accessoires Thule lorsque vous ne
les utilisez pas et avant de passer au lave-auto.
• Faites fonctionner régulièrement toutes les serrures afin
qu’elles ne se grippent pas. Employez du graphite ou un lubrifiant sec pour conserver leur souplesse. Les antivols Thule
sont conçus pour dissuader les voleurs et éviter les actes de
vandalisme. Retirez tout matériel de valeur de votre véhicule
s’il doit rester sans surveillance pendant une période prolongée. Gardez au moins une clé dans la boîte à gants.
• Pour protéger votre véhicule et votre galerie, respectez les
vitesses limites et le code de la route. Adaptez votre vitesse
aux conditions de la route et à la charge transportée.
• N’utilisez pas de galerie et d’accessoires Thule à d’autres
fins que celles pour lesquelles ils ont été conçus. Ne dépassez pas leur capacité de charge maximale. Le non respect
de ces consignes et des instructions spécifiques au produit
annulera la garantie.
• Tout chargement doit être attaché en utilisant les sangles
fournis.
• Consultez votre revendeur pour toute question sur le fonctionnement et les limites des produits Thule. Lisez attentivement toutes les instuctions et les informations de la garantie.
• Ne pas utiliser sur une remorque ou un véhicule remorqué.
• Ne pas utiliser pour la conduite hors route.
• Garder les pneus de vélo éloignés du tuyau d’échappement
chaud.
Cuando use portacargas y accesorios Thule, debe asegurarse de entender todas las precauciones. Los puntos
indicados a continuación le ayudarán a usar el sistema
de bastidor y fomentarán su seguridad.
• Por seguridad y para obtener un ajuste correcto, use
solamente el bastidor o accesorio Thule recomendado
según en la Guía de ajuste Thule más actual. No suponga
el ajuste del bastidor, siempre verifique la Guía de ajuste
más actual cuando compre un nuevo vehículo.
• Salvo instrucción contrario, no se debe superar la
capacidad máxima de 75 kg (165 lb) designada para
los portacargas de Thule. No transporte más de 75 kg
(165 lb.) en los portacargas Thule. Los portacargas
Thule no incrementan la resistencia de las canaletas ni
del techo. Thule no garantiza cargas que excedan este
limite. Carga total = el peso de la carga + el peso de los
accesorios usados para el transporte.
• Siempre asegúrese que las puertas del automóvil estén
abiertas cuando monte un sistema de bastidor para
techo. Cerciórese de que las perillas, los pernos, los
tornillos, las correas y las cerraduras estén firmemente
sujetos, apretados y asegurados con llave antes de cada
viaje. Debe revisar periódicamente que las perillas, los
pernos, los tornillos, las correas y los seguros no tengan
señales de desgaste, corrosión o fatiga. Revise su carga
en las paradas durante su viaje para garantizar la seguridad continua de la sujeción.
• Verifique las leyes estatales y locales que rigen la
proyección de objetos más allá del ancho del vehículo.
Esté al tanto de la anchura y altura de su carga, ya
que las ramas, los puentes, los estacionamientos de
baja altura pueden dañar su carga.Toda carga afectará
el comportamiento de manejo del vehículo. Nunca
conduzca con alguno de los seguros, las perillas o los
bastidores abiertos o sin seguro. Todas las cargas largas, como tablas a vela, tablas de surf, kayacs, canoas y
madera, deban atarse al frente y atrás los parachoques o
ganchos de remolque del vehículo.
• Quite su bastidor y accesorios Thule cuando no se
usen y antes de entrar a establecimientos para lavado
automático de vehículos.
• Todas los seguros deben girarse y moverse periódicamente para garantizar que no se atasquen. Use grafito u
otro lubricante en seco similar para este fin. Los seguros
Thule están diseñados para disuadir el vandalismo y
los robos. Saque todo equipo valioso si su vehiculo no
tendrá vigilancia por largo tiempo.Ponga porlo menos
una llave en la guantera.
• Como seguridad para su vehículo y sistema de bastidor,
obedezca todos las límites de velocidad y avisos de tráfico. Adapte su velocidad a las condiciones del camino y
de la carga transportada.
• No use portacargas y accesorios Thule con otra función
para la que fue destinada. No exceda su capacidad de
carga. Se anulará la garantia si no sigue estos lineamientos o las instrucciones del producto.
• Todas las cargas deben atarse con la correas incluídas.
• Consulte a su distribuidor Thule si tiene alguna pregunta
sobre el funcionamiento y los límites de los productos
Thule. Repase cuiadosamente todas las instrucciones y
la de garantia.
• No use en tráilers o vehículos de remolque.
• No conduzca fuera del camino.
• Mantenga las ruedas de las bicicletas lejos del tubo de
escape caliente.
Thule Inc. • 42 Silvermine Road • Seymour, CT 06483
Thule Canada Inc. • 700 Bernard • Granby QC J2J 0H6
North American Consumer Service: Toll Free 800-238-2388 / Fax450-777-3615•www.thule.com
C3
Page 9

THULE CAR RACK SYSTEMS LIMITED LIFETIME WARRANTY [EFFECTIVE JANUARY 1, 2006]
Register online at www.thuleracks.com/register
THULE will warranty all THULE brand car rack systems and
its accessories manufactured by THULE during the time that
an original retail purchaser owns the product. This warranty
terminates if a purchaser transfers the product to any other
person.
Subject to the limitations and exclusions described in this
warranty, THULE will remedy defects in materials or workmanship by repairing or replacing, at its option, a defective
product without charge for parts or labor. In addition, THULE
may elect, at its option, not to repair or replace a defective
product but rather issue to a purchaser a refund equal to the
purchase price paid for the product or a credit to be used
toward the purchase of a new THULE load carrier system.
No warranty is given for defects caused by normal wear and
tear, cosmetic rust, scratches, accidents, unlawful vehicle
operation, or modification of, or any types of repair of, a load
carrier system other than those authorized by THULE.
No warranty is given for defects resulting from conditions
beyond THULE’s control including, but not limited to, misuse,
overloading, or failure to assemble, mount or use the product
in accordance with THULE’s written instructions or guidelines
included with the product or made available to the purchaser.
No warranty is given for THULE products purchased outside
of the United States, Canada and Mexico.
In the event that a product is defective, the purchaser should
contact the THULE dealer from whom the product was
purchased or an Authorized Thule Service Center. If the dealer
or Authorized Thule Service Center is not able to correct the
defect, the purchaser should contact THULE in writing or by
phone using the contact information listed at the bottom of
this page.
In the event that a product needs to be returned to THULE, a
THULE technician at the address or telephone number listed
below will provide the purchaser with the appropriate mailing
address and any additional instructions. Please note that
the purchaser will be responsible for the cost of mailing the
product to THULE and that proof of purchase in the form of an
original purchase invoice or receipt and a detailed description
of the defect must be included in the mailing.
DISCLAIMER OF LIABILITY
REPAIR OR REPLACEMENT OF A DEFECTIVE PRODUCT OR THE
ISSUANCE OF A REFUND OR CREDIT (AS DETERMINED BY
THULE) IS A PURCHASER’S EXCLUSIVE REMEDY UNDER THIS
WARRANTY. DAMAGE TO A PURCHASER’S VEHICLE, CARGO
AND/OR TO ANY OTHER PERSON OR PROPERTY IS EXCLUDED.
THIS WARRANTY IS EXPRESSLY MADE IN LIEU OF ANY AND
ALL OTHER WARRANTIES, EXPRESS OR IMPLIED, INCLUDING
THE WARRANTIES OF MERCHANTABILITY AND FITNESS FOR A
PARTICULAR PURPOSE.
THULE’S SOLE LIABILITY TO ANY PURCHASER IS LIMITED TO
THE REMEDY SET FORTH ABOVE. IN NO EVENT WILL THULE
BE LIABLE FOR ANY LOST PROFITS, LOST SALES, OR FOR ANY
CONSEQUENTIAL, DIRECT, INDIRECT, INCIDENTAL, SPECIAL,
EXEMPLARY, OR PUNITIVE DAMAGES OR FOR ANY OTHER
DAMAGES OF ANY KIND OR NATURE.
SOME STATES DO NOT ALLOW THE EXCLUSION OR LIMITATION
OF INCIDENTAL OR CONSEQUENTIAL DAMAGES, SO THE ABOVE
LIMITATIONS MAY NOT BE APPLICABLE.
THIS WARRANTY GIVES YOU SPECIFIC LEGAL RIGHTS, AND
YOU MAY ALSO HAVE OTHER RIGHTS WHICH VARY FROM
STATE TO STATE.
THULE garantit tous les systèmes de support de la marque THULE
pour voitures et ses accessoires fabriqués par THULE tant que le
premier acheteur au détail détient le produit. Cette garantie prend fin
si un acheteur transfert le produit à une personne.
Selon les limites et les exclusions décrites dans cette garantie,
THULE remédiera aux défauts de matériaux ou de maind’oeuvre en
réparant ou en remplaçant, à sa discrétion, un produit défectueux
sans frais de pièces ou de main d’oeuvre. De plus, THULE peut
décider, à sa discrétion, de ne pas réparer ou remplacer un produit
défectueux mais d’émettre un remboursement de l’acheteur égal
au prix payé pour le produit, ou un crédit à utiliser pour l’achat d’un
système de support de charge THULE neuf.
Aucune garantie n’est émise pour les défauts causés par une usure
normale, pour la rouille esthétique, pour les rayures, pour l’utilisation
inégale du véhicule, pour toute modification de celuici, pour tout type
de réparation, pour un système de support de charge autre que ceux
autorisés par THULE.
Aucune garantie n’est émise pour les défauts résultant de conditions
hors du contrôle de THULE, notamment une mauvaise utilisation,
une surcharge ou un assemblage ou montage non conformes aux
instructions écrites ou directives de THULE incluses avec le produit
ou mises à disposition de l’acheteur.
Aucune garantie n’est émise pour les produits THULE achetés hors
des États-Unis, du Canada ou du Mexique.
Dans le cas où un produit serait défectueux, l’acheteur doit contacter
soit le revendeur THULE chez lequel le produit a été acheté, soit le
centre de service après-vente Thule. Si le revendeur ou le centre de
service après-vente Thule n’est pas en mesure de corriger le défaut,
l’acheteur doit contacter Thule par écrit ou par téléphone (voir les
coordonnées en bas de cette page).
Dans l’éventualité où un produit doit être renvoyé à THULE, un
technicien THULE à l’adresse ou au numéro de téléphone indiqué
ci-dessous fournira à l’acheteur l’adresse d’envoi appropriée et
des instructions supplémentaires. Veuillez noter que l’acheteur sera
responsable des frais d’envoi du produit à THULE et qu’une preuve
d’achat sous la forme de l’original d’une facture ou d’un reçu d’achat
et une description détaillée du défaut doivent être inclus dans l’envoi.
DÉNI DE RESPONSABILITÉ
LA REPARATION OU LE REMPLACEMENT D’UN PRODUIT DEFECTUEUX
OU L’EMISSION D’UN REMBOURSEMENT OU D’UN CREDIT (SELON
LE CHOIX DE THULE) CONSTITUE LE RECOURS EXCLUSIF DE
L’ACHETEUR SOUS CETTE GARANTIE. LES DEGATS AU VEHICULE DE
L’ACHETEUR, AU CHARGEMENT OU/ET A TOUTE AUTRE PERSONNE
OU BIEN SONT EXCLUS.
CETTE GARANTIE REMPLACE EXPRESSÉMENT TOUTES LES
AUTRES GARANTIES EXPRESSES OU IMPLICITES Y COMPRIS TOUTE
GARANTIE DE QUALITÉ MARCHANDE ET DE CONFORMITÉ À UN
USAGE PARTICULIER.
LA SEULE RESPONSABILITÉ DE THULE ENVERS TOUT ACHETEUR EST
LIMITÉE AU RECOURS DÉFINI CI-DESSUS. EN AUCUN CAS THULE
NE PEUT ÊTRE TENU RESPONSABLE DES PERTES DE REVENUS,
DE PERTES DE VENTES, DES DOMMAGES DIRECTS OU INDIRECTS,
ACCESSOIRES, PARTICULIERS, SPÉCIAUX, INTÉRÊTS MAJORÉS OU
PUNITIFS OU DE TOUT AUTRE DOMMAGE DE TOUT TYPE OU NATURE.
CERTAINS ÉTATS OU PROVINCES N’AUTORISENT PAS L’EXCLUSION
OU LA LIMITATION DES DOMMAGES ACCESSOIRES OU INDIRECTS,
LES LIMITATIONS DÉCRITES CI-DESSUS PEUVENT DONC NE PAS
ÊTRE APPLICABLES.
CETTE GARANTIE VOUS DONNE DES DROITS SPÉCIFIQUES QUI
PEUVENT VARIER D’UN ÉTAT OU PROVINCE À L’AUTRE.
THULE garantizará todos los sistemas portacargas de la marca
THULE y sus accesorios fabricados por THULE mientras el
comprador original esté en posesión del producto. Esta garantía
finaliza si un comprador transfiere el producto a cualquier otra
persona.
Según las limitaciones y exclusiones que se describen en esta
garantía, THULE remediará cualquier defecto en los materiales
o la mano de obra reparando o reemplazando, a discreción
propia, cualquier producto defectuoso sin cobrarle al propietario
por las piezas o la mano de obra. Además, THULE puede optar,
a discreción propia, a no reparar o reemplazar un producto
defectuoso y en su lugar devolver al comprador el dinero del
precio que pagó por el producto o dotarle un crédito que puede
usarse para comprar un nuevo sistema portacargas THULE.
No se otorga garantía alguna por los defectos causados por el
uso y desgaste normales, la corrosión cosmética, las ralladuras,
los accidentes o la conducción ilegal del vehículo, o cualquier
modificación o reparación del sistema portacargas sin incluir
aquellas modificaciones o reparaciones autorizadas por THULE.
No se otorga garantía alguna por los defectos que resulten de
condiciones más allá del control de THULE que incluyen, pero
no se limitan a, el uso indebido, la sobrecarga, la instalación,
montaje o usos incorrectos del producto según las instrucciones
o las directrices escritas de THULE adjuntas con el producto o
que estén a disposición del comprador.
No se otorga garantía alguna por los productos Thule que se
compren fuera de los Estados Unidos, Canadá o México.
En caso que el producto presente defectos, el comprador
deberá comunicarse con el vendedor THULE que se lo vendió,
o con un Centro Autorizado de Servicio Thule. En caso que el
vendedor o Centro Autorizado de Servicio Thule no puedan
solucionar el defecto, el comprador deberá comunicarse por
correo o teléfono con el servicio de información de THULE cuyos
datos aparecen a pié de página.
En el caso de que el producto deba devolverse a THULE,
un técnico de THULE en la dirección o número de teléfono
indicados abajo le proporcionará una dirección postal donde
enviarlo así como instrucciones adicionales. Por favor observe
que el comprador será responsable de abonar el costo de enviar
el producto THULE y que debe adjuntar una prueba de compra
como una factura o un recibo original así como una descripción
detallada del defecto.
DESCARGO DE RESPONSABILIDAD
BAJO ESTA GARANTÍA, LA ÚNICA SOLUCIÓN PARA EL
COMPRADOR ES EL REEMPLAZO DEL PRODUCTO DEFECTUOSO,
LA DEVOLUCIÓN DEL DINERO O DOTACIÓN DE CRÉDITO (SEGÚN
LO DETERMINE THULE). SE EXCLUYEN LOS DAÑOS AL VEHÍCULO
DEL COMPRADOR, A LA CARGA O A CUALQUIER OTRA PERSONA
O PROPIEDAD.
ESTA GARANTÍA SE HACE DE FORMA EXPRESA EN VEZ DE
CUALQUIER OTRA GARANTÍA, IMPLÍCITA O EXPLÍCITA, INCLUSO
LAS GARANTÍAS DE COMERCIABILIDAD Y ADECUACIÓN PARA
PROPÓSITOS CONCRETOS.
LA ÚNICA RESPONSABILIDAD DE THULE HACIA EL COMPRADOR
SE LIMITA A LA SOLUCIÓN ESTABLECIDA ANTERIORMENTE.
EN NINGÚN CASO SERÁ THULE RESPONSABLE DE NINGÚN
BENEFICIO PERDIDO, VENTAS PERDIDAS O DE CUALQUIER DAÑO
CONSECUENTE, DIRECTO, INDIRECTO, INCIDENTAL, ESPECIAL,
EJEMPLAR O PUNITIVO DE CUALQUIER TIPO O ÍNDOLE.
ALGUNOS ESTADOS NO PERMITEN LA EXCLUSIÓN O LA
LIMITACIÓN DE DAÑOS INCIDENTALES O CONSECUENTES,
POR CONSIGUIENTE EN ESOS ESTADOS LAS LIMITACIONES
ANTERIORES NO SON APLICABLES.
ESTA GARANTÍA LE OTORGA DERECHOS LEGALES ESPECÍFICOS
Y USTED TAMBIÉN PUEDE TENER OTROS DERECHOS QUE VARÍAN
DE UN ESTADO A OTRO.
Thule Inc. • 42 Silvermine Road • Seymour, CT 06483
Thule Canada Inc. • 700 Bernard • Granby QC J2J 0H6
North American Consumer Service: Toll Free 800-238-2388 / Fax450-777-3615•www.thule.com
C3
Register online at
www.thuleracks.com/register
Page 10
THULE 2012 REAR MOUNTED FIT GUIDE
NOTE: If your vehicle is not listed below, it may be a NO FIT. For the most up to date information consult Thule Fit
Guides at your local dealer, m.thule.com, thule.com or scan the code below from your smart phone.
Vehicle make, model and year
9001 RACEWAY 2
9002 RACEWAY 3
9003 RACEWAY
PLATFORM
FIT DIAL SETTING
Fit Tips: Read the appropriate
9009 / 9009XT
ARCHWAY 2
9010 / 9010XT
ARCHWAY 3
FIT DIAL SETTING
9006 / 9006XT
GATEWAY 2
9007 / 9007XT
GATEWAY 3
FIT DIAL SETTING
910XT PASSAGE 2
911XT PASSAGE 3
933 VENTURE
FIT DIAL SETTING
numbered tips on the
last page before
fitting vehicle.
ACURA
CL 2DR '01-03
'96-00
CSX 4DR (Canada) '12-13
'06-11
EL 4DR '01-06
'96-00
Integra 3DR '94-01
'90-93
Integra 4DR '94-01
'90-93
Legend 2DR '91-95
'87-90
Legend 4DR '91-95
'86-90
MDX '07-13 137
'01-06
RDX '13 133
'07-12 133
RL 4DR '05-13
'96-04
RLX 4DR '14 CHECK FOR UPDATE
RSX '02-06
SLX '96-99
TL '12-13
'09-11
'04-08
'99-03
'95-98
TSX '09-13
'04-08
TSX Sport Wagon '12-13
Vigor '91-95
ZDX '10-13
ü ü ü
ü ü ü
ü ü ü
ü ü ü
ü ü ü
ü
ü ü ü
ü
ü
ü
ü ü ü
ü
ü ü ü
ü ü ü
ü
ü ü ü
ü ü ü
ü ü ü
ü ü ü
ü ü ü
ü
ü ü ü
ü ü ü
ü ü ü
ü
ü ü ü
6
ü ü
6
ü ü
7
ü ü
7
ü ü
6
ü ü
6
ü
6
ü ü
5
ü
5
ü
5
ü
5
ü ü
5
ü
9
ü ü
7
ü ü
6
ü
6
ü ü
7
ü ü
7
ü ü
7
ü ü
7
ü ü
5
ü
7
ü ü
7
ü ü
10
ü ü
5
ü
8
ü ü
6
ü ü
6
ü ü
7
ü ü
7
ü ü
6
ü ü
6
ü
6
ü ü
5
ü
5
ü
5
ü
5
ü ü
5
ü
9
ü ü
7
ü ü
6
ü
6
ü ü
7
ü ü
7
ü ü
7
ü ü
7
ü ü
5
ü
7
ü ü
7
ü ü
10
ü ü
5
ü
8
ü ü
6
ü ü
6
ü ü
7
ü ü
7
ü ü
6
ü ü
6
ü
6
ü ü
5
ü
5
ü
5
ü
5
ü ü
5
ü
9
ü ü
7
ü ü
6
ü
6
ü ü
7
ü ü
7
ü ü
7
ü ü
7
ü ü
5
ü
7
ü ü
7
ü ü
10
ü ü
5
ü
8
ü ü
6 101,102,128
6 101,104,125,128
7 101,102,128
7 101,102,128
6 101,102,128
6 101,102,132
6 101,105,125,128
135,136
5 101,102,110,132,140
135,136
5 101,102,140
5 101,102,140
5 101,102
5 101,103,125,140
9 101,102,121,127,128
7 101,102,128
6 101,110,132
6 101,102,128
7 101,102,128
7 101,102,128
7 101,102,128
7 101,102,128
5 101,102,132
7 101,102,128
7 101,102,128
10 101,102,121,128
5 101,102,132
8 101,102,121,138
AUDI
80 & 90 Series '93-95
'88-92
100 & 200 Series '92-94
'89-91
A3 Sportback 5DR '06-13
A4 4DR '09-13
'02-08
'95-01
A4 Allroad '13
'01-05
A4 Wagon '09-12
'02-08
'97-01
A5 2DR '08-13 NO FIT
A6 4DR '12-13
ü ü ü
ü ü ü
ü ü ü
ü ü ü
ü ü ü
ü ü ü
ü ü ü
ü ü ü
ü ü ü
ü ü ü
ü ü ü
ü ü ü
ü ü ü
ü ü ü
5
ü ü
7
ü ü
5
ü ü
7
ü ü
8
ü ü
6
ü ü
6
ü ü
6
ü ü
9
ü ü
9
ü ü
9
ü ü
9
ü ü
9
ü ü
6
ü ü
5
ü ü
7
ü ü
5
ü ü
7
ü ü
8
ü ü
6
ü ü
6
ü ü
6
ü ü
9
ü ü
9
ü ü
9
ü ü
9
ü ü
9
ü ü
6
ü ü
5
ü ü
7
ü ü
5
ü ü
7
ü ü
8
ü ü
6
ü ü
6
ü ü
6
ü ü
9
ü ü
9
ü ü
9
ü ü
9
ü ü
9
ü ü
6
ü ü
5 101,102,138
7 101,104
5 101,102,138
7 101,131
8 101,102,128
6 101,102,116,128
6 101,102,116,128
6 101,102,138
9 101,102,121,128
9 101,102,121,128
9 101,102,121,128
9 101,102,121,128
9 101,102,121,128
6 101,102,138
1 501-5258-10_14
Page 11
THULE 2012 REAR MOUNTED FIT GUIDE
NOTE: If your vehicle is not listed below, it may be a NO FIT. For the most up to date information consult Thule Fit
Guides at your local dealer, m.thule.com, thule.com or scan the code below from your smart phone.
Vehicle make, model and year
9001 RACEWAY 2
9002 RACEWAY 3
9003 RACEWAY
PLATFORM
FIT DIAL SETTING
Fit Tips: Read the appropriate
9009 / 9009XT
ARCHWAY 2
9010 / 9010XT
ARCHWAY 3
FIT DIAL SETTING
9006 / 9006XT
GATEWAY 2
9007 / 9007XT
GATEWAY 3
FIT DIAL SETTING
910XT PASSAGE 2
911XT PASSAGE 3
933 VENTURE
FIT DIAL SETTING
numbered tips on the
last page before
fitting vehicle.
AUDI continued
A6 4DR '05-11
'98-04
'95-97
A6 Wagon '06-11
'99-05
'97-98
'95-96
A7 Sportback '12-13 CHECK FOR UPDATE
A8 '11-13
'04-10
'96-03
Q5 '09-13 134
Q7 '07-13 134
Quattro 2DR '90-92
RS4 4DR '09-13
'04-08
RS7 Sportback '12-13 CHECK FOR UPDATE
S4 4DR '09-13
'02-08
'95-01
S4 Wagon '01-08
S5 2DR '08-13 NO FIT
S6 4DR '12-13
'05-11
'98-04
'95-97
S6 Wagon '02-03
S7 Sportback '12-13 CHECK FOR UPDATE
S8 '11-13
'04-10
'01-03
TT '07-13
'00-06
ü ü ü
ü ü ü
ü ü ü
ü ü ü
ü ü ü
ü ü ü
ü ü ü
ü ü ü
ü ü ü
ü ü ü
ü ü ü
ü ü ü
ü ü ü
ü ü ü
ü ü ü
ü ü ü
ü ü ü
ü ü ü
ü ü ü
6
ü ü
6
ü ü
9
ü ü
9
ü ü
8
ü ü
7
ü ü
7
ü ü
6
ü ü
6
ü ü
6
ü ü
6
ü ü
6
ü ü
9
ü ü
6
ü ü
6
ü ü
6
ü ü
9
ü ü
7
ü ü
7
ü ü
6
ü ü
6
ü ü
9
ü ü
9
ü ü
8
ü ü
7
ü ü
7
ü ü
6
ü ü
6
ü ü
6
ü ü
6
ü ü
6
ü ü
9
ü ü
6
ü ü
6
ü ü
6
ü ü
9
ü ü
7
ü ü
7
ü ü
6
ü ü
6
ü ü
9
ü ü
9
ü ü
8
ü ü
7
ü ü
7
ü ü
6
ü ü
6
ü ü
6
ü ü
6
ü ü
6
ü ü
9
ü ü
6
ü ü
6
ü ü
6
ü ü
9
ü ü
7
ü ü
7
ü ü
6 101,102,138
6 101,102,138
133
9 101,102,121,128
9 101,102,121,128
137
8 101,102
7 101,102,128
7 101,102,128
135
135
6 101,102,116,128,132
6 101,102,116,128,132
6 101,102,116,128
6 101,102,116,128
6 101,102,138
9 101,102,121,128
6 101,102,138
6 101,102,138
6 101,102,138
133
9 101,102,121,128
7 101,102,128
7 101,102,128
135
133
133
BMW
1 Series 3DR '08-13
1 Series 3DR Convertible '08-13
3 Series 2DR '06-13
'00-05
'92-99
'76-91
3 Series 4DR '12-13
'06-11
'99-05
'92-98
'76-91
3 Series Compact Ti '95-99
3 Series Wagon '11-13
'00-10
5 Series 4DR '11-13
ü
ü
ü
ü ü ü
ü ü ü
ü ü ü
ü
ü
ü ü ü
ü ü ü
ü ü ü
ü
ü
ü ü ü
7
ü
7
ü ü
6
ü ü
5
ü ü
7
ü
7
ü
6
ü ü
6
ü ü
5
ü ü
9
ü
9
ü
8
ü ü
7
ü
7
ü
7
ü
7
ü ü
6
ü ü
5
ü ü
7
ü
7
ü
6
ü ü
6
ü ü
5
ü ü
9
ü
9
ü
8
ü ü
7
ü
7
ü
7
ü
7
ü ü
6
ü ü
5
ü ü
7
ü
7
ü
6
ü ü
6
ü ü
5
ü ü
9
ü
9
ü
8
ü ü
2 501-5258-10_14
7 101,102,128
7 101,102,128,156
7 101,102,128,132
7 101,102,128
6 101,102,138
5 101,109
7 101,102,128,132
7 101,102,128,132
6 101,102,138
6 101,102,138
5 101,109
134
9 101,102,121,128,132
9 101,102,121,128,132
8 101,102,128
Page 12
THULE 2012 REAR MOUNTED FIT GUIDE
NOTE: If your vehicle is not listed below, it may be a NO FIT. For the most up to date information consult Thule Fit
Guides at your local dealer, m.thule.com, thule.com or scan the code below from your smart phone.
Vehicle make, model and year
9001 RACEWAY 2
9002 RACEWAY 3
9003 RACEWAY
PLATFORM
FIT DIAL SETTING
Fit Tips: Read the appropriate
9009 / 9009XT
ARCHWAY 2
9010 / 9010XT
ARCHWAY 3
FIT DIAL SETTING
9006 / 9006XT
GATEWAY 2
9007 / 9007XT
GATEWAY 3
FIT DIAL SETTING
910XT PASSAGE 2
911XT PASSAGE 3
933 VENTURE
FIT DIAL SETTING
numbered tips on the
last page before
fitting vehicle.
BMW continued
5 Series 4DR '04-10
'97-03
'89-95
5 Series Gran Turismo 5DR '10-13 133
5 Series Wagon '11-13
'04-10
'99-03
'92-96
6 Series 2DR '11-13 CHECK FOR UPDATE
'04-10
6 Series 2DR Convertible '11-13 CHECK FOR UPDATE
'04-10
7 Series 4DR '06-13
'02-05
'95-01
'88-94
X1 '11-13 CHECK FOR UPDATE
X3 '11-13 134
'04-10 134
X5 '07-13
'00-06
X6 '09-13
Z3 '96-02
Z4 '03-13
Z8 '00-03
ü ü ü
ü ü ü
ü ü ü
ü
ü
ü
ü ü ü
ü ü ü
ü ü ü
ü ü ü
ü ü ü
8
ü ü
5
ü ü
5
ü ü
8
ü
8
ü
8
ü
6
ü ü
6
ü ü
7
ü ü
7
ü ü
ü ü
8
ü ü
8
ü ü
5
ü ü
5
ü ü
8
ü
8
ü
8
ü
7
ü ü
7
ü ü
7
ü ü
7
ü ü
8
ü ü
8
ü ü
8
ü ü
5
ü ü
5
ü ü
8
ü
8
ü
8
ü
7
ü ü
7
ü ü
7
ü ü
7
ü ü
8
ü ü
8
ü ü
8 101,102,128
5 101,102,138
5 101,102,138
8 101,102,121,128,132
8 101,102,121,128,132
8 101,102,121,128,132
134
7 101,102,128
7 101,102,128
7 101,102,128
7 101,102,128
133
133
8 101,102,121,138
135,137
8 101,102,121,138
133
133
135
BUICK
Allure (Canada) '10-13
'05-09
Century 4DR '97-05
'82-96
Century Wagon '82-96
Enclave '08-13
Encore '13
LaCrosse '10-13
'05-09
LeSabre 4DR '00-05
'92-99
Lucerne '06-11
Park Avenue 4DR '97-05
'91-96
Ranier '04-07
Reatta '88-91
Regal 2DR '88-96
Regal 4DR '10-13
'97-04
'91-96
Rendezvous '02-07
Riviera '95-99
Roadmaster '91-96
ü
ü
ü
ü
ü ü ü
ü ü ü
ü
ü
ü ü ü
ü ü ü
ü ü ü
ü ü ü
ü ü ü
ü ü ü
ü ü ü
ü
6
ü
6
ü
6
ü
8
ü
9
ü ü
8
ü ü
6
ü
6
ü
5
ü ü
5
ü ü
8
ü ü
6
ü ü
6
ü ü
6
ü ü
6
ü ü
10
ü
6
ü
6
ü
6
ü
8
ü
9
ü ü
8
ü ü
6
ü
6
ü
5
ü ü
5
ü ü
8
ü ü
6
ü ü
6
ü ü
6
ü ü
6
ü ü
10
ü
6
ü
6
ü
6
ü
8
ü
9
ü ü
8
ü ü
6
ü
6
ü
5
ü ü
5
ü ü
8
ü ü
6
ü ü
6
ü ü
6
ü ü
6
ü ü
10
ü
6 101,102,116,128,132
6 101,102,116,128,132
6 101,105,125,132,138
132
8 101,105,125,132,138
9 101,102,121,128
8 101,102,121,128
6 101,102,116,128,132
6 101,102,116,128,132
5 101,138,142
5 101,102,128
8 101,102,128
6 101,138,142
6 101,105,138
135,137
134
6 101,105,138
CHECK FOR UPDATE
135
6 101,105,138
10 101,112,121,125,132,138
135
134
3 501-5258-10_14
Page 13

THULE 2012 REAR MOUNTED FIT GUIDE
NOTE: If your vehicle is not listed below, it may be a NO FIT. For the most up to date information consult Thule Fit
Guides at your local dealer, m.thule.com, thule.com or scan the code below from your smart phone.
Vehicle make, model and year
9001 RACEWAY 2
9002 RACEWAY 3
9003 RACEWAY
PLATFORM
FIT DIAL SETTING
Fit Tips: Read the appropriate
9009 / 9009XT
ARCHWAY 2
9010 / 9010XT
ARCHWAY 3
FIT DIAL SETTING
9006 / 9006XT
GATEWAY 2
9007 / 9007XT
GATEWAY 3
FIT DIAL SETTING
910XT PASSAGE 2
911XT PASSAGE 3
933 VENTURE
FIT DIAL SETTING
numbered tips on the
last page before
fitting vehicle.
BUICK continued
Skylark 2DR '88-91
Skylark 4DR '92-97
'86-91
Terraza '05-07
Verano 4DR '12-13
ü
ü
ü
ü ü ü
ü ü ü
6
ü
5
ü
6
ü
11
ü ü
7
ü ü
6
ü
5
ü
6
ü
11
ü ü
7
ü ü
6
ü
5
ü
6
ü
11
ü ü
7
ü ü
6 101,105,132
5 101,105,117,118
6 101,105,132
11 101,102,121,128
7 101,102,128
CADILLAC
ATS 2DR '13 CHECK FOR UPDATE
Catera '97-01
CTS 2DR '10-13 133
CTS 4DR '10-13
'03-09
CTS Sport Wagon 5DR '10-13
DeVille 4DR '00-05
'94-99
DTS '06-11
Eldorado 2DR '94-02
'92-93
'87-91
Escalade '07-13 134
'01-06
'99-00
Escalade ESV '07-13
'03-06 134,137
Escalade EXT '02-13 153
Fleetwood 4DR '93-95
Seville '98-03
Seville STS '98-03
'92-97
SRX '10-13
'04-09
STS '05-11 135
XTS '13 CHECK FOR UPDATE
XLR '04-09 135,137
ü ü ü
ü
ü ü ü
ü ü ü
ü ü ü
ü ü ü
ü ü ü
ü
ü
ü ü ü
ü ü ü
ü ü ü
6
ü ü
8
ü
8
ü ü
7
ü ü
6
ü ü
7
ü ü
6
ü ü
10
ü
10
ü
6
ü ü
10
ü ü
10
ü ü
6
ü ü
7
ü
7
ü ü
7
ü ü
6
ü ü
7
ü ü
6
ü ü
10
ü
10
ü
6
ü ü
10
ü ü
10
ü ü
6
ü ü
7
ü
7
ü ü
7
ü ü
6
ü ü
7
ü ü
6
ü ü
10
ü
10
ü
6
ü ü
10
ü ü
10
ü ü
6 101,105,125,128
7 101,102,141
7 101,102,141
133
7 101,102,128
6 101,102,138
7 101,102,128
133
6 101,102,138
135
10 101,106,121,132,138
10 101,106,121,132,138
134
6 101,111,138
135
135
133
10 101,102,121,128,129
10 101,102,121,128,129
CHEVROLET
Astro Van '90-05
Avalanche '02-13
Aveo 4DR '07-11
'04-06
Aveo 5DR '07-11
'04-06
Beretta 2DR '87-96
Blazer 2DR '95-05
Blazer 4DR '95-02
Camaro '10-13
'93-02
'82-92
Caprice 4DR '91-96
Caprice Wagon '91-96
ü
ü
ü
ü
ü
ü ü ü
7
ü
8
ü
9
ü
10
ü
6
ü
6
ü ü
7
ü
8
ü
9
ü
10
ü
6
ü
6
ü ü
7
ü
8
ü
9
ü
10
ü
6
ü
6
ü ü
4 501-5258-10_14
137
7 101,102,128,132
8 101,128,132,147
9 101,128,132,147
10 101,128,132,147
6 101,105,132
134
134
134
6 101,105
134
Page 14

THULE 2012 REAR MOUNTED FIT GUIDE
NOTE: If your vehicle is not listed below, it may be a NO FIT. For the most up to date information consult Thule Fit
Guides at your local dealer, m.thule.com, thule.com or scan the code below from your smart phone.
Vehicle make, model and year
9001 RACEWAY 2
9002 RACEWAY 3
9003 RACEWAY
PLATFORM
FIT DIAL SETTING
Fit Tips: Read the appropriate
9009 / 9009XT
ARCHWAY 2
9010 / 9010XT
ARCHWAY 3
FIT DIAL SETTING
9006 / 9006XT
GATEWAY 2
9007 / 9007XT
GATEWAY 3
FIT DIAL SETTING
910XT PASSAGE 2
911XT PASSAGE 3
933 VENTURE
FIT DIAL SETTING
numbered tips on the
last page before
fitting vehicle.
CHEVROLET continued
Skylark 2DR '88-91
Skylark 4DR '92-97
'86-91
Terraza '05-07
Verano 4DR '12-13
Cavalier '82-94
Cavalier 2DR '95-04
Cavalier 4DR '95-04
Cavalier Wagon '88-94
Cavalier Z24 '82-94
Celebrity Wagon '90-91
Celebrity '88-91
Cobalt 2DR '05-10
Cobalt 4DR '05-10
Colorado '04-13 153
Corsica 4DR '87-96
Corsica Hatchback '90-95
Corvette '05-13
'99-04
Cruze 4DR '11-13
Cruze Eco 4DR '11-13
Equinox '10-13
'05-09
EuroSport '88-91
Full Size Blazer '91-94
Full Size Pickup '79-87
Full Size Pickup / CK '88-00
HHR '06-11
Impala '06-13
'00-05
Lumina 2DR '90-94
Lumina 4DR '90-01
Lumina APV Van '90-96
Malibu '13
'08-12
'04-07
'97-03
Malibu Maxx Wagon '04-07
Metro 3DR '98-01
Metro 4DR '98-01
Monte Carlo '06-07
'00-05
'95-99
Orlando 5DR (Canada) '12-13 CHECK FOR UPDATE
Prizm '98-02
S-10 Blazer 2DR '83-94
S-10 Blazer 4DR '83-94
S-10 '94-03
S-10 '83-93
Silverado '07-13 148
ü
ü
ü
ü ü ü
ü ü ü
ü ü ü
ü
ü
ü ü ü
ü ü ü
ü ü ü
ü ü ü
ü ü ü
ü ü ü
ü ü ü
ü ü ü
ü ü ü
ü ü ü
ü ü ü
ü ü ü
ü ü ü
ü ü ü
ü ü ü
ü ü ü
ü ü ü
ü
ü ü ü
ü
ü
ü ü ü
ü ü ü
ü
6
ü
5
ü
6
ü
11
ü ü
7
ü ü
6
ü ü
7
ü
7
ü
9
ü ü
8
ü ü
7
ü ü
7
ü ü
6
ü ü
7
ü ü
7
ü ü
9
ü ü
9
ü ü
11
ü ü
7
ü ü
6
ü ü
6
ü ü
6
ü ü
7
ü ü
7
ü ü
7
ü ü
6
ü
8
ü ü
8
ü
6
ü
7
ü ü
6
ü ü
7
ü
6
ü
5
ü
6
ü
11
ü ü
7
ü ü
6
ü ü
7
ü
7
ü
9
ü ü
8
ü ü
7
ü ü
7
ü ü
6
ü ü
7
ü ü
7
ü ü
9
ü ü
9
ü ü
11
ü ü
7
ü ü
6
ü ü
6
ü ü
6
ü ü
7
ü ü
7
ü ü
7
ü ü
6
ü
8
ü ü
8
ü
6
ü
7
ü ü
6
ü ü
7
ü
6
ü
5
ü
6
ü
11
ü ü
7
ü ü
6
ü ü
7
ü
7
ü
9
ü ü
8
ü ü
7
ü ü
7
ü ü
6
ü ü
7
ü ü
7
ü ü
9
ü ü
9
ü ü
11
ü ü
7
ü ü
6
ü ü
6
ü ü
6
ü ü
7
ü ü
7
ü ü
7
ü ü
6
ü
8
ü ü
8
ü
6
ü
7
ü ü
6
ü ü
7
ü
6 101,105,132
5 101,105,117,118
6 101,105,132
11 101,102,121,128
7 101,102,128
6 101,105
7 101,132,142
7 101,132,142
9 101,105,127
134
8 101,105,125,138
135
7 101,102,128
7 101,110,128
6 101,105,127
134
134
134
7 101,102,128
7 101,102,128
9 101,112,121,138
9 101,112,121,138
135
148
148
11 101,102,121,128
7 101,102,128
6 101,116,128,142
6 101,108
6 101,108
134
7 101,102,127,128
7 101,102,127,128
7 101,102,128
6 101,102,116,125,128,129,132
8 101,102,128
8 101,102,132
6 101,102,132,140
7 101,102,128
6 101,102,128
135
7 101,102,116,128,132
135
135
148
148
5 501-5258-10_14
Page 15

THULE 2012 REAR MOUNTED FIT GUIDE
NOTE: If your vehicle is not listed below, it may be a NO FIT. For the most up to date information consult Thule Fit
Guides at your local dealer, m.thule.com, thule.com or scan the code below from your smart phone.
Vehicle make, model and year
9001 RACEWAY 2
9002 RACEWAY 3
9003 RACEWAY
PLATFORM
FIT DIAL SETTING
Fit Tips: Read the appropriate
9009 / 9009XT
ARCHWAY 2
9010 / 9010XT
ARCHWAY 3
FIT DIAL SETTING
9006 / 9006XT
GATEWAY 2
9007 / 9007XT
GATEWAY 3
FIT DIAL SETTING
910XT PASSAGE 2
911XT PASSAGE 3
933 VENTURE
FIT DIAL SETTING
numbered tips on the
last page before
fitting vehicle.
CHEVROLET continued
Silverado / Silverado Classic '99-07
Sonic 4DR '12-13
Sonic 5DR '12-13 CHECK FOR UPDATE
Spectrum 2DR '85-88
Spectrum 4DR '85-88
Suburban '07-13 134
Tahoe '07-13 134
Tahoe 2DR '95-99
Tahoe 4DR '95-99
Tracker '99-04
Trax (Canada) '13
TrailBlazer 4DR '02-09
TrailBlazer EXT 4DR '02-06
Traverse '09-13
Uplander '05-08
Venture '97-04
Volt '11-13
ü ü ü
ü
ü
'00-06
'92-99
'00-06
ü
ü
ü
ü
ü
ü ü ü
ü ü ü
ü ü ü
ü ü ü
ü ü
7
ü ü
7
ü
6
ü
10
ü
10
ü
10
ü
10
ü
10
ü
8
ü ü
9
ü ü
11
ü ü
10
ü ü
8
ü ü
7
ü ü
7
ü
6
ü
10
ü
10
ü
10
ü
10
ü
10
ü
8
ü ü
9
ü ü
11
ü ü
10
ü ü
8
ü ü
7
ü ü
7
ü
6
ü
10
ü
10
ü
10
ü
10
ü
10
ü
8
ü ü
9
ü ü
11
ü ü
10
ü ü
8
ü ü
7 101,102,128
7 101,102,132,138
6 101,102,132
10 101,106,121,132,138
10 101,106,128,132
10 101,106,121,132,138
10 101,106,128,132
10 101,106,128,132
8 101,102,121,128
9 101,102,121,128
11 101,102,121,128
10 101,106,121,138
8 101,102,128
148
135,137
135,137
CHRYSLER
200 4DR '11-13
300 '11-13
'05-10
300M '98-04
Aspen '07-09
Cirrus '95-00
Concorde '98-04
'93-97
Conquest '85-89
Crossfire '04-08
LeBaron Coupe '85-89
LeBaron 4DR '94-96
LHS '98-02
'91-97 133
New Yorker '91-96
New Yorker 5th Ave. '91-93
Pacifica '04-08
PT Cruiser '01-10
Sebring 2DR (Hardtop) '01-06
'95-00 133,135
Sebring 4DR '07-10
'01-06
Town & Country '11-13
'08-10
'01-07
'96-00
'91-95
Voyager / Grand Voyager '01-03
ü ü ü
ü ü ü
ü ü ü
ü ü ü
ü ü ü
ü ü ü
ü ü ü
ü
ü
ü ü ü
ü
ü ü ü
ü
ü
ü
ü ü ü
ü ü ü
ü ü ü
ü
ü
ü ü ü
7
ü ü
7
ü ü
7
ü ü
6
ü ü
11
ü ü
6
ü ü
6
ü ü
6
ü
6
ü
6
ü ü
9
ü
10
ü ü
6
ü
6
ü
6
ü
11
ü ü
11
ü ü
10
ü ü
10
ü
10
ü
10
ü ü
7
ü ü
7
ü ü
7
ü ü
6
ü ü
11
ü ü
6
ü ü
6
ü ü
6
ü
6
ü
6
ü ü
9
ü
10
ü ü
6
ü
6
ü
6
ü
11
ü ü
11
ü ü
10
ü ü
10
ü
10
ü
10
ü ü
7
ü ü
7
ü ü
7
ü ü
6
ü ü
11
ü ü
6
ü ü
6
ü ü
6
ü
6
ü
6
ü ü
9
ü
10
ü ü
6
ü
6
ü
6
ü
11
ü ü
11
ü ü
10
ü ü
10
ü
10
ü
10
ü ü
7 101,102,128
7 101,102,128
7 101,102,128
6 101,102,128
11 101,102,121,128
6 101,106,125
6 101,102,128
133
134,135
135
6 101,105,132,138
6 101,105,132
6 101,102,128
133
133, 135
9 101,102,121,138
10 101,102,121,128,129
6 101,102,116,128,132
6 101,102,116,128,132
6 101,102,116,128,132
11 101,102,121,128
11 101,102,121,128
10 101,102,121
10 101,102,121,139
10 101,102,121,139
10 101,102,121
6 501-5258-10_14
Page 16

THULE 2012 REAR MOUNTED FIT GUIDE
NOTE: If your vehicle is not listed below, it may be a NO FIT. For the most up to date information consult Thule Fit
Guides at your local dealer, m.thule.com, thule.com or scan the code below from your smart phone.
Vehicle make, model and year
9001 RACEWAY 2
9002 RACEWAY 3
9003 RACEWAY
PLATFORM
FIT DIAL SETTING
Fit Tips: Read the appropriate
9009 / 9009XT
ARCHWAY 2
9010 / 9010XT
ARCHWAY 3
FIT DIAL SETTING
9006 / 9006XT
GATEWAY 2
9007 / 9007XT
GATEWAY 3
FIT DIAL SETTING
910XT PASSAGE 2
911XT PASSAGE 3
933 VENTURE
FIT DIAL SETTING
numbered tips on the
last page before
fitting vehicle.
DODGE
Aries '81-89
Avenger '07-13
Caliber '07-12
Caliber SRT4 '07-12 NO FIT - SPOILER
Caliber SXT '07-12 NO FIT - SPOILER
Caravan / Grand Caravan '11-13
Challenger '09-13 NO FIT
Charger '11-13
Colt 2DR '93-95
Colt 4DR '93-95
Colt Hatchback '90-92
Colt Vista Wagon '92-95
Dakota '09-11 148
Dart 4DR '13 CHECK FOR UPDATE
Daytona '84-93
Durango '11-13
Dynasty '88-93
Intrepid '98-04
Journey '13
Magnum '05-08
Neon 2DR '95-99
Neon 4DR '00-05
Nitro '07-11
Omni '78-90
Ram 1500 '13
Ram 1500 '09-12
Ram 2500 / 3500 '10-13
Shadow 2DR '87-94
Shadow 4DR '87-94
ü ü ü
'95-00
ü ü ü
ü ü ü
'08-10
'01-07
'96-00
'90-95
'06-10
'84-92
'88-91
'05-08 148
'97-04 148
'87-96 148
'04-09
'98-03
'93-97
'08-12
'95-99
'02-08
'94-01
'03-09
'94-01
ü ü ü
ü ü ü
ü
ü
ü ü ü
ü ü ü
ü
ü ü ü
ü ü ü
ü ü ü
ü ü ü
ü
ü ü ü
ü ü ü
ü ü ü
ü ü ü
ü ü ü
ü
ü ü ü
ü ü ü
ü ü ü
ü
ü
ü
ü ü ü
ü
'02
7
ü ü
9
ü ü
11
ü ü
11
ü ü
10
ü ü
10
ü
10
ü
7
ü ü
7
ü ü
9
ü
6
ü ü
8
ü ü
9
ü ü
9
ü ü
6
ü
11
ü ü
11
ü ü
10
ü ü
6
ü ü
6
ü ü
6
ü
11
ü ü
11
ü ü
9
ü ü
6
ü
7
ü
6
ü
11
ü ü
7
ü
7
ü ü
9
ü ü
11
ü ü
11
ü ü
10
ü ü
10
ü
10
ü
7
ü ü
7
ü ü
9
ü
6
ü ü
8
ü ü
9
ü ü
9
ü ü
6
ü
11
ü ü
11
ü ü
10
ü ü
6
ü ü
6
ü ü
6
ü
11
ü ü
11
ü ü
9
ü ü
6
ü
7
ü
6
ü
11
ü ü
7
ü
7
ü ü
9
ü ü
11
ü ü
11
ü ü
10
ü ü
10
ü
10
ü
7
ü ü
7
ü ü
9
ü
6
ü ü
8
ü ü
9
ü ü
9
ü ü
6
ü
11
ü ü
11
ü ü
10
ü ü
6
ü ü
6
ü ü
6
ü
11
ü ü
11
ü ü
9
ü ü
6
ü
7
ü
6
ü
11
ü ü
7
ü
7 101,102,128
9 101,102,121,128
11 101,102,121,128
11 101,102,121,128
10 101,102,121,128
10 101,102,121,139
10 101,102,121,139
7 101,102,128
7 101,102,128
9 101,102,140
6 101,102
8 101,102
9 101,105,121
9 101,102,121
6 101,105,121,132,138
11 101,112,121,125,128
11 101,112,121,125,128
10 101,102,121,128
6 101,105
6 101,102,128
6 101,102,132
11 101,102,121,128
11 101,102,121,128
9 101,102,121,128
6 101,102,132
7 101,102,132
6 101,102,132
11 101,102,121,128
7 101,109,121,132
135
133,135
133
148
148
148
148
148
148
148
148
135
135
7 501-5258-10_14
Page 17

THULE 2012 REAR MOUNTED FIT GUIDE
NOTE: If your vehicle is not listed below, it may be a NO FIT. For the most up to date information consult Thule Fit
Guides at your local dealer, m.thule.com, thule.com or scan the code below from your smart phone.
Vehicle make, model and year
9001 RACEWAY 2
9002 RACEWAY 3
9003 RACEWAY
PLATFORM
FIT DIAL SETTING
Fit Tips: Read the appropriate
9009 / 9009XT
ARCHWAY 2
9010 / 9010XT
ARCHWAY 3
FIT DIAL SETTING
9006 / 9006XT
GATEWAY 2
9007 / 9007XT
GATEWAY 3
FIT DIAL SETTING
910XT PASSAGE 2
911XT PASSAGE 3
933 VENTURE
FIT DIAL SETTING
numbered tips on the
last page before
fitting vehicle.
DODGE continued
Spirit '89-94
Stratus 2DR '01-06
Stratus 4DR '01-06
'95-00
ü
ü
ü
ü ü ü
6
ü
6
ü
6
ü
6
ü ü
6
ü
6
ü
6
ü
6
ü ü
6
ü
6
ü
6
ü
6
ü ü
6 101,112,132
6 101,102,116,128,132
6 101,102,116,128,132
6 101,106,125
FIAT
500 3DR '11-13
500 Abarth 3DR '12-13
500C 3DR Convertible '12-13 NO FIT
500L 5DR '13 CHECK FOR UPDATE
ü ü ü
ü ü ü
10
ü ü
10
ü ü
10
ü ü
10
ü ü
10
ü ü
10
ü ü
10 101,102,132,138
10 101,102,132,138
FORD
Aerostar '85-97
Aspire 3DR '95-97
Aspire 5DR '95-97
Bronco (Full Size) '87-96
Bronco II '84-90
C-Max '13 CHECK FOR UPDATE
Contour '95-00
Crown Victoria '92-10
Crown Victoria, LTD '88-91
Edge '11-13
'07-10
Edge Sport '11-13
'07-10
Escape '13
'08-12
'01-07
Escort 3DR '91-96
Escort 4DR '97-02
'91-96
Escort Hatchback '87-90
Escort Wagon '91-99
Escort GT 2DR '88
Excursion '00-05
Expedition '05-13
'97-04
Expedition EL '05-13
'97-04
Explorer 2DR '96-00
'91-95
Explorer 4DR '11-13
'02-10
'96-01
'91-95
Explorer Sport '01-03
Explorer Sport Trac '01-10 153
F-150 '09-13 148
'04-08 148
'97-03 148
ü
ü
ü
ü
ü
ü ü ü
ü ü ü
ü ü ü
ü ü ü
ü ü ü
ü ü ü
ü ü ü
ü ü ü
ü ü ü
ü
ü ü ü
ü ü ü
ü ü ü
ü ü ü
ü ü ü
ü ü ü
ü ü ü
ü ü ü
ü ü ü
ü ü ü
ü ü ü
ü ü ü
ü ü ü
ü ü ü
ü ü ü
ü
10
ü
6
ü
6
ü
6
ü
6
ü
6
ü ü
9
ü ü
9
ü ü
9
ü ü
9
ü ü
10
ü ü
10
ü ü
10
ü ü
7
ü ü
7
ü
7
ü ü
8
ü ü
9
ü ü
5
ü ü
10
ü ü
11
ü ü
11
ü ü
11
ü ü
11
ü ü
9
ü ü
9
ü ü
9
ü ü
10
ü ü
9
ü ü
9
ü ü
9
ü
10
ü
6
ü
6
ü
6
ü
6
ü
6
ü ü
9
ü ü
9
ü ü
9
ü ü
9
ü ü
10
ü ü
10
ü ü
10
ü ü
7
ü ü
7
ü
7
ü ü
8
ü ü
9
ü ü
5
ü ü
10
ü ü
11
ü ü
11
ü ü
11
ü ü
11
ü ü
9
ü ü
9
ü ü
9
ü ü
10
ü ü
9
ü ü
9
ü ü
9
ü
10
ü
6
ü
6
ü
6
ü
6
ü
6
ü ü
9
ü ü
9
ü ü
9
ü ü
9
ü ü
10
ü ü
10
ü ü
10
ü ü
7
ü ü
7
ü
7
ü ü
8
ü ü
9
ü ü
5
ü ü
10
ü ü
11
ü ü
11
ü ü
11
ü ü
11
ü ü
9
ü ü
9
ü ü
9
ü ü
10
ü ü
9
ü ü
9
ü ü
9
ü
10 101,102,128
6 101,102,132,138
6 101,102,132,138
148
6 101,103,118
6 101,102,132
6 101,108
9 101,102,121,138
9 101,102,121,138
9 101,102,121,138
9 101,102,121,138
10 101,102,121,128
10 101,102,121,128
10 101,102,121,128
7 101,103,138
7 101,103,116,125,128,132
7 101,103,138
8 101,105,138
9 101,102,121,138
5 101,103,125,138
10 101,102,121
11 101,106,121,128
11 101,106,121,128
11 101,106,121,128
11 101,106,121,128
9 101,108,121,139
9 101,102,121,138
9 101,102,121,128
10 101,102,121,138
9 101,108,121,138
9 101,102,121,138
9 101,108,121,139
8 501-5258-10_14
Page 18

THULE 2012 REAR MOUNTED FIT GUIDE
NOTE: If your vehicle is not listed below, it may be a NO FIT. For the most up to date information consult Thule Fit
Guides at your local dealer, m.thule.com, thule.com or scan the code below from your smart phone.
Vehicle make, model and year
9001 RACEWAY 2
9002 RACEWAY 3
9003 RACEWAY
PLATFORM
FIT DIAL SETTING
Fit Tips: Read the appropriate
9009 / 9009XT
ARCHWAY 2
9010 / 9010XT
ARCHWAY 3
FIT DIAL SETTING
9006 / 9006XT
GATEWAY 2
9007 / 9007XT
GATEWAY 3
FIT DIAL SETTING
910XT PASSAGE 2
911XT PASSAGE 3
933 VENTURE
FIT DIAL SETTING
numbered tips on the
last page before
fitting vehicle.
DODGE continued
Spirit '89-94
Stratus 2DR '01-06
Stratus 4DR '01-06
'95-00
ü
ü
ü
ü ü ü
6
ü
6
ü
6
ü
6
ü ü
6
ü
6
ü
6
ü
6
ü ü
6
ü
6
ü
6
ü
6
ü ü
6 101,112,132
6 101,102,116,128,132
6 101,102,116,128,132
6 101,106,125
FIAT
500 3DR '11-13
500 Abarth 3DR '12-13
500C 3DR Convertible '12-13 NO FIT
500L 5DR '13 CHECK FOR UPDATE
ü ü ü
ü ü ü
10
ü ü
10
ü ü
10
ü ü
10
ü ü
10
ü ü
10
ü ü
10 101,102,132,138
10 101,102,132,138
FORD
Aerostar '85-97
Aspire 3DR '95-97
Aspire 5DR '95-97
Bronco (Full Size) '87-96
Bronco II '84-90
C-Max '13 CHECK FOR UPDATE
Contour '95-00
Crown Victoria '92-10
Crown Victoria, LTD '88-91
Edge '11-13
'07-10
Edge Sport '11-13
'07-10
Escape '13
'08-12
'01-07
Escort 3DR '91-96
Escort 4DR '97-02
'91-96
Escort Hatchback '87-90
Escort Wagon '91-99
Escort GT 2DR '88
Excursion '00-05
Expedition '05-13
'97-04
Expedition EL '05-13
'97-04
Explorer 2DR '96-00
'91-95
Explorer 4DR '11-13
'02-10
'96-01
'91-95
Explorer Sport '01-03
Explorer Sport Trac '01-10 153
F-150 '09-13 148
'04-08 148
'97-03 148
ü
ü
ü
ü
ü
ü ü ü
ü ü ü
ü ü ü
ü ü ü
ü ü ü
ü ü ü
ü ü ü
ü ü ü
ü ü ü
ü
ü ü ü
ü ü ü
ü ü ü
ü ü ü
ü ü ü
ü ü ü
ü ü ü
ü ü ü
ü ü ü
ü ü ü
ü ü ü
ü ü ü
ü ü ü
ü ü ü
ü ü ü
ü
10
ü
6
ü
6
ü
6
ü
6
ü
6
ü ü
9
ü ü
9
ü ü
9
ü ü
9
ü ü
10
ü ü
10
ü ü
10
ü ü
7
ü ü
7
ü
7
ü ü
8
ü ü
9
ü ü
5
ü ü
10
ü ü
11
ü ü
11
ü ü
11
ü ü
11
ü ü
9
ü ü
9
ü ü
9
ü ü
10
ü ü
9
ü ü
9
ü ü
9
ü
10
ü
6
ü
6
ü
6
ü
6
ü
6
ü ü
9
ü ü
9
ü ü
9
ü ü
9
ü ü
10
ü ü
10
ü ü
10
ü ü
7
ü ü
7
ü
7
ü ü
8
ü ü
9
ü ü
5
ü ü
10
ü ü
11
ü ü
11
ü ü
11
ü ü
11
ü ü
9
ü ü
9
ü ü
9
ü ü
10
ü ü
9
ü ü
9
ü ü
9
ü
10
ü
6
ü
6
ü
6
ü
6
ü
6
ü ü
9
ü ü
9
ü ü
9
ü ü
9
ü ü
10
ü ü
10
ü ü
10
ü ü
7
ü ü
7
ü
7
ü ü
8
ü ü
9
ü ü
5
ü ü
10
ü ü
11
ü ü
11
ü ü
11
ü ü
11
ü ü
9
ü ü
9
ü ü
9
ü ü
10
ü ü
9
ü ü
9
ü ü
9
ü
10 101,102,128
6 101,102,132,138
6 101,102,132,138
148
6 101,103,118
6 101,102,132
6 101,108
9 101,102,121,138
9 101,102,121,138
9 101,102,121,138
9 101,102,121,138
10 101,102,121,128
10 101,102,121,128
10 101,102,121,128
7 101,103,138
7 101,103,116,125,128,132
7 101,103,138
8 101,105,138
9 101,102,121,138
5 101,103,125,138
10 101,102,121
11 101,106,121,128
11 101,106,121,128
11 101,106,121,128
11 101,106,121,128
9 101,108,121,139
9 101,102,121,138
9 101,102,121,128
10 101,102,121,138
9 101,108,121,138
9 101,102,121,138
9 101,108,121,139
9 501-5258-10_14
Page 19

THULE 2012 REAR MOUNTED FIT GUIDE
NOTE: If your vehicle is not listed below, it may be a NO FIT. For the most up to date information consult Thule Fit
Guides at your local dealer, m.thule.com, thule.com or scan the code below from your smart phone.
Vehicle make, model and year
9001 RACEWAY 2
9002 RACEWAY 3
9003 RACEWAY
PLATFORM
FIT DIAL SETTING
Fit Tips: Read the appropriate
9009 / 9009XT
ARCHWAY 2
9010 / 9010XT
ARCHWAY 3
FIT DIAL SETTING
9006 / 9006XT
GATEWAY 2
9007 / 9007XT
GATEWAY 3
FIT DIAL SETTING
910XT PASSAGE 2
911XT PASSAGE 3
933 VENTURE
FIT DIAL SETTING
numbered tips on the
last page before
fitting vehicle.
FORD continued
F-250 '11-13
F-350 '11-13
Fiesta 4DR '11-13
Fiesta 5DR '11-13
Fiesta Sport 5DR '12-13 NO FIT - SPOILER
Five Hundred '05-07
Flex '08-13
Focus 2DR '08-11
Focus 3DR '00-07
Focus 4DR '12-13
Focus 5DR '12-13
Focus Wagon '00-07
Freestar '04-07
Freestyle '05-07 137
Full Size Pickup '79-96
Fusion '13
Mustang '10-13
Probe '93-97
Ranger '98-11
Taurus 4DR '13
Taurus Wagon '96-06
Taurus X '08-09 137
Tempo 2DR '84-94
Tempo 4DR '84-94
Thunderbird '02-05
Tracker '89-97
Transit Connect '09-13 137
Windstar '99-03
'99-10
'99-10
ü
ü
ü ü ü
ü ü ü
ü ü ü
ü ü ü
ü ü ü
'08-11
'00-07
'02-07
'06-12
'05-09
'99-04
'95-98
'91-92
'93-97
'83-97
'10-12
'08-09
'96-06
'92-95
'86-91
'86-95
'89-97
'86-87
'95-97
ü ü ü
ü ü ü
ü ü ü
ü ü ü
ü ü ü
ü ü ü
ü
ü
ü ü ü
ü ü ü
ü ü ü
ü ü ü
ü
ü
ü
ü
ü
ü ü ü
ü ü ü
ü
ü
ü
ü ü ü
'98
7
ü
10
ü
8
ü ü
10
ü ü
8
ü ü
8
ü ü
7
ü ü
7
ü ü
7
ü ü
8
ü ü
8
ü ü
10
ü ü
11
ü ü
8
ü
8
ü
7
ü ü
7
ü ü
6
ü ü
6
ü ü
8
ü
8
ü
8
ü
6
ü
6
ü
9
ü ü
8
ü ü
6
ü
6
ü
6
ü
10
ü ü
7
ü
10
ü
8
ü ü
10
ü ü
8
ü ü
8
ü ü
7
ü ü
7
ü ü
7
ü ü
8
ü ü
8
ü ü
10
ü ü
11
ü ü
8
ü
8
ü
7
ü ü
7
ü ü
6
ü ü
6
ü ü
8
ü
8
ü
8
ü
6
ü
6
ü
9
ü ü
8
ü ü
6
ü
6
ü
6
ü
10
ü ü
7
ü
10
ü
8
ü ü
10
ü ü
8
ü ü
8
ü ü
7
ü ü
7
ü ü
7
ü ü
8
ü ü
8
ü ü
10
ü ü
11
ü ü
8
ü
8
ü
7
ü ü
7
ü ü
6
ü ü
6
ü ü
8
ü
8
ü
8
ü
6
ü
6
ü
9
ü ü
8
ü ü
6
ü
6
ü
6
ü
10
ü ü
7 101,102,128
10 101,102,128
8 101,102,116,128
10 101,102,121,128
8 101,102,128
8 101,102,121,128
7 101,103,116,125,126,128
7 101,103,116,125,126,128
7 101,103,116,125,126,128
8 101,102,121,128
8 101,102,121,128
10 101,102,121,128
11 101,106,121,128
8 101,102,128,132
8 101,102,116,128,132
7 101,102,128
7 101,102,128
6 101,112
6 101,108,138
8 101,102,116,128,132
8 101,102,116,128,132
8 101,102,116,128,132
6 101,106,126,132
6 101,103,132,138
9 101,106,121
8 101,102,121,138
6 101,108,132,138
6 101,108,132,138
6 101,103,132,138
10 101,102,121,128
148
148
148
148
148
135
133
148
148
148
135
135
135
135
135
10 501-5258-10_14
Page 20

THULE 2012 REAR MOUNTED FIT GUIDE
NOTE: If your vehicle is not listed below, it may be a NO FIT. For the most up to date information consult Thule Fit
Guides at your local dealer, m.thule.com, thule.com or scan the code below from your smart phone.
Vehicle make, model and year
9001 RACEWAY 2
9002 RACEWAY 3
9003 RACEWAY
PLATFORM
FIT DIAL SETTING
Fit Tips: Read the appropriate
9009 / 9009XT
ARCHWAY 2
9010 / 9010XT
ARCHWAY 3
FIT DIAL SETTING
9006 / 9006XT
GATEWAY 2
9007 / 9007XT
GATEWAY 3
FIT DIAL SETTING
910XT PASSAGE 2
911XT PASSAGE 3
933 VENTURE
FIT DIAL SETTING
numbered tips on the
last page before
fitting vehicle.
FORD continued
Vans (E-Series) '79-13 NO FIT
ZX2 '98-03
ü
7
ü
7
ü
7
ü
7 101,103,116,125,128,132
GMC
Acadia '07-13
Canyon '04-12 148
Classic Sierra '88-00
Denali 01-04
Denali XL '00-04
Envoy '98-01
Envoy/Denali 4DR '02-09
Envoy XL '02-06
Envoy XUV '04-05 135,137
Full Size Jimmy '79-91
Full Size Pickup '79-87
Jimmy 2DR '95-01
Jimmy 4DR '95-01
S-15 Jimmy '92-94
S-15 '85-93 135
Safari Van '90-05
Sierra '07-13 148
'99-06
Sonoma '94-04
Suburban '92-99
Terrain '10-13
Terrain Denali '12-13
Yukon '07-13 134
'00-06
Yukon XL '07-13 134
'00-06
ü ü ü
ü
ü
ü
ü ü ü
ü ü ü
ü
'99
ü
ü
9
ü ü
10
ü
10
ü
10
ü
9
ü ü
9
ü ü
10
ü
10
ü
10
ü
9
ü ü
10
ü
10
ü
10
ü
9
ü ü
9
ü ü
10
ü
10
ü
10
ü
9
ü ü
10
ü
10
ü
10
ü
9
ü ü
9
ü ü
10
ü
10
ü
10
ü
9 101,102,121,128
148
10 101,106,121,132,138
10 101,106,121,132,138
137
135,137
135,137
148
148
134,135
134,135
134
137
148
148
10 101,106,128,132
9 101,112,121,138
9 101,112,121,138
10 101,106,121,132,138
10 101,106,128,132
10 101,106,121,132,138
HONDA
Accord 2DR '13
'08-12
'03-07
'98-02
'94-97
'90-93
'86-89
Accord 4DR '13
'08-12
'03-07
'98-02
'94-97
'90-93
'86-89
Accord Hatchback '86-89
Accord Wagon '91-93
Civic 2DR '12-13
ü ü ü
ü ü ü
ü ü ü
ü
ü ü ü
ü
ü ü ü
ü ü ü
ü ü ü
ü ü ü
ü ü ü
ü ü ü
ü
ü ü ü
ü ü ü
ü ü ü
7
ü ü
7
ü ü
7
ü ü
6
ü
5
ü ü
6
ü
6
ü ü
8
ü ü
8
ü ü
8
ü ü
7
ü ü
5
ü ü
6
ü
6
ü ü
8
ü ü
7
ü ü
7
ü ü
7
ü ü
7
ü ü
6
ü
5
ü ü
6
ü
6
ü ü
8
ü ü
8
ü ü
8
ü ü
7
ü ü
5
ü ü
6
ü
6
ü ü
8
ü ü
7
ü ü
7
ü ü
7
ü ü
7
ü ü
6
ü
5
ü ü
6
ü
6
ü ü
8
ü ü
8
ü ü
8
ü ü
7
ü ü
5
ü ü
6
ü
6
ü ü
8
ü ü
7
ü ü
11 501-5258-10_14
7 101,102,128
7 101,102,128
7 101,102,147
6 101,110,128,132
5 101,102,138
6 101,102,132
6 101,103,138
8 101,102,128
8 101,102,128
8 101,102,128
7 101,102,128
5 101,102,138
6 101,102,132
6 101,103,138
134
8 101,102,121,138
7 101,102,138
Page 21

THULE 2012 REAR MOUNTED FIT GUIDE
NOTE: If your vehicle is not listed below, it may be a NO FIT. For the most up to date information consult Thule Fit
Guides at your local dealer, m.thule.com, thule.com or scan the code below from your smart phone.
Vehicle make, model and year
9001 RACEWAY 2
9002 RACEWAY 3
9003 RACEWAY
PLATFORM
FIT DIAL SETTING
Fit Tips: Read the appropriate
9009 / 9009XT
ARCHWAY 2
9010 / 9010XT
ARCHWAY 3
FIT DIAL SETTING
9006 / 9006XT
GATEWAY 2
9007 / 9007XT
GATEWAY 3
FIT DIAL SETTING
910XT PASSAGE 2
911XT PASSAGE 3
933 VENTURE
FIT DIAL SETTING
numbered tips on the
last page before
fitting vehicle.
HONDA continued
Civic 2DR '06-11
'01-05
'96-00
'92-95
Civic Si 3DR '02-05
Civic 3DR '96-00
'92-95
Civic 4DR '12-13
'06-11
'01-05
'96-00
'92-95
'86-91
Civic Wagon '88-91
Crosstour '10-13
CRV '12-13 133
'07-11 133
'02-06
'97-01
CRX '88-91
CRZ '11-13
del Sol '93-97
Element '03-11
Element SC '03-11
FCX Clarity 4DR '09-13 CHECK FOR UPDATE
Fit '09-13
'07-08
Fit Sport '09-13 NO FIT - SPOILER
'07-08 NO FIT - SPOILER
Insight '10-13
'00-06
Odyssey '11-13 NO FIT - SPOILER
'05-10 146
'95-04
Passport '98-02
'94-97
Pilot '09-13
'03-08
Prelude '97-01
'92-96
'88-91
'83-87
Ridgeline '06-13 153
Ridgeline Sport '12-13 153
S2000 '00-09
ü ü ü
ü ü ü
ü
ü
ü ü ü
ü
ü ü ü
ü ü ü
ü ü ü
ü
ü
ü ü ü
ü ü ü
ü ü ü
ü
ü
ü ü ü
ü ü ü
ü ü ü
ü ü ü
ü ü ü
ü
ü
ü
ü ü ü
7
ü ü
6
ü ü
6
ü
6
ü
8
ü ü
8
ü
7
ü ü
7
ü ü
6
ü ü
6
ü
6
ü
6
ü ü
9
ü ü
8
ü ü
7
ü
5
ü
11
ü ü
11
ü ü
10
ü ü
10
ü ü
8
ü ü
8
ü
4
ü
6
ü
6
ü ü
7
ü ü
6
ü ü
6
ü
6
ü
8
ü ü
8
ü
7
ü ü
7
ü ü
6
ü ü
6
ü
6
ü
6
ü ü
9
ü ü
8
ü ü
7
ü
5
ü
11
ü ü
11
ü ü
10
ü ü
10
ü ü
8
ü ü
8
ü
4
ü
6
ü
6
ü ü
7
ü ü
6
ü ü
6
ü
6
ü
8
ü ü
8
ü
7
ü ü
7
ü ü
6
ü ü
6
ü
6
ü
6
ü ü
9
ü ü
8
ü ü
7
ü
5
ü
11
ü ü
11
ü ü
10
ü ü
10
ü ü
8
ü ü
8
ü
4
ü
6
ü
6
ü ü
7 101,102,138
6 101,102,128
6 101,102,132
6 101,102,132
8 101,102,121,128
135
8 101,102,121,132,138
7 101,102,128
7 101,102,128
6 101,102,128
6 101,102,132
6 101,102,132
6 101,102
9 101,102
8 101,102,121,138
134
7 101,102,121,128
5 101,110,125,126,132,138
11 101,121,128,147
11 101,121,128,147
10 101,102,121,128
10 101,102,121,128
8 101,102,121,138
134,135
135
8 101,102,121,132,138,144
134
133
133
135
4 101,102,132,138
6 101,103,125,132
6 101,103,125
135
HUMMER
H1/Hummer '93-08 NO FIT
H2/H2 SUT '03-10
H3 '05-10
12 501-5258-10_14
Page 22

THULE 2012 REAR MOUNTED FIT GUIDE
NOTE: If your vehicle is not listed below, it may be a NO FIT. For the most up to date information consult Thule Fit
Guides at your local dealer, m.thule.com, thule.com or scan the code below from your smart phone.
Vehicle make, model and year
9001 RACEWAY 2
9002 RACEWAY 3
9003 RACEWAY
PLATFORM
FIT DIAL SETTING
Fit Tips: Read the appropriate
9009 / 9009XT
ARCHWAY 2
9010 / 9010XT
ARCHWAY 3
FIT DIAL SETTING
9006 / 9006XT
GATEWAY 2
9007 / 9007XT
GATEWAY 3
FIT DIAL SETTING
910XT PASSAGE 2
911XT PASSAGE 3
933 VENTURE
FIT DIAL SETTING
numbered tips on the
last page before
fitting vehicle.
HUMMER continued
H3T ‘09-10 153
HYUNDAI
Accent 3DR '07-11
'00-06
'95-99
Accent 4DR '12-13
'06-11
'00-05
'95-99
Accent 5DR '12-13
Azera '12-13
'10-11
'06-09
Elantra 2DR '13 CHECK FOR UPDATE
Elantra 4DR '11-13
'07-10
'01-06
'99-00
'92-98
Elantra 5DR '01-06
Elantra GT 5DR '13
Elantra Touring '09-12
'01-05
'97-00 134
Entourage '07-10
Equus '11-13 CHECK FOR UPDATE
Excel 2DR '90-94
Excel 4DR '90-94
'86-89
Excel 5DR '86-89
Genesis 2DR '09-13 146
Genesis 4DR '09-13
Santa Fe '13
'07-12
'01-06
Santa Fe Sport '13
S Coupe '91-96
Sonata '11-13
'06-10
'02-05
'99-01
'95-98
'89-94
Tiburon '02-08
'97-01
Tuscon '10-13
'05-09
Velostar 3DR '12-13 137
Veracruz '07-12 134
ü ü ü
ü ü ü
ü
ü ü ü
ü ü ü
ü ü ü
ü
ü ü ü
ü ü ü
ü ü ü
ü ü ü
ü ü ü
ü ü ü
ü ü ü
ü ü ü
ü ü ü
ü ü ü
ü ü ü
ü ü ü
ü
ü ü ü
ü
ü
ü ü ü
ü ü ü
ü ü ü
ü ü ü
ü ü ü
ü ü ü
ü ü ü
ü ü ü
ü ü ü
ü
ü
ü ü ü
ü ü ü
ü ü ü
8
ü ü
8
ü ü
7
ü
7
ü ü
7
ü ü
7
ü ü
6
ü
8
ü ü
7
ü ü
7
ü ü
7
ü ü
7
ü ü
8
ü ü
7
ü ü
7
ü ü
7
ü ü
8
ü ü
7
ü ü
10
ü ü
7
ü
6
ü ü
8
ü
8
ü
8
ü ü
10
ü ü
10
ü ü
9
ü ü
10
ü ü
5
ü ü
7
ü ü
7
ü ü
7
ü ü
7
ü
6
ü
7
ü ü
10
ü ü
10
ü ü
8
ü ü
8
ü ü
7
ü
7
ü ü
7
ü ü
7
ü ü
6
ü
8
ü ü
7
ü ü
7
ü ü
7
ü ü
7
ü ü
8
ü ü
7
ü ü
7
ü ü
7
ü ü
8
ü ü
7
ü ü
10
ü ü
7
ü
6
ü ü
8
ü
8
ü
8
ü ü
10
ü ü
10
ü ü
9
ü ü
10
ü ü
5
ü ü
7
ü ü
7
ü ü
7
ü ü
7
ü
6
ü
7
ü ü
10
ü ü
10
ü ü
8
ü ü
8
ü ü
7
ü
7
ü ü
7
ü ü
7
ü ü
6
ü
8
ü ü
7
ü ü
7
ü ü
7
ü ü
7
ü ü
8
ü ü
7
ü ü
7
ü ü
7
ü ü
8
ü ü
7
ü ü
10
ü ü
7
ü
6
ü ü
8
ü
8
ü
8
ü ü
10
ü ü
10
ü ü
9
ü ü
10
ü ü
5
ü ü
7
ü ü
7
ü ü
7
ü ü
7
ü
6
ü
7
ü ü
10
ü ü
10
ü ü
8 101,102,128
8 101,102,128
7 101,108,132,138
7 101,102,128
7 101,102,128
7 101,102,128
6 101,108,126,132,138
8 101,102,121,128
7 101,102,128
7 101,102,128
7 101,102,128
7 101,102,128
8 101,102,128
7 101,102,128
7 101,102,126,128
133
7 101,102,121,128
8 101,102,121,128
7 101,102,121,138
134,137
10 101,102,121,128
7 101,108,132,138
6 101,102,138
8 101,102,121,132
8 101,102,121,132,138
8 101,102,128
10 101,102,121,128
10 101,102,121,128
9 101,102,121,138
10 101,102,121,128
5 101,102,138
7 101,102,128
7 101,102,128
7 101,102,128
7 101,102,126,128,132
6 101,108,126,132,138
133
7 101,102,121,128
133
10 101,102,119,121
10 101,102,121,128
13 501-5258-10_14
Page 23

THULE 2012 REAR MOUNTED FIT GUIDE
NOTE: If your vehicle is not listed below, it may be a NO FIT. For the most up to date information consult Thule Fit
Guides at your local dealer, m.thule.com, thule.com or scan the code below from your smart phone.
Vehicle make, model and year
9001 RACEWAY 2
9002 RACEWAY 3
9003 RACEWAY
PLATFORM
FIT DIAL SETTING
Fit Tips: Read the appropriate
9009 / 9009XT
ARCHWAY 2
9010 / 9010XT
ARCHWAY 3
FIT DIAL SETTING
9006 / 9006XT
GATEWAY 2
9007 / 9007XT
GATEWAY 3
FIT DIAL SETTING
910XT PASSAGE 2
911XT PASSAGE 3
933 VENTURE
FIT DIAL SETTING
numbered tips on the
last page before
fitting vehicle.
HYUNDAI continued
XG300/350 ‘01-05
ü ü ü
7
ü ü
7
ü ü
7
ü ü
7 101,102,128
INFINITI
EX35 '08-13
EX37 '13
FX35 '07-13
FX45 '03-08
FX50 '09-13
G20 '99-02
'91-96
G25 4DR '11-12
G35 2DR '03-08
G35 4DR '07-08
'03-06
G37 2DR '09-12
G37 4DR '09-13
G37 Convertible '09-12 NO FIT
I30 '00-01
'95-99
I35 '02-04
J30 '92-98
JX '12-13
M '11-13
M30 '90-92
M35 '06-10
M45 '06-10
'03-04
Q45 '02-07
'97-01
'90-95
QX4 w/o spare tire '97-03
QX56 '11-13
'04-10
ü ü ü
ü ü ü
ü ü ü
ü ü ü
ü ü ü
ü ü ü
ü
ü
ü
ü
ü
ü ü ü
ü ü ü
ü ü ü
ü ü ü
ü ü ü
ü ü ü
ü ü ü
ü ü ü
ü ü ü
ü ü ü
ü ü ü
ü ü ü
10
ü ü
10
ü ü
10
ü ü
10
ü ü
10
ü ü
7
ü ü
6
ü
7
ü
ü
7
ü
7
ü
ü
7
ü
6
ü ü
6
ü ü
6
ü ü
6
ü ü
11
ü ü
8
ü ü
8
ü ü
8
ü ü
6
ü ü
10
ü ü
11
ü ü
11
ü ü
10
ü ü
10
ü ü
10
ü ü
10
ü ü
10
ü ü
7
ü ü
6
ü
7
ü
7
ü
7
ü
7
ü
7
ü
7
ü
6
ü ü
6
ü ü
6
ü ü
6
ü ü
11
ü ü
8
ü ü
8
ü ü
8
ü ü
6
ü ü
10
ü ü
11
ü ü
11
ü ü
10
ü ü
10
ü ü
10
ü ü
10
ü ü
10
ü ü
7
ü ü
6
ü
7
ü
7
ü
7
ü
7
ü
7
ü
7
ü
6
ü ü
6
ü ü
6
ü ü
6
ü ü
11
ü ü
8
ü ü
8
ü ü
8
ü ü
6
ü ü
10
ü ü
11
ü ü
11
ü ü
10 101,102,121,128,151
10 101,102,121,128,151
10 101,102,121,141
10 101,102,121,141
10 101,102,121,141
7 101,102,116,128
6 101,103,132,138
7 101,102,116,128
7 101,102,138
7 101,102,116,128
7 101,102,116,128,132
7 101,102,138
7 101,102,116,128
6 101,103,125,128
6 101,110,128
6 101,103,125,128
6 101,103,126
11 101,102,121,128
8 101,102,128
134
8 101,102,128
8 101,103,128
135
133
133
6 101,103
10 101,102,121,128
11 101,112,121,128
11 101,112,121,128
ISUZU
Amigo '99-01
Ascender '03-10
Axiom '02-04
Hombre '96-01
I-280/I-290 '06-09 153
I-350/I-370 '06-09 153
I-Mark 2DR '86-89
I-Mark 4DR '86-89
Impulse '90-93
Oasis '96-99
Truck '81-87
Truck w/ Space Cap '89-94
Truck w/ Standard Cab '88-95
Rodeo '98-04
ü ü ü
ü
ü
ü
'91-97
10
ü ü
7
ü
7
ü
8
ü
10
ü ü
7
ü
7
ü
8
ü
14 501-5258-10_14
135,137
10
ü ü
7
ü
7
ü
8
ü
10 101,102,121,128
135
7 101,102,132,140
7 101,102,132,140
134
134
148
148
148
8 101,102,121,132,138,,144
Page 24

THULE 2012 REAR MOUNTED FIT GUIDE
NOTE: If your vehicle is not listed below, it may be a NO FIT. For the most up to date information consult Thule Fit
Guides at your local dealer, m.thule.com, thule.com or scan the code below from your smart phone.
Vehicle make, model and year
9001 RACEWAY 2
9002 RACEWAY 3
9003 RACEWAY
PLATFORM
FIT DIAL SETTING
Fit Tips: Read the appropriate
9009 / 9009XT
ARCHWAY 2
9010 / 9010XT
ARCHWAY 3
FIT DIAL SETTING
9006 / 9006XT
GATEWAY 2
9007 / 9007XT
GATEWAY 3
FIT DIAL SETTING
910XT PASSAGE 2
911XT PASSAGE 3
933 VENTURE
FIT DIAL SETTING
numbered tips on the
last page before
fitting vehicle.
ISUZU continued
Stylus '91-93
Trooper '92-02
'84-91
ü
6
ü
6
ü
6
ü
6 101,102,132
144, 149
JAGUAR
F-Type Convertible '13 135
S-Type '00-08
VDP Vanden Plas '96-02
XF 4DR '12-13 135
'09-11 135
XFR 4DR '12-13 135
'10-11 135
XJ12 4DR '94
XJ 4DR '10-13 135
XJR 4DR '10-13 135
XJ6 4DR '96-97
'89-95
XJ8 '97-09
XJS 2DR '92-96
XK 2DR '12-13 135
'09-11 135
XKR 2DR '12-13 135
'10-11 135
XK8 2DR '97-11
X-Type 4DR '02-08
X-Type Wagon '05-08
ü ü ü
ü ü ü
ü ü ü
ü ü ü
ü ü ü
ü ü ü
ü ü ü
ü ü ü
ü ü ü
7
ü ü
6
ü ü
6
ü ü
6
ü ü
6
ü ü
6
ü ü
6
ü ü
7
ü ü
7
ü ü
7
ü ü
6
ü ü
6
ü ü
6
ü ü
6
ü ü
6
ü ü
6
ü ü
7
ü ü
7
ü ü
7
ü ü
6
ü ü
6
ü ü
6
ü ü
6
ü ü
6
ü ü
6
ü ü
7
ü ü
7
ü ü
7 101,102,128
6 101,128,130
6 101,103
6 101,128,130
6 101,103
6 101,128,130
6 101,103
135
7 101,102,128
7 101,102,128
JEEP
Cherokee '91-01
CJ-7 '79-95
Commanche '86-94
Commander '06-10
Compass '11-13
'07-10
Grand Cherokee '11-13
'05-10
'99-04
'93-98
Grand Wagoneer '84-92
Liberty '08-12
'02-07
Liberty Renegade '05-07
Patriot '07-13
Wrangler '87-13
Wrangler Unlimited '04-13
ü ü ü
ü ü ü
ü ü ü
ü ü ü
ü ü
ü ü
ü
ü ü ü
ü ü ü
ü ü ü
8
ü ü
11
ü ü
9
ü ü
9
ü ü
9
ü ü
9
ü ü
10
ü
9
ü ü
11
ü ü
11
ü ü
8
ü ü
11
ü ü
9
ü ü
9
ü ü
9
ü ü
9
ü ü
10
ü
9
ü ü
11
ü ü
11
ü ü
8
ü ü
11
ü ü
9
ü ü
9
ü ü
9
ü ü
9
ü ü
10
ü
9
ü ü
11
ü ü
11
ü ü
8 101,109,121,139
148
11 101,102,121,128
9 101,102,121,128
9 101,102,121,128
9 101,102,121,128
9 101,105,121,128
10 101,102,121,132,138
9 101,105,121,138
137
11 101,102,121,128
11 101,102,121,128
KIA
Amanti '04-09
Borrego '09-12
Cadenza 4DR '12-14 CHECK FOR UPDATE
ü ü ü
7
ü ü
7
ü ü
7
ü ü
7 101,102,128
NO FIT
15 501-5258-10_14
Page 25

THULE 2012 REAR MOUNTED FIT GUIDE
NOTE: If your vehicle is not listed below, it may be a NO FIT. For the most up to date information consult Thule Fit
Guides at your local dealer, m.thule.com, thule.com or scan the code below from your smart phone.
Vehicle make, model and year
9001 RACEWAY 2
9002 RACEWAY 3
9003 RACEWAY
PLATFORM
FIT DIAL SETTING
Fit Tips: Read the appropriate
9009 / 9009XT
ARCHWAY 2
9010 / 9010XT
ARCHWAY 3
FIT DIAL SETTING
9006 / 9006XT
GATEWAY 2
9007 / 9007XT
GATEWAY 3
FIT DIAL SETTING
910XT PASSAGE 2
911XT PASSAGE 3
933 VENTURE
FIT DIAL SETTING
numbered tips on the
last page before
fitting vehicle.
KIA continued
Carens '07-12
Credos '98-99
Forte 2DR '10-13
Forte 4DR '10-13
Forte 5DR '11-13
Optima 4DR '11-13
'07-10
'01-06
Rio 4DR '12-13
'06-11
'01-05
Rio5 5DR '12-13
Rio Cinco Wagon '06-11
'02-05
Rondo '07-12
Rondo EX '09-12
Sedona '11-12
'06-10
'02-05
Sephia '98-01
'94-97
Soul '10-13
Sorento '11-13
'03-09
Spectra 4DR '07-09
'04.5-06 137
'00-04.5
Spectra5 '05-09 134
Sportage '11-13
'05-10
'95-02
ü ü ü
ü ü ü
ü ü ü
ü ü ü
ü ü ü
ü ü ü
ü ü ü
ü ü ü
ü ü ü
ü ü ü
ü ü ü
ü ü ü
ü ü ü
ü ü ü
ü ü ü
ü ü ü
ü ü ü
ü ü ü
ü
ü ü ü
ü ü ü
ü ü ü
ü ü ü
ü
ü ü ü
ü ü ü
11
ü ü
8
ü ü
8
ü ü
10
ü ü
7
ü ü
7
ü ü
7
ü ü
8
ü ü
8
ü ü
7
ü ü
8
ü ü
9
ü ü
9
ü ü
11
ü ü
11
ü ü
11
ü ü
11
ü ü
10
ü ü
7
ü
11
ü ü
10
ü ü
10
ü ü
8
ü ü
6
ü
10
ü ü
10
ü ü
11
ü ü
8
ü ü
8
ü ü
10
ü ü
7
ü ü
7
ü ü
7
ü ü
8
ü ü
8
ü ü
7
ü ü
8
ü ü
9
ü ü
9
ü ü
11
ü ü
11
ü ü
11
ü ü
11
ü ü
10
ü ü
7
ü
11
ü ü
10
ü ü
10
ü ü
8
ü ü
6
ü
10
ü ü
10
ü ü
11
ü ü
8
ü ü
8
ü ü
10
ü ü
7
ü ü
7
ü ü
7
ü ü
8
ü ü
8
ü ü
7
ü ü
8
ü ü
9
ü ü
9
ü ü
11
ü ü
11
ü ü
11
ü ü
11
ü ü
10
ü ü
7
ü
11
ü ü
10
ü ü
10
ü ü
8
ü ü
6
ü
10
ü ü
10
ü ü
11 101,102,121,128
135
8 101,102,128
8 101,102,128
10 101,102,121,138
7 101,102,128
7 101,102,128
7 101,102,128
8 101,102,128
8 101,102,128
7 101,102,128
8 101,102,121,128
9 101,102,121,128
9 101,102,121,128
11 101,102,121,128
11 101,102,121,128
11 101,102,121
11 101,102,121
10 101,102,121,138
7 101,102,128,132
135
11 101,102,121,128
10 101,103,121,125,128
10 101,103,121,125,128
8 101,102,128
6 101,102,128,132
10 101,102,119,121
10 101,102,121,128
LAND ROVER
Discovery '94-98
Discovery II '98-04
Evoque Coupe 3DR '12-13 CHECK FOR UPDATE
Evoque 5DR '12-13 CHECK FOR UPDATE
Freelander '02-05
LR2 '07-13
LR3 '05-09
LR4 '10-13
Range Rover '13
Range Rover Sport '13 137
ü ü ü
ü ü ü
ü ü ü
'03-12
'87-02
'03-12 137
10
ü ü
11
ü ü
11
ü ü
10
ü ü
11
ü ü
11
ü ü
10
ü ü
11
ü ü
11
ü ü
10 101,102,121,128
11 101,128,147
11 101,128,147
137
137
137
LEXUS
CT200H 5DR '12-13
CT200H F Sport 5DR '12-13
ü ü ü
ü ü ü
8
ü ü
8
ü ü
8
ü ü
8
ü ü
8
ü ü
8
ü ü
8 101,102,121,128
8 101,102,121,128
16 501-5258-10_14
Page 26

THULE 2012 REAR MOUNTED FIT GUIDE
NOTE: If your vehicle is not listed below, it may be a NO FIT. For the most up to date information consult Thule Fit
Guides at your local dealer, m.thule.com, thule.com or scan the code below from your smart phone.
Vehicle make, model and year
LEXUS continued
ES250 '90-91
ES300 '02-03
'97-01
'92-96
ES330 '04-06
ES350 '07-13
GS '13
GS F '13
GS300 '06-08
'02-05
'98-01
'93-97
GS350 '06-11
GS400 '98-01
GS430 '06-11
'02-05
GS450h '07-11
GS460 '02-11
GX460 '09-13
GX470 '03-13
HS250H '10-12
IS300 4DR '01-05
IS300 SportCross '02-05
IS 250 '06-13
IS 350 '06-13
IS F '06-13
LS400 '95-00
'90-94
LS430 '01-06
LS460 '06-12
LX450 '96-97
LX470 '98-07
LX570 '08-13
RX300 '98-03
RX330 '04-06
RX350 '05-13
RX400H '06-13
RX450H '10-13
SC300 '98-01
SC400 '98-01
'91-93
SC430 '02-11
9001 RACEWAY 2
9002 RACEWAY 3
9003 RACEWAY
PLATFORM
FIT DIAL SETTING
9009 / 9009XT
ARCHWAY 2
9010 / 9010XT
ARCHWAY 3
FIT DIAL SETTING
9006 / 9006XT
GATEWAY 2
9007 / 9007XT
GATEWAY 3
FIT DIAL SETTING
910XT PASSAGE 2
ü ü ü
ü
ü ü ü
ü ü ü
ü ü ü
ü ü ü
ü ü ü
ü ü ü
ü ü ü
ü ü ü
ü ü ü
ü ü ü
ü ü ü
ü ü ü
ü ü ü
ü ü ü
ü ü ü
ü ü ü
ü ü ü
ü ü ü
ü ü ü
ü ü ü
ü ü ü
ü ü ü
ü ü ü
ü ü ü
ü
ü
ü
ü
ü
ü
ü
7
ü ü
6
ü
6
ü ü
7
ü ü
7
ü ü
7
ü ü
7
ü ü
7
ü ü
6
ü ü
6
ü ü
7
ü ü
6
ü ü
7
ü ü
6
ü ü
7
ü ü
7
ü ü
11
ü ü
11
ü ü
7
ü ü
6
ü ü
7
ü ü
7
ü ü
7
ü ü
7
ü ü
7
ü ü
7
ü ü
10
ü
10
ü
9
ü
9
ü
9
ü
9
ü
9
ü
7
ü ü
6
ü
6
ü ü
7
ü ü
7
ü ü
7
ü ü
7
ü ü
7
ü ü
6
ü ü
6
ü ü
7
ü ü
6
ü ü
7
ü ü
6
ü ü
7
ü ü
7
ü ü
11
ü ü
11
ü ü
7
ü ü
6
ü ü
7
ü ü
7
ü ü
7
ü ü
7
ü ü
7
ü ü
7
ü ü
10
ü
10
ü
9
ü
9
ü
9
ü
9
ü
9
ü
7
ü ü
6
ü
6
ü ü
7
ü ü
7
ü ü
7
ü ü
7
ü ü
7
ü ü
6
ü ü
6
ü ü
7
ü ü
6
ü ü
7
ü ü
6
ü ü
7
ü ü
7
ü ü
11
ü ü
11
ü ü
7
ü ü
6
ü ü
7
ü ü
7
ü ü
7
ü ü
7
ü ü
7
ü ü
7
ü ü
10
ü
10
ü
9
ü
9
ü
9
ü
9
ü
9
ü
Fit Tips: Read the appropriate
911XT PASSAGE 3
933 VENTURE
FIT DIAL SETTING
7 101,102,128
6 101,103,125,126,132,138
6 101,103
7 101,102,128
7 101,102,128
7 101,102,128
7 101,102,128
7 101,102,128
6 101,103,138
6 101,103,138
7 101,102,128
6 101,103,138
7 101,102,128
6 101,103,138
7 101,102,128
7 101,102,128
11 101,102,121,128
11 101,102,121,128
7 101,102,128
6 101,102,128
7 101,102,128
7 101,102,128
7 101,102,128
7 101,102,128
7 101,102,128
7 101,102,128
10 101,103,121,125,141
10 101,103,121,125,141
9 101,103,121,127,132,138
9 101,103,121,132,138
9 101,103,121,132,138
9 101,103,121,132,138
9 101,103,121,132,138
numbered tips on the
last page before
fitting vehicle.
135
133
134,137
133
135
135
135
135
135
LINCOLN
Aviator '03-05
Continental '98-02
'97-97
'90-96
LS '00-06
Mark LT '06-08 148
ü ü ü
ü ü ü
ü
ü
ü ü ü
11
ü ü
6
ü ü
7
ü
6
ü
7
ü ü
11
ü ü
6
ü ü
7
ü
6
ü
7
ü ü
11
ü ü
6
ü ü
7
ü
6
ü
7
ü ü
11 101,106,121,128
6 101,108
7 101,106,132,138
6 101,103,132,138
7 101,103,128
17 501-5258-10_14
Page 27

THULE 2012 REAR MOUNTED FIT GUIDE
NOTE: If your vehicle is not listed below, it may be a NO FIT. For the most up to date information consult Thule Fit
Guides at your local dealer, m.thule.com, thule.com or scan the code below from your smart phone.
Vehicle make, model and year
9001 RACEWAY 2
9002 RACEWAY 3
9003 RACEWAY
PLATFORM
FIT DIAL SETTING
Fit Tips: Read the appropriate
9009 / 9009XT
ARCHWAY 2
9010 / 9010XT
ARCHWAY 3
FIT DIAL SETTING
9006 / 9006XT
GATEWAY 2
9007 / 9007XT
GATEWAY 3
FIT DIAL SETTING
910XT PASSAGE 2
911XT PASSAGE 3
933 VENTURE
FIT DIAL SETTING
numbered tips on the
last page before
fitting vehicle.
LINCOLN continued
Mark VII '84-92
Mark VIII '96-99
'93-95
MKS '09-13
MKT '10-13 NO FIT
MKX '11-13
'07-10
MKZ '13
'07-12
Navigator '98-13
Town Car '98-11
Zephyr '06
ü
ü ü ü
ü ü ü
ü
ü ü ü
ü ü ü
ü
ü
ü ü ü
ü ü ü
ü
7
ü
6
ü ü
5
ü ü
7
ü
9
ü ü
9
ü ü
8
ü
8
ü
11
ü ü
6
ü ü
8
ü
7
ü
6
ü ü
5
ü ü
7
ü
9
ü ü
9
ü ü
8
ü
8
ü
11
ü ü
6
ü ü
8
ü
7
ü
6
ü ü
5
ü ü
7
ü
9
ü ü
9
ü ü
8
ü
8
ü
11
ü ü
6
ü ü
8
ü
7 101,109,117,132,138
6 101,103,117,125,128
5 101,103,139
7 101,102,116,128,132
9 101,102,121,138
9 101,102,121,138
8 101,102,128,132
8 101,102,116,128,132
11 101,106,121,128
6 101,102,128
8 101,102,116,128,132
MAZADA
2 5DR '11-13
3 4DR '04-13
3 5DR '04-13
323 3DR '90-94
5 5DR '12-13
'06-11
6 4DR '09-13
'03-08
6 5DR '04-08 135
6 Wagon '04-07
626 '93-02
929 '92-96
B-Series '94-10
CX-5 '13
CX-7 '07-12
CX-9 '07-13
Miata '90-05
Millenia '95-02
MPV '00-06
'91-98
MX-3 '92-96
MX-5 '06-09 135
MX-6 '93-97
Navajo '90-95
Pickup '79-93
Protege 4DR '99-03
'95-98
'90-94
Protégé 5 Wagon '02-03
RX-7 '93-98
RX-8 '04-11 135
Tribute '08-11
'01-06
ü
ü
ü ü ü
ü ü ü
ü ü ü
ü ü ü
ü ü ü
ü ü ü
ü ü ü
ü ü ü
ü ü ü
ü ü ü
ü
ü ü ü
ü ü ü
ü
ü
ü ü ü
ü ü ü
ü ü ü
ü ü ü
ü ü ü
ü ü ü
10
ü
6
ü
9
ü ü
7
ü ü
10
ü ü
10
ü ü
8
ü ü
8
ü ü
10
ü ü
10
ü ü
9
ü ü
10
ü ü
5
ü
10
ü ü
10
ü ü
6
ü
4
ü
9
ü ü
7
ü ü
6
ü ü
6
ü ü
10
ü ü
10
ü ü
10
ü
6
ü
9
ü ü
7
ü ü
10
ü ü
10
ü ü
8
ü ü
8
ü ü
10
ü ü
10
ü ü
9
ü ü
10
ü ü
5
ü
10
ü ü
10
ü ü
6
ü
4
ü
9
ü ü
7
ü ü
6
ü ü
6
ü ü
10
ü ü
10
ü ü
10
ü
6
ü
9
ü ü
7
ü ü
10
ü ü
10
ü ü
8
ü ü
8
ü ü
10
ü ü
10
ü ü
9
ü ü
10
ü ü
5
ü
10
ü ü
10
ü ü
6
ü
4
ü
9
ü ü
7
ü ü
6
ü ü
6
ü ü
10
ü ü
10
ü ü
10 101,102,128
6 101,102,128,132
9 101,102,128
7 101,103
10 101,102,128
10 101,102,128
8 101,102,116,128
8 101,102,116,128
10 101,102,128
135
133
10 101,102,121,128
9 101,102,121,128,151
10 101,102,121,128
5 101,103,126,132,138
133
10 101,102,121,128
10 101,102,121
6 101,103,121,132
4 101,108,132
9 101,102,121,139
135
7 101,102,116,128
6 101,102,126
6 101,102,126
135,137
134
10 101,102,121,128
10 101,102,121,128
MAZADA
190 4DR ‘92-00 133
18 501-5258-10_14
Page 28

THULE 2012 REAR MOUNTED FIT GUIDE
NOTE: If your vehicle is not listed below, it may be a NO FIT. For the most up to date information consult Thule Fit
Guides at your local dealer, m.thule.com, thule.com or scan the code below from your smart phone.
Vehicle make, model and year
9001 RACEWAY 2
9002 RACEWAY 3
9003 RACEWAY
PLATFORM
FIT DIAL SETTING
Fit Tips: Read the appropriate
9009 / 9009XT
ARCHWAY 2
9010 / 9010XT
ARCHWAY 3
FIT DIAL SETTING
9006 / 9006XT
GATEWAY 2
9007 / 9007XT
GATEWAY 3
FIT DIAL SETTING
910XT PASSAGE 2
911XT PASSAGE 3
933 VENTURE
FIT DIAL SETTING
numbered tips on the
last page before
fitting vehicle.
MAZADA continued
300 Wagon '88-98
300 CD '87-87
300 CE '88-88
300 SDL 4DR '87-87
300 SE '92-99
420 SEL '88-88
560 SEC '89-89
560 SEL '92-96
560 SL 2DR '87-87
B Class 5DR '10-13
C Class 2DR '12-13
'05-07
'02-04
C Class 4DR '07-13
'05-06
'01-04
'92-00 133
C Class Wagon '08-12 134
'05-06 134
'02-04
CL Class '11-13
'07-10
CLS Class 2DR '06-12 135
CLS Class 4DR '11-13
E Class 2DR '10-13 135
E-Class 4DR '10-13
'96-09
E Class Wagon '11-13
'04-10
'98-03
G Class '02-13
GL Class '13 135
'06-12 135
GLK '09-13 134
M Class '12-13
'06-11
'98-05
R Class '11-12
'06-10
S Class '00-13 NO FIT
SL Class '05-13 NO FIT
SLK Class '05-13 NO FIT
ü ü ü
ü ü ü
ü ü ü
ü ü ü
ü ü ü
ü ü ü
ü ü ü
ü ü ü
ü ü ü
ü ü ü
ü ü ü
ü ü ü
ü ü ü
ü ü ü
ü ü ü
ü ü ü
ü ü ü
ü ü ü
ü ü
ü ü
ü ü ü
ü ü ü
8
ü ü
6
ü ü
6
ü ü
6
ü ü
6
ü ü
6
ü ü
6
ü ü
10
ü ü
7
ü ü
7
ü ü
7
ü ü
7
ü ü
7
ü ü
7
ü ü
7
ü ü
7
ü ü
7
ü ü
7
ü ü
9
ü ü
9
ü ü
10
ü ü
10
ü ü
8
ü ü
6
ü ü
6
ü ü
6
ü ü
6
ü ü
6
ü ü
6
ü ü
10
ü ü
7
ü ü
7
ü ü
7
ü ü
7
ü ü
7
ü ü
7
ü ü
7
ü ü
7
ü ü
6
ü ü
6
ü ü
9
ü ü
9
ü ü
10
ü ü
10
ü ü
8
ü ü
6
ü ü
6
ü ü
6
ü ü
6
ü ü
6
ü ü
6
ü ü
10
ü ü
7
ü ü
7
ü ü
7
ü ü
7
ü ü
7
ü ü
7
ü ü
7
ü ü
7
ü ü
6
ü ü
6
ü ü
9
ü ü
9
ü ü
10
ü ü
10
ü ü
8 101,102,121,138
6 101,102,138
6 101,102,138
6 101,109,138
6 101,102,138
6 101,109,138
6 101,109,138
133
133
10 101,102,116,121,128
7 101,102,128
7 101,102,116,128
134
7 101,102,116,128
7 101,102,116,128
7 101,102,128
134
7 101,102,128
7 101,102,128
7 101,102,128
6 101,102,138
6 101,102,138
134
134
134
151
9 101,102,121,128
9 101,102,121,128
134,137
10 101,102,121,128
10 101,102,121,128
MERCURY
Cougar '99-02
'89-98
'87-88
Grand Marquis '92-09
'88-89
Mariner '05-10
ü
ü
ü ü ü
ü ü ü
6
ü
6
ü
7
ü ü
10
ü ü
6
ü
6
ü
7
ü ü
10
ü ü
6
ü
6
ü
7
ü ü
10
ü ü
19 501-5258-10_14
135
6 101,103,125,132,138
NO FIT
6 101,105,116,132
7 101,108
10 101,102,121,128
Page 29

THULE 2012 REAR MOUNTED FIT GUIDE
NOTE: If your vehicle is not listed below, it may be a NO FIT. For the most up to date information consult Thule Fit
Guides at your local dealer, m.thule.com, thule.com or scan the code below from your smart phone.
Vehicle make, model and year
MERCURY continued
Marauder '03-04
Milan '06-10
Montego '05-07
Monterey '04-07
Mountaineer '02-10
'96-01
Mystique '95-00
Sable 4DR '08-09
'00-05
'96-99
'92-95
'86-91
Sable Wagon '96-05
'85-95
Topaz 4DR '90-94
Tracer 4DR '97-99
'91-96
Tracer Wagon '91-99
Villager '99-02
'93-98
9001 RACEWAY 2
9002 RACEWAY 3
9003 RACEWAY
PLATFORM
FIT DIAL SETTING
9009 / 9009XT
ARCHWAY 2
9010 / 9010XT
ARCHWAY 3
FIT DIAL SETTING
9006 / 9006XT
GATEWAY 2
9007 / 9007XT
GATEWAY 3
FIT DIAL SETTING
910XT PASSAGE 2
ü
ü
ü ü ü
ü ü ü
ü ü ü
ü ü ü
ü
ü
ü
ü
ü
ü ü ü
ü ü ü
ü
ü ü ü
ü ü ü
ü ü ü
ü
6
ü
8
ü
8
ü ü
10
ü ü
10
ü ü
10
ü ü
6
ü
8
ü
6
ü
6
ü
6
ü
9
ü ü
8
ü ü
6
ü
6
ü ü
9
ü ü
10
ü ü
10
ü
6
ü
8
ü
8
ü ü
10
ü ü
10
ü ü
10
ü ü
6
ü
8
ü
6
ü
6
ü
6
ü
9
ü ü
8
ü ü
6
ü
6
ü ü
9
ü ü
10
ü ü
10
ü
6
ü
8
ü
8
ü ü
10
ü ü
10
ü ü
10
ü ü
6
ü
8
ü
6
ü
6
ü
6
ü
9
ü ü
8
ü ü
6
ü
6
ü ü
9
ü ü
10
ü ü
10
ü
Fit Tips: Read the appropriate
911XT PASSAGE 3
933 VENTURE
FIT DIAL SETTING
6 101,105,116,132
8 101,102,116,128,132
8 101,102,116,128
10 101,102,121,138
10 101,102,121,128
10 101,102,121
6 101,103,118
8 101,102,116,128,132
6 101,106,126,132
6 101,106,126,132
6 101,103,132,138
9 101,106,121
8 101,102,121,138
6 101,108,132,138
6 101,102,138
9 101,102,121,138
10 101,102,121,128
10 101,102,121,126,132,138
numbered tips on the
last page before
fitting vehicle.
135
135
MINI
Clubman '08-13 135
Clubvan '13 135
Cooper (includes JCW models) '03-13
Cooper Coupe '12-13 NO FIT
Countryman '11-13 135
Cooper Roadster '12-13 CHECK FOR UPDATE
ü ü ü
10
ü ü
10
ü ü
10
ü ü
10 101,102,121,128
MITSUBISHI
3000GT '91-99
Diamante 4DR '97-04
Diamante Wagon '92-96
Eclipse '10-12 134,135
Endeavor '04-11
Expo/Expo LRV '92-95
Galant '04-12
Galant GTZ '99-03
Lancer 4DR '08-13
Lancer Sportback '10-13
MiEV '12-13 CHECK FOR UPDATE
ü ü ü
'91-96
'06-09 134,135
'95-03
'97-03
'94-96
'89-93
'85-88
'02-07
'04-05
ü ü ü
ü ü ü
ü ü ü
ü ü ü
ü ü ü
ü ü ü
ü ü ü
ü ü ü
ü ü ü
ü ü ü
ü ü ü
7
ü ü
5
ü ü
8
ü ü
10
ü ü
9
ü ü
7
ü ü
6
ü ü
5
ü ü
5
ü ü
5
ü ü
7
ü ü
7
ü ü
7
ü ü
5
ü ü
8
ü ü
10
ü ü
9
ü ü
7
ü ü
6
ü ü
5
ü ü
5
ü ü
5
ü ü
7
ü ü
7
ü ü
7
ü ü
5
ü ü
8
ü ü
10
ü ü
9
ü ü
7
ü ü
6
ü ü
5
ü ü
5
ü ü
5
ü ü
7
ü ü
7
ü ü
7 101,102,128
5 101,108,126,138
8 101,102,121,127
10 101,102,121,128
9 101,102,121,138
7 101,102,128
6 101,102,128
5 101,102,138
5 101,102,138
5 101,108,114
7 101,102,128
7 101,102,128
134,135
134,135
135
137
134
20 501-5258-10_14
Page 30

THULE 2012 REAR MOUNTED FIT GUIDE
NOTE: If your vehicle is not listed below, it may be a NO FIT. For the most up to date information consult Thule Fit
Guides at your local dealer, m.thule.com, thule.com or scan the code below from your smart phone.
Vehicle make, model and year
9001 RACEWAY 2
9002 RACEWAY 3
9003 RACEWAY
PLATFORM
FIT DIAL SETTING
Fit Tips: Read the appropriate
9009 / 9009XT
ARCHWAY 2
9010 / 9010XT
ARCHWAY 3
FIT DIAL SETTING
9006 / 9006XT
GATEWAY 2
9007 / 9007XT
GATEWAY 3
FIT DIAL SETTING
910XT PASSAGE 2
911XT PASSAGE 3
933 VENTURE
FIT DIAL SETTING
numbered tips on the
last page before
fitting vehicle.
MITSUBISHI continued
Mirage 2DR '00-02
'97-99
'93-96
'89-92
'85-88
Mirage 4DR '00-01
'97-99
'93-94
'89-92
'87-88
Montero '90-06
Montero 2DR '84-90
Montero Sport '97-04
Outlander '07-13 134
'03-06
Outlander Sport '11-13 134
Pickup '83-96
Precis 2DR '90-93
Raider '06-10 148
RVR (Canada) '11-13 134
Starion '85-89
ü ü ü
ü ü ü
ü ü ü
ü ü ü
ü ü ü
ü
ü ü ü
6
ü ü
8
ü ü
6
ü ü
5
ü ü
5
ü ü
9
ü
7
ü ü
6
ü ü
8
ü ü
6
ü ü
5
ü ü
5
ü ü
9
ü
7
ü ü
6
ü ü
8
ü ü
6
ü ü
5
ü ü
5
ü ü
9
ü
7
ü ü
6 101,108,128
133
133
8 101,102
133
6 101,108,128
133
5 101,102,138
5 101,102,138
133
137
9 101,102,121,132,138
134
7 101,108,138
134,135
NISSAN
200SX '95-98
240SX Coupe '93-93
300ZX '90-93
350Z '03-09 133
370Z '09-13 133
Altima 2DR '13
'08-12
Altima 4DR '13
'07-12
'02-06
'98-01
'93-97
Armada '08-13
'04-07
Cube '09-13
Frontier '05-13
'98-04
GT-R '08-12 NO FIT
Juke 5DR '11-13
Leaf 5DR '11-13 CHECK FOR UPDATE
Maxima 4DR '09-13
'04-08
'00-03
'95-99
'87-94
Maxima Wagon '87-88
Murano '03-12
ü
ü
ü ü ü
ü ü ü
ü ü ü
ü
ü
ü ü ü
ü ü ü
ü ü ü
ü ü ü
ü
ü ü ü
ü ü ü
ü ü ü
ü ü ü
ü
6
ü
6
ü
ü
ü
8
ü ü
8
ü ü
7
ü ü
6
ü
5
ü
11
ü ü
11
ü ü
11
ü ü
9
ü ü
7
ü
8
ü ü
6
ü ü
6
ü ü
8
ü ü
10
ü
6
ü
6
ü
7
ü
7
ü
8
ü ü
8
ü ü
7
ü ü
6
ü
5
ü
11
ü ü
11
ü ü
11
ü ü
9
ü ü
7
ü
8
ü ü
6
ü ü
6
ü ü
8
ü ü
10
ü
6
ü
6
ü
7
ü
7
ü
8
ü ü
8
ü ü
7
ü ü
6
ü
5
ü
11
ü ü
11
ü ü
11
ü ü
9
ü ü
7
ü
8
ü ü
6
ü ü
6
ü ü
8
ü ü
10
ü
6 101,102,132,138
134
6 101,103,128,132
7 101,102,138
7 101,102,138
8 101,102,128
8 101,102,128
7 101,102,138
6 101,102,139,140
5 101,102,140
11 101,112,121,128
11 101,112,121,128
11 101,102,119,121
148
148
9 101,102,121,128
7 101,102,116,128
8 101,102,128
6 101,103,125,128
135
6 101,103
8 101,102,121,138
10 101,102,121,141
21 501-5258-10_14
Page 31

THULE 2012 REAR MOUNTED FIT GUIDE
NOTE: If your vehicle is not listed below, it may be a NO FIT. For the most up to date information consult Thule Fit
Guides at your local dealer, m.thule.com, thule.com or scan the code below from your smart phone.
Vehicle make, model and year
9001 RACEWAY 2
9002 RACEWAY 3
9003 RACEWAY
PLATFORM
FIT DIAL SETTING
Fit Tips: Read the appropriate
9009 / 9009XT
ARCHWAY 2
9010 / 9010XT
ARCHWAY 3
FIT DIAL SETTING
9006 / 9006XT
GATEWAY 2
9007 / 9007XT
GATEWAY 3
FIT DIAL SETTING
910XT PASSAGE 2
911XT PASSAGE 3
933 VENTURE
FIT DIAL SETTING
numbered tips on the
last page before
fitting vehicle.
NISSAN continued
Murano CrossCabriolet '11-12 NO FIT
NX 1600, 2000 '92-94
NV200 Van '12-13 NO FIT
NV 1500 / 2500 / 3500 Van '12-13 NO FIT
Pathfinder '13
'05-12
'96-04
Pathfinder w/ Spare '96-01
Pathfinder w/o Spare '92-95
Pulsar '87-88
Quest '12-13
'04-11
'99-02
'93-98
Rogue '08-13
Sentra 2DR '95-99
'91-94
Sentra 4DR '13 CHECK FOR UPDATE
'07-12
'00-06
'95-99
'91-94
'82-90
Stanza 4DR '91-92
Titan Pick-up '04-13
Versa 4DR '12-13
'07-11
Versa 5DR '13 CHECK FOR UPDATE
Versa 5DR '07-12
Xterra '05-13
'00-04
ü ü ü
ü ü ü
ü ü ü
ü ü ü
ü
ü
ü ü ü
ü ü ü
ü ü ü
ü
ü ü ü
ü
ü ü ü
'90
ü ü ü
ü ü ü
ü ü ü
ü
ü ü ü
ü ü ü
ü ü ü
ü ü ü
ü ü ü
ü ü ü
ü ü ü
ü ü ü
6
ü ü
11
ü ü
11
ü ü
10
ü ü
10
ü
6
ü
11
ü ü
11
ü ü
10
ü ü
10
ü
10
ü ü
6
ü
6
ü ü
6
ü ü
8
ü ü
7
ü ü
6
ü
6
ü ü
6
ü ü
6
ü ü
7
ü ü
8
ü ü
9
ü ü
11
ü ü
11
ü ü
6
ü ü
11
ü ü
11
ü ü
10
ü ü
10
ü
6
ü
11
ü ü
11
ü ü
10
ü ü
10
ü
10
ü ü
6
ü
6
ü ü
6
ü ü
8
ü ü
7
ü ü
6
ü
6
ü ü
6
ü ü
6
ü ü
7
ü ü
8
ü ü
9
ü ü
11
ü ü
11
ü ü
6
ü ü
11
ü ü
11
ü ü
10
ü ü
10
ü
6
ü
11
ü ü
11
ü ü
10
ü ü
10
ü
10
ü ü
6
ü
6
ü ü
6
ü ü
8
ü ü
7
ü ü
6
ü
6
ü ü
6
ü ü
6
ü ü
7
ü ü
8
ü ü
9
ü ü
11
ü ü
11
ü ü
6 101,103,121
11 101,102,121,128
11 101,102,121,128
10 101,102,121,128
10 101,103,121,127,132,138
6 101,105,132
11 101,102,121,128
11 101,102,121,128
10 101,102,121,128
10 101,102,126,132,138
10 101,102,121,128,151
6 101,102,132,138
6 101,102,138
6 101,102,138
8 101,102,128
7 101,102,116,128
6 101,102,132,138
6 101,102,138
6 101,102,138
6 101,103
148
7 101,102,128
8 101,102,128
9 101,102,121,128
11 101,102,121,128
11 101,121,125,128,130
OLDSMOBILE
98 Regency '92-98
Achieva 4DR '92-98
Alero 2DR '99-04
Alero 4DR '99-04
Aurora '01-03
'95-00
Bravada '02-04
'96-01
'91-94
Custom Cruiser Wagon '92-95
Cutlass '97-99
Cutlass Ciera 4DR '82-96
Cutlass Cruiser Wagon '83-94
Cutlass Supreme 2DR '88-96
Cutlass Supreme 4DR '90-97
Delta 88 Royale '92-99
ü ü ü
ü ü ü
ü
ü
ü ü ü
ü ü ü
ü
ü ü ü
7
ü ü
6
ü ü
5
ü
5
ü
7
ü ü
6
ü ü
6
ü
6
ü ü
7
ü ü
6
ü ü
5
ü
5
ü
7
ü ü
6
ü ü
6
ü
6
ü ü
7
ü ü
6
ü ü
5
ü
5
ü
7
ü ü
6
ü ü
6
ü
6
ü ü
22 501-5258-10_14
7 101,126,130
6 101,102
5 101,126,128,132,142
5 101,126,128,132,142
7 101,102,128
135
135,137
135,137,144
134
135
6 101,128,142
133
134
135
6 101,108,132
6 101,105
Page 32

THULE 2012 REAR MOUNTED FIT GUIDE
NOTE: If your vehicle is not listed below, it may be a NO FIT. For the most up to date information consult Thule Fit
Guides at your local dealer, m.thule.com, thule.com or scan the code below from your smart phone.
Vehicle make, model and year
9001 RACEWAY 2
9002 RACEWAY 3
9003 RACEWAY
PLATFORM
FIT DIAL SETTING
Fit Tips: Read the appropriate
9009 / 9009XT
ARCHWAY 2
9010 / 9010XT
ARCHWAY 3
FIT DIAL SETTING
9006 / 9006XT
GATEWAY 2
9007 / 9007XT
GATEWAY 3
FIT DIAL SETTING
910XT PASSAGE 2
911XT PASSAGE 3
933 VENTURE
FIT DIAL SETTING
numbered tips on the
last page before
fitting vehicle.
OLDSMOBILE continued
Intrigue 4DR '97-02
LSS '96-99
Silhouette '97-04
Silhouette '90-96
ü ü ü
ü ü ü
6
ü ü
10
ü ü
6
ü ü
10
ü ü
6
ü ü
10
ü ü
6 101,105,128
10 101,102,121,138
135
137
PONTIAC
Aztec '01-05
Bonneville '00-05
'94-99
'86-93
Firebird '79-02
G3 5DR '08-10
G3 Wave 5DR (Canada) '08-10
G5 2DR '07-09
G5 4DR '07-09
G6 Coupe '06-09
G6 4DR '05-09
G8 4DR '08-09
Grand Am 2DR '99-05
'92-98
'85-91
Grand Am 4DR '99-05
'92-98
Grand Prix 2DR '97-02
'88-96
Grand Prix 4DR '04-08
'97-03
'88-96
GTO '04-06 146
LeMans '88-93
Montana '99-05
Montana SV6 '05-06
Solstice '06-09 137
Sunbird 2DR '85-94
Sunbird 4DR '85-94
Sunfire 2DR '95-05
Sunfire 4DR '95-05
Torrent '06-09
Trans Sport '97-98
'90-96
Vibe '03-10
ü
ü ü ü
ü
ü
ü
ü ü ü
ü ü ü
ü ü ü
ü ü ü
ü ü ü
ü
ü ü ü
ü
ü ü ü
ü ü ü
ü ü ü
ü ü ü
ü ü ü
ü ü ü
ü ü ü
ü ü ü
ü ü ü
ü ü ü
ü
ü
ü ü ü
ü ü ü
ü ü ü
10
ü
5
ü ü
6
ü
9
ü
9
ü
7
ü ü
7
ü ü
7
ü ü
7
ü ü
7
ü ü
5
ü
6
ü ü
5
ü
7
ü ü
6
ü ü
7
ü ü
7
ü ü
6
ü ü
7
ü ü
10
ü ü
11
ü ü
6
ü ü
6
ü ü
7
ü
7
ü
11
ü ü
10
ü ü
9
ü ü
10
ü
5
ü ü
6
ü
9
ü
9
ü
7
ü ü
7
ü ü
7
ü ü
7
ü ü
7
ü ü
5
ü
6
ü ü
5
ü
7
ü ü
6
ü ü
7
ü ü
7
ü ü
6
ü ü
7
ü ü
10
ü ü
11
ü ü
6
ü ü
6
ü ü
7
ü
7
ü
11
ü ü
10
ü ü
9
ü ü
10
ü
5
ü ü
6
ü
9
ü
9
ü
7
ü ü
7
ü ü
7
ü ü
7
ü ü
7
ü ü
5
ü
6
ü ü
5
ü
7
ü ü
6
ü ü
7
ü ü
7
ü ü
6
ü ü
7
ü ü
10
ü ü
11
ü ü
6
ü ü
6
ü ü
7
ü
7
ü
11
ü ü
10
ü ü
9
ü ü
10 101,112,121,125,132,138
5 101,138,142
6 101,110,116,132
135
134
9 101,128,132,147
9 101,128,132,147
7 101,102,128
7 101,110,128
7 101,102,128
7 101,102,128
7 101,102,128
5 101,126,128,132,142
135
6 101,109
5 101,126,128,132,142
135
7 101,102,128
6 101,108
7 101,102,128
7 101,102,128
6 101,108
7 101,102,138
10 101,102,121,138
11 101,102,121,128
6 101,110
6 101,110
7 101,132,142
7 101,132,142
11 101,112,121,128
10 101,102,121,138
137
9 101,102,121,128
PORSCHE
Cayenne '03-13
Panamera 4DR '10-13
SAAB
9-2x '05-06
9-3 3DR '99-02
9-3 4DR '06-12
ü ü ü
ü ü ü
ü ü ü
ü ü ü
10
ü ü
8
ü ü
7
ü ü
7
ü ü
10
ü ü
8
ü ü
7
ü ü
7
ü ü
10
ü ü
8
ü ü
7
ü ü
7
ü ü
23 501-5258-10_14
10 101,102,121,128
134
8 101,102,121,127,128
7 101,102,121,138
7 101,102,128
Page 33

THULE 2012 REAR MOUNTED FIT GUIDE
NOTE: If your vehicle is not listed below, it may be a NO FIT. For the most up to date information consult Thule Fit
Guides at your local dealer, m.thule.com, thule.com or scan the code below from your smart phone.
Vehicle make, model and year
9001 RACEWAY 2
9002 RACEWAY 3
9003 RACEWAY
PLATFORM
FIT DIAL SETTING
Fit Tips: Read the appropriate
9009 / 9009XT
ARCHWAY 2
9010 / 9010XT
ARCHWAY 3
FIT DIAL SETTING
9006 / 9006XT
GATEWAY 2
9007 / 9007XT
GATEWAY 3
FIT DIAL SETTING
910XT PASSAGE 2
911XT PASSAGE 3
933 VENTURE
FIT DIAL SETTING
numbered tips on the
last page before
fitting vehicle.
SAAB continued
9-3 4DR '03-05
9-3 Convertible '06-12
'03-05
9-3 5DR '99-03
9-3 Sport Combi '06-12
9-3x '10-12 134
9-4X '10-12
9-5 4DR '10-12
'99-09
9-5 Wagon '99-12
9-7x '05-09 135,137
900 2DR '69-93
900 3DR '94-98
900 4DR 89-93
900 5DR '94-98
900 Convertible '95
9000 4DR '86-98
9000 Hatchback '86-98
ü ü ü
ü ü ü
ü ü ü
ü ü ü
ü
ü ü ü
ü ü ü
ü ü ü
ü ü ü
ü ü ü
ü ü ü
ü ü ü
ü
ü
8
ü ü
7
ü ü
7
ü ü
7
ü ü
7
ü
10
ü ü
7
ü ü
7
ü ü
9
ü ü
7
ü ü
7
ü ü
7
ü ü
6
ü
6
ü
8
ü ü
7
ü ü
7
ü ü
7
ü ü
7
ü
10
ü ü
7
ü ü
7
ü ü
9
ü ü
7
ü ü
7
ü ü
7
ü ü
6
ü
6
ü
8
ü ü
7
ü ü
7
ü ü
7
ü ü
7
ü
10
ü ü
7
ü ü
7
ü ü
9
ü ü
7
ü ü
7
ü ü
7
ü ü
6
ü
6
ü
8 101,102,128
7 101,102,128
7 101,102,128
7 101,102,121,138
7 101,102,121,141
10 101,102,121,128,129
7 101,102,128
7 101,102,128
9 101,102,121,128
135
7 101,102,121,138
7 101,103
7 101,102,121,138
6 101,102,132,138
6 101,102,132
134
SATURN
Astra 3DR '08-10
Astra 5DR '08-10
Aura '07-10
Ion 2DR '03-08
Ion 4DR '03-08
LS 4DR '00-04
LW Wagon '00-04
Outlook '07-10
Relay '05-07
SC 2DR '97-02
'91-96
SC 3DR '97-02
Sky '07-10 146
SL 4DR '96-02
91-95
SW Wagon '93-01
Vue '08-10 134
'02-07
ü ü ü
ü ü ü
ü ü ü
ü ü ü
ü ü ü
ü ü ü
ü ü ü
ü ü ü
ü ü ü
ü
ü
ü
ü ü ü
7
ü ü
7
ü ü
7
ü ü
7
ü ü
7
ü ü
7
ü ü
9
ü ü
9
ü ü
11
ü ü
6
ü
6
ü
8
ü
11
ü ü
7
ü ü
7
ü ü
7
ü ü
7
ü ü
7
ü ü
7
ü ü
9
ü ü
9
ü ü
11
ü ü
6
ü
6
ü
8
ü
11
ü ü
7
ü ü
7
ü ü
7
ü ü
7
ü ü
7
ü ü
7
ü ü
9
ü ü
9
ü ü
11
ü ü
6
ü
6
ü
8
ü
11
ü ü
7 101,102,127,128
7 101,102,127,128
7 101,102,127,128
7 101,102,128
7 101,102,128
7 101,102,128
9 101,121,128,142
9 101,102,121,128
11 101,102,121,128
135
133
135
6 101,108,132
6 101,105,132
8 101,102,121,126,132
11 101,112,121,128
SCION
FR-S '12-13 NO FIT
IQ '12-13 CHECK FOR UPDATE
tC '11-13
'04-10
xA '04-07
xB '08-13
'04-07 135
xD '08-13
ü ü ü
ü ü ü
ü
9
ü ü
11
ü ü
10
ü
9
ü ü
11
ü ü
10
ü
9
11
10
ü ü
ü ü
ü
9 101,102,121,128
11 101,102,121,128
10 101,102,116,121,128,132
CHECK FOR UPDATE
134
24 501-5258-10_14
Page 34

THULE 2012 REAR MOUNTED FIT GUIDE
NOTE: If your vehicle is not listed below, it may be a NO FIT. For the most up to date information consult Thule Fit
Guides at your local dealer, m.thule.com, thule.com or scan the code below from your smart phone.
Vehicle make, model and year
9001 RACEWAY 2
9002 RACEWAY 3
9003 RACEWAY
PLATFORM
FIT DIAL SETTING
Fit Tips: Read the appropriate
9009 / 9009XT
ARCHWAY 2
9010 / 9010XT
ARCHWAY 3
FIT DIAL SETTING
9006 / 9006XT
GATEWAY 2
9007 / 9007XT
GATEWAY 3
FIT DIAL SETTING
910XT PASSAGE 2
911XT PASSAGE 3
933 VENTURE
FIT DIAL SETTING
numbered tips on the
last page before
fitting vehicle.
SMART
Fortwo '08-13 135
SUBARU
Baja '03-07 146
Forester '09-13
'03-08
'98-02
Impreza 2DR '95-01
Impreza 4DR '12-13
'08-11
'02-07
'93-01
Impreza WRX / WRX STI 4DR (w/o Spoiler)
Impreza 5DR '12-13
Impreza WRX / WRX STI 5DR (w/o Spoiler)
Justy '87-94
Legacy 4DR '10-13
Legacy Wagon (Canada) '09-12
Legacy Wagon '05-07
Legacy/Outback Wagon '95-99
Loyale 2DR '90-92
Loyale 4DR '90-92
Loyale Wagon '90-94
Outback 4DR '05-07
Outback Sport '02-11
Outback Wagon '10-13
SUS 4DR '98-99
SVX '92-97
Tribeca '06-13
XV Crosstrek (w/o Spoiler) '13
'12-13
'08-11
'02-07
'93-01
'08-11
'02-07
'93-99
'12-13
'08-11
'02-07
'93-99
'05-09
'00-04
'95-99
'90-94
'00-04
'89-94
'00-04
'00-01
'05-09 135
'00-04
ü ü ü
ü ü ü
ü ü ü
ü
ü ü ü
ü ü ü
ü ü ü
ü
ü ü ü
ü ü ü
ü ü ü
ü
ü ü ü
ü ü ü
ü ü ü
ü
ü ü ü
ü ü ü
ü ü ü
ü
ü ü ü
ü ü ü
ü ü ü
ü ü ü
ü
ü
ü ü ü
ü ü ü
ü ü ü
ü ü ü
ü ü ü
ü ü ü
ü ü ü
ü ü ü
ü ü ü
ü ü ü
ü ü ü
ü
ü ü ü
ü ü ü
ü ü ü
ü ü ü
10
ü ü
10
ü ü
9
ü ü
6
ü
7
ü ü
7
ü ü
6
ü ü
5
ü
7
ü ü
7
ü ü
6
ü ü
5
ü
8
ü ü
8
ü ü
8
ü ü
9
ü
8
ü ü
8
ü ü
8
ü ü
9
ü
7
ü ü
8
ü ü
8
ü ü
7
ü ü
6
ü
6
ü
9
ü ü
9
ü ü
9
ü ü
9
ü ü
8
ü ü
6
ü ü
6
ü ü
9
ü ü
8
ü ü
7
ü ü
8
ü ü
9
ü
10
ü ü
9
ü ü
10
ü ü
8
ü ü
10
ü ü
10
ü ü
9
ü ü
6
ü
7
ü ü
7
ü ü
6
ü ü
5
ü
7
ü ü
7
ü ü
6
ü ü
5
ü
8
ü ü
8
ü ü
8
ü ü
9
ü
8
ü ü
8
ü ü
8
ü ü
9
ü
7
ü ü
8
ü ü
8
ü ü
7
ü ü
6
ü
6
ü
9
ü ü
9
ü ü
9
ü ü
9
ü ü
8
ü ü
6
ü ü
6
ü ü
9
ü ü
8
ü ü
7
ü ü
8
ü ü
9
ü
10
ü ü
9
ü ü
10
ü ü
8
ü ü
10
ü ü
10
ü ü
9
ü ü
6
ü
7
ü ü
7
ü ü
6
ü ü
5
ü
7
ü ü
7
ü ü
6
ü ü
5
ü
8
ü ü
8
ü ü
8
ü ü
9
ü
8
ü ü
8
ü ü
8
ü ü
9
ü
7
ü ü
8
ü ü
8
ü ü
7
ü ü
6
ü
6
ü
9
ü ü
9
ü ü
9
ü ü
9
ü ü
8
ü ü
6
ü ü
6
ü ü
9
ü ü
8
ü ü
7
ü ü
8
ü ü
9
ü
10
ü ü
9
ü ü
10
ü ü
8
ü ü
10 101,102,121,128
10 101,102,121,128
9 101,102,128
6 101,111,132
7 101,102,128
7 101,102,128
6 101,102,128
5 101,102,132,139
7 101,102,128
7 101,102,128
6 101,102,128
5 101,102,132,139
8 101,102,121,127,128
8 101,102,121,127,128
8 101,102,121,127,128
9 101,102,121,128,132
8 101,102,121,127,128
8 101,102,121,127,128
8 101,102,121,127,128
9 101,102,121,128,132
7 101,102,121
8 101,102,128
8 101,128,147
7 101,102,128,129
6 101,103,132,138
6 101,103,132
9 101,102,121,128
9 101,102,121,128
9 101,102,121,128
9 101,102,138
8 101,102,121,138
6 101,103
6 101,103
9 101,102,121,138
8 101,128,132,147
7 101,102,128,129
8 101,102,121,127,128
9 101,102,121,128,132
10 101,102,121,128
9 101,102,121,128
136
135
10 101,102,121,128
8 101,102,121,127,128
25 501-5258-10_14
Page 35

THULE 2012 REAR MOUNTED FIT GUIDE
NOTE: If your vehicle is not listed below, it may be a NO FIT. For the most up to date information consult Thule Fit
Guides at your local dealer, m.thule.com, thule.com or scan the code below from your smart phone.
Vehicle make, model and year
9001 RACEWAY 2
9002 RACEWAY 3
9003 RACEWAY
PLATFORM
FIT DIAL SETTING
Fit Tips: Read the appropriate
9009 / 9009XT
ARCHWAY 2
9010 / 9010XT
ARCHWAY 3
FIT DIAL SETTING
9006 / 9006XT
GATEWAY 2
9007 / 9007XT
GATEWAY 3
FIT DIAL SETTING
910XT PASSAGE 2
911XT PASSAGE 3
933 VENTURE
FIT DIAL SETTING
numbered tips on the
last page before
fitting vehicle.
SUZUKI
Aerio 4DR '02-07 101,102,128
Aerio SX 5DR '02-06
Esteem 4DR '95-02
Esteem Wagon '98-02
Equator '09-13
Forenza 4DR '05-08 135
Forenza Wagon '05-08
Grand Vitara '06-13
Kizashi 4DR '10-13
Reno '05-08
Sidekick 2DR '91-98
Sidekick 4DR '91-98
Swift 2DR '91-94
Swift 3DR '95-01
Swift 4DR '91-94
SX4 4DR '07-13
SX4 Sport 4DR '07-13
SX4 Sportback 5DR
SX4 Hatchback '07-13
Verona '04-07
Vitara '99-05
XL-7 '07-09
ü
ü
ü ü ü
ü ü ü
ü ü ü
ü
ü
ü
ü ü ü
ü ü ü
'07-13
'01-06
ü
ü
ü ü ü
ü ü ü
6
ü
9
ü
8
ü ü
7
ü ü
8
ü ü
5
ü
8
ü
5
ü
6
ü ü
6
ü ü
9
ü
9
ü
7
ü ü
11
ü ü
6
ü
9
ü
8
ü ü
7
ü ü
8
ü ü
5
ü
8
ü
5
ü
6
ü ü
6
ü ü
9
ü
9
ü
7
ü ü
11
ü ü
6
ü
9
ü
8
ü ü
7
ü ü
8
ü ü
5
ü
8
ü
5
ü
6
ü ü
6
ü ü
9
ü
9
ü
7
ü ü
11
ü ü
6 101,102,132,138
9 101,102,121,128,132
8 101,102,128,132
7 101,102,128
8 101,102,128
5 101,102,132,138
8 101,102,132
5 101,102,132,138
6 101,102,128
6 101,102,128
9 101,102,121,128
9 101,102,121,128
7 101,102,128
11 101,112,121,128
134
TOYOTA
4 Runner 2DR '90-95
4 Runner 4DR '03-13
4 Runner 4DR '96-02
Avalon '13
'05-12
'00-04
'95-99
Camry 2DR '92-96
Camry 4DR '12-13
'07-11
'02-06
'97-01
'92-96
'87-91
Camry Wagon '92-96
'87-91
Celica '00-05
Celica 2DR '94-99
'90-93
Celica 3DR '94-99
'90-93
Celica Coupe '82-89
Corolla 4DR '09-13
'03-08
'98-02
ü ü ü
ü ü ü
ü
ü
ü ü ü
ü ü ü
ü ü ü
ü ü ü
ü ü ü
ü
ü ü ü
ü ü ü
ü ü ü
ü ü ü
ü
ü ü ü
ü
ü ü ü
ü ü ü
ü ü ü
ü ü ü
ü
10
ü ü
10
ü ü
7
ü
7
ü
7
ü ü
6
ü ü
7
ü ü
7
ü ü
7
ü ü
6
ü
6
ü ü
5
ü ü
9
ü ü
9
ü ü
5
ü
6
ü ü
5
ü
6
ü ü
6
ü ü
7
ü ü
8
ü ü
7
ü
10
ü ü
10
ü ü
7
ü
7
ü
7
ü ü
6
ü ü
7
ü ü
7
ü ü
7
ü ü
6
ü
6
ü ü
5
ü ü
9
ü ü
9
ü ü
5
ü
6
ü ü
5
ü
6
ü ü
6
ü ü
7
ü ü
8
ü ü
7
ü
10
ü ü
10
ü ü
7
ü
7
ü
7
ü ü
6
ü ü
7
ü ü
7
ü ü
7
ü ü
6
ü
6
ü ü
5
ü ü
9
ü ü
9
ü ü
5
ü
6
ü ü
5
ü
6
ü ü
6
ü ü
7
ü ü
8
ü ü
7
ü
137
10 101,102,121,128,145
10 101,102,121,127,128
7 101,102,128,132
7 101,102,116,128,132
7 101,102,128
133
6 101,103,125
7 101,102,128
7 101,102,128
7 101,102,128
6 101,106,125,132,138
6 101,103,125
5 101,108,138
9 101,102,121
9 101,108,121
135,136
5 101,103,121,132,138
6 101,103,126,138
5 101,103,121,132,138
6 101,103,126,138
6 101,103
7 101,102,128
8 101,102,128
7 101,102,128,132
26 501-5258-10_14
Page 36

THULE 2012 REAR MOUNTED FIT GUIDE
NOTE: If your vehicle is not listed below, it may be a NO FIT. For the most up to date information consult Thule Fit
Guides at your local dealer, m.thule.com, thule.com or scan the code below from your smart phone.
Vehicle make, model and year
9001 RACEWAY 2
9002 RACEWAY 3
9003 RACEWAY
PLATFORM
FIT DIAL SETTING
Fit Tips: Read the appropriate
9009 / 9009XT
ARCHWAY 2
9010 / 9010XT
ARCHWAY 3
FIT DIAL SETTING
9006 / 9006XT
GATEWAY 2
9007 / 9007XT
GATEWAY 3
FIT DIAL SETTING
910XT PASSAGE 2
911XT PASSAGE 3
933 VENTURE
FIT DIAL SETTING
numbered tips on the
last page before
fitting vehicle.
TOYOTA continued
Corolla 4DR '93-97
'89-92
Corolla S 4DR '09-12
'03-08
Corolla Wagon '93-96
88-92
Echo 2DR '00-06
Echo 4DR '00-06
FJ Cruiser '07-13 150,152
Highlander '08-13 134
'01-07
Land Cruiser '98-13
Matrix '09-13
'03-08
MR-2 '90-93
MR2 Spyder '00-05
Paseo '91-97
Paseo Convertible '97
Pickup '79-89
Pickup (Small) '89-96
Pickup (Standard) '89-96
Previa '91-97
Prius 4DR '01-03
Prius 5DR '10-13
'04-09
Prius C 5DR '12-13
Prius V 5DR Wagon '12-13
RAV 4 '13 NO FIT - SPOILER
'07-12 150, 152
'01-06
'96-00
Sequoia '08-13
'01-07
Sienna '11-13 NO FIT - SPOILER
'04-09
'98-03
Solara '04-08
'99-03
Supra '84-92
T100 '93-98
Tacoma '05-13
'96-04
Tercel 2DR '91-99
Tercel 4DR '91-99
Tercel Wagon '80-88
Tundra '07-13 148
'99-06
Vans '84-90
ü
ü
ü ü ü
ü ü ü
ü ü ü
ü ü ü
ü ü ü
ü ü ü
ü ü ü
ü ü ü
ü
ü ü ü
ü ü ü
ü ü ü
ü
ü
ü ü ü
ü ü ü
'10
ü ü ü
ü ü ü
ü ü ü
ü
ü
ü ü ü
'90
ü
ü ü ü
ü ü ü
ü ü ü
6
ü
6
ü
7
ü ü
8
ü ü
8
ü ü
8
ü ü
10
ü ü
11
ü ü
9
ü ü
9
ü ü
6
ü
9
ü ü
7
ü ü
7
ü ü
8
ü
9
ü
9
ü ü
9
ü ü
11
ü ü
11
ü ü
10
ü ü
7
ü
5
ü
6
ü ü
8
ü
6
ü ü
9
ü ü
10
ü ü
6
ü
6
ü
7
ü ü
8
ü ü
8
ü ü
8
ü ü
10
ü ü
11
ü ü
9
ü ü
9
ü ü
6
ü
9
ü ü
7
ü ü
7
ü ü
8
ü
9
ü
9
ü ü
9
ü ü
11
ü ü
11
ü ü
10
ü ü
7
ü
5
ü
6
ü ü
8
ü
6
ü ü
9
ü ü
10
ü ü
6
ü
6
ü
7
ü ü
8
ü ü
8
ü ü
8
ü ü
10
ü ü
11
ü ü
9
ü ü
9
ü ü
6
ü
9
ü ü
7
ü ü
7
ü ü
8
ü
9
ü
9
ü ü
9
ü ü
11
ü ü
11
ü ü
10
ü ü
7
ü
5
ü
6
ü ü
8
ü
6
ü ü
9
ü ü
10
ü ü
6 101,102,126,132
6 101,102,132
7 101,102,128
8 101,102,128
8 101,103,121,138
8 101,103,121,138
135
135
10 101,102,121,127,128
11 101,102,121,128
9 101,102,121,128
9 101,102,121,128
133
135
6 101,102,132,138
135
148
148
148
9 101,103,125,138
135
7 101,102,121,128
7 101,102,121,128
8 101,102,121,128
9 101,102,121,138
9 101,102,121,127,138
9 101,102,121,127,138
11 101,102,121,128
11 101,102,121,128
10 101,102,121,128
7 101,102,128,132
5 101,102,128,132
135
148
148
148
6 101,102
8 101,103,132
6 101,102
9 101,102,139
148
10 101,103,121,138
27 501-5258-10_14
Page 37

THULE 2012 REAR MOUNTED FIT GUIDE
NOTE: If your vehicle is not listed below, it may be a NO FIT. For the most up to date information consult Thule Fit
Guides at your local dealer, m.thule.com, thule.com or scan the code below from your smart phone.
Vehicle make, model and year
9001 RACEWAY 2
9002 RACEWAY 3
9003 RACEWAY
PLATFORM
FIT DIAL SETTING
Fit Tips: Read the appropriate
9009 / 9009XT
ARCHWAY 2
9010 / 9010XT
ARCHWAY 3
FIT DIAL SETTING
9006 / 9006XT
GATEWAY 2
9007 / 9007XT
GATEWAY 3
FIT DIAL SETTING
910XT PASSAGE 2
911XT PASSAGE 3
933 VENTURE
FIT DIAL SETTING
numbered tips on the
last page before
fitting vehicle.
TOYOTA continued
Venza '09-13
Yaris 3DR (Hatchback) '12-13
'07-11
Yaris 4DR (Sedan) '07-12
Yaris 5DR (Hatchback) '12-13
'07-11
ü
ü ü ü
ü ü ü
ü ü ü
ü ü ü
ü ü ü
9
ü
10
ü ü
10
ü ü
7
ü ü
10
ü ü
10
ü ü
9
ü
10
ü ü
10
ü ü
7
ü ü
10
ü ü
10
ü ü
9
ü
10
ü ü
10
ü ü
7
ü ü
10
ü ü
10
ü ü
9 101,102,121,138
10 101,102,121,128
10 101,102,121,128
7 101,102,121,128
10 101,102,121,128
10 101,102,121,128
VOLKSWAGEN
Amarok (Mexico) '10-13
Beetle '12-14
Beetle Convertible '03-10
Beetle Turbo '12-14
Cabriolet '84-98
Corrado '90-94
Eos '07-13 137
Eurovan '92-03 133
Fox '87-94
GLI '08-13
Golf (Type VI) 3DR '10-13
Golf (Type V) 3DR '06-09 see “Volkswagen Rabbit 3DR, 06-09
Golf (Type IV) 3DR '99-05
Golf (Type III) 3DR '93-99
Golf (Type VI) 5DR '10-13
Golf (Type V) 5DR '06-09 see “Volkswagen Rabbit 3DR, 06-09
Golf (Type IV) 5DR '99-06
Golf (Type III) 5DR '93-99
Golf '85-92
Golf City 5DR (Canada) '08-10
Golf R 3DR '10-13
Golf R 5DR '10-13
Golf Wagon (Canada) '10-12
GTI (Type VI) 3DR '10-13
GTI (Type V) 3DR '06-09
GTI (Type VI) 5DR '10-13
GTI (Type V) 5DR '06-09
GTI (Type IV) 3DR '99-06
GTI (Type III) 3DR '93-99
GTI 3DR '89-92
Jetta (Type VI) '11-13
Jetta (Type V) '06-10
Jetta (Type IV) 4DR '99-05
Jetta (Type III) 4DR '93-99
Jetta '85-92
Jetta SportWagen / Clean Diesel TDI
Jetta Wagon '01-08
Passat 4DR '12-13
ü
'98-10
'09-13
'06-10
'98-05
92-97 133
ü ü ü
ü
ü
ü ü ü
ü ü ü
ü ü ü
ü ü ü
ü
ü ü ü
ü ü ü
ü
ü
ü ü ü
ü ü ü
ü ü ü
ü ü ü
ü ü ü
ü ü ü
ü ü ü
ü ü ü
ü ü ü
ü
ü
ü ü ü
ü ü ü
ü ü ü
ü
ü
ü ü ü
ü ü ü
ü ü ü
ü ü ü
ü ü ü
6
ü ü
7
ü ü
5
ü ü
6
ü
5
ü ü
7
ü ü
8
ü ü
8
ü ü
8
ü
8
ü ü
8
ü ü
8
ü
7
ü
8
ü ü
8
ü ü
8
ü ü
10
ü ü
8
ü ü
8
ü ü
8
ü ü
8
ü ü
8
ü ü
8
ü
7
ü
7
ü ü
7
ü ü
7
ü ü
6
ü
6
ü
10
ü ü
10
ü ü
7
ü ü
7
ü ü
7
ü ü
6
ü ü
7
ü ü
5
ü ü
6
ü
5
ü ü
7
ü ü
8
ü ü
8
ü ü
8
ü
8
ü ü
8
ü ü
8
ü
7
ü
8
ü ü
8
ü ü
8
ü ü
10
ü ü
8
ü ü
8
ü ü
8
ü ü
8
ü ü
8
ü ü
8
ü
7
ü
7
ü ü
7
ü ü
7
ü ü
6
ü
6
ü
10
ü ü
10
ü ü
7
ü ü
7
ü ü
7
ü ü
6
ü ü
7
ü ü
5
ü ü
6
ü
5
ü ü
7
ü ü
8
ü ü
8
ü ü
8
ü
8
ü ü
8
ü ü
8
ü
7
ü
8
ü ü
8
ü ü
8
ü ü
10
ü ü
8
ü ü
8
ü ü
8
ü ü
8
ü ü
8
ü ü
8
ü
7
ü
7
ü ü
7
ü ü
7
ü ü
6
ü
6
ü
10
ü ü
10
ü ü
7
ü ü
7
ü ü
7
ü ü
6 101,102,128,155
7 101,102,128
5 101,102,128,155
6 101,112,121,125,132,138
5 101,102,138
7 101,102,128
8 101,102,121,128
8 101,102,121,128
8 101,102,132,138
8 101,102,121,128
8 101,102,121,128
8 101,102,132,138
7 101,102,121,132,138
8 101,102,121,128
8 101,102,121,128
8 101,102,121,128
10 101,102,121,128
8 101,102,121,128
8 101,102,121,128
8 101,102,121,128
8 101,102,121,128
8 101,102,121,128
8 101,102,132,138
7 101,102,121,132,138
7 101,102,128
7 101,102,128
7 101,102,128
6 101,102,132,138
6 101,103,132,140
10 101,102,121,128
10 101,102,121,128
7 101,102,128
7 101,102,128
7 101,102,128
148
135
137
28 501-5258-10_14
Page 38

THULE 2012 REAR MOUNTED FIT GUIDE
NOTE: If your vehicle is not listed below, it may be a NO FIT. For the most up to date information consult Thule Fit
Guides at your local dealer, m.thule.com, thule.com or scan the code below from your smart phone.
Vehicle make, model and year
9001 RACEWAY 2
9002 RACEWAY 3
9003 RACEWAY
PLATFORM
FIT DIAL SETTING
Fit Tips: Read the appropriate
9009 / 9009XT
ARCHWAY 2
9010 / 9010XT
ARCHWAY 3
FIT DIAL SETTING
9006 / 9006XT
GATEWAY 2
9007 / 9007XT
GATEWAY 3
FIT DIAL SETTING
910XT PASSAGE 2
911XT PASSAGE 3
933 VENTURE
FIT DIAL SETTING
numbered tips on the
last page before
fitting vehicle.
VOLKSWAGEN continued
Passat 4DR '90-91
Passat CC '09-13 135
Passat Wagon '90-10
Phaeton '04-06
Rabbit 3DR '06-09
Rabbit 5DR '06-09
Routan '11-13
'09-10
Scirocco '87-89
Tiguan '12-13 137
'08-11 137
Touareg '08-13
'04-07
Vanagon Van (T3) 80-02
ü ü ü
ü ü ü
ü ü ü
ü ü ü
ü ü ü
ü ü ü
ü ü ü
ü ü ü
ü ü ü
ü ü ü
ü ü ü
5
ü ü
10
ü ü
7
ü ü
9
ü ü
9
ü ü
11
ü ü
11
ü ü
6
ü ü
10
ü ü
10
ü ü
11
ü ü
5
ü ü
10
ü ü
7
ü ü
9
ü ü
9
ü ü
11
ü ü
11
ü ü
6
ü ü
10
ü ü
10
ü ü
11
ü ü
5
ü ü
10
ü ü
7
ü ü
9
ü ü
9
ü ü
11
ü ü
11
ü ü
6
ü ü
10
ü ü
10
ü ü
11
ü ü
5 101,103,138
10 101,102,121,128
7 101,112,128
9 101,102,121,128
9 101,102,121,128
11 101,102,121,128
11 101,102,121,128
6 101,103,121,138
10 101,102,121,128
10 101,102,121,128
11 101,102,121,123
VOLVO
240/260 4DR '79-93
240/260 Wagon '79-93
740/760 4DR '90
'84-89
740/760/940/960 Wagon '84-97
740/960 4DR '91-97
850 4DR '93-97
850 Wagon '94-97
C30 '08-13 137
C70 Convertible '06-13 137
'98-05
S40 '05-11
'00-04
S60 '10-13
'01-09
S70 '98-00
S80 '10-13
'07-09
'99-06
S90 '98-00
V40 '00-04
V50 '05-11
V70 '98-10
V70 XC '01-10
V90 '98-00
XC60 '09-13
XC70 '01-13
XC90 '03-13
ü ü ü
ü
ü ü ü
ü ü ü
ü
ü
ü
ü ü ü
ü ü ü
ü ü ü
ü ü ü
ü ü ü
ü
ü ü ü
ü ü ü
ü ü ü
ü
ü ü ü
ü ü ü
ü ü ü
ü ü ü
ü ü ü
ü ü ü
ü ü ü
ü ü ü
6
ü ü
10
ü
6
ü ü
6
ü ü
10
ü
6
ü
6
ü
6
ü ü
7
ü ü
7
ü ü
7
ü ü
7
ü ü
6
ü
7
ü ü
7
ü ü
7
ü ü
6
ü
11
ü ü
11
ü ü
11
ü ü
11
ü ü
11
ü ü
9
ü ü
11
ü ü
9
ü ü
6
ü ü
10
ü
6
ü ü
6
ü ü
10
ü
6
ü
6
ü
6
ü ü
7
ü ü
7
ü ü
7
ü ü
7
ü ü
6
ü
7
ü ü
7
ü ü
7
ü ü
6
ü
8
ü ü
9
ü ü
9
ü ü
9
ü ü
9
ü ü
9
ü ü
9
ü ü
9
ü ü
6
ü ü
10
ü
6
ü ü
6
ü ü
10
ü
6
ü
6
ü
6
ü ü
7
ü ü
7
ü ü
7
ü ü
7
ü ü
6
ü
7
ü ü
7
ü ü
7
ü ü
6
ü
8
ü ü
9
ü ü
9
ü ü
9
ü ü
9
ü ü
9
ü ü
9
ü ü
9
ü ü
6 101,102,138
10 101,102,121,132,130
6 101,102
6 101,109
10 101,102,121,132,130
6 101,102,132,138
6 101,102,132,138
137
6 101,110,128
7 101,102,128
7 101,108,128
7 101,102,128
7 101,102,128
6 101,102,132,138
7 101,102,128
7 101,102,128
7 101,102,128
6 101,102,132,138
8 101,102,121,128
9 101,102,121,128
9 101,102,121,128
9 101,102,121,128
9 101,102,121,128
9 101,102,121,128
9 101,102,121,128
9 101,102,121,128
29 501-5258-10_14
Page 39

THULE 2012 REAR MOUNTED FIT GUIDE
101 Place top clips in the gap at the front edge of
the top of the trunk, hatch or door.
102 Place lower clips in the bottom edge of trunk
or hatch.
103 Set lower clips/hooks into vehicle’s left and
right tow loops under the rear of the vehicle.
104 Set lower clips/hooks into tow loop on the
right and frame hole on the left.
105 Set lower clips into bottom edge of internal
metal bumper.
106 Set lower clips/hooks into frame holes.
107 Set lower clips into bottom edge of
rear doors.
108 Set lower clips into frame holes in back
of bumper.
109 Set lower clips onto bottom edge of bumper.
110 Set lower clip/hook onto edge of structural
bumper located behind plastic bumper.
111 Frame holes are located up high on the
backside of bumper.
112 Set lower clip/hooks into frame holes in
chassis behind bumper.
114 Chafe guards required.
115 To minimize contact between carrier tow
hooks and the bumper, slide the strap through
only one end of the chafe guard leaving the
other end free to rest between the tow hook
and the bumper.
116 Bumper cover may deform with the use of this
carrier. Remove carrier when not in use.
117 The upper arm of carrier, between rubber
pads, may contact the center ridge in the
trunk lid when carrier is fully mounted.
118 Lower arm of the carrier will mount against
the license plate and the lights to the left and
right of it.
119 Lower arm of the carrier will mount on the
ridge on the bottom of the rear door, just
above the bottom edge of the rear door.
126 Caution: The trunk lid may deform slightly with
the use of this carrier. Remove carrier when
not in use.
127 Route top strap under the spoiler on top of
the hatch.
128 Lower arm of carrier should be positioned on
upper tier of bumper.
129 Rubber weather stripping at top door/hatch
will deform over time. Remove carrier when
not in use.
130 Set lower clips/hooks into frame holes
in bumper located by the right and left
bumper strut.
131 Set lower clips/hooks into tow loop on the
right and edge of bumper, by the bumper
strut, on the left.
132 Thule cannot recommend the use of 3-bike
carriers on this vehicle.
133 Carrier is not recommended because lower
straps can not be mounted in a safe place.
134 Carrier is not recommended because top
straps should not be mounted directly to
glass or plastic trim covering glass.
135 Carrier is not recommended because vehicle
is unable to support carrier weight.
136 Carrier is not recommended because upper
arm of carrier could damage trunk lid.
137 Carrier is not recommended because top
straps can not be mounted in a safe place.
138 Lower arm of carrier will rest in the bottom
of the license plate well.
139 Lower arm of carrier will rest above license
plate well.
140 Lower arm of carrier will rest at bottom of
trunk lip.
141 Lower arm of carrier will rest in the area
between the license plate well and upper tier
of the bumper.
142 Set lower clips/hooks on top edge of the
metal bumper struts.
148 Please verify vehicle cargo area will accept
bicycle wheelbase prior to purchase.
149 Due to a factory incorporated “tire hanger”
on some models, the 963 “Spare Me” cannot
be used on this vehicle. Please check your
vehicle’s configuration before buying this
product.
150 Only the “963XT, 963XTR, and 963PRO” can
be used with this vehicle, due to mounting
limitations on the original “963 Spare Me”. If
you have the “963 Spare Me” and would like
to fit one of these vehicles - you need part
# 753-3532.
151 If this vehicle has a spoiler installed, it is a
“NO FIT”
152 If this vehicle has a spare tire mounted
back-up camera, the 963XT will not fit.
153 Truck bed is not long enough to carry bikes
using the 501 Insta-Gater.
154 All instances of this vehicle come with a
factory spoiler which is not strong enough to
take the weight of our strap carriers.
155 Place side clips in the bottom edge of trunk or
hatch next to the lower clips
156 Do not operate convertible roof while rack is
in place.
121 Caution: Rear wiper can not be used when
carrier is mounted.
122 Offset carrier to the right.
123 Lower arm of the carrier will mount higher
on the rear door, so that the upper arm rests
against the metal above the rear window.
124 Rear wiper must be positioned through the
upper arm of carrier.
125 Always check to make sure there is no
contact between the lower straps and the
muffler and/or exhaust pipe.
143 When installing a Freeway or Speedway rack
the use of a versa clip is required.
144 Vehicle can have an externally mounted spare
tire prohibiting the use of any strap rack.
145 Set lower clips/hooks into tow loop on the left
and frame hole on the right.
146 Carrier is not recommended because it
cannot be installed without unwanted contact.
147 Set lower clips/hooks in tow loop located in
the center of the vehicle behind the bumper.
30 501-5258-10_14
 Loading...