

Page 1
USER GUIDE
WWW.THRUST-UAV.COM
Page 2
USER GUIDE
The Riot 250R Pro
The Riot 250R Pro is the premiere FPV racing
drone on the market. With its next generation
integrated ight system, light and extremely
durable gel coat carbon ber frame and unique
design, it is built to get you noticed! Thrust UAV
takes great pride in the quality of our products and
provides distributors unmatched support to ensure
successful sales and growth in the
UAV market.
Index
Riot Set Up .................................................................................................................................................... 3
Conguration .............................................................................................................................................. 11
OSD (On-Screen Display) ...........................................................................................................................22
Pre-ight Check ..........................................................................................................................................24
Troubleshooting .......................................................................................................................................... 25
Drone Anatomy ...........................................................................................................................................26
2
Built and Manufactured in the U.S.A.
Page 3
RIOT SET UP
Install your receiver
1
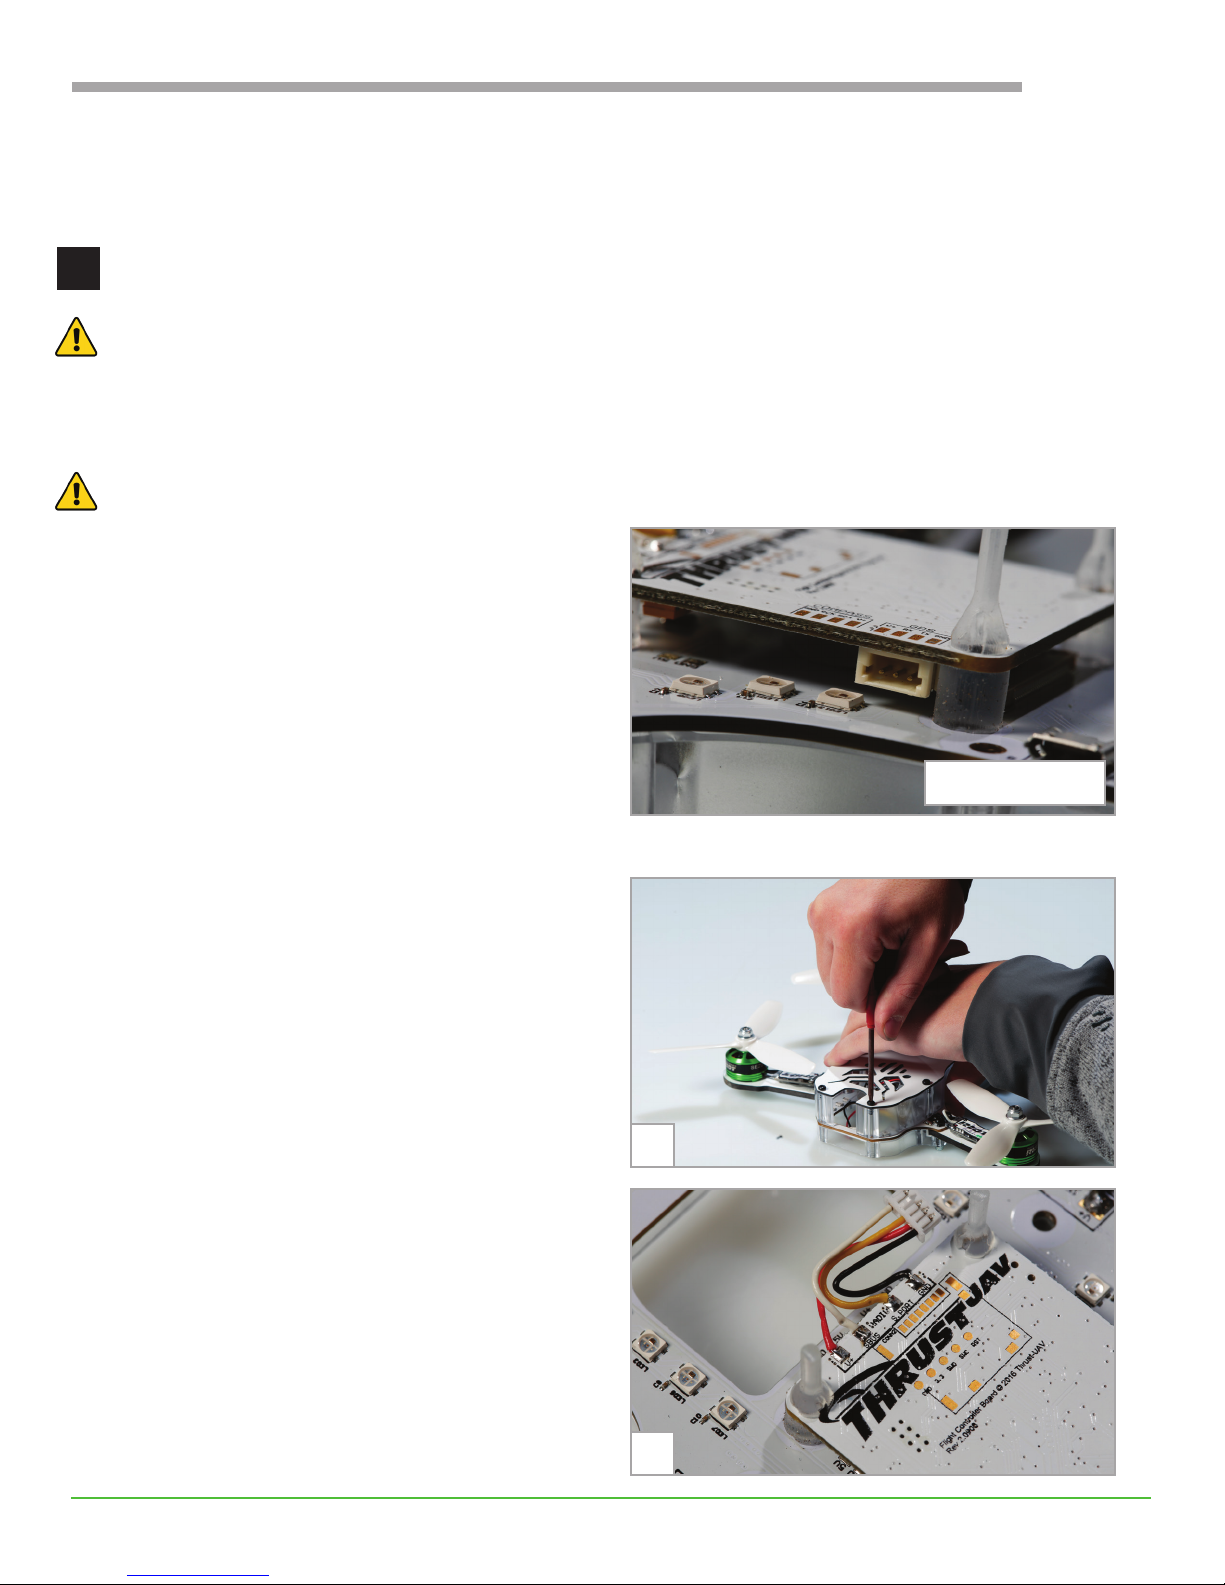
WARNING! Remove props and disconnect battery before connecting the RX (receiver).
The Riot is compatible with any PPM, SBUS or DSMX receiver so you can choose the one that works best
for you. For optimum performance, we recommend the FrSky XSR. Depending on the type of receiver,
either solder to the corresponding pads or connect to the Spektrum plug on the ight controller.
WARNING! Do not solder a DSMX receiver to the receiver pads.
For Spektrum RX
For all DSMX receivers, connect to the I.E. SPM4648
Spektrum plug on the ight controller. Spektrum
receivers are only rated for 3.3v and shouldn’t be
soldered to the RX pads.
USER GUIDE
For FrSky PPM or SBUS RX
Solder a PPM or SBUS receiver such as the FrSky
XSR to the corresponding pads on the ight
controller. With soldering iron in hand, see the
directions below.
a. Remove the top plate of the Riot’s frame using the
included torx driver.
b. Tin the pads on the ight controller.
c. Cut the receiver wires to the desired length. 2
inches is a good place to start.
d. Strip and tin the receiver wires.
e. Solder the receiver wires to the corresponding
pads.
• GND = black
• SBUS = white
Spektrum RX
a
• S-port = yellow
• V+ = red
f. Plug the wires into the receiver.
e
3
Page 4
USER GUIDE
g h
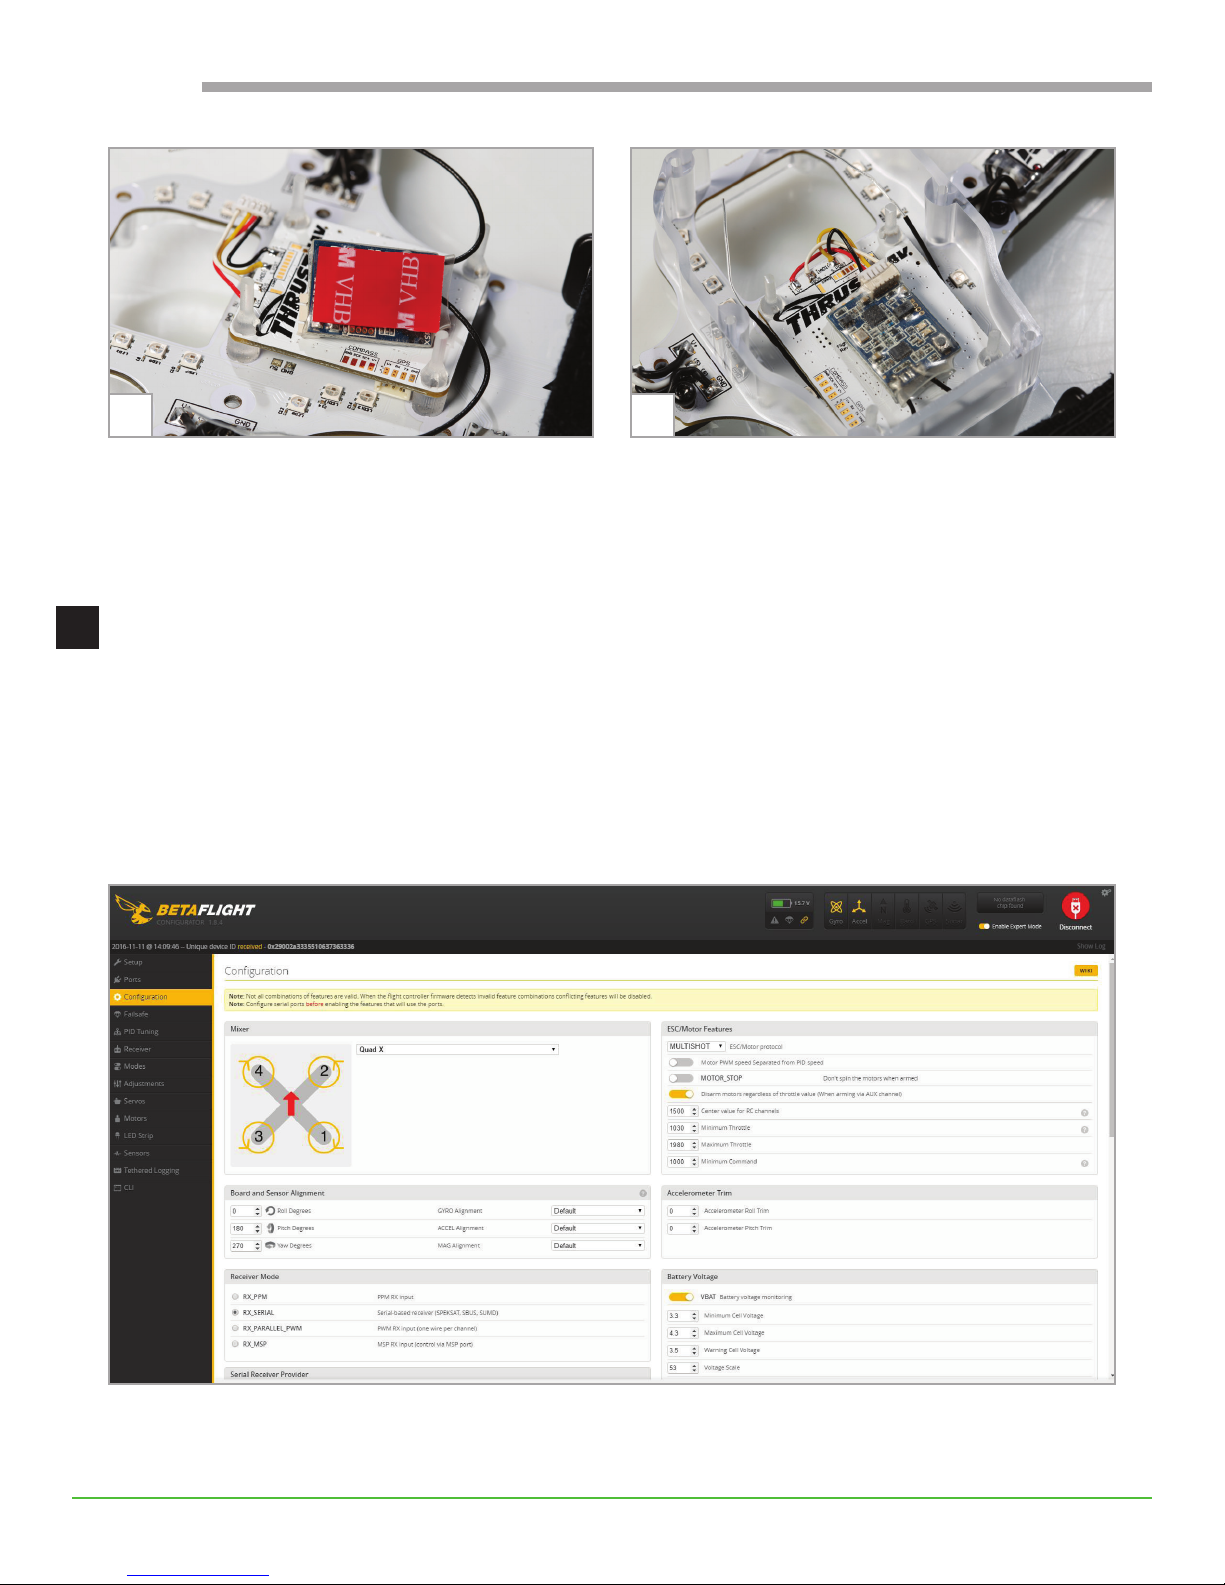
g. Attach the receiver to top of ight controller with a sticky dot or sticky tape.
h. Tuck the receiver antennas below top plate.
Congure the receiver
2
The Riot comes congured for the FrSky XSR/X4R receiver. For other receivers, these settings can be
customized in Betaight - Congurator, an open source ight controller software available for free from the
Google Chrome Store. Chrome web browser is required to run the Betaight software.
• Launch the app and connect the Riot to your computer via micro USB.
• Press the Connect button in the top right corner and open the Conguration tab.
4
Page 5
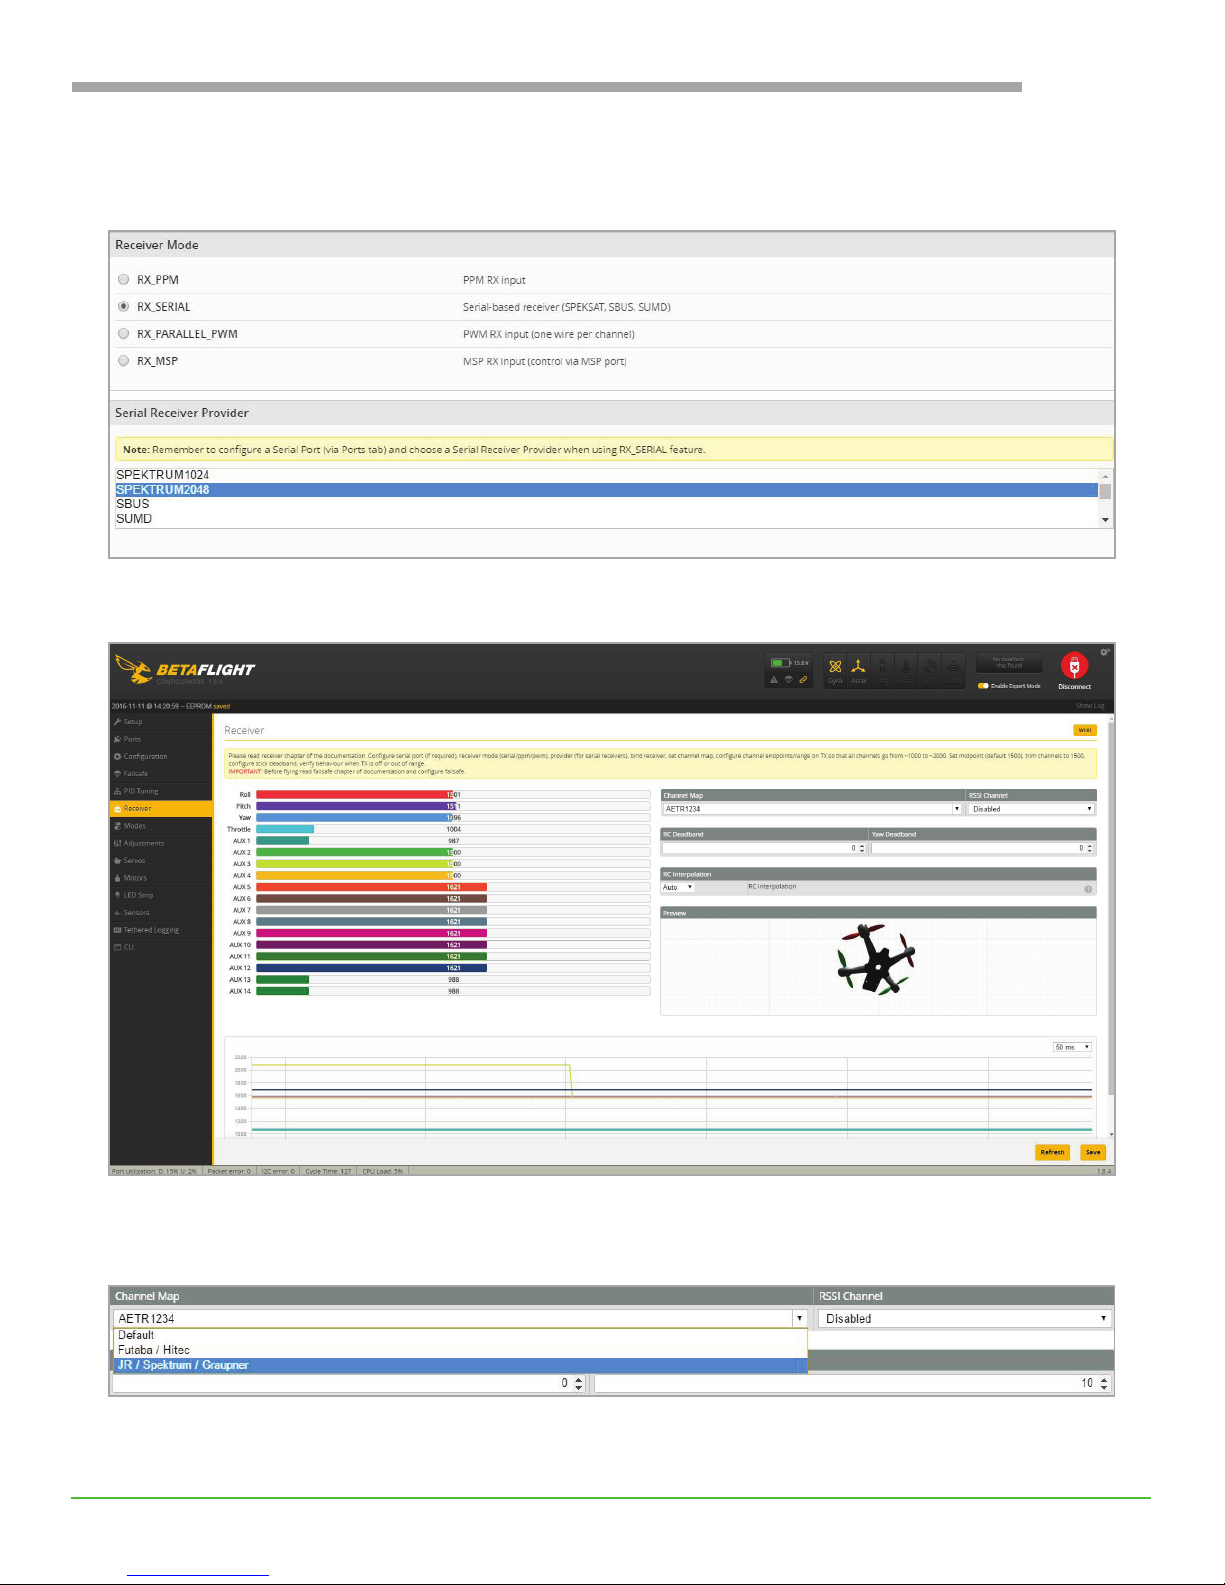
For Spektrum receivers
From the Conguration tab, change Serial Receiver Provider to SPEKTRUM2048.
Switch to the Receiver tab in BetaFlight.
USER GUIDE
From the Receiver tab, change the Channel Map to Spektrum. Click save in the lower right corner of
Betaight to adjust the conguration.
5
Page 6
USER GUIDE
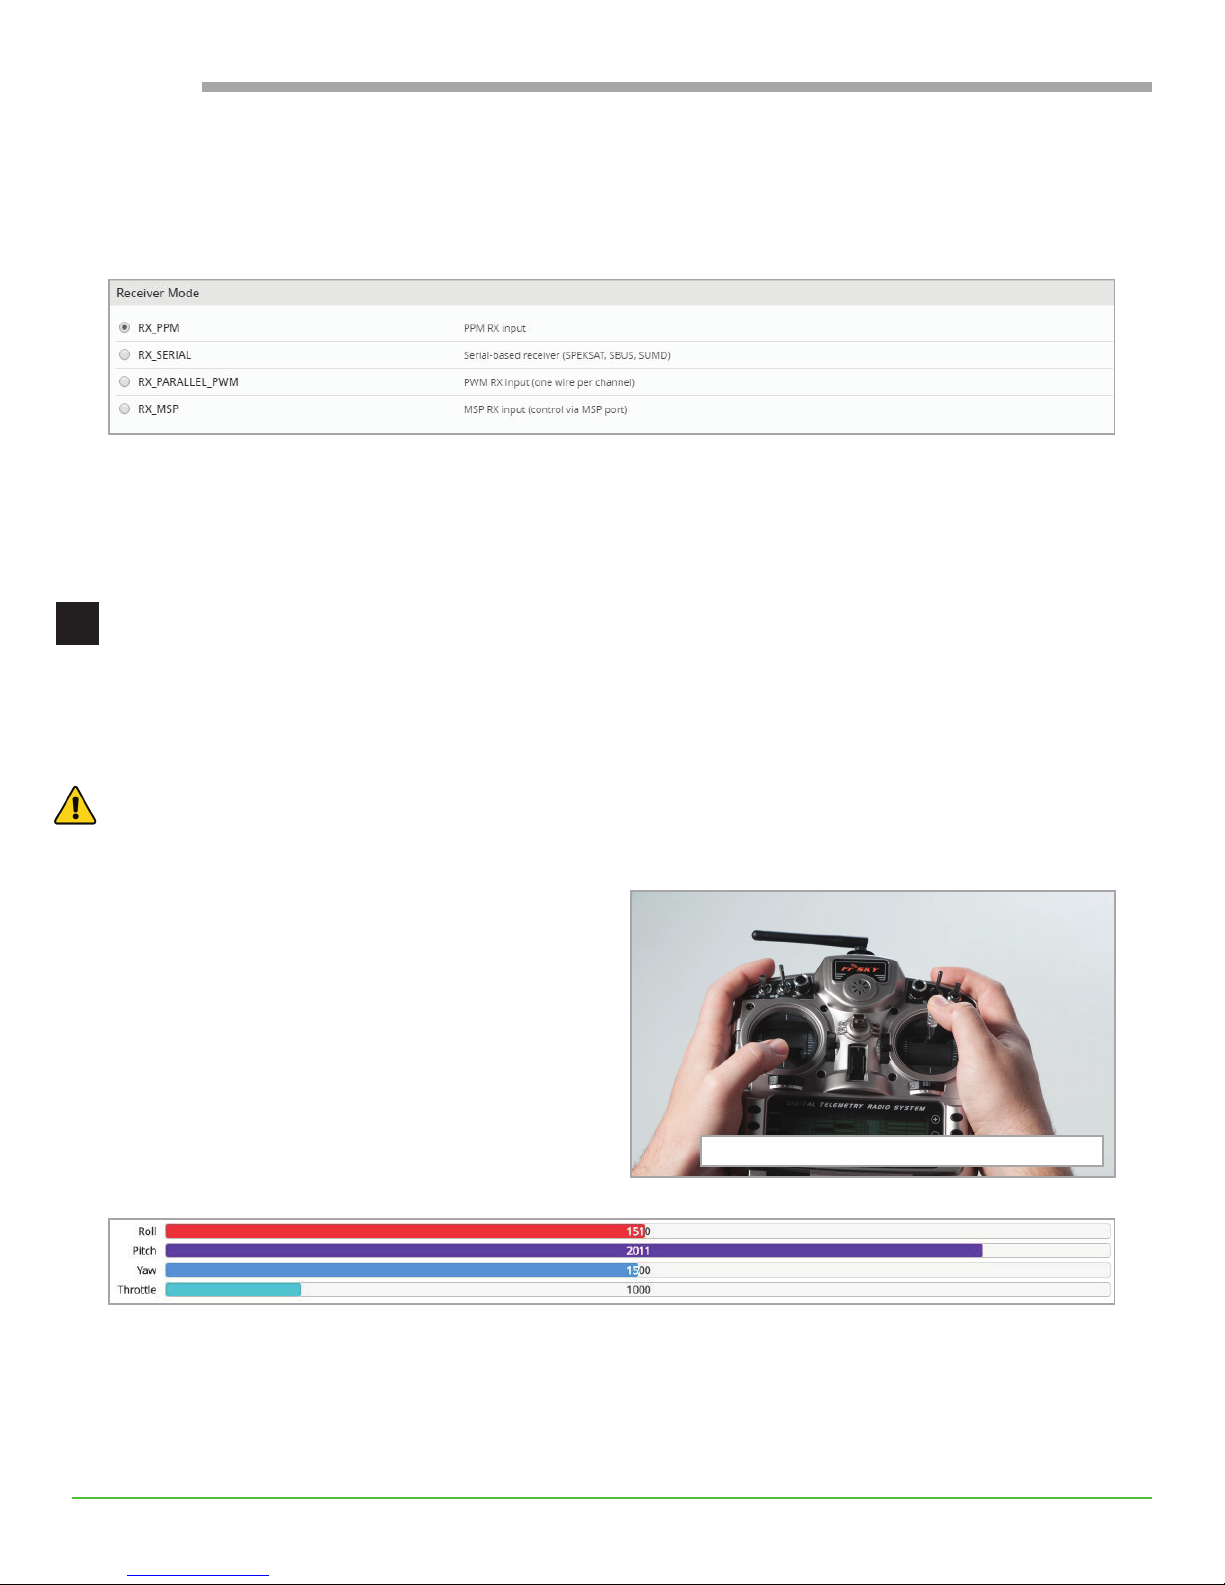
For FrSky PPM receivers
From the Conguration tab, switch the Receiver Mode from RX_SERIAL to RX_PPM. Click save in the lower
right corner of Betaight to adjust the conguration.
For FrSky SBUS receivers
The Riot is pre-congured for FrSky XSR/X4R, so this step is already done!
Bind the receiver to the radio & verify
3
the RX (receiver) channel mapping
Each type of radio operates differently. Refer to your radio instruction manual to bind the receiver to the
radio and to set the failsafe.
WARNING! Remove props and disconnect battery before RX (receiver) verication.
Verify the Riot’s connection to the radio from the Receiver tab in Betaight:
• Using Mode 2 controls, pitch forward and
throttle down. Watch the graph in Betaight to
verify the channel mapping. The pitch bar graph
should move right as the throttle bar moves left.
pitch forward and throttle down
6
Page 7
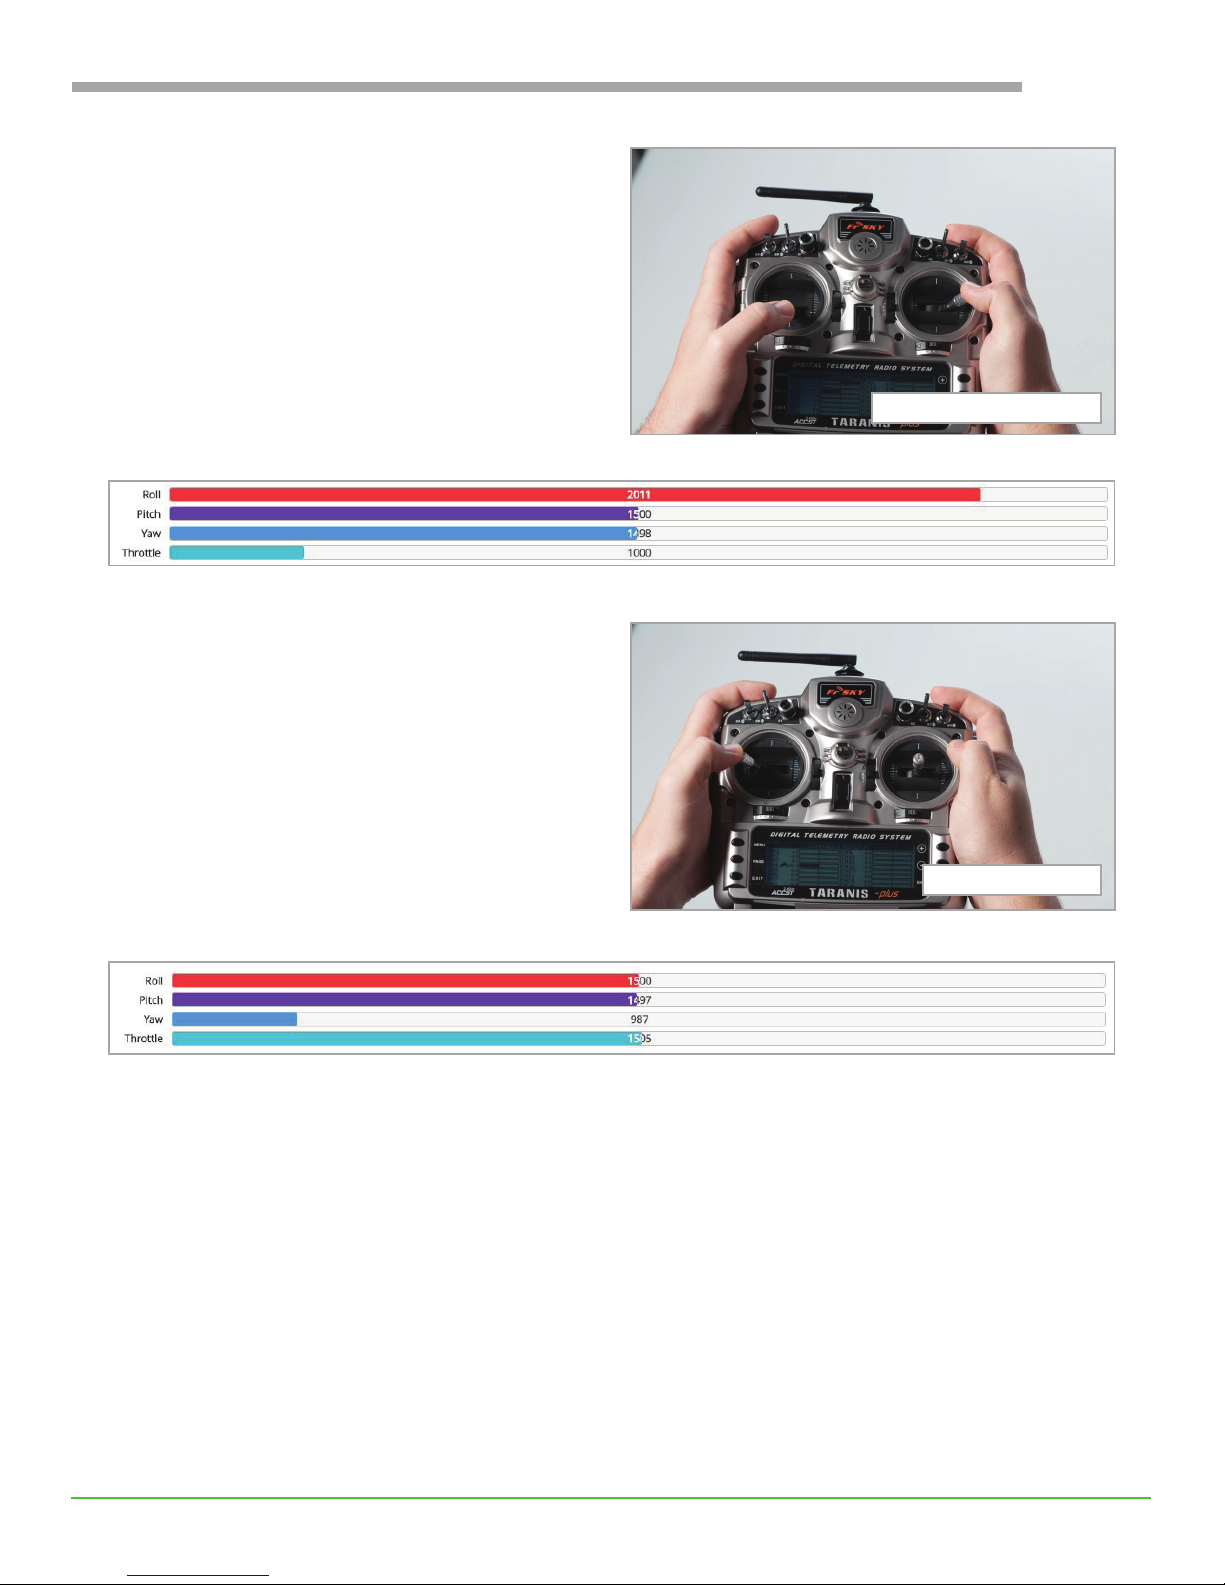
• Roll right and verify on Betaight that the roll
graph moves right.
• Yaw left and verify on Betaight that the yaw
graph moves left.
USER GUIDE
roll right
yaw left
For optimal racing control, refer to your radio manual to correct the sub trim if the stick values don’t hit
1000 at one extreme, 2000 at the other and 1500 in the middle.
7
Page 8
USER GUIDE
Verify motor direction
4
WARNING! Be sure props are removed props before connecting the drone to power.
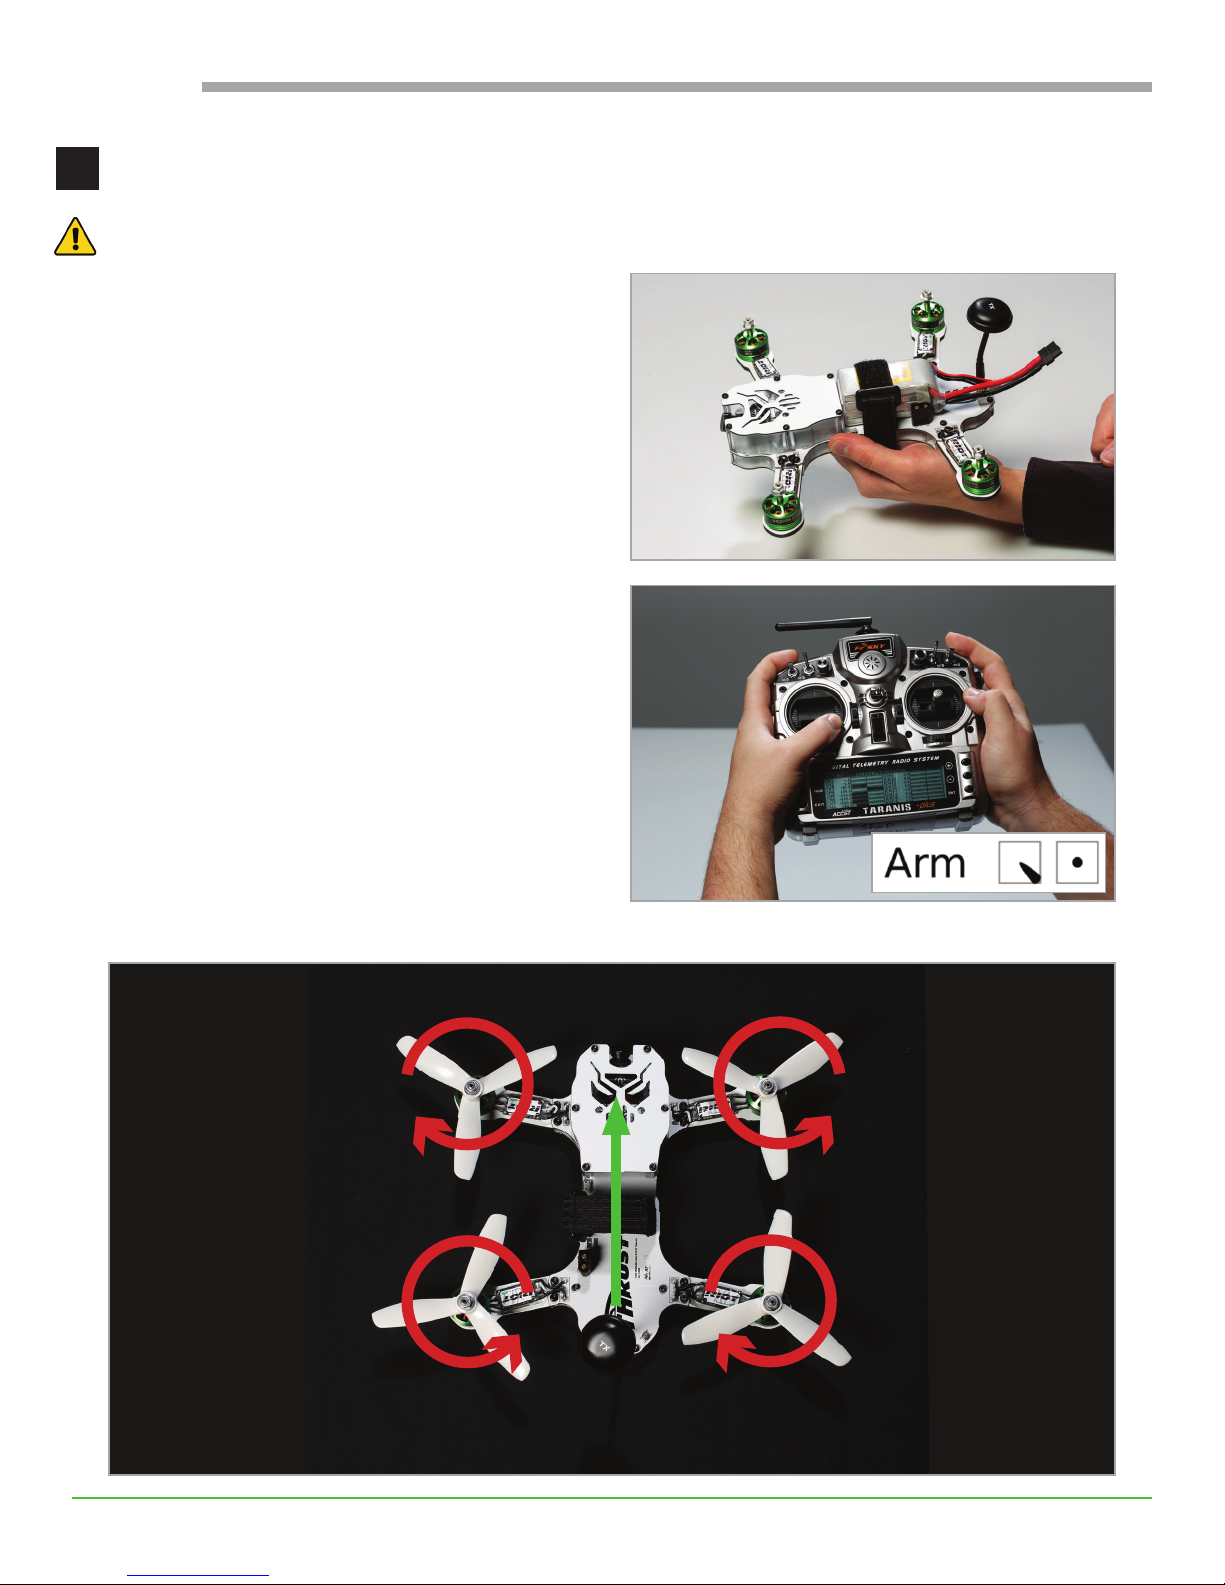
• Attach and plug in the LiPo battery. Be sure the
battery is rmly mounted against the top plate.
• Arm the drone with mode 2 stick commands:
right rudder with zero throttle.
• Gently check motor direction.
Each motor should spin as shown:
CW CCW
CCW CW
FRONT
8
Page 9
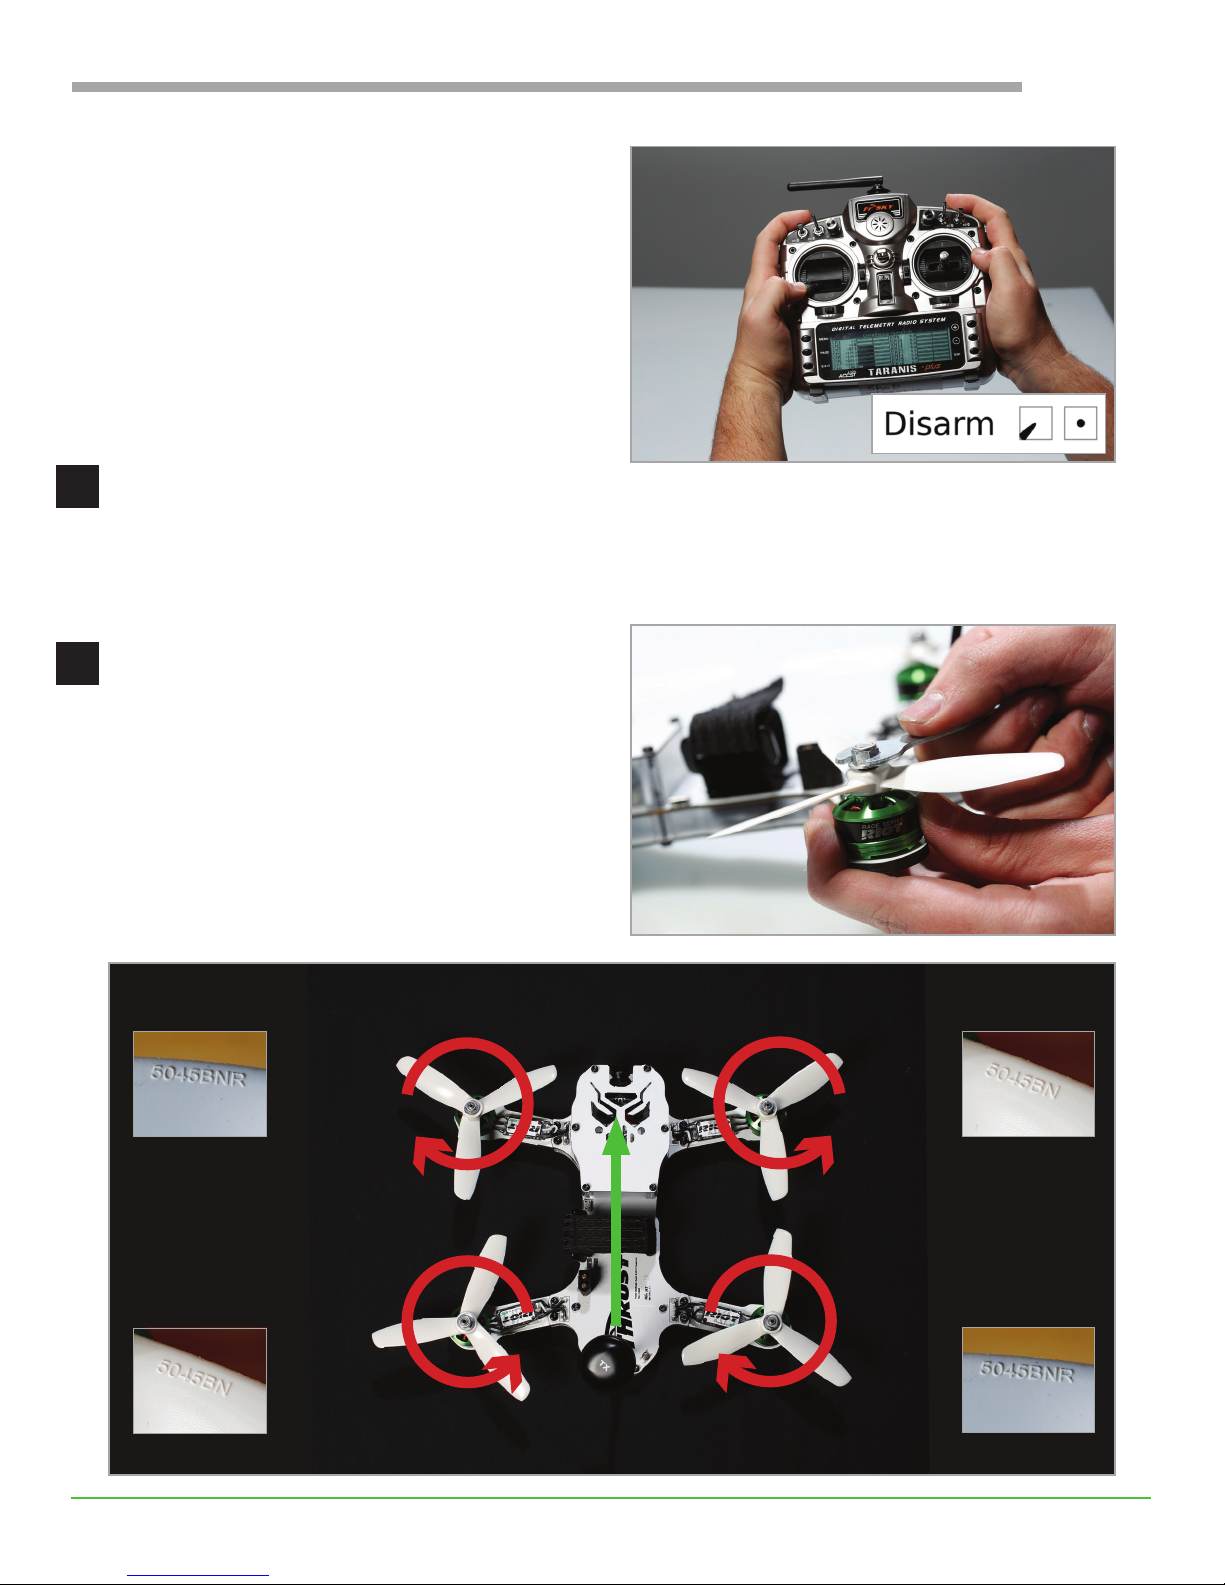
• Disarm with standard mode 2 stick commands
To correct the motor conguration, see
Troubleshooting for ESC conguration.
Set up the video channel
5
The Riot is set to the default channel of 5740 (Fatshark 1). Each type of FPV goggles operates differently.
Refer to your FPV goggle and module instructions to connect to the correct video channel.
Install the propellers
6
USER GUIDE
Attach propellers (props) to the top of each motor.
Thread nuts on top and tighten with a wrench. The
t should be snug.
Check for correct prop orientation before taking off.
Incorrect orientation causes drones to ip over or y
out of control.
Pusher (R)
Propellor
5045BNR
Normal
Propellor
CW CCW
FRONT
Normal
Propellor
5045BN
Pusher (R)
Propellor
CCW CW
5045BN
5045BNR
9
Page 10
USER GUIDE
Calibrate the sensors
7
WARNING! Set the drone on a at surface before connecting the battery to accurately calibrate the
sensors. Poorly calibrated sensors cause drones to y erratically.
The sensors calibrate automatically each time the battery is plugged in. When the noises go quiet, the
calibration is complete and the Riot is ready to y. Brand new LiPo batteries typically come at storage
voltage (3.85V per cell), so be sure to fully charge the LiPo before ying.
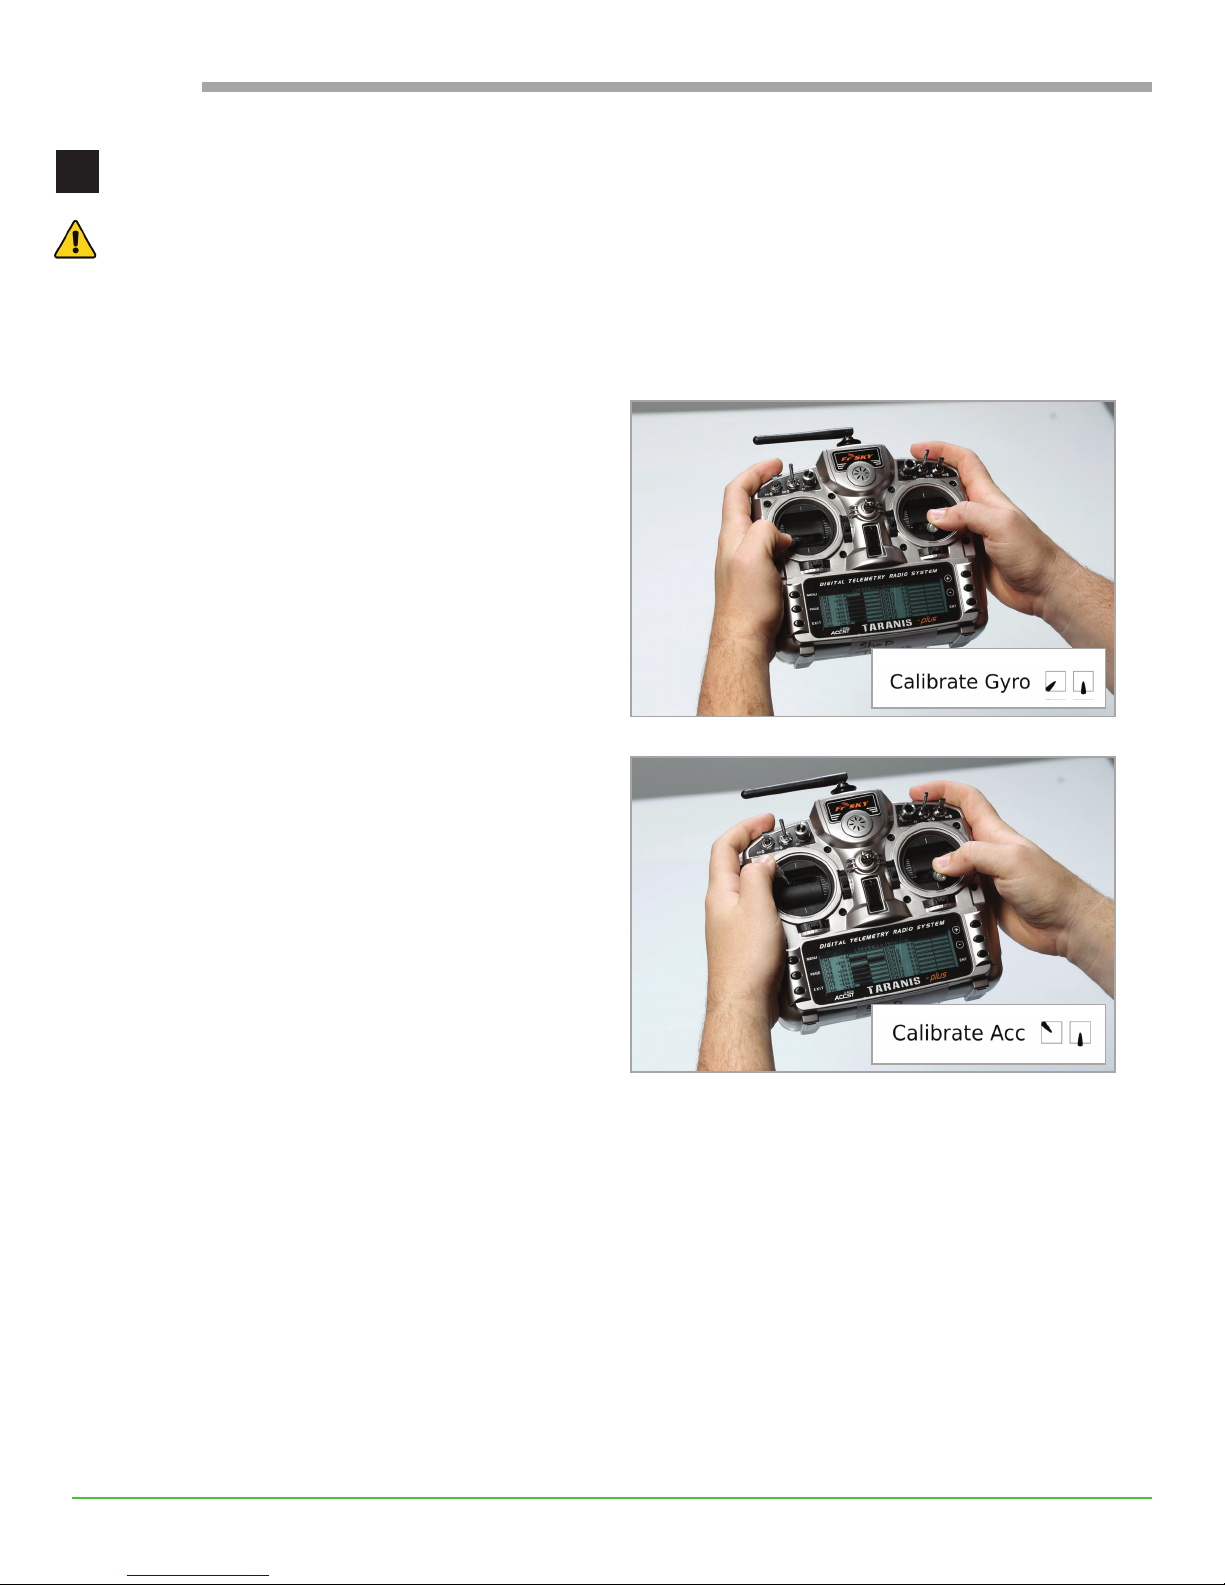
One way of troubleshooting erratic ight is to land
the drone and recalibrate the sensors using stick
commands. Throttle down and left while pitching
back to calibrate the gyro sensor.
Throttle up and left while pitching back to calibrate
the accelerometer.
10
Page 11
CONFIGURATION
Download Betaight
1
The Riot comes fully loaded with a default conguration. These settings can be customized in Betaight Congurator, an open source ight controller software available for free from the Google Chrome Store.
• Launch the app and connect the Riot to your computer via micro USB.
• Press the Connect button in the top right corner and open the Conguration tab.
Reset the Default Conguration
2
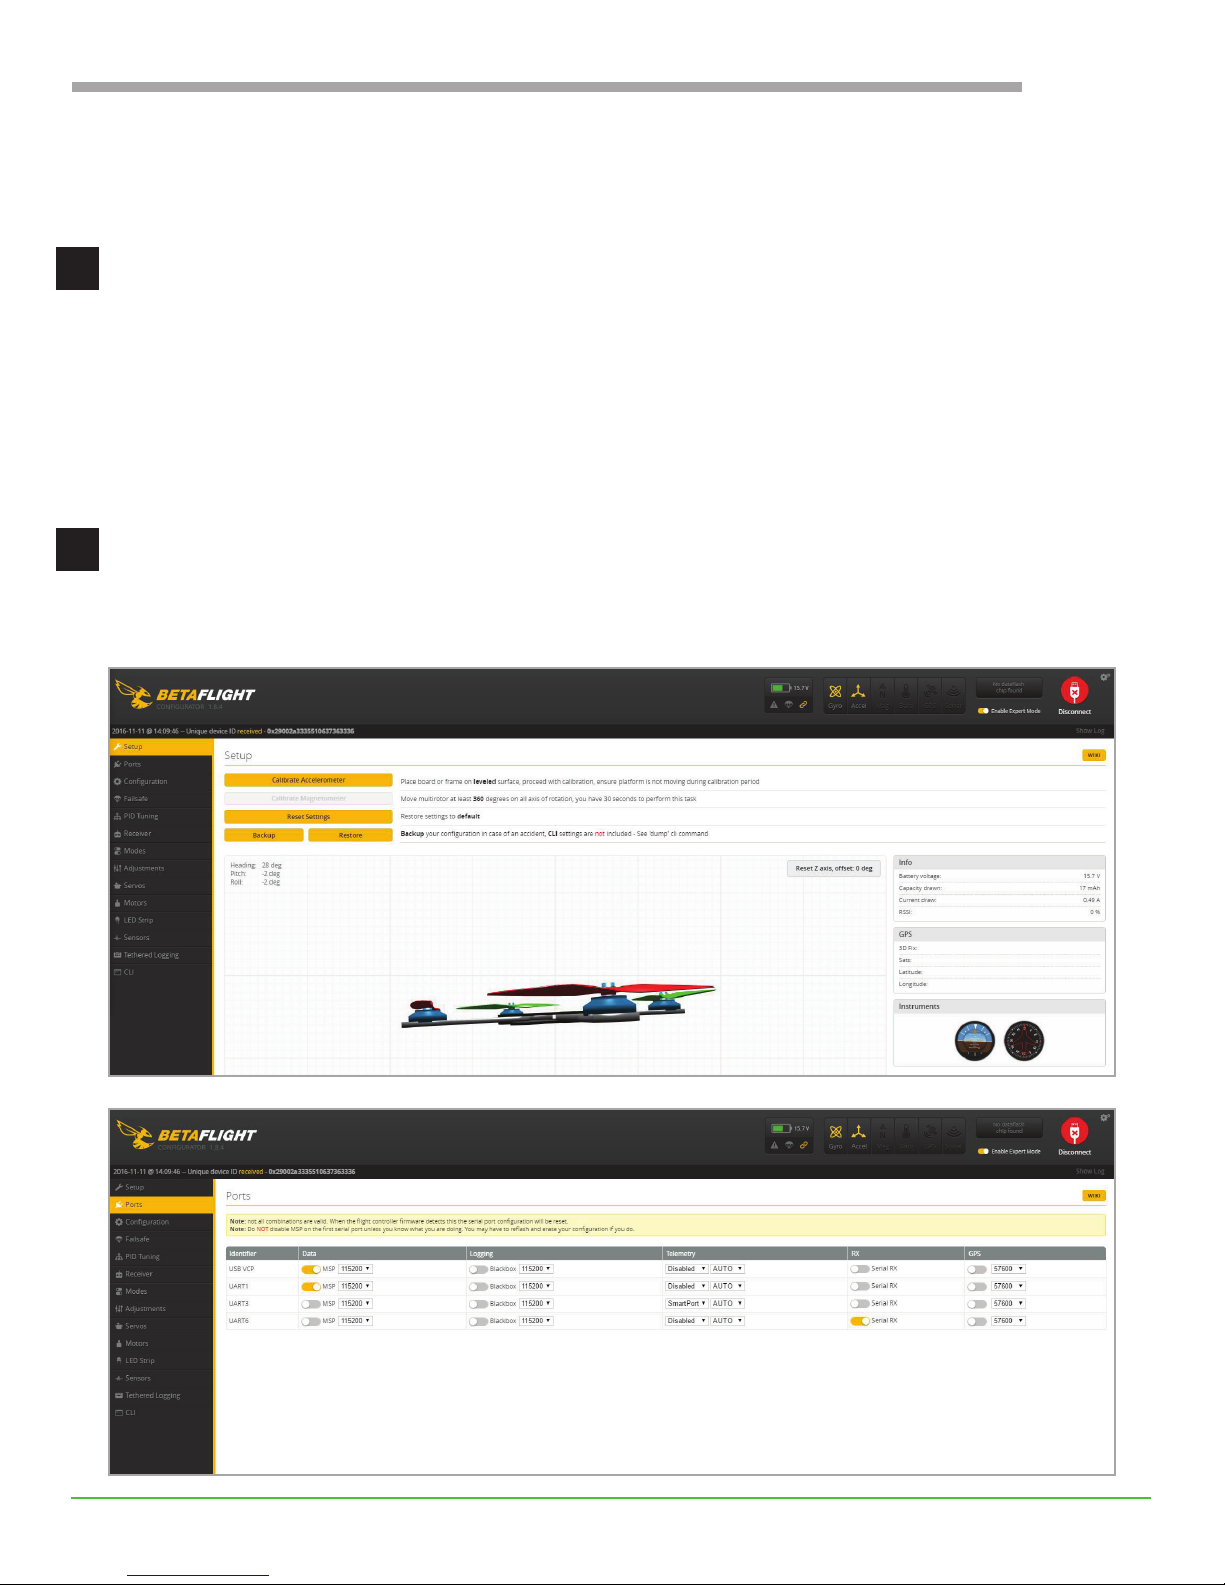
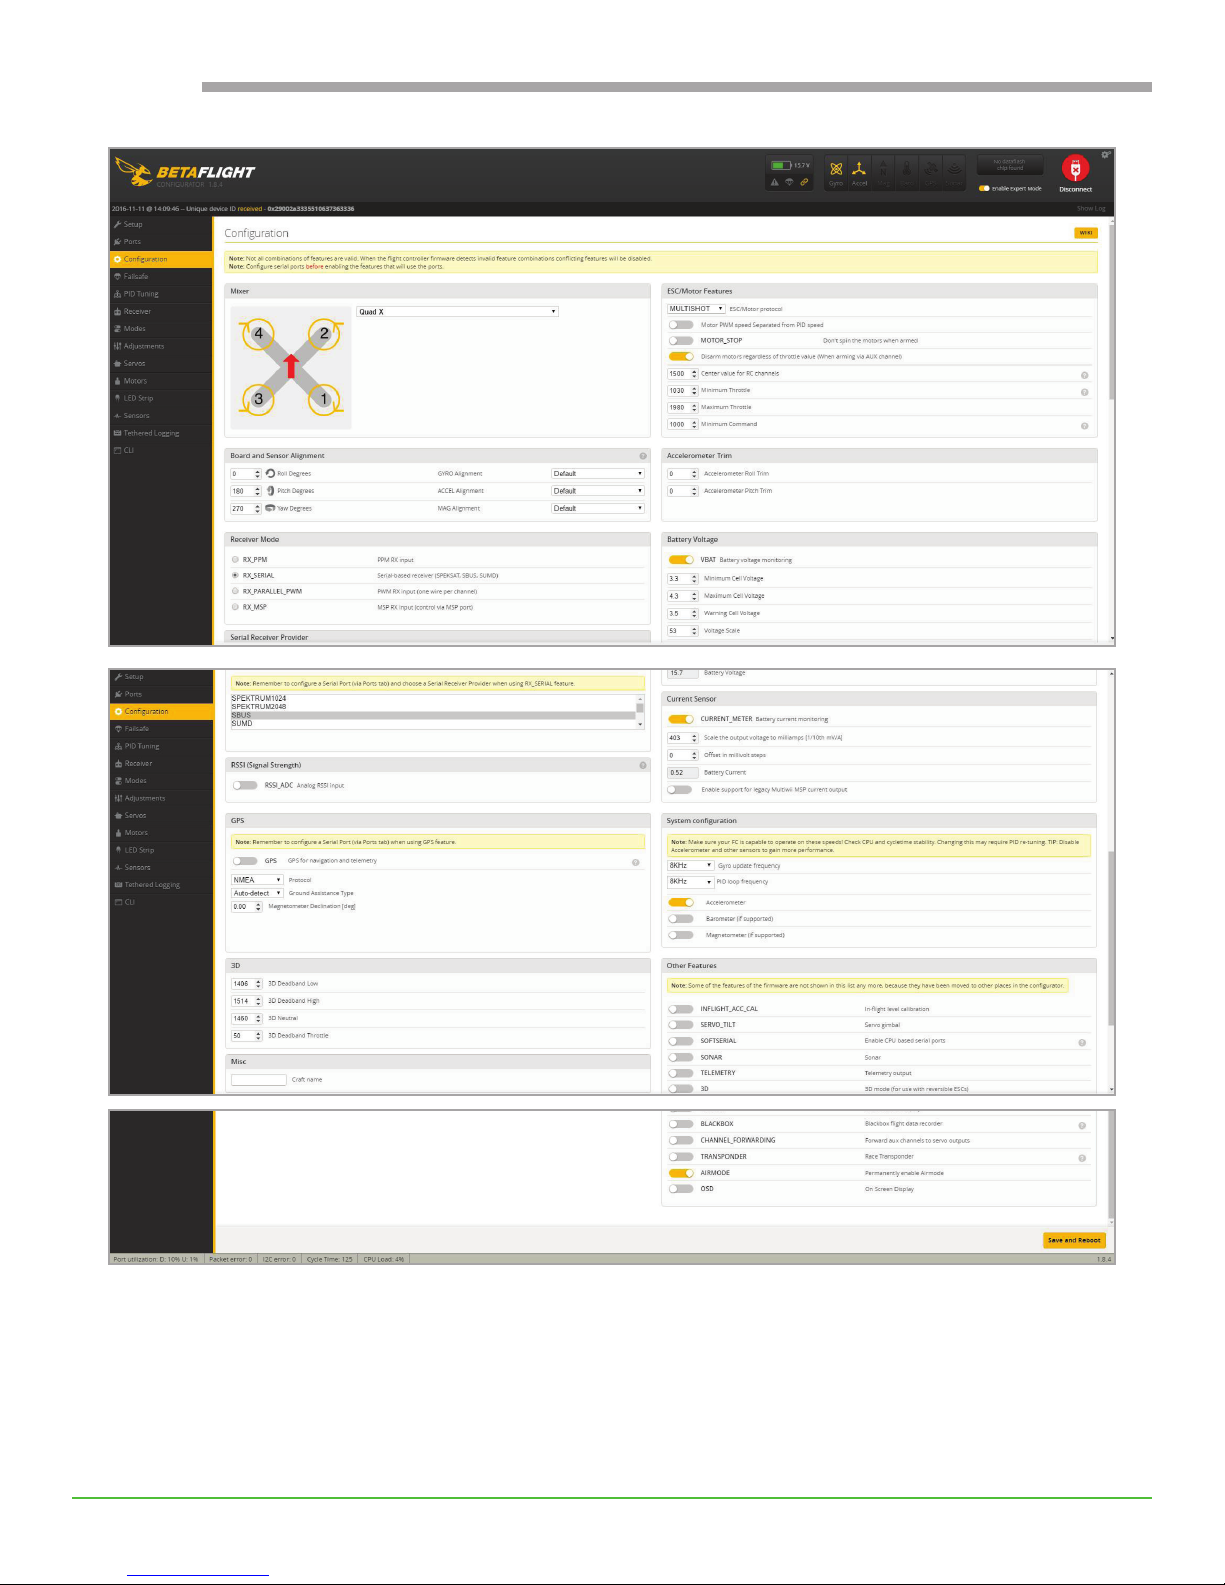
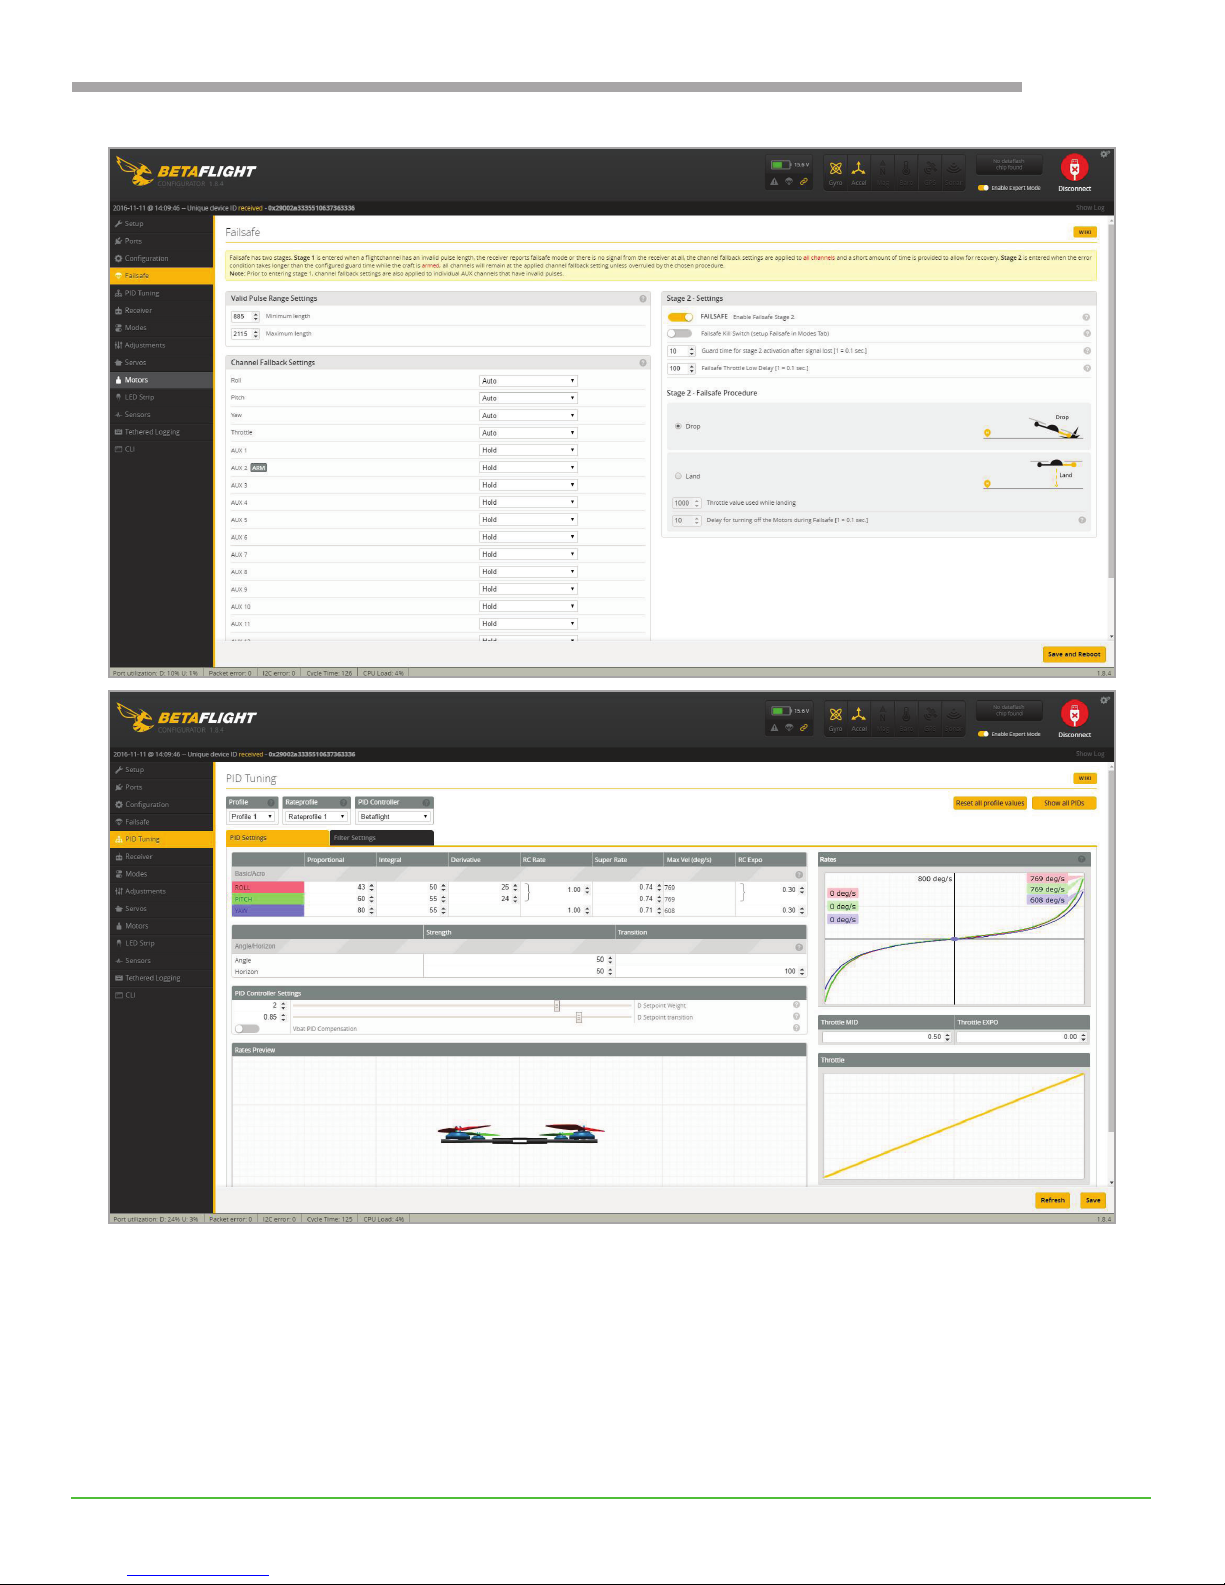
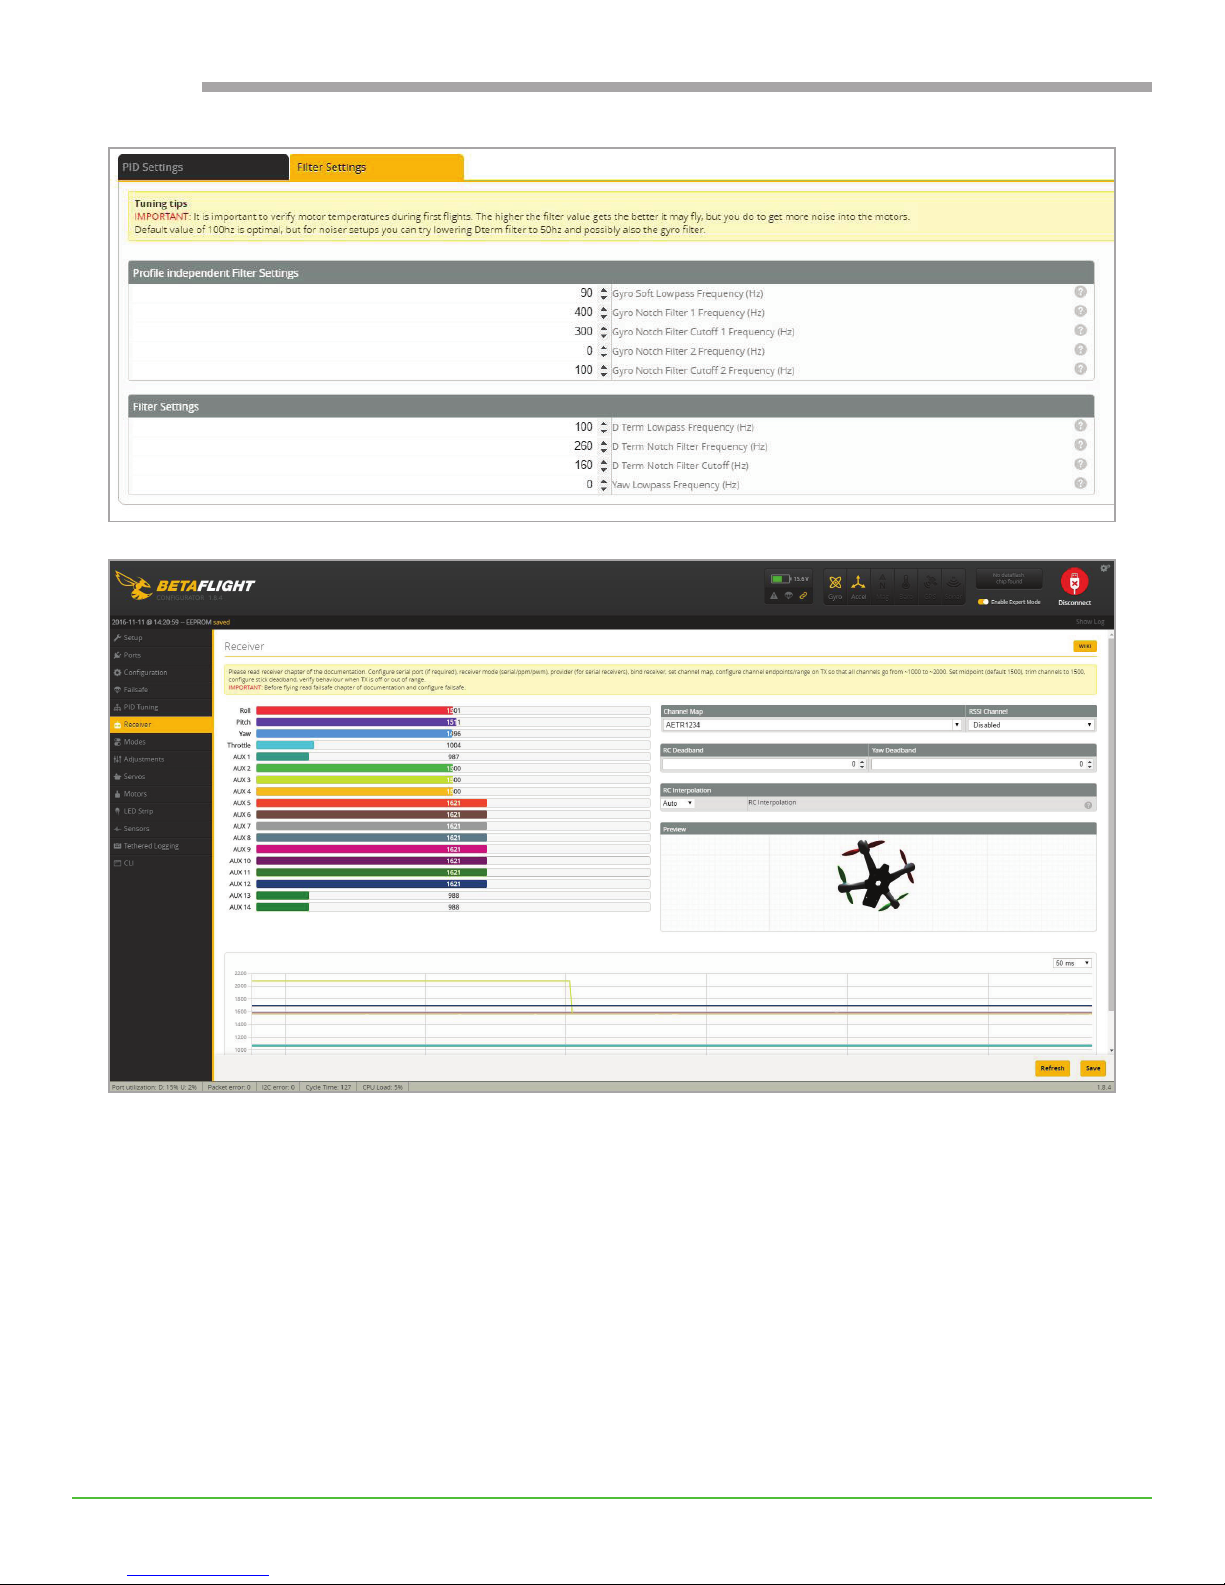
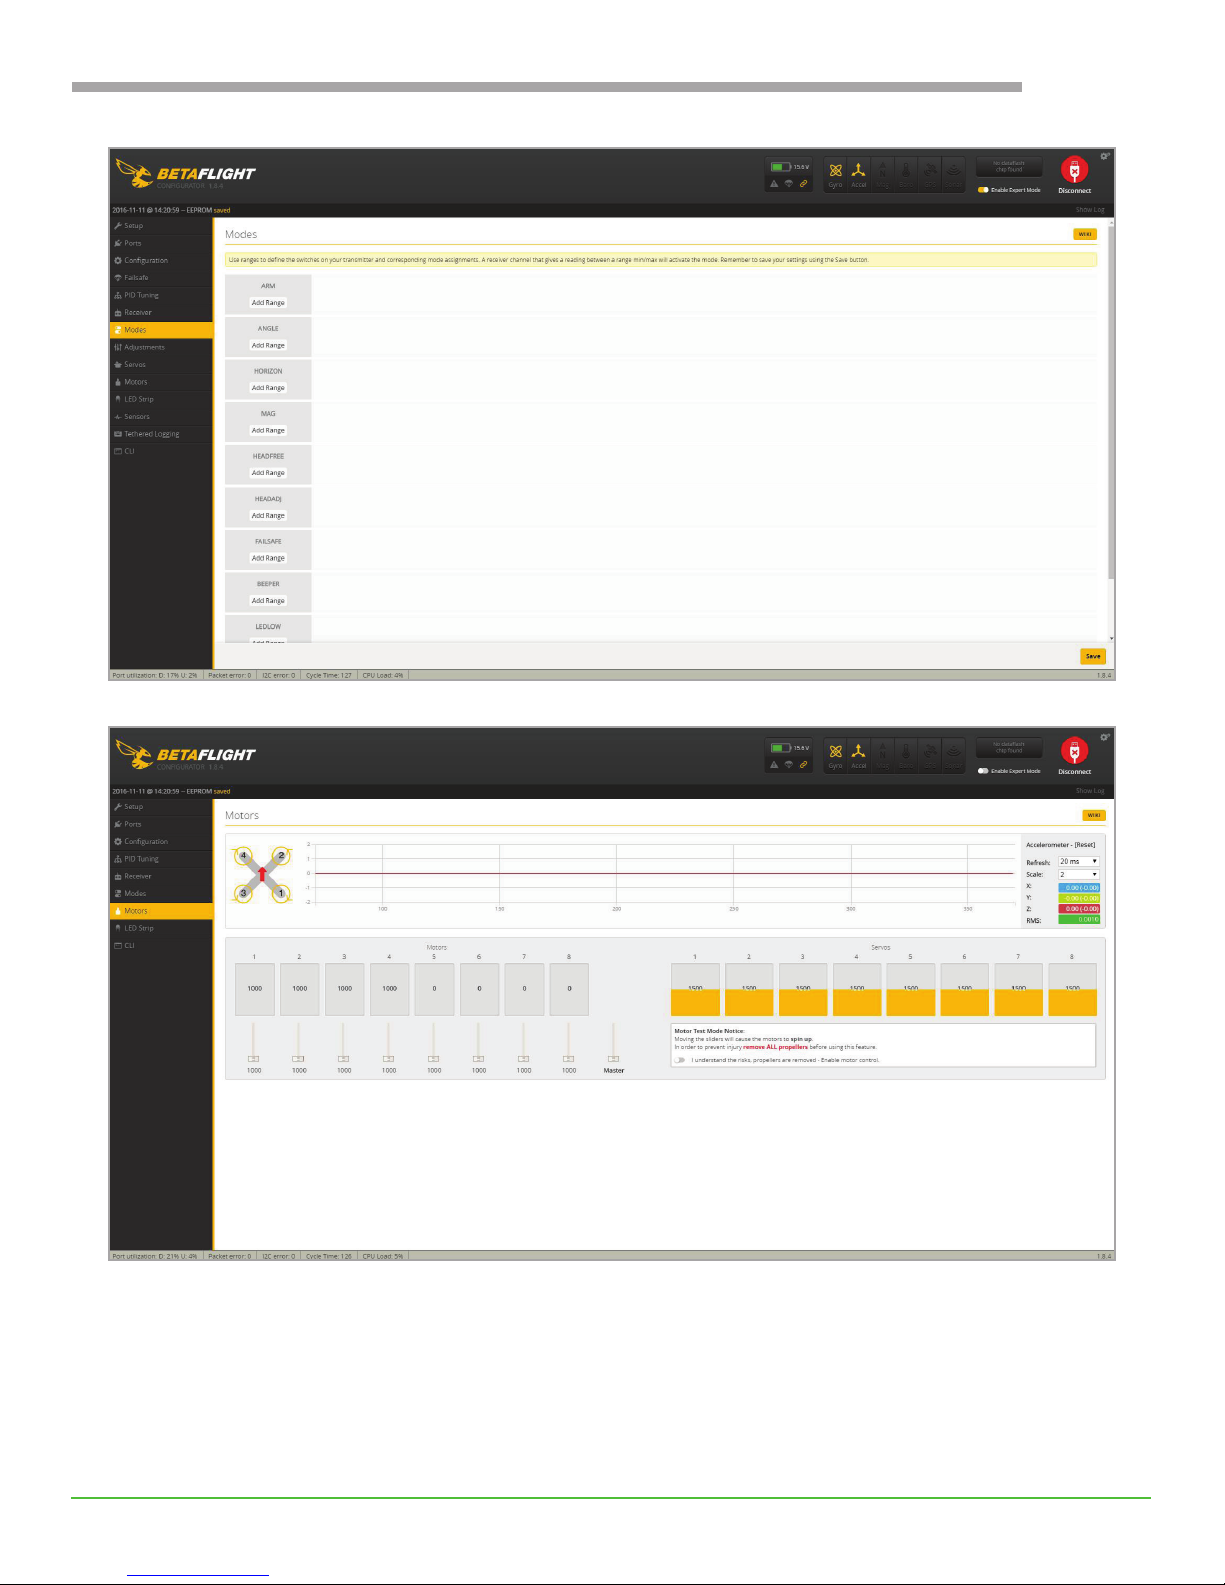
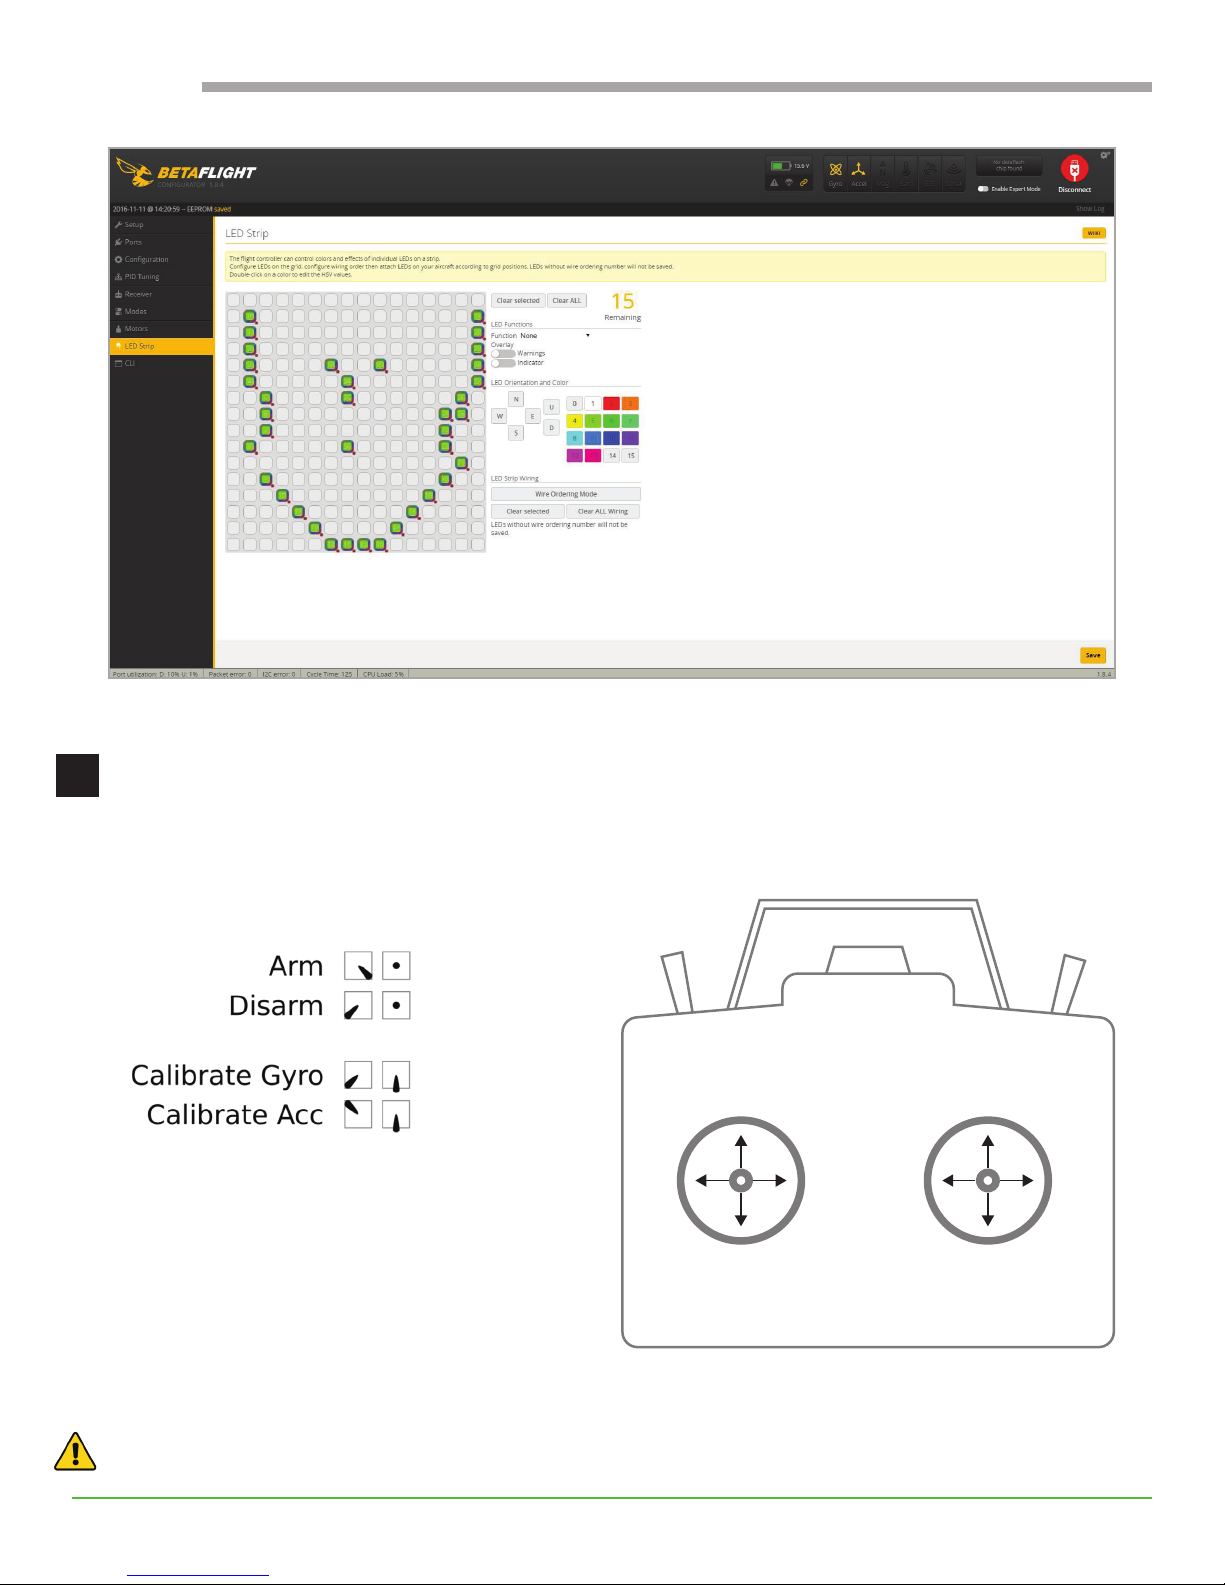
From the Setup page in Betaight, click Reset Settings at any point to return to the default settings shown
below. See Riot Set Up for details on conguring the receiver.
USER GUIDE
11
Page 12
USER GUIDE
12
Page 13
USER GUIDE
13
Page 14
USER GUIDE
14
Page 15
USER GUIDE
15
Page 16
USER GUIDE
Program Radio Controls
3
By default, the controls are set to mode 2, which is the most common conguration in the United States.
Mode 2 Stick Functions
The arm and disarm commands can also be
set to switches on the radio. All radios operate
Yaw
Left
Throttle
Up
Yaw
Right
Roll
Left
Pitch
Forward
differently, so refer to your TX (radio) manual for
direction on how to program the aux switches
on your radio. Typically a 2 position aux switch is
Throttle
Down
Pitch
Backward
set up for arm/disarm.
Roll
Right
After programming the aux switches, verify in the Betaight.
WARNING! Be sure props are removed before switch verication.
16
Page 17
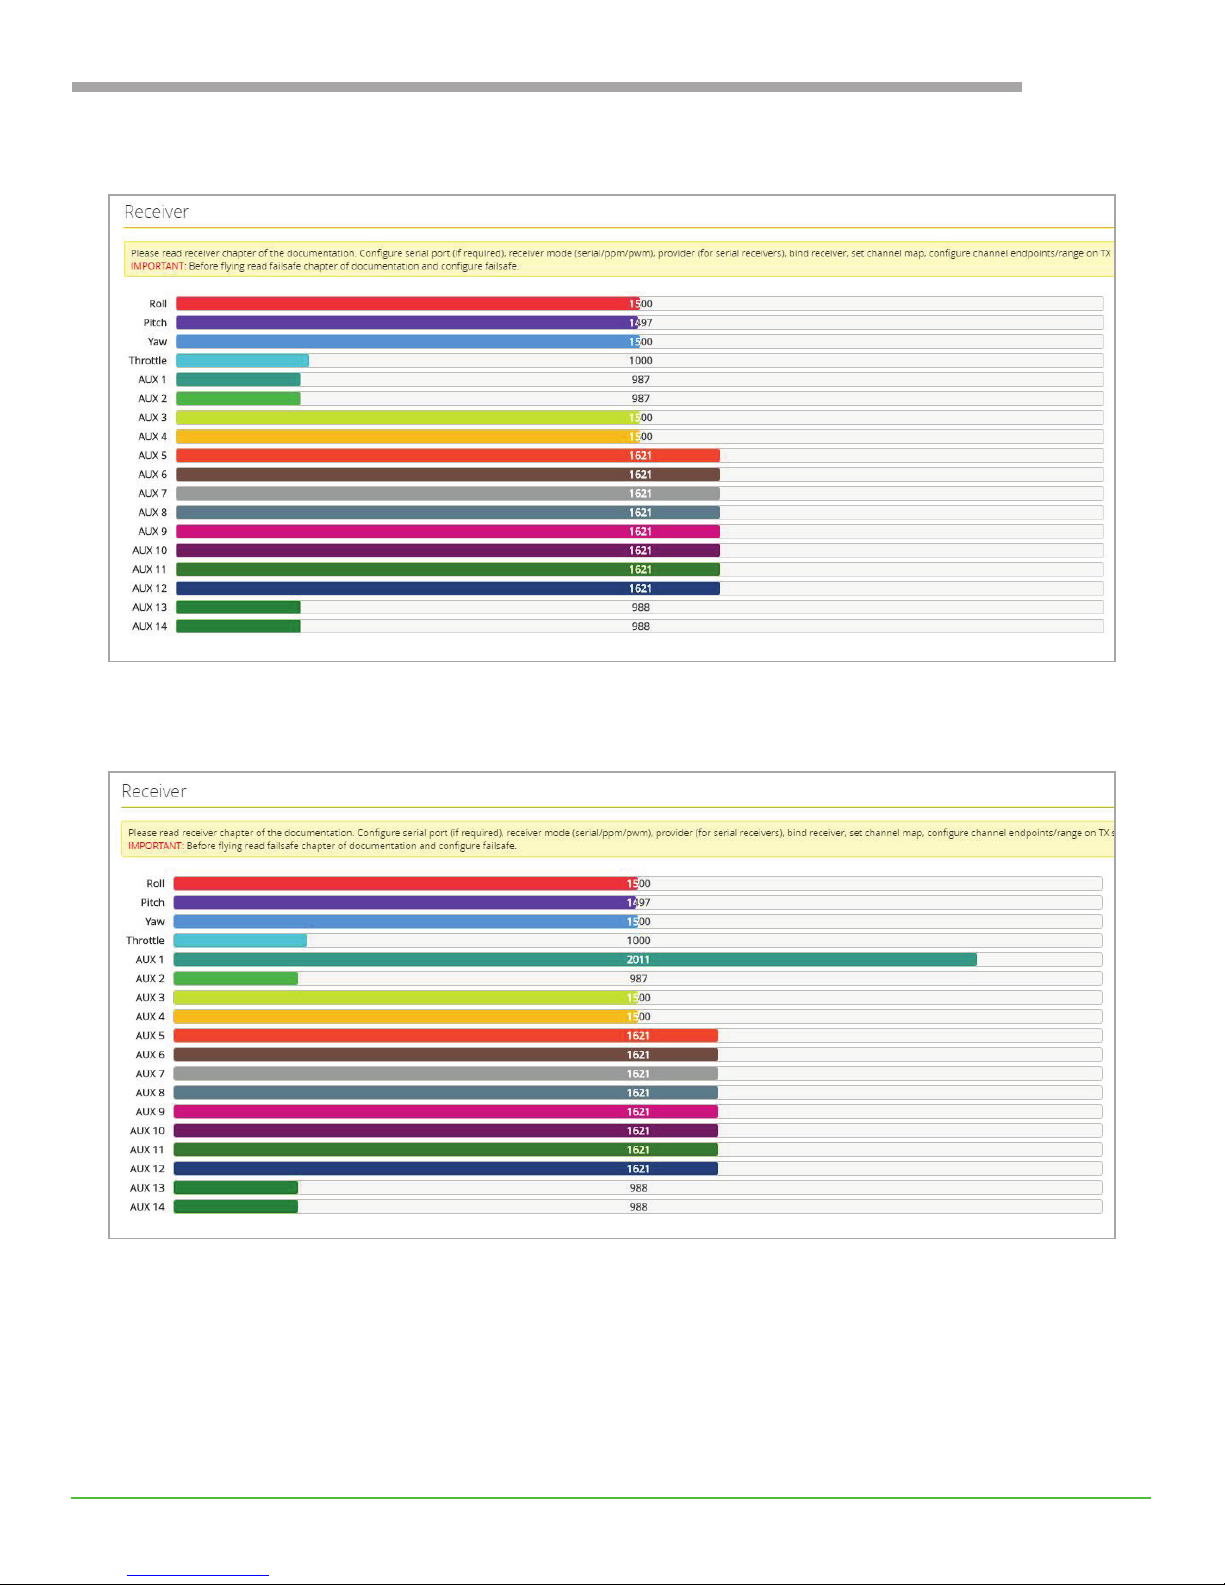
Start in the Receiver tab.
USER GUIDE
Flip the switch to see which AUX bar moves. Here, a two position switch was set up to channel 5, which
shows up as AUX 1 in Betaight.
17
Page 18
USER GUIDE
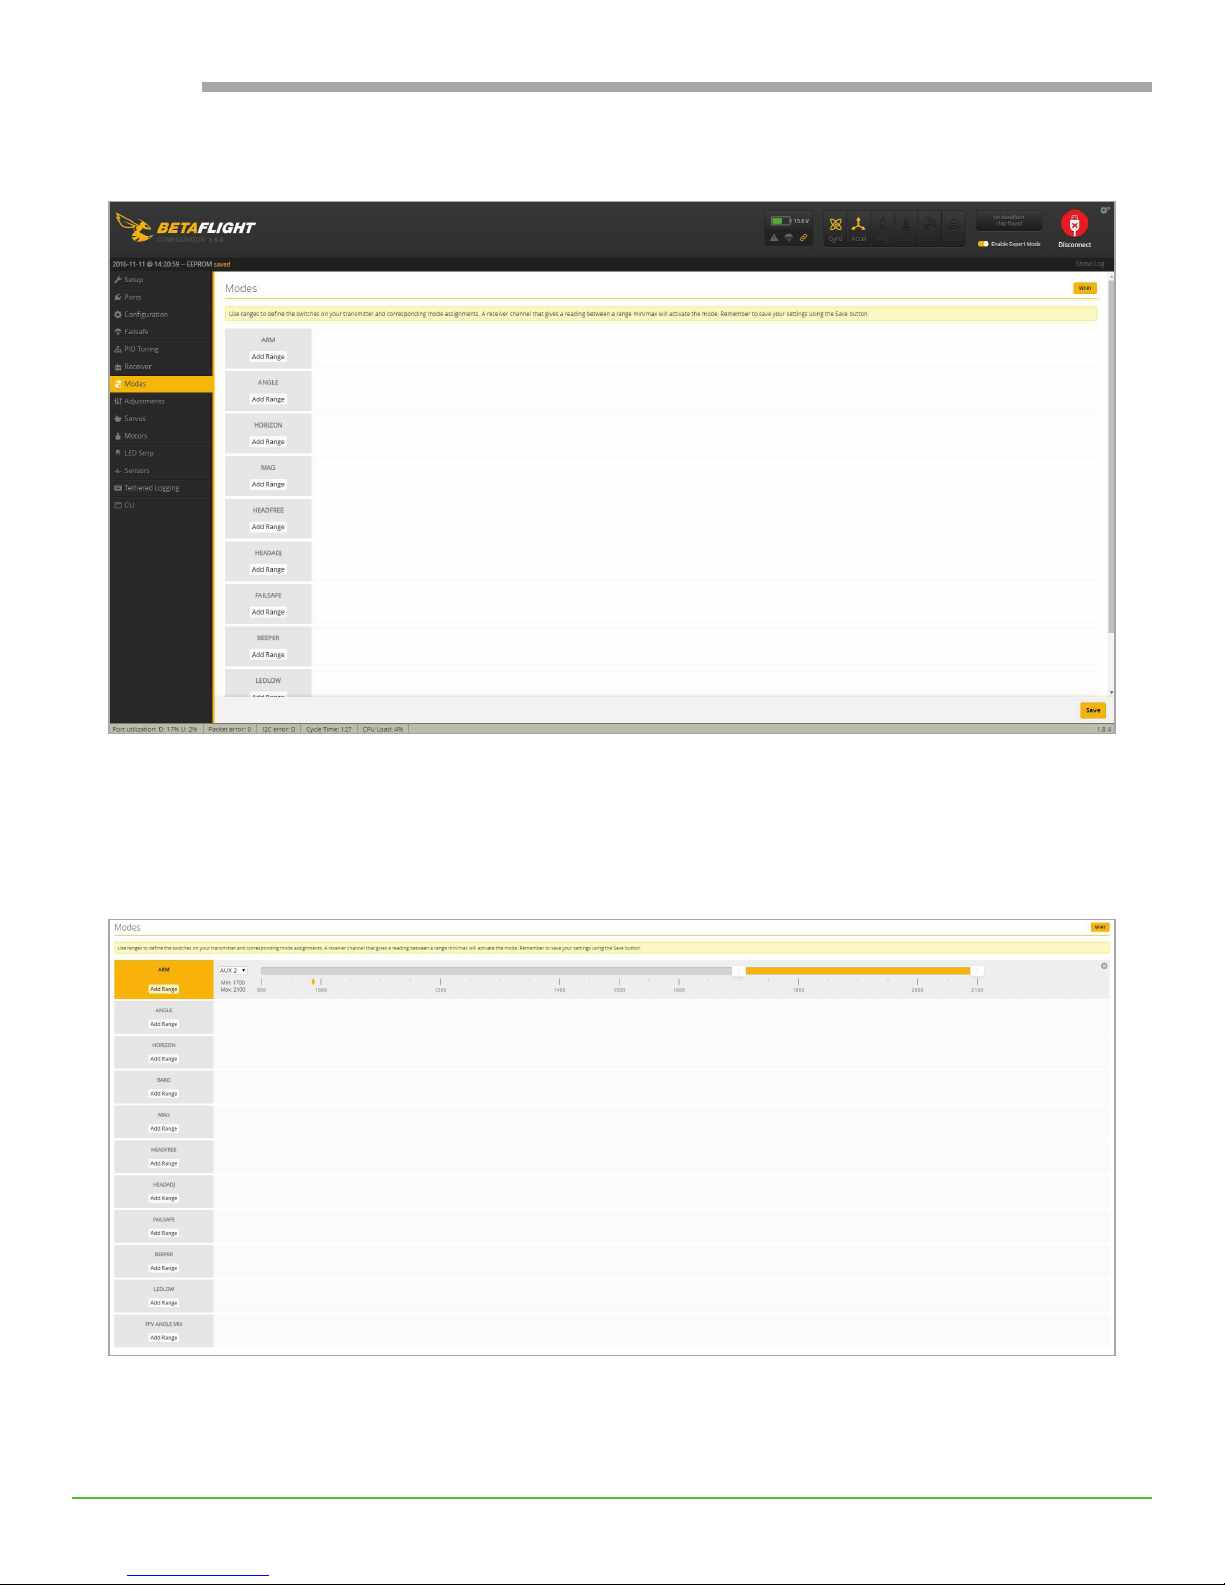
Move to the Modes tab to set up what function the switch activates.
To set the arm switch, click the Add Range button below ARM. Set the AUX drop down to the AUX number
from the Receiver page. If it was the AUX 1 bar that moved, leave the dropdown set to AUX 1. Drag the
slider to the position that you want to be the arm state. The orange indicator below the slider shows the
current switch position, so you can decide whether you want a forward or backward switch position to arm
the drone.
Click save in the lower right corner of Betaight to set the arm switch.
18
Page 19

Congure Multiple Flight Modes
4
The Riot comes congured to Rate Mode. Rate Mode gives pilots full control of the drone. This is the
recommended setting for aspiring drone racers. For new or beginner pilots we also recommend practicing
with a ight simulator, or conguring a switch to the Angle Mode. The Riot can be congured for multiple
ight modes in Betaight.
Common ight modes
ANGLE MODE: Angle mode is a stabilized mode that will not allow your quad to spin in any direction past
a set angle (50 degrees). This means that with your hands off the controls, it will use the accelerometer and
the gyroscope to keep the quad level. This is the default ight mode.
HORIZON MODE: Horizon mode is a mix between Angle and Air mode, offering stabilization while the
pitch/roll stick is near center, but using rate mode settings when sticks are at their endpoints. This allows a
pilot to y in a stabilized manner, but still perform rolls and ips when really pushing on the pitch/roll stick.
RATE MODE: This is the most difcult mode for ying but also the most responsive. Air mode uses the
gyro sensor which takes the pitch/roll stick inputs speed and angle and translates it into the rate at which
the craft rotates on that particular axis. Once you have become a skilled pilot, the reason you may want
to y in air mode is so that you won’t have the stabilization provided by the other modes, which can with
skilled piloting lead to smoother ying and better video capture. It will also let you perform banked turns
and make small adjustments to get through small gaps much more easily than a stabilized mode.
USER GUIDE
Like arm and disarm, ight modes can also be set to switches on the radio. Since all radios have their own
procedure, refer to your TX (radio) manual for directions on how to program the aux switches on your radio.
Typically a 3 position switch is set up for arm/disarm.
After setting up the aux switch for ight modes, verify in Betalight.
WARNING! Be sure props are removed before switch verication.
19
Page 20
USER GUIDE
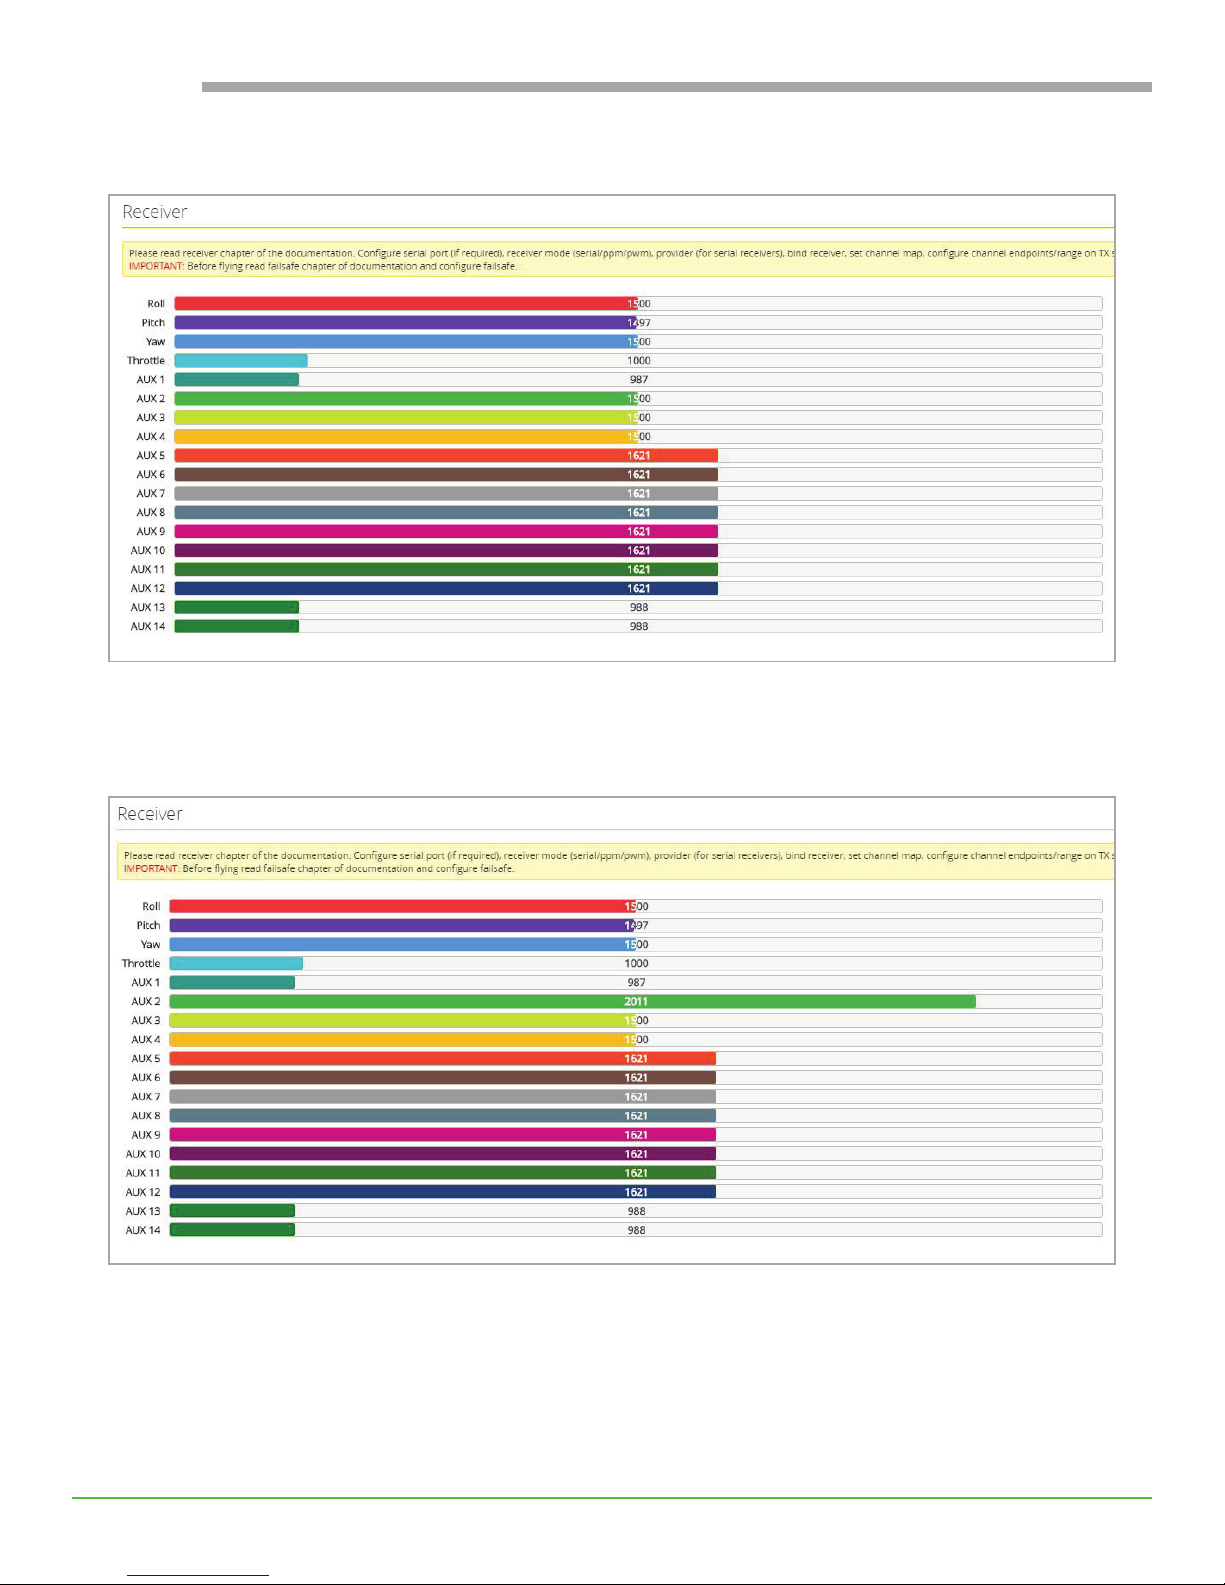
Start in the Receiver tab.
Flip the switch to see which AUX bar moves. Here, a three position switch was set up to channel 6, which
shows up as AUX 2 in Betaight.
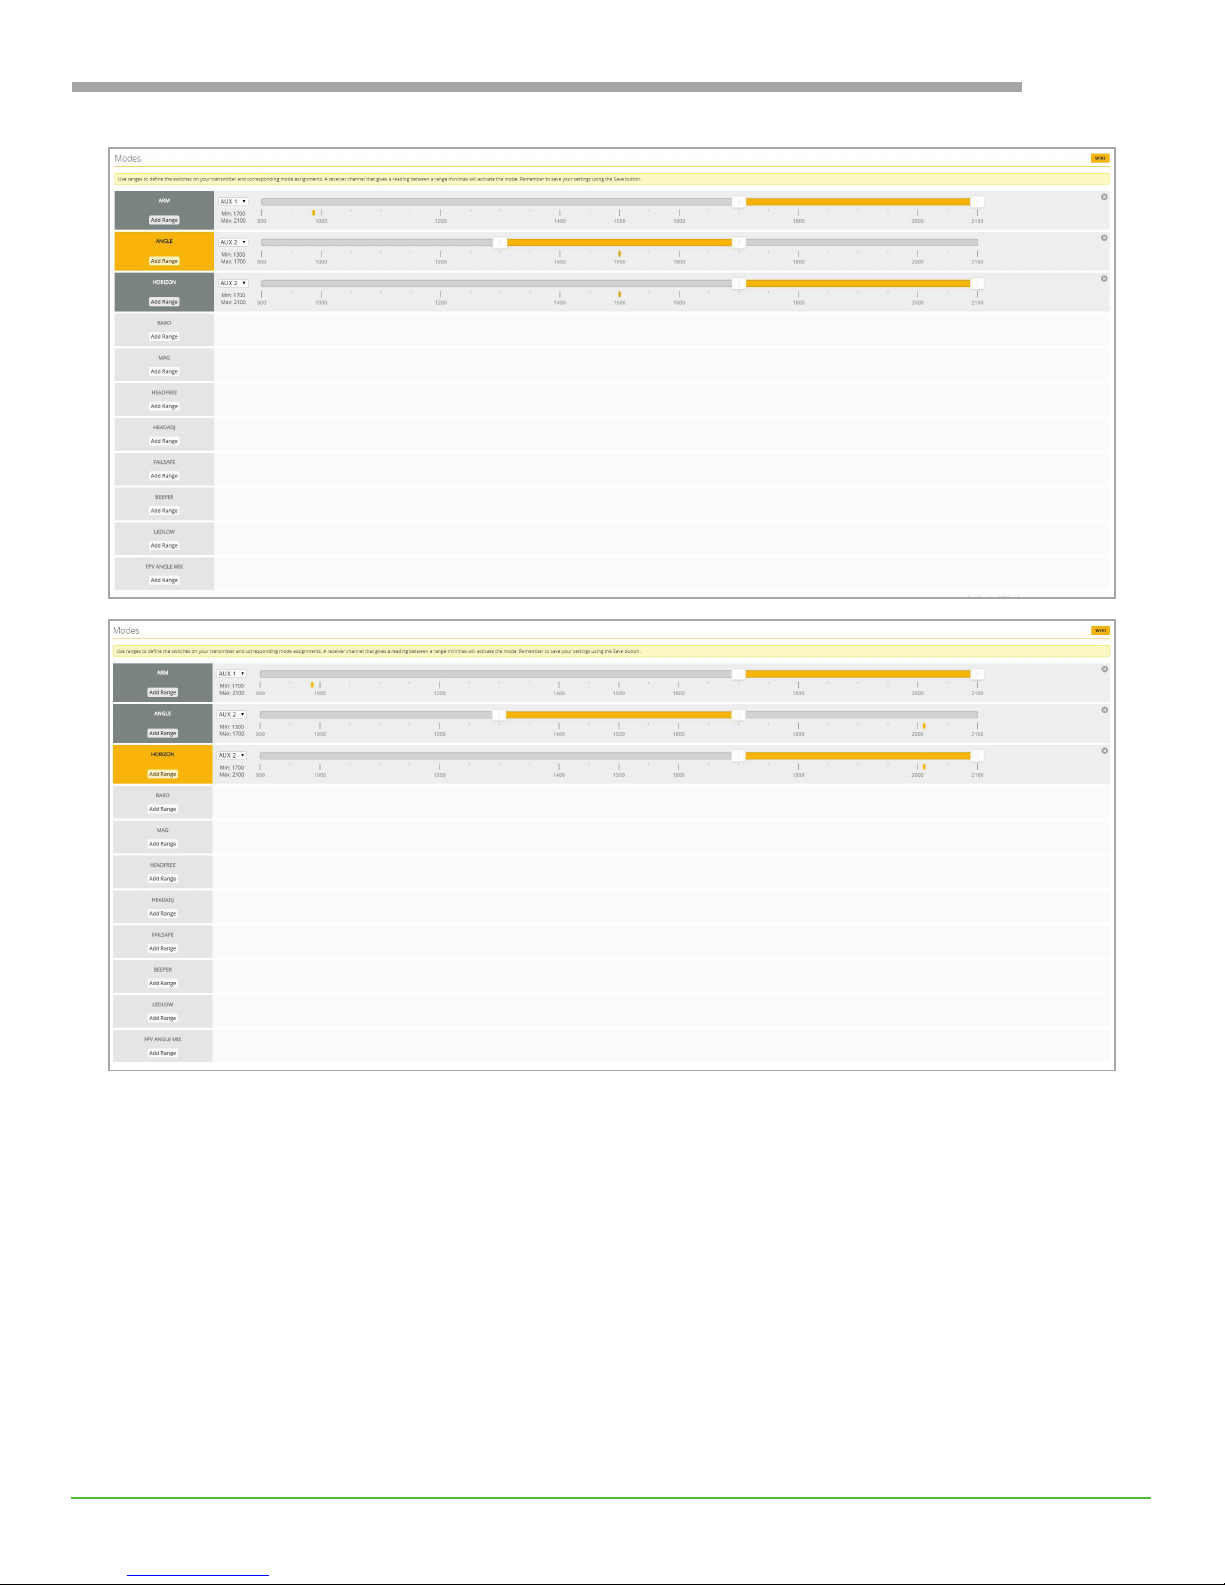
Move to the Modes tab to set up what each switch activates. To set up a new ight mode, click the Add
Range button below ANGLE or HORIZON. Set the AUX drop down to the AUX number from the Receiver
page. Drag the slider to the position that you want to be the arm state. The orange indicator below the
slider shows the current switch position. Switches turn yellow when successful activated on the radio.
20
Page 21
USER GUIDE
Click save in the lower right corner of Betaight to set the new modes.
21
Page 22
USER GUIDE
OSD (ON-SCREEN DISPLAY)
Open the Main Menu
1
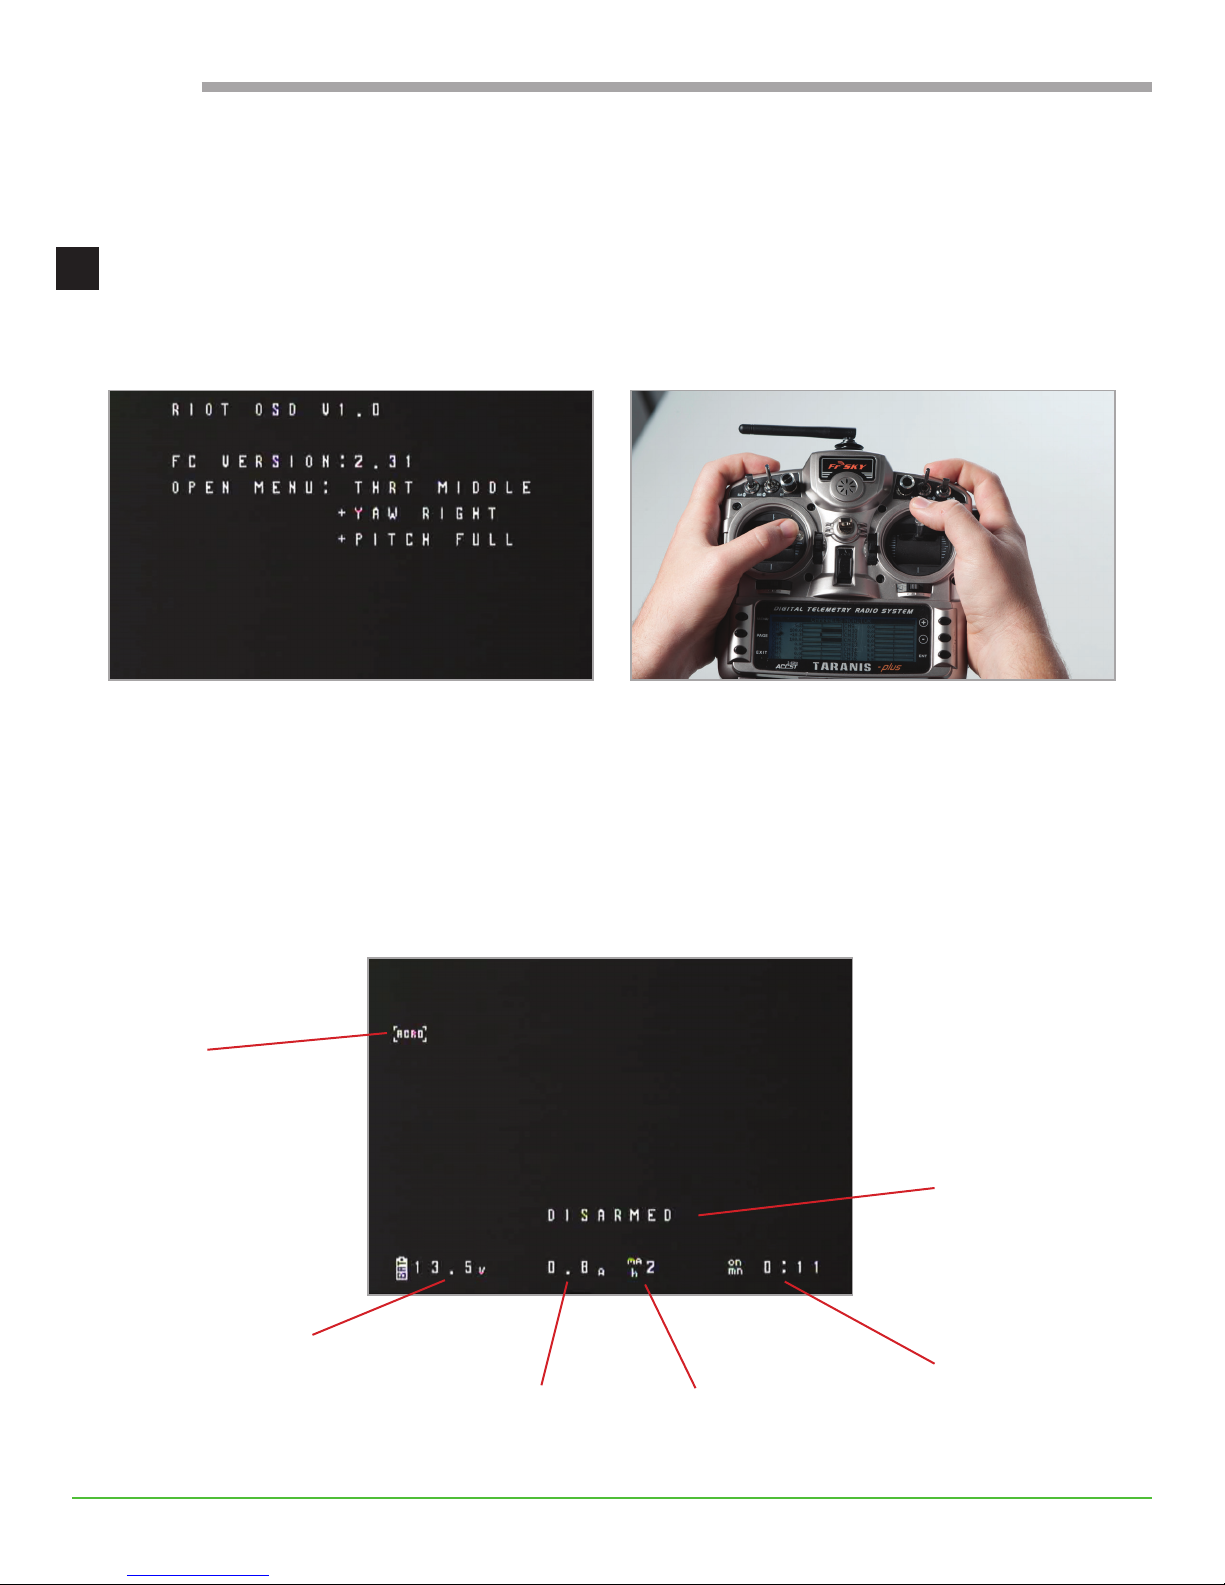
The OSD Open Screen shows in any 5.8 GHz FPV goggles when the Riot’s ight controller is turned on.
Yaw right and pitch forward to open the main menu.
The main screen shows the display that’s broadcast during ight.
Mode
Arm status
Battery Volts
22
Current Draw
mAh
Time on
Page 23
Adjust OSD Settings
2
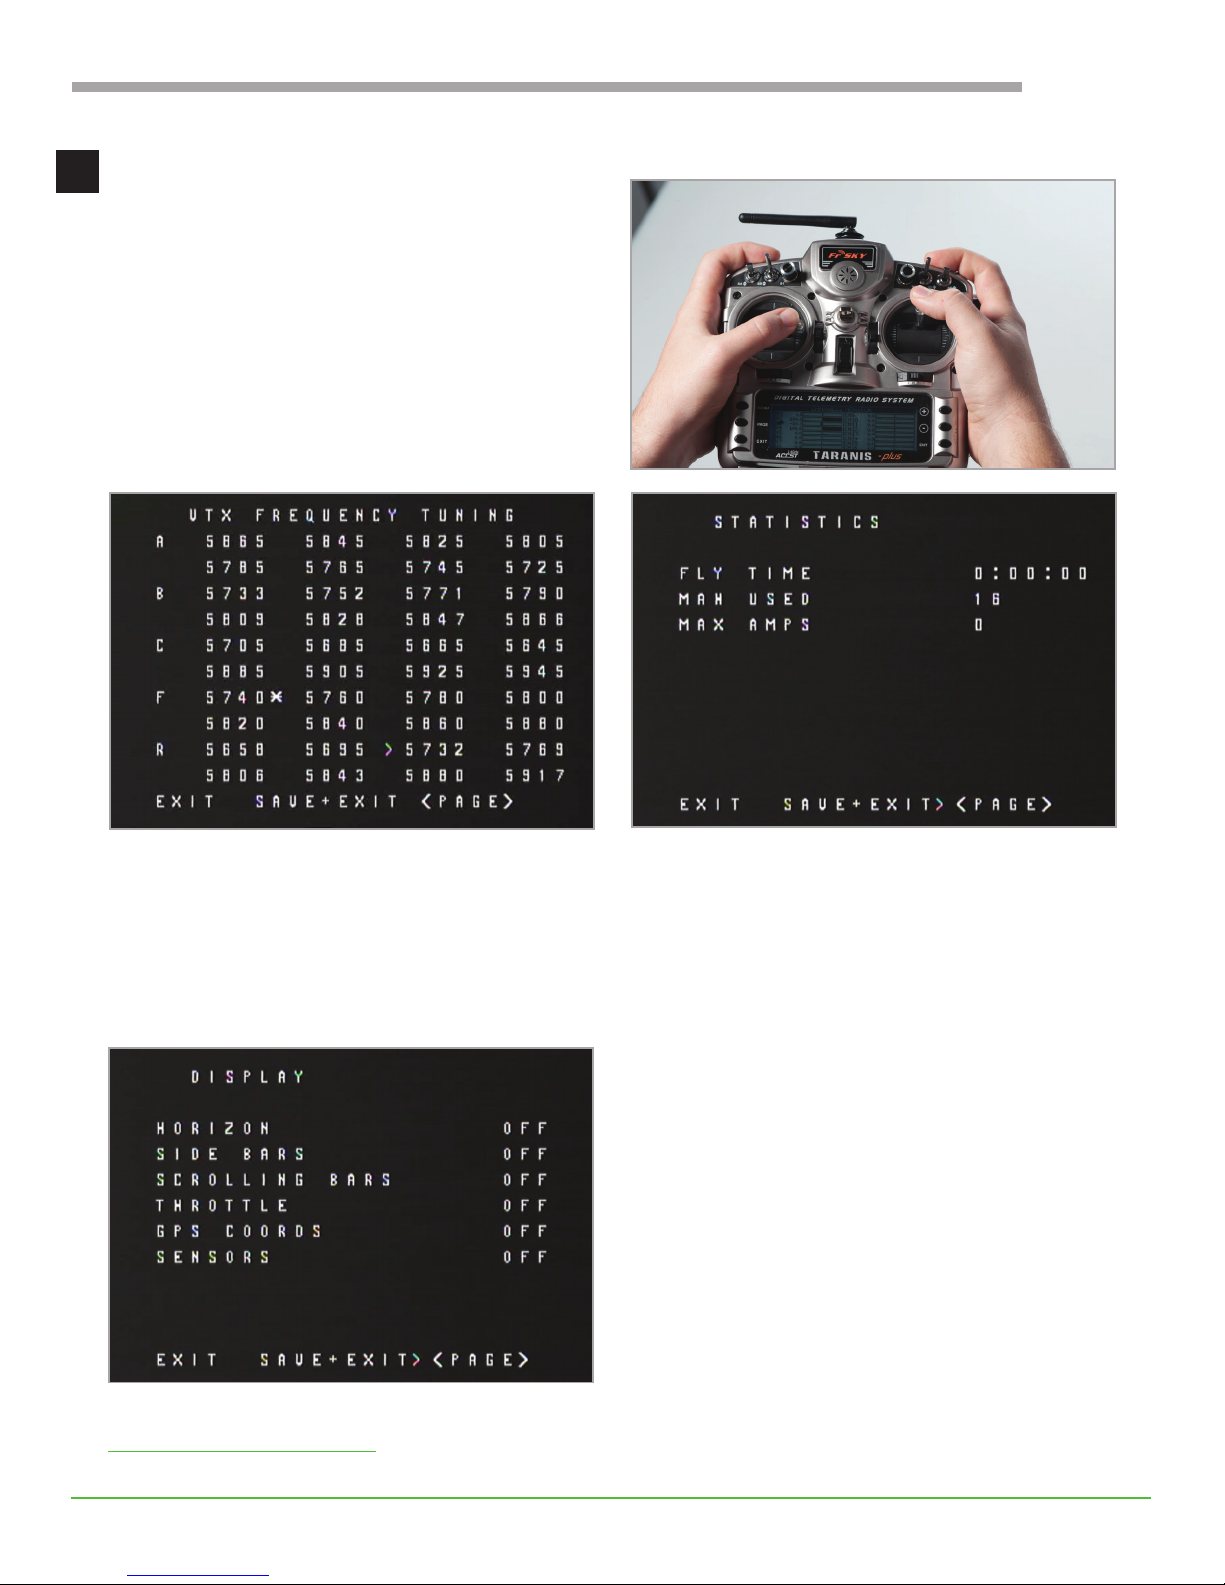
From the main menu, yaw right and pitch forward
again to move through the setting control screens.
USER GUIDE
The rst screen shows Frequency Selection. Move the
> up and down with the right stick. Yaw right to select.
Advanced user also have the option to explore the screens on PID Cong, Voltage, RC Tuning, RSSI,
Current, Advanced and Advanced Tuning.
The nal Display screen controls what shows on the main screen:
The OSD can also be congured from a laptop or desktop computer. Download MWOSD GUI from
www.thrust-uav.com/support. Connect the ight controller to the computer with a FTDI adaptor, FTDI and
serial-to-JST SH 6 pin cable.
The second screen shows Statistics, which
automatically pop up after each ight.
Horizon: a line parallel to the ground to help
maintain orientation.
Side Bars: vertical HUD sidebars
Scrolling Bars: sidebars that move in direction of
change for altitude and speed
Throttle: amount of throttle.
GPS Coords: the GPS coordinates if external GPS
sensor has connected to the Riot.
Sensors: output from any external sensors
connected to the Riot
23
Page 24

USER GUIDE
PRE-FLIGHT CHECK
The FAA recommends a thorough pre-ight check of your drone and operating environment before ying.
Here’s a short list:
Are you clear to y?
• Do you have enough daylight and fair weather?
• Have you notied an airport if ying within 5 miles?
• Are you away from people not involved in the ight operations as well as any sensitive property?
• Are you fully aware of and compliant with all federal and local ight regulations?
• If you’re ying FPV, do you have a spotter?
Is everyone involved in the drone operation aware of:
• Emergency and contingency procedures?
• Each person’s roles and responsibilities?
• Any potential hazards in the area?
Is your drone ready to y?
• Is the drone linked to the radio and goggles? If not, see the Troubleshooting section.
• Does the battery have enough power for your intended ight?
• Are the sensors accurately calibrated?
• Are all components securely attached?
• Is the drone’s registration clearly visible?
24
Page 25

TROUBLESHOOTING
1. The drone is not responding to radio controls.
• Check receiver wiring.
• Verify conguration in Betaight.
• Consult your receiver user manual: FrSky XSR, FrSky X4R or Spektrum
• Refer to your radio user manual.
2. The drone crashed and needs new parts.
• Replacement parts can be purchased directly from the Thrust UAV website, including:
USER GUIDE
- Motors
- Speed controllers
- Arms or frame
- Skirts
3. The goggles are not receiving video feed.
• Check the channel on the goggles. The default is set to 5740.
• Make sure the camera is plugged in.
• Check the battery percent power and charge if needed.
• Refer to your FPV goggle instruction manual.
4. The drone ies erratically.
• Check all screws and make sure the hardware is tight on each arm.
• Verify the sensor calibration.
- Flight controller
- Camera
- Antenna
- Missing screws or nuts
• Inspect the ESC’s for prop marks or severed wires. ESC’s can be replaced if damaged.
• Inspect the motors. They should spin smoothly and can be replaced if damaged.
• Check the prop orientation.
5. The motors aren’t congured correctly.
The ESC’s can be recongured using Betaght and BLHeliSuite. A great tutorial is at https://oscarliang.com/
ash-esc-via-cleanight-fc/
25
Page 26
USER GUIDE
DRONE ANATOMY
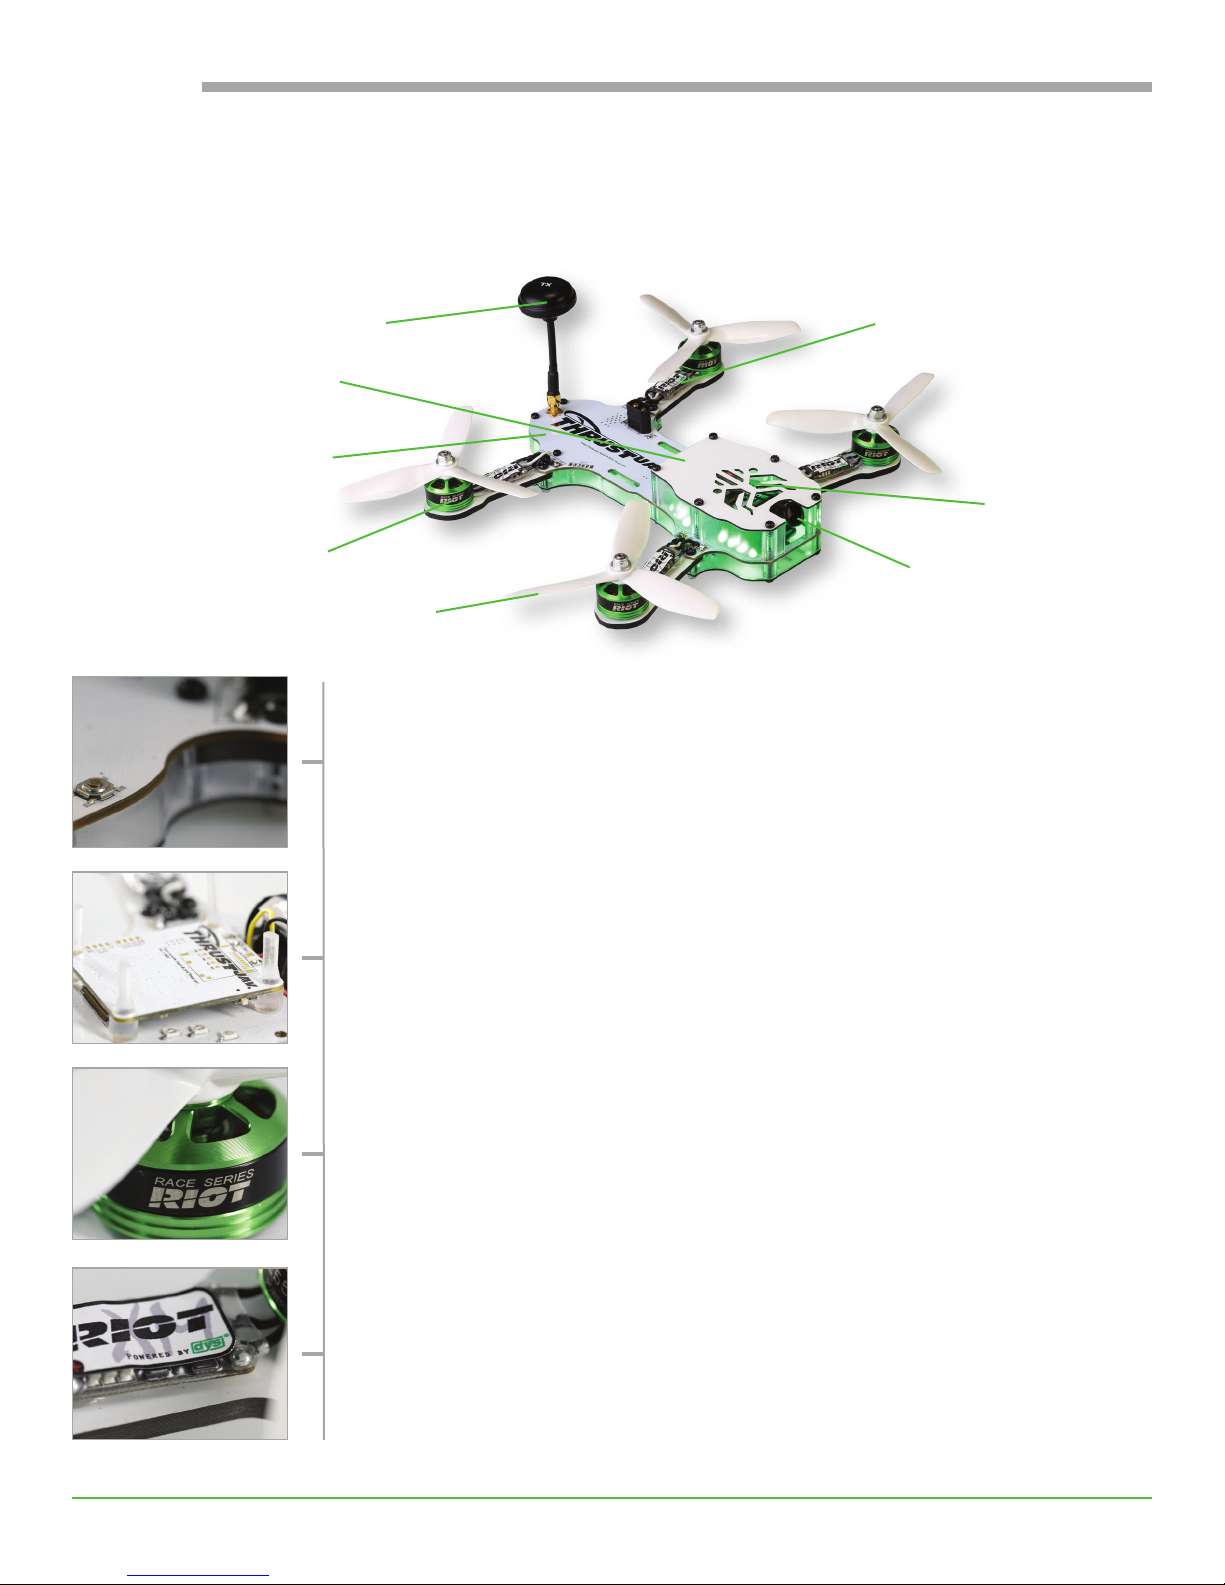
Video antenna
Frame
Integrated PDB
Motor
Electronic speed
control (ESC)
Flight controller
(inside)
Camera
Prop
Frame: The frame is the backbone of the drone.
The Riot comes with a 250-sized H frame, meaning it measures 250mm zdiagonally
between two motors while in the shape of a letter H. White gel-coated carbon
ber provides lightweight strength. Quick swap arms make it easy to repair and
customize the Riot yourself. Clear polycarbonate risers are nearly indestructible and
diffuse light from the LED’s for improved visibility.
Flight controller: The ight controller is the brain of the drone, the place
where programs from Betaight or Raceight are stored and executed
Currently the fastest processor on the market for top racing performance, the Riot’s
STMF4 ight controller contains a built-in gyroscope and accelerometer.
Motors: Motors spin the props.
The Riot ies with high quality DYS SE2205 2550kv motors utilizing new N52
magnets to ensure top racing performance. Depending on the props, the Riot has
a max ight time of 2-5 minutes.
Electronic speed control (ESC): The ESC’s control the speed of the motors by
regulating how quickly they turn the motors on and off.
The Riot is equipped with four DYS XM20’s, which are built with a F396 processor
designed for high kv motors.
26
Page 27
USER GUIDE
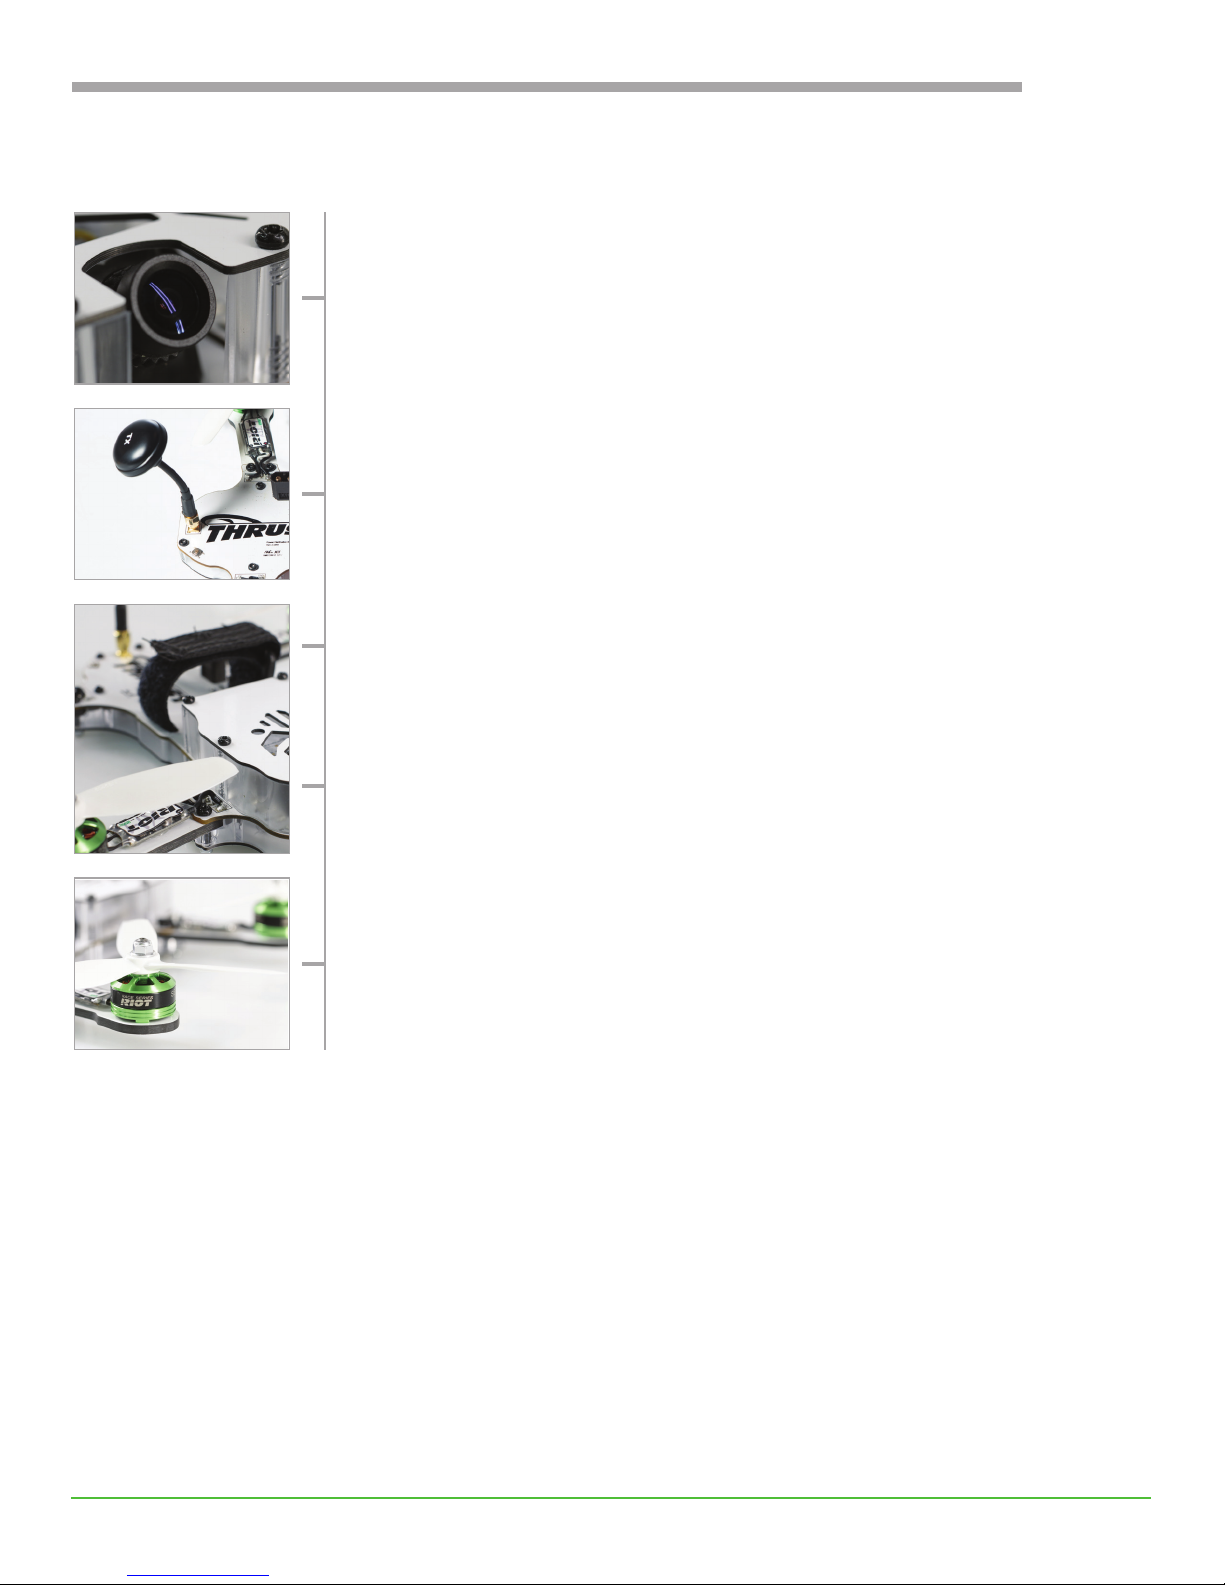
Camera: The camera captures video feed.
The Riot’s Runcam Swift CCD (charge-coupled device, a common sensor for
improved resolution in digital cameras) offers wider dynamic range for FPV racing.
Video antenna: The video antenna sends video to the goggles via RF (radio
frequency) transmission.
Durable and easy to install and remove, the Riot’s RHCP (right hand circular
polarized) omni antenna provides 360 degree coverage. See Riot Set Up for
antenna installation details.
Video transmitter (VTX): The VTX takes the analog signal from the camera and
converts it to RF (radio frequency) to send from the antenna to the FPV goggles.
The Riot’s VTX is fully integrated into the PDB for seamless telemetry.
Power distribution board (PDB): This is like the motherboard of a computer, the
place where all the drone’s electrical components connect to draw power from the
battery.
Designed and engineered by Thrust UAV, the Riot’s fully integrated PDB includes
52 addressable LED’s.
Propellers (Props): Props provide lift for the drone.
For the best of all worlds, the Riot comes equipped with hybrid bullnose 5045x3
Gemfam props. Moderately efcient, these provide a powerful 1200+ g of thrust.
See Riot Set Up for prop installation details.
ADDITIONAL COMPONENTS
To start racing, all you need is:
Radio: PPM, SBUS or DSMX compatible, FrSky Taranis recommended
Receiver: PPM, SBUS or DSMX compatible, FrSky XSR recommended
FPV Goggles and Compatible Module: Any, Fatshark Dominator V3 recommended
Battery: Any 3-4S 45C+ LiPo, 1300 size recommended, unless ying with an HD recording camera. Beginners
typically prefer starting with a 3S (11.1V) battery. A 4s (14.8V) battery is best for pros looking for aggressive,
top-speed performance.
Li-Po Compatible Balance charger: Any
27
Page 28

WWW.THRUST-UAV.COM
 Loading...