

Page 1
9636-0510
OPERATING & MAINTENANCE INSTRUCTIONS
FOR
MODEL GTU END SUCTION CENTRIFUGAL PUMPS
The Thrush End Suction Centrifugal Pumps has been carefully assembled and factory tested
to provide years of trouble-free service. In order to insure the service intended, the following
information is provided to enable proper installation, operation, and maintenance of this
product.
Location
The pump should be located in a clean, open area, where it is easily accessible for inspection,
lubrication and repair. Pumps installed in dark, dirty areas or in cramped locations are often
neglected which can result in premature failure of both the pump and the motor.
Adequate provisions should be made for electrical wiring to the pump motor. A switch should be
installed near the pump to facilitate service. Single phase motors are provided with built-in overload
protection. Three phase motors must be protected externally. The electrical conduit should be
positioned in such a way as to preclude the possibility of moisture entering the conduit or the motor
and causing short circuits.
Piping
Piping practices directly affect the efficiency and power consumption of pumps. Pay particular
attention to the seemingly insignificant details involved in piping. They make the difference between
a good and a bad installation. BOTH THE SUCTION AND THE DISCHARGE PIPING SHOULD BE
INDEPENDENTLY SUPPORTED NEAR THE PUMP. LIBERAL USE OF PIPE HANGERS AND
SUPPORT BLOCKS WILL PREVENT EXCESSIVE STRAIN ON THE PUMP CASING AND ON
THE PIPE JOINTS. IT IS ESSENTIAL THAT PIPING BE PROPERLY ALIGNED BEFORE
CONNECTION IS MADE. PIPING ALIGNMENT SHOULD NEVER BE ACHIEVED BY FORCE.
THIS COULD PRODUCE STRAIN ON THE PIPING AND THE PUMP CASING.
8/08
Page 2
Suction Piping
The diameter of the suction pipe should be at least that of the
pump suction nozzle. Use of a smaller diameter pipe will
result in loss of heat due to friction.
All joints must be tight to maintain the prime on the pump.
Elbows installed in any position at the suction nozzle have a
tendency to distribute the liquid unevenly in the impeller eye
and may cause a reduction in capacity, create an undesirable
thrust condition, or cause noisy operation. Therefore, elbows
should not be used at the suction nozzle. If this is unavoidable, long radius elbows should be used in place of standard
elbows wherever possible. This is because of their superior
flow characteristics.
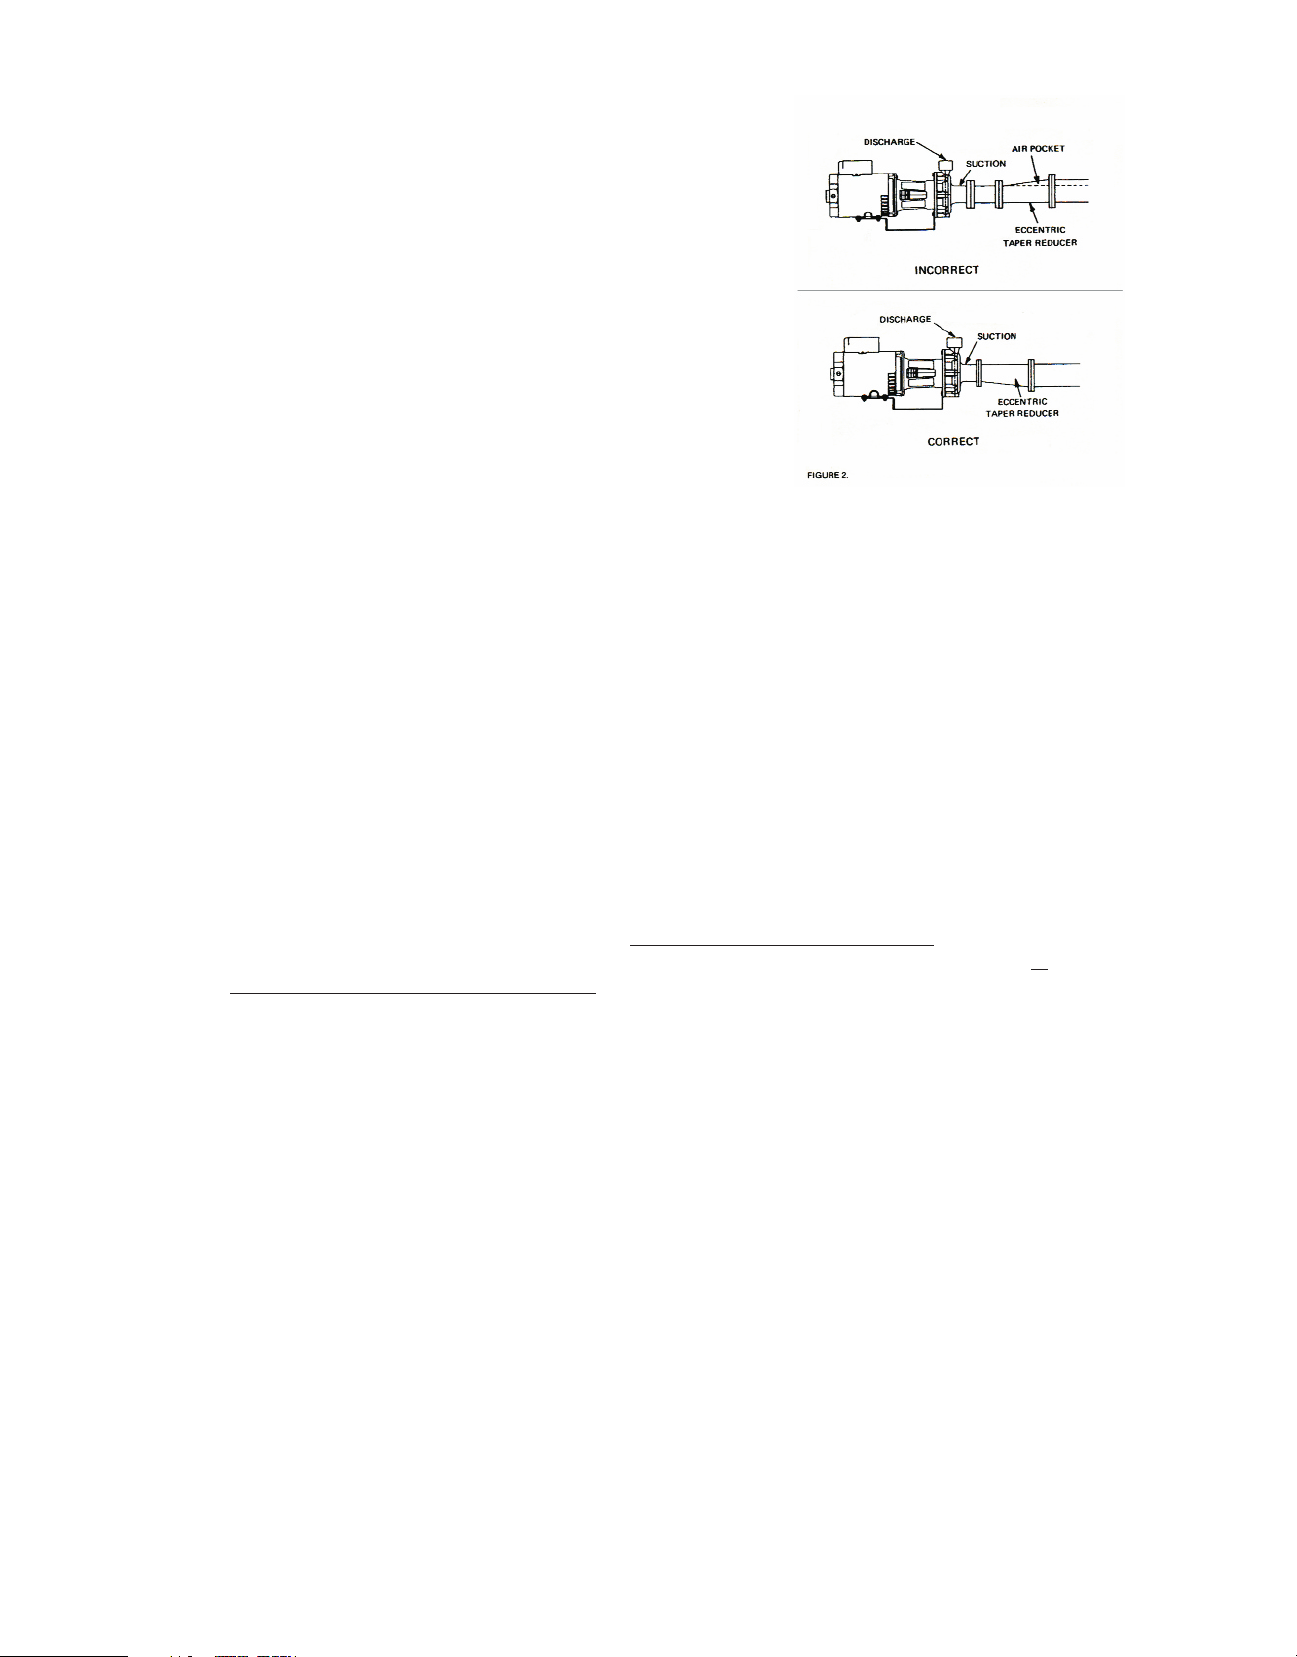
If reducers are necessary, they should be of the eccentric type.
They should be installed directly at the suction nozzle, with the
taper at the bottom to prevent air pockets from forming
(see Figure 2). Straight taper reducers should never be used in a horizontal suction line because of
the air pocket that is formed at the leg of the reducer and the pipe (see Figure 2).
If a strainer is installed on the suction line, it should be checked periodically to insure that it does not
obstruct flow to the pump. If the suction line does become sufficiently blocked, severe damage to
the pump will occur.
Discharge Piping
The discharge pipe diameter should be at least as large as the diameter of the pump discharge
nozzle. The size of the discharge pipe to be used is dependent upon the application.
The same cautions mentioned concerning elbows applied at the pump suction also apply to elbows
placed on the discharge piping.
If an increaser is needed at the pump discharge, it may be of the straight taper type.
Shut-Off Valves
Shut-off valves should be installed on both the suction and discharge lines to facilitate service. The
suction valve should only be used for shut-off, NEVER TO ADJUST PUMP FLOW
. One may
. Instead, it should be a globe, ball, or butterfly valve.
therefore us a gate valve. The discharge valve, however, may be used to throttle the pump. IF
SO, IT SHOULD NOT BE A GATE VALVE
Expansion Joints
Expansion joints are used primarily to prevent the transmission of piping strain caused by thermal
expansion and contraction, piping misalignment, pressure changes, or other causes, to the pump
casing. They can also be used to eliminate the transfer of noise from the pump to the system. It is
recommended that either the flexible metal type or the convoluted rubber bellows type with limit
bolts be used. Simple rubber expansion joints, which cost less, tend to deteriorate, making frequent
replacement necessary.
For the GTU model end-suction pump, rigid base mounting with flex-connections at suction and
discharge is recommended.
Operation
NOTE: CENTRIFUGAL PUMPS SHOULD NEVER BE STARTED OR RUN DRY. OPERATING A
PUMP DRY WILL CAUSE SCORING OF THE MECHANICAL SEAL, RESULTING IN PREMATURE
SEAL FAILURE. TO PREVENT THE PUMP FROM BEING RUN DRY, IT SHOULD ALWAYS BE
PRIMED BEFORE STARTING.
Shut-Off
The pump should never be operated at a shut-off head condition (no-flow). This can cause overheating, and result in damage to the pump. If the pump is to be run at a no-flow for an extended
period, provisions must be made for a relief by-pass. (Consult Factory)
Page 3

Priming the Pump
A pump will not operate satisfactorily until it is primed. All air must be expelled from the suction
piping and pump casing and be replaced by the liquid being pumped. There are several methods of
priming pumps. The one selected will depend on the specific requirements of the application.
Flooded Suction Priming
This method of priming a pump is relatively simple
(see Figure 3). The liquid source is located above the
pump. To prime the pump, open the air vent valve or
plug in the pump casing. Then slightly crack the gate
valve in the suction line. The suction line and the
pump should be filled slowly until a steady stream of
liquid is observed flowing from the air vent. After the
pump is operating, it is recommended that the air vent
valve or plug be opened again to insure that all the air
has been expelled from the pump casing.
Suction Lift
A foot valve should be used for priming on suction lift
applications (see Figure 4). The foot valve is located at
the bottom end or foot of the suction piping. It functions
as a check valve which allows flow only toward the
pump. It prevents the liquid from draining from the
pump and suction piping back into the sump after pump
shutdown.
Initial priming is accomplished by completely filling the
suction piping and pump casing with the liquid to be
pumped. This can be done most easily by first
removing the air vent valve or plug at the top of the
pump casing. Then a pipe nipple can be inserted in the
orifice with the appropriate increases to accommodate a
hose connection alternatively, a priming line can be inserted in the discharge piping between the check valve and
the pump, or the priming can be done with a bucket and a
funnel. It is important that the suction pipe and pump
casing be completely full of the liquid to be pumped.
When the pump is started, a vacuum is created by the
priming fluid. This vacuum, combined with atmospheric
pressure in the liquid well, forces liquid into the suction
piping, thus opening the valve and keeping it open until
the pump is shut down. When the pump is shut down,
the liquid being pumped reverses its direction of flow,
causing the valve to close. The liquid then becomes
trapped in the suction piping and pump casing, maintaining the prime on the pump.
It is possible for the pump to lose its prime (see Figure 4). This happens when dirt or debris keeps
the foot valve partially open, allowing fluid to drain from the pump casing and suction piping back
into the sump. For this reason, the prime should always be checked before starting the pump.
Refer to GTU pump performance curve (see Figure 5). For N.P.S.H. requirements.
Starting the Pump
The discharge valve should be partially closed when the pump is initially started. This will prevent
possible water hammer and lower initial power draw. As soon as the pump has reached its
operating speed, the discharge valve may be opened to the desired position.
Page 4

Seal Replacement
1. Close suction and discharge valves.
2. Break electrical connections to prevent drive unit from being energized during disassembly.
3. Remove 4 bolts from support bracket (38) and 8 bolts (30) from bracket (15) and pull motor
and bracket assembly from casing (28). Remove casing gasket (27).
4. Remove impeller acorn nut (3). Slide impeller (37) and impeller key (14) from the shaft.
5. In replacing seal kit assembly (21 & 22), slide rotary seal assembly (22) off the shaft. The rubber in
the seal head may be partially adhered to the shaft. In removing seat and o-ring (21) be very careful
in prying it out of seat holder (18). Seat holder is permanently pressed into the bracket. DO NOT
REMOVE.
NOTE: THE MECHANICAL SEAL IS A PRECISION PRODUCT AND MUST BE TREATED AS SUCH.
DURING REPLACEMENT, CARE MUST BE TAKEN TO AVOID DROPPING ANY PART OF THE SEAL,
TAKE PARTICULAR CARE NOT TO SCRATCH THE LAPPED FACES ON THE WASHER OR THE
SEALING SEAT. DO NOT PUT A SEAL BACK INTO SERVICE UNTIL THE SEALING FACES OF THE
WASHER AND SEAT HAVE BEEN LAPPED OR REPLACED.
6. The interior surface of the seat holder (18) should be cleaned of all residue. Coat new seat and o-ring
with soap and press into seat holder (18). Be sure seat and o-ring are seated firmly and
perpendicular to pump shaft.
7. Install new rotary seal (22) and insert key (14) in shaft keyway.
8. Slide impeller (37) onto shaft and replace acorn nut (3).
9. Replace new casing gasket (27) on bracket (15). Slide entire motor-bracket into casing (28). With
assembly properly positioned, in casing, replace 8-bolts (30). Reattach 4 support bracket bolts to
base.
10. Reconnect all electrical connections and open suction and discharge valves.
Motor Replacement
1. Disconnect wiring.
2. Loosen coupling at impeller shaft (63).
3. Remove 4-motor/bracket bolts (30B).
4. Remove 4-bolts (43), 4-washers (44), and 4-nuts (47) from motor support bracket (38).
5. Pull motor from bracket.
6. Remove coupling and place on new motor shaft.
7. Replace new motor in bracket and re-install 4-bolts (30B).
8. Replace 4-bolts (43), 4-washers (44), and 4-nuts (47) to motor support bracket (38).
9. Fasten coupling to impeller shaft.
10. Align coupling and tighten.
11. Check alignment after assembly.
12. Connect wiring to motor.
Cartridge Assembly Replacement
1. Disconnect wiring to motor.
2. Close shut-off valves on either side of pump casing, or if there are no valves, drain system to below
pump casing.
3. Loosen coupling from impeller shaft.
4. Remove motor by removing 4-bracket bolts (30B), 4-motor support bolts (43), 4-washers (44), and
4-nuts (47).
5. Remove 8-bolts holding bracket to casing and remove old bracket assembly. Clean old gasket (27)
from casing flange. New gasket is included with new cartridge unit.
6. Remove impeller nut (35), impeller (37), and shaft key (14) from old bracket assembly using 9/16"
socket wrench.
7. Remove rotary seal assembly (22).
8. Remove stationary seal (21) by inserting screwdriver at outer edge of seal and prying outward.
DO NOT REMOVE PRESSING-IN BRASS SEAL CUP.
9. Remove 3-cartridge bolts (30A) that fasten cartridge unit within bracket. Remove cartridge and
replace with new unit.
10. Coat new stationary seal assembly (21) with soap and press into brass seal cup (18) by hand. Be
sure seal is seated firmly and perpendicular to pump shaft.
11. Install new rotary seal assembly (22) and insert new key (14) in shaft keyway.
12. Install impeller (37) and impeller nut (35).
Page 5

13. Place new gasket (27) to bracket (15) and bolt bracket to casing (28). Re-install motor (50) to
bracket, guiding coupling over shaft. Retighten coupling.
14. Reinstall 4-bolts (30B) securing motor to bracket (15).
15. Reinstall 4-motor support bolts (43), 4-washers (44), and 4-nuts (47).
16. Open valves that were closed in Step 3. Vent all air and reconnect wiring to motor.
17. Verify alignment before starting pump.
GTU Motor/Cartridge Parts List
10. Cartridge Unit - 2104-0900 35. Im peller Acorn Nut - 9749-2430
14. Impeller Key - 37. Im peller - 9606-3150
21. Seat & O-Ring - 38. Pump Support Bracket - 2100-0910
22. Rotary Seal Head - 7301-5000 43. Bolt Motor to Support Bracket - 9604-020
27. Casing Gasket - 44. Washe r - 9751-0080
15. Bracket - 2150-0901 45A. Coupling Flange -
18. Brass Seat Holder - 9744-1011 45B. Coupling Sleeve -
28. Casing - 9606-1051 45C. Coupling Flange - 7304-9000
29. Pipe Plug - 9761-00 80 63. Cou pling Set Screws -
30. Bolt (Casing) - 9604-020 47. Nut - 9749-21 50
30A. Bolt (Cartridge) - 9747-0700 50. Mo tor - 9806-0110 Single / 9806-0271 Three
30B. Bolt (Bracket to Motor) - 9747-1040 62. Mo tor Key, Comes with Motor
}
}
GTU Motor/Cartridge Parts List
 Loading...