

Threshold TG3930UC-LS, TG3930UG-LS, TG3930UN-LS, TG3930UP-LS, TG3930UGR-LS Assembly Instructions Manual
Page 1

style # TG3930UC-LS
TG3930UG-LS
TG3930UN-LS
TG3930UP-LS
TG3930UGR-LS
dpci # 249-08-1656
249-08-1510
249-08-0943
249-08-0942
249-08-3463
>>>assembly instructions
threshold
tufted loveseat
Page 2

Congratulations on your latest Target purchase.
Now what? Don't start sweating over this box of parts. This will be easy. We did the hard work for you.
All you need to do is follow our simple instructions and you'll be on your way to transforming your
room in no time. Good luck-though we're confident you won't need it.
before you begin
1. Check for damaged or missing parts. Call 1-855-MYTGTHOME (855-698-4846) to order missing supplies.
2. Use the carton as a working surface to prevent product damage during assembly.
3. Gather all tools prior to assembly.
2
Page 3

table of contents
introduction 2
hardware 4
parts list 5
assembly 6-12
3
QUESTIONS? Just call 1-855-MYTGTHOME (855-698-4846). For faster service, have the style number and DPCI number ready when calling.
Page 4

hardware
(H1) x 2 (H2) x 4
hex socket head bolt hex socket head bolt
1.77" 1.18"
(H3) x 2 (H4) x 4 (H5) x 2 (H6) x 1
flat washer flat washer spring washer allen key
ø22mm ø16mm ø12.5mm M5
(H7) x 1
allen key
M4
4
Page 5
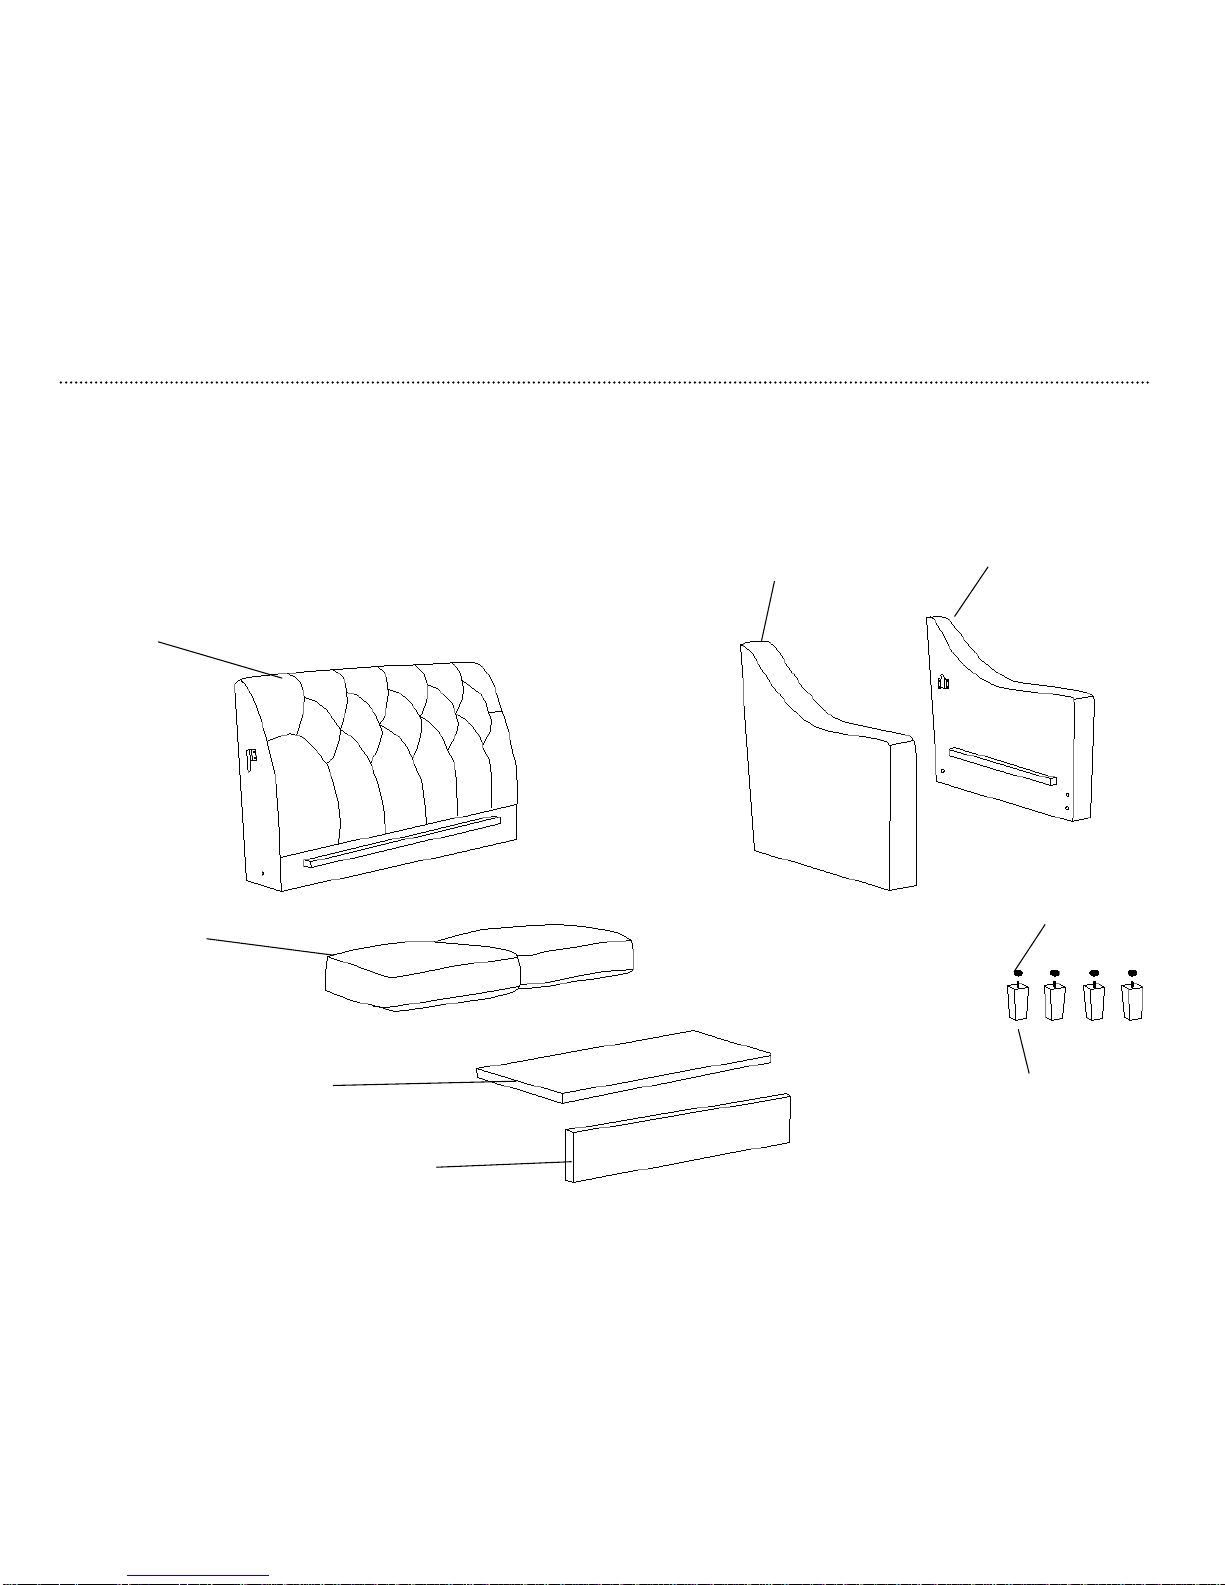
ITEM DESCRIPTION QUANTITY
A left arm 1
B right arm 1
C chair back 1
D1 front panel 1
D2 seat panel 1
E seat cushion 2
F foot 4
G plastic washer 4
5
A
C
B
E
D2
D1
F
G
Page 6
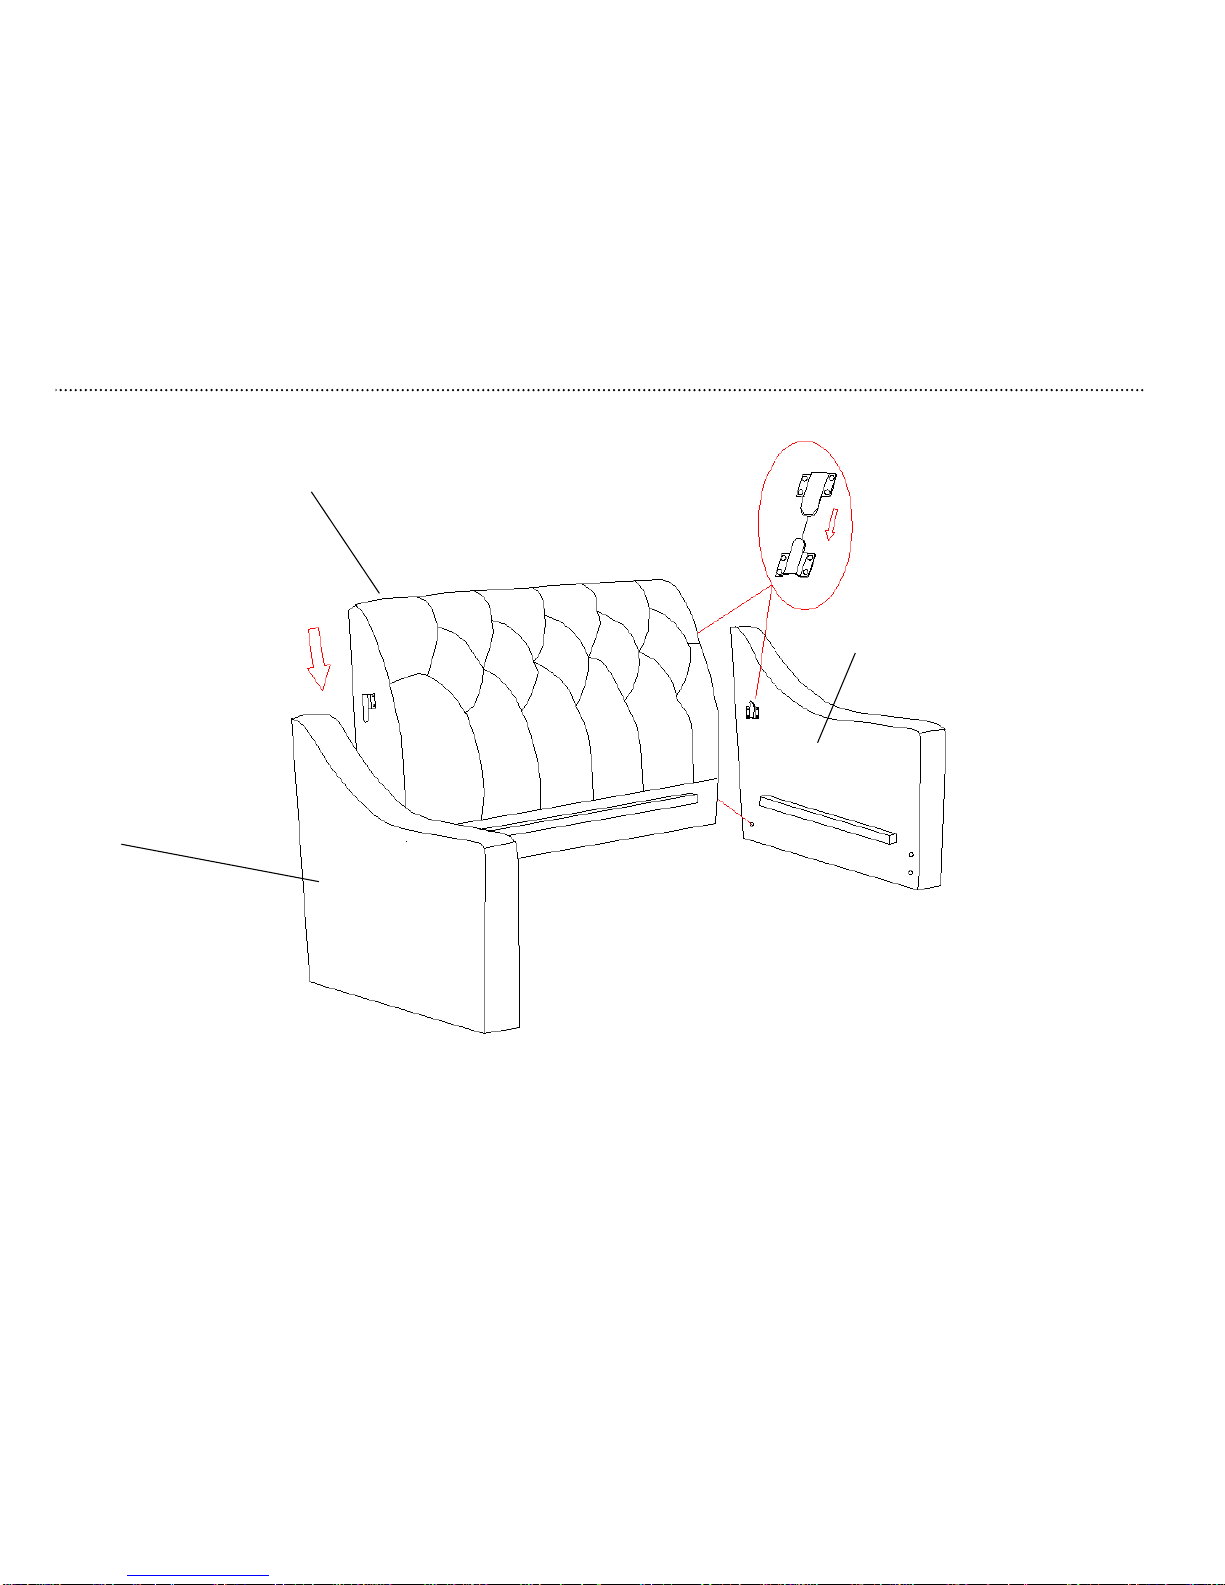
step 1.
2. Repeat this step to assemble the right arm (B) to chair back (C).
6
1. Attach left arm (A) to chair back (C) by inserting the metal bracket on
chair back (C) into the metal glide on left arm (A). Push the chair
back (C) with a downward force to secure it into place.
A
C
B
Page 7
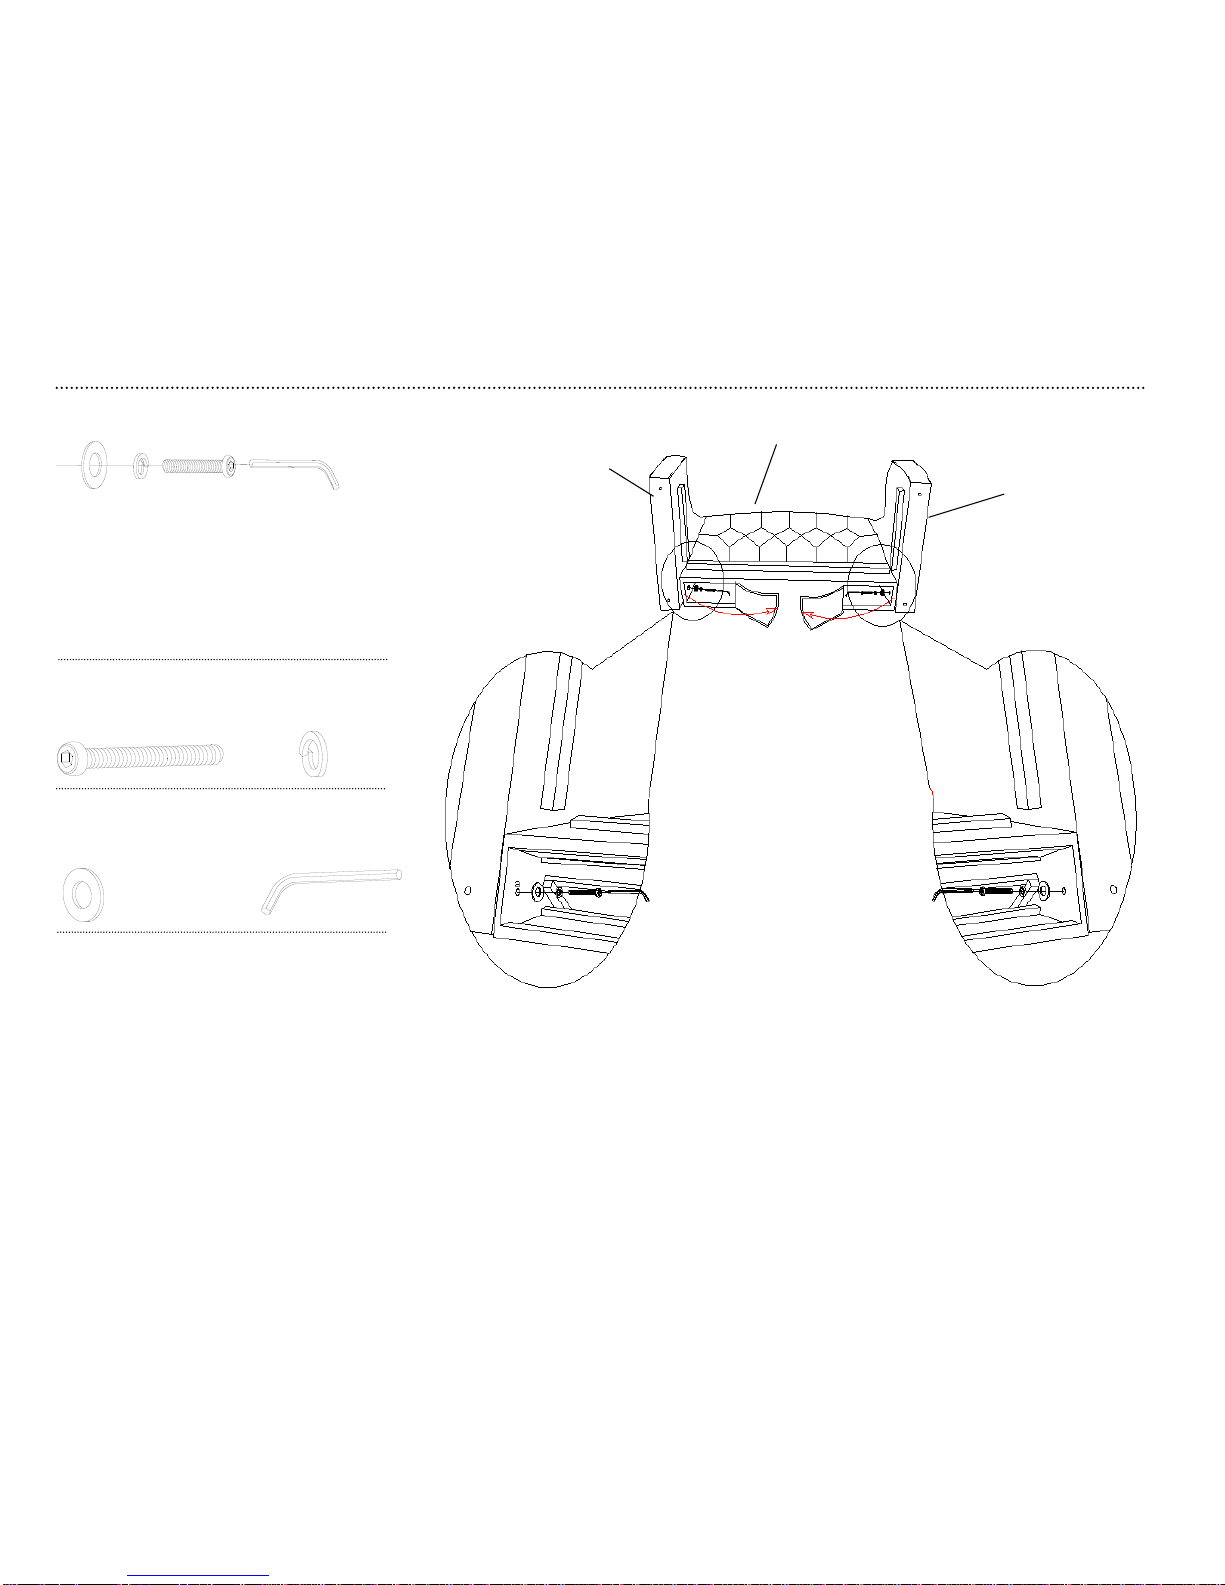
step 2.
(H1) x 2 (H5) x 2
hex socket head bolt spring washer
1.77" ø12.5mm
(H3) x 2 (H6) x 1
flat washer allen key
ø22mm M5
7
1. Attach left arm (A) and right arm (B) to chair back (C)
with hex socket head bolts (H1), flat washers (H3) and
spring washers (H5).
2. Use Allen Key (H6) to tighten the hex socket head bolts (H1).
H3
H5H1H6
B
C
A
Page 8
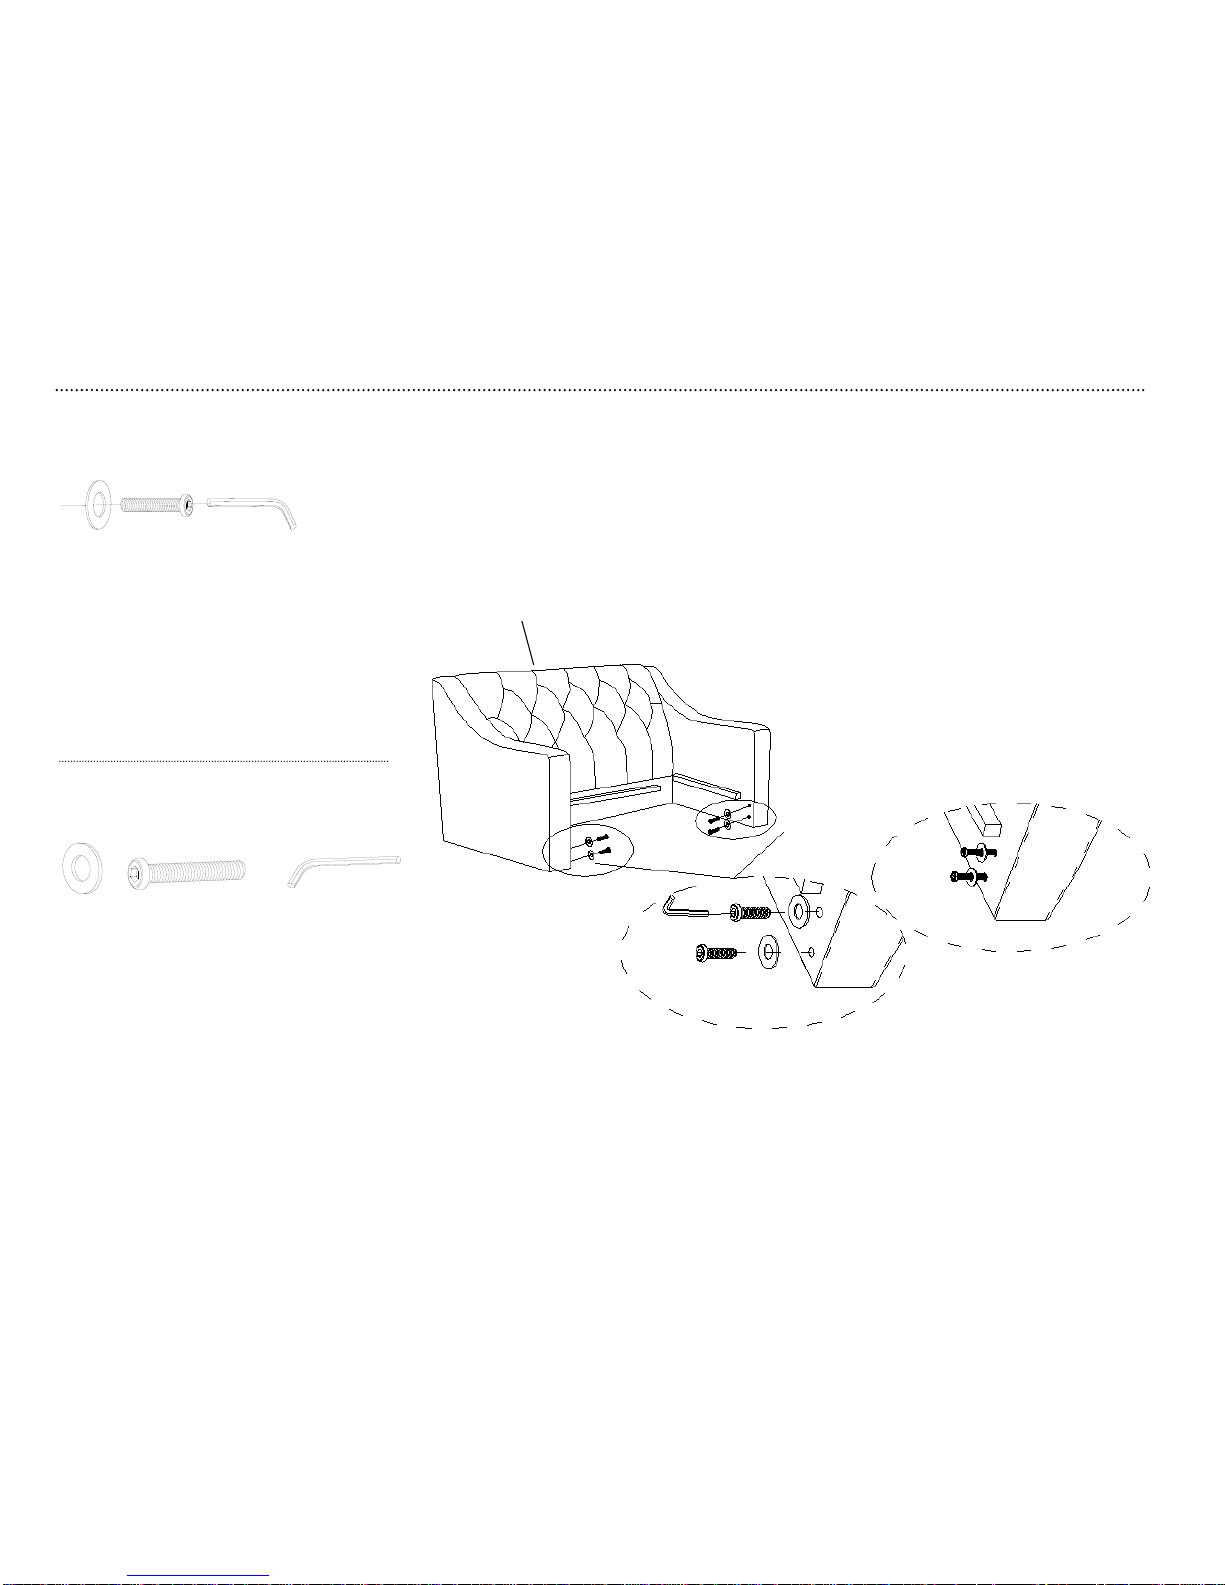
step 3.
(H4) x 4 (H2) x 4 (H7) x 1
flat washer hex socket head bolt allen key
ø16mm 1.18" M4
8
1. Install hex socket head bolts (H2) and flat washers
(H4) into arms (A & B). Use Allen Key (H7). DO
NOT tighten the bolts. Leave them extended about
half an inch (see above photo).
C
H4
H2
H7
A
B
Page 9
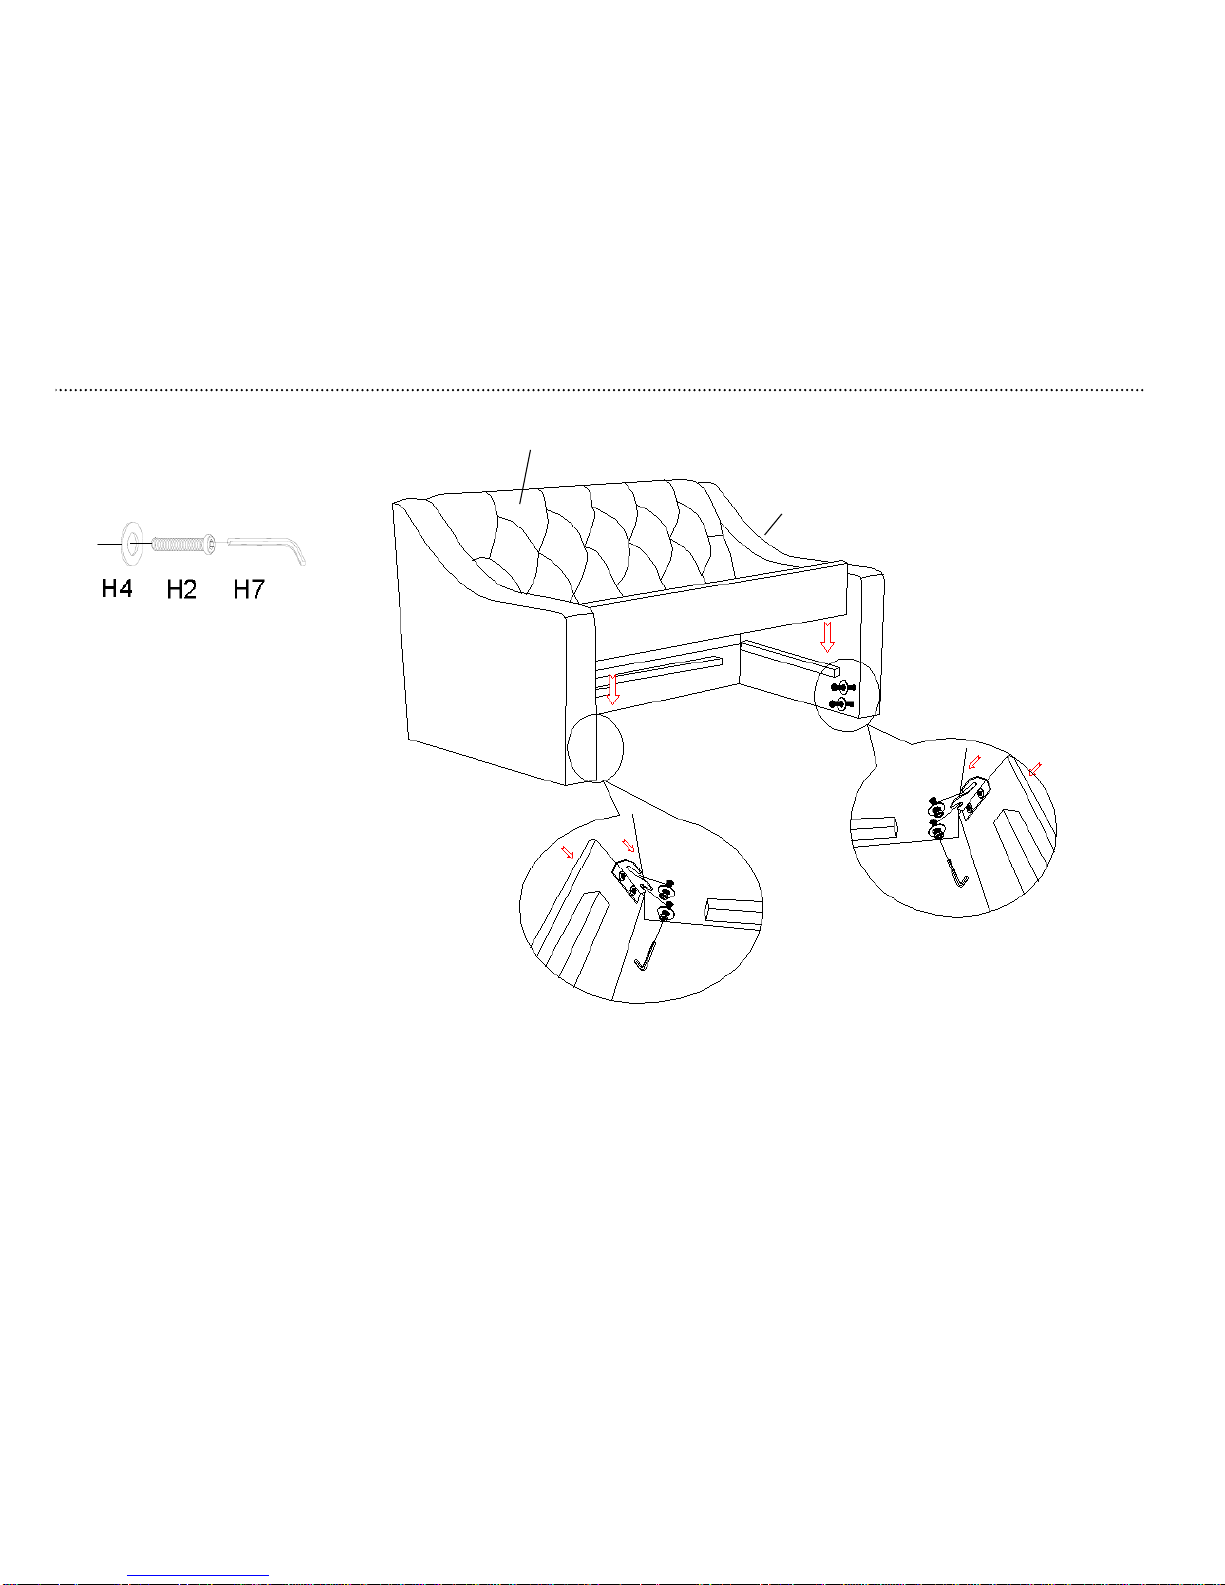
step 4.
9
1. Hook front panel (D1) to left arm (A) & right
arm (B) as shown below. Push front panel
(D1) with a downward force to lock it into
place.
2. Secure front panel (D1) to arms (A & B) by
tightening the hex socket head bolts (H2)
inserted in step 3 with Allen key (H7).
C
A
B
D1
Page 10
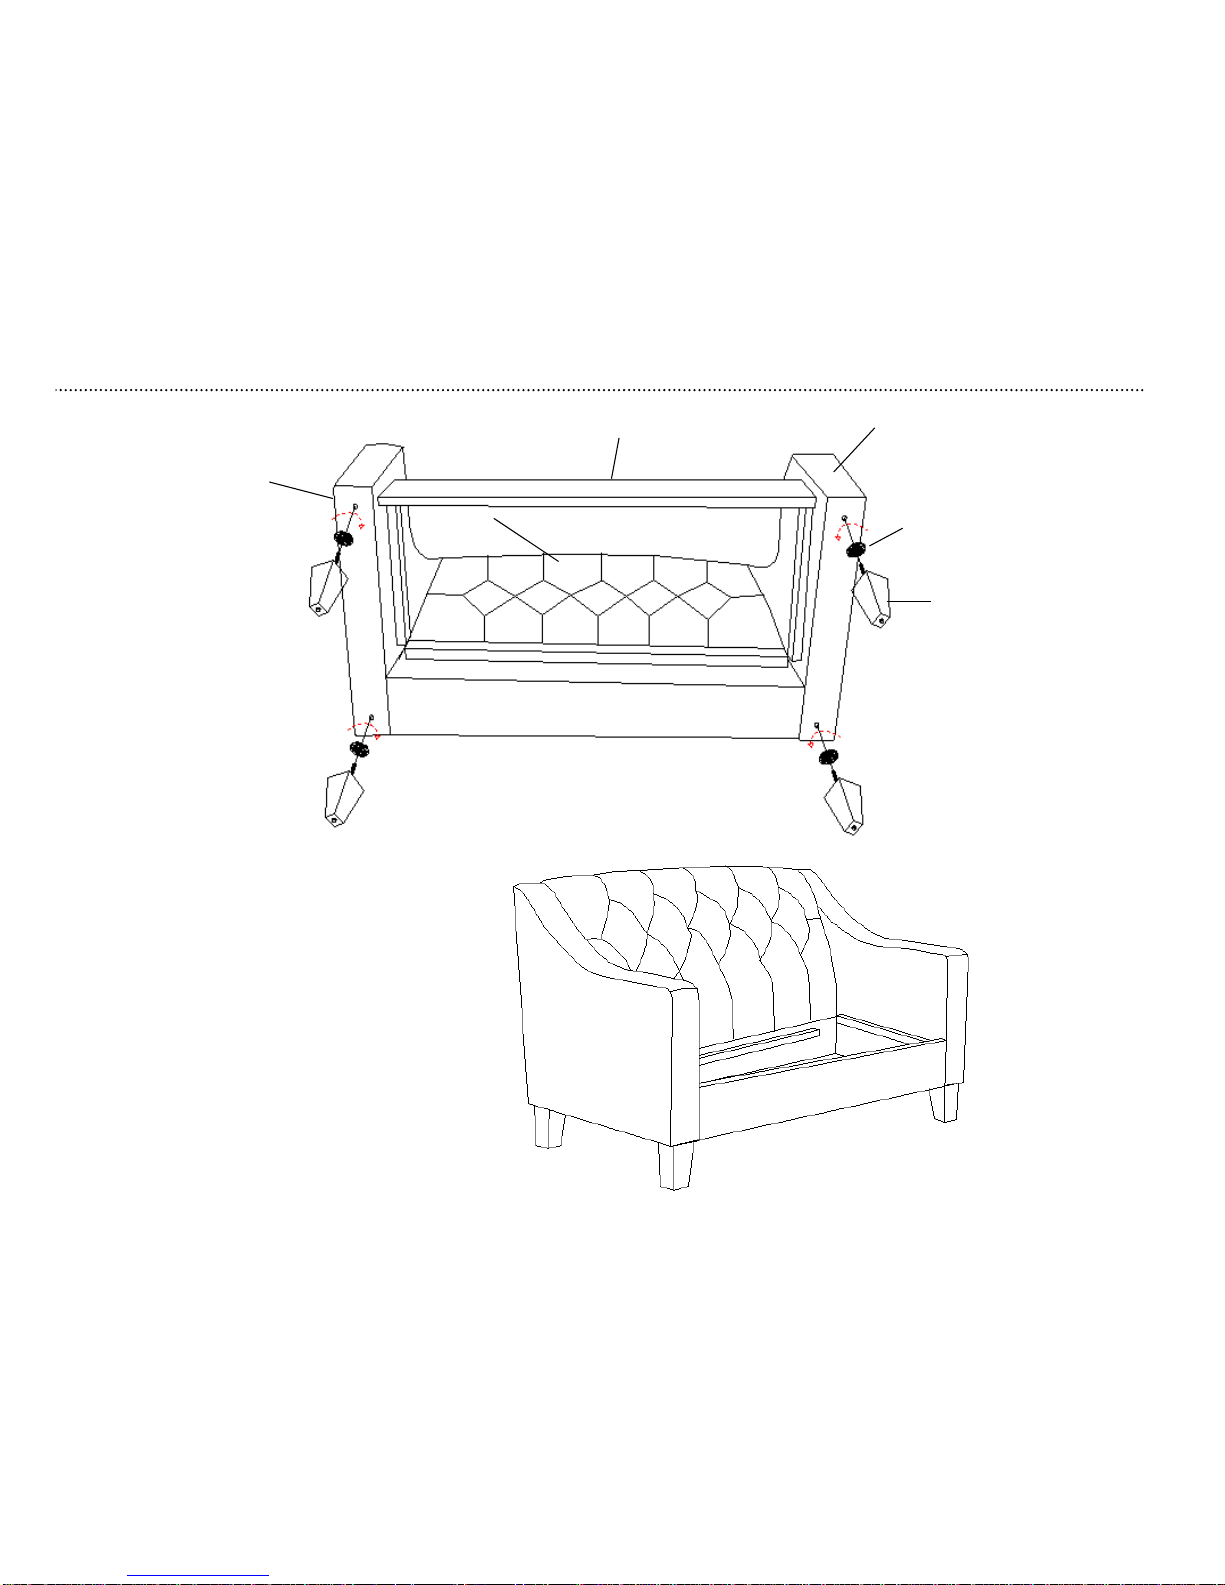
step 5.
10
1. Attach feet (F) to arms (A & B) with plastic washers (G)
by rotating clockwise.
NOTE: Plastic washers (G) must pass through the bolt
pre-installed on feet (F) before attaching feet (F) to the
arms (A & B).
2. Turn the assembled unit upright.
A
C
D1
B
G
F
Page 11
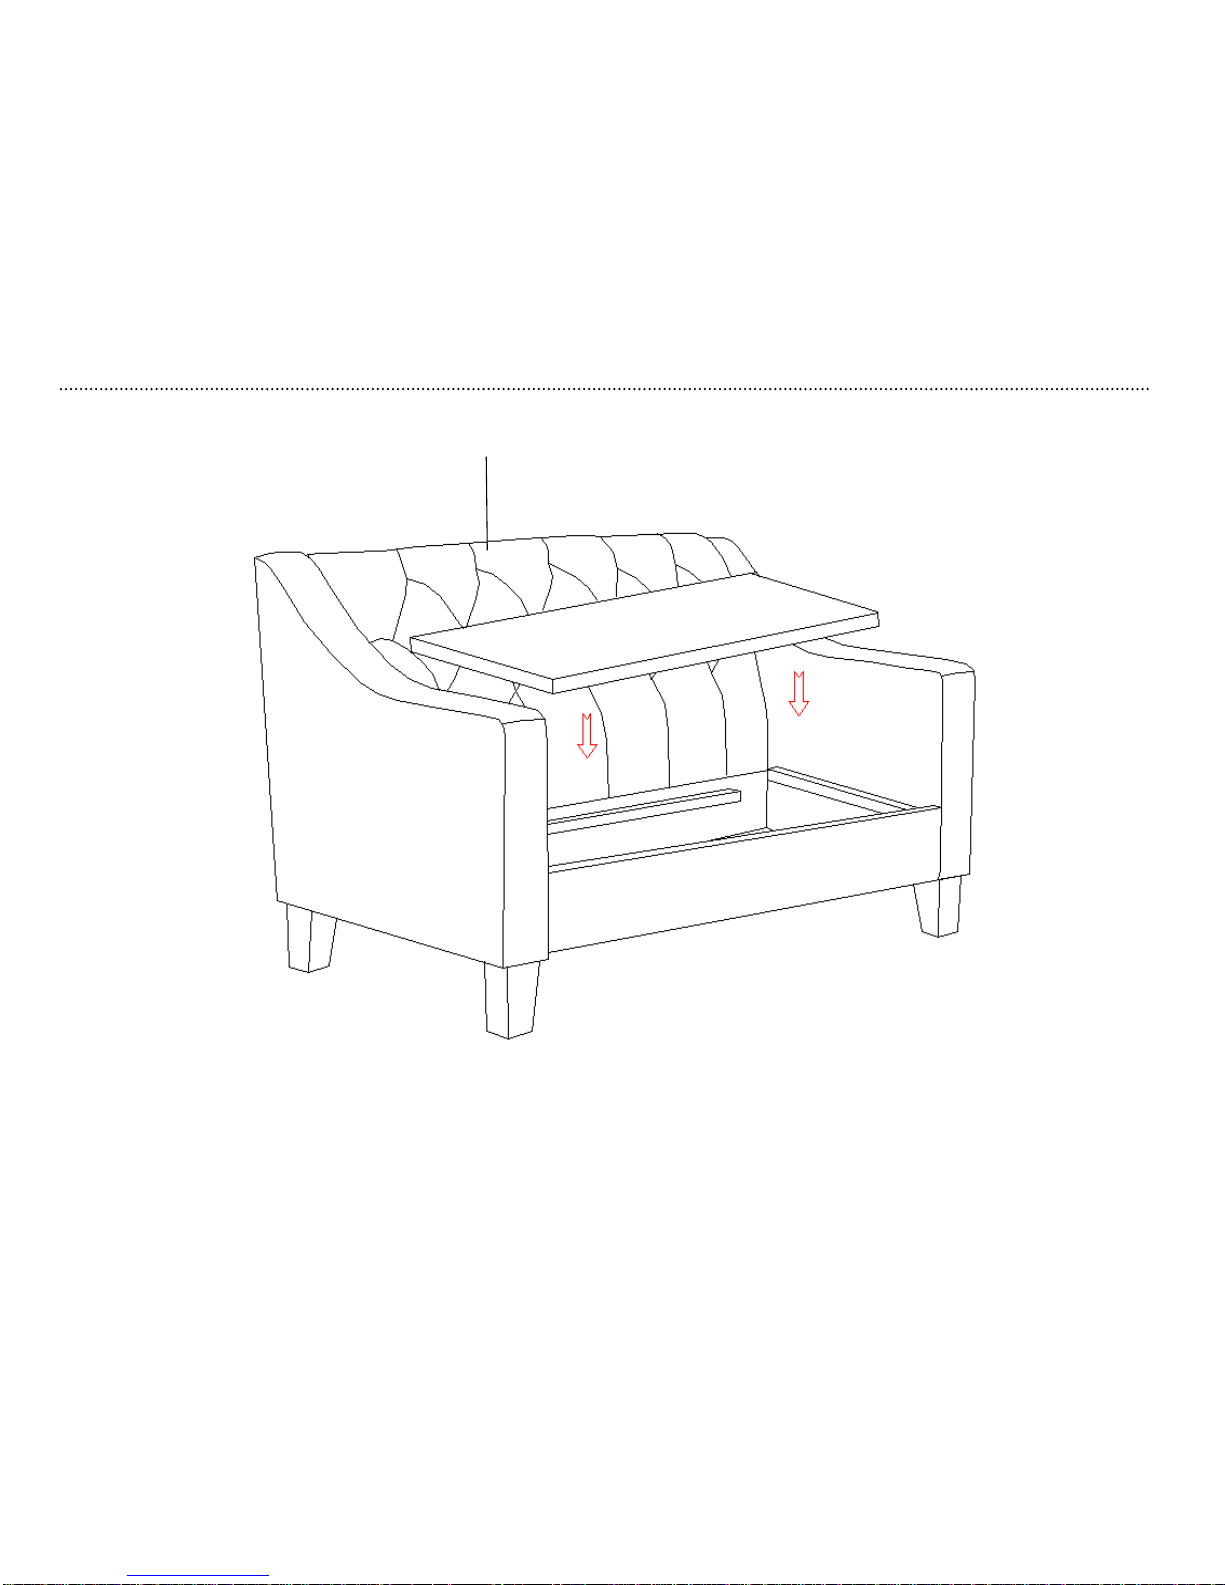
step 6.
1. Place seat panel (D2) on the assembled frame.
11
C
A
D2
B
D1
Page 12
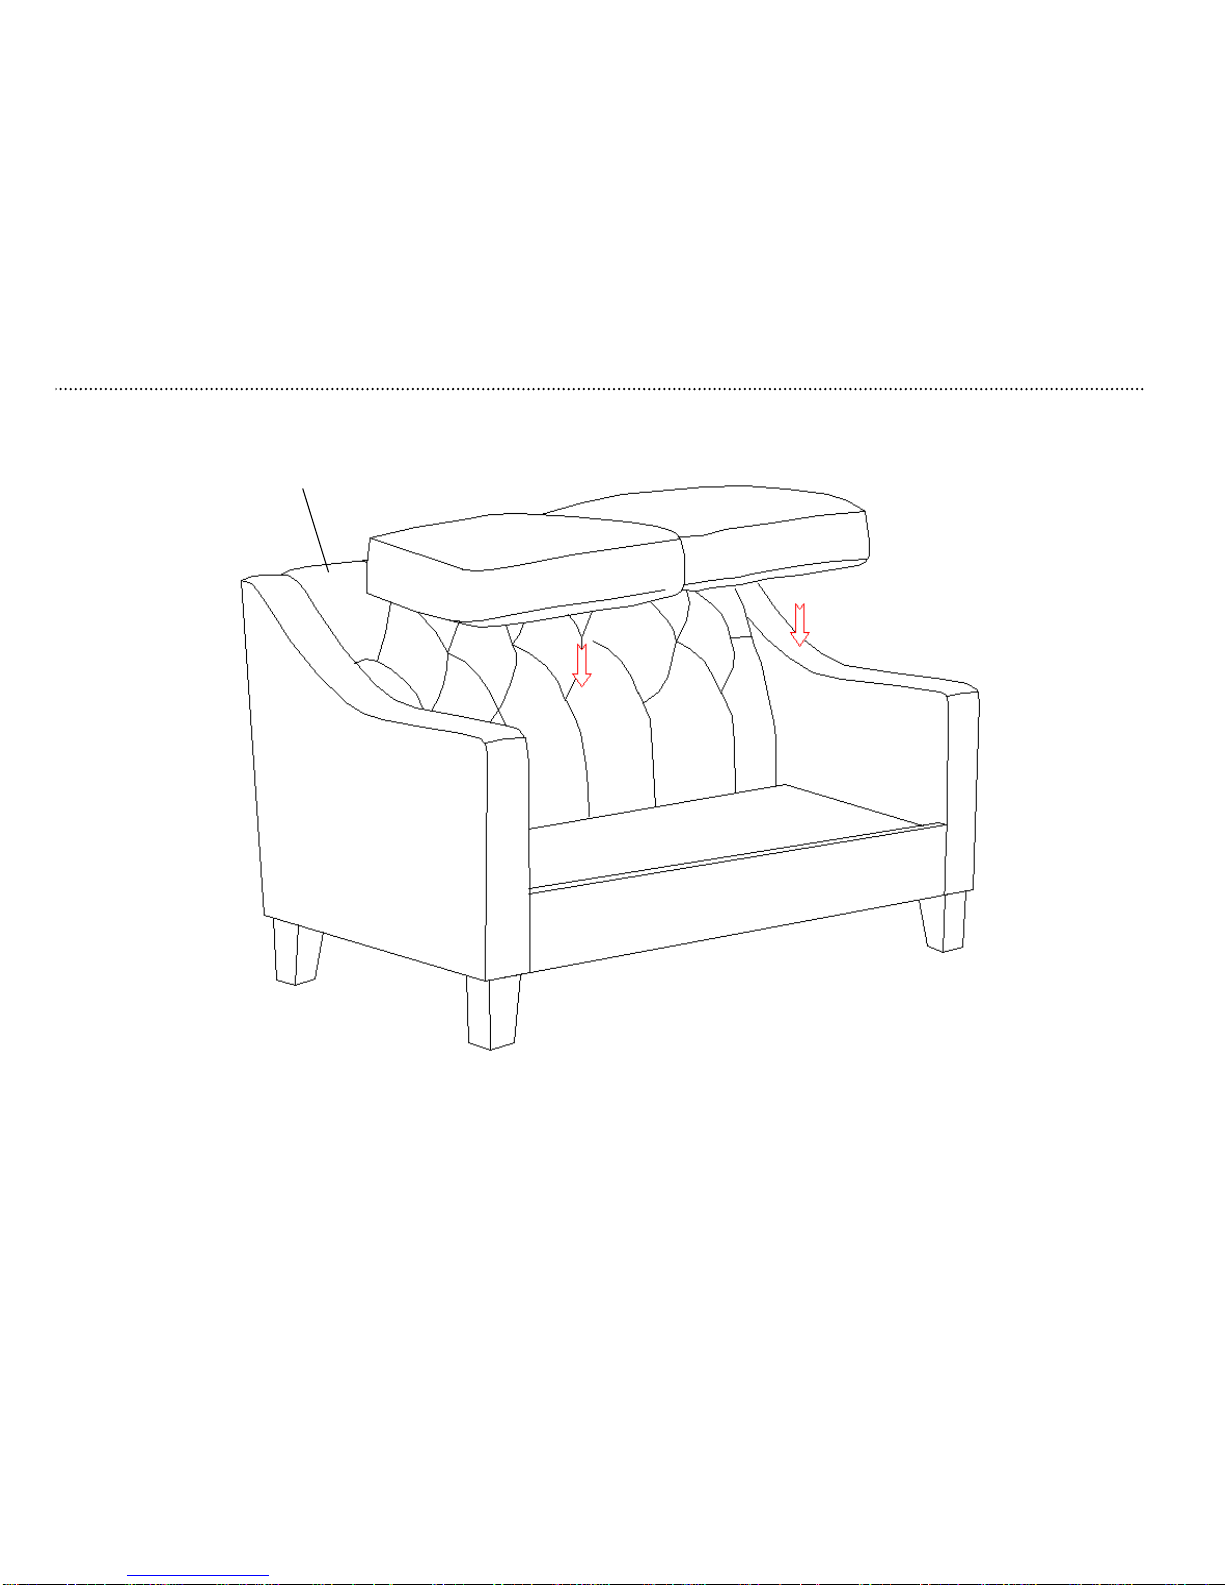
step 7.
1. Place seat cushions (E) on the seat panel (D2).
12
D2
D1
A
B
C
E
E
Page 13

© 2008 Target. The Bullseye Design is a trademark of Target Brands, Inc. All rights reserved.
 Loading...