

UPSIDE
Assembly Instructions

GENERAL ASSEMBLY INSTRUCTIONS · SIZES MAY VARY
UPSIDE
GENERAL ASSEMBLY INSTRUCTIONS ·
SIZES MAY VARY
5/32" Allen Wrench (provided) (1)
Hardware Provided Tools Required
M6 x16mm Bolt (20)
SIZES MAY VARY
5/32" Allen Wrench (provided) (1)
UPSIDE
Hardware Provided
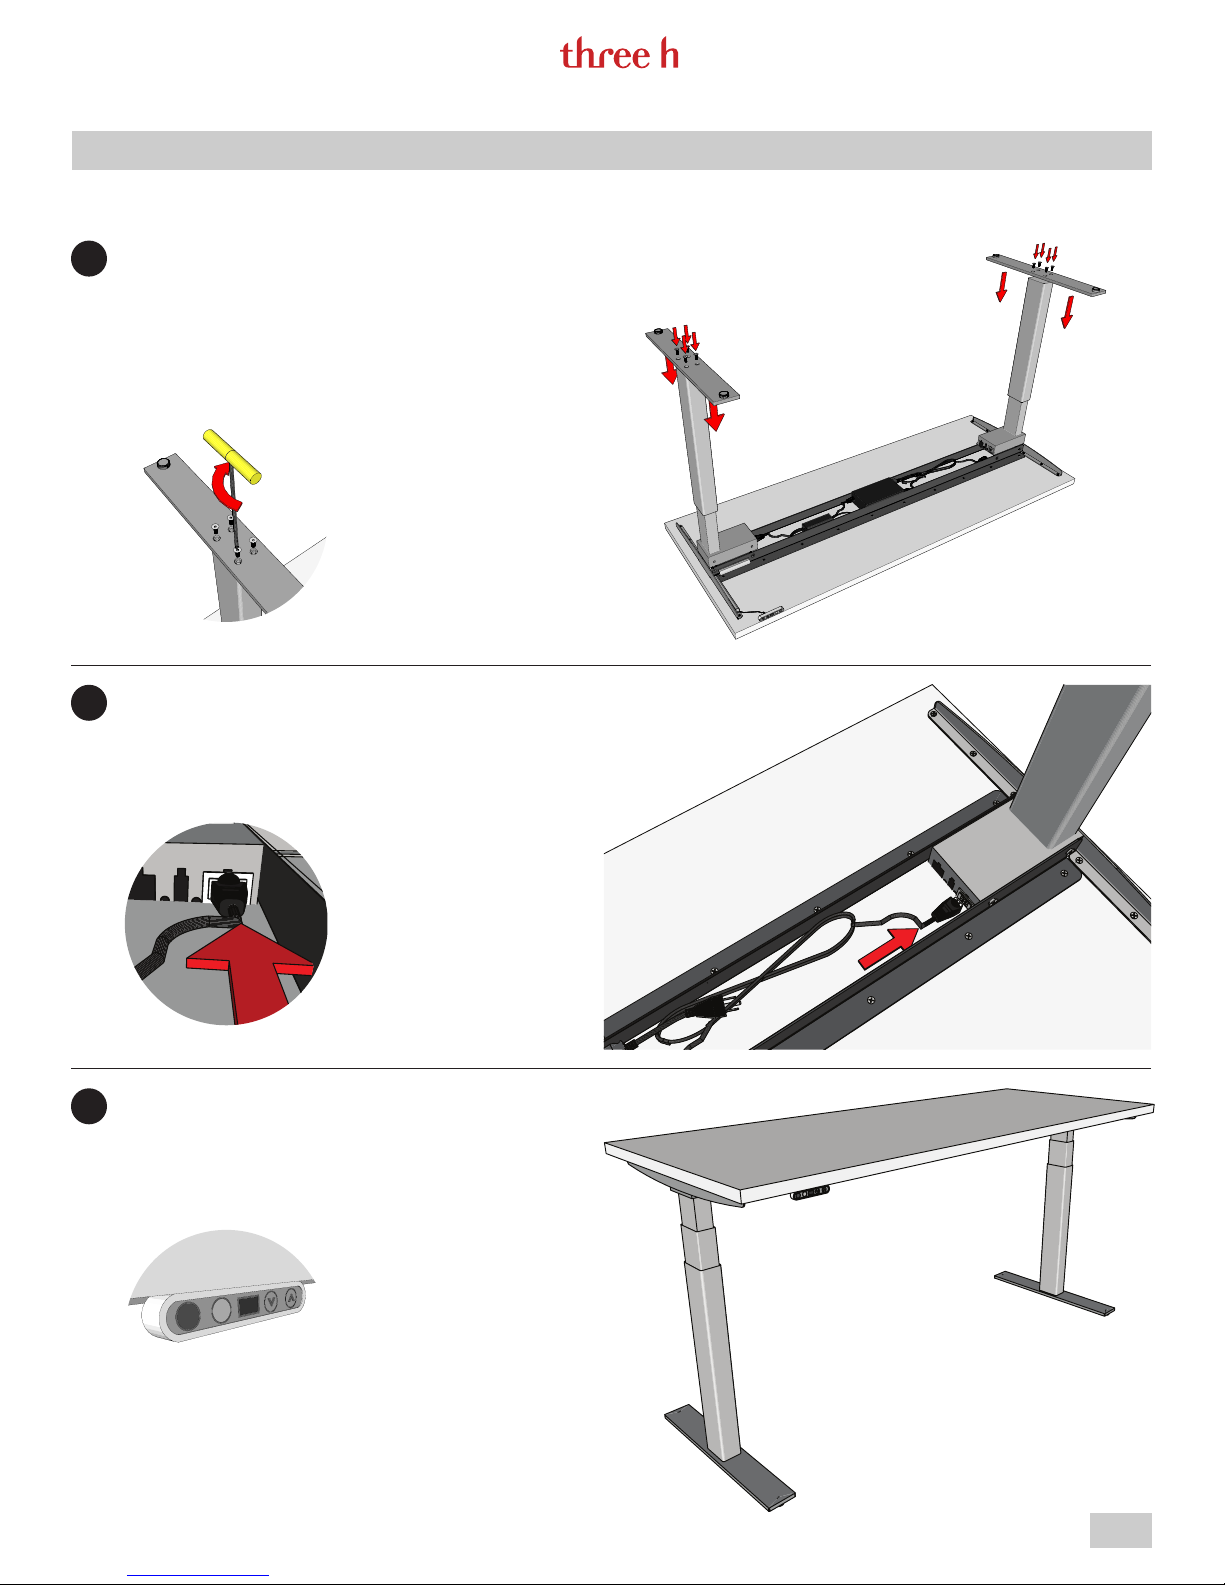
DESK TOP AND LEGS
1
Place desk top good side down on a clean
soft surface.
Place legs in position as shown.
Tools Required
LEG SECURE
2
Secure legs in place using 6 M6x16mm flat
socket cap bolt provided for each leg.
Pg. 2
LEG PLATES
3
Place bottom leg plates in position and
secure in place using 4 M6 x16mm flat
socket cap bolts provided for each plate.
GENERAL ASSEMBLY INSTRUCTIONS · SIZES MAY VARY
UPSIDE
POWER
4
Once the legs are secured in place and the
leg base plates are fasten securely, plug
the power cords into the legs.
INITIALIZATION
5
Turn desk to upright position and plug into
to outlet. Test the desk by lowering it to
the bottom and raising it to the top. If the
system fails initialization may be required.
(See page 8)
Pg. 3
GENERAL ASSEMBLY INSTRUCTIONS · SIZES MAY VARY
Important information
UPSIDE
Important information on LINAK
following headings:
Warning!
Failure to comply with these instructions may result in accidents
involving serious personal injury.
Failing to follow these instructions can result in the product being
damaged or being destroyed.
Safety instruction
General
Safe use of the system is possible only when the operating instructions
are read completely and the instructions contained are strictly observed.
Failure to comply with instructions marked with the ”NOTE” symbol may
result in serious damage to the system or one of its components.
It is important for everyone who is to connect, install, or use the
systems to have the necessary information and access to this User
Manual. Follow the instructions for mounting – risk of injury if
these instructions are not followed.
®
products can be found under the
The appliance is not intended for use by young children or infirm
persons without supervision.
If there is visible damage on the product it must not be installed.
Note that during construction of applications, in which the actuator
is to be fitted, there must be no possibility of personal injury, for
example the squeezing of fingers or arms.
Assure free space for movement of application in both directions to
avoid blockade.
Pg. 4

GENERAL ASSEMBLY INSTRUCTIONS · SIZES MAY VARY
www.linak.com/deskline
UPSIDE
Before installation, re-installation, or troubleshooting:
• Stop the DL5/DL6
• Pull out the mains plug.
• Relieve the DL5/DL6 of any loads, which may be released during the
work.
Before start-up:
• Make sure that the system has been installed as instructed in this User
Manual.
• Make sure that the voltage of the control box is correct before the
system is connected to the mains.
• System connection. The individual parts must be connected before the
control box is connected to the mains. See the User Manual for LINAK
actuators, if necessary.
During operation
• If the control box makes unusual noise or smells, switch off the mains
voltage immediately.
• Take care that the cables are not damaged.
• Unplug the mains cable on mobile equipment before it is moved.
• The products must only be used in an environment, that corresponds to
their IP protection.
Misc.
The actuator system has a sound level below 55dB(A) in typical
applications.
Updated manuals and declarations can always be found here:
Pg. 5

GENERAL ASSEMBLY INSTRUCTIONS · SIZES MAY VARY
UPSIDE
Repairs
In order to avoid the risk of malfunction, all DESKLINE® repairs must only be carried out by authorised LINAK
workshops or repairers, as special tools must be used and special gaskets must be fitted. Lifting units under
warranty must also be returned to authorised LINAK workshops.
Warning!
If any of the DESKLINE
®
products are opened, there will be a risk of subsequent malfunction.
Warning!
The DESKLINE
®
systems do not withstand cutting oil.
Pg. 6

GENERAL ASSEMBLY INSTRUCTIONS · SIZES MAY VARY
Electrical connection of the DL5/DL6 system
The DESKLINE® DL5/DL6 system is to be connected as shown on figure 4. Each DL5/DL6 is to be connected to
the sockets on the control box by means of the motor cables, which have an 6-pin plug in each end.
The CBD4/CBD5/CBD6 earth cable to be mounted on the desk construction (typically the top frame)in a way
any danger.
UPSIDE
Electrical connection of the DL5/DL6 system
The DESKLINE DL5/DL6 system is to be connected as shown on figure 4a (2 stage) or figure 4b (3 stage).
Each DL5/Dl6 is the connected to the sockets on the control box by means of the motor cables, which have
a 6-plug in each end. Figure 5.
Finally, the mains cable is to be mounted and power switched on.
Please note that the control box must only be connected to the voltage stated on the label.
CBD4/CBD5/CBD6 with earth
that ensures good electrical contact. The function of the earth cable is to earth the desk and ground static
electricity. The earth connection does not protect other electrical products.
CBD4/CBD5 with mains cut-off (non ZERO models)
If the power cable is damaged it has to be replaced by an authorized LINAK service centre to avoid
Figure 4a
Figure 4b
Figure 5
Pg. 7

GENERAL ASSEMBLY INSTRUCTIONS · SIZES MAY VARY
UPSIDE
Initialisation of the DESKLINE DL5/DL6 parallel systems
The DESKLINE system is intialised by pressing the down button once or twice and holding it down until DL5/
DL6 runs into end stop, it will then automatically run approx. 3 mm out again and hereafter slowly running in
again. Only release the down button when the movement has completely stopped.
If the key is released before the sequence is completed then the initialisation is interupted and must
be started again from the beginning.
It is sometimes necessary to press the down button twice to start the initialisation this is because the system
can be in different modes when the initialisation starts.
Approx. 5 mm
The CBD5 and CBD6 can control DL5 and DL6 in 2 parallel while the CBD4 can control DL5 and DL6 in 2, 3,
and 4 parallel so that the desk is always kept horizontal.
Anti-Collision™
The function (anti-collision) is an option for the standard CBD4/CBD5/CBD6 advanced/control box software
0077432 version 1.66 and later. A system with anti-collision can limit material damages on a desk if a
collision with a solid object should occur.
Enabling the anti-collision
To enable the anti-collision function a little plug called a dongle must be mounted in one of the 2 control
ports. The function is only active when the dongle is mounted. – If you remove the dongle again you disable
the function.
Method of operation
When the DL/DB’s are running the CBD4/CBD5/CBD6 monitors the current consumption on each channel
using a special algorithm. If the current consumption on one channel is increased more than a predefined
slope, a collision is assumed and all channels are stopped immediately and all DL/DB’s will start to run in the
opposite direction (approx. 50 mm). This return drive is done automatically and continues with or without
any control key pressed (for max. 2.5 sec.).
The anti-collision sensitivity is different in upward and downward direction. Upwards the force is approx. 20
kg. Downwards the load will be approx. 40 kg + the load on the DL/DB (the desk + what is on top of the
desk). The 40 kg are needed to activate the anti-collision function.
Situations where the anti-collision does not work
There are situations where the anti-collision will not be activated. These situations are:
• If the collision happens during the initialisation phase
• If the collision happens within the first 1000 msec or after the control button has been released
• If the collision happens between the floor and the table and the load on the desk + the weight of the legs
are lower than 40 kg
• If the collision happens over too long time, e.g. if the collision is with a soft object.
Pg. 8

DIAGNOSTIC CODES FOR CBD6S
DIAGNOSTIC
CODES
E01 Position Lost
E08 Watchdog
E09 LIN Collision Collisions detected on the LIN bus E49
E10 Power Fail Power fail happened E14
E11
E12 Position Error
E13 Short Circuit
E16 Key Error
NAME DESCRIPTION
Channel
mismatch
GENERAL ASSEMBLY INSTRUCTIONS · SIZES MAY VARY
The desk has an unknown position
and needs to be initialized
Indicate that software failed to kick
watchdog
Change in number of actuators
since initialization
One channel has position different
than others
Short circuit detected during
operation
Illegal keys pressed
(handled internally Dp1C)
CBD4/5/6
EQUIVALENT
POTENTIAL CAUSE
UPSIDE
E01
E08 • Program fault
E15
E13 • Too much back drive occurred
E10
E16 • Hitting multiple buttons simultaneously • Check switch
• Position error
• New desk leg added
• Key pressed on two or more connected
handsets simultaneously
• Multiple LINBUS devices activated
simultaneously
• Mains cable pulled during driving
• Internal fault
• Disconnection
• Desk leg added
• Squeezed motor cable
• Short in motor
• Initialize the system
• Unplug mains cable for 15 sec.
• Initialize the system
• Replace control box
• Check if another desk panel is
connected and being activated
• Unplug all but one desk panel
and test system
• Check mains cable is not caught and is
allowed to freely travel
• Check motor cable connections and integrity
• Change motor cable or Desk Leg
• Initialize the system
• Move table to fully retracted position
• Initialize the system
• Check motor cable connections
• Isolate and replace motor cable
• Isolate and replace desk leg
SOLUTION/
TROUBLESHOOTING
E17
E18
E23 Ch1 Missing Channel 1 is detected missing E17
E24 Ch2 Missing Channel 2 is detected missing E18
E25 Ch3 Missing Channel 3 is detected missing E19
E26 Ch4 Missing Channel 4 is detected missing E48
E27 Ch5 Missing Channel 5 is detected missing NEW • [Reserved for future development] • [Reserved for future development]
E28 Ch6 Missing Channel 6 is detected missing NEW • [Reserved for future development] • [Reserved for future development]
E29 Ch1 Type
E30 Ch2 Type
E31 Ch3 Type
E32 Ch4 Type
Safety Miss-
ing
Missing
Initialization
Plug
LIN bus unit does not support
safety feature
A special service tool is required to
change number of channels to the
system
Channel 1 is not same type as
when initialized
Channel 2 is not same type as
when initialized
Channel 3 is not same type as
when initialized
Channel 4 is not same type as
when initialized
NEW
NEW
E20
E21
E22
E23
• DP1C/ DPF1C does not have up-to-
date software
• [BASELIFT ONLY]
• Service tool missing from BASELIFT
system when initializing
• Disconnection
• Faulty motor cable
• Faulty motor leg
• Disconnection
• Faulty motor cable
• Faulty motor leg
• Disconnection
• Faulty motor cable
• Faulty motor leg
• Disconnection
• Faulty motor cable
• Faulty motor leg
• Change in desk leg type
• Loose wire inside motor
• Change in desk leg type
• Loose wire inside motor
• Change in desk leg type
• Loose wire inside motor
• Change in desk leg type
• Loose wire inside motor
• Try DP with more recent software
version (version printed on label)
• Add service tool
• Check motor cable connections and integrity
• Change motor cable or Desk Leg
• Initialize the system
• Check motor cable connections and integrity
• Change motor cable or Desk Leg
• Initialize the system
• Check motor cable connections and integrity
• Change motor cable or Desk Leg
• Initialize the system
• Check motor cable connections and integrity
• Change motor cable or Desk Leg
• Initialize the system
• Check desk leg type
• Change desk leg
• Initialize the system
• Check desk leg type
• Change desk leg
• Initialize the system
• Check desk leg type
• Change desk leg
• Initialize the system
• Check desk leg type
• Change desk leg
• Initialize the system
Pg. 9

DIAGNOSTIC CODES FOR CBD6S
DIAGNOSTIC
CODES
E33 Ch5 Type
E34 Ch6 Type
E35 Ch1 Pulse Fail
E36 Ch2 Pulse Fail
E37 Ch3 Pulse Fail
E38
E39 Ch5 Pulse Fail
E40
E41
Overload Up
NAME DESCRIPTION
Ch4 Pulse
Fail
Ch6 Pulse
Fail
Ch1
GENERAL ASSEMBLY INSTRUCTIONS · SIZES MAY VARY
Channel 5 is not same type as
when initialized
Channel 6 is not same type as
when initialized
Channel 1 had too many pulse
errors
Channel 2 had too many pulse
errors
Channel 3 had too many pulse
errors
Channel 4 had too many pulse
errors
Channel 5 had too many pulse
errors
Channel 6 had too many pulse
errors
Overload up occurred on Channel 1 E28
CBD4/5/6
EQUIVALENT
POTENTIAL CAUSE
SOLUTION/
TROUBLESHOOTING
UPSIDE
NEW • [Reserved for future development] • [Reserved for future development]
NEW • [Reserved for future development] • [Reserved for future development]
E24
E25
E26
E27
NEW • [Reserved for future development] • [Reserved for future development]
NEW • [Reserved for future development] • [Reserved for future development]
• Loose/ faulty cable
• Hall sensor PCB
• Loose/ faulty cable
• Hall sensor PCB
• Loose/ faulty cable
• Hall sensor PCB
• Loose/ faulty cable
• Hall sensor PCB
• Leg is overloaded
• Hit obstruction
• Reached end stop (before initialization
at upper end-stop occurs)
• Check motor cable connections and integrity
• Change Desk Leg
• Initialize the system
• Check motor cable connections and integrity
• Change Desk Leg
• Initialize the system
• Check motor cable connections and integrity
• Change Desk Leg
• Initialize the system
• Check motor cable connections and integrity
• Change Desk Leg
• Initialize the system
• Remove obstruction
• Remove load
• Initialize if necessary
E42
E43
E44
E45
E46
E47
E48
E49
Ch2
Overload Up
Ch3
Overload Up
Ch4
Overload Up
Ch5
Overload Up
Ch6
Overload Up
Ch1 Overload
DW
Ch2 Overload DWOverload down occurred on
Ch3 Overload DWOverload down occurred on
Overload up occurred on Channel 2 E29
Overload up occurred on Channel 3 E30
Overload up occurred on Channel 4 E31
Overload up occurred on Channel 5 NEW • [Reserved for future development] • [Reserved for future development]
Overload up occurred on Channel 6 NEW • [Reserved for future development] • [Reserved for future development]
Overload down occurred on
channel 1
channel 2
Channel 3
• Leg is overloaded
• Hit obstruction
• Reached end stop (before initialization
at upper end-stop occurs)
• Leg is overloaded
• Hit obstruction
• Reached end stop (before initialization
at upper end-stop occurs)
• Leg is overloaded
• Hit obstruction
• Reached end stop (before initialization
at upper end-stop occurs)
E32 • Hit obstruction
E33 • Hit obstruction
E34 • Hit obstruction
• Remove obstruction
• Remove load
• Initialize if necessary
• Remove obstruction
• Remove load
• Initialize if necessary
• Remove obstruction
• Remove load
• Initialize if necessary
• Remove obstruction
• Initialize if necessary
• Remove obstruction
• Initialize if necessary
• Remove obstruction
• Initialize if necessary
E50
E51
Ch4
Overload DW
Ch5 Overload DWOverload down occurred on
Overload down occurred on
Channel 4
Channel 5
E35 • Hit obstruction
NEW • [Reserved for future development] • [Reserved for future development]
• Remove obstruction
• Initialize if necessary
Pg. 10

DIAGNOSTIC CODES FOR CBD6S
DIAGNOSTIC
CODES
E52
E53 Ch1 Anti-Col
E54 Ch2 Anti-Col
E55 Ch3 Anti-Col
E56 Ch4 Anti-Col
E57 Ch5 Anti-Col
E58 Ch6 Anti-Col
E59
E60
E61
Overload DW
NAME DESCRIPTION
Ch6
Ch1 SLS/
PIEZO
Ch2 SLS/
PIEZO
Ch3 SLS/
PIEZO
GENERAL ASSEMBLY INSTRUCTIONS · SIZES MAY VARY
Overload down occurred on
Channel 6
Anti Collision triggered on
Channel 1
Anti Collision triggered on
Channel 2
Anti Collision triggered on
Channel 3
Anti Collision triggered on
Channel 4
Anti Collision triggered on
Channel 5
Anti Collision triggered on
Channel 6
Safety limit switch activated on
Channel 1
Safety limit switch activated on
Channel 2
Safety limit switch activated on
Channel 3
CBD4/5/6
EQUIVALENT
POTENTIAL CAUSE
SOLUTION/
TROUBLESHOOTING
UPSIDE
NEW • [Reserved for future development] • [Reserved for future development]
E36 • Hit obstruction
E37 • Hit obstruction
E38 • Hit obstruction
E39 • Hit obstruction
E36 • [Reserved for future development] • [Reserved for future development]
E37 • [Reserved for future development] • [Reserved for future development]
E40 • Hit obstruction
E41 • Hit obstruction
E42 • Hit obstruction
• Remove obstruction
• Initialize if necessary
• Remove obstruction
• Initialize if necessary
• Remove obstruction
• Initialize if necessary
• Remove obstruction
• Initialize if necessary
• Remove obstruction
• Initialize if necessary
• Remove obstruction
• Initialize if necessary
• Remove obstruction
• Initialize if necessary
E62
E63
E64
E65 Ch1 Pulse Dir
E66 Ch2 Pulse Dir
E67 Ch3 Pulse Dir
E68 Ch4 Pulse Dir
E69 Ch5 Pulse Dir
E70 Ch6 Pulse Dir
Ch4 SLS/
PIEZO
Ch5 SLS/
PIEZO
Ch6 SLS/
PIEZO
Safety limit switch activated on
Channel 4
Safety limit switch activated on
Channel 5
Safety limit switch activated on
Channel 6
Pulses counted wrong direction in
Channel 1
Pulses counted wrong direction in
Channel 2
Pulses counted wrong direction in
Channel 3
Pulses counted wrong direction in
Channel 4
Pulses counted wrong direction in
Channel 5
Pulses counted wrong direction in
Channel 6
E43 • Hit obstruction
NEW • [Reserved for future development] • [Reserved for future development]
NEW • [Reserved for future development] • [Reserved for future development]
E44
E45
E46
E47
NEW • [Reserved for future development] • [Reserved for future development]
NEW • [Reserved for future development] • [Reserved for future development]
• Motor poles are crossed
• Hall sensor Cables are crossed
• Motor poles are crossed
• Hall sensor Cables are crossed
• Motor poles are crossed
• Hall sensor Cables are crossed
• Motor poles are crossed
• Hall sensor Cables are crossed
• Remove obstruction
• Initialize if necessary
• Check motor cable connections and integrity
• Initialize the system
• Exchange desk leg
• Check motor cable connections and integrity
• Initialize the system
• Exchange desk leg
• Check motor cable connections and integrity
• Initialize the system
• Exchange desk leg
• Check motor cable connections and integrity
• Initialize the system
• Exchange desk leg
E71 Ch1A Short
E72 Ch1B Short
Short circuit detected on
Channel 1A
Short circuit detected on
Channel 1B
NEW • [Reserved for use with Homeline system] • [Reserved for use with Homeline system]
NEW • [Reserved for use with Homeline system] • [Reserved for use with Homeline system]
Pg. 11

Three H Furniture Systems Limited
156462 Clover Valley Rd.
New Liskeard, ON
Canada P0J 1P0
T. 1.800.767.5374
F. 1.888.484.5786
customer.service@three-h.com
www.three-h.com © 2017 Three H Furniture Systems Limited. All rights reserved.
 Loading...