

Page 1
easyTrack, Getting started 1(1)
Thrane & Thrane
TT-3026L/M
easyTrack
Getting Started
Thrane & Thrane-001 Rev. PA5 26. February 2002
© Thrane & Thrane. Commercial in Confidence
Page 2

easyTrack, Getting started 2(2)
1 Tabel of Contents
1 Tabel of Contents..............................................................................2
2 INTRODUCTION...............................................................................3
2.1 Free line of sight................................................................................3
2.2 Communication Modes....................................................................4
3 easyTrack COMMISIONING...........................................................5
3.1 Mobile number...................................................................................5
4 DNID – DATA NETWORK ID........................................................6
4.1 DNID Registration.............................................................................7
4.2 DNID Download................................................................................8
4.3 DNID Configuration..........................................................................10
5 EVENT.................................................................................................12
5.1 Event Configuration..........................................................................12
6 LAND MOBILE ALERT ...................................................................14
6.1 Land Mobile Alert Routing..............................................................14
6.2 Land Mobile Alert Configuration....................................................14
7 GENERAL CONFIGURATION........................................................15
7.1 Preferred Ocean Region....................................................................15
7.2 EGC – Enhanced Group Call.............................................................15
7.3 Local time............................................................................................17
8 APPENDIX 1 System Items..............................................................19
9 APPENDIX 2: COMMISSIONING FORM .....................................21
10 APPENDIX 3: DNID REGISTRATION FORM..............................23
Thrane & Thrane-001 Rev. PA5 26. February 2002
© Thrane & Thrane. Commercial in Confidence
Page 3
easyTrack, Getting started 3(3)
2 INTRODUCTION
This document describes how to commission and configure the tracking equipment
(TT-3026L/M easyTrack) for use on a mobile object such as a vehicle etc.
The following equipment is necessary to carry out the instructions in this document:
1) TT-3026L/M easyTrack
2) TT-3616B Break Out Box
3) TT-3682C 100-240VAC Desktop Power Supply
4) Opt. 940 Connection cable 5 meter w. 90 degrees angular plug
5) A PC/Laptop with Windows operating system
6) easyMail, messaging program (TT-10236A)
7) A standard RS -232 serial cable (f.ex: TT-37-108819)
8) Installation Manual (TT-98-116078-A)
For an overview of the items above refer to appendix 1.
Follow the next three steps:
1) Connect the Opt. 940 Connection cable 5 meter w. 90 degrees angular plug to the
TT-3616B Break Out Box in accordance with the TT-3026L/M easyTrack
Installation Manual (TT-98-116078-A) that you received together with the
easyTrack.
2) Connect a standard RS -232 serial cable between the TT-3616B Break Out Box
and your PC/Laptop.
3) Connect the TT-3682C 100-240VAC Desktop Power Supply to the TT-3616B
Break Out Box.
4) Power on the system. (The Red and Green LED on the Break Out Box should light
up).
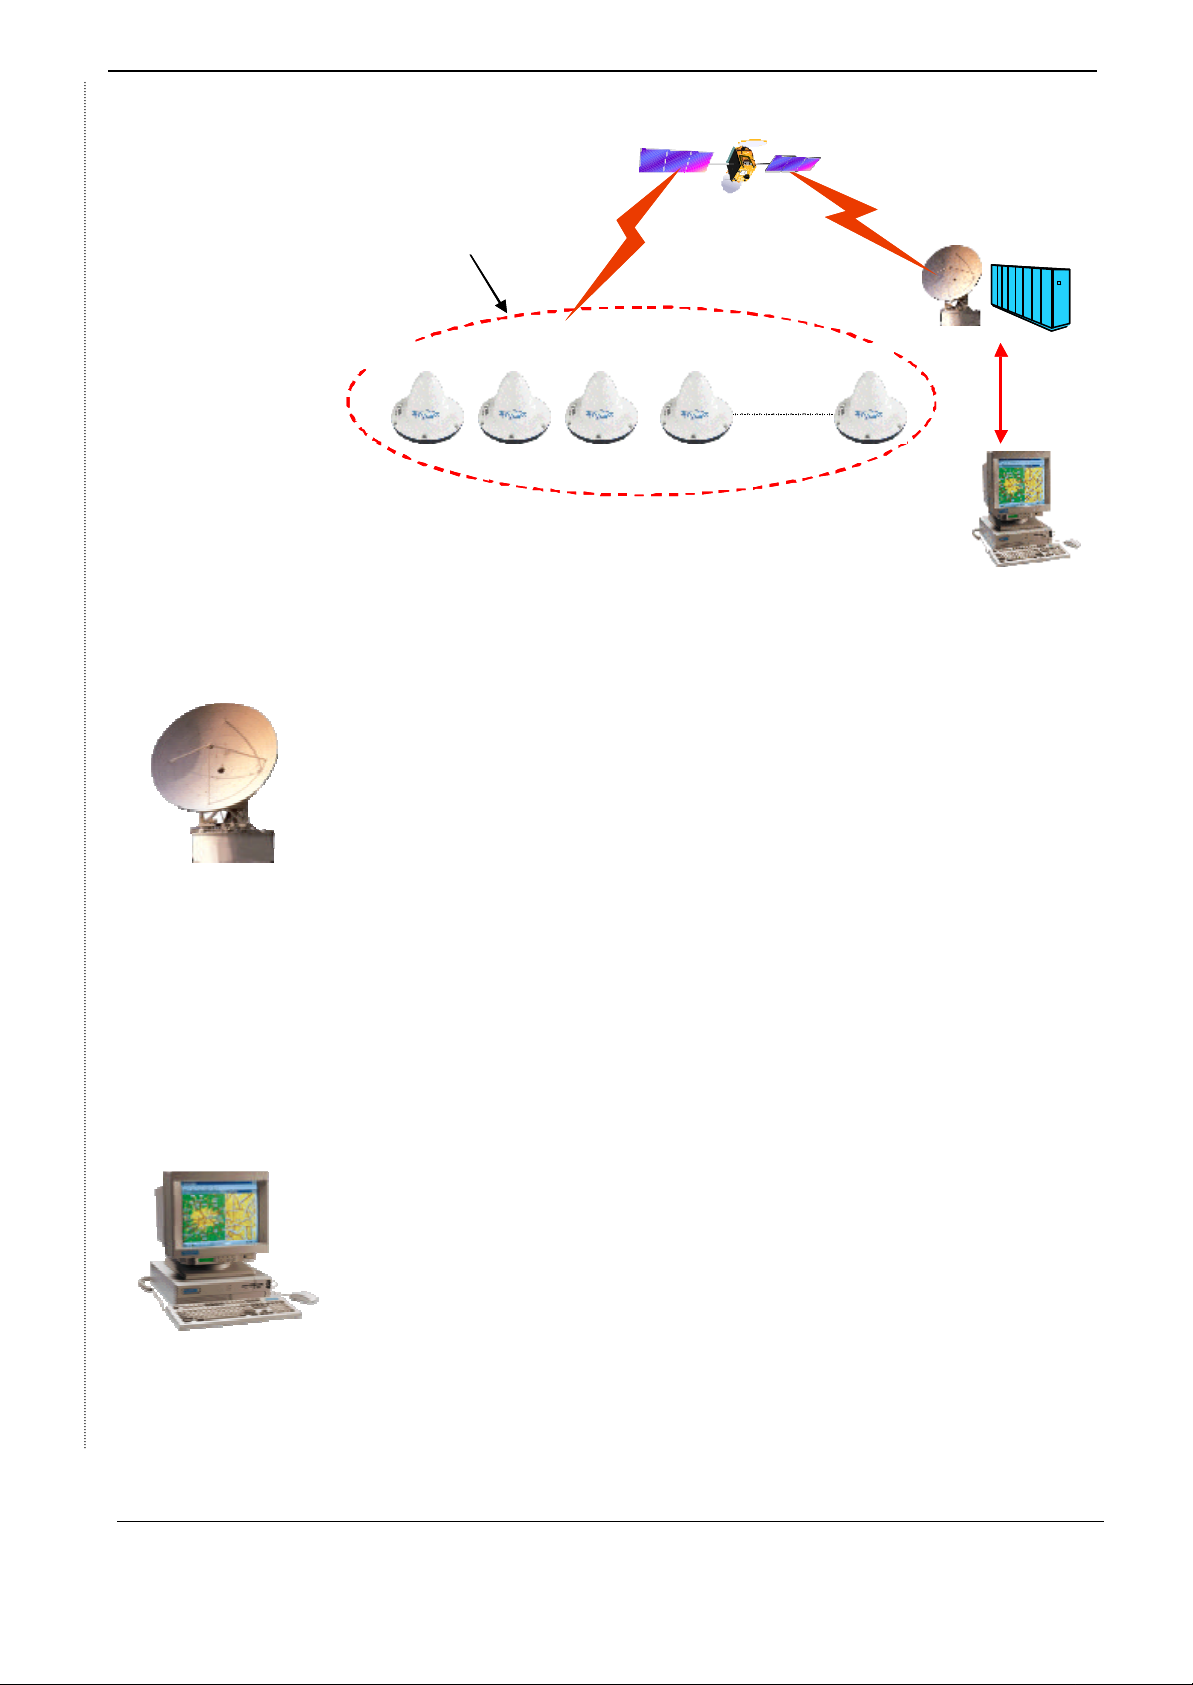
See figure 1 below:
Figure 1: System Set -up
2.1 Free line of sight
When the system has been set -up the easyTrack has to be switched on during the
whole session and has to be positioned to have a free line of sight to a satellite.
Thrane & Thrane-001 Rev. PA5 26. February 2002
© Thrane & Thrane. Commercial in Confidence
Page 4
easyTrack, Getting started 4(4)
Depending on your location on the globe you should choose the most optimal ocean
region (satellite) to use. A rule of thumb is to locate the easyTrack with a free line of
sight towards the Equator.
Figure 2: Inmarsat Coverage Map
The figure 2 above showing some examples of locations of easyTracks where each
of the four satellites is most appropriate.
North and South America:
If the easyTrack is going to be used in North or South America the most appropriate
satellite to use is West Atlantic. See figure 2 above.
Europe and Africa:
If the easyTrack is going to be used in Europe or Africa the most appropriate satellite
to use is East Atlantic. See figure 2 above.
Russia, China, India etc.:
If the easyTrack is going to be used in Russia, China, India etc. the most appropriate
satellite to use is Indian Ocean. See figure 2 above.
Australia:
If the easyTrack is going to be used in Australia the most appropriate satellite to use
is Pacific Ocean. See figure 2 above.
2.2 Communication Modes
Basically the Inmarsat -C system has 3 different modes: The messaging mode, the
reporting mode and the distress mode.
− Messaging Mode:
This mode is used to send and receive free text messages of up to
10Kbytes.
− Reporting Mode:
This mode is used to send short messages like: Position reports, Data
Thrane & Thrane-001 Rev. PA5 26. February 2002
© Thrane & Thrane. Commercial in Confidence
Page 5
easyTrack, Getting started 5(5)
reports and Pre-programmed messages from the vehicle to the Fleet
Tracking/Management software at the office. This mode can be compared
to the SMS service from cellular systems.
− Distress Mode:
This mode is used to send Land Mobile Alert back to the home office in
case of a distress situation. A single press on a button can activate this
mode. The T&T Opt. 112 external Alarm Button is available for that.
3 easyTrack COMMIS SIONING
Before you can use the easyTrack it has to be activated for communication in
Inmarsat’s database. In order to do this you must commission the easyTrack at your
national Telecom or directly with a Land Earth Station (LES).
Together with the easyTrack shipment you also receive an Inmarsat commission
form, which has to be filled in with customer details and faxed to the national
Telecom or the LES. See appendix 2.
Print appendix 2 and fill in the remaining spaces.
On the commissioning form you must fill in:
• Company details
• Type of Mobile Earth Station (Inmarsat -C)
• Mobile type (TT-3026L) and manufacturer (Thrane & Thrane)
• Inmarsat Serial Number (ISN) (4TT0871 XXXXXX) which can be found on the
label at the bottom of the easyTrack. See figure 3 below.
Figure 3: easyTrack Serial Number Label
When the national Telecom or LES has finished the registration procedures they will
send you details about your mobile number for the easyTrack. This mobile number is
necessary to send messages to your easyTrack.
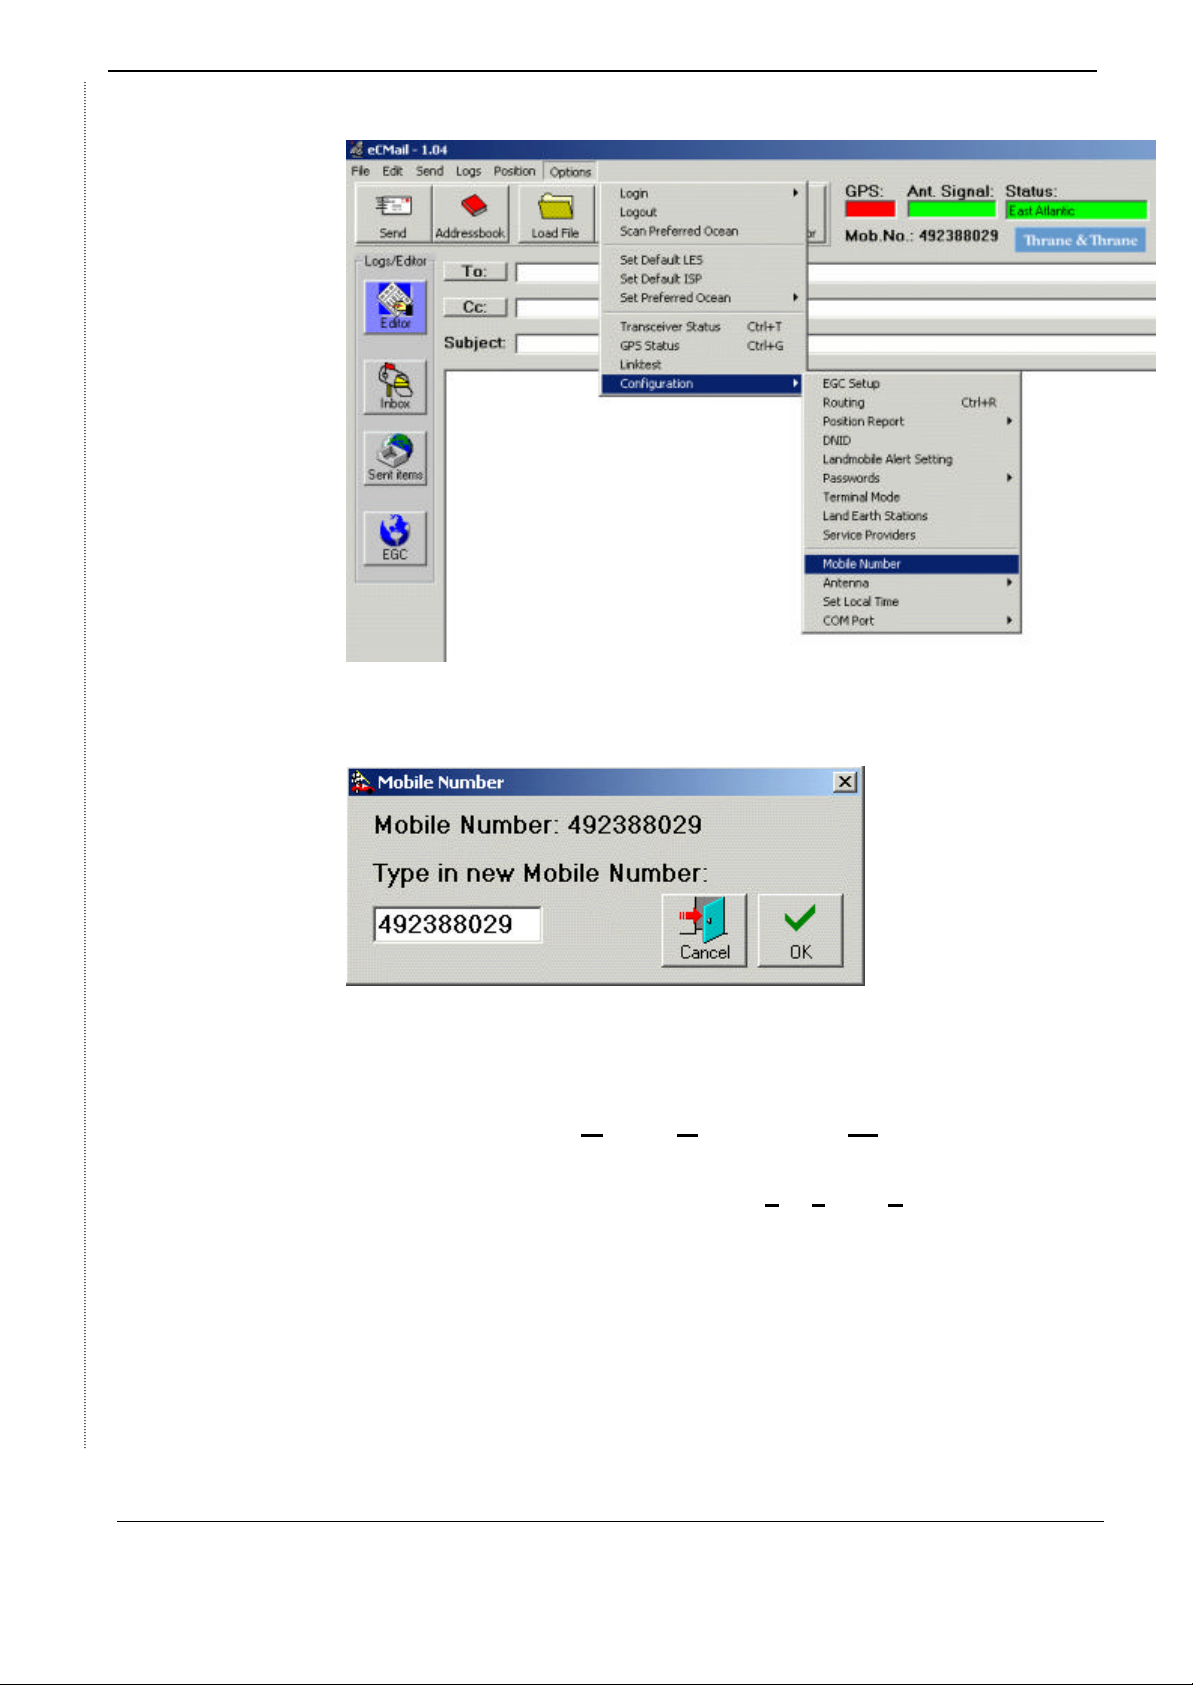
3.1 Mobile number
The mobile number provided by your local Telecom or LES is a nine digit number
starting with “4”. It is advisable to enter this mobile number into the easyTrack to be
able to remember it at all time.
To enter the mobile number in to the easyTrack with the easyMail software please
use the menu shown in figure 4:
Thrane & Thrane-001 Rev. PA5 26. February 2002
© Thrane & Thrane. Commercial in Confidence
Page 6
easyTrack, Getting started 6(6)
Figure 4: Mobile Number Menu
After selecting the Mobile Number menu the window in figure 5 will appear:
Figure 5: Mobile Number Window
Please type in the mobile number you received from the local Telecom or LES and
press the OK button.
4 DNID – DATA N ETWORK ID
To be able to use the data-/position reporting mode in the Inmarsat -C system you
need a so-called DNID number. DNID stands for Data Network Identity.
DNID:
The DNID number refers to a mailbox at the Land Earth Station (LES) where all
position/data reports from your easyTracks will be sent. With one DNID number you
can track up to 255 easyTracks. If you have a fleet with more than 255 easyTracks
you will need two or more DNID numbers.
Member Number:
To be able to distinguish between the 255 easyTracks on one DNID number, each of
the easyTrack units has a unique member number, which can be between 1 and
255. See figure 6 visualizing a fleet of easyTracks.
Thrane & Thrane-001 Rev. PA5 26. February 2002
© Thrane & Thrane. Commercial in Confidence
Page 7
easyTrack, Getting started 7(7)
Land Earth Station
Land Earth Station
DNID
Fleet with same DNID
Fleet with same DNID
DNID
Account
Account
Member no.1
Member no.1
2 3 4 ……..… 255
2 3 4 ……..… 255
Control Centre
Control Centre
Figure 6: Fleet of easyTrack
4.1 DNID Registration
To get a DNID number you have to contact the local telecom or LES that you want to
use for tracking. You can use the DNID Registration Form in appendix 3 when
applying for a DNID number.
When applying for a DNID number the LES needs the following information:
1) Customer name, Company Address, Customer e-mail address
2) Select ALL Ocean regions. See appendix 3.
3) Select Delivery Destination address for your position/data reports.
E-Mail:
E-Mail is the cheapest way to receive position/data reports and to send poll
commands. You have to inform the Land Earth Station Operator (LE SO) to set up
your DNID account to accept e-mails coming from the e-mail address your fleet
tracking software uses to send the poll commands. This is to prevent e-mail
spamming from other unknown e-mail addresses.
FTP:
This is a direct connection to the LES via the Internet, where the fleet tracking
software has to ping the DNID account for position/data reports.
ISDN/PSTN/X.25-Modem number:
This is a direct connection to the LES two-stage interface where the fleet tracking
software logs in with the username and password that you received when you
registered the DNID. After log on with username and password it is possible to send
poll commands, retrieve position/data reports and send text messages to
easyTracks.
4) Select Delivery option (Immediate forwarding/ Mailbox storage / Scheduled
forwarding)
Immediate Forward:
Thrane & Thrane-001 Rev. PA5 26. February 2002
© Thrane & Thrane. Commercial in Confidence
Page 8

easyTrack, Getting started 8(8)
With this configuration the LES will automatically deliver the position/data reports to
the fleet management software every time it receives position/data reports in the
DNID mailbox.
Mailbox Storage:
When mailbox storage at the LES has been chosen then it is up to the fleet
management software to connect to the LES and retrieve the position/data reports
when needed.
Scheduled forwarding:
With this configuration the LES will deliver the position/data reports at certain
schedules specified by the owner of the DNID account.
5) Select Position/Data report decoding to be T&T header. See appendix 3.
6) Select Message Header to be API header. See appendix 3.
7) Sign the DNID Commissioning form and send it to the LESO.
After registering your DNID the LESO will send you information about UserID and
Password to your DNID account. Whenever you contact the LESO regarding your
DNID account you must inform them about your UserID.
4.2 DNID Download
After you have received your DNID number from the LES the DNID number has to
be downloaded to each of the easyTracks. The LESO can do that over the air, via
the satellite link upon your request.
This is done by:
1) Log the easyTrack into the ocean region.
2) Contact the LESO for DNID download request.
3) Inform the LESO which DNID Number and Member Number to download
4) Inform the LESO which ocean region your mobile is logged in to.
5) Wait until the DNID download has been done.
You can check which DNIDs have been downloaded to your easyTrack using the
DNID menu in easyMail. See figure 7 below:
Thrane & Thrane-001 Rev. PA5 26. February 2002
© Thrane & Thrane. Commercial in Confidence
Page 9

easyTrack, Getting started 9(9)
Figure 7: DNID Menu
When you have chosen the DNID menu point the window in figure 8 will appear.
Figure 8: DNID List Window
At the above example you can see that the DNID Number 8087 has been
downloaded to all four oceans via EIK LES in Norway (004, 104, 204 & 304).
Thrane & Thrane-001 Rev. PA5 26. February 2002
© Thrane & Thrane. Commercial in Confidence
Page 10

easyTrack, Getting started 10(10)
4.3 DNID Configuration
When the DNID has been downloaded to the easyTrack each DNID has to be
configured to report the desired information i.e. I/O status, position, speed & heading
etc.
This configuration can be done from terminal mode in easyMail
4.3.1 Configuring an DNID entry
Each DNID entry has to be configured to report the required information. It is done
with the command dn –p
The format of the command dn –p is as follows:
DN –p <entry>,<auth>,<cat>,<date>,<iopin>,<speed>
Where each parameter means the following:
entry: This is the DNID entry number in the DNID entry list (dn –d). See picture of
terminal mode in figure 9.
auth: Authority level: 0-3, 0:normal user, 1:super user, 2: sysadm, 3: distributor.
cat: Format of data reports using this DNID.
0 = Land mobile position report
1 = Maritime position report
date: Add additional time and date information to data reports using this DNID.
0 = no time and date information included.
1 = time and date information, type 1, included.
2 = time and date information, type 2, included.
3 = time and date information, type 3, included.
iopin: Include IO-pin status in all data reports using this DNID.
0 = no IO-pin status included.
1 = IO-pin status included.
speed: Add additional speed and course information to data reports using this DNID
0 = no speed and course info included.
1 = speed and course info included.
Thrane & Thrane-001 Rev. PA5 26. February 2002
© Thrane & Thrane. Commercial in Confidence
Page 11

easyTrack, Getting started 11(11)
Figure 9: dn Terminal Mode Window
The most common use of DNID configuration for fleet tracking applications is to send
information about position, speed & heading and I/O pins. The configuration for that
is described below:
Entry Id = The DNID No. to configure (see output from dn –d in figure 9).
Auth = 0 ;Normal user (no protection).
Cat = 0 ;Land Mobile report.
Date = 0 ;Exclude Fishery Date formats
Iopin = 1 ;Include I/O pins in second packet of report
Speed = 1 ;Include Speed (km), Course and Altitude in second packet of report
To configure this for DNID Number 8000 in East Atlantic (DNID entry 0, LES 104)
you have to issue the following command to the easyTrack from Terminal Mode in
easyMail:
dn –p 0,0,0,0,1,1<return>
See figure 9.
To investigate how a specific DNID entry is configured you can use the command dn
–d <entry>.
: dn -d 0<return>
LES DNID Mem auth cat date io speed
104 8000 100 0 0 0 1 1
See also figure 9 showing output dn –d in Terminal Mode.
Thrane & Thrane-001 Rev. PA5 26. February 2002
© Thrane & Thrane. Commercial in Confidence
Page 12

easyTrack, Getting started 12(12)
For further detailed information about DNID Configuration refer to “TT-3026L/M
easyTrack Transceiver Software Interface Reference Manual “ (TT-98-116080)
5 EVENT
The easyTrack supports issuing of extra data/position reports triggered by I/O pin
changes, which could indicate disconnection of trailer, opened door etc.
This configuration can be done from Terminal Mode in easyMail.
5.1 Event Configuration
The ev command is used to program an DNID entry to send event reports according
to events.
The ev command has several options as shown below:
-o <LES>,<DNID>[,<mem>] : Create event program
-c <entry> : Delete event program
-p <entry>,<cat>,<powerctrl>,<sleepmode>,<io> : Data format
-d : Display event status
To make an event program it is necessary first to use the –o option to open a new
event entry specifying a LES and DNID pair. F.ex:
ev –o 104,8000
See figure 10 showing terminal mode window:
Thrane & Thrane-001 Rev. PA5 26. February 2002
© Thrane & Thrane. Commercial in Confidence
Page 13

easyTrack, Getting started 13(13)
Figure 10: Terminal Mode Window
To display the event entries available use the –d option.
: ev –d<return>
Id LES DNID Mem auth cat pwctrl sleep io
0: 104 8000 100 0 0 0 0 0
See figure 10 showing picture of terminal mode window, which shows that there is no
event active as “pwctrl”, “sleep” and “io” all are 0 (zero).
To configure this event entry (Id 0) to report every time an i/o pin changes use the
option –p. See below dump and the figure 10 of terminal mode window.
: ev -p 0,0,0,0,1
To check if the event program has been programmed correct use the ev –d
command as shown below and also on the figure 10 of terminal mode window.
: ev -d
Id LES DNID Mem auth cat pwctrl sleep io
0: 104 8000 100 0 0 0 0 1
Now the ev –d command shows that the “io” is “1” which will make the easyTrack
send position reports every time the i/o pins changes state.
Thrane & Thrane-001 Rev. PA5 26. February 2002
© Thrane & Thrane. Commercial in Confidence
Page 14

easyTrack, Getting started 14(14)
For further detailed information about Event Programming refer to TT3026L/M
easyTrack Transceiver Software Interface Reference Manual (TT-98-116080)
6 LAND MOBILE ALERT
The Land Mobile Alert functionality uses the Distress channel in the Inmarsat -C
system. It is therefore very important that the LES has been configured correctly
before using this functionality.
6.1 Land Mobile Alert Routing
In order to enable the Land Mobile Alert feature at the LES contact the LESO and
inform them about which mobile numbers you intend to use for Land Mobile Alert and
inform them to which address you want the alerts to be routed.
The types of destination addresses available are:
E-MAIL, TELEX, ISDN/PSTN -MODEM, PSTN/ISDN FAX and X.25.
The most common is to route the Land Mobile Alerts to the Fleet Tracking software
or your control centre.
6.2 Land Mobile Alert Configuration
In order to enable the Land Mobile Alert feature in the easyTrack some configuration
needs to be done using Terminal Mode in easyMail.
To enable the Land Mobile Alert function in the easyTrack type following command:
Se –k 1<return>
1) To disable Land Mobile Alert function in the easyTrack type following command:
Se –k 0<return>
Use following command to set up which LESes to use for the Land Mobile Alerts in
each Ocean region:
Se –m <aorw-les no>,<aore-les no>,<por-les no>,<ior-les no>
For instance:
Se –m 004,104,0,304
Where Pacific Ocean region LES No. is set to 0 (zero) because it is unused in this
example.
To view the setting type:
Se –m ALL_OCEANS
Which for instance can show the below:
LES IDs : 4, 104, 0, 304
For further detailed information about Land Mobile Alert configuration refer to
TT3026L/M easyTrack Transceiver Software Interface Reference Manual (TT-98-
116080)
Thrane & Thrane-001 Rev. PA5 26. February 2002
© Thrane & Thrane. Commercial in Confidence
Page 15

easyTrack, Getting started 15(15)
7 GENERAL CONFIGURATION
There are a couple of general configurations that need to be configured before the
easyTrack is ready to be installed on a vehicle.
7.1 Preferred Ocean Region
If the easyTrack is used in one ocean region only you should configure the preferred
ocean region option. This is done with easyMail by choosing the Set Preferred
Ocean menu. See figure 11:
Figure 11: Set Preferred Ocean Menu
The “Set Preferred Ocean” determines which ocean region the easyTrack shall scan
for if it loses sight of the used satellite.
If Preferred Ocean is set to “None” then it will scan all ocean regions.
If the easyTrack is used in one ocean region then it is recommended to set the
Preferred Ocean to the satellite in question.
For further detailed information about Preferred Ocean Region Settings refer to
TT3026L/M easyTrack Transceiver Software Interface Reference Manual (TT-98-
116080)
7.2 EGC – Enhanced Group Call
If there is no need for the broadcasted Inmarsat-C system information it is
recommended to disable reception of all EGC messages as this just fills up the
flashdisk storage in the easyTrack. Select “EGC Set -up” menu in easyMail to do this.
See the menu in figure 12 below:
Thrane & Thrane-001 Rev. PA5 26. February 2002
© Thrane & Thrane. Commercial in Confidence
Page 16

easyTrack, Getting started 16(16)
Figure 12: EGC Setup Menu
Deselect everything on the EGC window as shown in figure 13 below from easyMail
and then press OK.
Figure 13: EGC Setup Window
Thrane & Thrane-001 Rev. PA5 26. February 2002
© Thrane & Thrane. Commercial in Confidence
Page 17

easyTrack, Getting started 17(17)
7.3 Local time
When the easyTrack is connected to a PC running easyMail, easyMail will set the
PC’s system time to the local time configured in the easyTrack. This is to ensure
consistency in the timestamps on incoming messages.
It is recommended to set the local time difference in the easyTrack so it reflects the
time zone at your location. Thereby easyMail will not change your system time on the
PC.
To set the local time difference in the easyTrack select the “Set Local Time” menu as
shown in figure 14:
Figure 14: Set Local Time
After selecting the “Set Loc al Time” menu point the Set Local Time Window shown in
figure 15 will appear.
Figure 15: Set Local Time Window
Select your local time difference from the UTC (Universal Time Clock) and press the
OK button.
Now Windows clock in the lower right corner (see figure 16) should change and
show your local time at your location.
Thrane & Thrane-001 Rev. PA5 26. February 2002
© Thrane & Thrane. Commercial in Confidence
Page 18

easyTrack, Getting started 18(18)
Figure 16: Windows Clock
The easyTrack is now configured and it is time to test it.
Thrane & Thrane-001 Rev. PA5 26. February 2002
© Thrane & Thrane. Commercial in Confidence
Page 19

easyTrack, Getting started 19(19)
8 APPENDIX 1
System Items
Thrane & Thrane
Mini-C
TT-3026L
Januar 2002
Product number: Product description:
TT-3026L easyTrack Land-mobile system, incl. Integrated mini-C
Transceiver, Omni directional Antenna, 12 channel GPS,
5 x I/O pins + 1 Alarm input and integrated 10.5-32Vdc
Power Supply.
Options:
Opt.940 Connection cable, 5 meter with 90 degrees angular plug
Opt.941 Connection cable, 5 meter Straight
Opt.942 Connection cable, 10 meter Straight
Opt.943 Connection cable, 20 meter Straight
Opt.944 RS-232 DB -9 Plug with screw-terminals
Opt.112 Land-Mobile Alert Button
Thrane & Thrane-001 Rev. PA5 26. February 2002
© Thrane & Thrane. Commercial in Confidence
Page 20

easyTrack, Getting started 20(20)
Accessories:
TT-3616B easyTrack Break -Out Box
TT-3682C 100-240VAC to DC Desktop Power Supply
TT-37-108299-A Cigarette Lighter to TT-3616B Power Cable
Operators Terminal:
TT-3606C Message Terminal
Opt. 301 PCMCIA 512K Memory card
Opt. 920 Mounting Cradle for TT-3606C incl. 2 meter cable (DB-9 Plug)
TT-10236A easyMail, Windows 95/98/NT/2000 Messaging program
Thrane & Thrane-001 Rev. PA5 26. February 2002
© Thrane & Thrane. Commercial in Confidence
Page 21

easyTrack, Getting started 21(21)
9 APPENDIX 2:
COMMISSIONING FORM
Registration for service activation
of Land Mobile Earth Station
PSA use only code
Application number
Tick Boxes as appropriate.
Please write in block capitals Date Day Month Year
Customer’s reference number
1. Your details
Your name or the name of your organisation:
Address:
Town/city: State/province:
Post/ZIP code: Country:
Telephone + Country code ( ) Area code ( ) Telephone number ( )
Facsimile + Country Code ( ) Area code ( ) Facsimile number ( )
Contact person:
Title: Department:
What is their telephone number and/or extension? + Country code ( ) Area code ( ) Telephone number (
)
2. Paying the bill
With whom have you arranged payment of calls for this MES? The Service Provider The Accounting Authority
What is their code: If the Code is unknown, enter their name:
Thrane & Thrane-001 Rev. PA5 26. February 2002
© Thrane & Thrane. Commercial in Confidence
Page 22

easyTrack, Getting started 22(22)
5. Certification and agreement
4
8 7 4 T 0 T
3. What type of Mobile Earth Station (MES) are you registering?
What will be the primary use of the MES?
Enviroment usage The System Land mobile/Land fixed
Land Mobile Inmarsat-C Government Agents
Land Fixed Transport Tourism
Media Rental
Security Energy & resource
management
Finance Other
Please specify
Humanitarian Agriculture
and emergency
Construction Mining
What will be the country of registry of this MES?
Mobile Earth Station (MES) manufacturer: THRANE & THRANE Mobile Earth Station (MES) model TT-3026L
4. Inmarsat-C Services
Enter your Inmarsat Normal-C Serial number (. . . . . . . . . . . . . . . . . . . . . . . . . . . . . . . . . . . . .)
OR…Enter Inmarsat Serial Number (ISN) for Mini-C
PSA use only
Privacy Telex answerback Inmarsat Mobile number
Accepts the above Account. AA Signature:
(Enter AA Code)
I the owner, have read and agree to comply with the ‘Terms
Date:
and Conditions for (signed) the use of the Inmarsat space
segment’, in particular with all applicable national laws and
regulations relating to the use of Inmarsat Mobile Terminals.
Thrane & Thrane-001 Rev. PA5 26. February 2002
© Thrane & Thrane. Commercial in Confidence
Page 23

easyTrack, Getting started 23(23)
10 APPENDIX 3:
DNID REGISTRATION FORM
In order to utilize the Polling and Data reporting service the customer must be a
registered user. If you are not a registered user please contact us and we will send
you the necessary registration form. For downloading of DNID the Downloading
request of DNID for Polling and Data reporting form must be filled in.
Please type or use Block Letters.
All fields must be filled in.
Customer name
Customer address
Customer contact
E-Mail address
Ocean Region(s)
Delivery Destination ¨ E-mail ¨ X.25 ¨ PSTN/ISDN-modem ¨ FTP
Delivery Address
Delivery Options ¨ Immediate ¨ Retrieved (mailbox) ¨ Scheduled – Time/intervals:
Datareport decoding x T&T header
Message header x API header
x ALL
To be filled in by
Land Earth
User Identity
Station
By signing this registration form you have accepted the responsibility for payment of
charges related to Polling and Data reporting service.
Signature
Signature by
authorised person
Date Name Signature
Thrane & Thrane-001 Rev. PA5 26. February 2002
© Thrane & Thrane. Commercial in Confidence
DNID
 Loading...