

Page 1

PROGRAMMING GUIDE
SP3300 VHF
Page 2

SP3300 Programming Guide
Page 3

SP3300 Programming Guide
Contents
1 Introduction ...................................................................................................... 5
2 Required Equipment........................................................................................ 5
3 Installation and Usage of Software................................................................ 5
4 Method .............................................................................................................. 5
5 Password .......................................................................................................... 6
6 The Program ..................................................................................................... 6
Appendix ............................................................................................................... 15
Doc. No.: 60.273 Issue: B/0601
1
Page 4

SP3300 Programming Guide
2
Page 5

SP3300 Programming Guide
1 Introduction
This programming guide concerns the programming of the SP3300 Portable GMDSS
VHF radio.
The audience is intended to be Thrane & Thrane authorized service-personnel having
received proper training. Basically, the program is self-explanatory. Please read the
messages on the PC display carefully.
It is important to understand, that this programming utility also covers other models
of radios which are not in the Thrane & Thrane product portfolio right now. Therefore,
some functions are not allowed (no reaction on changes made).
2 Required Equipment
• SP3300 Portable GMDSS VHF radio
• Programming kit including BNC antenna adaptor and programming cable,
(part no. 739920)
• PC fitted with a COM-port, MS Windows XP
• Programming software, supplied on CD-ROM (partno: 739921) or
downloaded from the Thrane & Thrane extranet.
•
Battery: lithium battery (part no.: 55.360) or charged NiCa battery(part no.: 55.359)
3 Installation and Usage of Software
Create and name a directory on the C-drive, for example “SP3300”. Copy the files from
the CD-ROM into that directory.
Run the program by executing the file:
SP3300.exe
The functions and options will be described later in this programming guide.
4 Method
4.1 Fit the Antenna / BNC adapter to radio, make sure the BNC adapter connects
properly to the outer ring of the antenna connector, fit battery pack to radio.
4.2 Connect programming cable to COM port 1 of PC and then to the antenna
adaptor of radio.
The cable contains electronics and this will eventually break if connected in
reverse order!
4.3 Turn on radio while pressing down Scan, D/W and Ù keys. The radio should now
show PROG in the LCD display.
4.4 Start PC software by opening the execute file SP3300 (see chapter 6).
0601
3
Page 6

SP3300 Programming Guide
5 Password
PASSWORD IS: jack-tarr
Please note that on-screen letters are in capitals despite the settings of the keyboard.
6 The Program
When starting the program, the initial box will appear as a window on the PC display.
Note that this is NOT a mouse-cursor driven window. Use the direction keys to
navigate in the window.
Enter the mentioned password:
4
Page 7

SP3300 Programming Guide
6.1 Press PC key “1” to continue (if the cable and connector is added to port 2 –
then choose port “2”).The PC display will be similar to the below:
In case of re-programming: Press key “1” to continue. Please note that radios leave
the factory with a factory setting complying with the regulations. The PC display will
be similar to the display shown below:
5
Page 8

SP3300 Programming Guide
Press any key and the data from the radio will appear, ready for editing:
Now the initial data is loaded and can be altered following the instructions:
Press any key to go back to main menu:
Press key “3” to modify data:
6
Page 9

SP3300 Programming Guide
Comments//Please note that:
The screen copy shows the factory settings.
Sign-on text
Toggles between different start-up messages: Blank, GMDSS or DEBEG
Country:
Selects primary mode. NVM´s with INT (International) selected for the First Country
flag will receive on the INT Rx frequencies. The radio can be switched to USA with
weather channels if the VOL key is activated on power-up unless the Selected Mode
Only flag is set (Second Mode–YES).
Second Mode:
Enables or disables switch to USA with weather channels.
Scanning:
Enables or disables Scan and Memory Scan functions.
Channel 10 Scan:
Enables or disables channel 10 from SCAN facility (Scanning channel 10 is not
permitted in some countries)
Dual Watch:
Enables or disables Dual Watch.
Tri Watch:
Enables or disables Tri Watch.
Priority Channel:
Selects alternate channel to be monitored when Dual Watch is enabled.
7
Page 10

SP3300 Programming Guide
First key beep:
Enables or disables key beep.
Startup Channel (SC):
Selects the channel to be displayed on power up, usually Channel 16. Pressing
“SPACE” results in the shown window:
Watch Channel (WC):
Selects third channel to be monitored when Tri Watch is enabled.
USA/Canada Weather Channels:
Enables or disables USA weather channels.
ATIS Identifier:
An option which can be implemented, but it is not standard. Stores Automatic
Transmission Identification System (ATIS).
DSC Identifier:
Maritime Mobile Service Identity (MMSI) number – NOT AN OPTION FOR GMDSS
PORTABLE VHF.
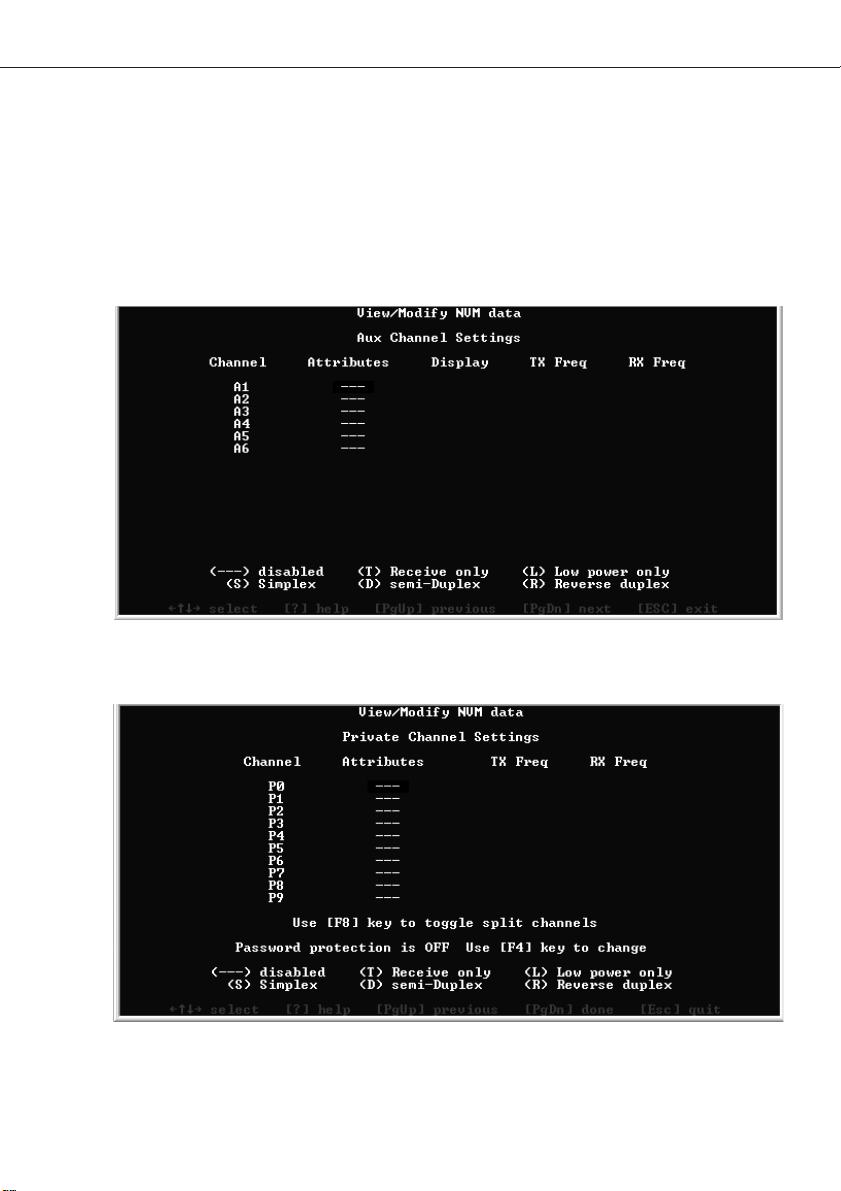
Press the “Page Down” key and more parameters shows up:
8
Page 11
SP3300 Programming Guide
Attribute settings can be changed by
a: Select required channel, using direction keys
b: Enter one of the attributes shown on the list at the bottom of the screen, simply
by pressing the selected key
c: Confirm by pressing “Enter”
This procedure also includes the attribute-settings shown in the next screencopy:
Press “Page Down” once more:
It may not be possible to change these attributes.
Press “Page Down” once more:
“Page Down” confirms any changes made.
It may not be possible to change these attributes.
PLEASE NOTE: The password protection toggle shall NOT be used. Do NOT
change this attribute – it does not apply to the GMDSS functionality.
9
Page 12

SP3300 Programming Guide
Press key “4” to save data in the radio.
Press key “5” to save data to a disk.
10
Page 13

SP3300 Programming Guide
The name “xyz” has been chosen for the example:
The file can be used later for reprogramming other radios.
In case of reloading the factory settings by loading the “mg1.dat” data file
supplied on the CD-ROM:
Start the programming mode as previously described. In the option menu, press “2”
to load NVM-data from a file. In fact, it is the same procedure as loading NVM-data
from the radio. When prompted for a file name, choose “mg1.dat” from the location
where the file is saved (in this example it is located on c:\)
When the NVM-data has been loaded into the PC, press any key to upload the data.
11
Page 14

SP3300 Programming Guide
Press any key and return to options. Choose “4” to save data to the radio.
If the programming is successful, the PC display will be similar to below after
approximately 20 seconds.
When the programming has been completed, !
Press any key to revert to the options menu.
Press “Esc” to quit the program.
Shut off the radio.
Disconnect the cable from the antenna-adaptor.
Disconnect the antenna adaptor from the radio.
Disconnect the programming cable from the PC.
In either case, thoroughly test that the radio operates as expected.That is, check the
settings simply by performing calls.
12
Page 15

Appendix
Model Programming File
SP3300 MG1.DAT
SP3300 Programming Guide
13
Page 16

Thrane & Thrane A/S • info@thrane.com • www.thrane.com
 Loading...