

Thrane&Thrane SAILOR 5133G, SAILOR 5134B, SAILOR 5132C, SAILOR 5133F, SAILOR 5132F Technical Manual
...Page 1
TECHNICAL MANUAL
SAILOR SYSTEM 5000 GMDSS CONSOLE
Page 2

Disclaimer
Any responsibility or liability for loss or damage in connection with the use of this product and the
accompanying documentation is disclaimed by Thrane & Thrane. The information in this manual is
provided for information purposes only, is subject to change without notice and may contain errors or
inaccuracies.
Manuals issued by Thrane & Thrane are periodically revised and updated. Anyone relying on this
information should acquire the most current version e.g. from the Thrane & Thrane Extranet at
http://extranet.thrane.com.
Thrane & Thrane is not responsible for the content or accuracy of any translations or reproductions, in
whole or in part, of this manual from any other source.
0935
Page 3

Console 5000
0930
CONTENTS
1 General information .......................................................................... 1-1
2 Installation ......................................................................................... 2-1
2.1 Dimensions.......................................................................................... 2-1
2.2 Drilling and cutting template ................................................................ 2-4
2.2.1 Tabletop mounting for 325mm and 400mm section ............................ 2-4
2.2.2 Tabletop mounting for 3 x 400mm section .......................................... 2-4
2.2.3 Bulkhead mounting for 325mm and 400mm section ........................... 2-5
2.2.4 Bulkhead mounting for 3 x 400mm section ......................................... 2-5
2.2.5 Earth stubs mounting .......................................................................... 2-6
2.2.6 Placement of print ............................................................................... 2-6
2.3 Mounting the console onto the bulkhead............................................. 2-7
2.4 Paper roll ............................................................................................. 2-9
2.5 Control units ........................................................................................ 2-9
2.6 Message terminal ................................................................................ 2-10
2.7 Factory configuration of the console ................................................... 2-11
3 Electrical installation ........................................................................ 3-1
3.1 TT-3606E opt. 003 NMEA Adapter for mini-C ..................................... 3-1
3.2 Grounding cables ................................................................................ 3-2
3.3 Console light........................................................................................ 3-3
3.4 Connection board ................................................................................ 3-4
3.5 Schematic connection board ............................................................... 3-5
4 Installation cables ............................................................................. 4-1
4.1 Console wiring system ........................................................................ 4-1
4.2 Internal cables overview ...................................................................... 4-2
4.2.1
Internal cables 2 section console w/ MF/HF Radiotelex, mini-C and VHF .......
4-4
4.2.2
Internal cables 3 section console w/ MF/HF Radiotelex, mini-C and VHF .......
4-5
4.2.3 Internal cables 3 section console w/ MF/HF, 2 x mini-C and VHF ...... 4-6
4.2.4 Internal cables 1 section console w/ MF/HF and VHF......................... 4-7
4.3 Installation external cabling ................................................................. 4-8
4.3.1 External cabling -
Emergency light, Battery Panel and position source ........
4-8
4.3.2 External cabling - Alarm Panel ............................................................ 4-9
4.3.3 External cabling - VHF ........................................................................ 4-9
4.3.4 External cabling - MF/HF ..................................................................... 4-10
4.3.5 External cabling - mini-C and Power supply ........................................ 4-10
Page 4

Page 5

1 General information Console 5000
1-1
0815
1 General information
With the System 5000 GMDSS console, all the communication equipment of the ship can be combined
in one small, compact console.
One of the main purposes of the console is to make the best possible use of the limited space on board
a ship. Furthermore, the fact that all the equipment is kept in the same place makes installation easy and
fast. Finally, the modular structure of the system means that it can easily be altered if for example a need
to have it extended should arise.
The standard console includes the following: Emergency light, battery panel, and connection board.
Furthermore, the console is designed with removable front plates for easy service and maintenance.
The console can be configured to match any maritime communication need. On the following pages,
some typical configurations are shown.
Page 6

1 General information Console 5000
1-2
0815
Page 7
2 Installation Console 5000
2-1
0929
2 Installation
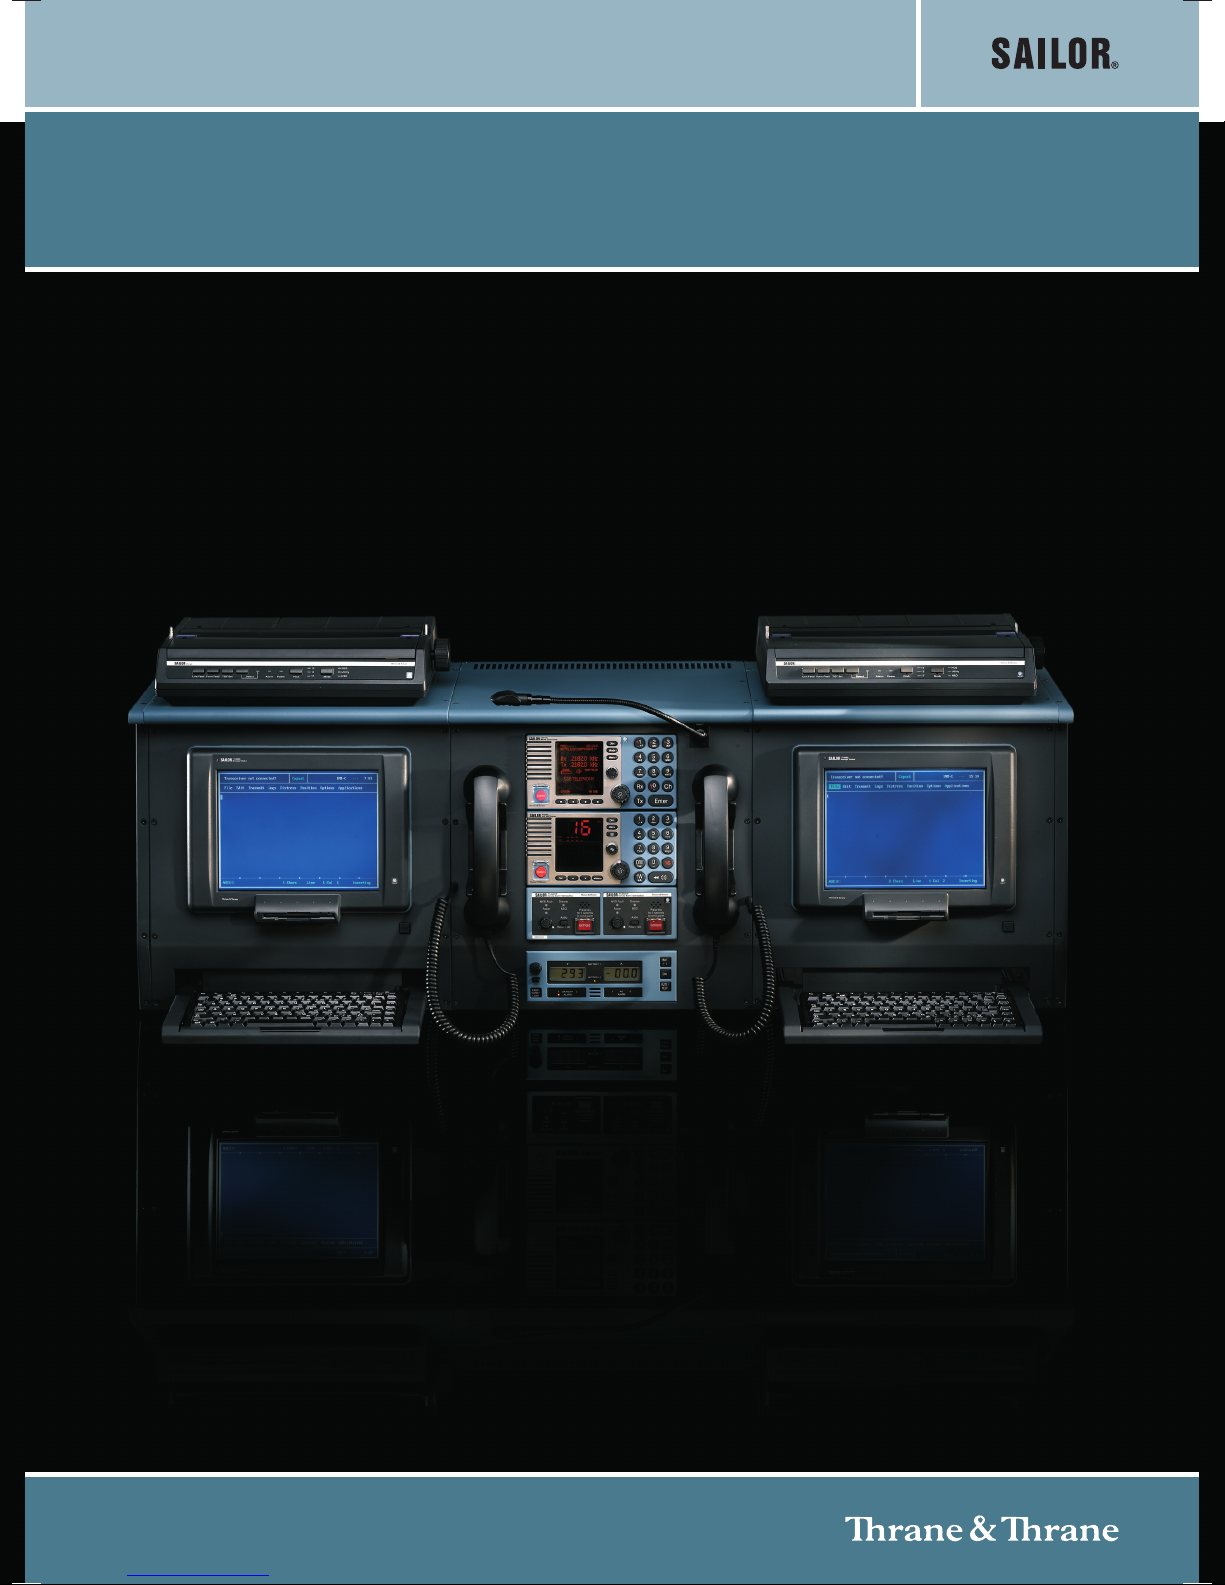
2.1 Dimensions
Console type numbers and part numbers refer to console hardware only, i.e. an empty console with only battery
panel, emergency light and connection board(s) installed.
Equipment illustrated for reference only.
Type: 5135C
Console part no.: 405135C-THRxx
BATTERY
ALARM
V
1
GENCY
EMER-
LIGHT
BATTERY 1
BATTERY 2
2A2AC1
ALARM
MUTE/
1 - 2
BATT
DIM
TEST
1645
405
500
99-127880
2 pcs. CU51x0 MF/HF Control Unit
TT-3043CP Console Panel
3 pcs. H1252B Parallel Printer
3 pcs. TT-3606E Message Terminal
Weight:
excl. units 60 kg.
incl. units 89 kg.
Type: 5134C
Console part no.: 405134C-THRxx
BATTERY
ALARM
V
1
GENCY
EMER-
LIGHT
BATTERY 1
BATTERY 2
2A2AC1
ALARM
MUTE/
1 - 2
BATT
DIM
TEST
1245
405
500
375
99-126990
CU51x0 MF/HF Control Unit
RT502x VHF Radio
TT-3043CP-2 Console Panel
2 pcs. H1252B Parallel Printer
2 pcs. TT-3606E Message Terminal
Weight:
excl. units 45 kg.
incl. units 65 kg.
Type: 5134B
Console part no.: 405134B-THRxx
BATTERY
ALARM
V
1
GENCY
EMER-
LIGHT
BATTERY 1
BATTERY 2
2A2AC1
ALARM
MUTE/
1 - 2
BATT
DIM
TEST
1170
405
500
375
99-127178
CU51x0 MF/HF Control Unit
TT-3043CP-2 Console Panel
2 pcs. H1252B Parallel Printer
2 pcs. TT-3606E Message Terminal
Weight:
excl. units 45 kg.
incl. units 65 kg.
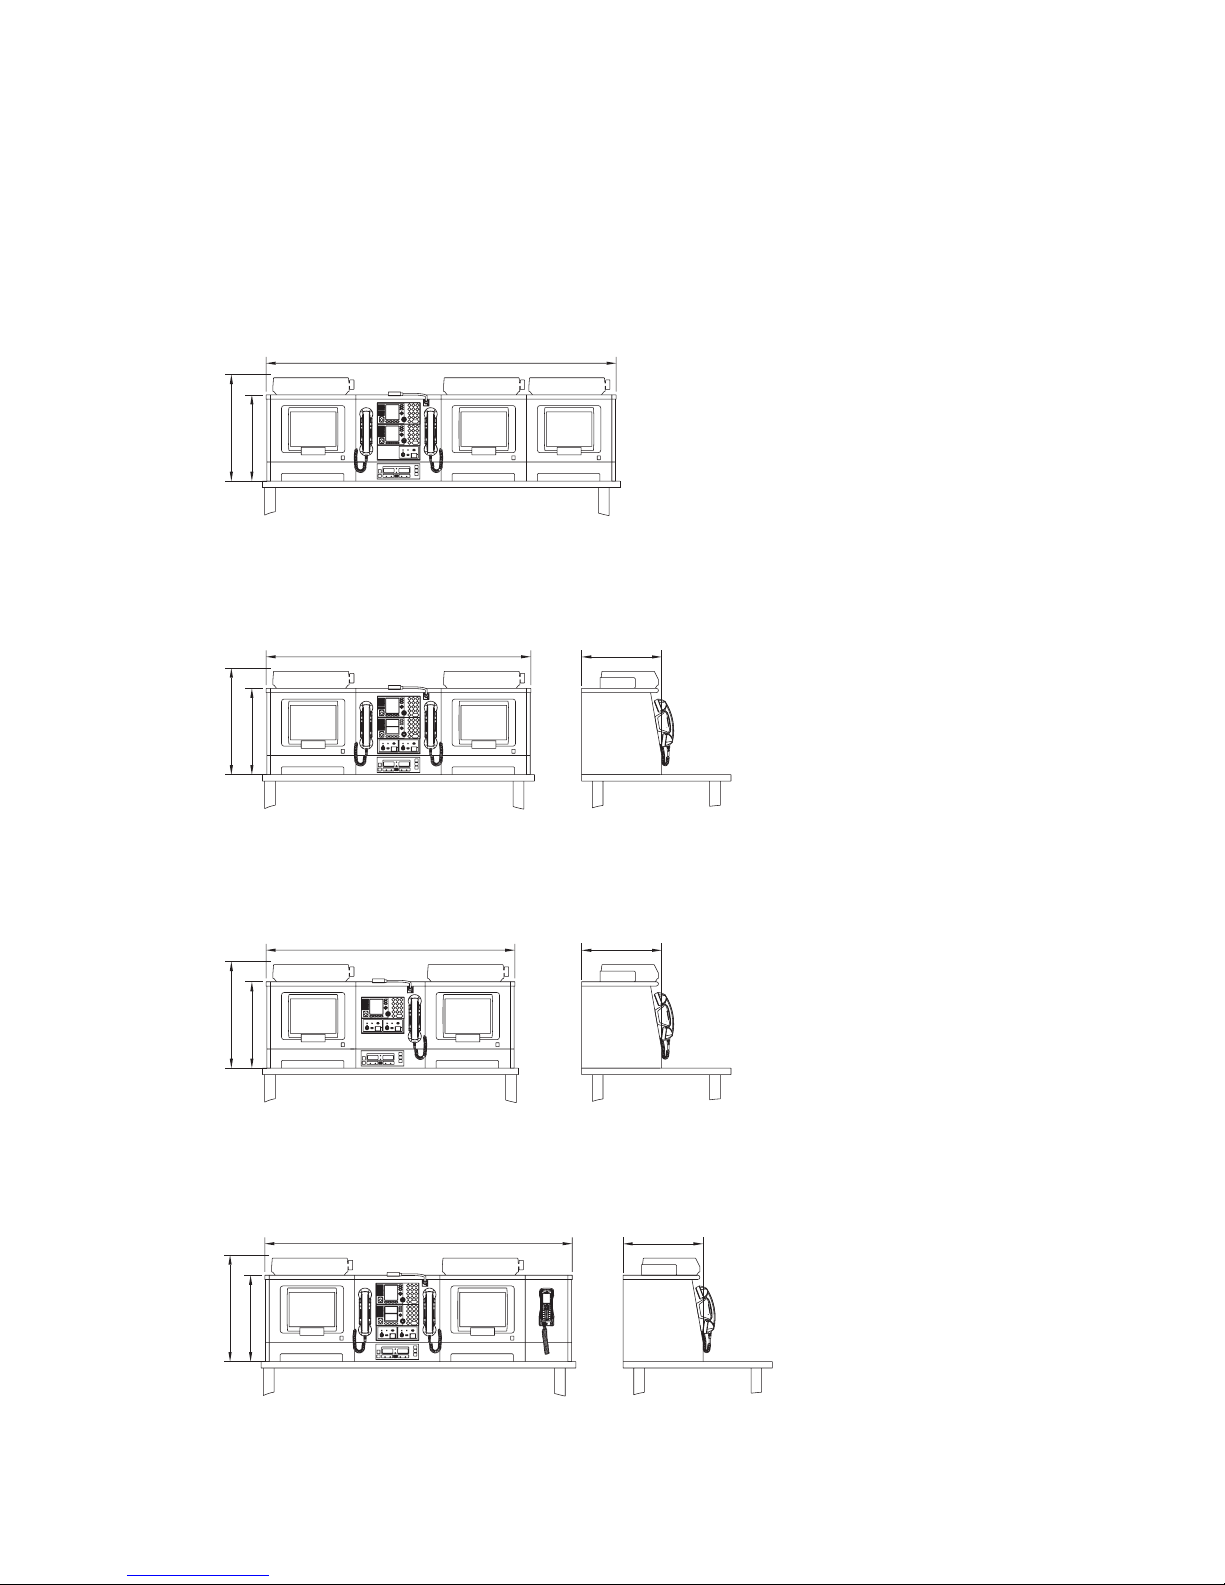
Type: 5134F
Console part no.: 405134F-THRxx
BATTERY
ALARM
V
1
GENCY
EMER-
LIGHT
BATTERY 1
BATTERY 2
2A2AC1
ALARM
MUTE/
1 - 2
BATT
DIM
TEST
1445
405
500
375
99-129806
CU51x0 MF/HF Control Unit
RT502x VHF Radio
TT-3043CP-2 Console Panel
2 pcs. H1252B Parallel Printer
2 pcs. TT-3606E Message Terminal
1 pcs. TT-3670 IP Handset
Weight:
excl. units 50 kg.
incl. units 71 kg.
Page 8
2 Installation Console 5000
2-2
0930
Type: 5134G
Console part no.: 405134G-THRxx
BATTERY
ALARM
V
1
GENCY
EMER-
LIGHT
BATTERY 1
BATTERY 2
2A2AC1
ALARM
MUTE/
1 - 2
BATT
DIM
TEST
1645
405
500
375
99-129805
CU51x0 MF/HF Control Unit
RT502x VHF Radio
TT-3043CP-2 Console Panel
2 pcs. H1252B Parallel Printer
2 pcs. TT-3606E Message Terminal
Weight:
excl. units 58 kg.
incl. units 78 kg.
Type: 5133C
Console part no.: 405133C-THRxx
BATTERY
ALARM
V
1
GENCY
EMER-
LIGHT
BATTERY 1
BATTERY 2
2A2AC1
ALARM
MUTE/
1 - 2
BATT
DIM
TEST
1245
405
500
375
99-126991
CU51x0 MF/HF Control Unit
RT502x VHF Radio
TT-3043CP Console Panel
2 pcs. H1252B Parallel Printer
2 pcs. TT-3606E Message Terminal
Weight:
excl. units 45 kg.
incl. units 65 kg.
Type: 5133G
Console part no.: 405133G-THRxx
BATTERY
ALARM
V
1
GENCY
EMER-
LIGHT
BATTERY 1
BATTERY 2
2A2AC1
ALARM
MUTE/
1 - 2
BATT
DIM
TEST
1645
405
500
375
99-129807
CU51x0 MF/HF Control Unit
RT502x VHF Radio
TT-3043CP Console Panel
2 pcs. H1252B Parallel Printer
2 pcs. TT-3606E Message Terminal
Weight:
excl. units 58 kg.
incl. units 78 kg.
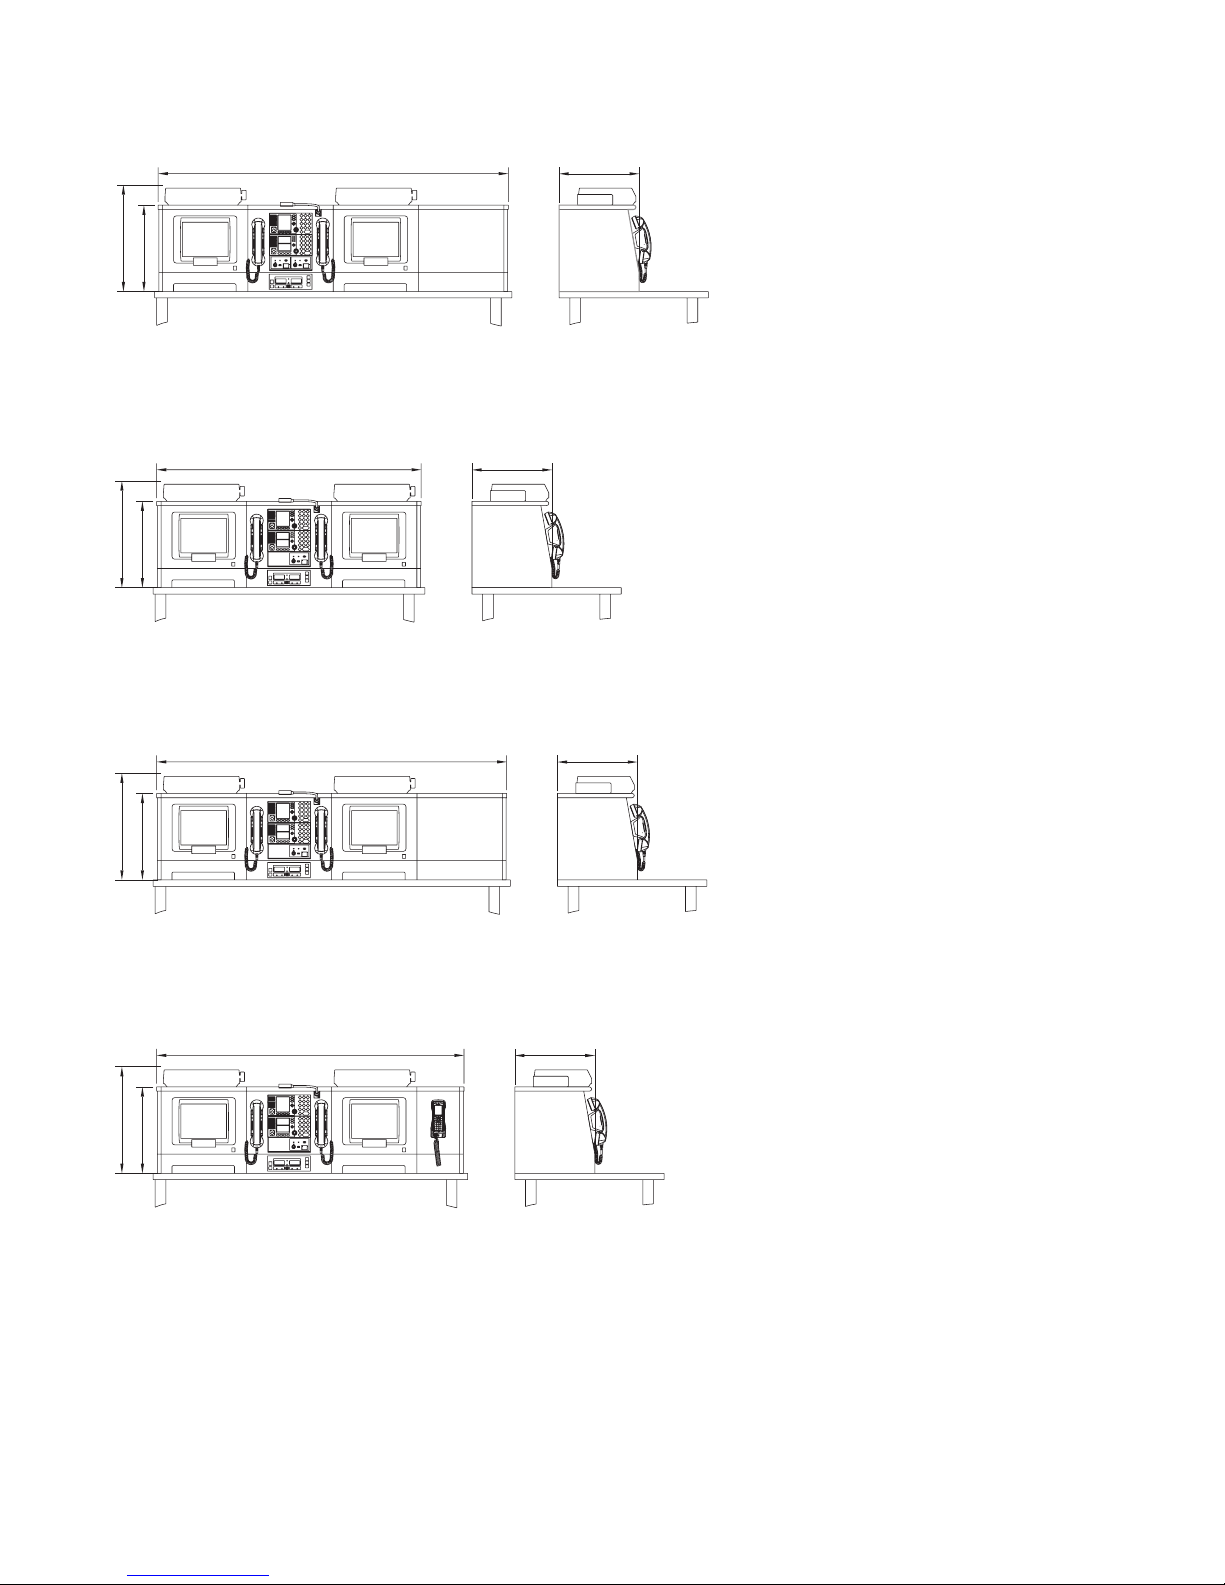
Type: 5133F
Console part no.: 405133F-THRxx
BATTERY
ALARM
V
1
GENCY
EMER-
LIGHT
BATTERY 1
BATTERY 2
2A2AC1
ALARM
MUTE/
1 - 2
BATT
DIM
TEST
1445
405
500
375
99-129808
CU51x0 MF/HF Control Unit
RT502x VHF Radio
TT-3043CP Console Panel
2 pcs. H1252B Parallel Printer
2 pcs. TT-3606E Message Terminal
1 pcs. TT-3670 IP Handset
Weight:
excl. units 50 kg.
incl. units 71 kg.
Page 9
2 Installation Console 5000
2-3
Type: 5132C
Console part no.: 405132C-THRxx
BATTERY
ALARM
V
1
GENCY
EMER-
LIGHT
BATTERY 1
BATTERY 2
2A2AC1
ALARM
MUTE/
1 - 2
BATT
DIM
TEST
845
405
500
375
99-126992
CU51x0 MF/HF Control Unit
RT502x VHF Radio
TT-3043CP Console Panel
2 pcs. H1252B Parallel Printer
TT-3606E Message Terminal
Weight:
excl. units 30 kg.
incl. units 51 kg.
Type: 5132F
Console part no.: 405132F-THRxx
BATTERY
ALARM
V
1
GENCY
EMER-
LIGHT
BATTERY 1
BATTERY 2
2A2AC1
ALARM
MUTE/
1 - 2
BATT
DIM
TEST
1045
405
500
375
99-129809
CU51x0 MF/HF Control Unit
RT502x VHF Radio
TT-3043CP Console Panel
2 pcs. H1252B Parallel Printer
TT-3606E Message Terminal
1 pcs. TT-3670 IP Handset
Weight:
excl. units 35 kg.
incl. units 57 kg.
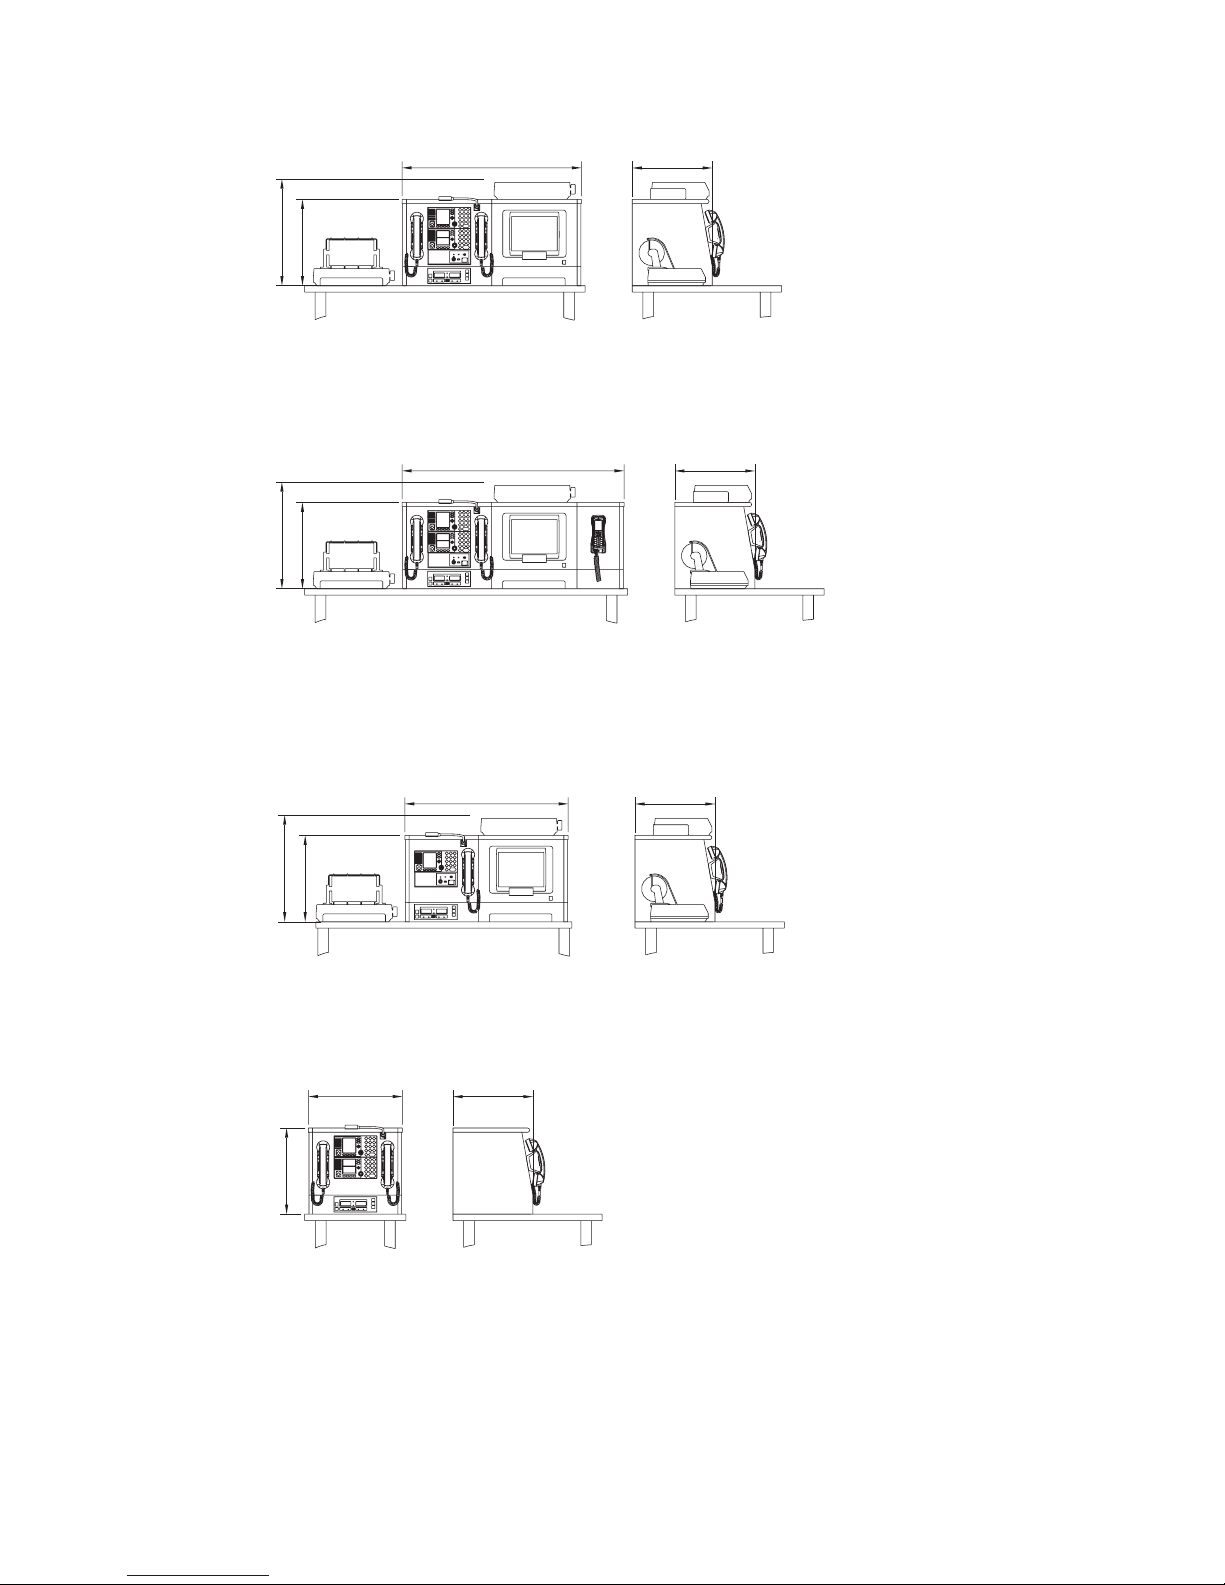
Type: 5132B
Console part no.: 405132B-THRxx
BATTERY
ALARM
V
1
GENCY
EMER-
LIGHT
BATTERY 1
BATTERY 2
2A2AC1
ALARM
MUTE/
1 - 2
BATT
DIM
TEST
770
405
500
375
99-127179
CU51x0 MF/HF Control Unit
TT-3043CP Console Panel
2 pcs. H1252B Parallel Printer
TT-3606E Message Terminal
Weight:
excl. units 28 kg.
incl. units 45 kg.
Type: 5131A
Console part no.: 405131A-THRxx
BATTERY
ALARM
V
1
GENCY
EMER-
LIGHT
BATTERY 1
BATTERY 2
2A2AC1
ALARM
MUTE/
1 - 2
BATT
DIM
TEST
445
405
375
99-126993
CU51x0 MF/HF Control Unit
RT502x VHF Radio
Weight:
excl. units 15 kg.
incl. units 23 kg.
0930
Page 10
2 Installation Console 5000
2-4
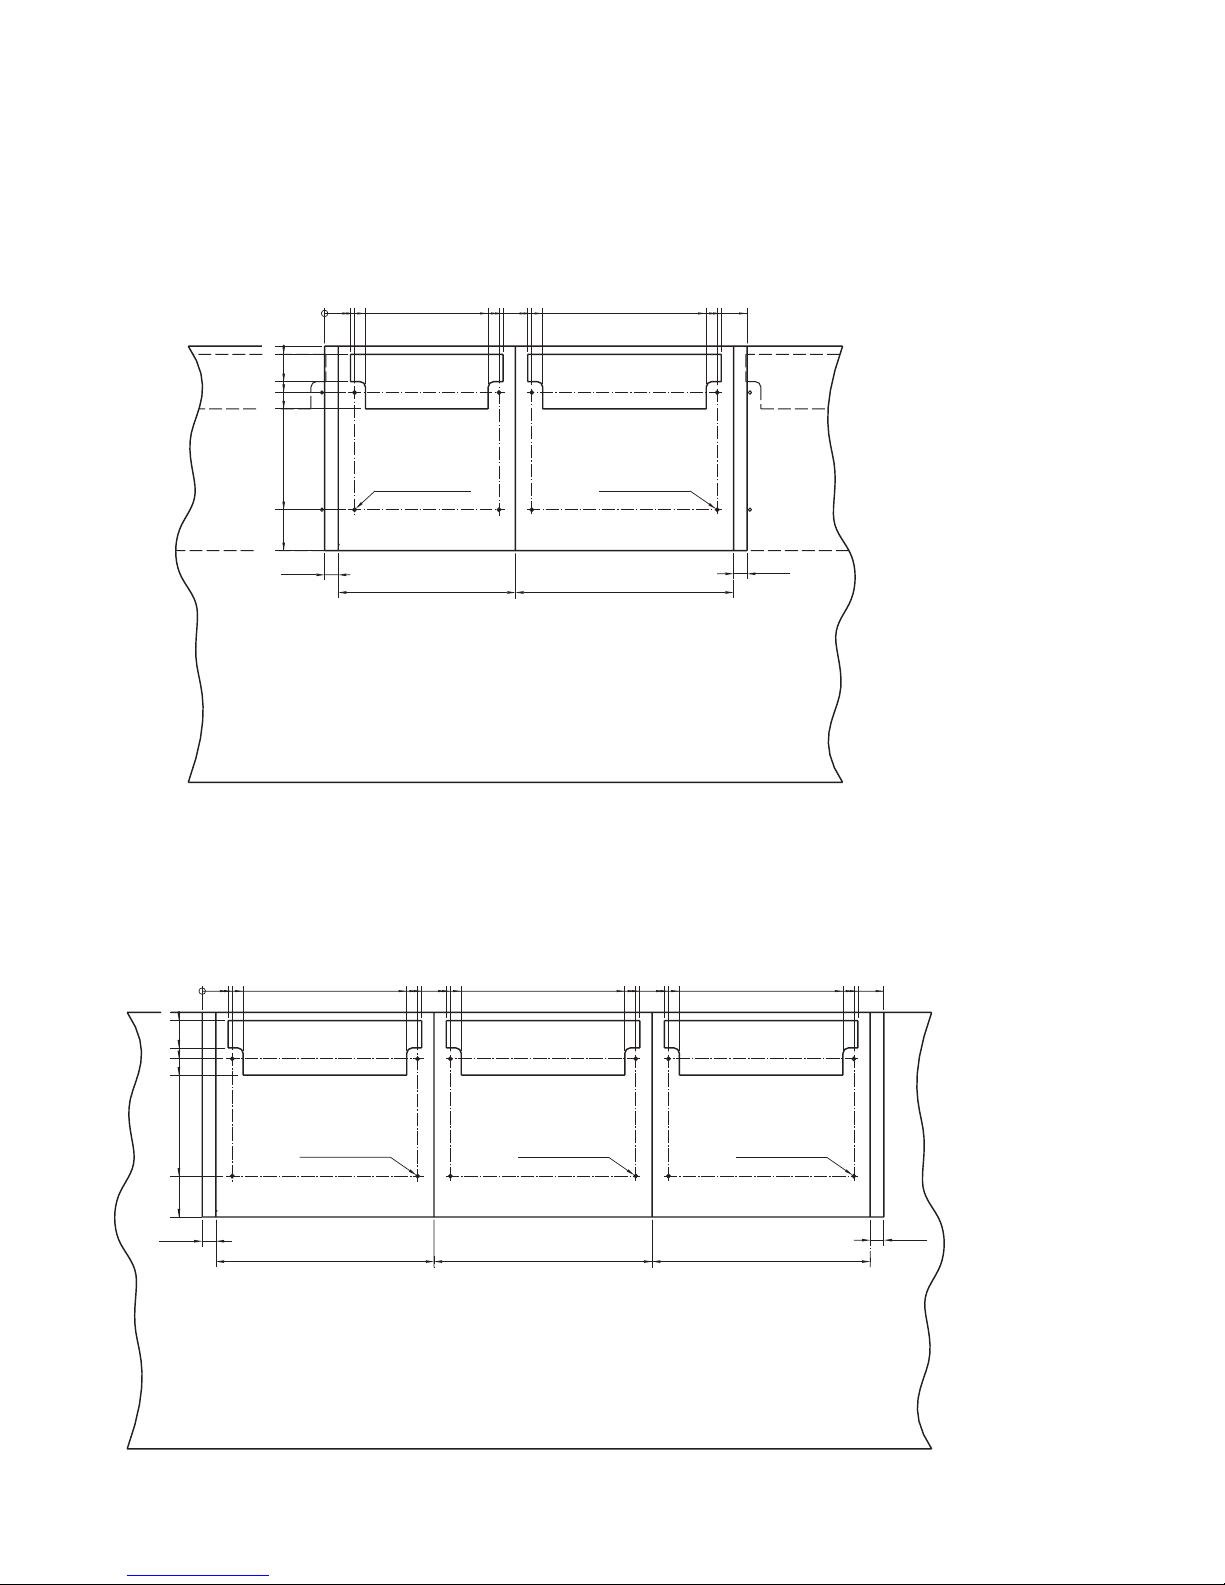
2.2 Drilling and cutting template
The console can be placed and mounted, in several different ways, to ensure optimal integration into the
user environment.
2.2.1 Tabletop mounting for 325mm and 400mm section
35846A
Cut for cable entry
for 325mm section.
325
25
375
300
115
85
65
4 mounting holes (ø6)
15
0
400
4 mounting holes (ø6)
Cut for cable entry
for 400mm section.
25
NB! The table must be sufficiently supported
to carry the console.
****
Drilling template Drilling template
775
727.5
700
400
372.5
327.5
300
75
47.5
0
720
380
320
55
2.2.2 Tabletop mounting for 3 x 400mm section
99-126894
Cut for cable entry
400
25
375
300
115
85
65
15
0
400
4 mounting holes (ø6)
Cut for cable entry
25
NB! The table must be sufficiently supported
to carry the console.
****
400
4 mounting holes (ø6)
Cut for cable entry
for 400mm section.
Drilling template
4 mounting holes (ø6)
1250
1202.5
1175
875
847.5
802.5
775
475
447.5
402.5
375
75
47.5
0
1195
855
795
455
395
55
0815
Page 11
2 Installation Console 5000
2-5
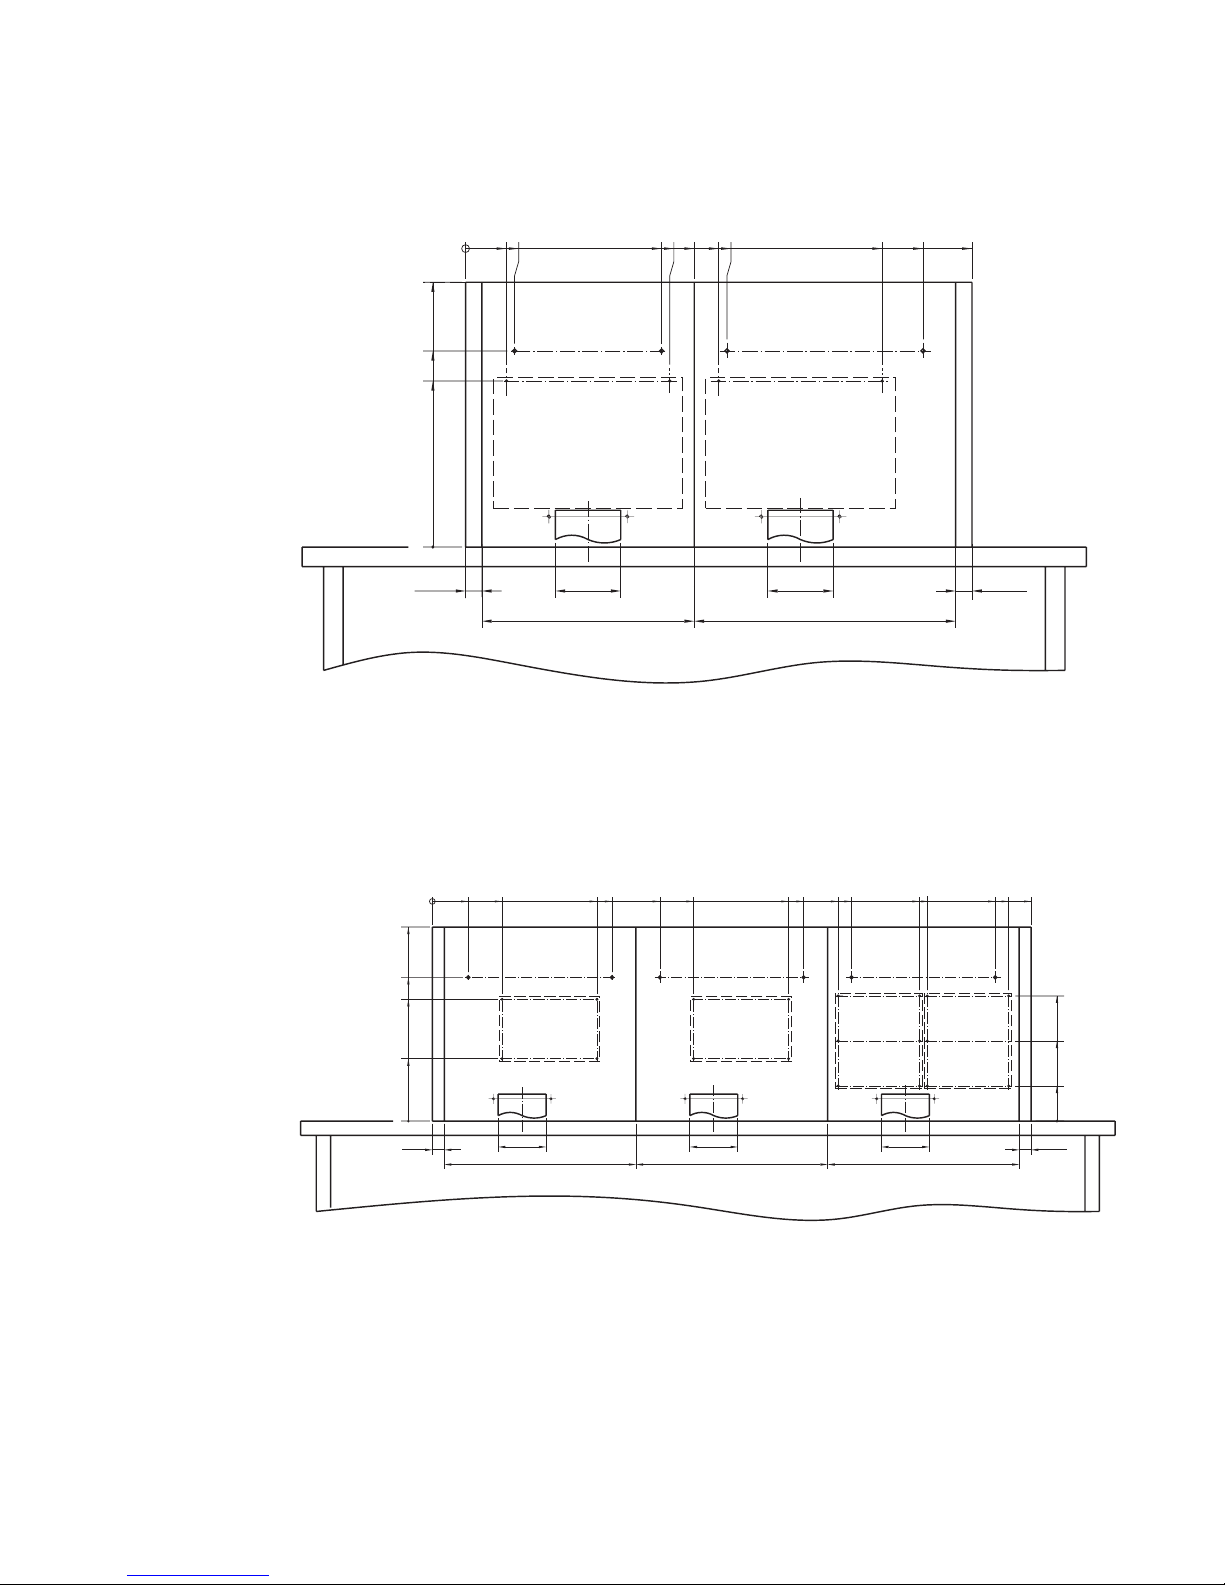
2.2.3 Bulkhead mounting for 325mm and 400mm section
Earth stubs entry.
Earth stubs entry.
35847B
100 100
0
405
254
300
25
**
*
*
**
25
**
for 325mm section.
Drilling template
for 400mm section.
Drilling template
775
700
637.5
400
387.5
350
312.5
300
75
62.5
0
400325
2.2.4 Bulkhead mounting for 3 x 400mm section
Earth stubs entry.
Earth stubs entry.
99-126895
100 100
0
405
300
**
*
*
**
**
for 400mm section.
Drilling template
Earth stubs entry.
100
**
0
261.3
167.3
73.3
254
130.3
25
25
400400400
1250
1203
1175
1033
1017
875
847
775
743.5
545.5
475
375
343.5
145.5
75
0
* To avoid vibration noise, the console should be fastened with screws onto the bulkhead.
** Space from last left- and righthand section to wall.
(22.5 + spacing = 25mm)
0815
Page 12

2 Installation Console 5000
2-6
2.2.5 Earth stubs mounting
Earth stubs entry.
Earth stubs entry.
99-127882
100 100
Earth stubs entry.
100
100mm
40mm
15mm
30mm
copper
4 pcs. M6 bolts
Earth stubs made of steel and
welded to the steel bulkhead.
15mm
100mmx0.5mm
0
187.5
587.5
987.5
2.2.6 Placement of print
Earth stubs entry
Earth stubs entry
99-129820
100 100
Earth stubs entry
100
Mini-C
Interconnection
Board (1)
Mini-C
Interconnection
Board (2)
Connection
Board (1)
Connection
Board (2)
0930
Page 13

2 Installation Console 5000
2-7
2.3 Mounting the console onto the bulkhead
When the console is placed on a table, the back of the console can be attached onto the bulkhead.
This allows for free access to the connection board and wiring while installing.
1 Remove the rear (back cover) panels, by removing all 6 screws in each panel.
(These will not be needed further and may be discharged of).
2 Remove the edge-profile, from top of the right end of the console (3 screws).
3 Remove the plate on the right end of the console (5 screws).
99-126994
2
3
1
4 Remove all key-hole screws from the back.
5 Using a hacksaw, cut away the back part, of the bottom plate, by following the pre-cut lines.
Do this on sections, where connection boards are fitted.
99-126995
*
**
**
*
4
5
9
0815
Page 14

2 Installation Console 5000
2-8
6 Mount all key-hole screws, from the inside of the console.
99-126996
6
**
7 Fasten the console to the bulkhead,
with 2 screws per section.
8 Loosen key-hole screws and lift up the front part.
7
Lift here
99-127884
8
12
*
*
*
*
*
*
*
*
*
*
*
*
9 At this point connection board wiring may be done
while having free access to the connection boards.
10 Fit the front part back onto the key-hole screws.
11 Fasten key-hole screws.
12 Fasten the console to the table, with four screws per section
13 Reinstall the plate, removed in step 3.
14 Reinstall the edge-profile, removed in step 2.
0815
Page 15

2 Installation Console 5000
2-9
2.4 Paper roll
99-126893
min. 680
Clearance required above console
to open top for access to
printer paper roll.
2.5 Control units
99-127913
4 screws M4x4
6 screws M4x6
4 screws M4x8
0815
Page 16

2 Installation Console 5000
2-10
0815
2.6 Message terminal
37209B
4 screws M4x10
Page 17

2 Installation Console 5000
2-11
2.7 Factory configuration of the console
When the System 5000 Console is ordered along with the relevant equipment sets and Service Pack part
number (Service Pack denotes factory installation of units in console) the configuration of the equipment
will be as per the following notation:
In consoles with two handsets and hence two radio control units, the left side handset is always associated
with the upper most control unit (MF/HF CU).
Supplied with the Console accessory kit are self adhesive labels which may be used to mark the
respective handsets for MF/HF and VHF, for ease of identification (Fig. 1).
BATTERY
ALARM
V
1
GENCY
EMER-
LIGHT
BATTERY 1
BATTERY 2
2A2AC1
ALARM
MUTE/
1 - 2
BATT
DIM
TEST
99-128517
MF/HF
VHF
MF/HF 2
Fig.1
Equipment configuration:
With two TT-3000EB mini-C installed (Fig. 2) the printer and Message Terminal/keyboard associated with
#1 mini-C (part of primary GMDSS equipment) is installed in the left hand side of the console and the
associated mini-C Alarm Panel being the left hand one. The #2 mini-C equipment (part of duplication
GMDSS equipment) is installed in the right hand side, the mini-C Alarm Panel being the right hand one.
Both Message Terminals will be configured with the Capsat application software program.
The MF/HF controller is installed as the upper most unit (as part of System #1 or primary GMDSS
equipment) and the #1 VHF installed below the MF/HF Control Unit also as part of the #1 System or
primary GMDSS equipment.
BATTERY
ALARM
V
1
GENCY
EMER-
LIGHT
BATTERY 1
BATTERY 2
2A2AC1
ALARM
MUTE/
1 - 2
BATT
DIM
TEST
99-128512
#1 mini-C
#1 printer
#1 keyboard
#2 mini-C
#2 printer
#2 keyboard
Fig.2
0815
Page 18

2 Installation Console 5000
2-12
With one TT-3000EB mini-C and the full MF/HF Radio Telex installed (Fig. 3) the MF/HF Control unit is
installed as the upper most unit being part of System #1 or primary GMDSS equipment with associated
Radio Telex Message terminal/keyboard and printer installed in the left hand side of the console. Same
notation applies in case of the GMDSS Radio Telex solution without Message Terminal (2-section
console - Fig. 4).
The #1 VHF is installed below the MF/HF Control Unit as part of the #1 System or primary GMDSS
equipment.
The TT-3000EB mini-C is installed in the right hand side of the console being part of System #2 or
duplication GMDSS equipment. In the case of two Message Terminals (Fig. 3) these are configured with
the Radio Telex application software program and the Capsat application software program respectively.
BATTERY
ALARM
V
1
GENCY
EMER-
LIGHT
BATTERY 1
BATTERY 2
2A2AC1
ALARM
MUTE/
1 - 2
BATT
DIM
TEST
99-128513
Radiotelex
#2 mini-C
mini-C printer
Keyboard
Radiotelex printer
Keyboard
Fig. 3
BATTERY
ALARM
V
1
GENCY
EMER-
LIGHT
BATTERY 1
BATTERY 2
2A2AC1
ALARM
MUTE/
1 - 2
BATT
DIM
TEST
99-128531
Radiotelex
#2 mini-C
#2 mini-C printer
KeyboardKeyboard
printer
Fig. 4
Page 19

3 Electrical Installation Console 5000
3-1
0815
3 Electrical installation
3.1 TT-3606E opt. 003 NMEA Adapter for mini-C
In case the position information generated by the build in GPS receiver of the TT-3026C mini-C
Transceiver is required for feeding to other external communication equipment like VHF radios etc., the
TT-3606E Opt. 003 NMEA Adapter is required to adapt the information into proper NMEA signal levels.
99-127912
When installing the TT-3606E Opt. 003 NMEA Adapter in the console, the cover of the Adapter box may
be discarded of.
Please refer to the installation manual delivered with the TT-3606E Opt. 003 NMEA Adapter for further
installation information (TT 98-124401). Manual is also available for download from the T&T Extranet/
eSupport download area.
Page 20

3 Electrical Installation Console 5000
3-2
0815
3.2 Grounding cables
Grounding of all external cable screens to the console is important in order to reduce risc of noise and
interference in the GMDSS installation.
The screen of each external cable must be properly terminated to the support bracket by means of a cable
lug properly secured to the support bracket with a screw.
99-127906
All internal cable screens are grounded to the support bracket using tie wraps.
99-127907
Page 21

3 Electrical Installation Console 5000
3-3
0815
3.3 Console light
Functional description
The intention is to supply the console workplace, with sufficient ambient light for working. If desired, the
light can be turned off completely, so that it does not distract the ship operator, for example during night
time. However when required the light can be turned on quickly, by means of a switch.
By turning the dimming potentiometer clockwise, the light intensity increases, and correspondingly
turning the potentiometer anti clockwise decreases the light intensity.
The light can be switched on or off, by pushing the to-way switch located just below the dimming
potentiometer.
If an external two-way light switch is installed for remote control of this console light, this switch should
be connected to the appropriate terminals on the primary connection board.
The gooseneck lamp is fed by a regulated DC voltage. The max. voltage supplied to the gooseneck lamp
is around above 12VDC.
The gooseneck lamp comprise a 3 pin XLR-plug with a release button. Pin 2 carries positive supply
voltage (+), pin 3 is connected to DC-. Pin 1 is not connected.
The supply for the dimming module is routed from the emergency batteries, through the connection board.
The light source is either by white LED´s or red LED´s. The use of LED´s greatly reduces current
consumption and heat dissipation normally associated with incandescent lamps.
24V_Light+
24V-
Battery
switch
External
circuit
Dimming
Gooseneck
connection
If an external switch is not installed, a jumper wire
GND
24V-
should be placed between "24V_Light+" and "M1".
99-126892
M1
M2
3
2
1
Page 22

3 Electrical Installation Console 5000
3-4
0815
3.4 Connection board
The connection board has been designed, so that connectors are grouped in relation to products.
Each connector has been given a unique name and designator in order to clearly identify the connector.
Also where the wires are mounted into terminal strips, each connection has been named. The first digit
of a designator, is a consecutive number, and the second digit is a digit only used for connections
belonging to that group. Every designator starts with an „X“, to indicate that this is a type of connector.
For example, the first connector for VHF connection carries the designator „X21“, the second connector
„X22“ and so on.
The only connector that differs from the above description, is the connector „Remote“, also designated
„X71“. This connector joins the remote function for both „MINI-C“ and „TELEX“.
In consoles with two connection boards, the primary equipment connects to the left connection board. The
duplication equipment connects to the right connection board. This means that for example in communications systems with two VHF radios, the primary VHF is the one located in the console and connects
to the left connection board. The duplication VHF will, if connected through the console connect, to the
right hand side connection board.
Component location connection board
X44
X43
Page 23

3 Electrical Installation Console 5000
3-5
3.5 Schematic connection board
0815
Page 24

3 Electrical Installation Console 5000
3-6
0815
Page 25

4 Installation cables Console 5000
4-1
0815
4 Installation cables
4.1 Console wiring system
The internal wiring of the console has been grouped and numbered in the following drawings, so that each
cable is easily identified by its unique identifier.
Numbering
The numbering is grouped in three digits, as indicated below. The type of signal carried is also indicated
in the table listing the internal cables.
X.Y.ZZ
C7 = Primary internal 1 = RF/Antenna X.2.00 through 19 = Control/Data
C8 = Duplication, backup, internal 2 = Signals X.2.20 through 29 = Relay output
C9 = Common internal 3 = DC power X.2.30 through 39 = Ext. signal
4 = AC power X.3.00 through 09 = Heavy duty DC
(distribution)
X.3.10 through 19 = Single power
Page 26

4 Installation cables Console 5000
4-2
1035
4.2 Internal cables overview
Cable No. Cable type From/To From/To Part No. Signal Conn.
C7.1.00 PL-PL RT50xx RF-Plug 527830 VHF Main RF 1:1
C7.1.01 PL-PL RT50xx RF-Plug 527830 VHF DSC RF 1:1
C7.2.00 9-9 pole Sub D CU51x0 MF/HF 56.123 AUX 1:1
C7.2.01 9-9 pole Sub D CU51x0 MF/HF 56.123 SCAN-BUS 1:1
C7.2.02 Centronics 25 pole
Data Terminal/CU
Printer Supplied Message 1:1
C7.2.03 2 pole mini-C Remote 56.121 On/Off 2
C7.2.04 9-9 pole Sub D Data Terminal TT-3616C Supplied Data 1:1
C7.2.05 Multi Cable TT-3616C TT-3043CP-2 37-122732-A Data 3
C7.2.06 15-15 pole Sub D RT50xx 37-126527 Option 8
C7.2.07 15-15 pole Sub D RT50xx 37-126528 SPARC-II 9
C7.2.12 8 pole mini din Printer Paper switch 56.122 Control 4
C7.2.14 9-9 pole Sub D Data Terminal CU51x0 MF/HF Supplied Data 1:1
C7.3.10 Power Cable Printer Supplied DC supply M
C7.3.11 Power Cable Data Terminal Supplied DC supply M
C7.3.12 Power Cable TT-3616C 37-123214-B DC supply 5
C7.3.13 Power Cable RT50xx Supplied DC supply M
C8.1.00 PL-PL RT50xx RF-Plug 527830 VHF Main RF 1:1
C8.1.01 PL-PL RT50xx RF-Plug 527830 VHF DSC RF 1-1
C8.2.00 15-15 pole Sub D RT50xx 37-126527 Option 8
C8.2.01 15-15 pole Sub D RT50xx 37-126528 SPARC-II 9
C8.2.02 Centronics 25 pole Data Terminal Printer Supplied Message 1:1
C8.2.03 9-9 pole Sub D Data Terminal TT-3616C Supplied Data 1:1
C8.2.04 Multi Cable TT-3616C TT-3043CP-2 37-122732-A Data 3
C8.2.05 2 pole mini-C Remote 56.121 On/Off 2
C8.2.06 8 pole mini din Printer Paper switch 56.122 Control 4
C8.3.10 Power Cable RT50xx Supplied DC supply M
C8.3.11 Power Cable Printer Supplied DC supply M
C8.3.12 Power Cable Data Terminal Supplied DC supply M
C8.3.13 Power Cable TT-3616C 37-123214-B DC supply 5
C9.2.01 9-9 pole Sub D Battery Panel 56.123 Batt Sense 1:1
C9.2.02 9-9 pole Sub D Battery Panel 56.123 Batt Sense 1:1
C9.3.10 Cable, 2 pole Emg. light/gooseneck 37-126773 DC supply 6
C9.3.11 Cable, 4 pole Emg. light-dimmer 37-126772 DC supply 7
Notes:
- Where „From/To“ is left blank, the cable is terminated at the connection board 59-126095.
See relevant internal wiring diagrams, for further information.
- „Supplied“ = Designates cable that is supplied with a product, and therefore does not have its own
part number.
- M = Consult the technical manual for the product.
- Where „Conn.“ is marked with „1:1“, this means that the cable ends are wired pin number 1 to pin
number 1, pin number 2 to pin number 2, and so on for further pin numbers.
Other markings at „Conn.“, refers to cable wiring connection drawings, at the following pages.
2: mini-C Remote, 2 pole:
The two wires are soldered on to two terminals, on an on/off push-button switch.
Page 27

4 Installation cables Console 5000
4-3
0815
3: Multi cable, TT3043CP-2:
TT-3616C TT-3043CP-2
+9VDC, White Pin 1
GND, Brown Pin 2
I/O 0, Red Pin 3
I/O 1, Gray Pin 4
I/O 2, Yellow Pin 5
I/O 3, Green Pin 6
I 4, Blue Pin 7
I 5, Pink Pin 8
Pin 9, Not connected
Pin 10, Not connected
Pin 11, Not connected
Pin 12, Not connected
Please refer to the installation manual delivered with the TT-3000EB mini-C GMDSS system for further
installation information (TT 98-122414).
4: mini din, paper switch:
The two conductors are soldered respectively to pin 1 and pin 2, of the paper switch.
Screen is soldered to the bracket for the paper switch.
5: Power cable, TT-3616C:
Connection board TT-3616C
Pin 1, +24V, Red DC +
Pin 2, -24V, Black DC Pin 3, Remote, White Remote On/Off
6: Cable, 2 pole, Emg. light/gooseneck lamp:
Connection board Gooseneck lamp
Pin 1 Gooseneck + Pin 2, Light supply
Pin 2 - Light Pin 3, Light ref.
7: Cable, 4 pole, Emg. light-dimmer:
Dimmer Connection board
Pin 1 Pin 2, - Light
Pin 2 Pin 1, M1
Pin 3 Pin 3, M2
Pin 4 Pin 4, Gooseneck +
8: Option, 15 pole SUB D connector:
Only wire numbers 12, 13 and the screen, is fed through this cable.
All other pin numbers has no connection.
9: SPARC-II, 15 pole SUB D connector:
Only wire numbers 2, 3, 6, 7 and the screen, is fed through this cable.
All other pin numbers has no connection.
Page 28

4 Installation cables Console 5000
4-4
1035
4.2.1 Internal cables 2 section console w/ MF/HF Radiotelex, mini-C and VHF
99-126328-A
Printer
On/Off
Keyboard
Battery Panel
Printer
Data Terminal
Interconnection Board
TT-3616C
RT50xx
(rear view)
MF/HF
CU51x0
mini-C
TT-3043CP
Keyboard
Light
Emergency
C7.2.00
C7.2.01
C7.2.12
C7.1.00
C7.1.01
C7.2.07
C8.3.13
C8.3.12
C8.3.11
C8.2.05
C8.2.03
C8.2.04
C8.2.02
C8.2.06
C9.2.02
C9.2.01
C9.3.11
C9.3.10
C7.3.13
C7.2.06
C7.3.10
C7.2.02
Handset
AUX
SCAN-BUS
Keyboard
Data
Printer
Battery 1
Battery 2
Battery 1
Battery 2
Page 29

4 Installation cables Console 5000
4-5
1035
4.2.2 Internal cables 3 section console w/ MF/HF Radiotelex, mini-C and VHF
99-126329-A
Printer
Keyboard
Printer
Data Terminal
Interconnection Board
TT-3616C
MF/HF
CU51x0
Keyboard
Data Terminal
Battery Panel
RT50xx
(rear view)
On/Off
mini-C
TT-3043CP
Light
Emergency
On/Off
C7.2.00
C7.2.01
C7.2.12
C7.3.11
C7.3.10
C7.2.06
C7.2.07
C7.1.00
C7.1.01
C8.3.13
C8.3.12
C8.3.11
C8.2.05
C8.2.03
C8.2.04
C8.2.02
C8.2.06
C9.2.02
C9.2.01
C9.3.11
C9.3.10
C7.2.02
C7.3.13
C7.2.14
C7.2.03
Handset
AUX
SCAN-BUS
Keyboard
Data
Printer
Battery 1
Battery 2
Battery 1
Battery 2
Page 30

4 Installation cables Console 5000
4-6
4.2.3 Internal cables 3 section console w/ MF/HF, 2 x mini-C and VHF
99-126331-A
Printer
Keyboard
Battery Panel
Printer
Data Terminal
Interconnection Board
TT-3616C
RT50xx
(rear view)
MF/HF
CU51x0
Keyboard
Data Terminal
Interconnection Board
TT-3616C
On/Off
On/Off
mini-C
TT-3043CP-2
Light
Emergency
C7.2.00
C7.2.01
C7.2.12
C7.2.02
C7.3.12
C7.3.11
C7.3.10
C7.2.03
C7.2.04
C7.2.05
C7.2.06
C7.1.00
C7.1.01
C7.3.13
C8.3.13
C8.3.12
C8.3.11
C8.2.05
C8.2.03
C8.2.04
C8.2.02
C8.2.06
C9.2.02
C9.2.01
C9.3.10
C9.3.11
C7.2.07
Handset
AUX
SCAN-BUS
Keyboard
Data
Printer
Battery 1
Battery 2
Battery 1
Battery 2
1035
Page 31

4 Installation cables Console 5000
4-7
4.2.4 Internal cables 1 section console w/ MF/HF and VHF
99-126332-A
Battery Panel
RT50xx
(rear view)
MF/HF
CU51x0
Light
Emergency
C7.2.01
C7.2.00
C7.1.00
C7.1.01
C7.2.06
C7.2.07
C7.3.13
C9.2.01
C9.3.10
C9.3.11
Handset
AUX
SCAN-BUS
Keyboard
Data
Printer
Battery 1
Battery 2
Battery 1
Battery 2
1035
Page 32

4 Installation cables Console 5000
4-8
4.3 Installation external cabling
4.3.1 External cabling - Emergency light, Battery Panel and position source
99-127898
M1
24V+
External switch
24V-
24V+
Charger
M2
1
2
3
GND
NMEA -
Position source
NMEA +
-SHUNT
+SHUNT
Power supply/Charger
+VBAT
External shunt box/
1
2
3
AC ALR 1
AC ALR 2
-VBAT
4
5
6
24V DC-
24V DC+
AC ALR 0
7
8
9
1
2
1
2
3
1
2
3
4
5
6
7
8
9
0815
Page 33

4 Installation cables Console 5000
4-9
4.3.2 External cabling - Alarm Panel
99-127899
GND
SPARC-BUS -
MF/HF - X4
SPARC-BUS +
3
5
2
+24V
9
5065
GND
SPARC-BUS -
VHF - X3
SPARC-BUS +
3
5
2
+24V
9
D-sub
D-sub
D-sub
D-sub
To # 1 mini-C connection board
To # 2 mini-C connection board
1
2
3
4
1
2
3
4
3,7
4,5
8,9
1,2
GND
Data +
Data +
VCC IN
3,7
4,5
8,9
1,2
GND
Data +
Data +
VCC IN
4.3.3 External cabling - VHF
99-127900
24V DC+
24V DC-
Power Supply
1
2
0815
Page 34

4 Installation cables Console 5000
4-10
4.3.4 External cabling - MF/HF
99-127901
24V DC +
24V DC -
Power Supply
+24V
7
Rx AF+
8
Transceiver
SCAN-BUS
AF -
5
GND
6
Data -
3
AF +
4
Supply on
1
Data +
2
Rx AF-
9
1
2
7
8
5
6
3
4
1
2
9
D-sub
4.3.5 External cabling - mini-C and Power supply
99-127902
24V DC +
24V DC -
Power Supply
1
2
0815
Page 35

Page 36

TT-98-127000-THR-C Issue: C/1035
Thrane & Thrane A/S • info@thrane.com • www.thrane.com
 Loading...