

Page 1
GB
EXPLORER® 300
GETTING STARTED
Page 2
Page 3
GB
GETTING STARTED
Congratulations on the purchase of your EXPLORER 300.
Before you start, please check that the following items are present:
• EXPLORER 300 terminal with built-in antenna
• Battery
• AC/DC adapter
• LAN cable
• Getting Started kit including Quick Guide, electronic manual, etc.
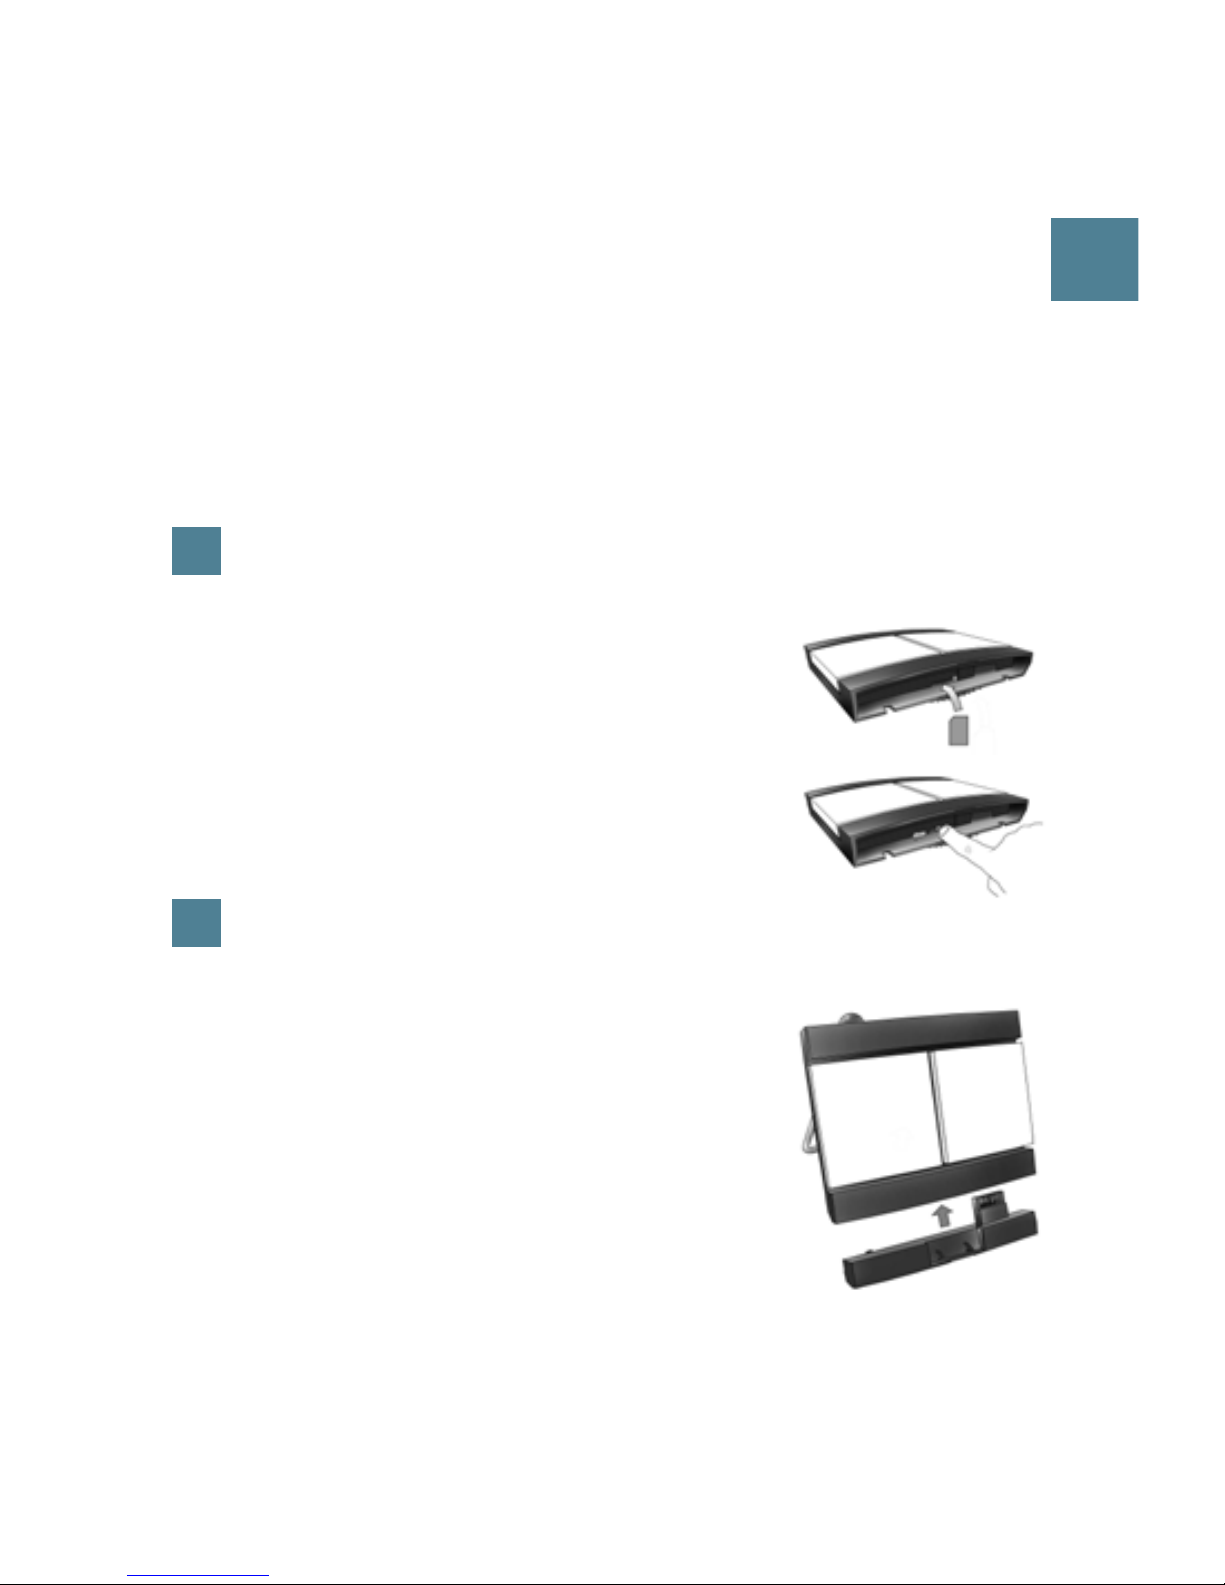
1
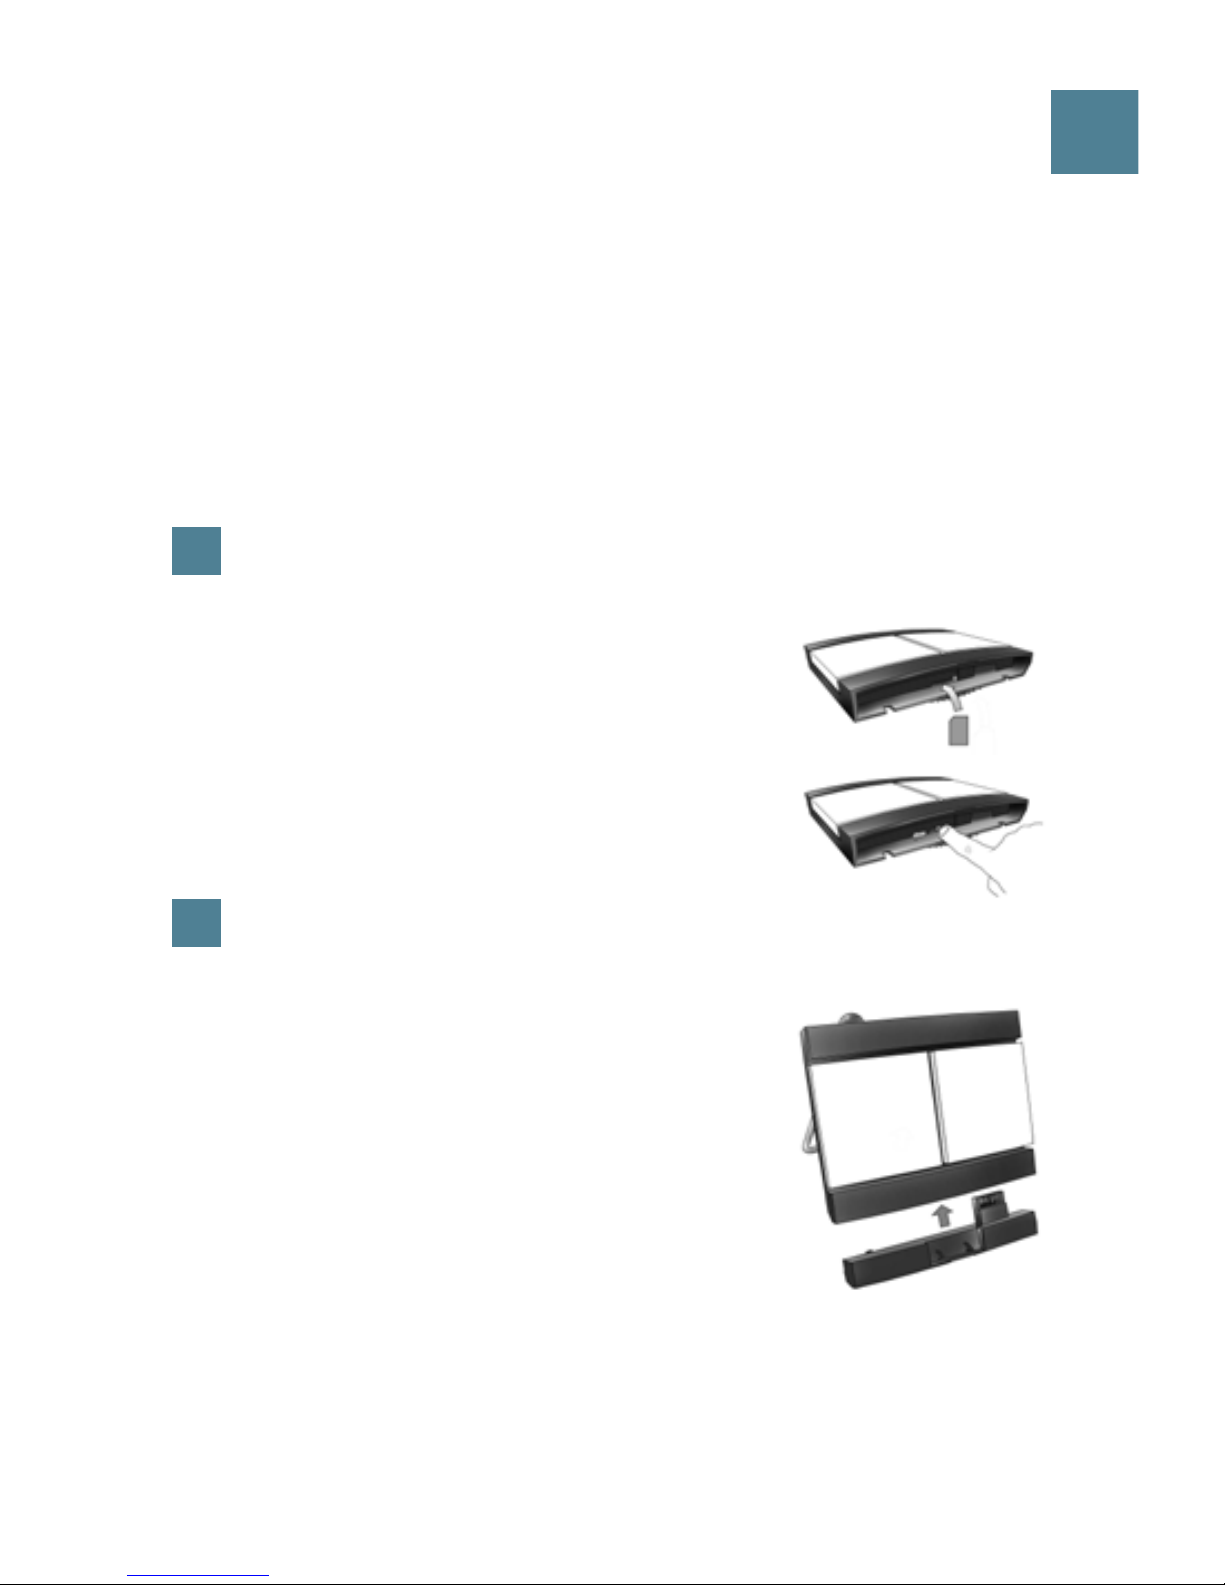
Insert the SIM card (provided by your Airtime Provider)
a. Insert the SIM card into the SIM slot and press
gently until it locks.
b. Slide the lock to secure the SIM card.
2
Insert the battery
Insert the battery and press gently until it locks.
NOTE: You can use the battery as power source, or
connect the DC input to one of the following power
sources:
• 100-240 V Mains using the AC/DC adapter
• 12 V DC in a car using the car charger cable
available from Thrane & Thrane
For further information, refer to the User Manual.
Page 4
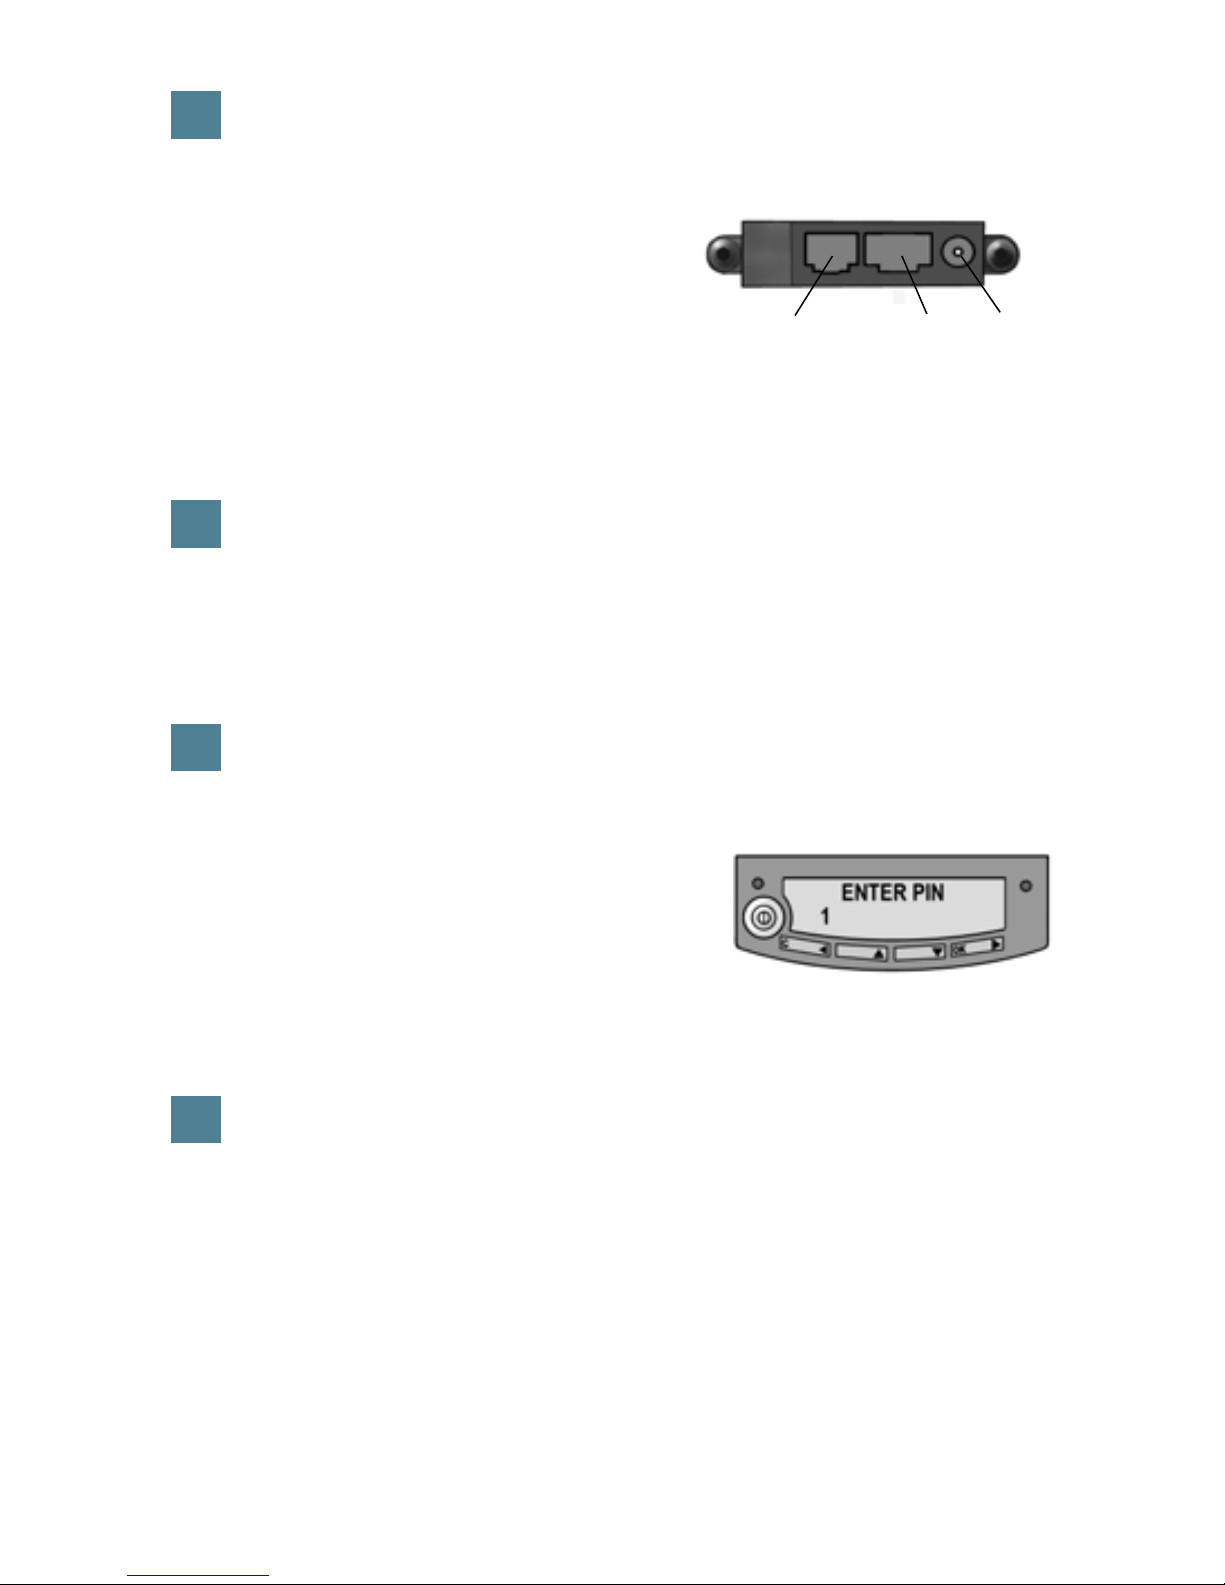
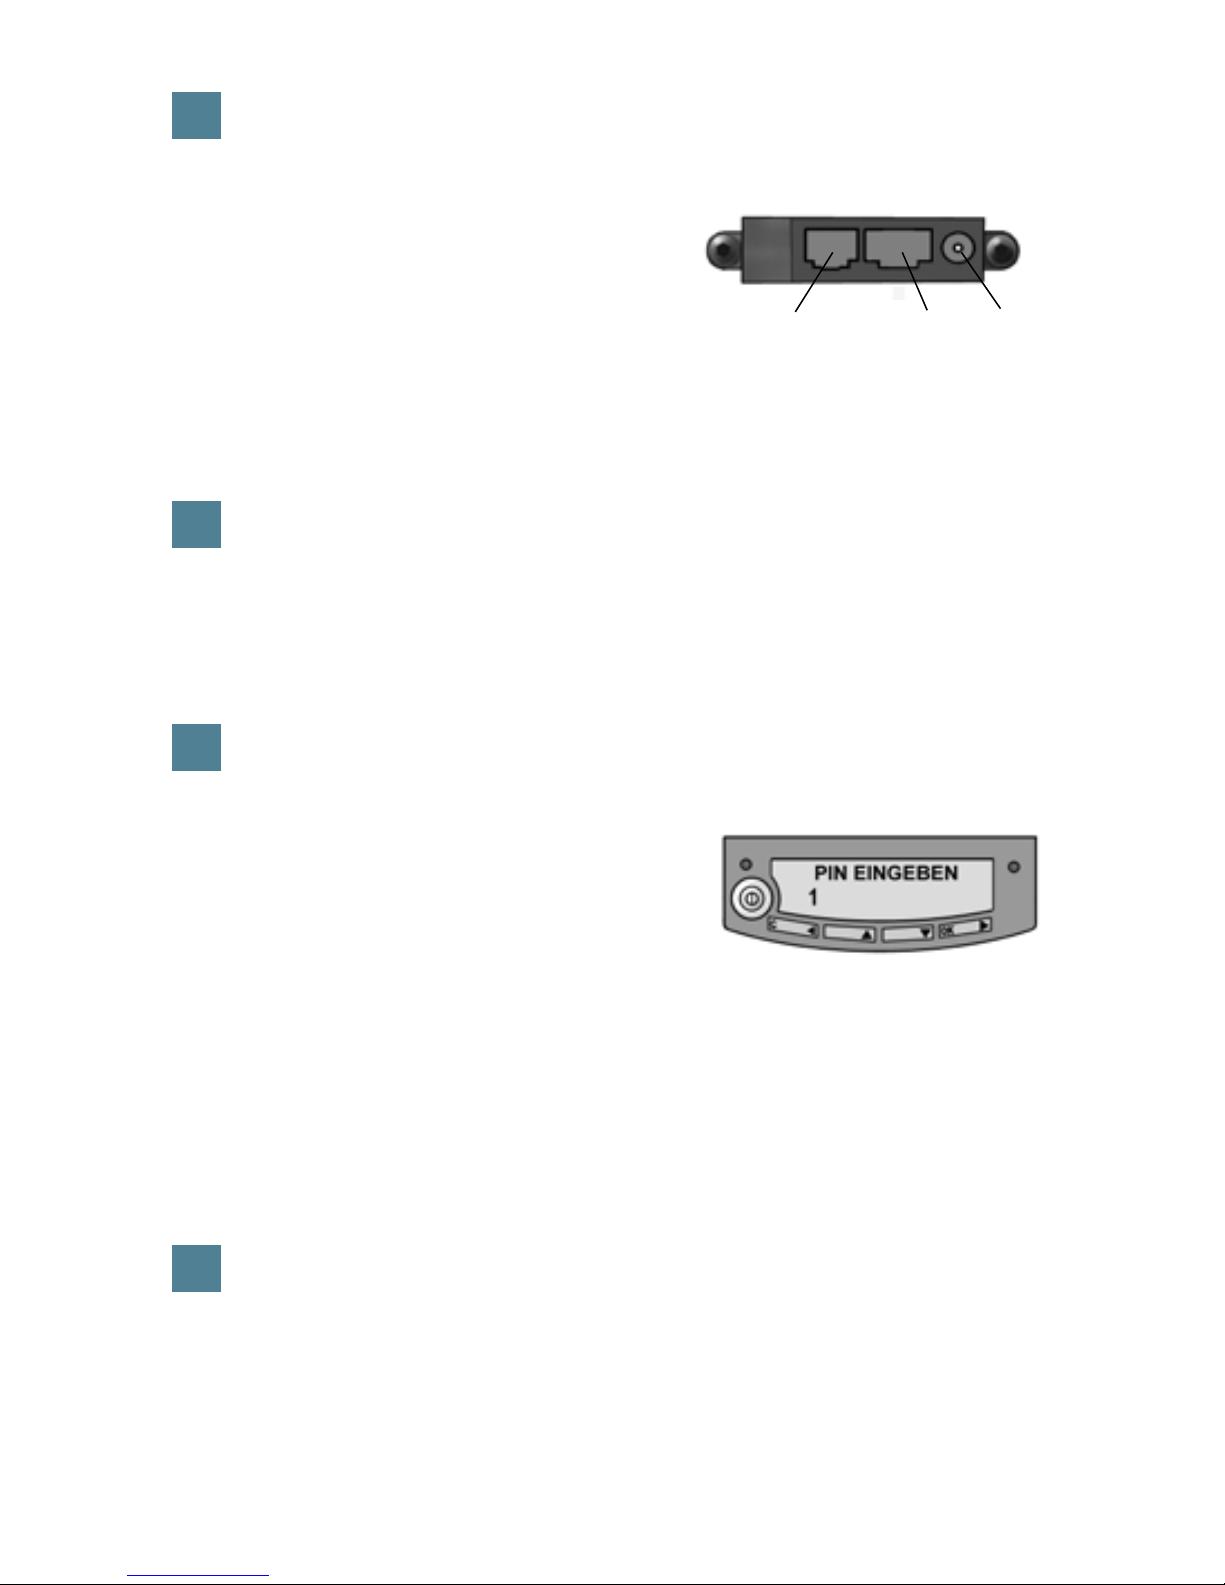
3
Connect the cables
Connect the cables to the relevant
connectors on the EXPLORER 300.
The connector panel is located on the side
of the EXPLORER 300.
One connector, the Bluetooth phone charging connector marked DC OUT, is
placed at the back of the EXPLORER 300.
4
Switch on the EXPLORER® 300
Push the power button next to the display and hold it for 1-2 seconds until
the green power indicator lights up.
5
Enter the PIN
a. When you are asked for a PIN, press OK.
b. Press
or a number of times until the
first digit is correct.
c. Press
OK to go to the next digit.
The previous digit is indicated by a *.
d. After pressing
OK to enter the last digit, press OK again to apply the PIN.
e. If you want to turn off the pointing sound, press
or .
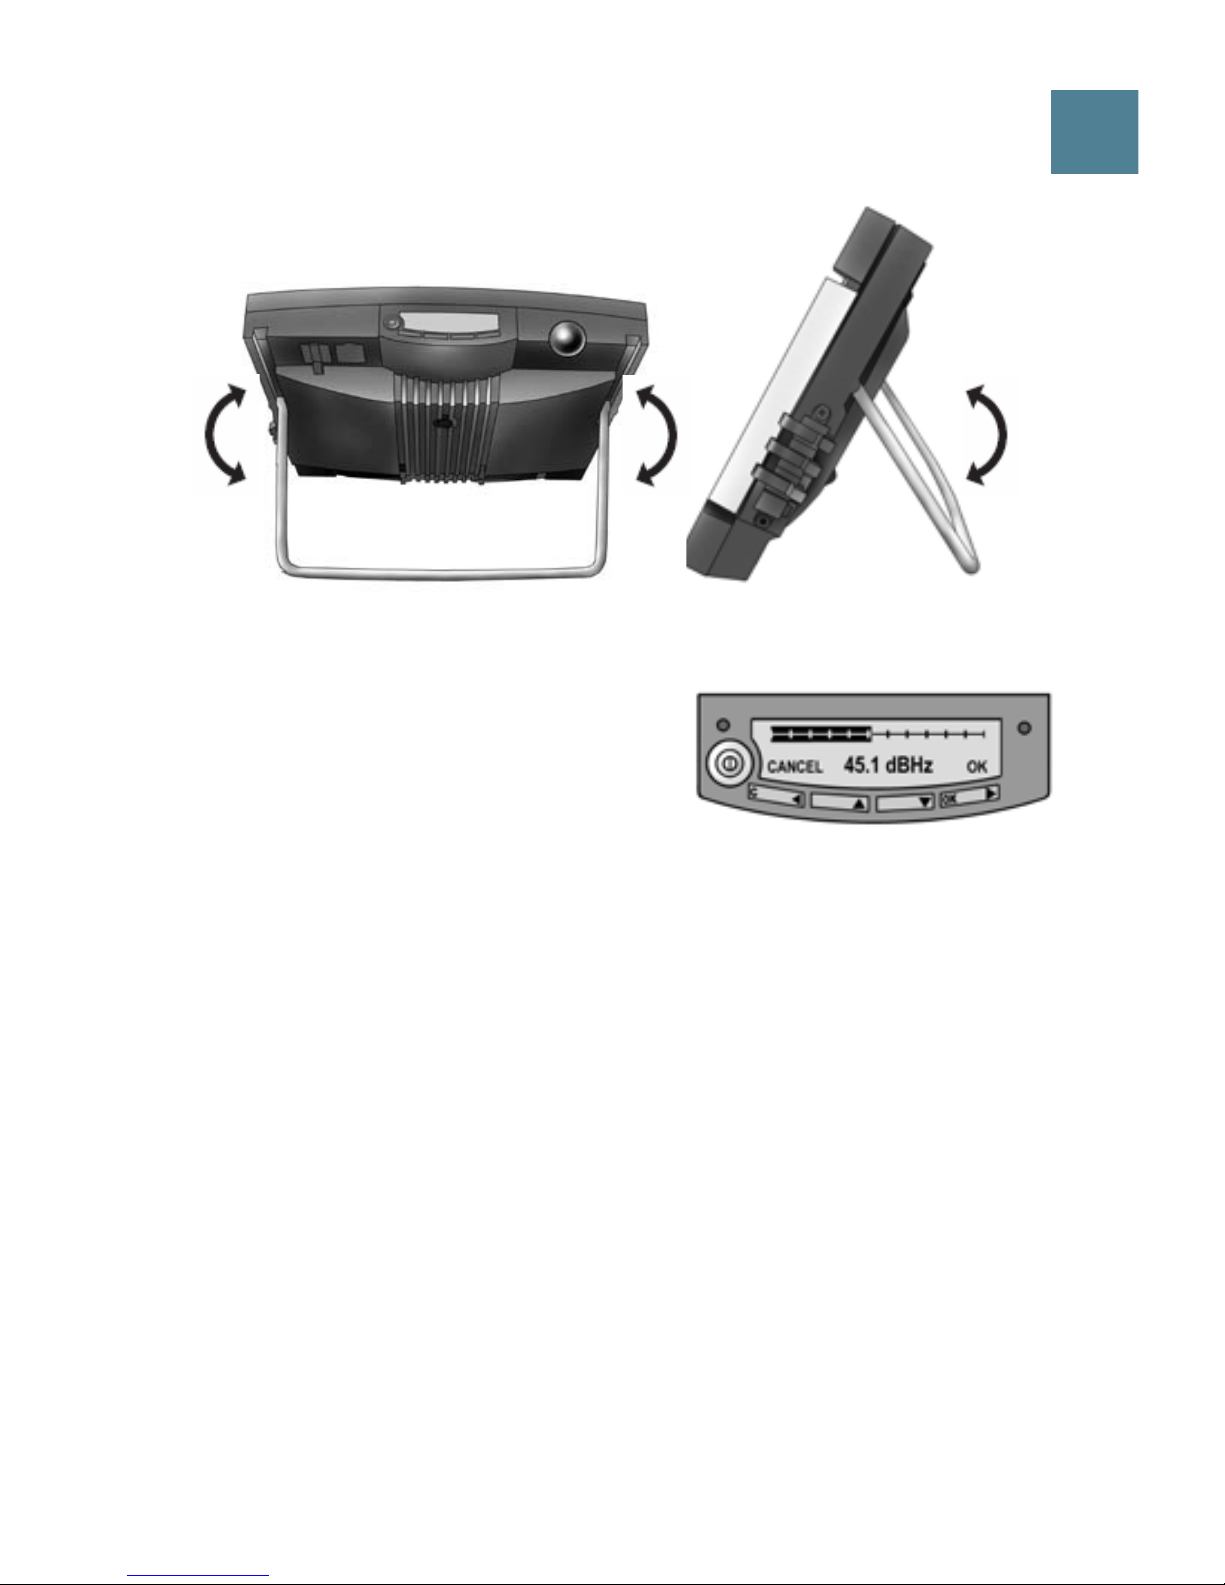
6
Point the antenna
Important! To obtain optimum bandwidth and operating time, adjust the
position of the antenna with great precision. Do not adjust the antenna
position until all cables are connected and the PIN entered.
Power
Phone
LAN
Page 5
GB
a. Using the built-in compass of the EXPLORER 300 as reference, rotate
and tilt the antenna so that it points in the approximate direction of the
BGAN satellite.
b. Use the displayed signal strength and the pointing sound to find the
highest possible signal strength, while slowly rotating and tilting the
EXPLORER 300.
c. Press
OK when you have obtained
the highest possible signal strength.
The EXPLORER 300 now starts to establish a connection to the BGAN
network.
The display shows the progress as follows:
•
SEARCHING: The EXPLORER 300 searches for the network operator.
Note that the search procedure can be very short, so you may not see
this text.
•
REGISTERING: When the network operator is found, the display shows
REGISTERING to show that the EXPLORER 300 is registering itself on the
network.
•
READY: The EXPLORER 300 is registered on the network.
The display may show a different text, for example if an error has occurred.
For further information, refer to the User Manual.
Page 6

NOTE: When the display shows READY, the terminal automatically activates
the LAN interface if the cable is connected and the interface is enabled. If
you are not going to use the LAN connection, remove the cable or disable
the LAN interface to avoid being charged for any transmission through this
interface.
You are now ready to make phone calls, browse the Internet or check your
e-mails, send files, run a video conference and much more.
MAKING A CALL FROM THE EXPLORER® 300
If you are using a Bluetooth handset, the handset must be paired and placed close
to the EXPLORER 300. For information on pairing, see the section BLUETOOTH
PAIRING at the end of this document.
To make a call from the EXPLORER 300, dial
00 <country code> <phone number> followed by # or off-hook key.
Example: To call Thrane & Thrane in Denmark: (+45 39558800), dial
00 45 39558800 followed by # or off-hook key.
MAKING A CALL TO THE EXPLORER® 300
To make a call to the EXPLORER 300, dial
+870 <mobile number>
+ is 00 for Europe and many other countries.
Page 7

GB
CHOOSING AN INTERFACE FOR DATA CONNECTION
The EXPLORER 300 has two types of interface for data connection: LAN interface
and Bluetooth interface.
The following table shows some characteristics of each interface, to help you
choose the right interface for your application.
Interface Power Consumption Range
LAN High Up to 100 m of cable
Bluetooth Medium Wireless connection.
Up to 25 m depending on the transmitter in the
computer and on the transmission conditions.
MAKING A LAN CONNECTION
To make a LAN connection, simply connect the LAN cable between your computer
and the LAN connector on the EXPLORER 300, and start up the EXPLORER 300 as
described in the beginning of this document.
As soon as the display of the EXPLORER 300 shows READY, the connection is
established automatically.
You are now ready to browse the Internet, check e-mails, send files etc.
NOTE: For information on configuration, refer to the User Manual.
Page 8

MAKING A BLUETOOTH DATA CONNECTION
To make a Bluetooth connection, place the computer close to the EXPLORER 300
and start up the EXPLORER 300 as described in the beginning of this document.
If the computer is already paired with the EXPLORER 300, the connection is
established automatically when both devices are ready and have discovered each
other. Note, however, that if your Bluetooth connection is defined as a dial-up
connection, you have to open the dial-up connection to activate the connection.
You are now ready to browse the Internet, check e-mails, send files etc.
NOTE: For information on configuration, refer to the User Manual. For information
on Bluetooth pairing, refer to the next section.
Page 9

GB
BLUETOOTH PAIRING
NOTE: This section only describes how to pair devices in which you can enter a
passkey. For information on devices in which you cannot enter a passkey, such as
headsets, refer to the User Manual.
To pair a Bluetooth device, do as follows:
1. Start up the EXPLORER 300 as described in the beginning of this document.
2. Place your Bluetooth device close to the EXPLORER 300.
3. On your Bluetooth device, search for new devices and select the EXPLORER 300
when it is found.
The default Bluetooth name of the EXPLORER 300 is EXPLORER 300.
If there is more than one EXPLORER 300 in the list, you can use the MAC address
to locate the correct one. To see the MAC address of your EXPLORER 300, enter
the display menu system and select
PROPERTIES > TERMINAL > HARDWARE > MAC.
4. On your Bluetooth device, enter the passkey of your EXPLORER 300.
The default passkey is the serial number of your EXPLORER 300.
To see the serial number, look at the label on the back of the EXPLORER 300 or
enter the display menu system and select
PROPERTIES > TERMINAL > HARDWARE > UNIT SER. NO.
The new Bluetooth device is now paired and ready to communicate with the
EXPLORER 300.
NOTE: Maximum 2 devices can be paired with the EXPLORER 300. If you have
already paired 2 devices you have to unpair a device before you can pair a new
one. For information on how to unpair devices, refer to the User Manual.
Page 10

ACCESSING THE WEB INTERFACE
To access the web interface, do as follows:
1. Connect a PC to the EXPLORER 300.
2. Start your Internet browser.
3. Enter the IP address of the web interface in the address field.
The default IP address is 192.168.0.1.
To see the IP address in the menu system, select
PROPERTIES>TERMINAL> IP ADDRESS.
The web interface now opens in your browser. For information on how to use the
web interface, refer to the User Manual.
Page 11
DE
ERSTE SCHRITTE
Herzlichen Glückwunsch zum Kauf des EXPLORER 300.
Stellen Sie zunächst sicher, dass die folgenden Komponenten vorhanden sind:
• EXPLORER 300-Terminal mit integrierter Antenne
• Batterie
• Netzteil
• LAN-Kabel
• Kit für die ersten Schritte, mit Kurzanleitung, elektronischem Handbuch etc.
1
Einsetzen der SIM-Karte (von Ihrem Netzbetreiber)
a. Setzen Sie die SIM-Karte in den SIM-Steckplatz
ein, und drücken Sie diese vorsichtig hinein, bis
sie einrastet.
b. Schieben Sie die Verriegelung ein, um die SIM-
Karte zu arretieren.
2
Einsetzen der Batterie
Setzen Sie die Batterie ein, und drücken Sie diese
vorsichtig hinein, bis sie einrastet.
HINWEIS: Sie können die Batterie als Stromquelle
verwenden, oder den Netzanschluss mit einer der
folgenden Stromquellen verbinden:
• Netzspannung mit 100 bis 240 V (über Netzteil)
• 12-V-Gleichstromanschluss in einem Fahrzeug
(über das Kfz-Adapterkabel von Thrane & Thrane)
Weitere Informationen finden Sie im Anwenderhandbuch.
Page 12
3
Anschließen der Kabel
Verbinden Sie die Kabel mit den
entsprechenden Anschlüssen des
EXPLORER 300.
Die Anschlussleiste befindet sich an der
Seite des EXPLORER 300.
Ein Anschluss zum Aufladen von Bluetooth-fähigen Telefonen mit der Kennzeichnung „DC OUT“ befindet sich auf der Rückseite des EXPLORER 300.
4
Einschalten des EXPLORER® 300
Drücken Sie die Taste neben der Anzeige, und halten Sie diese 1 bis 2
Sekunden lang gedrückt, bis die grüne Netzkontrollleuchte aufleuchtet.
5
Eingeben der PIN
a. Wenn Sie zur Eingabe einer PIN
aufgefordert werden, drücken Sie die
Taste OK.
b. Drücken Sie wiederholt die Taste
oder
bis die erste Ziffer korrekt ist.
c. Drücken Sie die Taste
OK, um zur nächsten Ziffer zu wechseln.
An Stelle der vorherigen Ziffer erscheint das Symbol *.
d. Wenn Sie zur Eingabe der letzten Ziffer die Taste
OK gedrückt haben,
drücken Sie erneut OK, um die PIN anzuwenden.
e. Wenn Sie die Hinweistöne deaktivieren möchten, drücken Sie die Taste
oder .
6
Ausrichten der Antenne
Wichtig! Wenn Sie die optimale Bandbreite und Betriebsdauer erreichen
möchten, richten Sie die Antenne sorgfältig aus. Passen Sie die
Antennenposition erst an, wenn alle Kabel angeschlossen sind und die PIN
eingegeben wurde.
Netz
Telefon
LAN
Page 13

DE
a. Verwenden Sie den integrierten Kompass des EXPLORER 300 als
Referenz, und drehen bzw. neigen Sie die Antenne so, dass diese in die
ungefähre Richtung des BGAN-Satelliten weist.
b. Ermitteln Sie mit Hilfe der angezeigten Signalstärke und des akustischen
Ausrichtungssignals die größtmögliche Signalstärke, indem Sie den
EXPLORER 300 langsam drehen und neigen.
c. Drücken Sie die Taste
OK, wenn die
größtmögliche Signalstärke erreicht
ist.
Der EXPLORER 300 beginnt nun mit der Einrichtung einer Verbindung zum
BGAN-Netzwerk.
In der Anzeige wird der Fortschritt wie folgt dargestellt:
•
SUCHEN: Der EXPLORER 300 sucht nach dem Netzwerk.
Beachten Sie, dass die Suche sehr kurz sein kann, sodass dieser Text gar
nicht erscheint.
•
REGISTRIEREN: Wurde das Netz gefunden, erscheint die Meldung
REGISTRIEREN, um darauf hinzuweisen, dass der EXPLORER 300 nun im
Netzwerk registriert wird.
•
BEREIT: Der EXPLORER 300 ist im Netzwerk registriert.
In der Anzeige kann ein anderer Text erscheinen, wenn z. B. ein Fehler
aufgetreten ist. Weitere Informationen finden Sie im Anwenderhandbuch.
Page 14

HINWEIS: Erscheint die Meldung BEREIT, aktiviert das Terminal automatisch die
LAN-Schnittstelle, wenn das Kabel angeschlossen und die Schnittstelle aktiviert
ist. Wenn Sie die LAN-Verbindung nicht nutzen möchten, entfernen Sie das
Kabel, oder deaktivieren Sie die LAN-Schnittstelle, um Verbindungskosten für
diese Schnittstelle zu vermeiden.
Sie können nun Anrufe tätigen, auf das Internet zugreifen, Ihre E-Mails
abrufen, Dateien versenden, eine Videokonferenz starten und vieles mehr.
TELEFONIEREN ÜBER DEN EXPLORER® 300
Wenn Sie ein Bluetooth-Handset verwenden, muss dieses mit dem EXPLORER 300
gekoppelt und in dessen Nähe platziert werden. Weitere Informationen hierzu
finden Sie im Abschnitt BLUETOOTH-KOPPLUNG am Ende dieses Dokuments.
Wenn Sie über den EXPLORER 300 telefonieren möchten, wählen Sie die Nummer
00 <Ländercode> <Rufnummer> gefolgt vom Zeichen # oder der Ruftaste.
Beispiel: Für einen Anruf bei Thrane & Thrane in Dänemark (+45 39558800)
wählen Sie 00 45 39558800 gefolgt von der Taste # oder der Ruftaste.
ANRUFEN DES EXPLORER® 300
Wenn Sie den EXPLORER 300 anrufen möchten, wählen Sie die Nummer
+870 <Mobilfunkrufnummer>
+ steht in Europa und vielen anderen Ländern für 00.
Page 15

DE
AUSWÄHLEN EINER SCHNITTSTELLE FÜR EINE DATENVERBINDUNG
Der EXPLORER 300 bietet zwei Schnittstellen für eine Datenverbindung: LAN und
Bluetooth.
Die folgende Tabelle zeigt einige Merkmale dieser Schnittstellen, um Ihnen die
Auswahl für Ihre Anwendung zu erleichtern.
Schnittstelle Stromverbrauch Reichweite
LAN Hoch Bis zu 100 m Kabel
Bluetooth Mittel Wireless-Verbindung.
Bis zu 25 m, je nach Sender am Computer und
Übertragungsbedingungen.
HERSTELLEN EINER LAN-VERBINDUNG
Wenn Sie eine LAN-Verbindung herstellen möchten, verbinden Sie einfach das
LAN-Kabel mit Ihrem Computer und dem LAN-Anschluss des EXPLORER 300.
Starten Sie dann den EXPLORER 300 wie am Anfang dieses Dokuments
beschrieben.
Erscheint in der Anzeige des EXPLORER 300 die Meldung BEREIT, wurde die
Verbindung automatisch hergestellt.
Sie können nun auf das Internet zugreifen, E-Mails abrufen, Dateien versenden etc.
HINWEIS: Informationen zur Konfiguration finden Sie im Anwenderhandbuch.
Page 16

HERSTELLEN EINER BLUETOOTH-DATENVERBINDUNG
Wenn Sie eine Bluetooth-Verbindung herstellen möchten, platzieren Sie den
Computer in der Nähe des EXPLORER 300, und starten Sie den EXPLORER 300 wie
am Anfang dieses Dokuments beschrieben.
Ist der Computer bereits mit dem EXPLORER 300 gekoppelt, wird die Verbindung
automatisch hergestellt, wenn beide Geräte bereit sind und sich gegenseitig
erkannt haben. Ist jedoch Ihre Bluetooth-Verbindung als Einwahlverbindung
definiert, müssen Sie die Einwahlverbindung öffnen, um sie zu aktivieren.
Sie können nun auf das Internet zugreifen, E-Mails abrufen, Dateien versenden etc.
HINWEIS: Informationen zur Konfiguration finden Sie im Anwenderhandbuch.
Informationen zur Bluetooth-Kopplung finden Sie im nächsten Abschnitt.
Page 17

DE
BLUETOOTH-KOPPLUNG
HINWEIS: In diesem Abschnitt wird nur die Kopplung von Geräten erläutert, für die
Sie einen Schlüssel eingeben können. Informationen zu Geräten ohne Möglichkeit
zur Schlüsseleingabe (z. B. Headsets) finden Sie im Anwenderhandbuch.
Gehen Sie wie folgt vor, um ein Bluetooth-Gerät zu koppeln:
1. Starten Sie den EXPLORER 300 wie am Anfang dieses Dokuments beschrieben.
2. Platzieren Sie Ihr Bluetooth-Gerät in der Nähe des EXPLORER 300.
3. Suchen Sie mit Ihrem Bluetooth-Gerät nach neuen Geräten, und wählen Sie den
EXPLORER 300 aus, wenn dieser gefunden wurde.
Der standardmäßige Bluetooth-Name des EXPLORER 300 lautet EXPLORER 300.
Werden in der Liste mehrere EXPLORER 300 angezeigt, können Sie das korrekte
Gerät mit Hilfe der MAC-Adresse ermitteln. Wenn Sie die MAC-Adresse Ihres
EXPLORER 300 einsehen möchten, öffnen Sie das Anzeigemenü, und wählen Sie
die Option
EIGENSCHAFTEN > TERMINAL > HARDWARE > MAC aus.
4. Geben Sie an Ihrem Bluetooth-Gerät den Zugangsschlüssel des EXPLORER 300
ein.
Der standardmäßige Zugangsschlüssel entspricht der Seriennummer des
EXPLORER 300.
Die Seriennummer finden Sie auf dem Etikett auf der Rückseite des
EXPLORER 300 oder im Anzeigemenü unter
EIGENSCHAFTEN > TERMINAL > HARDWARE > SERIENNUMMER.
Das neue Bluetooth-Gerät ist nun gekoppelt und kann mit dem EXPLORER 300
kommunizieren.
HINWEIS: Mit dem EXPLORER 300 können maximal zwei Geräte gekoppelt
werden. Sind bereits zwei Geräte gekoppelt, müssen Sie zunächst die Kopplung
eines Geräts aufheben.
Informationen zum Aufheben der Kopplung finden Sie im Anwenderhandbuch.
Page 18

ZUGREIFEN AUF DAS WEB-INTERFACE
Gehen Sie wie folgt vor, um auf das Web-Interface zuzugreifen:
1. Verbinden Sie einen PC mit dem EXPLORER 300.
2. Starten Sie Ihren Internet-Browser.
3. Geben Sie die IP-Adresse des Web-Interface im Adressfeld ein.
Die standardmäßige IP-Adresse lautet 192.168.0.1.
Wenn Sie die IP-Adresse im Menüsystem anzeigen möchten, wählen Sie die
Option
EIGENSCHAFTEN >TERMINAL> IP-ADRESSE aus.
Das Web-Interface wird nun im Browser geöffnet. Informationen zur Verwendung
des Web-Interface finden Sie im Anwenderhandbuch.
Page 19

FR
MISE EN ROUTE
Merci d’avoir acheté l’EXPLORER 300.
Avant de commencer, vérifiez la présence des éléments suivants :
• Terminal EXPLORER 300 avec antenne intégrée
• Batterie
• Adaptateur secteur
• Câble LAN
• Kit de mise en route comprenant le Guide rapide, le manuel électronique, etc.
1
Insertion de la carte SIM (fournie par votre fournisseur de
services de communications)
a. Insérez la carte SIM dans son logement et
enclenchez-la doucement.
b. Faites coulisser le dispositif de fermeture de la
carte SIM.
2
Insertion de la batterie
Insérez la batterie et enclenchez-la doucement.
REMARQUE : vous pouvez utiliser la batterie
comme source d’alimentation ou connecter l’entrée
CC à l’une des sources d’alimentation suivantes :
• Alimentation 100-240 V, à l’aide de l’adaptateur
secteur.
• CC 12 V dans une voiture, à l’aide du câble de
chargement disponible auprès de Thrane & Thrane.
Pour plus d’informations, reportez-vous au manuel d’utilisation.
Page 20

3
Connexion des câbles
Branchez les câbles aux connecteurs
correspondants de l’EXPLORER 300.
Le panneau de connexion se trouve sur le
côté du terminal.
Le connecteur de chargement de téléphone Bluetooth, marqué DC OUT, se
trouve à l’arrière de l’EXPLORER 300.
4
Mise en marche de l’EXPLORER® 300
Appuyez sur la touche de mise en marche située à côté de l’écran pendant 1
à 2 secondes jusqu’à ce que le voyant vert s’allume.
5
Saisie du code PIN
a. Lorsqu’un message vous demande d’entrer le PIN, appuyez sur OK.
b. Appuyez sur
ou sur jusqu’à ce que
le premier chiffre voulu s’affiche.
c. Appuyez sur
OK pour passer à la saisie du
chiffre suivant.
Le chiffre précédent est accompagné du
signe *.
d. Après avoir appuyé sur
OK pour entrer le dernier chiffre, appuyez à
nouveau sur OK pour valider le code PIN.
e. Vous pouvez désactiver le son de pointage en appuyant sur
ou sur .
6
Pointage de l’antenne
Important ! Pour optimiser la bande passante et le temps de fonctionnement,
réglez la position de l’antenne avec une grande précision. Pour effectuer ce
réglage, vous devez avoir connecté tous câbles et saisi votre code PIN.
Alim.
Téléphone
LAN
Page 21

FR
a. En utilisant le compas intégré de l’EXPLORER 300 comme référence,
faites pivoter l’antenne et inclinez-la dans la direction approximative du
satellite BGAN.
b. Utilisez l’intensité du signal affichée et le son de pointage pour trouver
l’intensité maximale, tout en faisant pivoter et en inclinant lentement
l’EXPLORER 300.
c. Lorsque vous avez obtenu l’intensité
du signal maximale, appuyez sur OK.
L’EXPLORER 300 commence à établir une connexion avec le réseau BGAN.
L’écran affiche la progression comme suit :
•
RECHERCHE : l’EXPLORER 300 recherche l’opérateur réseau.
La procédure de recherche pouvant être extrêmement brève, il est
possible que vous n’aperceviez pas ce texte.
•
ENREGISTREMT : une fois l’opérateur réseau trouvé, l’écran affiche
ENREGISTREMT pour indiquer que l’enregistrement de l’EXPLORER 300 sur
le réseau est en cours.
•
PRÊT : l’EXPLORER 300 est enregistré sur le réseau.
Il se peut que l’écran affiche un autre texte, par exemple si une erreur s’est
produite. Pour plus d’informations, reportez-vous au manuel d’utilisation.
REMARQUE : lorsque l’écran affiche PRÊT, le terminal active automatiquement
l’interface LAN si le câble est connecté et l’interface activée. Si vous n’utilisez pas
la connexion LAN, retirez le câble ou désactivez l’interface LAN afin d’éviter que
des transmissions via cette interface ne vous soient facturées.
Page 22

Vous pouvez alors passer des appels téléphoniques, naviguer sur Internet,
consulter vos e-mails, envoyer des fichiers, organiser une visioconférence, etc.
APPEL À PARTIR DE L’EXPLORER® 300
Si vous utilisez un combiné Bluetooth, il doit être jumelé et placé à proximité de
l’EXPLORER 300. Pour plus d’informations, reportez-vous à la section JUMELAGE
BLUETOOTH à la fin de ce document.
Pour passer un appel à partir de l’EXPLORER 300, composez
00 <code pays> <numéro de téléphone> suivis de # ou de la touche de décrochage.
Exemple : pour appeler Thrane & Thrane au Danemark : (+45 39558800), composez
00 45 39558800 suivi de # ou de la touche de décrochage.
APPEL VERS L’EXPLORER® 300
Pour passer un appel vers l’EXPLORER 300, composez
+870 <numéro de mobile>
+ correspond à 00 pour l’Europe et pour de nombreux autres pays.
Page 23

FR
CHOIX D’UNE INTERFACE POUR LA CONNEXION AUX DONNÉES
L’EXPLORER 300 dispose de deux types d’interface pour la connexion aux
données : LAN et Bluetooth.
Le tableau ci-dessous décrit certaines caractéristiques de ces interfaces pour vous
aider à choisir celle qui convient à votre application.
Interface Puissance consommée Portée
LAN Élevée Jusqu’à 100 m de câble
Bluetooth Moyenne Connexion sans fil.
Jusqu’à 25 m selon l’émetteur de l’ordinateur
et les conditions d’émission.
ÉTABLISSEMENT D’UNE CONNEXION LAN
Pour effectuer une connexion LAN, connectez le câble LAN entre votre ordinateur
et le connecteur LAN de l’EXPLORER 300, et démarrez ce dernier en suivant la
procédure décrite au début de ce document.
Dès que l’écran de l’EXPLORER 300 affiche PRÊT, la connexion s’établit
automatiquement.
Vous pouvez alors naviguer sur Internet, consulter vos e-mails, envoyer des
fichiers, etc.
REMARQUE : pour plus d’informations sur la configuration, reportez-vous au
manuel d’utilisation.
Page 24

ÉTABLISSEMENT D’UNE CONNEXION AUX DONNÉES BLUETOOTH
Pour effectuer une connexion Bluetooth, placez l’ordinateur à proximité de
l’EXPLORER 300 et démarrez ce dernier en suivant la procédure décrite au début de
ce document.
Si l’ordinateur est déjà jumelé avec l’EXPLORER 300, la connexion s’établit
automatiquement lorsque les deux dispositifs sont prêts et se sont détectés.
Toutefois, si votre connexion Bluetooth est définie en tant que connexion d’accès à
distance, vous devez ouvrir cette dernière pour activer la connexion.
Vous pouvez alors naviguer sur Internet, consulter vos e-mails, envoyer des
fichiers, etc.
REMARQUE : pour plus d’informations sur la configuration, reportez-vous au
manuel d’utilisation. Pour plus d’informations sur le jumelage Bluetooth, reportezvous à la section suivante.
Page 25

FR
JUMELAGE BLUETOOTH
REMARQUE : cette section explique comment jumeler des dispositifs dans lesquels
vous pouvez entrer un passe. Pour obtenir des informations sur les dispositifs dans
lesquels vous ne pouvez pas entrer de passe, par exemple des casques, reportezvous au manuel d’utilisation.
Procédez comme suit pour jumeler un dispositif Bluetooth :
1. Démarrez l’EXPLORER 300 en suivant la procédure décrite au début de ce
document.
2. Placez le dispositif Bluetooth à proximité de l’EXPLORER 300.
3. Sur le dispositif Bluetooth, recherchez les nouveaux dispositifs et sélectionnez
l’EXPLORER 300.
Le nom Bluetooth par défaut de l’EXPLORER 300 est EXPLORER 300.
Si la liste propose plusieurs EXPLORER 300, vous pouvez utiliser l’adresse MAC
pour trouver le terminal correct. Pour afficher l’adresse MAC de votre EXPLORER
300, accédez au système de menus d’affichage et sélectionnez
PROPRIÉTÉS > TERMINAL > MATÉRIEL > MAC.
4. Sur le dispositif Bluetooth, entrez le passe de l’EXPLORER 300.
Le passe par défaut correspond au numéro de série de l’EXPLORER 300.
Ce numéro se trouve sur l’étiquette située à l’arrière de l’EXPLORER 300. Vous
pouvez également le trouver en accédant au système de menus d’affichage et en
sélectionnant
PROPRIÉTÉS > TERMINAL > MATÉRIEL > NUM. SÉR. UNITÉ.
Le nouveau dispositif Bluetooth est jumelé et prêt à communiquer avec
l’EXPLORER 300.
REMARQUE : il est impossible de jumeler plus de 2 dispositifs avec l’EXPLORER
300. Si 2 dispositifs sont déjà jumelés, vous devez annuler le jumelage de l’un
d’eux. Pour plus d’informations sur l’annulation du jumelage de dispositifs,
reportez-vous au manuel d’utilisation.
Page 26

ACCÈS A L’INTERFACE WEB
Procédez comme suit pour accéder à l’interface Web :
1. Connectez un PC à l’EXPLORER 300.
2. Lancez votre navigateur Internet.
3. Entrez l’adresse IP de l’interface Web dans le champ prévu à cet effet.
L’adresse IP par défaut est 192.168.0.1.
Pour trouver l’adresse IP dans le système de menus, sélectionnez
PROPRIÉTÉS > TERMINAL > ADRESSE IP.
L’interface Web s’ouvre dans votre navigateur. Pour plus d’informations sur
l’utilisation de l’interface Web, reportez-vous au manuel d’utilisation.
Page 27

ES
INTRODUCCIÓN
Enhorabuena por la compra de su EXPLORER 300.
Antes de comenzar, compruebe que estén presentes los siguientes elementos:
• Terminal EXPLORER 300 con antena incorporada
• Batería
• Adaptador de CA/CC
• Cable LAN
• Kit de introducción que incluye la Guía rápida, el manual electrónico, etc.
1
Insertar la tarjeta SIM (proporcionada por su suministrador
de Servicios de Tráfico de Comunicaciones)
a. Inserte la tarjeta SIM en la ranura SIM y apriete
con suavidad hasta que encaje correctamente.
b. Deslice el cierre para que la tarjeta SIM quede
fijada en su sitio.
2
Insertar la batería
Inserte la batería y apriete con suavidad hasta que
encaje correctamente.
NOTA: puede usar la batería como fuente de
alimentación o conectar la entrada de CC a una de
las siguientes fuentes de alimentación:
• Red de 100-240 V mediante el adaptador de CA/CC
• 12 V CC en un coche mediante el cable cargador
para coche comercializado por Thrane & Thrane
Para obtener más información, consulte el Manual del usuario.
Page 28

3
Conectar los cables
Conecte los cables a los conectores
correspondientes del EXPLORER 300.
El panel del conector se encuentra en el
lateral del EXPLORER 300.
Uno de los conectores, el conector de carga del teléfono Bluetooth, marcado
con las letras DC OUT, se encuentra en la parte trasera del EXPLORER 300.
4
Encender el EXPLORER® 300
Pulse el botón de encendido situado junto a la pantalla y manténgalo
pulsado durante 1-2 segundos hasta que se ilumine el indicador de
encendido de color verde.
5
Introducir el PIN
a. Cuando se le solicite el PIN, pulse OK.
b. Pulse las teclas
o varias veces hasta
que el primer dígito sea el correcto.
c. Pulse
OK para desplazarse al siguiente
dígito.
El dígito anterior se indica mediante un asterisco (*).
d. Después de pulsar
OK para introducir el último dígito, vuelva a pulsar
OK para aplicar el PIN.
e. Si desea desactivar el sonido de conexión, pulse
o .
6
Colocar la antena
Importante: para obtener un ancho de banda y un tiempo de comunicación
óptimos, ajuste la posición de la antena con gran precisión. No ajuste la
posición de la antena hasta que todos los cables estén conectados y haya
introducido el PIN.
Aliment.
Tel.
LAN
Page 29

ES
a. Utilizando como referencia la brújula incorporada del EXPLORER 300,
gire e incline la antena para que apunte en la dirección aproximada del
satélite BGAN.
b. Utilice la potencia de señal mostrada y el sonido de conexión para
encontrar la mayor potencia de señal posible, mientras gira e inclina
lentamente el EXPLORER 300.
c. Pulse
OK cuando haya obtenido la
mayor potencia de señal posible.
En ese momento, el EXPLORER 300 comenzará a establecer una conexión
con la red BGAN.
En la pantalla se mostrará el siguiente progreso:
•
BUSCANDO: el EXPLORER 300 busca el operador de red.
Tenga en cuenta que el procedimiento de búsqueda puede ser muy
corto, por lo que es posible que no vea este texto.
•
REGISTRANDO: cuando se encuentra el operador de red, se muestra en
la pantalla el texto REGISTRANDO, que indica que el EXPLORER 300 se
está registrando en la red.
•
LISTO: el EXPLORER 300 está registrado en la red.
Es posible que en la pantalla aparezca un texto distinto, por ejemplo, si se
ha producido un error. Para obtener más información, consulte el Manual
del usuario.
Page 30

NOTA: cuando en la pantalla aparece el texto LISTO, el terminal activa
automáticamente la interfaz LAN si el cable está conectado y la interfaz está
habilitada. Si no va a utilizar la conexión LAN, quite el cable o deshabilite la
interfaz LAN para no tener que pagar posibles transmisiones a través de esta
interfaz.
Desde este momento ya puede realizar llamadas telefónicas, navegar por
Internet, consultar su correo electrónico, enviar archivos o celebrar una
videoconferencia, entre muchas otras cosas.
REALIZAR UNA LLAMADA DESDE EL EXPLORER® 300
Si utiliza un auricular Bluetooth, deberá asociarlo y colocarlo cerca del
EXPLORER 300. Para obtener más información sobre la asociación, consulte el
apartado ASOCIACIÓN BLUETOOTH que encontrará al final de este documento.
Para realizar una llamada desde el EXPLORER 300, marque:
00 <código del país> <número de teléfono> seguido de # o de la tecla de descolgado.
Ejemplo: para llamar a Thrane & Thrane en Dinamarca: (+45 39558800), marque
00 45 39558800 seguido de # o de la tecla de descolgado.
REALIZAR UNA LLAMADA AL EXPLORER® 300
Para realizar una llamada al EXPLORER 300, marque:
+870 <número de móvil>
+ equivale a 00 para Europa y muchos otros países.
Page 31

ES
ELEGIR UNA INTERFAZ PARA LA CONEXIÓN DE DATOS
El EXPLORER 300 dispone de dos tipos de interfaz para la conexión de datos: la
interfaz LAN y la interfaz Bluetooth.
En la siguiente tabla se muestran algunas de las características de cada interfaz,
para ayudarle a elegir la interfaz adecuada para su aplicación.
Interfaz Consumo de energía Rango
LAN Alto Hasta 100 m de cable
Bluetooth Medio Conexión inalámbrica.
Hasta 25 m, en función del transmisor del
ordenador y de las condiciones de transmisión.
REALIZAR UNA CONEXIÓN LAN
Para realizar una conexión LAN, basta con que conecte el cable LAN entre el
ordenador y el conector LAN del EXPLORER 300 y que ponga en marcha el
EXPLORER 300 tal y como se describe al principio de este documento.
En cuanto aparezca el texto LISTO en la pantalla del EXPLORER 300, la conexión se
establecerá automáticamente.
Desde este momento ya puede navegar por Internet, consultar su correo
electrónico, enviar archivos, etc.
NOTA: para obtener información sobre la configuración, consulte el Manual del
usuario.
Page 32

REALIZAR UNA CONEXIÓN DE DATOS BLUETOOTH
Para realizar una conexión Bluetooth, coloque el ordenador cerca del
EXPLORER 300 y ponga en marcha el EXPLORER 300 tal y como se describe al
principio de este documento.
Si el ordenador ya se ha asociado al EXPLORER 300, la conexión se establecerá
automáticamente cuando ambos dispositivos estén listos y se hayan detectado el
uno al otro. Sin embargo, debe tener en cuenta que si su conexión Bluetooth está
definida como una conexión de acceso telefónico, tiene que abrir la conexión de
acceso telefónico para activar la conexión.
Desde este momento ya puede navegar por Internet, consultar su correo
electrónico, enviar archivos, etc.
NOTA: para obtener información sobre la configuración, consulte el Manual del
usuario. Para obtener información sobre la asociación Bluetooth, consulte el
siguiente apartado.
Page 33

ES
ASOCIACIÓN BLUETOOTH
NOTA: en este apartado solo se explica cómo asociar dispositivos en los que se
puede introducir una contraseña. Para obtener información sobre los dispositivos
en los que no se puede introducir una contraseña, como los auriculares, consulte
el Manual del usuario.
Para asociar un dispositivo Bluetooth, haga lo siguiente:
1. Ponga en marcha el EXPLORER 300 tal y como se describe al principio de este
documento.
2. Coloque el dispositivo Bluetooth cerca del EXPLORER 300.
3. En el dispositivo Bluetooth, busque nuevos dispositivos y seleccione el
EXPLORER 300 cuando lo encuentre.
El nombre Bluetooth predeterminado del EXPLORER 300 es EXPLORER 300.
Si hay más de un EXPLORER 300 en la lista, puede usar la dirección MAC para
localizar el correcto. Para ver la dirección MAC del EXPLORER 300, entre en el
sistema de menús de la pantalla y seleccione
PROPIEDADES > TERMINAL > HARDWARE > MAC.
4. En el dispositivo Bluetooth, introduzca la contraseña del EXPLORER 300.
La contraseña predeterminada es el número de serie del EXPLORER 300.
Para saber el número de serie, consulte la etiqueta de la parte posterior del
EXPLORER 300 o entre en el sistema de menús de la pantalla y seleccione
PROPIEDADES > TERMINAL > HARDWARE > NÚM. SERIE UNIDAD.
Desde este momento, el nuevo dispositivo Bluetooth estará asociado y listo para
comunicarse con el EXPLORER 300.
NOTA: sólo pueden asociarse un máximo de 2 dispositivos con el EXPLORER 300.
Si ya tiene 2 dispositivos asociados, debe desasociar alguno de ellos para poder
asociar uno nuevo. Para obtener información sobre la forma de desasociar
dispositivos, consulte el Manual del usuario.
Page 34

ACCEDER A LA INTERFAZ WEB
Para acceder a la interfaz web, haga lo siguiente:
1. Conecte un ordenador al EXPLORER 300.
2. Inicie su navegador de Internet.
3. Introduzca la dirección IP de la interfaz web en el campo de dirección.
La dirección IP predeterminada es 192.168.0.1.
Para ver la dirección IP en el sistema de menús, seleccione
PROPIEDADES > TERMINAL > DIRECCIÓN IP.
La interfaz web se abrirá en su navegador. Para obtener información sobre la forma
de utilizar la interfaz web, consulte el Manual del usuario.
Page 35

RU
НАЧАЛО РАБОТЫ
Поздравляем с приобретением терминала EXPLORER 300.
Перед тем как приступить к работе, проверьте наличие следующих
компонентов:
• Терминал EXPLORER 300 со встроенной антенной
• Аккумулятор
• Преобразователь переменного тока (адаптер)
• Кабель для подключения к локальной сети (ЛВС)
• Комплект для начала работы с устройством, включая краткое
руководство, руководство в электронной форме и пр.
1
Вставьте SIM-карту (предоставляется вашим
Cepвис Пpoвaйдepом)
a. Вставьте SIM-карту в соответствующее
гнездо и слегка нажмите на нее, чтобы
зафиксировать в гнезде.
b. Сдвиньте фиксатор, чтобы закрепить SIM-
карту.
2
Вставьте аккумулятор
Вставьте аккумулятор и слегка нажмите на
него для фиксации.
ПРИМЕЧАНИЕ. В качестве источника питания
можно использовать аккумулятор или один
из следующих источников, подключаемых к
гнезду питания постоянного тока:
• Сеть электропитания напряжением 100-240 В
(через адаптер).
• Бортовая сеть автомобиля 12 В= (через кабель автомобильного
зарядного устройства, поставляемого компанией Thrane & Thrane).
Подробнее см. в руководстве пользователя.
Page 36

3
Подсоедините кабели
Подсоедините кабели к
соответствующим разъемам
терминала EXPLORER 300.
Панель разъемов расположена на
боковой поверхности терминала.
Один разъем для зарядки телефона с интерфейсом Bluetooth,
обозначенный надписью DC OUT, расположен на задней панели
EXPLORER 300.
4
Включите питание EXPLORER® 300
Нажмите кнопку включения питания, расположенную рядом с
дисплеем, и удерживайте ее нажатой в течение 1-2 секунд, пока не
загорится зеленый индикатор питания.
5
Введите PIN-код
a. При появлении запроса на ввод PIN-кода нажмите OK.
b. Нажмите кнопку или требуемое
количество раз до появления первой
цифры PIN-кода.
c. Нажмите OK для перехода к
следующей цифре.
Предыдущая цифра обозначается символом *.
d. После нажатия кнопки OK для ввода последней цифры нажмите
OK еще раз для принятия PIN-кода.
e. Если требуется отключить звук при наведении, нажмите кнопку
или
.
6
Наведите антенну
Важное замечание! Для получения оптимальной полосы
пропускания и продолжительности работы необходимо точно
отрегулировать положение антенны. Не регулируйте положение
антенны до тех пор, пока не подсоединены все кабели и не введен
PIN-код.
Питание
Тел.
ЛВС
Page 37

RU
a. Используя встроенный компас EXPLORER 300, поверните
и наклоните антенну таким образом, чтобы она указывала
примерно в направлении спутника BGAN.
b. Используйте отображаемое на экране значение и
вспомогательный звуковой сигнал для поиска максимальной
величины сигнала, медленно поворачивая и наклоняя
EXPLORER 300.
c. После получения максимального
значения сигнала нажмите OK.
EXPLORER 300 начинает процедуру установления соединения с
сетью BGAN.
Ход выполнения поиска отображается на дисплее следующим
образом:
•
ПОИСК: EXPLORER 300 ведет поиск оператора сети.
Необходимо отметить, что процедура поиска может быть очень
короткой, в этом случае указанный текст может не появиться на
экране.
• РЕГИСТРАЦИЯ: если оператор сети найден, на дисплее
появляется надпись РЕГИСТРАЦИЯ, означающая, что
EXPLORER 300 выполняет процедуру регистрации в сети.
• ГОТОВ: EXPLORER 300 зарегистрирован в сети.
На дисплее может отображаться и другой текст, например, в случае
обнаружения ошибки. Подробнее см. в руководстве пользователя.
Page 38

ПРИМЕЧАНИЕ. Когда на дисплее появляется надпись ГОТОВ,
терминал автоматически включает интерфейс ЛВС (если
подсоединен кабель и использование интерфейса разрешено). Если
соединение с ЛВС не требуется, отсоедините кабель или отключите
интерфейс ЛВС, чтобы избежать выставления счетов за передачу
данных через этот интерфейс.
Теперь все готово для выполнения телефонных звонков, просмотра
ресурсов сети Интернет, чтения электронной почты, отправления
файлов, запуска видеоконференции и многого другого.
ВЫПОЛНЕНИЕ ВЫЗОВА С ТЕРМИНАЛА EXPLORER® 300
При использовании телефонной трубки с интерфейсом Bluetooth следует
выполнить процедуру сопряжения трубки и терминала EXPLORER 300
и поместить трубку рядом с терминалом. Сведения о процедуре
сопряжения приведены в разделе СОПРЯЖЕНИЕ УСТРОЙСТВ
BLUETOOTH в конце данного документа.
Для выполнения вызова с помощью EXPLORER 300 наберите:
00 <код страны> <номер телефона> затем нажмите кнопку # или
кнопку снятия трубки.
Пример: чтобы позвонить в филиал Thrane & Thrane в Дании
(+45 39558800), наберите 00 45 39558800, после чего нажмите
кнопку # или кнопку снятия трубки.
ВЫПОЛНЕНИЕ ВЫЗОВА НА ТЕРМИНАЛ EXPLORER® 300
Для выполнения вызова на терминал EXPLORER 300 наберите:
+870 <номер мобильного телефона>
где ‘+’ = ‘00’ для Европы и многих других стран.
Page 39

RU
ВЫБОР ИНТЕРФЕЙСА ДЛЯ ПЕРЕДАЧИ ДАННЫХ
EXPLORER 300 имеет два интерфейса для передачи данных: ЛВС и
Bluetooth.
Для упрощения выбора наиболее подходящего интерфейса в следующей
таблице показаны некоторые их характеристики.
Интерфейс Энергопотребление Дальность действия
Локальная
вычислительная
сеть (ЛВС)
Высокое По кабелю длиной до 100 м
Bluetooth Среднее Беспроводное соединение.
До 25 м в зависимости от типа
передатчика, установленного
в компьютере, и условий при
передаче.
УСТАНОВЛЕНИЕ СОЕДИНЕНИЯ С ЛВС
Для установления соединения с ЛВС просто подсоедините кабель ЛВС
к компьютеру и разъему ЛВС на терминале EXPLORER 300 и включите
EXPLORER 300, как указано в начале этого документа.
Соединение устанавливается автоматически, сразу после появления на
дисплее EXPLORER 300 надписи ГОТОВ.
Теперь можно просматривать ресурсы сети Интернет, читать электронную
почту, посылать файлы и пр.
ПРИМЕЧАНИЕ. Подробные сведения о настройке см. в руководстве
пользователя.
Page 40

УСТАНОВЛЕНИЕ СОЕДИНЕНИЯ BLUETOOTH ДЛЯ
ПЕРЕДАЧИ ДАННЫХ
Для установления соединения через интерфейс Bluetooth разместите
компьютер рядом с EXPLORER 300 и включите EXPLORER 300 как
описано в начале данного документа.
Если компьютер и EXPLORER 300 уже сопряжены, соединение для
передачи данных устанавливается автоматически, когда оба устройства
готовы к работе и обнаружили друг друга. Однако следует отметить,
что если соединение Bluetooth настроено как коммутируемое, для его
включения необходимо открыть соответствующее коммутируемое
соединение.
Теперь можно просматривать ресурсы сети Интернет, читать электронную
почту, посылать файлы и пр.
ПРИМЕЧАНИЕ. Подробные сведения о настройке см. в руководстве
пользователя. Cведения о сопряжении устройств Bluetooth см. в
следующем разделе.
Page 41

RU
СОПРЯЖЕНИЕ УСТРОЙСТВ BLUETOOTH
ПРИМЕЧАНИЕ. В этом разделе описана процедура сопряжения
устройств, в которых предусмотрена возможность ввода кода доступа.
Сведения о сопряжении устройств, ввод кода доступа с которых
невозможен, например, гарнитур, приведены в руководстве пользователя.
Для сопряжения устройства Bluetooth выполните следующие действия:
1. Запустите EXPLORER 300, как описано в начале данного документа.
2. Поместите устройство Bluetooth рядом с EXPLORER 300.
3. На устройстве Bluetooth запустите процедуру поиска новых устройств и
выберите EXPLORER 300.
По умолчанию для терминала EXPLORER 300 используется имя
EXPLORER 300.
Если в показанном списке имеются несколько устройств с именем
EXPLORER 300, для выбора требуемого устройства можно
использовать MAC-адрес устройства. Для вывода MAC-адреса
терминала EXPLORER 300 войдите в меню системы и выберите:
СВОЙСТВА > ТЕРМИНАЛ > ОБОРУДОВАНИЕ > МАС.
4. Введите на устройстве Bluetooth код доступа к EXPLORER 300.
По умолчанию в качестве кода доступа используется серийный номер
EXPLORER 300.
Серийный номер указан на задней панели EXPLORER 300, также
серийный номер можно узнать, используя меню:
СВОЙСТВА > ТЕРМИНАЛ > ОБОРУДОВАНИЕ > CEP. HOMEP.
Теперь новое устройство с интерфейсом Bluetooth сопряжено и готово к
работе с EXPLORER 300.
ПРИМЕЧАНИЕ. К терминалу EXPLORER 300 можно подключить
максимум 2 устройства. Если с терминалом уже сопряжены 2 устройства,
перед сопряжением с новым устройством необходимо отключить одно
из уже подключенных. Подробные сведения об отмене сопряжения см. в
руководстве пользователя.
Page 42

ДОСТУП К WEB-ИНТЕРФЕЙСУ
Для доступа к web-интерфейсу выполните следующие действия:
1. Подсоедините ПК к терминалу EXPLORER 300.
2. Запустите Интернет-обозреватель.
3. Введите IP-адрес web-интерфейса в поле адреса.
По умолчанию используется IP-адрес 192.168.0.1.
Для вывода IP-адреса с помощью меню выберите:
СВОЙСТВА > ТЕРМИНАЛ > IP-АДРЕС.
В окне браузера появится web-интерфейс устройства. Подробные
сведения о использовании web-интерфейса см. в руководстве
пользователя.
Page 43

Page 44

Thrane & Thrane A/S • info@thrane.com • www.thrane.com
TT-98-123728-B
 Loading...