

Page 1
User Guide
User Guide
Page 2

RADIATION WARNING
High levels of radio frequency radiation are considered health hazardous. Although
no single value of “safe radiation level” has been agreed upon by all countries,
the American National Standards Institute (ANSI/LEEE C95.1-1992) recommends
that people should not be exposed to radiation stronger than 1 milliwatt per
square centimetre at the frequencies used in the Nera WorldPro terminal.
Accordingly, the operator of the terminal should ensure that the area extending
0.5 metre from the front of the antenna be kept clear of personnel when the terminal is transmitting.
OBTAINING LICENSING FOR INMARSAT TERMINALS
Under rights given under ITU Radio Regulations, local telecommunications administrations establish and enforce
national rules and regulations governing types of emissions, power levels, and other parameters that effect the
purity of signal, which may be radiated in the various frequency bands of the radio spectrum.
To legally operate an Inmarsat terminal, it is necessary to obtain permission from the local telecommunications
regulatory authorities of the country you are operating within. Using your terminal in any country without permission causes you to run the risk of confi scation of the terminal or legal action from local authorities. Normal
practice for taking telecommunications into another country is to apply for a license before travel. If a license has
not been obtained before travel, the equipment may be put into storage by local authorities until such time as a
license is obtained.
All specifi cations are subject to change without notice.
SAFETY DISTANCE 0.5 METRE
IN FRONT OF ANTENNA
Page 3

FCC Notice
USE CONDITIONS
This device complies with Part 15 of the FCC Rules. Operation is subject to the following two conditions: (1) this
device may not cause harmful interference, and (2) this device must accept any interference received, including
interference that may cause undesired operation.
NOTE: This equipment has been tested and found to comply with the limits for a Class B digital device, pursuant to
Part 15 of the FCC Rules. These limits are designed to provide reasonable protection against harmful interference
in a residential installation. This equipment generates, uses and can radiate radio frequency energy and, if not
installed and used in accordance with the instructions, may cause harmful interference to radio communications.
However, there is no guarantee that interference will not occur in a particular installation.
If this equipment does cause harmful interference to radio or television reception, which can be determined by
turning the equipment off and on, the user is encouraged to try to correct the interference by one or more of the
following measures:
• Reorient or relocate the receiving antenna.
• Increase the separation between the equipment and receiver.
• Connect the equipment into an outlet on a circuit different from that to which the receiver is connected.
• Consult the dealer or an experienced radio/TV technician for help.
EXPOSURE TO RADIO FREQUENCY RADIATION
This device complies with FCC RF radiation exposure limits set forth for an uncontrolled environment. The antenna
used for this transmitter must be installed to provide a separation distance of at least 50 cm from all persons and
must not be co-located or operating in conjunction with any other antenna or transmitter.
CAUTION
Changes or modifi cations not expressly approved by the manufacturer could void the user's authority, which is
granted by FCC, to operate this satellite terminal Nera WorldPro / Explorer 100/110.
Page 4

End User Licence Agreement
WindRiver/France Telecom/DVSI
PLEASE CAREFULLY READ THE LICENSE AGREEMENT
BELOW BEFORE USING THE PRODUCT THIS MANUAL
DESCRIBES. IN THE EVENT YOU CANNOT ACCEPT
THESE TERMS AND CONDITIONS, YOU SHOULD RETURN THE PRODUCT TO THE PLACE OF PURCHASE FOR
A REFUND OF THE PRICE PAID.
This Product contains embedded software from:
• WindRiver (WxWorks and GNAT). See license
agreement below.
• France Telecom (Turbocodes). France Telecom – TDF
– Groupe des ecoles des telecommunications
Turbo Codes patents license.
• Digital Voice Systems, Inc. (AMBE +2™ voice
compression technology) See license agreement
below.
WindRiver License Agreement.
End User shall take all steps necessary to protect Wind
River’s and its licensors’ proprietary rights.
This Agreement strictly prohibits End User from
(i) copying the Run-Time Module, except for archive
purposes consistent with the End User’s archive
procedures;
(ii) transferring the Run-Time Module to a third party
apart from the Target Application;
(iii) modifying, decompiling, disassembling, reverse
engineering or otherwise attempting to derive the
Source Code of the Run-Time Module;
(iv) exporting the Run-Time Module or underlying
technology in contravention of applicable U.S. and
foreign export laws and regulations; and
(v) using the Run-Time Module other than in connec-
tion with operation of the Target Application.
Furthermore, the End User shall observe that:
(i) the Run-Time Module is licensed, not sold. The
Supplier and its licensors retain ownership of all
copies of the Run-Time Module;
(ii) all implied warranties, including without limita-
tion the implied warranties of merchantability,
fi tness for a particular purpose, title and non-infringement shall be disclaimed;
(iii) liability for any special, indirect, punitive, inciden-
tal and consequential damages are excluded; and
(iv) any further distribution of the Run-Time Module
shall be subject to the same restrictions set forth
herein.
With respect to the Run-Time Module, Wind River
and its licensors are third party benefi ciaries of the
End User License Agreement and that the provisions
related to the Run-Time Module are made expressly
for the benefi t of, and are enforceable by, Wind River
and its licensors.”
Digital Voice Systems, Inc License Agreement.
Digital Voice Systems, Inc. The AMBE+2™ voice compression technology embodied in this product is protected by intellectual property rights, copyrights and
trade secrets of Digital Voice Systems, Inc. This voice
compression technology is licensed solely for use,
as is, within the Inmarsat satellite communications
system. US Patent Nos. 6,199,037, 6,161,089, 5,826,222,
5,754,974, 5,701,390, 5,715,365, 5,630,011, 5,649,050,
5,247,579, 5,870,405 and 5,226,084.
Page 5

EXPLORER 100/110
5
USER GUIDE
CONTENTS
INTRODUCTION .......................................... 7
General ............................................................................ 7
Applications .......................................................... 7
Key benefi ts .......................................................... 7
Standard equipment - ......................................8
WorldPro 1000 / Explorer 100 107020 ......8
Standard equipment - ......................................8
WorldPro 1010 / Explorer 110 107730 ...........8
Accessories ............................................................8
TECHNICAL DATA ......................................11
Physical data ....................................................... 11
Interfaces .............................................................. 11
Packet Switched (PS) service ..........................13
SMS - Short Message Service ........................13
Voice - Circuit Switched (CS) service ...........13
Battery - 102207..................................................13
AC/DC adapter - 102208 ................................. 14
DC power connector on terminal ............... 14
Power consumption ........................................ 14
Antenna performance .................................... 14
Environmental ................................................... 14
Documentation package supplied with the
terminals - 107014 ............................................ 14
OPERATION ................................................. 15
Satellite coverage map ..............................................15
Indicator panel ............................................................ 16
Terminal modes ...........................................................17
Pointing mode ....................................................17
Standby mode ....................................................17
Sleep mode ..........................................................17
Battery charging ........................................................ 18
SIM card ......................................................................... 19
Installing SIM card and battery ............................ 20
GPS To obtain a GPS fi x ..........................................21
Satellite communications ....................................... 22
Setting up, ....................................................................23
using the signal indicator .......................................23
ISDN Handset signal strength bar ..............24
BGAN LaunchPad signal strength bar .......24
Antenna pointing ......................................................25
Satellite signal at low elevation angles ..............26
Register with Network .............................................. 27
Message indicator ...................................................... 27
Emergency call - dial 911 ..........................................28
Cables and lengths ....................................................29
Split cable ............................................................29
Telephone interface cable..............................29
Ethernet cable ...................................................29
ISDN Splitter .......................................................29
The Explorer 100-110 Suite CD .............................. 30
Data connection via Ethernet .................................31
"Local Area Network" ........................................31
Publication 108491 Rev. 4.0 June 2007
Page 6

EXPLORER 100/110
6
USER GUIDE
CONTENTS
Voice communication via the ISDN Handset ...32
Getting Started ISDN Handset ..............................34
SIM pin / SIM card ............................................36
Making a Call .............................................................. 37
Additional Options ........................................... 37
Receiving a Call ..........................................................38
Text Message ..............................................................39
ISDN Handset Menu Options: ...................... 41
Split operation ............................................................42
Split operation
cont. ...............................................43
Multi User operation................................................ 44
Data connection via USB .........................................45
Installing USB drivers ......................................45
Communication via Bluetooth ............................ 46
Enabling Bluetooth using BGAN LaunchPad ....47
Enabling Bluetooth using the ISDN Handset ...47
Tenovis Bluetooth handset ................................... 48
EXPLORER 110 Using BT Headset .......................... 49
EXPLORER 110 WEB MMI ......................................... 50
EXPLORER 110 WEB MMI cont. .................................51
BGAN LaunchPad .......................................................52
Installation ................................................................... 52
Updates ................................................................52
Status ....................................................................54
GPS status ...........................................................54
Data connection................................................55
LaunchPad help .................................................56
Terminal log ........................................................ 57
Audio and lights setup on terminal ...........58
APPENDIX A - SYSTEM OVERVIEW .... A-1
Inmarsat BGAN system .......................................... A-1
System satellites .......................................................A-2
Transmission frequencies ......................................A-2
SAS (Satellite Access Station) ...............................A-2
Communication path .............................................A-4
APPENDIX B - LIST OF TERMS ............. B-1
APPENDIX C - TROUBLESHOOTING .. C-1
© Thrane&Thrane Norge AS, 2007
The Nera WorldPro terminal fully complies with the R&TTE directive.
IC: 6200A-107020
FCC ID:TSF107020
0434
30
30
Page 7

EXPLORER 100/110
7
USER GUIDE
General
The EXPLORER 100/110 satellite terminal is a small
lightweight satellite terminal providing transmission
via Inmarsat’s BGAN broadband data and voice service.
The Inmarsat BGAN system can be compared with the
3G Mobile network for cellular phones.
The terminal can be separated into two parts, so users
can choose between indoor and outdoor use, with no
need for an additional external antenna.
Combined with the EXPLORER ISDN Handset for voice
source, it is ideal for users who need to set up a complete broadband mobile offi ce in frequently changing
locations.
Voice and data connections can be used simultaneously.
All services are supported in spot beam, see the
Satellite
Coverage Map.
Applications
Remote access - high-speed access to your corporate
network, enabling access to company and customer
information.
Internet access -access the Internet at speeds up to
384kbps.
Email - send and receive email via the Internet or
email applications.
Telephony - make phone calls via a peripheral handset
at the same time as accessing data applications.
Streaming - select guaranteed quality of service up to
64kbps on demand, e.g. for video, audio.
INTRODUCTION
File transfer - send and receive large fi les.
Store and forward - save and send fi les e.g. video.
SMS - Short Message Service
Key benefi ts
Ultimate portability - at around half the size of a
laptop and weighing less than 1 kilo, it is the smallest
and lightest terminal in the BGAN range.
Simultaneous voice and broadband data - access your
data applications and make a phone call at the same
time.
Easy confi guration - the terminal can also be confi gured directly from the ISDN Handset.
Highly fl exible - uniquely designed to split into two
separate units, so the antenna can be placed outside,
while you work indoors in comfort - with no requirement for an additional external antenna.
The terminal can be connected to a laptop via the USB
port or Bluetooth, and via Ethernet from Q2 2006.
Global coverage - provides service anywhere within
the BGAN coverage area.
Easy to use - with the one-patch antenna design, it
takes less than a minute to locate a satellite communications signal. The service can be accessed via BGAN
LaunchPad on your laptop, or an on-box user interface
with self-explanatory indicators.
Robust - purposely designed to operate in challenging
environmental conditions.
Completely secure - connect seamlessly via your preferred VPN application.
Page 8

EXPLORER 100/110
8
USER GUIDE
Standard equipment WorldPro 1000 / Explorer 100 107020
• Interface Unit with built-in Bluetooth
• Antenna Unit with built-in GPS receiver
(camera stand compatible mounting nut
integrated)
• USB cable
• Rechargeable battery
• AC/DC adapter 110 - 240 VAC power w/Europlug
• QuickStart manual with CD containing the BGAN
LaunchPad PC interface and additional guides/
information
Standard equipment WorldPro 1010 / Explorer 110 107730
• Interface Unit with built-in Bluetooth
• Antenna Unit with built-in GPS receiver
(camera stand compatible mounting nut
integrated)
• Ethernet cable
• Rechargeable battery
• AC/DC adapter 110 - 240 VAC power w/Europlug
• QuickStart manual with CD containing the BGAN
LaunchPad PC interface and additional guides/
information.
.
Accessories
• Explorer ISDN Handset,
• Split cable for interconnection of separated Interface unit and Antenna Unit, 3, 10, 20 and 30 m
• Bluetooth handset
• DC/DC adapter, 10 - 32 VDC
• Soft case
• Extra battery packs
• Bracket mounts for antenna
• Cable for car power plug
• Bluetooth headset
• Coloured antenna cover
• ISDN/USB dongle
INTRODUCTION CONT’D
Page 9
Standard data up to
Standard Euro-ISDN phones
Terminal adapter ISDN to 2w analogue
EXPLORER 100/110
9
USER GUIDE
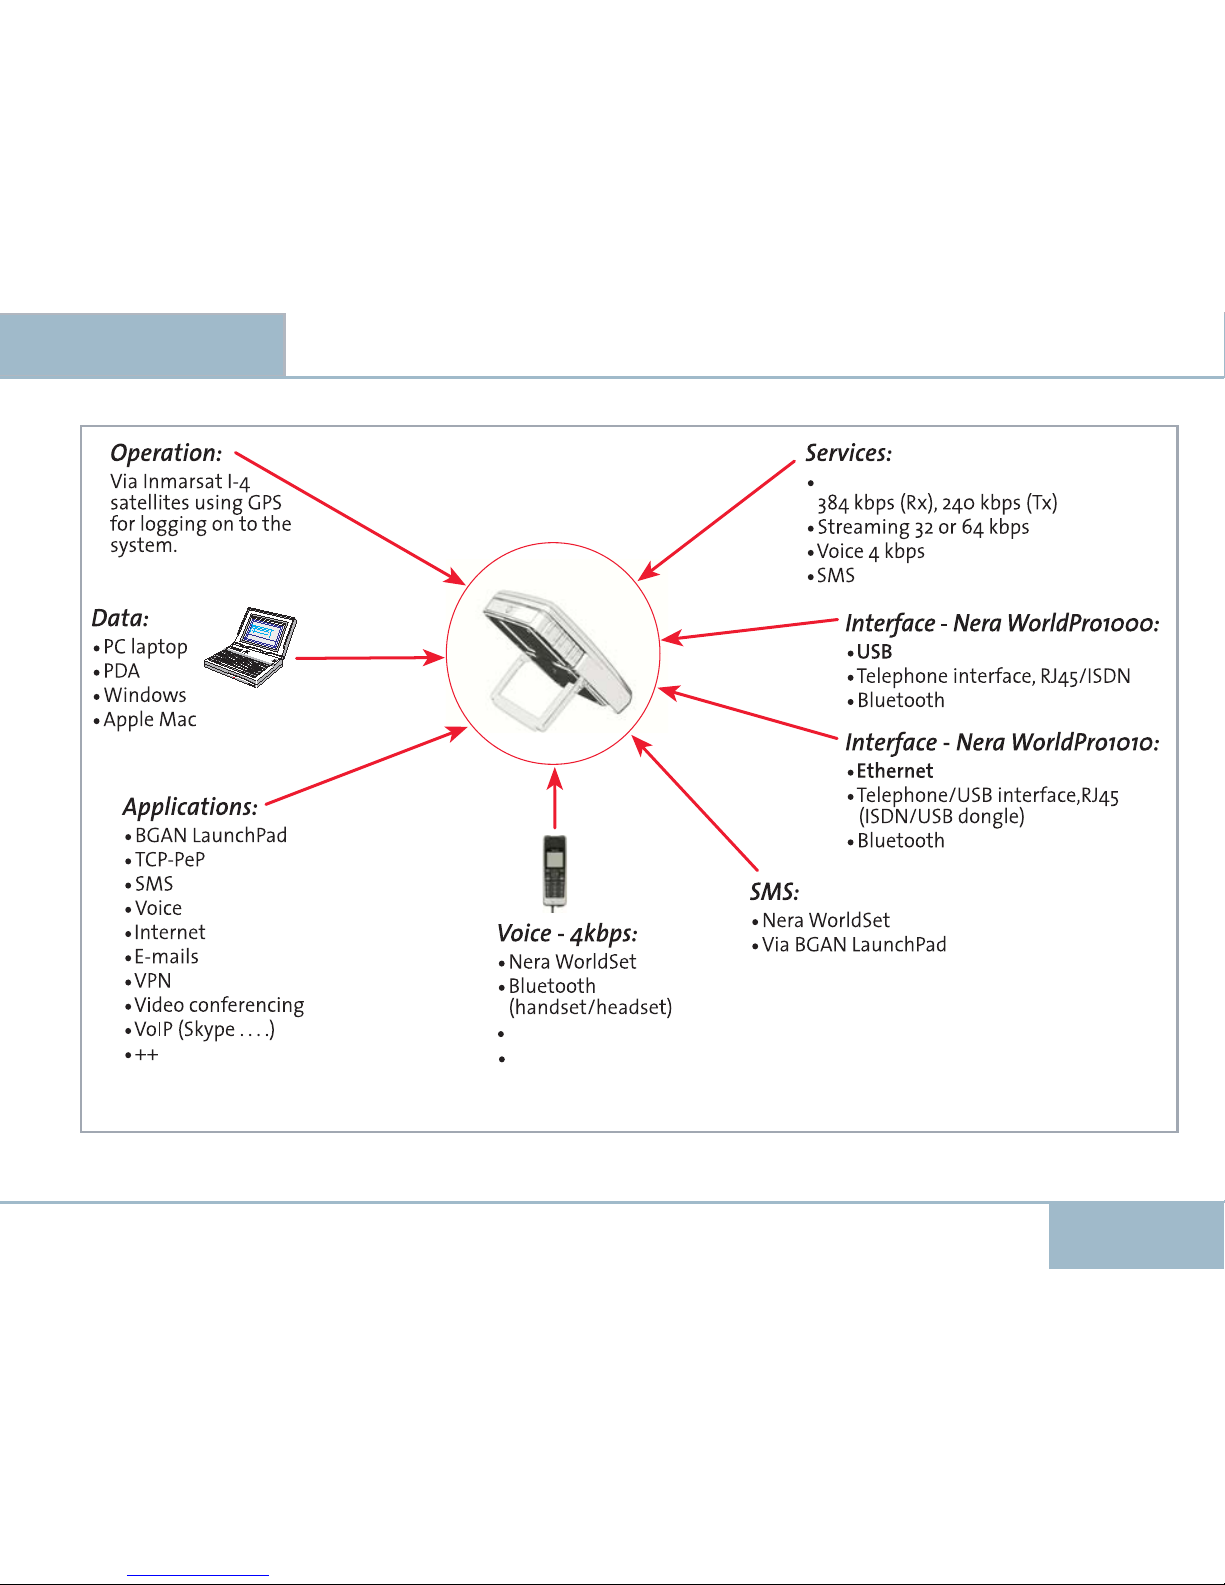
Figure 1 Nera WorldPro, functions and services.
INTRODUCTION CONT’D
Page 10
EXPLORER 100/110
10
USER GUIDE
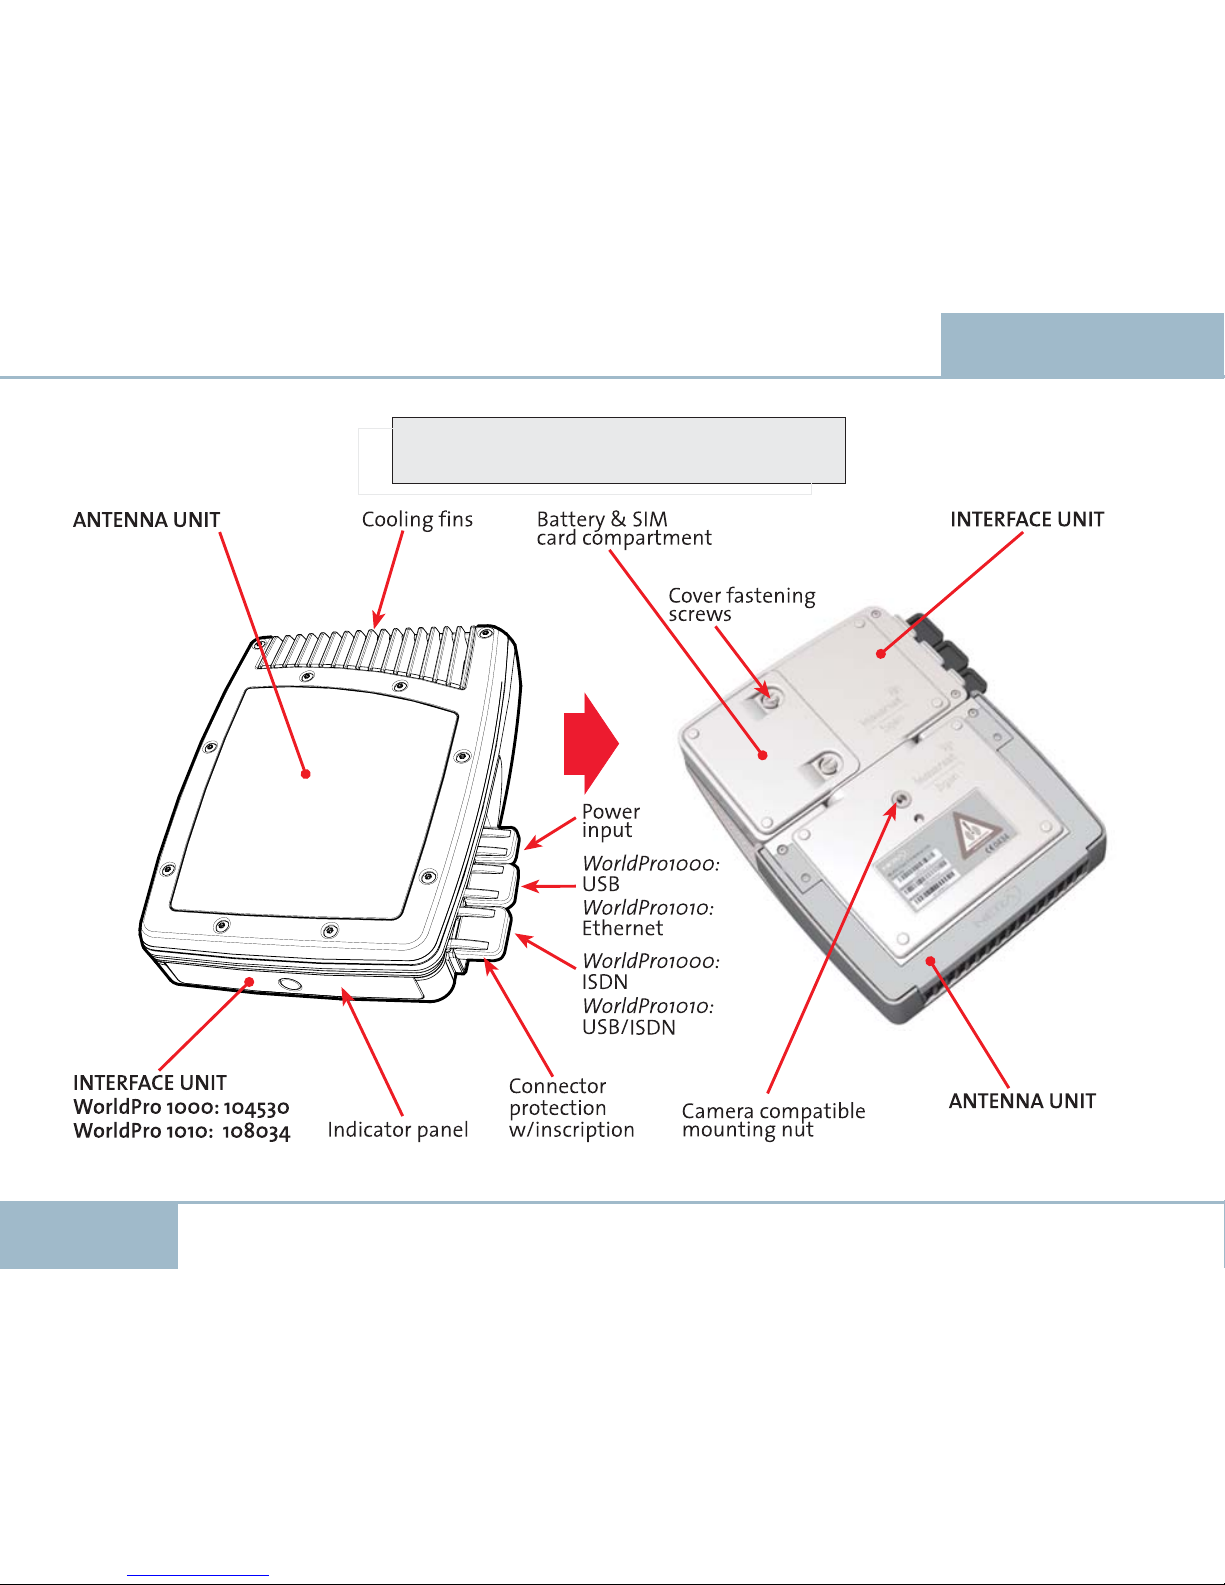
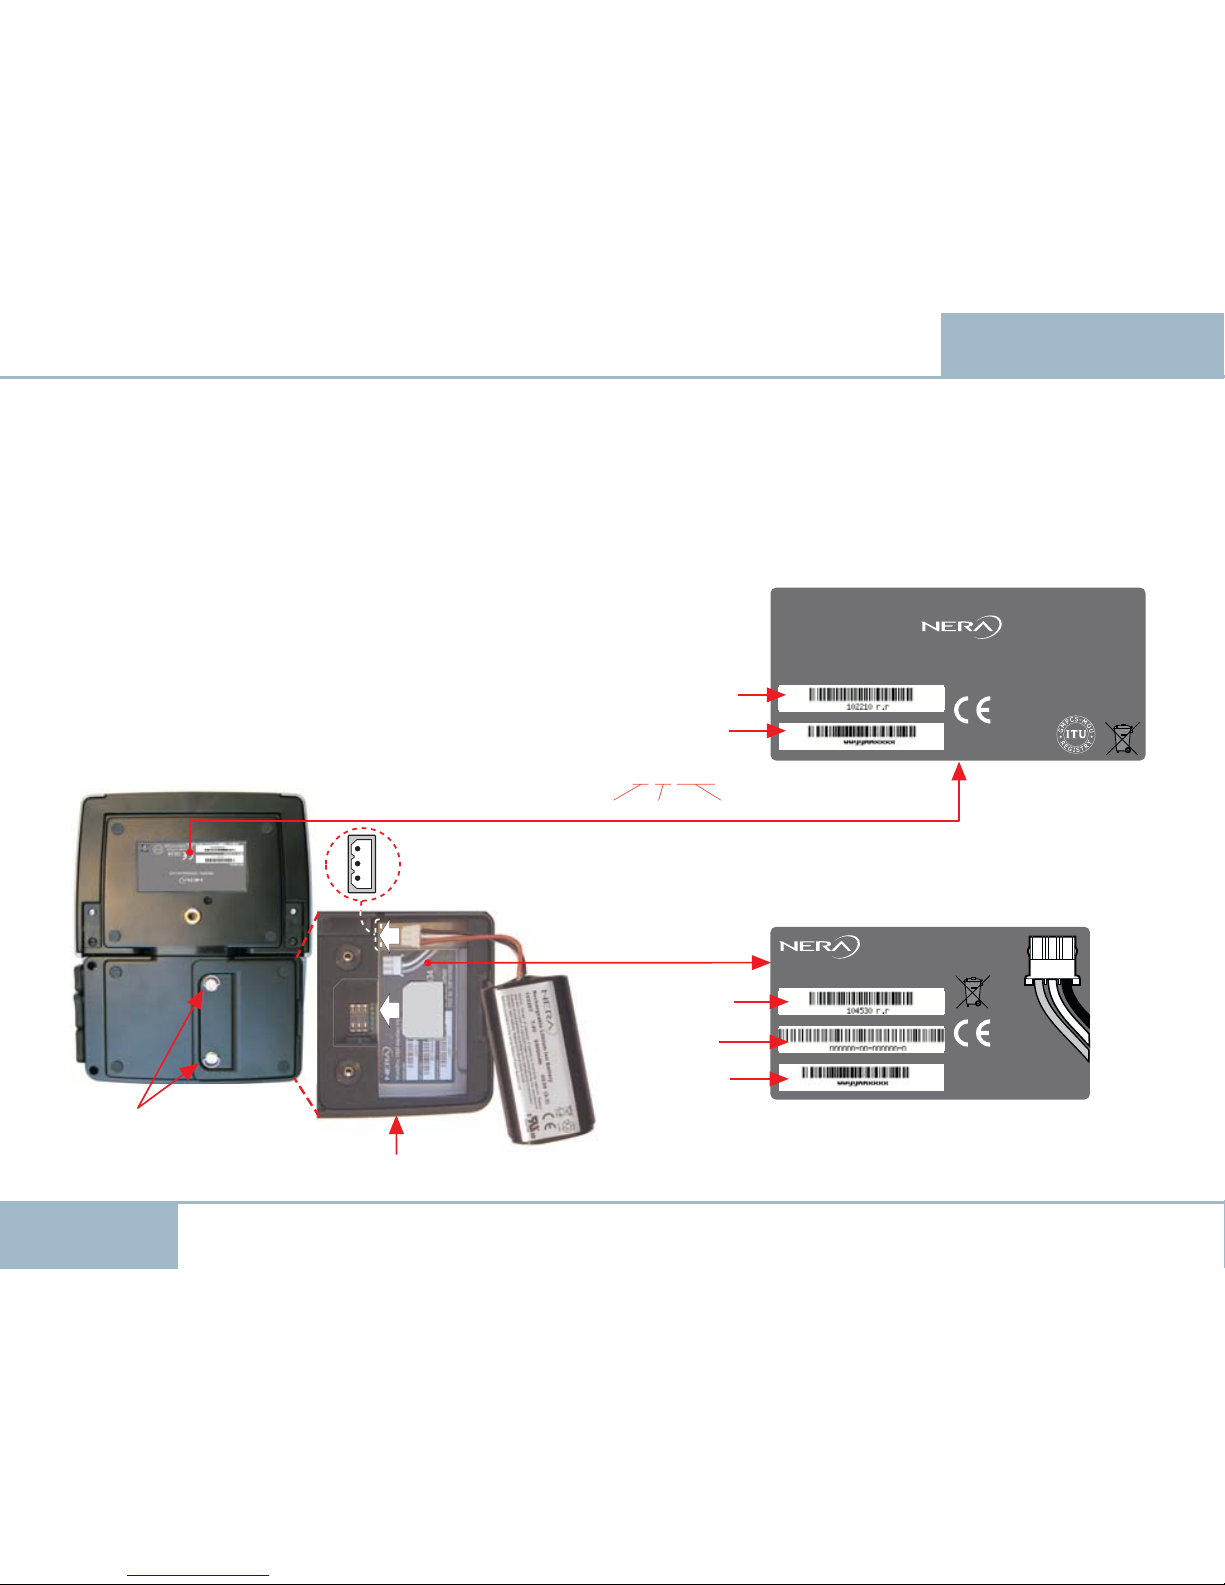
Figure: EXPLORER 100/110, identifi cation.
INTRODUCTION CONT’D
102210 or 108161
Nera WorldPro1000 / Explorer100 Complete: 107020
Nera WorldPro1010 / Explorer110 Complete: 107730
Page 11
EXPLORER 100/110
11
USER GUIDE
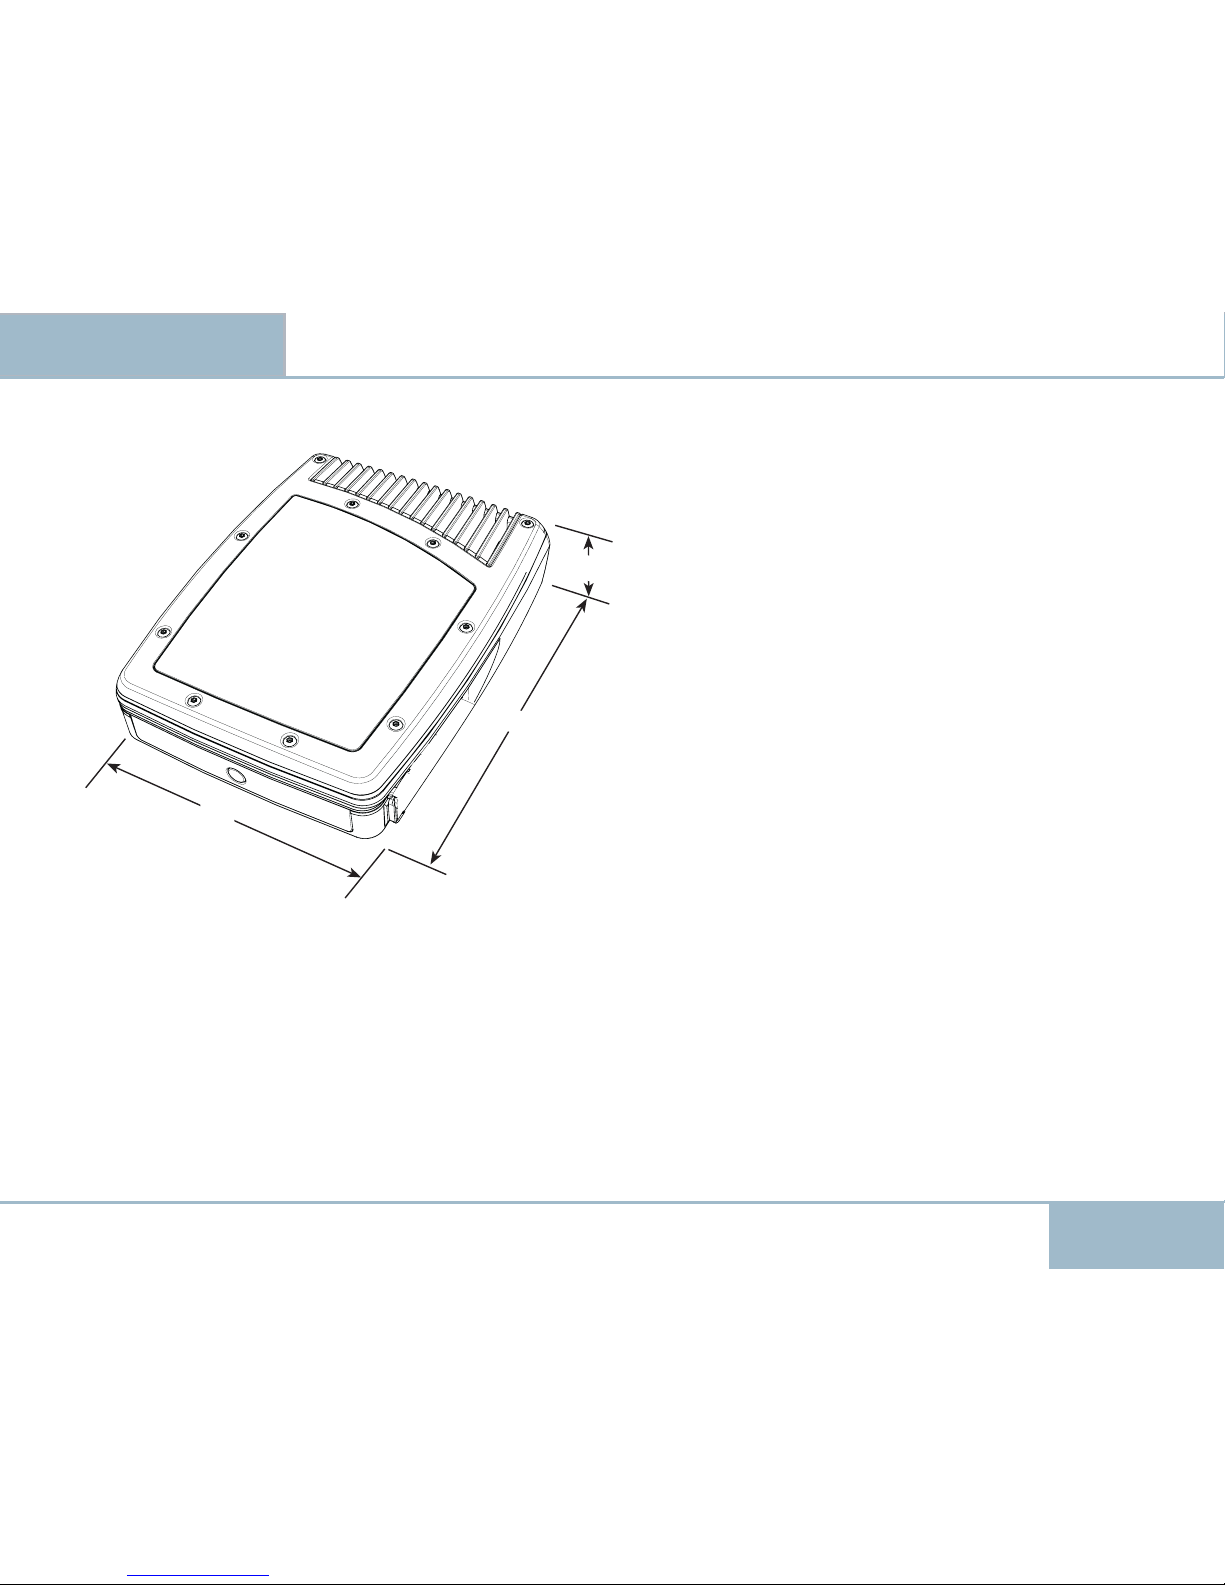
156
198
44
TECHNICAL DATA
Figure 3 Terminal dimensions and weight.
Weight:
< 1 kg including battery
Physical data
Interfaces
Bluetooth: Built-in antenna,
WP1000 = Class 2 (approx.
Range 10m)
WP1010 = Class 1 (approx.
Range 30m)
Bluetooth devices: Up to 4 devices connected at
the same time
Bluetooth support: Dedicated Wireless handset
Serial Port Profi le (SPP)
Dial up Networking (DUN)
Headset profi le (HSP)
Telephone:
1 RJ45 connector for Nera WorldSet
and ISDN phones.
Max drain 1.5 W Euro ISDN (1B+D)
1 x 64 kbps + 16 kbps
USB device port: 1 connector, USB v1.1
(USB v2.0 compatible)
Dual port support: - control port/serial port profi le
- DUN (dial up networking)
Nera WorldPro1010 / Explorer 110 only
Ethernet: 1 connector, RJ45
10 Base-T 100 Mb/s
IEEE 802.3 MDIX Compliant
Transparent forwarding
Telephone/USB: 1 connector, RJ45 combined to
RJ45/USB through splitter
Page 12

EXPLORER 100/110
12
USER GUIDE
12
TECHNICAL DATA CONT’D
USER GUIDE
Nera WorldPro1000 / Explorer 100
Figure 4a WorldPro 1000/ Explorer 100 connectors. Figure 4b WorldPro 1010 / Explorer 110 connectors.
(ISDN)
ISDN
Splitter
Nera WorldPro1010 / Explorer 110
Page 13

EXPLORER 100/110
13
USER GUIDE
13
TECHNICAL DATA CONT’D
USER GUIDE
• Calls made via ISDN Handset connected to the
Telephone Interface (ISDN compatible), or e.g.
Bluetooth handset (options).
• Voice mail (SMS notifi cation).
• Call line identifi cation, who is calling.
• Call forwarding.
• Call waiting/toggling
• Call barring
Battery - 102207
Type: 7.2 V - 2400 mAh Li-lon re-
chargeable
Standby: 36 hours
Typical use: 5 hours - 20% activity factor
Streaming data: 2.5 hours at 64 kbps
Maximum transmission: 1 hour continuous transmis-
sion at > 72 kbps at nominal
EIRP at edge of coverage and
edge of beam.
Charging: Via DC power input
Charge to maximum: 3 hours in standby, longer if us-
ing the terminal (no charging
when transmitting)
Charging temperature: 0°C to +55°C ambient
Terminal can be operated from AC/DC
adapter or 12VDC input with or without battery.
Packet Switched (PS) service
Shared channel (Variable Bit Rate service - VBR)
Pay for data sent/received
Transmit: Up to 240 kbps
Receive
:
Up to 384 kbps
Internet
E-mail
Any application supporting variable bit rates
Symmetrical (Constant Bit Rate service - CBR)
Pay per minute
Streaming data: 32 kbps, 64 kbps QoS options
(Quality of Service - QoS)
Video conferencing
Voice over IP
IP facsimile
SMS - Short Message Service
• To/from other BGAN terminals
• To/from mobile cellular telephones
• Editable in BGAN LaunchPad/Nera WorldSet
Voice - Circuit Switched (CS) service
Land line quality speech - 4kbps
Pay per minute
Page 14

EXPLORER 100/110
14
USER GUIDE
14
TECHNICAL DATA CONT’D
USER GUIDE
AC/DC adapter - 102208
Input voltage: 100 - 240VAC ±10%,
50 - 60 Hz, 800 mA
Default: Euro plug
Output voltage: 12VDC ± 10%
Output current: 2.5A max 35W
DC power connector on terminal
Centre pin: Positive polarity
Input voltage: 12VDC, -10%/+30% feed
(10.8VDC to 15.6VDC)
Plug dimensions: Inner dia 2.1mm, outer dia
5.5 mm length 10mm
Power consumption
Nera WorldPro is designed for minimum battery
consumption
Sleep mode: 0.5W
Transmission: <20W (depending on satel-
lite signal, devices connected,
activity factor)
Antenna performance
Gain: Tx 8.5 dBic, Rx 8.5 dBic
(right-hand circular polarisation)
Beamwidth: ± 30° at -3dB point
G/T: -18.5 dB/K
EIRP: 10 dBW
Frequency range: L-band Tx 1626.5-1660.5 MHz
Rx 1525.0-1559.0 MHz
Environmental
Storage device: -40°C to +80°C
Operational: -20°C to +55°C, 95 % humidity
(non-condensing)
Infrared: 500 W/m
2
Ultra violet: 54 W/m
2
Visible sunshine: 1150 W/m
2
MIL-SPEC 810E 505.3
Ice: 6 mm (non-operational)
IP: 44
Documentation package supplied with the
terminals - 107014
The CD ROM included in the package contains:
• BGAN LaunchPad program for operation from PC
• manuals
• application guides
• USB modem drivers
• and other useful information.
Page 15
USER GUIDE
EXPLORER 100/110
15
USER GUIDE
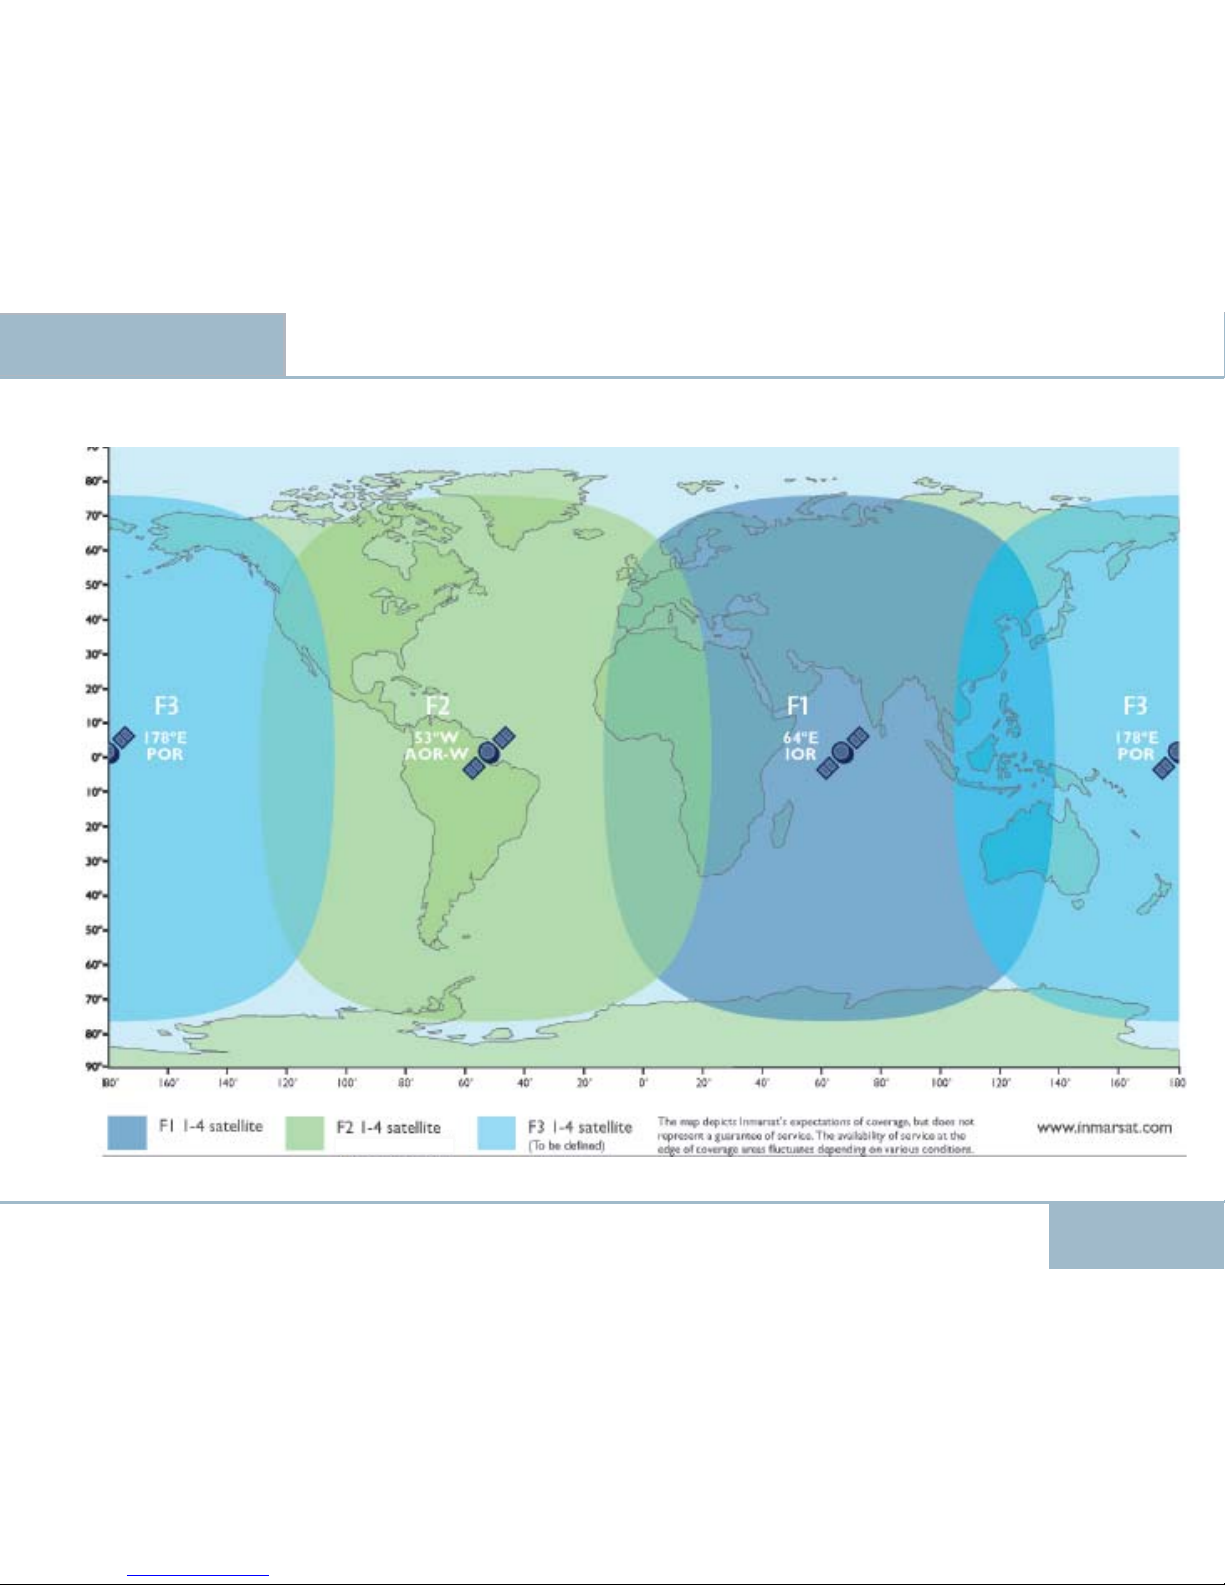
Satellite coverage map
OPERATION
Page 16
EXPLORER 100/110
16
USER GUIDE
16
OPERATION CONT’D
USER GUIDE
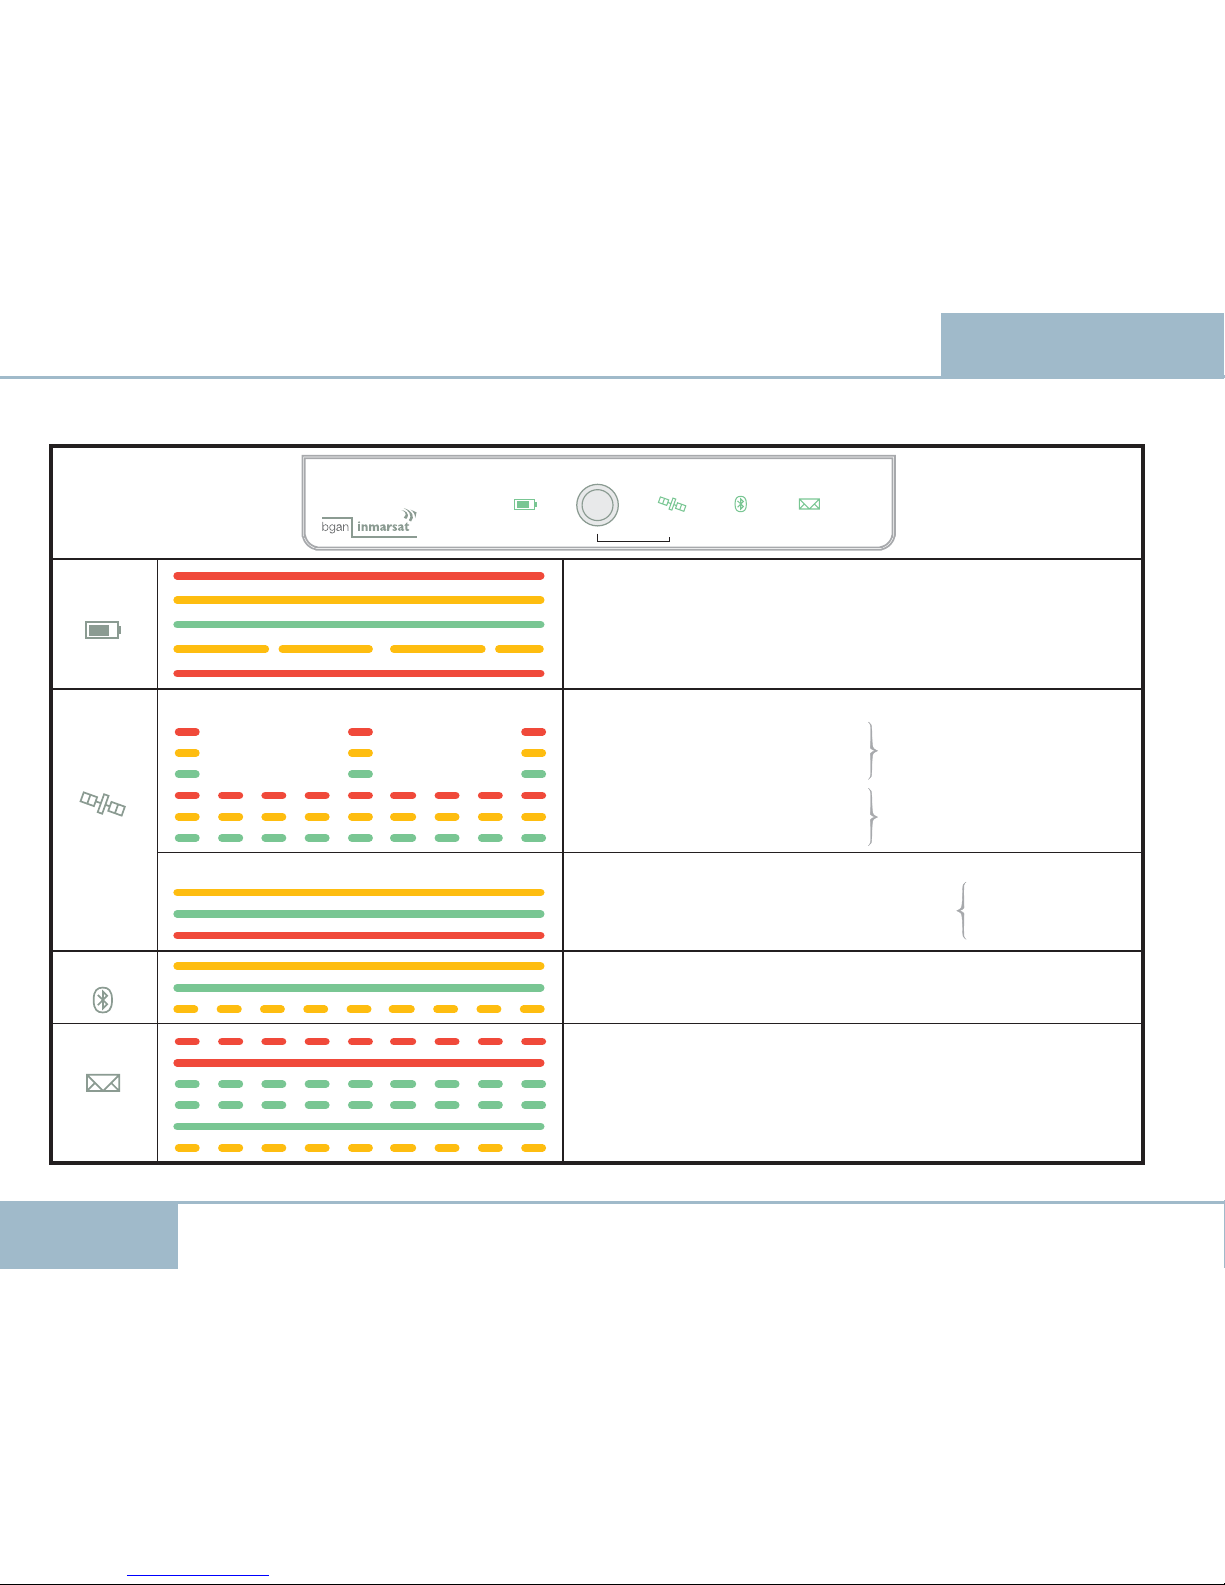
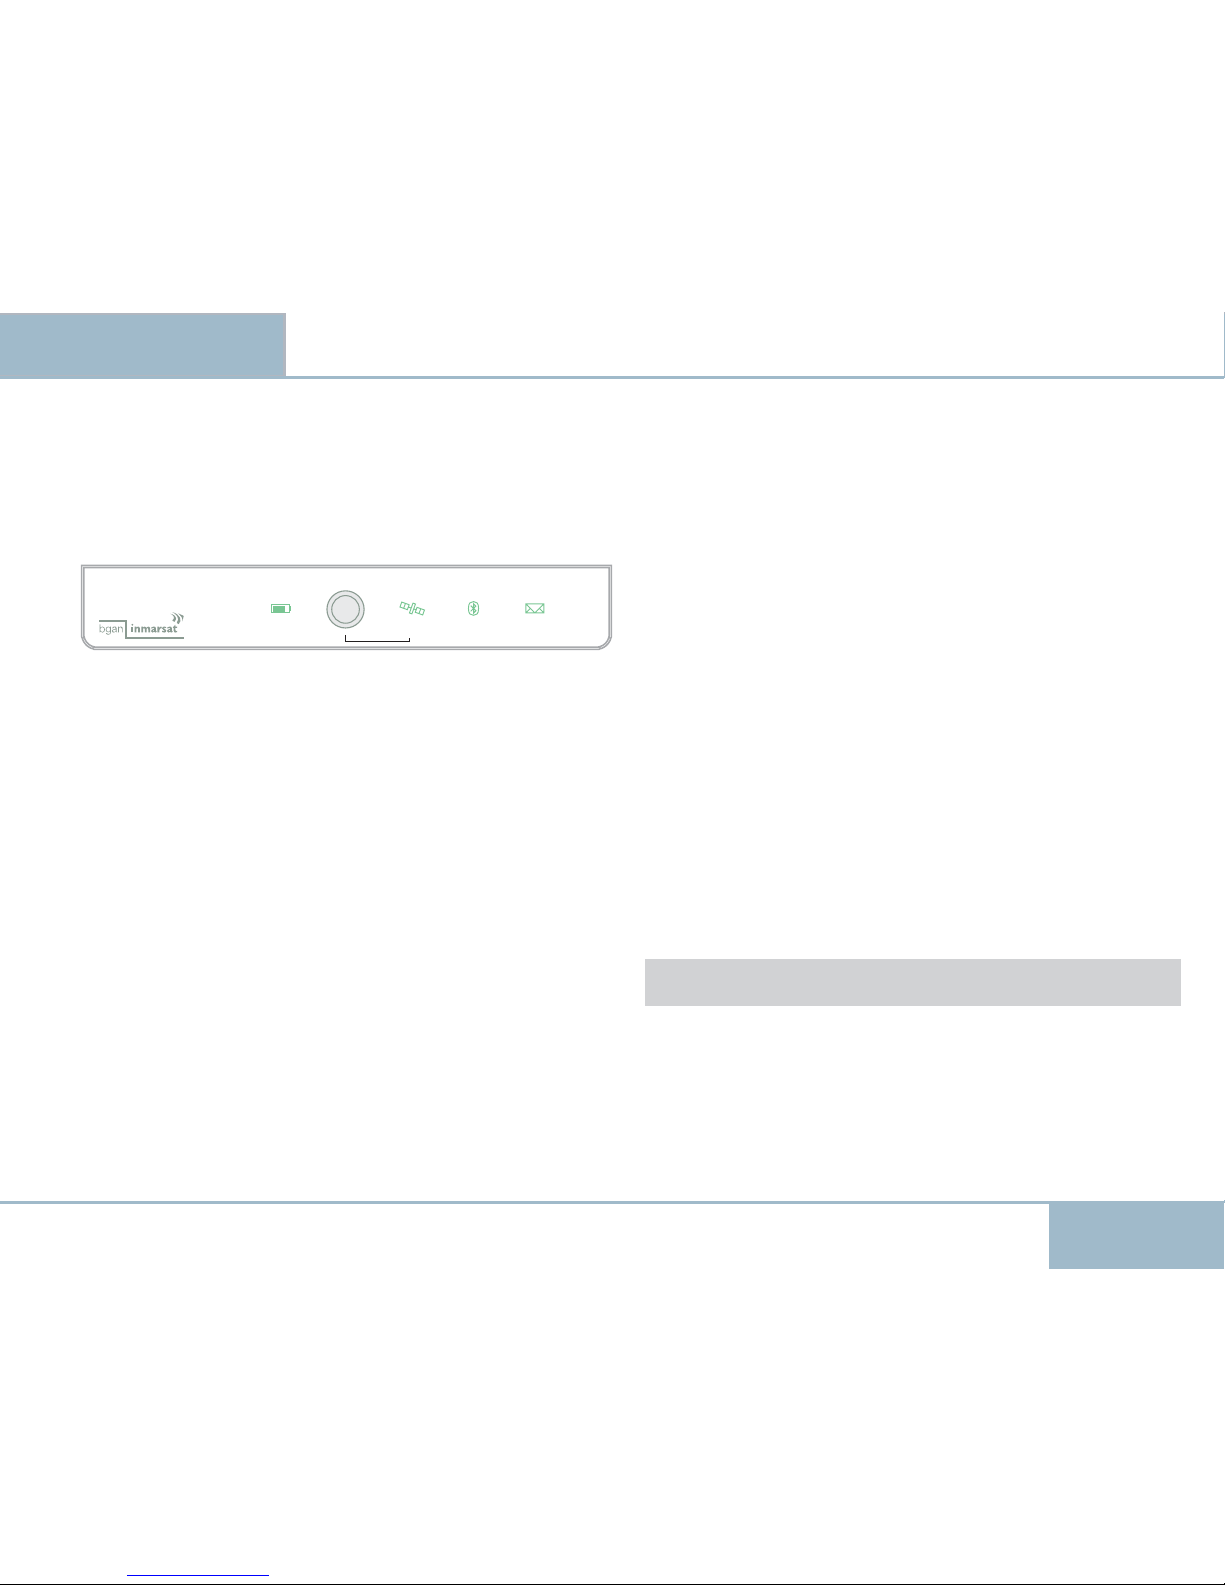
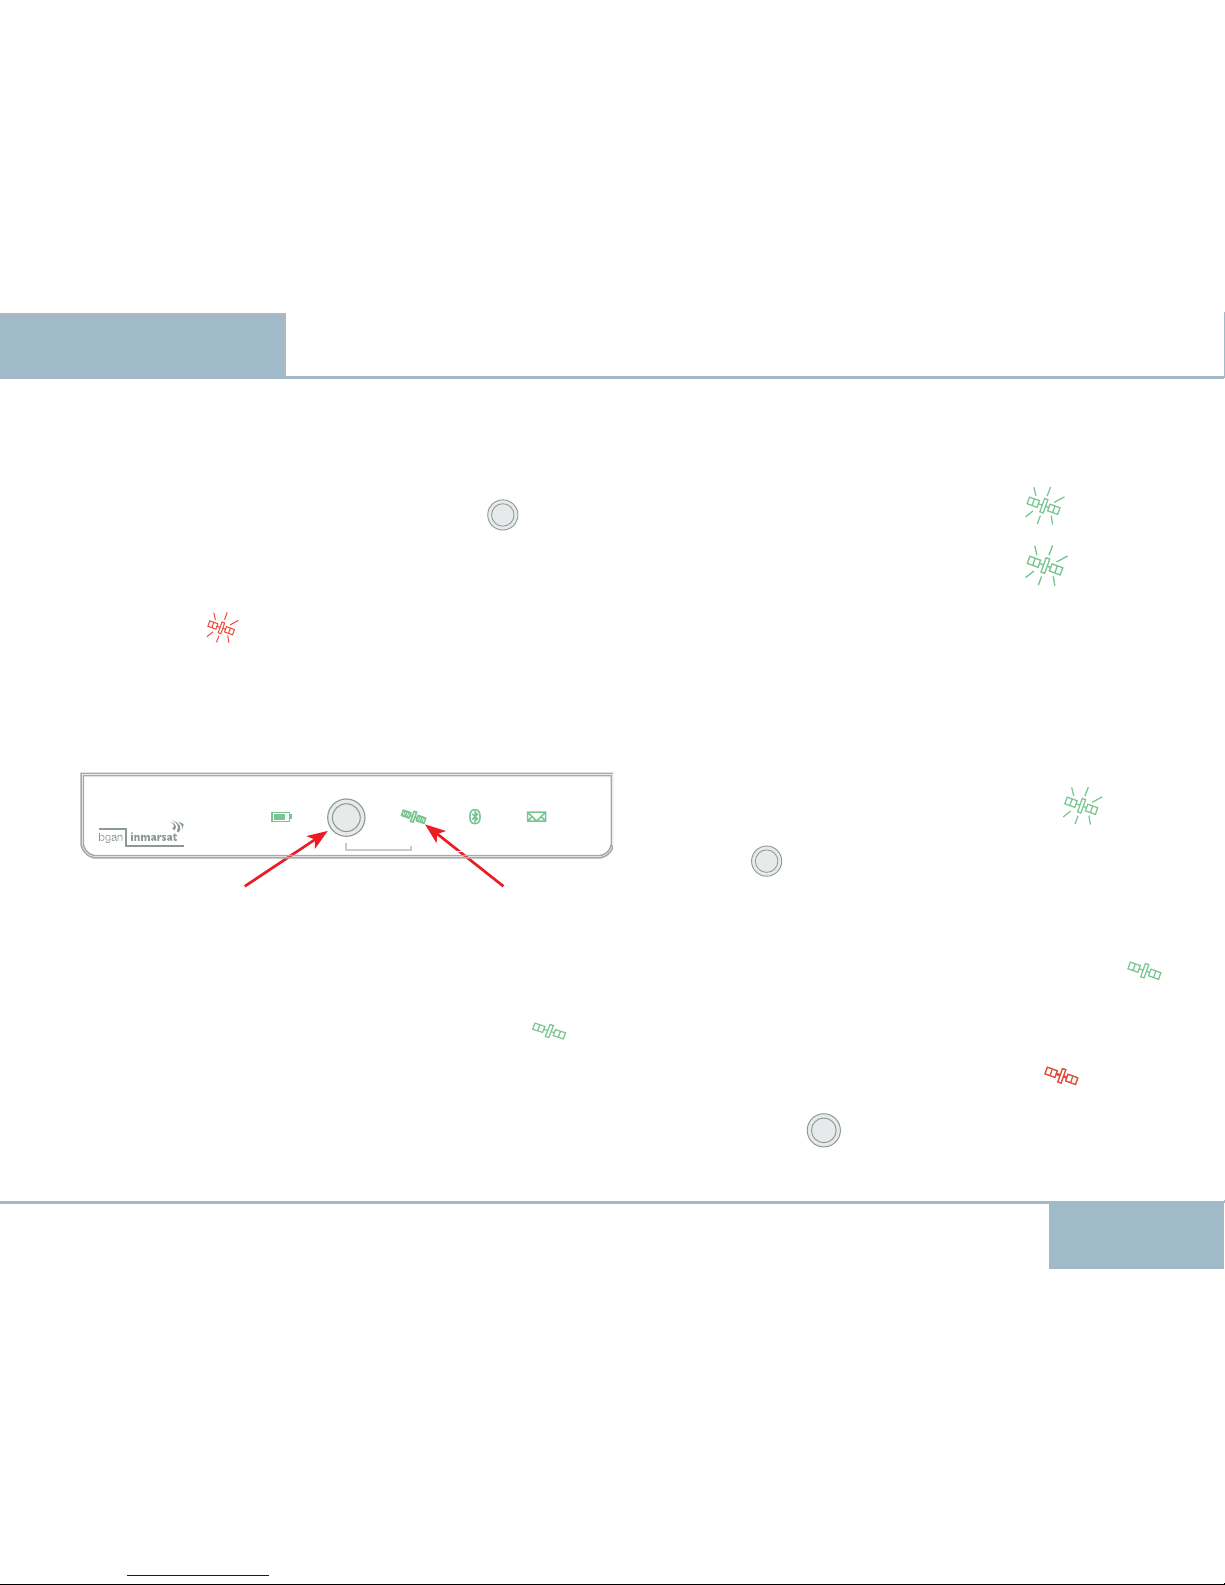
Indicator panel
Signal
Battery
Message
All indicators light
RED
for approx. 10secs
when powering OFF
All indicators light
GREEN for approx. 30
secs when powering ON
0 - 10% battery capacity
10 - 40% battery capacity
40 -100% battery capacity, or fully charged
Battery charging
No battery installed
Antenna pointing
No satellite signal: no GPS fix
" stored GPS fix
" new GPS fix
Satellite signal OK: no GPS fix
" stored GPS
" new GPS
Operational mode
Registration in progress or lost satellite sync
Attached to BGAN
Network rejection
Bluetooth enabled, no device connected
Bluetooth enabled, device connected
Bluetooth firmware update
New alarm
Alarm present
Incoming voice call
Receiving SMS
Lost voice call or unread SMS
PIN/PUK validation necessary
Bluetooth
Blink rate 0.3sec
Continuous sound varying
with received signal strength.
Blink rate 2 secs
Beep every 1 sec
during
registration
Blink rate 0.5 sec
Blink rate 0.5 sec for 30 secs
Blinks until answered/on-hook
Blink rate 0.5 sec for 10secs
In sleep mode, only the battery indicator lights
Blink rate 2secs
Beep rate 2secs
Signal Bluetooth Message
Activate
Battery
Page 17
EXPLORER 100/110
17
USER GUIDE
17
OPERATION CONT’D
USER GUIDE
Terminal modes
Toggling between Pointing mode and Standby mode
is done using the Activate button.
Pointing mode
The Terminal enters the pointing mode automatically
when powered on. The terminal exits pointing when
pressing Activate or registering onto the Inmarsat
BGAN Network via BGAN LaunchPad or the ISDN
Handset.
The buzzer in the Antenna Unit is active when in
pointing mode.
The buzzer can be turned off/on, or its level adjusted
from LaunchPad or the ISDN Handset.
Standby mode
In this mode the terminal logs onto the Inmarsat
BGAN system and becomes operational.
When charging the battery indoors with no intention
to operational, you can exit the Pointing mode (turn
off the sound) by switching to Standby mode.
Toggle between Pointing mode and Standby mode by
pressing the Activate button.
Sleep mode
Sleep mode is a state the terminal enters after 10 seconds in Standby mode, when logged onto the Inmarsat BGAN system and running on batteries only.
The terminal will wake up when activities occur like:
• Incoming calls / incoming SMS
• When using BGAN LaunchPad / the ISDN Handset.
• Making a call / sending SMS.
• Loosing satellite signal / alarm ocurred.
In sleep mode only the battery indicator is ON.
Signal Bluetooth Message
Activate
Battery
Page 18
EXPLORER 100/110
18
USER GUIDE
18
OPERATION CONT’D
USER GUIDE
Battery charging
When connecting DC input, the terminal will automatically be powered on and starts charging.
For alternative DC input devices, see Cables and
lengths > Power adapters later in this manual.
DC power connector data:
• Center pin = positive polarity
• Hollow plug: ø2.1 x ø5.5 x 10.0 mm
• 12 VDC - 10% / +30% feed (10.8 VDC - 15.6 VDC)
Power consumption:
The terminal can be operated on battery, and is designed to minimise power consumption.
• Sleep mode: 0.5 W
• Transmission: less than 20 W (depending on satel-
lite signal, devices connected, activity factor)
DC input level:
If the DC power source available exceeds 15.6 volts, the
DC/DC adapter must be used.
Solar panel:
Solar panel can be connected for operation and charging. The output power should be 20 W or more.
Charging time:
Charging time will vary depending on how full the
battery is and activities on the terminal when charging. The battery is typically fully charged within 3 hrs.
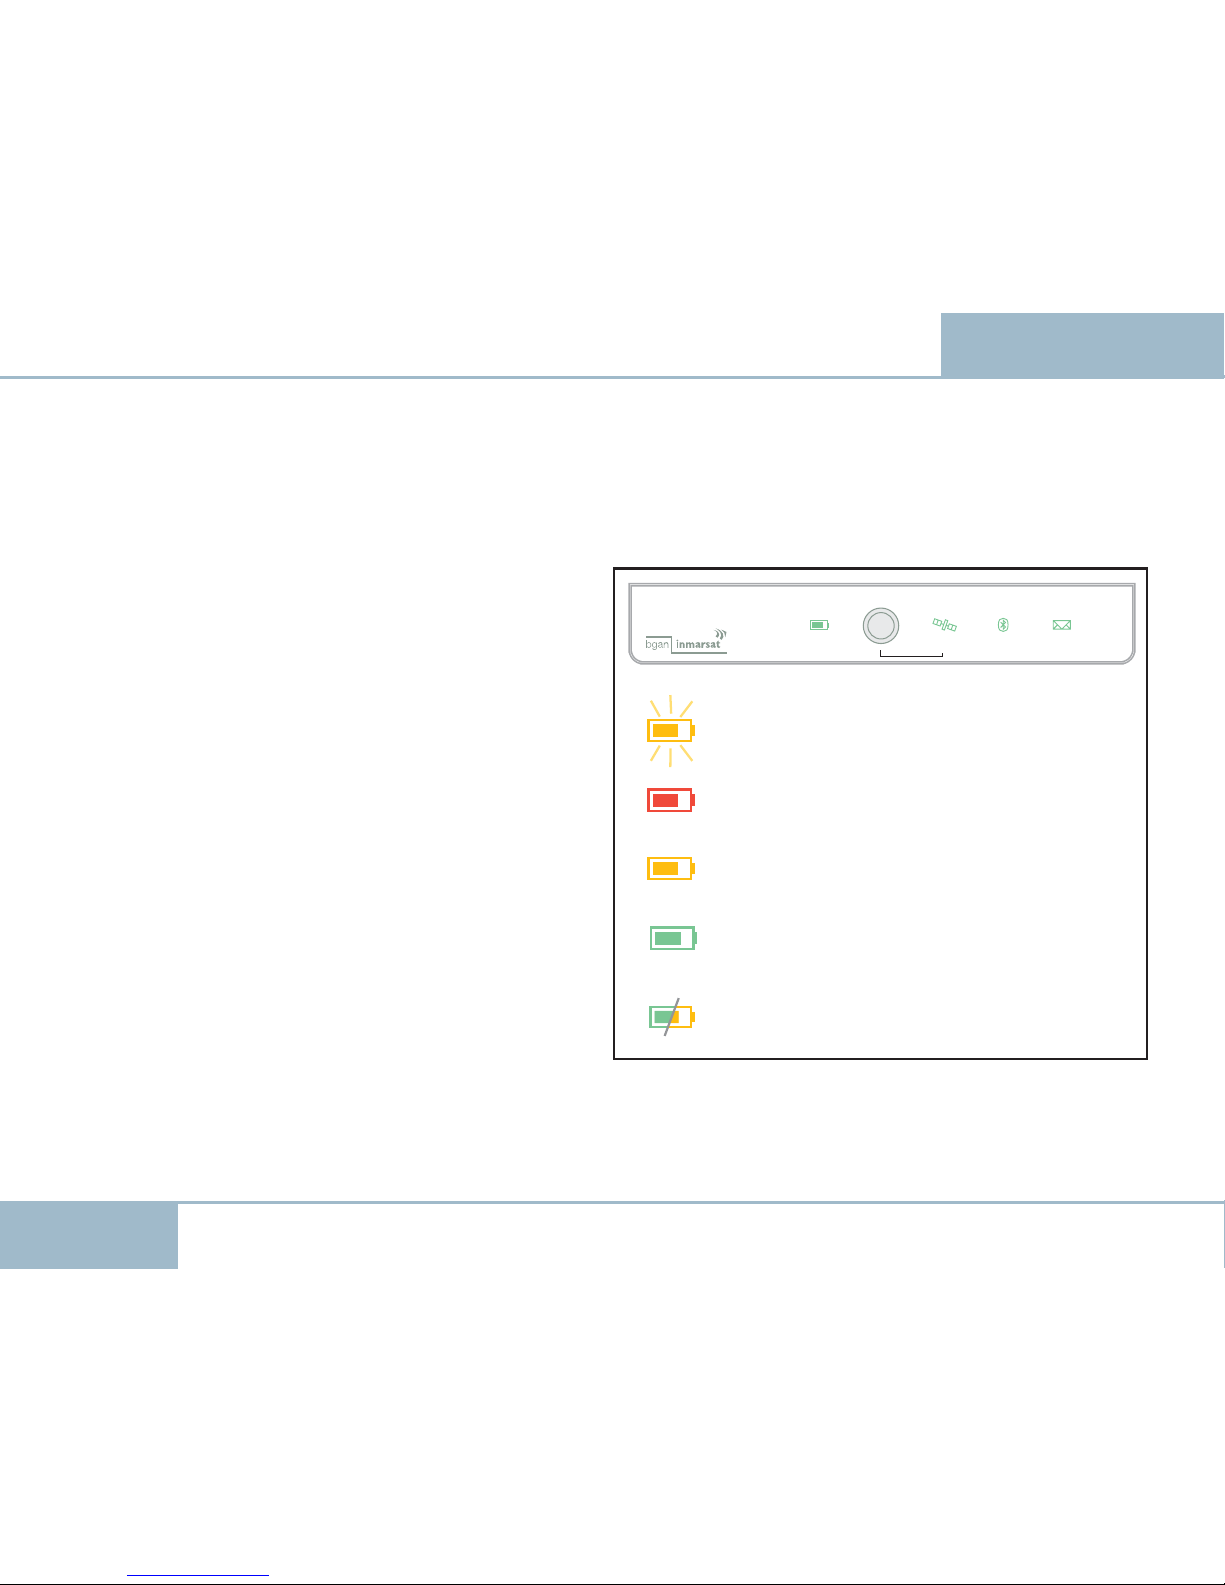
Battery status indications:
Signal Bluetooth Message
Activate
Battery
Blinking yellow:
- charging in progress
Steady red:
- less than 10 % remaining battery capacity.
Steady yellow:
- less than 40 % remaining battery capacity.
Steady green:
- more than 40 % full
ON, and all other indicators are OFF:
- sleep mode
Page 19
EXPLORER 100/110
19
USER GUIDE
19
OPERATION CONT’D
USER GUIDE
SIM card
The SIM card carries subscription information from
your Net service provider on an integrated circuit.
The card must be of the type USIM, which are subscriber identity modules designed for 3G mobile telephony.
The SIM card has its own set of Inmarsat Mobile
Numbers (IMN) on which the user can be contacted
irrespective of the Nera WorldPro used.
All outgoing calls will be billed to the owner of the SIM
card.
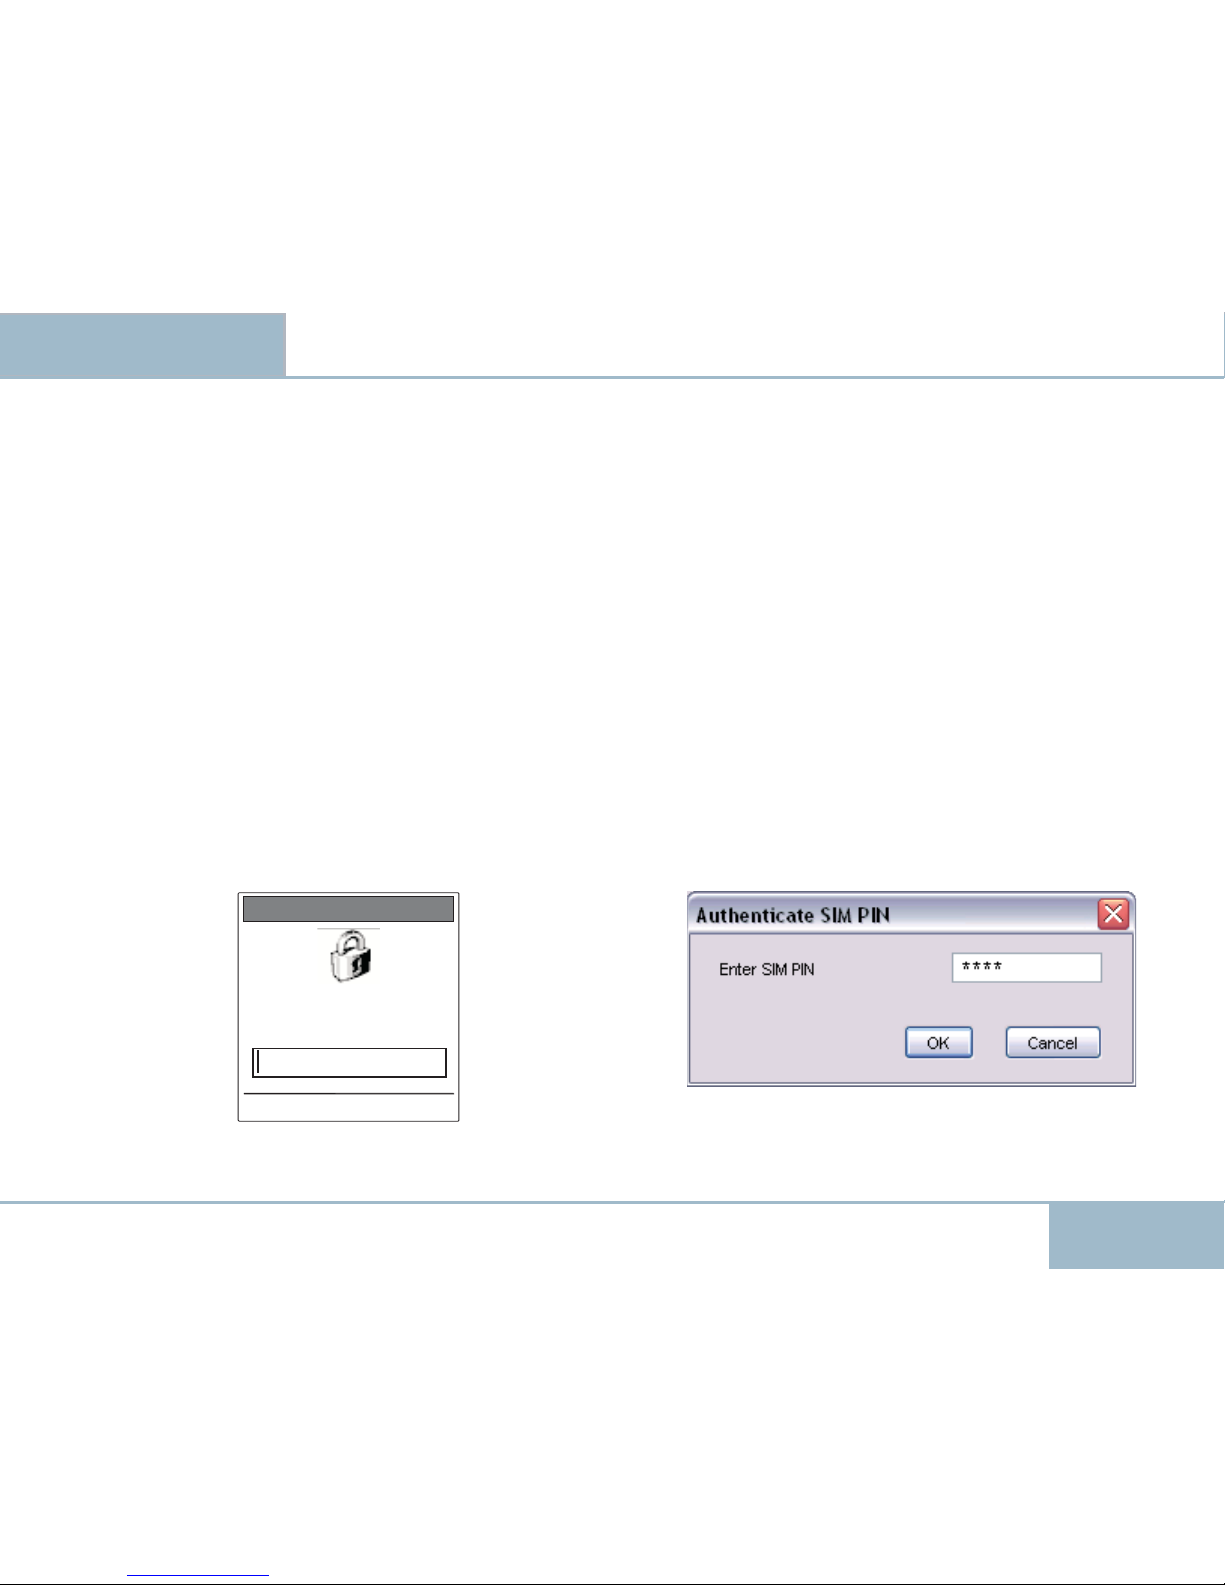
The SIM card is protected by a SIM PIN (Personal Identifi cation Number). Contact your Net service provider
if you do not have the PIN code.
If entering wrong PIN code, operation with that
particular SIM card will lock-up after three failed at-
tempts. You must then use the SIM unblock code (PUK
code) provided by your Net service provider to unlock
the card. Contact your Net service provider if you do
not have the PUK code.
To change or disable the PIN code, see later in this
manual.
The SIM card can store various information, e.g.:
• SIM PIN code (Personal Identifi cation Number)
• APN (Access Point Name)
• Phone book
• SMS messages sent and received
• Allowed and preferred Net service providers.
• Inmarsat Mobile Number (IMN)
• Service Provider information
BGAN LaunchPad SIM PIN promptISDN Handset SIM PIN prompt
Enter PIN number
Enter PIN
Enter
<Back
****
Page 20
EXPLORER 100/110
20
USER GUIDE
20
OPERATION CONT’D
USER GUIDE
Battery
compartment
Battery compartment
with cover removed
SIM
Battery
w/connector
Battery
receptacle
Cover fastening
screws.
Tip: use a coin to
loosen.
WorldPro 1000 Interface Unit
Article code
GMPCS
IC: 6200A-107020
FCC ID: TSF107020
IMEI number
Serial number
0434
Article number
IMEI number
Serial number
Article number
Serial number
Example:
03 05 11 0001
year month number
Article code
Designed in Norway.Assembled in Singapore.
IC: 6200A-107020
FCC ID:TSF107020
Serial number
WorldPro 1000Antenna Unit
0434
Installing SIM card and battery
A
Remove the battery compartment cover by loosen-
ing the two fastening screws.
B
The SIM card must be installed prior to installing
the battery. SIM card to be slid all the way into the slot.
C The battery is enclosed with the terminal , and
must be installed before it can be charged.
Normal charge time is 3 hrs.
D Connect a DC source, e.g. AC/DC adapter. DC input
range is from 10,8VDC to 15,6 VDC. Install the battery
compartment cover again, it locks the SIM card in
position.
The Terminal needs to be ON, to Charge the battery.
Equipment labels
One label is attached to the back of the Antenna Unit,
whereas the Interface Unit has a label attached inside
the battery compartment.
Page 21
EXPLORER 100/110
21
USER GUIDE
21
OPERATION CONT’D
USER GUIDE
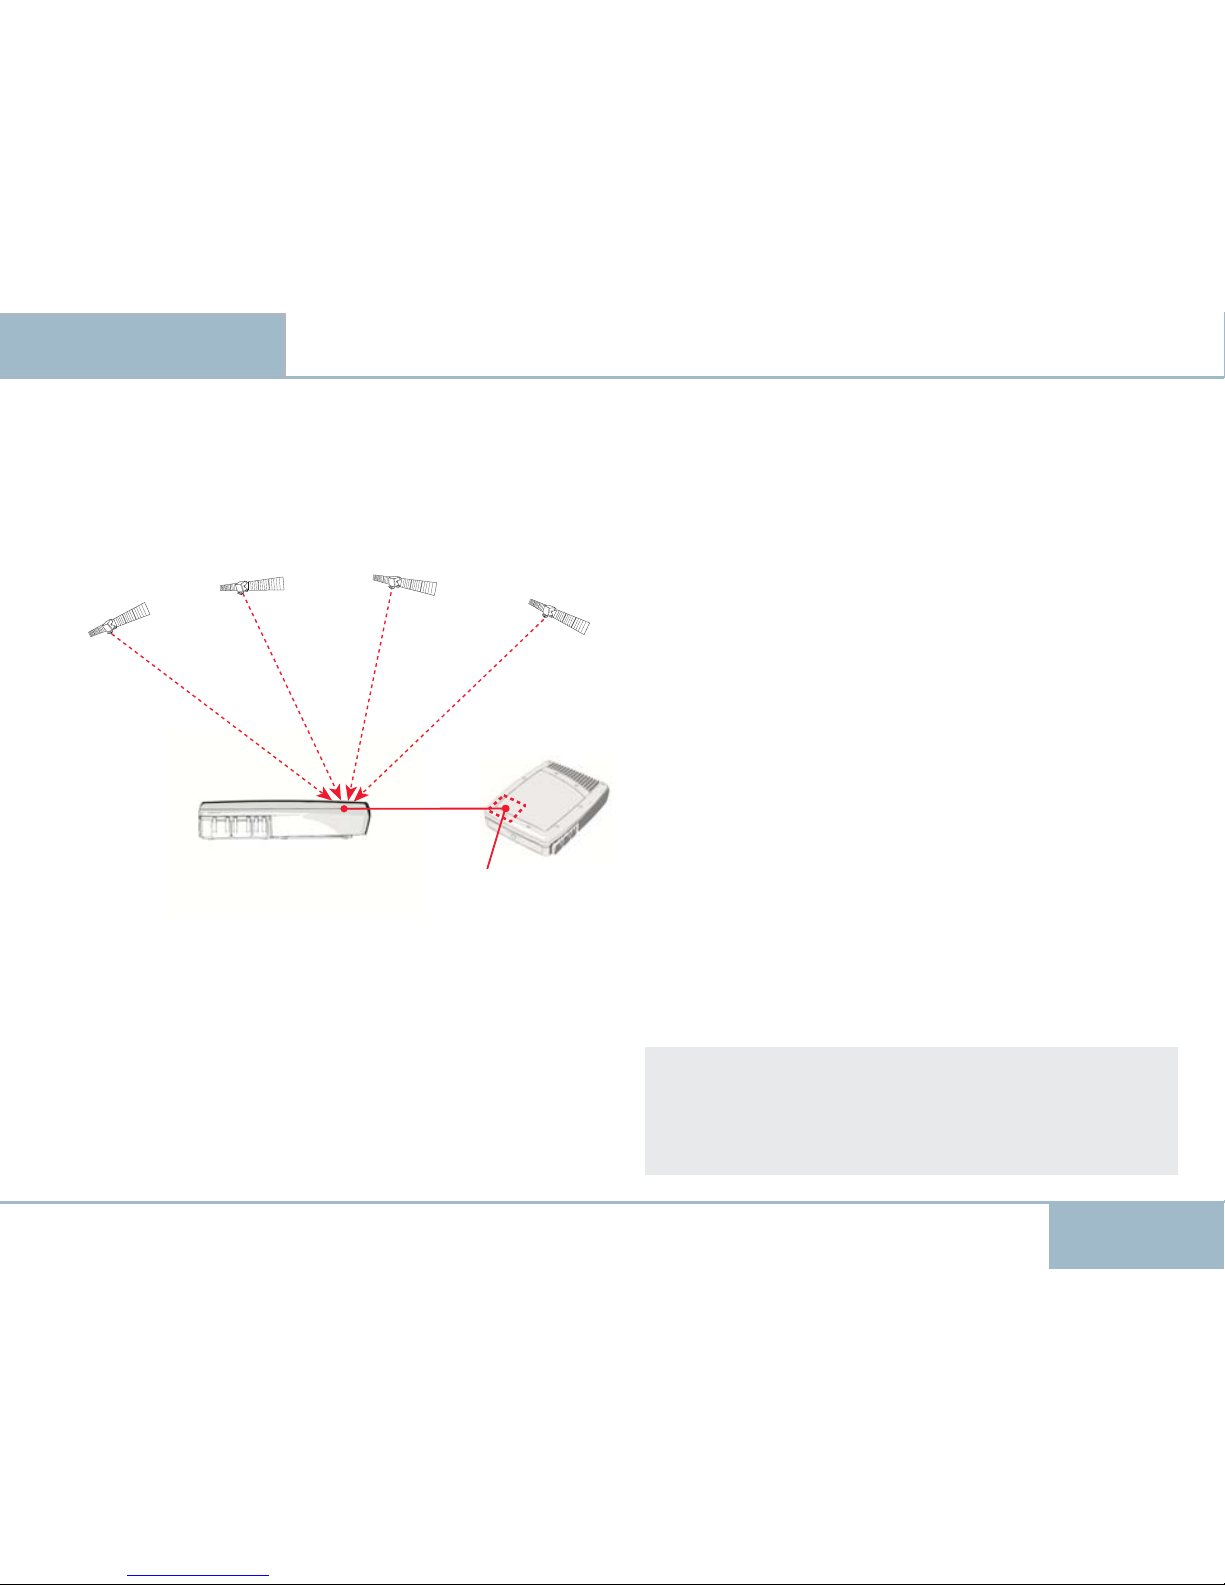
GPS
The Global Positioning System (GPS) uses 24 low
orbital satellites to fi x the position of the terminal
anywhere on the globe.
GPS fi x required
The BGAN network requires a valid GPS fi x to successfully register your terminal. Nera WorldPro only attempts
to obtain a GPS fi x the fi rst 20 minutes after power on.
The GPS receiver must see at least three GPS satellites
to obtain a 2-dimensional fi x (2D fi x).
The frequency of use determines how quickly the
GPS receiver built-in to the terminal (see above) can
obtain a fi x - it may take between a few seconds and
5 minutes.
GPS receiver antenna
GPS system - 24 low orbital satellites
To obtain a GPS fi x
1 Check the Signal indicator status to see if your ter-
minal has a GPS fi x. For possible statuses, see Antenna
pointing later in this manual.
2 Place the terminal in a position where it has the
best view of the open sky. The best results are obtained if you lay the terminal fl at.
The GPS receiver is located in the top left corner of the
terminal (see fi gure). Therefore make sure this area of
the Antenna unit in particular has a clear line of sight
to the sky.
3 If the Signal indicator lights yellow, the terminal
has a stored GPS fi x.
A stored GPS fi x can be used when registering onto
the network, but only if the terminal has not been
moved since it was last used, or is within the same
area (less than 300 km).
4 When you have a blinking green Signal indicator,
you have a new fi x. You are ready to point the terminal to the Inmarsat satellite and register with the
BGAN network.
When you power down the terminal, the GPS position is stored, and you are able to move the Nera
WorldPro to a place where you do not obtain a GPS
fi x, for example your hotel window.
Page 22
EXPLORER 100/110
22
USER GUIDE
22
OPERATION CONT’D
USER GUIDE
The BGAN Terminal
provides communication via satellite; which
requires free line of sight.
F1 - IOR
F2 - AOR-W
F3 - POR
37.500km
Nera WorldPro 1000 w/antenna
Elevation
Azimuth
Three satellites are positioned
stationary above equator.
The satellites provide the
coverage shown on the map.
The Terminal searches for all
satellites as default.
Satellite communications
Page 23
EXPLORER 100/110
23
USER GUIDE
23
OPERATION CONT’D
USER GUIDE
Setting up,
using the signal indicator
1
Power on terminal by pressing Activate for
1.5 seconds:
• All indicators light GREEN for approx. 15 seconds.
• Buzzer in antenna beeps slowly, Signal indicator
blinks RED
(YELLOW if old GPS fi x is stored in
terminal).
The terminal is automatically set in Antenna Point-
ing mode, i.e. it attempts to fi nd the Inmarsat BGAN
satellite and/or to obtain a GPS fi x which is needed to
log onto the BGAN network.
2 Obtaining a new GPS fi x (if not using old/stored fi x):
• Place the terminal in a location outdoor or inside a
window.
• Wait until the Signal indicator lights GREEN
, GPS
fi x is obtained.
• If the terminal is new, or have not been used for
some time, a GPS fi x may take up to 5 minutes.
• If no fi x is optained in 20 minutes after power on,
power off and start again from step
1.
3 Find the best signal:
• Align the antenna for the best possible satellite
signal at your location.
• Use the buzzer pitch and the GREEN
blinking
Signal indicator, see also Antenna pointing.
Use the buzzer pitch and the GREEN
blinking
Signal indicator. The buzzer pitch increases as the
satellite signal improves. A good satellite signal is
necessary to obtain a stable network connection.
Alternatively, the Nera WorldSet or BGAN LaunchPad
can be used as an aid in pointing the Nera
WorldPro.
4 Logging on:
• When the Signal indicator blinks GREEN
and
the buzzer pitch is as high as you can get it, press
Activate to log automatically onto the Inmarsat
BGAN network and exit Antenna Pointing mode.
5 Start communications:
•
When the Signal indicator lights steadily GREEN
,
you have successfully logged on and can start making voice calls, send SMS or set up a data connection
on your PC.
If the Signal indicator switches to RED
, your
logon attempt has failed.
Press Activate for 1.5 sec to power off the terminal, and start again from step 1.
Activate button Signal indicator
Signal Bluetooth Message
Activate
Battery
Page 24

EXPLORER 100/110
24
USER GUIDE
24
OPERATION CONT’D
USER GUIDE
ISDN Handset signal strength bar
Connection status
Register
GPS status:
GPS-fix OK
Antenna pointing:
Options
80/100
Global beam
BGAN LaunchPad signal strength bar
GPS fix new In pointing mode Signal bar varying depending
on satellite signal quality,
typically more than 50
When in pointing mode, this is
how the ISDN Handset or BGAN
LaunchPad will help you to verify
GPS fi x and satellite signal quality.
Legend:
- Signal strength more than 50
- GPS fi x OK / GPS fi x new
- Ready to register with the network
Alternative:
Use the WEB MMI available on Nera WorldPro1010
- Signal strength in % and dB/Hz
- GPS status and availability
Page 25

EXPLORER 100/110
25
USER GUIDE
25
OPERATION CONT’D
USER GUIDE
A
A
z
z
i
i
m
m
u
u
t
t
h
h
E
E
l
l
e
e
v
v
a
a
t
t
i
i
o
o
n
n
75°
75°
45°
45°
1010°
°
2020°
°
3030°
°
6060°
°
9090°
°
Antenna pointing
The Inmarsat satellite is positioned stationary above
equator. Aim the antenna towards the estimated
position of the satellite, or make a slow scan across
the hemisphere with the vertical angle 45°.
The vertical angle ranges stepwise from 10° to 90°.
Free line of sight to the satellite is required.
Observe the satellite Signal indicator, see fi gure.
See also Indicator panel.
A compass can be handy to
prepare for a location
(must be bought separately).h
The alignment buzzer in the Antenna Unit will sound
with increasing pitch in steps when closing in on the
satellite.
A strong signal helps saving power when you are running on battery only.
Acknowledge registering on to the Inmarsat system by
pressing Activate momentarily.
Nera WorldPro is now ready for call.
Alternatively, the Nera WorldSet or BGAN LaunchPad
can be used as an aid in pointing and registering on to
the network, see previous page.
Signal
Signal
indicator
indicator
Slow red blink:
- not ready for logging on
Slow yellow blink:
- not ready for logging on
Fast yellow blink:
- ready, but old GPS fi x may fail (if moved
more than 300 km, or old time stamp)
Slow green blink:
- not ready, but new GPS fi x ok
Fast green blink:
- ready for logging onto Inmarsat system
Page 26

EXPLORER 100/110
26
USER GUIDE
26
OPERATION CONT’D
USER GUIDE
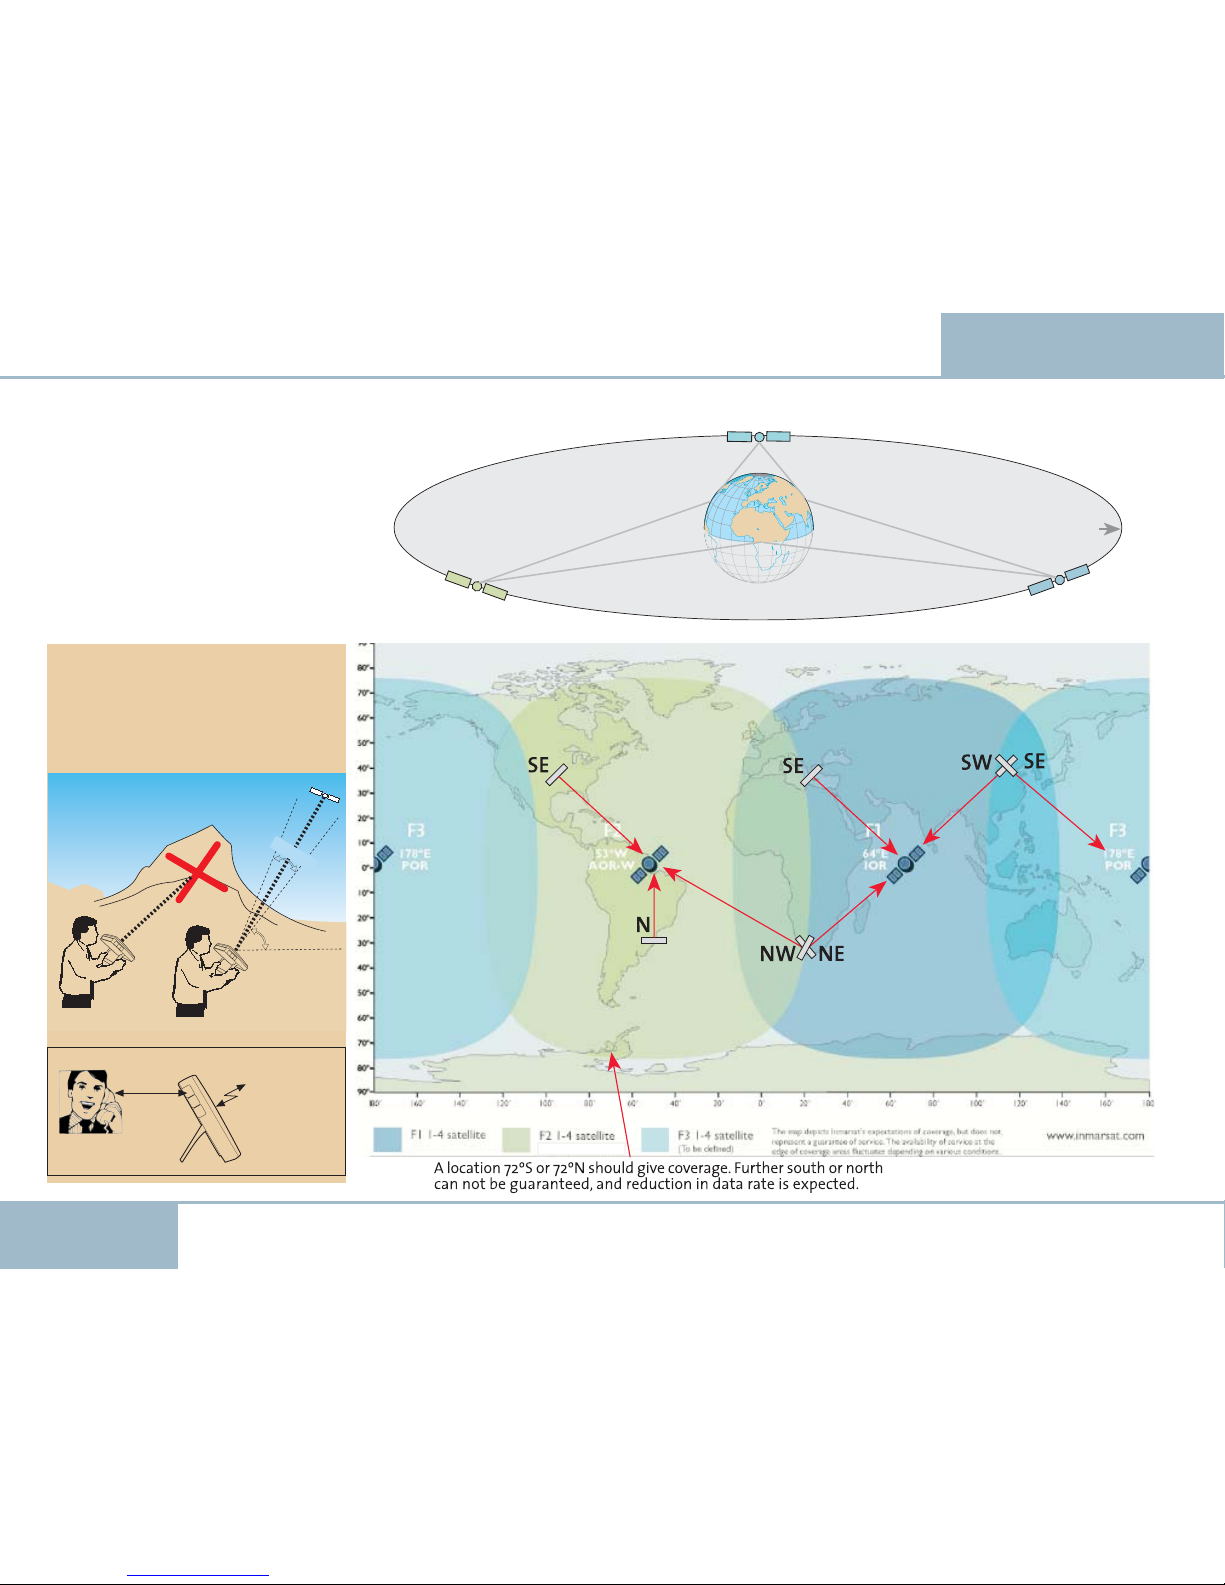
Satellite signal at low elevation angles
Angles below 10°
Inmarsat satellites are geostationary and are located
in fi xed positions in the sky above equator. A fi xed
antenna installation is therefore possible. However, a
geostationary satellite moves slightly (3° in azimuth +
1° in elevation) during a 24 hrs cycle.
At low elevations (< 10 degrees), variations in the satellite signal must be expected. This normally does not
affect the communication. Only if the surface in front
of the antenna is completely fl at, e.g. roof or calm
water, can it cause reduction in signal strength and/or
data rate.
The solution is to change the height above ground
30 cm up/down. On a fl at roof the antenna should be
installed close to the edge or horizontally on the roof,
especially for a permanent installation. This is not an
issue if the terrain in front of the antenna is uneven.
MULTIPATH FADING
AVOID REFLECTIONS AT 10 DEGREE ELEVATION OR LESS.
To find the best possible satellite signal when pointing
the antenna, adjust the terminal height above the surface
up or down in steps of 30cm.
Page 27

EXPLORER 100/110
27
USER GUIDE
27
OPERATION CONT’D
USER GUIDE
Message indicator
Green:
- SMS message received
- read SMS or check missed call using
BGAN LaunchPad/Nera WorldSet
Yellow:
- Enter SIM pin using BGAN LaunchPad
Nera WorldSet
Red:
- Alarm ocurred
- Use BGAN LaunchPad/Nera WorldSet
to read/verify
Register with Network
Pressing Activate logs terminal onto the Inmarsat
BGAN system and the buzzer is turned off.
The following Signal indications may occur:
Steady red:
- logging on attempt failed
Steady yellow:
- registration in progress or lost satellite
signal.
Steady green:
- logging on successful
Terminal ready for voice/SMS/data
If failed, redo Antenna pointing, making sure to acquire
a new GPS fi x, and/or fi nd a better satellite signal.
See also Appendix C - Troubleshooting
Message indicator
Signal Bluetooth Message
Activate
Battery
Page 28

EXPLORER 100/110
28
USER GUIDE
28
OPERATION CONT’D
USER GUIDE
Emergency call - dial 911
When dialing 911, an emergency call is sent to the
Inmarsat BGAN Network.
When the BGAN Network receives the call, it is forwarded to a Distribution Partner who will handle the
emergency call.
Please contact your Distribution Partner to check
that the service is available.
Note!
When dialing 911, Antenna Pointing will be ignored.
The emergency call will be sent even if the user has not
pressed Activate to accept antenna pointing, and the
antenna is not pointed correctly.
The emergency call will be sent even if the user has not
entered the SIM PIN code, or no SIM card is installed the
terminal.
Power adapters
Note!
All cables provide the best possible protection on the
terminal. Nera WorldPro /Explorer 100/110 should only
be used with these cables and accessories.
The Nera WorldPro terminal including the Nera WordSet telephone can be used outdoor in all weather conditions: heavy/rain/snow/hot/cold.
Supports
12mm and
9mm car
power
connector
AC/DC adapter - 102208
DC/DC adapter - 102228 (option)
DC cable - 107572 (option)
Dust & moist protection
Europlug
3m total length
3.5m total length
2.5m total length
Page 29

EXPLORER 100/110
29
USER GUIDE
29
OPERATION CONT’D
USER GUIDE
Ethernet cable
8-wire/2 metres.
ISDN Splitter
Cables and lengths
Split cable
3, 10, 20 & 30metres, allows separation of Antenna & Interface.
USB cable
Standard 1.8 metre cable.
Telephone interface cable
4-wire/2 metres.
RJ45
RJ45
106499
Dust & moist protection
30 m - 108425
A-MALE B-MALE
106500
Dust & moist protection
RJ45
RJ45
107993
Dust & moist protection
107374
RJ45
RJ45
Dust & moist protection
USB
0.37m total length
Page 30

EXPLORER 100/110
30
USER GUIDE
30
OPERATION CONT’D
USER GUIDE
2.Read the Information and select NEXT when
ready. The TCP-PEP program will increase the upload
troughput from your PC. More information about this
application is available at:
http://broadband.inmarsat.com/
The Explorer 100-110 Suite CD
The Nera WorldPro Suite CD enclosed with all terminal consists of :
Installation Guide Wizard
User documentation in PDF format
USB drivers
Desktop Icon to the WEB MMI
Inmarsat launchPad
BGAN TCP Accelerator for Windows Xp
-->Insert the CD :
The StartPage opens automatically in a few seconds.
The CD will Autorun on any Windows PC's. If not start
the program "Install EXPLORER 100&110 suitre" on the
CD.
If you have a Mac the installation wizard will not
start. Browse the CD to fi nd the user documentation.
1
2
3
3.Select the installation you want to install on your
PC. The TCP Accelerator should be installed separately.
The LaunchPad on the CD is for Windows. Go to:
http://broadband.inmarsat.com for more information
Page 31

EXPLORER 100/110
31
USER GUIDE
31
OPERATION CONT’D
USER GUIDE
ON/OFF
PC/ Mac
Nera WorldPro1010 / Explorer 110
Explorer ISDN Handset
Data connection via Ethernet
"Local Area Network"
Make a quick and easy connection. No PC applications
or drivers are neccesary. When your PC/Mac is
connected, it takes no more than 30 secounds to have
an Internet connection.
For more information about Ethernet connections:
See the Ethernet Application Guide.
Making a LAN connection:
To make a LAN connection simply connect the LAN/
Ethernet cable between your PC and the Terminal.
The connection is established automatically. Wait
approx. 30 secounds and you are ready to Brows the
Internet, check e-mails etc. A Pop-up will display
when connection is established.
To disconnect the LAN connection, unplug the Ether-
net cable or use the Terminal WEB MMI.
Get access to the WEB MMI by entering 192.168.0.1 in
your Internet Browser address fi eld. No applications
needs to be installed on your PC.
The BGAN Terminal allows
simultaneous voice and data connections.
Page 32

EXPLORER 100/110
32
USER GUIDE
32
OPERATION CONT’D
USER GUIDE
Voice communication via the ISDN
Handset
Connect the Explorer ISDN Handset to the telephone
interface (ISDN).
For antenna pointing, you can use the ISDN handset
display. Adjust for maximum signal.
For use, see later in this manual, for a quick user
introduction. or read the ISDN Handset- User Guide.
To call a subscriber, dial:
00 + country code + subscriber number +
To call the BGAN Terminal, dial:
00 + 870 + Inmarsat Mobile Number (IMN),
e.g. 00870771234567
In some contries 00 can not be used
Page 33

EXPLORER 100/110
33
USER GUIDE
33
OPERATION CONT’D
USER GUIDE
Loudspeaker and handsfree loudspeaker
Headset jack/handsfree
Using the ISDN Handset
Enabling BGAN users to configure and control the
terminal independently of a PC, the Explorer ISDN
handset turns BGAN into a powerful voice service in
its own right
Signal strength and battery status can be monitored
directly from the handset display. Address lists can
be accessed remotely.
Note:
Fore more detailed information about the ISDN hand-
set read the Explorer ISDN handset - User Guide.
Page 34

EXPLORER 100/110
34
USER GUIDE
34
OPERATION CONT’D
USER GUIDE
Getting Started ISDN Handset
1
Connect the Nera Worldset to the terminal
The EXPLORER ISDN Handset is powered from the
terminal via the ISDN interface
Split operation is shown in the fi gure
2 Turn on the terminal by pressing the Activate button.
•
•
SupportSupport
The EXPLORER 100/110 allows
simultaneous voice and data connections.
Page 35

EXPLORER 100/110
35
USER GUIDE
35
OPERATION CONT’D
USER GUIDE
Enter <Back
Enter PIN number
Enter PIN
06/06/13 11:34:35
Connect
3 Enter your SIM pin code.
If the SIM pin code is disabled,
the handset goes directly into
Connection status. If incorrect
pin see next page.
4 Verify the Connection status
information.
5 Wait until the GPS status:
Searching is switched to GPS-OK.
Or:
If the GPS status: GPS Acquiring
stored is displayed, verify the
time stamp of the GPS status
If stamp is recent, and terminal not moved to another
location continue with step 7
If the GPS status: Searching is
displayed longer than 5 minutes, move the antenna to a
new position.
If the BGAN terminal is being
used for the very fi rst time, or
in a complete new position, the
time period for receiving GPS
status: GPS-OK is prolonged.
•
•
-
•
•
6 Read the antenna pointing information.
7 When the antenna pointing indi-
cates a proper signal, press Connect.
Satellite signal status:
A signal bar indicates the satellite signal.
100% is the best signal.
A user should always use the
Connection status window to get
best possible signal before connecting to the satellite. Typical is
above 60. This secures a stable
connection for all services.
8 Wait until the display status Regis-
tering… is switched to Connected.
The terminal has now established a
proper satellite connection
9 Select OK, and the terminal is ready
-
-
-
•
06/06/13 11:34:35
06/06/13 11:34:35
Time stamp on GPS explenation
06/06/13 11:34:35
Year Month Day Hour Min Sec
Page 36

EXPLORER 100/110
36
USER GUIDE
36
OPERATION CONT’D
USER GUIDE
11 Start using the ISDN Handset.
The default display is shown.
Note! When the signal quality is
low, the battery consumption is
increased
Note! The battery is located in the
interface unit.
GPS Status: Refer to step 5 in this
procedure
SIM pin / SIM card
If an incorrect SIM PIN is entered, the following is
displayed:
Caution!
Operation with the particular SIM card will lock-up
after three failed SIM pin attempts. You must then
use the SIM unblock code (PUK code) provided by your
Service Provider(SP) or Distributor Partner(DP), to unlock the card. Contact your SP or DP if you do not have
the PUK code.
When the PUK code is used, the SIM PIN is reset to the
cards's default PIN.
Enter PH-Corp PIN:
If PH-Corp PIN is prompted the terminal is locked to
one SP or DP. Make sure to use the correct SIM card.
Enter PH-FSIM PIN:
If this is prompted, the terminal is locked to one specifi c SIM card, and only this SIM can be used.
Page 37

EXPLORER 100/110
37
USER GUIDE
37
OPERATION CONT’D
USER GUIDE
3737
Additional Options
Pressing Continue provides the following choices:
Call the dialled number
Save the number, see paragraph Phonebook
Send text message, see paragraph Text messages
Speaker on:
Pressing Speaker on enables the speaker phone
mode. This is useful for a group of people having a
conference call.
Options during a call:
Press Mute on/off to toggle the microphone on/off.
This makes it possible to have a private conversation, without the other party being able to hear
Pressing Options provides the following choices:
Press Speaker on/off to activate/deactivate the
speaker phone mode
Audio Control Display: Press the arrow left/right/
up/down for adjustments. Adjust microphone sensitivity and speaker volume sensitivity
-
-
-
•
•
-
-
Making a Call
1
Dial 00, country code and subscriber number, e.g.:
0047 67244700
Press Del to delete digits
2 Press the key to send the
number.
The Call active display shows
the duration of the call as it
progresses.
3 Make the conversation
4 Press the to end the call.
The display shows the duration
of the call
•
•
•
Page 38

EXPLORER 100/110
38
USER GUIDE
38
OPERATION CONT’D
USER GUIDE
Receiving a Call
When the handset is ringing, press
Redial
Make the conversation
The Call active display shows the duration of the
call as it progresses
3. Press
to end the call
The display shows the duration of the call
Additional options:
Silent ringing:
Press Right soft-key to switch off the ringing tone.
The received call may be answered any time.
You are asked to save the number to Phonebook
when the call has ended.
Note! This feature can be disabled in the Phonebook
menu.
Options during a call:
Press Mute on/off to toggle the microphone/speak-
er on/off. This makes it possible to have a private
conversation, without the other party being able to
hear
Pressing Options provides the following choices:
Press Speaker on/off to activate/deactivate the
loudspeaker
Audio Control Display: Press the arrow left/right/
up/down for adjustments. Adjust microphone sen-
sitivity and speaker volume sensitivity
1.
2.
•
•
-
-
•
•
-
-
The symbols:
Symbol loudspeaker
ON/OFF
Choice when making/
receiving a call – left
soft-key
Symbol silence
ON/OFF
When receiving a call
- right soft-key
Symbol call-options During a call – right
soft-key
Symbol mute
ON/OFF
During a call – left
soft-key
Page 39

EXPLORER 100/110
39
USER GUIDE
39
OPERATION CONT’D
USER GUIDE
Text messages may consist of up to
160 characters.
Messages Received
1 In the default display, select
Menu
2 Select Menu, 2, Text Messages.
The display lists the choices:
3 Select the Inbox to list the
received messages
Use the
to reveal all data,
e.g.:+870772134293 16:38
16/1/2006
4 Press Read to display the mes-
sage content.
5 Press Close to store the message.
Additional Services
Pressing Options displays several choices:
Reply
Forward
Call
Delete
Delete all
Select Reply to enter a message to the sender
Press Send to send the reply
Press OK to confi rm
Select Forward to send the selected message to
another subscriber
Select Call to make a call to the message sending
subscriber
Press Delete to remove a single item from the
inbox list
Press Delete all to remove all items from the inbox
list
-
-
-
-
-
•
-
-
•
•
•
•
Text Message
Page 40

EXPLORER 100/110
40
USER GUIDE
40
OPERATION CONT’D
USER GUIDE
Sending Message
1 In the default display, select Menu
2 Select Menu 2, Text Messages
3 Scroll down to Write
message
4 Press Select to open the New
message entry display
5 Write the message, and use the
Del-key for editing
6 Press Send when ready
7 Select the subscriber number
from the contact list, or:
Press Option to open the Contact
display.
Enter number directly
Type the subscriber number, or
search for SIM Card
8 Select Send
The message is sent when accepted
in the display
If not the message is saved as
Unsent message
-
-
-
•
1.Inbox (3)
2.Write message
3.Unsent (3)
4.Sent (3)
5.Options
Text messages
Select
Switches between small/capital letters
Add symbol
Text message icon.
Visible when received
text message or
unsent text message
Page 41

EXPLORER 100/110
41
USER GUIDE
41
OPERATION CONT’D
USER GUIDE
SMS
1. Inbox
2. Write Message
3. Unsent
4. Sent
5. Option
SMS
1. Inbox
2. Write Message
3. Unsent
4. Sent
5. Option
Phone Book
1. Find Contact
2. Search SIM for contacts
3. Option
1. Add
2. Copy
3. Delete
4. +++
Phone Book
1. Find Contact
2. Search SIM for contacts
3. Option
1. Add
2. Copy
3. Delete
4. +++
Terminal Settings
1. Call Control
2. Icon back light
3. Bluetooth
4. USB
5. Pointing Sound
6. Locks (SIM lock)
7. Log files
8. Master reset
9. About (softeware version etc)
Terminal Settings
1. Call Control
2. Icon back light
3. Bluetooth
4. USB
5. Pointing Sound
6. Locks (SIM lock)
7. Log files
8. Master reset
9. About (softeware version etc)
Connection Status
(Dynamic up date)
1. GPS Status
2. Dynamic up dated antennat pointing/Signal Strenght
Connect to the network
Connection Status
(Dynamic up date)
1. GPS Status
2. Dynamic up dated antennat pointing/Signal Strenght
Connect to the network
Handset Settings
1. Signal and Tones
2. Text size
3. Backlight
4. Display contrast
5. Mic and Line out
6. Time Format
7. Language
8. Hand set number
9. About Handset
Handset Settings
1. Signal and Tones
2. Text size
3. Backlight
4. Display contrast
5. Mic and Line out
6. Time Format
7. Language
8. Hand set number
9. About Handset
Last CallsLast Calls
ISDN Handset Menu Options:
Page 42

EXPLORER 100/110
42
USER GUIDE
42
OPERATION CONT’D
USER GUIDE
Split operation
Explorer 100/110 can also be operated with the Interface Unit separated from the Antenna Unit.
The Split cable interconnects the two units, allowing
e.g. the Interface Unit to be placed inside a building
and the Antenna Unit outside.
Split Cable
(30 meter maximum)
Interface Unit
w/ISDN Handset
The split cable is optional (max 30 m).
For more information on cables, see Cable and lengths
previously in this manual.
Activate buttons on the Interface Unit and the Antenna Unit can both be used for starting/accepting the
satellite signal, and reading signal status.
Page 43

EXPLORER 100/110
43
USER GUIDE
43
OPERATION CONT’D
USER GUIDE
Split operation cont.
It is recommended to install the antenna in split operation with the split cable facing down. (see picture).
This is to make sure that the water does drip of the
unit.
Page 44

EXPLORER 100/110
44
USER GUIDE
44
OPERATION CONT’D
USER GUIDE
USB/ISDN Splitter
EXPLORER 110
EXPLORER ISDN Handset
Multi User operation
It is possible to have multiple users on a EXPLORER
100/110. If use of USB, the USB/ISDN splitter needs
to be connected to the ISDN interface. On the Ethernet interface, it is possible to connect a Router or a
Switch.
More information about multiple users, using
Switch and Routers is found on the the
Ethernet_Connection_user_Guide.
Page 45

EXPLORER 100/110
45
USER GUIDE
45
OPERATION CONT’D
USER GUIDE
EXPLORER 100:
Data connection via USB
Use this connection together with Inmarsat
LaunchPad or make a Network Connetion on your PC.
For more information about Network connections:
See the DUN Application Guide.
Installing USB drivers
Note! Installing USB Drivers is only necessary to do
once. Make sure to use the same PC USB port the next
time you connect to BGAN terminal. The drivers are
installed from the enclosed CD.
First time the Terminal is connected to the PC, a "Found
new hardware wizard" window will pop up.
Check
"Install the software automatically (Recommended)"
and click Next.
Then it is important to follow the wizard until it is
fi nished. The Found New Hardware Wizard is repeated
tre times, because the terminal has a Dual USB port.
For more information:
See the Connecting to PC via USB Application Guide.
BGAN LaunchPad supports operation via the USB
interface:
See Installing the BGAN LaunchPad later in this manual.
Note!
For connection via USB, the USB drivers must be
installed, run the EXPLORER 100&110 suite CD on
your PC before you connect the terminal.
Page 46

EXPLORER 100/110
46
USER GUIDE
46
OPERATION CONT’D
USER GUIDE
( Dialing from Inmarsat LaunchPad or
WorldPro WEB MMI )
3
Communication via Bluetooth
If not integrated in the PC, plug the Bluetooth adapter
into the USB port. Switch on the PC and, if required,
install the self-running software enclosed with the Bluetooth adapter.
Bluetooth handsets are available as option.
Use the BGAN LaunchPad or the ISDN Handset to en-
able the Bluetooth interface. The Bluetooth indicator
lights up.
Enable Bluetooth on the PC/Bluetooth handset using
the default passkey "0000" for connection to the Nera
WorldPro terminal.
The Bluetooth indicator lights green when the PC is
connected. The Terminal is now ready for operation via
Bluetooth.
For detailed description for PC, see the Connecting to PC
via Bluetooth Application Guide on the CD.
See also the Bluetooth handset manual.
Page 47

EXPLORER 100/110
47
USER GUIDE
47
OPERATION CONT’D
USER GUIDE
Enabling Bluetooth using BGAN
LaunchPad
Enabling Bluetooth using the
ISDN Handset
Bluetooth
Select
1.
Turn Bluetooth on
2.Search for Devicel
3.List Paired Devices
4.Change Terminal Num
5.Security Settings
Terminal settings
Select
0.About
1.Call control
2.IP Quality of Service
3.Bluetooth
4.USB
Select
Signal Bluetooth Message
Activate
Battery
Check that the Bluetooth indicator
on the Nera WorldPro lights yellow.
(Rev 2.4.0 and above)
AT command: AT+WNERADEVINT=”BT”,n
n=1 Bluetooth ON
n=0 Bluetooth OFF
Enabling Bluetooth with AT commands using HyperTerminal
Indication on the Terminal
Page 48

EXPLORER 100/110
48
USER GUIDE
48
OPERATION CONT’D
USER GUIDE
Tenovis Bluetooth handset
How to establish connection with Nera WorldPro the
fi rst time
:
1 To switch on, press and hold the
right softkey a few seconds.
2 Search all devices by pressing
the left softkey.
3 Device details appear in the
display.
The EXPLORER 100/110 is recognized as e.g. E110 03487, where the
last fi ve digits match the terminal
IMEI number.
Press Enrolment
4 Enter the passkey: 0 0 0 0 (default) and select Enrol-
ment by pressing the right softkey:
5 Connection established
successfully, see below.
6 To switch off, press and
hold the left softkey a few
seconds.
Page 49

EXPLORER 100/110
49
USER GUIDE
49
OPERATION CONT’D
USER GUIDE
EXPLORER 110 Using BT Headset
You will be guided through a few steps in order to
prepare the terminal for BlueTooth dialling.
When the Headset is paired, you can dial you number
via the WEB MMI
Page 50

EXPLORER 100/110
50
USER GUIDE
50
OPERATION CONT’D
USER GUIDE
EXPLORER 110 WEB MMI
The WEB MMI can be used on Apple Mac, Windows 2000/Xp/Vista
The WorldPro1010 terminal provides an Ethernet
interface which can be used for data communications
as well as a Web interface for confi guration of the
terminal.
Page 51

EXPLORER 100/110
51
USER GUIDE
51
OPERATION CONT’D
USER GUIDE
EXPLORER 110 WEB MMI cont.
1. Simply enter the WorldPro1010’s default IP address
192.168.0.1 into your Web browsers address line and
the Status Summary page will be shown:
2. Enter the SIM PIN code and press the Enter Pin
button.
More information about the WEB MMI is found
on the EXPLORER_110_Ethernet_user_Guide.
3. Select Data Connections menu item on the web
MMI page. You may store three different data connection confi gurations: Normal, Alternative1 and Alternative2. For most cases only one confi guration (Normal)
should be suffi cient.
The different data connection settings are explained
below:
- Standard background: Varying bit rate dependent on available resources. Tariff based
on data volume.
- Streaming 32kbps Guaranteed bit rate. Time based tariff.
- Streaming 64kbps Guaranteed bit rate. Time based tariff.
Page 52

EXPLORER 100/110
52
USER GUIDE
52
OPERATION CONT’D
USER GUIDE
BGAN LaunchPad
Installation
The BGAN LaunchPad allows you to set up and manage your satellite communications. You can open
and monitor data connections, send and receive text
messages and manage your phone call history and
contact details.
The program is available on the enclosed CD and
must be installed on the PC harddisk.
1 Insert the CD :
The EXPLORER 100&110 Suite opens automatically in a
few seconds.
(If not start the program "Install EXPLORER 100&110
suite" on the CD).
Alternatively is BGAN LaunchPad is located at:
-http://broadband.inmarsat.com/
2 To install on PC, follow the instructions given in the
installer program.
When prompted, select Single User installation.
3 If USB connection is required, USB drivers must be
installed in the PC prior to connecting to the USB cable between the PC and the Terminal, see USB drivers
previously in this manual.
4 If Bluetooth connection, see the Connect to PC via
Bluetooth application guide.
5 Switch ON the Terminal.
6 Start the BGAN LaunchPad program by clicking
Start > Programs > BGAN LaunchPad. If necessary, aid
LaunchPad to connect to your Nera WorldPro.
Updates
The BGAN LaunchPad enables you to update the software via a network.
Click Update on LaunchPad to initiate software upgrade.
Since an upgrade patch may amount to several megabytes, it is advisable to perform the update when connected to a terrestrial broadband network.
BGAN LaunchPad is also available for Apple Mac and Linux.
Page 53

EXPLORER 100/110
53
USER GUIDE
53
OPERATION CONT’D
USER GUIDE
Satellite
pointing
aid
Data
connection
setup
Read/
write
SMS
Phone
book
Data and call
duration
information
Distribution
Partner
information
Help and
service
Launch
zone
Control
zone
Status
zone
GPS status Register status, and
available services
Battery
status
Information only!
Not your exact
position, but if city
is selected satellite
pointing guidance
is available.
Signal strength will normally vary when using
different services. In pointing mode, make sure to
obtain the best possible signal strength.
Overview
Page 54

EXPLORER 100/110
54
USER GUIDE
54
OPERATION CONT’D
USER GUIDE
Status
Terminal in pointing mode. Search for
best possible signal
strength.
Typically 50% or higher.
GPS status
Searching for GPS
fi x, please wait.
New GPS fi x OK,
please register by
pressing Activate
on terminal, or
clicking.
Stored GPS fi x can
be used if terminal has not been
moved since used
last time.
Login to Inmarsat
system failed.
Page 55

EXPLORER 100/110
55
USER GUIDE
55
OPERATION CONT’D
USER GUIDE
Data connection
Background data
connected.
Terminal is online.
Streaming 32kbps
Streaming 64kbps
Connected to network.
Standard background data:
- transmit: up to 240 kbps
- receive: up to 384 kbps
1
2
3
Page 56

EXPLORER 100/110
56
USER GUIDE
56
OPERATION CONT’D
USER GUIDE
LaunchPad help
Page 57

EXPLORER 100/110
57
USER GUIDE
57
OPERATION CONT’D
USER GUIDE
Terminal log
Click Display to list terminal events.
The last 100 events are stored.
The list can be saved to fi le.
Events log fi le lists information/alarms that have
occurred on the terminal.
Active alarms will pop up on the screen and are
also displayed along with red alert message on
Interface Unit.
Alarms are repeated in the event log until solved.
Warnings/Information is stored in event log for
information only.
Page 58

EXPLORER 100/110
58
USER GUIDE
58
OPERATION CONT’D
USER GUIDE
Audio and lights setup on terminal
Page 59

A-1
USER GUIDE
EXPLORER 100/110
SAS
DATA
NETWORKS
MOBILE
NETWORKS
2G 2.5G 3G
TELEPHONE
NETWORKS
IOR
R
P
7
8
9
4
5
6
1
2
3
S
0
#
R
MES
APPENDIX A - SYSTEM OVERVIEW
Inmarsat BGAN system
The Inmarsat Broadband Area Network service (BGAN)
provides both voice and broadband data through a
truly portable device on a global basis.
Data and voice transmissions to and from mobile/
fi xed subscribers is offered anywhere within the
worldwide coverage of the Inmarsat 4 spot beam
system, see map later in the User Guide.
The benefi t of the INMARSAT system is its high capacity, and the rapid and reliable connection between the land based (fi xed)
users and the Mobile Earth Stations
(MESs).
Each satellite region is under the
control of a Satellite Access Station
(SAS), which controls and monitors
the traffi c between the MESs and
the SAS.
SAS: Satellite Access Station w/Dis-
tribution Partners (interconnects
fi xed telecommunication networks
with the Inmarsat system, two in each
Ocean Region).
MES: Mobile Earth Station
(Nera WorldPro, a user terminal for the Inmarsat system).
Figure A-1 Overview of the Inmarsat BGAN system.
Page 60

A-2
USER GUIDE
EXPLORER 100/110
A-2
APPENDIX A - SYSTEM OVERVIEW CONT’D
E
Q
U
A
T
O
R
EARTH
12000 km
35700 km
Pacific Ocean Region
Indian Ocean Region
F2 54°W
F1 64.5°E
F3 178°E
Atlantic Ocean Region
System satellites
The satellites are positioned in a geostationary orbit
above the equator at approximately 35700km altitude.
See fi gure A-2.
In geostationary orbit, each satellite moves at the
same rate as the earth, and so remains in the same
relative position to the earth.
The satellites provide 99% landmass coverage.
Nera WorldPro can communicate via the three satel-
lite Ocean Regions:
F1 Indian Ocean Region
F2 Atlantic Ocean Region
F3 Pacifi c Ocean Region
The coverage area of the satellites for Nera WorldPro
(BGAN) is shown on the Satellite coverage map, see
earlier in this manual. Communication is possible in areas marked with brown and reddish brown (light grey
and grey when printed in black), indicating spotbeam
coverage.
Transmission frequencies
The Inmarsat BGAN terminals operate in the following L-band frequencies:
MES transmission frequencies:
1626.5 MHz - 1660.5 MHz
MES receiving frequencies:
1525.0 MHz - 1559.0 MHz
SAS (Satellite Access Station)
Two SAS stations cover both the IOR and AOR-E satellite regions. See fi gure A-3.
The SASs provide the interface to the international
networks for telephony and data: PSTN (Public
Switched Telephone Networks), PSDN (Packet
Switched Data Networks) and Mobile Telephone
Networks.
Figure A-2
Satellite positions.
Page 61

A-3
USER GUIDE
EXPLORER 100/110
A-3
APPENDIX A - SYSTEM OVERVIEW
CONT’D
Figure A-3 BGAN Satellite Access Station Europa for IOR and AOR satellite.
Page 62

A-4
USER GUIDE
EXPLORER 100/110
A-4
APPENDIX A - SYSTEM OVERVIEW CONT’D
SAS
Satellite
Access
Station
Other
Mobile
network
PSTN/
ISDN
DP
Distribution
Partner
SP
Service
Provider
IP
network
Recognized using
APN (Access Point Name)
stored on your SIM card
Nera WorldPro 1000
Nera WorldSet
Time delay ~0.25 second
Communication path
Page 63

B-1
USER GUIDE
EXPLORER 100/110
APPENDIX B - LIST OF TERMS
AC Alternating Current
AOR Atlantic Ocean Region West (F2 - 53ºWest).
APN Access Point Name
Azimuth horizontal direction angle between north
and, e.g. the direction to the satellite.
Bit rate the number of bits transmitted per second
(bps).
Bluetooth Wireless computer interface.
Bps Bits per second.
BGAN Inmarsat Broadband Global Area Network, mo-
bile communications service providing simultaneous
voice and data.
BT Bluetooth
CBR Constant Bit Rate
CHV2 higher access level on the SIM card.
CS Circuit Switched service.
DC Direct Current.
Dongle Bluetooth device that connects to the PC.
DP Distribution Partner
DSP Digital Signal Processor.
DTE Data Terminal Equipment.
DUN Dial Up Network.
Elevation vertical angle to the satellite, i.e. the height
of the satellite above the horizon.
Ethernet Local Area Network (LAN)
FWD ID forward Id, telephone network identity.
GPRS General Packet Radio Service.
GPS Global Positioning System.
IMN Inmarsat Mobile Number, a unique 9-digit
number which identifi es each device connected to the
Nera WorldPro terminal.
Inmarsat International Maritime Satellite Organisation.
IMEI International Mobile Equipment Identifi er, a
unique number that can be found on the label inside
the battery compartment of the Interface Unit.
IMSI a unique SIM card number
IOR Indian Ocean Region (F1 - 64º East).
IP Internet Protocol
IPDS Inmarsat Packet Data Service.
ISDN Integrated Services Digital Network.
ISN Inmarsat Serial Number, individual number as-
signed to each WorldPro terminal.
ITU International Telecommunications Union
Kbps Kilobits per second.
LAN Local Area Network.
LaunchPad Inmarsat BGAN PC software.
LED Light Emitting Diode
MES Mobile Earth Station, a user terminal for an In-
marsat system; the Nera WorldPro terminal is an MES
for the Inmarsat BGAN system.
Modem Device/driver for conveying digital data.
Page 64

B-2
USER GUIDE
EXPLORER 100/110
APPENDIX B - LIST OF TERMS CONT’D
MSN Multiple Subscriber Number, the extension
number that connected equipment responds to.
OID Originating terminal IDentifi cation.
Ocean Region the coverage area of an Inmarsat satel-
lite within which the Nera WorldPro terminal may
communicate.
PABX Private Automatic Branch Exchange.
Passkey Bluetooth enabling key
PIN Personal Identifi cation Number.
POR Pacifi c Ocean Region (F3 - 178ºEast).
PPP Point-to-Point Protocol used for serial data com-
munication via the Nera WorldPro USB port or Bluetooth connection.
PS Packet Switched data service.
PSTN Public Switched Telephone Network
PUK Personal Unblocking Key, code that allows un-
blocking a SIM card.
QoS Quality of Service
RF Radio Frequency.
SAS Satellite Access Station, a station that intercon-
nects fi xed telecommunications networks with the
Inmarsat system.
SIM Subscriber Identity Module
SMS Short Message System.
SP Service Provider
Spot Beam an Ocean Region is divided into sub-
regions, each “spotlighted” by a beam from the region
satellite.
Terrestrial Network a fi xed telecommunications network, such as a telephone network or a data network,
which connects to the Inmarsat system at an SAS.
UDI Unrestricted Digital Information.
UMTS Universal Mobile Telecommunications System.
USB Universal Serial Bus.
USIM SIM card designed for 3G mobile telephony.
UTC Coordinated Universal Time, referenced to Green-
wich Mean Time (GMT).
VBR Variable Bit Rate.
VoIP Voice over Internet Protocol, broadband internet
telephone communications.
VPN Virtual Private Network.
Page 65

USER GUIDE
C-1
EXPLORER 100/110
Setting up problem Probable cause Action
The Interface Unit is not
switched ON
1. The indicators do not light
up:
Power is not connected.
Battery is not installed.
2. The Nera WorldSet display
freezes or stays completely
blank:
The handset cord is not
connected or damaged
Check that the handset cord is properly connected
and inspect the cord. Uses the RJ45 pins 3, 4, 5 and
6 only.
Disconnect cord from Interface Unit and connect it
again.
Press Activate button for 1.5 secs.
Check that the power adapter is properly connected,
use any DC source in the range 10.8 - 15.6 V.
3. SIM not installed Message indicator blinks
red
Insert SIM card. Must be a G3 SIM (USIM) provided
by an Inmarsat DP/SP.
Read alarms in BGAN LaunchPad or Nera WorldSet.
Check SIM card installation/orientation.
4. Message indicator blinks
yellow
SIM PIN needs to be
entered
With SIM card installed a SIM/PUK code is required.
Use Nera WorldSet or BGAN LaunchPad to enter PIN.
5. Signal indicator lights red
Network rejection
Restart terminal and make sure to acquire a new
GPS fix (green Signal indicator) before registering
with the Inmarsat BGAN Network.
GPS is needed for registering with the Inmarsat
system.
Make sure to achieve the best possible satellite
signal at your location. Avoid obstructions.
Find another location.
Check for correct SIM card id IMSI, or terminal IMEI.
APPENDIX C - TROUBLESHOOTING
Page 66

USER GUIDE
C-2
EXPLORER 100/110
USER GUIDE
C-2
APPENDIX C - TROUBLESHOOTING CONT’D
Setting up problem Probable cause Action
10.Nera WorldPro functions
abnormally:
Terminal in software upgrade mode.
To exit the upgrade mode, switch OFF the terminal
and switch it ON again.
Download new software from the Nera website.
(preferably done by a Nera Regional Service Centre)
All signal indicators stay
yellow. Activate button
has been pressed and held
for more than 10seconds.
9. Nera WorldPro 1000/1010
functions abnormally:
Turn off the terminal by pressing the Activate
button, and switch on again. May be necessary to
press Activate for 10secs or remove battery.
Verify correct voltages to the terminal: 10.8 - 15.6 VDC.
Download new software from the Nera website.
(preferably done by a Nera Regional Service Centre)
All signal indicators stay
red, or blink
The signal strength indicator should preferably
exceed 50% in BGAN LaunchPad or in the Nera
WorldSet display.
Check that no obstacles block the free sight to the
satellite.
Restart the search for any satellite by pressing the Activate
button.
8. Low signal reception:
Obstructions
7. Nera WorldPro cannot find
the satellite:
No or weak signals.
Sight to satellite obstructed
Check that no obstacles block the free sight to the
satellite.
Check with the coverage map.
6. Signal indicator blinks
yellow
Terminal has a stored GPS
and a new fix is not yet
obtained
Wait up to 5 minutes. However, it is possible to log
onto the Inmarsat system if the stored GPS position
is within the same region as you were the last time
you used the terminal, and the time stamp is
accepted by the system.
Page 67

USER GUIDE
C-3
EXPLORER 100/110
USER GUIDE
C-3
APPENDIX C - TROUBLESHOOTING CONT’D
Setting up problem Probable cause Action
11. Logging into the system fails Signal indicators switch to
red after login attempt
Check that the SIM card is installed.
The terminal is black listed (IMEI number).
The SIM card is black listed (IMSI number).
Page 68

Problems connecting to PC
Probable cause Action
1. No contact with modem
using USB:
Wrong setup of USB driver.
Check cable connection.
Disconnect USB cable, and reconnect
On PC, open Phone and Modem options and check
whether USB Modem driver is connected to COM
port. If not:
Alt. A
1. Remove Modem in Phone and Modem options.
(Nera Dual Port1/Port2)
2. Run the Nera USB wizard.
3. Reconnect the Nera WorldProterminal
4. Follow the New Hardware Wizard in Windows.
Click next, and repeat procedure 3 times:
Nera Dual Port/Control port 1/2
Alt. B
The PC does not recognize the Nera WorldPro.
Update the Nera USB drivers. Drivers can be
updated via Control Panel > System > Hardware
> Device Manager. Typically, a driver is not
recognized by computer marked in device
manager as a question mark.
Alt. C
1. Remove previous USB installations via Control
Panel>System>Hardware>Device Manager.
Double-click universal serial Bus Controller and
uninstall the USB universal Host Controller.
Warning! Removes all USB drivers.
2.Repeat installation of USB driver
USER GUIDE
C-4
EXPLORER 100/110
USER GUIDE
C-4
APPENDIX C - TROUBLESHOOTING CONT’D
Page 69

3
6. Other problems
Read the Nera WorldPro FAQ document
available on CD or http://satcom.neraworld.com
If you have installed tne Nera WorldPro Software Suite
on your PC, it is available select
-->start/all programs/ Nera WorldPro Suite
USER GUIDE
C-5
EXPLORER 100/110
USER GUIDE
C-5
APPENDIX C - TROUBLESHOOTING CONT’D
Page 70

Operation problem Probable cause Action
1. Unsuccessful call:
Try again
Check event log for information.
Call the Net Service Provider/Distribution Partner.
Network busy
Nera WorldPro is not
commissioned.
The called party is busy.
Subscriber busy appears
in Nera WorldSet display
Wait for some time and try again.
Call another subscriber.
2. Problems with making a
voice call.
Always use the International prefix
e.g. 004767244700.
Remember to key "#" as the last digit before starting
transmission. Not needed on Nera WorldSet.
SIM card is not accepting phone calls.
No valid GPS
Check Signal indicator
Check BGAN LaunchPad
Press Activate button and repeat the satellite
pointing.
Incomplete dialing
Service not commissioned
Not logged on to the
Inmarsat system
3. Problems with incoming
voice call.
Subscriber must dial International prefix e.g.
00870772420510.
Wrong MSN settings in voice device. Erase MSN in
device, or select MSN no. 20.
Voice device not properly connected to terminal.
4. Problems with data
communication:
Wrong PC settings
Use BGAN LaunchPad to establish a data connection.
Verify DUN (Dial Up Network) settings. Number to dial
should be *98# (for background data via COM port)
Read Connecting to PC application guides on CD.
USER GUIDE
C-6
EXPLORER 100/110
USER GUIDE
C-6
APPENDIX C - TROUBLESHOOTING CONT’D
Page 71

USER GUIDE
C-7
EXPLORER 100/110
USER GUIDE
C-7
APPENDIX C - TROUBLESHOOTING CONT’D
Operation problem Probable cause Action
5. Connection unsuccessful:
Other end does not reply
No answer from SAS
Wrong connection details
Verify that you are logged on to the system.
Verify satellite signal
Check the APN address (located on the SIM card)
with your Distribution Partner (DP). Select correct
user name and password. If required, enter data
using BGAN LaunchPad.
Check whether your SIM card is registered.
6. Terminal fails to connect in
data mode
Incomplete dialing
Verify satellite signal indicator, shouild light green.
Using BGAN LaunchPad, check status and network
registration.
Using BGAN LaunchPad, make sure to select data
connection.
Select background data.
Try again.
7. Disconnects after some time
Check properties>options>idle time before hang up.
Check satellite signal, can vary in some locations,
see User Guide.
Wrong setting in dialup
(DUN)
8. Satellite Signal indicator
turns red
Logging onto the Inmarsat
system failed
Terminal has no GPS fix, or stored fix is rejected.
Satellite signal too low.
Make sure to acquire a GPS fix.
Verify satellite signal.
Page 72

USER GUIDE
C-8
EXPLORER 100/110
USER GUIDE
C-8
APPENDIX C - TROUBLESHOOTING CONT’D
Operation problem Probable cause Action
10.Streaming fails
Check with your DP (Distribution Partner) on the
availability on your SIM card.
Using BGAN LaunchPad, verify APN located on SIM
card.
Nera WorldPro supports QoS streaming 32 and
64kbps.
Not available service
11. Out of range
Not within the Inmarsat coverage.
Check GPS fix, get a new GPS fix.
Check satellite signal, typically more than 50%.
9. Low throughput
Try later
Use another Ocean Region
Note! You only pay for data sent/received
Check satellite signal
Many users logged on
the system
Page 73

Page 74

Thrane & Thrane Norge AS
Bergerveien 12, PO Box 91
N-1375 Billingstad, Norway
Tel: +47 67 24 47 00
Fax: +47 67 24 46 21
www.thrane.com
info@thrane.com
 Loading...