

Page 1

1
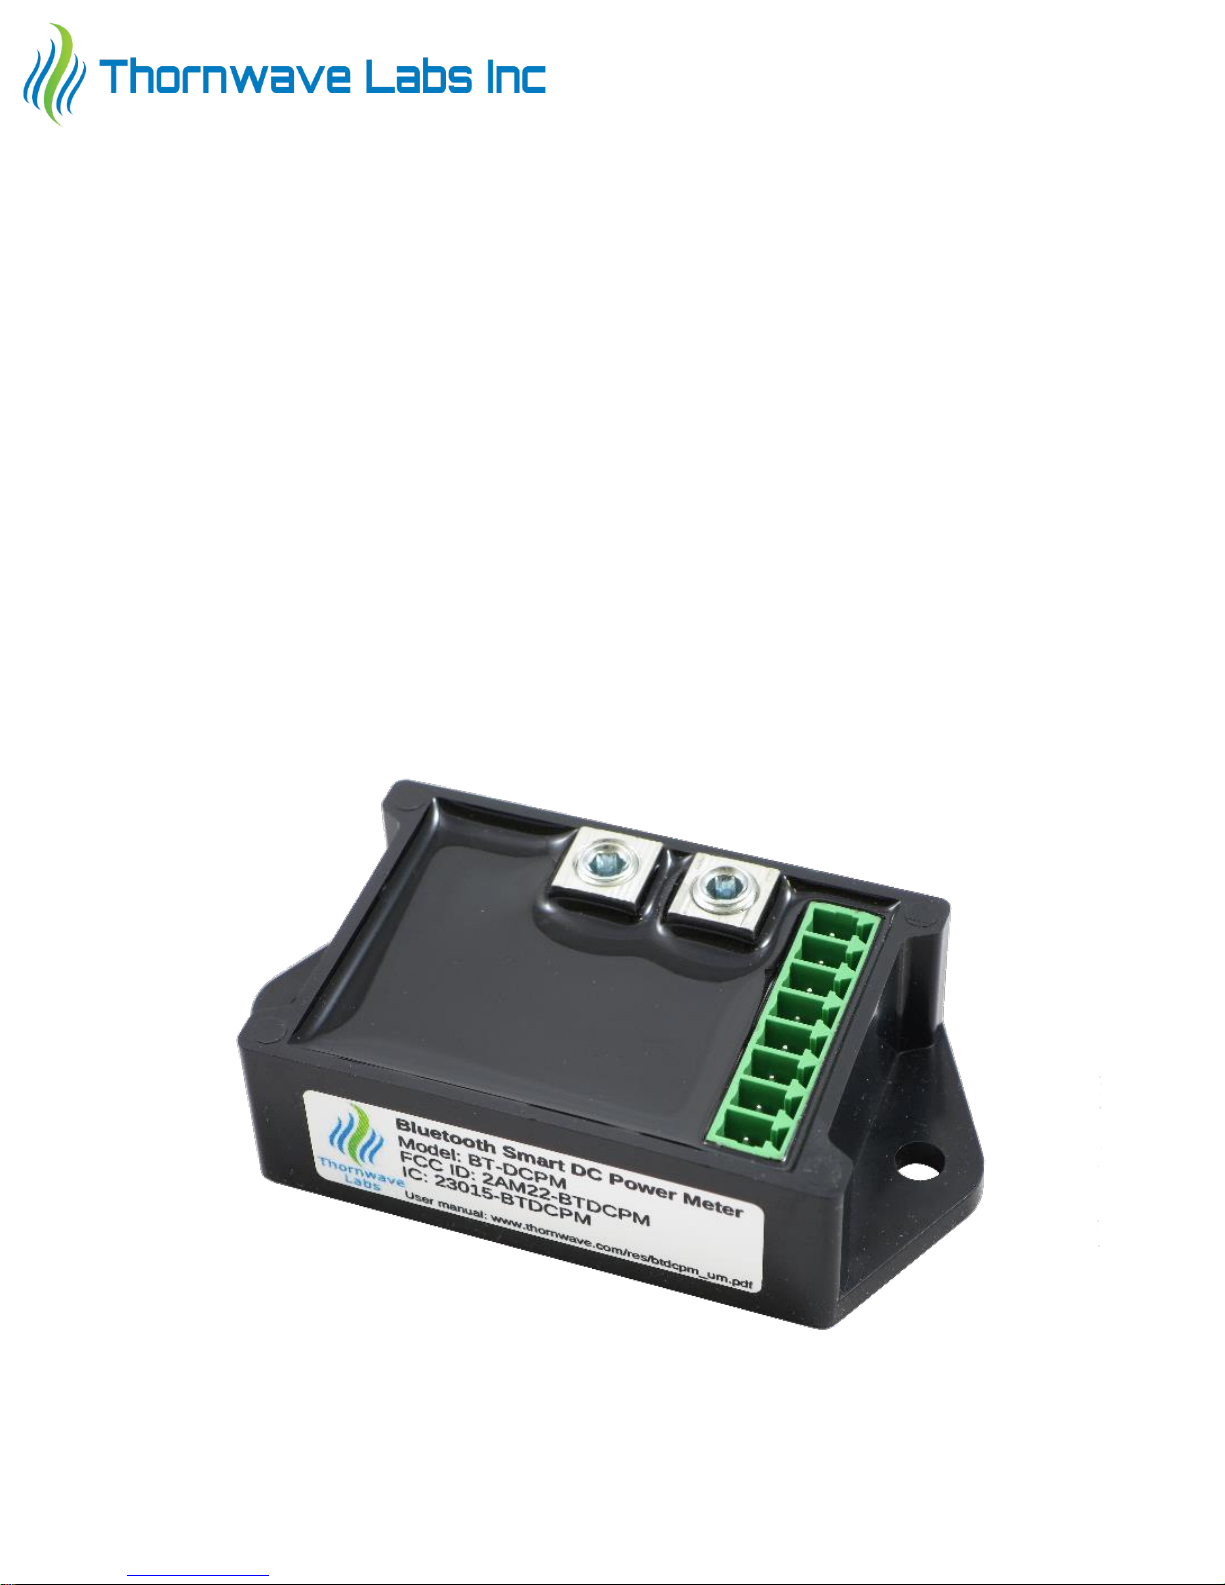
PowerMon
Model: BT-DCPM
Bluetooth LE Enabled
Advanced Battery Monitor / DC Power Meter
– USER MANUAL –
Page 2
2
BRIEF
PowerMon (BT-DCPM) is a Bluetooth Smart (LE) Swiss-army knife tool that can be used in any DC circuit.
Its primary function is advanced battery monitor / DC power meter. PowerMon allows monitoring of important
electrical parameters: two voltages (0-75V), one current (0-60A using the integrated current shunt or up to
10,000A using an external current shunt), peak current, power (W), energy (Wh), battery charge (Ah) and
temperature. Many other parameters are computed: the battery state of charge (SOC) as a percentage,
remaining battery runtime, battery statistics (number of cycles, total discharged capacity, …). The current
measurement can be either unidirectional or bidirectional. In bidirectional mode, PowerMon senses current
flow in both directions (positive and negative). The device can drive a mechanical or solid-state relay which
allows it to function as a low voltage disconnect, high voltage disconnect, over-current disconnect, battery
isolator in multiple battery systems, remote on/off switch and timer. A mobile device running either Android or
iOS and the PowerMon app (available for free on Google Play Store and Apple App Store) are required for
operating this device.
Page 3

3
FEATURES
• Measures two voltages, one current
(unidirectional or bidirectional), peak
current, power (W), charge meter (Ah),
energy (Wh) and temperature
• Operates at up to 75V and 60A of
continuous current (75A peak current) using
the integrated current shunt
• Can sense up to 160mV of voltage drop
across an external current shunt allowing
current of up to 10,000A to be measured
• Full differential input for the current shunt,
allowing it to be mounted either on the
ground or positive wire
• Can control one relay or SSR (solid state
relay)
• Low / high voltage disconnect
• Over-current disconnect (circuit-breaker)
• Battery isolator for dual battery bank
systems
• Battery monitor (battery fuel gauge),
displays the state of charge in percentage
and the remaining time on battery
• Lithium iron phosphate battery charge
manager
• Timers
• Can use an external temperature sensor
• User / master password protection
• Very low power consumption (see
Performance Parameters)
• Bluetooth Smart (LE) radio with internal
antenna and long range
• 8-pole terminal block for connecting to the
system that will be monitored
• ABS plastic enclosure with mounting
flanges, completely enclosed in epoxy
potting compound
• Measures only 3.0” x 1.55” x 0.75” (76mm x
39mm x 19mm) including the mounting
flanges.
• Weatherproof
• Free PowerMon app available for Android
and iOS
• Most parameters can be configured,
allowing it to achieve top performance with
a variety of current shunts and batteries
TYPICAL APPLICATIONS
• RVs, boats, off-the-grid cabins
• Solar and wind alternative energy
• Vehicle batteries
• Backup electrical systems
• Lithium Iron-Phosphate battery charge manager
• Automatization: solar irrigation systems, solar street lights, general purpose DC timers
Page 4
4
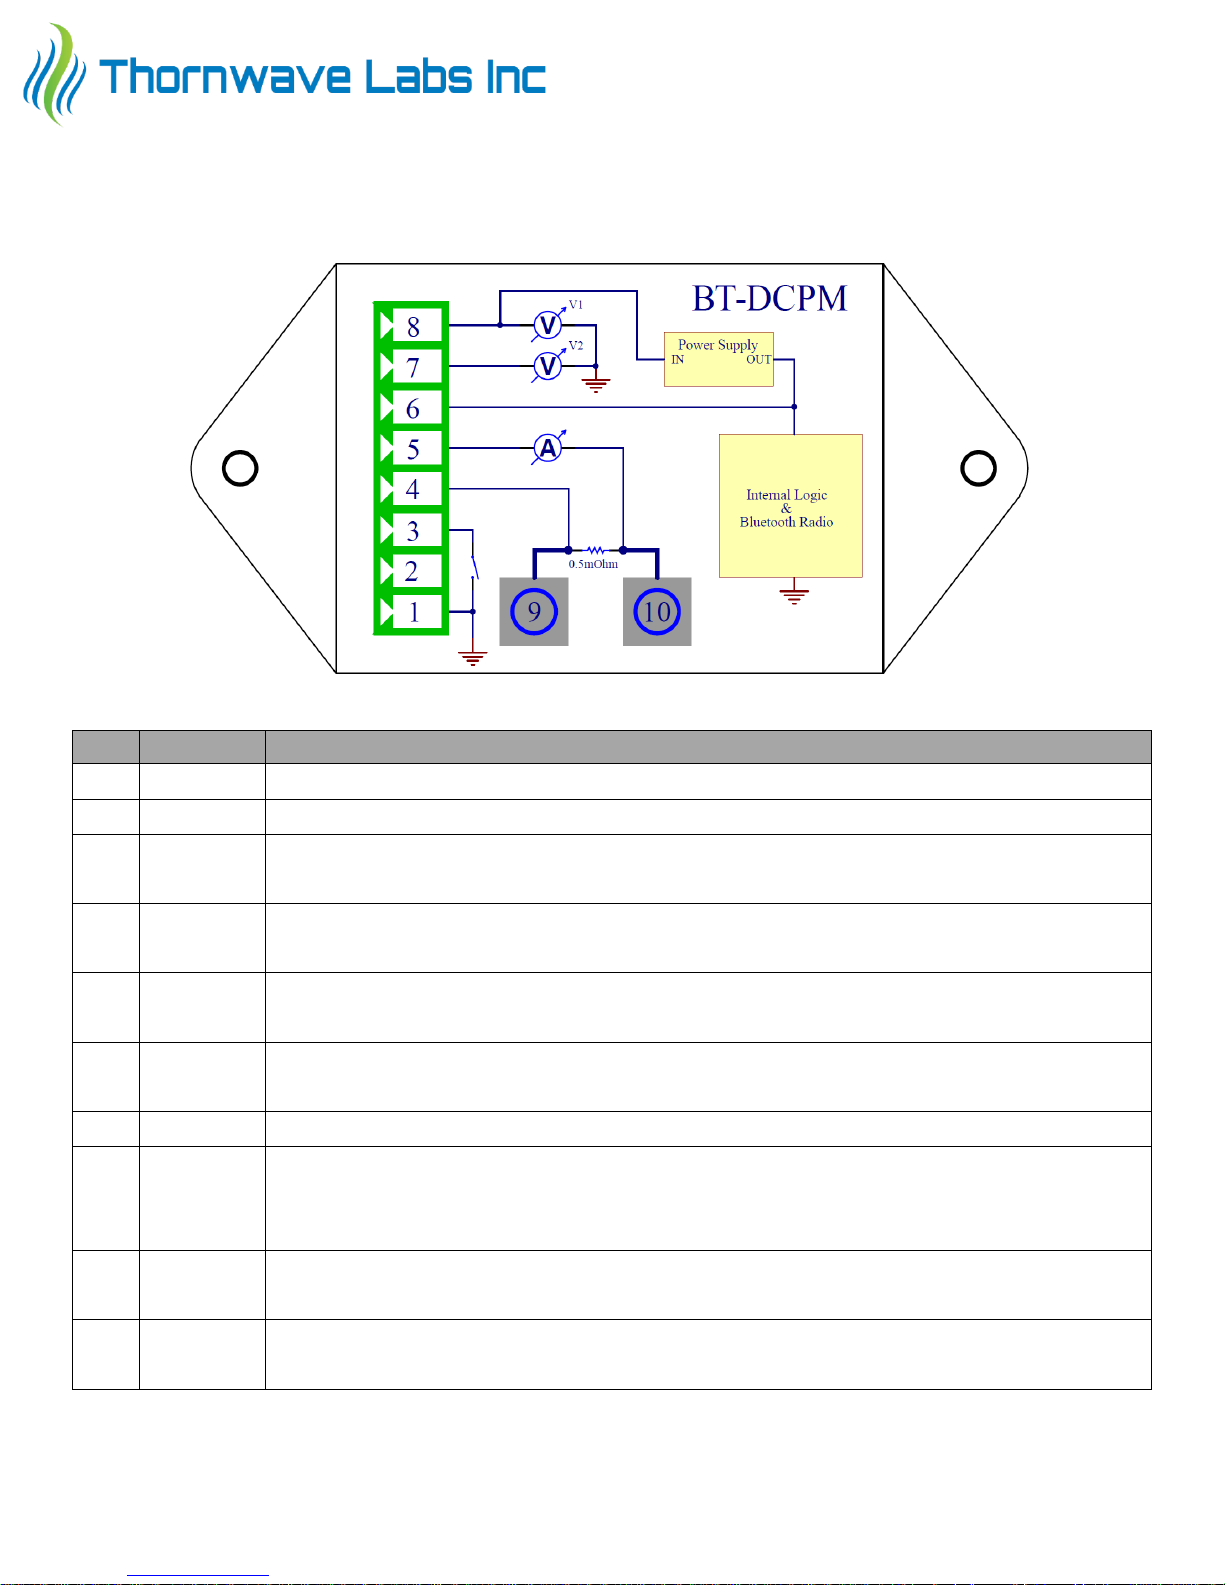
TERMINAL DESCRIPTION / INTERNAL DIAGRAM
No.
Name
Terminal Description
1
GROUND
System ground
2
MF
Multi-function (for hardware revision 2.2 and up) – call for details
3
RELAY
Relay output. It controls a mechanical or solid-state relay. This terminal is
connected to ground internally by the device when the power is turned ON.
4
ES+
External shunt connection. When using the internal current shunt connect
this terminal to ES- (terminal 5)
5
ES-
External shunt connection. When using the internal current shunt connect
this terminal to ES+ (terminal 4)
6
VS
Optional power supply. If available, connect this terminal to a power supply
of not more than 18V. This connection is optional.
7
V2
Second monitored voltage. Can measure the voltage of a second battery.
8
V1
Main power. This is the main voltage that will be monitored. The device
also draws its power form this terminal. If power is applied to terminal 6
(VS), the device will draw its power from VS instead of V1.
9
IS-
Internal shunt connection. The measured current is flowing from IS+ to ISor backwards. Do not connect if using an external shunt.
10
IS+
Internal shunt connection. The measured current is flowing from IS+ to ISor backwards. Do not connect if using an external shunt.
Page 5

5
SPECIFICATIONS
Absolute Maximum Ratings
1,2
Maximum voltage at V1 and V2
+65V (hw rev 2.00)
+75V (hw rev 2.20)
Maximum voltage at VS
+18V
Maximum voltage at RELAY
+18V (hw rev 2.00)
+30V (hw rev 2.20)
Maximum current through RELAY terminal (maximum
relay coil current)
0.5A
Maximum current through IS+ and IS- (using the
integrated current shunt)
60A continuous, 75A peak
Maximum current (using an external current shunt)
depends on external shunt
(up to 10,000A)
Maximum differential input sense voltage ES+ to ES(using an external shunt)
-75V to +75V
Maximum common mode input sense voltage (ES+, ES-,
IS+, IS-)
-2V to +75V
Operating temperature
-30°C to +85°C
1. Stresses greater than those listed under “Absolute Maximum Ratings” may cause permanent damage to the device.
2. All voltages are referenced to ground unless otherwise specified.
Page 6

6
Performance Parameter
Value
Measured voltage (V1, V2)
0 to 60V (hw rev 2.00)
0 to 75V (hw rev 2.20)
Measured voltage accuracy
0.5%
Measured current (using integrated shunt IS+, IS-)
0 to 60A
Current monitoring accuracy (using integrated shunt)
2% - without calibration
1% - with calibration
Integrated current shunt resistance
0.5 mOhm / ±1%
Voltage at external shunt input (ES+ to ES-)
0 – 160mV / ~20µV resolution
Current monitoring accuracy (using external shunt)
depends on external shunt
precision, typically better than 1%
with calibration
Minimum external current shunt resistance
0.1 mOhm
Power (using integrated shunt)
max. 4500W
Power meter
more than 1000 MWh
Charge meter
more than 1000 MAh
Battery state-of-charge monitor
0% – 100%
Temperature
1°C / 1°F resolution
Current draw (current consumed by the device)
at 12V
at 24V
at 36V
at 48V
at 60V
at 75V
7.2 mA
7.5 mA
7.8 mA
8.1 mA
8.5 mA
8.9 mA
Page 7

7
COMPLIANCE STATEMENTS
FCC
ATTENTION: Changes or modifications not expressly approved by Thornwave Labs Inc could void the
user's authority to operate the equipment.
ATTENTION: This device complies with Part 15 of the FCC rules. Operation is subject to the following two
conditions: (1) this device may not cause harmful interference and (2) this device must accept any interference
received, including interference that may cause undesired operation.
ATTENTION: Cet appareil est conforme à la Partie 15 des règlements de la FCC. L'opération doit se
conformer aux deux conditions suivantes: (1) cet appareil ne peut causer d'interférences nuisibles et (2) cet
appareil doit accepter toute interférence reçue, y compris les interférences qui peuvent provoquer un
fonctionnement indésirable.
IC RSS-102 RF Exemption
This system has been evaluated for RF Exposure per RSS-102 and is in compliance with the limits specified
by Health Canada Safety Code 6.
L’exposition aux radiofréquences de ce système a été évaluée selon la norme RSS-102 et est jugée
conforme aux limites établies par le Code de sécurité 6 de Santé Canada.
IC RSS-Gen 8.4
This device complies with Industry Canada license-exempt RSS standard(s). Operation is subject to the
following two conditions: (1) this device may not cause interference, and (2) this device must accept any
interference, including interference that may cause undesired operation of the device.
Le présent appareil est conforme aux CNR d'Industrie Canada applicables aux appareils radio exempts
de licence. L'exploitation est autorisée aux deux conditions suivantes: (1) l'appareil ne doit pas produire de
brouillage, et (2) l'utilisateur de l'appareil doit accepter tout brouillage radioélectrique subi, même si le
brouillage est susceptible d'en compromettre le fonctionnement.
Page 8

8
SAFETY INSTRUCTIONS
Warning !
Read all the instructions and cautions before using the PowerMon device. Thornwave Labs Inc does not
assume responsibility for any injury or property damage caused by improper installation, bad wiring or use of
PowerMon outside of its intended purpose. The device should be installed by a professional.
Warning !
The PowerMon device should not be used for any medical purposes, life sustaining equipment, safety
applications or any application where equipment failure can cause injury, death, fires, or any other hazard.
Warning !
There are no serviceable parts or fuses inside the power meter! Do not disassemble or attempt to repair!
The unit operates with voltages up to 75V which can be lethal or cause serious and permanent injury.
Warning !
Do not submerge under water or other liquids. The device is weatherproof but not waterproof.
Warning !
The device is to be connected to DC circuits only, not exceeding 75V and 60A (using the integrated
current shunt). Failure to do so will result in equipment damage. Higher currents are supported when using an
external current shunt. Confirm that all connections are tight to avoid excessive heating and sparks. Never
connect the V1 or VS terminals to a power source without using a fuse or circuit breaker. A 0.1A to 5A fuse or
circuit breaker is required.
Warning !
Batteries are dangerous! Do not short-circuit a battery or the power meter. Batteries can produce
flammable and explosive gases and can generate very high currents that can lead to serious consequences
including explosion, fire, damage to equipment, personal injury and even death. It is the user’s responsibility to
operate the equipment in a safe manner. Do not charge batteries in an enclosed environment unless allowed
by the manufacturer of the battery. Never connect a load to a battery without using fuses or circuit breakers.
Page 9

9
FUNCTIONAL OVERVIEW
Device power. The PowerMon device is drawing its supply power from the V1 terminal and using an
internal voltage regulator it creates an internal supply voltage of 9V. This internal supply voltage is available at
the VS terminal but should not be used to supply any external load. Attempting to power external loads from
VS will damage the device. If a power supply of maximum 18V is available it is recommended to connect it to
the VS terminal. This will turn the internal regulator off and provide the power for the device, improving
efficiency (only if V1 is higher than 24V). When the device is used to monitor 12V batteries, V1 and VS can be
wired together to the positive side of the 12V battery. If an appropriate power supply voltage is not available
the VS input should be left unconnected.
Integrated current shunt. When using the integrated current shunt, the ES+ and ES- pins should be
connected together using a wire bent in a U shape and attached to the supplied terminal block. The current to
be monitored should be routed through the IS+ and IS- terminals. An internal current shunt of 0.5mOhm exists
in between these two terminals. The aluminum, hex screw terminal blocks (IS+ and IS-) can accept wires up to
6AWG in size. In order to minimize the voltage drop on wires and connections, use the thickest wires that can
support the required current. The common mode voltage at IS+ and IS- can be in between -2V and +75V relative
to ground, allowing the current shunt to be placed either on the positive side of the circuit or on the ground
wire. Current flowing from IS+ to IS- will display as a positive value and current from IS- to IS+ will display as a
negative value. The current sign can be flipped from the device configuration.
External current shunt. To monitor a large current or a very small current more accurately, an external
current shunt can be used. This method allows monitoring current up to 1,000A with reasonable resolution or
even higher current if resolution can be sacrificed. Using a higher resistance current shunt, current in the milliamp range can be measured accurately. The external current shunt resistor should be connected to the ES+ and
ES- inputs. To avoid noise the wires should be as short as possible. Twisting the sense wires reduces noise even
further. The IS+ and IS- terminals should be left unconnected. The common mode voltage at ES+ and ES- can be
in between -2V and +75V relative to ground, allowing the current shunt to be placed either on the positive side
of the circuit or on the ground wire. Current flowing from the ES+ to ES- sides of the external shunt will be
displayed as a positive value and current from ES- to ES+ will be displayed as a negative value. The current sign
can be flipped from the device configuration.
Operation. Once the device receives power it will start advertising its presence to other Bluetooth
devices. Using a cell-phone or tablet running the PowerMon app (found on the App Store / Play Store) the user
can scan for PowerMon devices and connect to one of them at a time (if multiple devices are present). Multiple
PowerMon devices can be distinguished after changing their Bluetooth name using the mobile app. This will be
displayed by the app upon scanning for Bluetooth devices. The factory default name is “DCPM”. Once the mobile
app is connected to a power monitor device, the app will display all the measured electrical parameters and
update them in real-time. Tapping on a measurement value for longer than 1 second will open a menu that
allows operations and configuration specific to that measurement.
Page 10

10
Radio performance. The device contains an internal Bluetooth Smart (LE) radio operating in the 2.4GHz
ISM band and an internal antenna. For best performance, the device should be installed in such a way to offer
a path for radio waves to reach it. Metal walls or enclosures can attenuate or completely shield the device.
Installation on non-metallic surfaces is preferred. The mobile device app displays the RSSI value (Received Signal
Strength Indication) in real-time.
Power relay control. PowerMon can control a power relay (either mechanical or solid-state) using the
RELAY output (terminal 6). When active (relay turned on), the RELAY terminal is internally connected to ground
by the device. The relay should be connected between its power supply and the RELAY terminal. The low/high
voltage disconnect and over-current disconnect functions require the use of a relay / SSR (Solid State Relay).
Low voltage disconnect. When this mode is enabled, and the battery voltage drops below a specified
value, the device disconnects the load, protecting the battery from over-discharge. In order to disconnect the
load, the voltage has to be below the set threshold for a configurable amount of time. This feature helps in
situations where cranking an engine or a short high current load causes the battery voltage to momentarily
drop. The device will re-engage the power relay a configured amount of time after the condition that caused it
to disconnect is removed. In this mode PowerMon can also operate as a battery isolator. The relay is used to
connect the house batteries in parallel with the starting battery. The LVD filter value should be set to 5000ms.
The disconnect threshold should be set to 13.2V and the connect threshold to 13.6V. When the engine is started
and the alternator starts charging the starting battery, the voltage will start increasing. When the voltage
reaches 13.6V (the connect threshold) the relay engages and connects the house batteries to the starting
battery, this way allowing all batteries to be charged. When the engine is stopped the voltage will quickly drop
below 13.2V (the disconnect threshold) and the relay disengages, isolating the house batteries from the starting
battery. The house batteries voltage can be monitored using the V2 input. Note that the thresholds (13.6V and
13.2V) are just an example. They can be configured to best fit the application.
High voltage disconnect. This function is similar to the low voltage disconnect, but as the name suggests
it will disconnect the load when the voltage goes above the disconnect threshold and will reconnect the load
when the voltage goes below the reconnect threshold. This mode can be used together with the low voltage
disconnect. Possible uses are to protect the load from high voltage conditions, start external chargers or
generators, connect to the grid and so on.
Over-current disconnect. PowerMon can operate as a circuit breaker. When this mode is enabled and
the measured current increases above a user specified trip value, the device disconnects the load, protecting
the batteries and load from over-current. The device will re-engage the power relay a configured amount of
time after the condition that caused it to disconnect is removed.
WARNING! Although PowerMon can disconnect power if an over-current condition occurs, it should not be
used to replace circuit-breakers. A properly rated circuit-breaker or fuse should be used to protect the load
and the wiring!
Page 11

11
Battery fuel gauge. PowerMon is a battery monitor so it can keep track of a battery state of charge. This
is accomplished by using coulomb counting. For the battery fuel gauge to work properly the current should be
sensed bidirectionally. Charging current should be positive and discharging current should be negative. Due to
the complex nature of chemical batteries, small errors in measurement and integrating current over long
periods of time will introduce errors in the state-of-charge estimation. This is normal and expected. For this
reason, the device will re-synchronize its SOC counter with the battery every time a full charge is performed. A
full charge is detected based on the chemistry of the battery but in general it requires a voltage higher than a
threshold while at the same time the charging current being lower than a threshold. The battery fuel gauge will
also take into consideration the Peukert effect. The next table shows the Peukert coefficients used for various
battery chemistries.
Battery Chemistry
Peukert Coefficient
Lead Acid - Flooded
1.25
Lead Acid – AGM
1.15
LiFePO4
1.02
Li-Ion/LiPoly
1.02
LiFePO charge manager. PowerMon can manage the charging of a lithium iron phosphate battery. This
function cannot be used together with the other disconnect functions. If enabled, the mobile app will
automatically disable the other functions. A relay must be placed in between the battery and the charger, or
power source used for charging (for example the vehicle alternator). The function of this relay is to disconnect
the charger from the battery if a full charge is detected or the power supply is turned off (for example the
engine is tuned off). To use the LiFePO charge manager, connect the V1 input to the battery positive and V2
input to the charger positive. The internal shunt and the relay should be wired in between the charger and the
battery. (see wiring diagrams at the end of the manual).
The user configures the number of LiFePO cells connected in series (4 for a 12V battery) and the total
capacity of the battery in Ah. These parameters are used to calculate a few thresholds as seen in the table
below. At least one disconnect condition has to be true for at least 2 seconds for the disconnect to take place.
The connect conditions must be true for time specified in “Connect Time” for the connect to take place
(default is 10 seconds).
The following table shows the conditions used by PowerMon to decide whether to connect or
disconnect the charger from the battery (turn the relay ON/OFF). V1 is connected to the battery and V2 to the
charger. Current refers to the current flowing in between the battery and the charger. “C” refers to the
battery capacity. Care should be exercised to ensure that the current is positive when the battery is being
charged and negative if it is being discharged. If wired backwards, use the “Flip Current Sign” option to fix it.
WARNING! PowerMon cannot be used as a charge current limiter or LiFePO cell balancer. A properly sized
battery charger is required to recharge LiFePO batteries. Thornwave Labs Inc. does not assume any
responsibility for expensive battery damage.
Page 12

12
Connect Conditions (10 sec. delay used)
Disconnect Conditions (2 sec. delay used)
battery voltage (V1) less than 3.32V / cell
AND
charger voltage (V2) at least 0.2V above the
battery voltage (V1)
battery voltage (V1) greater than 3.65V / cell
-
charging current (I) less than C/100 or 1 Amp,
whichever is greater
-
full charge is detected:
battery voltage (V1) greater than 3.5V /cell
AND
charging current (I) less than C/20
Time keeping. PowerMon keeps track of time internally. The internal clock can be set by tapping on
the Device Time tab for longer than one second. The internal date and time will be updated using the system
time provided by the mobile app.
Timer function. The device supports controlling the relay using a set of up to 16 timers. Each timer
contains a start time, stop time and repetition. The start time specifies the time of day (HH:MM) when the relay
turns on. Stop time specifies the time of day when the relay turns off. A timer does not need to have both a
start and stop time set. One of them can be disabled. This kind of timers should be used in pairs: one turns the
power on and the other one turns it off. Repetition controls when will the timer will trigger. This can be either
DOW (Day of Week) where the timer repeats on specific days of the week or DOM (Day of Month) where the
timer repeats on a specific day of the month.
Using multiple timers, users can create very complex time schedules.
Examples:
Timer1: START 4:50PM, STOP 5:10PM, REPETITION DOW Sun Mon Tue Wed Thr Fri Sat
This timer will run every day and turn the relay on for 20 minutes, from 4:50PM until 5:10PM
Timer2: START 8:00PM. STOP: disabled, REPETITION DOW Sun Mon Tue Wed Thr Fri Sat
Timer3: START disabled, STOP: 7:00AM, REPETITION DOW Sun Mon Tue Wed Thr Fri Sat
This set of timers used together will turn the relay on every day at 8:00PM and turn it off the following
day at 7:00AM.
Timer4: START 12:00AM. STOP: disabled, REPETITION DOM: 1
Timer5: START disabled, STOP: 12:00AM, REPETITION DOM: 8
This set of timers used together will turn the relay on every 1st of the month at 12:00AM and turn it off
7 days later on the 8th of the month at 12:00AM.
Page 13

13
Configuration. The following parameters can be configured using the PowerMon app:
Current Sense Voltage Range: The current shunt resistor voltage drop measurement range. This should be
adjusted to be higher than the maximum expected voltage drop across the current shunt.
Unidirectional (positive current only)
Bidirectional (positive and negative current)
+160mV
-
+150mV
-
+120mV
-
+90mV
±80mV
+60mV
±60mV
+30mV
±30mV
-
±15mV
-
±7.5mV
Current Shunt Resistance: The resistance value of the current shunt used (in milli-Ohms). By default, it is set to
0.5mOhm which is the integrated shunt resistance.
Flip Current Sign: Allows the current sign to be flipped by software. Can be used to correct a wiring mistake
without having to re-wire the device.
Peak Current Noise Filter: Enables or disables the peak current noise filter. If the filter is disabled, the peak
current detector will be more sensitive, but it will also pick up more noise. If enabled, the peak current detector
will react more slowly to current changes and may not catch a very short current peak.
Meter Voltage Source: The voltage used to calculate power and energy. V1 or V2 can be selected.
Initial Power Status: The default power status when powering the device. If set to on the relay will be turned on
automatically when the device receives power.
Trigger on RELAY: If enabled, the device will turn the power on as a response to the RELAY terminal being
temporarily pulled to ground using a push button.
Invert RELAY Logic: Enabling this option will invert the behavior of the RELAY terminal, when the power is on
the RELAY terminal will be floating and when the power if off it will be driven to ground.
Connect Filter (ms): The duration of time in milli-seconds the LVD (Low Voltage Disconnect), HVD and OCD (OverCurrent Disconnect) conditions have to be removed in order to re-engage the power relay.
MF Terminal Function: Selects the function of the MF terminal: Data Output or External Temperature Sensor.
The external temperature sensors is only available for hardware revision 2.2 or higher.
Page 14

14
Low Voltage Disconnect
LVD Voltage Source: The voltage used by the low voltage disconnect feature. V1 or V2 can be selected.
LVD Connect Threshold: The voltage in volts above which the power relay can re-engage (after the
connect filter time has passed). This must be higher than LVD Disconnect Threshold.
LVD Disconnect Threshold: The voltage in volts below which the power relay will disengage.
LVD Filter (ms): The duration of time the voltage has to be below the disconnect threshold for the relay
to disengage.
High Voltage Disconnect
HVD Voltage Source: The voltage used by the high voltage disconnect feature. V1 or V2 can be selected.
HVD Connect Threshold: The voltage in volts below which the power relay can re-engage (after the
connect filter time has passed). This must be lower than HVD Disconnect Threshold
HVD Disconnect Threshold: The voltage in volts above which the power relay will disengage.
HVD Filter (ms): The duration of time the voltage has to be above the disconnect threshold for the relay
to disengage.
Over-Current Disconnect
OCD Trip Threshold: The current in amperes above which the power relay disengages.
OCD Filter (ms): The duration of time the current has to be above the trip value in order to disengage
the relay. In order to function as a circuit breaker this should be set to a very low value between 0ms ..
20ms. Larger values will slow down the reaction to over-current. In some instances, this could be useful.
Auto-Off Timer: If enabled the power will turn off automatically after the specified time since it was turned on
has passed. This effectively becomes a turn-off timer.
Page 15

15
Battery Fuel Gauge
Battery Voltage Source: The voltage used by the battery fuel gauge feature. V1 or V2 can be selected.
Battery Chemistry: The chemistry of the battery used.
Number of Cells: Number of cells of the battery. 12V Lead Acid batteries have 6 cells. 12V LiFePO4 have
4 cells. If you have batteries connected in series, add the number of cells in each of them. If batteries are
connected in parallel the number of series cells does not change.
Battery Capacity: Battery capacity in Ah. If batteries are connected in parallel, add up their capacities. If
batteries are connected in series the capacity does not change. (only the number of cells in series does)
Disconnect on Fuel Gauge: The device will disconnect power (turn the relay off) when the battery state
of charge becomes lower than this threshold (in percentage). The “Invert RELAY logic” option can invert
this behavior.
Connect on Fuel Gauge: The device will re-connect power (turn the relay ON) when the battery state of
charge becomes higher than this threshold (in percentage). The “Invert RELAY logic” option can invert
this behavior.
LiFePO Charge Manager
Number of Cells: Number of cells of the battery. 12V LiFePO4 have 4 cells. If you have batteries connected
in series, add the number of cells in each of them. If batteries are connected in parallel the number of
series cells does not change.
Battery Capacity: Battery capacity in Ah. If batteries are connected in parallel, add up their capacities. If
batteries are connected in series the capacity does not change. (only the number of cells in series does)
Default Factory Settings. The default configuration for PowerMon is to use the integrated current shunt.
The device can always be reset to the default configuration using the PowerMon app. To do this, connect to a
device, tap the right corner menu (iOS) or right corner menu and then About (for Android). Tap on Factory Reset.
WARNING: When resetting to the factory defaults, all custom settings and timers will be erased,
including the device calibration and the battery fuel gauge internal state. The device Bluetooth name will not
be changed.
Page 16

16
Configuration example. Let’s suppose that current of up to 400A needs to be measured bidirectionally.
For this purpose, we will use a 500A / 50mV current shunt.
Ohm’s law states:
RIV =
This means that the voltage drop across a resistor is equal to the current passing through that resistor
multiplied by the resistance value. Rearranging that equation, we get:
I
V
R =
. Using this we can calculate the
resistance of the shunt:
mOhmOhm
A
mVV
1.00001.0
500
)50(05.0
==
In order to properly configure PowerMon we set the Sense Resistor to 0.1mOhm and Sense Voltage Range to
±60mV since this is the next higher range available that can be used for measuring up to 50mV. Using the
±60mV range allows a current up to ±600A to be measured but the 500A shunt rating should not be exceeded.
Page 17

17
MOBILE APPLICATION – POWERMON
The PowerMon device requires a mobile device running Thornwave Labs’ PowerMon app which is
available free of charge for both Android and iOS platforms and can be found on Google Play Store and Apple
App Store. The mobile device used needs to be equipped with a Bluetooth Smart (LE) adapter. The app will not
install on devices that are too old to support Bluetooth Smart (4.0).
PowerMon allows the following operations to be performed:
• scan for PowerMon devices and display a summary of measurements (voltage, temperature, battery
state of charge and power status)
• connect to devices and obtain real-time measurements
• set the device configuration (external shunt parameters, low voltage disconnect, high voltage disconnect
overcurrent disconnect, battery fuel gauge,… see the Configuration paragraph)
• zero the current reading offset
• calibrate the current reading
• rename the device
• reset the power and charge meters back to zero
• manually turn the power relay ON/OFF
• update the internal device clock from the mobile device current time and date
• create, edit and delete timers
• reset to factory defaults
• configure the password protection function
• update the device firmware (when new releases are published)
Scan for devices. The first screen that appears after PowerMon is launched is the scan screen. If the
mobile device Bluetooth adapter is not enabled PowerMon will prompt the user to enable it before continuing.
The app will then display all the PowerMon devices that are within range. Each advertisement packet contains
the device name, firmware version, two voltage readings (V1 and V2) and the device temperature. All this
information will be displayed by the app together with the device RSSI (Receiver Signal Strength Indication). The
RSSI value is a direct indicator of the signal strength received from a device. In most practical scenarios involving
Bluetooth, this is a negative number and is measured in dBm (decibel referenced to 1mV). Typical values range
from -110dBm being a very weak signal to -30dBm or better being a very strong signal. For a reliable connection,
an RSSI of at least -100dBm is required.
Page 18

18
Measurement limits. The app allows setting measurement limits. When a measurement value is in
between the specified limits it will be displayed with black. If the measurement is outside of the specified limits
(less than the low limit or more than the high limit) it will be displayed in red. This feature allows for easy
identification of parameters that are not within normal limits. In order to configure the limits, tap on the top
right corner menu button when on the scan screen. This menu also allows disabling of V2 measurement in case
it is not used. The voltage limits set here are also used in the main screen.
Connect to PowerMon devices. In order to connect to a device, tap on it in the scan list. The app will
switch to the main screen which can be used for all the interactions with a connected device. The main screen
displays the real-time electric parameter measurements. By long-tapping on a parameter tab, the user can
access a menu that is specific for that parameter. This will allow to set measurement limits, zero the current
offset, calibrate the current reading, reset the power and the charge meters and manually control the power
relay.
Zero the current offset. Due to the high sensitivity of the current measurement circuitry inside the
PowerMon device, the value displayed may have a small offset (measurement is different than zero even when
the actual current is zero). Typically, this is less than 0.1A. In situations where the measurement precision is
critical, the offset can be zeroed. To do this, disconnect the current wires from the device (or from the external
shunt) or make sure the actual current is zero. This can also be achieved by turning the power relay off from the
application (in case the system is wired with a relay). Tap on the “Current” tab and then “Zero Current”. The
operation will take 3 seconds to complete during which do not allow any current to pass through the device.
Also, do not zero the current offset if the actual current is greater than zero. Doing so will introduce a very large
offset.
Current calibration. Typically, the device can measure current with better than 2% precision. If higher
precision is required, the current measurement can be calibrated allowing for better than 1% precision. To
calibrate the current reading, a multimeter capable of measuring current with a precision better than 0.5% is
required. Connect the multimeter leads in series with the current to be measured and read the actual value of
the current. Tap on the “Current” tab, “Calibrate Current” and then type the actual value measured by the
multimeter. The sign of the current does not matter. Once calibrated, the only way to change the calibration is
to reset the device to factory defaults or re-calibrate. The device will not accept a calibration current more than
20% away from the current reading.
Renaming the device. Renaming the device can be achieved using the top right menu button and taping
on “About”. The maximum name length is 8 characters.
Timers. From the “timers” screen, users can create new timers, edit or delete them.
Page 19

19
Battery Fuel gauge. The device implements a fuel gauge functionality for lead-acid, LiFePO4 and other
lithium batteries. When the device is first powered on, the fuel gauge will display “-----” meaning that it is not
synchronized with the battery. A full charge is required to bring the SOC in sync with the battery. By tapping on
the Battery tab for longer than one second a few options relating to the fuel gauge will be shown. The user can
manually force a battery synchronization or retrieve the battery statistics. Do keep in mind that forcing the
battery synchronization can lead to an inaccurate battery state-of-charge indication until the first full charge
event occurs.
Password lock. The device can be locked using a master / user password scheme. Various functions
become unavailable when they are password locked. When the user attempts to use one of the locked functions,
the app will ask for the required password (user or master). If the master password is entered instead of the
user password all the functions become unlocked. The user password will not be accepted instead of the master
password. Once a correct password has been entered the device will unlock only the set of functions that apply
to that password. The user password will unlock only a sub-set of functions while the master password will
unlock all functions. If the master password is not set, the user password unlocks all the functions of the device.
Once a set of functions have been unlocked they will stay in this state until the device is disconnected, after
which they will revert back to the locked state (if any password has been set). This protection scheme allows
the device to still be operated by a user while allowing only the manufacturer or technician (the master) to make
configuration changes that may affect the proper or safe functioning of the system. The password lock function
can be accessed from the About page.
The next table describes which set of functions are affected by the master / user passwords.
Function
Master Password Required
User Password Required
View monitored data
Save configuration
YES
YES
Device rename
YES
YES
Reset to factory defaults
YES
YES
Zero current offset
YES
YES
Calibrate current
YES
YES
Reset peak current
YES
Reset power meter
YES
Reset charge meter
YES
Turn power ON/OFF
YES
Force fuel gauge sync.
YES
YES
Remove master password
YES
Remove user password
YES
Timers (add / edit / delete)
YES
Set time
YES
Firmware upgrade
YES
YES
Page 20

20
WIRING DIAGRAMS
Page 21

21
Page 22

22
Page 23

23
Page 24

24
Page 25

25
DIMENSIONS
Dimensions are in inch.
Page 26

26
ORDERING
Part Number
Description
BT-DCPM
PowerMon - Bluetooth smart DC power meter / battery monitor with
low/high voltage disconnect, over-current disconnect, timers and LiFePO
charge manager
Page 27

27
Changelog:
Date
Revision Description
8/1/2017
Initial preliminary version.
8/7/2017
Added FCC/IC required warnings.
8/9/2017
Revised FCC/IC required warnings.
7/17/2017
Added FCC required statement.
9/6/2017
Added details. Improved manual. Removed “preliminary” watermark.
9/10/2017
Added “Voltage Source” configuration parameter.
9/18/2017
Added “Mobile Application - PowerMon” section.
11/21/2017
Added “Timers” sections.
1/4/2018
Improved wiring diagrams. Added information about Auto-Off timer.
3/8/2018
Added new features implemented in the latest firmware release: peak current, high voltage
disconnect, battery fuel gauge
5/9/2018
Added new features implemented in the latest firmware release: password lock, disconnect on fuel
gauge.
6/11/2018
Added paragraph about master/user password locking.
10/12/2018
Added PowerMon brand name. Updated the device specifications. Improvements.
11/12/2018
Added LiFePO charge manager sections.
 Loading...