

Thorn security LT42THL3DS1, LT55THL3DS1 Owner's Manual

LCD TV WITH DIGITAL TUNER
Owners Manual
Model No: LT42THL3DS1
Please read this manual carefully before operating the unit,and retain it for future reference.
ENGLISH
LT55THL3DS1

Table of contents
CAUTION
Avoid touching the LCD screen with your finger(s) . Doing so may damage the screen.
On Disposal
Please observe the local regulations regarding the disposal of packaging materials,
exhausted batteries and old equipment.
Table of contents
1
Caution
1
Installation
4
Remote Control
5
7
Warning
Location
Cleaning
Accessories
Power
Caution
Antenna
4
4
4
4
4
4
4
Care For Remote Control
Connecting the DVD player via the Y PBPR
input
10
9
11
Connecting the D VD, VCR or other Video
apparatus through A V input
(Composite-basic quality)
How to c onnect a d evice using HDMI
Connection (HDMI-highest quality)
Important Safety Instructions
2,3
Connecting the Computer through
VGA input
13
Connecting an Antenna
13
Controls of side panel
9
12
Install the remote control batteries
Connecting audio amplifier
(for superior digital sound effect)
10
Connections
10
Position the T V
9
6
Television overview
Screen Menu(only for PC)
20
21
Picture Menu
Time Menu
24
26
Setup Menu
28
EPG Menu
29
Record
30
Multimedia
37
SMART TV
INSTALLING WIZARD
SETUP PAGE
37
37
41
MAIN LAUNCHER
42
LAUNCHER INTRODUCTION
43
MEDIA PLAYER
45
BROWSER
46
APPLICATIONS
47SETTINGS
Trouble shooting
49
First-time installation
Switch the TV on/standby
Selection of Input Mode
14
15
15
OSD Function
Channel Page Menu(Only for DTV/ATV)
15
16
OSD Option Adjustment
16
14
Basic Operation
50
Technical Specification
51
Media Format Mode
52
Supported Screen Resolutions

Important Safety Instructions
WARNING
1. Read these instructions.
2. Keep these instructions.
3. Heed all warnings.
4. Follow all instructions.
5. Do not use this apparatus near water.
6.A lways turn the unit off and unplug the power cord when cleaning the unit. Clean only with a soft-dry cloth.
7. Do not block any ventilation openings.
8. Do not install near any heat sources such as radiators, heaters, stoves, or other apparatus (including
amplifiers) that produce heat.
9. Protect the power cord from being walked on or pinched particularly at the point where they exit from the
apparatus.
10. Only use attachments/accessories specified within this manual.
11. Unplug this apparatus during lightning storms or when unused for long periods of time.
12. Do not at tempt to repair this appliance yourself. Do not attempt to open or dismantle this product. Doing
so may result in electric shock or physical injury.
13. The External Power Supply is a Class I (Earthed Device).Please ensure you connect the mains plug to an
earth mains outlet.If unsure, please seek advice from your local qualified electrician.
14.Please ensure the appliance, remote, accessories or batteries are not placed in a position where they are
exposed to heat sources, direct sunlight or any other hazard.
15.Pls only use the external power adaptor provided by the manufacturer.
16.To prevent injury, this apparatus must be securely attached to the supporting surface in accordance with
the installation instructions.
IMPORTANT INFORMATION
Please ensure that this appliance is to take the
appropriate safety measures may result in
that are suitable for the specifications of this appliance. A stand has
been provided with this appliance however, if you choose to use alternative methods, this is at your
own risk. The manufacturer or supplier only recommends to use the stand provided.
Do not place the appliance on any unstable surface, stand or in a position that may create hazard
for the appliance, the user or any surroundings.
Do not place the television on tall furniture or wall brackets unless an appropriate anchoring or
securing method has been used.
It is recommended to always supervise children at all times when they are around electrical or
electronic appliances.
positioned in a sufficiently stable location, Failure
in juries, particularly to children, damage to property or
to the appliance.
Only use cabinets or stands
Only using furniture that can safely support the television.
Do not place the television on cloth or other unstable materials.
Educate children about the dangers of climbing on furniture to reach the television or its controls.
Seek advice from an appropriate expert when attempting to mount this appliance on a wall.
Important Safety Instructions
- T he apparatus shall not be exposed to dripping or splashing and no objects filled with liquids,such as vases,
shall be placed on the apparatus.
- Install the unit at an adequate distance from the wall to allow sufficient ventilation. Any ventilation holes should
not be impeded with items, such as newspaper, fabric,curtains etc.Do not place the unit in a poorly ventilated
enclosure, such as an enclosed cabinet.
- T o reduce the risk of fire or electric shock, do not expose the apparatusto rain o r moisture.
- Do not place the unit on an unstable surface, such as a wobbly stand or sloped table, or on any surface whose
area is smaller than the bottom area of the unit. Always place the unit on a flat stable surface.
- Do not place on top of any other appliance.
- Do not place a burning candle or similar on top of the unit.
- Do not place the unit near any heat source such as a fireplace or space heater.
- Keep the unit clean and never store it next to a heat source or in dirty, humid or wet places.
Keep it out of direct sunlight.
- Do not insert any any objects or liquids, into the ventilation openings or terminals.
- Press the buttons gently. Pressing them too hard can damage the unit.
- When moving the unit, be sure to turn the unit off and unplug the power cord from the wall outlet.
- If you notice any unusual odors or smoke around the unit, immediately disconnect the unit from the outlet and
contact the help line shown on the front of this manual.
Image Persistence
This product is not designed to have a fixed image patterns on the screen for extended
periods of tim e.
WARNINGS:
- This appliance is intended for household use only, and not for commercial or industrial use.
- Only connect the power plug to a suitable AC 100~240V 50Hz/60Hz earthed mains socket.

Installation
Power
This set operates on an AC main supply the voltage is indicated on the label on the back cover of unit.
In the event of thunderstorms or powercuts, please pull out the antenna and mains plugs until the
weather settles.
Warning
To prevent fire or shock hazard, do not expose the set to rain or moisture. Do not rub or strike the LCD
with anything hard as this may scratch, mark, or damage the Active LCD permanently.
Caution
Antenna
Location
Position your set s o that no b right light or s unlight falls directly o nto the screen. Care should be t aken not to
expose the set to any unnecessary vibration,moisture,dust or heat. A lso ensure that the se t is placed in a
position to allow a free flow of air. Do not cover the ventilation openings on the back cover.
Cleaning
Do not attempt to repair, disassemble or modify this product yourself as opening or removing covers may
expose you to the risk of electric shock or other hazards. There are no user-serviceable parts inside.
Repairs should only be performed by qualified personnel in order to avoid a hazard.
This appliance should be connected to an antenna.
1. Unplug the power cord from the mains outlet before connecting or disconnecting the antenna.
2. If an outside antenna or cable system is connected to the product, be sure the antenna or cable system
is grounded so as to provide some protection against voltage surges and built-up static charges.
3. Connect the RF Coaxial Antenna Cable (75 ohm) (not included) to the socket marked with ATV/DTV
Tuner on the rear panel of unit.
4. Connect the antenna cable to the wall antenna socket or jack.
5. For optimum picture quality, adjust the external antenna direction if needed or seek advice from your
local antenna installation expert.
- Always turn off the unit and unplug the power cord before cleaning the unit.
- Use a soft dry cloth to clean the unit. Never use harsh abrasives, cleaners when cleaning this appliance.
- Care should be taken so that objects do not fall and liquids are not spilled into the enclosure through
openings.
- Clean the screen with a soft, dry cloth only. Do not use substances such as household cleaning agents
as these may damage the screen.
- Do not touch, push, rub or strike the screen with hard objects as this may damage the screen
permanently.
Accessories:
Owner's Manual Remote Control 2*AAA batteries 2*glasses
Press this to access the on-screen setup menu.
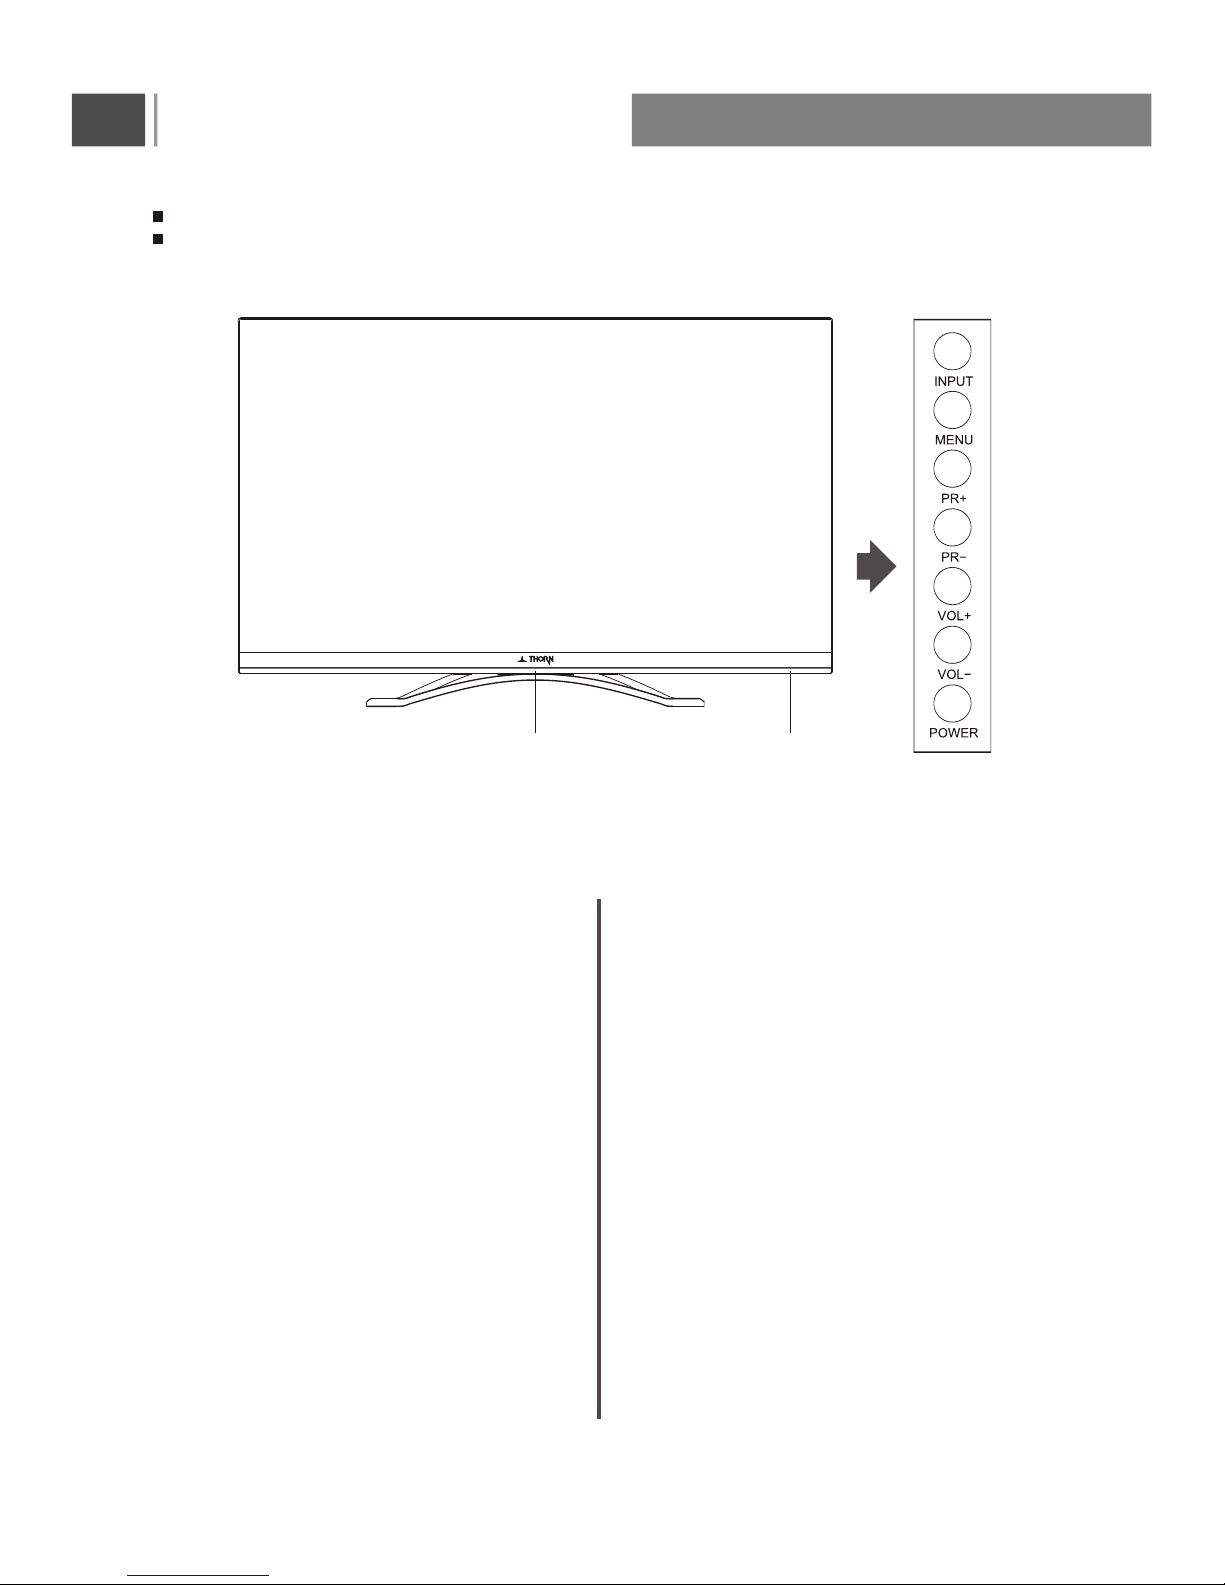
Controls of side panel
Shown is a simplified representation of the set.
Here shown may be somewhat different from your set.
Infrared Receiver Window
Press this button to display the input source
menu, then press PR+/PR- button to select
input source:DTV,ATV,AV,PC,YPbPr,SMART
TV,HDMI1,HDMI2,HDMI3,Media.
After selected, press VOL+/VOL- button to
confirm and access.
5
Power Indicator
POWER
INPUT
MENU
PR+/PR-(Channel Up/Down)
VOL+/VOL-(Volume Up/Down)
Selects a programme or a menu item.
Adjusts the volume.
Adjusts menu settings.
To receive the signal from remote control.
Red indicator light,this means the TV is in
standby mode;
Green indicator light,this means the TV is
in normal working condition;
When the "Power" button is pressed, there
may be a short delay until the picture appears.
To confirm activation, the LED will change to
green.
Switches the set On from standby or back to
standby mode.
Remote control sensorPower indicator
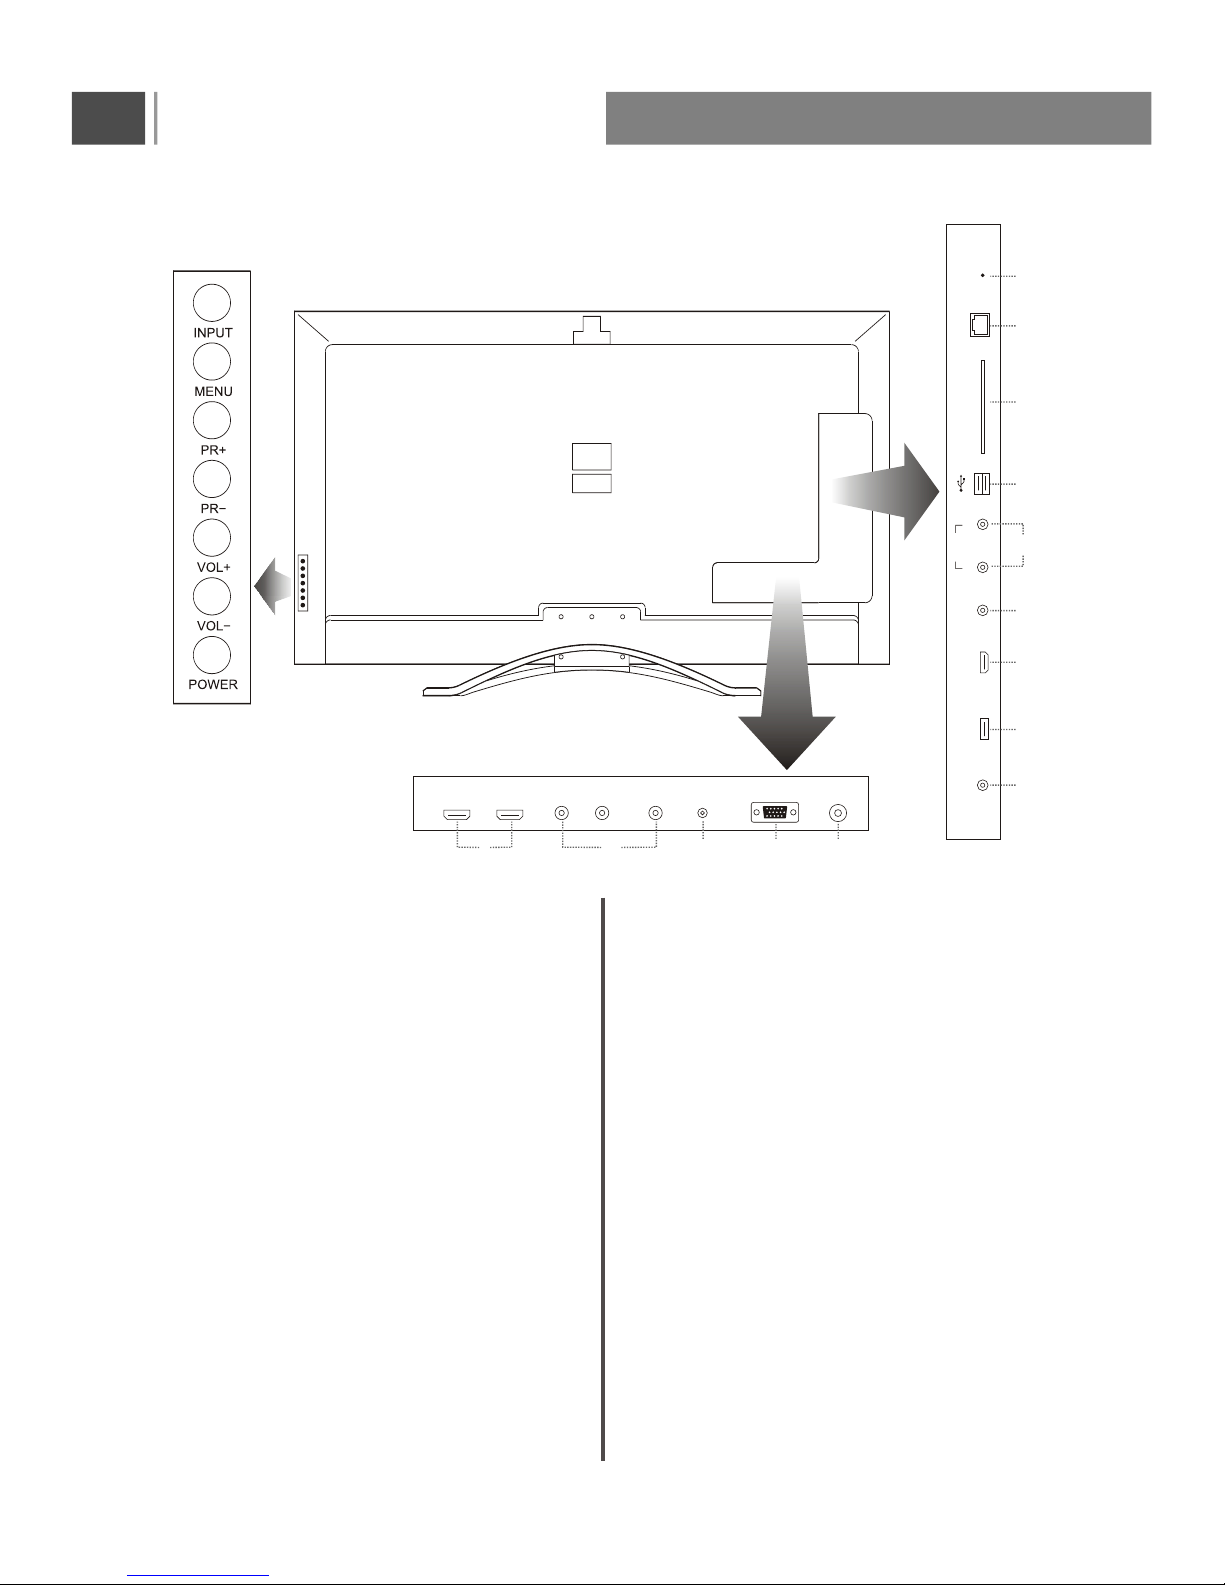
Television overview
Back connectors
6
4.
Connect the VGA output of your computer to
the VGA input connector of this appliance
using a VGA cable.
VGA IN SOCKET
3.
1.
HDMI1,HDMI2&HDMI3 SOCKETS
HDMI in socket - Connect to external equipment
with HDMI output sockets.
VGA-AUDIO IN SOCKET
Port for VGA audio input.
7.
Connect the mobile hard disk or flash drive
to this socket.
Note:The output current for the USB port is up
to 500mA.Some external hard drives may require
an external power source to be connected to
them to operate correctly. External memory
devices should be in FAT or FAT32 format.
Media IN SOCKET
Connect applicable equipment with YPBPR
output to these sockets.
2.YPBPR IN SOCKET
Port for digital audio output.
COAXIAL A UDIO OUTPUT JACK
RF antenna socket
5.
R F
6.
8.
VIDEO
Connect the video out sockets of your VCR or
other external appliance to the AV input socket
of the set.
9.
Audio IN SOCKET
Port for YPbPr and VIDEO audio input
USB IN SOCKET
10.
COAX
R F VGA
VGA AUDIO
YHDMI 1 HDMI 2
SD CARD IN SOCKET
11.
RJ 45 I NS OCKET
12.
Update key
13.
Pb Pr
Media
R J45
SD CARDHDMI 3
VIDEO
R
Update Key
L
VIDEO/
YPbPr
1 2 3 4 5
6
7
1
8
9
10
11
12
13
Connect usb device to this socket.
Connect SD CADR to this socket.
Connect software with this key.
Connect the cable can log on internet.
Note:
USB port does not support 3D video.
SLEEP
XXX
SUBTITLE SUBTITLE
7
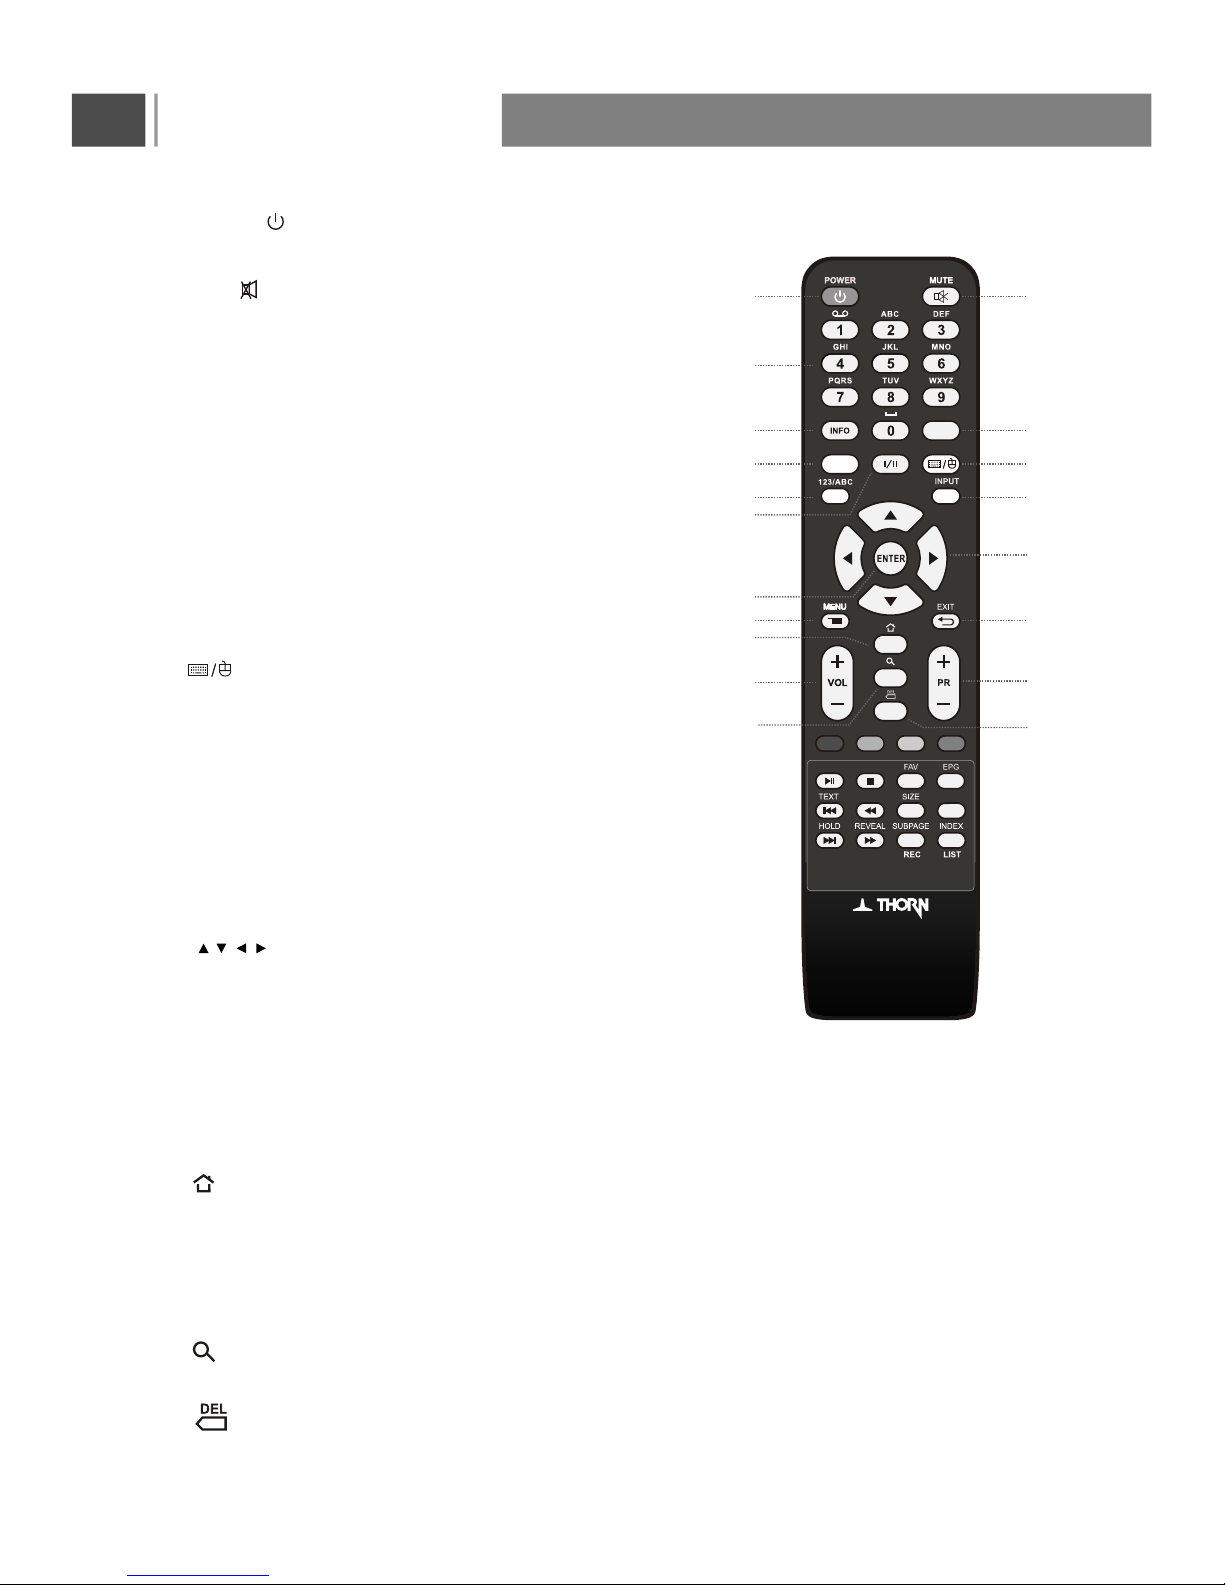
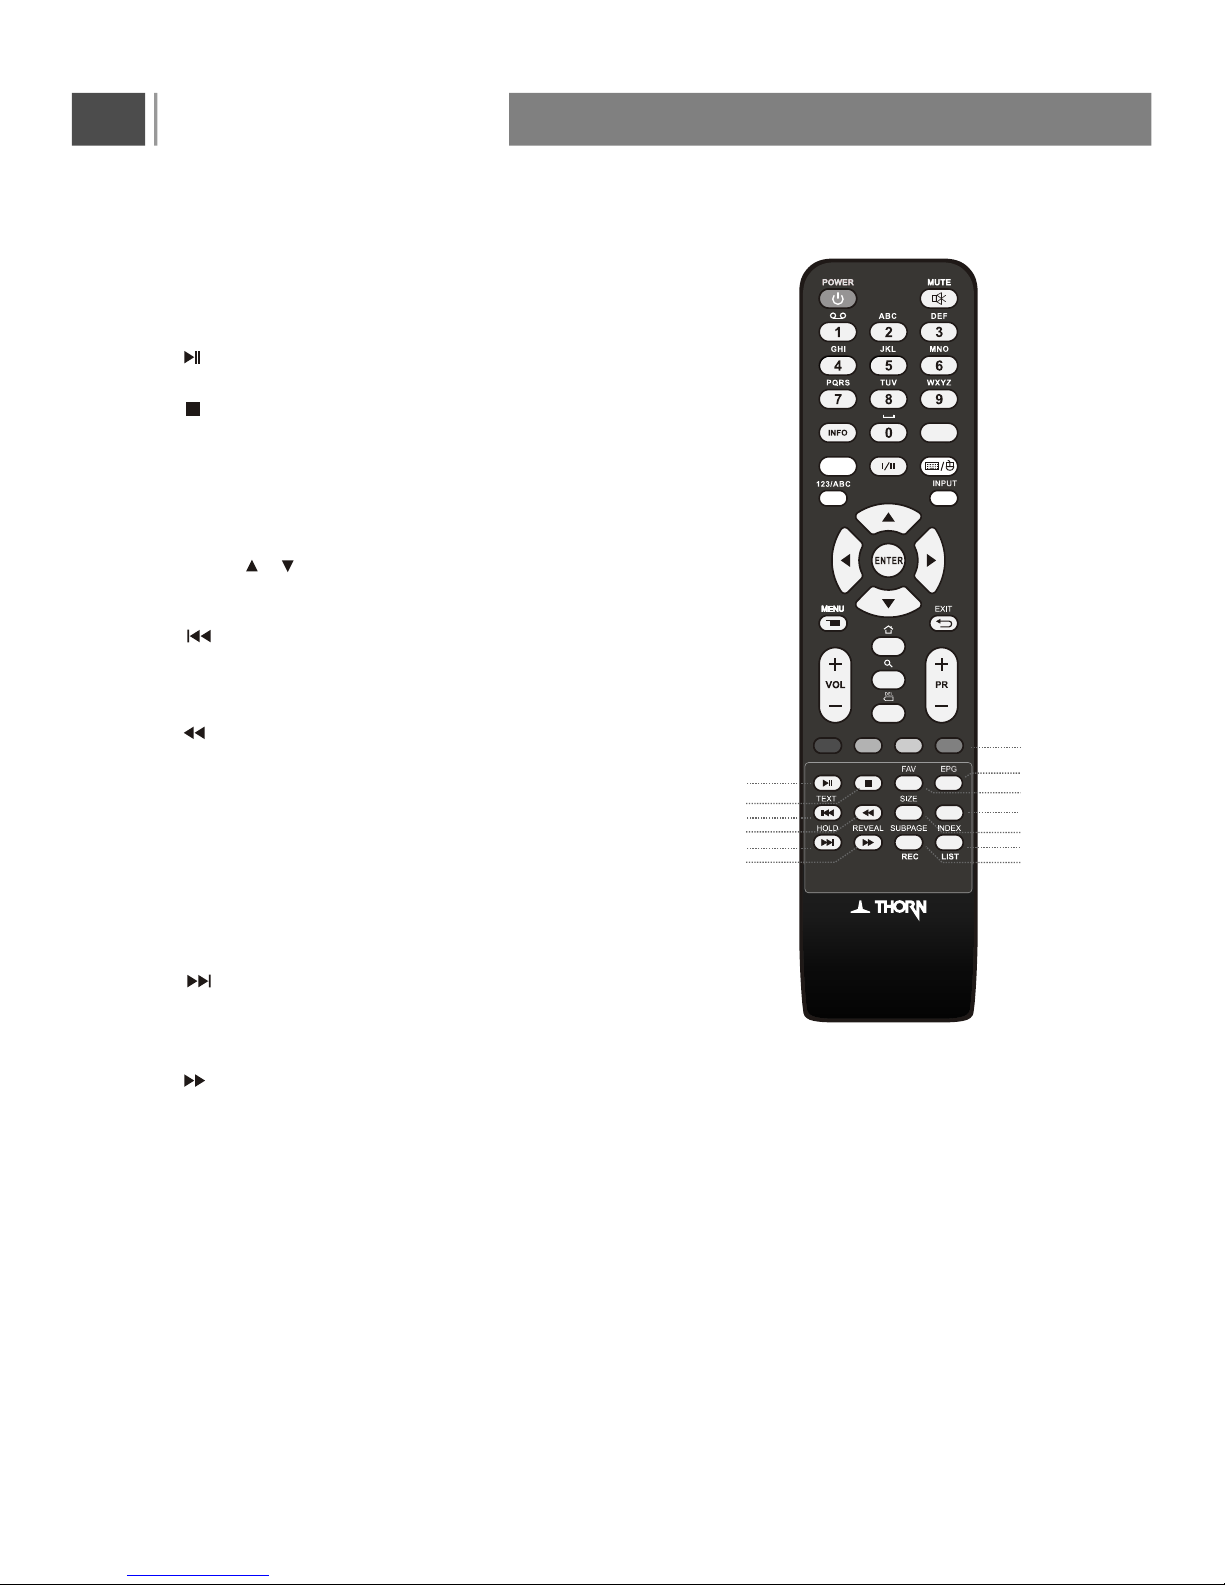
Remote control
1.POWER( ): Switches the TV on from standby or back
to standby.
2.Mute( ): Switches the sound on or off.
3.0~9 Number Buttons: Press 0~9 to select a channel,
or input the password.
4.INFO: Press to display the channel information;
this information disappears after 10 seconds.
5.RECALL: Press to return to previously-viewwed channel
(only for TV)
12.ENTER: Press to enter or confirm an entry.
13.Menu: Press to enter into the on-screen setup
Menu, press again to return.
14.EXIT: press this button to exit the menu.
16.VOL+/-: Press to adjust the volume output levels.
17.PR+/- : Switches to the next or previous channel.
6
.SLEEP: Press repeatedly to set a time delay
(10,20,30,60,90,120,180,240 minutes and Off)
after which the TV switches to standby. To cancel
sleep time,press Sleep button repeatedly until sleep off
appears.
.INPUT: Press to display the input source menu, then
using Direction buttons to select input signal source,
such as DTV,ATV,AV,PC,YPbPr,SMART TV,HDMI1,
HDMI2, HDMI3, and Media.
10
8
.I/II: Selects the sound output in TV mode.
11. , , , : Press Direction buttons to navigate the
on-screen menus and adjust the system settings to
your preference.
1 2
3
4 5
15
16
6 7
8 9
10
12
13 14
17
18. : Call out the search bar for search or input new web
address.
.123/ABC: Press to switched digital key and the letter key
under smart TV source.
15. : Press to back to home interface under smart TV
source.
19. :
XX
Press to backspace enter text.
7. : Press to switch the mouse arrow and select the
box under smart TV source.
9
18
19
RECALL
11
3D
3D: 2D/3D mode switch.
SLEEP
XXX
SUBTITLE SUBTITLE
RECALL
8
Remote control
20: The RED, GREEN, YELLOW & BLUE buttons
have various functions in different modes.
The on screen display will indicate the purpose
of these button when applicable.
21. :Press to play the program,Press again to pause.
22. :Press to stop the program.
25. :Press to move to the previous program.
TEXT: Press to activate the teletext and press again
to deactivate the teletext.
26. :Press to Reverse the program.
28. SIZE: Selects double height text Press this button
to enlarge the top half of the page.
Press thie button again to enlarge the button half
of the page.
Press this button again to return the normal display.
29. :Press to move to the next program.
HOLD: Press to shop the scrolling of text pages.
The text decoder stops receiving data.
30. :Press to forward the program.
REVEAL: Press to reveal hidden information such
as an swers to guiz.
32.REC: Press to enter the RECORD MENU in DTV
input source.
SUBPAGE: Press to display the sub page(when
avaible)
31.LIST/INDEX: Press to enter Recorded List menu.
21
22
25
24
29
31
20
28
32
30
26
27. SUBTITLE: Press to enter Subtitle language menu.
23. EPG(Electronic Program Guide): Press to display
the (DigitalTV Time table) mode Press again to exit.
24. FAV: Press to display the favourite channel list .
Press or to select the channel then press Enter
to confirm.
23
27
3D

Install the remote control batteries
-Turn over the remote control, open the battery cover.
- Insert two 1.5V (AAA) batteries into the compartment, take care to observe the and markings
indicated inside.
- Replace the cover until the lock clicks into place.
Note:
- Ensure the remote control is pointed towards the remote controlsensor on the right bottom
of the front panel.
- No obstacles should be placed between the remote control and the remote control sensor.
- Operate the remote control within a 5-metre range and an angle of 60 degrees. The remote
control may not work correctly if it is operated out of range or out of angle.
Care For Remote Control
- Avoid spilling liquids on the remote.
- Avoid dropping the remote.
- Always store the remote control in a dry and normal room temperature environment.
- If the remote is not performing satisfactorily, replace the batteries.
- I f t he r emote c ontrol w ill n ot b e u sed f or a l ong t ime ( over 1 m onth), p lease t ake o ut t he b atteries t o
avoid leakage.
- If the batteries have leaked, clean the battery compartment with a slightly damp cloth, use
gloves to ensure no chemicals come into contact with your skin and allow to dry thoroughly
before inserting new batteries.
- Do not mix new and used batteries.
- Keep batteries out of children's reach.
- When there is a strong ambient light source, the performance of the infrared remote sensor
may be degraded, causing unreliable operation.
- Batteries contain chemical substances, so they should be disposed of properly .
Remote Control
Position the TV
Warning:
1.Do not insert the power plug into the wall socket before all the connections are made.
2.Large screen TVs are heavy.Two people are required to carry and handle the TV.
3.Before you move the TV,disconnect the cables to prevent breakage.
Always ensure that you have easy access to the power cord or plug to disconnect the TV from the
power.
The TV is mounted on a swivel base,ensure no strain is placed on the power cord when the TV is
swivelled,Strain on the power cord can loosen connections.
For ideal viewing conditions,position the TV where light does not fall directly on the screen.
Coaxial
Audio Amplifier
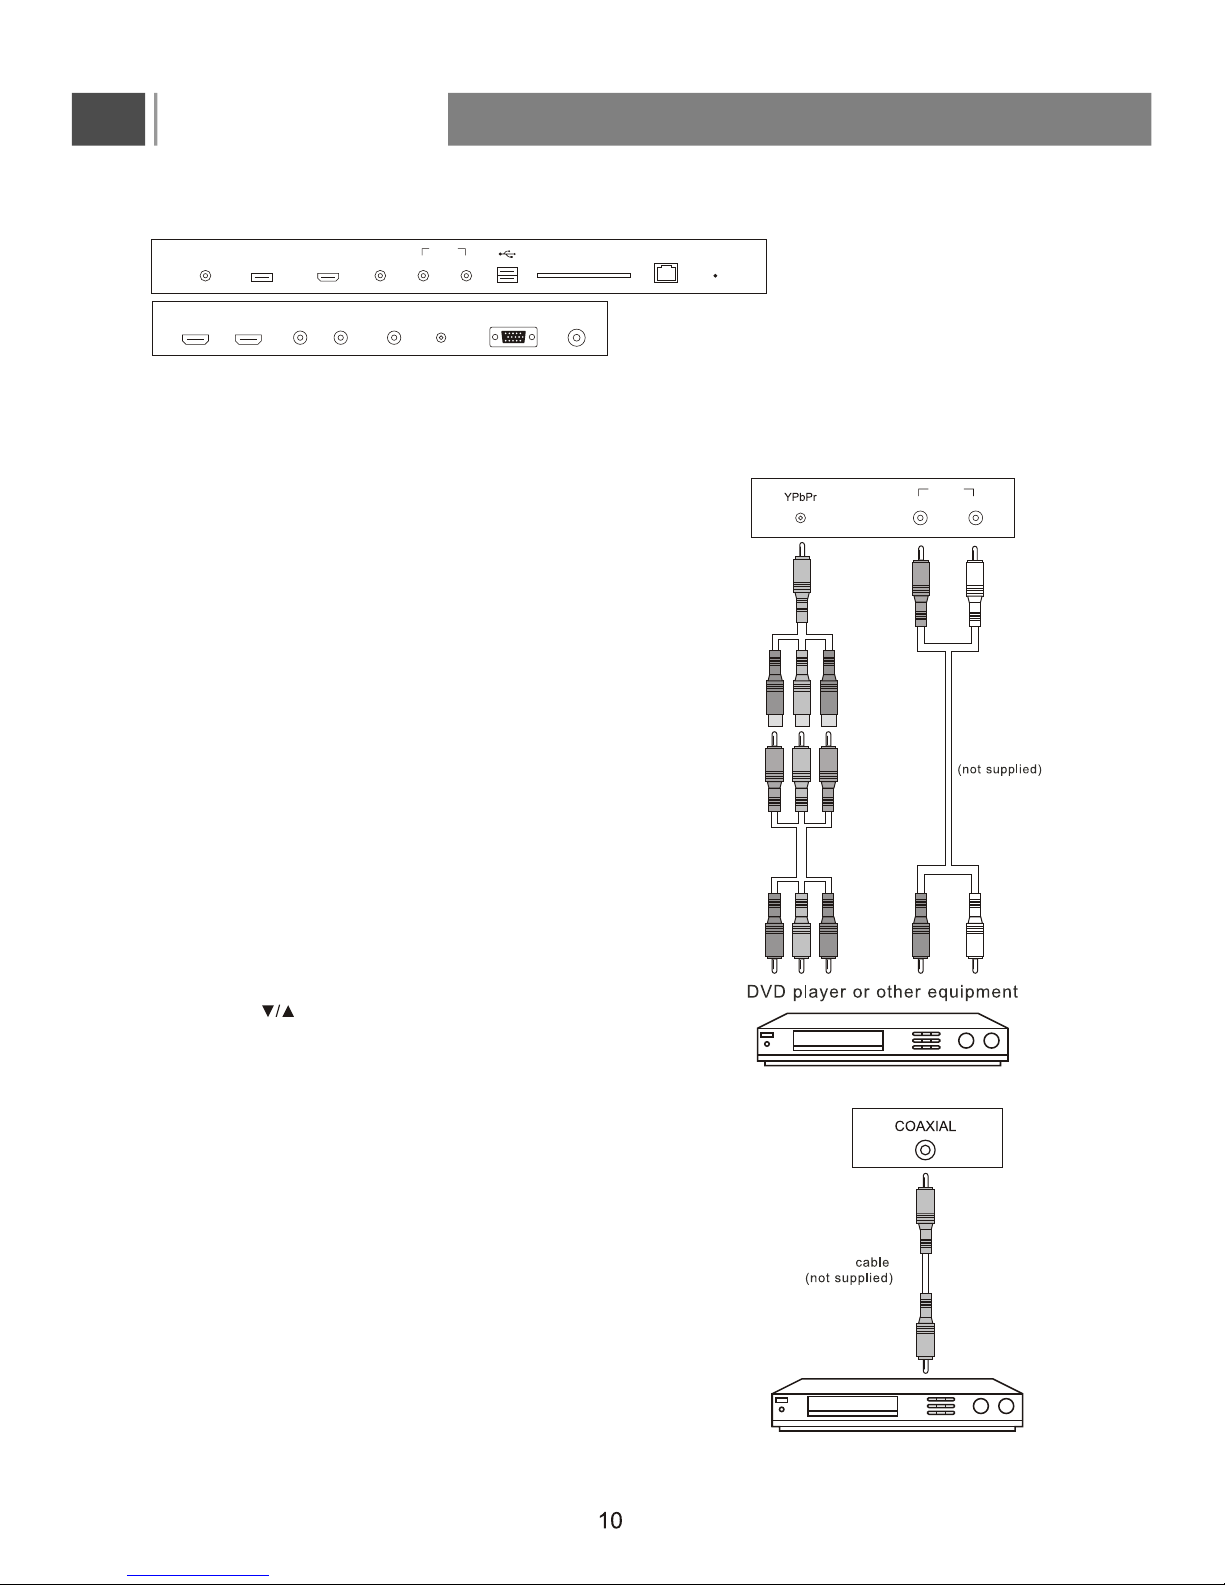
Connect a DVD player v ia t he Y PbPr
input (Component mode-high quality)
1. Use the YPbPr video cables (red/blue/green-not supplied)
to connect the DVD YPbPr video output jacks to the
corresponding YPbPr video input jacks (for labelled as
Y/ Pb/Pr) on the TV.
2. Use the YPbPr audio cables (White/Red - not supplied) to
connect the DVD L/R audio output jacks (white/red) to the
corresponding YPbPr audio input jacks (L/R) on TV.
3. Please ensure the Power Cord is connected attempting
to turn the TV on.
4. Press the POWER to turn on the LCD TV, then turn on
external equipment.
5. Press the INPUT button on remote or INPUT on right rear of
TV set to enter Input Source menu.
6. Press the on remote to select YPBPR and press
ENTER button to enter into YPbPr mode.
1. Ensure that the TV and other external equipment to be connected are switched off and
unplugged from the mains before commencing connection of audio visual cables.
2. Read the instructions carefully before connecting other external equipment.
3. Ensure that you observe the colour coding when connecting composite or component cables.
(for superior digital sound effect)
1. Connect the LCD's COAXIAL AUDIO OUTPUT jack to the
Audio Amplifier COAXIAL Input terminal using a coaxial
cable.
2. Press POWER to turn on the LCD,then turn on external
equipment.
3. Set the Audio Amplifier to coaxial input mode or follow the
instructions of the external audio device.
Connections
This section describes how to connect a selection of devices with different connectors.
Connecting audio amplifier
Component mode
YPbPr video
cables
(supplied)
YPbPr video
cables
(not supplied)
Component
audio cables
WhiteRed
R F VGA
VGA AUDIO
YHDMI 1 HDMI 2 Pb Pr
COAX Media
R J45
SD CARDHDMI 3
VIDEO
R
Update Key
L
VIDEO/
YPbPr
R L
VIDEO/
YPbPr
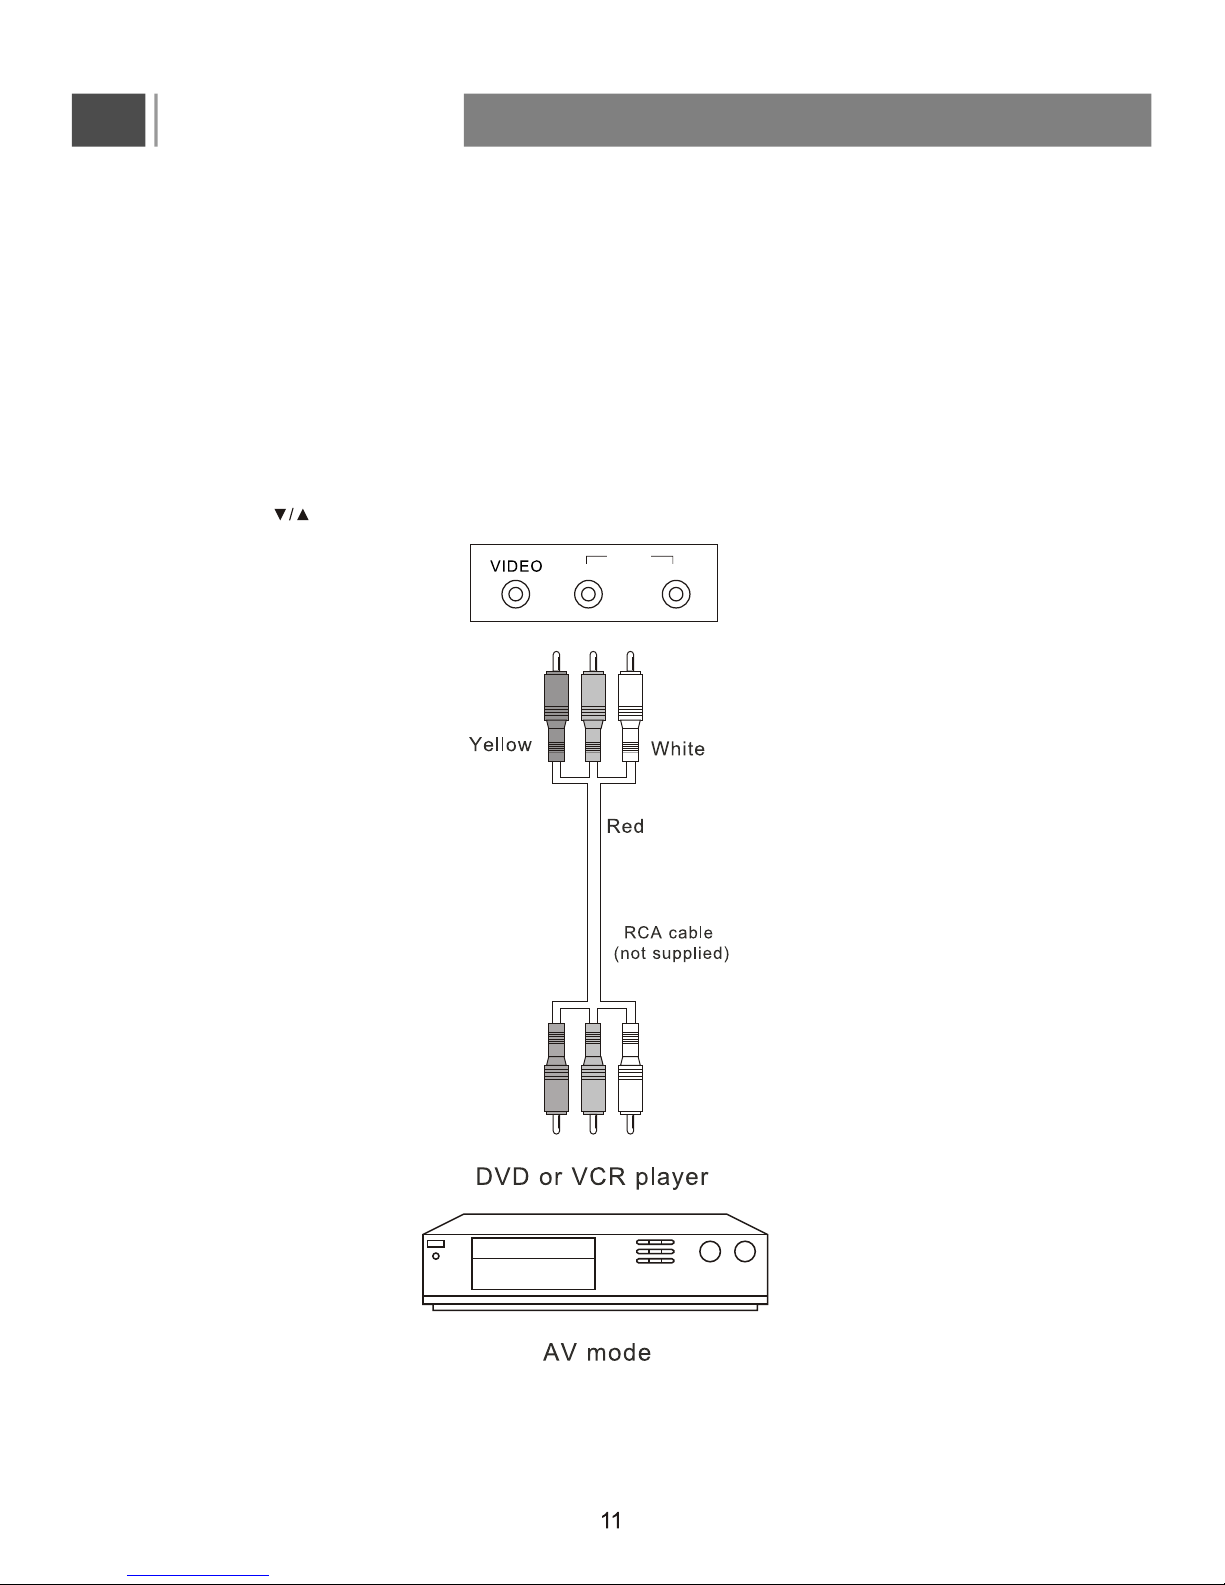
Connect t he D VD,V CR o r o ther v ideo a pparatus t hrough I nput
(Composite- b asic q uality)
1. AV IN mode: Use a video cable (Yellow/White/Red, not supplied) to connect the DVD, VCR or other
device's AUDIO/VIDEO output (CVBS) jacks to the AV Audio/Video input jacks on your TV.
2. Please ensure the Power Cord is connected before it is operated.
3. Press the POWER button to turn on the LCD, then turn on external equipment.
5. Press the to select A
V and press ENTER to confirm ypur source selection.
4. To watch the VCR or other video apparatus, please press the INPUT button to enter Input
Source menu.
Connections
R L
VIDEO/
YPbPr
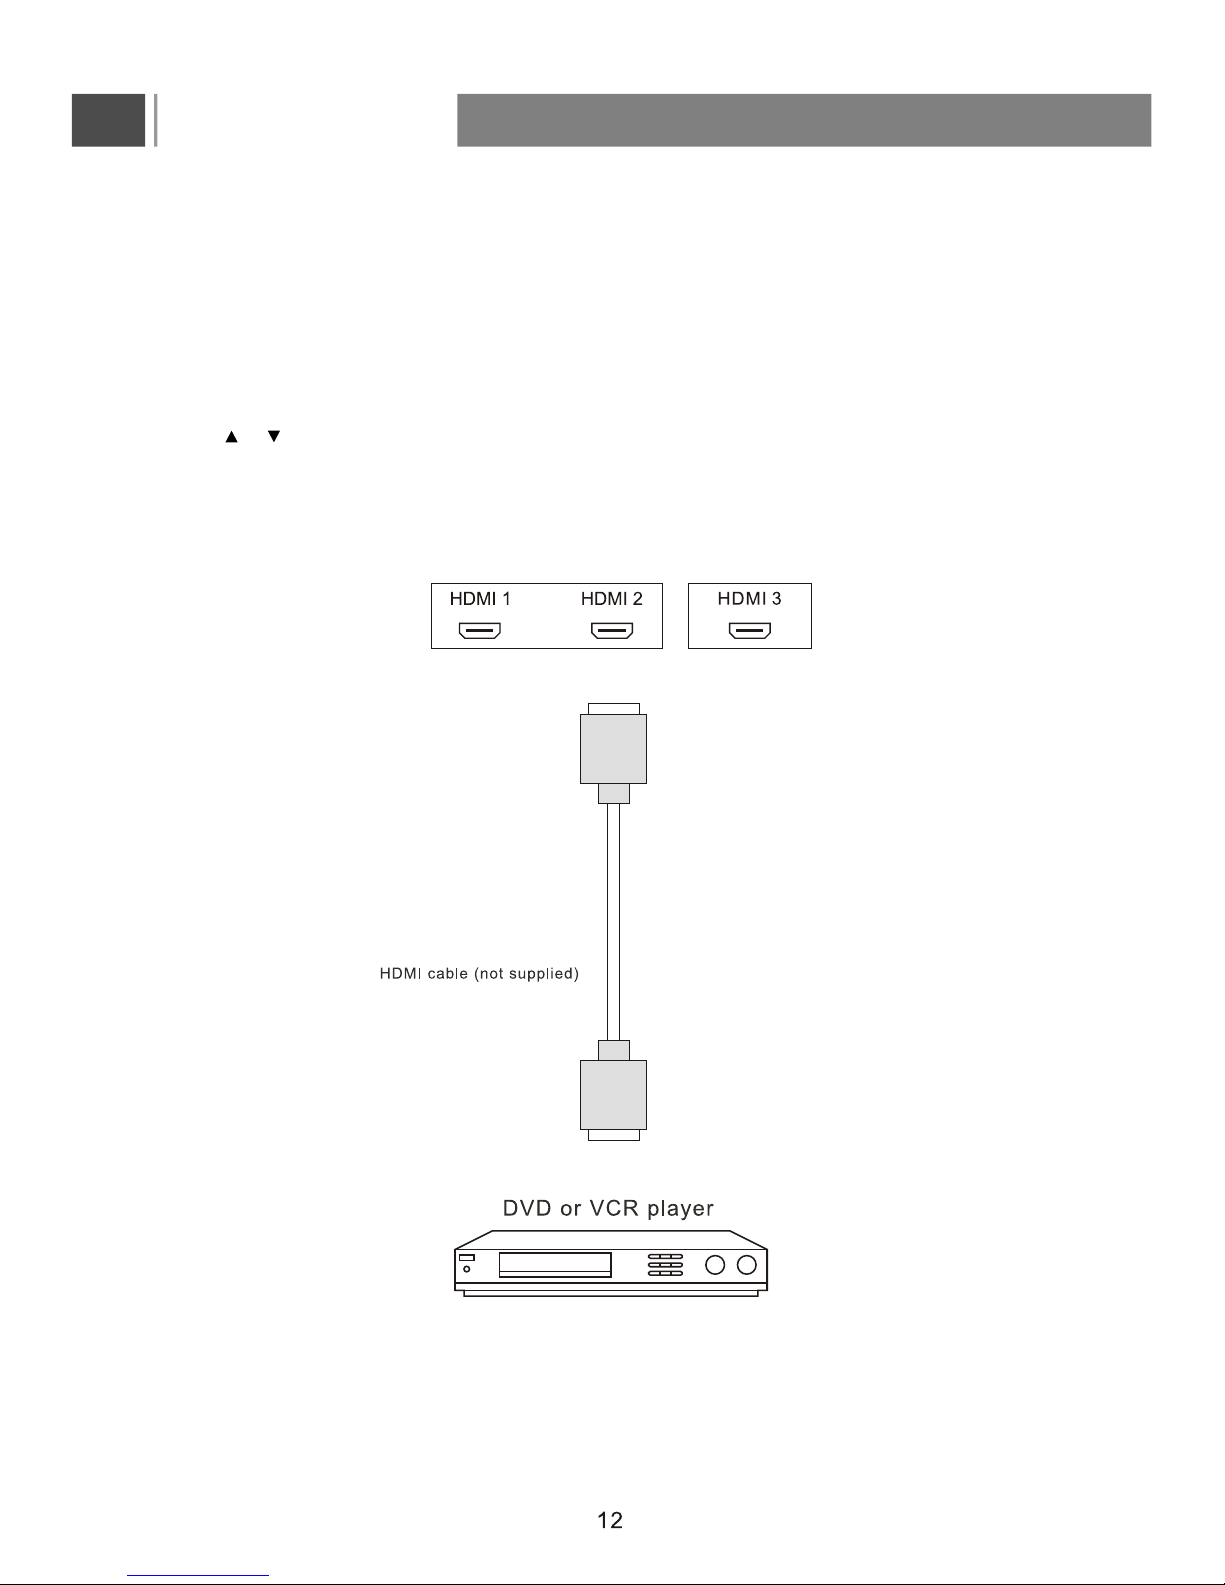
1. Turn on your TV, then press the INPUT button to enter Input Source menu.
2. Press or to select HDMI1/2/3 and press ENTER to confirm.
3. Turn on your device and set it to the correct mode. See the user guide for the external device for more
information.
Connect the HDMI cable between the HDMI interface on the TV set and HDMI output on the external device.
Connections
HDMI mode
To view from the device using HDMI:
How to connect a device using HDMI Connection(HDMI-highest quality):
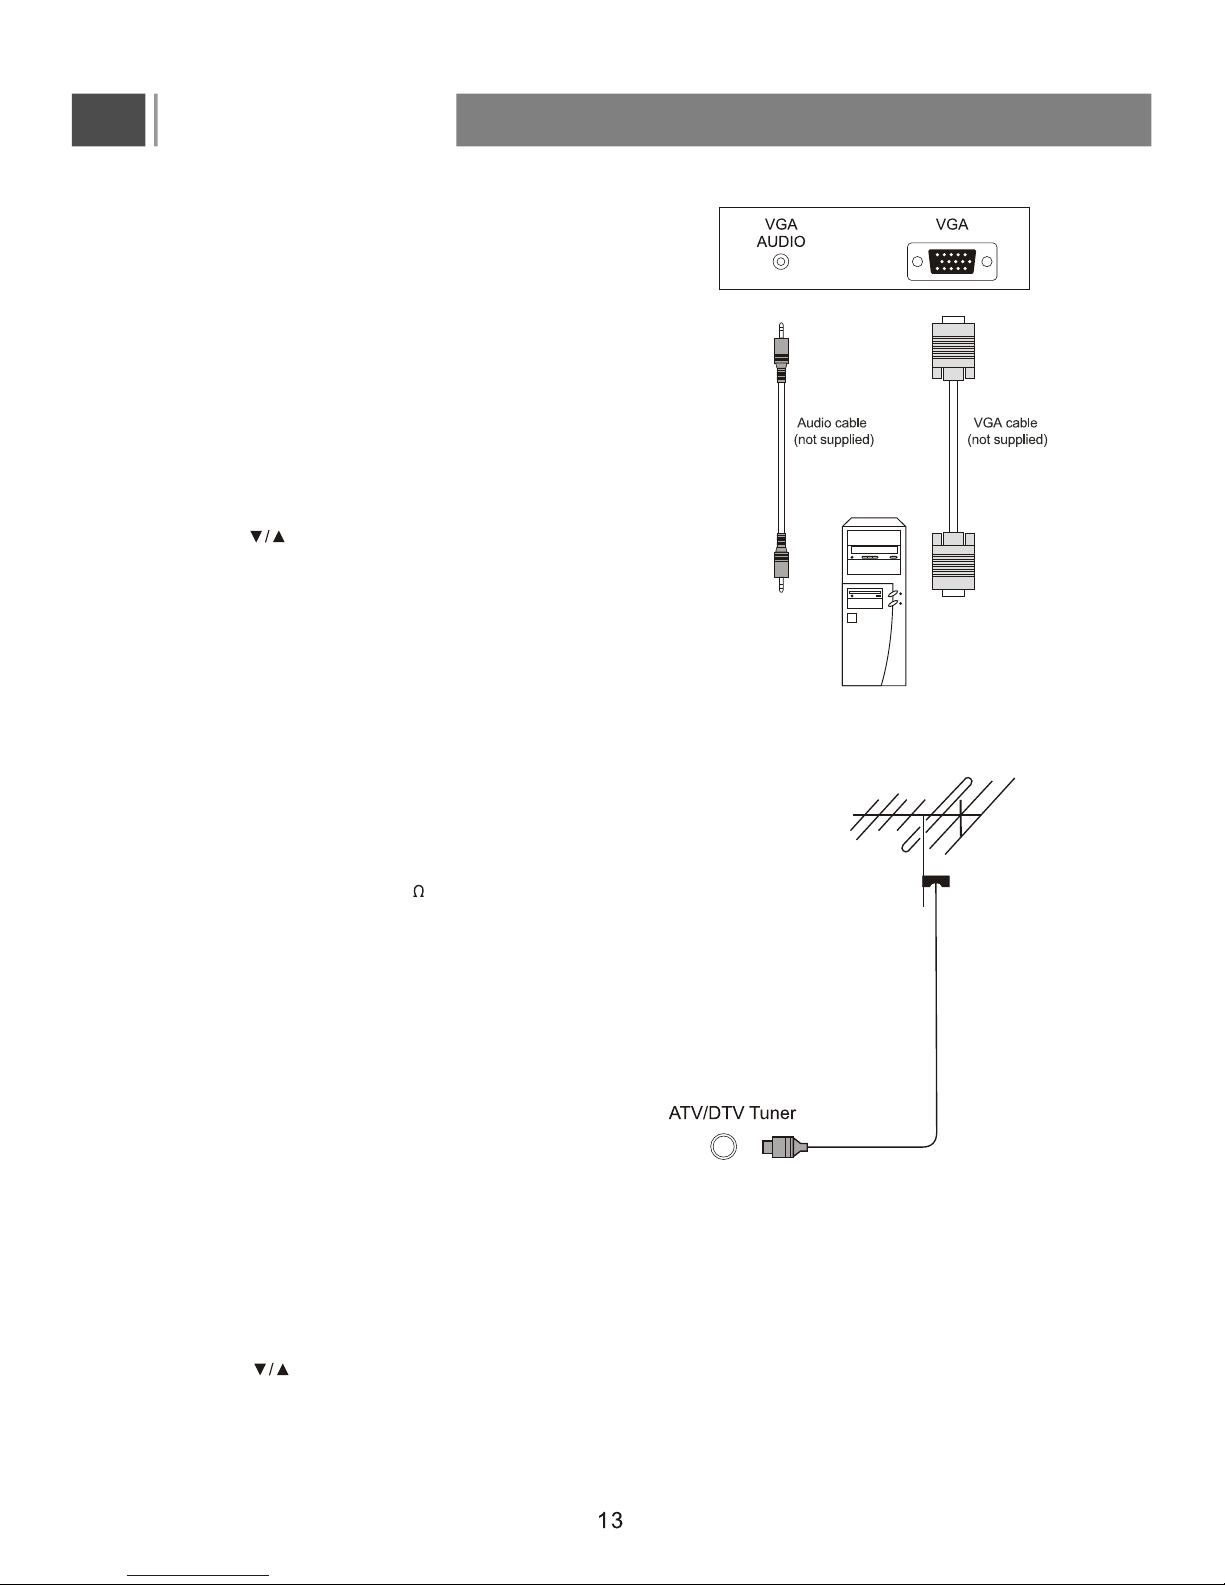
Connecting a Computer through VGA input
Remove power from the LCD (unplug from the wall
Outlet) and external equipment before connecting cables.
1. Connect the LCD to the computer using the VGA
(D-Sub 15 PIN) cable.
2. Connect the audio output of the computer to the VGA-Audio
input on the LCD TV with an audio cable (not supplied)
3. Please ensure the Power Cord is connected before it is operated.
4. Press POWER to turn on the LCD, then turn on the computer.
5. The LCD and Computer are working at the same time.
Press INPUT on the remote or INPUT on the right rear of the TV
set to enter into Input Source Menu.
6. Press the button to select PC and press ENTER to confirm .
Now your T V can be used as a PC monitor.
Connections
Connecting an Antenna
Unplug the power cord cable from the mains outlet before connecting
or disconnecting the antenna.
Connect the RF Coaxial Cable (75 ) (not supplied) to wall antenna
socket or jack.
Connecting directly to mobile
hard disk or flash drive
remove power cord from the LCD(unplug from the wall outlet)
beforeconnecting flash drive or mobile hard disk.
1.Connect flash drive or mobile hard disk to Media interface.
2.Please ensure the power cord is connected before it is operted.
3.Press the Power to turn on the LCD.
4.Press the INPUT button to select Media signal source.
5.Press the and ENTER button to confirm your INPUT soucre.

First-time installation
Basic Operation
Connect the power cord and antenna to your
Television, then turn on the TV. The first time you use your LCD,
will appear on the screen as right.
Select Language
Press button on the remote control to select the language to be used for menus and message.
Select Country
Press button on the remote control to highlight Country menu.
Press button on the remote control to select the country you want to.
Austra lia
/
/
/
the First Time Instrallation menu
Note
1. First time instrallation is displayed for the TV mode only when TV is turned on for the
first time.
2. If you would like to scan for stations again, select “Auto scan” in the channel menu.
Switch the TV on/standby
Please make sure the power cord is connected.
-Press POWER button on the remote control or on
the right rear of the TV to switch the TV on.
The power indicator changes from red to green.
-Press POWER button again to switch the TV to
standby mode.
The power indicator will change from green to red and
the appliance will switch off.
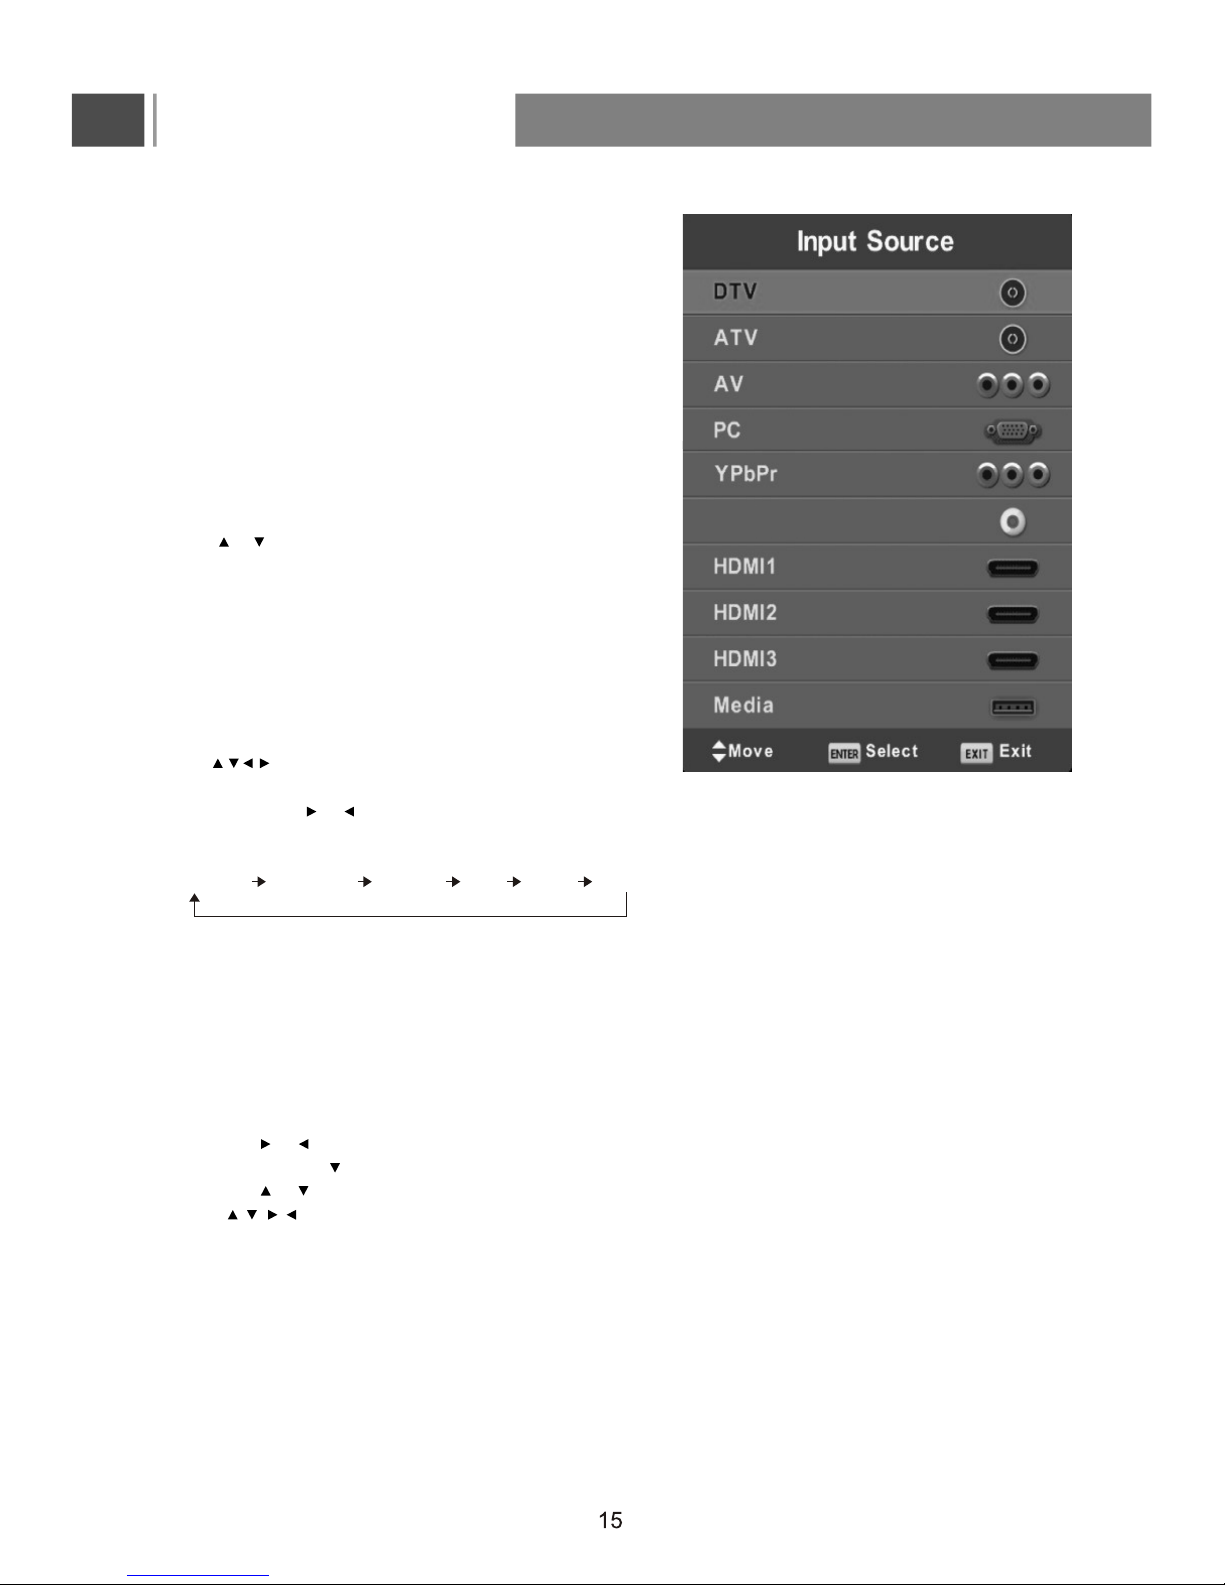
Selection of Input Mode
-Press the Input button to display the Input source
menu (as shown right).
-Press or or INPUT button to select the signal source you
desire, then press the ENTER button to confirm.
OSD Option Adjustment
After you have installed the batteries into the remote
control, you may want to set some preferences on the
LCD using the menu system.
-The buttons for OSD option adjustment include:
Menu, , , , ENTER and Exit buttons.
-Press the Menu button to display the OSD Setup
Menu then press or button to select the pages.
The pages are displayed in the following sequence
(circular display):
CHANNEL PICTURE SOUND TIME LOCK SETUP
Note: CHANNEL menu page is displayed only for TV
mode.
1. Press the Menu button to display the OSD setup
menu.
2. Press the or button to select the menu pages.
3. Press the Enter or button to enter.
4. Press the or button to select an item.
5. Press , , , button to select or adjust a setting.
6. If you do not make a selection within several seconds,
the main menu closes automatically.
7. Press the Menu or Exit button to return or exit OSD setup
menu.
Basic Operation
SMART TV
Basic Operation
OSD FUNCTION
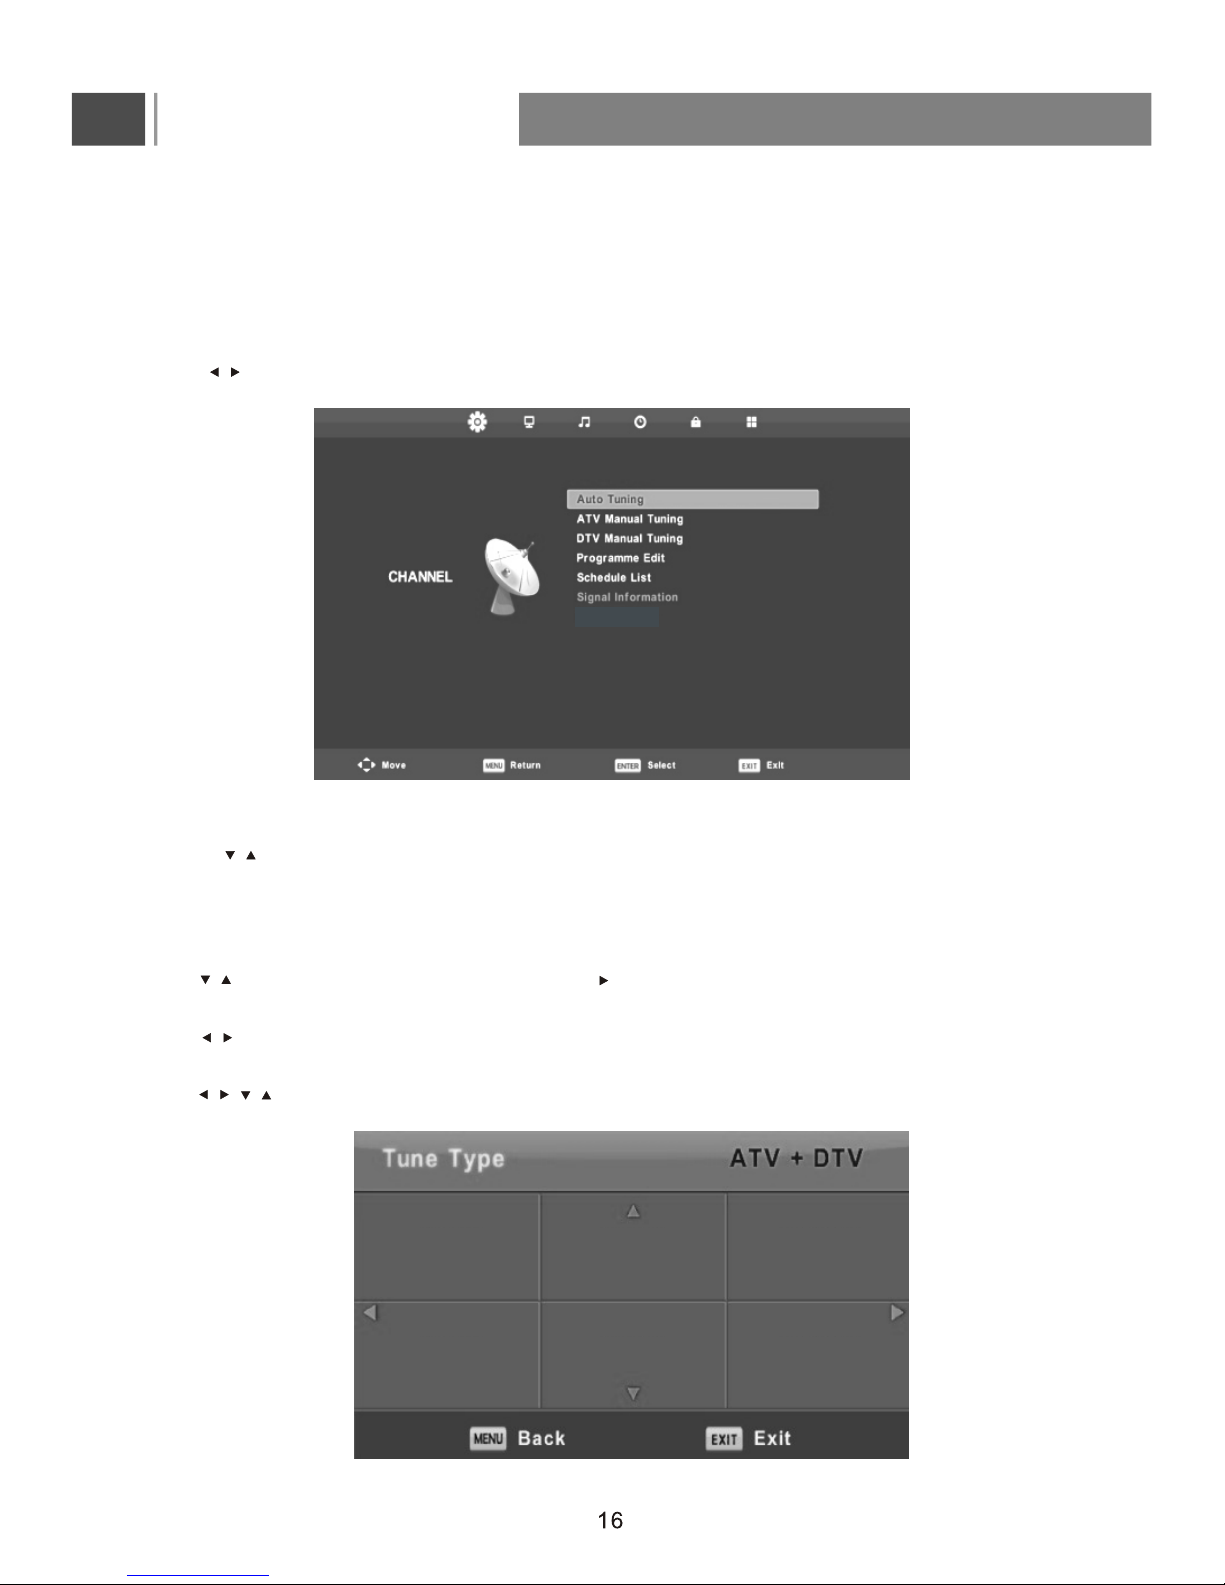
Channel Page menu(Only for DTV/ATV )
The menu is available only in DTV/ATV mode.
Press MENU button to display the main menu.on the remote control
Press button on the remote control to select CHANNEL in the main menu.
Channel Menu
1. Press button on the remote control to select the option that you want to adjust in the CHANNEL menu.
2. Press Enter button on the remote control to adjust.
3. After finishing your adjustment, Press MENU button to save and return back to the previous menu.
Auto Tuning
Press button to select Auto Tuning, then press Enter/ button to enter and select tuner type.
Tuner Type
Press button on the remote control to select tuner type: ATV +DTV, DTV, ATV .
Country
Press button on the remote control
to select country
.
/
/
/
/
/
//
UK France Italy
Australia Germany Portugal
 Loading...