

Thorn SOLO Owner's Manual

Owner’s Guide
Please read carefully prior to first use

2
Thank you for purchasing your Thorn bicycle.
Here at Thorn Cycles we want you to be delighted with your purchase and have made every effort to
try to ensure just that!
This owner’s manual outlines the simple maintenance that you will need to carry out on your Thorn
bicycle to allow you to gain the best and longest service from your bike. Given the appropriate care
and maintenance it requires we are convinced your bicycle should last many years. Don’t forget our
specialist sales team and our mechanics are always ready to help you and we can service your bike
for you should you wish.
Contained in the manual are the details of our lifetime warranty on the frame and forks for you the
original owner which we are proud to have offered and upheld for over 25 years.
The manual also shows you how to approach riding your new Thorn bicycle in the safest manner.
Every effort is made to ensure your bicycle has reached you in perfect mechanical order, however, it
is very important that you read this manual thoroughly. Ensure you follow the reassembly
instructions and the basic safety checks as detailed in the manual before you ride your new bicycle.
We aim to provide you with reliable, efficient service at all times. Not only do we boast one of the
best warranties on the market, we also strive to provide outstanding after sales service. All of our
staff are here to look after you and to provide you with the customer service you require.
If you have any questions about your new bicycle, or if you need advice concerning cycling related
issues, please do not hesitate to contact us (details on the back cover) and we will do our utmost to
help you.
Enjoy your bicycle and happy riding!
Best wishes,
Robin Thorn

3
CONTENTS
4. Preparing your bicycle before your first ride
5. Correct reassembly of handlebars
6. Mechanical safety checks
7. Tyre pressures
8. Rear derailleur adjustment
9. Trim adjustment
9. Front derailleur adjustment
10. Cable tension adjustment
10. Derailleur gear changing
11. STI rapidfire levers
11. STI road levers
12. Transmission chain tension on Rohloff equipped Thorn cycles
12. How to adjust the transmission chain tension on Rohloff equipped Thorn cycles -
(not Mercury models)
15. Tensioning the connecting chain on a Rohloff equipped tandem
16. How to adjust the transmission chain tension using the Thorn lightweight mini
eccentric (Mercury models only)
18. Brake types
19. Brake adjustment
19. Brake maintenance
20. Handlebar position
20. Tyre care
20. Quick release front wheel removal
20. Quick release rear wheel removal
21. Rear wheel removal with internal gear mech
22. Rear wheel removal with external gear mech
23. Maintenance of S&S machine couplings
24. Best practice for Rohloff oil changes
25. Thorn expedition rear rack
26. Safer cycling
28. Notes
29. Service record
31. Your warranty

4
Preparing your bicycle before your first ride
Although a lot of time has been spent preparing your bicycle to a very high standard, if it has been
delivered in a box there are certain adjustments which will need to be carried out before it is
possible to ride the bike.
This section will cover these important points stage by stage.
If you are unsure about any of these tasks, please do not hesitate to contact us.
When your new Thorn bicycle bike left our workshop it will have been inspected thoroughly to
ensure it meets our exacting standards but it may have travelled many miles in its cardboard box
and, although it shouldn’t have been, it may have been roughly handled.
Please check the box for signs of damage in transit and contact us if you have any concerns.
1. Remove all packaging from your bicycle. Do not to use any sharp instruments too close to
the paintwork or the tyres! Retain the packaging in case your cycle needs to be returned.
Please dispose of responsibly when no longer required.
2. Visually inspect the bicycle to ensure there has been no damage in transit. Again, contact us
if you have any concerns.
3. Locate your pedals (either in the packaging – or your own pedals if none have been supplied
with your bicycle) and identify which pedal is which (left/right). Apply some grease
(preferably copper slip) sparingly to the threads.
4. Put the right pedal into the drive side crank arm and screw the pedal in a clockwise direction
and tighten firmly.
5. Put the left pedal into the non-drive side crank arm and screw the pedal in an anti-clockwise
direction. It is important not to under tighten the pedals, as permanent damage to the
threads can occur.
6. Loosen the bolts holding the handlebar stem to the forks. This has two bolts on the back of
the stem which clamp around the steerer tube. Loosen these bolts with a 5mm Allen key. DO
NOT LOOSEN THE TOP CAP ALLEN BOLT.
7. Turn the handlebar stem until it is in line with the front wheel.
8. Re-tighten the bolts you loosened in step 6.
9. See page 5 if your bars or fork have been detached from your bike.
10. There is a chance that the headset may now have some play in it. You can check this by
applying the front brake and rocking the bicycle back and forwards. . If there is ANY
movement, you should loosen the stem bolts and anything else clamped around the steerer
tube, then, gently tighten the top cap bolt so the spacers and stem cap are pulled together
until the correct tension is achieved. Then re-tighten the stem bolts and accessories to the
correct torque.
If you have any doubts about assembling your bicycle correctly, please refer the
task to a qualified bicycle mechanic as incorrectly assembled bicycles can be lethal.
5
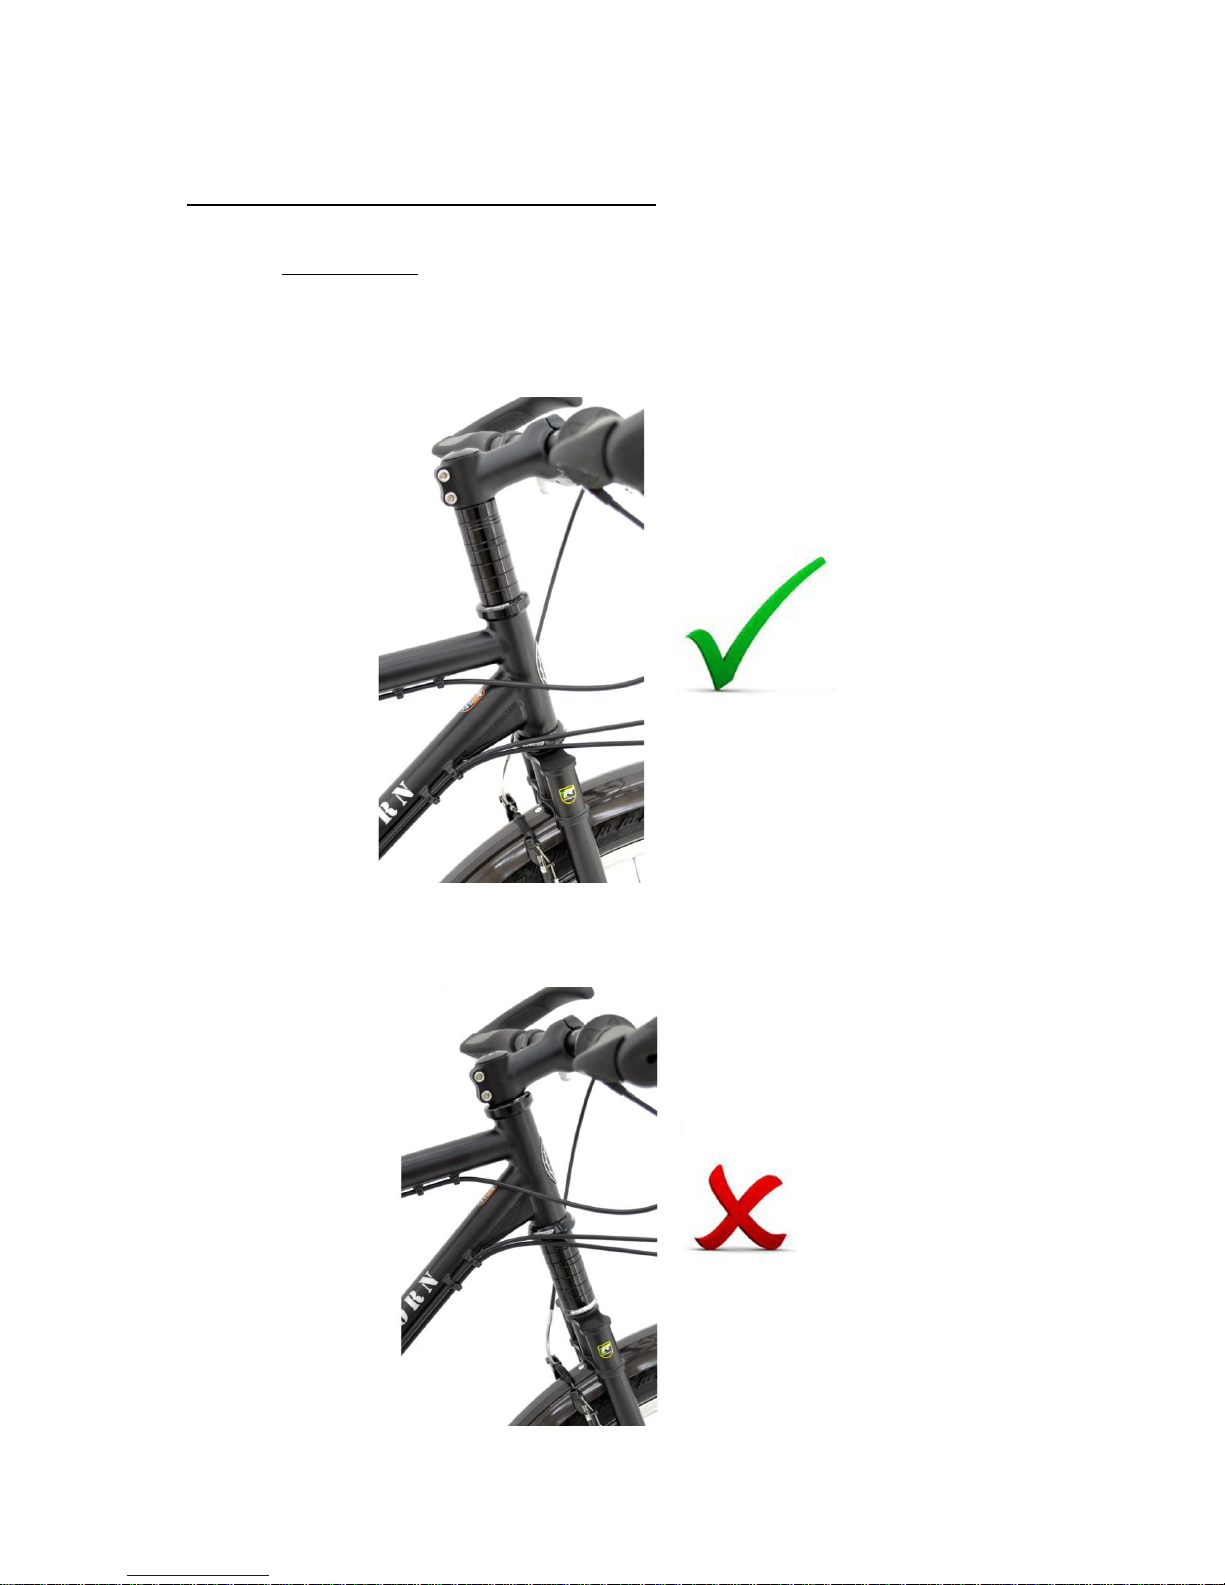
Correct reassembly of the handlebars
IMPORTANT YOU MUST READ THIS NOTICE BEFORE YOU ASSEMBLE
YOUR NEW THORN BICYCLE
The Correct way to assemble the spacers and stem is shown below:
The diagram below shows how NOT to assemble the bicycle, this is very dangerous and may
cause serious injury or death!

6
Mechanical safety checks
Routinely check the condition of your bike before every ride.
1. Visually inspect the bicycle to ensure no components have been damaged.
2. Check stem & handlebar bolts are tightened securely to the appropriate torque settings.
3. Check that the QR skewers are fitted correctly and tightly closed.
4. In the case of rim brakes. Check that the pads are tight. When the brakes are applied, check
that the pads do not touch the tyres.
5. Check that the cables do not pull through and check that maximum braking force can be
applied, before the levers hit the bars.
6. In the case of disc brakes, ensure that the brakes work before riding the bike. If they are
hydraulic - check for hydraulic leaks. If they are cable operated discs, check that the cables
can’t pull through.
7. With all disc brakes, be aware that it takes several long, hard applications before maximum
braking efficiency is achievable.
8. Before embarking on a longer ride. Ride ‘round the block’ and apply the brakes at low speed,
before trying them at higher speed.
9. In the case of derailleur gears, check that the rear derailleur hanger has not been bent and
try shifting into the big sprocket, to confirm that the mech does not get caught by the spokes.
10. Ensure you run through all the gears of the bike before setting off on a ride.
11. Check the tightness of mudguard stays and carriers.
12. Check the function of your lights.
13. Check that the tyre pressures are appropriate - not necessarily max pressure (see page 7).
WARNING!
IF ALL IS NOT TOTALLY CLEAR YOU MUST CONTACT US BEFORE YOU ATTEMPT
TO RIDE THE BIKE.
TEL. +44 (0) 1278 441505
EMAIL: sales@thorncycles.co.uk

7
Tyre pressures
Bicycles must NOT be ridden with their tyres inflated higher than the maximum pressures stated in
the tables below.
It may be necessary, however, to over-inflate the tyres in order to get the tyres to seat correctly but
once seated, it is essential that the pressure is reduced accordingly before riding. If the bike is
ridden with over-inflated tyres it may cause the rims to fail catastrophically or be permanently
damaged.
The min pressures may be used for comfort or for grip on tricky surfaces but extra care must be
taken to avoid large stones and potholes; this is especially important if heavy loads are being
carried.
The recommended pressures should be the perfect balance between comfort, efficiency and
reliability.
700c tyre
size
SOLO
Recommended
FRONT
Recommended
REAR
Absolute
MAX
MIN
23c
108
118
130
85
25c
100
110
120
75
28c
88
95
105
65
32c
70
75
90
55
35c
60
65
80
45
38c
53
58
75
40
40c
48
53
70
35
26” tyre
size
SOLO
Recommended
FRONT
Recommended
REAR
Absolute
MAX
MIN
1.35”
60
65
80
45
1.6”
48
53
70
35
1.75”
45
50
65
32
2.0”
40
45
58
30
2.1”
38
43
54
28
2.25”
35
40
50
26
2.35”
32
37
48
24
8
SIS derailleur gear adjustment
To help ensure that your derailleur gears work efficiently and to prolong their life, they must be kept
clean and free from excess dirt and should be properly lubricated.
The next few pages and diagrams show the basics of how to adjust derailleur gears. If you have any
problems you should contact us before riding.
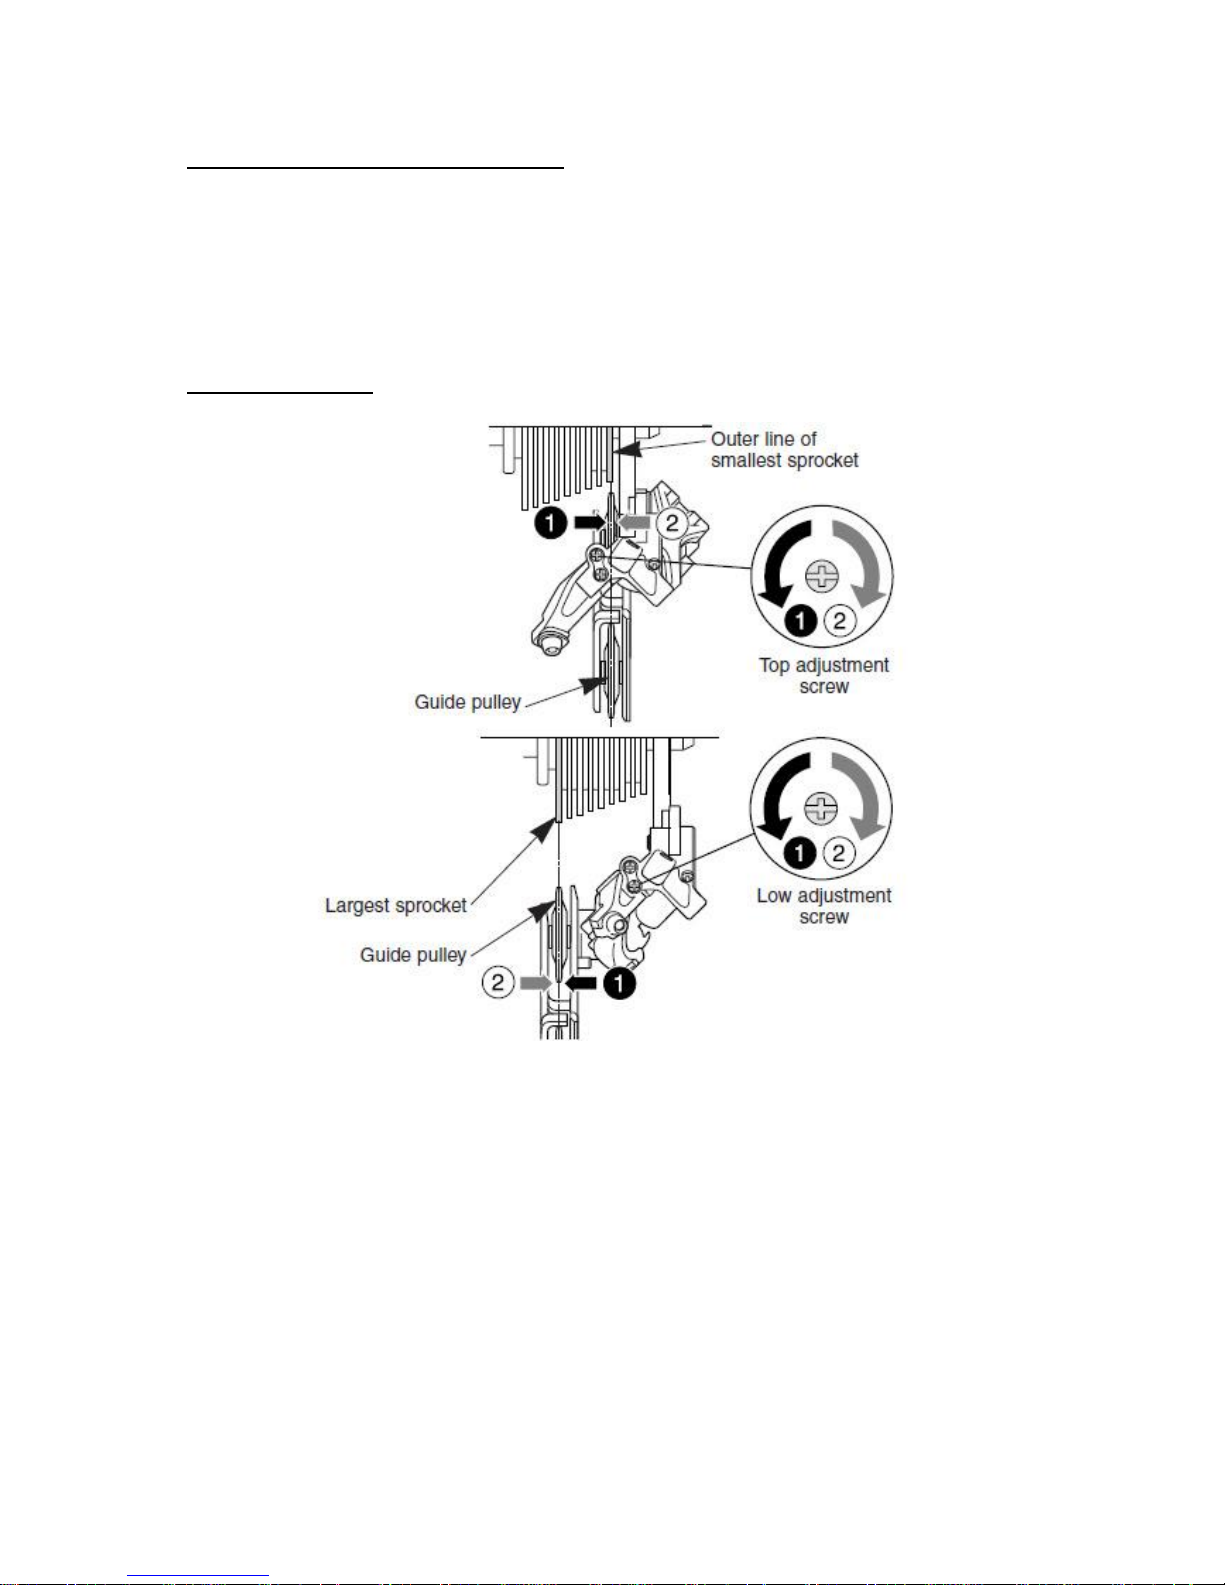
Rear derailleur
High and Low adjustment (the rear wheel must be free to rotate)
The idea is to find the position where the shift will always occur, but there is no possibility of
accidentally over-shifting the rear derailleur into the spokes.
This will not only be expensive but will cause the rear wheel to lock up…with potentially serious
consequences.
We recommend that you confirm the gear operation whilst cycling at low speed on a quiet road.
Turn the low adjustment screw so that the top jockey wheel moves to a position directly below the
largest sprocket. Turn the top gear adjustment screw on the gear mechanism so that, looking from
the rear, the top jockey wheel is below the outer line of the small sprocket.
Check that the chain cannot accidentally over-shift the small sprocket.
9
Trim adjustment
1. If the chain will not move to the 2nd gear, turn the right-hand down tube cable adjusting barrel to
increase the tension (counter clockwise).
If the chain moves past the 2nd gear, decrease the tension (clockwise).
2. Next, with the chain on the 2nd sprocket, increase the inner cable tension while turning the chain
wheel forward. Stop turning the cable adjusting barrel just before the chain makes noise against the
3rd sprocket. This completes the adjustment.
Be sure to lubricate each part of the derailleur.
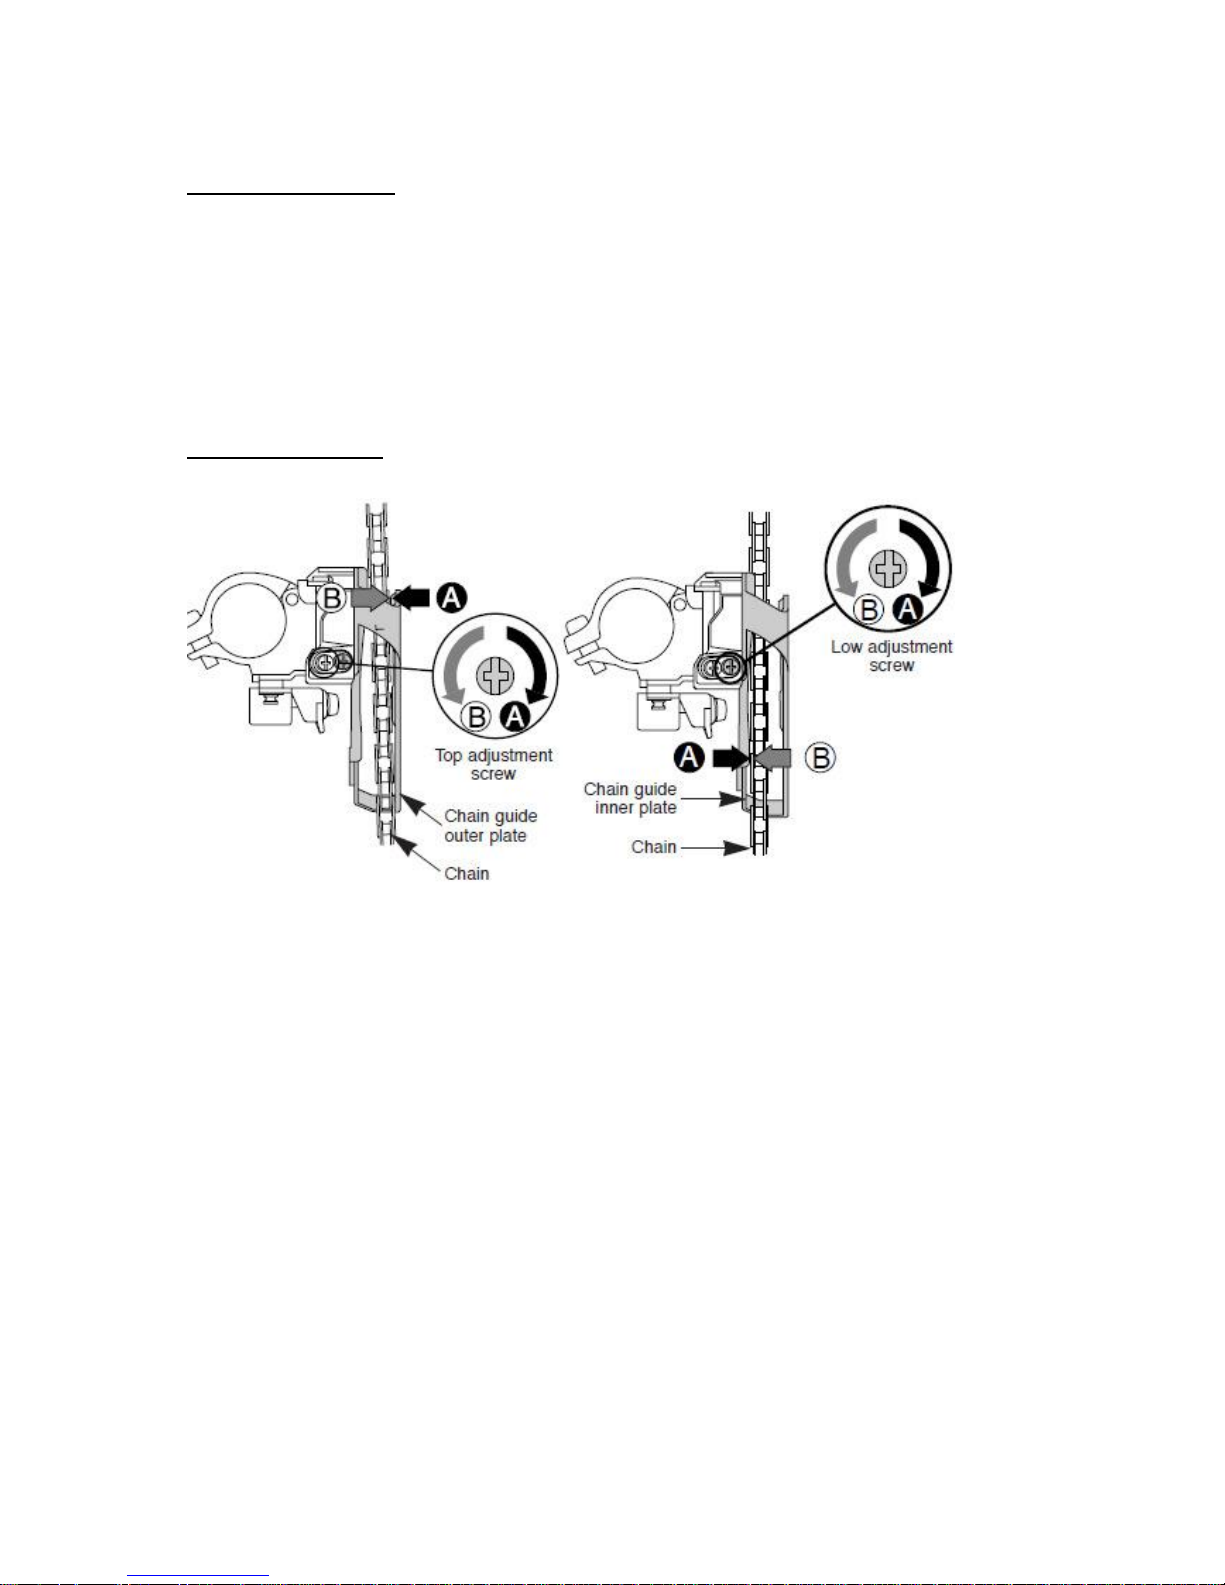
Front derailleur
The adjustment of the sideways movement of the front changer is done by means of two gear stop
screws situated on the body of the changer mechanism. The top screw limits the inner travel of the
changer cage, the low limits the outward movement Use the following procedure for adjustment:
(the rear wheel must be free to rotate)
1. While turning the pedals forward select the middle (on a triple chainset) or the top chain ring then
select the smallest rear sprocket.
2. While turning the pedals adjust the top screw on the front changer so that the chain will just drop
into the lower ring with the gear lever fully forward.
3. Select the largest rear sprocket. If there is any evidence of chain rub adjust the top screw until this
just ceases.
4. With the chain still on the largest rear sprocket select the ring below the largest at the front.
Adjust the low screw so that the chain just selects the outer chain ring when the gear lever is moved
through its full arc range.
5. Select the smallest rear sprocket, if there is any evidence of chain rub then adjust the low screw
until this just ceases.
6. If problems continue to arise please contact us for advice.

10
Cable tension adjustment
In time if your gears do not operate smoothly, it may be that your gear cables have stretched out a
bit and need adjustment.
You can adjust the tension for the front and rear gear cables by using the in-line barrel adjusters
situated on the gear pods (Rapid-fires) or on the down tube (road STI’s).
Further detailed instructions on gear and derailleur adjustments can be found in the supplied
manufacturers component instruction manuals.
Derailleur gear changing
The rider’s left gear lever controls the front derailleur.
The right gear lever controls the rear derailleur.
The large rear sprockets generate low gears for hill climbing. The small rear sprockets enable high
gear ratios for speed and downhill riding.
The small front chain ring produces low gear ratios while the larger front chain rings produce higher
gear ratios.
To operate your derailleur gear system efficiently thus reducing damage, wear and keeping noise to
a minimum, avoid using the maximum crossover gear ratios of large chain ring/large rear sprocket
and small chain ring/small rear sprocket.
NB: For positive gear selection, observe these four precautions:
1. Change only when pedals and wheels are moving in a forward motion.
2. Reduce pedal pressure while changing gears.
3. Never back pedal when changing gear.
4. Never force the gear levers.
Gear selection should be made in anticipation of need since forward motion of the bicycle is
required.
It is advisable to change to a low gear before stopping in order to be in the proper gear when you
start up.
On hills, change gear early while still maintaining forward speed.
 Loading...