

Page 1
TD 103 A
BEDIENUNGSANLEITUNG
USER GUIDE
MANUEL D’UTILISATION
Thorens GmbH
Lustheide 85 · 51427 Bergisch Gladbach · Deutschland
www.thorens.com · info@thorens.com
www.thorens.com
Page 2

Inhalt Seite
Inhalt 2
Sehr geehrter Thorens-Kunde 3
Garantie 4
Sicherheitshinweise 5
Technische Daten 6
Geräteübersicht 7
Auspacken und Montage 8
Tonarm und Systemeinstellungen 10
Grundlegende Bedienung 13
2INHALT
Page 3

Sehr geehrter Thorens-Kunde,
herzlichen Dank für Ihr Vertrauen in unser Produkt, den Plattenspieler TD 103 A.
Mit dem Kauf dieses Plattenspielers haben Sie ein Präzisionsinstrument zur Wiedergabe von Schallplatten
erworben, das, um seiner Aufgabe gerecht zu werden, mit Sorgfalt behandelt und aufgestellt werden muss.
Die Fertigung dieses Laufwerks und die Montage erfolgen komplett in Deutschland - dies garantiert höchste
Qualität, auch noch nach Jahren.
Verständlicherweise wollen Sie möglichst sofort mit dem Musikhören loslegen. Wir bitten Sie jedoch: Lesen
Sie bitte diese Anleitung vor dem ersten Gebrauch aufmerksam durch, damit Sie das Laufwerk optimal nutzen
können und lange daran Freude haben. Wir haben uns bemüht, alles Notwendige und Wissenswerte in dieser
Anleitung unterzubringen.
Sollten Sie noch Fragen haben, die hier nicht beantwortet werden, so wenden Sie sich direkt an Ihren Händler.
Ihr Thorens-Team
3 SEHR GEEHRTER THORENS-KUNDE
Page 4

Garantie
Es gelten die gesetzlichen Garantiebestimmungen. Tritt innerhalb der Garantiezeit ein Mangel an Ihrem Gerät auf, so benachrichtigen Sie Ihren Händler unter Angabe der Art der Störung. Falls der Fehler nicht vor Ort
durch Zusenden eines entsprechenden Ersatzteiles bei einfachen Fehlern behoben werden kann, senden Sie
das Gerät bitte nach Rücksprache in der Originalverpackung an Thorens ein. Sollte keine Originalverpackung
mehr vorhanden sein, können Sie diese von Thorens gegen Gebühr erhalten. Die Einsendung hat frei Haus zu
erfolgen. Unfrei eingesandte Waren werden nicht angenommen. Der Rückversand erfolgt frei Haus. Verschicken Sie den TD 103A niemals ohne die Transportsicherungsschrauben. Schäden, die durch Nichtbeachtung
der Bedienungsanleitung oder durch äußere mechanische Einwirkungen erfolgen, sowie Transportschäden
sind durch die Garantie nicht abgedeckt. Die Garantie erstreckt sich nur auf das Laufwerk und den Motor inklusive Netzteil. Tonarme und Tonabnehmer haben die vom jeweiligen Hersteller gewährte Garantie.
Für weitere Fragen steht Ihnen unser Service jederzeit gerne zur Verfügung.
4GARANTIE
Page 5

Sicherheitshinweise
ACHTUNG!
Um Brandgefahr oder elektrischen Schäden vorzubeugen, darf das Gerät nicht Feuchtigkeit oder Regen ausgesetzt werden.
Bitte önen Sie das Gerät nicht!
Halten Sie das Verpackungsmaterial, wie z.B. Folien von Kindern fern. Bei Missbrauch könnte Erstickungsge-
fahr bestehen.
Entsorgung von Elektrogeräten durch Verbraucher in privaten Haushalten innerhalb der EU.
Das Gerät am Ende seiner Lebenszeit nicht im normalen Hausmüll entsorgen. Erkundigen Sie sich
nach Möglichkeiten einer umweltgerechten Entsorgung bei den örtlichen Behörden, bei Wertstohöfen, oder dort, wo Sie das Gerät erworben haben.
Dieses Produkt entspricht den geltenden EU-Vorschriften.
5 SICHERHEITSHINWEISE
Page 6

Technische Daten
Antrieb Riemenantrieb
Netzspannung 230V/50Hz
115V/60Hz
Netzfrequenz 50/60Hz
Leistungsaufnahme 1,5W
Plattenteller-Drehzahlen (U/min) 33,3, 45, 78
Gleichlaufschwankungen +/- 0,06 / 0,035 % DIN/WRMS
Störspannungsabstand
(DIN 45500)
Rumpel-Fremdspannungsabstand
Rumpel-Geräuschspannungsabstand
Eektive Tonarmlänge 211mm
Kröpfungswinkel 26°
Überhang 19,5mm
Tangentialer Spurfehlwinkel 0,15°/cm Rad.
Tonabnehmer Ortofon 2M Red
Empfohlene Auflagekraft 17.5mN (1,75g)
Übertragungsbereich 20Hz-22kHz
Übertragungsfaktor 5,5mV / 1000Hz, 5cm/sec.
Abtastfähigkeit 70um
Tonabnehmergewicht 7,2g
Abmessungen (BxHxT) 430 x 365 x 130 mm
51 dB
63 dB
6TECHNISCHE DATEN
Page 7
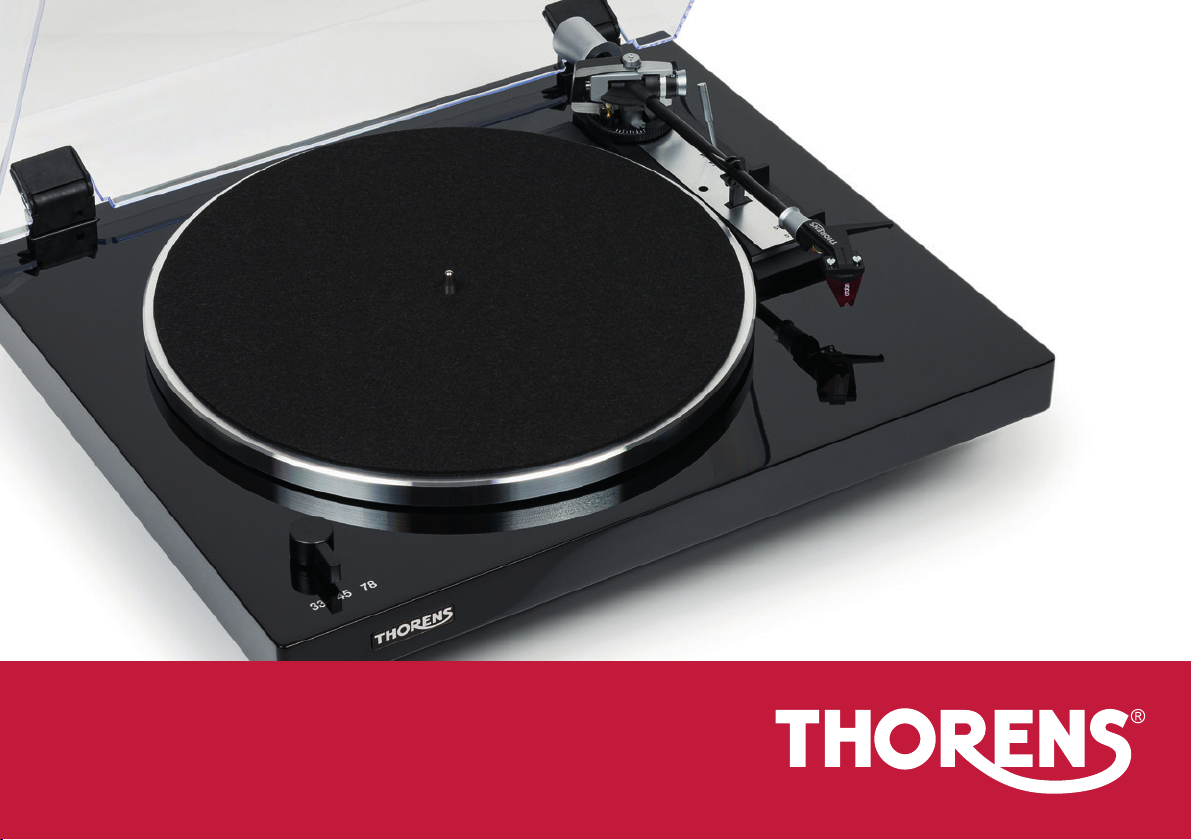
Geräteübersicht
16 17 18
2
12
1
33 45 78
3
1: Staubschutzhaube
2: Scharnier
12
3: Gegengewicht
4
14
5
13
7
30
17
6
4: Auflagekraft
5: Lifthebel
2
6: Größe wählen
1
(Single oder LP)
7: Tonarmstütze
8: Drehzahlauswahl
10
9: Kontermutter Headshell
10: Start/Stop Schalter
9
15
8
11
16 17 18
11: Schrauben Tonabnehmer
12: Tonabnehmer
13: Justage Aufsetzpunkt
14: Antiskating
15: Transportsicherung
16: Audioausgang
17: Masseanschluss
18: Netzanschluss
7 GERÄTEÜBERSICHT
Page 8
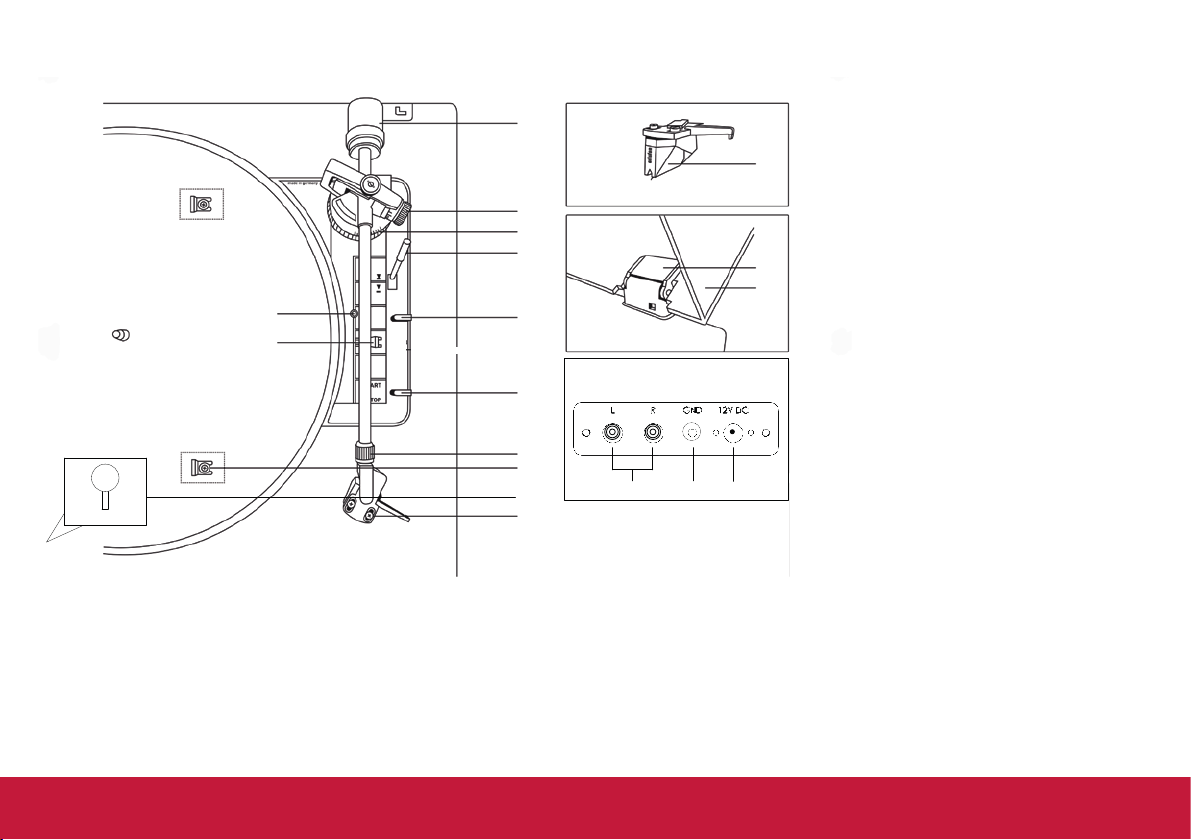
Auspacken und Montage
Entnehmen Sie das Gerät und alle Zubehörteile
der Verpackung. Entfernen Sie durch seitlichen
Druck die beiden Transportsicherungen (15).
Sie befinden sich vorne links und hinten rechts
unter dem Plattenteller.
Legen Sie nun den Plattenteller auf den Antriebsteller und drücken die beiden Sicherungsfedern soweit nach unten, bis sie in die Rille
der Plattentellerachse einrasten.
Stecken Sie die beiden Scharniere (2) in die
dafür vorgesehenen Aussparungen.
Schieben Sie die Abdeckhaube (1) parallel zu
der Stellung der Scharniere (Önungswinkel
ca. 60°) bis zum Anschlag in diese ein. In dieser Stellung lässt sich die Haube auch jederzeit
wieder abnehmen.
Durch die Auswahl eines entsprechenden
THORENS-Netztransformators kann der
Plattenspieler an allen vorkommenden Netzwechselspannungen betrieben werden. Der
Niederspannungsstecker am Kabel des Steckernetztransformators wird in die Buchse (18)
an der Geräterückseite gesteckt.
Fig. 1
Fig. 3
Fig. 2
8AUSPACKEN UND MONTAGE
Page 9

Das Stereo-Verbindungskabel besitzt zwei
Phonostecker (von manchen Herstellern auch
Cinch-Stecker oder RCA-Stecker genannt). Sie
sind entweder mit L für den linken Kanal und R
für den rechten Kanal bezeichnet. Fehlen diese
Buchstaben, so ist der rechte Kanal mit rot
und der linke Kanal mit weiß gekennzeichnet.
Die Cinch-Stecker werden in die Phono-Buchsen am Verstärker oder Receiver gesteckt (16).
Die getrennt geführte Litze stellt die Erd- oder
Masseverbindung her (17). Sie wird am Massepunkt des Verstärkers befestigt.
9 AUSPACKEN UND MONTAGE
Page 10

Tonarm und Systemeinstellungen
Stellen Sie den Regler für die Auflagekraft (4)
auf 0 und drehen Sie die Antiskating-
Einrichtung (14) entgegen dem Uhrzeigersinn
bis an den Anschlag.
Nun drehen Sie das Tonarm-Gegengewicht (3)
auf das hintere Tonarmrohr.
Entriegeln Sie den Tonarm (7) und schwenken ihn nach innen. Bringen Sie den Lifthebel
(5) in Stellung
, dabei den Tonarm festhalten. Durch Verdrehen des Gegengewichts (3)
kann der Tonarm exakt ausbalanciert werden;
er muss frei schweben. Legen Sie den Arm
zurück in die Tonarmstütze. Nun können Sie
die Auflagekraft (4) und die Antiskatingkraft (14)
einstellen. Bei dem eingebauten Tonabnehmer
Ortofon 2M Red werden 17,5 mN eingestellt.
Beachten sie die nachstehende Tabelle:
Auflagekraft
Auflagekraft-Einstellung 4
1 = 10 mN 1
1,25 = 12,5 mN 1.25
1,5 = 15 m 1.5
2M Red —> 1,75 = 17,5 mN 1.75
2 = 20 mN 2
2,5 = 25 mN 2.5
3 = 30 mN 3
Antiskating-Einstellung 14
10TONARM UND SYSTEMEINSTELLUNGEN
Page 11

ERSETZEN DER ABTASTNADEL
• Verriegeln Sie den Tonarm in der Stütze.
• Entfernen Sie den Nadelschutz.
• Umfassen Sie den Nadeleinschub und ziehen ihn vorsichtig nach vorne.
• Setzen Sie einen neuen Nadeleinschub in umgekehrter Reihenfolge ein.
• Setzen Sie den Nadelschutz wieder auf.
ENTFERNEN DES TONABNEHMERS
• Evtl. sind die folgenden Schritte einfacher durchzuführen, wenn vorher das Headshell vom Tonarm abgenommen wird.
• Verriegeln Sie den Tonarm in der Stütze.
• Entfernen Sie die Abtastnadel wie oben beschrieben – oder stellen Sie sicher, dass der Nadelschutz aufgesetzt ist.
• Lösen Sie die beiden Schrauben, die den Tonabnehmer mit dem Headshell verbinden.
• Lösen Sie die vier Kabel an den Pins an der hinteren Seite des Tonabnehmers.
• Falls Sie das Headshell abgenommen haben, setzen Sie sie wieder ein.
11 TONARM UND SYSTEMEINSTELLUNGEN
Page 12

EINBAU EINES NEUEN TONABNEHMERS
• Evtl. sind die folgenden Schritte einfacher durchzuführen, wenn vorher das Headshell vom Tonarm abgenommen wird.
• Verbinden Sie die vier Kabel des Headshells mit den Pins an der Rückseite des Tonabnehmers. Berücksichtigen
Sie die korrekte Zuordnung der farbigen Kabel zu den passenden Pins.
• Entfernen Sie den Nadeleinschub des neuen Tonabnehmers
• Verschrauben Sie den neuen Tonabnehmer am Headshell mit zwei passenden Schrauben.
• Setzen Sie den Nadeleinschub wieder ein.
• Schieben Sie den Nadelschutz auf.
• Falls Sie das Headshell vom Arm abgenommen haben, setzen Sie es wieder ein.
• Um den neuen Tonabnehmer zu justieren, folgen Sie der dazu beiliegenden Anleitung. Es empfiehlt sich dazu, die
Schrauben am Headshell zunächst noch nicht fest anzuziehen.
WICHTIGER HINWEIS
Wir empfehlen eine regelmäßige Reinigung Ihrer Schallplatten mittels Bürste, die wir als separates Produkt
anbieten. Ebenfalls sollte die Nadel für die Abtastung sauber sein, passende Produkte zur Reinigung bieten wir
ebenfalls an.
Um Ihre wertvollen Schallplatten lange im bestmöglichen Zustand zu erhalten, sollte die Abtastnadel regelmäßig (alle 300-500 Stunden) gewechselt werden.
TRANSPORT DES PLATTENSPIELERS
Setzen Sie den Nadelschutz auf den Tonabnehmer, verriegeln den Arm in der Stütze, lösen den Antriebsriemen von der Antriebsrolle und entfernen danach den Plattenteller mit dem Riemen von der Tellerachse.
12TONARM UND SYSTEMEINSTELLUNGEN
Page 13

Grundlegende Bedienung
DREHZAHLWAHL
Mit dem linken Schaltknopf (8) lassen sich die Geschwindigkeiten 33, 45 und 78 einstellen.
PLATTENDURCHMESSERWAHL
Mit dem Schalter (6) rechts neben dem Tonarm kann der Plattendurchmesser auf 17 cm (Single) und 30 cm
(LP) eingestellt werden. Dies ist nur bei automatischem Start notwendig.
AUTOMATISCHER START
Ziehen Sie den durchsichtigen Nadelschutz nach vorne ab. Der Lifthebel (5) muss sich in Stellung
Schieben Sie den Schalthebel (10) auf Start und der Tonarm setzt automatisch auf der Schallplatte auf.
MANUELLER START
Bringen Sie den Lifthebel (5) in Stellung
über die Einlaufrille der Schallplatte. Der Motor läuft jetzt an. Der Tonarm wird nun mit dem Lifthebel (5) bedämpft und Platten schonend abgesenkt. Mit dem Lifthebel kann der Tonarm an jeder beliebigen Stelle, auch
zur kurzzeitigen Spielunterbrechung, abgehoben werden. Der Plattenteller dreht sich weiter.
STOP
Am Ende der Schallplatte wird der Tonarm automatisch zur Tonarmstütze zurückgeführt und das Gerät abgeschaltet. Sie können den Plattenspieler auch abschalten, indem Sie den Schalthebel (10) auf Stop schalten,
oder den Lifthebel (5) in Stellung
bringen und den Tonarm von Hand auf die Tonarmstütze zurückführen.
. Nehmen Sie den Tonarm von der Tonarmstütze und schwenken ihn
befinden.
13 GRUNDLEGENDE BEDIENUNG
Page 14

TD 103 A
BEDIENUNGSANLEITUNG
USER GUIDE
MANUEL D’UTILISATION
14
Page 15

Contents Page
Contents 15
Dear THORENS customer 16
WARRANTY 17
Safety instructions 18
Technical specifications 19
Device overview 20
Unpacking and setup 21
Electrical Connections 22
Adjusting tone arm and pick-up cartridge 23
15 CONTENTS
Page 16

Dear THORENS customer,
Thank you very much for your confidence in our product, the record player TD 103 A. With the purchase
of this device you have acquired a precision instrument for the purpose of playing back analogue records. This appliance however requires your attention with respect to set-up, placement and handling
in order to achieve a flawless operation. The TD 103A has been designed and assembled completely in
Germany which will guarantee you the highest quality to be maintained for years to come. Understandably, you want to listen to your beloved records right away but we strongly advise that you read these
instructions attentively before proceeding with the setup, simply to ensure long-lasting listening pleasure.
We have spared no eorts to pack all necessary information and comprehensive guidance into this manual, yet in the event that you have any further queries regarding your new record player please do not
hesitate to ask your THORENS dealer for further assistance.
Sincerely yours,
THORENS TEAM
16DEAR THORENS CUSTOMER
Page 17

WARRANTY
Legal warranty directives and regulations are to be applied here. In case a failure or malfunction occurs in your
record player during the warranty period please inform your THORENS dealer or general representative and
describe the malfunction that has occurred. If the malfunction cannot be remedied on site by sending you the
respective user-serviceable spare part, you are kindly requested to send the unit in its original shipping box
to the THORENS representative in your country. If the original shipping box is no longer in your possession
your THORENS representative will be in the position to supply a new one for a small charge. Shipping costs
to THORENS or to an authorized service center must be prepaid because otherwise the parcel will be rejected upon arrival. After repair or service the unit will be returned to you free of charge. Whenever you ship this
turntable kindly use the screws for the security during transportation.
Any damage or malfunction caused by failure to observe the instructions contained in this manual as well as
damages occurred in transport or shipping are not covered by this warranty. This warranty only covers the
turntable and motor including power sup-ply and mains transformer. The tone arm and pick-up cartridge are
covered by the warranty of the respective manufacturer thereof.
In the event that you have further queries or need assistance please do not hesitate to contact your
authorized THORENS service.
17 WARRANTY
Page 18

Safety precautions
CAUTION!
To prevent the risk of fire or electrical damage, do not expose the device to moisture or rain.
Please do not open the device!
Keep the packaging material, such as plastic foils, away from children. Danger of asphyxiation by misuse.
Disposal of electrical appliances by consumers in private households within the EU.
At the end of its lifetime, do not throw the device away with the normal household waste.
Ask about the options for environmentally sound disposal at the local authorities, at recycling
centers, or where you purchased the device.
This product complies with applicable EU regulations.
18SAFETY INSTRUCTIONS
Page 19

Technical data
Drive Belt Drive
Main voltage 230V/50Hz
115V/60Hz
Line frequency 50/60Hz
Power requirement 1,5W
Platter speeds (rpm) 33,3, 45, 78
Wow and flutter +/- 0,06 / 0,035 % DIN/WRMS
Signal-to-noise ratio
(DIN 45500)
Rumpel unweighted signal-to-noise
Rumpel weighted signal-to-noise
Eective tonearm length 211mm
Oset angle 26°
Overhang 19,5mm
Tangential tracking error 0,15°/cm Rad.
Cartridge Ortofon 2M Red
Tracking force 17.5mN (1,75g)
Frequency range 20Hz-22kHz
Output 5,5mV / 1000Hz, 5cm/sec.
Tracking capability 70um
Cartridge weight 7,2g
Dimensions (WxHxD) 430 x 365 x 130 mm
51 dB
63 dB
19 TECHNICAL SPECIFICATIONS
Page 20

Device overview
16 17 18
2
12
1
33 45 78
3
4
14
5
13
7
30
17
6
2: Hinge
12
3: Tonearm counterweight
4: Scale for setting tonearm
tracking force
2
5: Lift lever
1
6: Switch for size (Single or LP)
7: Tonearm support with
tone arm lock
1: Dustcover
10
9
15
8
11
16 17 18
8: Speedselector
9: Head-shell locking nut
10: Start/Stop switch
11: Securing screw for
cartridge
12: Stylus
13: Screw for Tonearm set down
14: Antiskating setting
15: Transport lockings
16: Audio output
17: Ground
18: Connection socket for
power supply
20DEVICE OVERVIEW
Page 21

UNPACKING AND SETUP
Take the record player and all accessories
out of the carton. Remove the two transportation
locks (15) by applying lateral pressure. The
locks are located underneath the platter at
the
front left and at the rear right. Put the platter
onto the sub-platter and press down
the two safety springs until they set into the
groove of the platter spindle.
Insert each hinge (2) into the respective
recess. Hold the dust cover (1) parallel to the
hinges (opening angle approximately 60°),
insert and push as far as it will go. Being in
this position the dust cover may be removed
at any time.
Fig. 1
Fig. 3
Fig. 2
21 UNPACKING AND SETUP
Page 22

ELECTRICAL CONNECTIONS
By choosing the appropriate THORENS
mains transformer this record player can be
operated from nearly all existing public mains
supplies. The low voltage plug on the cable
that is coming from the mains transformer
unit is to be inserted into jack (18) at the rear
side of the record player.
The stereo signal leads have two phono
plugs which are also known as „Cinch“ or
RCA-plugs. They are marked with either the
letter „L“ for the left channel or „R“ for the
right channel. lf these letters are missing
then most likely the right channel is marked
red, perhaps by featuring a red plug at both
ends, and the left channel is marked white
or black accordingly. The RCA-plugs are
inserted into the phono input jacks of an
amplifier or receiver (16). The
separate single litz wire is making a connection to ground (17) and is to be fastened
underneath the ground screw of the amplifier or receiver.
22ELECTRICAL CONNECTIONS
Page 23

Adjusting tone arm and pick-up cartridge
Turn the tracking force adjuster (4) to „0“ and
the anti-skating knob (14) counter-clockwise
until it stops.
Screw the tonearm counter weight (3) onto
the rear tonearm tube.
Unlock the tone arm (7) and move it a bit
towards the centre of the platter. Bring the
lift-lever (5) into position
while holding
back the tone arm.
By turning the counter weight (3) the tone
arm can be precisely balanced in order to
make it hover freely above the platter. Move
the tone arm back to its rest. You can now
adjust the tracking force (4) and the anti-skating force (14). Adjust to 17,5 mN for
the factory-installed pick-up cartridge 2M
Red.
As for the required anti-skatingforce refer to the table below:
Tracking force
Tracking force scale 4
1 = 10 mN 1
1,25 = 12,5 mN 1.25
1,5 = 15 m 1.5
2M Red —> 1,75 = 17,5 mN 1.75
2 = 20 mN 2
2,5 = 25 mN 2.5
3 = 30 mN 3
Antiskating setting 14
23 ADJUSTING TONE ARM AND PICK-UP CARTRIDGE
Page 24

TO REPLACE THE STYLUS
• Put the rest clip on the pick-up arm.
• Remove the protective cap from the stylus.
• Pull the stylus to the lower front and remove it.
• Put in the new stylus following the reverse procedure.
• Replace the protective cap on the stylus.
TO REMOVE THE CARTRIDGE
• Put the rest clip on the pick-up arm.
• Remove the stylus to prevent damage.
• Remove the two cartridge fixing screws.
• Disconnect the four link wires at the back of the cartridge.
TO INSTALL NEW CARTRIDGE
• Connect the four link wires.
• Take care of the receptacle’s colors.
• Install the cartridge in the head shell.
• Install the two cartridge fixing screws.
• Re-install the stylus.
• Replace the protective cap on the stylus.
24ADJUSTING TONE ARM AND PICK-UP CARTRIDGE
Page 25

IMPORTANT RECOMMENDATIONS
We advise you to clean your records using a rag impregnate with an antistatic product for maximum enjoyment of your records and also to make them last.
We would also point out that for the same reason your stylus should be replaced periodically (approximately
every 300 to 500 hours). Dust the stylus from time to time using a very soft brush dipped in alcohol (brushing
from back to front of the cartridge).
WHEN TRANSPORTING YOUR RECORD PLAYER DO NOT FORGET TO:
Replace the protective cap on the stylus. Disconnect the drive belt by stretching it over the motor pulley, and
allow it to wrap back around the inner drive area and then remove the platter by pulling it straight up o the
spindle. Put the rest clip into the pick-up arm.
SELECTING SPEED
With the knob on the left (8) the speed can be set at 33, 45 and 78rpm.
SELECTING RECORD DIAMETER
With the button (6) on the right near the tone arm, the diameter of the records can be pre-set, whereby 17
cm is used for „Single“ and 30 cm for „Long Play (LP)“ vinyl records. This function is necessary only when the
record player is operated in its automatic mode.
25 ADJUSTING TONE ARM AND PICK-UP CARTRIDGE
Page 26

AUTOMATIC START
Remove the transparent stylus guard by carefully pulling it towards you.
The lift lever (5) must be in position
Move the knob (10) into position Start and the tonearm will be automatically lowered onto the record.
MANUEL START
Bring the lift-lever (5) into position
Unlock the tone arm from its rest and move it above the lead-in groove of the record. The motor and platter
will now start turning. By lowering the lift-lever (5) the tone arm gently declines, thus being very kind to your
precious records. With the help of the lift-lever the tone arm may be moved up and down again anywhere
across the record while the platter keeps turning.
STOP
After reaching the lead-out groove the tone arm will be automatically lifted up and returned to its rest. The
motor is switched o. You can also switch o the record player by either moving knob (10) into position Stop,
or by raising lift-lever (5) into
position and returning the tone arm manually to its rest.
.
.
26ADJUSTING TONE ARM AND PICK-UP CARTRIDGE
Page 27

TD 103 A
BEDIENUNGSANLEITUNG
USER GUIDE
MANUEL D’UTILISATION
27
Page 28

Table des matières
Table des matières 28
Cher client THORENS 29
Garantie 30
Précautions de sécurité 31
Caractéristiques techniques 32
Aperçu de l’appareil 33
Déballage et assemblage 34
Branchements 35
Réglages du bras de lecture et du système 36
28TABLE DES MATIÈRES
Page 29

Cher client THORENS,
merci d’accorder votre confiance à notre produit, la platine TD 103 A. Avec l’acquisition de cette pla-tine, vous
disposez d’un instrument de précision pour la reproduction de disques, qui doit être mani-pulé et installé avec
soin, pour qu’il puisse répondre à vos attentes. La fabrication et l’assemblage de cette platine TD 103A sont
entièrement réalisés en Allemagne – ce qui est une garantie de qualité supérieure, même après de longues
années d’utilisation.
Bien entendu, vous souhaiteriez écouter immédiatement de la musique. Cependant nous vous recommandons de lire attentivement ce mode d’emploi avant toute mise en service, afin de pouvoir utiliser de façon
optimale cette platine et d’en profiter le plus longtemps possible. Nous nous sommes eorcés d’inclure dans
cette notice les instructions indispensables et tout ce qu’il est bon de savoir pour une utilisation conforme.
Pour toute autre question, veuillez vous adresser directement à votre revendeur.
Votre équipe Thorens
29 CHER CLIENT THORENS
Page 30

GARANTIE
Les conditions de garantie légale sont applicables. Si un défaut apparaît sur votre appareil pendant la durée
de validité de la garantie, veuillez en informer votre revendeur en lui précisant le type du défaut. Si le défaut
constaté ne peut pas être réparé par l’envoi et le remplacement de la pièce détachée correspondante, retournez l’appareil à Thorens, après accord préalable, dans son emballage d’origine. Si vous ne disposez plus de
l’emballage d’origine, vous pouvez en obtenir un de Thorens contre paiement. L’expédition en retour doit se
faire en port payé. Les marchandises arrivant en port dû ne seront pas acceptées. La réexpédition se fera en
port payé. N’expédiez jamais le tourne-disque sans avoir fixé les vis de sécurité pour le transport.
Les dommages consécutifs au non respect des instructions du mode d’emploi ou à des eets mé-caniques
extérieurs, tels que des dommages de transport, ne sont pas couverts par la garantie. Le garantie ne couvre
que le mécanisme d’entraînement de la platine, son moteur et le bloc secteur. Le bras de lecture et la cellule
de lecture sont garantis par leur fabricant respectif.
Notre service après-vente est à votre entière disposition pour toute autre question.
30GARANTIE
Page 31

Précautions de sécurité
ATTENTION!
Pour empêcher tout risque d’incendie ou de dommage électrique, n’exposez pas l’appareil à l’humidité ou la pluie.
Veuillez ne pas ouvrir l’appareil !
Gardez le matériel d’emballage, tel que les feuilles en plastique, éloignez des enfants. Danger d’étouement.
Mise au rebut des appareils électriques par les consommateurs dans les déchets privés dans l’UE.
À la fin de sa durée de vie, ne jetez pas l‘appareil avec les déchets ménagers normaux.
Demandez les options pour une mise au rebut respectueuse de l‘environnement auprès des autori-
tés locales, dans les centres de recyclage, où là où vous avez acheté l‘appareil.
Ce produit est conforme avec les règlements applicables de l’UE.
31 PRÉCAUTIONS DE SÉCURITÉ
Page 32

Caractéristiques techniques
Entraînment à courrole Entraînment à courrole
Tensions secteur 230V/50Hz
115V/60Hz
Fréquence secteur 50/60Hz
Concommation 1,5W
Vitesses du plateau (tr/mn) 33,3, 45, 78
Tolérance de vitesses +/- 0,06 / 0,035 % DIN/WRMS
Rapport signal/bruit
(DIN 45500)
Signal/tension extérieure de ronflement
Signal/tension perturbatrice de ronflement
Longueur eciace du bras 211mm
Angle de coude 26°
Excédent 19,5mm
Angel tangentiel de l‘erreur de piste 0,15°/cm Rad.
Cellule Ortofon 2M Red
Force d‘appui 17.5mN (1,75g)
Bande passante 20Hz-22kHz
Facteur de transmission 5,5mV / 1000Hz, 5cm/sec.
Capacité de lecture 70um
Poids de cellule 7,2g
Dimensions (LxHxP) 430 x 365 x 130 mm
51 dB
63 dB
32CARACTÉRISTIQUES TECHNIQUES
Page 33

Aperçu de l‘appareil
16 17 18
2
12
1
3
4
14
5
13
7
33 45 78
1: Capot de protection
2: Charnière
3: Contrepoids du bras de lecture
4: Réglage de la force d‘appui du bras de lecture
5: Levier lève-bras
6: Sélection de diamètre des disques
30
17
6
10
9
15
8
11
16 17 18
7: Support et verrouillage du bras
de lecture
12
8: Réglage de la vitesse
9: Ecrou de fixation de la tête de
lecture
10: Start/Stop
2
1
11: Vis de fixation de la tête de lecture
12: Cellule de lecture
13: Réglage du point de descente
du bras de lecture
14: Réglage anti-patinage
15: Dispositif de sécurité pour le
transport
16: Sortie audio
17: borne de mise à la terre
18: Douille de branchement secteur
12 V DC
33 APERÇU DE L‘APPAREIL
Page 34

Déballage et assemblage
Retirez l’appareil ainsi que toutes les pièces
accessoires du carton d’emballage.
Enlevez les deux butées de transport (15) en
les poussant latéralement. Elles se trouvent à
l’avant gauche et à l’arrière droit sous le plateau du tourne-disque.
Posez maintenant le plateau sur la plaque
support du moteur et poussez les deux ressorts d’arrêt vers l’arrière jusqu’à ce qu’ils
s’encliquettent dans l’orifice de l’axe du plateau. Enfoncez les deux charnières (2) dans les
ouvertures prévues à cet eet.
Placez le couvercle (1) parallèlement aux charnières (angle d’ouverture env. 60°) jusqu’à ce
qu’il soit bloqué dans celles-ci. Ainsi, le couvercle peut être enlevé à tout moment.
Fig. 1
Fig. 3
Fig. 2
34DÉBALLAGE ET ASSEMBLAGE
Page 35

Branchements
L’utilisation d’un transformateur d’alimentation
THORENS correspondant vous permet de
connecter le tourne-disque à toutes les tensions alternatives existantes. La fiche basse
tension du câble transformateur d’alimentation
doit être enfoncée dans la prise (18) à l’arrière
de l’appareil.
Le cordon de raccordement stéréo possède
deux fiches phono (aussi appelées fiches
Cinch ou fiches RCA par certains fabricants).
Elles sont, soit marquées d’un L pour le canal
gauche, soit d’un R pour le canal droit. À défaut de ces lettres, le canal droit est en rouge
et le canal gauche en blanc. Les fiches Cinch
doivent être enfoncées dans les prises phono de l’amplificateur ou du récepteur (16). Le
cordon livré séparément assure la connexion al
la masse ou à la terre (17). Veuillez le coincer
sous la borne de masse de l’amplificateur.
35 BRANCHEMENTS
Page 36

Réglages du bras de lecture et du système
Amenez le bouton de réglage de la force d’appui (4) sur 0 et tournez le bouton de réglage
de l’anti-skating (14) dans le sens inverse des
aiguilles d’une montre jusqu’au blocage complet.
Vissez maintenant le contrepoids du bras (3)
sur l’extrémité arrière du bras de lecture.
Déverrouillez le bras de lecture (7) et déplacez-le vers l’intérieur. Actionnez le levier du
lève-bras en tenant le bras de lecture. En tournant le contrepoids (3), vous pouvez
exactement équilibrer le bras, ce dernier doit
se mouvoir librement.
Ramenez le bras sur le repose-bras, Maintenant, vous pouvez régler la valeur de la force
d’appui (4) et de l’antiskating (14). Pour le
système Ortofon 2M Red intégré, il est recommandé de régler la valeur à 17,5 mN.
Veuillez tenir compte du tableau suivant:
Force d‘appui 4 Anti-patinage 14
1 = 10 mN 1
1,25 = 12,5 mN 1.25
1,5 = 15 m 1.5
2M Red —> 1,75 = 17,5 mN 1.75
2 = 20 mN 2
2,5 = 25 mN 2.5
3 = 30 mN 3
36RÉGLAGES DU BRAS DE LECTURE ET DU SYSTÈME
Page 37

REMPLACEMENT DU DIAMANT :
• Fixez le bras sur son support
• Enlevez le capuchon de protection du diamant
• Abaissez le diamant le plus bas en avant pour le retirer.
• Mettre le nouveau diamant en refaisant la procédure à l’inverse.
• Remettez le capuchon de protection du diamant.
CHANGEMENT DE CELLULE :
• Fixez le bras sur son support
• Retirez le diamant préalablement pour éviter tout dommage.
• Retirez les deux vis de fixations
• Déconnectez en douceur les 4 fils au dos de la cellule.
INSTALLER UNE NOUVELLE CELLULE :
• Reconnectez les 4 fils (noir, blanc, jaune, rouge)
• Faire bien attention à respecter le code couleurs.
• Installez la cellule sur son support.
• Repositionnez les deux vis de fixations
• Remettez le diamant
• Puis le capuchon de protection du diamant.
37 RÉGLAGES DU BRAS DE LECTURE ET DU SYSTÈME
Page 38

RECOMMANDATIONS IMPORTANTES :
Nous vous conseillons de nettoyer vos disques avec un chion adéquat imprégné d’un produit antistatique
approprié de manière à obtenir un maximum de plaisir et aussi les préserver.
Nous aimerions également attirer votre attention sur le fait d’entretenir et de changer votre diamant pour ces
mêmes raisons régulièrement (environ : Toutes les 300 - 500 heures) .
Dépoussiérez le diamant à chaque utilisation à l’aide d’une brosse souple trempée dans de l’alcool (brossez
en douceur de l’arrière vers l’avant de la Cellule).
QUAND VOUS TRANSPORTEZ VOTRE PLATINE N’OUBLIEZ PAS DE :
Repositionnez le capuchon de protection sur le diamant. De retirer la courroie de dessus la poulie, en l’étirant,
lui permettant ainsi d’aller s’enrouler autour du plateau d’entraînement De retirer le plateau en l’enlevant de
l’axe de rotation. N’oubliez pas de verrouiller le bras sur son support.
Sélection de vitesse
Le bouton gauche vous permet de régler (8) les vitesses 33 t/mn, 45 t/mn ou 78 t/mn.
Sélection de diamètre des disques
Le bouton (6) à droite du bras de lecture permet de régler le diamètre des disques (17 cm et 30 cm).
Cette opération est uniquement nécessaire pour la mise en marche automatique.
38RÉGLAGES DU BRAS DE LECTURE ET DU SYSTÈME
Page 39

Mise en marche automatique
Enlevez le protège pointe transparent, en le tirant vers l’avant. Le levier du lève-bras (5) doit être actionné.
Placez le levier de commande en position START (10) afin que le bras de lecture se positionne automatique-
ment sur le disque.
Mise en marche manuelle et utilisation du lève-bras
Actionner le levier du lève-bras (5).
Enlevez le bras de lecture du repose-bras et placez-le sur le sillon d’entrée du disque. Le moteur d’entraîne-
ment se met en marche. Le bras de lecture est ralenti par le levier du lève-bras (5), ensuite il s’abaisse délicatement sur le disque.
Le levier du lève-bras permet de relever le bras à n’importe quel point, même pour des arrêts de courte durée.
Le plateau du tourne-disque continue de tourner.
Arrêt
Lorsque le bras de lecture arrive à l’extrémité du disque, il revient automatiquement sur le repose-bras, et
l’appareil arrête de fonctionner. Vous pouvez aussi éteindre le tourne-disque en amenant le levier de commandement (5) dans la position STOP (10), ou en actionnant le levier du lève-bras et en ramenant manuellement le
bras sur le repose-bras.
39 RÉGLAGES DU BRAS DE LECTURE ET DU SYSTÈME
Page 40

Thorens GmbH
Lustheide 85 · 51427 Bergisch Gladbach · Deutschland
www.thorens.com · info@thorens.com
www.thorens.com
 Loading...