

Page 1
H-H.264IP-E
Network Encoder
Revision 2.3-2016
Thor Broadcast 2016 Tel: (800) 521-8467 Email: [email protected] http://www.thorbroadcast.com
Page 2

H-H.264IP-E
A Note from Thor Broadcast about this Manual
Intended Audience
This user manual has been written to help people who have to use, integrate and to install the
product. Some chapters require some prerequisite knowledge in electronics and especially in
broadcast technologies and standards.
Disclaimer
No part of this document may be reproduced in any form without the written permission of
Thor Broadcast.
The contents of this document are subject to revision without notice due to continued
progress in methodology, design and manufacturing. Thor Broadcast shall have no liability
for any error or damage of any kind resulting from the use of this document.
Copy Warning
This document includes some confidential information. Its usage is limited to the owners of
the product that it is relevant to. It cannot be copied, modified, or translated in another
language without prior written authorization from Thor Broadcast.
Thor Broadcast 2016 Tel: (800) 521-8467 Email: [email protected] http://www.thorbroadcast.com
Page 3

H-H.264IP-E
Table of Contents
CHAPTER 1 - INTRODUCTION ......................................................................................................................... 4
1.1 P
RODUCT OVERVIEW
1.2 K
EY FEATURES
1.3 S
PECIFICATIONS
1.4 P
RINCIPLE CHART
1.5 A
PPEARANCE AND DESCRIPTION
1.6 S
YSTEM CONNECTION SAMPLES
CHAPTER 2 - INSTALLATION GUIDE ................................................................................................................ 7
2.1 S
AFET Y INSTRUCTIONS
CHAPTER 3 – WEB NMS OPERATION .............................................................................................................. 8
3.1 L
3.2 O
CHAPTER 4 – NETWORK CONNECTION AND SETUP...................................................................................... 14
CHAPTER 5 - TROUBLESHOOTING ................................................................................................................ 17
CHAPTER 6 -PACKING LIST ........................................................................................................................... 18
.................................................................................................................................................... 8
OGIN
PERATION
............................................................................................................................................. 9
............................................................................................................................... 4
........................................................................................................................................ 4
...................................................................................................................................... 5
................................................................................................................................... 5
............................................................................................................... 6
................................................................................................................ 6
............................................................................................................................. 7
Thor Broadcast 2016 Tel: (800) 521-8467 Email: [email protected] http://www.thorbroadcast.com
Page 4

H-H.264IP-E
Chapter 1 - Introduction
1.1 Product Overview
The Thor Broadcast H-H.264IP-E is a single channel encoder with multiple input options to stream any
HDMI/YPpBr input into an MPEG4 stream that is web managed and can be viewed over LAN or Public
Internet. This compact unit brings you big time result broadcast HDMI compliant video source in HD
Resolution in H.264 format in a compression format that makes it easy to view on most internet ready devices
with browsers. Use your IP STB, PC or TV to watch your programs anywhere. Whether you are in your house
or across the globe, you'll never miss a game or your favorite show.
The device supports HDMI compliant input and encodes in MPEG 4 AVC/H.264 format. After that, it pushes
the IP signal output over UDP (unicast/multicast), RTMP and HLS. The USB port is designed to record and
save the encoded video (TS) in ts* files in the USB thumb or Hard Disks and play it back through IP output to
increase your content options.
http://thorbroadcast.com/sklep-204/produkt-237
1.2 Key Features
Easy set-up
Watch and control your live and recorded TV shows anywhere, anytime
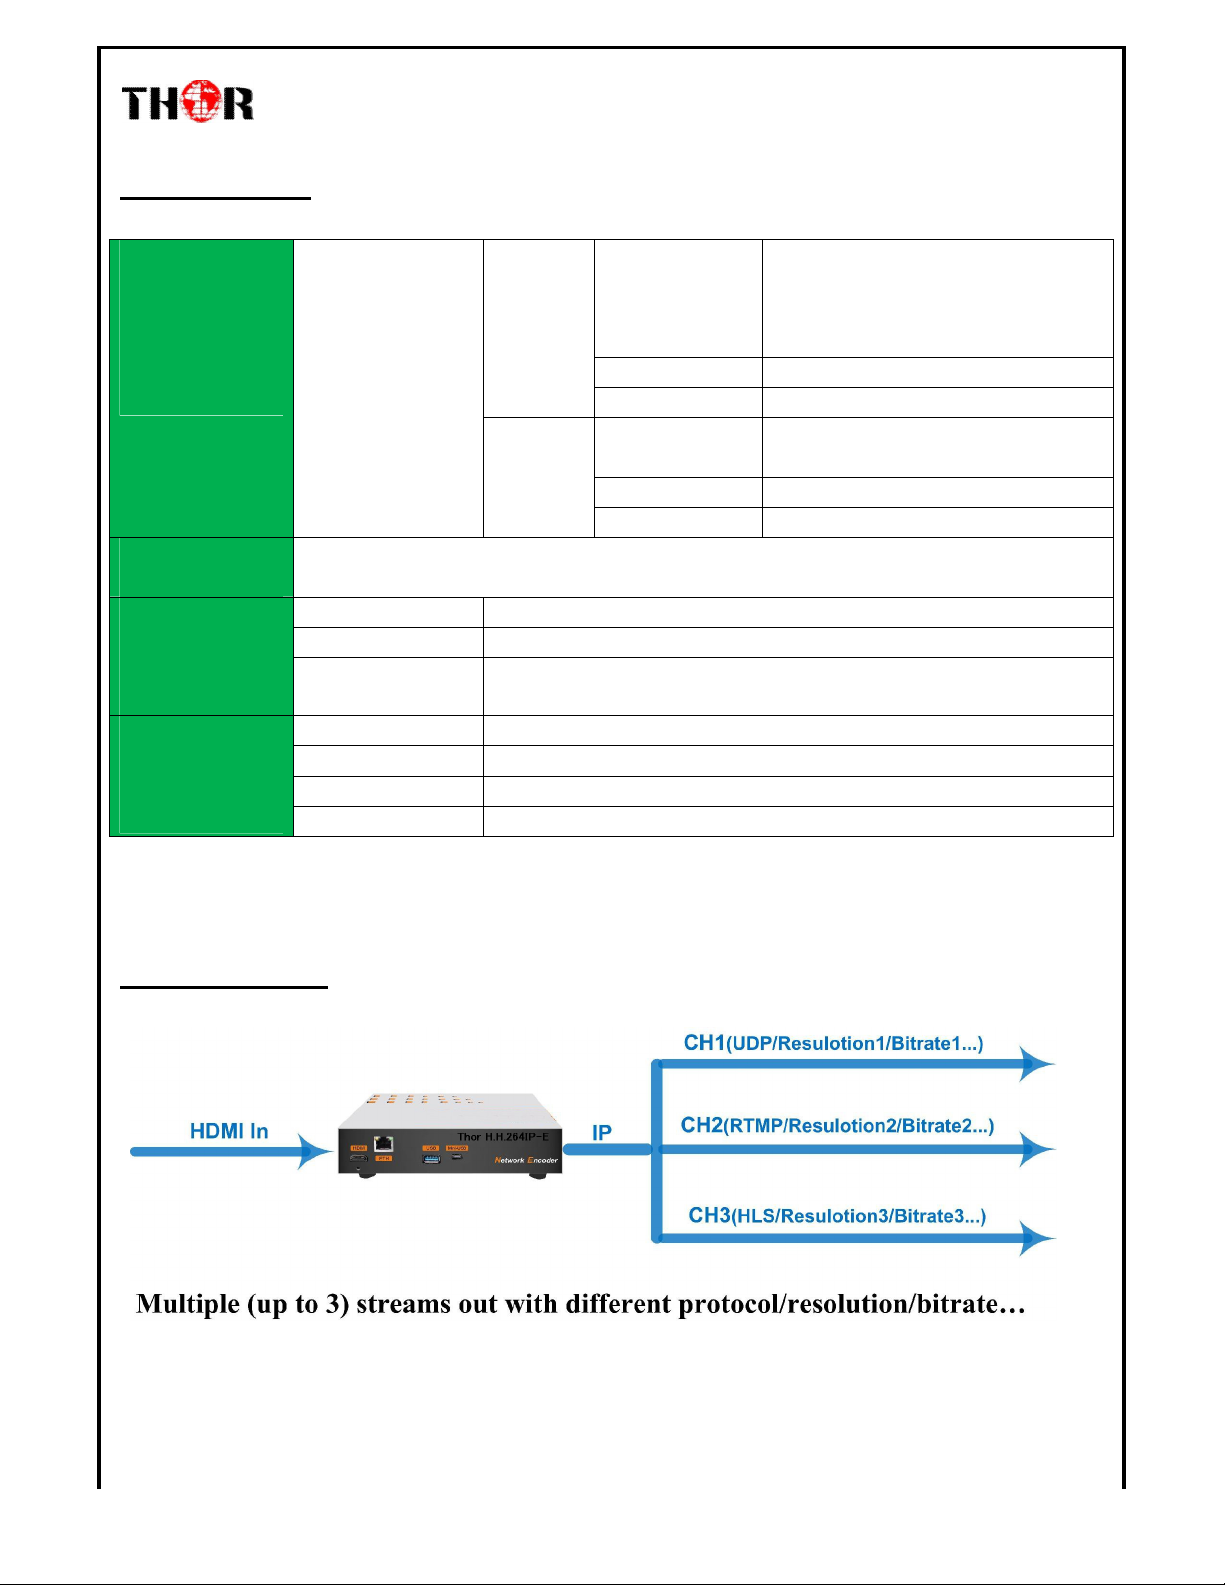
Multiple streams out with different protocol/resolution/bitrate…
Resolution downscale conversion
HLS Protocol supports Apple terminals simultaneously running as per different resolution and
bitrate setting
USB port for TS recording and playing back, increase signal source options
HDMI input
IP Output over UDP(unicast/multicast), RTMP, HLS
Thor Broadcast 2016 Tel: (800) 521-8467 Email: [email protected] http://www.thorbroadcast.com
Page 5
1.3 Specifications
H-H.264IP-E
Encoder
Stream Out
System
General
HDMI input
Video
Resolution
Encoding
Bit rate
Audio
Encoding
Sample rate
Bitrate
1920x1080_60p, 1920x1080_60i
1920x1080_50p,1920x1080_50i
1280x720_60p ,1280x720_50p
720x576_60i ,720x576_50i
MPEG-4 AVC/H.264
1Mbps~15Mbps
MPEG1 Layer II, MPEG2-AAC,
MPEG4-AAC
48KHz, 44.1KHz(RTMP)
48,64, 96, 128kbps
IP out over UDP (Unicast/multicast), RTMP, HLS (RJ45, 100/1000M self-adaption)
Remote control
Language
Upgrade
Approx weight
Operation temp.
Power supply
Dimensions
Web-server NMS
English control interface
USB/NFS
≤1Kg
0~45 degrees Celsius
DC12V
183*110*45mm
1.4 Principle Chart
Thor Broadcast 2016 Tel: (800) 521-846 Email: [email protected] http://www.thorbroadcast.com
Page 6
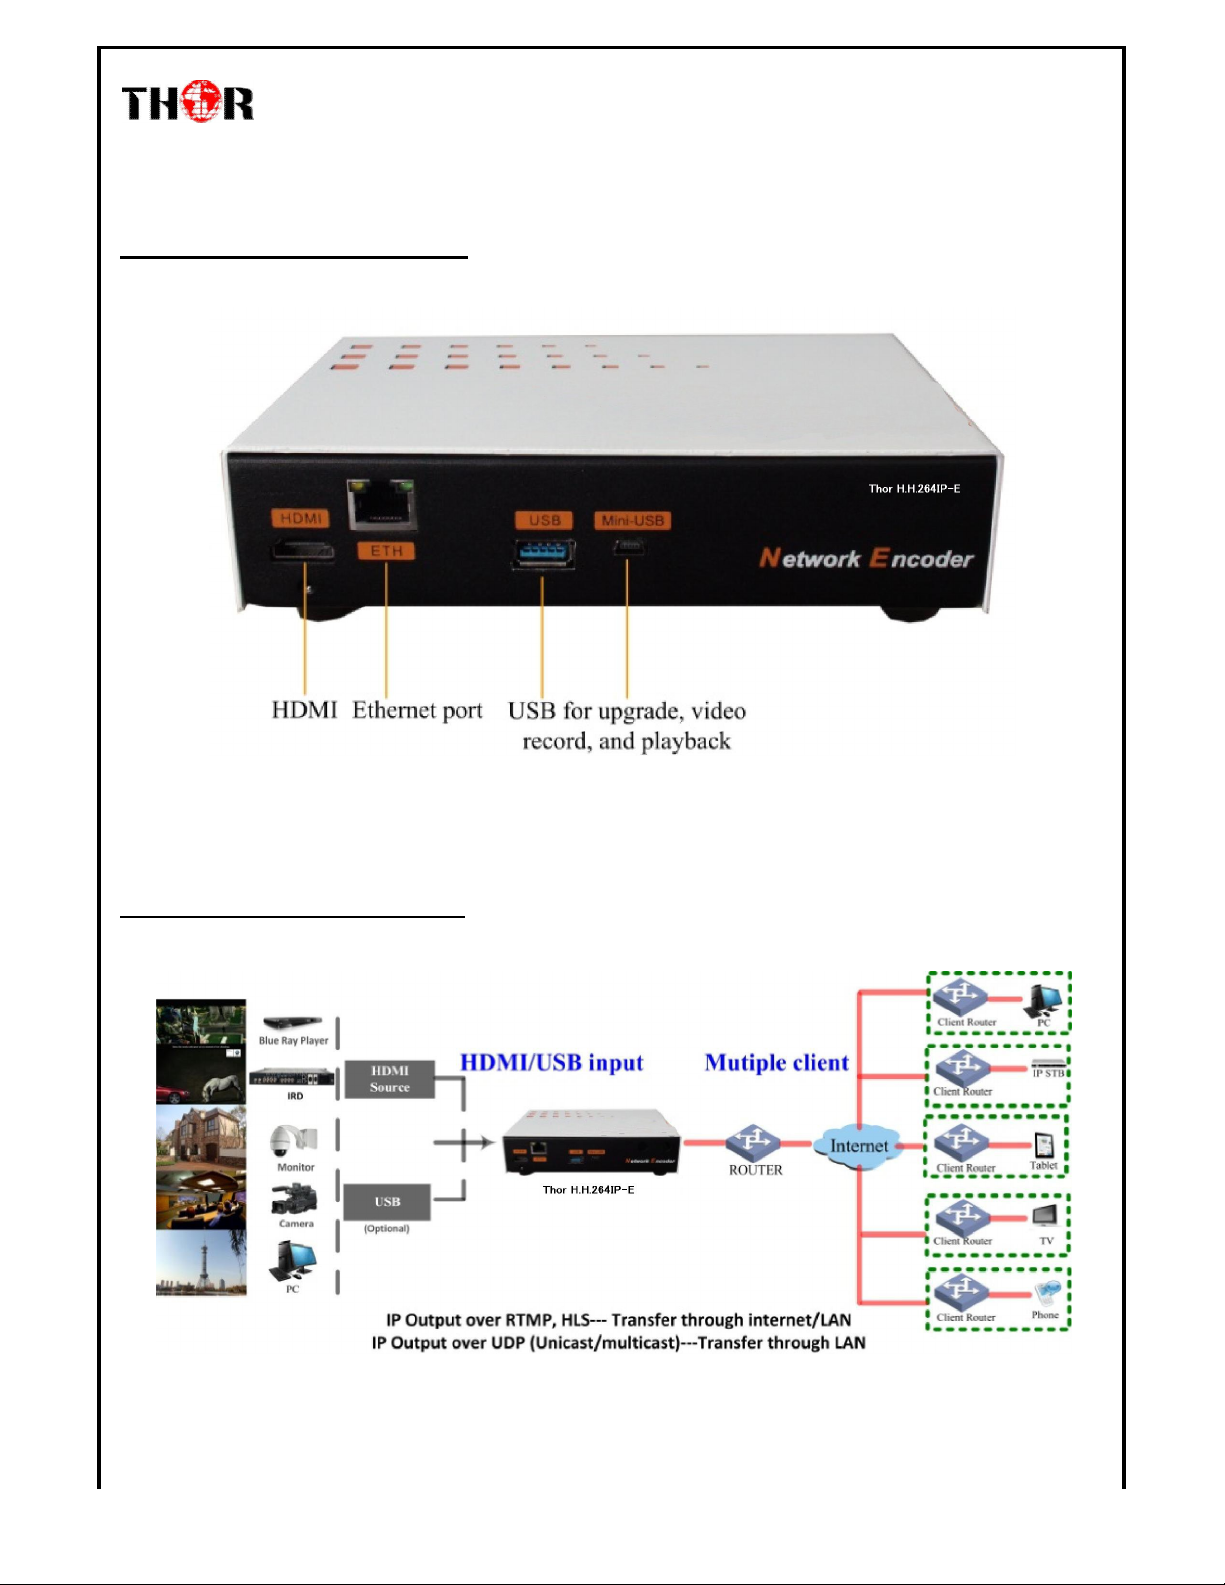
1.5 Appearance and Description
H-H.264IP-E
1.6 System Connection Samples
Thor Broadcast 2016 Tel: (800) 521-8467 Email: [email protected] http://www.thorbroadcast.com
Page 7

H-H.264IP-E
Chapter 2 - Installation Guide
Please use caution when installing the device
2.1 Safety Instructions
WARNING: To prevent fire or electrical shock, do not expose the device to rain or moisture.
The network encoder is powered with a voltage of 12V DC. The power supply voltage must not
exceed the recommended voltage, which otherwise may cause irreparable damage to the device and
the invalidation of the warranty. Therefore:
Do not replace power supply with a voltage greater than 12V DC.
Do not connect the device to a power outlet if the power cord is damaged.
Do not plug the device into socket until all cables have been connected correctly.
Do not cut the cord.
Avoid placing the device next to any central heating components and in any areas of high humidity.
Do not cover the device with anything that obstruct the ventilation slots.
If the network encoder has been kept in cool conditions for a long time, keep it in a warm room
minimum 2 hours before plugging into the power supply.
Mount the device in vertical position with the connectors located on the top.
Safety check- Upon completion of any service or repairs to this device, ask the service technician to
perform safety checks to determine that the device is in proper condition. Call Thor Fiber***
Thor Broadcast 2016 Tel: (800) 521-8467 Email: sales@thor fiber.com http://www.thorbroadcast.com
Page 8
H-H.264IP-E
Chapter 3 – WEB NMS Operation
In order to operate this unit you must connect it to a workstation for control; the network encoder and
USB device, users can just perform the operation with the web Brower in the PC (Personal Computer).
3.1 Login
The default IP address of this device is 192.168.200.64. (We can modify the IP through the front
panel.)
Connect the PC and the network encoder with an ethernet cable, and use ping commands to confirm
they are on the same network segment.
I.G. the device IP address is 192.168.200.64 we then change the PC IP to 192.168.200.xxx (xxx can be
1 to 254 except 64 to avoid IP conflict).
Use any web browser to connect the device with the PC by inputting the device’s IP address in the
browser’s address bar and press Enter.
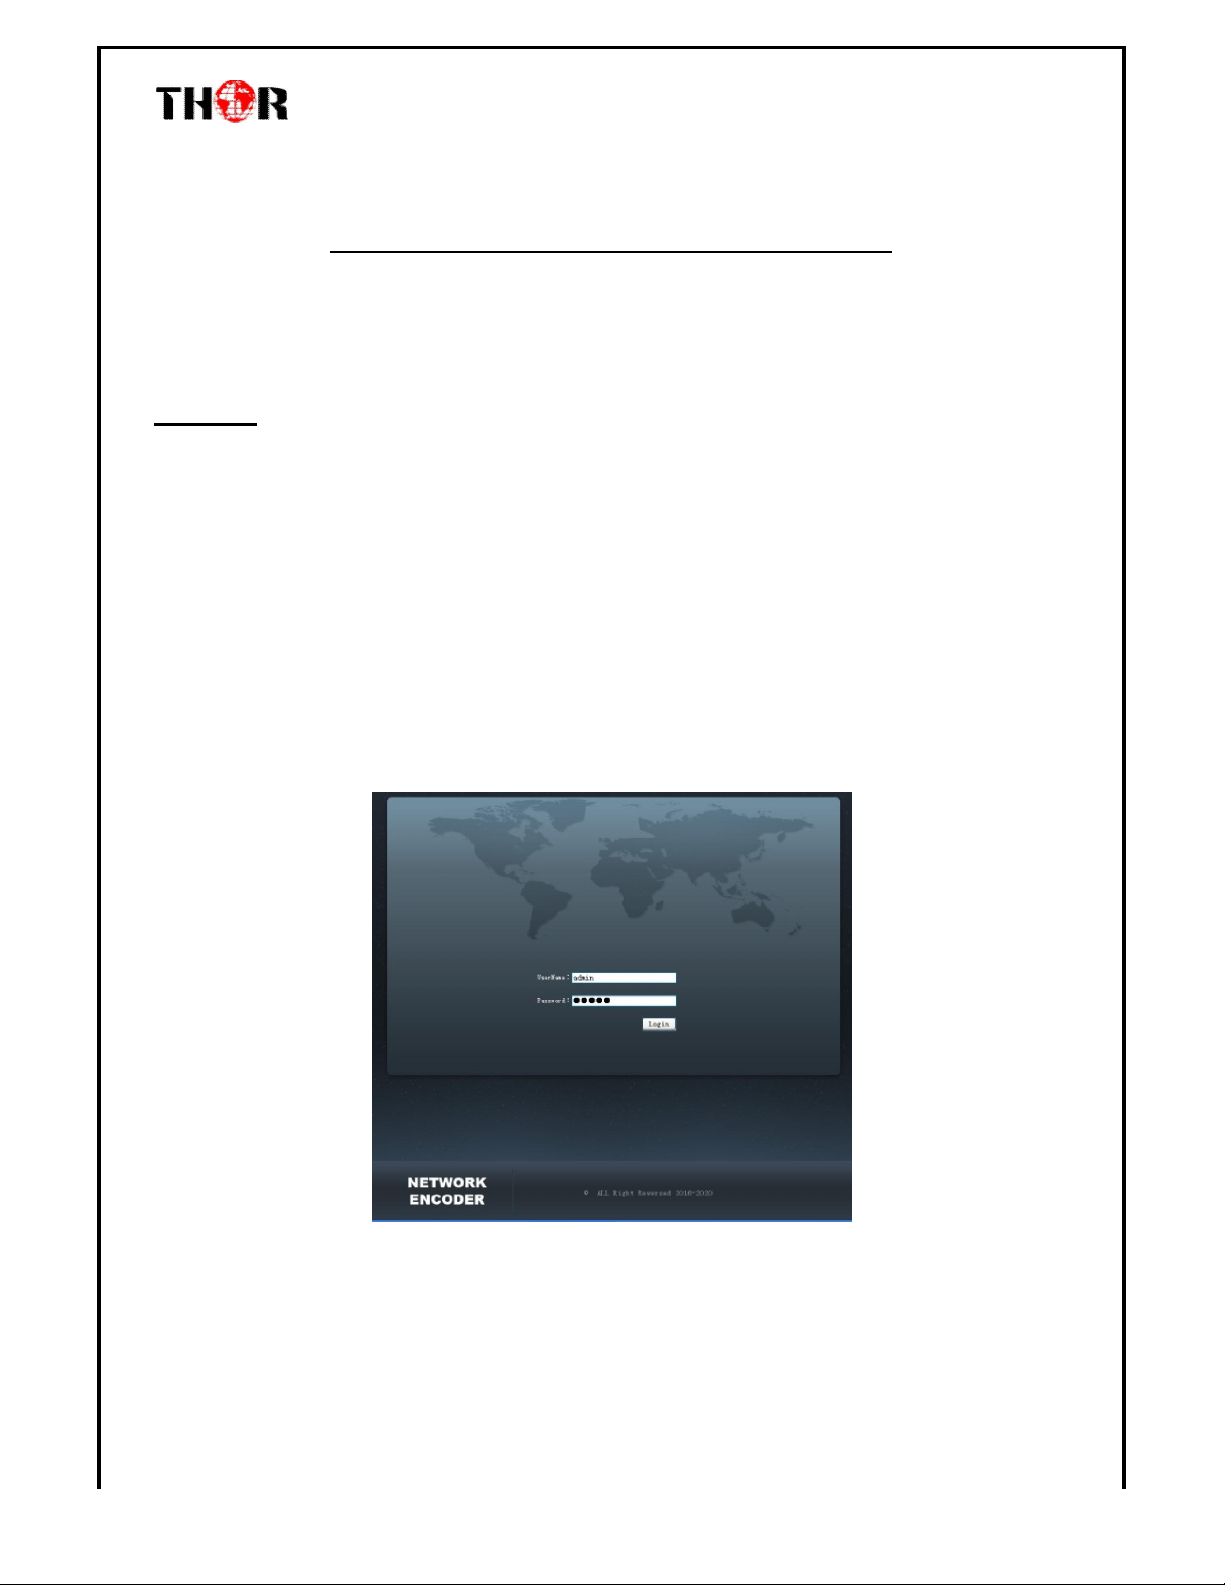
It will display the Login interface as shown in Figure-1. Input the Username and Password (Both the
default Username and Password are “admin”.) and then click “Login” to start the device.
Figure-1
Thor Broadcast 2016 Tel: (800) 521-8467 Email: sales@thor fiber.com http://www.thorbroadcast.com
Page 9
record file to USB or hard disks.
H-H.264IP-E
3.2 Operation
Summary:
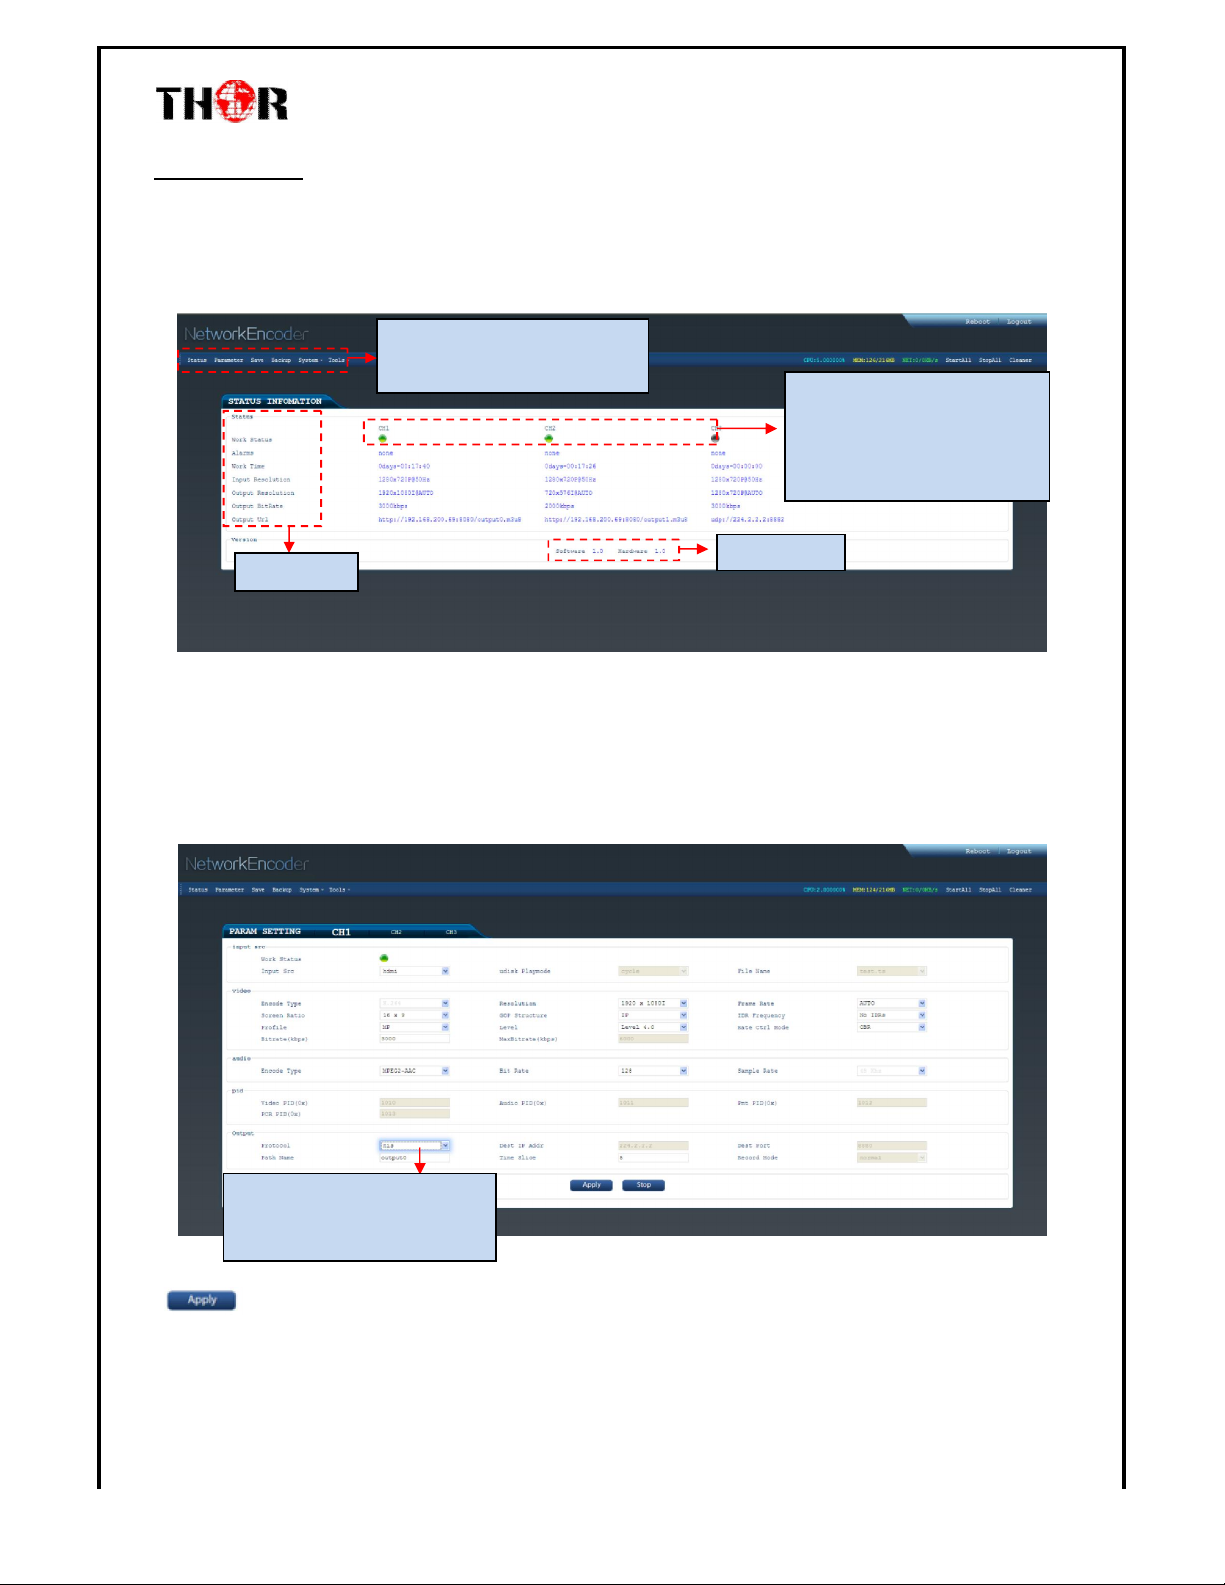
When you confirm the login, it displays the WELCOME interface as in Figure-2 where you can have
an overview of the device’s system information and working status.
User can click any item here to enter the
corresponding interface to check information
or set the parameters.
Alarm Area: Green light indicates the
corresponding item is in normal status.
Otherwise the light is gray.
Thor supports up to 3 streams out
with different protocol, resolution, bitrate,
etc.
Status information
Version information
Figure-2
Parameters → Channel 1/2/3:
From the menu on the top side of the web gui, click “CH1”or “CH2” or”CH3”, it will then display the
interface where you can configure the encoding parameters for the output channel. The Thor Broadcast
H-H264IP-E supports up to 3 streams out with different protocol, resolution, bitrate, etc. (Figure-3)
Save/Restore:
Thor Broadcast 2016 Tel: (800) 521-8467 Email: sales@thor fiber.com http://www.thorbroadcast.com
Supports IP output over UDP
(unicast/multicast), RTMP and HLS.
User can choose the output protocol and
Figure-3
Click this button to apply the modified parameters.
Page 10
H-H.264IP-E
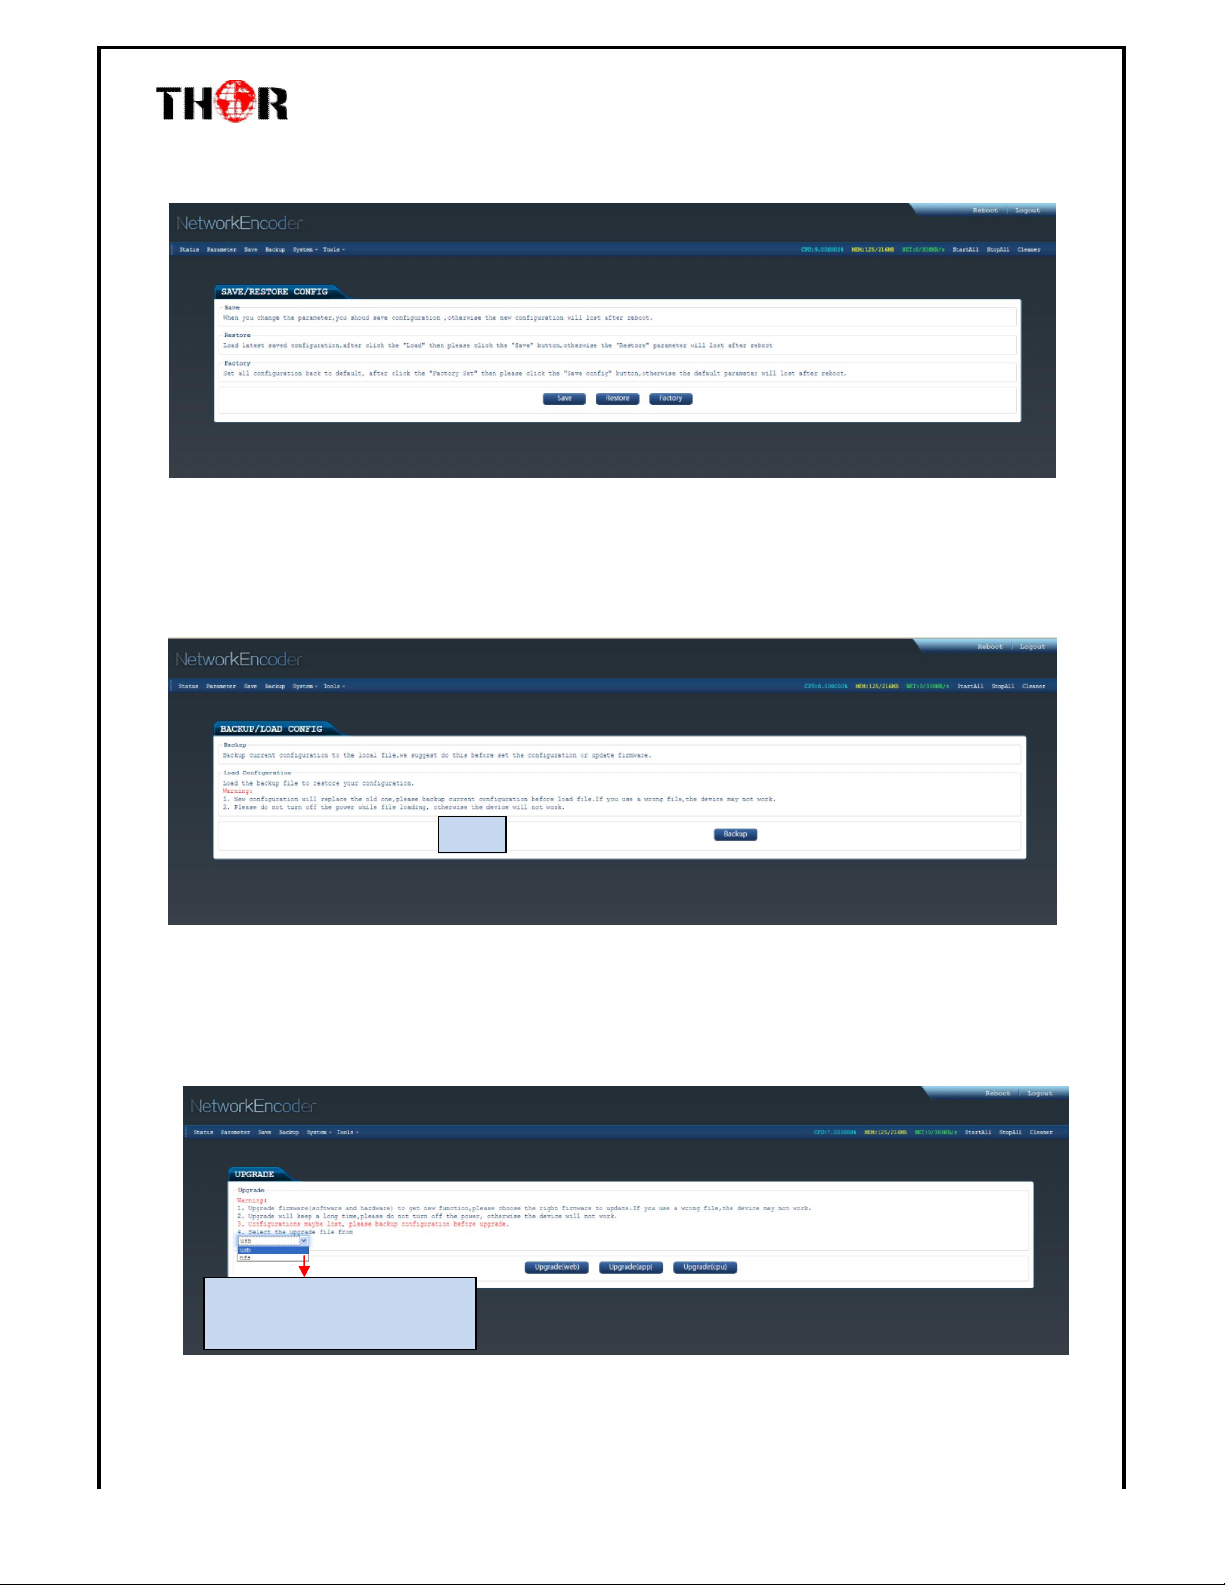
From the menu on the top side of the webpage, click “Save/Restore”, it will display the screen as
Figure-4 where to save or restore your configurations.
Figure-4
Backup/Load:
From the menu on the top side of the webpage, click “Backup”, it will display the screen as Figure-5
where to backup or load your configurations.
Browse…
Figure-5
System → Update (Web)/(App)/(CPU):
From the menu on the top side of the webpage, click “Update”, it will display the screen as Figure-6
where you can update the corresponding part for the device.
There are 2 types of ways to upgrade web,
app, and CPU. One is USB, the other is
network
Figure-6
Thor Broadcast 2016 Tel: (800) 521-8467 Email: sales@thor fiber.com http://www.thorbroadcast.com
Page 11
H-H.264IP-E
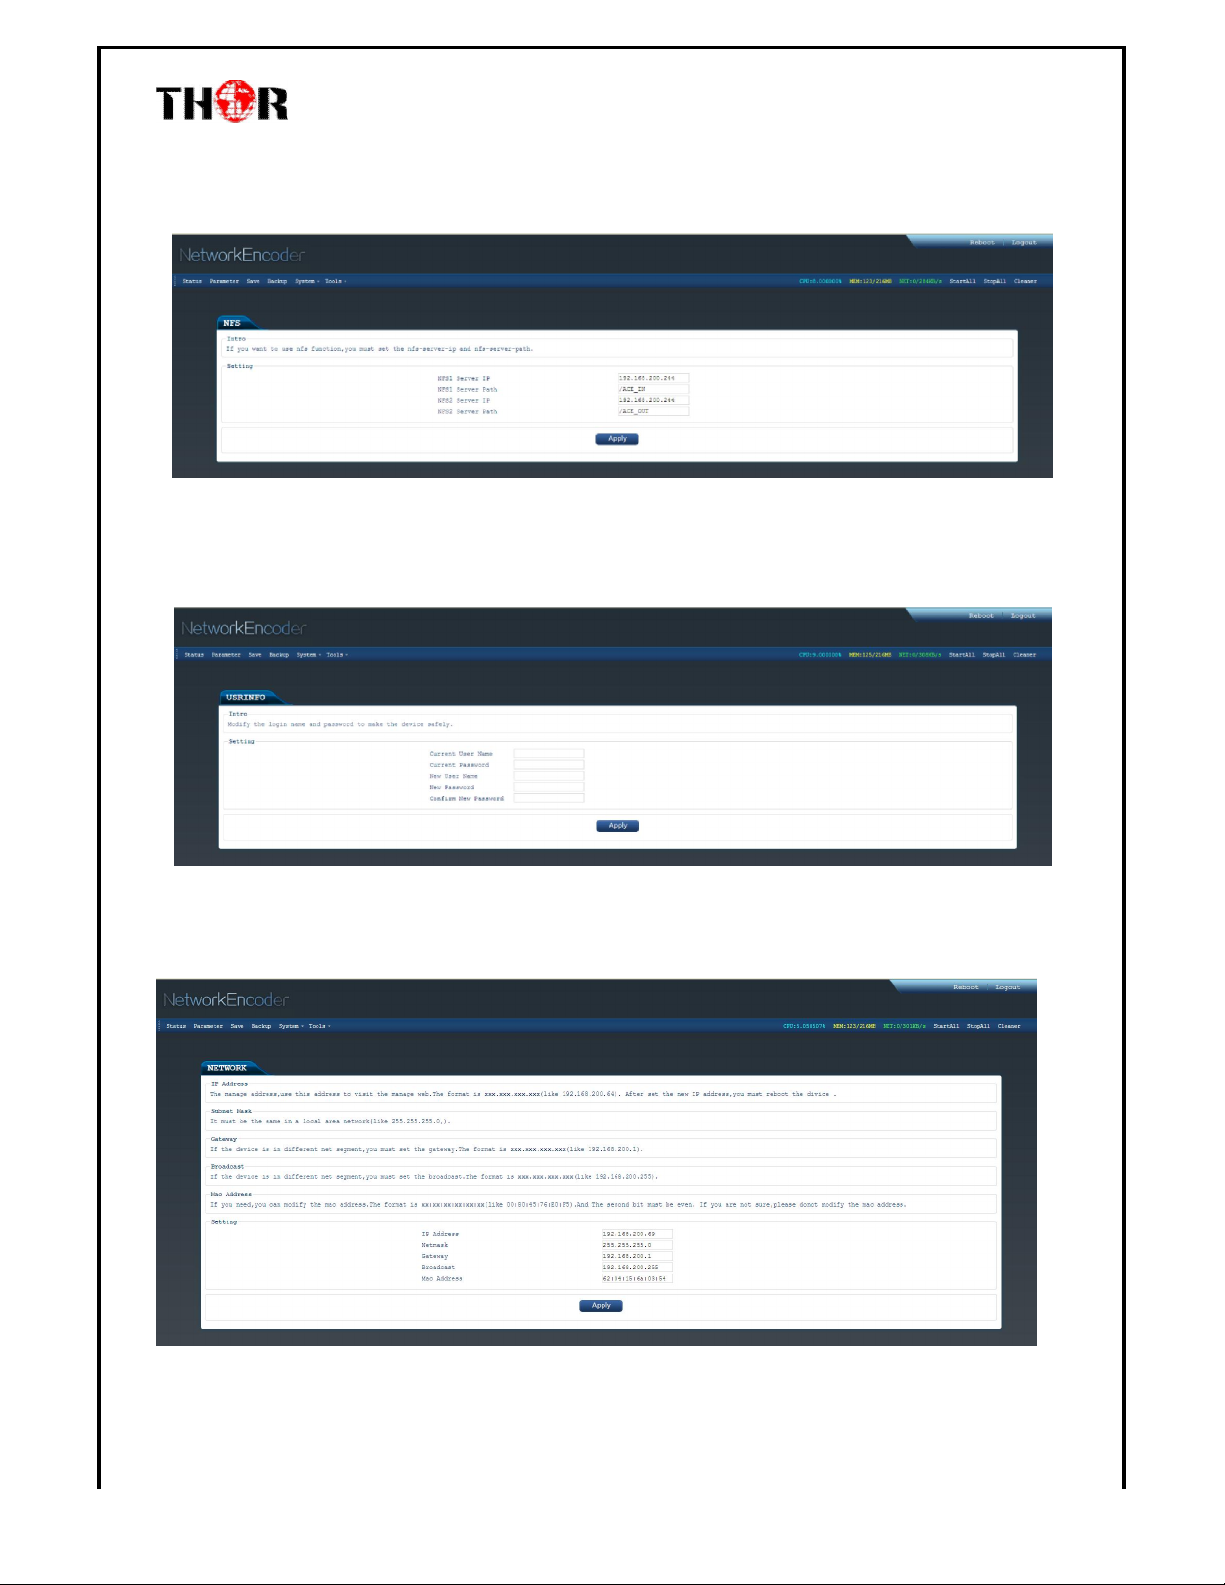
Tools→NFS:
Before upgrading NFS, you should connect the NFS server IP by entering the NFS server IP address
and server path.( Figure-7)
Figure-7
System → Password:
From the menu on the top side of the webpage, click “Password”, it will display the screen as Figure-8
where to set the login account and password for the web NMS. (Figure-8)
Figure-8
System→Network:
Click ‘Network’, it will display the interface as Figure-9 where to set network parameters.
Figure-9
Thor Broadcast 2016 Tel: (800) 521-8467 Email: sales@thor fiber.com http://www.thorbroadcast.com
Page 12
H-H.264IP-E
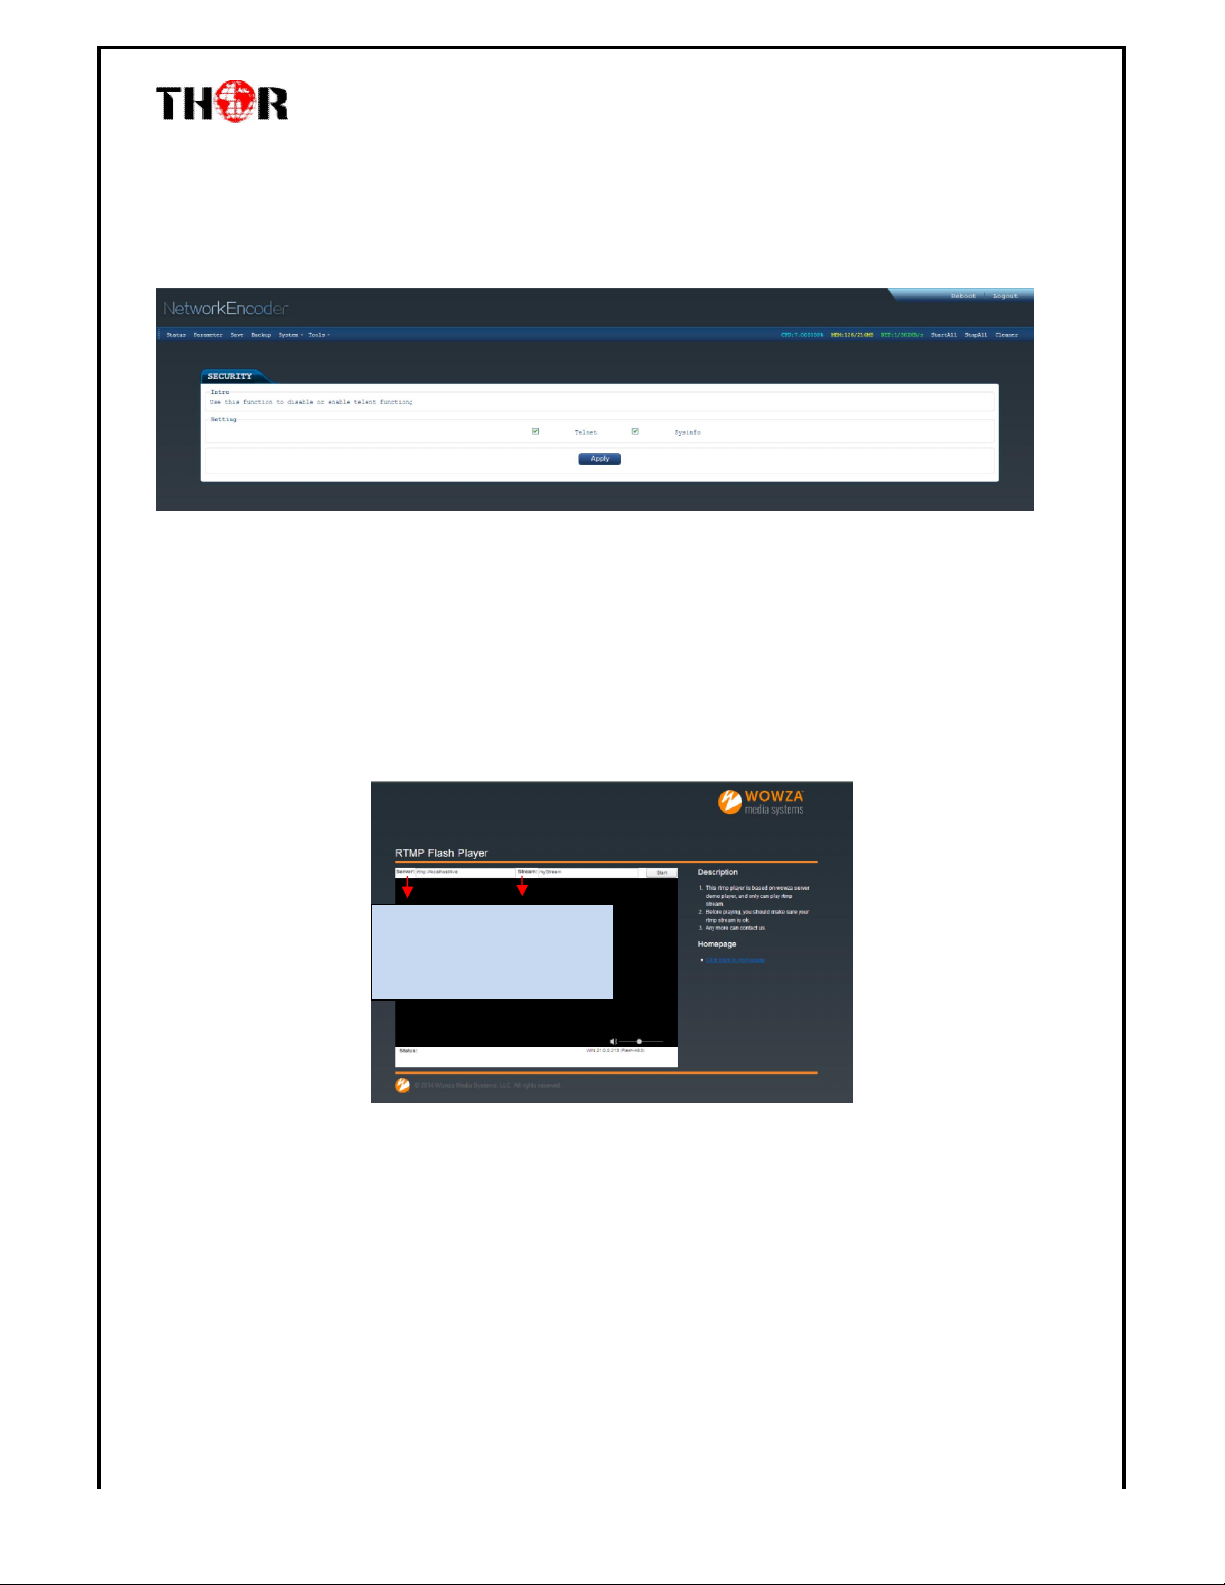
Tools→Security:
From the menu on the top side of the webpage, click “Security”, it will display the screen as Figure-10
where to disable or enable telnet function for the device.
Figure-10
Tools→RTMP:
From the menu on the top side of the webpage, click “RTMP”, it will display the screen as Figure-11
where to set the RTMP flash player for the device.
Users should change “local host” to
server IP address, and change “my
stream” to path name, and then click
“start” to play RTMP output protocol
Figure-11
Thor Broadcast 2016 Tel: (800) 521-8467 Email: sales@thor fiber.com http://www.thorbroadcast.com
Page 13
H-H.264IP-E
USB:
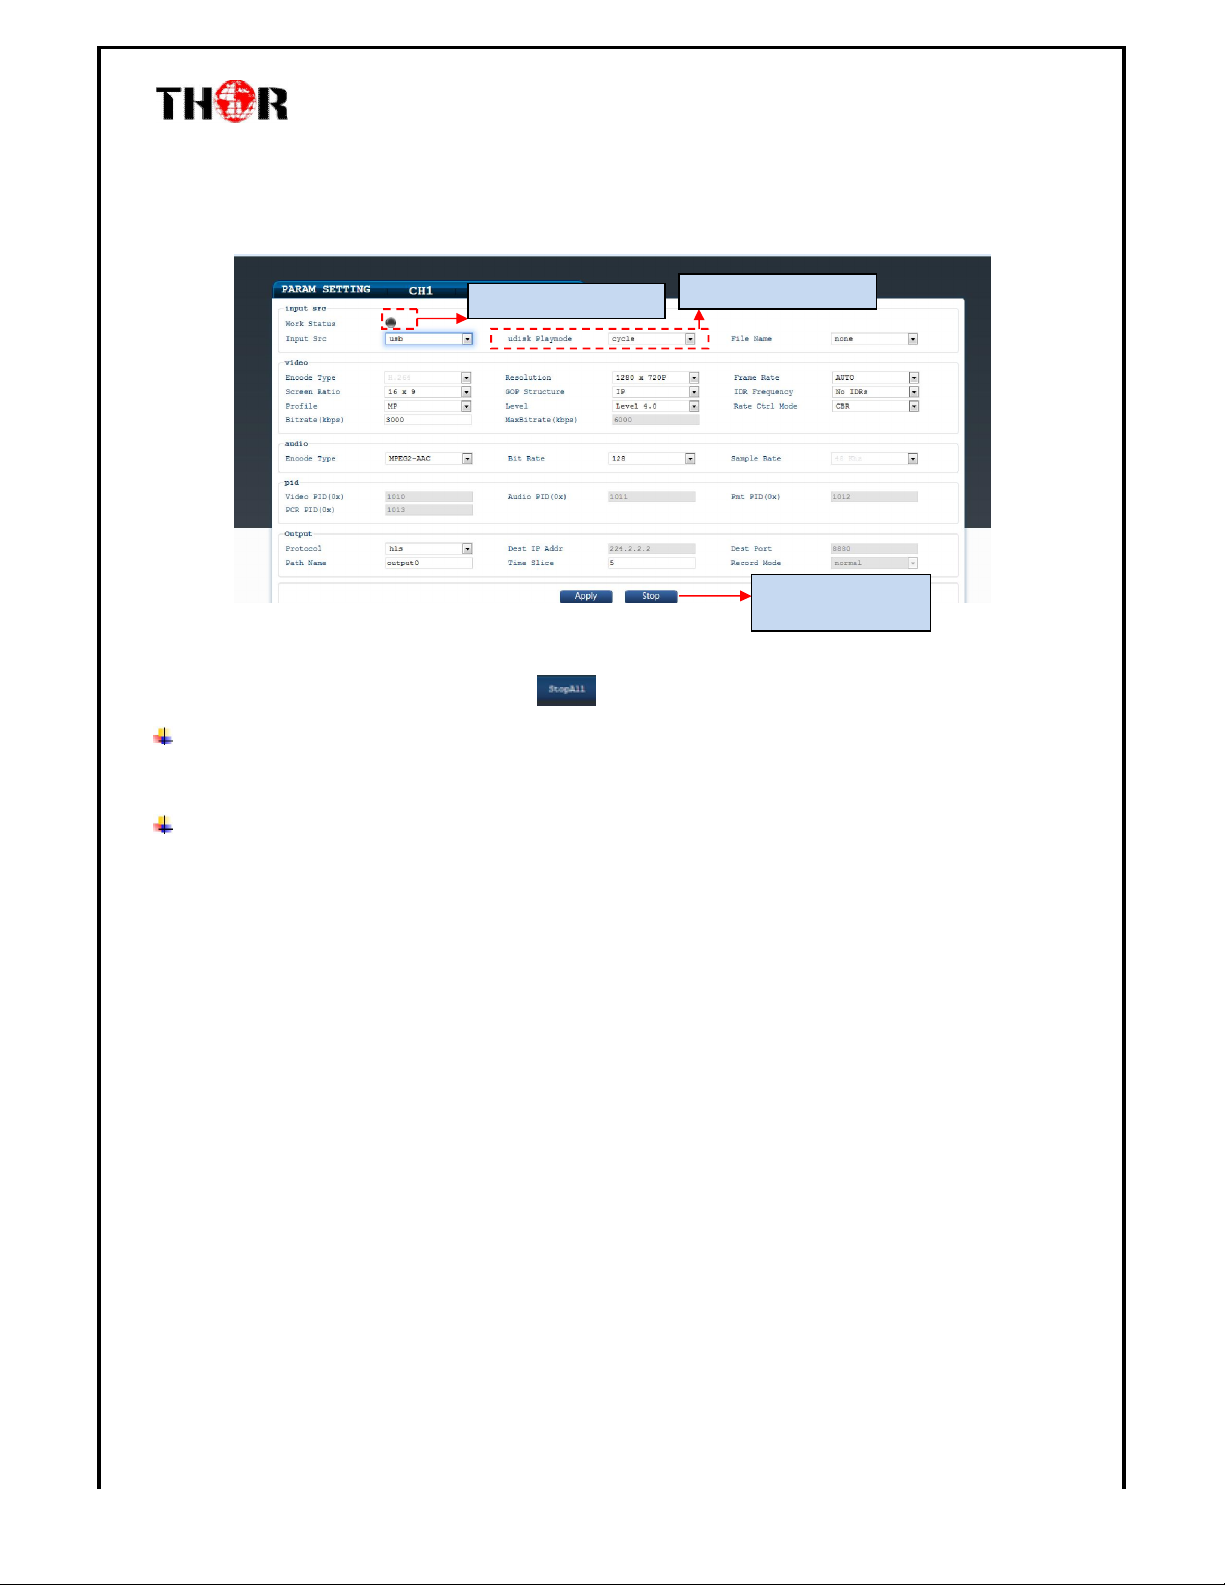
From the menu on up side of the webpage, clicking “USB”, it displays the interface where users can
operate USB device. (Figure-12)
For reading USB device status
Figure-12
For selecting USB play mode
To stop USB device recording
or playing TS
Before setting up USB, you should click “ ” to stop all output.
NOTE: It is necessary to connect and USB device and signal source and activate encoding to
operate TS recording.
NOTE: It is necessary to connect USB device when operating the TS play function.
Detailed Explanation:
There are 3 record modes provided:
“Single file”: For example, when the file size is set as 1000M and the *.ts is recorded up to 1000M,
it automatically stops recording TS.
“Cycle file”: For example, when the file size is set as 1000M and the *.ts is recorded up to 1000M,
it automatically saves the files and continues to record TS and save it to next file until the USB
memory is full.
“Loop record”: It automatically saves the files and continues to record TS and save it to next file.
When the USB memory is full, it replaces the previous file.
Advanced Configurations:
File Name: Users can enter this menu to edit name for the *.ts files to be recorded. For example, if
users name it “Record-”, it will give that name to the saved *.ts files “Record-001.ts”,
“Record-002.ts”… “Record-00N.ts”.
Thor Broadcast 2016 Tel: (800) 521-8467 Email: sales@thor fiber.com http://www.thorbroadcast.com
Page 14
Http://IP
address: IP port/program name. m3u8
H-H.264IP-E
Chapter 4 – Network Connection and Setup
Situation:LAN network
This is applicable for users on a LAN network, like at home.
STB/
DVD/
Camera/
USB Pen
Steps:
1. Connect to STB/DVD etc with signal cable or insert USB memory with xx.ts files to provide signal
source.
2. Connect to Wi-Fi router (Keep the encoder IP and router IP in the same network segment.)
3. Connect the Wi-Fi between the mobile terminals and the router.
4. Play the video/Audio
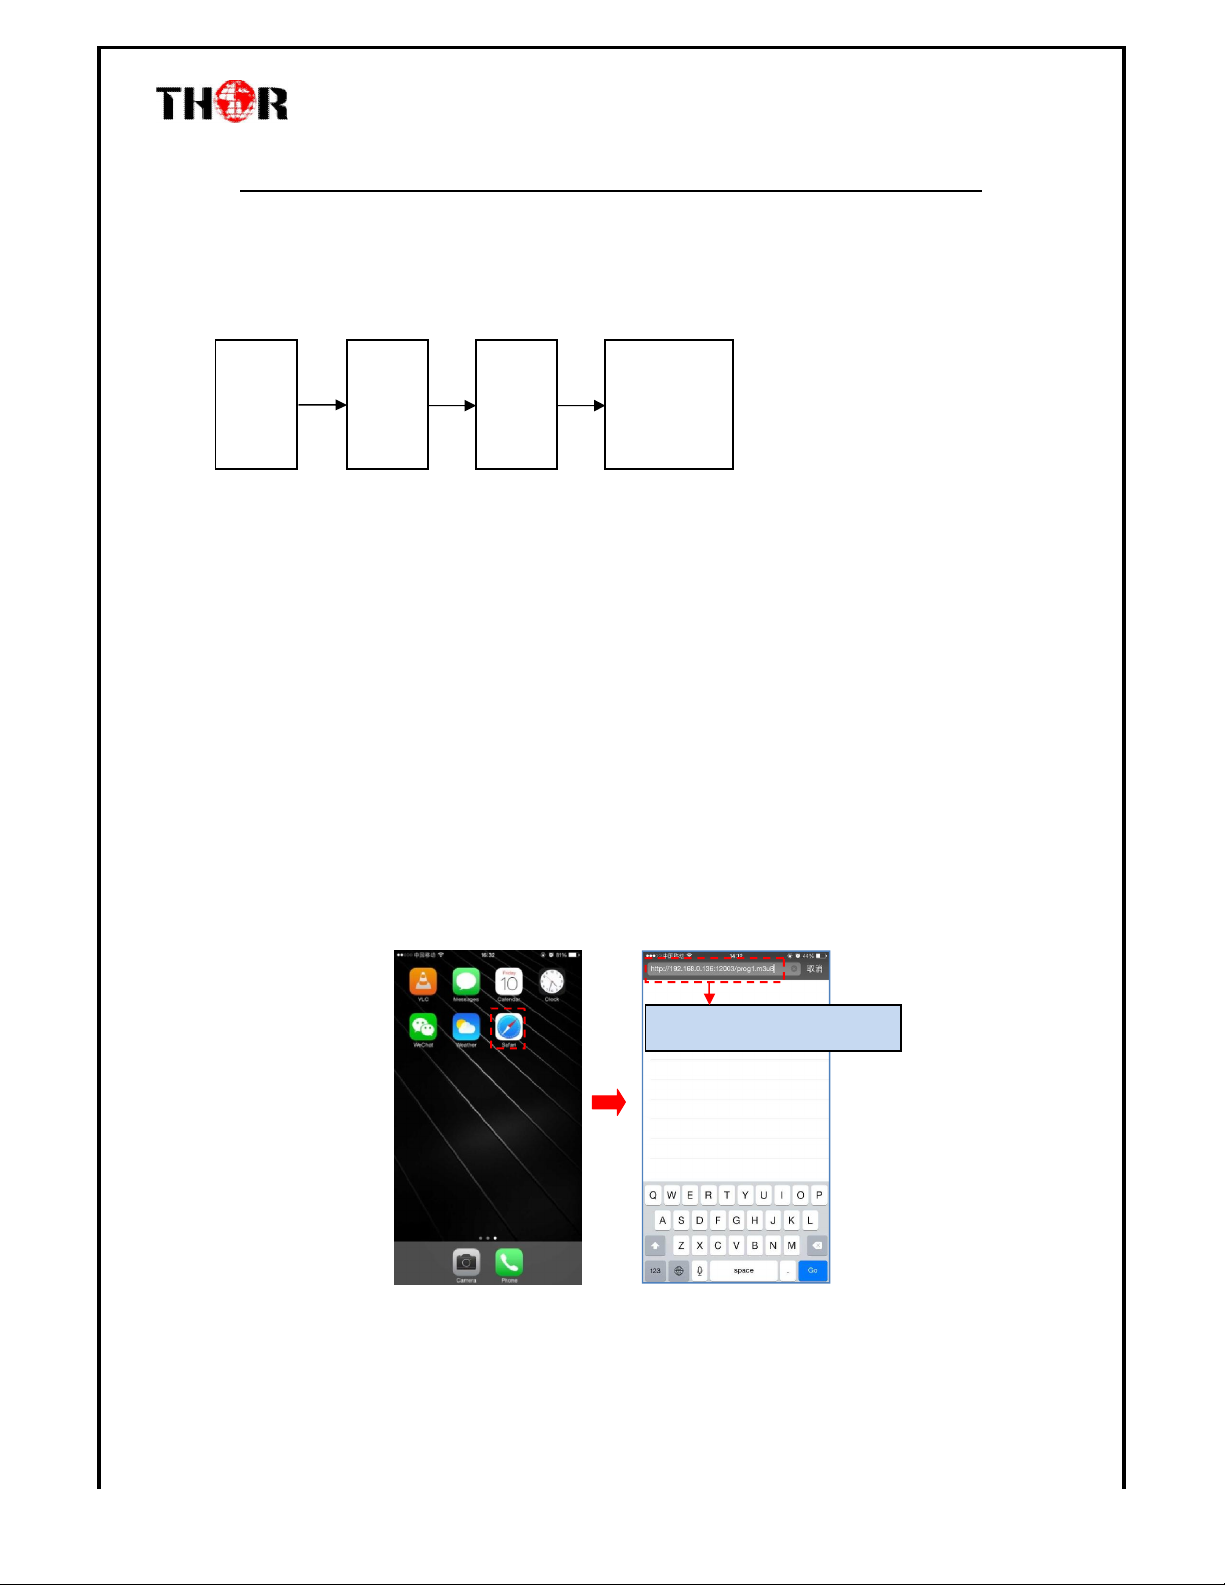
1) Play the video/audio on phone/Tablet under HLS protocol.
Apple devices can use “Safari” browser when HLS is applied as the output protocol, no need for
any 3rd party player.
**Note: Android devices need to install “HLS plug-in” to play when HLS is applied
Network
Encoder
(used as
Server)
Wi-Fi
Router
Mobile
Termi nals
(Laptop/ Tablet/
Phone…)
Thor Broadcast 2016 Tel: (800) 521-8467 Email: sales@thor fiber.com http://www.thorbroadcast.com
(e.g. Http://192.168.0.136:12003 /prog1.m3u8)
Page 15
Click
here
HLS Protocol:
H-H.264IP-E
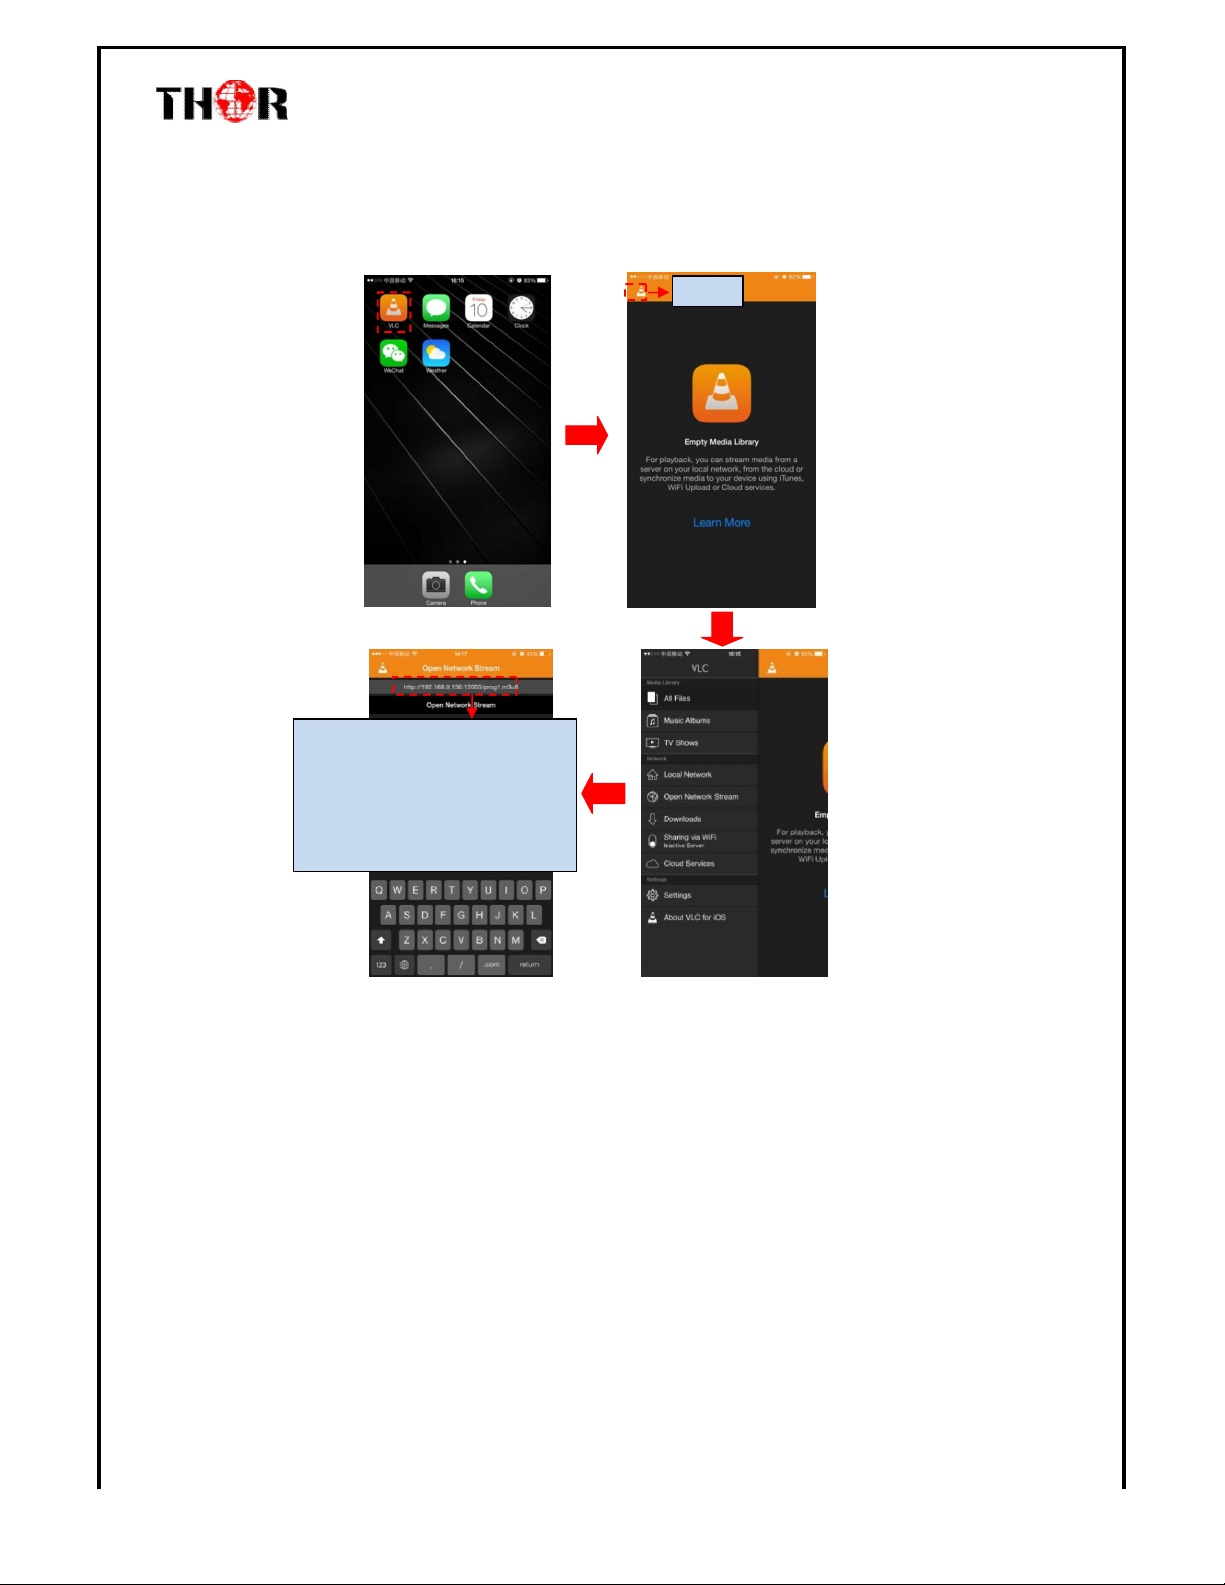
2) Play the video/audio with media player (VLC is recommended) on phone/Tablet.
Click here
Http://IP address: IP port/program name. m3u8 (e.g.
http://192.168.200.66:8080/output0.m3u8
RTMP Protocol:
Rtmp: //IP address: IP port/program name
(e.g. rtmp://192.168.200.55/live/output0)
UDP Protocol:
Udp: //@IP address: IP port
(e.g. udp://@192.168.0.137:12002)
Thor Broadcast 2016 Tel: (800) 521-8467 Email: sales@thor fiber.com http://www.thorbroadcast.com
Page 16
Network Stream
”
HLS Protocol:
Udp: //@IP address: IP port (
e.g. Udp://@192.168.0.137:
12
002)
to unfold
H-H.264IP-E
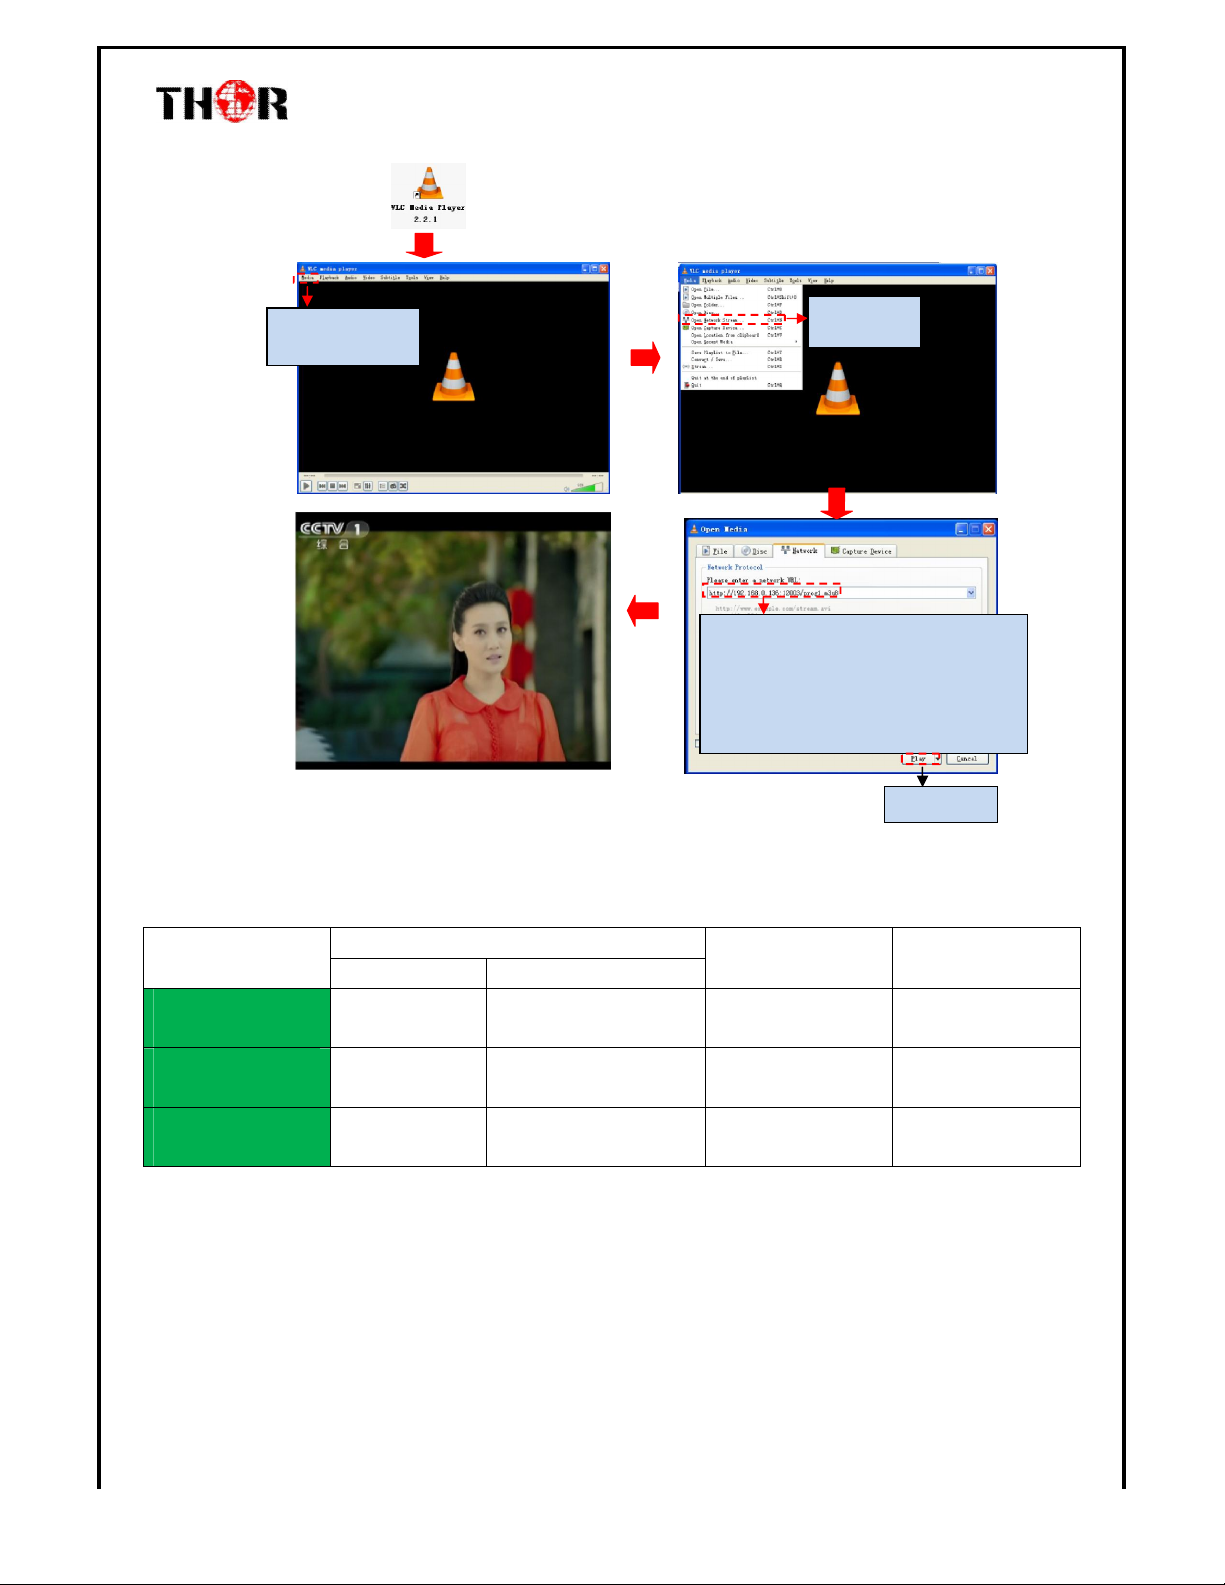
3) Play the video/audio with media player (VLC is recommended) on computer.
Click “Media”
pull down menu
Click “Open
Http://IP address: IP port/program name. m3u8
(e.g. Http://192.168.0.136:12003/prog1.m3u8)
HTTP Protocol:
Http://IP address: IP port/program name
(e.g. Http://192.168.0.136:12000/prog1)
RTSP Protocol:
Rtsp: //IP address: IP port/program name
(e.g. rtsp://192.168.0.136:12001/prog1)
UDP Protocol:
To p lay program
Here's a guide to what is needed in the receiving terminals when you watch through the H-H264IP-E
network encoder.
Mobile Terminals
IOS Android
IP STB PC
UDP
RTMP
HLS
2 2 4 2
2 2 4 1 or 2
1 or 2 2 or 3 4 2
1: Browser
2: 3rd Party Media Player like VLC, Buzz Player etc
3: Browser with HLS plug-in
4: Depends on the protocols supported by the STB
Thor Broadcast 2016 Tel: (800) 521-8467 Email: sales@thor fiber.com http://www.thorbroadcast.com
Page 17

H-H.264IP-E
Chapter 5 - Troubleshooting
THOR’s ISO9001 quality assurance system has been approved by the CQC organization. We
guarantee the products’ quality, reliability and stability. All THOR products haven passed all
testing and manual inspections before they are shipped out. The testing and inspection scheme
already covers all the Optical, Electronic and Mechanical criteria which have been published
by THOR. To prevent a potential hazard, please strictly follow the operation conditions.
Prevention Measures
Installing the device in a place where the environmental temperature is between 0 to 45 °C
Making sure the unit has plenty of ventilation for the heat-sink on the rear panel; and other
heat-sink bores if necessary
Checking the AC input within the power supply and ensure it is working, the connection is
correctly installed before switching on device
Checking all signal cables have been properly connected
Frequently switching on/off device is prohibited; the interval between every switching
on/off must be greater than 10 seconds.
Conditions needed to unplug power cord
Power cord or socket damage.
Any liquid that got into the device.
Any materials that could cause a circuit short
Device in damp environment
Device has suffered from physical damage; i.e. it fell off a rack.
Longtime idle.
After switching on and restoring to factory setting, device still won’t work properly.
Maintenance needed on device
Thor Broadcast 2016 Tel: (800) 521-8467 Email: sales@thor fiber.com http://www.thorbroadcast.com
Page 18

Chapter 6 -Packing List
H-H.264IP-E
H-H264IP-E Encoder 1PC
User's Manual 1PC
HDMI Cables 2PCS
Power Cord 1PC
For Further Tech Support:
1-800-521-THOR(8467)
Thor Broadcast 2016 Tel: (800) 521-8467 Email: sales@thor fiber.com http://www.thorbroadcast.com
 Loading...